
Page 1
BLD223544
The Myth of a Perfect Revit Template
Michael Massey
Sanveo
Description
Creating and maintaining a Revit project template is probably the most important step in your
journey in the Revit implementation. Whether you are trying to create one from scratch or trying
to improve the project template you already have, this session will discuss what needs to be
included in a ‘perfect’ template. I have worked with many clients, including architects, engineers,
and contractors, setting up templates. Come see what I have learned in working with others in
creating the Perfect Revit Template.
Speaker(s)
Michael Massey graduated from Texas A&M University with a degree in architecture. He has
27-plus years of experience working in the architecture, engineering, and construction (AEC)
industry. Mike specializes in Building Information Modeling (BIM) for architects and MEP
(mechanical, electrical, and plumbing) engineers. Mike is an Autodesk Certified Instructor with
Professional Certifications in Revit Architecture, Revit MEP (Electrical) and Revit MEP
(Mechanical). Mike is a repeat speaker at Autodesk University and won the Top Speaker award
at Autodesk University 2016. Mike has also been a contributing author for Autodesk Official
Training Courseware.
Learning Objectives
• What items to include in a Template
• Setting up Views, View Templates, and Filters
• Including Links and Worksharing in a Template
• Creating a Master Revit Project

Page 2
Table of Contents
Introduction .............................................................................................................................. 3
Why Create a Template ............................................................................................................ 4
Maintain Standards ............................................................................................................. 4
Increase Efficiency .............................................................................................................. 6
Template Planning / Strategies ............................................................................................... 6
Converting Projects to Templates .......................................................................................... 7
Adding a Template to the Recent Files Page ......................................................................... 8
What items to include in a Template....................................................................................... 9
General Annotation and Graphic Standards ........................................................................ 9
Model Content ....................................................................................................................10
Annotation Content ............................................................................................................11
Analytical Items ..................................................................................................................14
Setting up Views, Filters, and View Templates .....................................................................17
Views .................................................................................................................................17
View Types & Browser Organization ..................................................................................18
View Filters ........................................................................................................................19
View Templates .................................................................................................................20
Applying View Templates ...................................................................................................21
Assigning View Templates .................................................................................................22
Assigning View Templates to New View Types ..................................................................22
Including Links and Worksharing in a Template ..................................................................24
Links ..................................................................................................................................24
Worksharing .......................................................................................................................25
Creating a Master Revit Project .............................................................................................25
Conclusion ..............................................................................................................................27

Page 3
Introduction
Revit is a platform that can increase productivity on projects if used effectively. One of the first
tasks in implementing Revit is to create a Revit Template to use to begin projects with. Revit
Templates are a starting point that can have many settings and items that are typical on projects
already created. This course will look at what should and should not be in a Revit Template and
discuss how to prepare the template so that projects can begin consistently.
When Revit is installed, it comes with several Revit Templates that can be used to create a
project. Revit templates will have a .rte file extensions. When a new project is created, Revit
will prompt for a template to be used to start a project. Below is a list of the out of the box
Imperial Revit Templates and a brief description of each one.
Template File Name
Description
Commercial-Default.rte
Architectural template for commercial projects. This
template has metal frame construction components.
Construction-Default.rte
Used by General Contractors. This template has many
schedules defined to allow for quick quantifications of many
components.
Default.rte
This is a bare bones template with very few settings or
components.
Electrical-Default.rte
Electrical Template with electrical settings and
components.
Mechanical-Default.rte
Mechanical Template with mechanical settings and
components.
Plumbing-Default.rte
Plumbing Template with plumbing settings and
components.
Residential-Default.rte
Architectural template for residential projects. This
template has wood frame construction components.
Structural Analysis-Default.rte
Structural Template with structural settings and
components.
Systems-Default.rte
MEP Template that contains settings and components for
mechanical, electrical and plumbing.
The out of the box templates can be used as the starting point of creating a custom template.
To do this, a new project can be created using the preferred out of the box template. Settings
can be modified, and components can be brought into the project. To save the modified out of
the box template, simply perform a Save As and select Templates.

Page 4
Why Create a Template
There are many reasons to create a Revit template. Some companies will have the need to
create multiple templates for different project types or for different disciplines. Two main
reasons are to maintain standards and to increase efficiency.
Maintain Standards
Back in the CADD days, standards would consist of items like layers, linetypes, dimensions, and
fonts. These same items can be established in the Revit template.
Annotation
All annotation in the out of the box templates are set to use the Ariel font. Annotation
can be customized by modifying the items below.
• Text types – Create multiple text types with different sizes and fonts to be used in
the project.
• Dimension types – Customize Dimension types to have preferred fonts,
arrowheads, units, and display.
• Tags and Markers – Customize tags and markers (such as elevation marker,
section marker, etc…) to have preferred information that is called out with
preferred font.
Line Weights and Line Patterns
Revit uses a series of line weights to control the graphical display of components. Line
weights consist of numbers ranging from 1-16, with one being the thinnest and 16 being
the thickest. Below is a listing of the out of the box line weights.

Page 5
Line Patterns define the look of the line. It could be a solid line or have a pattern of
dashes and dots. There are many different line patterns in the out of the box templates.
These can be modified as needed. New ones can be created or ones that are not used
can be deleted. Any type of line pattern can be created using either dashes, dots, or
spaces. Below is a sample of the out of the box line patterns.
Object Styles
Object styles are the defaults that Revit used to determine how components are
displayed in the project. All components in Revit are classified into a Category.
Examples of categories are Walls, Doors, Lighting Fixtures, Duct, etc. Object style
allows users to specify the line weight, line color, line pattern, and material of each
category. These are project wide settings that control the initial display of each
category. The Object Styles should be carefully examined and modified so categories
are displayed correctly.

Page 6
Naming Conventions
The following are some of the naming conventions that should be determined to allow
users to follow so there is consistency in projects as to how things are named.
• View Names – Many views will be created in a Revit project. To help with finding
and knowing what the view is for, a proper name should be used.
• Family Names – Families should be named in a way that users know what they
are.
• Family Types – Family types will allow for multiple types of a Family. Naming
family types are important to know what they are depicting.
• Sheet Names and Numbers – A clear and consistent naming and numbering
system for sheets should be established.
• Wall Types – Wall Types should have a naming system that is clear and easy to
understand.
• System Types – MEP system types should be named to clearly define the
system.
Title Blocks
Company title block families for multiple size sheets should be created that can be used
on all projects. Title blocks may need to be customized for individual projects, but a
standard title block family should be the starting point for all projects.
Increase Efficiency
A proper Revit template will increase efficiency on projects. There are many settings and
components that can be preconfigured in a Revit template. Not having to set these settings or
populate the project with components every time a new project is created is one of the best
ways to increase efficiency.
In addition to the items already mentioned, the remainder of this class will focus on key items to
consider when creating a Revit template.
Template Planning / Strategies
Prior to creating a Revit template, proper planning should be performed. Planning will define
the who, what, where, when, and how of the template. Creating a Revit template can be
overwhelming but if proper planning is performed, the process will not be as difficult. I believe
that Revit templates are never finished. Items and settings are continually tweaked to improve
the template. Understanding that it is never finished, will ease the strategy of creating one. You
do not have to create or modify everything in the first attempt.

Page 7
Below is a list of items that should be done during the planning stage of creating a Revit
template.
• Gather existing CADD standards – Existing CADD standards can be used as the roadmap
for items that need to be created in Revit.
• Review what is out of the box – Review all the out of the box settings to determine what
changes are required.
• Make a list of requirements – This list will consist of fonts, dimensions, tags, markers, line
weights, line patterns, naming conventions, and graphical displays
• Make cuts – Try to shorten the list of requirements to include the most important ones. If an
out of the box setting can be used, then mark that requirement from the list.
• Determine if different project types or clients will require unique templates. Many offices will
have multiple templates for different project types or clients. Some clients will require you to
use their standards.
Converting Projects to Templates
One strategy to create a Revit template is to convert a project into a template. An initial project
can be started using one of the out of the box templates. During the duration of the project,
settings will be modified, and components will be inserted into the project. Once this initial
project is complete, you will have a good start to a template by simply saving the project as a
template. This strategy will increase the time it will take to complete the initial project because
settings and components will have to be modified during the project.
To convert a project to a template, all that must be done is perform a Save As and select
Template. This will create a .rte file that can be used for future projects. There are some items
to consider doing to clean up the project prior to saving it as a template.

Page 8
• Delete all geometry – The best way to ensure
that all geometry is deleted is to create a 3D
view and ensure that all categories are visible
in the view. This will allow all geometry to be
selected and then deleted.
• Perform a selective purge – Purging will
eliminate components that are not placed in
the model. By deleting all geometry,
everything will be purgeable. Some of the
components may be project specific and not
needed in the Revit template. These items can
be purged. Components that are needed in
the Revit template should not be purged.
• Delete Views – the project will have many
views. Delete the views that are specific for
the project and are not needed in the Revit
Template.
• Rename views to be generic – Rename the
views that are named specifically for the
project to a generic name. For example;
Lobby Floor Plan could be renamed to Level
01 Floor Plan.
Adding a Template to the Recent Files Page
Once the Revit template is created, users can quickly access the template by adding it to the
Recent Files page. The Recent Files page will initially list the out of the box templates. New
projects can be created using these templates simply by selecting on the template name.

Page 9
This list can be modified by going into the Revit Options. The Revit Options is found in the File
tab of the menu, inside the Revit Options dialog. The Template list can be modified in the File
Location section. Templates can be added or removed by selecting the plus and minus
buttons. It is recommended that the template be saved to a shared network location and the
path to the template point to that location.
What items to include in a Template
General Annotation and Graphic Standards
As mention in the planning stage above, general annotation and graphic standards should be
included in the Revit template. Try to use the out of the box settings for as much as you can.
Below is a list of items that you
should review that fall in General
Annotation and Graphic
Standards:
• Line Weights
• Line Styles
• Line Patterns
• Object Styles
• Annotation Symbols
• Dimension Types
• Text types
• Filled Regions
• Material Libraries

Page 10
Model Content
Model content consists of both System Families and Component Families. System Families
(ie: walls, ceilings, floors, roofs, duct types, pipe types, conduit types, cable tray types, wiring
types) are created and defined inside of the project. Component Families (essentially
everything else that is in the model) are separate little families that are created and then
inserted into the project.
When considering what system families to create and which component families to insert into
the template follow the rule below.
Rule: If there is something that you use in EVERY project, then it belongs in your
template. If it is only used in SOME of the projects then it doesn’t belong in your
template!
The reason you do not want to over populate the Revit template with model content is file size.
The goal is to create the Revit template and keep the file size down to a minimum. File size is
Revit’s worst enemy. I try to keep my Revit templates as small as possible. The worst thing is
to have a template that is large because if it is, it will only get larger as you start to model the
project. A good goal for the file size would be between 20-50 mb.
The discipline that the Revit template is created for will determine what model content should be
created or inserted into the template. Below is a good starting list of System Families and
Settings that should be considered for each discipline.

Page 11
Annotation Content
Revit considers anything that is 2D in a project as Annotation, simply because it is not 3D
geometry. In addition to the Model Content and Settings that have previously been discussed,
Annotation Content should be considered when creating the Revit Template.
Drafting Views
Drafting views are 2D views that can be used to create typical details for a project.
There are many typical details that are common in projects. Any typical details that are
used in ALL projects should be created in the Revit template. If a detail is not used in
EVERY project, then it should be kept in a Master Revit Project. (We will discuss the
Master Revit Project towards the end of this document.)
If you want to use CADD details, take the time to convert these to Revit Drafting Views
as opposed to inserting CADD details. This will eliminate all the CADD items that come
into Revit when a CADD detail is inserted.
Name Drafting Views with appropriate names that follows the naming system that has
been defined by the company. View Type parameters can also be created to assist in
organizing drafting views.

Page 12
Legends
Legends are views that can be used in projects to create typical legends. Legends are
unique in that they are one of the only view types in Revit that can be placed onto
multiple sheets, multiple times. Because of this, Legends are sometimes used for other
items, such as General Notes.
Schedules
Typical Schedules should be pre-defined with the appropriate parameters. The
schedules will not have any data until the model is populated. This will save time and
create consistency among schedules in other projects. Below is a typical Door
Schedule.
General Notes
General or Typical Notes should be defined in the Revit template using either Drafting
Views or Legend Views. Notes can be edited to make project specific once the project is
started. Notes can be placed onto the sheets beforehand, if sheets are typical for the
project, to avoid having to place them once the project starts.

Page 13
Sheets
Sheets can be defined in the Revit template with sheet names and numbers. This will
ensure consistency with names and numbers across all projects. Sheets should have
title blocks placed on them and any typical notes or schedules. The cover sheet may
require a separate title block to allow for project parameters to call out project
information, such as, Project Name, Project Address, Owner Information, etc…
Sheet parameters can be created to assist in organizing sheets in the Project Browser.
The Project Browser can be grouped and sorted with custom parameters, as in the
example below.

Page 14
Analytical Items
In addition to content, there are other settings and items that should be considered when
creating a Revit template. The items listed below may not apply to all disciplines but is a good
list of items to review and modify as needed.
Materials
The Revit Material Library has many materials already created in the out of the box
templates. It is a good idea to review and remove the materials that are not needed. If
there is a concern about needing the materials, a company library can be created to
store the materials outside of the Revit template. Then if the materials are needed,
users can simply add from the company material library.
Color Schemes
Color Schemes are useful for graphically illustrating categories of spaces. Color
schemes can be used on Rooms, Areas, Spaces, Zones, Pipes, and Ducts. If there are
particular colors or patterns that are desired, a color scheme can be created to store
these settings.
MEP System Types
System types are used with Duct and Pipes. Systems are logical entities that facilitate
calculations for flow and sizing of ductwork and pipes. There are several default system
types created for both duct and pipe in the out of the box templates. Other system types
can be created to handle other types of components and systems. For example, you
can create a high-pressure supply air system. You can also modify the type parameters
for a system type, including graphical overrides, materials, calculations, abbreviation,
and rise/drop symbols. I would recommend creating all the systems that are typically
used on projects so there is consistency in the naming and the graphical settings.

Page 15
MEP Settings
The MEP Settings are settings that will probably not change much from project to
project. It is a good idea to review the default settings and modify them in the Revit
template so you do not have to modify them on every project. Some of the specific
settings to look at are duct/pipe sizes. This is the master list of duct/pipe sizes that will
be able to be used in the project. You can add and remove sizes as needed.
Shared Parameters
Shared parameters are definitions of parameters that you can add to families or projects.
Shared parameter definitions are stored in a file independent of any family file or Revit
project; this allows you to access the file from different families or projects.
The shared parameter file is technically not part of the Revit template, but it should be
considered when creating the Revit template. If there are specific parameters that need
to be used on all projects, the best location to store the parameter definitions are in a
shared parameter file. This will allow the parameters to be used in families and tags.

Page 16
Import/Export Settings
When importing or exporting CAD files into or from Revit, it is important to review the
settings prior to importing/exporting.
The import settings will allow you to assign Revit line weights to CAD colors. This will
ensure that line weights are defined in the CAD files. This is done by mapping colors to
line weights. There are 255 standard CAD colors to map. This can be a tedious
process but if done in the Revit template, it only needs to be done once.
The export settings will allow Revit categories to be mapped to CAD layers. This will
ensure that proper layer names and colors are used when the Revit project is exported.
The settings also allow for mapping of line types, fill patterns, text and fonts. By setting
this up in the Revit template, it will be set correctly in all projects.

Page 17
Keynotes
A keynote parameter is available for all model elements (including detail components)
and materials. You can tag each of these elements using a keynote tag family. The
keynote value is derived from a separate text file that contains a list of keynotes.
Revit provides 2 sample text files for keynoting. These can be modified to meet
company standards.
Keynotes assigned in a project are linked to their source keynote table. When the
keynote table is changed, keynotes in the project will reflect the changes when the
project is closed and reopened.
Template Guide
A template guide is a set of instructions on how to use the Revit template. This will
outline the key parts of the Revit template and explain to users how the template is
intended to be used. The template guide can be created in an external document or a
drafting or legend view can be created to be viewed inside the project.
Setting up Views, Filters, and View Templates
Views
Plan views in Revit are based on Levels. A plan view cannot be
created if there is not an associated level. Levels should be
created for the number of stories in the building. For the Revit
template, it is recommended to create the number of levels that
match most of your projects. For example, if you primarily do
single story projects you will only need one level, but if you focus
on high-rise buildings, you may have up to 50 levels in your
Revit template. Some suggest it is easier to delete levels not
needed as opposed to creating levels.
For plan views, it is best to create a floor plan and a ceiling plan
for each level in the Revit template. In addition to that, you may
want to create other plans that are typically required for projects,
for example, life safety plans.
Another type of view that is helpful are 3D views. I typically
create an overall 3D view and a 3D view for each level in the
Revit template and use the Section Box to crop the view to show
just that one level.
Page 18
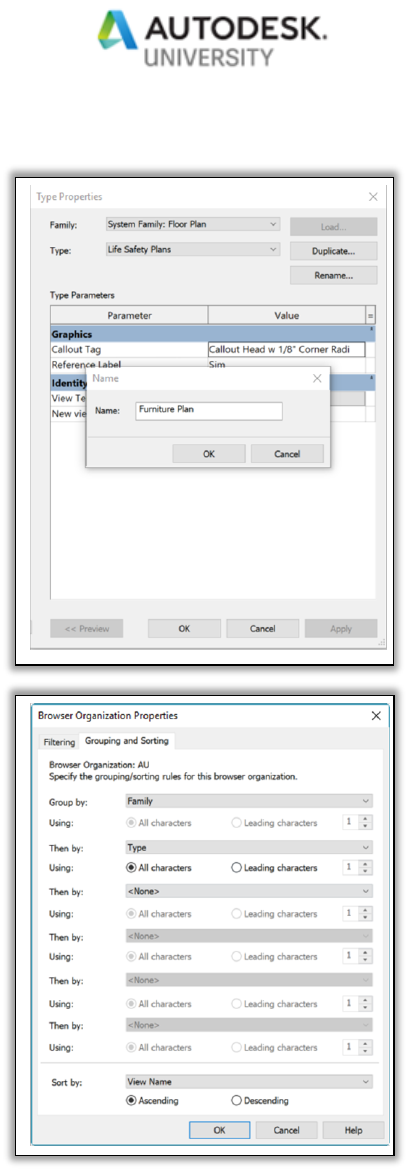
View Types & Browser Organization
The Project Browser can get lengthy which makes finding
views a difficult task. Being able to organize the views is
important to save time when looking for views to open. One
way to organize the views in the Project Browser is to
create additional View Types. Additional View Types can
be created by duplicating an existing type in the Type
Properties of the view. For example, the Floor Plan view
type could be duplicated to create a Furniture Plan View type.
Then the Project Browser could be organized by the View
Type to group all the furniture plans together.
The organization of the Project Browser can be customized
to sort and group views in many ways using the Browser
Organization Properties. Custom view parameters can also
be created and used to organize the Project Browser. The
organization of the Project Browser should be carefully
thought out in the Revit template, so all projects are
organized in a clear and usable fashion.

Page 19
View Filters
Visibility/Graphics is the primary method to control the visibility or graphics of a group of
elements inside the Revit model. Visibility/Graphics will only change the visibility or graphics
of categories in the current view. Visibility/Graphics is also a tool to change the entire
category; you are not able to select partial parts of a category. To control partial parts of
categories, a View Filter must be used.
View Filters provide a way to override the graphic display and control the visibility of elements
that share common properties in a view. For example, if you need to change the line style and
color for 2-hour fire-rated walls, a view filter can be created that selects all walls in the view that
have the 2-hour value for the Fire Rating parameter. You can then add the filter to a view and
define the visibility and graphics display settings (such as line style and color. When you do
this, all walls that meet the criteria defined in the filter will update with the appropriate visibility
and graphics settings.
View Filters are created by setting up a filter that will search desired categories that meet a rule
set up by the user. Once the View Filter is created for the project, the View Filter can be
added to the desired views by adding them to the Visibility/Graphics for the view.

Page 20
View Templates
A View Template is a collection of view properties, such as view scale, discipline, detail level,
and visibility settings.
Use view templates to apply standard settings to views. View templates can help to ensure
adherence to office standards and achieve consistency across construction document sets.
Before creating view templates, first think about how you use views. For each type of view (floor
plan, elevation, section, 3D view, and so on) what view types do you use? For example, an
architect may use many types of floor plan views, such as dimensional, life safety, demolition,
furniture, and enlarged.
You can create a view template for each type of view to control settings for the
Visibility/Graphics overrides of categories, view scales, detail levels, graphic display options,
and more.
Creating and assigning view templates to views is the single most important task in creating a
Revit template. Every view should have a view template assigned to it. This will ensure that
standards are followed, and the views will display correctly.

Page 21
View Template Tips
When crating view templates consider the following tips.
• You may not want to include Scale and View Range.
o The scale and view range may need to be view specific. By not including
these in the View Template, this ensures that the template can be used
on many views of the same type regardless of the view scale and view
range.
• Remove out of the box view templates to avoid confusion.
o The Revit out-of-the-box templates include several view templates that
can be used. If custom view templates are created, then deleting the out-
of-the-box view templates will avoid confusion as to which one to use.
• Create View Templates in Revit Project Template.
o Most of the time, view templates will not change in different projects. By
creating the view templates in the Revit project template, the template will
only have to be created once.
• View Templates can be transferred from other projects by using the Transfer
Project Standards.
Applying View Templates
To apply a view template to a view, the easiest way is to simply right click on the view name in
Project Browser and then select Apply Template Properties. This will open the Apply View
Template dialog. Select the desired
View Template to be applied in the list
of names. You can use the view
properties of another project view as a
view template. To do this, select Show
Views and select the view name in the
list. Once the desired view template or
view name is selected, select OK.
When View Templates are applied, the
view template properties are
immediately applied. However, the
view is not linked to the view template.
The view can later be changed so that
the view properties are not following
the properties in the view template.
The view template must be re-applied
to return the properties back to what is
in the view template.
In addition, applying view templates does not change the properties in the view if the view
template is modified after the view template has been initially applied. If changes are made to
the view template, the view template must be re-applied to the views that are needing to be set
to a view template.

Page 22
Assigning View Templates
When you Assign a view template to a view, you create a link between the template and the
view. Later changes to the view template are automatically applied to any linked views. You
can assign a view template to a single view or to multiple views at one time.
When a view template is assigned to a
view the view properties that are
controlled by the assigned view
template display in gray, indicating that
they are disabled.
To change those values, you must do
one of the following:
• Change the corresponding property
in the assigned view template.
• On the Properties palette for the
view, change the View Template
value to <None> (or to another
template that does not define that
property). You can then change the view property as desired.
Assigning View Templates to New View Types
When new views are created in the project, a view template can be automatically assigned to
those view types by assigning the view templates to new view types. For example, when a
section is created, a section view template can be assigned automatically. This will ensure that
all new views are following office standards as far as the view properties.
To assign view templates to new view types
1. Select a view in the Project Browser that is the type of view desired (floor plan, ceiling
plan, section, elevation, etc…).
2. In the properties, select Edit Type to open the Type Properties of that particular view
type.

Page 23
3. In the Type Properties, for View Template applied to new views, click the button in the
Value column.
4. In the names list, select the view template to assign.
5. Click OK.
6. Another way to Assign View Templates to views is to create a View Schedule. In a
view schedule, all view properties can be displayed for all views. Included in this list is
the assigned view template. The assigned view template for all views in the project can
easily be verified or changed in a view schedule.

Page 24
Including Links and Worksharing in a Template
Links
Typically, other disciplines are brought into a Revit project by linking. Visibility settings can be
applied to links through Visibility/Graphics. If the link is removed, the settings that were
applied are lost. In plan views, column grids are often needed to be hidden in links to avoid
duplicate column grid lines. The same applies to elevations and level lines. These settings
cannot be applied until the link is loaded into the Revit project. So the question is, how do you
apply these settings to the Revit template so that when a project is started using the Revit
template and links are brought into the project, these settings will automatically be applied
without having to do it manually?
The answer is to use placeholder links in the Revit template. A blank Revit project can be
created and saved and linked into the template. For example, in an architectural template, a
MEP placeholder file and a Structural placeholder file can be linked into the template and view
settings can be applied to the placeholder links. When the actual project begins, the
placeholder links will be replaced with the actual links. It is important to understand that the
placeholder links should not be removed, but to use the Reload From option in the Manage
Links dialog. This will allow predefined view settings to be in the View Templates for links.

Page 25
Worksharing
Worksharing cannot be enabled in a Revit template. Many users would like to have Worksharing
enabled in the Revit template so Worksets will not have to be created in each project. Since
this is not currently possible (maybe in the future Autodesk will add this feature) the only work
around is to save the Revit template as a project. This workflow will work but users will have to
begin a new project by opening the template project and perform a save as instead of starting
by creating a new project.
During the opening of the project template, users will have to use the Detach from Central
option and then Preserve Worksets, to be able to create a new central file. This workflow can
be confusing, and some decide that it is not worth the trouble. It just depends on the number of
worksets that are needed.
Creating a Master Revit Project
As mentioned earlier, one of the goals in creating a Revit template is to keep the file size as
small as possible. Remember the rule, that if it something is not needed in EVERY project
then it does not belong in the template. To assist with this, I recommend creating a Master
Revit Project to store needed items that then can be inserted into a project on an as needed
basis. The Master Revit Project can contain all the items you may need and don’t want to
recreate each time you need them.

Page 26
The Master Revit Project can contain system families that can be brought into a project by
copy/pasting individual system families or by using the Transfer Project Standards (although
Transfer Project Standards will bring in all the types, where you may not want all of them).
The Master Revit Project can also contain typical details, schedules and sheets. The Master
Revit Project is a great way to create a detail library. Details can be created and stored by
creating Drafting Views in the Master Revit Project. The Insert From File command can be
used to insert the details, schedules and sheets into a project.

Page 27
Conclusion
As stated at the start, using a Revit template is the biggest way to increase productivity at the
start of a project. As we have seen, there are many items that can be pre-populated inside of a
Revit template. If you are not using a custom template, you need to begin as soon as possible.
If you are struggling with creating a template or if the task seems overwhelming, remember that
a template is never finished. You do not have to make it perfect the first go around. Also
remember that you can use a completed project to begin your template.
I want to thank you for attending my session The Myth of a Perfect Revit Template. I hope
this session has brought you to a knowledge level that you feel comfortable creating Revit
templates to meet your project needs.
