
teachwombat.com
Guitar Lesson Plans

Not Just A Commercial!
This material is presented by my guitar teacher's downloadable
resources website https://teachwombat.com
I sell (and lets be honest, would like you to buy
😊
) my materials
but this guide is not only a promotional device for my website.
The principles an ideas contained in the following pages are
relevant (unfortunately for me
☹
) whether you choose to
download my stuff or not?
Guitar teachers have been getting along without teachwombat
for years and you can make your own handouts and backing
tracks if you have the time, technology and inclination to do it?
I would claim that my materials are there for guitar teachers
who would rather get on with the business of teaching the guitar
but then again I'm hoping to sell you stuff?
I genuinely hope that there is something in here that you can
use in the never ending quest to avoid (or give up?) the dreaded
day job
Cheers!
Rob Hylton

The "Big Picture"
Before we take a detailed look at individual lessons it can be a good idea to
develop an overview of the typical beginner guitarist and to make some
projections with relation to the kind of situations that you are likely to
experience as a teacher?
If there is a single tip I would pass on to anyone setting out to teach guitar to
novice players it would be to be aware of the following............?
Most students will try to form the chord shapes with their fingers too "flat" to
the neck of the guitar. This will result in them unintentionally "killing" other
strings that are supposed to ring out?
The solution is to be found by encouraging them to press down on the
strings with just the tips (rather than the flattened pads) of their fingers. in
order to do this their fingers should be curled around so that they approach
the fretboard at something like a ninety degree angle. This will dictate that
they do not accidentally stop a guitar string from "ringing out" whilst trying to
hold down a string that is physically quite close?
This single problem is likely to come up time and time again during early
lessons and the trick is not to get too hung up about it while ensuring that
you (and your student) pay it sufficient attention to it that together you are
able to gradually improve the situation?
People new to the guitar will try to "hold" the neck rather
than play on it?
anyway.......... On with the guitar lesson plans.........
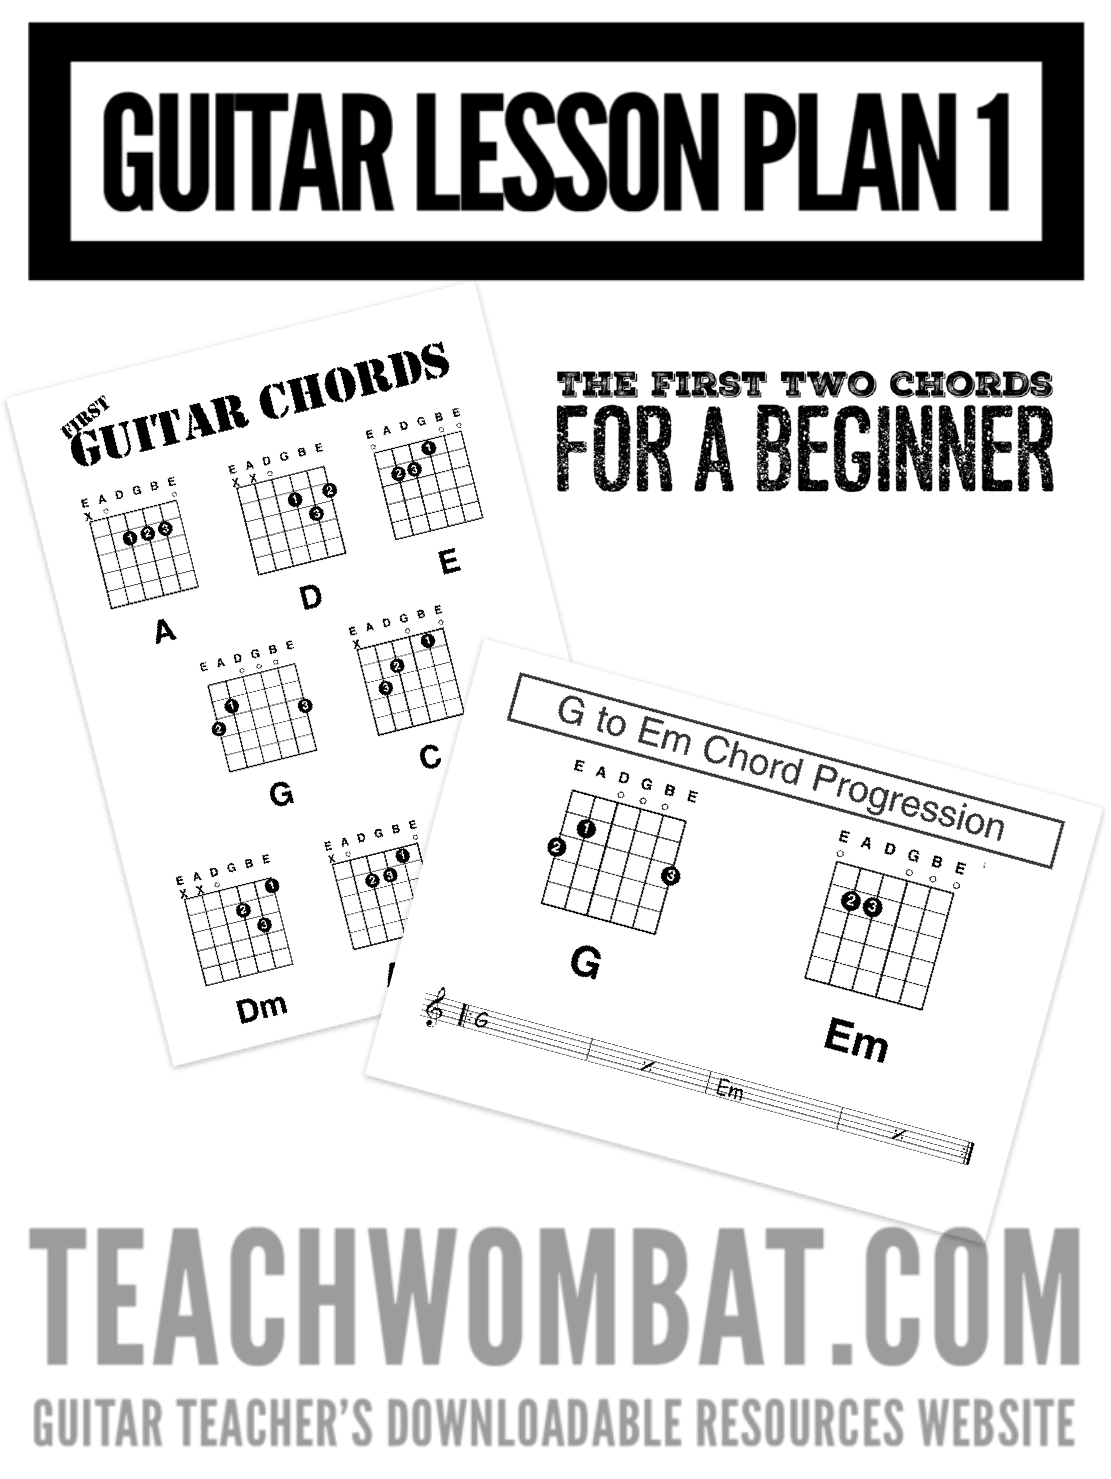

Lesson Objectives
1: Learn two chord shapes (G and Em)
2: Become familiar with changing between the shapes smoothly
3: Play the chords along with a supplied backing track
Theory, Technique and Repertoire
At the beginning of the first lesson you should spend some time with
your student helping them to understand the difference between music
theory (which may be introduced at a later stage) and developing a
technique (the physical ability to move between chord shapes and
notes on the neck of the guitar) which will be the focus of the first few
months of study
Concentrating on moving between chords in time to music (rather than
studying music theory) during the early stages will allow them to quickly
move on to playing and moving between the chords in order to play
songs that they know (developing repertoire)

Explain how chord diagrams work and spend a little time making sure
that your student understands how the numbers inside the black dots
on each chord diagram relates to the four fingers of the left (fretting)
hand
Give them a chord sheet featuring the shapes G and Em
Spend as much time as you need to with the student learning and then
familiarising themselves with the two shapes on the sheet. This stage
will probably take up quite a lot of the session and you need to resist
the temptation to move too quickly here
Do not worry too much at this stage if your student is not sounding all
of the notes cleanly or if some of the fretting hand fingers are damping
the strings to either side of the one being fretted
This is to be expected andthere are enough open strings being
sounded that the chords will still generally sound acceptable
As the student learns the shapes in turn encourage them to change
from one to the other and when having done so to sound each chord
once with a single downstroke of their strumming hand.
The session is focussed on two chord shapes (G and Em) and uses a
backing track (that you can give to your student on CD or you could
even send it to them as an email attachment?)
It is strongly reccomended that you take a look at the video material
relevant to these early lessons at
https://teachwombat.com/teachingguitarfirstlessons.html

When they are able to change (slowly) between the chords introduce
the G to Em backing track.
Count your student ("1-2-3-4") into each chord change and ask them
to play a single chord with a downstroke of the plectrum as each chord
changes
If they become comfortable with this during the lesson then you could
ask them to try a four strum (down-up-down-up) strumming pattern
(see the videos on https://teachwombat.com for examples of this and
similar strumming patterns)
Give (or send via email) your student a copy of the backing track and
the handout with the chord sequence on it so that they can practice
before the next session.
You may also choose to give them a copy of the “first guitar chords”
handou (shown above)t that contains all of the eight chords that they
will be working with during the early stages of study
Explain the importance of practice and encourage them to take on
board the following principle
"You do not learn to play guitar during guitar lessons. You learn to play
BETWEEN them"?
Ask your student if there is anything that they do not understand with
relation to the material covered and let them know the focus of the next
session where two new chords (C and D) will be introduced along with
some more involved right hand strumming patterns

Practice Plans
Contained within the resources is a blank “practice plan” document that
you can use as a reminder to your students
As well as space for reminders relating to theoretical, technical and
repertoire based activities there is a space where students can record
problems that they encounter or questions that they would like help with
an answer to between lessons

Lesson 1: Introduce the chords of G and Em
Lesson 2: Two new chords (C and D)
Lesson 3: A new chord (A) and a “Rock” backing track
Lesson 4: The final chords (Am Dm and E) a beginner
needs to learn with a “funky” backing track
Lesson 5: From lesson five onwards activities should be
made up of combinations of three “strands”
Strand 1:
Use more of the
backing tracks
featuring the eight
chords learned to this
point which require
more rapid chord
changes and
introduce more
complicated
strumming patterns
Strand 2:
Repertoire:
Now that your student
can move between eight
basic chords fairly
smoothly you can start
to introduce songs (or
fragments of songs) that
use the chords
You can also introduce
new chords (F and the
four string Bm shape
are particularly useful)
on an “as required”
basis as new songs are
chosen and studied
Strand 3:
More advanced
technical
elements such as
power chords and
(then) bar chords
can be introduced
(using the backing
tracks) and basic
music theory can
be incorporated
as required

You can download the other lesson plans in this series from
https://teachwombat.com/teachingguitarfirstlessons.html
You can also pick up these kids guitar lesson plans from
https://teachwombat.com/teachingchildrenguitar.html

Important Stuff!
The next part of this guide will be based around teaching power
chords and from there making the move into full major and
minor bar chords but I can't stress enough.........
Don't try to teach too much too soon!
There are Probably months of lessons (and income?) before you
get a novice to the point that they are ready to hold down bar
chords and if you try to take it too quickly you won't do either of
you much good?
Encourage the development of a basic technique
The eight chords of the "CAGED System" and the ability to change
between them in time to music offers an ideal "solid foundation"
to anyone who wishes to become a guitarist.
Once they have the eight chords down its time for your students
to...........
Develop "repertoire"
Use the chords (C A Am G E Em D and Dm) alongside fairly simple
single note material as appropriate to get your student playing
songs (or fragments of songs) that he or she recognises and
(hopefully) likes.
Students get a real "buzz" from this (remember how it was for
you?)
