
1
LOGITECH ROOM DESIGN GUIDE
ROOM DESIGN GUIDE
SETTING
UP A VIDEO
MEETING SPACE

INTRODUCTION
ENVIRONMENT
VIDEO COLLABORATION SOLUTIONS
BEST PRACTICES
ROOM CONFIGURATION
LAYOUT EXAMPLES
1
2
4
6
11
17
02 Room Properties
02 Lighting
02 Color
03 Background
03 Furniture
06 Display
08 Camera
09 Audio
05 Huddle Rooms/Small Meeting Spaces
05 Medium/Large Meeting Spaces
11 Compute
12 Meeting Controllers
13 Connections
16 Cable Management
17 Huddle Rooms
19 Mid-Sized Conference Rooms
21 Large Conference Rooms

1
LOGITECH ROOM DESIGN GUIDE
LAYOUT EXAMPLES
Sample design diagrams to demonstrate good product selection and
installation in various room congurations and uses.
Video meetings are increasingly pervasive in organizations of every size and type due to compelling improvements in
AV quality, exibility, ease of use, and aordability—plus the simple fact that face-to-face collaboration through video
conferencing is the next best thing to being there in person.
As adoption rates steadily increase, so do expectations about the overall video meeting experience. Proper installation and
set-up can mitigate many common pain points, or solve them altogether. The key to achieving professional results is a
combination of:
ENVIRONMENT
Optimizing factors such as lighting, background, and furniture to help
optimize the overall quality of video meetings.
VIDEO COLLABORATION SOLUTIONS
Matching the right video conferencing equipment to the physical
meeting space.
BEST PRACTICES
Placing products within the designated space to enable the right mode
of work and best meeting experience possible.
ROOM CONFIGURATION
Selecting the correct technology and conguring it properly to provide
for rooms that provide the right functionality for the space.
This guide will help you understand—and be able to proactively control—these essential variables for producing consistent
quality video meetings with condence and ease.
INTRODUCTION

2
LOGITECH ROOM DESIGN GUIDE
ENVIRONMENT
The meeting room environment provides a visual context that can enhance (or diminish) the overall quality of video
meetings. Follow these guidelines to achieve professional-quality results and create the best possible user experience.
ROOM PROPERTIES
Whenever possible, choose a meeting space with minimal reective surfaces, especially exterior windows and other
large glass surfaces. Note that some surfaces that appear matte to the eye can still create glare seen by remote
users even though not visible in the physical space itself. Meeting room selection should also be informed by the
ability to inuence lighting, room color, background variables, furniture, and room size/shape.
LIGHTING
An evenly-lit meeting space helps the camera capture the
most accurate color, contrast and video denition. With
color temperatures typically in the 3000K to 4500K range,
the diused uorescent xtures found in many oce
spaces work well for this purpose.
Any strong light source behind a meeting participant
tends to darken the subject and produce an undesirable
silhouette, so avoid pointing the camera towards exterior
windows or other harsh lighting (like directional spotlights).
Bright sunlight can also create sharp contrasts that are
challenging for a video camera to render, even when the
camera isn’t pointed directly towards an exterior window.
To help mitigate this issue, consider installing blinds,
curtains or shades to better control the lighting situation.
Positioning a subject between the camera and an exterior window or other harsh
light source can cause an undesirable silhouette that degrades video quality.
Logitech
®
RightLight™ technology solves backlit and other lighting challenges by
optimizing light balance to emphasize faces and render natural-looking skin tones.
COLOR
Room color can aect the visual quality of a video
meeting. While not the most exciting, the best option is
a solid gray or other neutral color on walls visible to the
camera.
Avoid bright colors (such as pure red, blue, and green),
which can cause the camera to unintentionally skew
esh tones and other hues. Also avoid bold patterns in
the background whenever possible. Cameras generally do
not capture patterns well which ultimately leads to visual
distractions and a reduced experience.
If energizing the room with color is important for branding,
display, or other purposes, use it sparingly and on the
wall behind the camera’s eld of view. Keep in mind, even
objects out of the camera’s view, such as low seating, can
produce color bounce if reected o nearby walls.

3
LOGITECH ROOM DESIGN GUIDE
BACKGROUND
To a camera visual clutter is much like complex patterns and should be avoided in the camera’s line of sight whenever possible.
Examples include unnecessary furniture, table clutter, ornate plants, busy artwork, framed prints with reective glass, and
moving objects (like curtains in a draft). When possible, conceal any wiring needed at the table on the tables underside.
Transparent walls or windows can also be a source of distraction if colleagues on the far end of the call are able to see
movement or activity outside the meeting room. Glass walls also pose a privacy issue in that anyone outside can look into the
room and watch your meeting. Possible solutions include blinds or curtains, a privacy screen, or frosted glass.
FURNITURE
Regardless of room size, a suitable conference table and appropriate number of chairs help anchor and dene the meeting
space. Frequently the table size and number of chairs will quickly rene product selection to a few products or sometimes
even just a single product.
Furniture should be arranged so that the camera can “see” everyone at the table. This is typically accomplished by positioning
the camera and screen at the head of the table and arranging seating on both of the long sides, as shown here:
Effective furniture arrangement in a huddle room/small meeting space. Effective furniture arrangement in a large conference room.
The shape of the table itself can help maximize the number of people visible on camera. A tapered shape (like a
triangle,trapezoid or semi-circular) is best, with the wider end nearest to the screen and camera. Avoid selecting a
rectangular table if possible because participants closest to the camera can tend to block from view those seated behind
them.
Circular tables can be a good choice for smaller rooms since they don’t block the camera’s line of sight. If selecting a
circular table, be aware that the location of the table legs may limit where people can be comfortably seated. To extend
in-room participation, select small high-top tables and light-weight moveable seating that can bring more people into the
discussion.
In all cases, be aware of how the camera’s eld of view frames in-room participants for those outside the room. Furniture
close to the camera will necessitate a wider eld of view than furniture at a greater distance from the camera.
ENVIRONMENT

4
LOGITECH ROOM DESIGN GUIDE
VIDEO COLLABORATION SOLUTIONS
Logitech surveys business video conferencing users around the globe each year to identify trends and insights that can
help continually improve our products. Given that “ease of use” is the most cited factor in the selection of a business video
conferencing system, Logitech is intently focused on delivering products that are as intuitive and easy to use as possible.
Each of the following Logitech video collaboration solutions provides purpose-driven attributes and benets matched to
specic room types–from huddle rooms and small conference rooms to large meeting spaces, all with the plug-and-play
simplicity our customers value.
Look for Logitech RightSense™ technologies in our video collaboration products that make better video meetings easy and
automatic. RightSense proactive technologies are built right into our cameras and audio solutions to make video meetings
naturally more beautiful and ecient with no calibration, manual intervention or support required.
The latest addition to the video collaboration product line that increases the ease and functionality of meeting spaces is
Logitech Tap. Tap is a touch control surface that enhances existing systems such as Logitech MeetUp and Rally products.
This accessory enables the native user interface of supported software clients to be just a nger press away.
Mid-sized conference room with Tap meeting room controller and Rally ConferenceCam.
LOGITECH RIGHTSIGHT
™
LOGITECH RIGHTSOUND
™
LOGITECH RIGHTLIGHT
Logitech RightSound optimizes
the human voice and enhances
conversational clarity.
Logitech RightSight automatically
moves the camera and adjusts
the zoom so no one gets left out
of the picture. Click here for more
information.
Logitech RightLight helps
everyone look their best on
camera, regardless of lighting
conditions.

5
LOGITECH ROOM DESIGN GUIDE
HUDDLE ROOMS/SMALL MEETING SPACES
MEDIUM/LARGE MEETING SPACES
Logitech MeetUp is the preferred ConferenceCam for groups of up to six people (or up to eight people with the optional
Expansion Mic for MeetUp) in huddle rooms and small conference rooms. With a super-wide, low-distortion 120° diagonal
eld of view
1
, even those closest to the camera can be seen. The space saving, integrated audio bar provides an exceptional,
natural sound experience for all meeting participants. The integrated audio includes a speaker for amplication coupled
with a beamforming microphone so that your entire installation can reside with the display and not require complex cabling.
With a compact design that minimizes cable clutter, MeetUp fullls the unique audio and visual requirements for successful
meetings in smaller spaces. MeetUp also integrates seamlessly with a dedicated room computer for room based software
clients. When paired with these services, adding the optional Logitech Tap meeting room controller provides an intuitive
easy to use touch interface at the table or on the wall to join and control a meeting.
1
FOV is measured diagonally. For horizontal and vertical measurements please visit www.logitech.com.
Logitech Rally is the agship video conferencing solution for medium and large meeting spaces of up to 40+ people. Rally
sets the standard for video quality, vocal clarity, industrial design, and meeting automation. Modular audio, expansive PTZ
capabilities, and Ultra-HD video are combined with Logitech RightSense technologies that automatically frame human
gures and optimize color and luminance for human faces. Rally provides an unprecedented level of design and installation
exibility while still maintaining the same level of simplicity that the entire Logitech video collaboration product line
contains. The Rally base package fullls the needs and requirements for most spaces on their own. When additional audio
coverage is required you can add one speaker and up to six additional beamforming Logitech Rally Mic Pods.
Rally easily integrates with a dedicated room computer and can be paired with the Tap meeting room controller for simple
to use native interface for joining and controlling your meeting.
Logitech Connect is a portable, all-in-one solution designed
for small groups of up to six people. With a rechargeable
battery, Connect is compact and mobile so you can take
it from room to room. Designed for tabletop placement
and small spaces, this video conference solution oers
a generous 90° diagonal eld-of-view with pan and tilt,
4x zoom, and razor-sharp optics making it easy to see
everyone in the room.
Logitech BCC950 is ideal for personal use or for small ad
hoc meetings with up to four people. An all-in-one device
with 1080p video and professional audio, BCC950 delivers
HD video from a motorized camera and wideband audio
from a full-duplex speakerphone.
Logitech GROUP is the amazingly aordable video
conferencing solution for rooms that seat up to 14 people
(or up to 20 with optional expansion mics). A familiar
speakerphone experience with center of table audio
combined with advanced features like acoustic echo
cancellation, noise reduction technology, and intuitive
controls, it’s easier than ever to include everyone in the
conversation. For great-sounding audio calls, pair a mobile
device with Bluetooth
®
wireless technology to the GROUP
speakerphone.
VIDEO COLLABORATION SOLUTIONS

6
LOGITECH ROOM DESIGN GUIDE
BEST PRACTICES
DISPLAY
SINGLE, DUAL DISPLAY, OR MULTIPLE DISPLAYS
DISPLAY SIZE
Ideally, the display should be large enough for everyone in the meeting to easily see the shared content on the screen while
also in proportion to the conference table and overall meeting space. The optimal display will be capable of displaying
both camera video and content video at resolutions and a size that even text is readable. To determine the optimal
display size, measure the distance between the wall where the display will mount and the furthest seating position. Divide
the distance to the furthest position by 4 and that will give you the recommended minimum height of the screen. If you
multiply the screen height by 1.8 then you will have the diagonal size, which is the dimension given for display sizes. Larger
can sometimes be better and this is where some discretion may be used, but the method listed above should consistently
produce good results.
MOUNTING OPTIONS
Select a display mounting option based on the constraints
and preferences for the meeting space. A common choice
for larger conference rooms is to mount the display(s) on a
wall for a professional appearance and increased visibility
for everyone at the table.
When a single display is mounted on a wall, the center of
the display should align with the center of the wall and the
table. Dual display installations can be positioned either
horizontally or vertically. For horizontal mounting, place
the displays such that the center of the table aligns with
the gap between the two displays. For vertical installations,
follow the same rules as with a single display.
Keep camera placement in mind when positioning displays.
If the camera is installed too high or too low it renders a
suboptimal projection of the people in the room. Similarly,
displays that are positioned too wide, too high, or too low
can create an unnatural view for remote participants as the
people in the room look to the screens. The optimal position
for camera and displays is the one that best supports relaxed,
natural eye contact between all meeting participants.
If there is a single individual being called then their head
should be in the upper third of the image. For this reason,
mounting the camera above the display will produce a
more natural experience for these types of calls. If there
is a group of people on the other side the participants
will tend to occupy most, if not all, of the screen and
mounting above or below the screen produce roughly the
same experience. Remember that the best experience will
keep the camera as close to eye level as possible. Eye level
is relative to the seating in the room, but for standard
seating this is 46-50” (116-127 cm) on average. This means
that when mounting the camera below the display, keep
in mind that the display will have to be elevated on the
wall. If this works in a space is objective based on the users
aesthetic desires for the room. When mounting the camera
above the display, the bottom of the display should be as
close to the surface height of the table as possible. In most
cases the top surface of a standard conference room table
is 30” (76 cm). This typically puts the camera above eye
level, but may still provide for a better experience.
Huddle rooms and small meeting spaces can be
adequately provisioned with a single at-panel display.
If there is room for an additional screen, one can be used
to display the remote participants while the other can be
dedicated to shared content. This is particularly helpful in
larger rooms so people furthest from the screens can easily
see the shared content.
An additional advantage of dual displays is it allows a PTZ
camera to be placed at eye level between the two screens.
With a single display, the camera is typically situated just
below or above the screen.

7
LOGITECH ROOM DESIGN GUIDE
DISPLAY CARTS
Mobile display carts can add portability and exibility
to where video meetings are held. A mobile cart can
contain a complete system and be wheeled into open
spaces or to dierent rooms with just a power cable and a
networking jack as the only external connections needed.
Stationary carts can be a good option in spaces where it is
impractical or not possible to permanently install displays
and other equipment. Whether mobile or stationary, a
suitable cart should provide solid mounting options, cable
management accommodations and a sturdy, functional
design.
Look for a cart solution that has optional brackets
and easy mounting options for the camera, computer,
speakers, meeting room controller, power strip and other
Heckler Design offers an AV cart with an optional Logitech MeetUp Bracket.
SETTINGS
Display settings determine important attributes of the video you see on screen, including display resolution, color saturation,
and brightness/contrast. Settings should be reviewed and adjusted as needed during installation, in advance of the rst
live video meeting. In general, displays by default have many settings that process the video and audio in an attempt to
optimize them for television. These settings should be disabled or set to the lowest level where disable is not an option, to
ensure the best possible performance from your video and audio. If there is a video setting labeled “Game Mode” then this
usually is the best performance for video settings with the least processing.
INTERACTIVE DISPLAYS
Interactive displays are touch-enabled video screens. For room layouts designed to support front-of-room collaboration for
brainstorming and whiteboard use, an interactive display enables users to digitize their notes, illustrations, and other work
enabling better real-time collaboration and to be saved for future access.
A video-enabled interactive display can be used for in-room collaboration as well as video meetings with remote
participants. Multiple cloud-based video meeting platforms now support interactive displays for real time annotations and
shared content, or even as a meeting controller. With Zoom Rooms, for example, one touch on the screen enables users to
easily annotate, draw, highlight, erase, and record meeting content to the Zoom cloud.
BEST PRACTICES
accessories. The Heckler AV Cart, for example, provides an optional MeetUp Bracket that securely mounts the device directly
to the cart while maintaining a clean aesthetic and keeping cables managed. AV carts are available for single or dual
displays, plus storage for accessories and mounting for devices such as the computer. When installing components that
produce heat while operating, such as a computer, be sure to provide adequate ventilation. When permanently deploying
an AV cart in a room, also take into account the shape of the legs and casters to ensure easy movement around the
meeting space. You may also want to consider devices to secure the gear to the cart such as Kensington
®
locks and optional
locks for any storage drawers and doors.

8
LOGITECH ROOM DESIGN GUIDE
CAMERA
The core of any video conferencing solution is the camera itself. The camera should be positioned at an optimal height,
distance, and viewing angle in order to see everyone in the room.
Field of View (FOV) determines the side-to-side viewing capacity of the camera lens. This specication varies among
Logitech video conference solutions as follows:
ANGLE
The ideal camera position is eye level, which provides the most natural orientation for face-to-face collaboration. Visual
performance can be diminished if a camera is positioned too high (or too low) relative to meeting participants.
An eye-level camera position may be dicult to accomplish with a single display where the camera must be positioned just
above or below the screen. To help address this issue, all Logitech ConferenceCams feature a motorized pan and tilt that
can help adjust and ne-tune the viewing angle.
DISTANCE
A certain amount of distance is required to take full advantage of a camera’s FOV and ensure everyone is in frame. As
shown in the diagrams below, the trick is to situate seating in locations that enable the camera to deliver its full potential.
Meeting tables designed with one end wider than the other (like a triangle or trapezoid shape) can help include more people
within the camera’s view.
Rally and GROUP provide a 90° diagonal FOV with
motorized pan and tilt, offering ideal coverage for
medium and large conference rooms.
MeetUp provides a 120° diagonal FOV that easily
accommodates huddle rooms where people sit on
either side of the camera.
Connect provides a 90° diagonal FOV for tabletop
placement and small spaces.
BEST PRACTICES
Logitech Rally, Logitech GROUP
and Logitech Connect: 90° FOV
(diagonal)
Logitech MeetUp: 120° FOV
(diagonal)
Logitech BCC950: 78° FOV
(diagonal)
The FOV of each Logitech lens is designed for optimal performance in its intended environment. The super-wide, low-
distortion 120° diagonal eld of view provided by MeetUp, for example, is ideal for huddle rooms where people are seated
relatively close to the display and camera.

9
LOGITECH ROOM DESIGN GUIDE
In addition to outstanding video, highly-intelligible audio is essential to successful video conferencing. Every Logitech video
conference solution provides both.
MeetUp, Connect, and BCC950 are all-in-one systems that include both a speaker and microphones. BCC950 features
an omnidirectional speakerphone with a 4’ radius mic range: Connect oers a 50% wider range with a 6’ radius. MeetUp
provides an 8’ radius range out of the box, which can be extended with an expansion mic an additional 3’ radius from
where the expansion mic is placed.
MeetUp, Connect, and BCC950 are all-in-one systems that include both a speaker and microphones. MeetUp provides an 8’
radius range out of the box, which can be extended with an expansion mic an additional 3’ radius from where the expansion
mic is placed. Connect oers a 50% wider range with a 6’ radius. BCC950 features an omnidirectional speakerphone with a
4’ radius mic range.
GROUP enables conference participants to converse within a 10’ (3m) radius around the speakerphone and be heard so
clearly by remote participants that it seems like conversations are happening in the same room. Optional expansion mics
extend the conversation area from 20’ to 28’ so anyone seated further away from the speakerphone can be clearly heard.
Rally maximizes audio performance and exibility with individual mic pods that produce remarkably clear and natural
conversational sound. Each mic pod contains multiple beamforming elements and RightSound technology that focuses
on active speakers while automatically eliminating acoustic distractions. Up to seven mic pods work together to create
consistent audio coverage for every seating position throughout large meeting spaces.
AUDIO
MICROPHONE PLACEMENT
With a 4’ radius acoustic range, up to four BCC950 users
will experience the best audio performance when seated
near the all-in-one unit. Connect delivers the best audio
results when 1-6 meeting participants are seated within a
6’ radius of the device.
MeetUp features three beamforming mics with an 8’ radius
that collect sound in the direction it faces. MeetUp cannot
pick up sound from behind it, so it should be positioned to
face the people in the room. The optional, omnidirectional
expansion mic provides a 3’ (1m) radius range from where
it is placed.
GROUP features a full-duplex speakerphone that provides
a center of table 360 degree audio experience with four
omnidirectional mics. Beamforming technology helps
focus on speech throughout a 10’ (3m) radius space (or 28’
(8.5m) with optional expansion mics).
Each Rally Mic Pod provides exceptional conversational
clarity throughout a 7.5’ radius, eectively serving up to 10
people. Additional mic pods can be easily added to expand
audio coverage and provide convenient access to mute
controls.
Optional expansion mics extend the
conversation area for GROUP from
20’ to 28’.
Rally can be expanded to serve up to 46 people with the addition of optional mic pods.
One Rally Mic Pod delivers exceptional
acoustic performance for up to ten
people.
BEST PRACTICES

10
LOGITECH ROOM DESIGN GUIDE
ACOUSTICAL SUPPORT
Regardless of how good a quality audio system may be, every physical space has intrinsic acoustic properties, many of
which can be managed. Types of materials used for room construction and furniture has the greatest impact on room
acoustics. Try to avoid rooms with highly reective surfaces such as metal, stone, glass or similarly hard materials. These
materials tend to increase sound reections that compromise audio quality. Glass windows can allow outside noise to leak
in and cause distractions to people in the room and on the other side of the call.
Acoustic ceiling tiles can be very eective in absorbing sound and reducing echo and reverb. Acoustic panels that hang from
the ceiling are an eective alternative.
Carpet is an ideal ooring material because it absorbs sound well. Generally, softer and loftier materials absorb sound best.
Acoustic panels can be used to absorb sound and reduce unwanted reections. In general, the more surface area covered
the better. Supplement the sound absorption of acoustic panels with bass traps in the corners of the room for even better
results against low frequency problems.
BEST PRACTICES

11
LOGITECH ROOM DESIGN GUIDE
ROOM CONFIGURATION
Selecting the most appropriate video conferencing solution for your environment and organizing your physical meeting
space are the essential rst steps needed to ensure professional-quality video meetings. The nal step is to place and
congure the equipment in the best possible way to support this goal.
Here are some key considerations and best practices:
COMPUTE
All Logitech video conference solutions are USB peripherals with plug-and-play connectivity to a computer of some form.
The most common options are a personal laptop, sometimes referred to in terms of Bring Your Own Device (BYOD), or a
dedicated computer of some type permanently installed in the meeting room.
Logitech video collaboration solutions are ideal for BYOD scenarios since they work right out of the box without additional
software once everything is plugged in. With USB plug-and-play simplicity, BYOD users enjoy the exibility to set up ad hoc
meetings in any video-enabled meeting space with full access to any application on their own laptop.
Alternatively, many organizations prefer the consistency and convenience of provisioning video meeting spaces with
dedicated computer sources. In this scenario, all connections are already made and tested so that everything is always set up
and ready to launch a meeting. Users encounter the same experience every time and enjoy the reliability of a pre-congured,
consistent experience. Rooms with a dedicated computer can gain additional ease of use by installing the optional Logitech
Tap control surface.
PLACEMENT
The primary location for the computer source is either on
the meeting table (as with a personal laptop), mounted
below the table or behind the display wall. An advantage
of positioning the computer near the display is proximity
to AC power, Ethernet, and other components to which
the computer connects.
Regardless of the chosen location, the computer requires
proximity to the camera to connect through the USB
cable. Supplied USB cables vary in length from 6.5’ to
16’ depending on which Logitech solution is acquired.
In all cases, a quality Internet connection is required to
provide a quality experience with video calls. Due to this
requirement, wired Ethernet is recommended over using
wireless (WiFi).
When planning the placement of the computer source,
consider the connections for the meeting controller (see next section), HDMI cable(s) to the display, USB cables for the
camera and speakerphone, Ethernet and power. HDMI and USB extenders are available if the in-box connectors for the
camera, speakerphone and meeting controller are not long enough for a specic instance.
12
LOGITECH ROOM DESIGN GUIDE
ROOM CONFIGURATION
Cabling example of Tap and Rally in a mid-sized meeting room with a dedicated room computer.
MEETING CONTROLLERS
In addition to the basic components of a video collaboration system (the display, computer source, and either an all-
in-one solution or the combination of a camera, mics, and speakers) a meeting controller is also needed. The meeting
controller can be either wired or wireless. Product options include a Logitech K400 Plus Wireless Touch Keyboard, a Logitech
Tap or wireless tablets.
Tap is a 10” (254mm) touch surface which displays the native interface for video collaboration software. Tap requires a
USB connection to the computer, power, and provides an optional HDMI input to enable wired content sharing. Tap can be
placed on a table out of the box; additionally there are swivel mount, riser and wall mount optional accessories available.
If the supplied USB cable is not long enough, the Logitech Strong USB cable is another option accessory that comes in 33
feet (10m) or 82 feet (25m) forms. Strong USB is an active optical cable that enables the extension of USB 2.0, USB 3.0
and USB 3.1 up to distances of 82 feet (25m). Being optical, the cable does not pass power to power remote devices, but
does power itself from the device to which it is connected and therefore does not need any external power supply.
For congurations with a user supplied wireless tablet, power is needed close to the placement of the tablet on the table to
avoid a low battery state at an inconvenient moment. Be sure to secure the tablet using a charging dock.

13
LOGITECH ROOM DESIGN GUIDE
ROOM CONFIGURATION
Huddle room cabling example with MeetUp and BYOD setup.
CONNECTIONS
At the most basic level, you will need to ensure power is readily available to the video conferencing hardware, display(s), and
the computer source.
Other cables and connections include a USB cable between the video conferencing hardware and computer source, an HDMI
cable or cables between the computer source and display(s), and an Ethernet connection for Internet access. Take note of
how cable lengths and proximity to power/network outlets will inform your possible installation options in any given room.
For the Logitech GROUP system deployments in larger conference rooms, additional connections are required between the
hub, camera, speakerphone, and optional expansion microphones
Logitech Rally oers even more installation exibility, including the addition of up to seven individual mic pods and an
external speaker (mono) or two (stereo). With each Rally Mic Pod providing exceptional conversational clarity throughout a
7.5’ (2.3m) radius (eectively serving up to 10 people) the possibilities are expansive.

14
LOGITECH ROOM DESIGN GUIDE
Large meeting room / boardroom cabling example with Rally and BYOD setup.
Mid-sized meeting room cabling example with Rally and BYOD setup.
ROOM CONFIGURATION

15
LOGITECH ROOM DESIGN GUIDE
ROOM CONFIGURATION
For seamless meeting room installations, route cables through a conduit or under-the-table wire tray to keep cables
organized, mitigate visual clutter, and reduce potential tripping hazards. Logitech Screen Share brings fast and easy content
sharing to any conference room computer. Simply connect a laptop or tablet via HDMI to start sharing. There is no need
to install software, enter a passcode, or even connect to the internet. Screen Share works with Zoom, Skype
®
for Business,
WebEx
®
, BlueJeans, and other meeting services that support content sharing via USB.
Packed with video encoding technology in a surprisingly compact device, the Screen Share connects to the conference room
computer via USB, and provides an HDMI input for instant content sharing as shown below:
Logitech Screen Share connects to the conference room computer via USB (1) and provides an HDMI input (2) for instant content sharing.

16
LOGITECH ROOM DESIGN GUIDE
TABLE GROMMETS
Table grommets allow devices and connections needed
above the table to cleanly pass the wires through to the
bottom side with minimal visual impact.
Combined with under-table trays, organize and protect
cables, hubs, and computer resources beneath the work
surface and provide access points through table grommets
located wherever wired equipment (like a Rally Mic Pod) is
positioned. In situations where power or Ethernet outlets
have been installed in the oor, consider using cable ties to
secure connectors and power cords to table legs.
ROOM CONFIGURATION
STRAIN RELIEF
Strain Relief is a way to mechanically secure cables to
that the connector on the cable and the connector on
the device to which it connects is not under tension (also
called strain). Properly implementing strain relief is vital to
a proper install to reduce potential failures that could occur
during install or at any point in the future. This is true for all
products, but even more for products that may be moved
around like Tap when it is not permanently mounted using
the swivel mount.
When installing cable runs, remember to leave some slack
in the line to allow for exibility of movement during use.
With the GROUP speakerphone, for example, users tend
to move the speakerphone in their direction in order to use
the controls.
CONDUITS
Conduits can be installed under the oor, above a
suspended ceiling, or behind walls to help run cables
from dierent parts of the room to the required devices.
When running cables through conduit, take care to
ensure compliance with applicable re and building
codes. Plenum-rated cable has a special insulation with
low-smoke and low-ame characteristics and is typically
specied for use in conduits and air-handling spaces.
RACEWAYS
Where space for concealed conduit is unavailable, consider
above-oor raceways to deliver cables from wall to table
while mitigating potential tripping hazards. Compared
to running cables under carpet, cable channel raceways
provide greater exibility for adding, removing, or
modifying cable runs in needs change. Raceways are also
available for wall applications as when installing the display
or Rally Speakers.
CABLE RETENTION
Various cable retention brackets, Velcro, and zip tie
solutions are available from third-party providers. With
Rally, a Rally Mounting Kit is available that includes two
robust cable retention brackets to help secure the Rally
Display Hub and Rally Table Hub connectors, reduce
cumbersome cable clutter, and support a streamlined
installation with a professional appearance.
CABLE EXTENDERS
In larger video meeting spaces, the standard cables may
not reach far enough for the planned installation. The good
news is that extender solutions are readily available.
For GROUP, easily customize your conference room setup
with the GROUP 10m or 15m Extended Cable. Use it to
increase the distance from the hub to the camera or
speakerphone. This 10-meter cable replaces the 5-meter
DIN cable included with GROUP and can be routed
through a conduit or raceway for super-clean conference
room installations.
Note that conduits have a xed capacity for how many
cables they can accommodate. characteristics and is
typically specied for use in conduits and air-handling
spaces. Note that conduits have a xed capacity for how
many cables they can accommodate.
CABLE MANAGEMENT
In order to create a clean and professional video meeting space, cable management is an essential part of the installation
process. Depending on room size along with number and length of cables, managing wiring can become a complex
challenge for installers seeking to keep cables and cords neatly organized and contained.
A disorganized jumble of cables and cords can be distracting, diminish user experience, and reduce the overall eectiveness
of meetings. Taking the time to do the installation right is well worth the eort. Here are some basic considerations for a
streamlined cable management plan:


20
LOGITECH ROOM DESIGN GUIDE
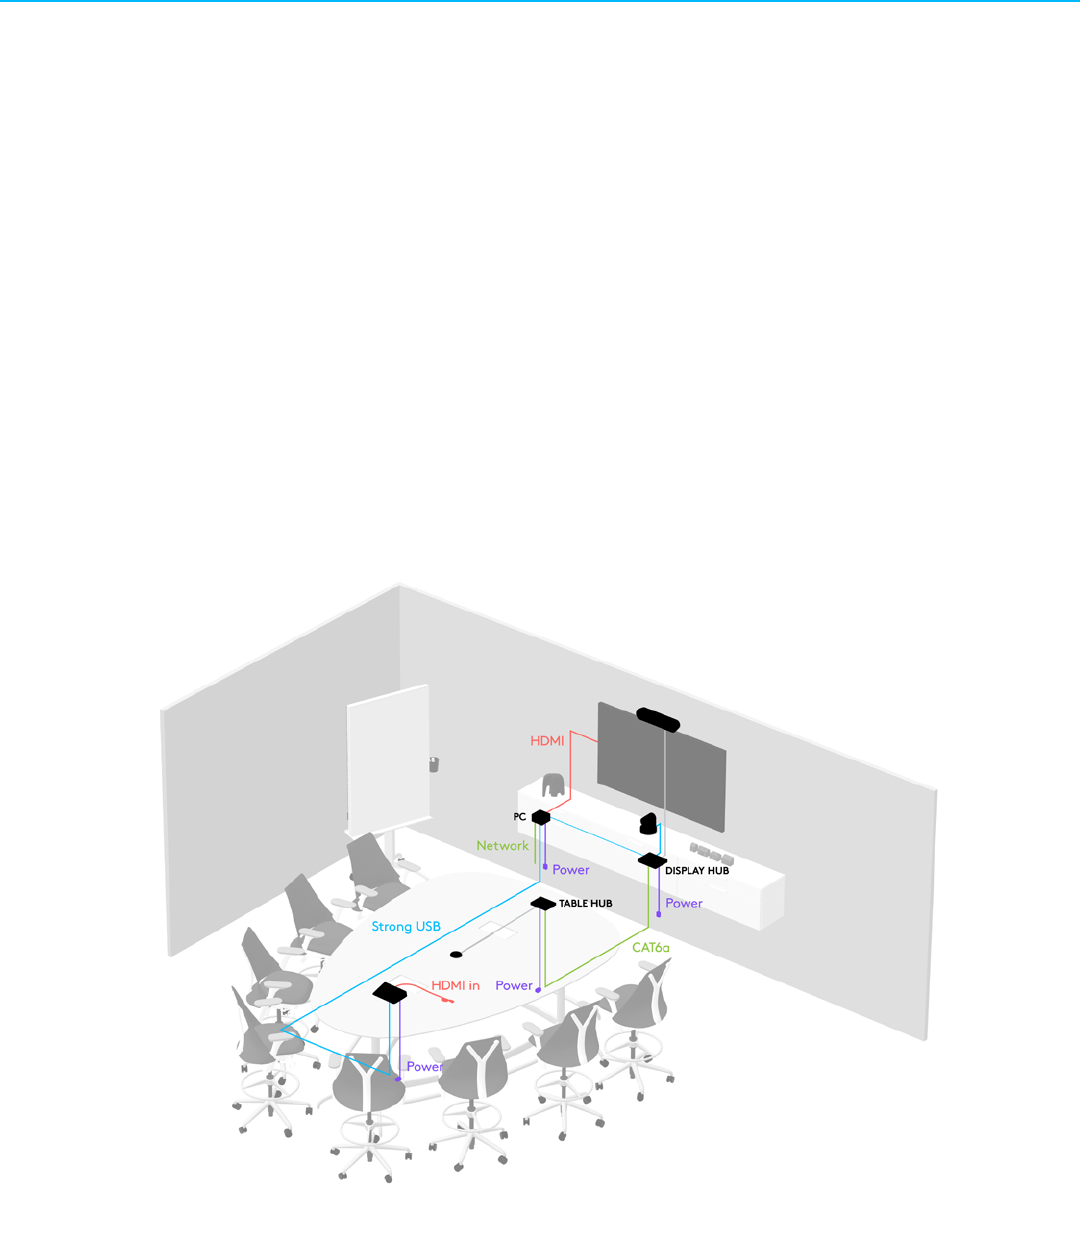
Mid-sized conference room layout example with Logitech Rally ConferenceCam and Logitech Tap meeting room controller.
Mid-sized conference room cabling example with Logitech Rally ConferenceCam, Logitech Tap meeting room controller and dedicated room compute.
LAYOUT EXAMPLES


© 2019 Logitech. Logitech, the Logitech logo and other Logitech marks are owned by Logitech and may be
registered. All other trademarks are the properties of their respective owners. Logitech assumes no responsibility for
any errors that may appear in this publication. Product, pricing and feature information contained herein is subject
to change without notice.
www.logitech.com/vc
Contact your reseller
or call us at 800-308-8666
Logitech Inc.
7700 Gateway Blvd.
Newark, CA 94560
Published August 2019
