
manual and training guide

2
forward
In 2007, the American Society for the Prevention of Cruelty to Animals (ASPCA
®
) acquired
SAFER™ (Safety Assessment for Evaluating Rehoming).
The ASPCA invites you to learn about the program which will help you to better know the dogs
in your care, by identifying which dogs in your shelter or rescue group are ready to go into your
placement program, which ones will benefit from behavior modification and which ones will need
careful management if they are to be placed. The heart of the SAFER program is an aggression
assessment tool designed by Emily Weiss, Ph.D., CAAB, for the Kansas Humane Society in Wichita.
In 1999, Kansas Humane Society approached Dr. Weiss to develop an aggression assessment
that could identify safe, adoptable dogs which would be short, accurate and cost little to implement
— concerns shared by most shelter organizations. Initially, SAFER was a six-item assessment
which could be completed in less than six minutes utilizing an Assessor and an Observer, shelter
staff who were knowledgeable about dog behavior and possessed excellent observation and safe
animal handling skills. Since its inception, a seventh item has been added — toy behavior — so the
assessment now takes a couple of minutes longer per dog.
Beyond the addition of a seventh assessment item, the SAFER program has grown in other ways.
During her work with Southern and Midwestern shelters taking part in the Rescue Waggin’
®
Animal
Transport Program sponsored by PetSmart Charities
®
and the ASPCA, Dr. Weiss came to realize
the importance of Assessor Certification, to ensure that SAFER Assessors were all consistent in
their execution of the program. (See SAFER Certification chapter for more information.) Through
her shelter intern program, behavior modification protocols for common behavior issues such as food
bowl aggression and touch-sensitivity have been tested and modified and are now available so that
after those problems are identified in the assessment, shelter behavior staffers can take action.
While SAFER is the first tool developed by Dr. Emily Weiss, MYM Canine-ality was subsequently
designed by going beyond an aggression assessment to help best match individual dogs with
adopters’ lifestyles and expectations. Dr. Emily Weiss also researched and developed other
match-making programs for puppies and cats, Puppy-ality™ and Feline-ality™, respectively.
To learn more about the ASPCA
’
s SAFER and Meet Your Match programs, visit www.ASPCApro.org.

3
contents
introduction
research
who should assess
using the SAFER
™
assessment – an overview
facility requirements and equipment
the SAFER
™
assessment item by item
utilizing the SAFER
™
worksheet
role of the observer
SAFER
™
certification
behavior modification and management protocols
glossary
reproducible forms and templates
4
7
11
13
15
19
37
41
43
47
65
69

4
ASPCA
®
SAFER™ is a seven item aggression
assessment that identifies the dog’s comfort level
with restraint and touch, reaction to new experiences
including movement and sound stimuli, bite inhibition,
behavior around food and toys, and arousal level
toward other dogs. The dog’s behavioral response to
these assessment items and the organization’s
Standard Operating Procedures (SOP) determine the
next steps to be taken with the dog.
why utilize an aggression assessment
Shelters that employ SAFER™ or other research-
based behavior assessments report fewer
aggression complaints, more adoptions, and better
client interactions. Simply put, they are able to more
accurately communicate to the adopter about what
they should expect, and how to best manage, a dog
in their home.
SAFER™ demands staff time, facility space
and a passel of supplies; and at times, it can raise
controversy. Why should shelters assess their dogs?
Short answer: it’s the prudent thing to do. A prudent
shelter is one that employs good judgment and
common sense. It is prudent to have a validated
scientific tool to back up that “gut feeling” that the
dog identified as good with kids and first-time pet
guardians has the highest probability to be a safe
choice for them. It is prudent to determine which
dogs will flourish when given some behavior
modification for the quirks and foibles identified
by the assessment. It is prudent to put in place a
consistent assessment procedure when determining
which dogs are most likely to be a danger to staff,
volunteers, potential adopters and the community at
large, so that next-step discussions will center around
what to do with the dog, not around what was done
to the dog. These are the reasons to find the staff
time and spend the money necessary to employ an
aggression assessment. In an age where lawsuits
are common and insurers are scarce, not to do so
would be…imprudent.
what the scoring means
When a dog scores “1s” and “2s” on his assessment,
he is less likely to bite under ordinary living situations
when handled in a mildly stressful or moderately
awkward manner than dogs who score “3s,” “4s” and
“5s.” Dogs that score “3s” may be safe and inhibit
their bite, but they could be made safer by putting
them on a behavior modification program. Dogs that
score “4s” may have serious fear or intolerance issues
and should either receive behavior modification
training and then be reassessed or only be adopted
out to experienced adopters ready to manage the
dog’s issues. Dogs whose behavior during one of the
first four assessment items score a “5” have the
Shelters that employ
SAFER
™
or other
research-based behavior
assessments report fewer
aggression complaints,
more adoptions, and better
client interactions.
introduction
ASPCA
®
SAFER
™
guide

5
highest probability to be a serious danger to staff,
volunteers and visitors to the facility. (See Research
pages 7–10 for more information.) They should only
be handled by the shelter’s most experienced staff
until their disposition is determined. These dogs may
respond well to behavior modification or they may not.
determining next steps
Once a dog is assessed and his behavior responses
noted, the assessment team should review his
worksheet. If any of the canine behaviors displayed
were reason for concern, the team should first review
the assessment video to ensure there was nothing
improper in the way the assessment was conducted
or the way the dog was handled that attributed to
the dog’s particular response. If all was done by the
book, the dog’s assessment should be brought to
the attention of the Animal Behavior or Animal Care
Supervisor to determine next steps. As each shelter
is unique and has different resources available, next
steps will vary from shelter-to-shelter.
If staff and cage space is available, the dog might
be given another twenty-four hours to settle into
his surroundings and then be re-assessed. If the
shelter employs a behavior staff, the dog may
be put on a behavior modification program and
re-assessed after the program is complete. Some
shelters have behavior foster homes in which to
house dogs with potential behavior issues for a trial
period. Experienced foster volunteers would follow
through with the shelter’s behavior modification
program and observe the dog’s behavior in a “real
life” setting. Shelters without behavior departments
may utilize community dog trainers to either devise
additional behavior modification protocols, work
with the shelter dogs or serve as behavior foster
homes — paid or unpaid. A local rescue group
may be interested in taking the dog. Sharing the
assessment with the group allows them to make an
informed decision about whether or not they have the
resources to meet the animal’s needs.
Or your facility may be an overcrowded, high
volume, open access animal care and control
with few resources and no Friends of the Shelter
group. Your shelter may not even be able to assess
every dog over six months of age. In this case,
SAFER™ might only be used to help identify the
behaviorally soundest pit bulls and guarding breeds
to insure that those placed up for adoption
will be great ambassadors for both their breeds
and your shelter.
The SAFER assessment may help supervisors
make euthanasia decisions, but the assessment
alone should never be the only input considered.
Relinquishment surveys done at intake, veterinary
reports from the health check, and input from animal
care technicians, volunteers, and foster parents
should also be considered whenever a life
or death decision must be made.

6

research
7

One focus of Dr. Emily Weiss’ graduate career
was on the selection of service dogs from shelters.
Her research, which was conducted at the Kansas
Humane Society of Wichita (KHS), focused
specifically on developing a set of assessment
items that would better predict service dog potential
in dogs selected from shelters. This work was
published in The Journal of Applied Animal
Behaviour and the Journal of Applied Animal
Welfare Science (1997, 2002). During the data
collection period, the KHS expressed an interest
in having a research-based assessment to help
identify potential aggression. They had a high
number of reports of aggression about their adopted
dogs. Several of the assessment items researched
for the service dog work focused on arousal, fear,
and other potential issues, making a good base
for a potential aggression assessment.
SAFER™ was developed based on the needs
and resources of the Kansas Humane Society of
Wichita (KHS). The open admission facility was, like
most facilities, short staffed. The time allotted for an
assessment was about six minutes per dog. Items
from the earlier research were added to a food
aggression assessment that was already available
for shelter use (Assess-a-Pet
®
, Sue Sternberg). Staff
was trained on the assessment process and then the
six item assessment was tested on a sample of dogs.
The sample was derived from dogs entering KHS.
All dogs were randomly assigned a number as they
entered the facility. If the number was odd, the dog
was placed in Group 1, if the number was even, the
dog was placed in Group 2. All dogs that entered
without a bite report and were considered by the
facility to be healthy were included in the study.
group 1:
These dogs were assessed using SAFER™
and received “1s” and “2s” on the assessment.
group 2:
These dogs were not assessed. They were
given a thorough health exam; and if they
aggressed during the exam, they were not
included in the study.
There were a total of 141 dogs in the sample:
66 in Group 1, and 75 in Group 2. The groups
are not equal due to issues beyond the study’s
control (illness, overcrowding etc.).
Results of the study were encouraging.
Note: At the time of the research, KHS was
struggling (as many facilities do) with too many
animals and not enough resources to support them.
They very often needed to euthanize for space.
During the study period, seven of the study dogs
were euthanized for space — those with the longest
stay (by the hour and minute) pulled. Eight dogs
were euthanized for health reasons. Twelve dogs
were euthanized for behavior reasons — eight from
Group 2 and four from Group 1.
22 dogs were adopted and returned (no aggression
reported in returns)
91 dogs were adopted
Adopters were called after the dogs were in their
homes for more than two weeks and were asked a
series of questions regarding observed aggression.
Replication of data in different environments is
one way to prove the strength of an experiment.
To this end, a similar study of SAFER™ was
recently conducted at the County of Riverside
Department of Animal Services (Riverside, CA)
comparing 50 assessed and 50 unassessed dogs.
Adopters reported incidents of growling in 14 of the
unassessed dogs and only three of the assessed
dogs; five of the unassessed and one assessed dog
bit but did not break the skin; and two unassessed
dogs bit someone and broke the skin.
8
research
identifying aggression
adopter reports on aggression
observed in the home
assessed unassessed
group group
nipping 4 14
food
aggression 1 5
aggression
around toys 2 5
growling at
a human 1 10

It is important that Assessors are trained to remain
objective and to accurately report the behavior they
observe during the assessment. Provided no
intervention has occurred, ideally dogs should
respond the same when an assessment is repeated
even if a different trained Assessor conducts the
second assessment, and even if the second
assessment occurs in a different environment.
Testing this consistency with a large population of
dogs would have been difficult. However, SAFER™
was used by PetSmart Charities’ Rescue Waggin’
®
transport program. This program, which at the time
of publication has saved over 15,000 dogs, brings
dogs from areas with low live release rates of
behaviorally healthy dogs to shelters with very high
adoption rates. This has given us the opportunity to
more fully explore whether SAFER™ is likely to
consistently produce the same results over time,
and with different Assessors as assessments are
done at both source and receiving shelters.
When the transport program began, Assessors at
both source and receiving shelters were trained,
but there was no certification program to check the
ability of individuals to accurately assess the dogs.
Receiving shelters were reporting a high number of
transported dogs with significant behavior issues.
These dogs require more resources, and often take
longer to be adopted. Since the receiving shelters
needed to save their resources for the at risk dogs
in their own communities, devising a method to
decrease the likelihood of transporting dogs with
significant behavior issues was necessary. The
solution was to certify individuals assessing for
the Rescue Waggin’
®
program to ensure that all
Assessors have the skills to conduct and score
correctly. Certification involves sending a tape
of the individual assessing three dogs in their
facility. Approximately 55% of those who submit
are certified on their first attempt. Once certification
was put in place, we assessed the program. We
followed 3,000 dogs in the Rescue Waggin’
®
program from source shelter to receiving shelter,
and only 3% of the dogs scored differently at the
receiving facility than they did at the source facility.
9
research
Many facilities can benefit from an assessment
tool that can help identify safety at intake. The
use of SAFER™ at intake was originally researched
at the Wisconsin Humane Society. Forty-one
owner-relinquished dogs were assessed at intake.
Twenty-one of the dogs scored “1s” and “2s” on
the assessment at intake. Of those, eighteen of
those scored “1s” and “2s” when assessed after
staying in the facility approximately 24-72 hours.
In other words, 86% of the dogs that scored “1s”
and “2s” at intake scored the same after being
housed in the facility for 1-3 days.
Twenty dogs scored at least one 3, 4 or 5. These
dogs were also then housed in the shelter for 1-3
days and then reassessed. Two-thirds of these dogs
scored the same after being housed in the shelter,
while one third had either a decreased level of
potential aggression, or a behavior (such as food
aggression) that was easily modifiable.
SAFER
™
as an intake tool
When the transport
program began,
assessors at both
source and receiving
shelters were trained,
but there was no
certification program
to check the ability of
individuals to accurately
assess the dogs.
consistency between assessors
and assessment centers

10
research
One of the most exciting areas of research with the
SAFER™ program has been the investigation of
behavior modification and management programs
for dogs in which potentially aggressive behavior
has been noted. We continue to build support for
these dogs, and do so by researching the
effectiveness of particular programs.
Food guarding is a very common behavior issue
in shelter dogs. We define food guarding as when
a dog aggresses over food items, and not over
toys or other non-food items. Working with the
Wisconsin Humane Society, Dr. Weiss developed a
simple in-shelter and in-home behavior modification
plan (see Reproducible Forms and Templates
section for details) for dogs displaying food
aggression during the SAFER™ assessment.
Criteria for subject selection was as follows: All
dogs had to be over six months of age; scored “1s”
and “2s” on all other parts of SAFER™ other than
food behavior; the dogs could not leave the food
item to aggress, aggression was only toward food
items; no behaviors suggesting possession
aggression were present. Bully breeds were not
chosen for this study.
All dogs that met the criteria during the study
period were placed on the food guarding program
to eliminate the behavior before being placed on
the adoption floor. The dogs were placed up for
adoption and identified as CARE (Canine Achievers
Reaching for Excellence) dogs. Adoption was
restricted to adopters without toddlers, and those
willing to continue to work with the dog in the home.
(See food guarding program for adopters in the
Reproducible Forms and Templates section for
more information.)
Follow-up was conducted by calling the adopters
on the third day post adoption, the third week post
adoption, and third month post adoption focusing
both on general health/behavior of the dog and
behavior regarding food. We also asked a set of
questions regarding potential stressors in the
adopter’s life such as divorce, moving, etc. Finally,
we asked adopters to videotape the behavior of
their dog at ‘dinner time’ so that we could view the
actual behavior in the home.
Fifty dog/adopter pairs participated in the study. Of
that group, forty-eight dogs had no observable food
aggression in the home. One dog appeared to have
possession aggression issues and was returned to
the shelter after aggressing toward the adopter over
a dish towel. One dog was observed by the adopter
as growling over the food bowl on the third week
post adoption, but the behavior was no longer
present after three months in the home.
We continue to research behavior modification and
management programs so that we can best support
the dogs, the adopters, the shelters, and the
communities in which they reside.
Food guarding is a very
common behavior issue
in shelter dogs. We define
food guarding as when a
dog aggresses over food
items, and not over toys
or other non-food items.
supporting dogs with identified
behavior challenges

who should assess
11

who should assess
SAFER™ is an assessment that requires certain skills.
While SAFER™ training and certification can assist in
skill development, ideally Assessors already have the
following skills before learning the assessment:
ability to objectively observe behavior
Objective observation is vital for accurate assessments.
Assessors should be skilled at objective observation as
opposed to subjective interpretation. Phrases such as
“He liked that” are not useful for assessment, but “loose
body, mouth open, huffing” are useful and objective ways
to discuss and observe behavior.
canine communication knowledge
The Assessor will be working with a large variety of
dogs and, in many cases, will not have any information
regarding a particular dog’s past behavior. It is vital
that the Assessor is well versed in canine behavior
and communication to keep safe, and to be sure the
dog is assessed accurately and humanely.
training in safe and humane dog handling
This guide and the SAFER™ workshops focus on handling during the actual assessment. However,
there are many interactions with the dog before the assessment begins. The Assessor
will be removing the dog from his kennel, walking him, etc. For example, if a dog is handled in a
rough or startling manner by an Assessor in the kennel run, his behavior is less likely to be an
accurate reflection of his future behavior. Assessors should be trained in how to handle dogs safely
and humanely before attempting aggression assessments.
good physical health
SAFER™ requires bending, kneeling, and quick movement and fast reflexes. This is one
instance where accommodations cannot be made for physical challenges and disabilities on
behalf of the Assessor. If the assessment is not carried out as written, the results are invalid.
12
who should assess
Ideally
Assessors should not have any interaction or contact with the dog prior to
the assessment.
In addition, Assessors with breed biases (pro or con) should refrain from
assessing those breeds.

using the SAFER
™
assessment –
an overview
13

using the SAFER
™
assessment –
an overview
SAFER™ is a short seven item aggression
assessment that generally takes no more
than ten minutes per dog to complete. This
estimate does not include the time necessary
to prepare the assessment room, remove the
dog from his cage and give him an opportunity
to eliminate before the evaluation. The carefully
planned sequence of assessment items builds
from least invasive and stimulating to most
invasive and arousing, in order to determine
what, if any, aggression issues the dog may
have. The assessment must follow the
sequence as written; failure to do so may
unnecessarily put the Assessor at risk.
The SAFER™ assessment can be used as an
intake tool for limited admission shelters to
determine whether or not a dog is a safe adoption
candidate they will accept into their facilities or
to determine what behavior modification the dog
might need. However, it is generally recommended
that open admission shelters provide dogs that
have just arrived two to three days to settle in
before performing the assessment. Our studies
show that there is a 15% difference between how
the dog scores when assessed at intake versus
reassessing after allowing him time to acclimate.
While the percentage is small, it is recommended
each dog get that opportunity to settle in when at
all possible.
14
using the SAFER
™
assessment — an overview

facility requirements
and equipment
15

16
facility requirements and equipment
facility requirements and equipment
SAFER™ assessments demand little in the way of special equipment or space. Most tools can be
found in the average shelter.
assessment room
The ideal assessment room is a
large, quiet and relatively empty
room. However, any quiet room
that is at least 10' x 10' can work.
video camera and tripod
The video camera is used to record
every assessment. Often, behavior
occurs quickly, and a review of the
tape can help determine what
behavior was demonstrated.
Further, taping helps with quality
control, as Assessor handling can
be reviewed and then improved
upon based on taped observations.
Assess-A-Hand
®
This tool is used for two assessment
items. It is simply a plastic hand
on a stick, and is available at
www.suesternberg.com.
food bowls
The food behavior item is
conducted using a food bowl.
The bowl should be an
appropriate size for the dog
being assessed. Metal bowls
are preferred for most assessment
rooms as they will most easily
slide across the floor when
manipulated.
two armless chairs
Several of the assessment items
are conducted while seated in a
chair. The chair should be armless
so that the Assessor can easily
move on and off, as well as side
to side. The Observer should be
seated during the same items that
the Assessor is seated.
dry and canned dog
food (at least two types)
The food behavior assessment
item requires that the dog consume
the food presented during the
assessment. We recommend
moderately valuable food—a kibble
mixed with canned. Two types of
food should be available in case the
dog does not find the first choice
palatable.

17
facility requirements and equipment
NOTE: It is strongly recommend that the assessment room be stocked with items to help diffuse
aggression, should it become necessary to do so. For example keep SprayShield (formerly Direct
Stop), an air horn, and/or a bucket of water on hand.
two to three toys
For the toy behavior item, two
to three toys should be presented
such as a rope toy, squeaky toy
or ball (big enough to be removed
from the dog’s mouth). The toys
should be of varied textures and
shapes. Minimally, we recommend
a rope and a squeaky.
new unbasted
rawhide per dog
The rawhide item requires an
unbasted rawhide. It should be
large enough that it can be touched
with the Assess-a-Hand
®
when
the dog has his mouth fully around
it. Ideally, a new rawhide should be
used with each dog.
buckle or
martingale collar
During the assessment, the dog
must wear a collar with a buckle or
plastic clasp that does not tighten
when the leash is tugged. If your
shelter fits all incoming dogs with
semi-martingale collars (also known
as Premier collars), there is no need
to change them for the assessment.
However, the buckle collar is preferred.
six-foot leash
The leash must be six feet long
and size-appropriate for the dog.
Cotton web, nylon or leather
leashes 1/2 inch to 5/8 inch in
width are both strong and easy
to handle for most Assessors.
clipboard
A clipboard is used by the Observer
to hold the SAFER™ worksheet.
optional sound machine
Many facilities have difficulties
controlling external sound around
the assessment room. Sound
machines that emit white noise
(sounds like the static on your
radio) can be quite effective in
buffering noise outside the
assessment room.

18

the SAFER
™
assessment
item by item
19

20
the SAFER
™
assessment item by item
the SAFER
™
assessment
item by item
Let’s examine each assessment item in sequence. We will focus on how each item is conducted, what
behaviors the item is meant to identify and what those might mean in regard to the dog’s adoptability profile.
We will also focus on scoring options for that item and tips about body position and leash control to keep in
mind in order to accurately conduct the assessment.
item 1: look
•
Place the chair in the room where it is not against a wall or
in a corner.
•
Sit upright in the chair with knees apart approximately
shoulder width and feet flat on the floor.
•
If the dog is small, (around 15-20 pounds or less or if you
feel you are hovering over the dog) evaluate the dog from
the floor instead of sitting in a chair. Kneel on the floor with
one knee on the floor and the other leg with foot flat on floor.
•
Allow the dog a minute or two to get comfortable with the
Assessor and the room. (Soft verbal and physical contact
with the dog is acceptable during this time.)
•
Quietly coax the dog into a position between the knees,
facing the Assessor.
•
Gather up the leash and lightly grasp the collar with one
hand, then lightly cup dog’s lower jaw in both hands and
encourage the dog with soft eye contact.
•
Allow the dog to pull away and/or avoid the eye contact.
•
If the dog moves his head before he has settled in your hands, repeat up to three times.
STOP THE ASSESSMENT if dog freezes, hard stares and/or growls or tries to bite. Proceed
to the Food and Toy Behavior Items if additional information is desired.
insights gained from item one:
To determine how the dog responds when lightly restrained and given soft
yet direct eye contact from a stranger.

21
the SAFER
™
assessment item by item
scoring:
Dog leans forward or jumps up to lick the Assessor’s face with tail wagging, ears back and eyes
averted. [Enter “1”]
Dog’s eyes are averted, with tail wagging and ears back. He allows head to be held loosely in
Assessor’s cupped hands. [Enter “1”]
Dog holds gaze with soft eyes, soft body. He allows head to be held loosely in Assessor’s cupped
hands. Dog holds gaze for three full seconds. [Enter “1”]
Dog’s eyes are averted. His ears are back, his tail is down, and he has a relaxed body posture.
Dog allows head to be held loosely in Assessor’s cupped hands. [Enter “1”]
Dog’s eyes are averted. His body posture is stiff and fearful, his tail is low and not moving. He
allows head to be held loosely in Assessor’s cupped hands. [Enter “2”]
Dog pulls out of Assessor’s hands each time without settling during three repetitions.
[Enter “2”]
Dog jumps on the Assessor, consistently rubs his shoulder on the Assessor, and will not allow
Assessor to conduct the assessment. [Enter “3”]
Dog holds eye contact while remaining motionless with ears forward. His body is stiff and becomes
stiffer as assessment progresses. [Enter “4”]
Dog freezes and/or growls or tries to bite. [Enter “5”]
Note behaviors observed before, during or after the item.
tips for success:
•
Be sure to sit either upright or tilting slightly back in the chair. Do not lean
forward and loom over the dog.
•
When assessing on the floor with a small dog, do not sit cross-legged
because it does not facilitate moving away quickly.
•
Do not pull or push dog into position. Use hand movements or voice to
coax the dog into position.
•
Use the same hand to control the excess leash and to grasp the collar
at the side of the neck.
•
Do not hold the dog’s head in place. Allow him to turn away to
avoid eye contact.

item 2: sensitivity
•
When the Look item is complete, Assessor will move directly
to the Sensitivity item. Sit upright in the chair with legs
moderately spread and feet flat on floor. (Kneel on the floor
if the dog is small.)
•
Coax the dog to stand perpendicular to Assessor, centered
in front of Assessor’s knees. The dog can stand or sit for
this item.
•
If the dog’s body is oriented to the right, gather the leash in
your right hand and grasp the collar with your right hand,
fingers facing towards the dog’s rear. Brace your right elbow
against your knee in order to control the dog’s head. If the
dog’s body is oriented to the left, gather the leash in your left
hand and grasp the collar with your left hand, fingers facing
towards the dog’s rear. Brace your left elbow against your
knee in order to control the dog’s head.
•
With your free hand, grasp (with pressure slightly more than
normal touch) and lift and twist handfuls of skin and fur in a
kneading motion, starting at the neck, following an inch or two
outside the spinal column, working down the dog’s body past the tail to the flank and back up again.
•
Execute the “down and back” pattern twice.
STOP THE ASSESSMENT if dog freezes and his eyes grow hard, if he head flips and
mouths with extreme pressure, growls, or he attempts to bite. (Assessment item continues if dog is
mouthing with light to moderate pressure.) Proceed to the Food and Toy Behavior Items
if additional information is desired.
22
the SAFER
™
assessment item by item
insights gained from item two:
To determine the dog’s touch sensitivity. Fearfulness toward new experiences
may be noted as well.

scoring:
Dog leans into the Assessor, eyes soft or squinty, soft and loose body, open mouth. [Enter “1”]
Dog stands still and accepts the touch, his eyes are averted, and his tail is in neutral position with
relaxed body posture. Dog’s mouth is likely closed for at least a portion of the assessment item.
[Enter “1”]
Dog displays high energy and movement, but it is directed toward getting closer to the Assessor.
His body is soft, likely panting, may jump up between attempts to lick Assessor. [Enter “2”]
Dog is active and focused on the Assessor and all other stimuli available. His body is soft, likely
panting, likely to display high movement between attempts. [Enter “2”]
Dog stands still and accepts the touch, his eyes are averted, his tail is between his legs, body stiff,
mouth closed, lip long, ears likely back, may lip lick. [Enter “2”]
Dog repeatedly turns toward the Assessor’s hand, with loose body and open mouth, mouths the
hand, but does not apply pressure. Or, dog licks hands while lips are long. [Enter “2”]
Dog is not fearful and is struggling to get away. The dog is not focused and is in constant
movement, unconnected to the Assessor. [Enter “3”]
Dog stands tall and square. His tail perpendicular to spine, mouth closed for the majority of
assessment item. [Enter “3”]
Dog repeatedly turns toward the Assessor’s hand with a very fast head movement. If able, he
muzzle punches the hand. His body is stiff and he has a closed mouth with a short lip. [Enter “4”]
Dog freezes, growls or tries to bite. [Enter “5”]
Note behaviors observed before, during or after the item.
23
the SAFER
™
assessment item by item
tips for success:
•
When necessary, stand up and/or take a few steps to help get the dog
into position.
•
Lean over the dog as little as possible.
•
Kneading movement should be firm but not painful to the dog.
•
Make sure the kneading action is on the side opposite to the Assessor’s
knees so that if the dog attempts to bite, he will turn his head away from
Assessor’s body, not toward it.
•
If the dog attempts to bite, stand up quickly and push chair away to avoid
falling over it. (This is why a light folding chair is preferred to any other
kind of seating.)
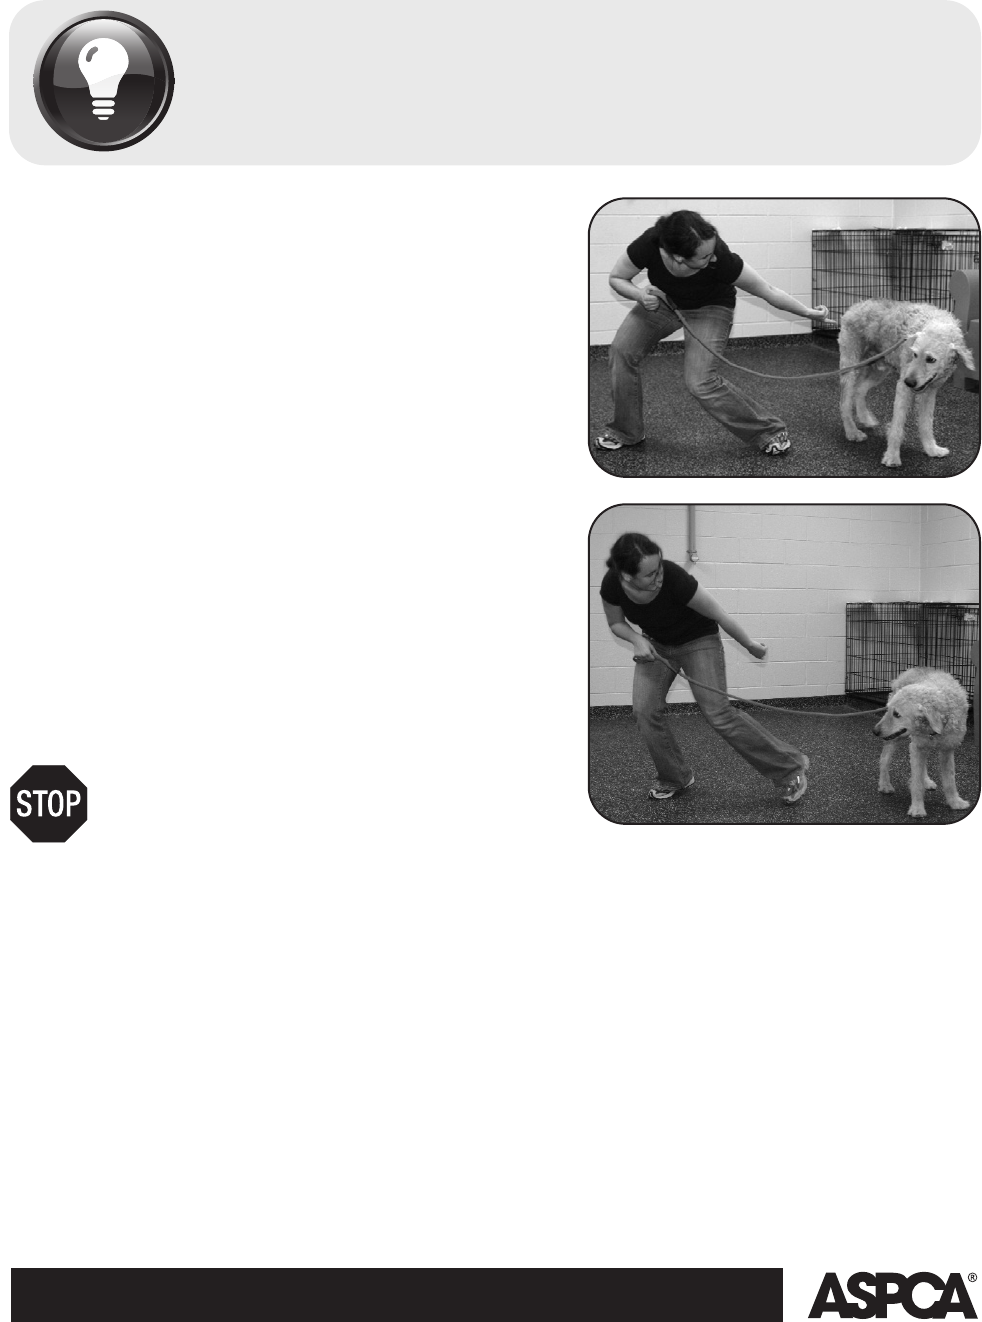
item 3: tag
•
Stand and quietly move chair to the edge of the room.
•
When standing sideways to the dog, in a high-pitched happy
voice say, “Do you want to play?”
•
Begin moving around the room with the dog, remembering to
keep the leash loose and continuously engaging the dog with
a playful voice (remain engaged until the item has ended).
•
Then with body lowered by slanting sideways away from the
dog and bending at the knees, tag dog’s rear flank with two
fingers and say “POW!”
•
Dog does not have to be engaged with the Assessor in order
to be tagged.
•
After the tag, side step away from dog. Be aware of the leash
tension. (Keep the leash loose. Dog must have the choice to
move away from the Assessor.)
•
Observe the dog’s response.
•
Repeat two more times if it is safe to do so.
•
End the item by crouching down or sitting in the chair at an
angle to the dog and then observe the dog’s behavior.
STOP THE ASSESSMENT if dog growls or
tries to bite. Proceed to the Food and Toy Behavior
Items if additional information is desired.
24
the SAFER
™
assessment item by item
insights gained from item three:
To determine the dog’s response to movement and sound stimuli. To identify
dogs with potential dominance aggression or fear aggression.

25
the SAFER
™
assessment item by item
tips for success:
•
Do not drag the chair when moving it out of the way.
•
Be sure to keep your body angled away from the dog at all times.
•
Keep leash slack at all times so the dog has the choice to move away
(flee) instead of feeling trapped and forced to engage.
•
Use a playful, high-pitched voice.
•
Never loom over the dog.
•
Keep body low, angled away from the dog when moving in to tag.
•
Tag should be quick and light on dog’s rear flank, using just the fingertips.
•
If the dog becomes aggressive, immediately become still, angled away
from the dog.
•
If dog charges, quickly gather up excess leash and using both hands,
hold dog out at arm’s length until he settles down.
•
Be sure to keep leash loose even after the Tag portion has ended.
scoring:
Dog assumes play position and joins the game. Or dog indicates play with huffing, soft ‘popping’
of the body, etc. Dog might jump on Assessor once play begins. [Enter “1”]
Dog stands with his tail low and wagging, and comes toward the Assessor in a friendly manner
when the Assessor ceases moving. [Enter “1”]
Follows at end of leash, body soft, or low and a bit fearful. [Enter “1”]
Dog is fearful but unresponsive when touched. Approaches the Assessor when the game ends.
Dog is likely crouching, may have long lip or lip lick. [Enter “2”]
Dog is not fearful but is unresponsive to the Assessor, and approaches the Assessor at the
end of the game (may need coaxing to approach). He is focused on stimuli other than the
Assessor. [Enter “2”]
Dog repeatedly turns quickly away when touched, or repeatedly spins toward the touch, and
repeatedly tries to exit. Dog may be crouching, tail is tucked, mouth closed, body stiff. [Enter “3”]
Dog responds with his tail high, ears forward, mouth likely closed for at least half of the assessment
item, body stiff and body checks the Assessor. Dog is often focused on other stimuli in the room.
[Enter “3”]
Dog panics with vocalization combined with tail tuck, yelping and repeatedly trying to exit. (If dog
settles after 1st or 2nd tag, choose 1st “3” scoring option). [Enter “4”]
Dog stands his ground while not cornered and barks at the Assessor with ears forward, body stiff,
mouth closed and lips pursed when not barking. [Enter “4”]
Dog growls or tries to bite. [Enter “5”]
Note behaviors observed before, during or after the item.
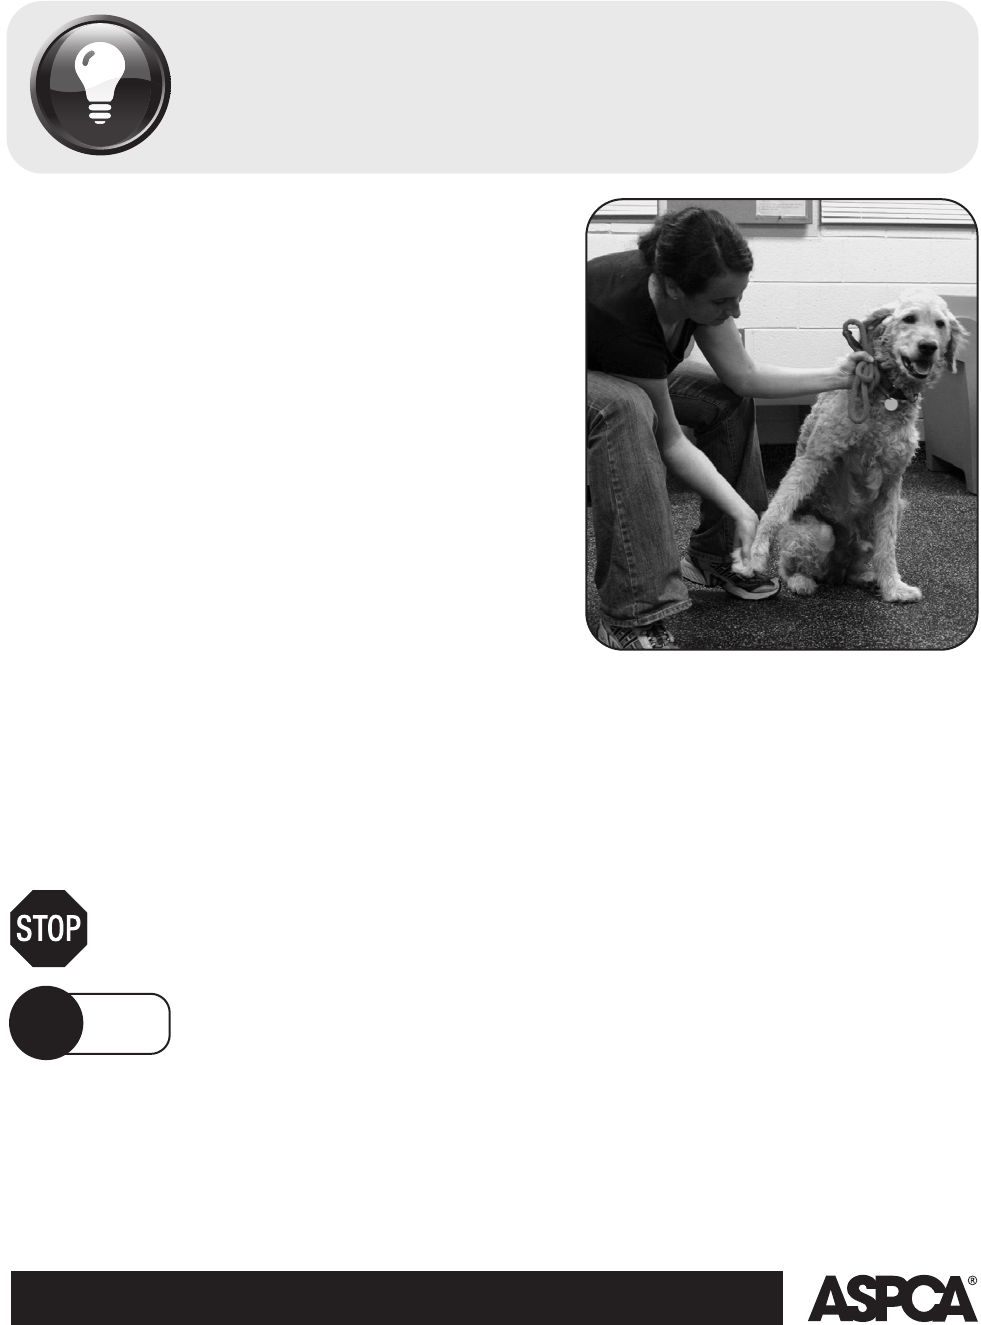
item 4: squeeze
•
Quietly place chair back into position used in “Look” and
“Sensitivity” assessment items.
•
While standing in front of chair, coax dog so that he stands
or sits perpendicular to the Assessor.
•
Sit with knees spread apart and feet on floor. (Kneel on the
floor if the dog is small.)
•
If the dog’s body is oriented to your right, with your left hand
gather excess leash and hold the collar, fingers facing
upwards towards the dog's head. If the dog is oriented to
your left, with your right hand gather excess leash and hold
the collar, fingers facing upwards towards the dog's head.
•
Brace the arm holding the leash and collar on your knee,
pushing dog out from Assessor.
•
Say the word “squeeze” and with other hand, pick
up foreleg nearest you midway down leg and lightly
run hand down to paw.
•
Using just finger pads, squeeze between the dog’s toe pads. Increase pressure on the skin between the 2
toes until the dog responds.
Allow dog to withdraw paw.
•
If there is no response in 3 seconds, stop the pressure and release the paw.
•
Score response for first squeeze.
•
Repeat for a second time, using the same verbal cue and same paw. (Score separately.)
STOP THE ASSESSMENT if dog tries to bite. Proceed to the Food and Toy Behavior Items if
additional information is desired.
26
the SAFER
™
assessment item by item
insights gained from item four:
To determine the dog’s sensitivity response, bite inhibition, acceptance of
being held or touched in a mildly controlled and unpleasant manner, and what
he chooses to do when given warning that something mildly unpleasant will
happen a second time.
If the dog struggles or immediately pulls back when you first reach for
the paw, squeeze the rear flank instead of the skin between the toes.
note
!

27
the SAFER
™
assessment item by item
Instructions for using the flank (flank is the area about
2–4 inches below the anus on the back of a dog’s thigh):
If you determine the dog has paw sensitivity issues or that it is unsafe to squeeze the paw
(according to the notes on the paw portion of the SAFER worksheet), you will use the flank.
•
Coax dog so that he stands or sits perpendicular to the Assessor.
•
Sit with knees spread apart and feet on floor. (Kneel on the floor if the dog is small.)
•
The hand nearest the dog’s head should hold both the gathered leash and the collar. For example, if the
dog’s body is oriented to the right, gather the leash in your right hand and grasp the collar with your right
hand, fingers facing towards the dog’s rear. Brace your right elbow against your knee in order to control the
dog’s head. And if the dog’s body is oriented to the left, gather the leash in your left hand and grasp the
collar with your left hand, fingers facing towards the dog’s rear. Brace your left elbow against your knee in
order to control the dog’s head. (Same position as is used in the Sensitivity item)
•
With your free hand poised just below the dog’s neck on the outside the dog’s spinal column, first say
“squeeze” (before touching the dog), then stroke the dog’s back from neck to flank and, using just finger
pads, squeeze a section of skin on the dog’s flank. Increase pressure on the flank until the dog responds.
•
If there is no response in 3 seconds, stop the pressure and release.
•
Repeat for a second time, using the same side/flank and the same verbal cue. (Score the first and second
attempt separately.)

28
the SAFER
™
assessment item by item
If the dog's behavior upon the first attempt matches any of the response choices
higher than a “2”, you should use the rear flank.
note
!
scoring:
if paw is used:
First Second
Attempt Attempt
Dog gently pulls back his paw. Dog may lick hand. [Enter “1”]
Dog does not respond at all for three seconds. His eyes are averted and his ears are
relaxed or back. [Enter “1”]
Dog gently pulls back and whimpers. [Enter “2”]
Dog gently places his open mouth over the Assessor’s hand without applying
pressure. [Enter “2”]
Dog closes mouth, becomes stiff. [Enter “3”] Note: If this behavior occurs on the
first attempt, use the flank instead.
Dog is soft in body and eye, and moves his legs/body so that the Assessor is
unable to hold the paw [Enter “3”] Note: If this behavior occurs on the first attempt,
use the flank instead.
Dog yelps repeatedly or screams. [Enter “3”] Note: If this behavior occurs on the
first attempt, use the flank instead.
Dog head flips while pulling back paw. [Enter “3”] Note: If this behavior occurs on
the first attempt, use the flank instead.
Dog reaches toward the Assessor’s hand on the second attempt while moving his
paw away when the Assessor attempts to lift it. The dog will not allow the Assessor
to assess second time. [Enter “4”] Note: If this behavior occurs on first attempt,
use the flank instead.
Dog growls. [Enter “4”] Note: If this behavior occurs on the first attempt, use the
flank instead.
Dog freezes and/or tries to bite. [Enter “5”] Note: If this behavior occurs on the first
attempt, use the flank instead.
Note behaviors observed before, during or after the item.

29
the SAFER
™
assessment item by item
tips for success:
•
Move the dog into position before sitting down or lure him into place using
voice and hand movements. Do not physically force dog into position.
•
Don’t lean or reach over the back of the dog. Use the front paw closest to
the Assessor.
•
Do not hold onto the foot if the dog wants to withdraw it.
•
Apply pressure with fingertips only, never use fingernails.
•
Repeat twice on the same side (paw or flank) unless it is unsafe to do so.
scoring:
if rear flank is used:
First Second
Attempt Attempt
Dog sits, mouth open or lip long. [Enter “1”]
Dog does not respond at all. [Enter “1”]
Dog gently places his open mouth over the Assessor’s hand without applying
pressure. [Enter “2”]
Dog closes mouth, begins to purse lips and becomes stiff. [Enter “3”]
Dog head flips while moving hip away. [Enter “3”]
Dog growls. [Enter “4”] Note: If this behavior occurs on the first attempt stop the
assessment. Proceed to the Food and Toy Behavior items if additional information
is desired.
Dog tries to bite. [Enter “5”] Note: If this behavior occurs on the first attempt stop
the assessment. Proceed to the Food and Toy Behavior items if additional
information is desired.
Note behaviors observed before, during or after the item.

item 5: food behavior
•
Have the Observer hold the dog on leash.
•
Quietly move chair to the edge of the assessment space.
•
Place bowl containing a mixture of kibble and canned food
on the floor and slide it within the dog’s reach.
•
Have the Observer hold the dog on leash, with some slack,
standing slightly behind and to the side of dog.
•
Quietly move chair to the edge of the assessment space.
•
Place bowl containing a mixture of kibble and canned food
on the floor and slide it within the dog’s reach.
•
Allow the dog a few moments to begin eating and “own”
the bowl.
•
Assessor then approaches the dog head-on saying, “Give me
that food!” in a normal tone of voice (not high or low pitched).
Assessor shifts to stand sideways to the dog, and reaches
out and places Assess-a-Hand
®
in the bowl, moving the bowl
approximately one foot toward Assessor.
•
Observer allows some slack in the leash making sure dog
cannot reach the Assessor, but can follow the food dish
should he choose to do so. The dog should not feel any
tension on the leash.
•
Assessor backs away with Assess-a-Hand
®
behind her and
allows dog to resume eating.
•
Assessor repeats, “Give me that bowl!” and waits a moment to see if dog withdraws.
•
Assessor places Assess-a-Hand
®
in bowl and gently pushes head away from bowl, first pushing the right
cheek then pushing the left cheek.
30
the SAFER
™
assessment item by item
insights gained from item five:
To identify food aggression.(This item was initially designed by Sue Sternberg
and used in her Assess-a-Pet™ assessment.)

31
the SAFER
™
assessment item by item
tips for success:
•
Dog should not be fed within two hours prior to the SAFER™
assessment.
•
Have food bowl prepared before the SAFER™ assessment
begins. There should be enough food in the bowl to allow the dog
to eat for two minutes.
•
Make sure to give the dog enough time to really engage in eating
before trying to take the food away.
•
If dog is not eating, try a higher value food. The higher meat content in
canned cat food can be a good addition for finicky eaters.
•
Be sure to give the verbal warning (“Give me that bowl!”) when
reaching for the bowl the first time and before reaching for the bowl
the second time.
•
When moving toward the dog, hold the Assess-a-Hand
®
as you would
your own hand. When backing away, put it behind you.
•
If the dog does not eat, repeat the Food Behavior and Toy Behavior items
12 to 24 hours later. Both items must be conducted at the same time.
scoring:
Dog lifts head and ceases eating when you reach to pull the bowl away or push him out. [Enter “1”]
Dog calmly allows the food to be moved, follows the dish, but does not interfere with the dish’s
movement. Dog’s body is soft and loose, eyes soft, tail neutral. He lifts his head when hand is
pushed against his cheek. [Enter “1”]
Dog follows the dish with his tail down, body likely a bit stiff. Dog lifts head after a bit of pressure
from hand to cheek. [Enter “2”]
Dog follows the dish, his tail between his legs, ears are forward. His body is stiff. Dog does not lift
his head from the bowl when hand is applied to his cheek. [Enter “3”]
Dog gulps food, begins to eat faster and with bigger bites, body stiff. He does not lift head when
hand is applied to cheek. [Enter “3”]
Dog freezes and/or growls. [Enter “4”]
Dog tries to bite. (Use chart on the worksheet to identify level of bite attempt/bite.) [Enter “5”]
Note behaviors observed before, during or after the item.

item 6: toy behavior
part 1
•
Observer continues holding dog’s leash slightly behind and
to the side of the dog.
•
Assessor shakes or squeaks first toy and tosses onto floor
within dog’s reach.
•
Give dog a few moments to get invested in play with toy.
•
If dog does not engage in first toy, give some brief verbal
encouragement (“Want to play?”), shake/squeak and toss a
second toy of a different type about a foot away from the first
toy, still within reach for the dog.
•
Assessor approaches from the front and says “Give me that toy!” while reaching for it with Assess-a-Hand
®
.
(Similar to food bowl approach.)
•
Observer allows some slack in the leash but makes sure dog cannot reach Assessor. The dog should not
feel tension in the leash.
•
Note dog’s response to the toy he was most invested in if two different toys were used.
•
After the item is complete, the Observer should move the dog away from the toy(s). When the dog is out of
reach of the toy(s), the Assessor should pick it (them) up.
optional part 2
•
Observer continues holding dog's leash slightly behind and to the side of the dog.
•
Assessor tosses or gently rolls a rawhide within the dog's reach.
•
Give dog time to engage in chewing rawhide.
•
Approach from the front and say “Give me that toy!” while reaching for rawhide with the Assess-a-Hand
®
.
•
Note response to rawhide removal.
32
the SAFER
™
assessment item by item
insights gained from item six:
To identify possible possession aggression and any behaviors which could
benefit from behavior modification now to prevent future problems including
freezing, blocking access to toy with body, snapping, growling or giving the
Assessor hard eyes.

33
the SAFER
™
assessment item by item
tips for success:
•
Make sure food bowl has been picked up from previous assessment item.
Be sure that any kibble that was spilled onto the floor during the Food
Behavior item is also picked up.
•
Observer must watch to keep leash slack throughout assessment item
unless dog threatens Assessor.
•
Assessor should encourage play with a slight bend at the waist while
shaking or, if possible, squeaking the toy. Be sure not to bend over dog.
•
If second toy is necessary, the shape and texture should be very different
from the first one offered.
•
Verbal encouragement should be brief and end once toy is tossed.
•
Make sure not to throw second toy directly atop first toy.
•
Use a brusque tone when saying “Give me that toy!” but don’t be
overwhelming or intimidating.
•
Watch for how/where the dog places his body in relation to the
toy/rawhide and Assessor. Especially note hunkering over object (body
blocking) and placing paw atop object.
•
Ideally, clean toys and new rawhides are used with each dog. Minimally,
wash the toys at least once a day and replace rawhides that have been
chewed and/or are wet/soft.
scoring:
Toys Rawhide
only (if used)
No interest. [Enter “1”]
Dog settles down close to chew, will relinquish toy or rawhide to you. [Enter “1”]
Dog settles close, keeps a firm grip and is loose and wiggly. He does not place his
body between you and the toy/rawhide. [Enter “1”]
Dog takes toy away, keeps a firm hold. His body is between you and the toy or
rawhide, and he is loose and wiggly. No growling or stiffness. [Enter “2”]
Dog takes toy/rawhide away, keeps a firm hold. His body is stiff. [Enter “3”]
Dog freezes and/or growls. [Enter “4”]
Dog attempts bite (use chart on worksheet) [Enter “5”]
Note behaviors observed before, during or after the item.

item 7: dog-to-dog behavior (optional)
Who should you choose for your helper dog? First and foremost the helper dog should be the same
gender as the dog being assessed and at least six months of age. He/she should be stable and social
with other dogs. The size of the helper dog should be within 20 pounds of the dog being assessed.
•
Observer leaves to get appropriate helper dog, (this dog should be identified prior to assessment) while
Assessor removes dog being assessed from room.
•
Observer enters empty assessment room, bringing helper dog to far end of the room. Observer then stands
still and quietly holds helper dog’s leash.
•
Assessor re-enters with dog being assessed.
•
Keep leash loose on approach.
•
Observe dog’s responses as he notices and approaches helper dog.
•
Physical contact is not necessary for this assessment item.
34
the SAFER
™
assessment item by item
insights gained from item seven:
To identify dog-to-dog aggression or potentially challenging behaviors such
as growling, hysterical barking and lunging to make known which dogs
would benefit from behavior modification and “meet and greets” or need
placement in a home without other dogs. The dog that approaches with
body held high and tail up within the first couple of seconds of approach
is more likely to have dog aggression issues at some point.
Item Seven: Dog-to-Dog Behavior is optional. Do not conduct if there are no
suitable helper dogs in the facility. Instead observe how the dog responds to other
dogs when moving him in and out of the cage and around the shelter. Make notes
in the “Behaviors observed . . .” section.
note
!

scoring:
Dog approaches the helper dog in play position. His mouth is open. [Enter “1”]
Dog approaches the helper dog submissively (head low, tail low, ears back, lip long). [Enter “1”]
Dog approaches helper dog with tail at spine level, body not stiff, ears relaxed, lip long or neutral.
[Enter “2”]
Dog does not approach the helper dog. Turns body to side in relation to other dog, or exits.
[Enter “2”]
Dog approaches the helper dog, body soft, tail well above spine level, ears forward. [Enter “2”]
Dog approaches the helper dog by rushing in with his tail high, stiff body, head tall, and ears erect.
[Enter “3”]
Dog charges the helper dog while growling or attempting to bite. [Enter “4”]
Note behaviors observed before, during or after the item.
35
the SAFER
™
assessment item by item
tips for success:
•
Only use a dog that has already been SAFER
™
assessed as the
helper dog.
•
Remember that the helper dog should be in the room before dog being
assessed is brought back for last assessment item.
•
Only the approach behavior is being observed and noted for assessment.
•
Make sure video camera is set up to catch approach behavior, not actual
dog-to-dog interaction.
Be sure to take your observational “snapshot” in the first few seconds of the
approach. Dogs do not have to touch.
note
!

36

37
utilizing
the SAFER
™
worksheet

assessor
M M D D Y Y
shelter name
date
M M D D Y Y
date entered shelter
dog’s name
sex
❑
male
❑
neutered male
❑
female
❑
spayed female
coat color
breed
dog ID number
age
observer
utilizing the SAFER
™
worksheet
The SAFER™ worksheet captures the dog’s responses for each assessment item. If aggression is noted, a
clearer picture of each response is achieved by using the chart at the end of each assessment item. This
additional information will be helpful in guiding the behavior team as it determines which dogs are candidates
for behavior modification. There is also space to capture information about how the dog behaved before,
during and after the assessment item. Behaviors such as yawning, lip licking, etc. can be valuable pieces of
information and should be captured.
First, fill in the general information at the top of the sheet before beginning the assessment.
Then, as each assessment item is conducted, choose the one response that best matches the dog’s
behavior. The realm of dog behavior responses is limitless, so those observed may not be an exact match.
Choose the one that is closest to a match, and make sure to note other behaviors observed in the space
provided marked “Note behaviors observed.” Enter the number found at the end of the selected response on
the line provided. Note that scoring options progress from least likely to aggress to the most likely to
aggress (softest behavior to stiffest behavior). Choose the response that encompasses the most
severe behavior you observed, always keeping an eye on the dog's body tension.
In the event that the dog responds in an aggressive manner, check or circle all the body postures observed in
the chart following the scoring options.
Example of box at the bottom of Item One: Look
38
utilizing the SAFER
™
worksheet
If aggression is noted, use the checklist below to evaluate the dog’s response. You can use this
information to help best guide the behavior team regarding potential behavior modification and
management (see guide for protocols).
❑
Body stiff
❑
Eyes hard
❑
Vocalizes
❑
Exposes teeth
❑
Freeze
❑
Ears back
❑
Dog growls
❑
Snaps no contact
❑
Tail up
❑
Ears forward
❑
Attempts to bite
❑
Tail down

After the final item has been scored, review the scores and mark an “X” in the corresponding box for each
assessment item in the large chart on the last page of the worksheet. The name of each item runs horizontally
along the top of the box in the order they are conducted. The numbers 1-5 represent the possible scores for
each item.
Note that shaded text appears in some of the boxes. These are designed to help guide the Assessor
regarding both safety and potential behavior modification.
P = Potential behavior modification and/or management
R = Behavior modification and/or management strongly recommended
S = STOP item for safety reasons. Behavior modification and/or management strongly recommended.
Move to food if SOP suggests
For example if, during the Look Item, the dog averted his eyes and was stiff and fearful, the score is “2,” the
Assessor would mark an “X” in “Look” column at row 2 as follows:
If the dog was ”stiff but held eye contact,” the score would be “4.” The “X” would be placed over the letter “R”
under the “Look” column.
If the dog froze and growled or attempted to bite during the Look item, the score would be “5” and the “X”
would be placed in the box of the far left column, over the letter “S.” The Assessor would either end the
assessment at this point or move to Food or Toy Behavior Items if additional information on the dog’s
behavior is desired. This additional information may help determine the dog’s placement options.
The Sensitivity, Tag, Squeeze, Food Behavior and Toy Behavior items contain responses that may be scored
“P.” These responses indicate arousal, fear or inhibited aggression on the dog’s part. The dog indicates a
discomfort level with the assessment that might be modified through some behavior modification.
39
utilizing the SAFER
™
worksheet
1
2
X
3
PPPP P PP
4
RRRRRRRRP
5
SSSSRRRR
Look Sensitivity Tag Squeeze 1 Squeeze 2 Food Toy Rawhide Dog

40

role of the observer
41

42
role of the observer
observation of behavior: Oftentimes behaviors
are not visible to the Assessor, such as tail position
in the Look item, or eyes and ears in the Sensitivity
item, and it is the job of the Observer to calmly
and quietly communicate these to the Assessor.
Comments about the perceived state of the dog (“he
seems to like it,” “he seems happy”) are subjective
statements and are not of use to the Assessor, and
might even put her at risk.
fill out worksheet: The worksheet should
be filled out after each assessment item is
conducted. The Observer should keep notes
regarding behavior both during and between
each assessment item. The Observer should
discuss the dog’s behavior for each item with the
Assessor to determine which choice best describes
the dog’s behavior for each item.
video recording: The video camera should have
a wide angle option, and should be placed where
it will not easily be knocked over. The Observer
should turn the camera on at the beginning of each
assessment and identify the name, breed and ID
number of the dog being assessed. The Observer
should turn the record function off before leaving
to get the helper dog, and turn it back on when
they return to the room. The camera should again
be turned off at the conclusion of the dog’s SAFER™
assessment. The Observer should keep a log of
which dogs are recorded on each particular
tape or DVD, so that they are easy to find in the
future, if necessary.
holding for food bowl and
toy behavior items: The Observer holds the
leash for both the Food and Toy Behavior items.
It is important that there is slack in the leash during
the items, so that the dog feels he has a choice as
to where to move. At the same time, the Observer
must always be aware of the length of leash
available to the dog, and the safety of the Assessor.
Should the dog aggress, the Observer is responsible
for safely containing the dog to avoid injury. The
Observer should hold the leash with two hands,
being careful not to stand in a corner or against a
wall, which would make defensive handling difficult.
handling the helper dog for dog-to-dog
item: After the Toy Behavior item is complete, the
Observer should give the dog’s leash back to the
Assessor and fill out the worksheet for the previous
item. The Observer will then leave to collect the
helper dog. After the Observer leaves, the Assessor
will also exit the room with the dog being assessed.
The Observer should be sure the helper dog is of
the same gender as the dog being assessed, and is
appropriate with other dogs. The Observer should
enter the assessment room first with the helper dog
and stand far from the door. Ideally, the Observer
and helper dog are about 10-15 feet from the
doorway. The Observer will stand still and hold the
leash while observing the behavior of the assessed
dog as he enters the room. Both Assessor and
Observer should take a mental “snapshot” of the
assessed dog’s behavior upon the initial approach.
helping to defuse aggression when
necessary:
On very rare occasions, a dog may
display a high level of aggression. The Observer
should always be ready to defuse this aggression.
One useful tool is the clipboard used to hold the
worksheet. Slamming the clipboard to the ground
can produce a very loud noise that will likely distract
the dog so that the Assessor can regain a safe
position. We strongly suggest keeping SprayShield
(formerly Direct Stop), a bucket filled with water
or even a sound canister handy as tools to help
defuse aggression.
assisting in proper handling technique:
The Observer should communicate to the Assessor
any checks or improvements needed in handling. By
working as equal partners, the assessment is more
likely to be accurate and effective.
role of the observer
SAFER™ was specifically designed to be
conducted by two staff members, an Assessor
and an Observer. The Observer role is vital. The
Observer serves the following purposes:
•
Observes dog behavior that is not visible
to Assessor
•
Keeps notes regarding behavior and fills out
the worksheet
•
Takes responsibility for videotaping the
assessment
•
Holds dog for food bowl and toy behavior items
•
Handles helper dog in dog-to-dog behavior item
•
Helps defuse aggression when necessary
•
Assists in assuring proper handling technique

43
SAFER
™
certification

SAFER
™
certification
The SAFER™ assessment is a tool that requires
strong handling skills, body awareness, and a keen
understanding for objectively observing canine
behavior. When the assessment was first introduced
on a national level, there was no certification
process. Over time it became apparent that a
certification process was necessary to ensure
that Assessors have the skills to conduct the
assessment correctly. Certification is achieved
when an ASPCA
®
SAFER™ reviewer validates an
Assessor’s skill in properly handling dogs and
accurately scoring the appropriate behavior
exhibited by the dog. Review is accomplished
by viewing submitted video of assessments and
corresponding worksheets. The certification is valid
for one year after which recertification is required.
SAFER™ certification does not certify the
organization that employs the person; rather it is
certification of an individual to show that they have
the skills necessary to conduct the assessment.
Certification helps ensure that an Assessor has the
knowledge and skills to maintain her safety when
handling a potentially aggressive dog. Improper
handling and technique makes the Assessor
vulnerable to a bite should the dog choose to
aggress. Equally as important, proper handling
ensures that the dog is exhibiting behavior that is
more likely predictive of future behavior. Inappropriate
handling can provoke responses that are not
reliable, resulting in potential inappropriate choices
regarding placement of the animal.
To apply for certification, the Assessor submits
three full assessments on video and copies of the
corresponding worksheets for review by the
ASPCA
®
. The video is reviewed and feedback is
given pertaining to technique and canine behavior
scoring skills. It is possible that certification may not
be achieved in the first attempt. In this case, the
reviewer will inform the Assessor of modifications
needed in technique and observation of behavior to
properly implement the assessment. The Assessor
can submit a second tape. When the Assessor
consistently demonstrates strong techniques and
objective behavior observations, she will be certified
for one year.
practicing the assessment prior to a
submission for certification
It is highly recommended that the assessment is
practiced for 2–4 weeks before submitting a tape
for certification. Prepare by doing the following:
1. Observe dog playgroups at the shelter and
practice reading canine body postures and
behavior, specifically: tail posture, ear posture,
body posture, eye shape, lip length, invitations
to play (play bow, huffing, and popping body
movements), body slams, shoulder rubs, etc.
Use the glossary in this guide and the video
glossary on the SAFER DVD to aid in objectively
identifying the behaviors.
2. Practice the assessment on resident/safe dogs.
3. Identify the most challenging assessment item,
such as the Tag item, and be sure to practice
proper handling with safe dogs.
44
SAFER
™
certification
SAFER™ certification
does not certify the
organization that the
person is employed by;
rather it is certification
of an individual to show
that they have the skills
necessary to conduct
the assessment.

4. Videotape all practice assessments and review
them multiple times, critiquing both the handling
skills and the canine behavior scoring skills of the
Assessor. We highly recommend you use our
SAFER Certification Checklist (image below and
checklist template is included in the Reproducible
Forms and Templates section of this guide) when
reviewing your practice assessments as this is
the very document used by the SAFER reviewers
to ensure your handling is correct. Other people
from your facility who are also pursuing certification
can critique the assessments for their own practice
and to help you become certified. Over the
weeks, improvement in handling and behavior
observation skills should be noted.
45
SAFER
™
Certification

handling technique
required for certification
Proper handling as a SAFER™ Assessor is crucial
in two ways: 1) helping maintain safety if a dog
chooses to aggress and, 2) in identifying a valid,
predictive behavioral response from the dog. It is
for those reasons that the Assessors are expected
to consistently use proper handling techniques.
instructions for sending in
a submission for certification
When submitting a tape for certification, there are
strict guidelines that must be followed to ensure a
smooth and timely review process. When improper
submissions are made, the review is delayed and
in some circumstances the tapes are not reviewed.
Please follow the instructions in the Reproducible
Forms and Templates section to successfully make
a submission.
46
SAFER
™
certification
This is the certification certificate you will receive upon successful submission.

47
behavior modification
and management
protocols

48
behavior modification and management protocols
introduction to behavior modification
protocols
When conducting SAFER™, there is an opportunity to observe and identify behaviors that could be
challenging to adopters and/or shelter staff. The following is a set of tested behavior modification protocols
for dogs and puppies which, when coupled with adopter support and enrichment, should enhance the dog’s
adoptability and safety level in the home and community. The protocols provided here relate to behaviors
identified through the SAFER™ assessments.
first steps
Before conducting behavior modification and management work, three
important programs should be in place in your facility.
•
Program 1 is a general enrichment program
•
Program 2 is adoption follow-up
•
Program 3 is a standardized program for analyzing progress of animals
receiving interventions.
The ASPCA
®
strongly recommends that Program 1 (enrichment) and Program 2
(adoption follow-up) be put in place before focusing on behavior modification. Together,
these programs help ensure success by supporting the needs of both your dogs and adopters.
One standard definition of enrichment is “Additions
to an animal's environment with which the animal
voluntarily interacts and, as a result, experiences
improved physical and/or psychological health.”
It is important to support dogs in your care with
enrichment opportunities. There is a wealth of
research that demonstrates that stress levels
increase when enrichment is not provided to
animals in shelters. Behaviors such as hyper-
arousal, depression, and obsessive/compulsive
behaviors are not uncommon when enrichment is
not present. Dogs and puppies may display
behaviors that make adoptions more challenging
simply because they are not given the opportunity
to chew, exercise their bodies and minds or
have the opportunity to make choices in their
environment. This is especially true for canines
with behavior challenges.
In general, overall enrichment should include:
•
Daily walks (controlled and monitored)
•
Social interaction (both human and canine
when possible)
•
Food games (using food/treat-dispensing toys
such as KONG,
®
Tug-a-Jug™, etc.)
•
Opportunities for sensory stimulation such as
sound (classical music), odor (lavender, spices,
and even a bit of bedding from the cat area),
and textures (feel a brush against the skin, soft
bedding, and hard Boomer Balls
®
to nose
around the play yard).
program one
enrichment

49
behavior modification and management protocols
It is important to have good post-adoption support
for your adopters. This is especially true for the
more challenging matches, and for dogs and
puppies with more challenging behaviors. Ideally,
it’s best to follow up with every adopter, but when
time and resources are in short supply, start by
following up with:
•
Adopters who chose a dog with behavioral
challenges
•
Adopters who chose a dog outside their color
category (for those shelters employing MYM
Canine-ality™)
Reach out to your adopters the third day after the
adoption, the third week after adoption, and the
third month after adoption. Be sure to have a list of
resources available, such as trainers and certified
applied animal behaviorists in your area, in the
event an adopter needs assistance with specific
issues. Providing follow-up support is one of the
best ways to help keep the bond between adopters
and their new family members strong.
A vital part of any management/behavior-
modification program is monitoring the progress
of the chosen intervention for the individual
dog or puppy. It is important to remain objective
not only when conducting the SAFER™
assessment, but also when conducting behavior
modification protocols. The ASPCA
®
strongly
recommends keeping a behavior log of each
behavior modification session. The template
provided in the Reproducible Forms and Templates
section is designed to easily keep track of the
number of sessions, the positive reinforcers used,
and progress toward the goal. The template makes
it easy to troubleshoot when a program is not
moving forward as planned. One can read all of the
dog’s logs to find what reinforcers were successful,
what time of day is more productive, etc. Review the
previous day’s logs before beginning each session.
Once you have these three programs in place,
you are ready to begin working with the following
set of protocols.
program two
adoption follow-up
program three
standard program
for tracking progress

50
behavior modification and management protocols
program four
behavior modification
protocols
who should be conducting the protocols?
It is strongly recommended that those implementing behavior modification programs have a solid
working knowledge of learning theory. Certified Pet Dog Trainers are ideal candidates.
Before conducting behavior modification and management work, be sure to have programs one,
two and three (enrichment, adoption follow-up and a system for tracking progress, respectively)
in place in your facility.
In the SAFER™ assessment, some scores of
“3,” “4,” and “5” indicate behavior modification
is needed prior to adoption. The following
protocols are specific to behaviors observed
during the SAFER™ assessment. It is vital to
track the dog’s progress when implementing
a behavior modification protocol. Use the
“Behavior Log” to monitor the protocol’s
effectiveness and as a communication tool
for staff.

51
behavior modification and management protocols
food guarding program
The goal is to have the dog learn to be relaxed around the food bowl, lifting his head
and even backing up from the bowl when you approach.
program instructions:
1. Give dog some mildly valuable food such as a dry kibble that is a bit tastier than what he has as free
feed. Prepare some tasty treats (balled up canned food works well). Approach the food bowl; and as
long as he is not aggressive (i.e. stiffening, hard stare, guarding bowl), drop in a treat. If he displays
aggressive behaviors, wait until he is done, refill his bowl and present it to him again. During your first
session you may need to fill the bowl a few times before you are able to capture a relaxation in body.
2. After 5-7 repetitions, you can now expect him to lift his head when you approach — even just a tiny
bit — before dropping in the next treat.
3. When he is reliably lifting his head for food, you will begin
to bend down, as if to lift his bowl, and then drop the treat.
Watch carefully for stiff behavior.
4. Increase the amount you bend.
5. At this point, you should now be able to take the bowl and
exchange for something better.
6. Practice with at least two other Assessors, in two other
physical spaces before the dog is placed on the adoption
floor. In other words, the dog should be tested in at least four
different spaces (one being his home kennel) by a total of
three or more people.
7. Daily behavior logs must be kept for each dog on the program.
All dogs placed for adoption from this program must be clearly
identified so adopters can be properly counseled, go home with
the food-guarding program and be flagged for follow-up. Plan on
a minimum of two 4-5 minute sessions a day.
when the dog is adopted: Review the “Food Program” instructions with the adopter which can be
found in the Reproducible Forms and Templates section. Remember to follow up with the adopter at
three days, three weeks and three months post-adoption.
identifying dogs for the program:
•
Dog is SAFER™ “1” or “2” on all parts of the
SAFER™ assessment other than the food behavior.
•
The dog does not shoulder rub or body slam during
any part of the assessment.
•
The dog does not body-block, place foot in bowl,
or urinate in bowl.
•
The dog was assessed with two toys and no
possession-type behaviors were observed.
before you begin:
•
Be sure the dogs are given enrichment and
walks daily.
•
All dogs entering the food program should be
on free feed (access to a full bowl of food at all
times) for at least 24 hours before starting this
program. Dogs must be free fed consistently.
If they are not on free feed, the protocol is much
less likely to be effective.
behavior modification
protocols
One of a series of ASPCA
®
Behavior Modification Protocols
developed by Emily Weiss, Ph.D., CAAB

52
behavior modification and management protocols
how does the clicker work?
It can be difficult to deliver food at the exact moment you want to reinforce a behavior. A conditioned
reinforcer, such as a clicker or the word “yes”, tells the dog the reward is coming and marks the
behavior you want the dog to repeat.
The clicker is a novel and consistent sound that does not change with our mood or gender.
Since dogs don’t find clicks or words inherently reinforcing, you will need to charge, or give
meaning to, your clicker. First, we teach the dog that every time he hears the clicking sound,
he gets a treat. Once he understands that clicks are always followed by treats, the click becomes
a powerful feedback tool. Now the handler can click (to give feedback) the instant the dog does a
select behavior. For example, if you want to teach a dog to sit, you click when his rear hits the floor
and then immediately deliver a treat. With repetition, the dog learns that sitting earns rewards.
“charging” your clicker
Realize that in most instances the dog has not heard this sound before; therefore, it currently has
no meaning. Here is how to change that:
1. Start with a container of soft and smelly treats cut up about the size of a pea nearby.
2. Place the clicker in your hand.
3. Click once and immediately reach for a treat and feed the dog.
4. Click again and offer another treat.
5. Continue to repeat the click-and-treat combination at varying intervals, sometimes after a few
seconds, sometimes after one minute.
6. Repeat 20-30 more times.
tips:
•
Remember to click just once and follow every click with a treat. After you click, deliver the treat
to the dog’s mouth as quickly as possible so it is easier for him to make this connection.
•
When you are clicking, keep your body still and quiet. Avoid reaching for the treats as you are
clicking or saying “good boy!” while you click. We want the dog to learn that the click is the
important thing, so click THEN treat and praise.
•
Be generous. Lots of clicks/treats in the beginning will help the dog make the association and help
him want to stay in the game. Keep the sessions short (5 –10 minutes.)
•
The dog will start to turn toward you and look expectant when he hears the click — which means
he understands that meaning of the clicker. Once he understands this link between his behavior
and getting a click, he is ready for training.
behavior modification
protocols
how does the clicker work
The goal is introduce the dog to a conditioned reinforcer. A conditioned reinforcer
tells the dog a reward is coming and marks the behavior you want the dog to repeat.
(Required technique for working with touch-sensitive dogs – see page 53)
One of a series of ASPCA
®
Behavior Modification Protocols
developed by Heather Mohan-Gibbons, MS, RVT, CPDT, ACAAB

behavior modification and management protocols
behavior modification
protocols
program instructions:
1. Identify where the dog is touch-sensitive by reviewing the SAFER™ assessment and notes along with
any other available information (relinquishment survey, vet exam, notes from kennel staff and volunteers).
2. Define your goals. Is your goal for the dog to be completely non-reactive, even to a strong tail pull? Is it for
the dog to remain relaxed and open-mouthed even when he is restrained for a vet hold? Write down your
goal behavior; then note where the dog is now with regard to the goal behavior. Plot the distance between
the starting place and the goal, and then break that distance down into easy-to-achieve steps. Start at step
one and use the behavior log to keep track of progress.
3. Identify what the dog finds motivating. Let the dog tell you how he wants to be “paid” for learning new
behavior. Have a variety of rewards on hand: liver treats, hot dogs, cheese, tennis balls. Track what
the dog prefers on the Behavior Log. Reward with higher value treats when the dog gives a particularly
relaxed response and as you get closer to the touch sensitive area. Otherwise, vary the treats so the dog
never knows what’s coming.
4. Introduce the dog to a conditioned reinforcer such as a clicker or the word “yes.” Refer to Clicker Training
protocol included in this chapter (page 52).
5. Begin by touching the dog in a place where you know he is not sensitive. You want to start far away
from the sensitive area and move closer over time (multiple sessions) while he stays non-reactive.
For example, if the dog head flipped when you touched his flank area during the Sensitivity item, begin
training by first touching his shoulder. This way you’ll be setting him up for success — a light touch on the
shoulder should bring about a non-reactive response, and you will
click and treat that response. The sequence is this: You touch, dog
stays relaxed, click, and then treat. Repeat often. Go slowly and
work at each level (refer to your goal and easy-to achieve steps)
with the dog relaxed. You know you have moved too quickly if the
dog changes from relaxed to stiff behavior. If that happens, do not
correct the dog; instead view it as feedback that he is not ready for
you to go that quickly. Make note of where it was that you touched
him when he became stiffer, go back one step, and continue the
session. End each session on a positive note.
6. Progress at a slow place, paying attention to feedback given
to you by the dog, towards the goal behavior. You may choose
to vary the speed, pressure or location of the touch depending
on your goal. If you choose to vary the touch, ensure that each
variance is tried independently. Do not try to train them all at once.
It may take weeks before the dog meets the goal behavior.
Be patient and remember to take it slow.
when the dog is adopted: Review the “Touch Sensitivity” instructions with the adopter which can be
found in the Reproducible Forms and Templates section. Remember to follow up with the adopter at three
days, three weeks and three months post-adoption.
working with touch-sensitive dogs
The goal is to decrease reactivity to touch.
53
One of a series of ASPCA
®
Behavior Modification
Protocols developed by Emily Weiss, Ph.D., CAAB and
Heather Mohan-Gibbons, MS, RVT, CPDT, ACAAB

54
behavior modification and management protocols
The rules for tug-and-drop:
1. The dog sits (or lies down) and waits for you to invite him to play (“Take it” or
“Get it”) before ever putting his mouth on the toy;
2. The dog releases the toy to you whenever you request (“Drop” or “Give”);
3. The dog takes care not to put his mouth on human skin while playing tug.
program instructions:
Most dogs will play tug with any type of toy, but tug
is most pleasurable for the human when they are
comfortable with the toy. Obtain a fleece or soft
rope toy 1-2 feet long. Handles are useful although
dogs often enjoy playing with the handles so much
that they are inclined to grab the handle, whether
there is a human hand attached there or not. A tug
toy with a bungee type handle puts less stress on
both the dog and the human.
1. Grasp the toy with one hand at each end. Ask
the dog to sit. When he does, say “Yes, get it!”
and wave the toy in front of the dog’s face or
drag it along the ground in front of him, so
that he is likely to grab the toy in the middle,
thereby avoiding your hands. When he grasps
it, verbally encourage him to play while you
move the toy back and forth, up and down, to
stimulate him to tug. Do this for 10-20 seconds.
2. The next step is to teach the dog to release
the toy on cue. Different approaches work
for different dogs. You should not shout or
intimidate the dog in order to get him to release
the toy. Say “Give” or “Drop” in a conversational
voice. Avoid repeating the cue over and over;
say it once and then take action to prompt the
dog to release. Here are a few suggestions:
a. Say “Give” and instantly stop tugging the toy
(let your arm go limp), but keep hold of it with
one hand. Say “Sit.” If the dog releases the
toy and sits, immediately say “Yes, get it!”
and entice the dog to play again. With sufficient
repetitions, the dog should learn to let go of
the toy and sit as soon as he hears you say
“give.” Eventually, you vary how long the dog
must sit before you invite him to play again.
b. Say “Give” and instantly stop tugging the toy
(let your arm go limp), but keep hold of it with
one hand. With the other hand, reach over
the dog’s head to cover his eyes. Some dogs
will release the toy as soon as you do this.
If the dog releases the toy, immediately say
“Yes, get it!” and entice the dog to play again.
With sufficient repetitions, the dog should
learn to let go of the toy as soon as he hears
you say “give,” so you don’t have to cover
his eyes. Eventually, vary how long the dog
must wait before you invite him to play again.
Sometimes ask him to sit before inviting him
to play.
c. Say “Give” and instantly stop tugging the toy
(let your arm go limp), but keep hold of it with
one hand. With the other hand, reach and
grasp the dog by his collar. Pull him forward
toward you and hold him stationary. This has
the effect of making any tugging he does
ineffective. Wait. Most dogs will drop the toy
after a few seconds. Immediately say “Yes!”
release his collar, say “Get it,” and invite the
dog to play again. With sufficient repetitions,
the dog should learn to let go of the toy as
soon as he hears you say “give,” so you don’t
have to take hold of his collar. Eventually,
tug-and-drop training
behavior modification
protocols
over-arousal
The goal is to teach self control to easily over-aroused dogs.
One of a series of ASPCA
®
Behavior Modification Protocols
developed by Emily Weiss, Ph.D., CAAB

55
behavior modification and management protocols
sometimes ask the dog to sit, after the dog
releases the toy, before inviting him to
play again.
d. Say “Give” and instantly stop tugging the toy (let
your arm go limp), but keep hold of it with one
hand. With the other hand, place a treat right in
front of the dog’s nose so that he can’t help but
smell it. Most dogs will instantly release the toy
to grab the treat. Say “Yes,” give him the treat,
and ask him to sit. When he does, say, “Get it,”
and invite the dog to play again. With sufficient
repetitions, the dog should learn to let go of the
toy as soon as he hears you say “give,” so you
don’t have to use the treat. You will still want to
reward him with a treat when he releases the
toy until the release behavior is fully learned.
Sometimes ask the dog to sit after the dog
releases the toy, before inviting him to play
again. This method is undesirable if the dog is
reluctant to play again after receiving the treat.
Some dogs are so motivated by food that they
are uninterested in play after eating a treat and
so it is hard to accomplish the tug training.
3. Repeat the sequence of tugging for 10-20 seconds,
then asking for a release, at least 10 times in
succession. Realize that for procedures “a-c,” the
reward for the dog releasing the toy is to get you to
play again. This means that, while the dog is
learning to play tug, you should instantly say “yes!”
when he releases and invite play again. Don’t waste
time praising or patting him. When a dog is into
playing tug, they usually don’t care about praise or
patting — they want to play more! For procedure
“d,” the dog has two incentives for releasing the toy:
to get the food reward and to get you to play again.
So it’s still important to get the game going again
quickly. Only when the dog promptly and willingly
drops the toy as soon as you ask, should you ask
him to sit and wait for any amount of time between
bouts of tugging.
4. If, at any time, the dog jumps forward to grab at the
toy when you have not invited him, say “Uh-uh!” and
instantly pull the toy behind your back or over your
shoulder where it is inaccessible. If the dog already
has the toy in his mouth, do what works (from above
options) to get him to release it again but don’t reward
him when he lets go. Next time, be ready so that
when he jumps forward to grab it, you can snatch it
away. Ask him to sit and wait before presenting the
toy and inviting him to “get it.” You must teach him
that he never gets the toy when he jumps for it before
you ask. If you are consistent with this, he will learn
that the best way to get you to play tug is to sit and
wait patiently until you start the game.
5. If, at any time, the dog misses the toy and puts his
mouth on your hand, instantly shriek loudly, drop the
toy, and march out of the room (time out). If there is
a door, slam it in the dog’s face. Wait a few seconds
(no more than 20-30 seconds), then return and act
like nothing happened. Invite him to play again, but
use a warning voice to remind him to be careful.
If the dog bites your hand more than a few times
(3-4) in one play session, despite implementing
time-outs, your dog may not be able to learn to play
tug appropriately. Certainly if he keeps doing this,
despite continued corrections, it’s not safe to play
tug with him. If you’re really committed to teaching
this game, use l-o-o-n-g tug toys so there’s plenty
of room for his mouth and your hands.
6. When you’re ready to end the game, follow the
same steps to get the dog to release the toy on
request, but this time, ask him to sit and offer him a
treat. While he’s eating the treat, put the tug toy
away. He should not have access to the tug toy
except when you are playing with him.
7. If the dog starts playing but then escalates to the
point where he’s no longer playing but instead is
aggressively guarding the toy, immediately cease
playing tug with him. The way to determine if your
dog has switched from play to aggression is to
watch for signs such as a stiff body, stiff tail, “hard”
eye contact and snarling (lifting/wrinkling lips while
growling). If the dog is becoming aggressive, simply
drop the toy and walk away.
when the dog is adopted: Review the
“Tug-and-Drop Training” instructions with the adopter
which can be found in the
Reproducible Forms and
Templates section. Remember to follow up with the
adopter at three days, three weeks and three months
post-adoption.

56
behavior modification and management protocols
program instructions:
•
Sit in the doorway of the cage with door open and your back to the dog, with left arm behind the
back with hand on the floor, palm up, loaded with a high-value treat.
•
Sit still, talking to the dog without looking at him, waiting for him to eat the treat in hand.
•
Once a treat is eaten, load up another one.
•
Once the dog begins to "explore" handler – sniffing hair or ears, pawing at hand instead
of running to the back of the cage – as the next treat is taken, touch the dog's chin or side
of face with one finger.
•
After a few repetitions, move to the sideways position, leaving treat hand at side.
•
After a few repetitions in that position, bring the treat hand into your lap. Before you know it,
the dog is sitting in your lap and ready to have a slip lead put on around the neck.
•
Toss a treat away from you to get the dog off your lap
and try to go for a walk.
With a dog too stressed to walk on a leash or for one that
may have never been on a leash, it would be best for the
dog to be on a buckle collar and leash rather than a slip
lead that might tighten when he panics.
For dogs that freeze when they feel pressure from the
lead we recommend that the leash be clipped to the dogs
buckle collar while the dog is in his kennel. Disperse treats
throughout his space so that he is likely to move about.
Leave the leash on for a couple of hours so that he is
likely to step on the leash and become used to pressure
on and off around the collar. Be sure that he is monitored
while wearing the leash in his run.
when the dog is adopted: Review the “Program
for Fearful Behavior” instructions with the adopter which
can be found in the Reproducible Forms and Templates
section. Remember to follow-up with the adopter at three
days, three weeks, and three months post-adoption.
behavior modification
protocols
working with fearful/timid dogs
Please note this protocol is not without risk. The dogs that benefit most from this
protocol are those who cannot be taken out of the cage for SAFER™ assessments
due to their present state. This protocol should only be used with dogs that are
cowering in the back of the cage but are not showing signs of fear aggression.
(Conflicted dogs showing signs of fear aggression could choose to bite the moment
you turn your back to them.) It is vital that the handler conducting this protocol has a
solid understanding of canine behavior.
One of a series of ASPCA
®
Behavior Modification Protocols
developed by Emily Weiss, Ph.D., CAAB

57
behavior modification and management protocols
program instructions:
1. Place a visual barrier, such as a blanket or nylon panel, over the kennel door of the reactive dog.
2. When the stimulus (most likely yourself or a person with a dog on leash) that causes reactivity in the
kenneled dog passes by the kennel door, toss a high value treat under the door when there is a noted
decrease in reactivity (i.e. the dog is quieter). You may have to stand in front of the kennel door and
wait for a decrease in reactivity prior to tossing in a treat and walking away. Remember to keep a
sideways stance in relation to the dog and kennel door. Repeat this each time the aversive stimulus
passes by. Staff and volunteers should go about their daily routine, but be aware of the reactive dog
and toss treats into kennel accordingly for decreased reactivity. (Note: If you choose to walk away from
the kennel door while the dog is reactive, you’re rewarding the reactive behavior and will have an
increased difficulty in modifying the behavior).
3. When there is a marked decrease in reactivity and you notice the dog approaching the kennel door
with a loose body posture as the aversive stimulus passes by the kennel door, slightly raise the visual
barrier so that the dog can see a few inches under the barrier.
4. Toss treats under the kennel door for a noted decrease in reactivity each time the aversive stimulus
passes by the kennel door. You may have to stand in front of the kennel door and wait for a decrease
in reactivity prior to tossing in a treat and walking away.
5. Repeat the above procedure until the dog is standing at the kennel door relaxed with no visual barrier
and the aversive stimulus passes by.
6. Before the dog can be placed on the adoption floor, be sure that he replicates relaxed behavior at the
kennel door in at least 3 different kennels including his adoption floor kennel.
7. Place a treat cup on his kennel door so that adopters can toss treats in his kennel as they walk by.
8. Keep a daily behavior log.
identifying dogs for the program:
•
The dog was SAFER™ assessed and meets the
adoption criteria at your facility.
•
The dog aggresses at the kennel door towards
people or dogs, but his eyes are soft, ears back,
and lip is long. His body posture is likely
backwards, facing away from kennel door.
•
When the kennel door is open, the dog runs to the
rear of the kennel and keeps a sideways stance to
the kennel door and keeps soft body posture.
before you begin:
•
Provide extra kennel enrichment for the dog.
•
Identify what triggers the aggressive response
at the kennel door (i.e. dogs, people, people
wearing hats, etc.). Most commonly in the shelter
environment dogs are reactive to people and dogs.
•
Place a treat cup on the door and be sure that
staff and volunteers have treat bags or treats in
their pockets at all times.
behavior modification
protocols
aggression behind the kennel door
The goal of this program is to decrease aggression behind the kennel door.
One of a series of ASPCA
®
Behavior Modification Protocols modified by
Emily Weiss, Ph.D., CAAB (Original program developed by Dee Ganley,
CPDT and Nancy Lyon at the Upper Valley Humane Society)

58
behavior modification and management protocols
program instructions:
1. Teach the dog a “look” cue. The goal of using
this cue is to have the dog turn and make eye
contact with you when you say
the verbal cue.
a. Charge (classically condition) a reward
marker (click, “good,” etc.).
b. Hold a treat in your hand that is visible
to the dog. Bring the treat up to the outer
corner of your eye, then use your reward
marker and deliver the treat when the
dog follows the treat with his eyes and
makes eye contact with you. Repeat until
dog is reliably replicating this behavior.
c. Now say the verbal cue “look” and bring
the treat up close to your eye. Reward the
dog when he tracks the treat with his eyes
and makes eye contact. Repeat until he is
reliably replicating the behavior.
d. At this point, begin to keep the treat
hidden until after you deliver the “look”
verbal cue and the dog makes eye contact
with you. Repeat until he is reliably
replicating this behavior in other locations
besides the room in which you did the
initial training.
2. Teach the dog the “sit” cue.
a. Get dog to stand toe-to-toe with you.
b. Place bit of food between thumb and
forefinger.
c. Bring treat (lure) to dog’s nose and get
his attention with it. It is okay if he licks
or nibbles at it, but do not give him the
treat yet.
d. Slowly raise the lure up and as the dog
follows it with his nose, move it back over
his head a few inches.
e. As his head tilts back, he is likely to sit.
f. As soon as the rear touches the floor, say
“yes” and give the dog the treat.
g. Practice 6-10 times in quick succession.
h. After the dog is anticipating the next move
and begins to sit before you move your
hand up and back, he is ready to learn the
verbal command. Take a piece of food,
hold it in your hand at about waist level
and when the dog looks like he’s ready to
offer the behavior, say “sit.” When he sits,
say “yes” and give him the food.
identifying dogs for the program:
•
The dog is a SAFER™ “1” and “2” dog
on all parts of the assessment other than the
Dog-to-Dog Behavior item.
•
He likely responds to seeing other dogs by
attempting to rush in with tail high and ears
forward, growling, alarm barking, and/or lunging
on the end of the leash.
before you begin:
•
Provide extra kennel enrichment for the dog
in the program.
•
Provide daily walks with skilled staff members
and volunteers on a path less frequented by
other dogs.
behavior modification
protocols
reactivity towards other dogs
The goal of this program is to manage the dog’s reactive behavior by teaching
him to look at the person holding the leash when in the presence of other dogs.
One of a series of ASPCA
®
Behavior Modification
Protocols developed by Emily Weiss, Ph.D., CAAB

59
behavior modification and management protocols
i. Dogs need the opportunity to generalize. In
order for him to really know the command,
you must practice it in many locations,
under various weather conditions, around
different levels of distraction, and on
different flooring surfaces.
Note: The two verbal cues are going to stay separate
and you will not be chaining the “look” and “sit”
cue/behaviors together. Asking the dog to sit will make
it more difficult to be reactive in the initial stages of the
program. Once the dog is adopted into a new home, he
will be able to be on a walk and be asked to “look” while
continuing to walk.
3. Now that the dog knows how to both “look”
and “sit,” another dog can be brought into the
behavior modification.
4. Have the reactive dog on leash and identify
a safe distance from another dog on leash
to begin practicing the “look” and “sit” cues.
When correctly identifying the proper distance
to begin the program, the dog should show
little to no reactivity.
5. Have the non-reactive dog out of view and
have someone helping bring him into view of
the reactive dog. The moment the reactive
dog sees him say the “look” cue and reward
him for the correct behavior. Then immediately
ask the dog to “sit” and reward him for the
correct behavior. Be sure you are rewarding
each individual behavior in order to keep them
separate. The non-reactive dog then leaves
out of view. Repeat this until the reactive
dog reliably looks and sits when you ask each
time the non-reactive dog comes into view.
If you cannot get his attention off the other
dog, you likely have to begin from a further
distance.
6. Once the dog is successful at a certain
distance, decrease the distance between the
two dogs and repeat the above procedure.
7. Continue to decrease the distance according
to the dog’s success and repeat the above
procedure.
8. Once the dog reliably look and sits on
cue in the presence of many dogs in multiple
locations, he is ready for adoption.
9. Keep a daily behavior log.
Note: This is not a behavior modification protocol, but a way
to manage the behavior of the dog around other dogs. Be
sure to teach the adopters how to use the “look” cue prior to
them leaving the shelter with the dog.
When the dog is adopted: Review the
“Program for Reactivity Towards Other Dogs”
instructions with the adopter which can be found
in the Reproducible Forms and Templates
section. Remember to follow-up with the adopter
at three days, three weeks, and three months
post-adoption.

60
behavior modification and management protocols
identifying dogs for the program:
•
The dog scores a “3,” “4,” or “5” on the Food
Behavior item (only if he body blocks, places
paws in bowl or bites the bowl) and the Toy
Behavior item, and your behavior team
chooses behavioral intervention for the dog.
•
The dog exhibits body slamming, shoulder
rubbing, and/or tall body posture throughout
the assessment. (Note: For safety reasons,
the dog should have a loose body and soft
eye while exhibiting these behaviors.)
before you begin:
teach the dog the “sit” cue.
•
Get dog to stand toe-to-toe with you.
•
Place bit of tasty, stinky food (hot dogs or
cheese) between thumb and forefinger.
•
Bring treat (lure) to dog’s nose and get his
attention with it. It is okay if he licks or nibbles
at it, but do not give him the treat yet.
•
Slowly raise the lure up and as the dog follows
it with his nose, move it back over his head a
few inches.
•
As his head tilts back, he is likely to sit.
•
As soon as the rear touches the floor,
say “yes” and give the dog the treat.
•
Practice 6-10 times in quick succession.
•
After the dog is anticipating the next move
and begins to sit before you move your hand
up and back, he is ready to learn the verbal
command. Take a piece of food, hold it in
your hand at about waist level and when the
dog looks like he’s ready to offer the behavior,
say “sit.” When he sits, say “yes” and give
him the food.
•
Dogs need the opportunity to generalize. In
order for him to really know the cue, you must
practice it in many locations, under various
weather conditions, around different levels of
distraction, and on different flooring surfaces.
behavior modification
protocols
i hold the resources
The goal of this program is to manage a bossy or anxious dog using predictable,
non-physical methods.
Any dog would benefit from this program; however, dogs that feel they need to control resources
in the home and guard them from humans do quite well. Other behaviors such as body slamming,
shoulder rubbing, and body blocking indicate a dog that would benefit from this program. The basis of
the program is that the dog must do something, such as “sit,” before he receives anything of value to
him.
One of a series of ASPCA
®
Behavior Modification Protocols
developed by Emily Weiss, Ph.D., CAAB

61
behavior modification and management protocols
program instructions:
The program requires you to ask the dog
to “sit” before he receives anything that is
important to him. This can be used on a
consistent basis for all of the dogs in your
facility and should be used to manage
dogs that are in a behavior modification
program prior to adoption. The dog should
“sit” for the following things to occur:
•
Receive his meals
•
Receive toys or treats
•
Have a person enter his kennel
•
Exit his kennel
•
Go through a door
•
Receive attention
•
Have his leash put on
•
Anything he really likes!
By keeping clear rules in your kennels,
your dogs will understand that you control
important resources. In addition, they’ll
learn that if they don't defer to you, they
will not receive items that they perceive
to be valuable. You will have better and
clearer communication with the dogs using
non-physical methods. Your adopters will
see the dogs’ manners and will be more
likely to take a dog home!
when the dog is adopted: Review
the “I hold the resources!” instructions
with the adopter which can be found in
the Reproducible Forms and Templates
section. Remember to follow-up with the
adopter at three days, three weeks and
three months post-adoption.

62
behavior modification and management protocols
behavior modification
protocols
program instructions:
1. Move an appropriately sized crate into a large outdoor or indoor space where the behavior
modification will take place.
2. Engage the dog in a polite (not rough and tumble) game of tug or chase. The moment the dog
engages in physical play with you by moderately mouthing, mounting/masturbating, or body
slamming use your NRM in a tone of dismay and gently
place the dog into his crate and ignore him.
3. After 1–2 minutes allow him to exit the kennel and
re-engage in play with you.
4. Repeat the sequence for 10–20 minutes 2 times per day.
5. Once you see a significant and consistent reduction
in inappropriate play, practice in another location with
another person prior to placing in adoption.
6. Daily behavior logs must be kept for each b-mod dog
in the program.
Note: The same protocol can be used for inappropriate play with other
dogs. Instead of having a human engage in play with the dog, a social/polite
dog can engage the dog in play after a smooth introduction. The dog is
placed in the kennel proceeding the NRM when he uses inappropriate
physical play.
when the dog is adopted: Review the “Inappropriate
Play” instructions with the adopter, which can be found in the
Reproducible Forms and Templates section. Remember to
follow-up with the adopter at three days, three weeks and three months post-adoption.
identifying dogs for the program:
•
The dog is SAFER™ “1” or “2” on all parts of
the assessment other than the Tag item.
•
During the Tag item, the dog remained loose
with mouth open and soft eyes during the
body slamming, mounting/masturbating,
and/or moderate mouthing. (Note: This
protocol is not appropriate for dogs who
mount with a stiff body and hard eye.)
before you begin:
•
Provide extra kennel enrichment for the dog in
the program.
•
Provide daily walks with staff members and
volunteers who are skilled in ignoring inappropriate
behavior and rewarding appropriate behavior.
•
Choose a non-reward marker (NRM), such as “oops”
or “too bad,” to use in a voice of dismay (do not yell
or use an aggressive voice) when the dog chooses
an incorrect behavior in regards to play. The NRM
will immediately precede him being removed from
play and returned to his crate or kennel.
inappropriate play – body slamming, moderate
mouthing, etc.
The goal of this program is for the dog to play in a less physical and more
appropriate manner with humans
.
One of a series of ASPCA
®
Behavior Modification Protocols
modified by Emily Weiss, Ph.D., CAAB (Original program
developed by Dee Ganley, CPDT)

behavior modification and management protocols
63
top 10 ways to provide
enrichment for the dogs
in your care
Below are 10 ways to provide enrichment for the dogs in your care. It is important
that enrichment is provided for the entire duration of a dog’s stay at your facility.
Remember that enrichment is only enriching when the dog engages with it, so
it is important to have a variety of opportunities available at your disposal.
It is not necessary to use all ten of these; they are suggestions. When
constructing an enrichment plan for the dogs in your care, it is important
to stimulate the dogs in different ways using all of their senses and
to frequently change the type of enrichment to decrease
boredom and increase novelty in the kennels.
1. Rotate toys two or three times
per day, providing items of different
textures, shapes and sizes.
2. Provide play dates with other social dogs
in your facility.
3. Make mealtime more interesting by placing food in kibble-dispensing enrichment devices.
4. Provide two walks per day with your volunteers.
5. Have volunteers read to the dogs in the kennel.
6. Teach the dogs a few verbal cues, using positive reinforcement only, including “sit,” “stay,”
“high five,” etc.
7. Give the dogs paper products to shred, including newspaper, paper towel and toilet
paper tubes, and paper from the recycling bin.
8. Freeze peanut butter, canned food, yogurt, cottage cheese, or applesauce in a Kong
®
.
9. Play soft, classical music during adoption hours.
10. Rub spices (peppermint, cinnamon or allspice) into toys or bedding or dilute extracts
and spray them on the walls of the kennel.

64

glossary
65

66
aggression
Aggression encompasses a range of behaviors
that usually begins with warnings and can culminate
in an attack.
arousal
A change in physiological state caused by
excitement that can sometimes lead to aggression.
During arousal, the dog’s tail will be perpendicular
to spine, ears will be forward, and dogs will
sometimes body-slam and mouth with pressure.
Hair is frequently raised (piloerect).
assessment
The action or an instance of assessing: appraisal,
estimation, measurement, determination, and
evaluation.
attempt, or try, to bite
The dog attempts to bite Assessor but is foiled
due to proper handling.
body block
Dog moves around the food bowl, toy or rawhide
and places his body directly in between the
Assessor and the resource. Or dog stands over
or lies on top of toys, rawhide or bowl. The behavior
is replicated when you reposition your body with
respect to the resource.
body slam
Dog firmly jumps with two or four feet on Assessor
with a stiff/tense body and then turns away from
Assessor.
body weight back
Dog’s body is leaning away from Assessor, carrying
the bulk of his weight over his back legs.
body weight forward
Dog’s body is leaning toward Assessor, carrying
the bulk of his weight over forelegs.
ear posture
ears back
Dog lays ears flat to the head and the tips of the
ears are pointing to the rear of the dog. Slight
variations will occur depending on breed of dog
and shape of ears.
ears forward
The base of the ear is brought further towards the
front of the head. Oftentimes, the dog’s forehead
will be furrowed when ears are forward.
eyes
hard eye
Dog’s eye is large and the whites are likely
observable. Dog is likely stiff or is freezing.
Sometimes called whale eye.
soft eye (blinking)
Dog’s eye is an almond shape. The whites
of the eye can barely be seen and the dog
is likely blinking.
squinty eye
Dog’s eyes appear to be partially closed and
relaxed. They are smaller than the almond shape.
fearful
A physiological state which can be observed as
dilated pupils, ears back, tail tucked, body low to
the ground. Dog may freeze or try to exit.
freeze
Dog temporarily ceases all movement, stops
breathing and becomes stiff.
furrowed brow
There are wrinkles across the forehead of the brow.
greeting
Dog approaches Assessor, body soft and wiggly,
shifting weight from foot to foot, wagging tail. Face
oriented toward Assessor’s face.
greeting jump
Dog softly jumps up on Assessor or onto
Assessor’s lap to get closer and submissively
lick the Assessor’s chin. Dog’s ears are back,
eyes are soft, tail at spine level or low, lip is
long and body is relaxed.
head flip
Dog swiftly turns head towards Assessor’s hand
with closed mouth. This behavior can be paired
with a muzzle punch.
glossary
glossary of terms

glossary
67
huffing (laughing)
A short, repetitive pant that the dog exhibits
during play.
inguinal exposure
The dog sits with his hip rocked to one side
with an outstretched rear leg exposing his belly.
lip length
long lip
Dog’s lip is long and stretched towards the ear.
pursed lip
Dog’s lip is tense and short.
lip lick
Dog licks his lips out of the context of food or eating,
sometimes called a tongue flick.
look away
Dog clearly avoids eye contact with another human
or dog by obviously turning his head sideways.
loose and wiggly
Dog’s entire body is relaxed. His body, from neck
to tip of tail, is wagging back and forth.
mouths
Dog places mouth on Assessor, another dog, or
leash/other items and can use pressure on a scale
ranging from no pressure up to extreme pressure
leaving tooth impressions on skin. This behavior
is seen in many different contexts, including play,
expressing discomfort, frustration, and arousal.
mouth position
closed mouth
Dog brings upper and lower jaw, lips and teeth
together. He is unable to pant through his mouth.
open mouth
Dog’s jaw is relaxed with the lower jaw separated
from the upper jaw and lip.
muzzle punch
Dog firmly hits Assessor’s body or hand with
his muzzle – he likely has a closed mouth.
panting
relaxed panting
Dog’s overall body is relaxed and has a
soft face, has his mouth open and is calmly
breathing through his mouth at a fairly normal
respiration rate.
stress panting
Dog’s mouth is open and is breathing at a
rapid rate. Oftentimes, there are significant
tight facial wrinkles.
paw lift
Dog holds one of his front paws off the floor.
play bow
Dog lowers the front of his body to the floor with
his legs outstretched in front of him with his rear
elevated to initiate play.
popping body movements
Dog makes quick, dramatic, short movements with
his body and stops or becomes still in-between each
movement to initiate play.
predictive
Foretell on the basis of observation, experience, or
scientific reason.
shoulder rub
Dog leans his body into Assessor and in a short but
deliberate move, rubs with his shoulder then moves
away and tends to other stimuli in the room. The
dog may appear to be unconnected to the Assessor.
reliable
Giving the same result on successive trials. Reliability,
within the context of SAFER research, refers to the
degree to which the assessment is consistent and
stable in its measurements when repeated by
different people and in different facilities.

glossary
68
research design
The goal of performing research is to test a question
and set up the design so the study is reliable and
valid. Statistics can then be done to determine if
one thing has a direct relationship to another. If
that relationship (correlation) is found, you cannot
change anything from the original design, or you
have to re-test to know if you get the same results.
With regard to SAFER, the assessment was
designed with specific order, handling and
equipment. When the assessment is conducted
the way it was designed there is a predictive
relationship between the behavior during the
assessment and the dog's future behavior. This
assessment has been determined to be valid and
reliable. This is why we do the assessment in the
same way and in the same order each time. If
SAFER is done differently, one cannot make any
inferences about behavior or until that new design
has been re-tested.
snaps
Dog quickly brings upper and lower jaw together,
usually only front incisors are visible. Does not
make contact. A snapping/clicking of the teeth is
oftentimes audible.
squared
Dog’s body is tense and tall. His body appears to
make a square shape and he likely has ears forward
and tail tall or perpendicular to spine. This position
is most easily observed in front-weighted dogs. For
dogs who are naturally square in body, look for taller
head posture and stiffer body.
stiff
The muscles in the dog’s body are taut.
stress yawn
The dog yawns out of the context of sleep or
being tired.
submissive grin
Dog lifts his lips and exposes his teeth upon
greeting. The rest of his body is likely loose and
wiggly, his ears are back, his eyes are soft or
squinty and his tail and body are low, sometimes
called smile.
submissive rollover
Dog rolls onto back and exposes his belly. His
ears are back, eyes are soft and tail low or tucked.
He may urinate a bit.
sweating paws
A stress response that causes the pads of the dog’s
feet to sweat. Wet spots are left behind on the floor
where the dog walks.
tail postures
down
Dog’s tail runs parallel to his rear legs or points
to the floor.
neutral
The dog’s tail is at spine level or parallel to spine.
perpendicular to spine
Dog’s tail is above spine level and makes a
90-degree angle where it attaches to the body.
stiff tail
Dog’s tail is not moving or is flagging back and
forth and is paired with a stiff body. Tail is likely
tucked or perpendicular to spine.
tucked
Dog’s tail is tucked under the dog’s body and
is covering his/her genitalia. Or the docked tail
is pressed down, tight to the body.
tail wag
Tail wags should be put in context with above
postures.
circle wag
Dog moves tail in slow circles.
flagging
Tail stiff and tall. Tip of tail moving in short rapid
back-and-forth movements. Observed with tail
high and tail at spine level. (Not to be confused
with the female in heat who "flags" her tail to
one side when touched on the rear.)
sweeping
Tail moving back and forth in a sweeping motion.
urine marking
Dog lifts his leg or positions his body to urinate on
an item, another dog or a person.
validity
Assessment validity refers to the degree to which
the assessment actually measures what it claims
to measure.

69
reproducible forms
and templates
Agencies have permission to reprint the following program forms and templates.
The templates provided need to be used without altering their content or appearance.
Should you have any questions about formatting of these forms, please contact

70
reproducible forms and templates
reproducible forms
and templates
The following documents and forms have been provided to you for reproduction. As SAFER™ is a
copyrighted program, all templates must be used as presented. Should you have any questions
about formatting of these forms, please contact [email protected].
In the event your templates become lost, damaged or destroyed, you can contact the ASPCA
®
at
SAFER
™
worksheet
Use an assessment form
for each dog and keep it
with the dog’s paperwork.
7 pages
preparing for
certification
checklist
Use this checklist
when preparing
for SAFER™
certification.
3 pages
SAFER
™
submission
form
Complete and enclose
this form with each
SAFER certification
submission.
1 page

71
reproducible forms and templates
touch
sensitivity
handout
Review this handout with
adopters who choose a
dog who exhibited touch
sensitivity tendencies
during the assessment.
1 page
tug-and-drop
handout
Review this handout with
adopters who choose a
dog who exhibited
difficulty dis-arousing
during the assessment.
2 pages
behavior log
Use this form to keep
track of each dog’s
progress when
implementing behavior
modification protocols.
1 page
food guarding
handout
Review this handout with
adopters who choose a
dog who exhibited food
guarding tendencies
during the food behavior
assessment item.
1 page
inappropriate
play handout
Review this handout
with adopters who choose
a dog who exhibited
inappropriate play behavior
during the assessment.
1 page
fearful
behavior
handout
Review this handout
with adopters who choose
a dog who exhibited
fearful behavior during
the assessment.
1 page

72
reproducible forms and templates
reactivity to
other dogs
handout
Review this handout
with adopters who choose
a dog who exhibited
reactivity toward other
dogs during the dog-to-
dog assessment item.
1 page
i hold the
resources
handout
Review this handout
with adopters who
choose a dog who
exhibited “bossy”
behavior during the
assessment.
1 page

assessor
SAFER
™
worksheet
M M D D Y Y
shelter name
date
M M D D Y Y
date entered shelter
dog’s name
sex
❑
male
❑
neutered male
❑
female
❑
spayed female
coat color
breed
dog ID number
age
If aggression is noted, use the checklist below to evaluate the dog’s response. You can use this
information to help best guide the behavior team regarding potential behavior modification and
management (see guide for protocols).
❑
Body stiff
❑
Eyes hard
❑
Vocalizes
❑
Exposes teeth
❑
Freeze
❑
Ears back
❑
Dog growls
❑
Snaps no contact
❑
Tail up
❑
Ears forward
❑
Attempts to bite
❑
Tail down
Behaviors observed before, during or after the item:
item 1 – look:
Dog leans forward or jumps up to lick the Assessor’s face with tail wagging, ears back and eyes
averted. [Enter “1”]
Dog’s eyes are averted, with tail wagging and ears back. He allows head to be held loosely in
Assessor’s cupped hands. [Enter “1”]
Dog holds gaze with soft eyes, soft body. He allows head to be held loosely in Assessor’s cupped
hands. Dog holds gaze for three full seconds. [Enter “1”]
Dog’s eyes are averted. His ears are back, his tail is down, and he has a relaxed body posture.
Dog allows head to be held loosely in Assessor’s cupped hands. [Enter “1”]
Dog’s eyes are averted. His body posture is stiff and fearful, his tail is low and not moving. He
allows head to be held loosely in Assessor’s cupped hands. [Enter “2”]
Dog pulls out of Assessor’s hands each time without settling during three repetitions. [Enter “2”]
Dog jumps on the Assessor, consistently rubs his shoulder on the Assessor, and will not allow
Assessor to conduct the assessment. [Enter “3”]
Dog holds eye contact while remaining motionless with ears forward. His body is stiff and becomes
stiffer as assessment progresses. [Enter “4”]
Dog freezes and/or growls or tries to bite. [Enter “5”]
observer

If aggression is noted, use the checklist below to evaluate the dog’s response. You can use this
information to help best guide the behavior team regarding potential behavior modification and
management (see guide for protocols).
❑
Body stiff
❑
Eyes hard
❑
Vocalizes
❑
Exposes teeth
❑
Freeze
❑
Ears back
❑
Dog growls
❑
Snaps no contact
❑
Tail up
❑
Ears forward
❑
Attempts to bite
❑
Tail down
Behaviors observed before, during or after the item:
item 2 – sensitivity:
Dog leans into the Assessor, eyes soft or squinty, soft and loose body, open mouth. [Enter “1”]
Dog stands still and accepts the touch, his eyes are averted, and his tail is in neutral position with
relaxed body posture. Dog’s mouth is likely closed for at least a portion of the assessment item.
[Enter “1”]
Dog displays high energy and movement, but it is directed toward getting closer to the Assessor.
His body is soft, likely panting, may jump up between attempts to lick Assessor. [Enter “2”]
Dog is active and focused on the Assessor and all other stimuli available. His body is soft, likely
panting, likely to display high movement between attempts. [Enter “2”]
Dog stands still and accepts the touch, his eyes are averted, his tail is between his legs, body stiff,
mouth closed, lip long, ears likely back, may lip lick. [Enter “2”]
Dog repeatedly turns toward the Assessor’s hand, with loose body and open mouth, mouths the
hand, but does not apply pressure. Or, dog licks hands while lips are long. [Enter “2”]
Dog is not fearful and is struggling to get away. The dog is not focused and is in constant
movement, unconnected to the Assessor. [Enter “3”]
Dog stands tall and square. His tail perpendicular to spine, mouth closed for the majority of
assessment item. [Enter “3”]
Dog repeatedly turns toward the Assessor’s hand with a very fast head movement. If able, he
muzzle punches the hand. His body is stiff and he has a closed mouth with a short lip. [Enter “4”]
Dog freezes, growls or tries to bite. [Enter “5”]

item 3 – tag:
Dog assumes play position and joins the game. Or dog indicates play with huffing, soft ‘popping’
of the body, etc. Dog might jump on Assessor once play begins. [Enter “1”]
Dog stands with his tail low and wagging, and comes toward the Assessor in a friendly manner
when the Assessor ceases moving. [Enter “1”]
Follows at end of leash, body soft, or low and a bit fearful. [Enter “1”]
Dog is fearful but unresponsive when touched. Approaches the Assessor when the game ends.
Dog is likely crouching, may have long lip or lip lick. [Enter “2”]
Dog is not fearful but is unresponsive to the Assessor, and approaches the Assessor at the
end of the game (may need coaxing to approach). He is focused on stimuli other than the
Assessor. [Enter “2”]
Dog repeatedly turns quickly away when touched, or repeatedly spins toward the touch, and
repeatedly tries to exit. Dog may be crouching, tail is tucked, mouth closed, body stiff. [Enter “3”]
Dog responds with his tail high, ears forward, mouth likely closed for at least half of the assessment
item, body stiff and body checks the Assessor. Dog is often focused on other stimuli in the room.
[Enter “3”]
Dog panics with vocalization combined with tail tuck, yelping and repeatedly trying to exit. (If dog
settles after 1st or 2nd tag, choose 1st “3” scoring option). [Enter “4”]
Dog stands his ground while not cornered and barks at the Assessor with ears forward, body stiff,
mouth closed and lips pursed when not barking. [Enter “4”]
Dog growls or tries to bite. [Enter “5”]
If aggression is noted, use the checklist below to evaluate the dog’s response. You can use this
information to help best guide the behavior team regarding potential behavior modification and
management (see guide for protocols).
❑
Body stiff
❑
Eyes hard
❑
Vocalizes
❑
Exposes teeth
❑
Freeze
❑
Ears back
❑
Dog growls
❑
Snaps no contact
❑
Tail up
❑
Ears forward
❑
Attempts to bite
❑
Tail down
Behaviors observed before, during or after the item:

Note: If the dog's behavior upon the first attempt matches any of the response choices higher than a
“2”, you should use the rear flank.
if rear flank is used:
First Second
Attempt Attempt
Dog sits, mouth open or lip long. [Enter “1”]
Dog does not respond at all. [Enter “1”]
Dog gently places his open mouth over the Assessor’s hand without applying
pressure. [Enter “2”]
Dog closes mouth, begins to purse lips and becomes stiff. [Enter “3”]
Dog head flips while moving hip away. [Enter “3”]
Dog growls. [Enter “4”] Note: If this behavior occurs on the first attempt stop the
assessment. Proceed to the Food and Toy Behavior items if additional information
is desired.
Dog tries to bite. [Enter “5”] Note: If this behavior occurs on the first attempt stop
the assessment. Proceed to the Food and Toy Behavior items if additional
information is desired.
If aggression is noted, use the checklist below to evaluate the dog’s response. You can use this
information to help best guide the behavior team regarding potential behavior modification and
management (see guide for protocols).
❑
Body stiff
❑
Tail down
❑
Ears forward
❑
Exposes teeth
❑
Freeze
❑
Eyes hard
❑
Vocalizes
❑
Snaps no contact
❑
Tail up
❑
Ears back
❑
Dog growls
❑
Attempts to bite
Behaviors observed before, during or after the item:
item 4 – squeeze:
if paw is used:
First Second
Attempt Attempt
Dog gently pulls back his paw. Dog may lick hand. [Enter “1”]
Dog does not respond at all for three seconds. His eyes are averted and his ears
are relaxed or back. [Enter “1”]
Dog gently pulls back and whimpers. [Enter “2”]
Dog gently places his open mouth over the Assessor’s hand without applying
pressure. [Enter “2”]
Dog closes mouth, becomes stiff. [Enter “3”] Note: If this behavior occurs on the
first attempt, use the flank instead.
Dog is soft in body and eye, and moves his legs/body so that the Assessor is
unable to hold the paw [Enter “3”] Note: If this behavior occurs on the first attempt,
use the flank instead.
Dog yelps repeatedly or screams. [Enter “3”] Note: If this behavior occurs on the
first attempt, use the flank instead.
Dog head flips while pulling back paw. [Enter “3”] Note: If this behavior occurs on
the first attempt, use the flank instead.
Dog reaches toward the Assessor’s hand on the second attempt while moving his
paw away when the Assessor attempts to lift it. The dog will not allow the Assessor
to assess second time. [Enter “4”] Note: If this behavior occurs on first attempt,
use the flank instead.
Dog growls. [Enter “4”] Note: If this behavior occurs on the first attempt, use the
flank instead.
Dog freezes and/or tries to bite. [Enter “5”] Note: If this behavior occurs on the first
attempt, use the flank instead.

If aggression is noted, use the checklist below to evaluate the dog’s response. You can use this
information to help best guide the behavior team regarding potential behavior modification and
management (see guide for protocols)
❑
Body block
❑
Ears back
❑
Paws in bowl
❑
Snaps at hand (no contact)
❑
Body stiff
❑
Ears forward
❑
Urinates in bowl
❑
Repeated contact bite
❑
Freeze
❑
Eyes hard
❑
Bites bowl
❑
Leaves bowl to bite hand
❑
Tail up
❑
Exposes teeth
❑
Bites up Assess-a-Hand
®
❑
Tail down
❑
Vocalizes
Behaviors observed before, during or after the item:
If the dog does not eat, try another type of food. If necessary, reassess at a
later point.
note
!
item 5 – food behavior:
Dog lifts head and ceases eating when you reach to pull the bowl away or push him out. [Enter “1”]
Dog calmly allows the food to be moved, follows the dish, but does not interfere with the dish’s
movement. Dog’s body is soft and loose, eyes soft, tail neutral. He lifts his head when hand is
pushed against his cheek. [Enter “1”]
Dog follows the dish with his tail down, body likely a bit stiff. Dog lifts head after a bit of pressure
from hand to cheek. [Enter “2”]
Dog follows the dish, his tail between his legs, ears are forward. His body is stiff. Dog does not lift
his head from the bowl when hand is applied to his cheek. [Enter “3”]
Dog gulps food, begins to eat faster and with bigger bites, body stiff. He does not lift head when
hand is applied to cheek. [Enter “3”]
Dog freezes and/or growls. [Enter “4”]
Dog tries to bite. (Use chart on the worksheet to identify level of bite attempt/bite.) [Enter “5”]

Recommend using 2 non-food toys (rope, squeaky, etc.) and then 1 unbasted
rawhide item. Enter number for each item in that part of the column.
note
!
If aggression is noted, use the checklist below to evaluate the dog’s response. You can use this
information to help best guide the behavior team regarding potential behavior modification and
management (see guide for protocols)
❑
Body block
❑
Ears back
❑
Paws on toy
❑
Snaps at hand (no contact)
❑
Body stiff
❑
Ears forward
❑
Urinates on toy
❑
Repeated contact bite
❑
Freeze
❑
Eyes hard
❑
Leaves toy to bite hand
❑
Tail up
❑
Exposes teeth
❑
Bites up Assess-a-Hand
❑
Tail down
❑
Vocalizes
Behaviors observed before, during or after the item:
item 6 – toy behavior:
Toys Rawhide
only (if used)
No interest. [Enter “1”]
Dog settles down close to chew, will relinquish toy or rawhide to you. [Enter “1”]
Dog settles close, keeps a firm grip and is loose and wiggly. He does not place his
body between you and the toy/rawhide. [Enter “1”]
Dog takes toy away, keeps a firm hold. His body is between you and the toy or
rawhide, and he is loose and wiggly. No growling or stiffness. [Enter “2”]
Dog takes toy/rawhide away, keeps a firm hold. His body is stiff. [Enter “3”]
Dog freezes and/or growls. [Enter “4”]
Dog attempts bite (use chart on worksheet) [Enter “5”]

Be sure to take your observational “snapshot” in the first few seconds of the
approach. Dogs do not have to touch.
note
!
If aggression is noted, use the checklist below to evaluate the dog’s response. You can use this
information to help best guide the behavior team regarding potential behavior modification and
management (see guide for protocols).
❑
Freeze
❑
Eyes soft
❑
Vocalizes
❑
Exposes teeth
❑
Body soft
❑
Eyes hard
❑
Dog growls
❑
Snaps no contact
❑
Body stiff
❑
Ears back
❑
Attempts to bite
❑
Tail up
❑
Ears forward
❑
Tail down
Behaviors observed before, during or after the item:
For each item, mark an ‘x’ in the box that intersects with the score for that item.
(Ex.: If the Sensitivity item has a score of “2”, put an “x” in the box where row “2” and “Sensitivity” intersect.)
Legend:
P = Potential behavior modification and/or management
R = Behavior modification and/or management strongly recommended
S = STOP item for safety reasons. Behavior modification and/or management strongly recommended.
Move to food if SOP suggests
General observations and recommendations:
item 7 – dog-to-dog behavior:
Dog approaches the helper dog in play position. His mouth is open. [Enter “1”]
Dog approaches the helper dog submissively (head low, tail low, ears back, lip long). [Enter “1”]
Dog approaches helper dog with tail at spine level, body not stiff, ears relaxed, lip long or neutral.
[Enter “2”]
Dog does not approach the helper dog. Turns body to side in relation to other dog, or exits. [Enter “2”]
Dog approaches the helper dog, body soft, tail well above spine level, ears forward. [Enter “2”]
Dog approaches the helper dog by rushing in with his tail high, stiff body, head tall, and ears erect.
[Enter “3”]
Dog charges the helper dog while growling or attempting to bite. [Enter “4”]
enter name and sex of dog-to-dog helper dog.
name _________________________________________________________________
sex
❑
male
❑
female
1
2
3
PPPP P PP
4
RRRRRRRRP
5
SSSSRRRR
Look Sensitivity Tag Squeeze 1 Squeeze 2 Food Toy Rawhide
Dog

preparing for your SAFER
™
certification submission
❑
Frequently review the handling guide for proper technique.
❑
Observe play groups of dogs at the shelter to practice reading canine behavior: tail posture, ear
posture, body posture, lip length, eye shape, etc.
❑
Practice assessment (especially assessment items you find to be challenging) on your own dogs
or on a stuffed dog.
❑
Tape all of your practice assessments and review/critique your handling and behavior reading skills.
❑
Ask others from your agency who are also preparing for certification to review your practice
assessments before taping for submission.
general checklist of requirements for SAFER
™
certification submission
room set-up and video:
❑
Use a spacious, quiet room for your assessments.
❑
Rid your room of clutter.
❑
Have proper lighting so handling technique and canine behavior can be easily viewed by
SAFER™ reviewer.
❑
If needed, use a white noise machine or static channel on a radio to drown out background noise.
❑
Remove all other animals from the room.
❑
Use an armless chair for the assessment.
❑
Place your camera in an area of the room so that the dog and the Assessor are in the frame at all times
(Observer may need to operate camera during tag to capture movement back and forth).
❑
If a mistake occurs while taping for certification, do not submit that dog’s tape. Items knowingly
performed incorrectly are still incorrect even when you make note of it during the video or on the
scoring sheet. We need to see you performing each item of the assessment correctly for certification.
™
SAFER
™
Certification Check List

be sure to do the following in each assessment item to ensure proper handling
look:
❑
The hand holding the leash is also lightly holding the collar with a couple of fingers. The other hand
touches the dog with an open palm on the other side of the dog’s face along the lower jaw line.
❑
Never hold the look for more than 3-5 seconds, and do not repeat unless the dog pulls out
of your hands.
❑
If the dog pulls out of your hands, try a maximum of three tries to position them before proceeding.
❑
Avoid leaning forward into the face of the dog and keep your upper body straight.
❑
Allow choice and never force the dog to look at you.
sensitivity:
❑
Ensure the hand that is holding the dog’s collar is locked onto your knee.
❑
Hold the dog’s collar on the side of the neck rather than over the back of the neck.
❑
Sit upright and keep your face away from his body and your hand.
❑
Begin your touch at the collar; firmly knead the skin (as if you’re kneading dough) down to just past the
hip, and back up to the collar.
❑
Use consistent touch moving from the collar to the hip and back up two times.
tag:
❑
Move the chair out of the way before starting Tag.
❑
Engage the dog with your voice and start moving before you touch him.
❑
Keep your voice engaged and your body moving the whole time. Do not stop once you’ve invited the
dog to play unless the dog exhibits aggressive behavior or you have completed all three tags.
❑
Avoid leaning over or reaching over the dog at all times.
❑
Face the direction you are about to run before popping the dog, so when he spins around you are not
facing him frontally.
❑
Tag the dog as you’re moving in the opposite direction.
❑
Give the dog a loose leash at all times and avoid dragging the dog along with you.
❑
Always tag the dog lightly with one finger on the thigh that is closest to you.
squeeze:
❑
Secure your holding hand on the dog’s collar on the side of the neck rather than the back
of the dog’s neck.
❑
Rock the dog’s head away from your body.
❑
Use your free hand to lift his leg saying “squeeze” prior to touching the leg.
❑
Lift the dog’s leg away from his head/body, so there is a V-shape between his leg and body.
❑
Say “squeeze” only once each time you lift the leg.
❑
When squeezing between the pads of the foot, apply just enough pressure for the dog to respond.
❑
Allow the dog to pull back his paw if he chooses to do so.
❑
Squeeze two consecutive times on the same paw.
food:
❑
Allow the dog enough time to become invested in the food bowl if he chooses.
❑
Ensure you are directly opposite of the Observer who is holding the leash.
❑
Ensure the Observer is giving the dog some slack in the leash so there is no tension.
❑
Approach from the front of the food bowl and pull the bowl towards you saying “Give me that” one time.
Back away. Advance again and reach back in and push the dog out of the bowl two times.
❑
In between each intervention, step back so the dog can again “own” the bowl.
❑
Keep the Assess-A-Hand
®
behind you when you retreat and while waiting.
❑
The Observer needs to keep two hands on the leash at all times when handling the dog.

be sure to do the following in each assessment item to ensure proper handling
toy:
❑
Offer another type of toy in texture and shape if the dog does not show interest in your first choice.
❑
Allow the dog several seconds to be interested in the toy or to settle with the toy before reaching in
with the Assess-A-Hand
®
.
❑
Ensure there is space between each toy so they are not in a pile.
❑
Offer a rawhide if the dog expresses no interest in the toys. When using a rawhide, it must be
offered last.
dog introduction:
❑
Avoid pulling the dog being assessed towards the helper dog. Always allow choice of movement.
❑
Score the behavior the dog exhibits as he is initially approaching the helper dog.
❑
Dogs do not need to touch.
❑
Choose a helper dog that is loose and wiggly around other dogs.
other tips for proper handling:
❑
Never force the dog into position at any time during the assessment.
❑
Coax the dog into position for each item using your voice and body language.
❑
Allow the dog choice of movement at all times.
❑
Communicate with your Observer about all pertinent behaviors either of you observe
during the assessment.
❑
Be sure to always use a six foot leash for your assessments.
❑
Minimize the amount of noise your chair makes when you move it around during the assessment.
notes:

how to become a SAFER
™
certified assessor
To become certified, ideally you would attend a two-day SAFER™ workshop taught by ASPCA SAFER
facilitators, or purchase and review the SAFER manual and training guide and SAFER instructional DVD.
Once trained, record your assessment technique with three dogs in your specific assessment area, as
described in the steps below.
1. Record three (3) full assessments per SAFER Assessor and submit to the ASPCA via DVD, electronic
video clip, or You Tube
During the assessment:
•
Be sure to conduct the Dog-to-Dog Behavior Item even if the agency you work for does not require
the item. This MUST be included for certification.
•
Interact as you normally would with your Observer. An important part of the assessment is interaction
and objective observation from both individuals. This includes audible conversation on video that
results in the choice of a score for each assessment item.
•
We are certifying the Assessor, so the final decision regarding observation of behavior of each dog
should be made by the Assessor.
2. Complete the SAFER worksheets for the three (3) dogs, and be sure to include the following information:
•
Name of the Assessor and the Observer, and the name of the facility
•
Physical description of each dog
•
Where on the DVD each dog is (for example, first dog on DVD, fifth dog on DVD) or clearly labeled
video clips if submitted electronically
•
Any health information, adoption recommendations, or other information you feel would be helpful in
evaluating the assessment being demonstrated
3. Submit the video, completed worksheets and completed submission form, with a check (payable to the
ASPCA) for $30 (per submission for each person requesting certification) to:
Wanda Echevarria, Community Outreach Office Manager, ASPCA
424 East 92nd Street, New York, New York 10128
NOTE: Be sure to complete the Submission for Certification form and include it with your submission.
If you choose to submit your video electronically, please send it to [email protected] and
include in the email the Assessor’s name, the agency name, and time-line for submitting paperwork and
submission check to the ASPCA’s New York offices. Your video will not be reviewed until all the proper
paperwork and check has been processed.
Your submission will be evaluated by an ASPCA SAFER facilitator, and you will receive a written response to
your submission within four weeks. If your technique and ability to assess behavior are appropriate and lead
to valid and predictive assessments, you will become a certified SAFER Assessor.
If you need assistance with technique, you will receive a report identifying areas that need refinement. After
you implement those changes in your technique, you can then submit a new video and set of worksheets for
certification. A $30 fee is required for each certification attempt.
Certification is good for one year. When your certification expires, you can submit a recent video of
three assessments as described above to be recertified.
If you have questions about the SAFER certification process, please contact us at
[email protected]. Thank you.

submission for SAFER™ certification
Please complete a separate form for each person requesting certification. Include this form with your video
tape or DVD, SAFER assessment worksheets, and a check for the certification fee ($30, payable to the
ASPCA) when you send these materials to the ASPCA.
name _________________________________________________________
organization _________________________________________________________
address _________________________________________________________
phone number _________________________________________________________
email address _________________________________________________________
if you attended a SAFER
where (city and state)__________________________________________
two-day workshop:
when (month and year)________________________________________
date of workshop _________________________________________________________
check one initial certification renew certification
❑
first submission
❑
first submission
❑
second submission
❑
second submission
❑
third submission
❑
third submission
Submit the DVD, completed worksheets, this completed submission form, and a check for $30
payable to the ASPCA to:
Wanda Echevarria, Community Outreach Office Manager
ASCPA
424 East 92nd Street
New York, New York 10128
Email electronic video to [email protected] along with Assessor’s name and agency.

behavior log
DATE
YOUR NAME
DOG’S NAME
BEHAVIOR FOR MODIFICATION
PRIMARY REINFORCER USED (FOOD, TOUCH, ETC.)
THE DOG’S BEHAVIOR SINCE THE LAST TRAINING SESSION HAS:
IMPROVED STAYED THE SAME DECLINED
LENGTH OF SESSION
WHICH BEHAVIOR WAS REINFORCED AT BEGINNING OF SESSION?
WHICH BEHAVIOR WAS REINFORCED AT END OF SESSION?
BASED ON YOUR ANSWERS TO THE TWO QUESTIONS ABOVE,
WHICH BEHAVIOR SHOULD THE NEXT SESSION BEGIN WITH?
DESCRIBE HOW MOTIVATED THE DOG WAS WHEN TRAINING TODAY
USING A SCALE OF 1 TO 10 (1 BEING LEAST MOTIVATED, 10 BEING MOST MOTIVATED), RATE THIS
DOG’S RESPONSE TO TODAY’S TRAINING COMPARED TO THE LAST TIME YOU WORKED WITH HIM.
IF TODAY IS YOUR FIRST DAY WITH HIM, MARK N/A.
1 2 3 4 5 6 7 8 9 10 N/A
COMMENTS
NUMBER OF SESSIONS TO DATE
ANIMAL #
SECONDARY REINFORCER USED (CLICKER, “YES,” ETC.)

food program
Congratulations!
You have adopted a new family member.
As your adoption counselor discussed with you, your dog displayed some food
aggression issues while in the shelter. What does this mean? It means that your dog may be
more likely to show aggression around his food than some other dogs. Food-aggressive dogs
may bite when they perceive that someone is trying to take their food. While we conducted a
successful behavior modification program with the dog during his time with us, we suggest that
you continue this work with the dog when you take him home. Food aggression is both
treatable and controllable. We suggest you follow the plan below, beginning the
moment your dog comes into your home.
the plan:
•
Food time should never be made into an event. Do not get the dog riled up for dinner.
•
Be sure your dog sits and waits for the food bowl. For the first few days, you might want
to keep the leash on the dog for this exercise. As the dog sits, you will bend toward the dog with the
bowl. If the dog gets up, stand up and have the dog sit again.
•
Put small amounts of food in the bowl. As the dog finishes the first bites, place more food in
the bowl. Feed the normal amount of food, but do so in small amounts.
•
Feed one-half of the dog’s food out of a food-dispensing toy such as the Buster Cube.
™
This will not only help with food issues, but it will also help keep your dog busy in body and mind.
•
When your dog is interacting with the food-dispensing toy or eating food from the
bowl, you can teach him that when he leaves the bowl or toy to look at you, he will get
something even better.
This is a very important and fun exercise! Begin by placing dry kibble in the
bowl or food-dispensing toy. Let the dog eat for a moment, then walk over with a tasty piece of cheese
or other highly desirable food item. Say the dog’s name. If he lifts his head, praise him and give him
the food item.
•
Trade. While this game is similar to what is written above, here you are not only asking the dog
to lift his head, but to let you have one object for another more desirable one. Place a tasty treat
that the dog loves in your pocket, and begin by giving the dog a boring toy — one that the dog finds
only marginally interesting. (We want the dog to quickly understand the game as well as avoid any
aggression, so we must begin by giving the dog something that is not highly desirable.) Once the dog
has this item for a moment, take the tasty treat out of your pocket and calmly say “Trade.” Draw the
dog toward you with the treat, and let him nibble the treat while you pick up the boring toy. When he
is done with the treat, have him sit and give back the toy. We want your dog to learn that you always
have something better and that he can trust you.
If you are unable to do the preceding exercises, we suggest you choose another dog to adopt. While
we cannot 100 percent predict the future, research does show that dogs who display food issues in the
shelter are more likely to display the same behaviors in the home. We want you to be safe and for the
dog to have the opportunity to be able to work through his issues. Please take the time to ask yourself
if you are ready to take on a bit of a project.

touch sensitivity
guidelines to assimilate your
new companion
Congratulations!
You have adopted a new family member.
As your adoption counselor discussed with you, your dog didn’t always accept all kinds
of touching. This dog indicated to us during his behavior assessment that he might act
aggressively if he was pushed beyond his comfort level. Your dog has had some training
here to help him be more comfortable with touch. Being comfortable with different types
of touch is important and is a skill you can help him continue to learn at home.
What does this mean? Your dog is more likely to show anxiety or aggression when being
touched on certain body parts, with a certain pressure or strength, or when being
touched at the same time that you are holding his collar. Any dog may bite
when they are uncomfortable with a touch, so it will be important to continue
the training in your home. We strongly suggest you follow the guidelines
below starting with the first day you bring him home. It is possible to move
your dog past this behavior issue with time, patience and practice.
guidelines:
•
Be aware of the touches your dog enjoys and doesn’t enjoy. Your dog has shown sensitivity
to ___________________________________________________. Since you know where your new
dog is uncomfortable being touched, instruct family members and visitors to touch the dog where he
likes to be touched instead. For instance, “This is my new dog, Tickles. He would love it if you would
squat down and pet his chest. That’s his favorite place to be petted.” If every new person he meets
pets him appropriately, it will help him relax when being touched.
•
Reward your dog for accepting touch. This will convince your dog that tolerating touch pays
off and the behavior is worth repeating. Have a baggy of tiny, soft, high-value treats like hot dog,
semi-moist liver treats, cheese or dried liver cut into pieces the size of a pea. Put your hand on your
dog and while touching him, feed him a treat. You are teaching your dog that accepting touch and
remaining relaxed pays off!
•
Refrain from engaging in wrestling or physical rough-housing with your dog. While some
dogs may enjoy this as much as many humans do, a touch-sensitive dog will almost certainly find this
unpleasant. Don’t undo all your hard work! Play cooperative games instead, like fetch, find-it games
(like hide and seek), living room agility, or teach him some tricks.
If you are unable to do these at-home exercises, we suggest you choose another dog to adopt. We want
you to be safe, and the dog to be able to work through his issues. Please think this through and ask
yourself if you have the time and motivation to help this dog learn to enjoy touch.

program for
inappropriate
play
the plan:
•
Avoid rough and tumble games with your dog. Although you would both likely have a great
time with the game, it encourages your dog to begin playing in inappropriate and physical ways.
•
Be sure to have an appropriately sized crate or a small room in your house that you can use
to put your dog into during “time-outs” when he plays too physically.
•
When your dog mounts, mouths, or body slams you or another dog, in a neutral voice say
“oops” or “too bad” and put him into the designated room or crate for a 1-2 minute “time-out.” After
the time out, he can exit the kennel and re-engage in play as long as he is appropriate.
If you are unable to do the preceding exercises, we suggest you choose another dog to adopt. While we
cannot 100 percent predict the future, research does show that dogs who display inappropriate play in
the shelter are more likely to display the same behaviors in the home. We want you and your dog to
create a strong bond early-on post-adoption and for your dog to have the opportunity to be able to work
through his issues. Please take the time to ask yourself if you are ready to take on a bit of a project.
Congratulations!
You have adopted a new family member.
As your adoption counselor discussed with you, your dog displayed some
inappropriate/physical play behavior while in the shelter. What does this
mean? It means that your dog may be more likely to mount, mouth,
and body slam you and/or other dogs while playing. While we
conducted a successful behavior modification
program with the dog while he was with us,
we suggest that you continue this work
with the dog when you take him home.
Inappropriate play is both treatable and
manageable. We suggest you follow the plan
below, beginning the moment your dog comes
into your home.

program for
fearful behavior
Congratulations!
You have adopted a new family member.
As your adoption counselor discussed with you, your dog displayed
significant fearful behavior, especially around humans, while in
the shelter. What does this mean? It means that your dog
may be more likely to exhibit fearful behavior around new
people, places, and things. While we conducted a successful
behavior modification program with the dog while he was with us,
we suggest that you continue this work with the dog when you take
him home. Fearful behavior is both treatable and manageable. We
suggest you follow the plan below, beginning the moment your dog
comes into your home.
the plan:
•
Be aware of your body language at all times with your dog. Keep a sideways stance to your
dog and avoid eye contact as a frontal stance and eye contact can increase his fearful responses. Be
sure new people coming to your home are aware of their own body posture. Remember that a forward
posture can communicate aggression to your dog and increase his fear.
•
Ignore all of your dog’s fearful behavior. By trying to help him through his fear by petting and
talking to him, you’d actually be rewarding the behavior and increasing the likelihood of him repeating
the behavior again in the future.
•
Keep tasty treats around your home, especially for the first few weeks living with your
new friend.
You will want to give him treats when he approaches you, other family members, or
decides to explore different rooms or items in your home. It is important for him to learn that
something good happens when he chooses to explore novel people or things.
•
When strangers come to your home, give them tasty treats to give to the dog if he
chooses to come over to sniff them
. If the dog chooses to not approach new people, he should
be ignored.
•
If your dog is dog-friendly, arrange for him to go for walks with other dogs who will
give him an added level of confidence on the street.
If you are unable to do the preceding exercises, we suggest you choose another dog to adopt. While we
cannot 100 percent predict the future, research does show that dogs who display fearful behavior in the
shelter are more likely to display the same behaviors in the home. We want you and your dog to create
a strong bond early-on post-adoption and for your dog to have the opportunity to be able to work through
his issues. Please take the time to ask yourself if you are ready to take on a bit of a project.

tug-and-drop
training
Most dogs will play tug with any type of toy, but tug
is most pleasurable for the human when they are
comfortable with the toy. Obtain a fleece or soft rope
toy 1-2 feet long. Handles are useful although dogs
often enjoy playing with the handles so much that
they are inclined to grab the handle, whether there is
a human hand attached there or not. A tug toy with a
bungee type handle puts less stress on both the dog
and the human.
1. Grasp the toy with one hand at each end. Ask the
dog to sit. When he does, say “Yes, get it!” and
wave the toy in front of the dog’s face or drag it
along the ground in front of him, so that he is
likely to grab the toy in the middle, thereby
avoiding your hands. When he grasps it, verbally
encourage him to play while you move the toy
back and forth, up and down, to stimulate him to
tug. Do this for 10-20 seconds.
2. The next step is to teach the dog to release
the toy on cue. Different approaches work for
different dogs. You should not shout or intimidate
the dog in order to get him to release the toy. Say
“Give” or “Drop” in a conversational voice. Avoid
repeating the cue over and over; say it once and
then take action to prompt the dog to release.
Here are a few suggestions:
a. Say “Give” and instantly stop tugging the toy
(let your arm go limp), but keep hold of it with
one hand. Say “Sit.” If the dog releases the
toy and sits, immediately say “Yes, get it!” and
entice the dog to play again. With sufficient
repetitions, the dog should learn to let go of
the toy and sit as soon as he hears you say
“give.” Eventually, you vary how long the dog
must sit before you invite him to play again.
b. Say “Give” and instantly stop tugging the toy
(let your arm go limp), but keep hold of it with
one hand. With the other hand, reach over the
dog’s head to cover his eyes. Some dogs will
release the toy as soon as you do this. If the
dog releases the toy, immediately say “Yes,
get it!” and entice the dog to play again. With
sufficient repetitions, the dog should learn to
let go of the toy as soon as he hears you say
“give,” so you don’t have to cover his eyes.
Eventually, vary how long the dog must wait
before you invite him to play again. Sometimes
ask him to sit before inviting him to play.
c. Say “Give” and instantly stop tugging the toy
(let your arm go limp), but keep hold of it with
one hand. With the other hand, reach and
grasp the dog by his collar. Pull him forward
toward you and hold him stationary. This has
the effect of making any tugging he does
ineffective. Wait. Most dogs will drop the toy
after a few seconds. Immediately say “Yes!”
release his collar, say “Get it,” and invite the
dog to play again. With sufficient repetitions,
the dog should learn to let go of the toy as
soon as he hears you say “give,” so you don’t
have to take hold of his collar. Eventually,
these are the three basic
parameters for playing
tug-and-drop:
program instructions:
1. The dog sits (or lies downs) and waits for you
to invite him to play (“Take it” or “Get it”) before
ever putting his mouth on the toy;
2. The dog releases the toy to you whenever you
request (“Drop” or “Give”);
3. The dog takes care not to put his mouth on human skin while playing tug.
sometimes ask the dog to sit, after the
dog releases the toy, before inviting him
to play again.
d. Say “Give” and instantly stop tugging the toy
(let your arm go limp), but keep hold of it with
one hand. With the other hand, place a treat
right in front of the dog’s nose so that he can’t
help but smell it. Most dogs will instantly
release the toy to grab the treat. Say “Yes,”
give him the treat, and ask him to sit. When
he does, say, “Get it,” and invite the dog to
play again. With sufficient repetitions, the dog
should learn to let go of the toy as soon as he
hears you say “give,” so you don’t have to use
the treat. You will still want to reward him with
a treat when he releases the toy until the
release behavior is fully learned. Sometimes
ask the dog to sit after the dog releases the
toy, before inviting him to play again. This
method is undesirable if the dog is reluctant to
play again after receiving the treat. Some
dogs are so motivated by food that they are
uninterested in play after eating a treat and so
it is hard to accomplish the tug training.
3. Repeat the sequence of tugging for 10-20 seconds,
then asking for a release, at least 10 times in
succession. Realize that for procedures “a-c,” the
reward for the dog releasing the toy is to get you
to play again. This means that, while the dog is
learning to play tug, you should instantly say
“yes!” when he releases and invite play again.
Don’t waste time praising or patting him. When a
dog is into playing tug, they usually don’t care
about praise or patting — they want to play more!
For procedure “d,” the dog has two incentives for
releasing the toy: to get the food reward and to
get you to play again. So it’s still important to get
the game going again quickly. Only when the dog
promptly and willingly drops the toy as soon as
you ask, should you ask him to sit and wait for
any amount of time between bouts of tugging.
4. If, at any time, the dog jumps forward to grab at the
toy when you have not invited him, say “Uh-uh!”
and instantly pull the toy behind your back or over
your shoulder where it is inaccessible. If the dog
already has the toy in his mouth, do what works
(from above options) to get him to release it again
but don’t reward him when he lets go. Next time,
be ready so that when he jumps forward to grab
it, you can snatch it away. Ask him to sit and wait
before presenting the toy and inviting him to “get
it.” You must teach him that he never gets the toy
when he jumps for it before you ask. If you are
consistent with this, he will learn that the best way
to get you to play tug is to sit and wait patiently
until you start the game.
5. If, at any time, the dog misses the toy and puts
his mouth on your hand, instantly shriek loudly,
drop the toy, and march out of the room (time
out). If there is a door, slam it in the dog’s face.
Wait a few seconds (no more than 20-30 seconds),
then return and act like nothing happened. Invite
him to play again, but use a warning voice to
remind him to be careful. If the dog bites your
hand more than a few times (3-4) in one play
session, despite implementing time-outs, your
dog may not be able to learn to play tug
appropriately. Certainly if he keeps doing this,
despite continued corrections, it’s not safe to play
tug with him. If you’re really committed to teaching
this game, use l-o-o-n-g tug toys so there’s plenty
of room for his mouth and your hands.
6. When you’re ready to end the game, follow the
same steps to get the dog to release the toy on
request, but this time, ask him to sit and offer him
a treat. While he’s eating the treat, put the tug toy
away. He should not have access to the tug toy
except when you are playing with him.
7. If the dog starts playing but then escalates to
the point where he’s no longer playing but instead
is aggressively guarding the toy, immediately
cease playing tug with him. The way to determine
if your dog has switched from play to aggression
is to watch for signs such as a stiff body, stiff tail,
“hard” eye contact and snarling (lifting/wrinkling
lips while growling). If the dog is becoming
aggressive, simply drop the toy and walk away.

Congratulations!
You have adopted a new
family member.
As your adoption counselor discussed with you, your dog displayed reactive
behavior towards other dogs while in the shelter. What does this mean?
It means that your dog may be more likely to rush towards other dogs
with tall posture, growl, alarm bark, and/or lunge at other dogs while on
leash. We began a successful management program for this behavior
while the dog was at the shelter and we highly recommend that if you choose to
adopt, you continue the program in your home. We suggest you follow the plan below,
beginning the moment your dog comes into your home.
the plan:
•
Continue to practice the “look” cue (using treats to reward the appropriate
behavior)
shown to you by your adoption counselor in the presence of other dogs and
without other dogs around.
•
Fit your dog with a Gentle Leader™, which can be found at your local pet supplies store.
Follow the DVD instructions to help your dog smoothly accept the device.
•
Give lots of treats to your dog when he acts in a relaxed, non-reactive manner
around other dogs.
•
Avoid introducing your dog to other dogs until you are able to recognize his
reactive behavior and the cues leading up to that point
and also have a few solid
verbal cues including “look at me” and “come.”
•
When introducing your dog to other dogs, be sure to have a loose leash.
If you are unable to do the preceding exercises, we suggest you choose another dog to adopt.
While we cannot 100 percent predict the future, research does show that dogs who display reactive
behavior towards dogs in the shelter are more likely to display the same behaviors in the home. It is
important to note that your dog’s reactivity towards other dogs has not been modified, but is simply
being managed by this program. We cannot guarantee that your dog can be off-leash with other
dogs without displaying aggressive behavior. If you choose to adopt, we highly recommend that you
contact a local trainer or behaviorist who uses positive reinforcement techniques to modify your dog’s
behavior. We want you and your dog to create a strong bond quickly post-adoption and for your dog
to have the opportunity to be able to work through his issues. Please take the time to ask yourself if
you are ready to take on a bit of a project.
program for
reactivity
towards
other dogs

Congratulations!
You have adopted a new family member.
As your adoption counselor discussed with you, your dog displayed some bossy behavior around
important resources while in the shelter. What does this mean? It means that your dog may
be more likely to control resources or attempt to control resources by guarding his food and toys
and/or body slamming you and/or rubbing you with his shoulder and then ignoring you. While we
conducted a management program with the dog while he was with us, we suggest that you
continue this work with the dog when you take him home. The simple premise of the program is
that you control the resources in the home using non-confrontation/non-physical methods. We
suggest you follow the plan below, beginning the moment your dog comes into your home.
The program requires you to ask the dog to “sit” before he receives anything that is
important to him. This can be used on a consistent basis throughout the life of your dog
and should be used to manage a dog that needs behavioral intervention.
By keeping clear rules in your house, your dog will understand that you control important resources. In
addition, he’ll learn that if he doesn’t defer to you, he will not receive items that are valuable to him. You
will have better and clearer communication with your dog using non-physical methods, which is the best
case scenario for both of you!
If you are unable to do the preceding exercises, we suggest you choose another dog to adopt. While we
cannot 100 percent predict the future, research does show that dogs who display anxiety around resources
in the shelter are more likely to display the same behaviors in the home. We want you and your dog to create
a strong bond early-on post-adoption and for your dog to have the opportunity to be able to work through his
issues. Please take the time to ask yourself if you are ready to take on a bit of a project.
the plan:
1. Teach the dog the “sit” cue.
•
Get dog to stand toe-to-toe with you.
•
Place bit of food between thumb
and forefinger.
•
Bring treat (lure) to dog’s nose and get
his attention with it. It is okay if he licks or
nibbles at it, but do not give him the treat yet.
•
Slowly raise the lure up and as the dog
follows it with his nose, move it back over
his head a few inches.
•
As his head tilts back, he is likely to sit.
•
As soon as the rear touches the floor,
say “yes” and give the dog the treat.
•
Practice 6-10 times in quick succession.
•
After the dog is anticipating the next move
and begins to sit before you move your hand
up and back, he is ready to learn the verbal
command. Take a piece of food, hold it in
your hand at about waist level and when the
dog looks like he’s ready to offer the
behavior, say “sit.” When he sits, say
“yes” and give him the food.
•
Dogs need the opportunity to generalize.
In order for him to really know the command,
you must practice it in many locations,
under various weather conditions, around
different levels of distraction, and on different
flooring surfaces.
2. You ask your dog to “sit” for the
following things to occur:
•
Receive his meals
•
Play with his favorite toys
•
Engage in play with you
•
Jump up to lay on the couch or bed
•
Go through the door
•
Cross the street
•
Have his leash put on
•
Exit the elevator
•
… Anything he really likes!
i hold the
resources!
