

Patternmaking
for Fashion Design
Helen Joseph-Armstrong
Fifth Edition

Pearson Education Limited
Edinburgh Gate
Harlow
Essex CM20 2JE
England and Associated Companies throughout the world
Visit us on the World Wide Web at: www.pearsoned.co.uk
© Pearson Education Limited 2014
All rights reserved. No part of this publication may be reproduced, stored in a retrieval system, or transmitted
in any form or by any means, electronic, mechanical, photocopying, recording or otherwise, without either the
prior written permission of the publisher or a licence permitting restricted copying in the United Kingdom
issued by the Copyright Licensing Agency Ltd, Saffron House, 6–10 Kirby Street, London EC1N 8TS.
All trademarks used herein are the property of their respective owners. The use of any trademark
in this text does not vest in the author or publisher any trademark ownership rights in such
trademarks, nor does the use of such trademarks imply any affi liation with or endorsement of this
book by such owners.
British Library Cataloguing-in-Publication Data
A catalogue record for this book is available from the British Library
Printed in the United States of America
ISBN 10: 1-292-02481-X
ISBN 13: 978-1-292-02481-3
ISBN 10: 1-292-02481-X
ISBN 13: 978-1-292-02481-3

Table of Contents
PEARSON C U S T OM LIBRAR Y
I
1
. Patternmaking Essentials for the Workroom
1
1Helen Joseph Armstrong
2
. Form Measurements and Figure Analysis
25
25Helen Joseph Armstrong
3
. Drafting the Basic Pattern Set
43
43Helen Joseph Armstrong
4
. Dart Manipulation
77
77Helen Joseph Armstrong
5
. Designing with Darts
111
111Helen Joseph Armstrong
6
. Stylelines
137
137Helen Joseph Armstrong
7
. Added Fullness
151
151Helen Joseph Armstrong
8
. Yokes, Flanges, Pin Tucks, and Pleat Tucks
167
167Helen Joseph Armstrong
9
. Contouring
185
185Helen Joseph Armstrong
10
. Collars
209
209Helen Joseph Armstrong
11
. Built-Up Necklines
237
237Helen Joseph Armstrong
12
. Cowls
247
247Helen Joseph Armstrong
13
. Skirts/Circles and Cascades
273
273Helen Joseph Armstrong
II
14
. Sleeves
349
349Helen Joseph Armstrong
15
. Kimono, Raglan, Drop Shoulder, and Exaggerated Armholes
383
383Helen Joseph Armstrong
16
. Buttons, Buttonholes, and Facings
417
417Helen Joseph Armstrong
17
. Plackets and Pockets
429
429Helen Joseph Armstrong
18
. Dresses Without Waistline Seams
447
447Helen Joseph Armstrong
19
. Strapless Foundation and Interconstruction
473
473Helen Joseph Armstrong
20
. Patternmaking for Bias-Cut Dresses
497
497Helen Joseph Armstrong
21
. Shirts
515
515Helen Joseph Armstrong
22
. Women's Jackets and Coats
537
537Helen Joseph Armstrong
23
. Men's Wear
573
573Helen Joseph Armstrong
24
. Capes and Hoods
625
625Helen Joseph Armstrong
25
. Knock-Off Copying Ready-Made Designs
641
641Helen Joseph Armstrong
26
. Pants
657
657Helen Joseph Armstrong
27
. Knits---Stretch and Shrinkage Factors
723
723Helen Joseph Armstrong
28
. Knit Top Foundations
733
733Helen Joseph Armstrong
29
. Activewear for Dance and Exercise
745
745Helen Joseph Armstrong
30
. Swimwear
767
767Helen Joseph Armstrong
31
. Introduction to Childrenswear
803
803Helen Joseph Armstrong
III
32
. Drafting the Basic Pattern Set: Measurement Taking and Standard Measurement Charts
811
811Helen Joseph Armstrong
33
. Collars, Sleeves, and Skirts
825
825Helen Joseph Armstrong
34
. Dresses and Jumpers
839
839Helen Joseph Armstrong
35
. Tops
851
851Helen Joseph Armstrong
36
. Pants and Jumpsuits
877
877Helen Joseph Armstrong
37
. Bodysuits, Leotards, Maillots, and Swimwear
901
901Helen Joseph Armstrong
38
. Bibliographic Credits
913
913Helen Joseph Armstrong
915
915Index
This page intentionally left blank

PATTERNMAKING TOOLS
Functions of Patternmaking Tools
Guide to Reading Ruler Increments
The Importance of Math
PATTERN PAPER
PATTERNMAKING TERMS
FABRIC TERMS
PATTERN GRAINLINE
DART
BLENDING, TRUEING, AND EQUALIZING
SPECIAL INFORMATION
Balance Line Terms
Styleline Guides
THE WAY WE WERE
PRODUCTION TERMS
BODY SCANNING
COMPUTER COMPANIES
LAST, BUT NOT LEAST
E-FIT SIMULATOR IS BORN
APPAREL PRODUCT DEVELOPMENT
COST SHEET
PATTERN CHART
DESIGN SPECIFICATIONS SHEET
Patternmaking
Essentials for the
Workroom
From Chapter 1 of Patternmaking for Fashion Design, 5/e. Helen Joseph-Armstrong.
Copyright © 2010 by Pearson Education. Published by Prentice Hall. All rights reserved.
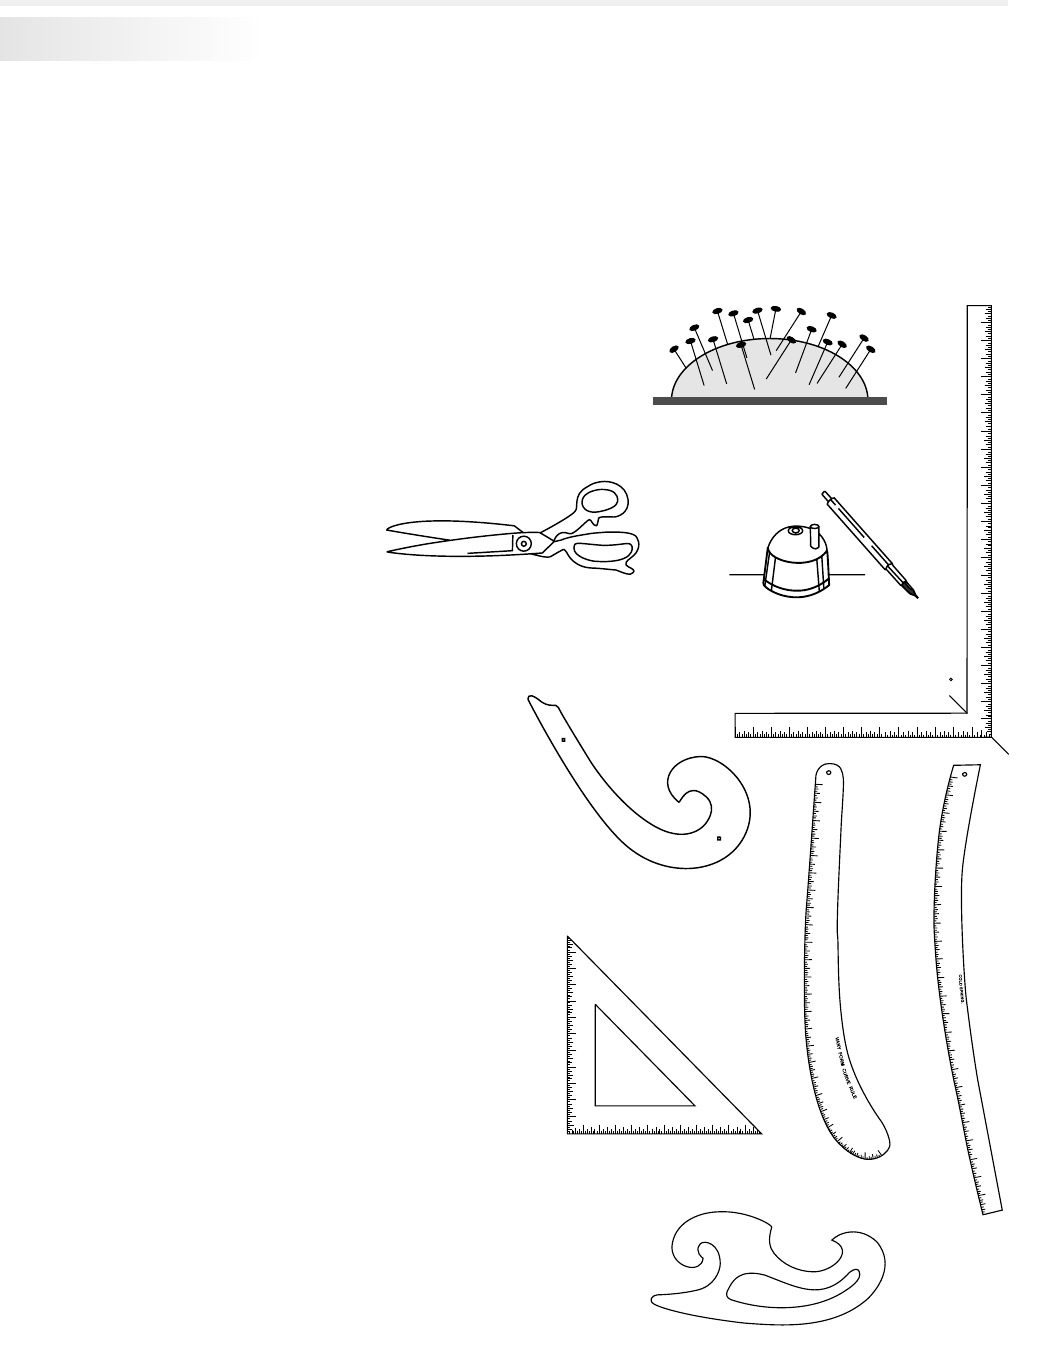
1. Straight pins:
___ Dressmaker silk #17 for draping and
fittings.
2. Straight pin holder:
___ Pincushion, or magnetic holder for wrist
or table.
3. Scissors:
___ Paper scissors.
___ Fabric scissors.
4. Pencils and pens:
___ Mechanical pencil and sharpener. (Use
#4-H lead for pattern work.)
___ Red and blue colored pencils to identify
pattern changes. Black, green, red, and
blue felt-tip pens for pattern information.
5. Rulers:
___ Flex general rule—1/2 × 12-inch (very
accurate).
___ 36-inch ruler.
___ 18 × 2-inch plastic rule (flexible for
measuring curves).
___ Tailor’s square—24 × 14-inch metal ruler
with two arms forming a 90° angle that
measures, rules, and squares
simultaneously.
___ Triangle with measurements to square
lines.
6. Curve rules:
___ French curve, Deitzgen #17 is one of
several curves used for shaping armhole
and neckline.
___ Sleigh curve, shapes necklines, armholes
and other curves, pockets, collars, and
cuffs.
___ Hip curve rule to shape hipline, hem,
lapels.
___ Vary form curve to blend and shape
armhole necklines.
PATTERNMAKING ESSENTIALS FOR THE WORKROOM
PATTERNMAKING TOOLS
To work efficiently, the patternmaker must have the proper tools and supplies. To communicate effectively in
the workroom and to minimize errors due to misunderstanding, the patternmaker should know and under-
stand terminology. This chapter introduces tools, supplies, and definitions of terms used in industry.
The professional patternmaker arrives on the job with all tools required for patternmaking. Each tool
should be marked with an identity symbol and transported in a carrying case. Tools may be purchased from
apparel supply houses, art stores, department stores, and yardage stores. Specialized tools, such as a rabbit
punch used to punch pattern holes for hanger hooks, are generally supplied by the manufacturer.
CO
LD SP
R
I
N
G
.
102-
CA
1
7
16
1
514
1
3
1
2
1
1
10
9
8
7
6
5
4
3
2
1
0
18
19
2
0
21
22
23
24
Vary form curve
2
2
21
20
19
18
1
7
16
1
5
1
4
1
3
1
2
1
1
1
0
9
8
7
6
5
4
3
2
1
0
23
2
4
M
A
D
E IN
U. S.
A.
10
0
-
C
Hip curve rule
French curve
1
1 2 3 4 5 6 7 8 9 1 0 11
234
56789
1011
Square/triangle
Sleigh curve
1
1 2 3 4 5
6 7 8 9 10 11 12 13 14
15 16 17 18 19 20 21 22 23 24
23456789
10
11121314
MADE IN U. S. A.
CO
LD SPRING. NEW YORK
45
Mechanical pencil and sharpener
Straight pins and cushion
2

PATTERNMAKING ESSENTIALS FOR THE WORKROOM
1
2
Ringer
Hanger
hook
7. Hanger hooks or ringers:
___ To hold patterns together while hanging
on rods.
8. Push pins:
___ For pattern manipulation and transferring
muslin patterns to paper.
9. Stapler and remover:
___ Prevents pattern slippage when cutting
several plys of paper together.
10. Magic mend scotch tape:
___ To mend pattern work.
11. Black twill tape:
___ Placement of stylelines on form and to
hold ease in place.
12. Notcher:
___ Cuts a 1/4 × 1/16-inch opening at the
pattern’s edge to indicate seam allowance,
center lines, and ease notches and to
identify front and back of patterns.
13. Tracing wheels:
___ Pointed wheel transfers pattern shapes to
paper.
___ Blunted wheel is used with carbon paper
to transfer pattern shapes to muslin.
14. Awl:
___ Pierces 1/8-inch hole in the pattern to
indicate the ending of darts, pocket, trim,
and buttonhole placements.
15. Metal weights (several):
___ Hold patterns in place for tracing and
marking.
16. Measuring tape—60 inches long:
___ Metal-tipped, linen or plastic to measure
the form. Metric is on the other side.
___ Metal tape 1/4 inch wide inside a
dispenser. It is convenient, flexible, and
very accurate.
17. Tailor’s chalk:
___ Clay, chalk, chalk wheel, or chalk marking
pencils in black and white. Use for
marking adjusted seams and stylelines.
18. Simflex folding measure:
___ Spaces button/button holes, pleats, tucks.
5
4
Metal tape
3

PATTERNMAKING ESSENTIALS FOR THE WORKROOM
Ease
Punch/circle pocket placements
Notch
inverse
corner
Functions of Patternmaking Tools
Tools provide the symbols used in marking fabric
and patterns in the production of garments. Sym-
bols are like a silent language that are understood
among the designer, seamstress, grader, marker
maker, and production personnel. Without these
symbols, garments would not be cut or stitched with
accuracy. Missing or misplaced symbols disrupt the
flow of production.
Notch Tool
The notch tool has a cutting blade that slips into the
pattern’s edge, leaving an 1/8- to 1/4-inch cut-out. As
the patterns are traced, the notch cut-outs are marked
on the fabric. The cutter slashes the fabric at these lo-
cations. The seamstress assembles and stitches the
garment parts following the notches (Figure 1).
The notch is used to indicate:
• Seam allowance (Figure 2).*
• Center lines.
• Identification of front and back patterns.
• Correct assembling of similar pattern parts
(Figure 3).
• Correct location of joining parts.
Gather and ease control (Figure 2).
Dart intake (Figure 1).
• Shoulder tip of extended shoulders.
• Waistline of one-piece garments.
• Zipper stopping point.
• Fold-back for hems and facings.
• Placement for inserts.
• Tension release (acute curves).
• Inverse corners (Figure 2).
*Unless instructed otherwise, 1/4-inch seams are not notched.
Overlocked seams are generally not notched.
Awl Punch and Circle
The awl puts a hole (or mark) on the pattern. The
hole is circled to notify the marker maker that a
drill is needed to burn a hole in the fabric, which
damages the garment. That is why the placement
of the drill hole is always inside the finished seam
(to cover the damage in the fabric).
• Dart back-off point (Figure 1).
• 1/8 inch in from corners.
• Buttonholes and buttons.
• Trimming.
• Pocket placements.
FRONTSIDE FRONT
SIDE BACKBACK
Figure 1
Figure 2
Figure 3
4
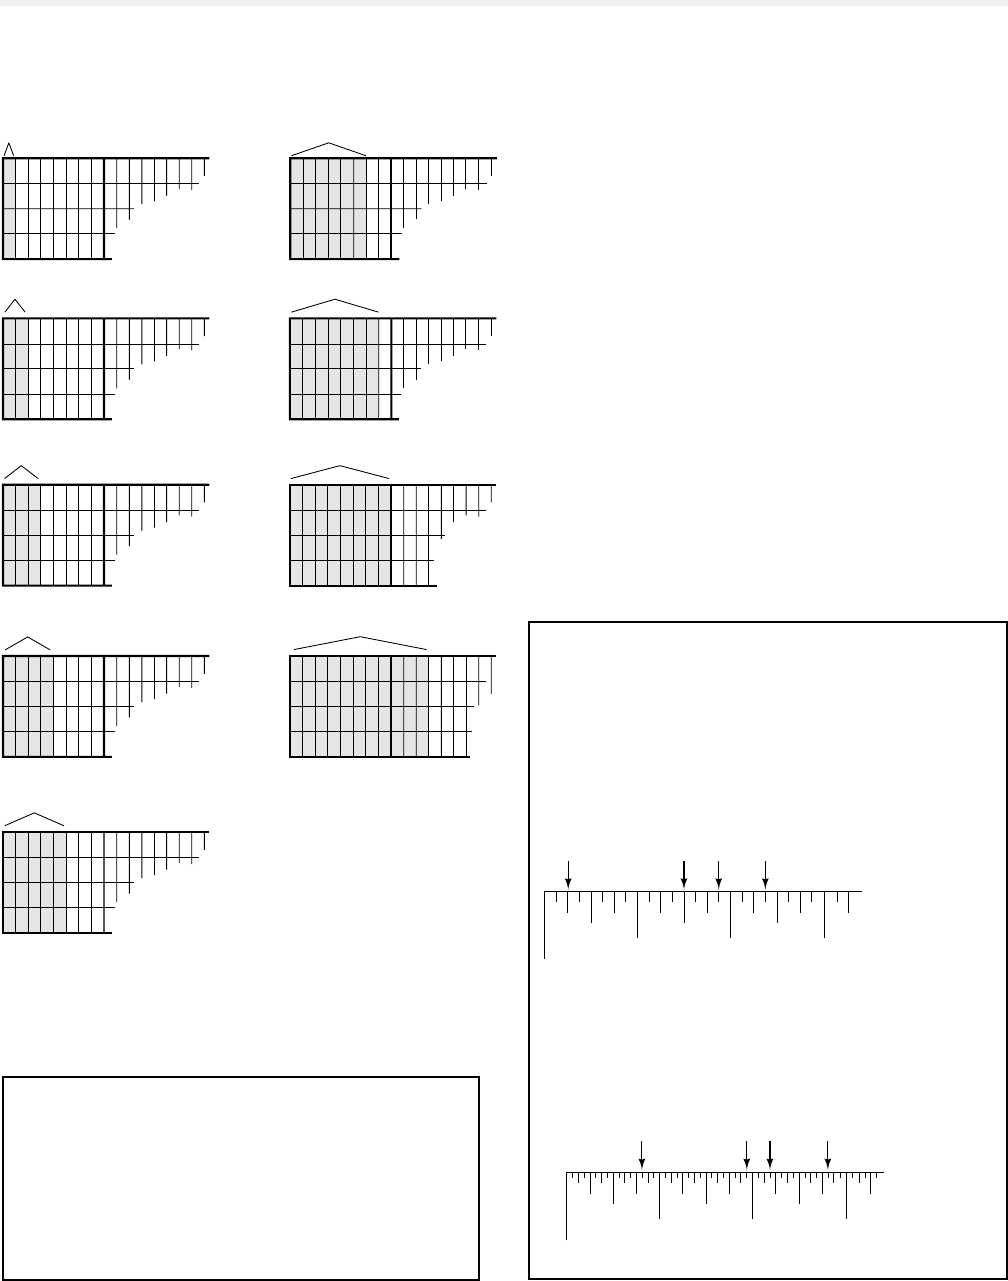
Test Your Math Skills
Write answers in the spaces provided. Also give
common denominators. Check answers at the
end of the chapter.
Test 1 Measure the distance between letters
given, starting from A; use 1/8-inch increments.
Test 2 Measure from the start of the ruler to A.
A to B, B to C, and C to D, at 1/6-inch
increments.
PATTERNMAKING ESSENTIALS FOR THE WORKROOM
1 x 1/8 = 1/8 "
1
1
3 x 1/8 = 3/8 "
1
2 x 1/8 = 1/4 "
1
4 x 1/8 = 1/2 "
1
5 x 1/8 = 5/8 "
6 x 1/8 = 3/4 "
1
1
7 x 1/8 = 7/8 "
YARDAGE IN INCHES
9 " = a quarter yard (1/4)
12 " = a third yard (1/3)
18 " = a half a yard (1/2)
24 " = 2/3 of a yard
36 " = 1 yard
2
2
2
2
2
2
2
1
11 x 1/8 = 1 3/8 "
2
1
2
* 1/16 " = one- half of 1/8 "
8x1/8=1"
The Importance of Math
Why should you have sufficient math skills to
read measuring devices: rulers, measuring tape, frac-
tions, and percentages? The answer is, to be eligible
for hire! In the fashion business, every phase of pro-
duction relies on the math skills of the associates to
stay in business.
For hire, you should be able to:
a. Take and record measurements of the form to
the exact 1/16 inch.
b. Compute yardage for single and mass-produced
garments.
c. Provide the exact measurements on spec sheets
for the production of garments.
d. Apply math instructions from a work sheet to
the developing project.
e. Operate a computer.
Decimal and Fraction Conversion
.063 = 1/16 .438 = 7/16
.125 = 1/8 .5 = 1/2
.188 = 3/16 .563 = 9/16
.25 = 1/4 .625 = 5/8
.313 = 5/16 .750 = 3/4
.375 = 3/8 .875 = 7/8
A BD C
123
8
ths
A _____ B
B _____ D
A _____ D
D _____ C
123
16
ths
A B C D
A _____
B _____
C _____
D _____
Guide to Reading Ruler Increments
(based on 1/8 inch*)
5

PATTERNMAKING ESSENTIALS FOR THE WORKROOM
BACK
FRONT
BACK SKIRT
FRONT SKIRT
SLEEVE
Basic Pattern Set
PATTERN PAPER
Pattern paper has code numbers to indicate its
weight from heavy to light:
Heavy-weight Paper—Weight Code
IX Granite Tag (.007) to 5X Granite Tag (.019)
• Heavyweight pattern paper is called tag board,
manila, or hard paper and is used primarily for
production patterns.
Light-weight Paper—Weight Code
1 to 5 Double-Duty Marking Paper
• Lightweight paper is called marking paper.
• Marking paper is used for making markers and to
develop first patterns.
• The paper is marked with a choice of symbols:
numbers, letters, short lines, and/or dots. The
symbols help when aligning the grainlines of the
patterns for tracing, and the numbers give an ac-
count of inches of the finished marker.
• Color-coded paper (color on one side only) has
two functions: to indicate right-side-up of the
pattern pieces and/or to indicate the design divi-
sion to which the patterns belong.
PATTERNMAKING TERMS
The following terms and definitions are related to
the workroom.
Pattern drafting. A system of patternmaking that
depends on measurements taken from a form or
model to create basic, foundation, or design pat-
terns. An example is the draft of the basic pattern set.
Flat patternmaking. A system of patternmaking
that depends on previously developed patterns. The
working pattern is manipulated by using the slash or
pivotal method to create design patterns.
Basic pattern set. A five-piece pattern set, consist-
ing of front and back bodice and skirt and a long
sleeve, which represents the dimensions of a specific
form or figure. It is developed without design fea-
tures. The traced copy is referred to as a working
pattern.
Working pattern. Any pattern used as a base for
manipulation when generating design patterns. In
this text the basic pattern set is the base for design
projects.
6

PATTERNMAKING ESSENTIALS FOR THE WORKROOM
Selvage
Selvage
Lengthwise grain(warp)
Crosswise grain (weft)
True bias
(45° angle)
FABRIC TERMS
Muslin. A plain-woven cotton made from bleached
or unbleached corded yarns in a variety of weights:
• Coarse-weave: Used for draping and testing basic
patterns.
• Light-weight: Used for softly draped garments.
• Heavy-weight: Firmly woven, used for testing tai-
lored garments, jackets, and coats.
Grain. The direction in which the yarn is woven or
knitted (lengthwise grain, or warp; crosswise grain,
or weft).
Lengthwise grain (warp). Yarns parallel with sel-
vage and at right angles to the crosswise grain. It is
the most stable grain.
Crosswise grain (weft). Yarns woven across the fab-
ric from selvage to selvage. It is the filling yarn of
woven fabrics. Crosswise grain yields to tension.
Selvage. The narrow, firmly woven, and finished
strip on both lengthwise grain edges of the woven
fabric. Clipping selvage releases tension.
Bias. A slanting or diagonal line cut or sewn across
the weave of the cloth.
True bias. The angle line that intersects with the
lengthwise and crosswise grains at a 45° angle. True
bias has maximum give and stretch, easily conform-
ing to the figure’s contours. Flares, cowls, and drapes
work best when cut on true bias.
Bowing and skewing. When filler
threads do not interlace with the
straight grains at 90°, bowing and
skewing, or a one-sided combination
occurs and is often sent to industry
in that condition unless otherwise
instructed.
Skewing Bowing
7

PATTERNMAKING ESSENTIALS FOR THE WORKROOM
S- T- R- E- T- C- H
Selvage
Selvage
Thread fill on the warp.
Thread fill on the weft.
S- T- R- E- T- C- H
Selvage
Selvage
Figure 1: Controlling the Grain
Finding the grainline. Pull a filler thread (weft)
on the cross-grain selvage to selvage. Cut through
the channel in preparation for stretching. Do not
trim the other end.
Figure 2: Aligning the Grainline
To correct bowing or skewing. Pull the fabric diago-
nally at opposite ends of the fabric. Repeat at the
other ends. This process helps to align the straight
grain (warp) and crosswise grain (weft); then press to
a perfect square.
This process can be done for individual gar-
ments but is impractical for mass-produced designs.
However, the manufacturer can request, at a cost,
to have the problem corrected by the fabric com-
pany. Computer-controlled weaving can correct the
problem.
Pull a weft
thread on
grain.
Trim
Figure 3: Thread-Marking Grains
Pull straight and filler threads through the squared
fabric and with colored threaded needle, slip
through the channels for marking.
Couture salons prepare toile in a similar man-
ner, as do some fashion schools, in preparing muslin
for draping projects. It is also an excellent way to in-
troduce beginning students to the straight and cross
grains that make up woven fabrics.
Thread lines allow the draper to view the grain-
line as the design is being created.
Figure 1
Figure 2
Figure 3
8

PATTERNMAKING ESSENTIALS FOR THE WORKROOM
Straight
Bias
Crosswise
Selvage
Selvage
Straight Grainline
PATTERN GRAINLINE
The pattern grainline is a line drawn on each pat-
tern piece (from end to end) to indicate how the
pattern should align with the lengthwise grain of
the fabric. Regardless of where the grainline is
drawn on the pattern, it will always be placed on the
fabric so that the grainline is parallel to the selvage
edge. Pattern placement is illustrated in Figure 1.
The effect of grainline on garments is shown in Fig-
ures 2, 3, and 4.
Direction of Grainline
• Vertical grainlines are drawn parallel to center
for garments cut on straight grain (Figure 2).
• Bias grainlines are drawn at an angle to center
(45° angle for true bias) for garments cut on the
bias (Figure 3).
• Horizontal grainlines are drawn at right angles
to center for garments cut on crosswise grain
(Figure 4).
Grainline Arrows
• Arrows placed at both ends of the grainline indi-
cate that the top of the pattern may be placed in
either direction along the lengthwise grainline of
the fabric (for fabrics without a nap).
• An arrow placed at the top or the bottom of the
grainline indicates that the pattern must be placed
in one direction only (for fabrics with a nap).
Crosswise grainline
Bias Grainline
Figure 1
Figure 2
Figure 3
Figure 4
9

PATTERNMAKING ESSENTIALS FOR THE WORKROOM
FRONT
Bust point
Dart point
Dart intake
Dart leg
Draw straight
line to true
side seam
Side dart
folded
FRONT
DART
Bust point. A designated place on the bust and pat-
tern and referred to in flat patternmaking as the piv-
otal point or apex (Figure 1).
Dart. A wedge-shaped cut-out in a pattern to control
the fit of a garment when stitched.
Dart legs. The two lines that converge at a predeter-
mined point on the pattern.
Dart intake. The amount of excess (or space) con-
fined between dart legs. Its purposes are to take up
excess where it is not needed and to gradually re-
lease fabric where it is needed to control the fit of
the garment.
Trueing. The blending and straightening of pencil
lines, crossmarks, and dot marks for the purpose of
establishing correct seam lengths—for example,
trueing a side seam having a side dart.
• Fold dart and draw side seam (Figure 2a).
• Trace the side seamline (Figure 2b).
• Unfold dart and pencil in the dart (Figure 2c).
Figure 1
Figure 2a
Figure 2b
Figure 2c
10

PATTERNMAKING ESSENTIALS FOR THE WORKROOM
Equalize
Equalize
Equalize
Equalize
Equalize
Blend
Blend
Blend
Blend
BLENDING, TRUEING,
AND EQUALIZING
Uneven curves of joining seams can be blended by
equalizing the differences. The adjusted seamlines
are blended smoothly along the seamline, especially
hiplines and leglines. Figure 1.
Blending. A process of smoothing, shaping, and
rounding angular lines along a seam for a smooth
transition from one point to the next and for blend-
ing marks made on the pattern or muslin. (Blending
includes trueing.) Figures 2a, 2b.
SPECIAL INFORMATION
Right-side-up (when sides differ). Instruction ap-
plies to asymmetrical designs (right side differs from
the left side) and for patterns cut from engineered
fabrics such as border prints, randomly spaced flow-
ers, geometric forms, and multiple colors. Such fab-
rics require specific pattern placement so that the
fabric design can be arranged in the same location
for all garments cut from that fabric. Right-side-up
(RSUP) indicates to the marker maker that the pat-
tern is to be placed face up on the marker.
Detail location. Mark the location in which a de-
tail is to be placed on the pattern. This will ensure
that the flower, abstract detail, or stripes will always
be on the correct side and in the correct place on the
garment.
Right- side up
Mark stripe on pattern at desired location
Stripe placement.
Figure 1
Figure 2a
Figure 2b
11

PATTERNMAKING ESSENTIALS FOR THE WORKROOM
Pin marking
Style tape
Styleline Guides
Figures 5a, b
Pin marking. Placing a series of pins through the
muslin or form to evaluate styleline placement.
Style tape marking. Styleline placement by color
adhesive tape to evaluate design features and to pro-
vide a guide when developing design patterns.
Balance Line Terms
Plumb line. A vertical
line that is at right angles
with the floor. Used to
determine the balance
of the figure.
Perpendicular line.
A straight line at right
angles to another line.
(See right angle.)
Vertical line. A line that
is straight up and down.
Horizontal line. A line
parallel with the floor.
Right angle. The 90°
angle formed by two in-
tersecting lines, referred
to as a squared line.
Asymmetrical line. A
center line with unequal
proportions on either
side of it.
Symmetrical line. A
center line with equal
proportions on either
side of it.
PERFECT FIGURE
Perfectly balanced
garment
IMPERFECT FIGURE
Perfectly balanced
garment
IMPERFECT FIGURE
Imperfectly balanced
garment
Balance. The perfect relationship between parts
that, when combined, form a unit (or whole) in
which each part is in exact proportion and harmony
with all others.
Balancing a pattern. Finding and adjusting the dif-
ferences between joining pattern parts to improve
the hang and fit of the garment.
Horizontal balance line (HBL). A reference to any
line marked around the form that is parallel with the
floor. Patterns are also marked with horizontal bal-
ance lines squared from the center lines representing
the crosswise grain when the garment is cut in fab-
ric. The HBL lines help when balancing the patterns.
Figure 5a
Figure 5 b
12

PATTERNMAKING ESSENTIALS FOR THE WORKROOM
The Way We Were
Clothing has been manufactured in essentially the same way
since the invention of the sewing machine in the mid-nineteenth
century. Old-fashioned, labor-intensive methods are still used
by some small manufacturers and designers of custom-made
apparel because they cannot afford technical upgrades. Personal
computers and inexpensive software are changing apparel
design, and even small manufacturers can afford
computer-assisted apparel production applications.
Today, more than 90 percent of apparel sold in America
is manufactured off-shore. This reality has accelerated use
of computer-assisted apparel production methods and
the Internet.
In the 1970s, grading and marker making was computerized,
followed in the 1990s by large computer-aided design (CAD)
systems taking over patternmaking, fabric design, and
design graphics.
Today, even the smallest manufacturer can rent
hardware and software to assist the design and production
processes. Computer-generated patterns, markers,
specifications, and cost sheets can be sent via the Internet
to factories located around the world. Though some jobs
have been lost, designers, patternmakers, marker makers,
graders, and cutters are still needed in this fast-paced
business.
Computer companies offer seminars for students
and current manufacturing employees to keep them
updated on new technology. Fashion schools have
added computer-assisted technology courses to their
curriculum.
TukaTech set up Tukacenters in America as an
innovation for students and those owning small businesses.
They can produce patterns and samples from designs using
TukaTech software and have the patterns printed out at a local Kinko’s.
Another innovation by TukaTech and the Fashion Book Store is
Fashion Project Café, which is housed in the Fashion Mart at Los Angeles,
California. The project was conceived as an associated service for
manufacturers large and small. The service center leverages the most
advanced technology in computer aided patternmaking, grading,
and 3-D sewing that streamlines apparel production, reduces cost,
and increases speed and quality to the market.
Even though American manufacturing is being outsourced to other
countries, the entrepreneur can always find a niche in this dynamic
industry that values change. Fashion-savvy youth and innovative fashion leaders still demand innovative
apparel. The mature customer searches for attractive garments that fit his or her changing figure.
Flexibility, research, and knowledge of a customer’s needs are the requirements of a successful apparel
manufacturer of any size.
Now that you have read the introduction, you are one step closer to reaching your goals. Go for it!
13

PATTERNMAKING ESSENTIALS FOR THE WORKROOM
Courtesy: TukaTech
PRODUCTION TERMS
First pattern. A first pattern is the original pattern
developed for designs. The first pattern is generally
made on marking paper and requires fitting and pat-
tern corrections. Half a pattern is developed in the
workroom (unless instructed otherwise). An asym-
metrical design always requires a full pattern. Unless
the garment is dropped from the line, it will be
tested for fit until perfect.
Production pattern. A production pattern is the fi-
nal corrected and error-free copy. The pattern con-
tains every pattern piece required to complete the
garment. The pattern is used by the grader for siz-
ing and by the marker maker for fabric layout. See
Figure 1c. A pattern chart is placed in front of the
pattern set and a design tag is stitched to the gar-
ment for tracking.
Marker. A marker is the arrangement of pattern
pieces, either manually traced on marking paper or
patterns laid on a special paper and photographed,
or patterns are digitized for computer application in
laying out the marker. All pattern symbols are
marked on the patterns. Patterns are interlocked;
sizes are mixed to eliminate fabric waste. Grainlines
on the patterns lay parallel with the selvage, with
one exception; small patterns are fit into available
space without regard to the grainline. The printout
paper marker is laid on top of many layers of fabric.
Patterns are cut either manually or by computer.
555
50
555
50
555
50
555
50
555
50
555
50
555
50
555
50
555
50
555
50
555
50
Traced Marker
Figure 1a
Figure 1b
Photo Marker
Figure 1c
Digitized Marker
14

PATTERNMAKING ESSENTIALS FOR THE WORKROOM
Computer Graded Patterns
Nesting of a graded pattern set.
Courtesy: TUKATECH
Fold
Paper
TABLE EDGE
Grader. A grader increases and decreases the size of
patterns based on the company’s perfected sample
(example: model size 10). The company sets its re-
quirements for grade length, circumference, and
width. Grade sizing differs from company to com-
pany. Graded patterns are done singularly, or graded
Hinge ruler. The Hinge ruler was originally created
by Kay Cleverly, who gave the ruler to Eleanor
Davis, who wrote the instructions. A version of
this ruler may be purchased through Vecchiarelli
Bros, Inc.
Dario grading machine. Purchase through
Vecchiarelli Bros., Inc., 121 W. 15th Street, Los
Angeles, CA 90015. Website: www.vebros.com;
telephone: 213-749-5944.
one on top of the other (nesting). Today most grad-
ing is done by computer; however, grading can be
done using the Dario grading machine, or manually
with the Hinge ruler or its equivalent. The graded
patterns go to the marker maker as the next step to-
ward production.
15

Digitizing
Courtesy: TukaTech
PATTERNMAKING ESSENTIALS FOR THE WORKROOM
Digitizer. Converts data to digital form for use in a
computer. A handheld mouselike device that, when
activated, transfers pattern shapes electronically to
the electronic work table. Pattern grading can also
be done without the table with greater speed.
Knocking off garments is another use of the digitizer,
as is two-dimensional pattern correcting.
Cutter. Cutting is done by hand using an electric
cutting machine. A skilled cutter’s hand secures and
moves the many plies of cut fabric away while the
other hand controls the cutting machine.
Computer cutting. The cutting blade is secured by
a safety cover as the blade penetrates plies of fabric.
The cutting blade is controlled by a digitized mea-
surement card.
BODY SCANNING
Body scanning is another tool that helps industry in
devising the best set of measurements for its cus-
tomers. The body scanner is a light-emitting device
that can produce scans accurate to 1/16 inch. Body
scanning takes place in a boxlike cube and replicates
the body measurements in three-dimensional (3D)
format. Several individuals, as well as large research
labs, have been working on this concept for years. It
has come of age, even though its full potential has
yet to be realized.
COMPUTER COMPANIES
Computer companies offer automated systems that
include fabric and garment design; pattern design,
grading, and marking; high-speed jet plotters; single-
ply cutters; spreading and cutting; unit-production
system; and electronic tracking in sewing, ware-
housing, distribution, and manufacturing.
Service to manufacturers by computer compa-
nies varies. Company websites are given below if
you would like additional information.
TukaTech: www.tukatech.com
Gerber: www.gerbertechnology.com
Lectra: www.lectra.com
Pad: www.padsystem.com
Investronica: www.investronica.com
Optitex: www.optitex.com
16

LAST, BUT NOT LEAST
Fitter. The fitter is indispensable in finalizing the fit
of garments for the next phase in production. A
good fitter examines inside the garment for cor-
rectly stitched seams before analyzing the fit. Fitting
sessions include the designer, assistant, and pattern-
maker in real time, or fitting is done by E-Fit simu-
lation. A garment often requires several cycles
before a perfect fit is achieved.
Sample sewer. The designer and patternmaker de-
pend on the expertise of the sample sewer for infor-
mation about the garment. Do seams match? Are
there too many notches, or not enough? Are the
notches placed correctly? Are there difficulties in
sewing the garment together?
E-FIT SIMULATOR IS BORN
In 2004, E-Fit Simulator software was developed by
the innovative mind of Iva Sareen, president of
PATTERNMAKING ESSENTIALS FOR THE WORKROOM
Courtesy: TukaTech
E-Fit Simulation
* The 3D model is a scan of a live body (male, female, and children of any size). The model is transferred to the E-Fit Simulator; a bone
structure is added; then animation is applied for real-time motion: walking, sitting, bending, and, yes, dancing.
TukaTech, who thought that fit approval, though
down to a week, was not good enough for fast fash-
ion developers who wanted their samples digitally
on the same body in electronic form.* E-Fit Simula-
tor software allows the entire garment to be sewn
electronically on a digital model, all in 3D CAD,
exactly the same as a Fit Model or fit form. Apply the
fabric print or color and properties to see in motion
if the garment fits on that model.
The tension map shows where the garment is
tight or loose, or has too much material at every
movement, exactly the way a live fit model would
give feedback. The X-ray mode allows the pattern-
maker to see in 3D exactly where to make the adjust-
ment on a 2D flat pattern, just like being in a fit
session with a live model. Once patterns are corrected,
a final garment can be sent electronically as a picture
or Windows media movie, showing how the garment
looks and fits. The designer can do e-fitting sessions
on his or her laptop anywhere and get approval
within hours, sometimes without making a physical
sample.
17

PATTERNMAKING ESSENTIALS FOR THE WORKROOM
FABRICS
Bauhaus
Brown
Leather
Surly Brown
100% Wool
Tweed
Golden
Grape
Alpaca
Wool
London Gray
Suede
Clockwork
Orange
Mohair
Plaid
FRONT AND BACK FLATS
JACKET FEVER
CUSTOMER
THE ULTIMATE
JACKET
2002
MY CUSTOMER
is a modern woman
who loves to
wear different hip
jackets as an
expression of her
moods and youthful
cool.
Courtesy:
Fashion Illustration for Designers by Kathryn Hagen
APPAREL PRODUCT
DEVELOPMENT
A commercial apparel designer is responsible for
product development, though specific duties vary
from company to company. The important elements
needed to create a successful commercial line are:
• Knowledge of the consumer. A garment should be
suitable for the person’s age, image, and lifestyle.
• Price. Consumers evaluate the cost of a garment
by anticipating use and pleasure received by
wearing it.
• Aesthetics. The design, color, and decoration of a
garment should enhance the face and figure of
the consumer.
A designer starts a new line by researching color
trends and fabric lines. Styling is determined by the
designer’s taste level, price of the line, the season,
degree of fashion taste of the manufacturer, and past
performance of specific styles.
The designer, assisted by design room person-
nel, may sketch, drape, or use a computer or flat pat-
terns to create the first samples. A typical design
room is staffed by an assistant designer, first pattern-
maker, sample cutter, and sample makers. Larger
manufacturers add sketchers, fit models, and other
assistants.
Merchandising the line is important to weed out
the styles that do not sell well. The final line is
shown to store buyers in the showroom, taken to re-
tailers by traveling sales representatives, sent via
computer images to buyers, and promoted through
trade advertisements and buying office networks.
Production pattern development follows sales
and prepares the first sample to be sewn efficiently
in a factory and to fit an average customer. The de-
signer is usually involved in sales presentations and
all decisions that affect the product’s aesthetics.
For in-depth information about product devel-
opment, read Inside Fashion Design, Fifth Edition,
written by Sharon Lee Tate, and published by
Pearson/Prentice Hall.
18

PATTERNMAKING ESSENTIALS FOR THE WORKROOM
COST SHEET
A cost sheet is a complete record of each design and
is used to cost the garment and establish the
wholesale price. The top part of the form (items 1
and 2) is completed in the design room. It should in-
clude the names and telephone numbers of the
salesperson and the fabric and trim companies, as
well as fabric swatches, a sketch, and special pattern
information or instructions. A blank copy is in-
cluded in the back of the book for duplicating.
The original copy is for the manufacturer or pro-
duction person, who completes the lower part
(items 3 and 4) and marks yardage. This provides the
manufacturer with information required for produc-
tion. A duplicate kept in the design room for quick
reference makes for fewer interruptions in the
design department.
19

PATTERNMAKING ESSENTIALS FOR THE WORKROOM
PATTERN CHART
The pattern chart is a complete record of all pattern
pieces within the pattern set. It also includes swatches
and special pattern information. Each pattern shape is
identified by name and number of pieces to be cut.
A color code is used to distinguish linings and inter-
linings from other pattern pieces. When completed,
the chart is placed in front of the production pattern
and given to the production manager. Some charts re-
quire sewing guides, as shown.
20

PATTERNMAKING ESSENTIALS FOR THE WORKROOM
DESIGN SPECIFICATIONS SHEET
The design specifications sheet is a record of the finishing requirements for each design. It is used by those re-
sponsible for finishing to ensure that the garment meets company standards. Study the chart and compare the
information to the design it represents.
21

PATTERNMAKING ESSENTIALS FOR THE WORKROOM
Form
Form make and type ______
Size ______ Year ______
FORM MEASUREMENT
CHART
Circumference Measurements
1. Bust: ______, plus 2 ease ______
2. Waist: ______, plus 1 ease ______
3. Abdomen: ______
4. Hip: ______, plus 2 ease ______
Upper Torso (Bodice)
5. Center length: F ______, B ______
6. Full length: F ______, B ______
7. Shoulder slope: F ______, B ______
8. Stra p: F ______, B ______
9. Bust depth: ______, radius ______
10. Bust span: ______
11. Side length: ______
12. Back neck: ______
13. Shoulder length: ______
14. Across shoulder: F ______, B ______
15. Across chest: ______
16. Across back: ______
17. Bust arc: ______
18. Back arc: ______
19. Waist arc: F ______, B ______
20. Dart placement: F ______, B ______
Special Information
Set form to desired height and measure the following:
C.F. waist to floor ______
C.B. waist to floor ______
C.B. neck to floor ______
Lower Torso (Skirt/Pant)
22. Abdomen arc: F ______, B ______
23. Hip arc: F ______, B ______
24. Crotch depth: ______
25. Hip depth: C.F. ______ C.B. ______
26. Side hip depth: ______
27. Waist to ankle: ______
Waist to knee: ______
Waist to floor: ______
28. Crotch length: ______
Vertical trunk: ______
29. Upper thigh: ______
Mid-thigh: ______
30. Knee: ______
31. Calf: ______
32. Ankle: ______
Foot entry: ______
22

PATTERNMAKING ESSENTIALS FOR THE WORKROOM
PERSONAL MEASUREMENT
CHART
Circumference Measurements
1. Bust: ______ 3. Abdomen: ______
2. Waist: ______ 4. Hip: ______
Upper Torso (Bodice)
5. Center length: F ______ B ______
6. Full length: F ______ B ______
7. Shoulder slope: F/R ______ F/L ______
B/L ______ B/L ______
8. Strap: F/R ______ F/L ______
9. Bust depth: F ______ Radius ______
10. Bust span: ______
11. Side length: F/R ______ F/L ______
12. *Back neck: ______
13. Shoulder length: ______
14. Across shoulder: F ______ B ______
15. Across chest: ______
16. Across back: ______
17. Bust arc: ______
18. Back arc: ______
19. Waist arc: F ______ B ______
20. Dart placement: F ______ B ______
21. Standard dart intake:
Front 1" (2 darts 1/2 to 5/8")
Back 2" (2 darts 1 to 1 1/4")
Lower Torso (Skirt/Pant)
22. Abdomen arc: F ______ B ______
23. Hip arc: F ______ B ______
24. Crotch depth: ______
25. Hip depth: CF ______ CB ______
26. Side hip depth: R/S ______ L/S ______
27. Waist to knee ______ ankle _____ floor _____
28. Crotch length _____ Vertical trunk: ______
29. Upper thigh: ______ Mid -th igh: ______
30. Knee: ______
31. Calf: ______
32. Ankle: ______
*Measuring the Arm
Use your measurements (shown by asterisks) for the
draft of the basic sleeve. Read the instructions. Use
the cap height from the sleeve measurement chart, or
use the formula to determine cap height.
(35) Biceps
(36) Elbow
straight
(37) Wrist
(36) Elbow bent
(38)
Around
hand
Circumference
Personal Figure Variations
A. Head height relationship:
Bust ______ Waist ______
Crotch ______ Knee ______
B. Bust/back/chest relationship:
Bust ______ Back ______
C. Hip types: ______
D. Arm types: ______
E. Abdominal/thigh relationship:
Abdominal ______ Thigh ______
F. Shoulder type ______
G. Shoulder/hip relationship:
Shoulder ______ Hip ______
H. Leg types ______
I. Leg types ______
J. Figure stance: ______
K. Asymmetric figure. Record high side, right and
left.
Shoulder: ______ Hip: ______
L. Tilting waistline. Record high and low.
Front: ______ Back: ______
M. Bust/waist ______
Waist/hip ______
Bust/hip ______
N. Other variations: ______
Mid- wrist bone
Elbow length (34)
(elbow bone)
Overarm length (33)
(shoulder tip to
wristbone)
Length
Personal Arm
Measurements
33. Overarm length:* ______
34. Elbow length:* ______
35. Biceps plus 2":* ______
36. Elbow bent (reference) ______
37. Wrist (reference) ______
38. Around hand (reference) ______
*39. Cap height ______
23

Test 1: A to B 10 (8ths), or 1-1/4"; B to D 3/8";
A to D 13 (8ths) or 1-5/8"; D to C 4/8", or 1/2"
Test 2: A 13/16"; A to B 18/16ths, or 1-1/8";
B to C 4/16ths, or 1/4"; C to D 9/16ths, or 5/8"
PATTERNMAKING ESSENTIALS FOR THE WORKROOM
ANSWERS TO SELF-EVALUATION
TESTS
24
From Chapter 2 of Patternmaking for Fashion Design, 5/e. Helen Joseph-Armstrong.
Copyright © 2010 by Pearson Education. Published by Prentice Hall. All rights reserved.
Form Measurements
and Figure Analysis
FORM MEASUREMENTS AND FIGURE ANALYSIS
WHO IS THE STANDARD IDEAL FIGURE?
Who Needs Her?
Does This Elusive Figure Have Standards?
Do Perfect Ratio Measurements Mean
Perfect Proportions?
Forms: Willow-Caned to Humanlike
PATTERN INDUSTRY STANDARDS
DEPARTMENT STORE STANDARDS
OTHER ATTEMPTS AT STANDARDIZATION
ASTM STANDARDS
Figure Analysis for Personal Use or
for Client
LANDMARK TERMS
MEASURING FORM AND MODEL
Preparing the Form for Measuring
Preparing the Model for Measuring
Taking Measurements
HORIZONTAL BALANCE LINE (HBL)
CIRCUMFERENCE FOR FORM AND MODEL
MEASUREMENTS
HORIZONTAL ARC FOR FORM AND MODEL
MEASUREMENTS
Front
Back
Model for Personal Fit
Neck Circumference
VERTICAL MEASUREMENTS FOR FORM
AND MODEL
Front and Back—Form and Model
Personal Fit: Asymmetric Verification
New Strap Measurement
STANDARD MEASUREMENT CHART
Form
Measurements
and Figure Analysis
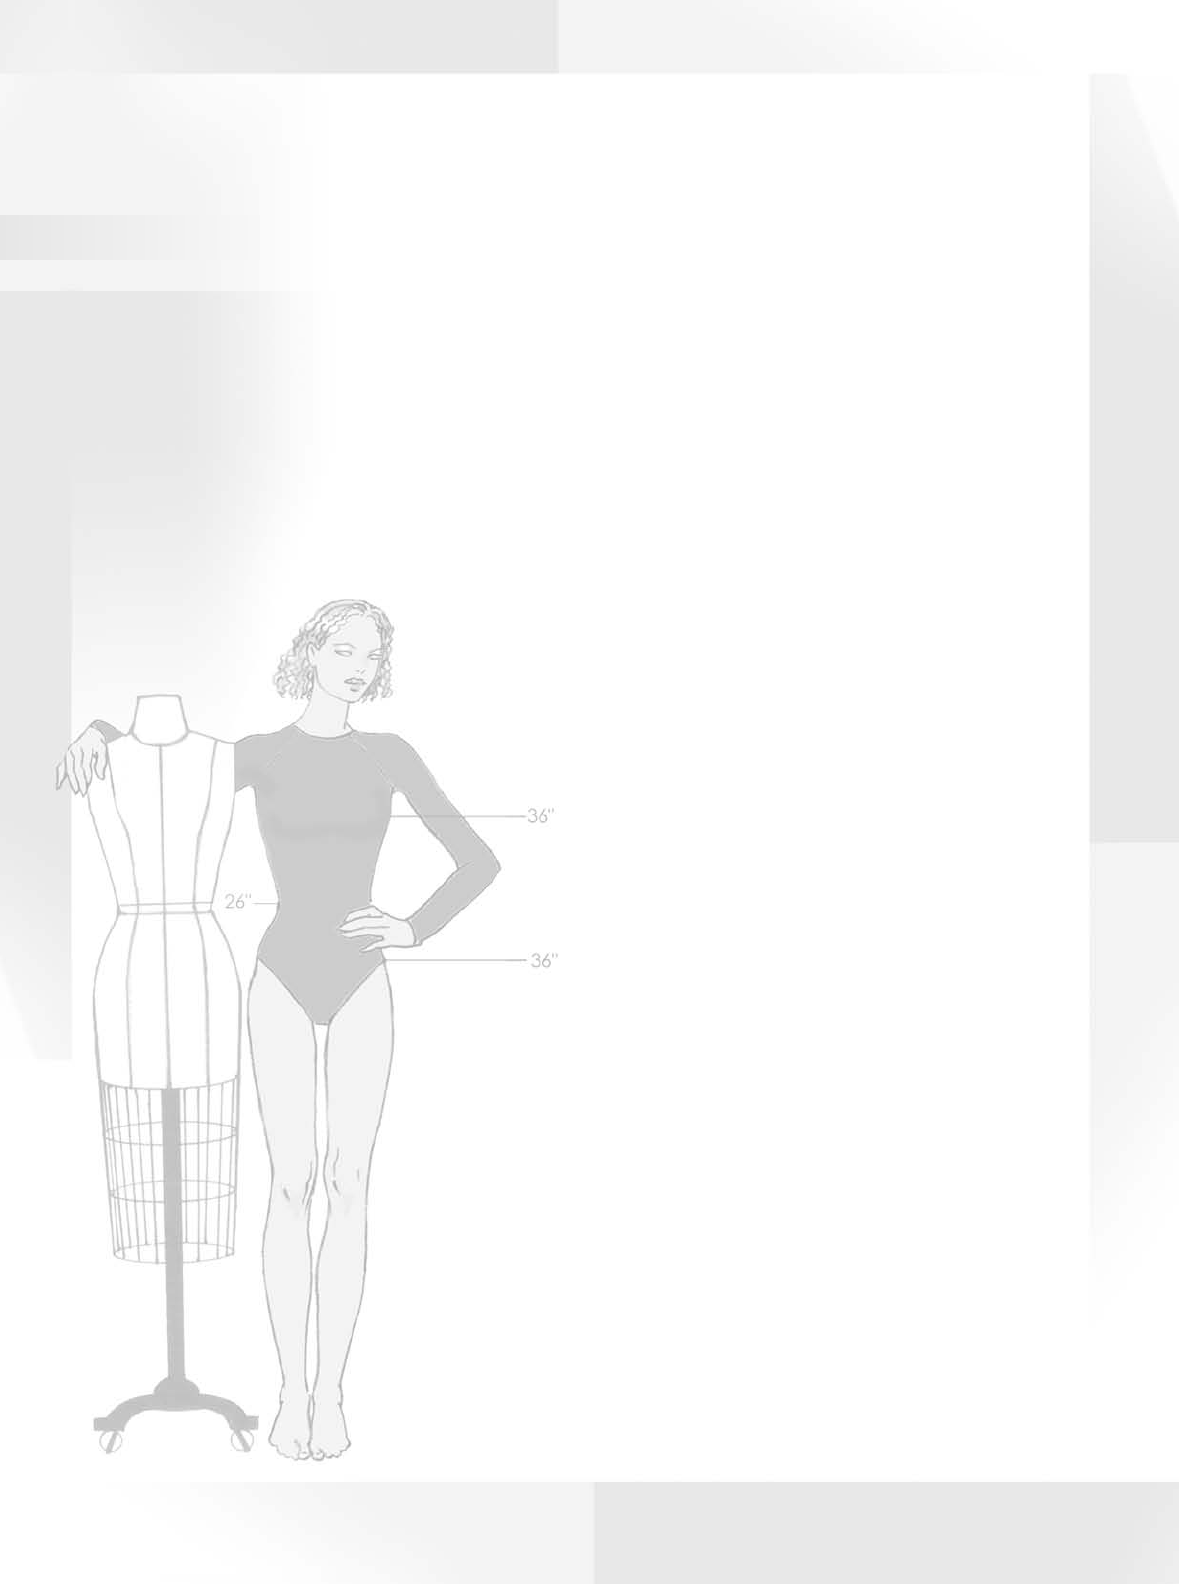
26

36"
36"
26"
WHO IS THE STANDARD
IDEAL FIGURE?
She is a composite figure whose measurement stan-
dards are based upon who is listening to whom. She
evolved from consumer feedback to buyer, buyer to
manufacturer, and manufacturer to model form com-
pany. Her standards are whatever successful manu-
facturers, commercial pattern companies, chain and
department stores, and industrial form companies
say they are. She is a form; she is a figure; she is a set
of measurements. And her silhouette changes at the
slightest whim of fashion. She is considered “ideal”
only when her measurements satisfy a majority of
consumers.
Who Needs Her?
Technicians need her dimensions for patternmaking
and fittings; designers need her silhouette for creating
new designs; manufacturers need her for showings;
models need to have her dimensions to be hired; and
consumers need her for their representation.
Does This Elusive Figure
Have Standards?
Even though her dimensions vary, she does have
standards. She is symmetrical, with an upright
stance and aesthetically pleasing body proportions,
with a ratio of 10- to 12 1/2-inch differences among
bust, waist, and hips. These standards are based
strictly on Western concepts of what is ideal. There
will never be a universally acceptable standard be-
cause of the variety of anatomical figure types.
Other countries set their own standards based on
their own regional concept of the ideal figure.
Some manufacturers prefer not to use standard-
ized measurements. They want the flexibility to
change measurements quickly to suit customer
needs. Increasing world trade has created a need for
a central database that contains regional measure-
ments for non-Western trading partners. Computer
technology may ultimately provide ready access to
such information.
Do Perfect Ratio Measurements
Mean Perfect Proportions?
Not necessarily so. Bulk (flesh) distribution around
the skeletal frame must be considered—for example,
large back and small bust; large bust and small back;
wide, flat front waist; and rounded, protruding back
waist; large hip and flat stomach; protruding stom-
ach and flat buttocks.
FORM MEASUREMENTS AND FIGURE ANALYSIS
27

FORM MEASUREMENTS AND FIGURE ANALYSIS
Forms: Willow-Caned to Humanlike
For the past 140 years, forms have adapted to the
whims of fashion by constantly being modified in
shape and measurements to satisfy the needs of
changing silhouettes. Original forms were shapeless,
willow-caned models with woven mounds that were
padded to individual specifications. Today’s forms
are partially made by hand. They are framed in
metal, molded with papier-mâché, laid over with
canvas, and covered in a princess garment of linen.
The seam lines and princess stylelines of the cover
garment set the boundaries between the front and
back bodice. The waistline seam defines the upper
and lower torso. In the manufacturing process, hu-
man errors can and do occur. Before measuring, ex-
amine the form for possible errors. Make adjustments
by following the instructions in the Measuring Form
and Model Section later in this chapter. Forms of
today represent the most common dimension
within each size group of males and females, chil-
dren to adults. Forms come with detachable arms
and legs and collapsible shoulders for ease of use.
Who Sets Form Measurements?
Form measurements are determined by the con-
sumer’s feedback to the buyers and buyer feedback
Courtesy of TukaTech
to the form company. Forms can be ordered to the
specific measurements of a private client; and com-
panies can order forms with special measurements
reflecting their consumer.
Cloning Fit Models
There are a number of new innovations in the devel-
opment of forms. Material used in humanlike forms
use a liquid-type substance instead of canvas and
metal. I am familiar with TUKAforms and have seen
them being developed. The forms are an exact
replica of the company’s fit model. The model is
scanned in a cube with a light-emitting device that
produces a perfect replica of the model. Forms are
made with a liquid substance that, when solidified,
feels like skin and flesh and can be penetrated with
pins without harm to the form. The model form
helps patternmakers and designers to develop gar-
ments with more accuracy in less time and without
a live model.
28

FORM MEASUREMENTS AND FIGURE ANALYSIS
5'1" t o 5 '3"
Young j unior/Teen
5/6–15/16
5' t o 5 '1"
Junior p etite
3jp–13jp
5'4" t o 5 '5"
Junior
5–15
5'2" t o 5 '3"
Half- size
10
1
/
2
–24
1
/
2
5'2" t o 5 '3"
Miss p etite
6mp–16mp
5'5" t o 5 '6"
Miss
6–20
5'5" t o 5 '6"
Woman
38–50
Composite of Figure Types
PATTERN INDUSTRY
STANDARDS
In response to national standards and consumers’
needs, the pattern industry established the Measure-
ment Standard Committee, which devised its own
standard set of figure types and sizes. The examples
below are composites of the pattern industry desig-
nated figure types by age and height categories. The
measurements are listed on the pattern envelope.
Their standards may already be influenced by the
American Society for Testing and Materials (ASTM)
and Textile Clothing Technology Corp’s [TC
2
] USA
National Size Survey measurements.
DEPARTMENT STORE
STANDARDS
Department stores and catalog merchants such as
Sears, Montgomery Ward, and Spiegel have devel-
oped their own strict specifications to satisfy the
needs of their customers. Some use or have used Na-
tional Bureau of Standards measurements. Others
conduct surveys and samplings of the population by
sending survey forms to their consumers, requesting
their measurements. This information is compiled,
and specification sheets are given to the manufac-
turer to use in developing patterns for their con-
sumers. JCPenney, Victoria’s Secret, and Jockey now
use ASTM [TC]
2
USA National Size Survey for their
measurements.
OTHER ATTEMPTS AT
STANDARDIZATION
Attempts to standardize sizes in America originally be-
gan in the late 1800s, when manufacturers mass-
produced farm labor uniforms in small, medium, and
large sizes—which proved less than ideal. The next ef-
fort was made by the military in its attempt to mass-
produce well-fitting uniforms. In 1901, the federal
government created the National Bureau of Standards,
a nonregulatory agency for the purpose of standardiz-
ing measurements. By 1970, NBS had developed a
complete size range standard based on frequency
measurements from large segments of the population.
ASTM STANDARDS
The American Society for Testing and Materials part-
nered with [TC]
2
USA National Size Survey for the pur-
pose of standardizing body measurements for better
fitting apparel. The research was intensive, measuring
10,000 subjects whose bodies were scanned. Two hun-
dred points were chosen for accurate body measure-
ments. For additional information or to order size
standards, contact ASTM at 100 Barr Harbor Dr., West
Conshohocken, PA 19428; phone: (610) 832-9585.
The following tables of measurement are available:
• Children: Sizes 2 to 6X/7, order # (D5826)
• Adult Female Misses: Sizes 2 to 20, order # (D5585)
• Women age 55 and older, order # (D5586)
• Menswear: order #(D6240–98) 2006
29

FORM MEASUREMENTS AND FIGURE ANALYSIS
1 Head
2 Head
3 Head
4 Head
5 1 /2 Head
7 1 /2 t o 8 Head
1 Head
Chin lev el
Bust lev el
Waist lev el
Crotch lev el
Knee b one
Floor
Figure Analysis for Personal Use
or for Client
If your figure is less than perfect, remember it’s the pat-
tern that must be perfect, not your figure.
To begin the process, it will be necessary to as-
sess the unique characteristics of the body being
measured. The model should wear a leotard over reg-
ularly worn foundation garments for taking mea-
surements. See the Personal Measurement Chart later
in this chapter.
Each group of figure variations is alphabetized
(A through J), and each figure within the group is
given a number. Circle the number that applies to
your figure, then record it under the appropriate let-
ter on the Personal Measurement Chart.
A: Head Height—A Measuring Device for
Comparison
• Measure the length of your head from the top
of the crown to chin level. Use the head mea-
surement to mark each head length down from
the chin.
• The blue lines behind the sample models indi-
cate head levels. The broken lines crossing the
sample models indicate where the bust point,
hip, crotch, and knee are in relation to the stan-
dard head marks of the perfect model with the
blue leotard.
• Compare your head locations with the model.
Record if the locations are above or below head
levels at: bust ___, waist ___, hip ___, knee ___.
30

D: Hip Types
1. Ideal: Pleasing proportion
among waist/shoulders/hips.
2. Heart shape: Protruding
roundness from waist. Legs
tend to meet at crotch.
3. Square shape: Square out from
side seams.
4. Diamond shape: Widest part of
the hip bone emphasized by a
smaller waist and shoulder.
C: Back/Bust/Chest
Relationship
1. Ideal: Bust/buttocks protrude in
a harmonious relationship.
2. Narrow back/large bust.
3. Full back/small bust.
4. Hollow inward chest.
5. Pigeon, a dominant chest bone.
FORM MEASUREMENTS AND FIGURE ANALYSIS
12 53 4
Back/Bust Relationship
12 3
Hip type
4
Figure Analysis Continued
The following discussion illustrates
anatomical variations. Circle the num-
ber(s) that apply to your figure. Record
your figure in spaces A through N. This
information is helpful in developing
your personalized basic pattern set.
B: Back Types
1. Ideal: Spine has a soft curve and
slight protruding buttock.
2. Flat: Straight back causes
buttocks to be prominent.
3. Rounded: Dominant spine curve
and prominent buttock.
4. Dowager’s hump: Shoulders fall forward in the
extreme.
12 3
Back types
4
31

FORM MEASUREMENTS AND FIGURE ANALYSIS
1 5
4
32
I- shape R- shape S- shape Oval O- shape O- shape
Abdominal/Thigh Relationship
F: Abdominal/Thigh
To compare, have the assistant
view your profile. If your shape
differs from the examples,
record on the Personal Measure-
ment Chart under “Deviation.”
G: Shoulder Types
1. Ideal: Shoulder slope is
approximately 25°.
2. Slopped shoulder: More
than 25°.
3. Square shoulder: Near 90°
angle with neck.
4. Muscular: Neck to
shoulder.
5. Bony: Dominant clavicle.
E: Arm Types
1. Ideal: Flesh and bone in perfect
harmony.
2. Thin: Boney appearance, with
prominent wrist, elbow, and shoulder
bones.
3. Full arms: Flesh starting to fall from top
of the arm.
4. Fleshiness: Bone structure covered with
flesh. Flesh has fallen from top of
the arm.
Ideal Thin Fleshy Fleshy
Arm Types
32

FORM MEASUREMENTS AND FIGURE ANALYSIS
12 3
Wide
shoulder
Small hips Wide hips
Narrow
shoulder
Shoulder/Hip relationship
5
4
H: Shoulder/Waist/Hip
1. Ideal: Shoulder/waist/hip in harmony.
2. Hourglass: Created by a small waist.
3. Straight line: Slight waist definition.
4. Wide shoulder/narrow waist.
5. Narrow shoulder/wide hips.
I: Leg Types
1 through 4. Identified by their names.
J: Figure Stance
The model’s stance affects the hang and balance of
garments. Pattern adjustment will be required.
1- Bowlegs 2- Knock- knees
3- Thin
4- Full thigh
1- Perfect 2- Bent 3- Upright
Tilting
waistline
Tilting
hemline
33

FORM MEASUREMENTS AND FIGURE ANALYSIS
1. Center front neck
Center back neck
2. Center front waist
Center back waist
3. Bust points
4. Center front bust level (between bust points)
5. Side front (princess)
Side back (princess)
6. Mid-armhole front
Mid-armhole back (at level with plate screw)
7. Shoulder tip
8. Shoulder at neck (shoulder/neck)
9. Armhole ridge or roll line
10. Plate screw
11. Armhole plate
LANDMARK TERMS
To measure accurately, you must know where the
landmarks are and identify them point to point for
specific locations. The following landmarks identify
the parts of the form that are referred to when mea-
suring from one landmark to another. Numbers refer
to both the front and back wherever indicated.
Personal fit. The instruction applies to models that
will be measured for drafting the basic patterns.
3
5
7
6
4
2
2
1
1
8
9
10
11
CAGE
BACK FRONT SIDE
ROLLER WHEELS
HEIGHT PEDAL
Symbol Key
CF Center front
CB Center back
BP Bust point
SS Side seam
SW Side waist
SH Shoulder
HBL Horizontal
balance
line
SH-TIP Shoulder
tip
34

FORM MEASUREMENTS AND FIGURE ANALYSIS
MEASURING FORM
AND MODEL
Forms are sometimes imperfect, with measurements
not always equal on each side of the center. Check
and remark the side seams if necessary. The shoulder
line may be misplaced, causing a sleeve to hang out
of alignment. (This problem is corrected at the time
of the fitting.)
Drafting depends on measurements taken from
a form or model. Measurement must be taken care-
fully to avoid fitting problems.
Personal measurements. Reference to personal fit
(shown in italics) will accompany some of the in-
structions.
Preparing the Form for Measuring
Figure 1
• Bust bridge: Cut a strip of cloth 1 1/2 26 inches.
Fold edges to center and fold again. Place across
bust points, ending 1 inch past the side seam.
Push pins through to secure. Trim unneeded
length. Thrust pins through bust points. Mark
center line.
• Waistline: Replace waistline tape, if damaged.
Figure 2
• Pinhead guides: Thrust pins through shoulder tip
at the ridge, or roll line, mid-armhole at level
with the plate screw, and 3/8 inch below the
center front neck.
Figure 3
• Armhole depth chart: To locate armhole depth,
choose the measurement from the Armhole
Depth Chart below that corresponds to the form
size. Measure down from the armhole plate and
thrust a pin head at the location. Grade up or
down by 1/8 inch for smaller or larger sizes. As
with establishing a set of measurements, they are
to be test fitted with sleeve attached. Make ad-
justments if necessary.
Pinhead
at b ust p oints
Shoulder tip
pinhead
Neck 3/8 "
depth
Mid- armhole pinhead
(FandB)
Armhole depth
Size 3/4—3/8 Size 11/12—3/4
Size 5/6—3/8 Size 13/14—1
Size 7/8—1/2 Size 15/16—1 1/8
Size 9/10—5/8 Size 18—1 1/4
Figure 1
Figure 2
Figure 3
• To determine cap height, measure up from arm-
hole depth to shoulder tip and add 3/8 inch.
35

FORM MEASUREMENTS AND FIGURE ANALYSIS
(c) (d) (e)
(g)
(h)
Mark below
finger for
armhole depth
(i)
(f)
FRONT BACK
(b)(a)
Preparing the Model for Measuring
Have a friend assist in measuring and recording on a
copy of the Personal Measurement Chart later in
this chapter.
The model should wear a bodysuit or leotard with
regular foundation garments worn underneath.
Figures 1a, b
Marking the garment: Lay garment flat. Draw a line
down the center front and back with tailor’s chalk,
or fine-point washable pen.
Figures 2c, d, e
Neckline: Dot mark center of the clavicle bone at
center front and the dominant bone (nape) at cen-
ter back neck. To complete the neckline shape, place
a delicate chain necklace around the model’s neck,
touching dot marks. Carefully draw neckline curve
with a fine-point washable pen.
Figures 3f, g, h, i
Dressing the model: The front chalk line is placed be-
tween the busts, navel, and crotch. The back chalk
line is centered along the spine line, crease of the
buttocks, and between the legs. The front and back
models (f and g) are marked, as follows:
Completing neckline: With ruler placed at the center
lines and to the dot marks of clavicle and nape, draw
center lines to neck.
With ruler on shoulder seam, draw line to neck (c).
Mid-armholes: With arms to the sides, mark the ends
of crease line with dots, or with straight pins
crossed.
Armhole depth: Place finger under the arm where
back muscle and arm articulate. Chalk-mark at bot-
tom of the finger at side seam (i).
Bust bridge: See Figure 1 on previous page for
instructions.
Waistline band: Place a belt, elastic, or band com-
fortably (not too tight) around the waist.
Figure 1
Figure 2
Figure 3
Figure 4
36

FORM MEASUREMENTS AND FIGURE ANALYSIS
Taking Measurements
• Place the metal tip end of the tape
measure at one reference point and
extend to the next reference point
when taking measurements.
• Record measurements on the Model
Measurement (Form or Chart or
the Personal Measurement Chart
found at the end of the chapter).
• Numbers in parentheses corre-
spond with those on the chart.
• Arc measurements are taken from
center lines to the side seam.
• The same half of the front and back
of the form is measured.
HORIZONTAL
BALANCE LINE (HBL)
Figures 1, 2, and 3
• Measure up from the floor to the pin
mark (X) at center front (Figure 1).
• Use this measurement to measure
up from the floor and pin mark cen-
ter back and side seams. Pin mark at
princess lines. Recheck measure-
ments (Figures 1 and 3).
• Draw a line around the hip touching each of the
pin marks, or use adhesive tape to mark the
hipline. The standard hip depth is 6 to 7 inches
down from the center front waist for juniors and
petites, 8 to 9 inches down for missy size.
Personal fit. Follow the instructions very carefully
and double check. If incorrect, the hemline of the
skirt will not hang parallel with the floor.
CIRCUMFERENCE FOR
FORM AND MODEL
MEASUREMENTS
Figures 4 and 5
• Bust (1). Across bust points and back.
• Waist (2). Around waist.
• Abdomen (3). Three inches below waist.
• Hip (4). Measure widest area with tape parallel
with floor. Pin to mark hip level at center front
(referred to as X-point).
Draw line
(represents
the horizontal
balance line
below waist)
FRONT
x
BACK SIDE
1
4
3
2
X
1
2
3
4
X
Figure 1 Figure 2 Figure 3
Figure 4 Figure 5
37

FORM MEASUREMENTS AND FIGURE ANALYSIS
15
17
19
23
25
22
10
20
14
FRONT
HORIZONTAL ARC FOR
FORM AND MODEL
MEASUREMENTS
Front
Figure 6
• Across shoulder (14). Shoulder tip to center front
neck.
• Across chest (15). Center front to 1 inch above
mid-armhole (pinhead mark).
• Bust arc (17). Center front, over bust point, end-
ing 2 inches below armplate at side seam.
• Bust span (10). Place tape across bust points; di-
vide in half for measurement.
• Waist arc (19). Center front waist to side waist
seam.
• Dart placement (20). Center front to side front
(princess line).
• Abdomen arc (22). Center front to side seam, start-
ing 3 inches down from waist.
• Hip arc (23). Center front to side seam on HBL line.
• Hip depth (25). Center front to HBL line.
Back
Figure 7
• Back neck (12). Center back neck to shoulder at
neck.
• Across shoulder (14). Shoulder tip to center back
neck.
• Across back (16). Center back to 1 inch above the
mid-armhole at ridge of pinhead.
• Back arc (18). Center back to bottom of arm plate.
• Waist arc (19). Center back waist to side waist
seam.
• Dart placement (20). Center back waist to side
back (princess line).
• Abdomen arc (22). Center back to side seam, start-
ing 3 inches down from waist.
• Hip arc (23). Center back to side seam on HBL line.
• Hip depth (25). Center back waist to HBL line.
Model for Personal Fit
Figures 8a, b
16
18
19
23
25
22
20
14
12
BACK
12
14
16
18
19
22
23
25
20
14
15
17
10
19
22
23
20
25
Measurements can be taken across the model
from one landmark to the other, then divided
in half and recorded. If the center lines of the
front and back are definitely centered, meas-
ure from the center line to the side seams of
the front and back bodice.
Neck Circumference
Measure around the upper neck, divide by 5,
and record in space #12.
Figure 6
Figure 7
Figure 8a
Figure 8b
38

FORM MEASUREMENTS AND FIGURE ANALYSIS
VERTICAL MEASUREMENTS
FOR FORM AND MODEL
Figures 9 and 10
• Side length (11). Pin mark below armplate at side
seam to side waist.
• Shoulder length (13). Shoulder tip to neck.
• Side hip depth (26). Side waist to HBL, on side of
form being measured.
• Bust radius (9). Measure from bust point ending
under bust mound to rib above.
Front and Back—Form and Model
Figures 11, 12, 13, 14
• Center length (5). Mark neck to waist (over bridge).
• Full length (6). Waist to shoulder at neck, parallel
with center lines.
• Shoulder slope (7). Center line at waist to the
shoulder tip (mark).
• Bust depth (9). Shoulder tip to bust point.
6
5
7
9
6
5
9
7
7
6
5
7
6
5
7
9
26
Bust
radius
13
11
Personal Fit: Asymmetric
Verification
Shoulder slope: Measure on right and left sides. If the
slope measurements differ more than an 1/8 inch,
the shoulders are asymmetric.
Side hip: Measure both side (see #26), if measure-
ments differ more that 1/8 inch, the hip is asymmet-
ric. The patterns will be drafted on folded paper and
discussed later.
Figure 15 and 16: New Strap
Measurement
Place metal tip of the measuring tape at corner of
shoulder/neck to bottom of the waist band at the
side seam and record.
Shoulder neck
Corner of
Side waist
8
Shoulder
neck
Side
waist
8
Figure 9 Figure 10
Figure 1 1
Figure 13
Figure 1 2
Figure 14
Figure 15
Figure 16
39

Standard Measurement Chart
CIRCUMFERENCE
MEASUREMENTS Grade:
1 1 1
1
1
/
2
1
1
/
2
1
1
/
2
2
(Ease not included)
Size:
6 8 10 12 14 16 18
1. Bust: 34 35 36
37-
1
/
2
39
40-
1
/
2
42-
1
/
2
2. Waist:
25-
1
/
2
26-
1
/
2
27-
1
/
2
29
30-
1
/
2
32 34
3. Abdomen: 32 33 34
35-
1
/
2
37
38-
1
/
2
40-
1
/
2
4. Hip:
35-
1
/
2
36-
1
/
2
37-
1
/
2
39
40-
1
/
2
42 44
UPPER TORSO
5. Center length:
Front
Back
14-
1
/
8
16-
1
/
4
14-
3
/
8
16-
1
/
2
14-
5
/
8
16-
3
/
4
14-
7
/
8
17
15-
1
/
8
17-
1
/
4
15-
3
/
8
17-
1
/
2
15-
5
/
8
17-
3
/
4
6. Full length:
Front
Back
16-
7
/
8
16-
3
/
4
17-
1
/
4
17-
1
/
8
17-
5
/
8
17-
1
/
2
18
17-
7
/
8
18-
3
/
8
18-
1
/
4
18-
3
/
4
18-
5
/
8
19-
1
/
8
19
7. Shoulder slope:
Front
Back
17-
1
/
16
16-
5
/
16
17-
3
/
8
16-
5
/
8
17-
3
/
4
17
18-
1
/
8
17-
3
/
8
18-
1
/
2
17-
3
/
4
18-
7
/
8
18-
1
/
8
19-
1
/
4
18-
1
/
2
8. New Strap: 17
17-
3
/
8
17-
3
/
4
18-
3
/
16
18-
5
/
8
19-
1
/
16
19-
9
/
16
9. Bust depth:
Radius:
9-
1
/
8
3
9-
5
/
16
3
9-
1
/
2
3
9-
11
/
16
3
9-
7
/
8
3
10-
1
/
16
3
10-
1
/
4
3
10. Bust span:
3-
5
/
8
3-
3
/
4
3-
7
/
8
4-
1
/
16
4-
1
/
4
4-
7
/
16
4-
11
/
16
11. Side length:
8-
1
/
8
8-
1
/
4
8-
3
/
8
8-
1
/
2
8-
5
/
8
8-
3
/
4
8-
7
/
8
12. Back neck:
2-
5
/
8
2-
7
/
8
3
3-
1
/
8
3-
1
/
4
3-
3
/
8
3-
1
/
2
13. Shoulder length:
5-
1
/
8
5-
3
/
16
5-
1
/
4
5-
3
/
8
5-
1
/
2
5-
5
/
8
5-
13
/
16
14. Across shoulder:
Front
Back
7-
1
/
2
7-
3
/
4
7-
5
/
8
7-
7
/
8
7-
3
/
4
8
7-
15
/
16
8-
3
/
16
8-
1
/
8
8-
3
/
8
8-
5
/
16
8-
9
/
16
8-
9
/
16
8-
13
/
16
15. Across chest:
6-
1
/
2
6-
5
/
8
6-
3
/
4
6-
15
/
16
7-
1
/
8
7-
5
/
16
7-
9
/
16
16. Across back:
6-
3
/
4
6-
7
/
8
7
7-
3
/
16
7-
3
/
8
7-
9
/
16
7-
13
/
16
17. Bust arc:
9-
1
/
2
9-
3
/
4
10
10-
3
/
8
10-
3
/
4
11-
1
/
8
11-
5
/
8
18. Back arc:
8-
1
/
8
8-
3
/
8
8-
5
/
8
9
9-
3
/
8
9-
3
/
4
10-
1
/
4
19. Waist arc:
Front
Back
6-
1
/
2
6-
1
/
8
6-
3
/
4
6-
3
/
8
7
6-
5
/
8
7-
3
/
8
7
7-
3
/
4
7-
3
/
8
8-
1
/
8
7-
3
/
4
8-
5
/
8
8-
1
/
4
20. Dart Placement:
Front
Back
3
3
3-
1
/
8
3-
1
/
8
3-
1
/
4
3-
1
/
4
3-
7
/
16
3-
7
/
16
3-
5
/
8
3-
5
/
8
3-
13
/
16
3-
13
/
16
4-
1
/
16
4-
1
/
16
21. Number not used
LOWER TORSO
22. Abdomen:
Front
Back
7-
3
/
4
8
8
8-
1
/
4
8-
1
/
4
8-
1
/
2
8-
5
/
8
8-
7
/
8
9
9-
1
/
4
9-
3
/
8
9-
5
/
8
9-
7
/
8
10-
1
/
8
23. Hip arc:
Front
Back
8-
5
/
8
9-
1
/
8
8-
7
/
8
9-
3
/
8
9-
1
/
8
9-
5
/
8
9-
1
/
2
10
9-
7
/
8
10-
3
/
8
10-
1
/
4
10-
3
/
4
10-
3
/
4
11-
1
/
4
24. Crotch depth:
9-
1
/
2
9-
3
/
4
10
10-
1
/
4
10-
1
/
2
10-
3
/
4
11
25. Hip depth:
Center front
Center back
7-
1
/
2
7-
3
/
8
7-
3
/
4
7-
5
/
8
8
7-
7
/
8
8-
1
/
4
8-
1
/
8
8-
1
/
2
8-
3
/
8
8-
3
/
4
8-
5
/
8
9
8-
7
/
8
26. Side hip depth:
7-
5
/
8
7-
7
/
8
8-
1
/
8
8-
3
/
8
8-
5
/
8
8-
7
/
8
9-
1
/
8
27. Waist to knee:
Waist to ankle:
Waist to floor:
22
37
39
22-
1
/
2
37-
1
/
2
39-
1
/
2
23
38
40
23-
1
/
2
38-
1
/
2
40-
1
/
2
24
39
41
24-
1
/
2
39-
1
/
2
41-
1
/
2
25
40
42
28. Crotch length:
Vertical trunk
24-
1
/
2
59
25-
1
/
4
60-
1
/
2
26
62
26-
3
/
4
63-
1
/
2
27-
1
/
2
65
28-
1
/
4
66-
1
/
2
29
68
29. Upper thigh:
Mid thigh:
20
18-
1
/
2
20-
3
/
4
19
21-
1
/
2
19-
1
/
2
22-
1
/
2
20-
1
/
4
23-
1
/
2
21
24-
1
/
2
21-
3
/
4
25-
3
/
4
22-
3
/
4
30. Knee: 13
13-
1
/
2
14
14-
1
/
2
15
15-
1
/
2
16
31. Calf:
12-
1
/
4
12-
5
/
8
13
13-
3
/
8
13-
3
/
4
14-
1
/
8
14-
1
/
2
32. Ankle:
Foot entry:
8-
1
/
2
12
8-
3
/
4
12-
1
/
4
9
12-
1
/
2
9-
1
/
4
12-
3
/
4
9-
1
/
2
13
9-
3
/
4
13-
1
/
4
10
13-
1
/
2
Missy patterns are available for purchase. Send requests to patterns4sale.com
40
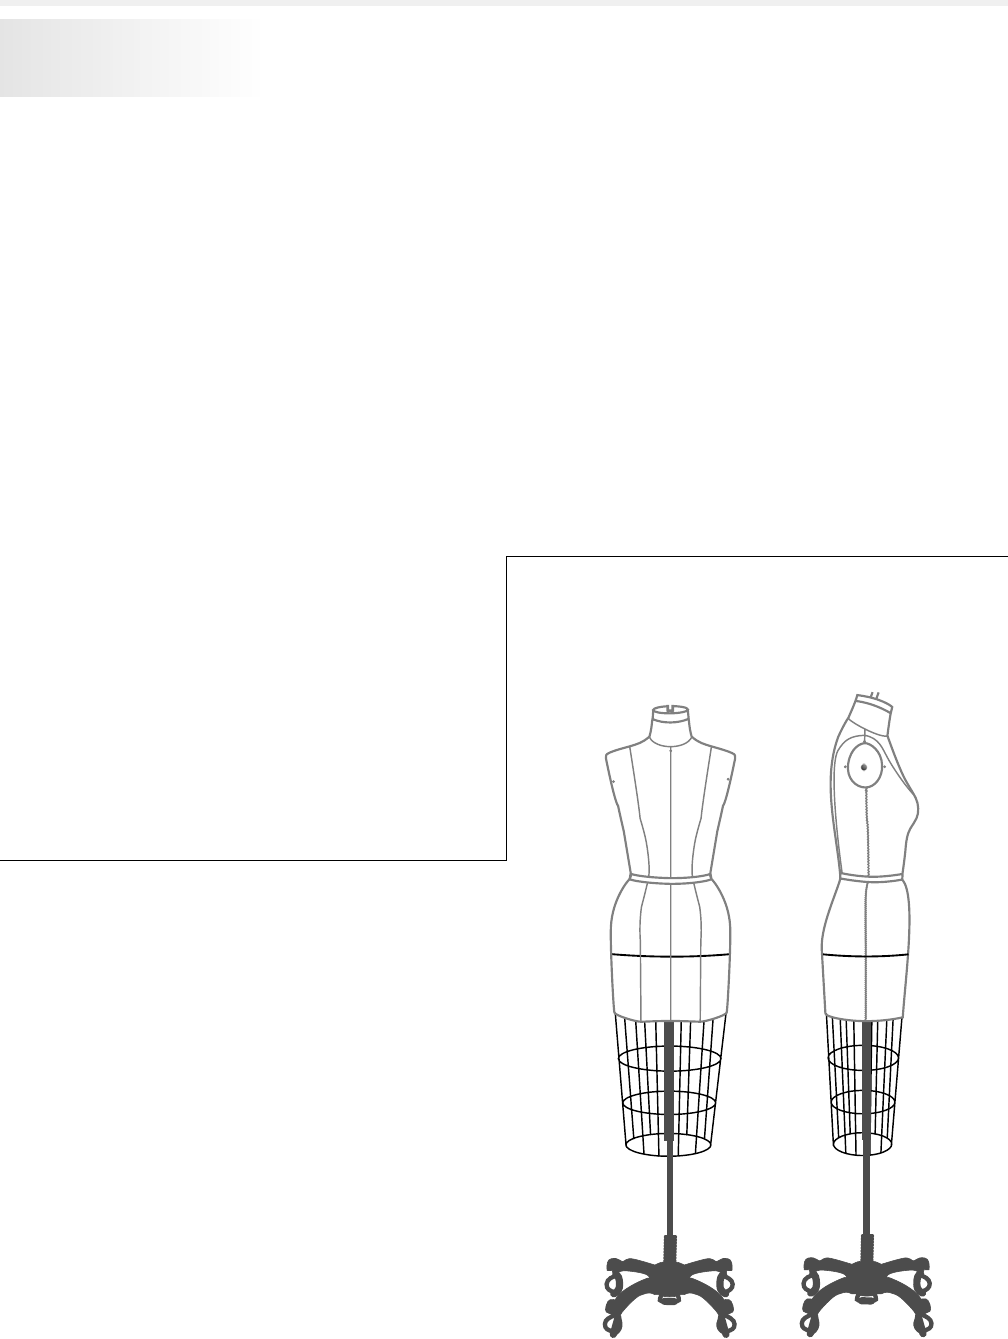
FORM MEASUREMENTS AND FIGURE ANALYSIS
Form
Form make and type ______
Size ______ Year ______
FORM MEASUREMENT
CHART
Circumference Measurements
1. Bust: ______, plus 2 ease ______
2. Waist: ______, plus 1 ease ______
3. Abdomen: ______
4. Hip: ______, plus 2 ease ______
Upper Torso (Bodice)
5. Center length: F ______, B ______
6. Full length: F ______, B ______
7. Shoulder slope: F ______, B ______
8. Stra p: F ______, B ______
9. Bust depth: ______, radius ______
10. Bust span: ______
11. Side length: ______
12. Back neck: ______
13. Shoulder length: ______
14. Across shoulder: F ______, B ______
15. Across chest: ______
16. Across back: ______
17. Bust arc: ______
18. Back arc: ______
19. Waist arc: F ______, B ______
20. Dart placement: F ______, B ______
Special Information
Set form to desired height and measure the following:
C.F. waist to floor ______
C.B. waist to floor ______
C.B. neck to floor ______
Lower Torso (Skirt/Pant)
22. Abdomen arc: F ______, B ______
23. Hip arc: F ______, B ______
24. Crotch depth: ______
25. Hip depth: C.F. ______ C.B. ______
26. Side hip depth: ______
27. Waist to ankle: ______
Waist to knee: ______
Waist to floor: ______
28. Crotch length: ______
Vertical trunk: ______
29. Upper thigh: ______
Mid-thigh: ______
30. Knee: ______
31. Calf: ______
32. Ankle: ______
Foot entry: ______
41

FORM MEASUREMENTS AND FIGURE ANALYSIS
PERSONAL MEASUREMENT
CHART
Circumference Measurements
1. Bust: ______ 3. Abdomen: ______
2. Waist: ______ 4. Hip: ______
Upper Torso (Bodice)
5. Center length: F ______ B ______
6. Full length: F ______ B ______
7. Shoulder slope: F/R ______ F/L ______
B/L ______ B/L ______
8. Strap: F/R ______ F/L ______
9. Bust depth: F ______ Radius ______
10. Bust span: ______
11. Side length: F/R ______ F/L ______
12. *Back neck: ______
13. Shoulder length: ______
14. Across shoulder: F ______ B ______
15. Across chest: ______
16. Across back: ______
17. Bust arc: ______
18. Back arc: ______
19. Waist arc: F ______ B ______
20. Dart placement: F ______ B ______
21. Standard dart intake:
Front 1" (2 darts 1/2 to 5/8")
Back 2" (2 darts 1 to 1 1/4")
Lower Torso (Skirt/Pant)
22. Abdomen arc: F ______ B ______
23. Hip arc: F ______ B ______
24. Crotch depth: ______
25. Hip depth: CF ______ CB ______
26. Side hip depth: R/S ______ L/S ______
27. Waist to knee ______ ankle _____ floor _____
28. Crotch length _____ Vertical trunk: ______
29. Upper thigh: ______ Mid -th igh: ______
30. Knee: ______
31. Calf: ______
32. Ankle: ______
*Measuring the Arm
Use your measurements (shown by asterisks) for the
draft of the basic sleeve. Read the instructions. Use
the cap height from the sleeve measurement chart, or
use the formula to determine cap height.
(35) Biceps
(36) Elbow
straight
(37) Wrist
(36) Elbow bent
(38)
Around
hand
Circumference
Personal Figure Variations
A. Head height relationship:
Bust ______ Waist ______
Crotch ______ Knee ______
B. Bust/back/chest relationship:
Bust ______ Back ______
C. Hip types: ______
D. Arm types: ______
E. Abdominal/thigh relationship:
Abdominal ______ Thigh ______
F. Shoulder type ______
G. Shoulder/hip relationship:
Shoulder ______ Hip ______
H. Leg types ______
I. Leg types ______
J. Figure stance: ______
K. Asymmetric figure. Record high side, right and
left.
Shoulder: ______ Hip: ______
L. Tilting waistline. Record high and low.
Front: ______ Back: ______
M. Bust/waist ______
Waist/hip ______
Bust/hip ______
N. Other variations: ______
Mid- wrist bone
Elbow length (34)
(elbow bone)
Overarm length (33)
(shoulder tip to
wristbone)
Length
Personal Arm
Measurements
33. Overarm length:* ______
34. Elbow length:* ______
35. Biceps plus 2":* ______
36. Elbow bent (reference) ______
37. Wrist (reference) ______
38. Around hand (reference) ______
*39. Cap height ______
42

THE BASIC DRESS FOUNDATION
Measurement
Creating Basic Patterns
Pattern Shapes Described
Why Darts?
Manual and Computer Drafting
FRONT BODICE DRAFT
BACK BODICE DRAFT
Increasing and Decreasing Bust
FITTING THE BODICE
Pattern Correction for Asymmetrical Models
Imperfect Alignment
FITTING THE NECKLINE
FITTING THE ARMHOLE
SKIRT DRAFT
Skirt Front and Back
Skirt Back (for Suits and Separates)
Fitting the Skirt
SELF-EVALUATION TRUE AND FALSE TEST
PREPARING PATTERNS FOR TEST FIT
Matching Joining Seams
THE BASIC SLEEVE
Sleeve Terminology
SLEEVE CAP EASE
Armhole Measurement
SLEEVE MEASUREMENT CHART
SLEEVE DRAFT
Drafting the Basic
Pattern Set
ADJUSTING SLEEVE TO ARMHOLE OF BODICE
Determining Cap Ease
Adjusting the Armhole to Accommodate
Cap Ease
Increase or Decrease the Biceps
Increase or Decrease Cap Ease
Setting the Sleeve into the Armhole
Evaluate the Hang and Fit of the Sleeve
SEAMLESS WORKING PATTERNS
SELF-EVALUATION TEST
COMPLETING THE PATTERN
Pattern Information
Seam Allowance
Basic Pattern Set—Seamed
From Chapter 3 of Patternmaking for Fashion Design, 5/e. Helen Joseph-Armstrong.
Copyright © 2010 by Pearson Education. Published by Prentice Hall. All rights reserved.

DRAFTING THE BASIC PATTERN SET
THE BASIC DRESS
FOUNDATION
Introduction to patternmaking begins with the draft
of the basic dress foundation. The dress has all the key
dimensions of the form and is represented by the ba-
sic pattern set. The basic dress is the very foundation
upon which patternmaking, fit, and design are
based. The basic dress is made up of five distinct
parts: a front and back bodice, a front and back skirt
that hang straight from the hip, and slim full-length
sleeves. The dress follows the model’s outermost
parts without contouring the hollow areas. The
dress has a series of seams that are directed toward
the figure’s bulges—the bust, abdomen, buttocks,
shoulder blades, and elbows. These seams are the
wedge shapes in the draft of the basic pattern set
that, when stitched, support the fit of the garment
and bridge the hollow areas. The perfect garment
will fit comfortably with sufficient ease and in per-
fect balance and harmony with the balance of the
model’s stance.
Measurement
The draft can be developed from measurements
taken of the form and recorded on the Model Mea-
surement Chart, or measurements can be taken
from the Standard Measurement Chart or from per-
sonal fit measurements.
For easy reference, record (in the spaces pro-
vided in the chart) the measurements by the num-
ber in parentheses given in the instructions.
Numbers correspond with those of the charts. Let-
ters used in the instructions give the direction that
each line is to be drawn. For example, B to C means
that the line is drawn from point B to point C, in the
amount indicated by the instructions. A shaded out-
line of the pattern illustrates the purpose of each
line drawn on the draft.
Suggestions for correcting fitting problems fol-
low the instructions for drafting the bodice, the
skirt, and the sleeve.
44

DRAFTING THE BASIC PATTERN SET
Creating Basic Patterns
Creating basic patterns begins with a two-dimen-
sional piece of paper (for drafting) or muslin (for drap-
ing). The dimensions of the form or model takes up
the necessary space within the paper or muslin, giv-
ing shape to the basic patterns. The remaining paper
or cloth is cut away (Figure 1).
Pattern Shapes Described
Patterns confine the dimensions of the figure by a
series of straight lines (shoulder, side seams, skirt—
below hip) and curved lines (necklines, armholes,
skirt—above hip). Wedges that appear at the pat-
tern’s edge are directed to the apex of the bust,
shoulder blade, abdomen, and buttock. Wedges are
called darts (Figure 2). The basic sleeve will be dis-
cussed later.
Why Darts?
Darts retain form or model measurements by confin-
ing unneeded fullness at the pattern’s edge. The dart
gradually releases fullness and terminates at or near
the apex of the bust, shoulder blades, buttocks, and
abdomen. The dart also has creative value. It is the
dart that converts a two-dimensional pattern into a three-
dimensional garment.
BACK
FRONT
S
h
o
u
l
d
e
r
d
a
r
t
e
x
c
e
s
s
W
a
i
s
t
d
a
r
t
exc
es
s
W
a
i
s
t
d
a
r
t
ex
c
es
s
B
u
s
t
d
a
r
t
e
x
c
e
s
s
W
a
i
s
t
d
a
r
t
ex
c
es
s
s
s
s
s
Manual and Computer
Drafting
Both manual and computer drafting methods
are offered for developing the basic pattern set.
Knowing both methods gives the patternmaker
more options in generating patterns.
Figure 1
Figure 2
45

DRAFTING THE BASIC PATTERN SET
FRONT BODICE DRAFT
Record chosen measurements in the spaces pro-
vided below. For models with asymmetric shoulders
and/or hips, draft on folded paper using measure-
ments for the high side. After the draft, the pattern
is cut and the low side is corrected.
Note: All pattern sizes can be purchased. Send request to
The standard draft is based on a missy dress
form with about a 10-inch difference between the
waist and bust (B cup) for all sizes. For a personal fit,
subtract the waist from bust, if more or less than
10 inches (tolerance 1/4 inch), follow the formula
suggestion.
Figure 1
• A to B = Full length (6), plus 1/8⬙ ______
Draw the line and label.
• A to C = Across shoulder, less 1/8⬙ (14)
______
Square 3 line down from C line.
• B to D = Center front length (5) ______
Mark and square out 4.
• B to E = Bust arc (17), plus 1/4* ______
Square out from B, and then square up 11 from E.*
Figure 2
• B to G = Shoulder slope (7), plus 1/8______.
G touches C line.
• G to H = Bust depth (9).______.
Mark on the G–B line.
• G to I = Shoulder length (13) ______.
Square down from I to intersect with D line.
• J to K = Bust span, plus 1/4⬙ (10) ______.
Square from J at center front through H to K.
• D to L = One-half of D to J.
Mark down from D.
• L to M = Across chest, plus 1/4⬙ (15) ______.
Square a guideline up and down from M.
• B to F = Dart placement (20) ______.
Square down 3/16 from F.
AC
D
BE
AC
G
I
D
BE
F
H
3/16 "
M
J
K
L
*Ease: Total 1/2 inch at bust level when side seam is drawn.
Figure 1
Figure 2
46

DRAFTING THE BASIC PATTERN SET
Figure 3
• I to N = New strap, plus 1/8⬙ (8) ______
Draw line from I to intersect E line.
• N to O = Side length (11) ______.
• N to P = Mark 1 1/4 inch out from N.
Personal fit, see formula or adjust after
the draft is complete. Tab page 44.
• O to P = Side length line is directed to P, and ends
when equal to N to O. Draw line from P to F.
Figure 4
Completing waist measurement:
• P to Q = Waist arc (19), plus 1/4" ease, less
B to F______.
Dart legs: Draw a line from K to F and measure. Draw
dart leg from K through Q equal to K to F.
Label R.
Dart point: Center a point 5/8 inch from bust point.
Redraw dart legs from this point to F and R.
Draw slight curved lines from B to F and R to P.
AC
G
I
D
L
J
BE
O
P
F
H
K
M
1 1/4 "
N
AC
G
I
D
L
J
BE
O
P
N
F
H
M
R
Q
K
5/8 "
Best Cup Formula: Test Fit
C Cup: N-P 7/8"
D Cup: N-P 1-1/2"
D Cup: N-P 1-3/4"
For additional information, see section on Fitting
the Bodice, three pages ahead.
Continue with instruction O-P.
G
O
M
IC
L
1/8 "
D
Figure 3
Figure 4
Figure 5
Figure 5
Armhole: Draw armhole curve with rule touching
G, M, and square line. Do not follow curve past
square line.
Neckline: Draw curve from I to D passing inside the
angle line by 1/8".
47

DRAFTING THE BASIC PATTERN SET
BACK BODICE DRAFT
Figure 6
• A to B = Full length (6) ______.
• A to C = Across shoulder (14) ______.
Square 3 inches down from C.
• B to D = Center back length (5) ______.
Mark and square out 4 inches.
• B to E = Back arc (18), plus 3/4 inch ______.
Square up from E.
Figure 7
• A to F = Back neck (12), plus 1/8 inch
______.
• B to G = Shoulder slope (7), plus 1/8 inch
______.
• F to H = Shoulder length (13), plus 1/2
inch ______.
Line may pass G.
Square down from F to D line.
• B to I = Dart placement (20) ______.
• B to J = Waist arc (19), plus dart intake of
1 1/2" and 1/4" (ease). (Junior/petite sizes: add
1 inch dart intake, plus 1/4-inch ease.)
• I to K = Dart intake.
Mark center and label L.
A
D
BE
C
F
D
G
H
BE
J
K
IL
C
A
Figure 6
Figure 7
48

DRAFTING THE BASIC PATTERN SET
Figure 8
• J to M = Square down 3/16 inch.
• M to N = Side length (11) ______.
• LtoO= Square up from L 1 inch less than M to
N.
Draw dart legs from O, 1/8 inch past I and K.
Draw slightly curved lines from K to M and from
B to I.
Figure 9
• F to P = One-half of F to H. Mark.
• P to Q = Draw a 3-inch line in the direction of
point O (indicated by broken line).
• P to R = 1/4 inch. Mark.
Draw dart leg from Q 1/8 inch past R and con-
nect to F.
Mark 1/4 inch from P. Draw other dart leg from
Q equal to dart leg Q–R, and connect to H.
• D to S = One-fourth of D to B. Mark.
• S to T = Across back, plus 1/4 inch (16)
______.
Square up and down from T, as shown.
Figure 10
• Armhole: Draw armhole with the French curve
touching H, T, and N. The curve should touch
square line.
• Neckline: Draw a 3/8-inch angle line from the cor-
ner. Draw neckline from F, angle line and ending
close to D.
To test fit, add seams to muslin. (See next two pages.)
A
F
D
G
H
B
N
E
J
K
M
IL
O
C
A
F
D
G
P
H
B
S
T
N
E
M
J
K
LI
O
Q
C
R
F
D
H
T
N
3/8 "
Figure 9
Figure 8
Figure 1 0
49

DRAFTING THE BASIC PATTERN SET
Increasing and Decreasing Bust
The bodice is drafted with a B cup. The pattern can
be adjusted for bust cup sizes A, C, D, and DD for
personal fit. Test fit and, if necessary, adjust again;
see Figures 4 and 5.
Figure 1
• Draw a line from dart point to bust point and to
but not through mid-armhole.
Figure 2
C, D, DD Cup
Spread at bust point as follows:
• C Cup = 3/8 inch.
• D Cup = 3/4 inch.
• DD Cup = 1 inch.
• Center bust point.
• Lengthen dart leg A to be equal to B.
Figure 3
A Cup
• Overlap bust point 3/8 inch. Tape.
• Center bust point.
• Shorten dart leg A to true with B.
FITTING THE BODICE
Cut and sew the bodice. Press without steam. Place
on form or model to analyze the fit. Always measure
corrected areas and adjust the patterns.
Figure 4
Looseness: Pin excess at bust to zero at shoulder and
waist.
FRONT
A
B
Bust pt.
Add
Spread
Center
Waist
B
FRONT
S
lash
Pivotal
A
B
FRONT
A
B
Overlap
Trim
Bust pt.
Center
Looseness
Bust
point
Trim
Slash, overlap
Blend
Tightness
Add
Blend
Slash, spread
Figure 5
Tightness: Stress folds radiating from bust. Slash
muslin from waist to bust, and spread to give bust
sufficient room.
Figure 1
Figure 2
Figure 3
Figure 4
Figure 5
50

DRAFTING THE BASIC PATTERN SET
Pattern Correction for
Asymmetrical Models
Model (a) with high/low shoulders.
Model (b) with high/low hips.
Corrections: Unfold the pattern: bodice (c) or
skirt (d). Slash from low side to high side. Overlap
recorded amount, mend, blend, and test.
Imperfect Alignment
Figures 2a, b
• Front or back bodice overlaps center line of the
form.
Low
High
Asymmetric
shoulders
Low
Asymmetric h ips
High
Slash, overlap
and blend
(low side)
Blend
FRONT
Slash,
overlap
and
blend
FRONT
Blend
Unpin and lift
muslin at shoulder tip
Lower shoulder
Pattern
Dart pinned
at, or beyond
bust point
Unpin and lower
muslin at shoulder tip
Raise shoulder
Pattern
• Possible solutions: Lift muslin at shoulder tip,
lower dart point, or check waistline measure-
ments and adjust side waist, if required.
• Correct the pattern by trimming the adjusted
amount at shoulder tip to zero at neck.
Figures 3a, b
• Front or back swings away from the center line.
• Possible solutions: Add muslin at shoulder tip,
check waistline measurements and adjust side
waist, if required.
• Correct the pattern by adding the adjusted
amount at shoulder tip to zero at neck.
Figure 1 a
Figure 1 b
Figure 1c
Figure 1d
Figure 2 a
Figure 2 b
Figure 3a
Figure 3b
51

DRAFTING THE BASIC PATTERN SET
FITTING THE NECKLINE
If the front or back neckline is too loose (more than
1/8 inch) (Figure 4a), open the shoulder and
smooth the fabric to fit. Mark the muslin and adjust
the length of the shoulder. If stress appears at the
shoulder/neck (Figure 4b), open the shoulder. Fit
the muslin to the neckline (allow 1/8-inch ease).
Mark the neckline and adjust the shoulder length, if
necessary.
FITTING THE ARMHOLE
A well-balanced sleeve depends on the accurate
shape of the armhole and the correct placement of
the shoulder and side seams of the form.
A well-shaped armhole fits smoothly over the
shoulder and falls away evenly from the lower part
of the armhole plate, and the side seam is aligned
with that of the form. There is no appearance of
stress lines or gapping. See Figure 5a.
If the armhole of the bodice is identified with
one of the examples, follow the suggested adjust-
ment and make corrections to the pattern.
Gap Above Front Mid-Armhole:
Figures 5a, b
• The fit problem is shown in Figure 5a.
• Release shoulder seam and smooth excess over
the shoulder. Pin and mark adjusted shoulder
(Figure 5b).
Gap Above Back Mid-Armhole:
Figures 6a, b
• The fit problem is shown in Figure 6a.
• Release shoulder seam and smooth excess over
the shoulder. Pin and mark adjusted shoulder
(Figure 6b).
Too loos e
Too tight
Figure 4 a
Figure 4b
Figure 5a
Figure 5b
Figure 6a
Figure 6b
52

DRAFTING THE BASIC PATTERN SET
Gap Below Front Mid-Armhole:
(Gaping is caused by unbalanced side seams.)
Figures 7a, b, c
• The fit problem is shown in Figure 7a.
• Pin the excess, allowing 1/4-inch ease (Figure 7b).
• Slash the pattern from mid-armhole to bust
point and from dart point to bust point. Overlap
the pattern equal to the amount pinned at the
armhole. Tape to secure (Figure 7c).
Figures 8a, b
• If the armhole is too tight at the front armhole
(Figure 8a), slash and spread 1/4 inch (Figure 8b).
Gap Below Back Mid-Armhole:
(Gaping is caused by unbalanced side seams.)
Figures 9a, b
• The fit problem is shown in Figure 9a.
• Release side seam and smooth excess downward.
Mark side seam and be sure that 3/4-inch ease is
included. Mark waistline.
• Measure the distance between the armhole pin
head and corrected muslin for pattern correcting
(Figure 9b).
FRONT
Overlap
Slash
Stress
FRONT
Paper
Blend
Mend
Figure 7a Figure 7b
Figure 7 c
Figure 8a
Figure 8b
Figure 9a
Figure 9b
53

DRAFTING THE BASIC PATTERN SET
Personal Dart Intake Chart
Column 1:
4-inch Difference
Front: 1 dart—1/2 intake. Back: 1 dart—3/4 intake.
5-inch Difference
Front: 1 dart—1/2 intake. Back: 1 dart—1 intake.
6-inch Difference
Front: 1 dart—1/2 intake. Back: 2 darts—5/8 intake.
7-inch Difference
Front: 1 dart—1/2 intake. Back: 2 darts—3/4 intake.
8- or 9-inch Difference
Front: 2 darts—3/8 intake. Back: 2 darts—7/8 intake.
10-inch Difference
Front: 2 darts—1/2 intake. Back: 2 darts—1 intake.
11-inch Difference
Front: 2 darts—5/8 intake. Back: 2 darts—1 1/8 intake.
12-inch Difference
Front: 2 darts—5/8 intake. Back: 2 darts—1 1/4 intake.
13- or 14-inch Difference
Front: 2 darts—5/8 intake. Back: 2 darts—1 3/8 intake.
(Allow 3/8 ease at each quarter waist. For 3 darts
at the back skirt, divide 2 3/4 into thirds.)
SKIRT DRAFT
The basic skirt foundation has several uses: as a
base for manipulation to create design pat-
terns, combined with the bodice as a dress, as a
skirt to complete a suit, and as a separate basic
skirt. Two versions of the back skirt are given.
In Type 1, the back darts are of equal intake
and length. Type 2 has two darts of unequal in-
take and length.
Record measurements from the Model
Measurement Chart in the spaces provided.
Personal fit: Use the Personal Dart Intake
Chart to determine the number of darts and dart
intake for the skirt draft. Subtract the waist (2)
from the hip measurement (4). Find the difference
to the nearest whole number in column 1.
For models having a sway back, mark one dart
in front, with all remaining excess taken up by the
back dart(s).
Side seam
Center back
Center front
D
G
EI
C
B
FJ
AH
BACK
Hip
FRONT
Skirt Front and Back
Figure 1
• A to B = Skirt length (as desired).
• A to C = Center front hip depth (25)
______.
• A to D = Back hip arc (23), plus 1/2 inch
(ease) ______.
Squared out from A, C, and B equal to A to D.
Draw center back line F to D. Label E and F.
• E to G = Center back hip depth (25)
______.
Crossmark location.
• A to H = Front hip arc (23), plus 1/2 inch
(ease) ______.
Squared out from A, C, and B equal to A
to H.
• Draw center front line J to H. Label J and I.
Figure 1
54

DRAFTING THE BASIC PATTERN SET
Figure 2
Back:
• D to K = Back waist arc (19), plus 1/4 inch
(ease), and add 2 inches for dart intake ______.
Personal fit; use dart intake from dart chart.
• D to L = Dart placement (20) ______.
Mark first dart 1 inch from L.
Mark dart space 1 1/4 inches and mark 1 inch for
second dart.
Square up and down from K.
Front:
• H to M = Front waist arc (19), plus 1/4 inch
(ease), and add 1 inch for dart intake ______.
Personal fit; use dart intake from dart chart.
• H to N = Dart placement (20) ______.
Mark first dart 5/8 inch from N.
Mark dart space 1 1/4 inches and mark 5/8 inch
for second dart.
Square up and down from M.
DL H
1"
1"
K
G
M
E
BACK
(Type 1)
FRONT
Hip
N
I
5/8 " 5/8 "
1 1/2"1 1/2"
Figure 3
• C to P = Side hip depth (26) ______.
Draw side seam curve using the skirt curve rule.
Shift the rule until the depth measurement
touches the front and back guidelines. Label P
and Q.
Waistline: Draw front and back waistline using
the shallow end of the curve ruler from G to P
(back) and from H to Q (front).
HD
G
E l
PQ
C
BACK FRONT
Hip
KM
Figure 2
Figure 3
55

DRAFTING THE BASIC PATTERN SET
BACK FRONT
Hip
5 1/2"
3 1/2"
BACK
5 1/2 "
3 1/2 "
1 1/2 "
5/8 "
Skirt Back (for Suits and Separates)
Trace the skirt back. Mark the corner of the dart leg
closest to center back. Do not include the dart intake
(Figure 5).
Adjust Dart Intake.
• Mark first dart intake 1 1/2 inches. Mark dart
space 1 1/4 inches. Mark second dart intake 1/2
inch. Mark dart centers. Use this measurement
from center back to mark dart points when draw-
ing dart legs to length as illustrated. True dart
legs by adding to the shorter leg.
• Blend to the curve of the waistline.
• Complete the pattern and cut in fabric for a test
fit given on the following two pages.
Personal fit; adjust using your measurements.
Figure 4
• Back darts: Locate centers of each dart intake,
and square down 5 1/2 inches (5 inches for jun-
iors and petites).
Draw dart legs from dart points to curve line of
the waist.
True dart legs by adding to the shorter legs and
blend to the curve of the waistline.
• Front darts: Repeat the process with the dart legs
3 1/2 inches long.
Figure 4
Figure 5
56

DRAFTING THE BASIC PATTERN SET
Fitting the Skirt
Sew the skirt with a long stitch. Press without steam
and place on the form. The skirt may be critiqued
separately as illustrated or stitched to the bodice.
The following check points are guides in analyz-
ing the fit of a skirt. The waistlines of the bodice and
skirt must match and the darts that are closest to the
center of the garment should align with the princess
line. If not, check measurements and make correc-
tions. Darts that appear with stress lines require that
the darts be shortened. Darts ending with more
than slight fullness require that the darts be stitched
to a longer length. Adjust side seams if the skirt is
too tight or too loose. The hemline of a balanced
skirt is parallel with the floor. If not, follow the ex-
amples below for suggestions in correcting the skirt
and patterns.
A Well-Balanced Skirt
Figures 1a, b
• The skirt aligns with the center lines of the form
and hangs straight from the hip to the hemline,
indicating that the HBL line (crossgrain) is paral-
lel with the floor (Figure 1a). The skirt stitched to
the bodice is shown in Figure 1b.
Imbalanced Skirt
Figures 2a, b
• Problem: The skirt overlaps the center line
(Figure 2a). A flare will appear at the center of the
skirt (Figure 2b).
• Possible causes: Insufficient dart intake or side
waist incorrectly marked. Check the location of
the HBL on the form and the skirt draft.
• Suggested solution: Raise the side waist until the
skirt aligns with the center line of the form. It may
be necessary to release the side seams to correct
the problem. Increase dart intake, if necessary.
Pin
Raise
side
waist
Figure 1a Figure 1b
Figure 2 a
Figure 2 b
57

DRAFTING THE BASIC PATTERN SET
Lower
side
waist
Figures 3a, b
• The skirt swings away from the center (Figure 3a).
• The skirt will press against the thigh and move
up the hipline when the wearer is walking (Fig-
ure 3b).
• Problem: Excessive dart intake or the side waist
incorrectly marked. Check the location of the
HBL on the form and the draft.
• Suggested solution: Lower the side waist until
the skirt aligns with the center line of the form.
It may be necessary to release the side seams to
correct the problem. Decrease the dart intake, if
necessary.
SELF-EVALUATION TRUE AND FALSE TEST
Circle true or false. The answers are at the end of the chapter.
Figure 3a Figure 3b
1. Darts control the fit of the T F
basic garment.
2. Dart legs confine unneeded excess. T F
3. A dart is the same as adding T F
fullness.
4. Bodice darts do not radiate from T F
the bust.
5. Gapping results from misplaced excess. T F
6. A standard missy form has a C-bust cup. T F
7. The HBL is parallel with the waist. T F
8. The center back waist is lower than the T F
center front waist.
9. Back darts are always the same length. T F
10. Some ease is in the front armhole. T F
11. Gapping is trimmed at the seams. T F
12. Darts take up excess caused by convex T F
shapes.
13. There are 12 major darts on the total T F
basic bodice and skirt.
14. It is not neccessary to recheck T F
measurements taken from the form
or model.
15. The armhole measurement can T F
determine the biceps.
16. The armhole measurement can T F
determine the cap height.
17. Measurements taken from a chart T F
guarantee a perfect fit.
18. The shoulder and side seam of the form T F
guarantees a perfect sleeve alignment.
19. The center cap notch stays at the T F
grain line.
20. The front sleeve is identified by T F
two notches.
58

DRAFTING THE BASIC PATTERN SET
Mark
Match
Match side seams
PREPARING PATTERNS
FOR TEST FIT
Matching Joining Seams
Place patterns with darts on top of patterns without
darts at joining seams. Seams that do not match
(check measurement chart) are adjusted equally at
each end and blended with seamline.
Trueing Front and Back Bodice at Stitch Line
Figure 1
• Place back pattern on top of front pattern
(shaded area), touching shoulder/neck corners
and mark dart location on front shoulder.
Trueing Front and Back Skirt
Figure 4
• Place back and front (shaded area) skirts together
at sides. Match HBL lines. Skirt should match to
side waist and hem from the HBL. If it does not,
recheck muslin or recheck square line on draft. If
correct, adjust patterns above and below the HBL
to true.
Mark
Match
Figure 2
• Move back pattern so that other dart leg touches
mark on front shoulder and pattern’s edge,
matching to shoulder tip. Adjust shoulder, if
necessary.
Figure 3
• Place side seams together, matching side at arm-
hole and waist. Adjust side seam, if necessary.
Match side seams
Figure 1
Figure 2
Figure 3
Figure 4
59

DRAFTING THE BASIC PATTERN SET
Match
Center back
Mark dart leg
Match
Trueing Bodice with Skirt
Figure 5
• Place center back of bodice to center back of skirt
(shaded area), matching stitchline to dart leg.
Adjust dart, if needed.
Figure 6
• Shift back pattern along waistline, matching
mark of bodice with other dart leg on skirt. Side
seams should match. If they do not, recheck
waistline measurements and adjust.
Figure 7
• Shift back pattern, matching other dart leg to
dart leg of skirt. Broken line is skirt dart under-
neath. Mark location of dart leg on bodice.
• Repeat for front bodice and skirt (not illustrated).
Figure 5
Figure 6
Figure 7
60

DRAFTING THE BASIC PATTERN SET
UPRIGHT
PERFECTFORWARD
SLEEVE
3363
10
2 self
Biceps Level
Elbow Level
Wrist
Level
Grainline
Cap
Height
S
l
e
e
v
e
C
a
p
THE BASIC SLEEVE
The basic sleeve is a mounted sleeve stitched to the
basic bodice armhole.
A sleeve is to fit an arm, which is one of the most
efficient and mobile parts of the human anatomy.
The arm functions primarily in a forward motion
but is capable of moving in every direction. This
flexibility should be considered when testing the fit
and comfort of the sleeve.
The center grain of a well-fitted sleeve should
align with or be slightly forward of the side seam of
models having a perfect stance. The arms of models
with stooped shoulders tend to hang too far forward
from the side seams. The arms of models with an up-
right stance tend to hang too far to the back from
the side seams. In either case, the sleeve should align
with the position of the relaxed arm without regard
to alignment with the side seam.
Sleeve Terminology
Communicating in terms that are familiar with
those in design and production will help to avoid
misunderstanding when problem solving.
Grainline. Straight grain of the sleeve, which is the
center of the sleeve from top of cap to wrist level.
Biceps level. Widest part of the sleeve dividing cap
from the lower sleeve.
Sleeve cap. Curved top of the sleeve above biceps
line.
Cap height. Distance from biceps to the top at the
grainline.
Elbow level. Placed at the articulation point of the
arm, and the location of the elbow dart.
Wrist level. Entry for the hand.
Notches. A notch at the top of the sleeve cap divides
cap ease between front and back sleeve and armhole
of the bodice. One notch identifies the front sleeve,
and two notches identify the back sleeve. Ease be-
gins and ends at the front and back notches.
Cap ease. Ranging from 1 1/4 inches to 1 1/2 inches
(depending on size) between front and back
notches.
61

DRAFTING THE BASIC PATTERN SET
F
l
e
x
rul
e
r
t
h
e
BACK
Record
FRONT
Record
Armhole Measurement
Figures 1a, b, and c
To measure the front and back armholes, use a thin,
flexible plastic rule held upright when measuring.
(Do not use a measure tape.)
Record measurements in spaces on the front and
back armholes of the pattern for future reference.
• Measure front bodice armhole. Record ______.
• Measure back bodice armhole. Record ______.
• Add Measurements together. Record ______.
• Divide in half, add 1/4 inch. Record ______.
Record this measurements for your model size in
the space provided on the Sleeve Messurement
Chart titled “Armhole measurement.”
In the sleeve draft, it is the A to E instructions.
Grade: 1 1
1
1
/
2
1
1
/
2
1
1
/
2
2
6 8 10 12 14 16 18
Sleeve length
21
1
/
2
21
3
/
4
22
22
1
/
4
22
1
/
2
22
3
/
4
23
Cap height
5
1
/
2
5
5
/
8
5
3
/
4
5
7
/
8
6
6
1
/
8
6
1
/
4
Armhole measurement — — — — — — —
Biceps
12
1
/
4
12
5
/
8
13
13
1
/
2
14
14
1
/
2
15
1
/
8
SLEEVE CAP EASE
Cap ease of the basic sleeve cap is approximately
1 1/4 to 1 1/2 inches for sizes 10 and above, and 1 1/8
to 1 1/4 inches for sizes below 10. The Sleeve Mea-
surement Chart provides measurements for the
sleeve draft but does not necessarily guarantee the
correct amount of cap ease because of differences in
forms and personal fit models. To help control cap
ease and to avoid puckering, follow the “Armhole
Measurements” formula (Figures 1a, b, and c). Other
sleeve fitting problems that may develop can be
resolved by referring to the armhole adjustment sec-
tions later in this chapter.
SLEEVE MEASUREMENT CHART
Figure 1 a
Figure 1b
Figure 1c
62

DRAFTING THE BASIC PATTERN SET
E
G
H
K
L
M
N
F
C
A
BACK
FRONT
3/8 "
1/2 "
1/4 " 3/16 "
5/8 " 3/4 "
SLEEVE DRAFT
Figure 2
Draw a line on paper. Mark and label:
A to B = Sleeve length ______.
A to C = Cap height. Mark ______.
C to D = One-half of C to B.
D to D⬘ = 3/4 inch. Mark. Square lines from
A, C, D, B.
Armhole measurement = ______. Place a ruler
at A and pivot until the measurement touches
biceps line. Mark.
C to E = One-half of biceps measurement. Mark.
Compare placement of the two marks, and mark
biceps in between. Label E. Draw a line from A
to E; divide into fourths. Mark and label, as
shown.
C to F = C to E
Draw a line from A to F. Divide into fourths,
mark and label, as shown.
B to O = 2 inches less than C to E.
B to P = B to O
Draw a line from O to E and from P to F.
Figure 3
Square lines from the following:
• G—in 3/8 inch • L—out 3/4 inch
• H—out 1/4 inch • M—out 3/16 inch
• K—out 5/8 inch • N—in 1/2 inch
Figure 2
O
P
E
G
H
K
L
M
N
F
C
A
BACK
FRONT
D'
D
B
Elbow
Wrist
Biceps
Figure 3
63

DRAFTING THE BASIC PATTERN SET
Figures 4a, b
Front Capline:
• Use the French curve to shape the capline by
touching A, L, and M. Draw the curve past M for
blending.
• Change the position of the curve rule touching F,
and N, and draw curve blending with M line (Fig-
ure 4a). Draw the curve.
Back Capline:
• Place the curve rule so that A, K, and H touch.
Draw the curve past H to blend (Figure 4b).
• Change the position of the curve rule touching E
and G, and draw curve blending with H line.
Figure 5
Completing the Sleeve:
• Label elbow Level S, and extend line R 1/4 inch.
Draw a line from R to E.
• Elbow dart:
R to T = One-half of R to D. Mark.
R to U = 1 inch. Mark.
T to U = R to T. Draw connecting line.
O to V = 3/4 inch. Mark.
Draw a line from U through V equal to S to P.
Label W.
WtoX= O to P. (Adjust at the fitting if necessary.)
Draw a line ending at wrist level. Draw a slightly
curved line from X to S to F.
Ease Control Notches
Back—Mark notch 1/2 inch up from G and the sec-
ond notch 1/2 inch above it.
Front—Mark one notch 1/2 inch above N.
Continue with instructions to determine cap ease.
Blend
3/4 "
1"
R
EF
GN
HM
T
U
S
V
W
X
O
P
D
Front
notch
Back
notches
E
G
H
K
L
M
N
F
C
A
BACK
FRONT
E
G
H
K
L
M
N
F
C
A
BACK
FRONT
Figure 4a
Figure 4b
Figure 5
64

DRAFTING THE BASIC PATTERN SET
Front b odice
FRONT
BACK
Mark
Mark shoulder tip
Move incrementally
to shoulder tip
ADJUSTING SLEEVE TO
ARMHOLE OF BODICE
The basic sleeve should measure approximately 2
inches more across the biceps of the pattern than
the circumference of the arm. The basic sleeve cap
should measure an average of 1 1/4 to 1 1/2 inches
more than the front and back bodice armhole. The
difference between the sleeve cap and armhole
measurement is the amount of ease needed to fit
over the ball of the arm. The amount of cap ease is
determined by the width of the biceps, the cap
height, and the circumference of the front and back
armhole of the bodice. If any one of the factors is
out of harmony, it will affect the fit and appearance
of the sleeve in the following ways: excessive or in-
sufficient cap ease, cap ease unequally distributed
between the front and back armhole, and sleeves be-
ing too tight or too loose. Incorrect placement of the
shoulder or side seams of the form will affect the
alignment of the sleeve. It is advisable to correct
these problems before attaching the sleeve to the
garment to minimize fitting problems later.
Determining Cap Ease
Two methods are given to determine cap ease. The
sleeve can be walked around the front and back arm-
hole, or the measurement can be taken by using the
plastic rule. Both are illustrated.
Method 1: Walking the Sleeve
Figures 1a, b, and c
• Place the corner of the front sleeve at biceps to
the corner of the bodice.
FRONT FRONTBACK BACK
Center Notch Center notc
Cap Ease
• If the cap ease is correct, center a notch between
the marks to equalize the ease. Then continue on
to the Setting the Sleeve into the Armhole section.
• If cap ease is more or less than required, see section
on suggested adjustments of the sleeve or the
armhole later in this chapter. When adjustments
have been completed, continue on to the Setting
the Sleeve into the Armhole section.
Figure 1c
• Use two pushpins alternately to pivot and ad-
vance the sleeve cap around the curve line of the
armhole.
• Mark the notch location of the sleeve to the arm-
hole of the bodice.
• When the sleeve cap reaches the shoulder tip of
the bodice, mark the location on the sleeve cap.
• Repeat the process for the back sleeve.
FRONT BACK
Move in crementally
up t o t his point
Figure 1 a
Figure 1b
65

DRAFTING THE BASIC PATTERN SET
F
l
e
x
t
h
e
r
u
l
e
r
BACK
BACK
Equals arm hole m easurement
Record
FRONT
FRONT
Equals armhole measurement
Record
Cap Ease
Figures 1d and e
Measure the distance between the marks.
• If the amount of cap ease is sufficient, center a
notch between the marks to equalize the excess.
The center notch may be moved to equalize the
ease. Continue to the next step, Setting the Sleeve
into the Armhole section, to cut, stitch, and bal-
ance the sleeve.
• If the cap ease is less or more than needed, see the
following pages for suggested adjustments of the
sleeve or the armhole. When all adjustments have
been completed, go to the Setting the Sleeve into
the Armhole section to cut and stitch the sleeve.
FRONT FRONTBACK BACK
Center notch Center notch
Method 2: Flex Rule Measurement
Figures 1a, b, and c
Use a very thin flexible plastic ruler held upright
with both hands as the rule is manipulated around
the curves of the armholes. Measure and record (if
not already recorded). Using back armhole measure-
ment, measure the back side of the sleeve cap and
mark where the back armhole measurement ended.
Repeat the process for the front armhole and
mark the front sleeve cap.
Figure 1 a
Figure 1 b Figure 1c
Figure 1e
Figure 1d
66

DRAFTING THE BASIC PATTERN SET
BACK
FRONT
Lower
notches
FrontBack
Do not lower
cap notches
BACK
FRONT
FRONT
Paper
Blend
Paper
Blend
BACK
Blend
Adjusting the Armhole to
Accommodate Cap Ease
Even though the cap ease is the correct amount or a
little more than required, the ease around the cap
may show puckers (small gathers). The reason may
be the weight of the fabric, or lack of control of the
machine as the fullness is stitched around the curve
of the armhole. Three examples showing how to
control the cap excess are given.
Figure 1 should be tried first. If the problem is
not resolved, combine with Figure 2 and finally
Figure 3. The cap ease for example problem is 1 3/4
inches.
Figures 1a, b, and c
Lower front and back armhole notches (do not lower
sleeve notches):
• Lower the front and back bodice notches 1/8
inch to 1/4 inch.
1/8 to 1/4 inch of sleeve ease is held and stitched
below the notches, leaving remaining cap ease
above the lowered notches.
Figures 2a, b
Increase the front and back armholes:
• Add 1/16 inch to the shoulder tip to zero at
shoulder/neck.
• Add 1/16 inch to the front and back armholes to
zero at the waist.
• The increased armhole can absorb more of the
cap ease.
Figures 3a and b
Transfer ease to the armhole from available darts:
• Transfer 1/8 inch from the front waist dart and
shoulder dart of the back bodice. Mend the pat-
tern, or use the pivotal method.
Figure 1 a
Figure 1 b
Figure 1 c
Figure 2a
Figure 2b
Figure 3a
Figure 3b
67

DRAFTING THE BASIC PATTERN SET
Pivot
upward
Pivot
downward
True dart legs
New biceps
mark
Biceps
Pivot
upward
Pivot
downward
True dart legs
New biceps
mark
Biceps
Increase or Decrease the Biceps
Changing the width of the biceps also increases or
decreases cap ease.
Figure 4
Increase biceps example: Add 1/2 inch to biceps
• Trace sleeve and all markings.
• Extend biceps line 1/4 inch to each side.
• Place sleeve with push pin on top of the ex-
tended line of the biceps. Pivot the sleeve up-
ward until sleeve curves touch. Trace and blend
with the traced cap. Pivot the sleeve downward
until the under seams touch at wrist level. Trace
and true the elbow dart.
• Repeat the process for the front sleeve. (Broken
lines indicate the original sleeve pattern.)
Figure 5
Decrease biceps example: Decrease bicep 1/2 inch
• Trace sleeve and all markings.
• Mark 1/4 inch in from each end of the biceps.
• Place sleeve and push pin at the new biceps mark
and follow the process shown in Figure 4.
Increase or Decrease Cap Ease
Problems: Puckering around the cap that appears
like a puff sleeve (decrease cap height) (see Figure 7)
or a sleeve swinging away from the side seam (in-
crease cap height) (see Figure 6).
This method will also increase or decrease cap
ease.
Figure 6
• To increase cap height, cut through the grainline
to the corner of the front and back sleeve, and lift
to spread the cap for the extra amount of ease
needed.
Figure 7
• To decrease cap height, cut through the grainline
to the corner of the front and back sleeve, and
overlap the cap to eliminate the excess ease.
Paper
Lift t o s pread c ap
Overlap
Blend
Figure 6
Figure 7
Figure 4
Figure 5
68

DRAFTING THE BASIC PATTERN SET
Gathering stitches
Aligned
Setting the Sleeve into the Armhole
The sleeve is ready to be placed into the armhole. It
is not known whether the sleeve will align with or
hang slightly forward of the side seam. It is possible
to precheck the fit by pinning the undersleeve to the
armhole from notch to notch and pinning the cap
notch to the shoulder seam. See Figures 2 and 4. If a
sleeve hangs out of alignment, it can be rotated to
correct the problem.
Figure 1a
• To prepare the sleeve, trace on muslin or the fab-
ric of choice.
• Draw the center grainline and the biceps lines.
Cut the sleeve from the fabric.
• Two methods can be used to sew the sleeve cap
to the armhole: The cap ease can be crimped and
stitched to the armhole or two rows of gather
stitches can be made from front to back notch.
Stitch one row at the seamline and the other
3/8 inch above. Pull the gather stitches to equal
the distance from the front to back armhole
notches. Ease should be evenly spaced to avoid
puckers.
• Baste or stitch the sleeve to the armhole of the
bodice for the test fit.
Evaluate the Hang and Fit
of the Sleeve
Does the sleeve align with or hang slightly forward
of the side seam (Figure 1)? Does the sleeve hang to-
ward the back (Figure 2) or more than 1 inch for-
ward of the side seam (Figure 3)? Sleeves that hang
out of alignment should be rotated until aligned.
Does the sleeve show puckers or puff around
the cap? If so, reduce cap height; see Figures 6 and
7 in the Back Bodice Draft section earlier in this
chapter.
Is there insufficient cap ease? If so, increase cap
height; see Figures 4 and 5 within the Front Bodice
Draft section earlier in this chapter.
Sleeve with Perfect Alignment
Figure 1b
• The grainline of a well-balanced sleeve is aligned
with or slightly forward of the side seam.
Figure 1a
Figure 1b
69

DRAFTING THE BASIC PATTERN SET
Shift t oward
front a nd
pin
BACK
Subtract
Add
FRONT
Add
Subtract
Swing forward of side seam
Shift toward
back
BACK
Add
Subtract
FRONT
Subtract
Add
Rotating the Sleeve
Rotating the sleeve will be necessary if the center
grain of the sleeve hangs too far forward or too far
back of the side seam of the garment. If either prob-
lem is observed, remove the sleeve from the armhole
of the garment and follow the illustrations to correct
the alignment of the sleeve.
Imperfect Alignment
Figures 2a, b
Sleeve hangs to the back of side seam.
Swing b ack of s ide s eam
Pattern Adjustment
Figures 3c, d
Adjust the shoulder and side seam, as shown.
Pattern Adjustment
Figures 4c, d
Adjust the shoulder and side seam, as shown.
Imperfect Alignment
Figures 4a, b
Sleeve hangs forward of side seam:
Figure 2 a
Figure 2 b
Figure 3 c
Figure 3 d
Figure 4a
Figure 4b
Figure 4c Figure 4d
70

DRAFTING THE BASIC PATTERN SET
Punch h oles
BACK
seamless
skirt
Punch holes
FRONT
seamless
skirt
SLEEVE
seamless
Punch h ole
FRONT
seamless
Punch
holes
BACK
seamless
Punch
hole
Punch hole
SEAMLESS WORKING PATTERNS
The basic pattern set should remain seamless to develop design patterns. Seams are added at the completion
of the basic pattern and design patterns. The professional designer or patternmaker may prefer to develop de-
sign patterns with seamed patterns to save time. The darts are partially cut out and a punch hole is placed at
the end of each dart for accuracy when tracing the pattern for manipulation.
SELF-EVALUATION TEST
Matching Test
Record numbers that match the examples. To check
your answers refer to the end of the chapter.
1. Changes 2-D to 3-D
2. Perfect fit
3. Cap ease for basic sleeve 3/8 inch
4. Gapping
5. Sleeve hangs to back
6. Puckers along cap line
7. Sleeve hangs out from side
8. Basic dress
9. HBL
10. Uneven hemline
11. Armhole notches
12. Equalize cap ease
13. Rotating sleeve
14. Biceps too loose
15. Bodice aligned
16. Working patterns
17. Stitched darts
_____ Darts
_____ Hori zontal balance line
_____ Once marked not moved
_____ Insufficient cap ease
_____ Misplaced fullness
_____ HBL marked incorrectly
_____ Balanced garment
_____ Basic dress bridges the hollows
_____ Cap height too short
_____ Adjusting sleeve balance
_____ Excessive cap ease
_____ Control fit
_____ Shift center cap notch
_____ Bodice in balance
_____ Decrease bicep
_____ Used for pattern manipulation
_____ Shift under seam to right
71

DRAFTING THE BASIC PATTERN SET
COMPLETING THE PATTERN
A completed pattern has seam allowance, pattern
symbols (notches, a punch, and circles), grainline,
and pattern information. Pattern symbols guide the
seamstress in constructing the garment, and pattern
information assists in the production process. If the
suggested pattern information differs from that of
the company’s standards, defer to the company’s
standard.
Pattern Information
Write or print pattern information clearly. Patterns
other than lining and interconstruction should be
written in black felt-tip pen. Lining patterns are
written in blue, interlining in green, and interfacing
in red. Pattern information can be placed in the cen-
ter of the pattern or placed along the grainline and
on the right-side-up of each pattern.
Grainline. The grainline is drawn through the
length of the patterns.
Pattern identification. Label each pattern (bodice
front, back, skirt, sleeve, collar, pocket).
Style number. Write the code number of the pattern
set—for example, 3363 (33 may identify the type of
garment and 63 may identify the fabric).
Pattern size. Record the pattern size.
Pieces cut. Write the number of pieces cut from
each pattern to complete the garment.
A line separates the size (10) from the number of
pieces cut. See examples on the next page.
Seam Allowance
The following are general guidelines:
1/4 Inch
• All faced areas
• Sleeveless armholes
• Narrow spacing
• Extreme curves)
1/2 Inch
• Armholes with sleeves
• Waistlines
• Center lines
• Stylelines
• Side seams (vary: 3/4 inch, 1 inch)
• Zipper seams (vary: 3/4 inch, 1 inch)
Overlock Seam
• 3/8-inch seam allowance
Punch/Circle
A symbol to indicate:
• Nearing the end of darts
• Pocket, or trim locations
• Button/Buttonhole placement
• Inverse corners
72

DRAFTING THE BASIC PATTERN SET
BACK
Skirt
10
2 s elf
3363
FRONT
Skirt
10
1 self
3363
3363
10
2 s elf
SLEEVE
BACK
Bodice
10
2 self
3363
FRONT
Bodice
10
1 self
3363
Basic Pattern Set—Seamed
73

DRAFTING THE BASIC PATTERN SET
Form
Form make and type ______
Size ______ Year ______
FORM MEASUREMENT
CHART
Circumference Measurements
1. Bust: ______, plus 2 ease ______
2. Waist: ______, plus 1 ease ______
3. Abdomen: ______
4. Hip: ______, plus 2 ease ______
Upper Torso (Bodice)
5. Center length: F ______, B ______
6. Full length: F ______, B ______
7. Shoulder slope: F ______, B ______
8. Stra p: F ______, B ______
9. Bust depth: ______, radius ______
10. Bust span: ______
11. Side length: ______
12. Back neck: ______
13. Shoulder length: ______
14. Across shoulder: F ______, B ______
15. Across chest: ______
16. Across back: ______
17. Bust arc: ______
18. Back arc: ______
19. Waist arc: F ______, B ______
20. Dart placement: F ______, B ______
Special Information
Set form to desired height and measure the following:
C.F. waist to floor ______
C.B. waist to floor ______
C.B. neck to floor ______
Lower Torso (Skirt/Pant)
22. Abdomen arc: F ______, B ______
23. Hip arc: F ______, B ______
24. Crotch depth: ______
25. Hip depth: C.F. ______ C.B. ______
26. Side hip depth: ______
27. Waist to ankle: ______
Waist to knee: ______
Waist to floor: ______
28. Crotch length: ______
Vertical trunk: ______
29. Upper thigh: ______
Mid-thigh: ______
30. Knee: ______
31. Calf: ______
32. Ankle: ______
Foot entry: ______
74

DRAFTING THE BASIC PATTERN SET
PERSONAL MEASUREMENT
CHART
Circumference Measurements
1. Bust: ______ 3. Abdomen: ______
2. Waist: ______ 4. Hip: ______
Upper Torso (Bodice)
5. Center length: F ______ B ______
6. Full length: F ______ B ______
7. Shoulder slope: F/R ______ F/L ______
B/L ______ B/L ______
8. Strap: F/R ______ F/L ______
9. Bust depth: F ______ Radius ______
10. Bust span: ______
11. Side length: F/R ______ F/L ______
12. *Back neck: ______
13. Shoulder length: ______
14. Across shoulder: F ______ B ______
15. Across chest: ______
16. Across back: ______
17. Bust arc: ______
18. Back arc: ______
19. Waist arc: F ______ B ______
20. Dart placement: F ______ B ______
21. Standard dart intake:
Front 1" (2 darts 1/2 to 5/8")
Back 2" (2 darts 1 to 1 1/4")
Lower Torso (Skirt/Pant)
22. Abdomen arc: F ______ B ______
23. Hip arc: F ______ B ______
24. Crotch depth: ______
25. Hip depth: CF ______ CB ______
26. Side hip depth: R/S ______ L/S ______
27. Waist to knee ______ ankle _____ floor _____
28. Crotch length _____ Vertical trunk: ______
29. Upper thigh: ______ Mid -th igh: ______
30. Knee: ______
31. Calf: ______
32. Ankle: ______
*Measuring the Arm
Use your measurements (shown by asterisks) for the
draft of the basic sleeve. Read the instructions. Use
the cap height from the sleeve measurement chart, or
use the formula to determine cap height.
(35) Biceps
(36) Elbow
straight
(37) Wrist
(36) Elbow bent
(38)
Around
hand
Circumference
Personal Figure Variations
A. Head height relationship:
Bust ______ Waist ______
Crotch ______ Knee ______
B. Bust/back/chest relationship:
Bust ______ Back ______
C. Hip types: ______
D. Arm types: ______
E. Abdominal/thigh relationship:
Abdominal ______ Thigh ______
F. Shoulder type ______
G. Shoulder/hip relationship:
Shoulder ______ Hip ______
H. Leg types ______
I. Leg types ______
J. Figure stance: ______
K. Asymmetric figure. Record high side, right and
left.
Shoulder: ______ Hip: ______
L. Tilting waistline. Record high and low.
Front: ______ Back: ______
M. Bust/waist ______
Waist/hip ______
Bust/hip ______
N. Other variations: ______
Mid- wrist bone
Elbow length (34)
(elbow bone)
Overarm length (33)
(shoulder tip to
wristbone)
Length
Personal Arm
Measurements
33. Overarm length:* ______
34. Elbow length:* ______
35. Biceps plus 2":* ______
36. Elbow bent (reference) ______
37. Wrist (reference) ______
38. Around hand (reference) ______
*39. Cap height ______
75

DRAFTING THE BASIC PATTERN SET
1. T; 2. T; 3. F; 4. F; 5. T; 6. F; 7. F; 8. T; 9. F; 10. T;
11. F; 12. T; 13. F; 14. F; 15. T; 16. T; 17. F; 18. F;
19. F; 20. F
ANSWERS TO SELF-EVALUATION
TESTS
Matching test: 1, 9, 11, 3, 4, 10, 2, 8, 7, 13, 6, 17,
12, 15, 14, 16, 5
76
Dart Manipulation
From Chapter 4 of Patternmaking for Fashion Design, 5/e. Helen Joseph-Armstrong.
Copyright © 2010 by Pearson Education. Published by Prentice Hall. All rights reserved.

DART MANIPULATION
TEST FIT
Qualities of the Flat Pattern Patternmaker
DART MANIPULATION
Principle #1
Applying Dart Manipulation—Introduction to
Design Patterns
Patternmaking Techniques
Charting Dart Locations
More About Darts
Completing the Dart
SINGLE-DART SERIES—SLASH-SPREAD TECHNIQUE
Steps in the Process
Center Front Waist Dart
Mid-Shoulder Dart
Center Front Neck Dart
French Dart
SINGLE-DART SERIES—PIVOTAL-TRANSFER
TECHNIQUE
Mid-Neck Dart
Side Dart
Mid-Armhole Dart
Shoulder-Tip Dart
THE SHOULDER DART
The Multidispersion Working Pattern for Use
When Shoulder Dart Not Required
THE BACK NECK DART
Excess Transferred to Armhole
SELF-EVALUATION TEST
Consistency of Dart Angle
Proof of Principle #1
TWO-DART SERIES—SLASH-SPREAD TECHNIQUE
Waist and Side Dart
Mid-Shoulder and Waist Dart
Mid-Armhole and Waist Dart
TWO-DART SERIES—PIVOTAL-TRANSFER
TECHNIQUE
Mid-Neck and Waist Dart
Shoulder-Tip and Waist Dart
Center Front Neck and Waist Dart
SELF-EVALUATION TEST
Dart
Manipulation
(Principle #1)
WHY FLAT PATTERNMAKING?
WORKING PATTERNS
FLAT PATTERNMAKING METHODS
THREE FLAT PATTERN TECHNIQUES
The Process
Design Analysis
PATTERNMAKING TERMS
78

DART MANIPULATION
WHY FLAT
PATTERNMAKING?
Flat patternmaking is the fastest and most
efficient method devised for developing
design patterns that control consistency of
size and fit of mass-produced garments.
Flat patternmaking is unique among other
methods in relying on copies of previously
developed patterns (working patterns) for
manipulation using the slash, or pivotal
methods.
Flat patternmaking is based on three
major patternmaking principles and tech-
niques: dart manipulation (relocating darts),
added fullness (adding more fabric in the
design), and contouring (fitting to the hol-
lows of a model’s figure). All are explained
in greater detail in this chapter. Read the
poem and see the transformation of a
working pattern into a design pattern (the
author’s signature design).
ODE TO A WORKING PATTERN
From a master pattern was I cloned,
a perfect shape to be changed and
honed.
While I lay prone on this tabletop,
design lines are plotted nonstop.
Who is this person with scissor in
hand
slashing, spread, lapping according
to plan?
Look what has been done to me
that outrageous pattern is a travesty!
My original shape I can’t reclaim,
for what I was is not the same.
But wait, now assembled and sewn,
what was confusing is now known.
I do not look the same it is true,
yet without me what could they do?
Draw the design on the model provided,
my shape the clue by which to be guided.
If perplexed, see later in text and you will
find me,
darted, flared, and fitted and in all my glory
Designs simple and complex you can create
by learning flat patternmaking, so why wait?
—Helen Joseph-Armstrong
BACK
FRONT
Working patterns
Design pattern
I am waiting to be dressed in my design
The magic—application of
three major patternmaking
principles and techniques.
79

DART MANIPULATION
WORKING PATTERNS
Working patterns should remain seamless for the in-
experienced patternmaker (for clarity) and for draft-
ing more complex patterns where joining parts
overlap. Experienced patternmakers may choose to
work with seamed patterns.
A pattern of any type can be a working pattern,
especially if a pattern exists that closely relates to a
design. For example, if the design has a princess line
FRONT
Bust point
Slashlin
e
Dart Manipulation
Dart
point
Close
5/8 "
FRONT
Adding Fullness
FRONT
3/8 "
3/8
Trim
"
Midriff
Close
Cut on fol
d
Overlap
Contouring
and the only difference is that the panels are gath-
ered, the patternmaker will choose a princess line
pattern to copy, if one is available. This saves time
because part of the design detail has already been
worked out.
Always trace a copy of the working pattern for ma-
nipulation when using the slash method for pattern de-
velopment. The original pattern is saved as a base for
other designs.
FLAT PATTERNMAKING
METHODS
There are two flat patternmaking techniques: Slash
method—to relocate darts, slash to open the pattern
for more fabric, or slash to overlap for a closer fit.
Pivotal/transfer method—the original pattern is
pivoted and traced in sections until the new pattern
shape is completed without slashing. Both pattern
methods are explained and illustrated in this chapter.
A working pattern becomes a design pattern af-
ter its shape changed through manipulation.
THREE FLAT PATTERN
TECHNIQUES
Dart manipulation. Changing the location of a
dart within the pattern frame. Remember that the
dart is responsible for fit and will be part of the de-
sign in one form or another.
Adding fullness. Applies when design fullness is
greater than the dart excess can provide. Added full-
ness is not directed to the pivotal point (bust).
Adding to the pattern’s outline also indicates that
added material is needed for the design.
Contouring. Fitting to the contour above, below,
and in between the bust, leaving the dart excess to
be absorbed into stylelines, or gathers. Gapping ease
caused by cut-out neck lines and armholes is trans-
ferred to be absorbed.
80

DART MANIPULATION
The Process
The process for creating design patterns using the flat patternmaking system:
• First, the design is analyzed and its creative elements identified.
• Second, the patternmaker identifies which of the three principles and techniques to apply in creating pat-
tern shapes for a three-dimensional replica of the design. Other design elements that do not change the
shape of the patterns are part of the finished design.
• Third, the working pattern—a traced copy using the slash method or the original pattern for the pivotal
method—is chosen.
Added
fullness
Contouring
Dart relocation
Added fullness
Design Analysis
Through design analysis, an experienced
patternmaker is able to identify which prin-
ciples and techniques to apply in developing
correct pattern shapes that end in a three-
dimensional replica of the design.
The example illustrates how a sketch
should be marked after the patternmaker
has identified principles and techniques in
preparing for pattern manipulation. The de-
sign incorporates all three principles and
patternmaking techniques.
To develop these skills, the patternmaker
should cut muslins for each design project.
Place the muslin on a form or model to
study and compare the relationship between
the pattern shapes and resulting design.
Eventually, when looking at a design,
the pattern shapes will be visualized, and
when looking at the shapes of patterns, the
design is revealed.
Design projects in the text provide analy-
ses of each design and the accompanying
principles and patternmaking techniques,
from simple to complex.
Each principle and patternmaking tech-
nique is carefully explained with clear illus-
trations and explanations throughout the
text.
81

DART MANIPULATION
PATTERNMAKING TERMS
Patternmaking terms and their definitions will be
introduced wherever appropriate throughout the
chapter to help facilitate understanding.
Pattern plot. The act of placing lines on a traced
copy of the working pattern relating directly to the
design features. The lines are used as guidelines for
pattern manipulation.
Pivotal point. A designated point on the pattern (for
example, the bust point). The pattern is slashed to,
or pivoted from, this point. This allows the pattern
shape to be altered without changing its size or fit.
Pattern manipulation. The act of slashing and
spreading, or pivoting a pattern to alter its original
shape. The new pattern shape represents design fea-
tures of the garment.
Design pattern. The finished pattern that contains
all the features related to the design.
TEST FIT
As each design project is completed, the design
should be cut in preshrunk muslin (or fabric cho-
sen for the design) and placed on a form or model
for a test fit. One-half of the garment is needed
when fitting the form (unless it is an asymmetri-
cal design, which requires a full garment). A full
garment is required when fitting the model. Seam
allowances can be added in one of two ways for a
test fit:
1. The seamless pattern can be traced on
cloth, adding seam allowance directly on
the fabric.
2. Seam allowances can be added to the pattern
before cutting in cloth.
The garment should be stitched using 6 to
10 stitches per inch. The seams are pressed without
steam. Place the garment on the form or model for
the test fit.
Qualities of the Flat Pattern Patternmaker
A patternmaker, with earnest dedication, will be able to:
• Analyze the similarities and differences between
design and working pattern, and can identify
which patternmaking principles and techniques
to apply to the developing design.
• Visualize in three dimensions as the design lines are
plotted on the working pattern. The process is done
while the pattern lays flat on a tabletop, hence, the
name flat patternmaking.
• Finalize the process through manipulating the plotted
design lines using the selected patternmaking principles
and techniques in creating an exact replicate of the
design.
As you continue your studies, you will learn all the necessary fundamentals that form the basis for confi-
dence in developing designs both simple and complex (see Ode to a Working Pattern). As your knowledge in-
creases, so also will your appreciation of the flat patternmaking method. I encourage you to experiment with
designs of your choice. Use the half-forms, size 8, as a practice tool when space is limited.
82

DART MANIPULATION
DART MANIPULATION
Principle #1
Principle. A dart can be transferred to any location around the pattern’s outline from a designated pivotal point
without affecting the size or fit of the garment.
Corollary. The dart excess (space between the dart legs) can be used as gathers, pleats, tuck-darts, stylelines
(those that cross over the bust point or within 1 inch of the bust), cowls, flare (unstitched dart legs), or ease
in the armhole for casual garments. The creative use of the dart excess is called a dart equivalent.
The dart or its equivalent will always be somewhere within the pattern where it was first developed. Dart(s)
or dart equivalents will direct themselves toward the pivotal point. A dart ends before reaching the pivotal
point and should not go beyond it, especially the pivotal point of the bust.
Style d arts Multiple darts Stylelines Gathers Flare Tuck- darts Cowl
Applying Dart Manipulation—Introduction to Design Patterns
The technique is applied when the dart of working patterns (bodice, skirt, sleeve, or any working pattern) are
relocated in the process of creating design patterns. To create a design pattern, the design is analyzed first to
identify the location of the dart or equivalent before manipulating the pattern.
The following design projects illustrate the beginning of pattern manipulation, and each process should
be completed in the order given because each will help to prepare the patternmaker or designer for more ad-
vanced work. Both artistic and technical skills are required to successfully creat design patterns.
Patternmaking Techniques
• Slash-spread and overlap: Through this method, the patternmaker is able to see how the original working
pattern changed into a design pattern.
• Pivotal-transfer: This method does not require that the working pattern be slashed in order to change its
original shape into a design pattern. It is a faster method and, with experience, it is preferred. Project
examples start in the section entitled Single-Dart Series—Pivotal Transfer Technique later in this chapter.
83

DART MANIPULATION
Charting Dart Locations
To prepare for the following projects, trace a copy of
the basic front bodice pattern on tag board and draw
guidelines from bust point, marking each dart loca-
tion. The guidelines establish common areas for dart
relocation and for creating design patterns. How-
ever, they are not the only dart locations because a
dart can be transferred anywhere around the pat-
tern’s outline. The selected dart locations have spe-
cific uses and names. The names should be learned
for clarity when communicating in the design
room. Label the waist dart legs A and B.
The French dart can be placed at any angle be-
low the straight dart; the C.F. (center front) bust dart
and straight dart are squared from the center front.
The mid-armhole dart is directed from bust point to
the armhole notch, and the shoulder dart is placed
at the princess line.
The shapes of the patterns that encircle the
charted pattern differ from one another and are the
result of transferring the original waist dart to
the designated locations. The size and fit have not
been altered by this process. For verification, refer to
the Side Dart section, Figure 2, later in this chapter.
7—C.F. neck
8—C.F. bust level
9—C.F. waist
A
B
1—French
2—Straight (side)
3—Mid- armhole
4—Shoulder tip
5—Mid- shoulder
1
2
3
4
5
6
7
8
9
6—Mid- neck
84

DART MANIPULATION
More About Darts
All darts radiate from convex shapes of the figure. The
bust is rounded, not pointed. If the dart is stitched to
the end of the pivotal point, strain lines will appear
around the bust, distorting the fit of the garment. The
dart should end at a distance from the bust point to
release fabric (fullness) for the bust mound.
Completing the Dart
The dart can be finished one of two ways:
1. Trim dart excess to within 1/2 inch of the
seamline before stitching the dart (Figure 3).
2. Fold the dart excess under and stitch on the
seamline (Figure 5).
Figure 1: Direction of Dart Excess
Follow the arrows for direction of the dart excess
when folded. The excess is placed on the back side
of the pattern and on the wrong side of the garment.
Excess folds downward for darts located any-
where along the
• Armhole
• Side seam
• Center lines
Excess folds toward the center front/back for
darts located anywhere along the
• Shoulder
• Neckline
• Waistline
The folded dart follows the shape of the seam it
lays against. If not, the dart will twist when stitched.
Darts placed at corners (broken lines) of the pat-
tern are usually trimmed to 1/2 inch of seamline.
Figure 1
FRONT
A
B
Bust point
Dart point
5/8 "
Figure 2
Locating Dart Point—Applies to the One-Dart
Control
Figure 2
• After the dart is relocated, draw guidelines (light
lines) from waist to the bust point.
• Center a mark 5/8 inch below bust point to es-
tablish the dart point.
• Draw the actual dart legs from waist to the dart
point mark. Label A and B.
85

DART MANIPULATION
FRONT
Dart point
Figure 3
Inside fold
Crease- fold dart leg ( A)
(B)
Figure 4
Trim
Figure 5
Dart Excess Trimmed
Figure 3
• Add a 1/2-inch seam allowance; notch and cut
from paper.
• Punch and circles not required.
Dart Excess Folded
Figure 4
• The example illustrates the waist dart excess
folded toward center front. For all other dart lo-
cations, see arrow directions in Figure 1 on the
previous page.
• Cup the pattern when crease-folding the dart leg
A to B. The crease ends at dart point (not bust
point).
Tracing the Folded Dart
Figure 5
• With the dart folded, cup the pattern and trace
across the fold at waist. The tracing will give the
correct shape to the dart excess.
FRONT
Pencil in
Figure 6
Punch and Circle Required
Figure 6
• Unfold the dart and pencil in perforated marks.
• Center a mark 5/8 inch below the dart point for
the location of the punch and circle symbol
(guide alerting the seamstress to sew 1/2 inch be-
yond the mark to the dart point).
• Add 1/2-inch seams, notch, and punch/circle.
• Trace, cut, and stitch for test fit.
86
