
Live Story
Magento 2 Integration
v1.0.2 - User Guide

Table of Contents
Summary 3
Magento Overview 4
Store hierarchy 4
Content types 5
Live Story Overview 6
Layouts and destinations 6
E-Commerce and language integrations 6
Integration Setup 8
Connect Magento 2 and Live Story 8
Test the connection 9
Configure store views and languages binding 10
Place Live Story’s main script 11
Next steps 11
Content Management 12
Known Issues 13
Release History 14

Summary
Live Story is a smart Content Management System. Our platform aggregates existing and user
generated content. We editorialize it and make that content live, multi-channeled, and
shoppable. Our design-forward approach seamlessly integrates into your digital platforms: easy
to use, easy to customize, easy to engage.
The purpose of this component is the integration between Live Story and Magento, in order to
allow brand customers to save their visual contents on Commerce Cloud and embed them into
their websites.
A Live Story’s subscription and a platform account are compulsory to enable the integration, so
additional costs will be charged to the customer by Live Story Inc. at the end of the process. To
obtain more information, a contact form to the Sales office can be filled on the company website
( https://www.livestory.nyc/ ).

Magento Overview
This paragraph is intended to give a short overview of some Magento concepts involved by the
integration and their usage, in particular regarding content types and visibility.
Store hierarchy
A Magento instance offers three levels of configuration, catalog, and content: website, store and
store view.
● Website: it’s Magento’s main container, it contains the product catalog.
● Stores: a store represents a dedicated selection from the website’s catalog. Every store
has its own design and main menu.
● Store Views: store views are presentation layers customers usually deal with. Their
typical usage is to support multiple languages, so they tend to become the content
container.
1
1
https://docs.magento.com/m2/ce/user_guide/stores/websites-stores-views.html

Content types
In Magento, users can create three types of content elements: pages, blocks and widgets.
● Pages: the common section for content and information regarding a particular subject.
● Blocks: a modular component used that can be positioned anywhere on the page. They
are also called static blocks, or CMS blocks.
● Widgets: similar to blocks, a Widget is a snippet of code designed to show dynamic
data.

Live Story Overview
Layouts and destinations
A piece of content in Live Story is called a layout. The design can be fixed in strips or grids,
with user generated content from social networks, or free to design for users. A layout can
contain images, text, links, embeddable content like videos and so on.
Every layout can be put on a web page directly or by using a destination, which is a container
that allows users to switch and schedule layouts without changing the page code when a layout
modification occurs.
The basic standard integration process works by embedding two scripts in the web page:
● Main script, which loads Live Story’s core engine, usually placed in the head section.
● Embed code, which takes care of loading the content, a single layout or a destination,
and it must be placed exactly where the content has to be shown.
E-Commerce and language integrations
Live Story has the abilities to place product information from the e-commerce and to let users
put translations of their text content.

Users can configure the languages they need and set Live Story to daily sync the products
catalog from a list of Google Merchant feeds. In order to know which translation and catalog to
load, the embed code supports two attributes, data-store and data-lang.
Please refer to the official frontend integration guide to retrieve further information regarding the
attributes configuration.

Integration Setup
Connect Magento 2 and Live Story
The connection between Magento and Live Story consists of creating a new integration on the
Magento side and configure Live Story with its details, in terms of instance URL and credentials.
Live Story offers two methods to set its configuration, OAuth and manual. While the manual
method has the greatest versatility in all the possible scenarios, the OAuth method is the
simplest and the most secure way to connect with Magento, thanks to its automated steps and
the OAuth pattern properties.
The following steps will only consider the OAuth method, leaving the manual method knowledge
the Console’s inline guide.
The OAuth integration process starts with the Magento 2 Admin Dashboard. Follow these
steps:
1. Log-in in your Magento 2 Admin Dashboard
2. Go to System > Integrations
3. Click on Add New Integration button
4. Fill the following fields:
a. Name: Live Story
b. Callback URL (refer to Live Story’s Console for the latest URL):
https://api.livestory.io/admin/oauth/login/magento2
c. Identity Link URL (refer to Live Story’s Console for the latest URL):
https://console.livestory.io/#/brand-settings/platforms/ma
gento2
d. Your Password: the password used to log-in in your admin account
5. Click on API link on the left sidebar, after Integration Info

6. Select the following paths under the Resources tree:
a. Content > Elements > Pages
b. Content > Elements > Blocks
c. Stores > Settings > All Stores
7. Click on Save
8. Click on Activate link on Live Story integration line
9. Click on Allow button
10. The Live Story console will be opened in a popup. Click on the Connect button to save
the integration
11. The popup will be closed and Magento will activate the integration
After that, coming back to the Console, in Brand Settings > Platform integrations > Magento 2,
the connection details will appear.
Test the connection
A test is available to check if Live Story can connect to Magento 2 and it has been granted all
the required permissions. To start it, click on the Test Integration button below the connection
details.

Configure store views and languages binding
Right after the connection details section, Live Story shows the current store configuration, from
the website to every store view. As said in E-Commerce and language integrations, users can
define content languages and product catalogs.
Since a Magento’s store view is the frontend combination of a product catalog subset and a
language, the Console allows associating a store view to its feed and language sets. With this
association, Live Story will be able to automatically set its data-store and data-lang
embed attributes, according to the chosen store views for the content.

Place Live Story’s main script
As said in Layouts and destinations, Live Story needs its main script, the frontend core engine,
loaded in every page content is supposed to be embedded. Usually, it’s put on every website
page, at the end of the head section.
The only requirement for Live Story’s main script is to take care of loading it after its
dependency, which is jQuery . In Magento 2’s default themes, RequireJS is used to handle
2 3
javascript and plugin dependencies, so this guide will show how to configure it for Live Story.
This example code, tested in Magento 2’s Luma theme, shows how to load Live Story after
jQuery. The LIVE_STORY_MAIN_SCRIPT_URL placeholder needs to be replaced with the
actual URL, available in the Console.
<script type="text/javascript">
require(['jquery'], function() {
require(['LIVE_STORY_MAIN_SCRIPT_URL']);
});
</script>
In addition, if needed, that code can be added using Magento’s Admin dashboard, embedding it
in the footer section instead of the head. Open the theme configuration page, Content >
Configuration > Edit and locate the Footer section.
3
https://requirejs.org/
2
https://jquery.com/

Next steps
After completing the basic configuration, it’s time to setup the usages and the scenarios that
involve Live Story in the Magento content lifecycle: landing pages, editorial sections and
banners. These aspects are not covered in this guide, since they need to be designed with the
content team, the system integrator and the Live Story team, all together, but they are
definitely the next steps to consider.
Another integration step can be the conversion tracking setup: Live Story has an attribution
engine that helps users know how much revenue it brings up to the store conversions. To
enable it, it takes a few additional scripts to add in some e-commerce sections, like product
pages, cart page, checkout page, and order-confirmation/thank-you page. Follow the frontend
integration guide for more details.

Content Management
The content creation starts in Live Story’s Console by designing a new layout for your
e-commerce. When completed, click on Publish to make the layout public. Now the layout is
ready to be pushed to Magento, locate the Integrations section on the Design page and click
on Create Content to start.

A popup will appear, walking the user through the creation process. The first step is content
type. The available choices are: page or static block. The widget type is excluded due to its
nature in Magento (see Content types for details). Click on the type, and then Select.
The next step will show a list of editable content attributes, from the general ID and title to the
meta attributes for SEO purposes. When a little globe icon appears next to the attribute name,
the value can be translated in any language Live Story has been configured for. This will be
very useful since Live Story will be able to create the localized content versions for the store
views, at the end of the process.
In addition, it’s possible to set if the content has to be active or not. Click on Next when
everything needed has been filled.
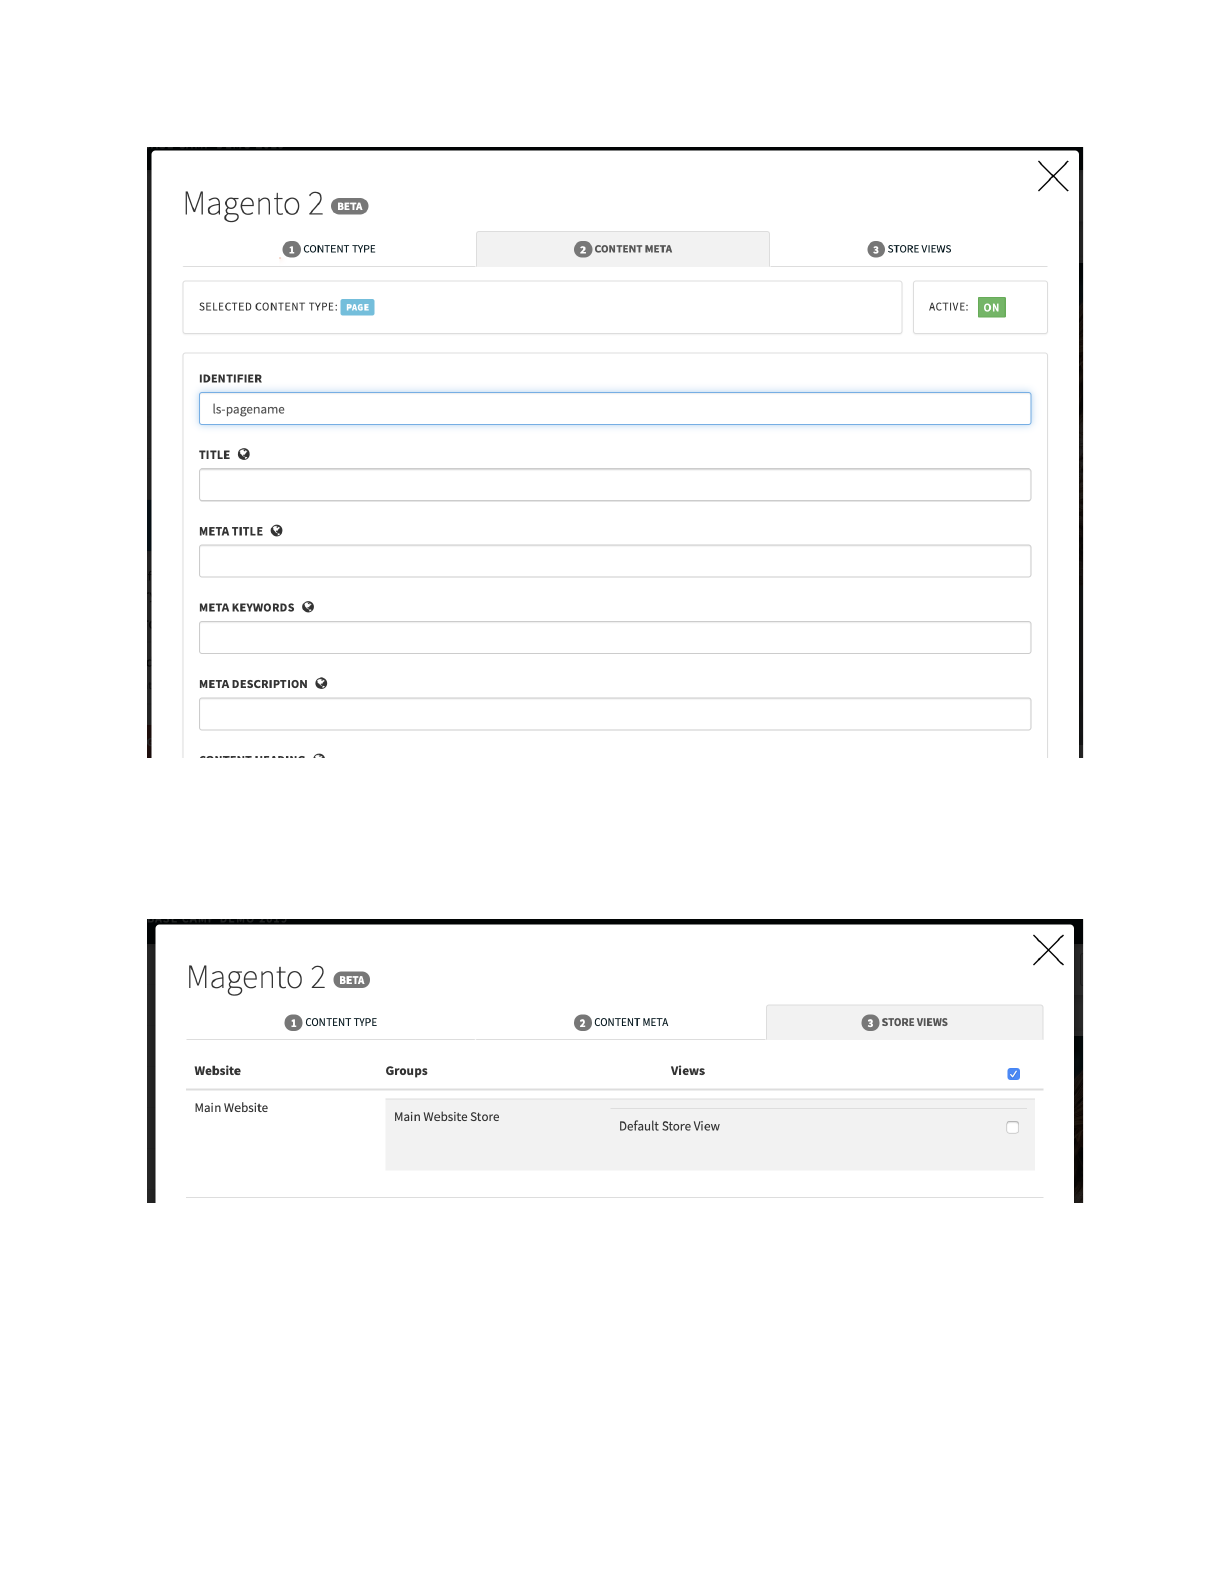
The last step allows users to decide which store views are going to receive the content. It’s
possible to select a subset of them, or let the content be available to all, by selecting the
checkbox on the table header, on the top-right corner.
For every entry, Live Story will create a localized version of the content, combining all the
information and translations added during the process and handling the front-end loading of the
assigned catalog feed and language. Also, Live Story will take care to bind them to the layout in
order to automatically update them when a change occurs.

When everything is ready, click on Create to push the content to Magento. If not, click on any
step tab to review and edit every change. After creation, content is immediately available in
Magento.
The edit process follows the same steps of the creation. If a layout has already been pushed to
Magento, the details will appear on the integration section.
If an integration needs to be removed from the Live
Story side, click on the red button Remove
Integration. If it needs to be removed on the Magento
side, the action must be taken from the Magento
Admin dashboard.
To edit an existing integration, click on its name to
open the wizard popup. It will show the values put
there last time during creation or update.
The most interesting part comes to the store views
section. By default, Live Story will keep and update
every previously selected store view.
However, it also allows users to push content to new
store views by creating them or removing it, by changing the checkboxes on the store view
table.
Known Issues
In this section are the listed known issues about the Live Story’s integration cartridge package:
● A technical issue in Magento code does not allow Live Story to push content with the
“all” store view checkbox flagged and any other store view checkbox flagged, the call to
Magento will just fail. Always pay attention to select “all” or another store view. If this
situation occurs, remove the created content in the Magento Admin dashboard and
restart.
● Editorial sections work when it’s possible to organize content by defining a hierarchy,
which is a feature available only in Magento Enterprise Edition or with some external
plugins
● Do not open Magento content created by Live Story if WYSIWYG editor is enabled. It
can remove part of Live Story’s code inside the content body, causing the design to not
load properly on the page.
● Due to Magento API limitations, any emoji character is stripped to the resulting SEO
version of a Live Story content.
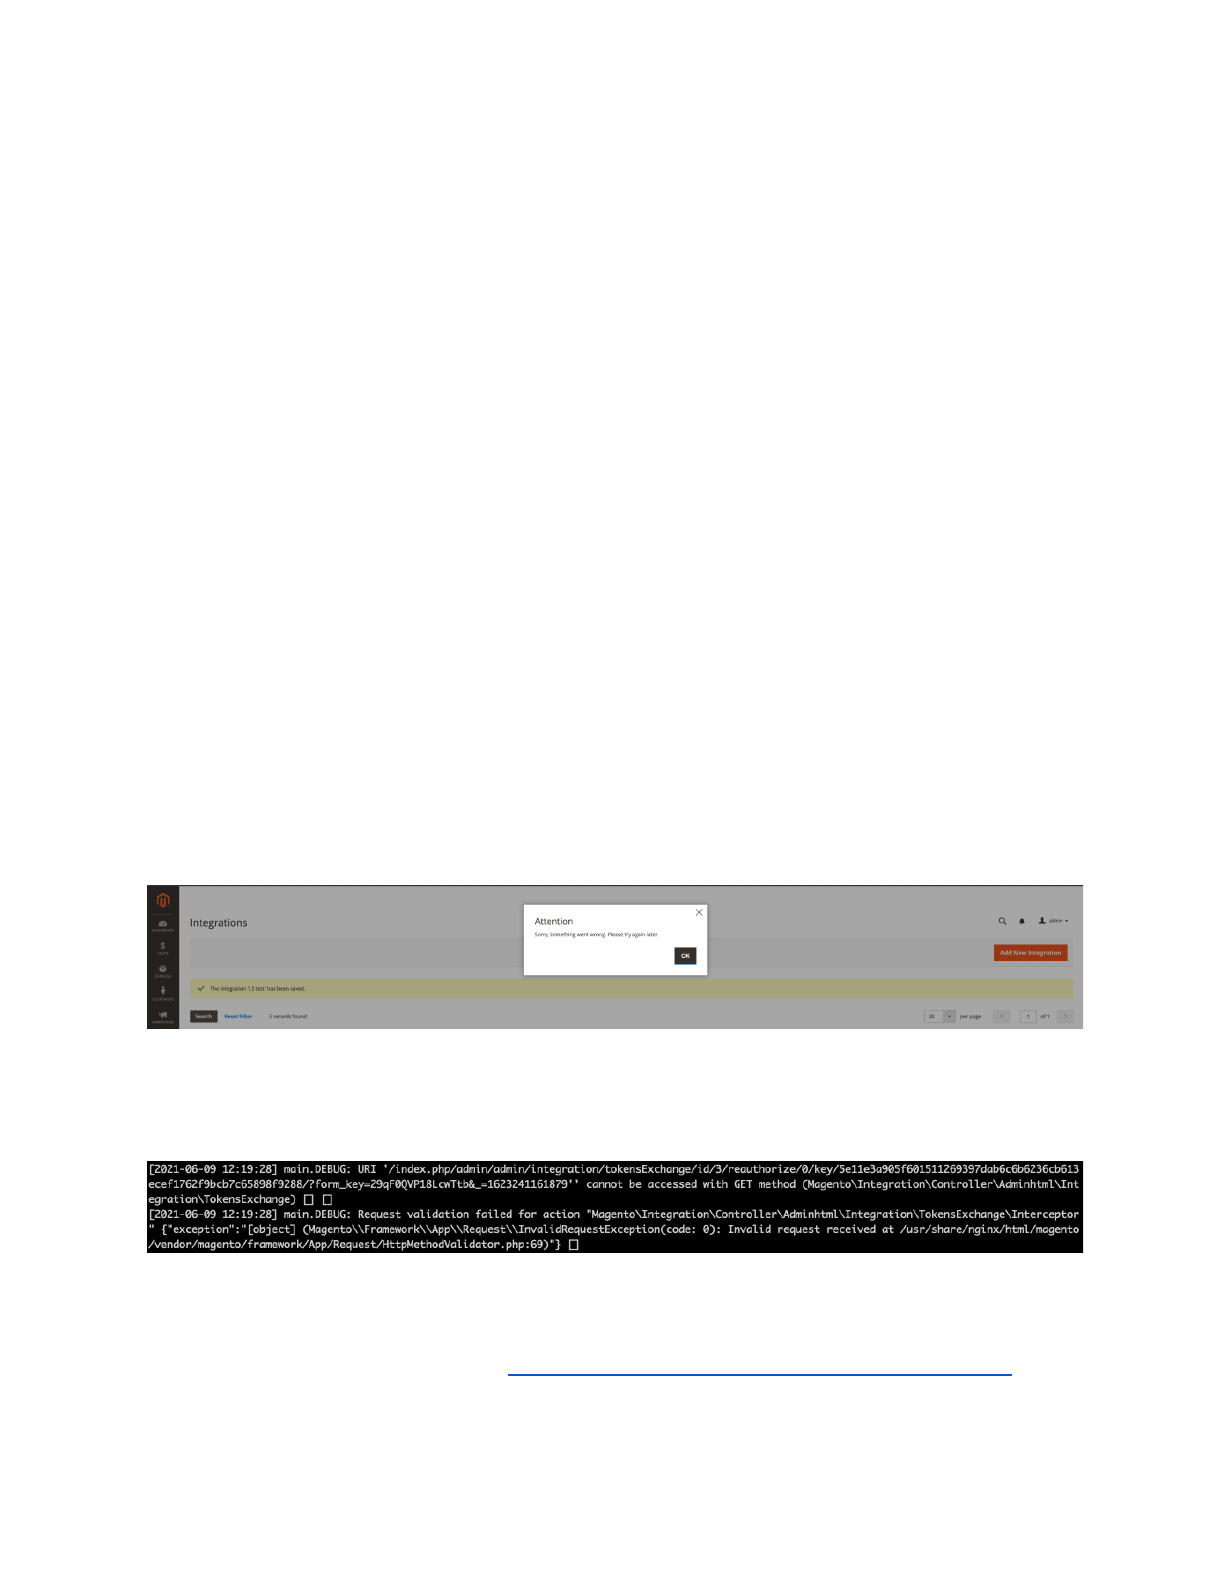
Failed Integration Activation
On Magento 2.4.2 the integration activation might fail with the error “Sorry, something went
wrong. Please try again later.”.
In addition, in the debug log file usually located at $MAGEROOT/var/log/debug.log, the
following error message should appear:
The issue is caused by a Magento bug (completely unrelated to Live Story) involving the file
$MAGEROOT/vendor/magento/module-integration/Controller/Adminhtml/Inte
gration/TokensExchange.php, https://github.com/magento/magento2/issues/33013.

While an official bug resolution is waiting to be released, in order to manually fix the issue, this
extension package provides a complete patch file that can be directly applied.
(livestory-livestory/Console/m242p1_fix_integration_activation.patch).
The following is an example of applying a patch file. Please use your actual path for the Live
Story’s extension root folder.
$: cd $MAGEROOT/vendor/magento/module-integration/Controller/Adminhtml/Integration
$: patch < ~/livestory-livestory/Console/m242p1_fix_integration_activation.patch
$: patching file TokensExchange.php
$:
Is it possible to manually apply the changes by opening the patch file and following the
instructions.
As an alternative to patching a vendor file, or if the issue persists, is it possible to configure the
integration between Live Story and Magento following the Manual configuration procedure (see
Integration Setup > Connect Magento 2 and Live Story) instead of the OAuth one.

Release History
Date
Version
Note
01/04/2020
1.0.0
First release
01/04/2021
1.0.1
Compatibility update
09/06/2021
1.0.2
Compatibility update
