
Owner’s Manual
Before using the instrument, be sure to read “PRECAUTIONS” on pages 4-5.
For information on assembling the instrument, refer to the instructions at the end of this
manual.
EN
YDP
-
165
YDP
-
145
YDP
-
S55
YDP
-
S35
DIGITAL PIANO

1. IMPORTANT NOTICE: DO NOT MODIFY THIS
UNIT!
This product, when installed as indicated in the instruc-
tions contained in this manual, meets FCC requirements.
Modifications not expressly approved by Yamaha may
void your authority, granted by the FCC, to use the prod-
uct.
2. IMPORTANT: When connecting this product to accesso-
ries and/or another product use only high quality shielded
cables. Cable/s supplied with this product MUST be used.
Follow all installation instructions. Failure to follow instruc-
tions could void your FCC authorization to use this prod-
uct in the USA.
3. NOTE: This product has been tested and found to com-
ply with the requirements listed in FCC Regulations, Part
15 for Class “B” digital devices. Compliance with these
requirements provides a reasonable level of assurance
that your use of this product in a residential environment
will not result in harmful interference with other electronic
devices. This equipment generates/uses radio frequen-
cies and, if not installed and used according to the instruc-
tions found in the users manual, may cause interference
harmful to the operation of other electronic devices. Com-
pliance with FCC regulations does not guarantee that
interference will not occur in all installations. If this product
is found to be the source of interference, which can be
determined by turning the unit “OFF” and “ON”, please try
to eliminate the problem by using one of the following
measures:
- Relocate either this product or the device that is being
affected by the interference.
- Utilize power outlets that are on different branch (circuit
breaker or fuse) circuits or install AC line filter/s.
- In the case of radio or TV interference, relocate/reorient
the antenna. If the antenna lead-in is 300 ohm ribbon
lead, change the lead-in to co-axial type cable.
If these corrective measures do not produce satisfactory
results, please contact the local retailer authorized to dis-
tribute this type of product. If you cannot locate the appro-
priate retailer, please contact Yamaha Corporation of
America, 6600 Orangethorpe Ave., Buena Park,
CA90620, USA.
The above statements apply ONLY to those products dis-
tributed by Yamaha Corporation of America or its subsid-
iaries.
(529-M04 FCC class B YCA 01)
FCC INFORMATION (U.S.A.)
(529-M02 FCC sdoc YCA 01)
COMPLIANCE INFORMATION STATEMENT
(Supplierʼs declaration of conformity procedure)
Responsible Party: Yamaha Corporation of America
Address: 6600 Orangethorpe Ave. Buena Park, Calif. 90620
Telephone: 714-522-9011
Type of Equipment: Digital Piano
Model Name: YDP-165, YDP-145, YDP-S55, YDP-S35
This device complies with Part 15 of the FCC Rules.
Operation is subject to the following two conditions:
1) this device may not cause harmful interference, and
2) this device must accept any interference received including interference that may cause undesired operation.
The model number, serial number, power requirements, etc., may be found on or
near the name plate, which is at the bottom of the unit. You should note this
serial number in the space provided below and retain this manual as a perma-
nent record of your purchase to aid identification in the event of theft.
Model No.
Serial No.
(1003-M06 plate bottom en 01)
The name plate is located on the bottom of the unit.

For AC adaptor
Explanation of Graphical Symbols
The lightning flash with arrowhead symbol
within an equilateral triangle is intended to
alert the user to the presence of uninsulated
“dangerous voltage” within the product’s
enclosure that may be of sufficient
magnitude to constitute a risk of electric
shock to persons.
The exclamation point within an equilateral
triangle is intended to alert the user to the
presence of important operating and
maintenance (servicing) instructions in the
literature accompanying the product.
IMPORTANT SAFETY INSTRUCTIONS
1 Read these instructions.
2 Keep these instructions.
3 Heed all warnings.
4 Follow all instructions.
5 Do not use this apparatus near water.
6 Clean only with dry cloth.
7 Do not block any ventilation openings. Install in
accordance with the manufacturer’s instructions.
8 Do not install near any heat sources such as
radiators, heat registers, stoves, or other
apparatus (including amplifiers) that produce
heat.
9 Do not defeat the safety purpose of the polarized
or grounding-type plug. A polarized plug has two
blades with one wider than the other. A grounding
type plug has two blades and a third grounding
prong. The wide blade or the third prong are
provided for your safety. If the provided plug does
not fit into your outlet, consult an electrician for
replacement of the obsolete outlet.
10 Protect the power cord from being walked on or
pinched particularly at plugs, convenience
receptacles, and the point where they exit from the
apparatus.
11 Only use attachments/accessories specified by
the manufacturer.
12 Use only with the cart,
stand, tripod, bracket, or
table specified by the
manufacturer, or sold with
the apparatus. When a cart
is used, use caution when
moving the cart/apparatus
combination to avoid injury
from tip-over.
13 Unplug this apparatus during lightning storms or
when unused for long periods of time.
14 Refer all servicing to qualified service personnel.
Servicing is required when the apparatus has
been damaged in any way, such as power-supply
cord or plug is damaged, liquid has been spilled or
objects have fallen into the apparatus, the
apparatus has been exposed to rain or moisture,
does not operate normally, or has been dropped.
(502-M01 UL 60065-1 en 01)
CAUTION: TO REDUCE THE RISK OF
ELECTRIC SHOCK, DO NOT REMOVE
COVER (OR BACK). NO USER-SERVICEABLE
PARTS INSIDE. REFER SERVICING TO
QUALIFIED SERVICE PERSONNEL.
CAUTION
RISK OF ELECTRIC SHOCK
DO NOT OPEN
WARNING
TO REDUCE THE RISK OF FIRE OR ELECTRIC SHOCK, DO NOT EXPOSE THIS APPARATUS TO RAIN OR
MOISTURE.

4
YDP-165, YDP-145, YDP-S55, YDP-S35 Owner’s Manual
PRECAUTIONS
PLEASE READ CAREFULLY BEFORE PROCEEDING
Especially in the case of children, a guardian should provide guidance on how to properly use and
handle the product before actual use.
Please keep this manual in a safe and handy place for future reference.
WARNING
Always follow the basic precautions listed below to avoid the possibility of serious injury or even death from
electrical shock, short-circuiting, damages, fire or other hazards. These precautions include, but are not limited to,
the following:
Power supply
• (YDP-165, YDP-S55) Do not place the power cord near
heat sources such as heaters or radiators. Also, do not
excessively bend or otherwise damage the cord, or
place heavy objects on it.
• Do not touch the product or the power plug during an
electrical storm.
• Only use the correct voltage specified for the product.
The required voltage is printed on the name plate of the
product.
• Use the specified AC adaptor (page 41).
• (YDP-165, YDP-S55) Use only the supplied power cord.
Do not use the power cord for other products.
• Check the power plug periodically and remove any dirt
or dust which may have accumulated on it.
• Insert the power plug firmly all the way into the AC
outlet. Using the product when it is not plugged in
sufficiently can cause dust to accumulate on the plug,
possibly resulting in fire or skin burns.
• When setting up the product, make sure that the AC
outlet you are using is easily accessible. If some trouble
or malfunction occurs, immediately turn off the power
switch and disconnect the plug from the outlet. Even
when the power switch is turned off, as long as the
power cord is not unplugged from the wall AC outlet, the
product will not be disconnected from the power source.
• Do not connect the product to an electrical outlet using
a multi-plug outlet extender. Doing so can result in
lower sound quality, or possibly cause overheating in
the outlet.
• When disconnecting the power plug, always hold the
plug itself and not the cord. Pulling by the cord can
damage it and cause electric shocks or a fire.
• If not using the product for long periods of time, be sure
to pull the power plug from the AC outlet.
Do not disassemble
• This product contains no user-serviceable parts. Do not
attempt to disassemble the internal parts or modify
them in any way.
Water warning
• Do not expose the product to rain, use it near water or
in damp or wet conditions, or place on it any containers
(such as vases, bottles or glasses) containing liquids
which might spill into any openings or places where
water may drop. A liquid such as water getting into the
product may cause a fire, electric shocks, or
malfunctions.
• Use the AC adaptor indoors only. Do not use in any wet
environments.
• Never insert or remove a power plug with wet hands.
Fire warning
• Do not place any burning items or open flames near the
product, since they may cause a fire.
Using the bench (if included)
• Do not place the bench in an unstable position where it
might accidentally fall over.
• Do not play carelessly with or stand on the bench.
Using it as a tool or stepladder or for any other purpose
might result in accident or injury.
• Only one person should sit on the bench at a time, in
order to prevent the possibility of accident or injury.
• If the bench screws become loose due to extensive
long-term use, tighten them periodically using the
specified tool in order to prevent the possibility of
accident or injury.
• Keep special watch over any small children so that they
don’t fall off the rear of the bench. Since the bench does
not have a backrest, unsupervised use may result in
accident or injury.
DMI-9 1/2

5
YDP-165, YDP-145, YDP-S55, YDP-S35 Owner’s Manual
If you notice any abnormality
• If any of the following problems occur, immediately turn
off the power switch and disconnect the power plug
from the outlet. Finally have the device inspected by
Yamaha service personnel.
- The power cord or plug becomes frayed or damaged.
- Unusual smells or smoke are emitted.
- Some object, or water has been dropped into the
product.
- There is a sudden loss of sound during use of the
product.
- Cracks or other visible damage appear on the
product.
CAUTION
Always follow the basic precautions listed below to avoid the possibility of physical injury to you or others, or
damage to the product or other property. These precautions include, but are not limited to, the following:
Assembly
• Assemble the product in the proper sequence by
following the assembly instructions in this manual. Also,
make sure to tighten the screws or bolts regularly.
Failure to do so might result in damage to the product or
even injury.
• (YDP-S55, YDP-S35) Be sure to attach the anti-fall
brackets to the product, to ensure stability (page 37).
Failure to do so might result in damage to the product or
even injury.
Location
• Do not place the product in an unstable position or a
location with excessive vibration, where it might
accidentally fall over and cause injury.
• Do not go near the product during an earthquake.
Strong shaking during an earthquake could cause the
product to move or tip over, resulting in damage to the
product or its parts, and possibly causing injury.
• When transporting or moving the product, always use
two or more people. Attempting to lift the product by
yourself may result in injuries, such as back injuries, or
cause the product to be dropped and broken, which
could lead to other injuries.
• Before moving the product, remove all connected
cables, to prevent damage to the cables or injury to
anyone who might trip over them.
Connections
• Before connecting the product to other electronic
components, turn off the power for all components.
Before turning the power on or off for all components,
set all volume levels to minimum.
• Be sure to set the volumes of all components at their
minimum levels and gradually raise the volume controls
while playing the product to set the desired listening
level.
Handling
• Do not insert your finger or hand in any gaps on the key
cover or product. Also take care that the key cover does
not pinch your finger.
• Do not insert foreign materials such as metal or paper
into any openings or gaps of the product. Failure to
observe this may cause a fire, electric shocks, or
malfunctions.
• (YDP-S55, YDP-S35) Do not apply excessive force
when closing the key cover. A key cover equipped with
the SOFT-CLOSE™ mechanism closes the cover
slowly. Applying excessive force to the key cover when
closing it could damage the SOFT-CLOSE™
mechanism, and possibly result in injury to your hands
and fingers caught under the closing key cover.
• Do not rest your weight on, or place heavy objects on
the product, and do not use excessive force on the
buttons, switches or connectors.
• Keep small parts out of the reach of infants. Your
children may accidentally swallow them.
• Do not use the product or headphones for a long period
of time at a high or uncomfortable volume level, since
this can cause permanent hearing loss. If you
experience any hearing loss or ringing in the ears,
consult a physician.
• Remove the power plug from the AC outlet before
cleaning the unit. Failure to observe this may cause
electric shocks.
Always turn the power off when the instrument is not in
use.
Even when the [ ] (Standby/On) switch is in standby
status (power lamp is off), electricity is still flowing to the
instrument at the minimum level.
When you are not using the instrument for a long time,
make sure you unplug the power cord from the wall AC
outlet.
Yamaha cannot be held responsible for damage
caused by improper use or modifications to the
product, or data that is lost or destroyed.
DMI-9 2/2

6
YDP-165, YDP-145, YDP-S55, YDP-S35 Owner’s Manual
NOTICE
To avoid the possibility of malfunction/ damage to the product,
damage to data, or damage to other property, follow the notices
below.
Handling
• Do not use the instrument in the vicinity of a TV, radio,
stereo equipment, mobile phone, or other electric devices.
Otherwise, the instrument, TV, or radio may generate noise.
• When you use the instrument along with an app on your
smart device, such as a smartphone or tablet, we recommend
that you enable “Airplane Mode” on the device to avoid noise
caused by communication.
• Do not expose the instrument to excessive dust or
vibrations, or extreme cold or heat (such as in direct
sunlight, near a heater, or in a car during the day) to prevent
the possibility of disfiguration, damage to the internal
components or unstable operation. (Verified operating
temperature range: 5° – 40°C, or 41° – 104°F.)
• Do not place vinyl, plastic or rubber objects on the
instrument, since this might discolor the instrument.
Maintenance
• When cleaning the instrument, use a soft and dry/slightly
damp cloth. Do not use paint thinners, solvents, alcohol,
cleaning fluids, or chemical-impregnated wiping cloths.
• During extreme changes in temperature or humidity,
condensation may occur and water may collect on the
surface of the instrument. If water is left, the wooden parts
may absorb the water and be damaged. Make sure to wipe
any water off immediately with a soft cloth.
Saving data
• Some of the data of this instrument (page 31) are retained
when the power is turned off. However, the saved data may
be lost due to some failure, an operation mistake, etc.
Information
About copyrights
• The copyright of the “content”
*1
installed in this product
belongs to Yamaha Corporation or its copyright holder.
Except as permitted by copyright laws and other relevant
laws, such as copying for personal use, it is prohibited to
“reproduce or divert”
*2
without the permission of the
copyright holder. When using the content, consult with a
copyright expert.
• If you create music or perform with the contents through the
original use of the product, and then record and distribute
them, the permission of Yamaha Corporation is not required
regardless of whether the distribution method is paid or free
of charge.
*1: The word “content” includes a computer program, audio
data, Accompaniment Style data, MIDI data, waveform
data, voice recording data, music score, and score data,
etc.
*2: The phrase “reproduce or divert” includes taking out the
content itself in this product, or recording and
distributing it without changes in a similar manner.
About functions/data bundled with the
instrument
• Some of the preset songs have been edited for length or
arrangement, and may not be exactly the same as the
original.
About this manual
• The illustrations as shown in this manual are for
instructional purposes only.
• Windows is a registered trademark of Microsoft®
Corporation in the United States and other countries.
• “QR Code” is a registered trademark of DENSO WAVE
INCORPORATED.
• The company names and product names in this manual are
the trademarks or registered trademarks of their respective
companies.
Tuning
• Unlike an acoustic piano, this instrument does not need to
be tuned by an expert (although the pitch can be user-
adjusted to match other instruments). This is because the
pitch of digital instruments is always maintained perfectly.
About disposal
• When disposing of this product, please contact the
appropriate local authorities.
Button names
The names of panel buttons are enclosed in square brackets
[ ]. Also, the word “button” is omitted throughout this
manual (for example, the PLAY button is expressed as
[PLAY]).

7
YDP-165, YDP-145, YDP-S55, YDP-S35 Owner’s Manual
Table of Contents
PRECAUTIONS .................................... 4
About the Manuals................................ 8
Included Accessories ............................. 8
Panel Controls and Terminals ............. 9
Basic Operations
Setting Up.............................................11
Key Cover (YDP-165, YDP-145)............................11
Music Rest (YDP-165, YDP-145)...........................11
Key Cover and Music Rest (YDP-S55, YDP-S35)12
Turning the Power On.............................................13
Auto Power Off Function........................................14
Setting the Operation Confirmation Sounds........14
Volume Limiter Function .......................................14
Using Headphones ...................................................15
Playing the Piano..................................16
Intelligent Acoustic Control (IAC)........................16
Using the Pedals........................................................17
Using the VRM Lite Function ................................18
Changing the Touch Sensitivity .............................18
Using the Metronome..............................................19
Advanced Operations
Playing Various Musical Instrument
Sounds (Voices)....................................20
Selecting a Voice.......................................................20
Listening to the Demo Songs ..................................21
Adding Variations to the Sound (Reverb) ............22
Transposing the Pitch in Semitones ......................23
Fine-tuning the Pitch ...............................................23
Layering Two Voices (Dual mode)........................24
Playing Duo...............................................................25
Song Playback and Practice .................26
Listening to Preset Songs.........................................26
Practicing a One-Hand Part....................................27
Playing Back Immediately from the First Note
(Quick Play) ..............................................................27
Recording Your Performance .............28
Recording Your Performance ................................28
Changing the Initial Settings of the Recorded Song
....................................................................................29
Deleting Recorded Data ..........................................29
Using with a Computer or a Smart
Device ................................................... 30
Using an App on Your Smart Device....................30
Playback/Recording of Audio Data (USB Audio
Interface) ...................................................................30
Backing up Data and Initializing the
Settings.................................................31
Data Maintained When Power is Turned Off......31
Initializing the Settings............................................31
Confirming the firmware version of this
instrument.................................................................31
Appendix
Troubleshooting ..................................32
Keyboard Stand Assembly...................33
Assembly Precautions ............................................. 33
Moving/Installing .................................................... 33
YDP-165, YDP-145 Assembly................................ 34
YDP-S55, YDP-S35 Assembly................................37
Specifications .......................................40
Index.....................................................42
Song List...............................................43
Quick Operation Guide ...........at the end

8
YDP-165, YDP-145, YDP-S55, YDP-S35 Owner’s Manual
Thank you for choosing this Yamaha digital piano.
This instrument provides exceptionally high-quality sound
and expressive control for your playing enjoyment.
In order to make the most of the performance potential and features of the instrument,
please read the manuals thoroughly, and keep them in a handy place for later reference.
About the Manuals
This instrument has the following manuals.
Included Manuals
• Owner’s Manual (this book)
Explains how to use the instrument.
Online Manuals
• Quick Operation Guide
Shows in chart form the functions assigned to the
buttons and the keyboard for quick understanding.
https://manual.yamaha.com/mi/kb-ekb/ydp-165_s55/
• Smart Device Connection Manual
Explains how to connect the instrument to a
smartphone or tablet, etc.
• Computer-related Operations
Includes instructions on connecting this instrument to
a computer, and operations related to transferring
song data.
• MIDI Reference
Contains the MIDI Data Format and MIDI
Implementation chart, as well as descriptions on MIDI
functions such as MIDI channel and Local Control
settings.
To obtain these materials, access the Yamaha
Downloads website, then enter the model name for
searching the desired files.
Included Accessories
• Owner’s Manual (this book) × 1
• “50 Classical Music Masterpieces” (music book)
×
1
• Online Member Product Registration × 1
• AC adaptor* × 1
• Power cord* × 1 (YDP-165, YDP-S55)
• Bench* × 1 (YDP-165, YDP-145)
* May not be included depending on your particular
area. Please check with your Yamaha dealer.
Yamaha Downloads
https://download.yamaha.com/
Smart device application –
“Smart Pianist”
With the specially developed “Smart
Pianist” app running on your smart
device, you can remotely control your digital
piano for even more convenience and
flexibility. By presenting various parameters
on-screen, this app allows you to make settings
in a visual, more intuitive manner. For more
details on “Smart Pianist,” refer to the
following Yamaha web site.
https://www.yamaha.com/kbdapps/
For instructions on connecting the instrument
to a smart device, Connection Wizard in
“Smart Pianist” will guide you according to the
operating condition and environment. To start
the Connection Wizard, tap “ ” (Menu)
located at the upper left of the screen to open
the Menu display, and then tap “Instrument” →
“Start Connection Wizard.”
NOTE
This instrument does not support wireless connection.
Please select “Cable” in the selection of the connection
method to the Smart Pianist.

9
YDP-165, YDP-145, YDP-S55, YDP-S35 Owner’s Manual
Panel Controls and Terminals
YDP-S55, YDP-S35
The illustrations are taken from the YDP-S55.
YDP-165
YDP-145
YDP-165, YDP-145
The illustrations are taken from the YDP-145.
Bottom
(Keyboard side)
Bottom
(Keyboard side)
Bottom
(Keyboard side)
Music braces (YDP-165)
Music rest
PHONES
YDP-S55
YDP-S35
Bottom
Rear
Bottom
(Keyboard side)

10
YDP-165, YDP-145, YDP-S55, YDP-S35 Owner’s Manual
1 [P] (Standby/On) switch......................... page 13
For turning the power on or setting to standby.
2 [MASTER VOLUME] knob ..................... page 14
For adjusting the volume of the entire sound.
CAUTION
Do not use this instrument at a high volume level for a
long period of time, to avoid damaging your hearing.
3 [DEMO/SONG] button.....................pages 21, 26
For playing the Demo Songs, 50 Classical
Masterpieces, and lesson songs.
4 [PIANO/VOICE] button............. pages 20, 22, 24
For selecting a single Voice, two Voices for layering or
a Reverb Type.
5 [METRONOME] button.......................... page 19
For starting or stopping the metronome.
6 [+R], [−L] buttons ................. pages 19, 20, 26, 27
• In general, these are for selecting the next or
previous Voice.
• During Song playback, these are for selecting the
next or previous Song, and (while holding down
[PLAY]) turning on/off the right-hand and left-
hand Parts individually.
• During Metronome playback, these are for
increasing or decreasing the Tempo.
7 [REC] button............................................ page 28
For recording your keyboard performance.
8 [PLAY] button.......................................... page 28
For playing back the recorded performance.
9 [FUNCTION] ...................................pages 14, 23
Simultaneously holding both [DEMO/SONG] and
[PIANO/VOICE] and pressing a specified key allows
you to change various settings, including Auto Power
off function, Transpose parameters, etc.
) [PHONES] jacks....................................... page 15
For connecting a set of standard stereo headphones.
Headphone hanger (YDP-165 only)
You can hang the headphones on this instrument
when not using them.
For instructions on installing the headphone hanger,
refer to “Keyboard Stand Assembly” on page 36.
NOTICE
Do not hang anything other than the headphones on the
hanger.
Doing so may damage this instrument or the hanger.
!
[USB TO HOST] terminal ....................... page 30
For connecting to a computer or a smart device.
@ DC IN jack................................................ page 13
For connecting the AC adaptor.
# [TO PEDAL] jack..............................pages 36, 39
For connecting the pedal cord.
$ Pedals ....................................................... page 17
For controlling expression and sustain, just as on an
acoustic piano.
Level decreases Level increases
11
YDP-165, YDP-145, YDP-S55, YDP-S35 Owner’s Manual
Basic Operations
Setting Up
To open the key cover:
Lift the cover slightly, then push and slide it to the
end.
To close the key cover:
Slide the cover toward you and gently lower the
cover over the keys.
CAUTION
• Hold the cover with both hands when opening or closing it.
Do not release it until it is fully opened or closed. Be
careful to avoid catching fingers (yours or others,
especially children’s) between the cover and main unit.
• Do not place objects, such as a piece of metal or paper, on
top of the key cover. Small objects placed on the key cover
may fall inside the unit when the cover is opened and may
be nearly impossible to remove. This could cause electric
shock, short circuit, fire or other serious damage to the
instrument.
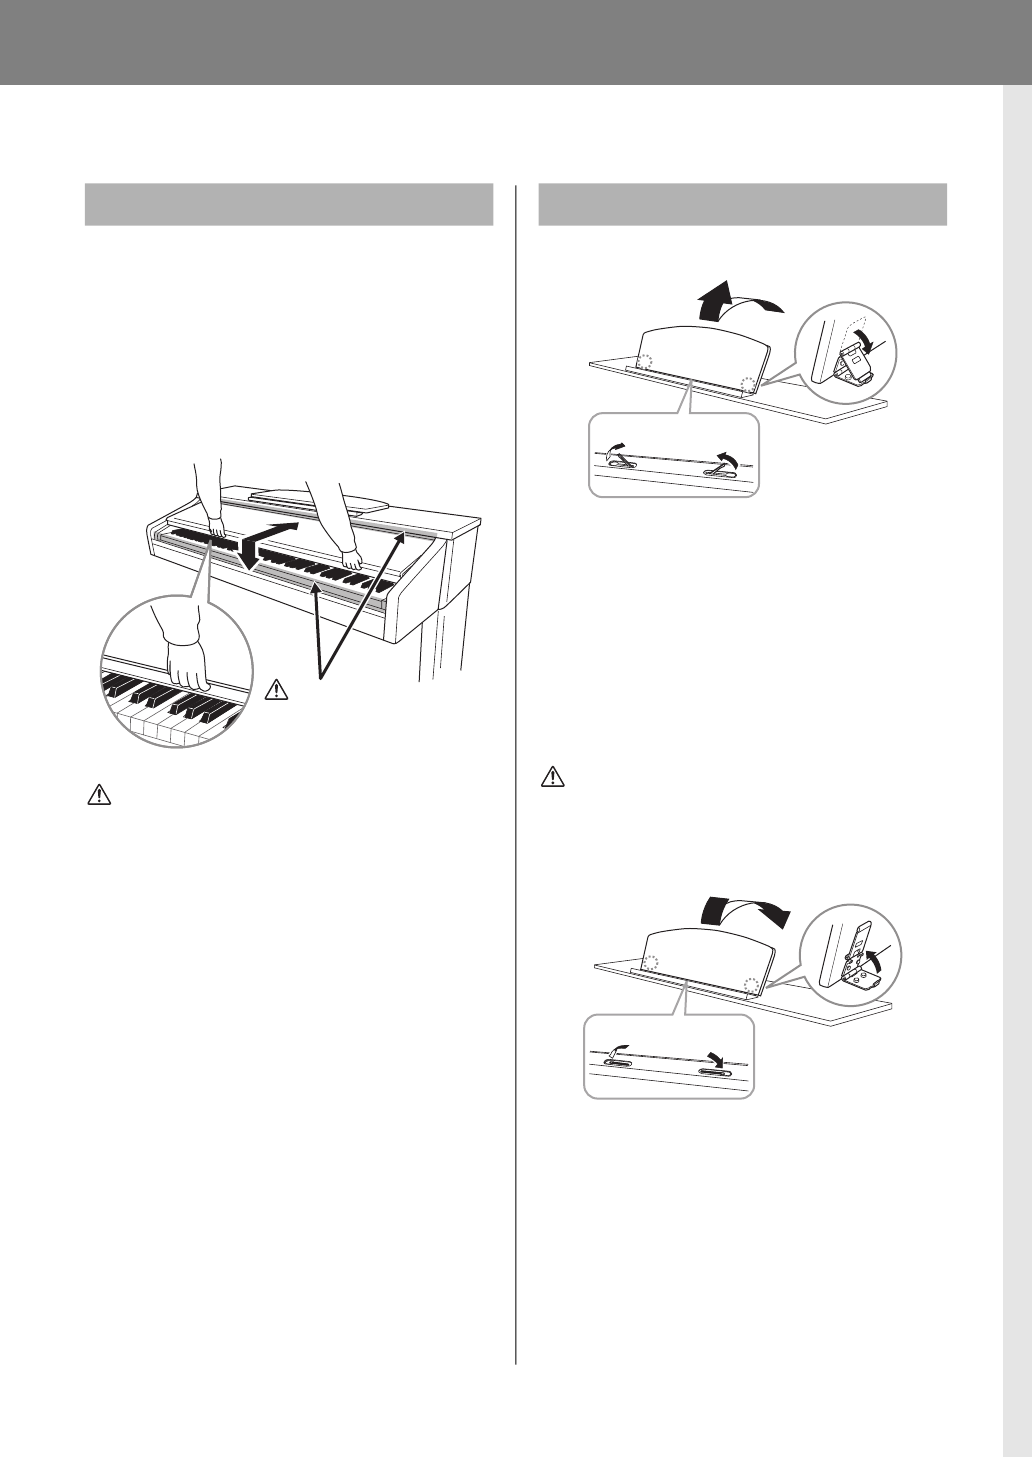
To raise the music rest:
1. Pull the music rest up and toward
yourself as far as it will go.
2.
Flip down the two metal supports at the
left and right on the rear of the music rest.
3. Lower the music rest so that the metal
supports latch into place.
(YDP-165) Music braces allow you to hold the
pages of music books in place.
CAUTION
Do not try to use the music rest in a half-raised position.
When lowering the music rest, do not release your hands
from the music rest until it is all the way down.
To lower the music rest:
(YDP-165) Close the Music braces if they are open,
and then lower the music rest by following the
instructions below.
1. Pull the music rest toward yourself as far
as it will go.
2. Raise the two metal supports (at the rear
of the music rest).
3. Gently lower the music rest backward
until it is all the way down.
Key Cover (YDP-165, YDP-145)
CAUTION
Be careful to avoid catching
your fingers when opening or
closing the cover.
Music Rest (YDP-165, YDP-145)
Music braces (YDP-165)
Music braces (YDP-165)

Setting Up
12
YDP-165, YDP-145, YDP-S55, YDP-S35 Owner’s Manual
CAUTION
Hold the key cover with both hands when opening or closing
it. Do not release it until it is fully opened or closed. Be careful
to avoid catching fingers (yours or others, especially
children’s) between the key cover and main unit.
Opening the key cover
1. Hold the edge of the key cover top with
both hands, then open the key cover
slowly.
2. Fold down the front part of the key
cover.
3. Unfold the music rest.
Closing the key cover
1. Fold the music rest.
2. Unfold the front part of the key cover.
3. Hold the key cover with both hands and
close it slowly.
The key cover is equipped with the special SOFT-
CLOSE™ mechanism which closes the cover slowly.
CAUTION
Do not apply excessive force when closing the key cover.
Applying excessive force to the key cover when closing it
could damage the SOFT-CLOSE™ mechanism, and possibly
result in injury to your hands and fingers caught under the
closing key cover.
Key Cover and Music Rest
(YDP-S55, YDP-S35)
CAUTION
Be careful to avoid catching your fingers
when opening the cover.
CAUTION
Be careful to avoid catching your fingers
when closing the cover.
NOTICE
Before closing the key cover, be sure to fold
the music rest and unfold the front part of the
key cover.

Setting Up
13
YDP-165, YDP-145, YDP-S55, YDP-S35 Owner’s Manual
1. Connect the plugs of the AC adaptor in
the order shown in the illustration.
YDP-165, YDP-S55
YDP-145, YDP-S35
Follow the order shown above in reverse when
disconnecting the AC adaptor.
WARNING
• Use the specified adaptor (page 41) only. The use of other
adaptors may result in irreparable damage to both the
adaptor and the instrument.
• When setting up the product, make sure that the AC outlet
you are using is easily accessible. If some trouble or
malfunction occurs, immediately turn the power off and
disconnect the plug from the outlet.
• When using the AC adaptor with a removable plug,
- Make sure to keep the plug attached to the AC adaptor.
Using the plug alone can cause electric shock or fire.
- If the plug is accidentally removed from the AC adaptor,
never touch the metallic section when attaching the plug.
To avoid electric shock, short circuit or damage, also be
careful that there is no dust between the AC adaptor and
plug.
2. Turn down the [MASTER VOLUME]
knob to “MIN.”
3. Press the [P] (Standby/On) switch to
turn the power on.
The lamps on the buttons to the left of the keyboard
light up, and when they go out, the instrument starts
up.
4. Press the [P] (Standby / On) switch
again for 1 second to turn off the power.
The power indicator turns off.
CAUTION
Even when the [P] (Standby/On) switch is in the standby
status, electricity is still flowing to the instrument at a
minimum level. When not using the instrument for an
extended period of time, be sure to unplug the power cord
from the wall AC outlet.
NOTICE
Press only the [P] (Standby/On) switch when turning the
power on. Any other operations, such as pressing the keys,
buttons or pedals may cause the instrument to malfunction.
Turning the Power On
AC outlet
AC adaptor
DC IN jack (page 10)
DC plug
Power cord
AC plug
The shape of the plug and outlet differ depending on the
locale.
AC outlet
AC adaptor
DC IN jack (page 10)
DC plug
Plug
Slide the plug
as indicated
The shape of the plug and outlet differ depending on the locale.
2
3
The power lamp
lights up.
The buttons to the left of
the keyboard go from lit
to unlit.
Setting Up
14
YDP-165, YDP-145, YDP-S55, YDP-S35 Owner’s Manual
To prevent unnecessary power consumption, this
function automatically turns the power off if the
instrument is not operated for 30 minutes.
Default setting: Enabled
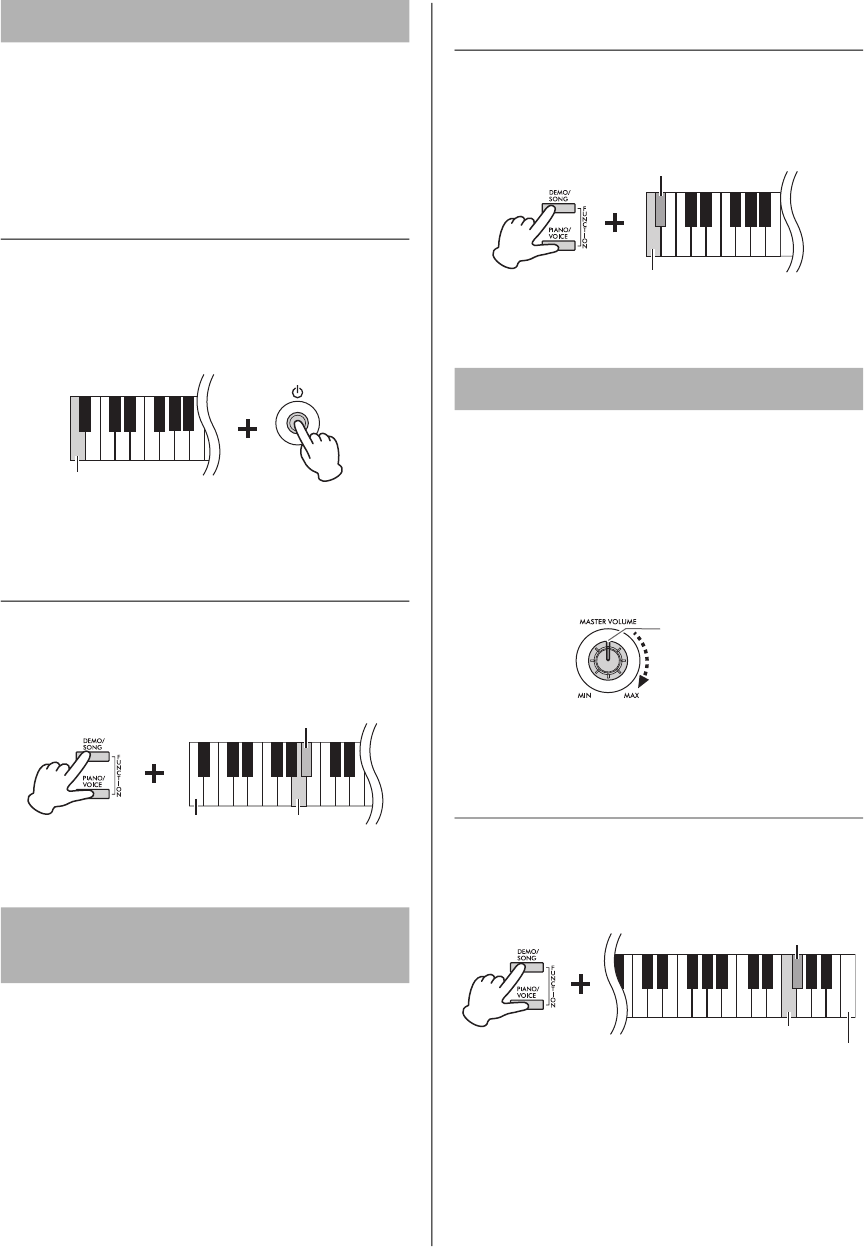
Disabling Auto Power Off (simple method)
While holding down the A-1 key (the lowest key),
press the [P] (Standby/On) switch to turn the
instrument on. The [REC] indicator flashes three
times, indicating the Auto Power Off function has
been disabled.
Switching the Auto Power Off Function
(Enable/Disable)
While holding down [DEMO/SONG] and
[PIANO/VOICE] simultaneously, press the A#0
key to enable the Auto Power Off function or the
A0 key to disable it.
When a setup is changed using a button and key
combination, an operation sound (on, off, click,
tempo value input) is sounded. This confirmation
sound can be enabled (on) or disabled (off) as
desired.
Default setting: On
Turning the Operation Confirmation
Sounds On/Off
While holding down [DEMO/SONG] and
[PIANO/VOICE] simultaneously, press the A#-1
key to turn the sounds on or the A-1 key to turn the
sounds off.
When this function is on, the Master Volume does
not increase even when the [MASTER VOLUME]
knob is turned to the right from center. The
maximum volume is lower, compared to when this
function is not used, so that you can protect
hearing when using the headphones or prevent
loud sound from coming out of the speakers.
Default setting: Off
Volume Limiter On/Off setting
While holding down [DEMO/SONG] and
[PIANO/VOICE] simultaneously, press the F#6 key
to turn the function on or the F6 key to turn the
function off.
NOTICE
When turning this function off, if the [MASTER VOLUME] knob
is turned to the right from center, loud noises may occur.
Make sure that the knob is turned to the left from center, and
then turn this function off.
Auto Power Off Function
Setting the Operation
Confirmation Sounds
Lowest key
A#0 (Enable)
Lowest key
A0 (Disable)
Volume Limiter Function
Lowest key A-1 (Off)
A#-1 (On)
Maximum Volume (Center)
The Master Volume does not
increase even when the
[MASTER VOLUME] knob is
turned to the right from center.
F#6 (On)
Highest key
F6 (Off)

Setting Up
15
YDP-165, YDP-145, YDP-S55, YDP-S35 Owner’s Manual
Since this instrument is
equipped with two
[PHONES] jacks, you
can connect two sets of
standard stereo
headphones. If you are
using only one set of
headphones, insert a plug
into either jack, which
automatically shuts off
the speakers according to
the default setting.
CAUTION
Do not use headphones at a high volume for an extended
period of time; doing so may cause hearing loss.
NOTE
If you are using an adaptor plug, be sure to remove this as well
when unplugging the headphones. No sound will come out of the
instrument’s speakers if the adaptor plug is left connected.
Speaker On/Off setting
You can set whether the sound of this instrument is
always output from its built-in speaker or not.
While holding down [DEMO/SONG] and
[PIANO/VOICE] simultaneously, press one of the
F5 – G5 key.
Default setting: Normal
Reproducing a natural sense of distance
(Stereophonic Optimizer)
The Stereophonic Optimizer gives you the feeling
of playing an actual acoustic piano — even though
you’re listening through headphones. Normally, the
sound comes out from headphones sounds very
close to your ears. However, this Stereophonic
Optimizer effect recreates a natural distance or the
sense of physical space between your ears and the
instrument, just as when playing an acoustic piano.
Default setting: On
While holding down [PIANO/VOICE], press the
F#3 key to turn the function on or the F3 key to
turn the function off.
NOTE
The Stereophonic Optimizer affects only Piano Voices (page 20).
Using Headphones
Off
(F5 key)
The speaker will not sound.
On
(F#5 key)
The speaker will always sound regardless
of whether a set of headphones is
connected or not.
Normal
(G5 key)
The speaker will sound only if headphones
are not connected.
PHONES
Bottom surface
Standard stereo phone plug
F#5 (On)
Highest key
F5 (Off)
G5 (Normal)
F3 (Off)
C3
F#3 (On)

16
YDP-165, YDP-145, YDP-S55, YDP-S35 Owner’s Manual
Playing the Piano
IAC is a function which automatically adjusts and controls the sound quality
according to the overall volume of the instrument. IAC Control is effective only
on the sound output of the instrument speakers or headphones. Even when the
volume is low, this lets you hear both low sounds and high sounds clearly.
Especially when using the headphones, the burden on the ears is reduced
without raising the overall volume excessively.
To turn on/off IAC:
While holding down [DEMO/SONG] and [PIANO/VOICE] simultaneously,
press the C#2 key to turn the function on or the C2 key to turn the function off.
To adjust IAC Depth:
While holding down [DEMO/SONG] and [PIANO/VOICE] simultaneously,
press the D2 key to decrease the value, or the E2 key to increase.
The higher the value, the more clearly that low and high sounds are heard at
lower volume levels.
Intelligent Acoustic Control (IAC)
Default setting:
On
C2 (Off)Lowest key
C#2 (On)
Lowest key
D2 (Depth -1) E2 (Depth +1)
D#2 (Default)
Setting range:
-3 – +3
Default setting:
0

Playing the Piano
17
YDP-165, YDP-145, YDP-S55, YDP-S35 Owner’s Manual
Damper Pedal (Right)
When you press the damper pedal, the notes you
play have a longer sustain. When you select a
Piano Voice, pressing the damper pedal also
activates the VRM Lite function (page 18) to
accurately recreate the unique resonance of an
acoustic grand piano’s strings. Moreover, this
instrument has a Half-pedal function for fine,
expressive control of the sustain.
Sostenuto Pedal (Center)
If you play a note or chord on the keyboard and
press the sostenuto pedal while holding the
note(s), the notes will sustain as long as the pedal
is held.
All subsequent notes will not sustain.
While the sostenuto pedal is held, the Organ and
Strings Voices (page 20) continuously without
decay after the notes have been released.
Soft Pedal (Left)
The soft pedal reduces the volume and slightly changes the timbre of notes
played while the pedal is pressed. The soft pedal will not affect notes that are
already playing when it is pressed.
Keep in mind that this pedal function will be changed from the Soft pedal
depending on the selected Voice.
When Jazz Organ Voice (page 20) is selected, pressing the left pedal switches
between fast/slow rotation of the rotary speaker.
When the Vibraphone Voice (page 20) is selected, the left pedal switches Vibrato
on and off.
Using the Pedals
NOTE
If the pedals do not work, the
pedal cord plug may be not
connected. Securely insert the
pedal cord plug into the
proper jack (page 39).
Half-pedal function
This function allows you to vary the sustain length depending on how far the pedal
is pressed. The farther down you press the pedal, the more the sound sustains. For
example, if you press the damper pedal and all notes you are playing sound a bit
murky and loud with too much sustain, you can release the pedal half way or higher
to decrease the sustain (murkiness).
When you press the damper
pedal here, the notes you play
before you release the pedal
have a longer sustain.
When you press the sostenuto
pedal here while holding the
note, the note will sustain as
long as you hold the pedal.

Playing the Piano
18
YDP-165, YDP-145, YDP-S55, YDP-S35 Owner’s Manual
The VRM (Virtual Resonance Modeling) Lite technology featured in this
instrument reproduces sophisticated string resonance faithfully using a virtual
musical instrument (physical modeling), and makes the sound more like that of
a real acoustic piano. Since instantaneous resonance is made at the moment
according to the state of the keyboard or pedal, you can vary the sound
expressively by changing the timing of your pressing the keys, and the timing
and depth of your pressing the pedal. This function affects only to the Piano
Voices (page 20).
To turn on/off the VRM Lite:
While holding [PIANO/VOICE], press the C#3 key to turn the function on or
the C3 key to turn the function off.
You can specify the Touch Sensitivity (how the sound responds to your playing
strength). This setting does not change the weight of the keyboard.
While holding down [PIANO/VOICE], press one of the C6 – D#6 keys.
Touch Sensitivity List
Using the VRM Lite Function
Lowest key C3 (Off)
C#3 (On)
Default setting:
On
Changing the Touch Sensitivity
NOTE
This setting is disabled with
some Voices, such as an
organ sound.
Default setting:
C#6 (Medium)
Key
Touch
Sensitivity
Description
C6 Soft Produces relatively high volume even with light playing strength.
C#6 Medium Standard Touch Sensitivity.
D6 Hard Requires strong playing to produce high volume.
D#6 Fixed
The volume level will be the same regardless of how hard you play
the keys.
C6
Highest key (C7)
D6
C#6 D#6
Playing the Piano
19
YDP-165, YDP-145, YDP-S55, YDP-S35 Owner’s Manual
The metronome feature is convenient for practicing with an accurate tempo.
1. Press [METRONOME] to start the Metronome.
2. Press [METRONOME] to stop the Metronome.
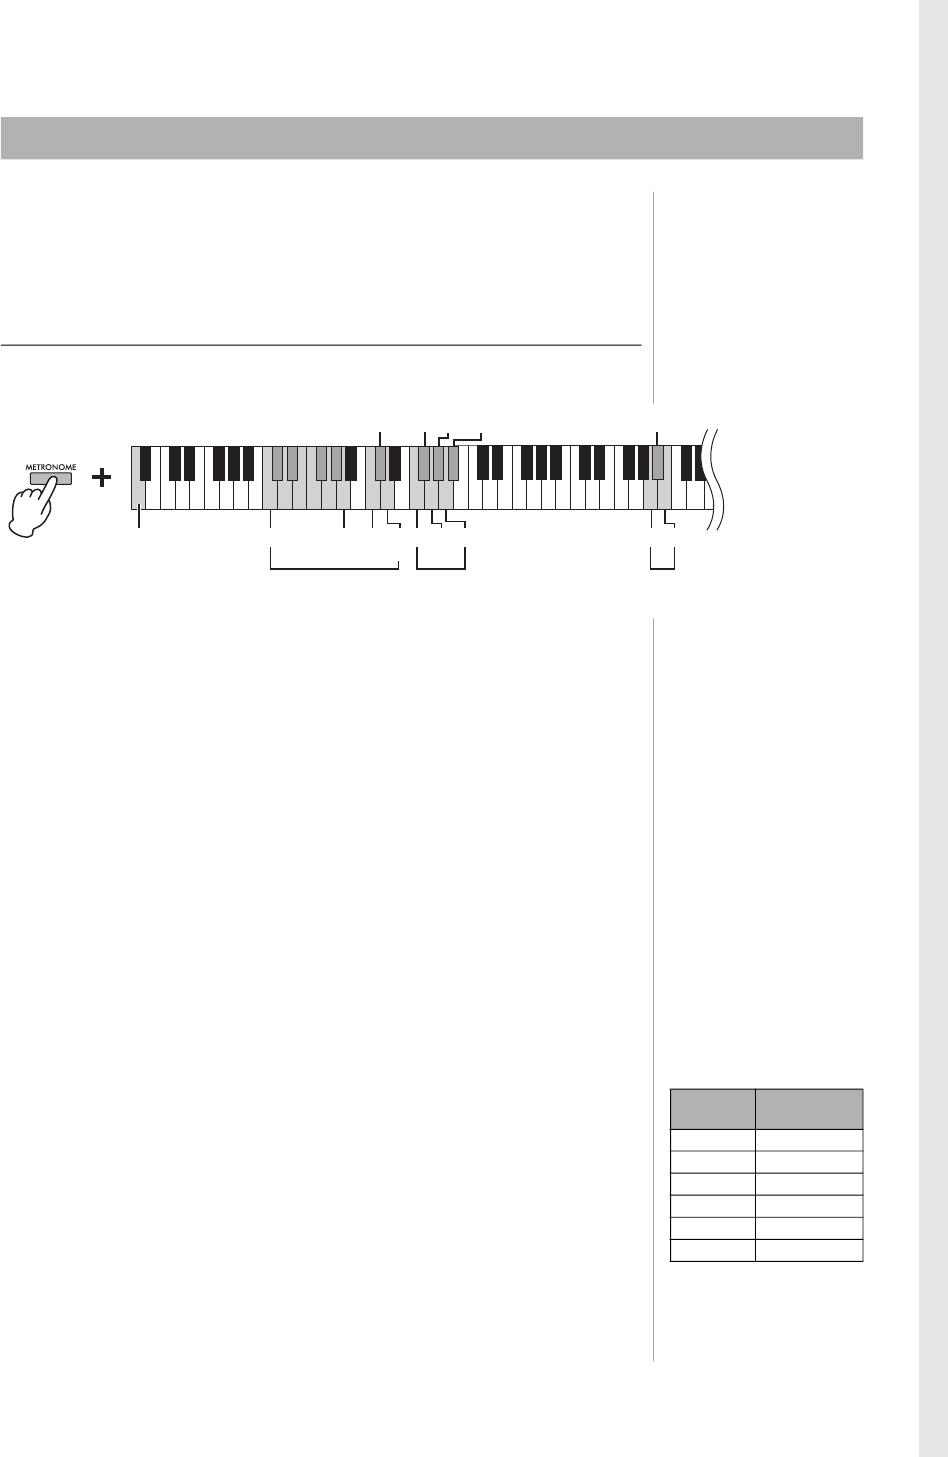
Metronome setting
While holding down the [METRONOME], press one of the highlighted keys
(shown below) or [+R]/[−L] to set the Metronome parameter.
Voice confirmation of current Tempo value (in English)
While holding down [METRONOME], press the A-1 key (lowest key).
Adjusting the Tempo
The Metronome tempo can be set from 5 to 280 beats per minute.
•To increase or decrease the value by 1:
While holding down [METRONOME], press [+R] to increase or [−L] to decrease.
While the metronome is playing, press [+R] to increase or [−L] to decrease.
•To increase or decrease the value by 10:
While holding down [METRONOME], press the D2 key to increase or the C2 key
to decrease.
•To specify a numeric value:
While holding down [METRONOME], press the relevant C1 – A1 keys one by one
in order. Specifying three digits or releasing [METRONOME] after specifying one
or two digits will enter the value.
•Resetting the value to the default (120)
While holding down [METRONOME], press [+R] and [−L] simultaneously, or
press the C#2 key. While the metronome is playing, press [+R] and [−L]
simultaneously.
Selecting the Beat (time signature)
While holding down [METRONOME], press one of the F2 – A#2 keys.
The first beat is accented with a bell sound and the rest with clicks. Default
setting is 0 (F2). In this setting, clicks sound in all beats.
Adjusting the Volume
While holding down [METRONOME], press the B4 key to increase the volume
or the A4 key to decrease. To reset to the default setting, press the A#4 key while
holding down [METRONOME].
Using the Metronome
22447
13 3056 5
6
9
80
C1 A1
C2
(-10)
D2
(+10)
F2 G2 A2 A4 B4
G#2 A#2
Lowest key A-1
C#2 (Default: 120)
Adjusting
the Volume
Selecting the Beat
(time signature)
Adjusting
the Tempo
Confirming the
current Tempo
F#2
A#4 (Default: 7)
NOTE
A numeric value is read out
when a relevant key is
pressed.
If the entered value is outside
the setting range, it will be
ignored.
Setting range:
1 – 10
Default setting:
7 (A#4)
Key
Beat (time
signature)
F2 0 (no accent)
F#2 2
G2 3
G#2 4
A2 5
A#2 6
20
YDP-165, YDP-145, YDP-S55, YDP-S35 Owner’s Manual
Advanced Operations
Playing Various Musical Instrument Sounds (Voices)
To select “CFX Grand”:
Simply press [PIANO/VOICE].
To select another Voice:
After pressing [PIANO/VOICE], press [+R] or [−L] to select the next or previous
Voice.
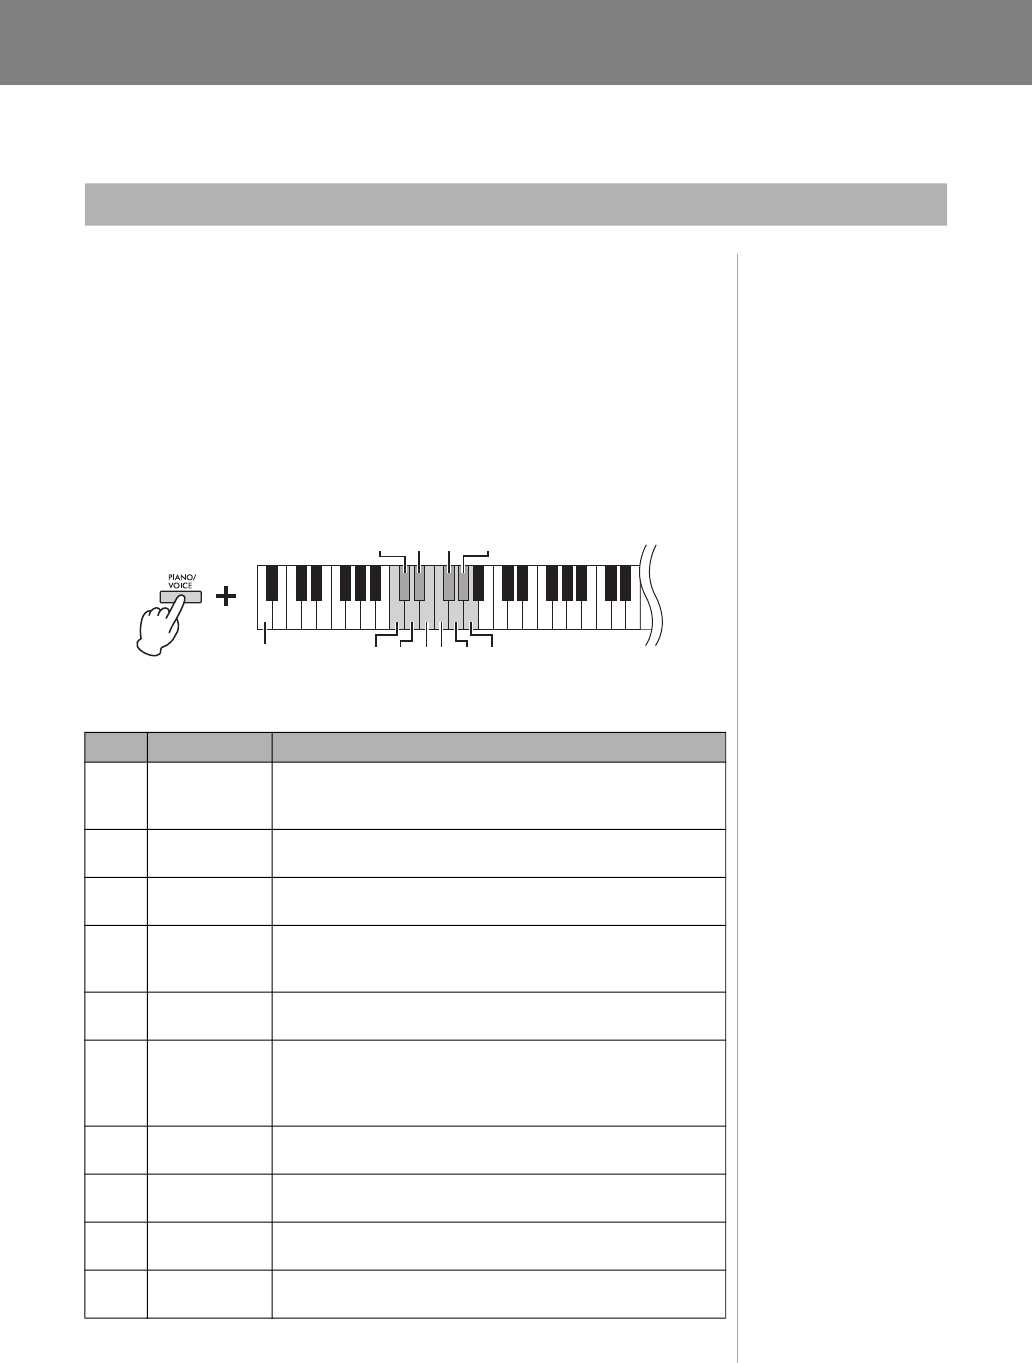
To select a specific Voice:
While holding down [PIANO/VOICE], press one of the C1 – A1 keys. For details
on which Voice is assigned to each key, see the list below.
Voice List
*Piano Voices.
Selecting a Voice
NOTE
To hear the characteristics of
the Voices, play back the
Demo Songs (page 21).
Key Voice Name Voice description
C1 CFX Grand*
Yamaha’s CFX flagship concert grand piano sound with a wide
dynamic range for maximum expressive control. Suitable for
playing in any music genre and style.
C#1 Mellow Grand*
Grand piano sound with a soft and warm tone. Good for playing
ballads.
D1 Pop Grand*
Bright piano sound. Good for clear expression and “cutting
through” other instruments in an ensemble.
D#1 Stage E.Piano
The sound of an electric piano using hammer-struck metallic
“tines.” Soft tone when played lightly, and an aggressive tone
when played hard.
E1 DX E.Piano
An electronic piano sound created by FM synthesis. Good for
standard popular music.
F1 Harpsichord
The definitive instrument for baroque music. Since harpsichord
uses plucked strings, there is no touch response. There is,
however, a characteristic additional sound when the keys are
released.
F#1 Vibraphone
Vibraphone played with relatively soft mallets. The tone becomes
more metallic the harder you play.
G1 Pipe Organ
This is a typical pipe organ sound (8' + 4' + 2'). Good for sacred
music from the Baroque period.
G#1 Jazz Organ
The sound of a “tonewheel” type electric organ. Often heard in
jazz and rock music.
A1 Strings
Stereo-sampled, large-scale strings ensemble with realistic
reverb. Try combining this Voice with piano in the Dual mode.
C#1 D#1 F#1 G#1
C1
D1 E1 F1 G1 A1Lowest key

Playing Various Musical Instrument Sounds (Voices)
21
YDP-165, YDP-145, YDP-S55, YDP-S35 Owner’s Manual
Special individual Demo Songs are provided for all of the instrument Voices.
1. Press [DEMO/SONG] to start playback.
The Demo Song for the current Voice starts. During playback, the [PLAY] lamp
flashes at the current tempo.
Starting with the selected Song, the playback of the Demo Songs will continue.
After the last Demo Song, the sequence then returns to the first Demo Song and
repeats until you stop it. To change to a specific Demo Song, simultaneously hold
down [DEMO/SONG], and then press and hold one of the C1-A1 keys.
To play back the selected Demo Song repeatedly:
While holding down the [DEMO/SONG], press and hold one of the C1-A1 keys.
The operation sound (page 14) sounds twice and the Demo Song can be played
back repeatedly.
To change the Demo Song during playback:
Press [+R] or [−L] to change to the next or previous Demo Song.
If you change to the next or previous Demo Song during repeated playback, that
Demo song will also play back repeatedly.
2. Press [DEMO/SONG] or [PLAY] to stop playback.
The [PLAY] lamp turns off.
Demo Song List
The length and actual content of the Demo Songs (excluding the original Songs) may differ from
the original compositions. The original Demo Songs are Yamaha originals (© Yamaha
Corporation).
Listening to the Demo Songs
NOTE
If you want to change the
playback tempo, see page 19.
Key Voice Name Title Composer
C1 CFX Grand Valse No.2 As dur op.34-1 “Valse Brillante” F. F. Chopin
C#1 Mellow Grand The Nutcracker Medley
P. I.
Tchaikovsky
D1 Pop Grand Original —
D#1 Stage E.Piano Original —
E1 DX E.Piano Original —
F1 Harpsichord
Concerto a cembalo obbligato, 2 violini, viola e
continuo No.7, BWV 1058
J. S. Bach
F#1 Vibraphone Original —
G1 Pipe Organ Herr Christ, der ein'ge Gottes-Sohn, BWV 601 J. S. Bach
G#1 Jazz Organ Original —
A1 Strings Original —
C#1 D#1 F#1 G#1
C1
D1 E1 F1 G1 A1Lowest key

Playing Various Musical Instrument Sounds (Voices)
22
YDP-165, YDP-145, YDP-S55, YDP-S35 Owner’s Manual
This instrument features several Reverb Types that add extra depth and expression to the sound to create a
realistic acoustic ambience. The appropriate Reverb Type and Depth are called up automatically when you
select each of the Voices and Songs. This is why the Reverb Type need not be selected; however, you can
change it if desired.
To select a Reverb Type:
While holding down [PIANO/VOICE], press one of the C2 – E2 keys.
Reverb Type List
To adjust Reverb Depth:
The higher the value, the greater the depth, and the lower the value, the lesser the
depth.
While holding down [PIANO/VOICE], press the G2 key to decrease the value by
1 or the A2 key to increase the value by 1.
While holding down [PIANO/VOICE], press the G#2 key to reset the Reverb
Depth to the default setting, which is the most suitable value for the current
Voice.
Adding Variations to the Sound (Reverb)
NOTE
In Dual Mode (page 24), an
optimum reverb type for the
combination of Voices is
assigned automatically.
Key Reverb Type Description
C2 Recital Hall
Simulates the clear reverb sound you would hear in a medium-
sized concert hall for piano recitals.
C#2 Concert Hall
Simulates the gorgeous reverb sound you would hear in a large
concert hall for orchestral performances.
D2 Chamber
Suitable for playing chamber music; simulates the intimate
reverb sound you would hear in a spacious room, such as for
classical music recitals.
D#2 Club
Simulates the vivid reverb sound you would hear in a live music
venue or a jazz club.
E2 Off No effect is applied.
Lowest key
A2 (Depth +1)
G#2 (Default)
G2 (Depth -1)
C#2 D#2
C2 D2 E2
Selecting a Reverb Type
Adjusting Reverb Depth
Setting range:
0 (no effect) – 20 (maximum
depth)

Playing Various Musical Instrument Sounds (Voices)
23
YDP-165, YDP-145, YDP-S55, YDP-S35 Owner’s Manual
You can shift the pitch of the entire keyboard up or down in semitones in order to facilitate playing in
difficult key signatures, or to easily match the pitch of the keyboard to the range of a singer or other
instruments. For example, if “+5” is selected, playing key C produces pitch F, letting you play a song of F
major as though it were in C major.
To transpose the pitch down:
While holding down [DEMO/SONG] and [PIANO/VOICE] simultaneously,
press a key between F#2 (-6) and B2 (-1).
To transpose the pitch up:
While holding down [DEMO/SONG] and [PIANO/VOICE] simultaneously,
press a key between C#3 (+1) and F#3 (+6).
To restore the normal pitch:
While holding down [DEMO/SONG] and [PIANO/VOICE] simultaneously,
press the C3 key.
You can fine-tune the pitch of the entire instrument in about 0.2 Hz steps. This lets you accurately match the
keyboard pitch to that of other instruments or ensembles.
To tune up (in about 0.2 Hz steps):
Press and hold down [DEMO/SONG] and
[PIANO/VOICE] simultaneously, and press [+R].
To tune down (in about 0.2 Hz steps):
Press and hold down [DEMO/SONG] and
[PIANO/VOICE] simultaneously, and press [−L].
To set the pitch to 442.0 Hz:
Press and hold down [DEMO/SONG]
and [PIANO/VOICE] simultaneously,
and press the C#1 key.
To restore default pitch (440.0 Hz):
While simultaneously holding down [DEMO/
SONG] and [PIANO/VOICE], press [+R] and
[−L] simultaneously. Alternately, you can press
the C1 key while holding down [DEMO/
SONG] and [PIANO/VOICE] simultaneously.
Transposing the Pitch in Semitones
NOTE
The transposition setting
affects not only the pitch of the
keyboard but also the pitch of
Song playback (page 26).
The transposition setting of the
Transposition for the Keyboard
and the Song cannot be set
independently.
-5 -3 -1 0 +2 +4 +5
-6 -4 -2 +1
+3 +6
F#2
Lowest key
F#3
Transpose down Transpose up
C3 (Normal pitch)
Fine-tuning the Pitch
Hz (Hertz)
This unit of measurement
refers to the frequency of a
sound and represents the
number of times a sound wave
vibrates in a second.
Setting range:
414.8 – 466.8 Hz
Default setting:
A3 = 440.0 Hz
C#1
Lowest key
Playing Various Musical Instrument Sounds (Voices)
24
YDP-165, YDP-145, YDP-S55, YDP-S35 Owner’s Manual
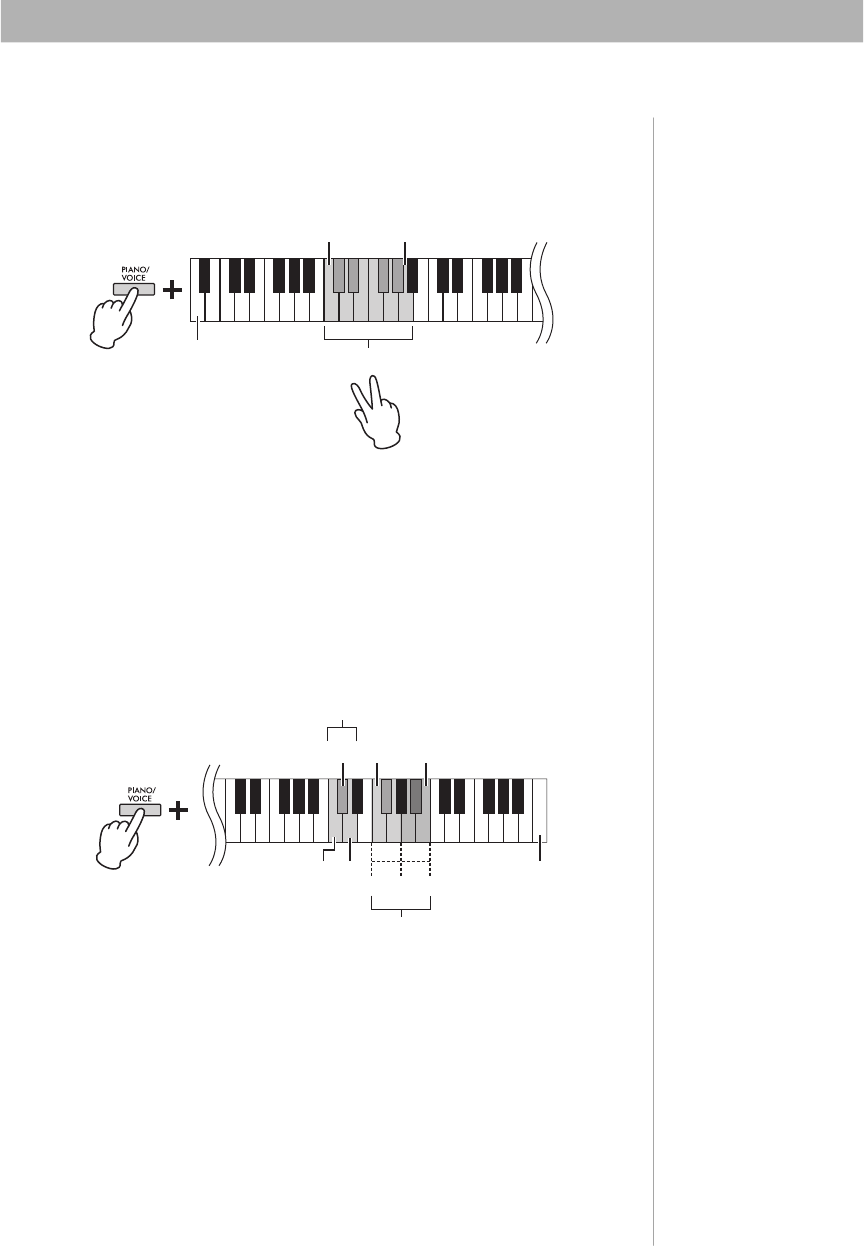
You can layer two Voices and play them simultaneously to create a more richly textured sound.
1. Engage the Dual mode.
While holding down [PIANO/VOICE], simultaneously hold down two keys
between C1 and A1 to select the two desired Voices. For information on which
Voices are assigned to the keys, refer to “Voice List” (page 20).
The Voice assigned to the lower key will be designated as Voice 1, and the Voice
assigned to the higher key will be designated as Voice 2. You cannot assign the same
Voice to both Voice 1 and Voice 2 simultaneously in Dual mode.
To shift the Octave for each Voice:
While holding down [PIANO/VOICE], press one of the keys F5 – G5 or A5 – B5 as
shown in the illustration below. For example, pressing the B5 key twice while
holding down [PIANO/VOICE] shifts Voice 1 up by two octaves. To restore the
default setting, simultaneously hold down [PIANO/VOICE] and press the A#5 key
for Voice 1 or the F#5 key for Voice 2.
To adjust the Balance between two Voices:
While holding down [PIANO/VOICE], press the C5 key to decrease the value or
the D5 key to increase. When the value is set to “0,” the volume levels of the two
Voices reset to their respective default settings. Settings below “0” increase the
volume of Voice 2, while settings above “0” increase the volume of Voice 1, in
relation to the other.
2. To exit from Dual mode, press [PIANO/VOICE].
Layering Two Voices (Dual mode)
C1 A1
Lowest key
Engaging Dual mode
NOTE
The Dual and Duo modes
(page 25) cannot be engaged
at the same time.
Setting range:
-2 – 0 – +2
Setting range:
-6 – (Default Setting) – +6
Default setting:
Differs depending on the Voice
combination.
-1
00
+1-1 +1 -1 +1
C5
Highest key
C#5 (Default setting) F5 B5
Shifting the octave
Adjusting the balance
Voice 2
Voice 1
D5

Playing Various Musical Instrument Sounds (Voices)
25
YDP-165, YDP-145, YDP-S55, YDP-S35 Owner’s Manual
This function allows two different players to play the instrument, one on the left and the other on the right,
over the same octave range.
1. While holding down [PIANO/VOICE], press [+R] and [−L]
simultaneously to engage Duo.
The keyboard is divided into two sections, with the E3 key as the Split Point.
2. One person can play the left section of the keyboard while
the other plays the right.
To shift the Octave for each section:
Same operation as in Dual (page 24).
In Duo, the left section is assigned to Voice 2, while the right section is assigned to
Voice 1.
To adjust the volume balance between two keyboard sections:
Same operation as in Dual (page 24).
Settings below “0” increase the volume of Left Voice (Voice 2), while settings above
“0” increase the volume of Right Voice, in relation to the other.
Pedal function in Duo
• Damper Pedal: Applies Sustain to the right section.
• Sostenuto Pedal: Applies Sustain to both sections.
• Soft Pedal: Applies Sustain to the left section.
To select the Duo Type:
You can set how the sound is emitted from the speakers.
• Separated: The sound of the left section is emitted from the left speaker, and the
sound of the right section is emitted from the right speaker.
• Balanced: The sound of both parts are emitted from both speakers in a natural
balance.
While holding down [PIANO/VOICE], press the A4 key or the A#4 key to change
the setting.
3. To exit from Duo, while holding down [PIANO/VOICE],
press [+R] and [−L] simultaneously.
Playing Duo
NOTE
• Different Voices cannot be
assigned to the Right Voice
and Left Voice.
• The Split Point cannot be
changed from E3.
Split Point E3Equivalent to C3 (middle C) Equivalent to C3 (middle C)
Left section (Voice 2) Right section (Voice 1)
Setting range:
-2 – 0 – +2
Setting range:
-6 – 0 – +6
NOTE
The way the sound is output
from the headphones is the
same as the selected Duo
Type.
NOTE
• If the keyboard is in Dual,
engaging Duo will exit from
Dual. Voice 1 is used as the
Voice of the entire keyboard.
• In Duo, VRM Lite is not
effective. When the Type of
Duo is set to“Separated,”
Reverb and Stereophonic
Optimizer are not effective.
Default Setting:
Separated
F#4 (Separated)
F4 (Balanced) Highest key

26
YDP-165, YDP-145, YDP-S55, YDP-S35 Owner’s Manual
Song Playback and Practice
In addition to the Demo Songs, Preset Songs (50 Classical Music Masterpieces and Lesson Songs) are
provided for your listening pleasure.
1. Find the Song number and Music book that you want to
play back.
For the details on the Song number and Music book, refer to the Song List
(page 43) or Quick Operation Guide (page 48.)
2. While holding down [DEMO/SONG], press one of the C0–
G#0 keys to select a Music book.
3. While holding down [DEMO/SONG], press one of the C2–
C#6 keys to start playback.
The number of each piano Preset Song is assigned to the C2–C#6 keys.
During playback, the [+R] and [−L] lamps light, and the [PLAY] lamp flashes at the
current tempo. Playback of the Preset Songs continues in sequence, starting with
the selected Song. After the last Preset Song, the sequence then returns to the first
Preset Song and repeats until you stop it.
To play back the selected Song repeatedly:
While holding down the [DEMO/SONG], press and hold one of the C2–C#6 keys.
The operation sound (page 14) sounds twice and the selected Song can be played
back repeatedly.
To change the Preset Song during playback:
Press [+R] or [−L] to change to the next or previous Preset Song.
If you change to the next or previous Preset Song during repeated playback, that
Preset song will also play back repeatedly.
To change the tempo during playback:
While holding down [METRONOME], press [+R] or [−L] to increase or decrease
the Tempo value by 1. Other instructions are the same as those of the Metronome
Tempo (page 19).
Listening to Preset Songs
$%
C0
'()*$%
$ᅊ&ᅊ'ᅊ)ᅊ*ᅊ$ᅊ
50 Classics
Bayer 51–100
Burgmüller 1–25
Czerny 100, 1–50
Czerny 30, 1–30
Bayer 1–50
Bayer 101–106
Czerny 100, 51–100
Hanon
Lowest key
C3
Highest key (C7)
Song 1 Song 10 Song 20 Song 30 Song 40
C4 C5
C2
Song 50 (C#6)
C6
NOTE
• You can play the keyboard
along with the playback of
the Preset Song as well as
change the Voice played
from the keyboard.
• Depending on the selected
Music book, there are some
keys to which the Song are
not applied. When pressing
such keys, no Songs are
played back.
Default Setting (Music
book):
50 Classical Music
Masterpieces
NOTE
Even if you perform other
operations after changing the
Music book, the book will not
be reset to the default setting,
50 Classical Music
Masterpieces. It will be reset to
the default setting when the
power is turned off.

Song Playback and Practice
27
YDP-165, YDP-145, YDP-S55, YDP-S35 Owner’s Manual
To play back from the beginning of the Song
During playback, press [+R] and [−L] simultaneously to jump to the playback
position at the beginning of the Song then continue playback at the last specified
tempo.
4. Press [DEMO/SONG] or [PLAY] to stop playback.
The [PLAY], [+R] and [−L] lamps turn off.
All the Songs except for the Demo (page 21) let you turn on or off the left-hand and right-hand Parts
individually. By turning off [+R], for example, you can practice the right-hand Part while the left-hand Part
is playing back, and vice versa.
1. Start playback of the Preset Songs (page 26; 50 Classical
Music Masterpieces and Lesson Songs) or the User Song
(page 28).
2. While holding down [PLAY], press [+R] or [−L] to turn the
Part off.
Pressing the same button repeatedly while holding down [PLAY] toggles playback on
and off.
3. Practice the Part which is turned off.
To change the Tempo:
If desired, you can change the tempo for your practice convenience. For details,
refer to page 19.
4. Press [PLAY] to stop playback.
This Quick Play feature enables you to specify whether a Song should play back
immediately from the very first note (On), or play back any silence or rests that
exist before the first note (Off).
To turn on/off Quick Play:
While holding down [DEMO/SONG], press the A#-1 to turn the function on or
A-1 key to turn the function off.
Practicing a One-Hand Part
NOTE
• Selecting another Song will
reset the on/off status.
• For the details on the Parts of
the duet Songs, refer to
page 43.
• For the User Song, Parts can
only be independently
turned on or off when
recording the right or left part
independently (step 2,
page 29).
or
The lamp of the button lights
when the corresponding Part
is on.
Playing Back Immediately from the First Note (Quick Play)
Default setting:
On
A#-1 (On)
A-1(Off)
Lowest key

28
YDP-165, YDP-145, YDP-S55, YDP-S35 Owner’s Manual
Recording Your Performance
This instrument lets you record your keyboard performance as the User Song. Up to two Parts (left-hand and
right-hand) can be recorded separately.
1. Select the desired Voice and other parameters, such as beat
(time signature), for recording.
For instructions on selecting a Voice, refer to page 20. If necessary, set other
parameters, such as beat (time signature) and effects, in this step.
2. Engage the Record Ready mode.
Quick Recording
Press [REC] to engage the Record Ready mode. Your keyboard performance will be
automatically recorded to the right-hand Part even if you play with both your right
and left hands. Note that the already-recorded data of the right- and left-hand parts
will be erased by Quick Recording.
Recording to individual parts
While holding down [REC], press [+R] or [−L] to engage the Record Ready mode
for the Part you want to record.
If data has already been recorded to the other Part, the data in this Part will be
played back while recording.
To turn the Part off or on, press the appropriate part button ([+R] or [−L]) while
holding down [PLAY].
To exit from Record Ready mode:
Simply press [REC].
3. Play the keyboard or press [PLAY] to start recording.
The [REC] lamp lights up while the Recording Part lamp flashes at the current
tempo.
4. Press either [REC] or [PLAY] to stop recording.
The [REC], [PLAY], [+R] and [−L] lamps flash, indicating that the recorded data is
being stored. After the Save operation is completed, the lamps will turn off,
indicating that the Record operation has been completed.
5. To hear the recorded Song, press [PLAY] to start playback.
Press [PLAY] again to stop playback.
To record to the other part
Repeat the steps above. In step 2, follow the instructions of “Recording individual
parts.”
Recording Your Performance
NOTICE
Only one Song (2 tracks) can
be recorded to this
instrument.
Note that recording your
performance to a part
containing data will replace
already-recorded data with
the new data.
NOTE
• The “Smart Pianist” app
(page 8) enables you to
record your keyboard
performance as MIDI/audio
data and save it on your
smart device.
• You can use the Metronome
while recording; however, the
Metronome sound will not be
recorded.
• If the keyboard is in the Duo
mode (page 25), the data
will be recorded to each
Part. The Part for recording
cannot be specified.
• If the data capacity of the
instrument approaches full
when you engage Record
Ready mode, the [REC] and
[PLAY] lamps flash quickly
for about three seconds.
To record the right-hand Part ([+R]) To record the left-hand Part ([−L])
NOTICE
Never turn off the power
while the recorded data is
being stored (while the
lamps are flashing).
Otherwise, all recorded data
will be lost.
Recording Capacity
This instrument can record up
to 100 KB (approximately
11,000 notes).

Recording Your Performance
29
YDP-165, YDP-145, YDP-S55, YDP-S35 Owner’s Manual
The settings of the following parameters can be changed after the Record operation is completed.
• For individual Parts: Voice, Volume balance (Dual/Duo), Reverb Depth
• For the entire Song: Tempo, Reverb Type
1. Make settings for the above parameters as desired.
2. While holding down [REC], press the desired Part ([+R] or
[−L]) to engage Record Ready mode.
The [REC], [PLAY] and selected Part lamps flash.
In this status, do not press [PLAY] again or any key. Otherwise, the originally
recorded performance data will be deleted.
3. While holding down [REC], press [PLAY] to exit from
Record Ready mode.
The [REC], [PLAY], [+R] and [−L] lamps flash. After the Save operation is
completed, the lamps will turn off, indicating that the operation has been
completed.
Confirm the setting by pressing [PLAY] to play the Song.
To delete the entire Song:
1. While holding down [REC], press [DEMO/SONG].
The [REC] and [PLAY] lamps flash alternately.
To cancel the operation, press [REC].
2. Press [PLAY] to delete the data of the entire Song.
The [REC], [PLAY], [+R] and [−L] lamps flash.
After the operation is completed, all lamps turn off.
To delete a specific Part:
1. While holding down [REC], press [+R] or [−L] (depending
on the Part you want to delete) to engage Record Ready
mode.
The [REC], [PLAY] and selected Part ([+R] or [−L]) lamps flash.
2. Press [PLAY] to start recording without playing the
keyboard.
The selected Part ([+R] or [−L]) lamp flashes.
3. Press [REC] or [PLAY] to stop recording.
All data recorded for the selected Part will be deleted, and the lamp turns off.
Changing the Initial Settings of the Recorded Song
Deleting Recorded Data
NOTE
If a User Song has not been
recorded to the instrument, the
[REC] and [PLAY] lamps flash
quickly for about three
seconds.

30
YDP-165, YDP-145, YDP-S55, YDP-S35 Owner’s Manual
Using with a Computer or a Smart Device
Connecting this instrument to a computer or a smart device allows you to transmit/receive performance data
and Song data to/from the computer or a smart device. For details on connections, refer to “Computer-
related Operations” or “Smart Device Connection Manual” on the website (page 8).
By using an app on a smart device, you can take advantage of convenient
functions and get more enjoyment out of this instrument. In particular, with the
“Smart Pianist” app running on your smart device, you can remotely control
your digital piano for even more convenience and flexibility.
For information about the compatible smart devices and apps, access the
following page:
https://www.yamaha.com/kbdapps/
You can play back audio data on a smart device or a computer with this
instrument. You can also record your keyboard performance as audio data to a
music production app on a smart device or a computer.
When using this function on a computer running Windows, you will need to
install the Yamaha Steinberg USB Driver to your computer. For details, refer to
the “Computer-related Operations” on the website (page 8).
Audio Loop Back On/Off
You can set whether audio sound input from the [USB TO HOST] terminal is
returned to the computer/smart device or not along with the performance played
on the instrument.
While holding down [DEMO/SONG] and [PIANO/VOICE] simultaneously,
press the C6 key to turn this parameter “Off” or the C#6 key to turn it “On.”
NOTICE
Use an AB type USB cable of
less than 3 meters. USB 3.0
cables cannot be used.
NOTE
For instructions on using MIDI,
refer to “MIDI Reference”
(page 8).
Computer
USB terminal
[USB TO HOST]
terminal (page 9)
USB cable
Instrument
USB cable (with conversion cable, adaptor, etc.)
This instrument is not
compatible with
wireless connections.
Make sure to use a
“wired” cable
connection with your
smart device.
Smart device
Using an App on Your Smart Device
NOTICE
Do not place your smart
device in an unstable
position. Doing so may
cause the device to fall and
result in damage.
NOTE
While using “Smart Pianist”
with the instrument, all buttons
on the instrument cannot be
used. Control the instrument
by using “Smart Pianist.”
Playback/Recording of Audio Data (USB Audio Interface)
NOTE
The volume of the audio sound
input can be adjusted from a
computer or a smart device.
Default setting: On
NOTICE
If loud or unusual noises
occur, set Audio Loop Back
to off.
C#6 (On)
C6 (Off)
Highest key

31
YDP-165, YDP-145, YDP-S55, YDP-S35 Owner’s Manual
Backing up Data and Initializing the Settings
The following settings and data are maintained even if you turn the power off.
With this operation, all data (with the exception of the User Song) will be reset to
the factory default settings.
To do this, simultaneously hold down the C7 (the highest) key and turn on the
power.
You can confirm the firmware version of your instrument by audible voice in English.
While holding down [DEMO/SONG] and [PIANO/VOICE] simultaneously, press the B0 key.
About the latest Firmware Version
Yamaha may from time to time update firmware of the product without notice for improvement. Make sure
to check our website for information of the latest release and upgrade the firmware for your instrument.
Data Maintained When Power is Turned Off
• Metronome Volume
• Metronome Beat (time signature)
• Touch Sensitivity
• Tuning
• Intelligent Acoustic Control Depth
• Intelligent Acoustic Control On/Off
• Volume Limiter On/Off
• Stereophonic Optimizer On/Off
• Operation Confirmation Sounds On/Off
• Auto Power Off Enable/Disable
• Speaker On/Off
• User Song data
• Duo Type Separated/Balanced
Initializing the Settings
NOTICE
Never turn off the power
while the Initialize operation
is being executed (that is,
while the [REC], [PLAY], [+R]
and [−L] lamps are flashing).
NOTE
If this instrument somehow
becomes disabled or
malfunctions, turn off the
power then execute
Initialization.
C7
Highest key
Confirming the firmware version of this instrument
Lowest key
B0

32
YDP-165, YDP-145, YDP-S55, YDP-S35 Owner’s Manual
Appendix
Troubleshooting
Problem Possible Cause and Solution
Power suddenly and unexpectedly turns off.
This is normal and the Auto Power Off function may have been activated
(page 14). If desired, disable the Auto Power Off function.
The power of the instrument does not turn on.
The plugs are not properly connected. Make sure that the DC plug is
securely inserted into the DC IN jack on the instrument, and that the AC
plug is securely inserted to the AC outlet (page 13).
A click or pop is heard when the power is
turned on or off.
This is normal when electrical current is being applied to the instrument.
Noise is heard from the speakers or
headphones.
The noise may be due to interference caused by the use of a mobile phone
in close proximity to this instrument. Turn off the mobile phone, or move it
further away from this instrument.
When you use the instrument along with the application on your smart
device, we recommend that you set “Airplane Mode” to “ON” on your smart
device in order to avoid noise caused by communication.
The overall volume is low, or no sound is heard.
The Master Volume is set too low. Set it to an appropriate level using the
[MASTER VOLUME] knob (page 10).
Make sure a pair of headphones or conversion adaptor is not connected to
the [PHONES] jack (page 15).
The Speaker setting is “Off.” Set the Speaker to “Normal” or “On” (page 15).
The Volume Limiter setting is “On”.Set the Volume Limiter to “Off” (page 14).
Make sure that Local Control is On. For details, refer to the “MIDI
Reference” (page 8).
Pedals do not function.
The pedal cord may not be securely connected to the [TO PEDAL] jack. Be
sure to insert the pedal cord all the way until the metal part of the cord plug
disappears from view (pages 36, 39).
The pitch and sound quality of the Piano Voice
is wrong in a specific key range.
This is no problem.
Yamaha develops the Piano Voices so that the original piano sound is
reproduced as faithfully as possible. This is why you may hear overtones
emphasized in a certain key range, or you may feel that the sound pitch or
quality is different from another key range.
Playing the keys produces a rattling noise.
This is no problem.
The keyboard mechanism of this product is designed to simulate the actual
noises of an acoustic piano. Such noises are produced even if you play an
acoustic piano.
The [+R] and [−L] lamps flash when this
product is started, when a Song is selected, or
when recording is finished.
This is no problem.
It is because the [+R] and [−L] lamps may flash when the internal
processing of this product is taking a long time. Note that no operations are
available while these are flashing.

33
YDP-165, YDP-145, YDP-S55, YDP-S35 Owner’s Manual
Keyboard Stand Assembly
Before assembling the instrument, be sure to read the
precautions below.
CAUTION
• Assemble the instrument using at least two people.
• Assemble the instrument on a hard and flat floor with ample
space.
• Be sure to use the correct parts in the correct orientation,
and assemble the instrument in accordance with the
sequence given here.
• Keep small parts (such as screws) out of the reach of
infants. Children may accidentally swallow them.
• Be sure to use only the included screws of specified sizes.
Use of any other screws can cause damage or malfunction
of the product.
• To disassemble the unit, reverse the assembly sequence
given here.
When moving the instrument, be sure to keep the
instrument horizontal and hold with two or more people.
Do not subject the instrument to excessive vibration or
shock. After re-installation, check the assembly checklist.
If you move to another location, you can transport the
instrument along with other belongings. The unit can be
transported either assembled or disassembled.
We recommend that you place the instrument away
from the wall by about 5 cm to optimize and enhance
the overall sound even further.
CAUTION
Always hold the bottom of the main unit. Moving the unit by
holding any part other than the bottom may cause damage to
the unit or personal injury.
NOTICE
Rotate the adjuster under the pedal until it no longer touches
the floor surface before moving the instrument. The adjuster
can damage the floor.
YDP-165, YDP-145 page 34
YDP-S55, YDP-S35 page 37
Assembly Precautions
Have a Phillips-head (+) screwdriver of the appropriate size
ready.
Post-assembly checklist
• There are no unused parts.
• The instrument is stable even if you shake it.
• The pedal adjuster is firmly pressed against to the floor
surface.
• Both the pedal cord and power cord are plugged
securely into the correct jacks.
→ If there are any items above you haven’t confirmed,
review the assembly procedure and correct any errors.
Moving/Installing
Be sure to hold
the bottom.
Rotate the adjuster until
it no longer touches the
floor surface.

Keyboard Stand Assembly
34
YDP-165, YDP-145, YDP-S55, YDP-S35 Owner’s Manual
You can watch a video of the assembly.
Check if you have all of the items indicated below.
NOTICE
Make sure to place the main unit on the polystyrene foam
pads that have been removed from the packages. Position the
pads so that they will not contact the speaker covers on the
bottom of the main unit.
* The adaptor may not be included, or may look different from the
illustration above, depending on your particular area.
1. Align the side boards with each end
of pedal box, and lightly tighten
with flat head screws (6 × 20 mm)
for temporary fastening
These screws will be tightened securely later in
step 3.
2. Attach the back board.
Depending on the model, the surface color of one
side of the back board may be different from the
other side. In this case, position the back board so
that the side facing the front (pedal side) matches
the color of the main unit.
2-1 Place the back board on each foot of side
boards.
2-2 Attach the top of the back board by
temporarily fastening the thin screws (4 ×
12 mm).
2-3 While pushing on the lower part of the side
boards from the outside, secure the bottom
ends of the back board using tapping screws
(4 × 20 mm) in the order from outside to
inside (
1 → 2).
YDP-165, YDP-145 Assembly
Scan the QR code at left or access the
website below.
https://4wrd.it/ydp_assembly_video1
YDP-165
× 2
YDP-145
× 4
× 4
× 2
× 4 × 4
Cord holder
Speaker cover Speaker coverPolystyrene foam pads
Main unit
Back board
Pedal box
Side board (L) Side board (R)
Flat head screws (6 × 20 mm) Caps
Thin screws (4 × 12 mm) Tapping screws
(4 × 20 mm)
Thick screws (6 × 16 mm)
AC adaptor Power cord
Headphone hanger
Screws
(4 × 10 mm)
AC adaptor
Headphone hanger set
× 4
Side board (R)
Side board (L)
Pedal box
Flat head screws (6 × 20 mm)

Keyboard Stand Assembly
35
YDP-165, YDP-145, YDP-S55, YDP-S35 Owner’s Manual
2-4 Securely tighten the screws on the top of the
back board that were attached in step 2-2.
3. Secure the pedal box.
3-1 Securely tighten the screws on the pedal
box that were attached in step 1.
3-2 Attach the caps to the screw heads.
4. Set the main unit in place.
4-1 Be sure to hold the bottom surface at least
10 cm inside from the edge of the main unit
so that you do not pinch your hands.
4-2 Place the main unit on the side boards so
that the front of the main unit and the side
boards are aligned. Slide the main unit
forward and insert the metal fittings on the
bottom of the main unit into the metal
fittings on the side boards.
CAUTION
• Be careful not to pinch your hands or drop the main
unit.
• Do not hold anywhere other than the specified
position.
5. Secure the main unit by tightening
the thick screws (6 × 16 mm).
2
-
2, 2
-
4
2
-
1
2
-
3
× 2
× 4
Side board (R)
Side board (L)
Back
board
Tapping screws (4 × 20 mm)
Thin screws
(4 × 12 mm)
3
-
1
3
-
2
× 4
Pedal box
Side board (R)
Side board (L)
Back board
Caps
At least
10 cm
At least
10 cm
Main unit
Side board (R)
Side board (L)
Back board
× 4
Main unit
Side board (R)
Side board (L)
Thick screws
(6 × 16 mm)

Keyboard Stand Assembly
36
YDP-165, YDP-145, YDP-S55, YDP-S35 Owner’s Manual
6. Connect the pedal cord plug and the
power plug.
6-1 Insert the pedal cord plug to the
[TO PEDAL] jack from the rear.
Insert the plug until the metal part disappears
from view.
NOTICE
If it is not plugged in firmly, it may cause the pedals to
not work.
6-2
Wind the cord holders around pedal cord to
hold it.
The cord holders are attached to the side board
(L).
6-3 (YDP-165 only) Connect the power cord to
the AC adaptor.
6-4 Insert the DC plug into the DC IN jack.
7. Rotate the adjuster until it presses in
firm contact with the floor surface.
Make sure that the pedal box does not rattle or
give way when you step on the pedals.
8. (YDP-165 only) Attach the
headphone hanger.
Use the included two screws (4 x 10 mm) to attach
the hanger as shown in the illustration.
6
-
1
6
-
2
6
-
4
TO PEDAL DC IN
Cord holder
Metal part
To press against
the floor
To separate from
the floor
× 2
Included screws
(4 × 10 mm)

Keyboard Stand Assembly
37
YDP-165, YDP-145, YDP-S55, YDP-S35 Owner’s Manual
You can watch a video of the assembly.
Check if you have all of the items indicated below.
NOTICE
Make sure to place the main unit on the polystyrene foam
pads that have been removed from the packages. Position the
pads so that they will not contact the connector panel on the
bottom of the main unit.
* The anti-fall brackets are not for earthquake countermeasures.
* The adaptor may not be included, or may look different from the
illustration above, depending on your particular area.
1.
Align the side boards with each end
of pedal box, and lightly tighten with
flat head screws (6 × 20 mm) for
temporary fastening.
These screws will be tightened securely later in
step 3.
Leave the pedal cord out on the back side of the
instrument.
2. Attach the back board.
Depending on the model, the surface color of one
side of the back board may be different from the
other side. In this case, position the back board so
that the side facing the front (pedal side) matches
the color of the main unit.
2-1 Attach the top of the back board by
temporarily fastening the thin screws (4 ×
12 mm).
2-2 While pushing the lower part of the side
board from the outside, fix the lower side of
the back board on both sides with long
screws (6 × 25 mm). Also, fix the anti-fall
brackets together here.
2-3 Secure the remaining two places on the
lower side with tapping screws (4 × 20 mm).
YDP-S55, YDP-S35 Assembly
Scan the QR code at left or access the
website below.
https://4wrd.it/ydp_assembly_video2
× 2
× 2
× 2
× 2
(YDP-S35)
× 4
× 4
× 4
(YDP-S55)
Back board
Flat head screws
(6 × 20 mm)
Caps
Thin screws (4 × 12 mm)
Tapping screws (4 × 20 mm)
Cord holder
Long screws (6 × 25 mm)
Connector panel
Polystyrene foam pads
Side
board (L)
Side
board (R)
Pedal box
Thick screws (6 × 16 mm)
Anti-fall bracket (L) Anti-fall bracket (R)
Main unit
YDP-S55
YDP-S35
AC adaptor Power cord
AC adaptor
Front board
× 2
Side
board
(L)
Pedal box
Flat head screws
(6 × 20 mm)
Side
board
(R)

Keyboard Stand Assembly
38
YDP-165, YDP-145, YDP-S55, YDP-S35 Owner’s Manual
2-4 Re-tighten the screws on the upper side of
the back board that were temporarily
fastened in step 2-1.
CAUTION
Be sure to attach the anti-fall brackets. Failure to do so
might result in damage to the instrument or even
injury.
3. Secure the pedal box.
3-1 Securely tighten the screws on the pedal
box that were attached in step 1.
3-2
Attach the caps to the screw heads.
4. Set the main unit in place.
Be sure to hold the bottom surface 10 cm or more
inside from the edge of the main unit so that you
do not pinch your hands.
CAUTION
• Be careful not to pinch your hands or drop the main
unit.
• Do not hold anywhere other than the specified
position.
5. Secure the main unit by tightening
the thick screws (6 × 16 mm).
2-1, 2-4
2-3
2-2
× 2
× 4
× 2
Secure the anti-fall brackets using the screws.
Side
board (L)
Side
board (R)
Thin screws
(4 × 12 mm)
Back board
Anti-fall
bracket (R)
Anti-fall
bracket (L)
Tapping screws
(4 × 20 mm)
Long screws (6 × 25 mm)
3-1
3-2
× 2
Side board (L)
Back board
Side board (R)
Pedal box
Caps
At least
10 cm
At least
10 cm
Back board
Main unit
Align the dowels on the upper
part of the side boards with
the corresponding holes on
the bottom of the main unit.
× 4
Back board
Main unit
Side
board (L)
Side
board (R)
Thick screws
(6 × 16 mm)

Keyboard Stand Assembly
39
YDP-165, YDP-145, YDP-S55, YDP-S35 Owner’s Manual
6. (YDP-S55 only) With the non-felt
side of the front board facing the
front (pedal side), fix it with thin
screws (4 × 12 mm).
Install so that the gap between the side boards (L)
and (R) is equal on both sides.
7. Connect the pedal cord plug and the
power plug.
7-1 Insert the pedal cord plug to the
[TO PEDAL] jack from the rear.
Insert the plug until the metal part disappears
from view.
NOTICE
If it is not plugged in firmly, it may cause the pedals to
not work.
7-2
Wind the cord holder around pedal cord to
hold it.
The cord holder is attached to the side board (L).
7-3 (YDP-S55 only) Connect the power cord to
the AC adaptor.
7-4 Insert the DC plug into the DC IN jack.
8. Rotate the adjuster until it presses in
firm contact with the floor surface.
Make sure that the pedal box does not rattle or
give way when you step on the pedals.
× 2
Felt
Front board back side
Thin screws (4 × 12 mm)
Back board
Main unit
Front board
Side
board
(L)
Side
board
(R)
7-1
7-4
7-2
TO PEDAL
DC IN
Cord
holder
Metal part
To press against
the floor
To separate from
the floor

40
YDP-165, YDP-145, YDP-S55, YDP-S35 Owner’s Manual
Specifications
YDP-165 YDP-145 YDP-S55 YDP-S35
Product Name Digital Piano
Size/Weight
Width 1,357 mm [53-7/16"] 1,353 mm [53-1/4"]
Height
849 mm [33-27/64"]
(With music rest
raised:
1,003 mm [39-31/64"])
815 mm [32-1/16"]
(With music rest
raised:
969 mm [38-1/8"])
792 mm [31-3/16"]
(Key cover open:
976 mm [38-27/64"])
792 mm [31-3/16"]
(Key cover open:
968 mm [38-1/8"])
Depth 422 mm [16-5/8"]
309 mm [12-3/16"]
(Key cover open:
317 mm [12-15/32"])
*With anti-fall brackets
attached, the depth is
382 mm [15-3/64"].
296 mm [11-5/8"]
(Key cover open:
309 mm [12-3/16"])
*With anti-fall brackets
attached, the depth is
366 mm [14-13/32"].
Weight
42.0 kg
(92 lbs., 10 oz.)
38.0 kg
(83 lbs., 12 oz.)
40.0 kg
(88 lbs., 3 oz.)
37.0 kg
(81 lbs.,9 oz.)
Control
Interface
Keyboard
Number of Keys 88
Type
GH3 (Graded
Hammer 3) keyboard
with synthetic ebony
and ivory keytops
GHS (Graded
Hammer Standard)
keyboard with matte
black keytops
GH3 (Graded
Hammer 3) keyboard
with synthetic ebony
and ivory keytops
GHS (Graded
Hammer Standard)
keyboard with matte
black keytops
Touch Response Hard/Medium/Soft/Fixed
Pedal
Number of Pedals 3
Half Pedal Yes (Damper)
Functions Damper, Sostenuto, Soft
Panel Language English
Cabinet
Key Cover Style Sliding Folding
Music Rest Yes
Music Clips Yes —
Voices
Tone Generation Piano Sound Yamaha CFX
Piano Effect
Virtual Resonance
Modeling Lite
(VRM Lite)
Yes
Key-off Samples Yes
Smooth Release Yes — Yes —
Polyphony (max.) 192
Preset Number of Voices 10
Effects
Types
Reverb 4 types
Intelligent Acoustic
Control (IAC)
Yes
Stereophonic Optimizer
Yes
Functions
Dual Yes
Duo Yes
Songs (MIDI)
Preset
Number of Preset
Songs
10 Voice Demo Songs, 50 Classics, 303 Lesson Songs
Recording
Number of Songs 1
Number of Tracks 2
Data Capacity
Approx. 150 KB/Song
(approx. 11,000
notes)
Approx. 100 KB/Song
(approx. 11,000
notes)
Approx. 150 KB/Song
(approx. 11,000
notes)
Approx. 100 KB/Song
(approx. 11,000
notes)
Functions Overall Controls
Metronome Yes
Tempo Range 5 – 280
Transpose -6 – 0 – +6
Tuning 414.8 – 440.0 – 466.8 Hz (approx. 0.2 Hz increments)
USB Audio Interface 44.1 kHz, 24 bit, stereo
Connectivity
DC IN 16 V 12 V 16 V 12 V
Headphones
Headphones/Output
Standard stereo phone jack (× 2)
USB TO HOST Yes
Sound System
Amplifiers 20 W × 2 8 W × 2 20 W × 2 8 W × 2
Speakers 12 cm × 2

Specifications
41
YDP-165, YDP-145, YDP-S55, YDP-S35 Owner’s Manual
* The contents of this manual apply to the latest specifications as of the publishing date. To obtain the latest manual, access the Yamaha website then download
the manual file. Since specifications, equipment or separately sold accessories may not be the same in every locale, please check with your Yamaha dealer.
(58-M02 WEEE en 01)
Power Supply
AC Adaptor
PA-300C (Output:
DC 16 V, 2.4 A)
PA-150 or an
equivalent
recommended by
Yamaha (Output:
DC 12 V, 1.5 A)
PA-300C (Output:
DC 16 V, 2.4 A)
PA-150 or an
equivalent
recommended by
Yamaha (Output:
DC 12 V, 1.5 A)
Power Consumption
13 W (When using
PA-300C AC adaptor)
9 W (When using
PA-150 AC adaptor)
13 W (When using
PA-300C AC adaptor)
9 W (When using
PA-150 AC adaptor)
Auto Power Off Yes
Included Accessories
(*Included or optional depending on locale.)
Owner’s Manual
50 Classical Music Masterpieces (Music Book)
AC adaptor:
PA-300C*, Power
cord*
AC adaptor: PA-150
or an equivalent*
AC adaptor:
PA-300C*, Power
cord*
AC adaptor: PA-150
or an equivalent*
Bench* —
Online Member Product Registration
Separately Sold Accessories
(May not be available depending on your area.)
• HPH-150/100/50
headphones
• AC adaptor
PA-300C
• HPH-150/100/50
headphones
• AC adaptor: PA-150
or an equivalent
recommended by
Yamaha
• HPH-150/100/50
headphones
• AC adaptor
PA-300C
• HPH-150/100/50
headphones
• AC adaptor: PA-150
or an equivalent
recommended by
Yamaha
Information for users on collection and disposal of old equipment:
This symbol on the products, packaging, and/or accompanying documents means that used electrical and electronic
products should not be mixed with general household waste.
For proper treatment, recovery and recycling of old products, please take them to applicable collection points, in
accordance with your national legislation.
By disposing of these products correctly, you will help to save valuable resources and prevent any potential negative
effects on human health and the environment which could otherwise arise from inappropriate waste handling.
For more information about collection and recycling of old products, please contact your local municipality, your waste
disposal service or the point of sale where you purchased the items.
For business users in the European Union:
If you wish to discard electrical and electronic equipment, please contact your dealer or supplier for further
information.
Information on Disposal in other Countries outside the European Union:
symbol is only valid in the European Union. If you wish to discard these items, please contact your local authorities or
dealer and ask for the correct method of disposal.
YDP-165 YDP-145 YDP-S55 YDP-S35

42
YDP-165, YDP-145, YDP-S55, YDP-S35 Owner’s Manual
Index
Numerics
50 Classical Music Masterpieces .......................... 26, 43
A
AC adaptor .................................................................13
Accessories ....................................................................8
Assembly .....................................................................33
Audio Loop Back ........................................................30
Auto Power Off ...........................................................14
B
Backing up Data ..........................................................31
Beat .............................................................................19
C
Computer ...................................................................30
Computer-related Operations .......................................8
D
Damper Pedal .............................................................17
Delete ..........................................................................29
Demo Song List ...........................................................21
Demo Songs ................................................................21
Dual mode ..................................................................24
Duo .............................................................................25
F
Firmware version ........................................................31
H
Half-pedal ...................................................................17
Headphones ................................................................15
Hz (Hertz) ...................................................................23
I
Initializing ...................................................................31
Intelligent Acoustic Control (IAC) .............................16
K
Key Cover ............................................................ 11, 12
L
Left-hand Part .............................................................27
Lesson Songs ...............................................................43
M
Manuals ........................................................................8
Metronome .................................................................19
MIDI Reference ............................................................8
Music Rest ........................................................... 11, 12
O
Octave ........................................................................24
Operation Confirmation Sounds ................................14
P
Panel Controls and Terminals ...................................... 9
Pedals ......................................................................... 17
Pitch ...........................................................................23
Playback .....................................................................26
Power .........................................................................13
Q
Quick Operation Guide ..............................................48
Quick Play .................................................................. 27
R
Recording ................................................................... 28
Reverb ........................................................................ 22
Reverb Depth .............................................................22
Reverb Type ...............................................................22
Right-hand Part ..........................................................27
S
Smart Device ..............................................................30
Smart Device Connection Manual ............................... 8
Smart Pianist ................................................................ 8
Soft Pedal ...................................................................17
Song ........................................................................... 26
Song List .....................................................................43
Sostenuto Pedal .......................................................... 17
Speaker .......................................................................15
Stereophonic Optimizer ............................................. 15
T
Tempo ........................................................................ 19
Time signature ...........................................................19
Touch Sensitivity ........................................................ 18
Transpose ...................................................................23
Tuning ........................................................................ 23
U
USB Audio Interface .................................................. 30
USB TO HOST .....................................................10, 30
User Song ................................................................... 28
V
Voice ..........................................................................20
Voice List ................................................................... 20
Volume .................................................................10, 19
Volume Limiter .......................................................... 14
VRM Lite .................................................................... 18

43
YDP-165, YDP-145, YDP-S55, YDP-S35 Owner’s Manual
Song List
50 Classical Music Masterpieces Lesson Songs
No. Song Title Composer
Arrangements
1 Canon D dur J. Pachelbel
2 Air On the G String J. S. Bach
3 Jesus, Joy of Man’s Desiring J. S. Bach
4 Twinkle, Twinkle, Little Star Traditional
5 Piano Sonate op.31-2 “Tempest” 3rd mov. L. v. Beethoven
6 Ode to Joy L. v. Beethoven
7 Wiegenlied op.98-2 F. P. Schubert
8 Grande Valse Brillante F. F. Chopin
9 Polonaise op.53 “Héroïque” F. F. Chopin
10 La Campanella F. Liszt
11 Salut d’amour op.12 E. Elgar
12 From the New World A. Dvořák
13 Sicilienne G. U. Fauré
14 Clair de lune C. A. Debussy
15 Jupiter (The Planets) G. Holst
Duets
16 Menuett (Eine kleine Nachtmusik K.525) W. A. Mozart
17 Menuett G dur L. v. Beethoven
18 Marcia alla Turca L. v. Beethoven
19 Piano Concerto No.1 op.11 2nd mov. F. F. Chopin
20 The Nutcracker Medley P. I. Tchaikovsky
Original Compositions
21 Prelude (Wohltemperierte Klavier I No.1) J. S. Bach
22 Menuett G dur BWV Anh.114 J. S. Bach
23 Piano Sonate No.15 K.545 1st mov. W. A. Mozart
24 Turkish March W. A. Mozart
25 Piano Sonate op.13 “Pathétique” 2nd mov. L. v. Beethoven
26 Für Elise L. v. Beethoven
27 Piano Sonate op.27-2 “Mondschein” 1st mov. L. v. Beethoven
28 Impromptu op.90-2 F. P. Schubert
29 Frühlingslied op.62-6 J. L. F.
Mendelssohn
30 Fantaisie-Impromptu F. F. Chopin
31 Etude op.10-3 “Chanson de l’adieu” F. F. Chopin
32 Etude op.10-12 “Revolutionary” F. F. Chopin
33 Valse op.64-1 “Petit chien” F. F. Chopin
34 Nocturne op.9-2 F. F. Chopin
35 Nocturne KK4a-16/BI 49 [Posth.] F. F. Chopin
36 Träumerei R. Schumann
37 Barcarolle P. I. Tchaikovsky
38 La prière d’une Vierge T. Badarzewska
39 Liebesträume No.3 F. Liszt
40 Blumenlied G. Lange
41 Humoresque A. Dvořák
42 Arietta E. H. Grieg
43 Tango (España) I. Albéniz
44 The Entertainer S. Joplin
45 Maple Leaf Rag S. Joplin
46 La Fille aux Cheveux de Lin C. A. Debussy
47 Arabesque No.1 C. A. Debussy
48 Cakewalk C. A. Debussy
49 Je te veux E. Satie
50 Gymnopédies No.1 E. Satie
No. Album Title Title No. /Song Title Composer
1-50 Vorschule im
Klavierspiel op.101
1–106 F. Beyer
1-50 51-100
1-6 101-106
1-25 25 Etudes faciles
et progressives
op.100
1 La candeur J. F.
Burgmüller
2 Arabesque
3 Pastorale
4 Petite réunion
5 Innocence
6 Progrès
7 Courant limpide
8 La gracieuse
9 La chasse
10 Tendre fleur
11 La bergeronnette
12 Adieu
13 Consolation
14 La styrienne
15 Ballade
16 Douce plainte
17 Babillarde
18 Inquiétude
19 Ave Maria
20 Tarentelle
21 Harmonie des anges
22 Barcarolle
23 Retour
24 L'hirondelle
25 La chevaleresque
1-50 100 Übungsstücke
op.139
1–50 C. Czerny
1-50 51–100
1-30 30 Etudes de
mécanisme op.849
1–30 C. Czerny
1-20
21-42
The Virtuoso
Pianist
1–20
1-Variation. 1–22
C-L. Hanon
About Duet Songs
The songs listed below are duet songs.
• Nos. 16–20 of “50 Classical Music Masterpieces”
• Nos. 1–11 of the Vorschule im Klavierspiel op.101
of “Lesson Songs” as well as 32–34, 41–44, 63–64,
and 86–87
The right-hand part ([+R]) is for the right hand of
the first player, and the left-hand part ([−L]) is for
the left hand of the first player. The second player’s
parts cannot be turned off.

44
Apache License 2.0
Copyright (c) 2009-2018 Arm Limited. All rights reserved.
SPDX-License-Identifier: Apache-2.0
Licensed under the Apache License, Version 2.0 (the License); you may not use this file except in compliance with the License.
You may obtain a copy of the License at
www.apache.org/licenses/LICENSE-2.0
Unless required by applicable law or agreed to in writing, software distributed under the License is distributed on an AS IS BASIS, WITHOUT
WARRANTIES OR CONDITIONS OF ANY KIND, either express or implied.
See the License for the specific language governing permissions and limitations under the License.
Modified BSD license
COPYRIGHT(c) 2016 STMicroelectronics
Redistribution and use in source and binary forms, with or without modification, are permitted provided that the following conditions are met:
1. Redistributions of source code must retain the above copyright notice, this list of conditions and the following disclaimer.
2. Redistributions in binary form must reproduce the above copyright notice, this list of conditions and the following disclaimer in the
documentation and/or other materials provided with the distribution.
3. Neither the name of STMicroelectronics nor the names of its contributors may be used to endorse or promote products derived from this
software without specific prior written permission.
THIS SOFTWARE IS PROVIDED BY THE COPYRIGHT HOLDERS AND CONTRIBUTORS "AS IS" AND ANY EXPRESS OR IMPLIED
WARRANTIES, INCLUDING, BUT NOT LIMITED TO, THE IMPLIED WARRANTIES OF MERCHANTABILITY AND FITNESS FOR A
PARTICULAR PURPOSE ARE DISCLAIMED. IN NO EVENT SHALL THE COPYRIGHT HOLDER OR CONTRIBUTORS BE LIABLE FOR
ANY DIRECT, INDIRECT, INCIDENTAL, SPECIAL, EXEMPLARY, OR CONSEQUENTIAL DAMAGES (INCLUDING, BUT NOT LIMITED
TO, PROCUREMENT OF SUBSTITUTE GOODS OR SERVICES; LOSS OF USE, DATA, OR PROFITS; OR BUSINESS INTERRUPTION)
HOWEVER CAUSED AND ON ANY THEORY OF LIABILITY, WHETHER IN CONTRACT, STRICT LIABILITY, OR TORT (INCLUDING
NEGLIGENCE OR OTHERWISE) ARISING IN ANY WAY OUT OF THE USE OF THIS SOFTWARE, EVEN IF ADVISED OF THE
POSSIBILITY OF SUCH DAMAGE.
Important Notice:
U.S. LIMITED WARRANTY for Customers in the United States
For detailed information about this Yamaha product and warranty service,
please either visit the following website address (printable file is available at our website)
or contact Customer Service at the address or telephone number identified below.
Website Address:
yamaha.i.o/YDPWarranty
Customer Service:
Yamaha Corporation of America
6600 Orangethorpe Avenue, Buena Park, CA 90620-1273
Telephone: 800-854-1569

45

For details of products, please contact your nearest Yamaha
representative or the authorized distributor listed below.
Pour plus de détails sur les produits, veuillez-vous adresser à Yamaha
ou au distributeur le plus proche de vous figurant dans la liste suivante.
Die Einzelheiten zu Produkten sind bei Ihrer unten aufgeführten
Niederlassung und bei Yamaha Vertragshändlern in den jeweiligen
Bestimmungsländern erhältlich.
Para detalles sobre productos, contacte su tienda Yamaha más
cercana o el distribuidor autorizado que se lista debajo.
CANADA
Yamaha Canada Music Ltd.
135 Milner Avenue, Toronto, Ontario M1S 3R1,
Canada
Tel: +1-416-298-1311
U.S.A.
Yamaha Corporation of America
6600 Orangethorpe Avenue, Buena Park, CA 90620,
U.S.A.
Tel: +1-714-522-9011
MEXICO
Yamaha de México, S.A. de C.V.
Av. Insurgentes Sur 1647 Piso 9, Col. San José
Insurgentes, Delegación Benito Juárez, CDMX,
C.P. 03900, México
Tel: +52-55-5804-0600
BRAZIL
Yamaha Musical do Brasil Ltda.
Praça Professor José Lannes, 40-Cjs 21 e 22, Brooklin
Paulista Novo CEP 04571-100 – São Paulo – SP,
Brazil
Tel: +55-11-3704-1377
ARGENTINA
Yamaha Music Latin America, S.A.,
Sucursal Argentina
Olga Cossettini 1553, Piso 4 Norte,
Madero Este-C1107CEK,
Buenos Aires, Argentina
Tel: +54-11-4119-7000
PANAMA AND OTHER LATIN
AMERICAN REGIONS/
CARIBBEAN REGIONS
Yamaha Music Latin America, S.A.
Edificio Torre Davivienda, Piso: 20
Avenida Balboa, Marbella, Corregimiento de Bella
Vista, Ciudad de Panamá, Rep. de Panamá
Tel: +507-269-5311
THE UNITED KINGDOM/IRELAND
Yamaha Music Europe GmbH (UK)
Sherbourne Drive, Tilbrook, Milton Keynes,
MK7 8BL, U.K.
Tel: +44-1908-366700
GERMANY
Yamaha Music Europe GmbH
Siemensstrasse 22-34, 25462 Rellingen, Germany
Tel: +49-4101-303-0
SWITZERLAND/LIECHTENSTEIN
Yamaha Music Europe GmbH, Branch
Switzerland in Thalwil
Seestrasse 18a, 8800 Thalwil, Switzerland
Tel: +41-44-3878080
AUSTRIA/CROATIA/
CZECH REPUBLIC
/
HUNGARY/ROMANIA/SLOVAKIA/
SLOVENIA
Yamaha Music Europe GmbH, Branch Austria
Schleiergasse 20, 1100 Wien, Austria
Tel: +43-1-60203900
POLAND
Yamaha Music Europe
Sp.z o.o. Oddział w Polsce
ul. Wielicka 52, 02-657 Warszawa, Poland
Tel: +48-22-880-08-88
BULGARIA
Dinacord Bulgaria LTD.
Bul.Iskarsko Schose 7 Targowski Zentar Ewropa
1528 Sofia, Bulgaria
Tel: +359-2-978-20-25
MALTA
Olimpus Music Ltd.
Valletta Road, Mosta MST9010, Malta
Tel: +356-2133-2093
NETHERLANDS/BELGIUM/
LUXEMBOURG
Yamaha Music Europe, Branch Benelux
Clarissenhof 5b, 4133 AB Vianen, The Netherlands
Tel: +31-347-358040
FRANCE
Yamaha Music Europe
7 rue Ambroise Croizat, Zone d'activités de Pariest,
77183 Croissy-Beaubourg, France
Tel: +33-1-6461-4000
ITALY
Yamaha Music Europe GmbH, Branch Italy
Via Tinelli N.67/69 20855 Gerno di Lesmo (MB),
Italy
Tel: +39-039-9065-1
SPAIN/PORTUGAL
Yamaha Music Europe GmbH Ibérica, Sucursal
en España
Ctra. de la Coruña km. 17,200, 28231
Las Rozas de Madrid, Spain
Tel: +34-91-639-88-88
GREECE
Philippos Nakas S.A. The Music House
19th klm. Leof. Lavriou 190 02 Peania – Attiki,
Greece
Tel: +30-210-6686260
SWEDEN
Yamaha Music Europe GmbH Germany Filial
Scandinavia
JA Wettergrensgata 1, 400 43 Göteborg, Sweden
Tel: +46-31-89-34-00
DENMARK
Yamaha Music Denmark,
Fillial of Yamaha Music Europe GmbH, Tyskland
Generatorvej 8C, ST. TH., 2860 Søborg, Denmark
Tel: +45-44-92-49-00
FINLAND
F-Musiikki Oy
Antaksentie 4
FI-01510 Vantaa, Finland
Tel: +358 (0)96185111
NORWAY
Yamaha Music Europe GmbH Germany -
Norwegian Branch
Grini Næringspark 1, 1332 Østerås, Norway
Tel: +47-6716-7800
ICELAND
Hljodfaerahusid Ehf.
Sidumula 20
IS-108 Reykjavik, Iceland
Tel: +354-525-5050
CYPRUS
Nakas Music Cyprus Ltd.
Nikis Ave 2k
1086 Nicosia
Tel: + 357-22-511080
Major Music Center
21 Ali Riza Ave. Ortakoy
P.O.Box 475 Lefkoşa, Cyprus
Tel: (392) 227 9213
RUSSIA
Yamaha Music (Russia) LLC.
Room 37, entrance 7, bld. 7, Kievskaya street,
Moscow, 121059, Russia
Tel: +7-495-626-5005
OTHER EUROPEAN REGIONS
Yamaha Music Europe GmbH
Siemensstrasse 22-34, 25462 Rellingen, Germany
Tel: +49-4101-303-0
Yamaha Music Gulf FZE
JAFZA-16, Office 512, P.O.Box 17328,
Jebel Ali FZE, Dubai, UAE
Tel: +971-4-801-1500
TURKEY
Yamaha Music Europe GmbH
Merkezi Almanya Türkiye İstanbul Şubesi
Mor Sumbul Sokak Varyap Meridian Business
1.Blok No:1 113-114-115
Bati Atasehir Istanbul, Turkey
Tel: +90-216-275-7960
ISRAEL
RBX International Co., Ltd.
P.O Box 10245, Petach-Tikva, 49002
Tel: (972) 3-925-6900
OTHER REGIONS
Yamaha Music Gulf FZE
JAFZA-16, Office 512, P.O.Box 17328,
Jebel Ali FZE, Dubai, UAE
Tel: +971-4-801-1500
THE PEOPLE’S REPUBLIC OF CHINA
Yamaha Music & Electronics (China) Co., Ltd.
2F, Yunhedasha, 1818 Xinzha-lu, Jingan-qu,
Shanghai, China
Tel: +86-400-051-7700
HONG KONG
Tom Lee Music Co., Ltd.
11/F., Silvercord Tower 1, 30 Canton Road,
Tsimshatsui, Kowloon, Hong Kong
Tel: +852-2737-7688
INDIA
Yamaha Music India Private Limited
P-401, JMD Megapolis, Sector-48, Sohna Road,
Gurugram-122018, Haryana, India
Tel: +91-124-485-3300
INDONESIA
PT Yamaha Musik Indonesia Distributor
Yamaha Music Center Bldg. Jalan Jend. Gatot
Subroto Kav. 4, Jakarta 12930, Indonesia
Tel: +62-21-520-2577
KOREA
Yamaha Music Korea Ltd.
11F, Prudential Tower, 298, Gangnam-daero,
Gangnam-gu, Seoul, 06253, Korea
Tel: +82-2-3467-3300
MALAYSIA
Yamaha Music (Malaysia) Sdn. Bhd.
No.8, Jalan Perbandaran, Kelana Jaya, 47301
Petaling Jaya, Selangor, Malaysia
Tel: +60-3-78030900
SINGAPORE
Yamaha Music (Asia) Private Limited
Block 202 Hougang Street 21, #02-00,
Singapore 530202, Singapore
Tel: +65-6740-9200
TAIWAN
Yamaha Music & Electronics Taiwan Co., Ltd.
2F., No.1, Yuandong Rd., Banqiao Dist.,
New Taipei City 22063, Taiwan (R.O.C.)
Tel: +886-2-7741-8888
THAILAND
Siam Music Yamaha Co., Ltd.
3, 4, 15, 16th Fl., Siam Motors Building,
891/1 Rama 1 Road, Wangmai,
Pathumwan, Bangkok 10330, Thailand
Tel: +66-2215-2622
VIETNAM
Yamaha Music Vietnam Company Limited
15th Floor, Nam A Bank Tower, 201-203 Cach
Mang Thang Tam St., Ward 4, Dist.3,
Ho Chi Minh City, Vietnam
Tel: +84-28-3818-1122
OTHER ASIAN REGIONS
https://asia-latinamerica-mea.yamaha.com/
index.html
AUSTRALIA
Yamaha Music Australia Pty. Ltd.
Level 1, 80 Market Street, South Melbourne,
VIC 3205 Australia
Tel: +61-3-9693-5111
NEW ZEALAND
Music Works LTD
P.O.BOX 6246 Wellesley, Auckland 4680,
New Zealand
Tel: +64-9-634-0099
REGIONS AND TRUST
TERRITORIES IN PACIFIC OCEAN
https://asia-latinamerica-mea.yamaha.com/
index.html
NORTH AMERICA
CENTRAL & SOUTH AMERICA
EUROPE
AFRICA
MIDDLE EAST
ASIA
OCEANIA
DMI30
Head Office/Manufacturer: Yamaha Corporation 10-1, Nakazawa-cho, Naka-ku, Hamamatsu, 430-8650, Japan
Importer (European Union): Yamaha Music Europe GmbH Siemensstrasse 22-34, 25462 Rellingen, Germany
Importer (United Kingdom): Yamaha Music Europe GmbH (UK) Sherbourne Drive, Tilbrook, Milton Keynes, MK7 8BL, United Kingdom

3
4
5 6
Voice confirmation of
current Tempo value
Operation
Confirmation
Sounds
Default tempo
2
4
6
0
3
5
Default volume
1 step down
1 step up
10 steps down
10 steps up
Tempo (Metronome, Songs, etc.)
Metronome
Volume
Metronome Beat
Default setting
440.0 Hz
1 step down
1 step up
1 step down
1 step up
Off
Ch 1+2
On/Off
On/Off
Enable
On
Off
Off
1 step down
1 step up
ALL
On
Off
Off
Normal
On
On
On/Off
Ch 1
Ch 1
Disable
Tuning
Transpose
MIDI Transmit
Channel
MIDI Receive
Channel
Audio
Loop Back
Speaker
Volume
Limiter
Auto Power Off
IAC Depth
$ᅊ&ᅊ'ᅊ)ᅊ*ᅊ$ᅊ&ᅊ'ᅊ)ᅊ*ᅊ$ᅊ&ᅊ'ᅊ)ᅊ*ᅊ$ᅊ&ᅊ'ᅊ)ᅊ*ᅊ$ᅊ&ᅊ'ᅊ)ᅊ*ᅊ$ᅊ
442.0 Hz
$%
C0
'()*$%
C1
'()*$%
C2
'()*$%
C3
'()*$%
C4
'()*$%
C5
$%
C0
'()*$%
C1
'()*$%
C2
'()*$%
C3
'()*$%
C4
'()*$%
C5
'()*$%
C6
'( )*$%
C7
Local Control
Control ChangeProgram Change
Metronome settings
2
4
7
9
1
3
5
6
8
0
To turn Duo on or off:
Tuning settings
While holding down the [PIANO/VOICE],
simultaneously press the [+R] and [−L] to turn Duo on or off.
Duo setting
While holding down the [DEMO/SONG] and [PIANO/VOICE],
use the [+R] and [−L] as shown below to fine-tune the pitch of your instrument.
To tune up
(in about 0.2 Hz steps):
To tune down
(in about 0.2 Hz steps):
Default pitch: 440.0 Hz
On
Off
−6
−4
−2
+1
+3
+6
−5
−3
−1
0
(normal pitch)
+2
+4
+5
EN
Voice confirmation of
current system version
$ᅊ&ᅊ'ᅊ)ᅊ*ᅊ$ᅊ&ᅊ'ᅊ)ᅊ*ᅊ$ᅊ&ᅊ'ᅊ)ᅊ*ᅊ$ᅊ&ᅊ'ᅊ)ᅊ*ᅊ$ᅊ&ᅊ'ᅊ)ᅊ*ᅊ$ᅊ&ᅊ'ᅊ)ᅊ*ᅊ$ᅊ&ᅊ'ᅊ)ᅊ*ᅊ$ᅊ
YDP-165, YDP-145, YDP-S55, YDP-S35 Quick Operation Guide
To increase the value by 1:
To decrease the value by 1:
Other settings

ENGLISH
2
1
Reverb Types Reverb Depth VRM Lite Duo Type
Stereophonic
Optimizer
Volume Balance
(Dual/Duo mode)
Octave Shift
(Dual/Duo mode)
Touch
Sensitivity
Concert Hall
Club
Soft
2
4
7
9
11
14
16
19
21
23
26
28
31
33
35
38
40
43
45
47
50
Recital Hall
Chamber
Off
Default setting
1 step down
1 step up
Default setting
1 step down
1 step up
Off
0 (Voice 2)
−1 (Voice 2)
+1 (Voice 2)
0 (Voice 1)
−1 (Voice 1)
+1 (Voice 1)
Fixed
Medium
Hard
$%
C0
'()*$%
C1
'()*$%
C2
'()*$%
C3
'()*$%
C4
'()*$%
C5
'()*$%
C6
'( )*$%
C7
$%
C0
'()*$%
C1
'()*$%
C2
'()*$%
C3
'()*$%
C4
'()*$%
C5
'()*$%
C6
'( )*$%
C7
1
3
5
6
8
10
12
13
15
17
18
20
22
24
25
27
29
30
32
34
36
37
39
41
42
44
46
48
49
$ᅊ&ᅊ'ᅊ)ᅊ*ᅊ$ᅊ&ᅊ'ᅊ)ᅊ*ᅊ$ᅊ&ᅊ'ᅊ)ᅊ*ᅊ$ᅊ&ᅊ'ᅊ)ᅊ*ᅊ$ᅊ&ᅊ'ᅊ)ᅊ*ᅊ$ᅊ&ᅊ'ᅊ)ᅊ*ᅊ$ᅊ&ᅊ'ᅊ)ᅊ*ᅊ$ᅊ
$ᅊ&ᅊ'ᅊ)ᅊ*ᅊ$ᅊ&ᅊ'ᅊ)ᅊ*ᅊ$ᅊ&ᅊ'ᅊ)ᅊ*ᅊ$ᅊ&ᅊ'ᅊ)ᅊ*ᅊ$ᅊ&ᅊ'ᅊ)ᅊ*ᅊ$ᅊ&ᅊ'ᅊ)ᅊ*ᅊ$ᅊ&ᅊ'ᅊ)ᅊ*ᅊ$ᅊ
On
Off
On
Balance
Separate
YDP-165, YDP-145, YDP-S55, YDP-S35
While holding down the applicable button, press one of the highlighted keys shown below to select a Song or set a parameter.
Song playback
On
Off
Mellow Grand
Stage E.Piano
Vibraphone
Jazz Organ
CFX Grand
Pop Grand
DX E.Piano
Harpsichord
Pipe Organ
Strings
Mellow Grand
Stage E.Piano
Vibraphone
Jazz Organ
CFX Grand
Pop Grand
DX E.Piano
Harpsichord
Pipe Organ
Strings
Quick Play
Book Select
Demo Songs 50 Classics (50 Classical Music Masterpieces) / Lesson Songs
Beyer 1–50
Beyer 101–106
Czerny 100, 51–100
Hanon
50 Classics
Beyer 51–100
Burgmüller 1–25
Czerny 100, 1–50
Czerny 30, 1–30
50 Classics (50 Classical Music Masterpieces) Lesson Songs
1 Canon D dur
2 Air On the G String
3 Jesus, Joy of Man’s Desiring
4 Twi nkle, Tw in kle, Li ttl e Sta r
5 Piano Sonate op.31-2 “Tempest” 3rd mov.
6 Ode to Joy
7 Wiegenlied op.98-2
8 Grande Valse Brillante
9 Polonaise op.53 “Héroïque”
10 La Campanella
11 Salut d’amour op.12
12 From the New World
13 Sicilienne
14 Clair de lune
15 Jupiter (The Planets)
16 Menuett (Eine kleine Nachtmusik K.525)
17 Menuett G dur
18 Marcia alla Turca
19 Piano Concerto No.1 op.11 2nd mov.
20 The Nutcracker Medley
21 Prelude (Wohltemperierte Klavier I No.1)
22 Menuett G dur BWV Anh.114
23 Piano Sonate No.15 K.545 1st mov.
24 Turkish March
25
Piano Sonate op.13 “Pathétique” 2nd mov.
26 Für Elise
27
Piano Sonate op.27-2 “Mondschein” 1st mov.
28 Impromptu op.90-2
29 Frühlingslied op.62-6
30 Fantaisie-Impromptu
31 Etude op.10-3 “Chanson de l’adieu”
32 Etude op.10-12 “Revolutionary”
33 Valse op.64-1 “Petit chien”
34 Nocturne op.9-2
35 Nocturne KK4a-16/BI 49 [Posth.]
36 Träumerei
37 Barcarolle
38 La prière d’une Vierge
39 Liebesträume No.3
40 Blumenlied
41 Humoresque
42 Arietta
43 Tango (España)
44 The Entertainer
45 Maple Leaf Rag
46 La Fille aux Cheveux de Lin
47 Arabesque No.1
48 Cakewalk
49 Je te veux
50 Gymnopédies No.1
Voice settings
Voices
Manual Development Group
© 2021 Yamaha Corporation
Published 12/2021
MWMA-B0
VEH0250
Quick Operation Guide
1–50
1–50
1–6
1–25
1–50
1–50
1–30
1–20
21–42
Beyer 1–50
Beyer 51–100
Beyer 101–106
Burgmüller 1–25
Czerny 100, 1–50
Czerny 100, 51–100
Czerny 30, 1–30
Hanon 1–20
Hanon 1-Variation 1–22
