
User’s Guide
The DICOM image viewer and
image library tool for Windows
®
ii
Information in this guide is subject to change without notice and does
not represent a commitment on the part of Trillium Technology, Inc.
The software described in this guide is furnished under a license
agreement. The software may be used or copied only in accordance
with the terms of the agreement. It is against the law to copy the
software on any medium except as specifically allowed in the
agreement. No part of this guide may be reproduced or transmitted in
any form or by any means, electronic, mechanical, photocopying,
recording, or otherwise, without prior written permission of Trillium
Technology, Inc.
Notice to users: Use of the enclosed software is subject to
the license agreement approved during the installation
process and printed in this guide.
SHOWCASE is a trademark registered in the U.S. Patent office by
Trillium Technology, Inc., Ann Arbor, Michigan. Windows and
PowerPoint are registered trademarks of Microsoft Corporation. All
other trademarks are trademarks or registered trademarks of their
respective holders.
Regulatory Information
ShowCase has received US FDA clearance as a Class II Medical Device.
The K number for this product is K082135.
Document version 2.3
Trillium Technology, Inc.
Ann Arbor, MI
www.triltech.com
© 2000-2013, Trillium Technology, Inc. All rights reserved.
Simultaneously published in the U.S. and Canada.
Printed in the United States of America.
ShowCaseUserGuide.book Page ii Wednesday, May 15, 2013 12:59 PM

iii
END USER AGREEMENT
This End User Agreement (“Agreement”) by and
between Trillium Technology, Inc., with a place of
business in Ann Arbor, Michigan U.S.A. (“Trillium”) and
you (“User”) states the terms and conditions under
which the User may use the SHOWCASE software (the
“Software”). Please read this Agreement carefully before
accessing and using the Software. By using and
accessing the Software, and by clicking the button that
represents your agreement with this license, you indicate
that you have read and understand this Agreement and
that you are and agree to be bound to this Agreement. If
you do not accept this Agreement, cancel this
installation and neither access nor use the Software.
THE NATURAL PERSON CLICKING THE BUTTON
INDICATING AGREEMENT REPRESENTS AND WARRANTS
ON BEHALF OF USER THAT S/HE IS AUTHORIZED TO
SIGN CONTRACTS ON BEHALF OF, AND TO THEREBY
BIND, USER.
1. ARTICLE 1. CONDITIONS OF USE
1.1 License. Subject to the terms of this
Agreement, Trillium grants to User the right to use and
perform the Software for User’s internal business use
only. For each FIXED (Internet or manually activated)
license acquired, the foregoing license authorizes the
installation of one copy of the Software on a single
computer, provided that the primary user of a computer
on which a copy of the Software is installed may make a
second copy for his or her exclusive use on either a
home or portable computer. User may not disassemble,
decompile, reverse engineer, or otherwise translate the
Software or any portion thereof, nor may User permit or
encourage any of the foregoing. User may use the User's
Guide, including all updates thereto ("Documentation")
only in connection with User’s use of the Software
hereunder. The rights granted herein do not include the
right to sublicense.
ShowCaseUserGuide.book Page iii Wednesday, May 15, 2013 12:59 PM

iv
1.2 Dongles. If User has received a hardware key
(“Dongle”) from Trillium, User is authorized to make
copies of the Software on computers within User’s
possession and control. User shall not, and shall not
attempt to, duplicate, replicate, reverse engineer,
disassemble, or circumvent any Dongle provided to User.
In the event that User damages a Dongle, it may return
the Dongle to Trillium for repair or replacement (in
Trillium’s sole discretion), subject to Trillium’s then-
current payment terms. In the event that User declares a
Dongle lost, then Trillium will replace the Dongle upon
User’s payment of Trillium’s then-current portable license
fee, which amount is non-refundable in the event that
User later recovers the initial Dongle.
1.3 Fees. Amounts paid by User in connection
with the Software are non-refundable.
2. ARTICLE 2. INTELLECTUAL PROPERTY
2.1 Ownership and Title. Other than limited portions of
the Software performed, distributed, and reproduced
under license from Glyph & Cog, LLC, User agrees and
acknowledges that Trillium owns all right, title and
interest in and to the Software, Documentation and all
intellectual property therein, and that User will not
obtain or claim any ownership interest in the Software or
Documentation, or any portion thereof, or any
intellectual property therein. User agrees and
acknowledges that the Software and Documentation
contain the valuable trade secrets and proprietary
information of Trillium, which have been developed at
great expense over many years. User will not obscure,
alter or remove any patent, copyright, trademark, service
mark or other marking or legend contained on or in any
Software or Documentation. User will ensure that no
unauthorized persons have access to the Software, and
that no persons authorized to have such access will take
any action in violation of this Agreement. SHOWCASE is
ShowCaseUserGuide.book Page iv Wednesday, May 15, 2013 12:59 PM

v
a trademark owned by Trillium and registered with the
U.S. Patent and Trademark Office (Reg. No. 2,728,082).
2.2 Confidentiality. User hereby acknowledges
that the Software and Documentation contain
information that is trade secret and proprietary to
Trillium. User hereby agrees not to disclose such
information except to persons and organizations
expressly authorized by Trillium to receive such
information.
2.3 Confidential Information. User must keep all
Trillium Confidential Information to which User has
access in strict confidence. User may not disclose
Confidential Information, except to persons authorized
by Trillium.
3. ARTICLE 3. WARRANTY LIMITATION
3.1 WARRANTY LIMITATION. EXCEPT AS
EXPRESSLY PROVIDED HEREIN THE SOFTWARE AND
USER’S USE THEREOF IS PROVIDED "AS IS" WITHOUT
WARRANTY, EXPRESS OR IMPLIED OF ANY KIND,
INCLUDING BUT NOT LIMITED TO THE IMPLIED
WARRANTIES OF MERCHANTABILITY AND FITNESS FOR
A PARTICULAR PURPOSE. THE ENTIRE RISK ARISING
OUT OF THE USE OR PERFORMANCE OF THE SOFTWARE
REMAINS WITH USER. IN NO EVENT WILL TRILLIUM BE
LIABLE FOR ANY DAMAGE WHATSOEVER ARISING OUT
OF THE USE OF OR INABILITY TO ACCESS THE
SOFTWARE OR TO USE THE SOFTWARE, EVEN IF
TRILLIUM HAS BEEN ADVISED OF THE POSSIBILITY OF
SUCH DAMAGES. TRILLIUM DOES NOT WARRANT THAT
THE OPERATION OF THE SOFTWARE WILL BE
UNINTERRUPTED OR ERROR FREE. USER
ACKNOWLEDGES AND AGREES THAT USER HAS NOT
RELIED ON ANY EXPRESS OR IMPLIED REPRESENTATION
OF DISCREET, WRITTEN OR ORAL, AS AN INDUCEMENT
TO ENTERING INTO THIS AGREEMENT. Some
jurisdictions do not allow limitation of certain warranties,
ShowCaseUserGuide.book Page v Wednesday, May 15, 2013 12:59 PM

vi
so the above limitation may not apply to User. This
limited warranty gives User specific legal rights.
3.2 Indemnification. User shall defend, indemnify
and hold Trillium and its officers, directors, employees,
and agents harmless from and against any and all
threatened or actual claims, actions, liability, suits,
expenses, costs, fees (including attorney’s fees),
damages, or losses arising from or relating to (i) use of
the Software by persons authorized by User; (ii) User’s
acts (or any failure to act) hereunder; and (iii) any
breach by User of User’s obligations hereunder.
3.3 Limitation of Damages. TRILLIUM SHALL NOT
BE LIABLE TO USER UNDER THIS AGREEMENT OR IN
CONNECTION WITH THE SOFTWARE FOR ANY
PERSONAL INJURY, LOST PROFITS, CONSEQUENTIAL,
EXEMPLARY, INCIDENTAL, OR PUNITIVE DAMAGES,
REGARDLESS OF THE FORM OF ACTION, WHETHER IN
CONTRACT OR IN TORT, INCLUDING NEGLIGENCE, AND
REGARDLESS OF WHETHER TRILLIUM HAS BEEN
ADVISED OF THE POSSIBILITY OF SUCH DAMAGES IN
ADVANCE OR WHETHER SUCH DAMAGES ARE
REASONABLY FORESEEABLE. NOTWITHSTANDING ANY
PROVISION TO THE CONTRARY, THE LIABILITY OF
TRILLIUM FOR ANY REASON AND FOR ANY CAUSE OF
ACTION WHATSOEVER IN CONNECTION WITH THIS
AGREEMENT AND THE SOFTWARE OR USER’S USE
THEREOF SHALL NOT EXCEED AMOUNTS PAID TO
TRILLIUM HEREUNDER.
4. ARTICLE 4. MISCELLANEOUS
4.1 Term. This Agreement shall terminate
immediately upon the earlier to occur of (i) User’s notice
to Trillium; or (ii) User’s breach of the Agreement.
Immediately upon termination, User shall destroy any
copies of the Software, Dongles, or Documentation in
User’s possession or control. Section 1.2, Section 1.3,
and Articles 2, 3, and 4 shall survive the termination of
this Agreement.
ShowCaseUserGuide.book Page vi Wednesday, May 15, 2013 12:59 PM

vii
4.2 Assignments. All delegations, transfers or
assignments of rights, duties or obligations under this
Agreement by User without the prior written consent of
Trillium shall be null, void and without effect.
4.3 Restricted Rights. The Software and
documentation are provided with RESTRICTED RIGHTS.
Use, duplication, or disclosure by the Government is
subject to restrictions as set forth in subparagraph
(c)(1)(ii) of The Rights in Technical Data and Computer
Software clause at DFARS 252.227-7013, 227.7202-1(a)
and 227.7202-3(a) or subparagraphs (c)(1) and (2) of
the Commercial Computer Software-Restricted Rights at
48 CFR 12.212(a), or 52.227-14(41 & III), 52.227-19, as
applicable.
4.4 Entire Agreement. This Agreement contains
the entire understanding of the parties and supersedes
previous verbal and written communications, proposals
and agreements between the parties concerning the
subject matter hereof.
4.5 Amendments and Modifications. Unless
specifically provided in this Agreement, waivers,
alterations, modifications or amendments of a provision
of this Agreement shall not be binding unless such
waiver, alteration, modification or amendment is in
writing and signed by an authorized representative of
both parties.
4.6 Severability. If a provision of this Agreement is
rendered invalid, void or unlawful, the remaining
provisions shall remain in full force and effect.
4.7 Counterparts. This Agreement may be
executed in multiple counterparts, each of which shall
be an original, but which together shall constitute one
and the same instrument.
4.8 Governing Law. This Agreement shall be
governed by the laws of the State of Michigan without
regard to any rules of conflict or choice of laws. The
ShowCaseUserGuide.book Page vii Wednesday, May 15, 2013 12:59 PM

viii
parties consent to the exclusive jurisdiction of the state
and federal courts in the Eastern District of Michigan
with respect to all disputes arising from or related to this
Agreement.
4.9 Relationship of the Parties. It is agreed that
the relationship of the parties is primarily that of an
independent contractor. Nothing herein shall be
construed as creating a partnership, an employment
relationship, or an agency relationship between the
parties, or as authorizing either party to act as agent for
the other.
ShowCaseUserGuide.book Page viii Wednesday, May 15, 2013 12:59 PM
vii
Table of Contents
CHAPTER 1
Before You Begin. . . . . . . . . . . . . . . . . . . . . . . . . . . . . . . 1
Intended Use . . . . . . . . . . . . . . . . . . . . . . . . . . . . . . . . 1
CHAPTER 2
ShowCase Overview . . . . . . . . . . . . . . . . . . . . . . . . . . . . 5
Welcome to ShowCase Clinical Case Presentation
Tools . . . . . . . . . . . . . . . . . . . . . . . . . . . . . . . . . . . . . . . 5
DICOM Conformance . . . . . . . . . . . . . . . . . . . . . . . . . 7
Recommended System Requirements . . . . . . . . . . . 7
Installation Instructions. . . . . . . . . . . . . . . . . . . . . . . . 9
Technical Support . . . . . . . . . . . . . . . . . . . . . . . . . . . 10
CHAPTER 3
Basic Image Viewing. . . . . . . . . . . . . . . . . . . . . . . . . . . 11
CHAPTER 4
Structured Reports . . . . . . . . . . . . . . . . . . . . . . . . . . . . 17
Viewing Measurements in Structured Reports . . . . 17
CHAPTER 5
Image Editing . . . . . . . . . . . . . . . . . . . . . . . . . . . . . . . . . 21
CHAPTER 6
De-Identifying Images . . . . . . . . . . . . . . . . . . . . . . . . . 31
CHAPTER 7
Making AVI Files from DICOM Clips . . . . . . . . . . . . . 39
CHAPTER 8
Exporting Images into PowerPoint . . . . . . . . . . . . . . 43
CHAPTER 9
Burning Studies to CD or DVD . . . . . . . . . . . . . . . . . . 47
ShowCaseUserGuide.book Page vii Wednesday, May 15, 2013 12:59 PM
viii
CHAPTER 10
Making Measurements . . . . . . . . . . . . . . . . . . . . . . . . 53
Using the Measurement Tools. . . . . . . . . . . . . . . . . 53
Measurement Tools . . . . . . . . . . . . . . . . . . . . . . . . . 54
Calibrating Measurements . . . . . . . . . . . . . . . . . . . . 59
Reviewing and Exporting Measurements . . . . . . . . 59
CHAPTER 11
Transfering Studies from a ShowCase Image Center
. . . . . . . . . . . . . . . . . . . . . . . . . . . . . . . . . . . . . . . . . . . . . . 63
Configuring ShowCase Premier to Communicate with
Your Image Center . . . . . . . . . . . . . . . . . . . . . . . . . . 63
Local Store Settings. . . . . . . . . . . . . . . . . . . . . . . . . . 65
Auto-transfer Settings . . . . . . . . . . . . . . . . . . . . . . . . 65
Transferring Studies to Your ShowCase PC from the
Image Center. . . . . . . . . . . . . . . . . . . . . . . . . . . . . . . 66
CHAPTER 12
Configuring ShowCase Connect . . . . . . . . . . . . . . . . . 69
Initial Configuration . . . . . . . . . . . . . . . . . . . . . . . . . 69
Configuring Connected Devices. . . . . . . . . . . . . . . . 72
CHAPTER 13
Transferring Files Using ShowCase Connect. . . . . . 77
Storing Images Sent from Imaging Machines. . . . . 77
Transferring Images Using Query/Retrieve . . . . . . . 77
CHAPTER 14
Troubleshooting Networking Problems. . . . . . . . . . 81
Windows 7 and Windows 8 Machines . . . . . . . . . . 81
Error Logs. . . . . . . . . . . . . . . . . . . . . . . . . . . . . . . . . . 81
General Network Connectivity . . . . . . . . . . . . . . . . . 82
DICOM Network Connectivity . . . . . . . . . . . . . . . . . 82
ShowCaseUserGuide.book Page viii Wednesday, May 15, 2013 12:59 PM
ix
Firewalls . . . . . . . . . . . . . . . . . . . . . . . . . . . . . . . . . . . 83
What if Query/Retrieve Doesn't Work? . . . . . . . . . . 83
What if Query Works, Retrieve Doesn't? . . . . . . . . . 84
CHAPTER 15
Small Clinic Networks Recommendations . . . . . . . 85
Viewing Images . . . . . . . . . . . . . . . . . . . . . . . . . . . . . 87
Managing Images . . . . . . . . . . . . . . . . . . . . . . . . . . . 87
APPENDIX A
Keyboard Shortcuts . . . . . . . . . . . . . . . . . . . . . . . . . . . 89
ShowCaseUserGuide.book Page ix Wednesday, May 15, 2013 12:59 PM
x
ShowCaseUserGuide.book Page x Wednesday, May 15, 2013 12:59 PM
1
CHAPTER 1
Before You Begin
Welcome to ShowCase DICOM image viewing software.
Please read the important cautionary information that
follows. If you are using ShowCase software as an aid to
diagnosis, keep in mind that this software is not
intended to replace the skill and judgment of a qualified
medical practitioner and the software should be
operated only by trained users who are aware of the
software’s functions, capabilities and limitations.
Intended Use
ShowCase is diagnostic quality radiological viewing
software. ShowCase can be used to receive, store,
display, and manipulate medical images and associated
clinical data. ShowCase is not intended for diagnosis of
lossy compressed images.
Caution: Federal law restricts this device to sale or use
by or on the order of a physician.
Be sure to run ShowCase on suitable hardware.
Image display quality and image playback performance
will in part depend on your PC hardware. It is especially
important to use a high quality display device. Please
consult our latest hardware recommendations. Take
special note that mammographic images may have
special requirements. Please check FDA guidances on
reviewing mammographic images.
Please handle your clinical data with care.
• Users must establish procedures that protect
clinical data from unauthorized access.
ShowCaseUserGuide.book Page 1 Wednesday, May 15, 2013 12:59 PM
2
• Users should back up clinical data regularly and
institute a workflow that includes a sound
archive process.
• Studies deleted with the ShowCase Delete
function are permanently deleted from storage
and can only be recovered from the original
source or from a backup.
• Users are responsible for ensuring that storage
media comply with any local regulations on
media usage, including regulations on storage
time, use of medically licensed media, and data
backup.
Trillium Technology assumes no liability for the security
and availability of patient data.
Potential image data loss when saving images …
Under most circumstances ShowCase does not lossy
compress images when Saving or Copying studies;
Image quality is preserved. Exception: If you modify the
pixel data of JPEG compressed images in ShowCase (for
example to annotate or erase a name) and then re-save
the image, the image will be re-compressed during the
save operation at a quality setting of 75%. We
recommend:
• Using the higher quality original images for
primary diagnosis.
• When you need to annotate/erase images make
all of your modifications at once to avoid
multiple Saves.
Note: Files that are JPEG compressed are smaller and
easier to transfer, but lose some visual quality
that cannot be restored when decompressed.
When ShowCase displays images in a full-sized
window, it shows the JPEG compression ratio in
the lower left corner. You can find more
ShowCaseUserGuide.book Page 2 Wednesday, May 15, 2013 12:59 PM
3
information about JPEG compression at
www.jpeg.org.
De-identifying studies…
Please consult the chapter on de-identification for
information on the patient information that is removed
when de-identifying studies with ShowCase. Trillium
Technology has worked with research-oriented
customers to develop a process that is optimized for
their use, but the process cannot guarantee that all
identifying information is removed. If you need to be 100
percent sure that all possibly identifying information is
removed, export the images in AVI or BMP formats so
that no header information is included in the image.
Measurement accuracy…
Please be aware that the accuracy and correctness of
data displayed by ShowCase depend on the accuracy
and correctness of input data provided by other sources,
usually the acquisition device that produced the images
and associated data. If, for example the calibration factor
stored in an image DICOM header is incorrect, the
measurements made in ShowCase could be incorrect.
When making measurements using ShowCase tools,
accuracy depends on the acquired resolution in the x
and y dimensions. Since measurements are calculated
from the relative positions of cursor graphics
superimposed over the image, the accuracy also
depends on user skills in positioning the caliper points or
boundary points over features of interest in the image.
When performing measurements, be aware of this
source of human error.
ShowCaseUserGuide.book Page 3 Wednesday, May 15, 2013 12:59 PM
4
If you encounter errors in the software…
ShowCase has been thoroughly tested, but it is
impossible to completely test any piece of software and
errors could remain, leading to an incorrect presentation
of an image, a measurement or an item of clinical data.
Please report any errors to Trillium Technology so that
we can continue to improve the quality of our software.
ShowCaseUserGuide.book Page 4 Wednesday, May 15, 2013 12:59 PM
5
CHAPTER 2
ShowCase Overview
Welcome to ShowCase
Clinical Case
Presentation Tools
ShowCase is a diagnostic quality medical viewer for
Windows® 7 and Windows 8. This guide describes both
ShowCase Basic and ShowCase Premier. In addition, at
the end of the guide, you can find information on
ShowCase Connect, the DICOM network connection
module that you can add to either version of ShowCase
viewer.
ShowCase Premier includes all features described in
chapters 1-
11 of this guide. ShowCase Basic has a subset
of the features. Features that are only included in
ShowCase Premier are noted in the text of the guide. The
ShowCase splash screen, and the ShowCase About
screen, accessed from the Help menu, show the version
name.
ShowCase Basic is a versatile DICOM image viewer.
With ShowCase Basic, you can
• Display DICOM studies from DICOM disks (CDs,
MODs, DVDs) or individual DICOM files
• Play and step clips, customize clip margins and
playback speeds
• View images in selectable sizes and selectable
compare modes
• Make contrast/gamma adjustments to images
• View stress echo studies in standard stress
layouts by stage and view
• View measurements and calculations made on
ultrasound machines and exported in DICOM
Structured Reports
ShowCaseUserGuide.book Page 5 Wednesday, May 15, 2013 12:59 PM
6
• Edit, copy and paste images into new series or
studies
• Write your own DICOM disks
• For HIPAA compliance, remove patient
identifying information from both image and
study data
• Annotate both static images and clips
• Export prepared images in BMP, TIFF, JPEG and
AVI formats for slide shows, web pages or
publication artwork
• Export stress echo displays as synchronized
stress AVI files
Plus you have the ability to export full quality DICOM
images onto PowerPoint
®
slides. You can:
• Single-click export images to PowerPoint slides
• Play full quality DICOM images directly within
PowerPoint
• Access ShowCase image editing tools while
running in PowerPoint
• Auto-play, speed control, and step clips on
PowerPoint slides
ShowCase Premier is the full-featured version that
includes all the capabililties of ShowCase Basic, plus the
ability to perform measurements on images and write
images to CDs and DVDs with an Onboard viewer.
ShowCase Premier also provides remote access to
studies for sites that have a ShowCase Image Center.
You can:
• Perform line measurements on 2D images and
2D, Doppler, and M-mode ultrasound regions.
• Perform elliptical or free form area/perimeter
measurements
ShowCaseUserGuide.book Page 6 Wednesday, May 15, 2013 12:59 PM

7
• Export measurement values to a spreadsheet or
text file.
• Copy studies to CDs and DVDs along with an
Onboard Viewer that displays the studies on
Windows PCs.
• Transfer studies to a remote PC from a PC
running ShowCase Image Center.
You can pair both ShowCase Basic and ShowCase
Premier with ShowCase Connect to add DICOM
connectivity that transfers studies from imaging
machines or PACS servers to your PC. For more
information on ShowCase Connect, see chapters
12-15
of this guide.
DICOM Conformance
A full DICOM Conformance Statement for ShowCase
Connect and the media exchange features in ShowCase
Basic and Premier is available on our web site
www.TrilTech.com .
Recommended System Requirements
Displaying large medical images can require large
amounts of memory. ShowCase performance depends
on the type of image you display and your computer’s
memory size, disk space, and processor speed. We
recommend the following as a minimum system
specification:
•2 GB RAM
• 2 GB (10 GB for long-term storage) free disk
space
• Pentium IV Processor
• High-quality monitor that supports True Color
(24-bit or 32-bit color). You may want to consult
ShowCaseUserGuide.book Page 7 Wednesday, May 15, 2013 12:59 PM
9
Installation Instructions
If you have an earlier version of ShowCase installed on
your computer, you should uninstall it before continuing.
Follow these instructions to install ShowCase:
1. Depending on the medium you received, do one of
the following:
• Insert the installation CD into your desktop or
laptop CD reader.
• Insert the flash drive into a USB port.
In either case, Windows Explorer may open with a
list of files on the flash drive or CD, or a window will
appear requesting what to do. Select Open folder to
view files to open Windows Explorer.
2. Double-click the file called ShowCaseInstall.
3. Follow the instructions in the installation program.
4. Reboot your system if asked to do so, otherwise you
may run ShowCase immediately.
5. If you are installing ShowCase Connect at the same
time, refer to configuration instructions provided in
Chapter 12 for setting up your DICOM network
communication parameters.
6. See the separate instructions that came with your
license key for information on licensing ShowCase.
Note that if your license information came in an
email, you may wish to copy the email text to the
clipboard (
C
+C) so that you can easily paste it into
the ShowCase license dialog using the Auto-Fill
button provided in the dialog.
The installation CD or flash drive is also a DICOM disk
that includes sample images.
Updates to ShowCase software are available on our
web site
www.TrilTech.com.
ShowCaseUserGuide.book Page 9 Wednesday, May 15, 2013 12:59 PM
10
Technical Support
This user guide gives you step-by-step instructions for
common tasks. All versions of ShowCase also include
online Help (see Help menu). You can visit our web site
www.TrilTech.com for answers to frequently asked
questions, supplementary user information and the
latest update to this guide.
If you have additional questions or need help running
ShowCase, email
Trillium Technology, Inc.
Ann Arbor, MI
www.TrilTech.com
ShowCaseUserGuide.book Page 10 Wednesday, May 15, 2013 12:59 PM
11
CHAPTER 3
Basic Image Viewing
Setting Viewing Preferences
The first time you run ShowCase, follow these steps to
set your viewing size preference and default double-click
behavior:
1. Select Preferences from the Edit menu to set the
default viewing behavior on your machine.
2. Set the preferred image size. Common choices are:
• One-up with clip autoplay—shows images at
full size, one at a time with clips auto-playing as
soon as they display.
• Thumbnail—displays as many study images as
possible on the screen. You can then double-
click to enlarge images of interest.
• Medium size images—shows ultrasound images
at familiar quarter size.
3. You can determine what image tools ShowCase
displays when you double-click an image. In the
Double-click Behavior group box, select one of the
following options:
• Full Resolution Image Only—Select this option
if you normally want to view the image without
the distraction of tools.
• Window/Level Tools—Use this option if you
normally use double-click to adjust contrast.
• Annotation Tools—Select this option if you
frequently use ShowCase to prepare images for
presentations or research and want to annotate
or paint out patient information.
ShowCaseUserGuide.book Page 11 Wednesday, May 15, 2013 12:59 PM

12
• Measurement Tools — Select this option if you
frequently perform measurements on images
• DICOM Info Display Only (no image)—Select
this option to view DICOM information for the
image.
4. Select the Apply Window/Level Settings to all
images in Series check box if you want changes
made to a whole series instead of an individual
image.
5. Select the Always auto-start clips check box if you
want clips to play automatically as soon as they are
displayed.
6. Click OK to close the dialog.
Selecting a Study to View from a DICOM Disk
When you start ShowCase, the software looks at all
volumes on your computer to see if they include a
DICOM Directory. ShowCase should find all DICOM
formatted CDs, MODs, or DVDs that are available on your
machine.
Note: When you first insert a new CD or MOD you may
need to wait a few seconds for ShowCase to find
the disk.
Each DICOM volume available on your machine appears
as a tab in the Directories window. Click the tab of the
directory to view the study list.
ShowCaseUserGuide.book Page 12 Wednesday, May 15, 2013 12:59 PM

13
Viewing an Image File That is in DICOM Format
If you have DICOM formatted images that are not
organized in a DICOM directory, you can view them
using the browse button.
Use the browse window to point to the folder full of files
to view. If you have a single DICOM file, use the File
menu option Browse to DICOM File to find and select
the file.
Navigating Through a Series of Images
ShowCase organizes images by DICOM Series. When
there are multiple images in a series, you can position
the vertical scroll bar to move through the images. Or
you can use keyboard keys (
u
,
d
,
U
&
N
) to step
through images and the
H
and
n
keys to jump to the
beginning and end of the series.
Note: You can stop and start clips by right clicking on
the clip. This may be easier than using the start
button on the clip controller.
Selecting a New Study
When you have finished looking at a study and want to
move to a new study, you can close the current study or
leave it open to compare to another study. To close a
study either:
• Click the window close button (x) in the upper-
right hand corner of the window.
• Select Close Series from the File menu.
ShowCaseUserGuide.book Page 13 Wednesday, May 15, 2013 12:59 PM

14
To open a new study (whether or not you close the
previous one), follow these steps:
1. Click the Select Study button to select another
patient study or series of images.
2. Select the study you want from the list.
3. Click the Show button (or double-click the study in
the list).
Navigating Through Several Open Studies/Series
If you have more than one series window open, you can
navigate through the series windows by using the Next
and Prev buttons on the toolbar.
Comparing Studies
You can also view two studies next to each other in
Compare mode. Click on the Window menu to select a
method for arranging the Series windows. You can
compare left/right or top/bottom.
Contrast/Brightness
Double-click the image and if necessary, select the
Contrast/Brightness tab to adjust the window, level, or
gamma correction.
To apply the same settings to all of the images in the
series, select the Apply to All check box. If you export an
ShowCaseUserGuide.book Page 14 Wednesday, May 15, 2013 12:59 PM

15
image (AVI or BMP for example), the exported image
will keep the contrast settings.
Changing the Size of Displayed Images
If you want to change the size of images you are
displaying in the main window, click the toolbar size
button to cycle through available sizes, or use the size
drop-down to select a new viewing size. Click the arrow
next to the size button to display a drop-down menu
that shows all possible settings (see image on next
page). You can press the F9 key to toggle between
thumbnail size and full size with autoplay.
Apply to All
check box
ShowCaseUserGuide.book Page 15 Wednesday, May 15, 2013 12:59 PM

16
Select Preferences from the Edit menu to change the
default size. You can set a separate default size for
ultrasound images (US), cath images (XA), and all “Other
Modalities.”
Exporting, Making Slides, Annotating and Cropping
Images, etc.
The ShowCase Export button allows you to export
images in BMP, TIFF, JPG and AVI formats for
presentations and teaching files. As of ShowCase release
5.1 you can also export images in formats compatible
with iPhone and Blackberry devices and set up to store
the images directly to your “sync” directory. See
www.triltech.com for the latest Quick Guide
instructions.
See subsequent chapters for instructions on editing and
exporting.
ShowCaseUserGuide.book Page 16 Wednesday, May 15, 2013 12:59 PM
17
CHAPTER 4
Structured Reports
Viewing Measurements in Structured
Reports
ShowCase lets you view measurements and calculations
performed on ultrasound systems that transfer the
information in DICOM Structured Report files. In the
Series view of ShowCase study lists, the modality is
usually listed as SR for a series that contains a structured
report.
If your directory window is set to list Studies (instead of
Patients or Series) and you select a study that contains
both images and structured report data, one or more
structured report windows may open in addition to the
image window. If a study includes a structured report,
ShowCaseUserGuide.book Page 17 Wednesday, May 15, 2013 12:59 PM

18
you can switch to that window using the Structured
Report Data button found on the toolbar.
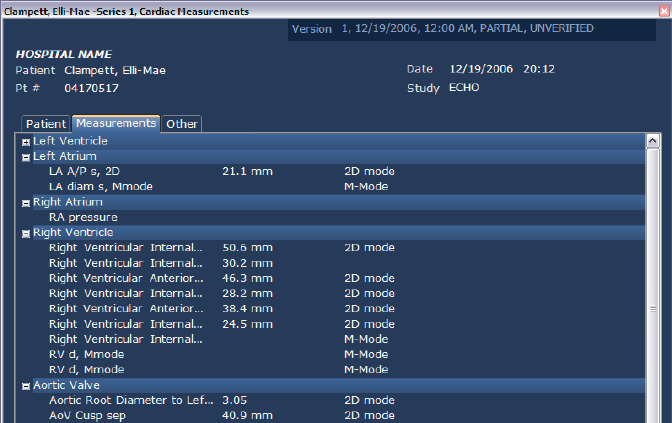
Structured Report windows have a heading that shows
the patient name and number, institution name, date of
the study, and study type. The type of structured report is
shown in the window title. Data is divided into multiple
pages with tabs as shown below.
There is usually a Patient tab that shows patient
demographic information, a Measurement tab that lists
measurements and calculations, and an Other tab that
shows machine and manufacturer information. Other
tabs that may appear include Procedure, Data, or Wall
Scores.
Measurements are divided into sections such as Left
Ventricle and Left Atrium as shown above. To hide and
show the measurements belonging to a section, click the
bright blue section heading bar.
To view all of the information about a single
measurement, hover the mouse pointer over the
measurement. This displays an information box that
includes any additional information (anatomical
location, direction of flow, etc) stored with the
measurement.
You can export the displayed structured report
measurement data to a text file or spreadsheet using the
Export button at the bottom of the window.
Follow these steps:
1. Select the type of export desired.
2. Click the Export To button. This displays a standard
Windows Save As dialog.
ShowCaseUserGuide.book Page 18 Wednesday, May 15, 2013 12:59 PM

19
3. Choose a folder and filename, and then click OK.
Exporting to a text file produces a file that looks like this:
Exporting to a data file produces a file with a “.csv”
extension, and exports the data in comma-separated
values that can be read by a spreadsheet. The
spreadsheet created from the above example looks like
the following:
You can print the structured report screen display by
selecting Print from the File menu or using the Print
button at the bottom of the display.
You cannot edit the data in a structured report.
ShowCaseUserGuide.book Page 19 Wednesday, May 15, 2013 12:59 PM

20
If there are multiple versions of the same structure
report stored, you will see a drop-down selection box in
the upper right-hand corner of the window for selecting
the correct version.
A study can include multiple structured report files, for
example cardiac and vascular structured reports for the
same study.
Caution: ShowCase fully supports Ultrasound Vascular
and Ultrasound Cardiac Comprehensive Struc
-
tured Reports and all Basic Text Structured
Reports. Other Structured Reports are dis
-
played for your convenience, but measure-
ments are presented as found in the file
without optimized labeling and formatting.
Watch for the warning message at the top of
the page indicating a template that is not fully
supported.
ShowCaseUserGuide.book Page 20 Wednesday, May 15, 2013 12:59 PM
21
CHAPTER 5
Image Editing
Caution: Be careful about using Save and Save As after
editing jpeg compressed clips. If the pixels in
the clip are modified (annotated or erased)
the clip will be re-compressed and lose quality
every time it is saved (see
Chapter 1, Before
You Begin). When working with clips, try to
make all of your changes at one time and
Save only once. Keep a copy of your original
image in case you want to revert to the origi
-
nal image data later.
Processing Tools
This section describes common procedures that you can
use to modify images or studies.
Creating a New Custom Image Series
To create a new series of DICOM images from existing
images, follow these steps:
1. Select New Series from the File menu (or press
C
+N).
2. Copy and paste key images from existing studies
into the window. Paste them in the order that you
want them to display the next time you view them in
ShowCase. Images need not be from the same
patient or modality.
ShowCaseUserGuide.book Page 21 Wednesday, May 15, 2013 12:59 PM

22
Saving Studies
To save a study as a new series of images in a DICOM
directory, follow these steps:
1. Select the Save Series As… option in the File menu
to display the Save As a New Series dialog.
2. Make any desired changes to patient name, id
number, accession number, study description, or
series description.
3. If you are de-identifying the study, check the De-
identify recommended DICOM fields check box
(see
Chapter 6, De-Identifying Images). ShowCase
ShowCaseUserGuide.book Page 22 Wednesday, May 15, 2013 12:59 PM

23
deletes patient information from the image files to
assure that your data is anonymous even when read
with software that displays DICOM elements.
Note: Also see Removing Patient Identifying
Information in Image Pixels, below.
4. Select the Save Destination directory using the
drop-down, and then click Save.
Removing Patient Identifying Information in Image
Pixels
You can erase rectangular areas of an image to the
background color. Annotations & erasures apply to all
frames in a clip.
1. Double-click an image in the series to view it in an
edit window.
2. Click the Annotation tab.
3. Select the Erase Rectangle tool to erase the patient
information from the image.
4. Hold down the left mouse button and drag the
mouse to draw the rectangle over the area you want
to erase. The color of the rectangle assumes the
image color of the point in the upper-left corner of
the rectangle. You can use keyboard arrow keys to
nudge the rectangle up/down or right/left. You can
ShowCaseUserGuide.book Page 23 Wednesday, May 15, 2013 12:59 PM

24
also resize the rectangle using the grab handles on
the corners of the rectangle.
5. Add additional erase rectangles as desired.
6. To delete an erase rectangle (to make the underlying
pixels visible again), select the rectangle and click
the Delete or Delete All tool or the
D
key.
7. Double-click the image in the edit window to return
to the main ShowCase window.
Note: When you save palette color or grayscale
images with paint-out areas or annotations,
ShowCase converts them to RGB color
images.
Copying Erase Rectangles to Other Images
The patient name is often in the same place for all
images of a series. You do not have to erase the name
from each image separately. To erase multiple images
quickly, follow these steps:
ShowCaseUserGuide.book Page 24 Wednesday, May 15, 2013 12:59 PM

25
1. Erase one image as described in Removing Patient
Identifying Information in Image Pixels on page 23.
2. Hold down the control key and press the A key to
select ALL images, or press
C
+click on each image
you want to apply the erase rectangle.
3. Click the Duplicate Erase Rectangles button on the
toolbar to copy the erasure to all selected images.
Adding Text, Arrow, or Rectangle Annotations
You can add text or arrow annotations, or draw color
rectangles on images by following these steps:
1. In an Edit Window, click the Annotation tab.
2. Apply tools:
• Use the text Annotate tool to add text to the
image. You can select text font, size, and color.
• The Fill Rectangle tool is similar to the erase
rectangle in operation. It draws a rectangle of
selected color. (Fill Rectangles don’t duplicate
with the Duplicate Erase Rectangles tool.)
• Use any of the arrow tools to add arrows to the
image. You can select arrow colors, but not
arrow sizes.
3. Save the series or export the images. ShowCase
burns the annotations into the image on export or
save.
Cropping Images for Export
You can crop an image (static or clip) so that only the
defined area displays in the series window or exports to
the BMP, TIFF, JPEG or AVI export file. To crop an image,
follow these steps:
1. In an Edit Window click the Annotation tab.
ShowCaseUserGuide.book Page 25 Wednesday, May 15, 2013 12:59 PM

26
2. Click the Crop tool.
3. Hold down the left mouse button and drag the
mouse to draw the rectangle around the area you
want to export. You can use keyboard arrow keys to
nudge the rectangle up/down or right/left. You can
also resize the rectangle using the grab handles on
the corners of the rectangle.
4. When you export the image, ShowCase only exports
the area within the cropping rectangle.
Note: You can select the crop rectangle to resize or
delete it.
ShowCaseUserGuide.book Page 26 Wednesday, May 15, 2013 12:59 PM

27
Setting Clip Margins and Frame Rate
You can set left and right margins for a clip. These
margins define the starting and ending frames. To set the
margins, follow these steps:
1. Double-click a clip to view it in an Edit Window. The
clip controller at the bottom of the window has
buttons to set the right and left margins of the clip.
2. Use the frame rate drop-down menu to set the
frame rate for clip playback.
When you export the clip to an AVI file, ShowCase only
exports the frames between the margins. The frame rate
exports with the clip.
Margin Buttons
Frame Rate Drop-Down
Clip
Controller
ShowCaseUserGuide.book Page 27 Wednesday, May 15, 2013 12:59 PM
28
Save and Export Options
After you process your images, you can save them in
DICOM format or export them in common export
formats. Select one of these options from the File menu:
• Save — overwrites current DICOM files
• Save Series As... — writes a new DICOM series
• Export Image As... — exports selected images to
AVI (clips); BMP, TIFF, or JPEG (static images).
You can check a box that automatically creates a
PowerPoint slide with your exported AVI file or
static image in the center of the slide.
Note: Before saving JPEG compressed DICOM images,
see note on
page 2 about possible loss of image
quality.
• Export Image to PowerPoint Slide— exports
selected images as ShowCase windows running
on PowerPoint slides. This leaves the images in
DICOM format and gives access to ShowCase
editing tools right on the slide (see
Chapter 8,
Exporting Images into PowerPoint on page 43).
Note: AVI compression — For AVI exports, you can
select a compression method from a list of
compressors available on your computer.
Uncompressed AVI files are extremely large.
Microsoft Video 1, Indeo, and Cinepak are
commonly available compressors. If you intend
to play your AVI files on a Macintosh® computer,
test one of your AVI files to make sure the
Macintosh has a compatible decompressor. The
Cinepak decompressor works on most
computers.
ShowCaseUserGuide.book Page 28 Wednesday, May 15, 2013 12:59 PM
29
Creating Standard DICOM Disks for Demo Disks,
Libraries, Referrals
Use Create New DICOM Directory from the File menu
to create a new DICOM directory on any re-writable
media (external disk, flash drive, MOD) or in a
designated folder. Use Save As or Copy your prepared
studies to the appropriate directory. (See
Chapter 9,
Burning Studies to CD or DVD on page 47 for directions
on making CDs and DVDs.)
ShowCaseUserGuide.book Page 29 Wednesday, May 15, 2013 12:59 PM
30
ShowCaseUserGuide.book Page 30 Wednesday, May 15, 2013 12:59 PM

31
CHAPTER 6
De-Identifying Images
ShowCase provides you with tools to help de-identify
DICOM images to use in teaching files and research
studies. It is increasingly common to employ such tools
with the advent of Privacy Standards in the Health
Insurance Portability and Accountability Act (HIPAA).
Removing Patient Identifying Information Burned
into an Image
You can erase rectangular areas of an image to the
background color. Erasures apply to all frames in a clip.
1. Double-click an image in the series to view it in an
edit window.
2. Click the Annotation tab.
3. Select the Erase Rectangle tool to erase the patient
information from the image.
ShowCaseUserGuide.book Page 31 Wednesday, May 15, 2013 12:59 PM

32
4. Hold down the left mouse button and drag the
mouse to draw the rectangle over the area you want
to erase. The color of the rectangle assumes the
image color of the point in the upper-left corner of
the rectangle. You can use keyboard arrow keys to
nudge the rectangle up/down or right/left. You can
also resize the rectangle using the grab handles on
the corners of the rectangle.
5. Add additional erase rectangles as necessary.
6. To delete an erase rectangle (to make the underlying
pixels visible again), select the rectangle and click
the Delete or Delete All tool or the
D
key.
7. Double-click the image in the edit window to return
to the main ShowCase window.
Note: When you save palette color or grayscale
images with paint-out areas or annotations,
ShowCase converts them to RGB color
images.
Copying Erase Rectangles to Other Images in the
Series
To erase the same area in multiple images in a series,
follow these steps:
1. Hold down the control key and press the A key to
select ALL images, or press
C
+click on each image
you want to apply the erase rectangle.
2. Click the Duplicate Erase Rectangles button on the
toolbar to copy the erase rectangle to all selected
images.
ShowCaseUserGuide.book Page 32 Wednesday, May 15, 2013 12:59 PM
33
Erasing Identifying Information in DICOM Elements
in Image Headers
Image header information can include patient names,
patient numbers, birth dates and other identification.
This is good for transferring vital clinical information, but
you need to remove this data when you use the file for
an anonymous teaching file or research file.
ShowCase can remove most of the identifying
information, while leaving information that might be
needed for clinical research.
To save an image series with identifying information
removed, follow these steps:
ShowCaseUserGuide.book Page 33 Wednesday, May 15, 2013 12:59 PM

34
1. Select the Save Series As… option in the File menu
to display the Save As dialog.
2. Make any desired changes to patient name, ID
number, accession number, study description, or
series description.
3. Check the De-identify recommended DICOM fields
check box to remove other identifying information
from the images.
4. You can decide whether to also remove physician
names (for example, referring physician).
ShowCaseUserGuide.book Page 34 Wednesday, May 15, 2013 12:59 PM

35
5. Click Save.
• Height and Weight are not removed by the
de-identify operation due to research needs.
• Birth date and time ARE removed, but
ShowCase calculates Patient Age (if missing) for
research purposes. It calculates age in years for
patients greater than 3 years old, months for
patients greater than 3 months old, and days for
patients less than 3 months old. Ages are
capped at 80 years old.
• Study ID is replaced with a new value.
• Study Date is replaced with the current date.
The table below lists standard DICOM elements that
ShowCase removes from image headers.
DICOM Element Name
DICOM
Group
DICOM
Element
PatientBirthDateElement 0x0010 0x0030
PatientBirthTimeElement 0x0010 0x0032
OtherPatientIDsElement 0x0010 0x1000
OtherPtNameElement 0x0010 0x1001
PtAddressElement 0x0010 0x1040
PtMothersNameElement 0x0010 0x1060
PtMilitaryRankElement 0x0010 0x1080
PtMilitaryBranchElement 0x0010 0x1081
PtRecordLocatorElement 0x0010 0x1090
PtTelephoneElement 0x0010 0x2154
PtOccupationElement 0x0010 0x2180
PtHistoryElement 0x0010 0x21B0
ShowCaseUserGuide.book Page 35 Wednesday, May 15, 2013 12:59 PM

36
If Leave Physician Names is unchecked, ShowCase
removes the following elements.
Warning: Using the ShowCase de-identify check box
does not guarantee that all patient identifi
-
cation is removed from the image.
• If the imaging equipment manufacturer
encodes identifying information in
DICOM elements that are not part of the
DICOM defined standard fields, that is,
in private elements, ShowCase does not
know about them. You can read these
DICOM elements for an image using the
ShowCase DICOM Information tab.
(Double-click an image to view the edit
window. Then, click the DICOM Informa
-
tion tab). This tab lists DICOM elements
embedded in the image header.
PtCommentsElement 0x0010 0x4000
DICOM Element Name
DICOM
Group
DICOM
Element
RefPhysElement 0x0008 0x0090
RefPhysAddress 0x0008 0x0092
RefPhysTelephoneNumber 0x0008 0x0094
PhysicianOfRecordElement 0x0008 0x1048
PeformingPhysicianElement 0x0008 0x1050
ReadingPhysicianElement 0x0008 0x1060
OperatorsNameElement 0x0008 0x1070
DICOM Element Name
DICOM
Group
DICOM
Element
ShowCaseUserGuide.book Page 36 Wednesday, May 15, 2013 12:59 PM
37
• You must evaluate the level of security
you need for your images. To accommo
-
date research uses, ShowCase does not,
for example, remove the institution and
equipment description, which might be
used by a knowledgeable person to
map the image to a specific patient. If
you really need 100% assurance that
others cannot trace patients, you should
save the image in a non-DICOM format
such as a bitmap or AVI file.
ShowCaseUserGuide.book Page 37 Wednesday, May 15, 2013 12:59 PM
38
ShowCaseUserGuide.book Page 38 Wednesday, May 15, 2013 12:59 PM

39
CHAPTER 7
Making AVI Files from
DICOM
Clips
ShowCase lets you make DICOM multi-frame images
into customized AVI files. Before export, you can margin,
crop, annotate, or adjust contrast and gamma. You can
select the AVI compressor method and the compression
quality setting to fit your imaging needs.
To make AVI files, follow these steps:
1. Get the studies from the imaging equipment onto
your ShowCase computer, and display them. You
can transfer images from CD or MOD or copy them
to a network folder that your ShowCase machine
can access.
For more details about selecting studies or browsing
to image files, see
Selecting a Study to View from a
DICOM Disk on page 12 and Viewing an Image File
That is in DICOM Format on page 13.
2. Remove patient information from images if
necessary. Follow these steps:
a. Double-click one clip in the series to view it in
an edit window.
b. Click the Annotation tab and erase the patient
name from the image using the Erase Rectangle
tool.
c. Double-click the image to close the edit window.
For more details, see Removing Patient Identifying
Information in Image Pixels on page 23.
ShowCaseUserGuide.book Page 39 Wednesday, May 15, 2013 12:59 PM

40
To erase the same area in multiple images in a
series, follow these steps:
a. Hold down the
C
key and click on A to select all
images, or press
C
+click on each image that
has pixels you want to erase.
b. Click on the Duplicate Erase Rectangles button
to copy the erase rectangle to all selected
images.
For more details, see Copying Erase Rectangles to
Other Images on page 24.
3. Margin and crop the clip if necessary. Follow these
steps:
a. Double-click on the image to view it in the Edit
window.
b. Use the tools on the Annotation tab to do any of
the following:
• Set the right and left margins using the
buttons on the bottom-right of the clip
controller.
• Set the frame rate using the drop-down
selection list on the bottom-right of the
clip controller.
• Draw a cropping rectangle on the clip as
needed.
For more details, see Cropping Images for Export on
page 25 and Setting Clip Margins and Frame Rate
on page 27.
4. After processing, select one or more clips and click
Export using one of these techniques:
• If you are in the Annotation tab of an Edit
window you can click the export button to
export the current image.
ShowCaseUserGuide.book Page 40 Wednesday, May 15, 2013 12:59 PM

41
• From a series window, select (click on) the
image(s) to export and then click the Export AVI
button or select Export Image As… from the
File menu.
If you are viewing a Stress Echo study in a stress
layout, the images are made into a single multi-
image AVI file that synchronizes all images in the
stage or view.
5. Make the following selections in the Export Image
dialog:
a. Select AVI as the Export File Type.
b. Select the compression method.
• When you create an AVI file, you can select a
compression method for the file. Compression
methods offered are different for each computer.
Three common compressors are Microsoft Video
1, Indeo and Cinepak. Cinepak is known for
working well on multiple platforms. The Trillium
web site
www.TrilTech.com has more
information about compressors.
• After ShowCase writes the AVI files, you can use
them in slidemaker programs or view them in
Quicktime
®
Player or Windows MediaPlayer™.
AVI files usually run well on both Windows and
Mac computers.
c. If desired, change the filename or path. You can
type in the field or click the Browse... button to
navigate to a desired directory.
6. You can optionally put the AVI movie on a
PowerPoint slide.
• Select the Put images on PowerPoint Slides
check box in the Export Images dialog. This
automatically puts your new AVI files on
PowerPoint slides.
7. Cl i c k Export to save the AVI file.
ShowCaseUserGuide.book Page 41 Wednesday, May 15, 2013 12:59 PM
42
ShowCaseUserGuide.book Page 42 Wednesday, May 15, 2013 12:59 PM

43
CHAPTER 8
Exporting Images into
PowerPoint
With ShowCase, you can use Windows ActiveX
technology to display DICOM formatted images at
original resolution on slides in PowerPoint. Images play
inside a ShowCase control so that you have ShowCase
editing tools to use while you design your presentation.
Note: To show images in ShowCase Windows in
PowerPoint you must have ShowCase installed
on the computer that runs the presentation.
To export images directly to PowerPoint, follow these
steps:
1. Process images in ShowCase as usual:
• You may wish to remove names, margin clips, or
crop images in ShowCase. Work in ShowCase if
you want to use Save or Save As after
processing. You can wait and process the images
in your PowerPoint presentation if you prefer,
but you can’t save your modifications to an
independent DICOM file.
2. Select and export images:
• If you are in a ShowCase edit window, you can
click the Export to Slide button to export the
current image to PowerPoint.
• If you are in a series window, you can click on
one or more images to select them (hold down
the
C
key to select multiple images). Then click
the Export to Slide button on the toolbar, or
select Export Image to PowerPoint Slide from
the File menu.
ShowCaseUserGuide.book Page 43 Wednesday, May 15, 2013 12:59 PM
44
• If you have a PowerPoint presentation open
ShowCase will add slides (one per image
exported) to the end of the presentation. The
images will be centered in the slides, usually at
full resolution size.
• If you do not have a PowerPoint presentation
open, ShowCase will open a new presentation
and create slides with images centered on the
slides.
3. Adjust your images in PowerPoint:
• If necessary, add titles to your slides or move the
image as you would any slide object.
• You must run the presentation to access
ShowCase editing tools for your images.
• When you run the presentation, images display
in ShowCase windows.
• If the image is a clip, ShowCase makes the clip
controller available. You can play, stop, single
step, or speed up / slow down the clip. Also, you
can stop and start the clip with either a single
left-click or a single right-click on the image.
• To access editing tools, double-click the image to
display the ShowCase edit window. You can
adjust brightness & contrast, crop, margin, erase
names, etc.
• While you are in the edit window you will see a
PowerPoint tab that accesses image appearance
settings. They allow you to decide whether to
automatically or manually start clips, whether to
show the image label, clip controller or image
frame, and whether to synchronize multiple clips
on the same slide.
ShowCaseUserGuide.book Page 44 Wednesday, May 15, 2013 12:59 PM

45
4. Save your presentation:
• When using PowerPoint 2007 or newer, you
must save the presentation as a .ppt file. The
newer .ppx compressed format doesn’t support
ShowCase ActiveX controls.
• When you save your presentation, ShowCase
images and all of their presentation settings are
saved in the presentation.
Exporting an Image from a PowerPoint Slide
You may have noticed that the ShowCase Export button
is available in PowerPoint. There are two reasons that
you may want to export an image from it’s DICOM
format in PowerPoint:
• If your presentation is getting too large to store
and run efficiently, you might make some of
your longer clips smaller by cropping them,
margining them, and then saving them as
compressed AVI files.
• You might want to put slides in a presentation
that can play on a computer that does not have
ShowCase, for example, to send the
presentation to a colleague. If ShowCase is not
installed on the computer, the recipient cannot
display ShowCase images. The recipient of the
presentation either needs to install ShowCase,
or you need to convert and replace the
ShowCase images as BMP and AVI files.
To export images, follow these steps:
1. Double-click the image to display it in the edit
window.
2. Click the export button to save the current image in
bmp, TIFF, JPEG, BMP or AVI format.
ShowCaseUserGuide.book Page 45 Wednesday, May 15, 2013 12:59 PM
46
Tips for Displaying Images in PowerPoint
• We recommend turning off auto-save in
PowerPoint. Manually Save your work often
instead. If your presentation gets large, saving
takes time and auto-save can interrupt at
inconvenient times.
• If your presentation gets too large, you may want
to convert very long clips to compressed AVI
files. Crop and margin the clips to further reduce
size.
ShowCaseUserGuide.book Page 46 Wednesday, May 15, 2013 12:59 PM

47
CHAPTER 9
Burning Studies to CD or DVD
With ShowCase Premier, you can quickly write studies to
CDs or DVDs. The technique you use depends on the
version of Windows you have on the computer running
ShowCase Premier. In either case, you can include a
ShowCase Onboard Viewer on the CD or DVD.
Burning CDs or DVDs
ShowCase Premier interacts directly with built-in CD and
DVD burning capability in Windows.
Note: Windows XP and Vista don’t have built-in DVD
burning (see
Copying Studies to DVD or CD
Staging Folder on page 49).
To copy studies to CD or DVD use the following steps.
1. From the ShowCase Directories window, select (click
on) the studies that you want to copy to a CD or
DVD.
2. Click the Burn CD button. This displays the Burn CD
or DVD dialog.
ShowCaseUserGuide.book Page 47 Wednesday, May 15, 2013 12:59 PM

48
3. You can check the box that says Include Viewer.
Uncheck the box if you do not want a viewer
included.
4. Click the Burn Now button to burn the CD
immediately, or click the Copy - Burn Later button
to copy the study to the Windows CD Burn staging
folder without burning the CD.
5. If you did not burn the CD immediately, you can click
on the CD Burning tab to see the studies waiting to
be burned to a CD or DVD. You can delete a study
from this list at any time. When you copy additional
studies to a CD or DVD, they are added to this list.
TAKE NOTE of the current size (in MB) of the studies
in the CD Burning list that appears above this study
list. Make sure that this number is less than the
capacity of the CD or DVD that you are using. Delete
studies if necessary.
ShowCaseUserGuide.book Page 48 Wednesday, May 15, 2013 12:59 PM

49
6. If you did not burn the CD immediately, you can click
the Burn CD button to start the burn.
7. The CD Burn Wizard finishes producing the CD and
then ejects the CD for you.
Caution: Do not add studies to a used CD that already
has studies on it. Results are unpredictable.
Make a new CD and copy all studies at once.
Copying Studies to DVD or CD Staging Folder
If your computer operating system does not have the
integrated CD burning wizard enabled or you want to
burn DVDs on a computer with Windows XP or Vista, you
need to use the software that came with your CD or DVD
drive (for example, Roxio CD & DVD Creator or Nero). To
set up your system to burn CDs or DVDs from Showcase,
follow these steps:
1. Using Windows Explorer, create a folder on your
computer to use as your CD or DVD Burning folder —
ShowCaseUserGuide.book Page 49 Wednesday, May 15, 2013 12:59 PM

50
a staging folder for studies that you will write to CD
or DVD.
Note: Be sure that you have enough disk space on
your hard disk to store the temporary files
that are created during the CD or DVD
writing process. For a standard CD, you’ll
need up to 700 MB of the available free
space. For a high-capacity CD, you’ll need
up to 1 gigabyte (GB) of the available free
space. For DVDs, you’ll need 5
GB.
2. Run ShowCase. Select a study and click the Burn
CD/DVD button. This displays the Burn CD or DVD
dialog.
3. If you haven’t selected the staging folder created in
Step 1, use the Browse button below the Staging
Folder field to select your CD or DVD burning folder.
Note: Once you have selected this folder,
ShowCase remembers it's location.
4. Click the Copy button to add the study to the staging
folder.
5. After you have copied all required studies to the
staging folder, you need to use your CD or DVD
ShowCaseUserGuide.book Page 50 Wednesday, May 15, 2013 12:59 PM
51
burning software to burn the contents of the staging
folder to a CD or DVD.
6. You must manually empty the staging folder after
the burning software completes and the CD or DVD
ejects. Select all studies in the study list for the
staging folder, and use the ShowCase Delete button
to remove the studies.
Warning: Do not add studies to a CD or DVD that
already has studies on it. Results are unpre
-
dictable. Make a new disk and copy all stud-
ies at once.
ShowCaseUserGuide.book Page 51 Wednesday, May 15, 2013 12:59 PM
52
ShowCaseUserGuide.book Page 52 Wednesday, May 15, 2013 12:59 PM

53
CHAPTER 10
Making Measurements
With ShowCase, you can make distance, circumference,
and area image measurements. In addition, a line tool
provides standard measurements on Doppler and M-
mode ultrasound regions. These are temporary
measurements that do not get saved with the image
when you close the image series. If you save the series
(select the Save Series As… option in the File menu in
the main ShowCase window), the measurement
outlines and labels are burned into the image and
appear like other annotations. You will not be able to
select or change the measurements once they are
burned into the image.
Using the Measurement Tools
To use the measurement tools, do one of the following:
• Double-click an image in the series to view it in
an edit window, and then click the
Measurements tab.
• Select the image in the series, and then click the
Image Tools button.
ShowCaseUserGuide.book Page 53 Wednesday, May 15, 2013 12:59 PM

54
Either approach displays the image with a palette of
measurement tool buttons along the left side of the
window.
Measurement Tools
There are measurement tools that let you draw straight
lines, ellipses, and enclosed, free-hand outlines. The
following sections describe how to use these
capabilities.
Line Tool
The Line tool lets you draw measurement lines on the
image. In most cases, this represents a distance
measurement.
For ultrasound images with regions, ShowCase
calculates the following values:
• 2D region: Distance, the length of the line in cm.
Current
Measurement
Measurement
Tools
ShowCaseUserGuide.book Page 54 Wednesday, May 15, 2013 12:59 PM

55
• M-mode region, vertical line: Length of the line
in cm.
• M-mode region, non-vertical line:
• Vertical length of the line in cm.
• dT – Elapsed time in sec between the
left most point and the right most point.
• Velocity in m/sec (the slope of the line).
• Spectral Doppler region of a Cardiac study
image:
• dV – Change in velocity between the
end points of the line in m/sec
• dT – Change in time between the end
points of the line in sec
• VP – Peak velocity in m/sec
• V2 – Velocity at the second end point in
m/sec
• Decel Time – Deceleration time in msec
• P½T - Pressure half-time in msec
• dP – Pressure gradient in mm HG
• Spectral Doppler region of a Vascular study
image:
• V1 – Velocity at the first point in m/sec
• V2 – Velocity at the second point in
m/sec
• RI – Resistivity index (MaxV-MinV)/MaxV
• S/D – Systolic to diastolic ratio V1/V2
• dV – Change in velocity in m/sec
• dT - Change in time in sec
To use the Line tool, follow these steps:
1. Select the Line tool.
2. Click the first endpoint.
3. Click or drag to the second endpoint.
ShowCase displays a series of measurement values
adjacent to the line. You can reposition the values by
ShowCaseUserGuide.book Page 55 Wednesday, May 15, 2013 12:59 PM

56
dragging the rectangle to a different location. You can
also reposition each of the endpoints by dragging them.
Note: If there is a spectral Doppler region in an
ultrasound image, a box appears in the bottom
left area of the window that allows you to select
whether to display Cardiac, Vascular, or other
Doppler measurement values. The Cardiac and
Vascular measurement values are shown above.
ShowCase remembers your selection for
subsequent measurements.
Ellipse Measurement
The Ellipse tool lets you measure the area or perimeter
of an elliptical area on the image. To measure an
elliptical area or perimeter, follow these steps:
1. Select the Ellipse tool.
2. Click a location on the image.
3. Drag the mouse pointer down the major axis of the
ellipse.
4. Release the mouse button. ShowCase displays the
area and perimeter of the ellipse.
Freehand Area Measurement
The Freehand Area tool lets you measure the area or
perimeter of a region of interest on the image. To
measure an area and perimeter, follow these steps:
1. Select the Freehand Area tool.
2. Click a location on the image. Do any combination of
the following to define the shape of the area:
• Drag the mouse pointer (keep the mouse button
pressed) to create a freehand border.
ShowCaseUserGuide.book Page 56 Wednesday, May 15, 2013 12:59 PM

57
• Release the mouse button and click at another
location in the image to create a straight line
from the previous point to the new point.
Continue with any combination of straight lines
(mouse button released between points) and
freehand lines (mouse button pressed). You
may need to double-click on the last point to
close the border.
3. When the shape is closed, showCase displays the
area and perimeter of the enclosed space.
Spectral Doppler Trace Measurement
The Spectral Doppler Trace tool lets you trace a Doppler
wave on ultrasound images that include a spectral
Doppler strip. To perform a Doppler trace measurement,
follow these steps:
1. Select the Doppler Trace tool if it is enabled.
2. Click and drag or click single points along a tracing
that represents one cardiac cycle from begin systole
to end diastole. For accurate results, do not cross
time discontinuities or trace multiple cycles. Do not
include the baseline.
3. When the trace is complete ShowCase displays:
• For Cardiac studies — Velocity Time Integral
(VTI), Max Velocity in m/sec, Mean Velocity in
m/sec, Peak Gradient in mmHg, Mean Gradient
in mmHg.
• For Vascular studies — Peak Systolic Velocity in
m/sec, End Diastolic Velocity in m/sec,
Acceleration Time in sec, Resistivity Index,
Systolic/Diastolic Ratio, Velocity Time Integral
(VTI).
ShowCaseUserGuide.book Page 57 Wednesday, May 15, 2013 12:59 PM

58
Changing the Color or Label of a Measurement
To change the color of a measurement or to modify the
label, first select the measurement by clicking on it in the
image.
Then, use the Color drop-down to display a color
selection pallette, and then select the desired color from
the choices displayed.
To modify the measurement label, type the new text into
the Meas Label field.
Deleting a Measurement
To delete a measurement object, follow these steps:
1. Select the object by clicking the object on the image.
2. Click the Delete button.
Adjusting Measurements
Until you close or perform a Save As (select the Save
Series As… option in the File menu in the main
ShowCase window), the measurements you make are
active and available for editing. To edit a measurement,
follow these steps:
1. Open the measurement tools (See Using the
Measurement Tools on page 53).
2. Select a measurement object by clicking the object
on the image.
3. Select one of the points used to define the object,
and drag it to the desired position.
Note: If the image does not include calibration
information, distances and areas are reported in
pixel units. You can use the Calibrate button
(
See Calibrating Measurements on page 59) to
ShowCaseUserGuide.book Page 58 Wednesday, May 15, 2013 12:59 PM

59
calibrate the image if you have sufficient
information to calibrate.
Caution: Measurements made in ShowCase are not
added to or used for calculations with the
“structured report” data sent from the ultra
-
sound machine. ShowCase measurements are
deleted when the window is closed.
Calibrating Measurements
Generally, the ultrasound system provides calibration
information for images. If, however, an image doesn’t
include calibration information, ShowCase provides the
ability for you to manually calibrate the image. To
calibrate, follow these steps:
1. Select the Distance button and trace a known
distance on the image.
2. ShowCase displays the length in pixels.
3. Click the Calibrate button. This displays the Image
Calibration dialog.
4. Enter the known length in centimeters in the Length
field.
5. Click OK.
This calibration remains in effect until the series is closed
or saved. To change the calibration, simply create a
distance measurement or select a measurement line,
and then click the Calibrate button again.
Reviewing and Exporting Measurements
ShowCase lets you review measurements on all images
in a series in one window. You can then export this
measurement list to a text file or data spreadsheet file as
comma-separated values (.CSV file).
ShowCaseUserGuide.book Page 59 Wednesday, May 15, 2013 12:59 PM

60
Reviewing Measurement Data
To review measurements, simply click the Information
button on the main ShowCase window toolbar. This
displays the Series and Study Information dialog.
This dialog provides summary information about the
series at the top. It includes a Temporary Measurement
Data list that shows measurements on all images; and it
includes a Measurement Image window that shows the
image related to the selected measurement.
ShowCaseUserGuide.book Page 60 Wednesday, May 15, 2013 12:59 PM

61
Exporting ShowCase Measurement Data
To export measurements made in ShowCase to a text file
or data spreadsheet file, select the type of export
desired, and
then click the Export To button. This
displays a standard Windows Save As dialog that lets you
choose a folder and filename.
Exporting creates a text file with information similar to
the following:
Name: Pediatric, Echo
Pt Number: HP_EXAMPLE
Study Date: 02/23/2000
Displayed Study: PEDIATRIC
Study Comments:
Series Number: 1
Series Description: MURMUR, R/O VSD
Number of Images: 6
Image 2
1-Length = 8.17 cm
Image 3
1-Length = 3.98 cm
2-Area = 2.61 cm2
Image 4
1-Area = 17.74 cm2
ShowCaseUserGuide.book Page 61 Wednesday, May 15, 2013 12:59 PM
62
ShowCaseUserGuide.book Page 62 Wednesday, May 15, 2013 12:59 PM

63
CHAPTER 11
Transfering Studies from a
ShowCase Image Center
This chapter is for sites that have the ShowCase Image
Center product running in their main clinic. (See
www.triltech.com for information on the Image Center
product.)
ShowCase Premier running on a remote PC can be
configured to communicate with your Image Center to
transfer studies from the main clinic to the remote PC.
Configuring ShowCase Premier to
Communicate with Your Image Center
To configure ShowCase Premier to communicate with a
ShowCase Image Center, follow these steps:
1. On the ShowCase Edit menu, click Image Center
Settings.
In the Image Center Settings dialog, first turn Image
Center access ON with the Enable Image Center
Access button in the upper right corner of the
screen:
2. Click the Add button to add the communication
information for your Image Center.
3. Enter the name for your Image Center in the Name
field. It can be any name you like.
4. Add the Image Center machine's IP address in the
Address field.
5. Enter the Port to use (default is 8080).
ShowCaseUserGuide.book Page 63 Wednesday, May 15, 2013 12:59 PM

64
6. Enter your User Name and Password on the Image
Center PC.
In most situations communication is over a Virtual
Private Network (VPN) to assure the privacy of patient
data. If you would like to configure ShowCase to
automatically reconnect to the VPN when needed for
ShowCase transfers, select the Automatically Connect to
VPN check box and fill in your VPN information.
If you do not have a VPN set up on the PC running
ShowCase Premier, please see the Support section of
www.TrilTech.com for information on VPNs.
ShowCaseUserGuide.book Page 64 Wednesday, May 15, 2013 12:59 PM

65
Local Store Settings
Set the directory to use for storing studies on the PC
running ShowCase Premier.
To create a new directory, select Create New DICOM
Directory from the File menu. Then, come back to the
Image Center Settings and browse to the directory by
clicking the browse button.
Note: The Browse button displays a standard
Windows Browse for Folder dialog that lets you
select a folder to use as an image storage
location.
Once you have selected the directory, there is a new icon
on the tab in the Study List window to identify it as the
directory receiving Image Center studies. For example, a
directory
ICSTUDIES on the C: drive would look like the
following:
Auto-transfer Settings
Depending on the work flow at your site, you may want
to set up a directory on your Image Center machine that
automatically transfers studies to your remote PC. To do
this, follow these steps:
1. Set up the directory on the Image Center machine
(separate instructions).
2. Make sure your log in is authorized to access the
directory.
ShowCaseUserGuide.book Page 65 Wednesday, May 15, 2013 12:59 PM

66
3. On your ShowCase Image Center Settings screen,
configure automatic transfer.
4. Select the Enable Automatic Image Transfer check
box. You can uncheck this box anytime you wish to
stop the auto transfers.
5. Use the From drop-down to select the Image Center
directory that has your studies. The dropdown
selection shows all Image Center directories you are
authorized to access.
6. In the Every field, set the time interval for checking
for new studies.
ShowCase automatically transfers any new studies found
in the Image Center directory.
Transferring Studies to Your ShowCase PC
from the Image Center
If you have automatic transfer configured and turned
ON, studies transfer and show up in the Study List
without further action on your part. You can select and
view the studies normally using ShowCase.
If you are not using automatic transfer, you can bring
studies to your machine manually. On your ShowCase
Study Lists dialog, you should now have an Image Center
button.
ShowCaseUserGuide.book Page 66 Wednesday, May 15, 2013 12:59 PM

67
Click the Image Center... button to bring up the list of
studies available in your Image Center. If a study has not
been transferred to your machine, it's Status is Remote.
Select (click on) the study or studies and then click the
Bring Local button to initiate the transfer to your
machine.
The Status then reports the progress of the transfer.
Once transferred, the study is listed in the designated
directory on your PC and you can view it normally.
To search for a specific study or group of studies, use the
Search dialog to filter the studies displayed.
ShowCaseUserGuide.book Page 67 Wednesday, May 15, 2013 12:59 PM

68
The title of the Study List reflects the Search filter.
Monitoring Study Transfers
You can leave the Image Center study list screen and the
study transfers continue.
If you expected a study to be in the designated directory
and do not see it there, look for the study in the Image
Center study list and check its Status.
To view a log of your transfer activity, select ShowCase
Download Log from the Help menu.
ShowCaseUserGuide.book Page 68 Wednesday, May 15, 2013 12:59 PM
69
CHAPTER 12
Configuring ShowCase Connect
Both ShowCase Basic and Premier can be paired with
the optional ShowCase Connect component. ShowCase
Connect adds DICOM connectivity to transfer studies
from imaging machines or PACS servers to your PC. In
DICOM terms, ShowCase Connect is a Store Service
Class Provider (SCP) and a Query Service Class User
(SCU). Please refer to our web site
www.triltech.com
for our most recent DICOM Conformance Statement
describing all ShowCase DICOM capabilities.
ShowCase Connect is an independent network “listener”
application. It can listen for image transfer commands
and store images to your disk, even if you are not
running your ShowCase viewer software.
Configuring DICOM nodes on a DICOM network is
usually a one time operation. Once you have finished
the configuration you might never have to visit the
Settings screens again.
Note: See Chapter 15 for advice on setting up a small
clinic network and for suggestions on managing
your image data.
Initial Configuration
You may wish to leave most of your network settings set
to their default values. If you need to customize any
settings, follow the steps below:
1. From the Start menu, run ShowCase Connect. Then
click on the Edit Settings button. The settings
ShowCaseUserGuide.book Page 69 Wednesday, May 15, 2013 12:59 PM

70
window may come up automatically the first time
you run ShowCase Connect.
2. If you want to change the default location for storing
images received over the network, use the Browse
button to locate your Main Image Folder Path.
•The Browse button displays a standard
Windows Browse for Folder dialog that lets you
select a folder anywhere on the network to use
as an image repository.
3. Select an option for Store in sub-folders grouped
by. ShowCase Connect can organized images into
sub-folders based on modality, image source or
Study ID. The default setting is to store by modality
(ShowCase creates sub-folders as needed and
names them US, CT, NM, etc. If you select No sub-
ShowCaseUserGuide.book Page 70 Wednesday, May 15, 2013 12:59 PM
71
folders, ShowCase Connect will import all images
into the main image folder.
Selecting AE_TITLE sorts images by their source. For
example, if two ultrasound machines “SEQUOIA1”
and “PHILIPS1” are connected to your network,
ShowCase Connect automatically sorts all stored
images into folders –
NetworkImages/SEQUOIA1 and
NetworkImages/PHILIPS1.
4. Select a method for naming your imported images.
There are 2 methods of naming images. You can
have ShowCase Connect use:
• Modality and patient name as the base of the
image name.
• Letters “IM” to start the name. The “IM” method
is the default and recommended way to name
images. This method is simpler and avoids
possible patient privacy issues.
5. Select a method for ending image names. You can
have ShowCase Connect use:
• A sequential number.
• The image number found in the image file.
Your image file names might look like this:
IM00001.dcm, IM00002.dcm, etc.
6. Configure DICOM network settings for this PC. Enter
the following information:
a. You must have a unique Application Entity Title
(DICOM AE_TITLE) for every node on the net
-
work. The default value is SHOWCASE_SCP. If
you have more than one copy of ShowCase
Connect running at the same time, each must
have a different AE_title (for example,
SHOWCASE, LAB1_PC).
b. Enter a Listen Port. 104 is a typical port to use
to receive images from a DICOM C-STORE opera
-
ShowCaseUserGuide.book Page 71 Wednesday, May 15, 2013 12:59 PM
72
tion. You should not need to change this unless
you have other DICOM software running on your
machine that is already using port 104.
c. Set the Max # Associations. This is the limit of
the number of simultaneous DICOM image
sources your computer can listen to at the same
time. Network speed and disk capacity may not
handle more than 1 or 2 associations.
Note: Write down your AE_TITLE and listen port – You
will need them to configure your ultrasound
machine, PACS server or other DICOM device
that communicates with ShowCase Connect.
7. Select the shut down behavior for ShowCase
Connect. If you do not check this box, ShowCase
Connect continues to run, listening for image store
commands.
8. Click the Save Settings button. Then exit ShowCase
Connect.
9. Launch ShowCase.
10. Select ShowCase Connect from the File menu. This
starts ShowCase Connect and establishes a link
between the applications. It is also a good
opportunity to verify that the ShowCase Connect
settings were properly saved.
Configuring Connected Devices
After initially configuring ShowCase Connect, you must
configure DICOM devices that communicate with
ShowCase Connect. This might be one or more
ultrasound machines or a PACS server.
Each machine has its own method of configuration, so
you may need to ask your IT department or the
ShowCaseUserGuide.book Page 72 Wednesday, May 15, 2013 12:59 PM

73
machine’s manufacturer for advice. All DICOM devices
have the following common configuration requirements:
• The ShowCase PC and ultrasound machines
and/or PACS server must be able to see each
other on the network. You can test this with a
"ping".
• You will need to set the ShowCase Connect
AE_TITLE in the other node and may need to
add other configuration information as well (for
example, authorize it to do a Query/Retrieve or a
C-STORE operation) .
• The port to use for sending images must match
the Listen Port in ShowCase Connect (
See
Initial Configuration on page 69). This is usually
Port 104.
•The HOSTS file on both the ShowCase and server
PCs may need to include entries to allow them
to see each other if you are not using static IP
addresses or a Domain Name Server (DNS).
IMPORTANT NOTE: Do NOT configure the ultrasound
machine to include “Storage Commit”.
Setting up Query/Retrieve
If you are using Query/Retrieve to request images from a
PACS or mini-PACS, set up a Query/Retrieve server node
in ShowCase Connect. You do not need to read this
section if you are sending images from ultrasound
machines and not querying a PACS. To set up a Query/
Retrieve server node, follow these steps:
1. Click the Query/Retrieve button.
ShowCaseUserGuide.book Page 73 Wednesday, May 15, 2013 12:59 PM

74
2. This displays the Query/Retrieve dialog.
3. In the Query/Retrieve dialog, click the Set up Query
Nodes button. This displays the Query/Retrieve
Node List dialog.
4. Click the Add New Node button to display the
Query/Retrieve Node Information dialog.
5. Fill in the information about the image server – the
node you want ShowCase Connect to request
images from. Enter the following:
a. Enter a name in the Assign a nickname to the
Image Source field. This can be anything that
helps you identify the Query/Retrieve node
when you have several to chose from (for exam
-
ple, Lab2 Server, Vascular Server).
ShowCaseUserGuide.book Page 74 Wednesday, May 15, 2013 12:59 PM

75
b. In the IMAGE SERVER Host Machine Name, you
can enter the PACS server’s TCP/IP address on
your network, or the machine name mapped in
the
lmhosts file or by your DNS.
Note: You might want to test to see if you have
a network connection to the machine
name by bringing up a command
window and entering
ping hostmachinename.
c. In the Server’s DICOM Application Entity Title
field, enter the DICOM AE_TITLE of your PACS
server.
d. Relational Queries run faster, so if your server
supports relational queries (check with the man
-
ufacturer), select the Supports Relational Que-
ries check box.
e. Click the Save button to save your settings for
this node and close the Query/Retrieve Node
Information dialog.
f. In the Query/Retrieve Node List dialog, select
the node, and click the Test button to see if
ShowCase Connect and the image server node
you have configured are connecting.
g. If all of the configuration information is correct,
ShowCase Connect displays a confirmation dia
-
log that tells you that the node is responding
and ready for Query Retrieve.
In most situations there is only one query/retrieve node
to set up, the server of your mini-PACS or PACS. If you
have multiple servers to query (for example, an
ultrasound image server and a cath image server), you
can set up multiple nodes. Then, each time you query for
images, make sure that you have selected the correct
image server (node) in the Query/Retrieve dialog.
ShowCaseUserGuide.book Page 75 Wednesday, May 15, 2013 12:59 PM
76
ShowCaseUserGuide.book Page 76 Wednesday, May 15, 2013 12:59 PM
77
CHAPTER 13
Transferring Files Using
ShowCase Connect
ShowCase Connect can store images sent from imaging
acquisition devices such as ultrasound machines. It can
also query a DICOM server for studies and retrieve them
to the local disk.
First, you need to configure your ShowCase Connect
computer and your acquisition device or DICOM server
to communicate with each other (
Chapter 12,
Configuring ShowCase Connect).
Storing Images Sent from Imaging
Machines
ShowCase Connect automatically stores images that it
receives from imaging acquisition devices in a folder you
select during initial configuration. You can use ShowCase
Premier or ShowCase Basic to view the images any time
during or after transfer. The main ShowCase viewer’s
Study List window lists all studies in the Network Images
folder. You can display a study, even if it is still in the
process of transferring images. The images appear as
they arrive at your computer.
Transferring Images Using Query/Retrieve
When you want to retrieve a study from your DICOM
server to your ShowCase Connect computer, click on the
Query Server button in the ShowCase Studies List
window. The button is only visible if you have configured
ShowCaseUserGuide.book Page 77 Wednesday, May 15, 2013 12:59 PM

78
your ShowCase Connect software to do Query/Retrieve.
This displays the Query / Retrieve dialog.
To perform a query, follow these steps:
1. The Node drop-down shows your usual source for
images. If you have connections to multiple servers
(multiple nodes), you can click on the down arrow
to select from a node list.
2. Enter the criteria you want to use for your query. You
can ask the server to return a list filtered by patient
name, patient ID, accession number, modality, study
ID, or a study date range (Start Date & End Date).
Enter as many of the fields as you like. The query
finds studies that match ALL of the criteria entered.
3. Click the Query button to generate a list of matching
studies. The status of your query updates at the top
of the list, so you will know if an error occurred or no
matching studies were found.
To perform a retrieve operation, follow these steps:
1. Once your server returns the list of matching studies,
you can select (click on) one or more studies in the
list.
ShowCaseUserGuide.book Page 78 Wednesday, May 15, 2013 12:59 PM
79
2. Click on the Retrieve button to transfer the selected
image series to your computer without showing the
images during the transfer.
3. Click on the Retrieve and SHOW button to transfer
the selected image series and display them in
ShowCase image windows while they are
transferring.
4. ShowCase Connect transfers the studies to the
Network Images folder (or other configured folder)
on your computer. It organizes and names the files
according to your configuration settings.
5. If you clicked the Retrieve and Show button, a
ShowCase image window comes forward on your
screen and the images pop up in the window as
ShowCase Connect writes them to your local disk.
6. If you want to view the images later, you can find
them in the ShowCase Study List window on the tab
for your Network Images folder (or other folder
named in your set-up). If the folder is not displayed,
you can use the Browse button to find it.
ShowCaseUserGuide.book Page 79 Wednesday, May 15, 2013 12:59 PM
80
ShowCaseUserGuide.book Page 80 Wednesday, May 15, 2013 12:59 PM

81
CHAPTER 14
Troubleshooting
Networking
Problems
Getting that first image to transfer is always the hardest
part of DICOM network setup. Once images have
transferred successfully, you may never need to visit the
settings screens again. This chapter provides some tips
for handling problems that can come up while setting up
the network connectivity.
Windows 7 and Windows 8 Machines
If you are running under the Windows 7 or Windows 8
operating system, we recommend that you do all of your
installation and configuration with an administrator log
in. If you think you installed, licensed, or configured
without administrator privileges, it is best to re-install.
Error Logs
If you are having trouble establishing communication
between ShowCase Connect and other DICOM devices,
you might be able to get information about the problem
by looking in error logs.
ShowCase Connect has a View Log button on the main
ShowCase Connect window. While sometimes difficult to
interpret, the entries in the log frequently document the
problem.
Most DICOM devices (image servers, ultrasound
machines, etc) also have error logs to help with
diagnosing communications problems. Consult the
manual for your DICOM device.
ShowCaseUserGuide.book Page 81 Wednesday, May 15, 2013 12:59 PM
82
General Network Connectivity
• The machines (ShowCase Connect computer
and the ultrasound machine or image server or
other DICOM device) must be able to see each
other on the network, so make sure that "ping"
works in both directions. Your IT staff may need
to help make sure your network is set up
correctly and advise you about each machine’s
network IP address.
• Some sites may need to use the LMHOSTS file on
computers to map IP addresses. If you enter a
host machine name instead of an IP address and
you are not using a Domain Name Server (DNS)
this could be necessary. Check with your IT
staff.
DICOM Network Connectivity
• The DICOM AE_TITLE is key for accurate
communication. Make sure that if you have
assigned the name "ShowCase_SCP" in the
ShowCase Connect Settings dialog, that the
same exact name (including capitalization) is
configured in the DICOM server, ultrasound
machine or other DICOM device you want to
communicate with.
• The ports that send/receive images must
match! The “Listen Port” in Network ShowCase
is usually port 104. The Send port on the
connected machine must be port 104 also.
• Do not set up your imaging machine to require
“Storage Commit” when sending images to
ShowCase Connect. ShowCase Connect does
not support Storage Commit.
ShowCaseUserGuide.book Page 82 Wednesday, May 15, 2013 12:59 PM
83
Firewalls
If your DICOM messaging says that an association was
refused and you have checked all of the network
connectivity setting above, you might have a firewall
preventing communication.
If your machine is protected by the standard Windows
Firewall, see the instructions below. For other firewall
vendors, consult the documentation on how to permit a
specific program to get access thru the firewall.
• For Windows XP, select Control
Panel→Windows Firewall, and then select the
Exceptions tab.
• For Windows 7, select Control Panel→System
and Security→Windows Firewall→Allow a
program through Windows Firewall.
• For Windows 8, select Settings→Windows
Firewall→Allow an app or feature through
Windows Firewall.
What if Query/Retrieve Doesn't Work?
You may be trying to query a DICOM system that does
not support Query/Retrieve. Very few ultrasound
machines support Query/Retrieve. You must “send” the
images from the ultrasound machine to ShowCase
Connect. You do not need to configure a Query/Retrieve
node if you are just sending images from an ultrasound
machine to ShowCase Connect. The Settings page
configuration data is sufficient. ShowCase itself does not
respond to Query commands, so you cannot Query
another machine running ShowCase. From the
ultrasound machine you will transfer the study using a
command that might say "send to PACS" or "send study".
ShowCaseUserGuide.book Page 83 Wednesday, May 15, 2013 12:59 PM
84
What if Query Works, Retrieve Doesn't?
If you can query an image server and get a list back but
then cannot retrieve, you very likely have a problem with
the IP address setting on the image server machine. The
image server will respond to a Query, but it will not store
images unless it has a valid IP address for your
ShowCase Connect system. A problem with the IP
address can happen if:
• The IP address isn't set correctly on the server –
Fix this by entering the correct IP address and
restarting.
• You are trying to Query/Retrieve from a home or
remote site that uses VPN access. The VPN
needs to be configured to map your IP address
to the same address each time you log in.
• You are trying to Query/Retrieve from a remote
site without a VPN, over a Cable or DSL
connection but your provider has not assigned
you a fixed IP address. Your PC must look like it
has a fixed IP address. Your Internet provider
may be able to provide you with a fixed IP
address.
If the IP address is not the problem make sure that the
port is correct (send port and listen port are the same)
and make sure you do not have a firewall blocking
communication (See Firewalls
on page 83).
If you are still unable to retrieve a study, please consult
the ShowCase Connect – Troubleshooting Connectivity
Problems Quick Step Guide, available on our website at
www.triltech.com. This quick guide is occasionally
updated with new tips.
ShowCaseUserGuide.book Page 84 Wednesday, May 15, 2013 12:59 PM
85
CHAPTER 15
Small Clinic Networks
Recommendations
This chapter is for small clinics setting up an office
network to store digital studies sent from ultrasound
machines and then view the studies on one or more
office computers. This chapter provides a few
recommendations on network configuration and image
management workflow.
Note: ShowCase does not provide a central database
or automatic archiving like more expensive
PACS products. If you are using ShowCase to
store and view images, you need to develop a
plan for managing your digital studies and
especially for ensuring that your storage media
comply with any local regulations on media
usage, including regulations on storage time,
use of medically licensed media, and data
backup.
One example of an imaging network, diagrammed
below, might include two ultrasound machines, a central
imaging PC and two additional viewing stations on office
PCs. The office network is gigabit Ethernet to allow fast
network access to images – Wi-Fi is too slow for large
datasets such as medical images. The central imaging PC
runs ShowCase Connect. It receives studies sent over the
DICOM network and stores the images in the active
image repository. The active image repository is a
designated folder (default name “NetworkImages”) on a
locally accessible disk drive. All image repositories are in
folders configured to be shared over the network.
ShowCaseUserGuide.book Page 85 Wednesday, May 15, 2013 12:59 PM

86
The following diagram shows an example of a
Windows PC network in a small clinic.
Ultrasound
Machine 1
Ultrasound
Machine 2
Central Imaging PC
Running ShowCase
Connect to store
images & running
ShowCase Premier
for viewing
Large
Capacity
Disk
(RAID)
Hosts
Past Studies
Repositories
Long term
storage
(eg: DVDs)
Viewing PCs running
ShowCase Basic- read
images over office
network
DICOM Store
ShowCaseUserGuide.book Page 86 Wednesday, May 15, 2013 12:59 PM
87
Viewing Images
The central imaging PC and the two additional viewing
PCs on the network can run either ShowCase Basic or
ShowCase Premier. Only the central imaging PC needs
to have the ShowCase Connect option. The viewing
stations can see the disks with the image repositories
over the office network. Any viewing station can view all
studies.
Managing Images
In this example clinic, each day’s studies come in to the
active image repository. After review, the studies move
from the active directory to one of the past studies
repositories and a DVD for long term storage.
To maintain good performance: Each image repository
(active, past) consists of a directory file (called
‘DICOMDIR’) and all of the image files referenced in the
directory. The directory file is updated every time an
image file is received. If the active image directory gets
very large the process of updating the directory becomes
noticeably slower. To maintain good performance, we
recommend that the active images repository
(NetworkImages directory) contain only recent studies –
the current day, week or month’s studies depending on
the number of cases performed at the site. Each day,
week or month a clinic operator moves the oldest
studies out of the active image repository on the central
imaging PC to the Past Studies Repositories on a large
disk. Some clinics move the studies right after they are
reviewed. Others move at the end of each week. The
goal is to keep the directory that receives images from
the ultrasound machine(s) as small as practical for the
clinic’s workflow. The Past Studies Repositories can be
larger because the directory file (DICOMDIR) is only
updated when studies are copied or deleted so
performance is usually not an issue. Some clinics store
ShowCaseUserGuide.book Page 87 Wednesday, May 15, 2013 12:59 PM
88
past images in multiple repositories organized by month
or year to keep them organized and manageable.
Periodically the clinic staff should move studies from
either the current studies repository or the Past Studies
Repository to a backup disk or to a DVD for archiving.
Note: To find the oldest studies in a ShowCase study
list, sort the list by date (click on the Date
column header). To move studies between
directories use ShowCase to COPY them. After
verifying that the copy was successful, DELETE
the studies from the original location.
Caution: Always move studies using the ShowCase Copy and
Delete functions. If you move image files with
Windows Explorer, the image directory will be incor
-
rect and you will need to do a ShowCase “repair” to
reconstruct the directory.
If you need assistance setting up folders that are shared
on the network or want to know how to run a “repair”
check the Trillium Technology web site
www.triltech.com for task-oriented user information.
ShowCaseUserGuide.book Page 88 Wednesday, May 15, 2013 12:59 PM

89
APPENDIX A
Keyboard Shortcuts
This chart provides ShowCase keyboard shortcuts.
Key(s) Action
Scroll
wheel
If your mouse has a scroll wheel, you can use it to
scroll thru images in a series, thru entries in a long
directory, or thru frames in a clip.
Right-click Start/stop a clip playback
Dbl-click Show image full size and access tools to modify
image (contrast, annotation, margins, speed)
C
-A Select All images
C
-O Open Directories window to select a new study
C
-P Print the current report or series of images to a
desktop printer (image quality is not diagnostic)
C
- I Show patient/ study information
C
- N Open a new, empty series window
1
Show the Help dialog
7
Move to the next image size (cycles thru all sizes)
9
Show images in one-up auto-play
U
Move to the next screen full of images
N
Move to the previous screen full of images
H
Move to the first image in the set
n
Move to the last image in the set
u
Move up one row of images
d
Move down one row of images
A
-F X Exit
ShowCaseUserGuide.book Page 89 Wednesday, May 15, 2013 12:59 PM
90
ShowCaseUserGuide.book Page 90 Wednesday, May 15, 2013 12:59 PM
