
Administrator's Guide

3
Contents
Administrator's Guide................................................................................................................................. 7
Using Web Config Network Configuration Software ................................................................................ 8
About Web Config ................................................................................................................................ 8
Accessing Web Config ......................................................................................................................... 8
Restricting Features Available for Users ............................................................................................ 10
User Feature Restriction................................................................................................................ 10
Configuring User Feature Restrictions........................................................................................... 10
User Setup Settings .................................................................................................................. 13
Changing the Administrator Password in Web Config ................................................................... 15
Locking the Settings ...................................................................................................................... 16
Disabling the External Interface..................................................................................................... 18
Changing the Default Scan Settings................................................................................................... 18
Updating Firmware Using Web Config ............................................................................................... 19
Using Your Product on a Secure Network .......................................................................................... 20
Configuring SSL/TLS Communication........................................................................................... 20
Configuring SSL/TLS Settings .................................................................................................. 20
Configuring a Server Certificate for the Product........................................................................ 21
Configuring IPsec/IP Filtering ........................................................................................................ 22
About IPsec/IP Filtering ............................................................................................................ 23
Configuring Default IPsec/IP Filtering Policy............................................................................. 23
Configuring Group IPsec/IP Filtering Policies ........................................................................... 24
IPsec/IP Filtering Policy Settings .............................................................................................. 25
IPsec/IP Filtering Configuration Examples................................................................................ 30
Configuring an IPsec/IP Filtering Certificate ............................................................................. 31
Configuring SNMPv3 Protocol Settings ......................................................................................... 32
SNMPv3 Settings...................................................................................................................... 33
Connecting the Product to an IEEE 802.1X Network..................................................................... 33
Configuring an IEEE 802.1X Network ....................................................................................... 34
IEEE 802.1X Network Settings ................................................................................................. 35
Configuring a Certificate for an IEEE 802.1X Network .............................................................. 36
4
Using a Digital Certificate .............................................................................................................. 37
About Digital Certification.......................................................................................................... 37
Obtaining and Importing a CA-signed Certificate...................................................................... 37
CSR Setup Settings .................................................................................................................. 39
CSR Import Settings ................................................................................................................. 40
Deleting a CA-signed Certificate............................................................................................... 41
Updating a Self-signed Certificate............................................................................................. 41
Configuring Protocols in Web Config............................................................................................. 42
Protocol Settings....................................................................................................................... 43
Using an LDAP Server................................................................................................................... 46
Configuring the LDAP Server and Selecting Search Settings ................................................... 46
LDAP Server Settings ............................................................................................................... 48
LDAP Search Settings .............................................................................................................. 50
Checking the LDAP Server Connection .................................................................................... 51
LDAP Connection Report Messages ........................................................................................ 52
Using an Email Server ................................................................................................................... 53
Configuring an Email Server ..................................................................................................... 53
Email Server Settings ............................................................................................................... 54
Checking the Email Server Connection .................................................................................... 55
Email Server Connection Report Messages ............................................................................. 56
Configuring Email Notification................................................................................................... 58
Importing and Exporting Web Config Settings ............................................................................... 59
Exporting Settings Using Web Config ....................................................................................... 59
Importing Settings Using Web Config ....................................................................................... 60
Using EpsonNet Config Network Configuration Software..................................................................... 62
Installing EpsonNet Config................................................................................................................. 62
Configuring a Product IP Address Using EpsonNet Config ................................................................ 62
Using Epson Device Admin Configuration Software ............................................................................. 64
Configuring Authentication Settings....................................................................................................... 65
About Authentication Settings ............................................................................................................ 65
Available Scanning Functions ........................................................................................................... 66
About Authentication Method ............................................................................................................. 68
Using an Authentication Device ......................................................................................................... 70
5
Connecting an Authentication Device............................................................................................ 71
Registering an Authentication Card ............................................................................................... 72
Authentication Device Settings...................................................................................................... 73
Registering and Setting Information ................................................................................................... 74
Enabling Authentication................................................................................................................. 75
Authentication Settings.................................................................................................................. 77
Registering User Settings.............................................................................................................. 79
Synchronizing with the LDAP Server............................................................................................. 80
Customizing One-Touch Functions ............................................................................................... 81
Logging in as an Administrator from the Control Panel ...................................................................... 82
Disabling Authentication Settings....................................................................................................... 83
Erasing All Data from the Product ........................................................................................................... 84
Solving Problems ...................................................................................................................................... 85
Scanning Error Messages.................................................................................................................. 85
Solving Network Software Usage Problems....................................................................................... 87
Forgot the Administrator Password ............................................................................................... 88
Cannot Access Web Config........................................................................................................... 88
The "Certificate has expired" Message Appears ........................................................................... 89
"The name of the security certificate does not match" Message Appears ..................................... 89
Model Name or IP Address Not Displayed in EpsonNet Config..................................................... 89
Solving Network Security Problems ................................................................................................... 89
Pre-Shared Key was Forgotten ..................................................................................................... 90
Cannot Communicate with the Product Using IPsec Communication ........................................... 90
Communication was Working, but Stopped................................................................................... 90
Cannot Connect After Configuring IPsec/IP Filtering..................................................................... 91
Cannot Access the Product After Configuring IEEE 802.1X .......................................................... 91
Cannot Read the Authentication Card ........................................................................................... 91
Solving Digital Certificate Problems ................................................................................................... 91
Digital Certificate Warning Messages............................................................................................ 91
Cannot Import a Digital Certificate................................................................................................. 93
Cannot Update a Certificate or Create a CSR ............................................................................... 93
Deleted a CA-signed Certificate .................................................................................................... 94
Where to Get Help.............................................................................................................................. 94
6
Notices ....................................................................................................................................................... 95
Trademarks........................................................................................................................................ 95
Copyright Notice................................................................................................................................. 95
Copyright Attribution...................................................................................................................... 96

7
Administrator's Guide
Welcome to the Administrator's Guide.
For a printable PDF copy of this guide, click here.
Note: Not all features mentioned in this Administrator's Guide are available with every product model.
You can use two software utilities to configure your product's advanced network settings: Web Config
and EpsonNet Config. This guide covers Web Config in detail; for information on using EpsonNet Config,
see the EpsonNet Config help utility.
The available network functions vary by product. (Unavailable functions are not displayed on the
product’s control panel or software settings screen.) Your product supports the following system
administration functions:
• SSL/TLS communication: use Secure Sockets Layer/Transport Layer Security to encrypt traffic and
avoid spoofing between the product and a computer
• IPsec/IP filtering: control access and secure communications between the product and a network
gateway
• Individual protocol control: enable and disable single services
• Remote configuration of scan destinations: use an LDAP server to look up email contacts
• User feature restriction: allow or deny access to scanning on a per user basis
• Import and export product settings: migrate settings from product to product

8
Using Web Config Network Configuration Software
Follow the instructions in these sections to configure your product's administrator network settings using
the Web Config software.
Note: Before you can configure system administration settings, you must connect the product to a
network. See the product's User's Guide for instructions.
About Web Config
Accessing Web Config
Restricting Features Available for Users
Changing the Default Scan Settings
Updating Firmware Using Web Config
Using Your Product on a Secure Network
About Web Config
Web Config is a browser-based application you can use to configure a product's settings. Basic and
advanced setting pages are available.
Note: Before you can configure system administration settings, you must connect the product to a
network. See the product's User's Guide for instructions.
You can lock the settings you select by setting up an administrator password for your product. See the
product's User's Guide for instructions.
Parent topic: Using Web Config Network Configuration Software
Accessing Web Config
You can access Web Config from your browser using HTTP or HTTPS.
By default, you access Web Config for the first time using HTTP. If you continue to use HTTP, Web
Config will not display all available menus.
1. Determine the product's IP address. On the product control panel, select Settings > Network
Settings > Network Status. Then select the active connection method (Wired LAN/Wi-Fi Status or
Wi-Fi Direct Status).
2. Start your web browser and make sure JavaScript is enabled.
9
3. Type the product IP address into the browser as follows, depending on the protocol you are using:
• IPv4: http://product IP address
• IPv6: http://[product IP address]/
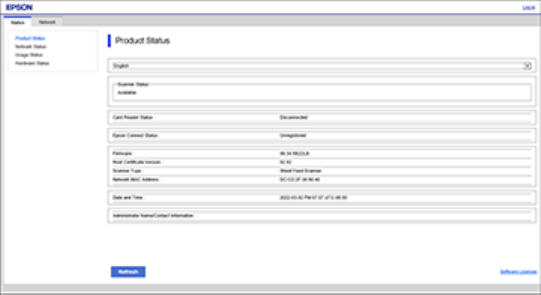
The Status page appears:
4. If you see a warning about the self-signed certificate, ignore the warning and continue to the product
IP address. See your browser help for details.
Note: You can disable the HTTPS requirement, update the self-signed certificate, or import a CA
(Certificate Authority) certificate to remove the warning message. See the links below for more
information.
To access Web Config after configuring HTTPS, enter https:// before the product IP address, shown in
step 3.
Note: If the product name is registered with the DNS server, you can use the product name instead of
the product IP address to access Web Config.
Parent topic: Using Web Config Network Configuration Software
Related tasks
Configuring SSL/TLS Settings
Updating a Self-signed Certificate
Obtaining and Importing a CA-signed Certificate
10
Restricting Features Available for Users
Follow the instructions in these sections to restrict users from using certain product features and create
an administrator password to lock the restrictions using the Web Config software.
User Feature Restriction
Configuring User Feature Restrictions
Changing the Administrator Password in Web Config
Locking the Settings
Disabling the External Interface
Parent topic: Using Web Config Network Configuration Software
User Feature Restriction
You can restrict available product features for individual users, with different features available to each
user. This requires users to log into the product control panel with their user name and password before
they can use control panel features.
With Windows, you can also restrict printing and scanning from the product software. This requires users
to log into the printing or scanning software, and allows the software to authenticate the users before
printing or scanning proceeds. For instructions on setting up software restrictions, see the help utility in
the printing or scanning software.
Parent topic: Restricting Features Available for Users
Configuring User Feature Restrictions
You can create individual user accounts and restrict access to control panel features separately for each
one.
1. Access Web Config and click Log in in the top right corner of the screen.
Enter the following default values for the log in information:
• User name: none (leave this field blank)
• Current password: product serial number (check the label attached to the back of the product to
locate the serial number)

11
You see a window like this:
2. Select the Product Security tab.
You see a window like this:
3. Click the Authentication drop-down list and select On (Device/LDAP Server).
4. Click Next.
5. Click OK to confirm the settings.
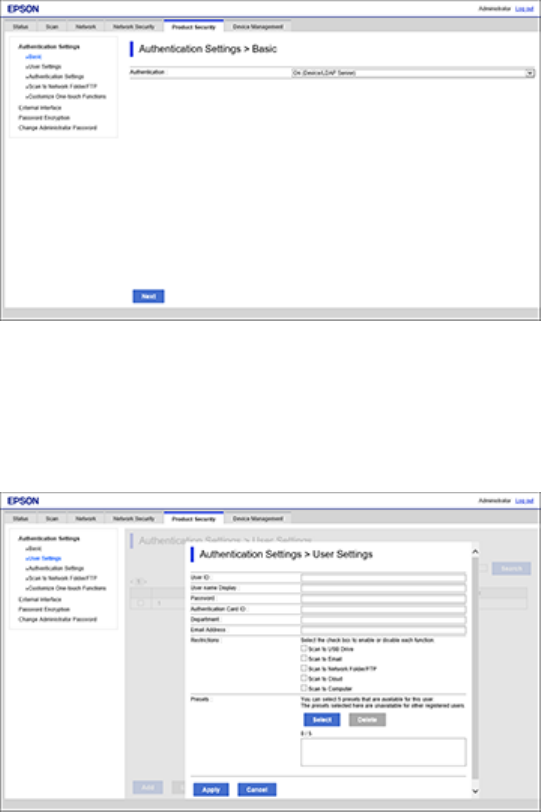
12
You see a window like this:
6. Select User Settings.
7. Click Add.
You see a window like this:
8. Enter a value in the User ID field.
9. Enter a name for the product control panel display in the User name Display field.

13
10. Enter a password for the user in the Password field.
11. Select the checkbox for each function you want the user to be able to perform, and deselect the
checkbox for each function you want to restrict access to.
12. Click Apply.
Note: When you edit a completed user account, you see a Delete option. Click it to delete a user, if
necessary.
Note: You can import and export a list of user features using EpsonNet Config. See the help utility in the
software for instructions.
User Setup Settings
Parent topic: Restricting Features Available for Users
Related concepts
About Authentication Settings
About Authentication Method
Related tasks
Accessing Web Config
User Setup Settings
You can configure these user settings in Web Config.
Setting Options/Description
User ID Enter an ID between 1 and 83 Unicode (UTF-8) characters for
Local DB authentication
User name Display Leave this blank or enter a user name for the product control
panel from 1 to 32 characters long in Unicode (UTF-16)
Password Leave this blank or enter a password from 1 to 32 characters
long in ASCII for Local DB authentication; (leave blank if you
selected User ID as the How to Authenticate User option in
Authentication Settings)
14
Setting Options/Description
Authentication Card ID Leave this blank or enter an authentication card ID from 1 to
116 characters in ASCII. If you selected Allowed as the Allow
users to register authentication cards option in
Authentication Settings, the result registered by users is
reflected.
ID Number If you selected Card or ID Number or ID Number as the How
to Authenticate User option in Authentication Settings, enter
a number up to 8 digits long that falls somewhere between the
number set in Authentication Settings > The Minimum Digit
Number of ID Number
Auto Generate If you selected Card or ID Number or ID Number as the How
to Authenticate User option in Authentication Settings, click
to generate an ID number with the same number of digits you
selected in Authentication Settings > The Minimum Digit
Number of ID Number
Department Leave this blank or enter a department name or other identifier
from 1 to 40 characters long in (UTF-16)
Email Address Leave this blank or enter the user's email address from 1 to
200 characters long in ASCII; this is the destination email
address for Scan to My Email
Scan to My Folder If you selected Individual in Scan to My Folder > Setting
Type, set the individual save to destination for each user
Restrictions Select the functions you want the user to be able to perform,
and deselect the functions you want to restrict access to
15
Setting Options/Description
Presets Set up to five presets that are only available to the selected
user from the Presets registered in the product. Follow these
guidelines:
• Presets that are allocated to a user can only be used by that
user
• Presets that are not allocated to any user can be used by all
users
• If a user only has one Presets available, that is
automatically loaded after authentication. If multiple Presets
are available, a list of Presets is displayed after
authentication
• You cannot create or display Presets that use functions that
have been restricted in Restrictions
Parent topic: Configuring User Feature Restrictions
Changing the Administrator Password in Web Config
You can change an administrator password using your product's control panel, Web Config, or
EpsonNet Config. You use the same administrator password in all cases.
Note: See your product's User's Guide for instructions on changing an administrator password using the
control panel. If you forget your administrator password, contact Epson for support, as described in the
product's User's Guide.
1. Access Web Config and log in using the administrator name and password.
2. Select the Product Security tab.
3. Select Change Administrator Password.

16
You see a window like this:
4. Enter a user name, if necessary.
5. Do one of the following:
• If you have set an administrator password before, enter the current password, then enter and
confirm the new password in the fields provided.
• If you have not set an administrator password before, enter the default password in the current
password field, then enter a new password and confirm it in the fields provided.
Note: The default password is the product's serial number.
6. Click OK.
Parent topic: Restricting Features Available for Users
Related tasks
Accessing Web Config
Locking the Settings
If you have set an administrator password, you can use the Web Config interface or the control panel to
prevent non-administrators from changing some settings in the settings menu.
17
Note: If Authentication Settings is enabled, Lock Setting is automatically enabled on the product control
panel. The control panel cannot be unlocked when Authentication Settings is enabled. If you disable
Authentication Settings, Lock Setting remains enabled until you disable it from the control panel or Web
Config.
1. Make sure you have set an administrator password.
2. Access Web Config and log in using the administrator name and password.
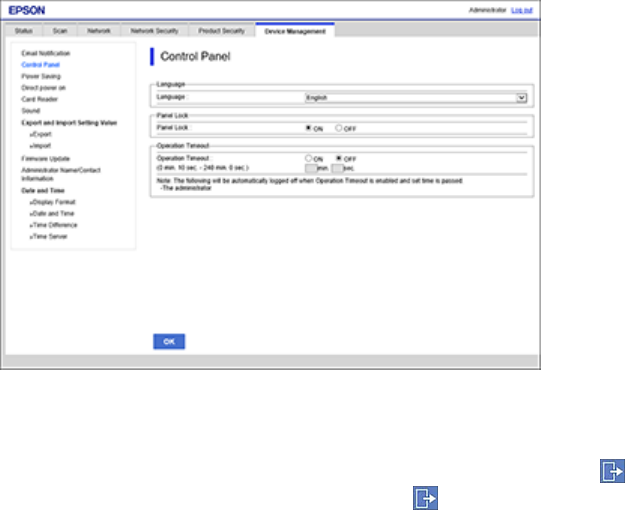
3. Select Device Management > Control Panel.
You see a window like this:
4. Enable the Panel Lock setting and click OK.
If you want to disable Lock Setting from the control panel, tap the icon in the top right corner of the
home screen to log in as an administrator. The icon does not appear on the home screen when Lock
Setting is disabled.
Parent topic: Restricting Features Available for Users
Related tasks
Accessing Web Config
Changing the Administrator Password in Web Config
18
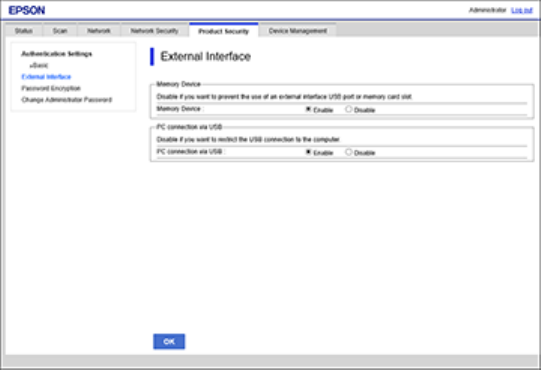
Disabling the External Interface
You can restrict the ability to scan using a memory device or a USB connection by disabling the USB
port. You can also disable the USB port using the product control panel.
1. Access Web Config and log in using the administrator name and password.
2. Select Product Security > External Interface.
You see a window like this:
3. Select the interface you want to disable and do one of the following:
• Select Disable to prevent a connection
• Select Enable to allow a connection
4. Click OK to save your setting.
Parent topic: Restricting Features Available for Users
Related tasks
Accessing Web Config
Changing the Default Scan Settings
You can change the default settings for various features using Web Config.
19
1. Access Web Config and log in using the administrator name and password.
2. Select the Scan tab.
3. Under User Default Settings, select a function and change the default settings for each option as
necessary.
4. Click OK to change the default settings.
Note: If you have selected an invalid combination of settings, they will be automatically changed to
valid settings.
Parent topic: Using Web Config Network Configuration Software
Related tasks
Accessing Web Config
Updating Firmware Using Web Config
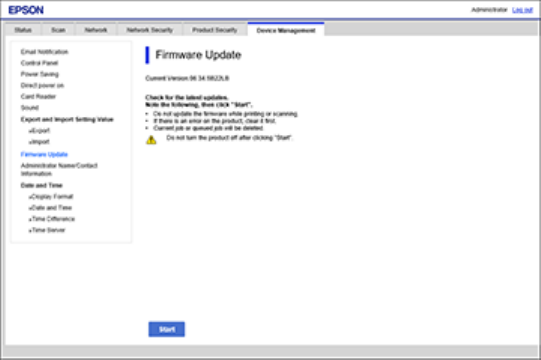
If your product is connected to the Internet, you can update the product firmware using Web Config.
1. Access Web Config and log in using the administrator name and password.
2. Select Device Management > Firmware Update.
You see a window like this:
20
3. Click Start to check for the latest firmware.
4. If there is a firmware update, click Start to begin the update.
Note: Make sure the product is not in use and clear any errors on the LCD screen before starting the
update. Do not turn off the computer or the product while updating.
Parent topic: Using Web Config Network Configuration Software
Related tasks
Accessing Web Config
Using Your Product on a Secure Network
Follow the instructions in these sections to configure security features for your product on the network
using the Web Config software.
Configuring SSL/TLS Communication
Configuring IPsec/IP Filtering
Configuring SNMPv3 Protocol Settings
Connecting the Product to an IEEE 802.1X Network
Using a Digital Certificate
Configuring Protocols in Web Config
Using an LDAP Server
Using an Email Server
Importing and Exporting Web Config Settings
Parent topic: Using Web Config Network Configuration Software
Configuring SSL/TLS Communication
Follow the instructions in these sections to configure SSL/TLS communication using Web Config.
Configuring SSL/TLS Settings
Configuring a Server Certificate for the Product
Parent topic: Using Your Product on a Secure Network
Configuring SSL/TLS Settings
If your product supports HTTPS, you can configure SSL/TLS to encrypt communications with your
product.
1. Access Web Config and log in using the administrator name and password.

21
2. Select the Network Security tab.
3. Under SSL/TLS, select Basic.
You see a window like this:
4. Select one of the options for the Encryption Strength setting.
5. Select Enable or Disable as the Redirect HTTP to HTTPS setting as necessary.
6. Click Next.
You see a confirmation message.
7. Click OK.
Parent topic: Configuring SSL/TLS Communication
Related tasks
Accessing Web Config
Configuring a Server Certificate for the Product
You can configure a server certificate for your product.
1. Access Web Config and log in using the administrator name and password.
2. Select the Network Security tab.
3. Under SSL/TLS, select Certificate.
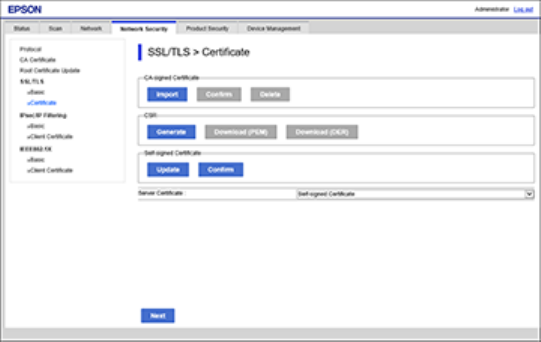
22
You see a window like this:
4. Select one of the following options:
• CA-signed Certificate: Select Import if you have obtained a CA-signed certificate. Choose the
file to import and click OK.
• Self-signed Certificate: Select Update if you have not obtained a CA (Certificate Authority)-
signed certificate and want the product to generate a self-signed certificate.
5. Click Next.
You see a confirmation message.
6. Click OK.
Parent topic: Configuring SSL/TLS Communication
Related tasks
Accessing Web Config
Configuring IPsec/IP Filtering
Follow the instructions in these sections to configure IPsec/IP traffic filtering using Web Config.
About IPsec/IP Filtering
Configuring Default IPsec/IP Filtering Policy
Configuring Group IPsec/IP Filtering Policies

23
IPsec/IP Filtering Policy Settings
IPsec/IP Filtering Configuration Examples
Configuring an IPsec/IP Filtering Certificate
Parent topic: Using Your Product on a Secure Network
About IPsec/IP Filtering
You can filter traffic to the product over the network based on IP address, service, and port by
configuring a default policy that applies to every user or group connecting to the product. For control of
individual users or user groups, you can configure group policies.
Note: IPsec is supported only by computers running Windows Vista or later, or Windows Server 2008 or
later.
Parent topic: Configuring IPsec/IP Filtering
Configuring Default IPsec/IP Filtering Policy
You can configure the default policy for IPsec/IP traffic filtering using Web Config.
1. Access Web Config and log in using the administrator name and password.
2. Select the Network Security tab.
3. Under IPsec/IP Filtering, select Basic.
You see a window like this:

24
4. Select Enable to enable IPsec/IP filtering.
5. Select the filtering options you want to use for the default policy.
6. Click Next.
You see a confirmation message.
7. Click OK.
Parent topic: Configuring IPsec/IP Filtering
Related tasks
Accessing Web Config
Configuring Group IPsec/IP Filtering Policies
You can configure group policies for IPsec/IP traffic filtering using Web Config.
1. Access Web Config and log in using the administrator name and password.
2. Select the Network Security tab.
3. Under IPsec/IP Filtering, select Basic.
4. Click a tab number for the policy number you want to configure.
You see a window like this:
5. Select the Enable this Group Policy checkbox.
6. Select the filtering options you want to use for this group policy.
25
7. Click Next.
You see a confirmation message.
8. Click OK.
9. If you want to configure additional group policies, click the next tab number and repeat the
configuration steps as necessary.
Parent topic: Configuring IPsec/IP Filtering
Related tasks
Accessing Web Config
IPsec/IP Filtering Policy Settings
Default Policy Settings
Setting Options/Description
Access Control Permit Access to permit IP packets to pass through
Refuse Access to prevent IP packets from passing
through
IPsec to permit IPsec packets to pass through
IKE Version Select the version of the Internet Key Exchange (IKE)
protocol that matches your network environment
Authentication Method Select an authentication method, or select Certificate if
you have imported a CA-signed certificate
Pre-Shared Key If necessary, enter a pre-shared key between 1 and 127
characters long
Confirm Pre-Shared Key Confirm the pre-shared key you entered
ID Type If you selected IKEv2 as the IKE Version setting, select
the ID type from the list.
ID If you selected IKEv2 as the IKE Version setting, enter
the necessary ID information

26
Setting Options/Description
Encapsulation If you selected IPsec as the Access Control option,
select one of these encapsulation modes:
Transport Mode: if you are using the product on the
same LAN; IP packets of layer 4 or later are encrypted
Tunnel Mode: if you are using the product on an Internet-
capable network, such as IPsec-VPN; the header and
data of IP packets are encrypted
Remote Gateway(Tunnel Mode) If you selected Tunnel Mode as the Encapsulation
option, enter a gateway address between 1 and 39
characters long
Security Protocol If you selected IPsec as the Access Control option,
select one of these security protocols:
ESP: to ensure the integrity of authentication and data,
and encrypt data
AH: to ensure the integrity of authentication and data; if
data encryption is prohibited, you can use IPsec
Algorithm Settings Select the encryption algorithm settings for the security
protocol you selected
Group Policy Settings
Setting Options/Description
Access Control Permit Access to permit IP packets to pass through
Refuse Access to prevent IP packets from passing
through
IPsec to permit IPsec packets to pass through
Local Address(Scanner) Select an IPv4 or IPv6 address that matches your network
environment; if the IP address is assigned automatically,
select Use auto-obtained IPv4 address. If an IPv6
address is assigned automatically, the connection may be
unavailable, so configure a static IPv6 address instead.
27
Setting Options/Description
Remote Address(Host) Enter the device's IP address (between 0 and 43
characters long) to control access, or leave blank to
control all addresses; if the IP address is assigned
automatically, such as by DHCP, the connection may be
unavailable, so configure a static address instead
Method of Choosing Port Select the method you want to used for specifying ports
Service Name If you selected Service Name as the Method of
Choosing Port option, select a service name option here;
see the next table for more information
Transport Protocol If you selected Port Number as the Method of Choosing
Port option, select one of these encapsulation modes:
Any Protocol
TCP
UDP
ICMPv4
See the Group Policy Guidelines table for more
information.
Local Port If you selected Port Number as the Method of Choosing
Port option, and TCP or UDP for the Transport Protocol
option, enter the port numbers that control receiving
packets (up to 10 ports), separated by commas, for
example 20,80,119,5220; leave this setting blank to
control all ports; see the next table for more information
Remote Port If you selected Port Number as the Method of Choosing
Port option, and TCP or UDP for the Transport Protocol
option, enter the port numbers that control sending
packets (up to 10 ports), separated by commas, for
example 25,80,143,5220; leave this setting blank to
control all ports; see the next table for more information
IKE Version Select IKEv1 or IKEv2 depending on the device that the
product is connected to
Authentication Method If you selected IPsec as the Access Control option,
select an authentication method here
28
Setting Options/Description
Pre-Shared Key If you selected Pre-Shared Key as the Authentication
Method option, enter a pre-shared key between 1 and
127 characters long here and in the Confirm Pre-Shared
Key field
ID Type If you selected IKEv2 as the IKE Version setting, select
the ID type from the list
ID If you selected IKEv2 as the IKE Version setting, enter
the necessary ID information
Encapsulation If you selected IPsec as the Access Control option,
select one of these encapsulation modes:
Transport Mode: if you are using the product on the
same LAN; IP packets of layer 4 or later are encrypted
Tunnel Mode: if you are using the product on an Internet-
capable network, such as IPsec-VPN; the header and
data of IP packets are encrypted
Remote Gateway(Tunnel Mode) If you selected Tunnel Mode as the Encapsulation
option, enter a gateway address between 1 and 39
characters long
Security Protocol If you selected IPsec as the Access Control option,
select one of these security protocols:
ESP: to ensure the integrity of authentication and data,
and encrypt data
AH: to ensure the integrity of authentication and data; if
data encryption is prohibited, you can use IPsec
Algorithm Settings Select the encryption algorithm settings for the security
protocol you selected
Group Policy Guidelines
Service name Protocol type Local/Remote port
number
Controls these operations
Any — — All services

29
Service name Protocol type Local/Remote port
number
Controls these operations
ENPC UDP 3289/Any port Searching for a scanner from
applications such as EpsonNet
Config, or the scanner driver
SNMP UDP 161/Any port Acquiring and configuring MIB from
applications such as EpsonNet
Config, or the scanner driver
WSD TCP Any port/5357 Controlling WSD
WS-Discovery UDP 3702/Any port Searching for WSD scanners
Network Scan TCP 1865/Any port Forwarding scan data from
Document Capture Pro
Network Push Scan TCP Any port/2968 Acquiring job information for push
scanning from Document Capture
Pro
Network Push Scan
Discovery
UDP 2968/Any port Searching for a computer during
push scanning from Document
Capture Pro
FTP Data (Remote) TCP Any port/20 Forwarding scan data to FTP client;
controls only an FTP server that uses
remote port 20
FTP Control
(Remote)
TCP Any port/21 Forwarding scan data to FTP client
CIFS (Remote)* TCP Any port/445 Forwarding scan data to a folder on
CIFS server
NetBIOS Name
Service (Remote)
UDP Any port/137 Forwarding scan data to a folder on
CIFS server
NetBIOS Datagram
Service (Remote)
UDP Any port/138
NetBIOS Session
Service (Remote)
TCP Any port/139
HTTP (Local) TCP 80/Any port Forwarding Web Config and WSD
data to a HTTP or HTTPS server
HTTPS (Local) TCP 443/Any port

30
Service name Protocol type Local/Remote port
number
Controls these operations
HTTP (Remote) TCP Any port/80 Communicating with Epson Connect,
firmware update, and root certificate
update on a HTTP or HTTPS client
HTTPS (Remote) TCP Any port/443
* To control forwarding of scan data or share a network folder, select Port Number as the Method of
Choosing Port option and specify the port numbers for CIFS and NetBIOS.
Parent topic: Configuring IPsec/IP Filtering
IPsec/IP Filtering Configuration Examples
You can configure IPsec and IP filtering in a variety of ways, as shown in the examples here.
Receiving IPsec Packets Only
Use this example only for configuring a default policy.
• IPsec/IP Filtering: Enable
• Access Control: IPsec
• Authentication Method: Pre-Shared Key
• Pre-Shared Key: Enter a key up to 127 characters long
Receiving Scanning Data and Scanner Settings
Use this example to allow communication of scanning data and scanner settings from specified services.
Default policy:
• IPsec/IP Filtering: Enable
• Access Control: Refuse Access
Group policy:
• Access Control: Permit Access
• Remote Address(Host): Client IP address
• Method of Choosing Port: Service Name
• Service Name: Select ENPC, SNMP, HTTP (Local), HTTPS (Local) and Network Scan
Receiving Access from Only a Specified Address for Product Access
In these examples, the client will be able to access and configure the product in any policy configuration.
31
Default policy:
• IPsec/IP Filtering: Enable
• Access Control: Refuse Access
Group policy:
• Access Control: Permit Access
• Remote Address (Host): Administrator's client IP address
Parent topic: Configuring IPsec/IP Filtering
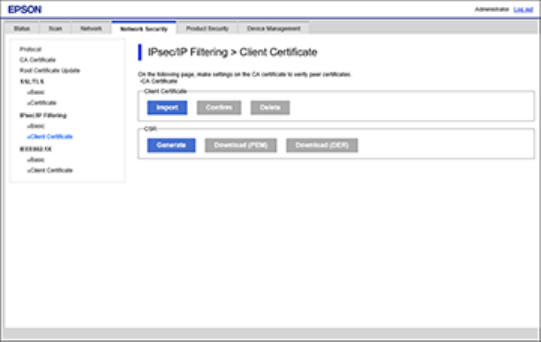
Configuring an IPsec/IP Filtering Certificate
You can configure a certificate for IPsec/IP traffic filtering using Web Config.
1. Access Web Config and log in using the administrator name and password.
2. Select the Network Security tab.
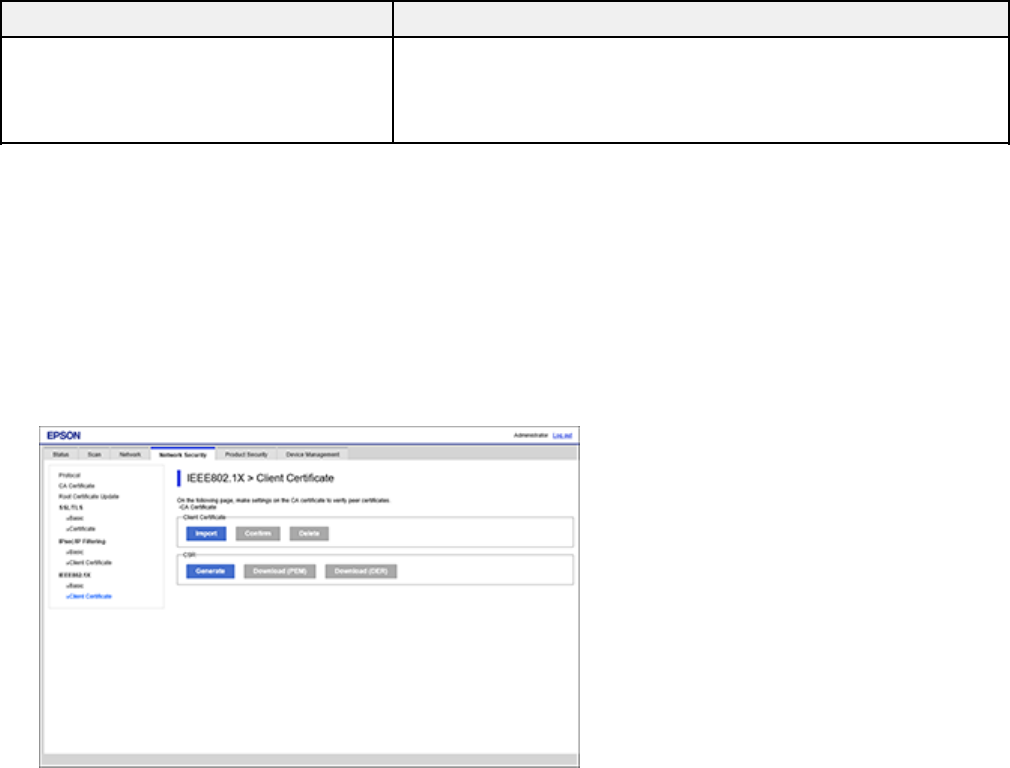
3. Under IPsec/IP Filtering, select Client Certificate.
You see a window like this:
4. Click Import to add a new client certificate and enter any necessary settings.
5. Click OK.
Parent topic: Configuring IPsec/IP Filtering
32
Related tasks
Accessing Web Config
Obtaining and Importing a CA-signed Certificate
Configuring SNMPv3 Protocol Settings
If your product supports the SNMPv3 protocol, you can monitor and control access to your product using
that protocol.
1. Access Web Config and log in using the administrator name and password.
2. Select the Network Security tab.
You see a window like this:
3. Scroll down and select the Enable SNMPv3 checkbox to enable SNMPv3 settings.
4. Select the settings you want in SNMPv3 Settings section.
5. Click Next.
You see a confirmation message.
6. Click OK.
SNMPv3 Settings
Parent topic: Using Your Product on a Secure Network
33
Related tasks
Accessing Web Config
SNMPv3 Settings
You can configure these SNMPv3 settings in Web Config.
Setting Options/Description
User Name Enter a user name from 1 to 32 characters long in
ASCII
Authentication Settings
Algorithm Select the algorithm for authentication
Password Enter a password from 8 to 32 characters long in
ASCII
Confirm Password Enter the authentication password again
Encryption Settings
Algorithm Select the algorithm for encryption
Password Enter a password from 8 to 32 characters long in
ASCII
Confirm Password Enter the encryption password again
Context Name Enter a context name from 1 to 32 characters long
in ASCII
Parent topic: Configuring SNMPv3 Protocol Settings
Connecting the Product to an IEEE 802.1X Network
Follow the instructions in these sections to connect the product to an IEEE 802.1X network using Web
Config.
Configuring an IEEE 802.1X Network
IEEE 802.1X Network Settings
Configuring a Certificate for an IEEE 802.1X Network
Parent topic: Using Your Product on a Secure Network
34
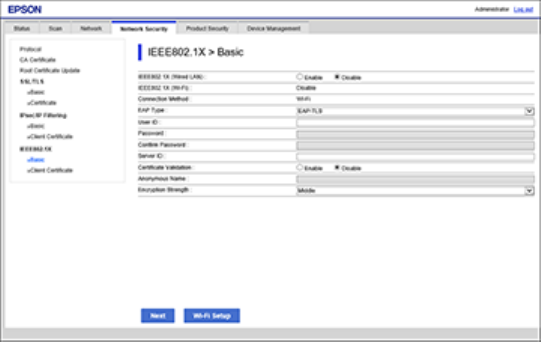
Configuring an IEEE 802.1X Network
If your product supports IEEE 802.1X, you can use it on a network with authentication provided by a
RADIUS server with a hub as an authenticator using Web Config.
1. Access Web Config and log in using the administrator name and password.
2. Select the Network Security tab.
3. Under IEEE802.1X, select Basic.
You see a window like this:
4. Select Enable as the IEEE802.1X (Wired LAN) setting.
5. To use the product on a Wi-Fi network, enable your product's Wi-Fi settings. See your product's
User's Guide for instructions.
The status of the connection is shown as the IEEE802.1X (Wi-Fi) setting.
Note: You can share the network settings for Ethernet and Wi-Fi networking.
6. Select the IEEE 802.1X setting options you want to use.
7. Click Next.
You see a confirmation message.
8. Click OK.
35
Parent topic: Connecting the Product to an IEEE 802.1X Network
Related tasks
Accessing Web Config
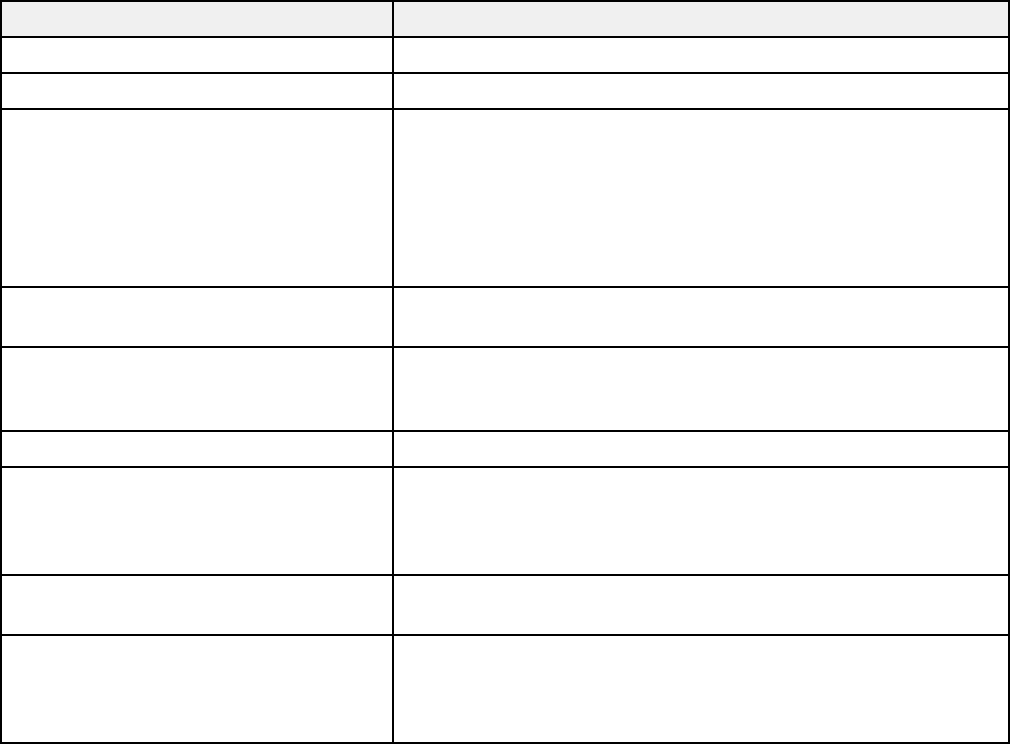
IEEE 802.1X Network Settings
You can configure these IEEE 802.1X network settings in Web Config.
Setting Options/Description
IEEE802.1X (Wired LAN) Enable or disable settings (IEEE802.1X > Basic)
IEEE802.1X (Wi-Fi) Displays the IEEE802.1X (Wi-Fi) connection status
EAP Type Select one of these authentication methods for connections
between the product and a RADIUS server:
EAP-TLS or PEAP-TLS: You must obtain and import a CA-
signed certificate
PEAP/MSCHAPv2 or EAP-TTLS: You must configure a
password
User ID Enter an ID between 1 and 128 ASCII characters for
authentication on a RADIUS server
Password Enter a password between 1 and 128 ASCII characters for
authentication of the product. If you are using Windows as a
RADIUS server, enter up to 127 ASCII characters.
Confirm Password Enter the authentication password again
Server ID Enter a server ID between 1 and 128 ASCII characters for
authentication on a specified RADIUS server; server ID is
verified in the subject/subjectAltName field of a server
certificate sent from the RADIUS server
Certificate Validation Select a valid certificate regardless of the authentication
method; import the certificate using the CA Certificate option
Anonymous Name If you selected PEAP-TLS or PEAP/MSCHAPv2 as the
Authentication Method setting, you can configure an
anonymous name between 1 and 128 ASCII characters
instead of a user ID for phase 1 of a PEAP authentication
36
Setting Options/Description
Encryption Strength Select one of the following encryption strengths:
High for AES256/3DES
Middle for AES256/3DES/AES128/RC4
Parent topic: Connecting the Product to an IEEE 802.1X Network
Configuring a Certificate for an IEEE 802.1X Network
If your product supports IEEE 802.1X, you can configure a certificate for the network using Web Config.
1. Access Web Config and log in using the administrator name and password.
2. Select the Network Security tab.
3. Under IEEE802.1X, select Client Certificate.
You see a window like this:
4. Click Import to add a new client certificate.
5. Click OK.
Parent topic: Connecting the Product to an IEEE 802.1X Network
Related tasks
Accessing Web Config
37
Using a Digital Certificate
Follow the instructions in these sections to configure and use digital certificates using Web Config.
About Digital Certification
Obtaining and Importing a CA-signed Certificate
CSR Setup Settings
CSR Import Settings
Deleting a CA-signed Certificate
Updating a Self-signed Certificate
Parent topic: Using Your Product on a Secure Network
About Digital Certification
You can configure the following digital certificates for your network using Web Config:
CA-signed Certificate
You can ensure secure communications using a CA-signed certificate for each security feature. The
certificates must be signed by and obtained from a CA (Certificate Authority).
CA Certificate
A CA certificate indicates that a third party has verified the identity of a server. You need to obtain a
CA certificate for server authentication from a CA that issues it.
Self-signed Certificate
A self-signed certificate is issued and signed by the product itself. You can use the certificate for only
SSL/TLS communication, however security is unreliable and you may see a security alert in the
browser during use.
Parent topic: Using a Digital Certificate
Obtaining and Importing a CA-signed Certificate
You can obtain a CA-signed certificate by creating a CSR (Certificate Signing Request) using Web
Config and submitting it to a certificate authority. The CSR created in Web Config is in PEM/DER format.
You can import one CSR created from Web Config at a time.
1. Access Web Config and log in using the administrator name and password.
2. Select the Network Security tab.
3. Under one of the following network security options, select the corresponding certificate:
• SSL/TLS and Certificate
• IPsec/IP Filtering and Client Certificate
• IEEE802.1X and Client Certificate

38
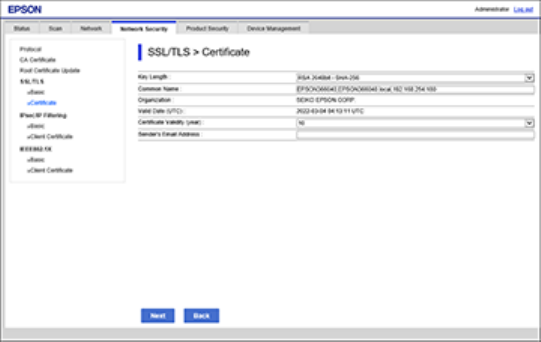
4. In the CSR section, select Generate.
You see a window like this:
5. Select the CSR setting options you want to use.
6. Click OK.
You see a completion message.
7. Select the Network Security tab again, and select your network security option and the
corresponding certificate.
8. In the CSR section, click the Download option that matches the format specified by your certificate
authority to download the CSR.
Caution: Do not generate another CSR or you may not be able to import a CA-signed certificate.
9. Submit the CSR to the certificate authority following the format guidelines provided by that authority.
10. Save the issued CA-signed certificate to a computer connected to the product.
Before proceeding, make sure the time and date settings are correct on your product. See the
product's User's Guide for instructions.
11. Select the Network Security tab again, and select your network security option and the
corresponding certificate.
12. In the CA-signed Certificate section, click Import.
39
You see a window like this:
13. Select the format of the certificate as the Server Certificate setting.
14. Select the certificate import settings as necessary for the format and the source from which you
obtained it.
15. Click OK.
You see a confirmation message.
16. Click Confirm to verify the certificate information.
Parent topic: Using a Digital Certificate
Related references
CSR Setup Settings
CSR Import Settings
Related tasks
Accessing Web Config
CSR Setup Settings
You can select these settings when setting up a CSR in Web Config.
Note: The available key length and abbreviations vary by certificate authority, so follow the rules of that
authority when entering information in the CSR.
40
Setting Options/Description
Key Length Select a key length for the CSR
Common Name Enter a name or static IP address from 1 to 128
characters long; for example, Reception scanner
or https://10.152.12.225
Organization, Organizational Unit, Locality,
State/Province
Enter information in each field as necessary, from
0 to 64 characters long in ASCII; separate any
multiple names with commas
Country Enter a two-digit country code number as specified
by the ISO-3166 standard
Sender's Email Address Enter the sender's email address for the mail
server setting
Parent topic: Using a Digital Certificate
CSR Import Settings
You can configure these settings when importing a CSR in Web Config.
Note: The import setting requirements vary by certificate format and how you obtained the certificate.
Certificate format Setting descriptions
PEM/DER format obtained from Web Config Private Key: Do not configure because the
product contains a private key
Password: Do not configure
CA Certificate 1/CA Certificate 2: Optional
PEM/DER format obtained from a computer Private Key: Configure a private key
Password: Do not configure
CA Certificate 1/CA Certificate 2: Optional
PKCS#12 format obtained from a computer Private Key: Do not configure
Password: Optional
CA Certificate 1/CA Certificate 2: Do not
configure
41
Parent topic: Using a Digital Certificate
Deleting a CA-signed Certificate
You can delete an imported CA-signed certificate with Web Config when the certificate expires or if you
have no more need for an encrypted connection.
Note: If you obtained a CA-signed certificate from Web Config, you cannot import a deleted certificate;
you must obtain and import a new certificate.
1. Access Web Config and log in using the administrator name and password.
2. Select the Network Security tab.
3. Select one of the following network security options and corresponding certificate:
• SSL/TLS and Certificate
• IPsec/IP Filtering and Client Certificate
• IEEE802.1X and Client Certificate
4. Click Delete.
You see a completion message.
5. Click OK.
Parent topic: Using a Digital Certificate
Related tasks
Accessing Web Config
Updating a Self-signed Certificate
If your product supports the HTTPS server feature, you can update a self-signed certificate using Web
Config.
1. Access Web Config and log in using the administrator name and password.
2. Select the Network Security tab.
3. Select SSL/TLS > Certificate.
4. Click Update.
42
You see a window like this:
5. Enter an identifier for your product from 1 to 128 characters long in the Common Name field.
Note: You can add up to 5 IPv4 addresses, IPv6 addresses, host names, or FQDNs; separated by
commas. The first value is assigned to the Common Name field, and the rest are added to the Alias
field of the certificate subject. You cannot enter a space before or after a comma.
6. Select a validity period for the certificate as the Certificate Validity (year) setting.
7. Click Next.
You see a completion message.
8. Click OK.
9. Click Confirm to verify the certificate information.
Parent topic: Using a Digital Certificate
Related tasks
Accessing Web Config
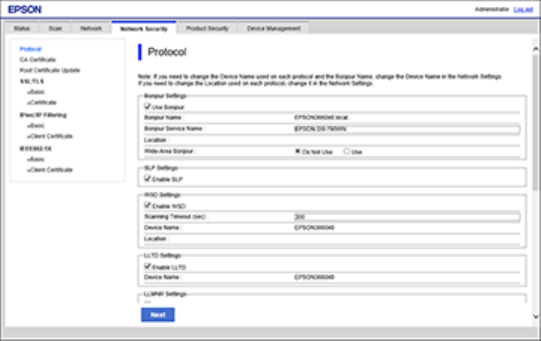
Configuring Protocols in Web Config
You can enable or disable protocols using Web Config.
1. Access Web Config and log in using the administrator name and password.

43
2. Select the Network Security tab.
You see a window like this:
3. Select or deselect the checkbox next to the service name to enable or disable a protocol.
4. Configure any other available protocol settings.
5. Click Next.
6. Click OK.
After the protocols restart, the changes are applied.
Protocol Settings
Parent topic: Using Your Product on a Secure Network
Related tasks
Accessing Web Config
Protocol Settings
Protocols
Name Description
Bonjour Bonjour is used to search for devices and AirPrint
44
Name Description
SLP SLP is used for push-scanning and network searching in
EpsonNet Config
WSD Add WSD devices, or scan from the WSD port
LLTD Displays the product on the Windows network map
LLMNR Use name resolution without NetBIOS even if you cannot use
DNS
SNMPv1/v2c Remotely set up and monitor your product
SNMPv3 Remotely set up and monitor your product with the SNMPv3
protocol
Bonjour Settings
Setting Options/Description
Use Bonjour Search for or use devices through Bonjour
Bonjour Name Displays the Bonjour name
Bonjour Service Name Displays the Bonjour service name
Location Displays the Bonjour location name
Wide-Area Bonjour Enables the Wide-Area Bonjour protocol; register all products
on the DNS server to locate them over the segment
SLP Settings
Setting Options/Description
Enable SLP Enable the SLP function to use the Push Scan function and
network searching in EpsonNet Config
WSD Settings
Setting Options/Description
Enable WSD Enable adding devices using WSD and scan from the WSD
port
45
Setting Options/Description
Printing Timeout (sec) Enter the communication timeout value for WSD scanning
between 3 and 3,600 seconds
Scanning Timeout (sec) Enter the communication timeout value for WSD scanning
between 3 and 3,600 seconds
Device Name Displays the WSD device name
Location Displays the WSD location name
LLTD Settings
Setting Options/Description
Enable LLTD Enable LLTD to display the product in the Windows network
map
Device Name Displays the LLTD device name
LLMNR Settings
Setting Options/Description
Enable LLMNR Enable LLMNR to use name resolution without NetBIOS, even
if you cannot use DNS
SNMPv1/v2c Settings
Setting Options/Description
Enable SNMPv1/v2c Enable SNMPv1/v2c for products that support SNMPv3
Access Authority Set the access authority when SNMPv1/v2c is enabled to
Read Onlyor Read/Write
Community Name (Read Only) Enter 0 to 32 ASCII characters
Community Name (Read/Write) Enter 0 to 32 ASCII characters
46
SNMPv3 Settings
Setting Options/Description
Enable SNMPv3 Enable SNMPv3 for products that support SNMPv3
User Name Enter 1 to 32 characters
Authentication Settings Select an algorithm and set a password for authentication
Encryption Settings Select an algorithm and set a password for encryption
Context Name Enter 1 to 32 characters
Parent topic: Configuring Protocols in Web Config
Related references
SNMPv3 Settings
Using an LDAP Server
Follow the instructions in these sections to use an LDAP server to provide email destination information
using Web Config.
Configuring the LDAP Server and Selecting Search Settings
LDAP Server Settings
LDAP Search Settings
Checking the LDAP Server Connection
LDAP Connection Report Messages
Parent topic: Using Your Product on a Secure Network
Configuring the LDAP Server and Selecting Search Settings
You can configure the LDAP server and select search settings for it using Web Config.
1. Access Web Config and log in using the administrator name and password.
2. Select the Network tab.
3. Under LDAP Server, select Basic.
Note: You can select the primary or secondary server as necessary.

47
You see a window like this:
4. Select Use as the Use LDAP Server setting.
5. Select the LDAP server settings.
6. Click OK.
7. Select the Network tab, if necessary.
8. Under LDAP Server, select Search Settings (Contacts).

48
You see a window like this:
9. Select the LDAP search settings you want to use.
10. Click OK.
Parent topic: Using an LDAP Server
Related references
LDAP Server Settings
LDAP Search Settings
Related tasks
Accessing Web Config
Configuring Protocols in Web Config
LDAP Server Settings
You can configure these LDAP server settings in Web Config.

49
Setting Options/Description
LDAP Server Address Enter the address of the LDAP server as necessary,
depending on the format of the server:
• IPv4 or IPv6 format: Enter from 1 to 255 characters
• FQDN format: Enter from 1 to 255 alphanumeric characters
in ASCII; you can use "-", except at the beginning or end of
the address
LDAP server Port Number Enter an LDAP server port number between 1 and 65535
Secure Connection Select the encryption method for connecting to the LDAP
server
Certificate Validation Select Enable to validate the certificate when connecting to
the LDAP server
Search Timeout (sec) Enter a search time interval before timeout from between 5
and 300 seconds
Authentication Method Select one of the available authentication methods listed
Kerberos Realm to be Used If you selected Kerberos Authentication as the
Authentication Method option, select the correct realm of
Kerberos authentication from the realms defined under the
Kerberos Settings menu entry.
Administrator DN/User Name Leave this blank or enter a user name for the LDAP server
from 0 to 128 characters long in Unicode (UTF-8); do not use
control characters such as 0x00-0x1F or OX7F (not available
when you selected Anonymous Authentication as the
Authentication Method option)
Password Leave this blank or enter a password from 1 to 128 characters
long in Unicode (UTF-8) for LDAP server authentication; do
not use control characters such as 0x00-0x1F or OX7F (not
available when you selected Anonymous Authentication as
the Authentication Method option)
Kerberos Settings
50
Setting Options/Description
Realm (Domain) If you selected Kerberos Authentication as the
Authentication Method option, enter the realm of Kerberos
authentication from 0 to 255 characters long in ASCII; you can
define up to 10 realms with associated addresses and port
numbers
KDC Address Leave this blank or, if you selected Kerberos Authentication
as the Authentication Method option, enter the Kerberos
server address from 0 to 255 characters long in IPv4, IPv6, or
FQDN format
Port Number (Kerberos) Leave this blank or, if you selected Kerberos Authentication
as the Authentication Method option, enter the Kerberos
server port number between 1 and 65535
Parent topic: Using an LDAP Server
LDAP Search Settings
You can configure these LDAP search settings in Web Config.
Contacts
Setting Options/Description
Search Base (Distinguished Name) Leave blank or search for an arbitrary domain name on the
LDAP server using 1 to 128 characters Unicode (UTF-8)
Number of search entries Specify the maximum number of search entries before an
error message appears, from 1 to 500
User name Attribute Enter the attribute name to display when searching for users
names from 1 to 255 characters long in Unicode (UTF-8); the
first character must be a-z, or A-Z
User name Display Attribute Leave blank or enter the attribute name to display as the user
name from 1 to 255 characters long in Unicode (UTF-8); the
first character must be a-z, or A-Z
Email Address Attribute Leave blank or enter the attribute name to display when
searching for email addresses from 1 to 255 characters long in
Unicode (UTF-8); the first character must be a-z, or A-Z

51
Setting Options/Description
Arbitrary Attribute 1 through
Arbitrary Attribute 4
Leave blank or specify other arbitrary attributes to search for
from 1 to 255 characters long in Unicode (UTF-8); the first
character must be a-z, or A-Z
Authentication
Setting Options/Description
Search Base (Distinguished Name) Leave blank or search for an arbitrary domain name on the
LDAP server using 1 to 128 characters Unicode (UTF-8)
User ID Attribute Enter the attribute name to display when searching for user ID
numbers from 1 to 255 characters long in ASCII; the first
character must be a-z, or A-Z
User name Display Attribute Leave blank or enter the attribute name to display as the user
name from 1 to 255 characters long in ASCII; the first
character must be a-z, or A-Z
Authentication Card ID Attribute Leave blank or enter the attribute name to display as the
authentication card ID from 1 to 255 characters long in ASCII;
the first character must be a-z, or A-Z
ID Number Attribute Enter the attribute name to display when searching for ID
number from 1 to 255 characters long in ASCII; the first
character must be a-z, or A-Z
Department Attribute Leave blank or enter the attribute name to display as the
department name from 1 to 255 characters long in ASCII; the
first character must be a-z, or A-Z
Email Address Attribute Leave blank or enter the attribute name to display when
searching for email addresses from 1 to 255 characters long in
ASCII; the first character must be a-z, or A-Z
Save To Attribute Leave blank or enter the attribute name that points to the
Scan To My Folder destination from 1 to 255 characters long
in ASCII; example: homeDirectory
Parent topic: Using an LDAP Server
Checking the LDAP Server Connection
You can test the LDAP server connection and view a connection report using Web Config.
52
1. Access Web Config and log in using the administrator name and password.
2. Select the Network tab.
3. Under LDAP Server, select Connection Test.
Note: You can select the primary or secondary server as necessary.
4. Click Start.
Web Config tests the connection and displays the connection report when it is finished.
Parent topic: Using an LDAP Server
Related tasks
Accessing Web Config
LDAP Connection Report Messages
You can review the connection report messages to diagnose LDAP connection problems in Web Config.
Message Description
Connection test was successful. Connection to the server is successful
Connection test failed. Check the
settings.
One of the following occurred:
• The LDAP server address or port number is incorrect
• A timeout occurred
• You selected Do Not Use as the Use LDAP Server setting
• If you selected Kerberos Authentication as the
Authentication Method setting, the Kerberos server
settings are incorrect
Connection test failed. Check the
date and time on your product or
server.
Connection failed because the time settings for the product
and the LDAP server do not match
Authentication failed. Check the
settings.
Authentication failed because the User Name and Password
settings are incorrect or, if you selected Kerberos
Authentication as the Authentication Method setting, the
time and date are not configured correctly
Cannot access the product until
processing is complete.
The product is busy
53
Parent topic: Using an LDAP Server
Using an Email Server
Follow the instructions in these sections to use an email server to send scan data by email, or use email
notification using Web Config.
Configuring an Email Server
Email Server Settings
Checking the Email Server Connection
Email Server Connection Report Messages
Configuring Email Notification
Parent topic: Using Your Product on a Secure Network
Configuring an Email Server
You can configure an email server using your product's control panel or Web Config.
Note: See your product's User's Guide for instructions on configuring an email server using the control
panel.
1. Access Web Config and log in using the administrator name and password.
2. Select the Network tab.
3. Under Email Server, select Basic.
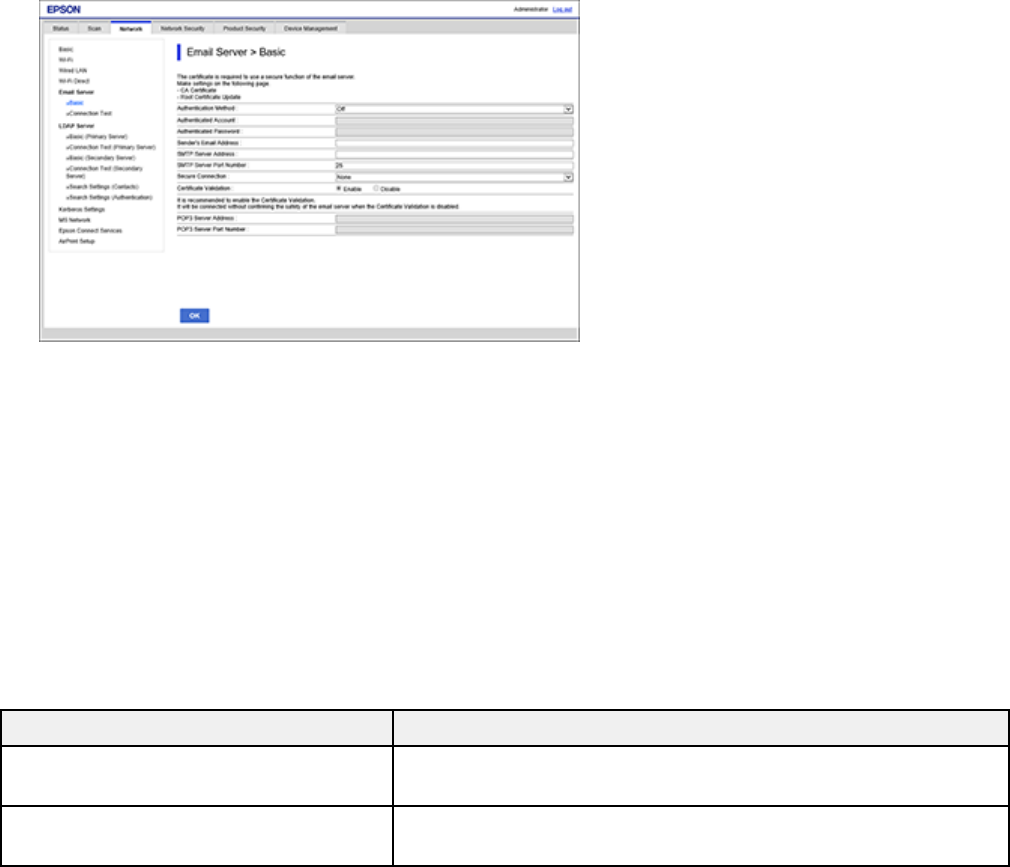
54
You see a window like this:
4. Select the email server settings.
5. Click OK.
Parent topic: Using an Email Server
Related references
Email Server Settings
Related tasks
Accessing Web Config
Email Server Settings
You can configure these email server settings in Web Config.
Setting Options/Description
Authentication Method Select the authentication method that matches your email
server
Authenticated Account Enter the authenticated account name from 1 to 255
characters long in ASCII

55
Setting Options/Description
Authenticated Password Enter the authenticated password from 1 to 20 characters long
in ASCII using A-Z, a-z, 0-9, and these characters:
! # $ % ' * + - . / = ? ^ _ { ! } ~ @
Sender's Email Address Enter the sender's email address from 1 to 255 characters
long in ASCII; do not use a period (.) as the first character or
use these characters: ( ) < > [ ] ;
SMTP Server Address Enter the SMTP server address from 1 to 255 characters long
using A-Z, a-z, 0-9, and "-" in IPv4 or FQDN format
SMTP Server Port Number Enter the SMTP server port number between 1 and 65535
Secure Connection Select the security method for the email server; available
choices depend on the Authentication Method setting
Certificate Validation Enable checking for a valid certificate; recommended value is
Enable
POP3 Server Address Enter the POP server address from 1 to 255 characters long
using A-Z, a-z, 0-9, and "-" in IPv4 or FQDN format
POP3 Server Port Number Enter the POP server port number between 1 and 65535
Parent topic: Using an Email Server
Checking the Email Server Connection
You can test the email server connection and view a connection report using your product's control panel
or Web Config.
Note: See your product's User's Guide for instructions on checking the connection using the control
panel.
1. Access Web Config and log in using the administrator name and password.
2. Select the Network tab.
3. Under Email Server, select Connection Test.
4. Click Start.
Web Config tests the connection and displays the connection report when it is finished.
Parent topic: Using an Email Server

56
Related tasks
Accessing Web Config
Email Server Connection Report Messages
You can review the connection report messages to diagnose email server connection problems in Web
Config.
Message Description
Connection test was successful. Connection to the server is successful
SMTP server communication error.
Check the following - Network
Settings
One of the following has occurred:
• Product is not connected to a network
• SMTP server is down
• Network connection is disrupted while communicating
• Received incomplete data
POP3 server communication error.
Check the following - Network
Settings
One of the following has occurred:
• Product is not connected to a network
• POP3 server is down
• Network connection is disrupted while communicating
• Received incomplete data
An error occurred while connecting
to SMTP server. Check the following
- SMTP Server Address - DNS Server
One of the following has occurred:
• DNS resolution failed
• Name resolution for an SMTP server failed
An error occurred while connecting
to POP3 server. Check the following
- POP3 Server Address - DNS Server
One of the following has occurred:
• DNS resolution failed
• Name resolution for a POP3 server failed
SMTP server authentication error.
Check the following - Authentication
Method - Authenticated Account -
Authenticated Password
SMTP server authentication failed
57
Message Description
POP3 server authentication error.
Check the following - Authentication
Method - Authenticated Account -
Authenticated Password
POP3 server authentication failed
Unsupported communication
method. Check the following - SMTP
Server Address - SMTP Server Port
Number Secure connection (SSL) is
unsupported.
The communication protocol is unsupported
Unsupported communication
method. Check the following - SMTP
Server Address - SMTP Server Port
Number
The communication protocol is unsupported
Connection to SMTP server failed.
Change Secure Connection to None.
There is an SMTP mismatch between a server and a client, or
when the server does not support an SMTP secure connection
Connection to SMTP server failed.
Change Secure Connection to
SSL/TLS.
There is an SMTP mismatch between a server and a client, or
the server requests an SSL/TLS connection for SMTP
Connection to SMTP server failed.
Change Secure Connection to
STARTTLS.
There is an SMTP mismatch between a server and a client, or
when the server requests a STARTTLS connection for SMTP
The connection is untrusted. Check
the following - Date and Time
The product’s date and time setting is incorrect or the
certificate has expired
The connection is untrusted. Check
the following - CA Certificate
The product has a root certificate mismatch or a CA Certificate
has not been imported
The connection is not secured. The certificate is damaged
SMTP server authentication failed.
Change Authentication Method to
SMTP-AUTH.
Authentication method mismatch between a server and a
client. The server does not support SMTP AUTH.
SMTP server authentication failed.
Change Authentication Method to
POP before SMTP.
Authentication method mismatch between a server and a
client. The server does not support SMTP AUTH.

58
Message Description
Sender's Email Address is incorrect.
Change to the email address for
your email service.
The specified sender’s Email address is wrong
Connection test failed. Check the
settings.
One of the following has occurred:
• The email server address or port number is incorrect
• A timeout has occurred
Cannot access the product until
processing is complete.
The product is busy
Parent topic: Using an Email Server
Configuring Email Notification
You can configure email notifications using Web Config so you can receive alerts by email when certain
events occur on the product, such as scanner errors or Wi-Fi failure. You can register up to 5 email
addresses and select the events for which you want to be notified.
1. Access Web Config and log in using the administrator name and password.
2. Select the Device Management tab.
You see a window like this:
59
3. Enter an email address in the Address 1 field.
4. Select the language in which you want to receive the email notifications from the drop-down menu
for the first email address.
5. Enter additional email addresses in each field as necessary, and select a language for each.
6. Select the checkboxes to indicate the events for which you want to receive email notifications.
7. Click OK.
Parent topic: Using an Email Server
Related tasks
Accessing Web Config
Importing and Exporting Web Config Settings
Follow the instructions in these sections to import and export your product's settings using the Web
Config software.
Exporting Settings Using Web Config
Importing Settings Using Web Config
Parent topic: Using Your Product on a Secure Network
Exporting Settings Using Web Config
You can export your product's settings and optionally encrypt the settings file with a password.
1. Access Web Config and log in using the administrator name and password.
2. Select the Device Management tab.
3. Under Export and Import Setting Value, select Export.

60
You see a window like this:
4. Select the settings you want to export.
Note: If you select a parent category, the child categories are also selected. By default, items that
are unique on the network, such as IP address, cannot be selected. If you want to export these
items, select Enable to select the individual settings of device. It is recommended that you
export only unique items when replacing a product on the network, otherwise you may encounter
conflicts on the network.
5. Enter and confirm an encryption password, if desired.
6. Click Export and save the file.
Parent topic: Importing and Exporting Web Config Settings
Related tasks
Accessing Web Config
Importing Settings Using Web Config
You can import settings to your product that you have exported previously. If encryption was used when
the settings were exported, obtain the necessary password before you import.
1. Access Web Config and log in using the administrator name and password.
2. Select the Device Management tab.
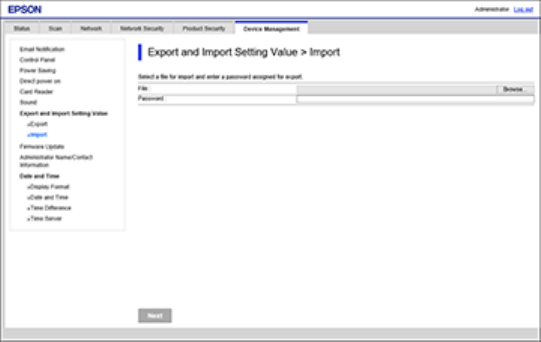
61
3. Under Export and Import Setting Value, select Import.
You see a window like this:
4. Click Browse and select the exported settings file.
5. If necessary, enter the decryption password.
6. Click Next.
7. Select the settings to import and click Next.
8. Click OK.
The selected settings are imported to the product.
Parent topic: Importing and Exporting Web Config Settings
Related tasks
Accessing Web Config

62
Using EpsonNet Config Network Configuration Software
Follow the instructions in these sections to configure your product's administrator network settings using
the EpsonNet Config software.
With Windows, you can configure network settings in a batch operation. See the EpsonNet Config help
utility for instructions.
Note: Before you can configure system administration settings, connect the product to a network. See
the product's User's Guide for instructions.
Installing EpsonNet Config
Configuring a Product IP Address Using EpsonNet Config
Installing EpsonNet Config
To install EpsonNet Config, download the software from the product's support page at
epson.com/support (U.S.), epson.ca/support (Canada), or latin.epson.com/support (Caribbean) and
follow the on-screen instructions.
Parent topic: Using EpsonNet Config Network Configuration Software
Configuring a Product IP Address Using EpsonNet Config
You can configure the product's IP address using EpsonNet Config.
1. Turn on the product.
2. Connect the product to a network using an Ethernet cable.
3. Do one of the following to start EpsonNet Config:
• Windows 11: Click , then search for EpsonNet Config and select it.
• Windows 10: Click > All Apps > EpsonNet > EpsonNet Config.
• Windows 8.x: Navigate to the Apps screen and select EpsonNet > EpsonNet Config.
• Windows (other versions): Click or Start and select All Programs or Programs. Select
EpsonNet > EpsonNet Config.
• Mac: Open the Applications folder, open the Epson Software folder, and select EpsonNet >
EpsonNet Config > EpsonNet Config.

63
After a few moments, the program displays the connected products.
4. Double-click the product you are configuring.
Note: If several products of the same model are connected, you can identify them by their MAC
address.
5. Enter the current administrator password if necessary, and click OK.
6. From the menu on the left, under TCP/IP, select Basic.
You see a window like this:
7. Select Manual.
8. Enter the product's IP address, Subnet Mask, and Default Gateway settings in the fields provided.
Note: To connect the product to a secure network, enter a static IP address. You can also configure
the DNS settings by selecting DNS, and enter proxy settings by selecting Internet from the TCP/IP
menu.
9. Select Transmit.
Parent topic: Using EpsonNet Config Network Configuration Software

64
Using Epson Device Admin Configuration Software
With Windows, you can discover and monitor remote devices, and configure network settings in a batch
operation. See the Epson Device Admin help for instructions.
To install Epson Device Admin, download the software from the support page at epson.com/support
(U.S.), epson.ca/support (Canada), or latin.epson.com/support (Caribbean) and follow the on-screen
instructions.

65
Configuring Authentication Settings
Follow the instructions in these sections to configure your product's Authentication Settings using the
Web Config software.
Note: Before you can configure Authentication Settings, you must connect the product to a network. See
the product's User's Guide for instructions.
About Authentication Settings
Available Scanning Functions
About Authentication Method
Using an Authentication Device
Registering and Setting Information
Logging in as an Administrator from the Control Panel
Disabling Authentication Settings
About Authentication Settings
You can enable Authentication Settings on the product to restrict access to authenticated users. This
requires users to log into the product control panel with their user name and password before they can
use control panel features.
You can create up to 50 user accounts, and restrict access to presets and control panel features
separately for each one.

66
Note: You cannot scan from a computer or a smart device when Authentication Settings is enabled.
Parent topic: Configuring Authentication Settings
Related tasks
Configuring User Feature Restrictions
Related topics
Using an LDAP Server
Available Scanning Functions
You can restrict access to these scanning functions on a per user basis.

67
Feature Description
Scan to My Folder Saves the scanned image to the folder assigned to each
authenticated user; available only when Authentication
Settings is enabled.
You need to set a dedicated folder as the save to destination
in advance. You can assign one shared folder to all
authenticated users, and automatically create personal folders
inside it, or assign individual network folders to each user.
Select Scan to Network Folder/FTP on the Product Security
tab, then select Shared to create one folder for all
authenticated users, or Individual to create individual folders
for each user.
Scan to My Email Sends the scanned image to the authenticated user's email
address; available only when Authentication Settings is
enabled.
Scan to Network Folder/FTP Saves the scanned image to a pre-defined folder on a network
computer or FTP server.
Scan to Computer Saves the scanned image to a connected computer using jobs
created in Document Capture Pro (Windows) or Document
Capture (Mac).
When Authentication Settings is enabled, you can only use
jobs registered in Presets.
Scan to Email Sends the scanned image to a registered email address.
Scan to Cloud Sends the scanned image to a registered cloud destination.
Scan to USB Drive Saves the scanned image to a USB device connected to the
product.
This feature is not available if an authentication device is
connected to the product.
Scan to WSD Saves the scanned image to a connected computer using
WSD; Authentication Settings must be disabled.

68
Feature Description
Presets You can register up to 48 preset scanning functions.
You can allocate up to five presets to users registered in the
Local DB. Allocated presets are available only to that user.
Presets that have not been allocated to any user can be used
by all users.
Parent topic: Configuring Authentication Settings
About Authentication Method
The product can provide authentication using the following methods without having to build an
authentication server.
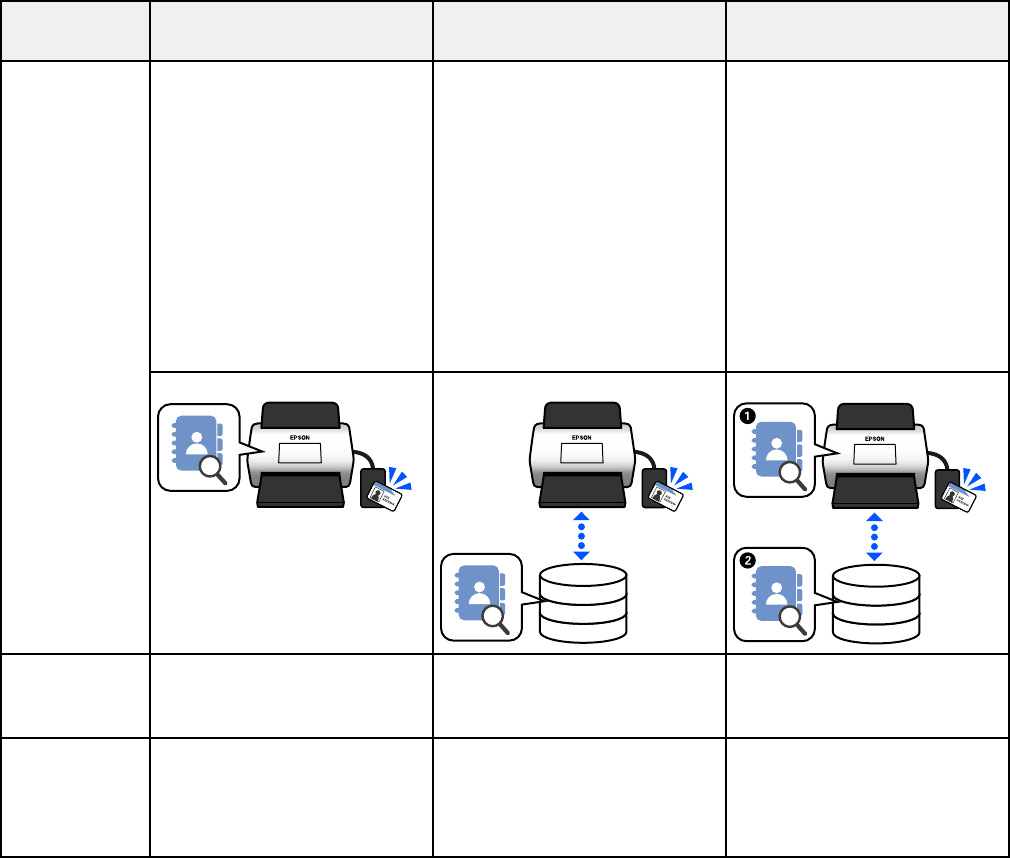
69
Details Device Authentication
(Local DB)
LDAP Server
Authentication
Local DB and LDAP
User
information
location
Product's memory
Checks the user
information registered to
the product and compares it
with the user who is using
the scanning function.
LDAP server*
Checks the user information
of the LDAP server
synchronized with the
product. Since up to 300
items of user information
from the LDAP server can be
temporarily stored in the
product's cache,
authentication can be
performed using the cache if
the LDAP server goes down.
Product's memory and
LDAP server
Checks the user
information registered in the
product; if there is no
match, then checks the
user information in the
LDAP server synchronized
with the product.
Number of
registered
users
50 (product's memory) Unlimited (LDAP server) 50 (product's memory)
Unlimited (LDAP server)
Product's
memory
cache
— 300 up to 300
(50 of the cache slots are
shared with User Settings
in Local DB)

70
Details Device Authentication
(Local DB)
LDAP Server
Authentication
Local DB and LDAP
Login
methods
You can log in to the product using any of the following methods:
• Hold up an authentication card, or enter a User ID and Password
• Hold up an authentication card, or enter an ID Number
• Enter a User ID and Password
• Enter a User ID
• Enter an ID Number
Limits of the
"Scan to"
feature
Set individually for each
user
Same settings for all LDAP
users
Local DB users: Set
individually
LDAP users: Same settings
for all users
Allocating
Presets to
users
Up to 5 per user —
(Cannot be set individually)
Local DB users: Up to 5 per
user
LDAP users: —
*A server that provides a directory service that can communicate with LDAP
Parent topic: Configuring Authentication Settings
Using an Authentication Device
Follow the instructions in these sections to connect and configure an authentication device such as an IC
card reader, and register authentication cards using the product control panel.
Note: This is not necessary if you are using standalone authentication.
Connecting an Authentication Device
Registering an Authentication Card
Authentication Device Settings
Parent topic: Configuring Authentication Settings

71
Connecting an Authentication Device
You can connect an authentication device, such as an IC card reader using a USB cable, and set the
reading format for the information received from the authentication card using Web Config.
Before you connect an authentication card reader to the product, make sure you have Document
Capture Pro Server Authentication Edition 2.0 or later on one of the following operating systems:
• Windows Server 2012 (Essentials/Standard/Datacenter)
• Windows Server 2012 R2 (Essentials/Standard/Datacenter)
• Windows Service 2016 (Essentials/Standard/Datacenter)
• Windows Server 2016
• Windows Server 2019
• Windows Server 2022
1. Connect the card reader’s USB cable to the external interface USB port on the product.
2. On the product's control panel, select Settings > Device Information > Authentication Device
Status.
3. Verify the connection status and authentication card recognition for the authentication device on the
product's control panel.
4. Access Web Config and log in using the administrator name and password.
5. Select Device Management > Card Reader.

72
You see this window:
6. Set the card reader parameters as necessary.
7. Click Next.
8. Click OK to confirm the settings.
Parent topic: Using an Authentication Device
Registering an Authentication Card
If you use a card reader as the authentication method, you need to register an authentication card for
each user. You can also enable users to register their own cards using the product control panel.
Note: User Settings need to be registered before you can register a user authentication card.
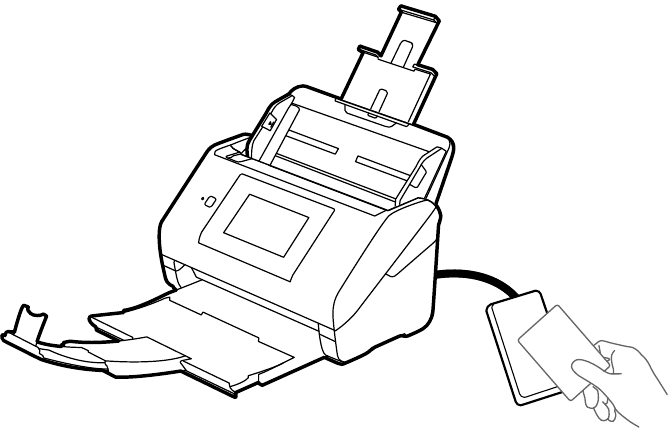
73
1. Hold the authentication card over the card reader until the user login screen displays on the control
panel.
2. Select Register.
3. Enter the User ID and Password on the control panel.
4. Select Register.
A registration completion screen appears.
When the user logs in with the authentication card, the user's name is displayed in the top right corner of
the home screen.
Parent topic: Using an Authentication Device
Related references
User Setup Settings
Related tasks
Configuring User Feature Restrictions
Authentication Device Settings
You can set the following card reading parameters for the authentication device.
74
Setting Description
Vendor ID Set the vendor ID of the authentication device that limits use
from 0000 to FFFF using 4 alphanumeric characters. If you do
not want to limit it, set to 0000.
Product ID Set the product ID of the authentication device that limits use
from 0000 to FFFF using 4 alphanumeric characters. If you do
not want to limit it, set to 0000.
Operational parameter Set the operation parameter of the authentication device from
0 and 8192 characters. A~Z, a~z, 0~9, +, /, =,space, and line
feed are available.
Card Reader Select the conversion format for authentication device.
Authentication Card ID save format Select the conversion format for authentication information of
an ID card.
Set card ID range Specify the reading range.
Text Start Position Specify the text start position 1 and 4096 for reading the ID
information.
Number of Characters Specify the number of characters from 1 to 4096 to be read
from the start position of the ID information.
Parent topic: Using an Authentication Device
Registering and Setting Information
Follow the instructions in these sections to make the necessary settings depending on the authentication
method and scanning method you use.
Note: Before proceeding, make sure the time and date settings are correct on your product. See the
product's User's Guide for instructions.
Enabling Authentication
Authentication Settings
Registering User Settings
Synchronizing with the LDAP Server
Customizing One-Touch Functions
Parent topic: Configuring Authentication Settings

75
Enabling Authentication
You can enable authentication using Web Config. You need to enable authentication on the product
before making authentication settings.
1. Access Web Config and log in using the administrator name and password.
2. Select the Product Security tab.
You see a window like this:
3. Select On (Device/LDAP Server) from the Authentication drop-down list and click Next.
4. Click OK to confirm the settings.
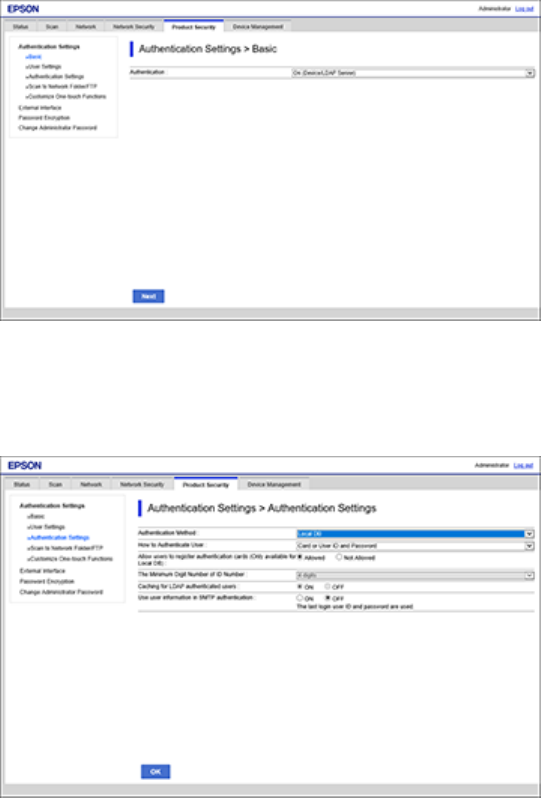
76
You see a window like this:
5. Click on Authentication Settings.
You see a window like this:
77
6. Select the desired settings and click OK.
Note: When Authentication Settings is enabled, Lock Setting is automatically enabled on the
product control panel. The control panel cannot be unlocked when Authentication Settings is
enabled. If you disable Authentication Settings, Lock Setting remains enabled until you disable it
from the product's control panel or Web Config.
Parent topic: Registering and Setting Information
Related tasks
Accessing Web Config
Configuring User Feature Restrictions
Authentication Settings
You can configure these authentication settings in Web Config.
Setting Options/Description
Authentication Method Select an authentication method.
Local DB: authenticate using the User Settings registered to
the product; the user needs to be registered in advance
LDAP: authenticate using the user information on the LDAP
server synchronized with the product; the LDAP server needs
to be set up in advance
Local DB and LDAP: authenticate using the user information
registered to either the product or the LDAP server
synchronized with the scanner; the user needs to be
registered and the LDAP server set up in advance
78
Setting Options/Description
How to Authenticate User Select how to authenticate a user.
Card or User ID and Password: user authenticates with an
authentication card or by entering a user ID and password
User ID and Password: user authenticates by entering a user
ID and password
User ID: user authenticates by entering a user ID
Card or ID Number: user authenticates with an authentication
card or by entering an ID number
ID Number: user authenticates by entering an ID number
Allow users to register
authentication cards
Set Allowed to let users register an authentication card on the
product control panel (setting does not appear when
Authentication Method > LDAP is selected)
The Minimum Digit Number of ID
Number
Select the minimum number of digits for the ID number.
Caching for LDAP authenticated
users
If you are using LDAP server authentication, you can set
whether or not to use caching for user information.
Use user information in SMTP
authentication
If you are using a user ID and password for authentication,
you can set whether or not to use user information for SMTP
authentication; the system uses the last user ID and password
that were logged in
Restrictions for LDAP authenticated
users
If you are using LDAP, you can set the functions that are
available to the user
Parent topic: Registering and Setting Information
Related references
LDAP Server Settings
User Setup Settings
Related tasks
Configuring User Feature Restrictions
Configuring the LDAP Server and Selecting Search Settings
Registering an Authentication Card

79
Registering User Settings
You can register user settings individually using Web Config.
1. Access Web Config and log in using the administrator name and password.
2. Select the Product Security tab.
You see a screen like this:
3. Select User Settings.
4. Click Add.
You see a screen like this:

80
5. Enter a name for a user in the User name Display field.
6. Enter a password for the user in the Password field.
Note: If you need to reset a password, leave the password field blank.
7. Select the checkbox for each function you want the user to be able to perform, and deselect the
checkbox for each function you want to restrict access to.
8. Click Apply.
Note: When you edit a completed user account, you see a Delete option. Click it to delete a user, if
necessary.
Note: You can import and export a list of user features using EpsonNet Config. See the help utility in the
software for instructions.
Parent topic: Registering and Setting Information
Related references
User Setup Settings
Related tasks
Accessing Web Config
Configuring User Feature Restrictions
Synchronizing with the LDAP Server
Configure the LDAP server settings for both the primary and secondary server as necessary.
Note: The LDAP server settings are shared with Contacts.
The following directory services are supported:
Active Directory Windows Server 2012
Windows Server 2012 R2
Windows Server 2016
Windows Server 2019
Windows Server 2022
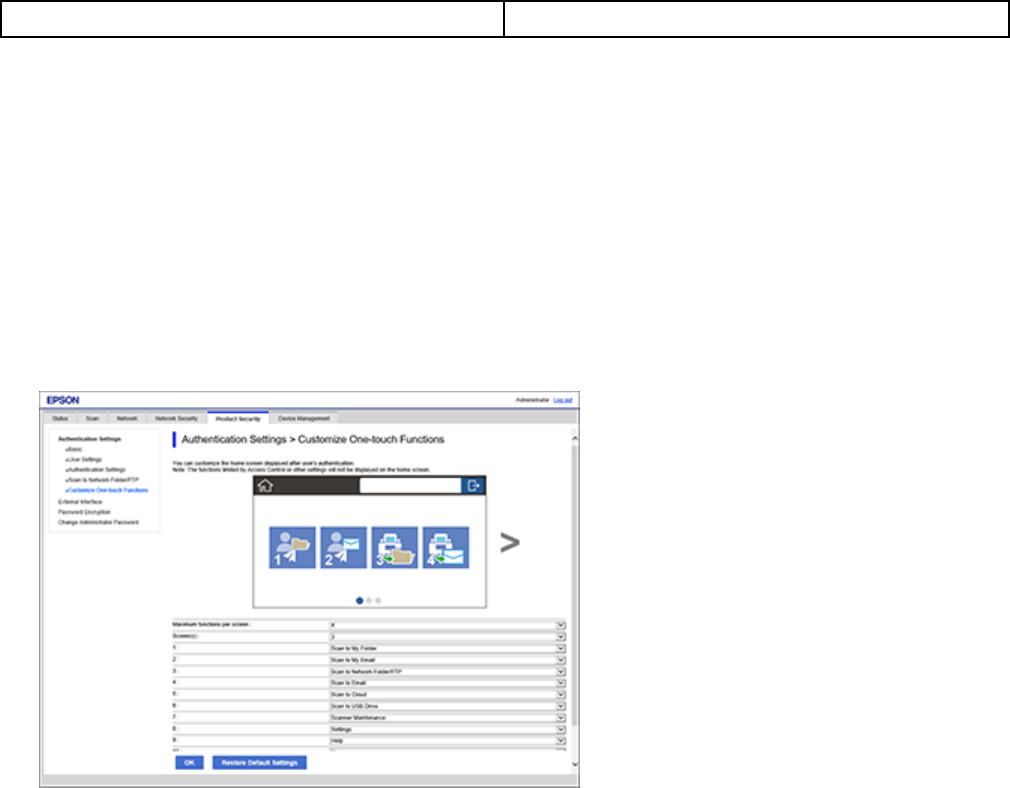
81
OpenLDAP Ver.2.3, Ver.2.4
Parent topic: Registering and Setting Information
Related tasks
Configuring the LDAP Server and Selecting Search Settings
Customizing One-Touch Functions
You can edit the icon layout on the control panel home screen to display only the functions available to
the authenticated user.
1. Access Web Config and log in using the administrator name and password.
2. Select Product Security > Customize One-Touch Functions.
You see a screen like this:
3. Select the following options from the drop-down menus:
• Maximum functions per screen: Select the layout of the icons displayed on the control panel.
The image changes according to the selected layout.
• Screens: Select the number of pages displayed.
• Select the functions you want to display for each numbered position.
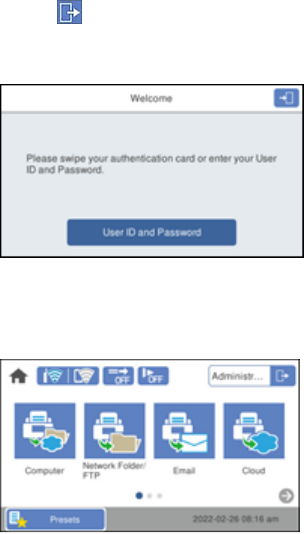
82
Note: Restricted functions and unregistered destinations are not displayed on the home screen.
Parent topic: Registering and Setting Information
Related tasks
Accessing Web Config
Logging in as an Administrator from the Control Panel
If you have set an administrator password, you can use any of the following methods to log in from the
product's control panel.
1. Make sure you have set an administrator password.
2. Tap the icon in the upper right corner of the screen.
• When Authentication Settings is enabled, the home screen looks like this:
• When Authentication Settings is disabled, the home screen looks like this:
3. At the confirmation screen, select Yes.
4. Enter the administrator's password.
A login complete message is displayed, and then the home screen is displayed on the control panel.

83
To log out, tap the icon again.
Parent topic: Configuring Authentication Settings
Related tasks
Changing the Administrator Password in Web Config
Disabling Authentication Settings
You can disable Authentication Settings using Web Config.
Note: Registered user settings are saved even if Authentication Settings is disabled. You can remove
the user settings by restoring the product to its default settings.
1. Access Web Config and log in using the administrator name and password.
2. Select Product Security > Basic.
3. Click the Authentication drop-down list and select Off.
4. Click Next.
5. Click OK to confirm.
Note: If you disable Authentication Settings, Lock Setting remains enabled until you disable it from
the control panel or Web Config.
Parent topic: Configuring Authentication Settings
Related tasks
Accessing Web Config

84
Erasing All Data from the Product
If you are giving away or disposing of your product, we recommend that you erase all data from the
product.
1. Select home icon, if necessary.
2. Select Settings.
3. Select System Administration.
You see the System Administration screen:
4. Scroll down and select Restore Default Settings.
5. Select All Settings.
6. Select Yes.
7. Select Close.

85
Solving Problems
Check these sections for solutions to problems you may have with the network configuration software.
Scanning Error Messages
Solving Network Software Usage Problems
Solving Network Security Problems
Solving Digital Certificate Problems
Where to Get Help
Scanning Error Messages
If you see an error message when scanning images to a shared folder, check for solutions in this table.

86
Message Solution
DNS error. Check DNS settings. Try the following:
• Make sure the address in the contacts list on the
scanner and the address of the shared folder
are the same.
• If the computer's IP address is static or set
manually, change the computer name in the
network path to the IP address. For example,
change \\EPSON02\SCAN to
\\192.168.xxx.xxx\SCAN.
• Make sure your computer is turned on and not
running in a power-saving mode, such as sleep
or standby. If your computer is in sleep mode,
you cannot save scanned images to the shared
folder.
• Temporarily disable your computer's firewall and
security software. If this clears the error, check
the settings in the security software.
• If Public network is selected as the network
location, you cannot save the scanned images
to the shared folder. Set the forward settings for
each port.
• If the IP address changes when reconnecting
using DHCP on a laptop, obtain the IP address
again.
• Make sure the DNS setting is correct.
• Make sure the computer name and IP address
are correct.
Authentication error. Check the location, user
name and password.
Make sure the user name and the password are
correct on the computer and in the contacts list on
the scanner. Also, make sure that the password
has not expired.

87
Message Solution
Communication error. Check the Wi-Fi/network
connection.
Try the following:
• Make sure MS Network is enabled.
• Make sure the address in the contacts list on the
scanner and the address of the shared folder
are the same.
• Access rights for the user in the contacts list
should be added to the Sharing and Security
tabs of the shared folder's properties. Access
permissions should also be enabled for the user.
The file name is already in use. Rename the file
and scan again.
Check if there is a file with the same name as the
file you want to save in the shared folder. Delete
the saved file or select a different file name.
Scanned file(s) are too large. Only XX page(s)
have been sent. Check if the destination has
enough space.
Try the following:
• Increase the storage space in the specified
folder.
• Reduce the number of documents.
• Lower the scanning resolution or increase the
compression ratio to reduce the size of the
scanned image.
Parent topic: Solving Problems
Solving Network Software Usage Problems
Check these sections if you have problems using the network software.
Forgot the Administrator Password
Cannot Access Web Config
The "Certificate has expired" Message Appears
"The name of the security certificate does not match" Message Appears
Model Name or IP Address Not Displayed in EpsonNet Config
Parent topic: Solving Problems
88
Forgot the Administrator Password
If you forget the password or inadvertently set it, contact Epson for assistance.
Note: In most cases, the default password is the product's serial number. If there is a "Password" label
attached to the back of the product, enter the 8-digit number shown on the label. If there is no
"Password" label attached, enter the serial number on the label attached to the base of the product for
the initial administrator password. If you restore the product to default settings, the administrator
password resets to the product serial number.
Parent topic: Solving Network Software Usage Problems
Cannot Access Web Config
If you cannot access Web Config on your product, try these solutions:
• Make sure your product is turned on and connected to your network using the correct IP address.
Verify the connection using your product control panel. See your product's User's Guide for
instructions.
• If you selected High as the Encryption Strength setting in Web Config, your browser must support
AES (256-bit) or 3DES (168-bit) encryption. Check your browser's encryption support or select a
different Encryption Strength option.
• If you are using a proxy server with your product, configure the browser's proxy settings as follows:
• Windows 11: Click , then search for Proxy Settings. Scroll down and set Use a proxy server to
On.
• Windows 10: Click > Settings > Network and Internet > Proxy. Scroll down and set Use a
proxy server to On. Select Don't use proxy server for local (Intranet) addresses.
• Windows 8.x: Navigate to the Apps screen and select PC Settings > Network > Proxy. Scroll
down and set Use a proxy server to On. Select Don't use proxy server for local (Intranet)
addresses.
• Windows (other versions): Click or Start and select Control Panel > Network and Internet >
Internet Options > Connections > LAN settings > Proxy server > Bypass proxy server for
local addresses.
• Mac: Select System Preferences > Network > Advanced > Proxies. Register the local address
under Bypass proxy settings for these Hosts & Domains. For example, 192.168.1.*: Local
address 192.168.1.XXX, subnet mask 255.255.255.0.
Parent topic: Solving Network Software Usage Problems
89
The "Certificate has expired" Message Appears
If the "The certificate has expired" message appears when you access Web Config using SSL
communication (HTTPS), the certificate is out of date. Make sure that the product date and time are
configured correctly, and obtain a new certificate.
Parent topic: Solving Network Software Usage Problems
"The name of the security certificate does not match" Message Appears
If a message beginning with "The name of the security certificate does not match . . ." appears when you
access Web Config using SSL communication (HTTPS), the product's IP address on the CSR or self-
signed certificate does not match what you entered in the browser. Change the IP address you entered
for the Common Name setting, and obtain and import a certificate again, or change the product name.
Parent topic: Solving Network Software Usage Problems
Model Name or IP Address Not Displayed in EpsonNet Config
If the product model name and/or IP address is not displayed in EpsonNet Config, try these solutions:
• If you selected the block, cancel, or shut down option on a Windows security or firewall screen, the IP
address and model name cannot display in EpsonNet Config. Register EpsonNet config as an
exception in your firewall or security software, or close the security software and try running EpsonNet
Config again.
• The operation may have timed out. Select Tools, select Options, select Timeout, and increase the
time option for the Communication Error setting. This may cause EpsonNet Config to run slower,
however.
Parent topic: Solving Network Software Usage Problems
Solving Network Security Problems
Check these sections if you have problems using the network security features.
Pre-Shared Key was Forgotten
Cannot Communicate with the Product Using IPsec Communication
Communication was Working, but Stopped
Cannot Connect After Configuring IPsec/IP Filtering
Cannot Access the Product After Configuring IEEE 802.1X
Cannot Read the Authentication Card
Parent topic: Solving Problems
90
Pre-Shared Key was Forgotten
If you forget a pre-shared key, change the key using Web Config for the default or group policy.
Parent topic: Solving Network Security Problems
Cannot Communicate with the Product Using IPsec Communication
Make sure your computer is using one of these supported algorithms for communicating with the
product:
Security method Supported algorithms
IKE encryption algorithm AES-CBC-128, AES-CBC-192, AES-CBC-256, AES-GCM-128*, AES-
GCM-192*, AES-GCM-256*, 3DES
IKE authentication
algorithm
SHA-1, SHA-256, SHA-384, SHA-512, MD5
IKE key exchange
algorithm
DH Group1, DH Group2, DH Group5, DH Group14, DH Group15, DH
Group16, DH Group17, DH Group18, DH Group19, DH Group20, DH
Group21, DH Group22, DH Group23, DH Group24, DH Group25, DH
Group26, DH Group27*, DH Group28*, DH Group29*, DH Group30*
ESP encryption algorithm AES-CBC-128, AES-CBC-192, AES-CBC-256, AES-GCM-128, AES-
GCM-192, AES-GCM-256, 3DES
ESP authentication
algorithm
SHA-1, SHA-256, SHA-384, SHA-512, MD5
AH authentication
algorithm
* Available for IKEv2 only
Parent topic: Solving Network Security Problems
Communication was Working, but Stopped
If network communication was working, but suddenly stopped, the product's and/or computer's IP
address may have changed or is invalid. Try these solutions:
• Disable IPsec using the product control panel.
• If DHCP is out of date, or the IPv6 address is out of date or was not obtained, you may not be able to
find the IP address registered in Web Config.
91
• If that does not solve the problem, enter a static IP address using Web Config.
Parent topic: Solving Network Security Problems
Cannot Connect After Configuring IPsec/IP Filtering
The set value may be incorrect. Disable IPsec/IP filtering from the product’s control panel. Connect from
the computer and configure the IPsec/IP Filtering settings again.
Parent topic: Solving Network Security Problems
Cannot Access the Product After Configuring IEEE 802.1X
If you cannot access the product after configuring it for IEEE 802.1X, disable IEEE 802.1X and Wi-Fi
using the product control panel. Then connect the product to a computer and configure IEEE 802.1X
using Web Config again.
Parent topic: Solving Network Security Problems
Cannot Read the Authentication Card
If the IC card reader cannot read the authentication card, try these solutions:
• Make sure the card reader is securely connected to the external USB port on the back of the product.
• Make sure both the card reader and the authentication card are supported.
Parent topic: Solving Network Security Problems
Solving Digital Certificate Problems
Check these sections if you have problems using a digital certificate.
Digital Certificate Warning Messages
Cannot Import a Digital Certificate
Cannot Update a Certificate or Create a CSR
Deleted a CA-signed Certificate
Parent topic: Solving Problems
Digital Certificate Warning Messages
If you see a warning message when using a digital certificate, check for solutions in this table.

92
Message Solution
Enter a Server Certificate. Select a certificate file and click Import.
CA Certificate 1 is not entered. Import CA certificate 1 before importing additional
certificates.
Invalid value below. Remove any unsupported characters in the file
path and password.
Invalid date and time. Set the date and time on the product using Web
Config, EpsonNet Config, or the product control
panel.
Invalid password. Enter the password that matches the password set
for the CA certificate.
Invalid file. Try the following:
• Import only certificate files in X509 format sent
by a trusted certificate authority.
• Make sure the file size is 5KB or less and is not
corrupted or fabricated.
• Make sure the chain in the certificate is valid;
check the certificate authority's website.
Cannot use the Server Certificates that include
more than three CA certificates.
Import certificate files in PKCS#12 format that
contains one or two CA certificates, or convert
each certificate to PRM format and import them
again.
The certificate has expired. Check if the certificate
is valid, or check the date and time on your
product.
Make sure the product time and date are set
correctly and, if the certificate is out of date, obtain
and import a new certificate.
93
Message Solution
Private key is required. Do one of the following to pair a private key with
the certificate:
• For PEM/DER format certificates obtained from
a CSR using a computer, specify the private key
file.
• For PKCS#12 format certificates obtained from
a CSR using a computer, create a file containing
the private key.
If you re-imported a PEM/DER format certificate
obtained from a CSR using Web Config, you can
only import it once. You must obtain and import a
new certificate.
Setup failed. Make sure the computer and product are
connected, and the certificate file is not corrupted,
then import the certificate file again.
Parent topic: Solving Digital Certificate Problems
Cannot Import a Digital Certificate
If you cannot import a digital certificate, try these solutions:
• Make sure the CA-signed certificate and the CSR have the same information. If they do not match,
import the certificate to a device that matches the information or use the CSR to obtain the CA-signed
certificate again.
• Make sure the CA-signed certificate file size is 5KB or less.
• Make sure you are entering the correct password.
Parent topic: Solving Digital Certificate Problems
Cannot Update a Certificate or Create a CSR
If you cannot update a self-signed certificate or create a CSR for a CA-signed certificate, try these
solutions:
• Make sure that you entered a Common Name setting in Web Config.
• Make sure the Common Name setting does not contain unsupported characters or is divided by a
comma. Correct the setting and update the certificate again.
94
Parent topic: Solving Digital Certificate Problems
Deleted a CA-signed Certificate
If you accidentally deleted a CA-signed certificate, try these solutions:
• If you retained a backup file, import the CA-signed certificate again.
• If you obtained the certificate using a CSR created in Web Config, you cannot import a deleted
certificate. Create a new CSR and obtain a new certificate.
Parent topic: Solving Digital Certificate Problems
Where to Get Help
If you need to contact Epson for technical support services, use the following support options.
Internet Support
Visit Epson's support website at epson.com/support (U.S.), epson.ca/support (Canada), or
latin.epson.com/support (Caribbean) and select your product for solutions to common problems. You
can download drivers and documentation, get FAQs and troubleshooting advice, or e-mail Epson with
your questions.
Speak to a Support Representative
Before you call Epson for support, please have the following information ready:
• Product name
• Product serial number (located on a label on the product)
• Proof of purchase (such as a store receipt) and date of purchase
• Computer configuration
• Description of the problem
Then see your product's User's Guide for contact information.
Parent topic: Solving Problems

95
Notices
Check these sections for important notices.
Trademarks
Copyright Notice
Trademarks
EPSON
®
is a registered trademark, the EPSON logo is a registered logomark, and Epson Connect
TM
is a
trademark of Seiko Epson Corporation.
Mac and OS X are trademarks of Apple Inc., registered in the U.S. and other countries.
Microsoft and Windows are trademarks of the Microsoft group of companies.
General Notice: Other product names used herein are for identification purposes only and may be
trademarks of their respective owners. Epson disclaims any and all rights in those marks.
Parent topic: Notices
Copyright Notice
All rights reserved. No part of this publication may be reproduced, stored in a retrieval system, or
transmitted in any form or by any means, electronic, mechanical, photocopying, recording, or otherwise,
without the prior written permission of Seiko Epson Corporation. The information contained herein is
designed only for use with this Epson product. Epson is not responsible for any use of this information as
applied to other products.
Neither Seiko Epson Corporation nor its affiliates shall be liable to the purchaser of this product or third
parties for damages, losses, costs, or expenses incurred by purchaser or third parties as a result of:
accident, misuse, or abuse of this product or unauthorized modifications, repairs, or alterations to this
product, or (excluding the U.S.) failure to strictly comply with Seiko Epson Corporation's operating and
maintenance instructions.
Seiko Epson Corporation shall not be liable for any damages or problems arising from the use of any
options or any consumable products other than those designated as Original Epson Products or Epson
Approved Products by Seiko Epson Corporation.
96
Seiko Epson Corporation shall not be held liable for any damage resulting from electromagnetic
interference that occurs from the use of any interface cables other than those designated as Epson
approved Products by Seiko Epson Corporation.
This information is subject to change without notice.
Copyright Attribution
Parent topic: Notices
Copyright Attribution
© 2023 Epson America, Inc.
12/23
CPD-62000R1
Parent topic: Copyright Notice
