
Virginia Department of Taxation
2012
Schedule VK-1
Consolidated
Owner’s Partnership Summary

2
Contents
Purpose ..................................................................................................................................... 3
Schedule VK-1 Consolidated Form Printout .......................................................................... 4
Schedule VK-1 Consolidated Form Requirements .................................................................... 6
Paper and Ink ........................................................................................................................ 6
Font Requirements ................................................................................................................ 6
Schedule VK-1 Consolidated Excel Form Layout ..................................................................... 6
Using Excel Headings ............................................................................................................ 6
Form Layout Instructions ........................................................................................................... 7
Columns, Headings and Data Fields ..................................................................................... 7
Columns ................................................................................................................................. 8
Headings ................................................................................................................................ 9
Data Fields ........................................................................................................................... 10
Page Setup .......................................................................................................................... 11
Margins ................................................................................................................................ 11
Print Area ............................................................................................................................. 11
Borders ................................................................................................................................ 11
Form Headings, Line Headings and Textbox ...................................................................... 11
1D Barcodes ........................................................................................................................ 12
Form Layout ............................................................................................................................ 13
VK-1 Consolidated Form Specifications .............................................................................. 13
Schedule VK-1 Consolidated Form Layout With Field Tags ................................................ 15
Excel – Formatting Cells ...................................................................................................... 16
Excel – Formatting Pages .................................................................................................... 19

3
Schedule VK-1 Consolidated
Purpose
The Schedule VK-1 Consolidated allows multiple owners to be reported on one excel summary
sheet while maintaining the taxpayer disclosure agreement.
The PTE will continue to send a copy of the Schedule VK-1 to each owner for filing purposes
but will no longer need to send a copy of each owner’s Schedule VK-1 to the Department. In its
place, a summary of each owner’s share will be reported on the Schedule VK-1 Consolidated
and sent to the Virginia Department of Taxation (the Department) for processing. The PTE
must not send the Schedule VK-1 Consolidated to its owners due to the taxpayer’s disclosure
agreement. The Web Upload system will not accept the VK-1 Consolidated form. It may only
be used with paper submissions.
PTEs reporting 9 or more owners must use the Schedule VK-1 Consolidated to report the
owner’s share of income, modifications, allocations, and the total additions, subtractions and
credits reported on the Schedule VK-1. PTEs reporting 9 or less owners may file the Schedule
VK-1 but are encouraged to file the VK-1 Consolidated with Form 502. The Schedule VK-1
Consolidated is in Excel format and may be converted to a PDF. Information may be extracted
or manually entered from the Schedule VK-1. The 502 instruction booklet must be used with
the VK-1 Consolidated form layout for field computations, additions, subtractions, tax tables and
mailing addresses.
If users have no or little Excel experience, a Schedule VK-1 Consolidated form Template can
be downloaded from our website
www.tax.virginia.gov located in the PTE form section.
For users who may create their own form, use the form layout, requirements and specifications
outlined in this document. Users must adhere to the requirements set forth in this document to
ensure accurate processing of the Schedule VK-1 Consolidated. The Appendix
at the end of
the document contains detailed steps for using Excel, including screenshots. The final form
print out as shown on the next page may be used as a guide to create the form layout.

4
Schedule VK-1 Consolidated
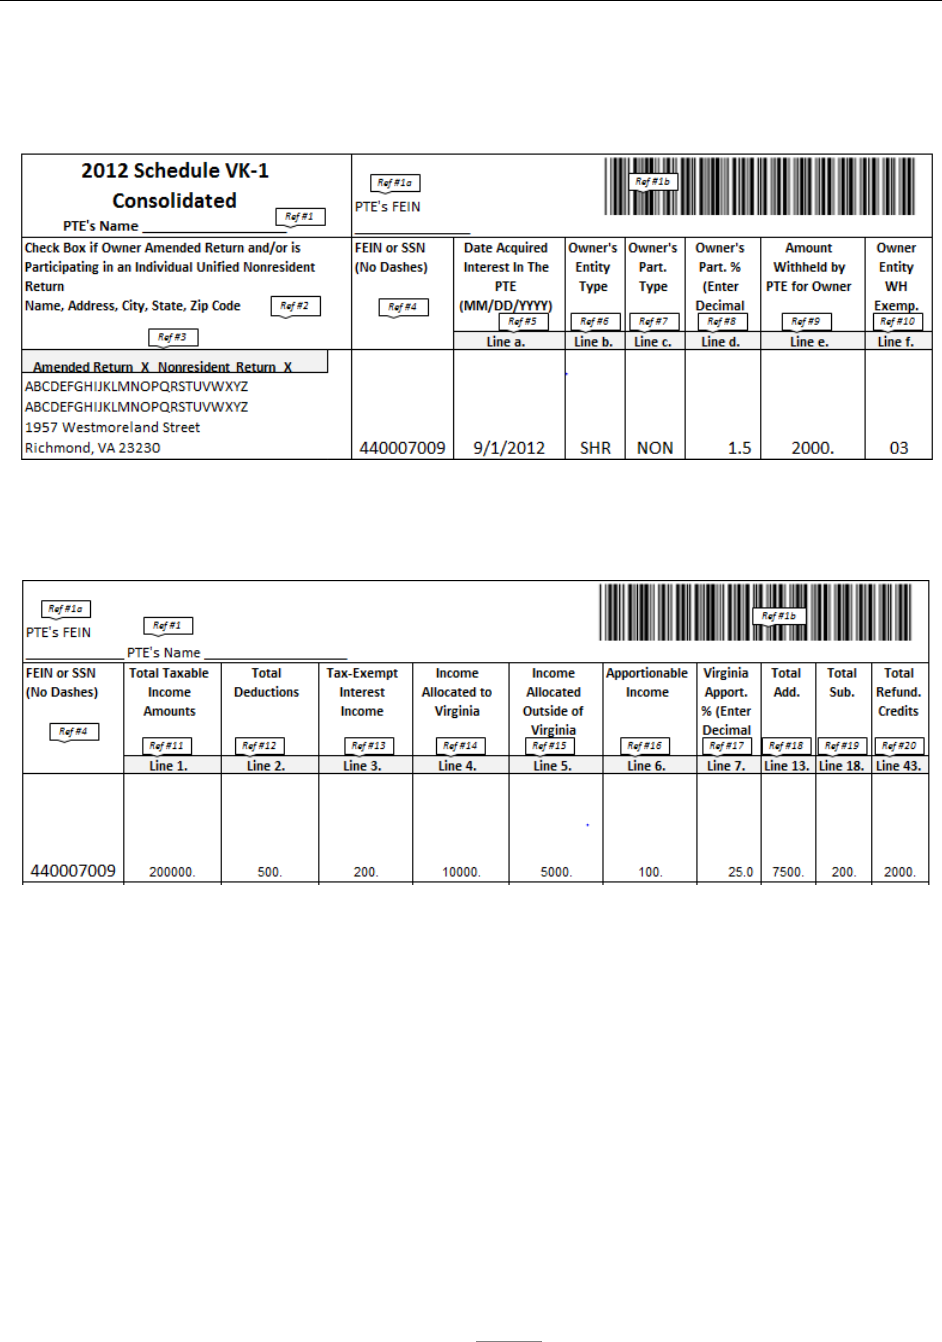
Schedule VK-1 Consolidated Form Printout

5
Schedule VK-1 Consolidated

6
Schedule VK-1 Consolidated
Schedule VK-1 Consolidated Form Requirements
Paper and Ink
• Paper size must be 8 ½ inches x 11 inches.
• Print single sided.
• Paper orientation is Portrait. DO NOT use Landscape.
• Paper weight is 20 pound bond (non-recycled) paper.
• Paper color must be white.
• Ink: black (other colored ink / light printing result in problems causing processing delays).
Font Requirements
• Text fields minimum point size is 6 point and the maximum is 11.
• Controlled data fields font size must be 12 point on Page 1 and no smaller than 8 point
font on Page 2 of the Schedule VK-1 Consolidated.
Schedule VK-1 Consolidated Excel Form Layout
Using Excel Headings
The top and left headings from Excel, columns A- R and rows 1-12 as shown is the area used to
create the form layout.

7
Schedule VK-1 Consolidated
Form Layout Instructions
Columns, Headings and Data Fields
There are a total of 9 rows to report each owner’s share of income, modifications, allocations,
additions, subtractions and credits. Each category is divided into column headings. The first
three rows are reserved for the form title, 1D barcodes, column headings and the corresponding
line numbers. The charts on the next page will show how the column width and row height is
defined for the form layout.
• 1
st
Row – form title, PTE’s Name, PTE’s FEIN and the 1D Barcode for Page 1 and 2
• 2
nd
Row – reserved for the column headings
• 3
rd
Row – corresponding line numbers to the column headings
Each column heading and row vary in size and must be formatted and print only as outlined on
Pages 8-9 and print as shown on Page 4 of this document. The data field rows are 68.25’’ in
height and the cell format is specified on Page 10.
Form headings must print in the same order as presented on the layout, but may be abbreviated
to provide more space if needed. Multiple pages of the Schedule VK-1 Consolidated may be
used to report additional partners.

8
Schedule VK-1 Consolidated
Columns
Use the chart below to determine the column width and row height for Rows 1 through 12 and
Columns A through R.
Excel Column
Column Width
Column A
35.86
Column B
10.57
Column C
11.71
Column D
6.
Column E
6.
Column F 7.71
Column G
10.86
Column H 6.67
Column I
10.14
Column J
10.14
Column K
9.86
Column L
10.
Column M
9.86
Column N
9.86
Column O
6.43
Column P
5.43
Column Q 5.57
Column R
5.71
Excel Row
Row Height
Row 1
52.
Row 2
58.5
Row 3 11.25
Row 4
68.25
Row 5
68.25
Row 6
68.25
Row 7
68.25
Row 8
68.25
Row 9
68.25
Row 10
68.25
Row 11
68.25
Row 12
68.25

9
Schedule VK-1 Consolidated
Headings
Use the chart and instructions to format the column headings and rows.
1. Merge Columns B through H on Row 1 only.
2. Merge Columns I through R on Row 1 only.
3. Select Row 3, Columns C through R, and shade it 5% darker white.
4. Merge Rows 2 and 3 in Column A only.
5. Merge Rows 2 and 3 in Column B only.
6. Use the chart below to determine the headings cell format for Rows 1 through 3 and
Columns A through R
.
Excel
Column
Column
Width
Row
Height
Cell
Category
Horizontal
Alignment
Vertical
Alignment
Text
Control
Font
Size
Cell A1
35.86
52.
General
Center
Bottom
Wrap
14
Cell B1-H1
Merged
Columns
52.
General
General
Bottom
No Wrap
_
Cell I1-R1
Merged
Columns
52.
General
General
Bottom
No Wrap
_
Cell A2
35.85
_
General
General
Bottom
Wrap
9
Cell B2 10.57 _ General Center Top Wrap
9
Cell C2-R2
_
58.5
General
Center
Top
Wrap
9
Cell C3-R3
_
11.25
General
Center
Top
Wrap
9

10
Schedule VK-1 Consolidated
Data Fields
Cells A4 through R12 is the area on the form used to enter owner’s information.
1. Starting on Row 4, change Row height to 68.25” for Cells C4 through C12.
2. Use the chart below to determine the Column height and cell format for
Rows 4 through 12
and Columns C through R.
Excel
Cell
Cell Category
Horizontal
Alignment
Vertical
Alignment
Text Control
Font
Size
Cell A4-A12
General
General
Bottom
Wrap
10
Cell B4-B12
Text
Center
Bottom
No Wrap
12
Cell C4-C12
General
Center
Bottom
No Wrap
12
Cell D4-D12
General
Center
Bottom
No Wrap
12
Cell E4-E12 General Center Bottom No Wrap
12
Cell F4-F12
Accounting
Decimal 1 Place
Center
Bottom
No Wrap
12
Cell G4-G12
Text
Center
Bottom
No Wrap
12
Cell H4-H12
Text
Center
Bottom
No Wrap
12
Cell I4-I12 Text Center Bottom No Wrap
8
Cell J4-J12
Text
Center
Bottom
No Wrap
8
Cell K4-K12
Text
Center
Bottom
No Wrap
8
Cell L4-L12
Text
Center
Bottom
No Wrap
8
Cell M4-M12
Text
Center
Bottom
No Wrap
8
Cell N4-N12
Text
Center
Bottom
No Wrap
8
Cell O4-O12
Accounting
Decimal 1 Place
Center
Bottom
No Wrap
8
Cell P4-P12
Text
Center
Bottom
No Wrap
8
Cell Q4-Q12
Text
Center
Bottom
No Wrap
8
Cell R4-R12 Text Center Bottom No Wrap 8

11
Schedule VK-1 Consolidated
Page Setup
1. Set the Page Setup to Portrait.
2. Set the Scaling to 100%.
3. Set the Paper Size to Letter.
NOTE: DO NOT use Landscape or the form will not print correctly and cause delays in
processing customer information.
Margins
The Footer margin defaults to 0.3 and does not to be changed.
1. Set the Top margin to 0.5.
2. Set the Bottom margin to 0.
3. Set the Left and Right margins to 0.2.
4. Set the Header margin to 0.26.
Print Area
The print area must be set to include the entire form layout, starting with the first Row with the
form title in the Header with the 1D Barcodes and ending with the last Row and Column titled ,
“Total Refund Credits”. Rows and columns must be repeated for print as described.
1. Set A1:R12 as the Print Area.
NOTE: If printing multiple pages OR
beyond Row 12, you MUST adjust the Print Area to
include these extra Rows or owner information.
2. Set $2:$3 as the Rows to repeat at top.
3. Set $B:$B as the Columns to repeat at left.
Borders
1. Highlight Cells A1 through R12.
2. Click the Outline option button.
3. Click the Inside option button.
Form Headings, Line Headings and Textbox
1. In Cell A1:
• Enter in bold font, form title “2012 Schedule VK-1 Consolidated”.
• Set the font size to 14.
• Enter in bold font, heading “PTE’s Name ________________”.
• Set the font size to 10.
2. In Cell B1:
• Enter in bold font, heading “PTE’s FEIN ________________”.
• Set the font size to 10.
• Heading is set to repeat on Page 2 of the Schedule VK-1 Consolidated.

12
Schedule VK-1 Consolidated
Form Headings, Line Headings and Textbox (continued)
3. In Cell I1:
• Enter in bold font, heading “PTE’s Name ________________”.
• Set the font size to 10.
4. In Cells B2 through R2,
• Enter the corresponding field and column descriptions from the form
specifications on Page 13.
• Set the font size to 9.
5. In Cells C3 through R3,
• Enter in bold font the form line numbers “Lines a-f, 1-7, 13, 18, and 43” that
corresponds to field and column descriptions per the form on Page 13.
• Set the font size to 9.
6. Owner information starts on Row 4 and ends on Row 12. Additional rows may be
added. If additional rows are added, you MUST
change the print area to include the
extra rows for viewing and printing.
7. Insert a textbox for the “Amended Return and/or is Participating in an Individual Non-
Resident Return” indicators. The textbox below can be copied/pasted to the form layout.
• Position the textbox inside the cell above the owner’s name and address, on
Rows 4 through 12
.
• Set the textbox Height to .2’’, the Width to 2.66’’, and the Scales to 100%.
• Add a Border around the textbox.
o Format the Shape of the textbox as Solid Fill and Color Solid.
o Shade the textbox 5% darker white.
• Inside the textbox, in bold font enter “Amended Return __ NonResident __”.
• Add at least 2 spaces between each indicator and text.
• Font size is 9.
The preparer inserts “X” beside the approproate check box that applies to each owner when
completing the form.
1D Barcodes
The Schedule VK-1 Consolidated has two 1D Barcodes, one for each page of the form. The
barcodes are placed in the header at the top right corner of each page.
• Page 1 1D Barcode is placed in merged Columns B through H on Row 1.
• Page 2 1D Barcode is placed in merged Columns I through R on Row 1.

13
Schedule VK-1 Consolidated
The 1D Barcodes can be copied from here and pasted to the form. Make sure the correct 1D
Barcode is on the correct page.
Page 1, 1D Barcode Page 2, 1D Barcode
Form Layout
On this page and continued on the next page are the specifications needed to design the form
layout in Excel for the Schedule VK-1 Consolidated. Screenshots with each column tagged as a
reference to the form specifications is provided on Page 15. The final form print out is on Page
4.
VK-1 Consolidated Form Specifications
Tag
Number
Line/Column
Description
Field
Length
Comments
1
Top/Left
PTE’s
Name_________________
15
Name of PTE
1a
Top/Left PTE’s
FEIN_________________
9 PTE’s 9 digit FEIN; will repeat on Page 2
1b
Top/Right
1D Barcode
-
Two 1D Barcodes; Page 1 1D Barcode,
stored in merged columns B-H, Page 2
Barcode on merged columns I-R
2
Col A
Shareholder Name
26
2
Col A
Shareholder Address
26
2
Col A
Shareholder Address
26
2
Col A
Shareholder City or Town, State
and Zip Code
26
3
Col A
Check if – Amended Return
and/or Non-Resident
Check if Amended Return and/or Owner is
Participating in an Individual Non-resident
Return
4
Col B
FEIN or SSN (no dashes)
9
Additional Owner Information
5
Col C;
Line a.
Date Owner Acquired Interest In
The Pass-Through Entity
10 Format is (MM/DD/YYYY)
6
Col D;
Line b.
Owner’s Entity Type
3
Enter code; see instructions
7
Col E;
Line c.
Owner’s Participation Type
3
Enter code; see instructions
8
Col F;
Line d.
Owner’s Participation
Percentage
6
Example: 47.35% - see instructions
9
Col G;
Line e.
Amount Withheld by PTE for
Owner
9
10
Col H;
Line f.
If Owner or Entity is exempt from
withholding enter exemption
code
2
Enter 2 digit exemption code; see
instructions
Distributive or Pro Rata Income and Deductions (See instructions)
11
Col I;
Line 1.
Total of Taxable Income Amounts 9

14
Schedule VK-1 Consolidated
VK-1 Consolidated Form Specifications (continued)
Tag
Number
Line/Column
Description
Field
Length
Comments
12
Col J;
Line 2.
Total of Deductions
9
13
Col K;
Line 3.
Tax-exempt
Interest Income
9
Allocation and Apportionment
14
Col L;
Line 4.
Income Allocated To Virginia 9 O
wner’s Share From PTE’s Schedule
502a, Section C, Line 2
15
Col M;
Line 5.
Income Allocated Outside
Of Virginia
9
Owner’s Share From PTE’s
Schedule 502a, Section C, Line 3(e)
16
Col N;
Line 6.
Apportionable Income
9
Owner’s Share From PTE’s
Schedule 502a, Section C, Line 4
17
Col O;
Line 7.
Virginia Apportionment Percentage 6 From PTE’s Schedule 502A,
Section B, percent from Line 1 or
Line 2(g)or 1
Virginia Additions - Owner’s Share
18
Col P;
Line 13.
Total additions
6
Add Lines 8-11 and 12a Page -12d
from VK-1, 1
Virginia Subtractions - Owner’s Share
19
Col Q;
Line 18.
Total Subtractions
6
Add Lines 14-16 and 17a-17d from
VK-1,
Virginia Tax Credits
20
Col R;
Line 43.
Total Refundable Credits
6
Total Refundable Credits from VK-1,
Page 2
15
Schedule VK-1 Consolidated
Schedule VK-1 Consolidated Form Layout With Field Tags
Page 1
Page 2

16
Schedule VK-1 Consolidated
Excel – Formatting Cells
The Format tab is used to align text, merge cells, wrap text, categorize a cell(s), create borders,
and change column width and row height. See diagrams on Pages 6 and 8. The next few
pages are a brief overview of the tools needed to create the form layout per Excel version 2007.
To save a formatting change you make:
Click OK (located at the bottom of the Format Cells tab).
Text can be Aligned using the horizontal and vertical alignment on the Format Cells tab.
1. Select the cell(s) that require alignment.
2. From the Home tab,
• Click the Format tab.
• Click Format Cells (the tab at the top reads “text alignment”).
3. Click on the arrow in the box for Horizontal and/or Vertical and select the appropriate
alignment.
To Merge cells, select the cells you want to merge.
1. From the Home tab, click the Format tab.
2. Click Format cells (the tab at the top reads “text alignment”).
3. Click on the box for Merge Cells.
Text can be Wrapped from the same Format Cells tab.
1. Select the cell(s) that has the text you want to wrap.
2. Click on the box for Wrap Text.
The cell Category is on the Format Cells tab. For each cell to format and print correctly, cells
must be categorized. Cells with dollar values, dates, and percentages MUST be are required to
have the category outlined in this document for the form layout.
1. Select the cell(s) that will need to be categorized.
2. From the Home tab, click the Format tab.
3. Click Format Cells.
4. Click the Number tab at the top (below the number tab it should read “category”)
5. Click on the arrow in the box for category and select the appropriate category.
Borders will help define the lines in the form layout to make the form easier to read.
1. Select the cells you want to add a Border.
2. From the Home tab, click the Format tab.
3. Click Format Cells.
4. Click the Borders tab.
5. Select a style from the Line Styles to the right of the border tab.
6. Click on the Border diagram to apply the line style to the form layout.
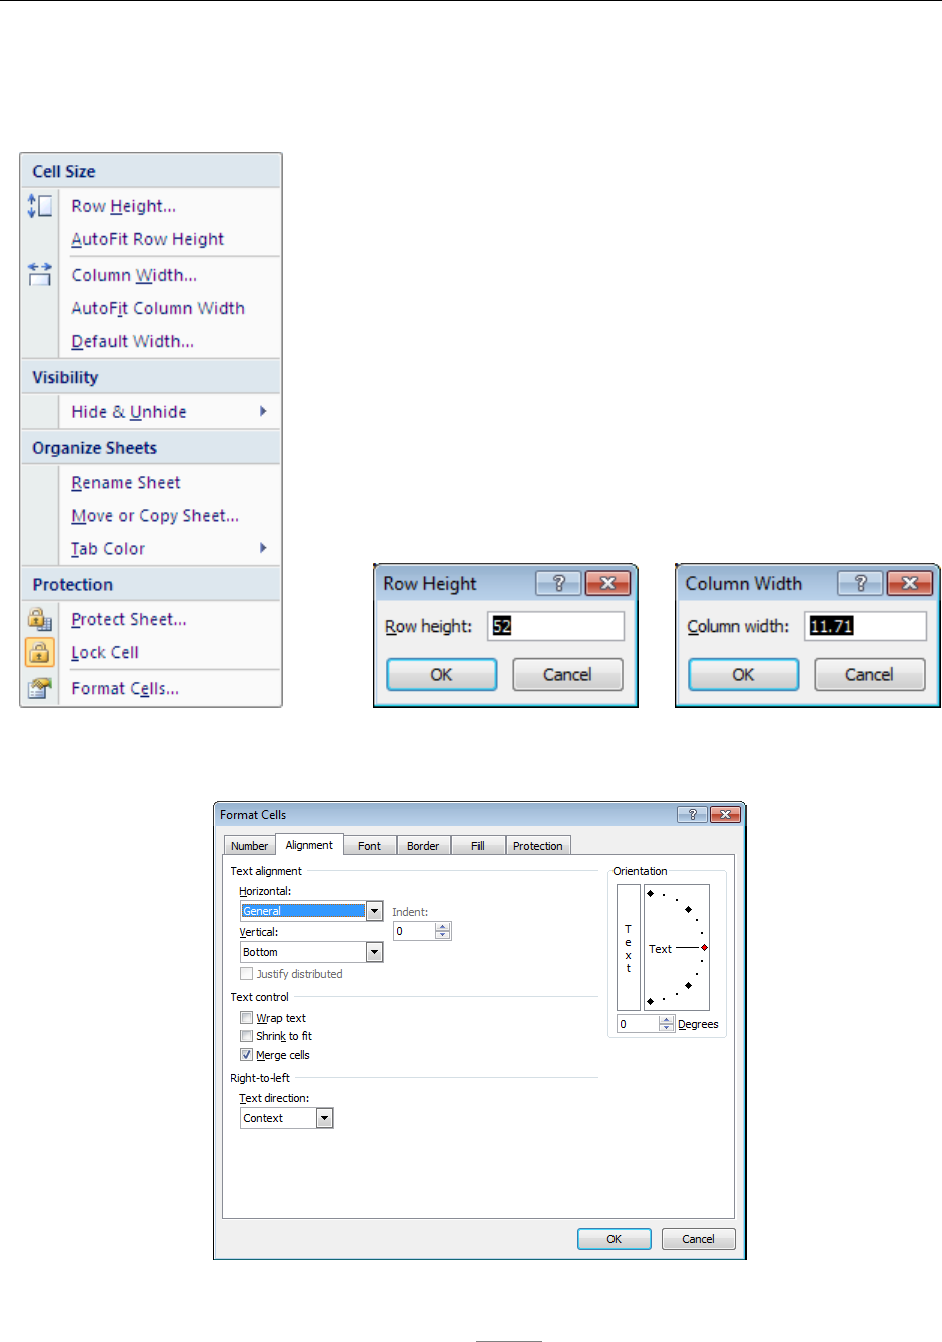
To change column Width or row Height, select the cell(s) you want to change.
1. From the Home tab, click the Format tab.
2. Click Column Width and enter the width of the column.
3. Click Row Height and enter the height of the row.
17
Appendix
Excel – Formatting Cells (continued)
Cell Size from the Format tab is used to change row height, column width and cell format.
The Format Cells Alignment tab is used to align text.

18
Appendix
Excel – Formatting Cells (continued)
Format the cells Category tab to format text.
Add a Border around the form and between each cell on the form.

19
Appendix
Excel – Formatting Pages
The Page Setup is used to set page orientation, size, margins and print area. See details on
Page 8. The next few pages are a brief overview of the tools needed to format the form layout.
To save a formatting change you make:
Click OK (located at the bottom of the Page Setup tab).
All of the settings for Formatting Pages can be accessed as described below.
1. From the Home tab, click the Page Layout tab.
2. From the Page section, click the arrow icon to open the Page Setup box (located in the
bottom right corner, below the “Print Titles” option).
The Page is set to a certain orientation and size to allow the information to be printed together.
1. Click the Page tab.
2. Select the appropriate page Orientation.
3. Adjust the Scaling.
4. Select the correct Paper Size.
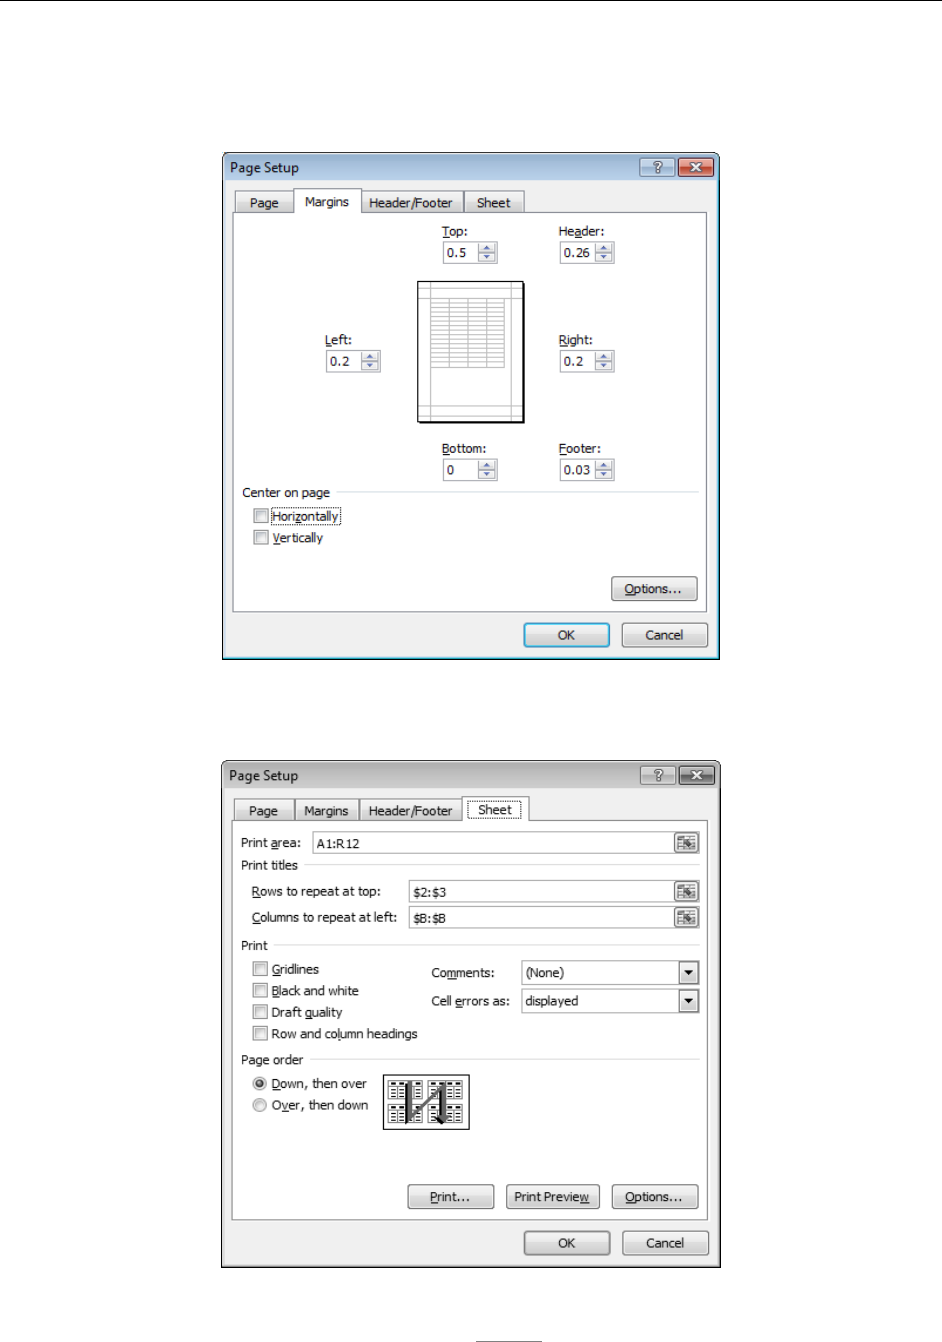
To set the page Margins,
1. Click the Margins tab.
2. Adjust the top, bottom, left and right margins to the appropriate setting.
The Print Area is set to allow proper information to be printed together, ex. barcodes and titles.
1. Click the Sheet tab.
2. Select the correct Print Area.
3. Select the appropriate rows and columns to repeat on each page.
The Page tab is used for the page orientation, scaling and paper size.
20
Appendix
Excel – Formatting Pages (continued)
The Margin tab is used for top, bottom left and right margin settings.
The Sheet tab is used for print area, rows to repeat and columns to repeat.
