1
When a candidate is moved to Candidate Selected status, the recruiter receives notification that a finalist has
been chosen for the position. This notification will prompt the recruiter to initiate the Skill Survey Reference
Check as well as generate a salary recommendation. (If the candidate is internal, an Internal Reference Form
will be sent through iCIMS in lieu of the Skill Survey.)
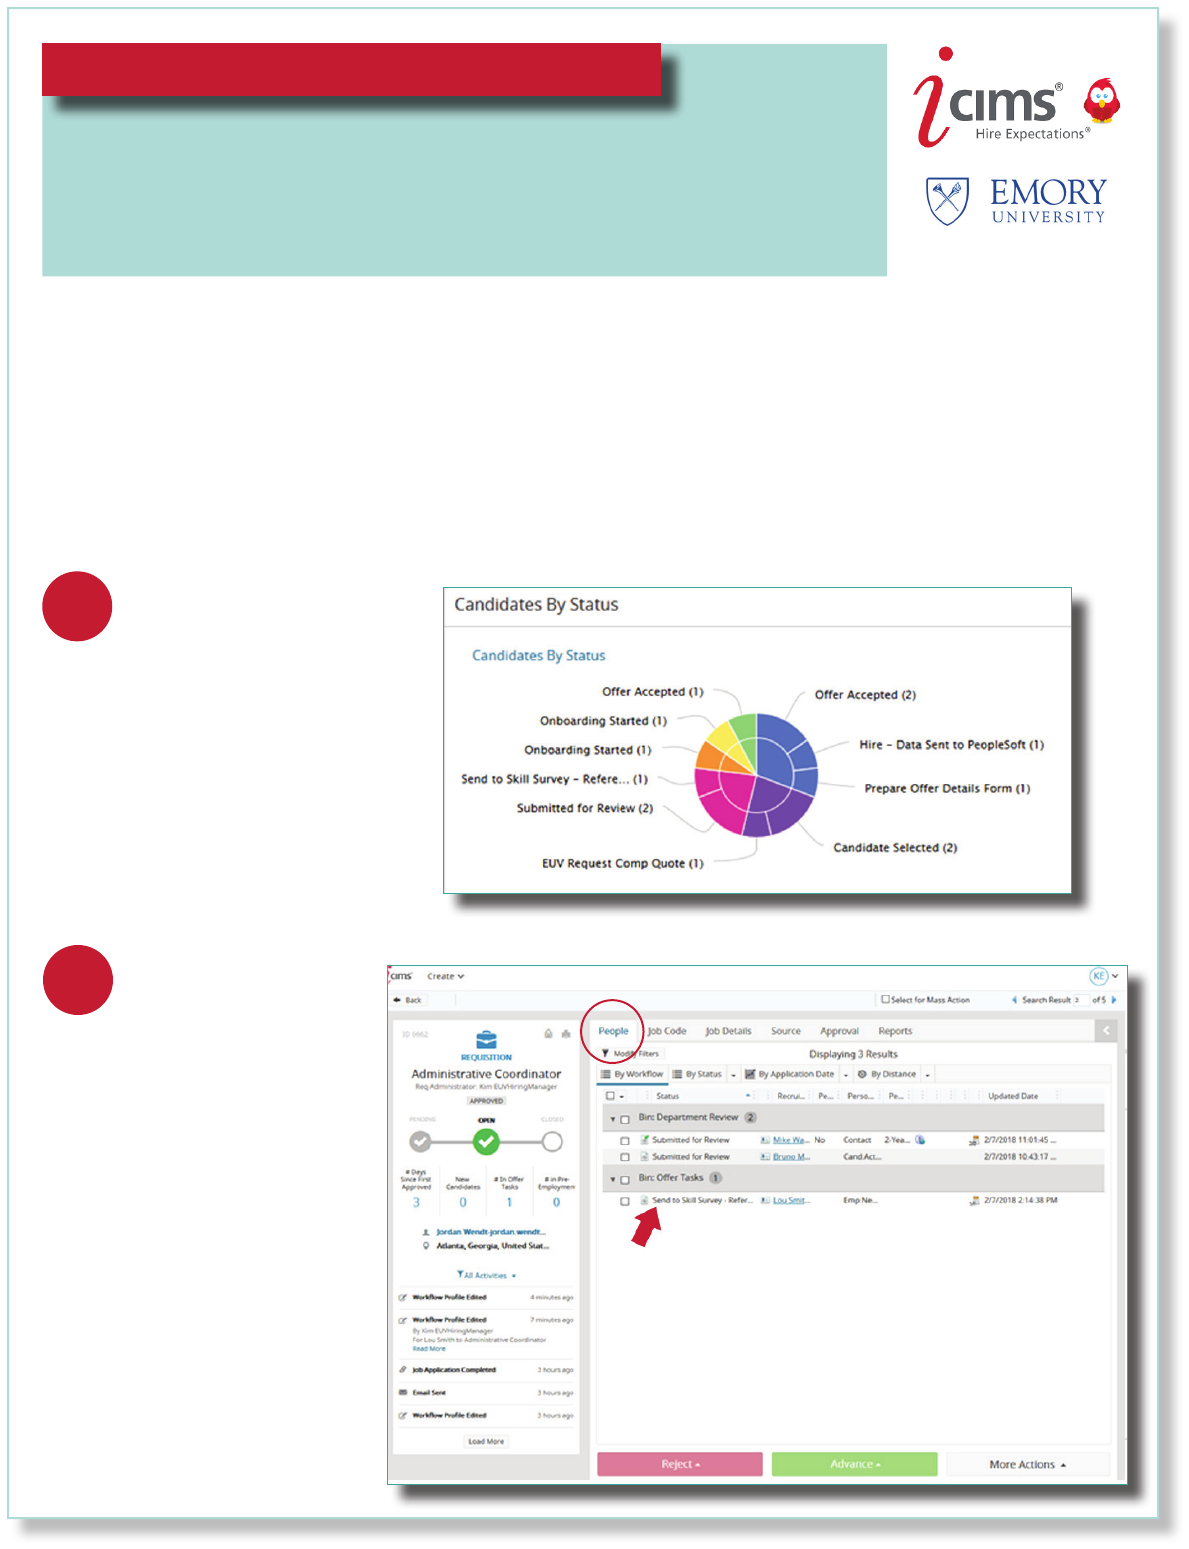
As the Req Administrator, you will be able to track the progress of the finalist in iCIMS. There are two ways to
track these steps in the process:
2
1
Check the Candidates
By Status panel on the
dashboard. Clicking on the
status will give you the name
of the candidate in that
status and the associated
requisition.
View the status of
the candidate on the
People tab within the
requisition.
The Offer Process - Staff Hiring
Overview: This job aid guides hiring managers and Requisition Administrators
through what happens after a finalist is selected: Creating and Sending an
Offer Letter, Post Offer Acceptance and Onboarding.

2
The Offer Details Form
The Offer Details Form is one form that combines the information that was formerly found on the Offer
Approval and Hire Transfer Form in the Kenexa/Brassring system.
Once the department and the recruiter have determined the compensation amount, the recruiter will send the
Req Administrator an email requesting that the Offer Details Form be completed.
The easiest way to
access this form is by
clicking on the link
provided in the email.
Another way to access
the form is through your
dashboard notification
in the My Offer Details
Form and Offer
Progression panel.

3
Completing the Offer Details Form
The Additional Information section contains new health and safety questions. Select your area from the drop
down menu and answer the questions.

4
Extending the Offer
After the Req Administrator has completed the Offer Details Form, the recruiter will be notified. The recruiter
will then route the Offer Details Form for approval.
The Offer Details Form must be approved by two key departmental decision makers. These can be the same
as the approvers of the requisition.
Once the Offer Details
Form has been approved,
the recruiter will send an
email notifying the Req
Administrator that the
offer has been approved
and that the offer may be
extended to the candidate.

5
Creating & Sending the Offer Letter
In addition to the email notification, there will be a dashboard notification that the Offer Details Form has
been approved and the offer is ready to extend.
On the People tab in the requisition, use the green Advance button to move the candidate to Send Offer
and Confidential Data Form status.

6
Choosing the Offer Letter
The iForms Center will pop up. Choose which Offer Letter you will send to the candidate. There are
two options:
1. Standard Offer Letter – This offer letter requires minimal editing. Most custom information will
pull from the requisition and the Offer Details Form. The Req Administrator may need to edit
information that did not parse, or edit the parsed information for completeness.
2. Customizable Offer Letter – This offer letter pulls only the job title, department name, division,
pay rate and pay frequency along with a contingency statement. Any additional information will
need to be manually added.

7
Building a Customizable Offer Letter
In the first text box,
below the recipient’s
name, enter the
beginning of the offer
letter.
Below the text box,
you will see the offer
information that parsed
from the requisition and
Offer Details Form. The
text boxes highlighted in
yellow are editable.
To begin building a
Customizable Offer
Letter, first click on Edit
in the top left corner of
the iForms Center.

8
Building a Customizable Offer Letter
A third text box is
located at the bottom
of the page. Enter the
sender’s name and
contact information here.
Below the parsed
information there is
another text box, enter
the conclusion of the
Offer Letter here.

9
Editing the Standard Offer Letter
Text within the red boxed section of the offer letter should be edited. To edit, simply click the Edit button in
the top left corner of the iForms Center.

10
Sending the Offer Letter
To send either version of the offer letter, click Send iForm. Then click Continue.

11
Sending the Offer Letter
If you need to edit this email template, you may do so by clicking in the body of the email.
When done, click Send.

12
Post Offer Acceptance
Once the candidate has signed the Offer Letter, the recruiter will be notified that the candidate has accepted
the offer through a dashboard notification in iCIMS.
Unless notified outside of the iCIMS workflow, this will trigger for the recruiter to begin the background check
and initiate any other pre-employment screening needed for the new hire.
Just as the candidate’s status was able to be tracked during the offer preparation, this status can also be
tracked though iCIMS during the pre-employment process.

13
Onboarding
Clicking into the dashboard notification will provide more insight into the progress of each new hire’s
Onboarding status.
Once the candidate has cleared all pre-employment screens, the recruiter will push their data to PeopleSoft
and initiate Onboarding. The new hire will be sent an email to complete their onboarding tasks online. As the
Req Administrator, you can track the onboarding progress of the new hire on your dashboard.
