
iSiLK
A graphical front-end for the SiLK tools
iSiLK was developed by the
Network Situational Awareness Group at CERT
Software Engineering Institute
Carnegie Mellon University
User’s Guide
for iSiLK version 0.3.2
January 2011

iSiLK User Guide
Copyright © 2007-2011 Carnegie Mellon University
iSiLK is released under the following licenses:
• GNU Public License (GPL) Rights pursuant to Version 2, June 1991
• Government Purpose License Rights (GPLR) pursuant to DFARS 252.225-7013
iSiLK and related applications are made available with NO WARRANTY.
ANY INFORMATION, MATERIALS, SERVICES, INTELLECTUAL PROPERTY
OR OTHER PROPERTY OR RIGHTS GRANTED OR PROVIDED BY
CARNEGIE MELLON UNIVERSITY PURSUANT TO THIS LICENSE
(HEREINAFTER THE "DELIVERABLES") ARE ON AN "AS-IS" BASIS.
CARNEGIE MELLON UNIVERSITY MAKES NO WARRANTIES OF ANY
KIND, EITHER EXPRESS OR IMPLIED AS TO ANY MATTER INCLUDING,
BUT NOT LIMITED TO, WARRANTY OF FITNESS FOR A PARTICULAR
PURPOSE, MERCHANTABILITY, INFORMATIONAL CONTENT,
NONINFRINGEMENT, OR ERROR-FREE OPERATION. CARNEGIE MELLON
UNIVERSITY SHALL NOT BE LIABLE FOR INDIRECT, SPECIAL OR
CONSEQUENTIAL DAMAGES, SUCH AS LOSS OF PROFITS OR INABILITY
TO USE SAID INTELLECTUAL PROPERTY, UNDER THIS LICENSE,
REGARDLESS OF WHETHER SUCH PARTY WAS AWARE OF THE
POSSIBILITY OF SUCH DAMAGES. LICENSEE AGREES THAT IT WILL NOT
MAKE ANY WARRANTY ON BEHALF OF CARNEGIE MELLON UNIVERSITY,
EXPRESS OR IMPLIED, TO ANY PERSON CONCERNING THE APPLICATION
OF OR THE RESULTS TO BE OBTAINED WITH THE DELIVERABLES
UNDER THIS LICENSE.
Licensee hereby agrees to defend, indemnify, and hold harmless Carnegie Mellon
University, its trustees, officers, employees, and agents from all claims or demands made
against them (and any related losses, expenses, or attorney's fees) arising out of, or relating
to Licensee's and/or its sub licensees' negligent use or willful misuse of or negligent
conduct or willful misconduct regarding the Software, facilities, or other rights or
assistance granted by Carnegie Mellon University under this License, including, but not
limited to, any claims of product liability, personal injury, death, damage to property, or
violation of any laws or regulations.
Carnegie Mellon University Software Engineering Institute authored documents are
sponsored by the U.S. Department of Defense under Contract F19628-00-C-0003.
Carnegie Mellon University retains copyrights in all material produced under this
contract. The U.S. Government retains a non-exclusive, royalty-free license to publish or
reproduce these documents, or allow others to do so, for U.S. Government purposes only
pursuant to the copyright license under the contract clause at 252.227.7013.
Table of Contents
Table of Contents........................................................4!
Getting Started with iSiLK..........................................7!
Introduction ......................................................................................... 7!
New Features in iSiLK 0.3.2............................................................... 7!
Installation ........................................................................................... 7!
Configuring iSiLK ............................................................................... 8!
Creating an SSH Key Pair ............................................................................ 8!
Testing your SSH Connection....................................................................... 9!
Editing the iSiLK Configuration Settings...................................................... 9!
A Brief Tour of iSiLK.................................................13!
Querying the Repository with the Query Builder .......................... 14!
Filtering based on the Selection ..................................................... 16!
Using the rwuniq Tool to Summarize Traffic ................................. 17!
Graphing rwuniq Results ................................................................. 17!
Using the Count Tool for Time-Series Counting ........................... 18!
Graphing rwcount Results ............................................................... 19!
Importing Data................................................................................... 20!
Creating a Plug-in Based on a Command Line.............................. 20!
Running an Arbitrary Unix Command Line .................................... 22!
Other Features .................................................................................. 22!
Running iSiLK from the command line .......................................... 24!
Creating a new problem set based on a query............................................. 24!
Creating a new problem set based on imported files................................... 25!

iSiLK User’s Guide Getting Started with iSiLK | 7
Getting Started with iSiLK
Introduction
iSiLK is a graphical front-end for the SiLK tools, designed to work with an
existing installation of the SiLK flow analysis suite. The application uses the SSH
protocol to connect to an analysis server, issue commands and copy data files.
This manual assumes you’re already using iSiLK with a standard SSH
application, and that you’ll be configuring iSiLK to use the same settings.
iSiLK provides an easy-to-use alternative interface to the core functionality of the
SiLK tool suite that makes it easier for an analyst to organize his analysis work,
interactively explore analysis results, and share those results with other analysts.
It’s important that you have a basic understanding of the SiLK tools and how to
apply them before using iSiLK. Although it’s possible to begin using iSiLK
immediately for simple queries, to get the most value from the tool, it’s
recommended that you first familiarize yourself with the SiLK tools and the basics
of flow analysis before getting started.
iSiLK is currently available for Microsoft Windows XP and Vista, and as Python
source that can be run on most Unix systems, and on Mac OSX. This manual
describes using the binary distribution of the application for Windows. For
information about running iSiLK on other platforms, consult the Development
and Deployment Guide.
New Features in iSiLK 0.3.2
This version includes one new feature:
• (Windows only) Added a custom URL handler (isilk://) that
automatically opens the iSiLK application and uses the query string as
pass-through parameters. For example:
isilk://query/?type=in,inweb&start-date=2004/12/28:16&aport=3812
Installation
This manual assumes that you or your system administrator has already set up a
flow collection system and that you have secure shell (SSH) access to a system with
the SiLK tools installed. If that’s not the case, before you can use iSILK you’ll
need to install SiLK and configure it to collect and store flow data collected on
your network. The SiLK tools can be downloaded from:
http://tools.netsa.cert.org/
where you’ll find a variety of other information about SiLK, flow analysis and
other related tools.
iSiLK is distributed as a Windows installer with the extension “.msi”. You can
simply double click on this file to install iSiLK under Program Files on your
system and add iSiLK to your Start menu. For information about running iSiLK
on other platforms, or directly from the command line using an existing
installation of Python, consult the Development and Deployment Guide.
Configuring iSiLK
Unless your system administrator has already configured iSiLK for you, the first
time you run iSiLK you’ll be prompted to configure your default SSH settings.
This will allow iSiLK to connect to an analysis server with the SiLK tools.
Before launching iSiLK for the first time, make sure you know the following:
• The host name or remote IP address of the analysis server where the SiLK
tools are installed.
• Your user id on that server.
You’ll also need a valid SSH key pair, installed on your desktop machine and the
server to allow communication between iSiLK and the remote host.
Creating an SSH Key Pair
Unless your system administrator has already configured your iSiLK set up, you
will need to make sure you have a valid SSH key pair. You can use an existing
keypair or you can run generate the keys on the remote system.
Assuming that the remote server is running openssh on the analysis server, you’ll
need to use ssh-keygen on the server to produce a new key pair and install the
public key on the server in your authorized keys file (generally found in your .ssh
directory under your home directory). The process will be similar for other SSH
implementations. The private key should reside on the windows machine in a
location where iSiLK will be able to read the file.
After logging into the remote system you’ll need to run ssh-keygen on the
analysis system—or another Unix system—to generate keys. You will be
prompted for the file in which to save the key. For example, if you enter
“id_isilk”, the exchange will look like:
remotehost$ ssh-keygen
Generating public/private rsa key pair.
Enter file in which to save the key (/home/jdoe/.ssh/id_rsa): id_isilk
Enter passphrase (empty for no passphrase):
Enter same passphrase again:
Your identification has been saved in id_isilk.
Your public key has been saved in id_isilk.pub.
The key fingerprint is:
5e:9a:02:40:f6:25:58:fd:f4:17:24:22:56:9b:ff:f4
iSiLK User’s Guide Getting Started with iSiLK | 9
This will create two key files, id_isilk and id_isilk.pub, your private and
public key, respectively. In order to use this key to log into this analysis host,
you’ll need to append the contents of the public key file to your ssh authorized
keys file:
remotehost$ cat mynewisilkkey.pub >> ~/.ssh/authorizedkeys
The next step is to move the private key (id_isilk) to your desktop machine.
Generally you’ll do this using a secure copy application running on your desktop.
(“scp”). For security reasons, you should copy the private key to a directory that
only you can read.
Testing your SSH Connection
Before running iSiLK for the first time you may want to make sure you can
invoke SiLK tools using a standard command-line ssh client if you have one
installed. This will allow you verify that SiLK is installed properly, that your
PATH is properly set, and that the SSH setup is correct. For example, run:
C:\> sshclient.exe –i id_mykey me@host rwfilter –help
If you don’t have a command line ssh client installed on the machine running
iSiLK, you can log into the server and ssh back into it:
$ ssh -i id_mykey localhost rwfilter -help
You can then verify rwfilter runs and that its output is the same as you see when
you log with an ssh console application and run that command directly at the
Unix command prompt.
Editing the iSiLK Configuration Settings
When you run iSiLK for the first time, you will be given the opportunity to set the
default iSiLK configuration to match the setup, keys, and remote host and login
information that is unique to your SiLK configuration.

All of the fields displayed in this dialog box are required by iSiLK.
• The REMOTE_HOST field should correspond to the IP address
or host name of the server on which you normally run the SiLK
tools.
• The REMOTE_USER field should contain your user name on
this machine.
• The REMOTE_PORT is the ssh port to connect on the remote
machine. Generally, you’ll just leave this to its default value of 22,
the standard port for SSH.
• The RSH_KEY is the full path name of the file on your machine
(e.g., C:\id_isilk).
You’ll also need to tell iSiLK about the directories where you’ll store
analysis results:
iSiLK User’s Guide Getting Started with iSiLK | 11
• The REMOTE_OUTPUT_DIR field should refer to the directory
where you normally store output files. This may correspond to
your home directory or a separate output directory (e.g.,
/output/jdoe/isilk).
• The REMOTE_LIBRARY_PATH is a set of directories separated
by a colon (“:”) where iSiLK should look for sets and other
secondary data files. This is also the directory that iSiLK will
search for remote files to import.
When you click “Configure Defaults”, iSiLK will test these settings by
issuing a series of simple commands. If iSILK is unable to connect to the
server it will display an error message to help you understand the issue.
One common error that may be displayed is “rwfilter: command not
found”. This indicates that your PATH is not set properly. You’ll need to
be sure that the SiLK binary installation directory is included in your path.
Typically this means adding a line to a shell configuration file on the server
(e.g., “.bashrc” if your Unix shell is bash) that looks like:
PATH=$PATH:<PREFIX>/bin
Where <PREFIX> is where the SiLK tools are installed. Typically this is
“/usr/local”.
Once you successfully configure iSILK, you can begin using the tool.

A Brief Tour of iSiLK | 13
A Brief Tour of iSiLK
iSiLK is designed around the concept of a “problem set”, a collection of related
flow data, analysis results and graphs.
When iSiLK starts you will be given an opportunity to open an existing problem
set or open a new problem set. The problem set will be displayed within a new
Problem Set Explorer window:
There are four major components of a Problem Set Explorer:
1. The Result Tree, which will contain the results of any analyses you run.
When you create a new problem set this tree will be empty.
2. The Toolbar, which includes buttons for each of the tools available
within iSiLK (also available through the Menu). The arrow on the right
side of each button will bring up a menu from which plug-ins can be
selected, if any are configured for that tool (see the Plug-in section below
for more information).
3. An Information Panel that displays basic information about the current
result (more details may be displayed by selecting the Info button).
4. A Result View that displays a record-oriented or graphical view of the
analysis result selected in the Result Tree.
Typically, your first step will be a “data pull” –an rwfilter query—to investigate
some network activity of interest. For example, a typical query would be for all
flows in the last day associated with a particular source IP address. This will be
1
3
2
4

followed by subsequent filtering of the data, analysis and related queries. As you
run further analysis on the data, these results are appended to the analysis Result
Tree. You can browse to any result by selecting it in the tree. Every result is
displayed under the parent data set that was used as input to the analysis. iSiLK
currently provides interfaces to the following SiLK tools:
• rwfilter for queries (the Query Builder tool)
• rwfilter for “drilling down” on query results (the Filter tool)
• rwcount for time-series counting
• rwuniq for other counting
• rwset for creating sets
It’s important to note that the analysis tools are always run on the remote analysis
system, not locally. Every result is stored remotely until you explicitly choose to
download it for browsing by clicking on the remote path displayed in the
Information Panel at the top of the result.
Querying the Repository with the Query Builder
Tools ➔ Query ➔ Query Builder provides a simplified interface for users for
querying the flow data repository.

A Brief Tour of iSiLK | 15
Using the Query Builder you can:
• Easily select query options including the time period to search and the
source and destination of traffic.
• Select from common rwfilter options by selecting “More Filter Options”.
Using the additional filter options you can filter based on protocol-specific
fields (i.e., ICMP type and code and TCP flags), traffic volumes and using
a prefix map.
• Display the rwfilter command-line equivalent for the currently selected
query.
• Select from common options, and site-specific defaults.
The result of the query will be added to the Result Tree. When the query
completes, the result of the query will be available on the remote machine. In
order to browse the result, you will need to download the result by clicking on the
path to the remote file displayed in the Information Panel. After doing that you’ll
be presented with a view that looks something like the following:
Using the record browser displayed in Result View you can:
• Browse the records returned by the query by using the standard list
controls.
• Sort records by clicking on the appropriate column header.
• Select records to copy to the clipboard by selecting “Copy as tabular data”
from the Edit menu (e.g., to paste into Excel)

Filtering based on the Selection
You can formulate additional queries and filter further based on the current
selection in the record browser displayed in the Result View. After selecting a
record of interest, you can:
• Query the repository based on the record by right clicking and selecting
the appropriate item from the pop up menu. This will add a new query
result to the Result Tree.
• Filter the results further by double-clicking (to select all records associated
with the given sip, dip, sport, dport and proto), right clicking and selecting
an item from the pop up menu, or using Tools ➔ Filter ➔ rwfilter…
In the second case, you’ll have an opportunity specify additional filtering criteria.
This will add a new “Filter Result” underneath the result that you’ve drilled down
on:

A Brief Tour of iSiLK | 17
Using the rwuniq Tool to Summarize Traffic
Tools ➔ Uniq ➔ rwuniq… provides a subset of the options provided by the
SiLK rwuniq command line tool. Using rwuniq you can:
• Specify one or more fields to count by (the key fields)
• Select a prefix map to use for counting based on symbolic labels.
• Specify one or more totals to calculate from among bytes, packets, flow
records, unique source IPs and unique destination IPs.
• View the corresponding rwuniq command line.
The result will be displayed in a record browser in the Result View. The
following shows bytes and packets totals based on protocol:
Graphing rwuniq Results
iSiLK has a simple graphing capability available through the Graph ➔ Quick
Graph tool. After selecting an rwuniq result in the Result Tree, click on the
Quick Graph tool to display a simple bar graph:
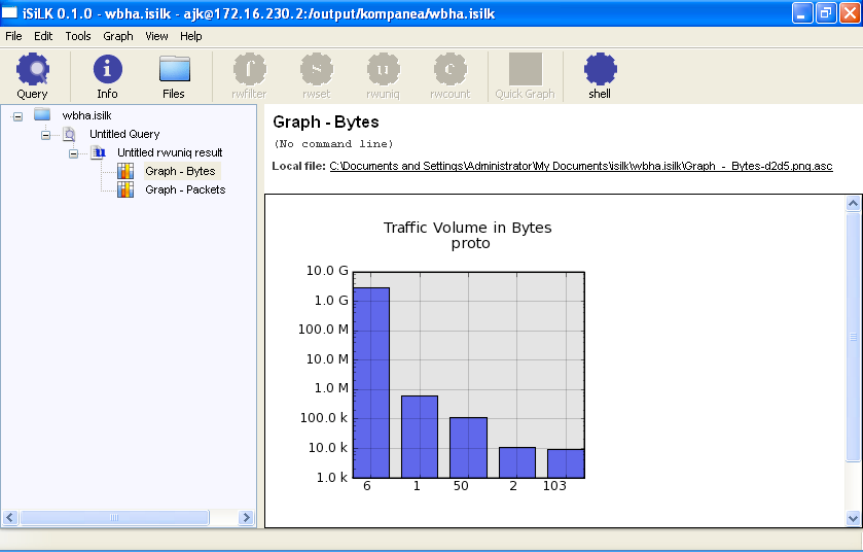
You can display a popup tooltip with more details about a bar in the graph by
moving the mouse over the bar. You can also drill down on the data
corresponding to a particular bar by double clicking on it.
Using the Count Tool for Time-Series Counting
Tools ➔ Count ➔ rwcount… provides a simplified interface to the rwcount
command-line tool. Using rwcount you can:
• Specify a time bin size.
• View the corresponding rwcount command line.
Note that rwcount uses the default rwuniq option for assigning totals to
particular time bins.

A Brief Tour of iSiLK | 19
Graphing rwcount Results
Like rwuniq results, rwcount results can be graphed using the Quick Graph tool:

Importing Data
File ➔Import Data File… allows you to select a file on the remote analysis
server to import into the current problem set (e.g., the result of some scheduled
analysis process). When you choose this menu option, iSiLK will search the
contents of all the directories in your in your REMOTE_LIBRARY_PATH (see
Tools ➔SSH Settings…) looking for files with particular file name extensions
that indicate their type. You can import the following file types using the import
feature:
• Binary flow data file (.rwf)
• Binary set file (.set or .bin)
Creating a Plug-in Based on a Command Line
iSiLK provides a mechanism that can be used to save a commonly-used
command line as a plug-in tool, the iSiLK equivalent of a “macro” or “script”. A
plug-in is an arbitrary command line that generates a single output file based on
an analysis of the current selection or based on a “query”. A query can consist of
an actual rwfilter-style query of the repository, or it can be any command that
retrieves flow data (e.g., a command invocation that returns the result of some
automated process).
Tools ➔Manage plug-ins… will display all of the currently registered plug-in
tools:

A Brief Tour of iSiLK | 21
To create a new plug-in based on a command-line you specify, click on “New…”.
This will display a dialog that will you provide a tool name, specify the command
line to use, and choose the category of tool you’re creating:

The command line template is an arbitrary Unix command line that can produce
either binary flow data or columnar ASCII output that iSiLK consumes. Use the
special “wildcard” string $input to refer to the file name for the currently selected
result in the problem set explorer—for a query, you can leave $input off the
command line. Similarly, use $output where you would normally specify an
output file name. One use of this feature is to make an otherwise unavailable
SiLK application available from within iSiLK. For example, you can create a
simple “Mask 24” tool for masking by /24, for example, to generate statistics in
terms of source network using rwuniq, by specifying a command line like:
cat $input | rwnetmask --sip-prefix=24 --output-path=$output
Note the use of the cat command above. This is necessary since rwnetmask is
expecting to read its input from standard input rather than a file. For SiLK tools
that let you specify an input file name this isn’t necessary.
After clicking on “Create plug-in”, the new tool will appear on the Tools menu
as “Mask 24” and on the menu adjacent to the appropriate toolbar button based
on the category you’ve specified.
Running an Arbitrary Unix Command Line
If the built-in set of tools doesn’t include a capability you need, but you don’t need
to create a new tool you can use Tools ➔Run shell command… to execute an
arbitrary command line. This tool will display a dialog very similar to the dialog
used to create a command line plug-in. See the discussion above for details.
Other Features
A variety of other features are available as menu options. These include:
• File ➔ Show Local Files will display the contents of the local working
directory corresponding the current problem set. This includes text
versions of all analysis results and graphics for files for all graphs.
• File ➔ Import Remote Data File… will search your remote library
path for files to import (e.g., the result of a cron job).
• Tools ➔ SSH Settings… allows you to adjust the ssh settings for the
current problem set as well as the default settings for future problem sets.
!
Use caution when changing the output directory
for a non-empty problem set. iSiLK will not copy
results to a new directory. It is possible to
manually copy results to a new directory and
then change the output directory setting, but this
is not recommended.
• View ➔ Command Log displays command line history in a panel at
the bottom of the problem set.
A Brief Tour of iSiLK | 23
• View ➔ Show File Info displays an information box with information
about the currently selected result, including the information returned by
the rwfileinfo tool for query and filter results. Also available through the
Info tool on the Toolbar.
• View ➔ View Options… allows you choose which of the available
columns to display in a particular record view and to select from options
that affect how field values are displayed in the record view.
• The Help menu includes items for the commonly used SiLK tools.
Selecting one of these items will launch your web browser and display the
appropriate documentation page on the SiLK public release web site.
Running iSiLK from the command line
iSiLK can be launched from a Command Prompt or from another application,
and includes command line options for automatically launching a query when
iSiLK is started. If iSiLK was installed via the Windows Binary, support for a
custom URL handler will also be included. This provides a simple way to
integrate iSiLK with other applications.
A typical invocation might look something like:
C:\>isilk.exe --type=in,inweb --start-date=2008/01/16
--end-date=2008/01/17 --saddress=10.1.1.1
Or via the new custom URL handler:
isilk://query/?type=in,inweb&start-date=2008/01/16&end-
date=2008/01&saddress=10.1.1.1
The above will launch iSiLK with a new empty problem set and immediately
launch a query for all incoming traffic between the 15
th
and 17
th
of January in
2008 associated with the source IP address 10.1.1.1.
You can display all of the command line options available in iSiLK using the help
option option:
C:\>isilk.exe --help
The following sections describe some of the command line options supported by
iSiLK.
Creating a new problem set based on a query
From the command line you can a new problem set based on a query using one
more of the rwfilter “pass-through” command line options supported by iSiLK.
These include the rwfilter “selection switches” used to select which data files to
search in the repository:
--class=CLASS
--type=TYPE
--sensors=SENSORS
--start-date=START_DATE
--end-date=END_DATE
as well as some of the common “partitioning switches”, including:
--saddress=SADDRESS
--daddress=DADDRESS
--any-address=ANY_ADDRESS
--dport=DPORT
--sport=SPORT
--aport=APORT
--proto=PROTO
A Brief Tour of iSiLK | 25
Creating a new problem set based on imported files
You can also create a new problem set that includes copies of a set of SiLK binary
data files available on the analysis server. This can be used as a simple way to
import the result of a cron job running on the server, or a data file generated by
running the command line tools.
Use the --import-files option with a comma-separated list of remote files to import
as analysis results. These files should correspond to paths on the server you’ve
configured as your default analysis host. For example:
C:\>isilk.exe --import-files=/shared/file1.rwf,/shared/file2.rwf
