
SAP Crystal Reports 2013 User Guide
■ SAP Crystal Reports 2013
2013-05-06
© 2013 SAP AG or an SAP affiliate company. All rights reserved. No part of this publication may be
reproduced or transmitted in any form or for any purpose without the express permission of SAP AG.
Copyright
The information contained herein may be changed without prior notice. Some software products
marketed by SAP AG and its distributors contain proprietary software components of other software
vendors. National product specifications may vary. These materials are provided by SAP AG and its
affiliated companies ("SAP Group") for informational purposes only, without representation or warranty
of any kind, and SAP Group shall not be liable for errors or omissions with respect to the materials.
The only warranties for SAP Group products and services are those that are set forth in the express
warranty statements accompanying such products and services, if any. Nothing herein should be
construed as constituting an additional warranty. SAP and other SAP products and services mentioned
herein as well as their respective logos are trademarks or registered trademarks of SAP AG in
Germany and other countries. Please see
http://www.sap.com/corporate-en/legal/copyright/index.epx#trademark for additional trademark
information and notices.
2013-05-06

Contents
Introduction to SAP Crystal Reports 2013............................................................................21Chapter 1
About Crystal Reports...........................................................................................................21
1.1
About the Crystal Reports documentation..............................................................................21
1.2
Locate information quickly......................................................................................................22
1.2.1
Sample Reports.....................................................................................................................22
1.2.2
Quick Start............................................................................................................................23Chapter 2
Learning how to use Crystal Reports.....................................................................................23
2.1
Sample data - Xtreme.mdb.....................................................................................................23
2.1.1
Report Creation Wizards........................................................................................................24
2.2
Standard................................................................................................................................24
2.2.1
Cross-Tab..............................................................................................................................24
2.2.2
Mailing Label..........................................................................................................................25
2.2.3
OLAP.....................................................................................................................................25
2.2.4
Quick start for new users.......................................................................................................25
2.3
Before you begin....................................................................................................................26
2.3.1
Creating the report.................................................................................................................26
2.3.2
Record Selection...................................................................................................................37
2.3.3
Grouping and sorting..............................................................................................................41
2.3.4
Completing the report............................................................................................................45
2.3.5
Quick start for advanced users...............................................................................................46
2.4
Choosing a report type and data source.................................................................................46
2.4.1
Working with report elements on the Design tab....................................................................47
2.4.2
Using other reporting features................................................................................................48
2.4.3
Report Design Concepts.......................................................................................................51Chapter 3
Basic report design................................................................................................................51
3.1
Deciding on the content of the report.....................................................................................51
3.2
Stating the purpose................................................................................................................51
3.2.1
Determining the layout of the report ......................................................................................52
3.2.2
Finding the data......................................................................................................................53
3.2.3
Manipulating the data.............................................................................................................54
3.2.4
2013-05-063

Determining printing area characteristics................................................................................55
3.2.5
Developing a prototype on paper...........................................................................................57
3.3
Introduction to Reporting......................................................................................................59Chapter 4
Report creation options..........................................................................................................59
4.1
Choosing data sources and database fields...........................................................................60
4.2
The Database Expert..............................................................................................................60
4.2.1
The Field Explorer...................................................................................................................62
4.2.2
About the report design environment.....................................................................................64
4.3
Design tab.............................................................................................................................64
4.3.1
Preview tab............................................................................................................................68
4.3.2
HTML Preview tab..................................................................................................................72
4.3.3
Creating a new report............................................................................................................73
4.4
Selecting the data source.......................................................................................................73
4.4.1
Adding tables.........................................................................................................................74
4.4.2
Linking multiple tables............................................................................................................75
4.4.3
Placing data on the report......................................................................................................77
4.4.4
BLOB (Binary Large Object) fields.........................................................................................83
4.4.5
Formatting data......................................................................................................................84
4.4.6
Record selection....................................................................................................................84
4.4.7
Grouping, sorting, and summarizing data................................................................................84
4.4.8
Using the drill-down option on summarized data.....................................................................85
4.4.9
Using the zoom feature..........................................................................................................86
4.4.10
Inserting page headers and footers........................................................................................86
4.4.11
Adding a title page to the report.............................................................................................87
4.4.12
Adding summary information to the report..............................................................................87
4.4.13
Exploring reports and working with multiple reports................................................................88
4.5
The Report Explorer...............................................................................................................89
4.5.1
The Workbench......................................................................................................................90
4.5.2
The Dependency Checker......................................................................................................92
4.5.3
Opening and docking explorers..............................................................................................93
4.5.4
Beyond basic reports.............................................................................................................94
4.6
SAP BusinessObjects Enterprise Repository........................................................................95Chapter 5
What is the SAP BusinessObjects Enterprise Repository?.....................................................95
5.1
Work flow..............................................................................................................................95
5.1.1
Accessing the SAP BusinessObjects Enterprise Repository..................................................96
5.2
To open the SAP BusinessObjects Enterprise Repository......................................................97
5.2.1
Repository Explorer toolbar....................................................................................................97
5.3
Adding subfolders and subcategories to the repository..........................................................98
5.4
2013-05-064
Contents

To add a new subfolder or subcategory..................................................................................99
5.4.1
Adding items to the repository...............................................................................................99
5.5
Adding a text object or bitmap image.....................................................................................99
5.5.1
Adding a text object or bitmap image - another method........................................................100
5.5.2
Adding a custom function.....................................................................................................100
5.5.3
Adding a command...............................................................................................................101
5.5.4
Using repository objects in reports ......................................................................................101
5.6
Adding a text object or a bitmap image to a report...............................................................102
5.6.1
Adding a custom function to a report....................................................................................102
5.6.2
Adding a command to a report.............................................................................................103
5.6.3
Adding a list of values to a parameter...................................................................................103
5.6.4
Modifying objects in the repository.......................................................................................103
5.7
To modify a repository object...............................................................................................104
5.7.1
Updating connected repository objects in reports................................................................104
5.8
To set the update option......................................................................................................105
5.8.1
Deleting items from the repository.......................................................................................105
5.9
To delete an object from the repository................................................................................105
5.9.1
Using Undo in the repository................................................................................................106
5.10
Designing Optimized Web Reports.....................................................................................107Chapter 6
Overview..............................................................................................................................107
6.1
Key strategies for optimizing web reports............................................................................108
6.1.1
Scale with SAP BusinessObjects Business Intelligence platform .........................................108
6.2
Evaluation times for date functions in SAP BusinessObjects Business Intelligence platform .109
6.2.1
Making the right design choices...........................................................................................110
6.3
Using faster report formats..................................................................................................110
6.3.1
Choosing between live and saved data................................................................................111
6.3.2
Designing summary reports.................................................................................................112
6.3.3
Using subreports carefully....................................................................................................113
6.3.4
Using other design elements effectively...............................................................................115
6.3.5
Designing reports to maximize data sharing.........................................................................115
6.3.6
Streamlining your reporting environment..............................................................................116
6.4
Selecting the fastest database and connection....................................................................116
6.4.1
Using table indexes..............................................................................................................116
6.4.2
Improving table-linking choices.............................................................................................117
6.4.3
Using thread-safe database drivers......................................................................................117
6.4.4
Using stored procedures for faster processing.....................................................................118
6.4.5
Using enhanced record selection formulas ..........................................................................119
6.5
Pushing down record selection—an example.......................................................................119
6.5.1
Record selection performance tips.......................................................................................120
6.5.2
Strategies for writing efficient record selection formulas......................................................121
6.5.3
2013-05-065
Contents

Incorporating parameter fields into record selection formulas...............................................124
6.5.4
Using SQL expressions where appropriate..........................................................................125
6.5.5
Improving grouping, sorting, and totaling..............................................................................125
6.6
Performing grouping on server.............................................................................................126
6.6.1
Benefits of grouping on server—an example........................................................................126
6.6.2
Using SQL Expressions for groups, sorts, and totals...........................................................127
6.6.3
Using SQL Expressions for Case Logic................................................................................128
6.6.4
Inserting summary and running total fields where possible....................................................128
6.6.5
Record Selection.................................................................................................................129Chapter 7
Selecting records.................................................................................................................129
7.1
Options for selecting records...............................................................................................129
7.1.1
Determining which field(s) to use.........................................................................................129
7.1.2
Using the Select Expert........................................................................................................130
7.1.3
Using formulas.....................................................................................................................132
7.1.4
Interaction of the Select Expert and the Formula Editor........................................................132
7.1.5
Saved data selection formulas..............................................................................................134
7.1.6
Using formula templates.......................................................................................................134
7.2
Record selection formula templates.....................................................................................134
7.2.1
Pushing down record selection to the database server.........................................................137
7.3
Troubleshooting record selection formulas...........................................................................137
7.4
To troubleshoot record selection formulas...........................................................................137
7.4.1
Correcting selections that do not generate data...................................................................139
7.4.2
Sorting, Grouping, and Totaling..........................................................................................141Chapter 8
Sorting data.........................................................................................................................141
8.1
Understanding sort options..................................................................................................141
8.1.1
Sorting single and multiple fields..........................................................................................143
8.1.2
Sort controls........................................................................................................................145
8.1.3
Grouping data......................................................................................................................147
8.2
Grouping data......................................................................................................................147
8.2.1
Creating custom groups.......................................................................................................149
8.2.2
Sorting groups conditionally.................................................................................................150
8.2.3
Sorting records within groups..............................................................................................151
8.2.4
Group selection...................................................................................................................152
8.2.5
Grouping data in intervals.....................................................................................................156
8.2.6
Grouping by the first letter of a company name....................................................................158
8.2.7
Grouping data hierarchically.................................................................................................159
8.2.8
Editing groups......................................................................................................................165
8.2.9
Summarizing grouped data...................................................................................................166
8.3
2013-05-066
Contents

To summarize grouped data.................................................................................................166
8.3.1
Ordering groups by summarized values................................................................................167
8.3.2
Selecting top or bottom N groups or percentages................................................................168
8.3.3
Selecting top or bottom groups or percentages conditionally...............................................170
8.3.4
Subtotaling...........................................................................................................................171
8.4
Subtotaling data...................................................................................................................171
8.4.1
Extending prices and subtotaling the extensions...................................................................172
8.4.2
Percentages.........................................................................................................................173
8.5
Calculating a percentage......................................................................................................174
8.5.1
Group headers.....................................................................................................................175
8.6
Creating group headers........................................................................................................175
8.6.1
Suppressing group headers.................................................................................................179
8.6.2
Drilling-down on group headers............................................................................................179
8.6.3
Running Totals....................................................................................................................181Chapter 9
Understanding running totals................................................................................................181
9.1
How running totals work.......................................................................................................181
9.1.1
Creating running totals.........................................................................................................182
9.2
Creating running totals in a list.............................................................................................182
9.2.1
Creating running totals for a group.......................................................................................184
9.2.2
Creating conditional running totals.......................................................................................185
9.2.3
Creating running totals in a one-to-many linking relationship.................................................187
9.2.4
Creating running totals using a formula.................................................................................188
9.3
To create running totals using a formula...............................................................................188
9.3.1
Multiple Section Reports.....................................................................................................191Chapter 10
About sections.....................................................................................................................191
10.1
Working with sections..........................................................................................................191
10.2
Inserting a section................................................................................................................192
10.2.1
Deleting a section................................................................................................................192
10.2.2
Moving a section..................................................................................................................193
10.2.3
Merging two related sections...............................................................................................193
10.2.4
Splitting and resizing sections..............................................................................................194
10.3
Splitting a section.................................................................................................................194
10.3.1
Resizing a section................................................................................................................195
10.3.2
Using multiple sections in reports ........................................................................................196
10.4
Keeping variable length objects from overwriting each other................................................196
10.4.1
Eliminating blank lines when fields are empty........................................................................197
10.4.2
Adding blank lines conditionally............................................................................................198
10.4.3
Form letters.........................................................................................................................198
10.5
2013-05-067
Contents

Working with text objects.....................................................................................................199
10.5.1
Creating a form letter using a text object..............................................................................200
10.5.2
Printing conditional messages in form letters........................................................................205
10.5.3
Formatting...........................................................................................................................207Chapter 11
Formatting concepts............................................................................................................207
11.1
Using a template..................................................................................................................207
11.2
Applying a template..............................................................................................................208
11.2.1
Removing an applied template..............................................................................................209
11.2.2
Reapplying the last template selected..................................................................................209
11.2.3
Using Template Field Objects...............................................................................................210
11.2.4
Template considerations......................................................................................................211
11.2.5
Using the Report Design Environment..................................................................................213
11.3
Section characteristics.........................................................................................................214
11.3.1
Making an object underlay a following section......................................................................214
11.3.2
Pre-printed forms.................................................................................................................216
11.3.3
Multiple columns..................................................................................................................216
11.3.4
Hiding report sections..........................................................................................................217
11.3.5
Hiding report objects............................................................................................................218
11.3.6
Placing text-based objects....................................................................................................220
11.3.7
Placing multi-line, text-based objects....................................................................................223
11.3.8
Importing text-based objects from a file................................................................................224
11.3.9
Spacing between text-based objects....................................................................................225
11.3.10
Selecting multiple objects.....................................................................................................232
11.3.12
Vertical placement...............................................................................................................233
11.3.13
Inserting character and line spacing......................................................................................233
11.3.14
Setting fractional font sizes..................................................................................................234
11.3.15
Setting page size and page orientation.................................................................................235
11.3.16
Setting page margins...........................................................................................................236
11.3.17
TrueType fonts.....................................................................................................................236
11.3.18
Printer drivers......................................................................................................................237
11.3.19
Formatting a report for web viewing.....................................................................................238
11.3.20
Formatting properties...........................................................................................................238
11.4
Working with absolute formatting.........................................................................................239
11.5
Adding borders, color, and shading to a field........................................................................239
11.5.1
Making a report, section, area, or object read-only...............................................................240
11.5.2
Locking an object's size and position....................................................................................241
11.5.3
Changing your default field formats......................................................................................241
11.5.4
Adding and editing lines.......................................................................................................243
11.5.5
Adding and editing boxes.....................................................................................................244
11.5.6
Expected behavior of line and box formatting.......................................................................245
11.5.7
2013-05-068
Contents

Adding shapes to a report....................................................................................................247
11.5.8
Scaling, cropping, and sizing objects....................................................................................248
11.5.9
Using conventional accounting formats................................................................................249
11.5.10
Repeating report objects on horizontal pages.......................................................................250
11.5.11
Using white space between rows.........................................................................................252
11.5.12
Working with conditional formatting......................................................................................254
11.6
Conditional on or off properties............................................................................................255
11.6.1
Conditional attribute properties............................................................................................255
11.6.2
Changing margins conditionally............................................................................................257
11.6.3
Changing X position conditionally.........................................................................................258
11.6.4
Creating footers after the first page.....................................................................................258
11.6.5
Using the Highlighting Expert................................................................................................260
11.6.6
Undo/Redo activities...........................................................................................................263
11.6.7
Using the Format Painter......................................................................................................263
11.7
To copy and apply formatting...............................................................................................264
11.7.1
Working with barcodes.........................................................................................................265
11.8
Adding a barcode.................................................................................................................265
11.8.1
Changing the appearance of a barcode................................................................................266
11.8.2
Removing a barcode............................................................................................................267
11.8.3
Charting..............................................................................................................................269Chapter 12
Charting concepts................................................................................................................269
12.1
Charting overview................................................................................................................269
12.1.1
Chart layouts.......................................................................................................................270
12.1.2
Chart types..........................................................................................................................271
12.1.3
Where to place a chart ........................................................................................................273
12.1.4
Drill-down with charts...........................................................................................................273
12.1.5
Drill-down with legends........................................................................................................273
12.1.6
Creating charts....................................................................................................................274
12.2
Charting on details or formula fields (Advanced layout)........................................................274
12.2.1
Charting on summary or subtotal fields (Group layout).........................................................275
12.2.2
Charting on Cross-Tab summaries (Cross-Tab layout).........................................................276
12.2.3
Charting on an OLAP cube (OLAP layout)............................................................................277
12.2.4
Working with charts.............................................................................................................278
12.3
Editing charts using the Chart Expert....................................................................................278
12.3.1
Editing charts using the Chart Options menu items..............................................................278
12.3.2
Editing charts using other menu items..................................................................................279
12.3.3
Using the zooming features with bar and line charts.............................................................280
12.3.4
Auto-arranging charts...........................................................................................................281
12.3.5
Formatting charts.................................................................................................................282
12.3.6
Using the underlay feature with charts.................................................................................283
12.3.7
2013-05-069
Contents

Mapping..............................................................................................................................285Chapter 13
Mapping concepts................................................................................................................285
13.1
Mapping overview................................................................................................................285
13.1.1
Map layouts.........................................................................................................................285
13.1.2
Map types............................................................................................................................286
13.1.3
Where to place a map..........................................................................................................288
13.1.4
Drill-down with maps............................................................................................................289
13.1.5
Creating maps......................................................................................................................289
13.2
Mapping on group fields (Group layout)................................................................................289
13.2.1
Mapping on Cross-Tab summaries (Cross-Tab layout).........................................................290
13.2.2
Mapping on an OLAP cube (OLAP layout)............................................................................292
13.2.3
Working with maps...............................................................................................................293
13.3
Editing maps using the Map Expert.......................................................................................293
13.3.1
Changing the map title.........................................................................................................294
13.3.2
Changing the map type........................................................................................................294
13.3.3
Changing map layers............................................................................................................294
13.3.4
Resolving data mismatches..................................................................................................296
13.3.5
Changing the geographic map..............................................................................................296
13.3.6
Zooming in and out on a map...............................................................................................297
13.3.7
Panning a map......................................................................................................................298
13.3.8
Centering a map...................................................................................................................298
13.3.9
Hiding and showing the Map Navigator................................................................................298
13.3.10
OLE.....................................................................................................................................301Chapter 14
OLE overview.......................................................................................................................301
14.1
OLE terminology..................................................................................................................301
14.1.1
Types of OLE objects...........................................................................................................302
14.1.2
General OLE considerations.................................................................................................302
14.1.3
Inserting OLE objects into reports........................................................................................303
14.2
To copy and paste OLE objects ...........................................................................................303
14.2.1
How OLE objects are represented in a report.......................................................................304
14.3
Editing OLE objects in reports..............................................................................................304
14.4
In-place editing.....................................................................................................................304
14.4.1
Dynamic OLE menu commands............................................................................................305
14.4.2
OLE and the Insert Picture command...................................................................................305
14.4.3
Working with static OLE objects..........................................................................................305
14.5
Inserting a static OLE object.................................................................................................306
14.5.1
Making a static OLE object dynamic.....................................................................................306
14.5.2
Converting a static OLE object to a bitmap image object......................................................307
14.5.3
2013-05-0610
Contents

Working with embedded vs. linked objects...........................................................................308
14.6
Embedded objects...............................................................................................................308
14.6.1
Linked objects......................................................................................................................309
14.6.2
Integrating Shockwave Flash (SWF) objects........................................................................310
14.7
Printing Shockwave Flash (SWF) objects.............................................................................311
14.7.1
Adding an Xcelsius SWF object to a report..........................................................................311
14.7.2
Using data binding to bind an Xcelsius SWF object to a report.............................................312
14.7.3
Cross-Tab Objects..............................................................................................................315Chapter 15
What is a Cross-Tab object?................................................................................................315
15.1
Cross-Tab example..............................................................................................................316
15.2
Report of order data - no sorting/grouping...........................................................................316
15.2.1
Report of order data - grouped by region.............................................................................317
15.2.2
Report of order data - grouped by product...........................................................................318
15.2.3
Report of order data - grouped by region and product..........................................................319
15.2.4
Order data in a Cross-Tab object.........................................................................................320
15.2.5
Creating a Cross-Tab report.................................................................................................321
15.3
To create a new cross-tab report.........................................................................................322
15.3.1
To add a Cross-Tab to an existing report..............................................................................322
15.3.2
Specifying the data source...................................................................................................323
15.3.3
Modifying the links...............................................................................................................324
15.3.4
Adding a chart......................................................................................................................324
15.3.5
Selecting records.................................................................................................................325
15.3.6
Defining the structure of the Cross-Tab...............................................................................325
15.3.7
Applying a predefined style and finishing the report..............................................................326
15.3.8
Adding a Cross-Tab to an existing report using the Cross-Tab Expert..................................326
15.3.9
Working with Cross-Tabs.....................................................................................................329
15.4
Showing values as percentages...........................................................................................329
15.4.1
Abbreviating large summarized fields ...................................................................................329
15.4.2
Customizing row/column labels............................................................................................330
15.4.3
Using running totals in Cross-Tabs.......................................................................................331
15.4.4
Printing Cross-Tabs that span multiple pages ......................................................................332
15.4.5
Formatting Cross-Tabs.........................................................................................................333
15.5
Changing width, height, and alignment of Cross-Tab cells....................................................333
15.5.1
Formatting background color of entire rows/columns...........................................................333
15.5.2
Formatting fields individually.................................................................................................334
15.5.3
Formatting several fields at one time....................................................................................334
15.5.4
Suppressing Cross-Tab data................................................................................................334
15.5.5
Displaying summarized fields horizontally.............................................................................336
15.5.6
Advanced Cross-Tab features..............................................................................................336
15.6
Calculated Members............................................................................................................336
15.6.1
2013-05-0611
Contents

Embedded Summaries.........................................................................................................340
15.6.2
Building Queries.................................................................................................................343Chapter 16
Connecting to a universe.....................................................................................................343
16.1
To connect to a universe......................................................................................................343
16.1.1
Defining the data selection for a query.................................................................................344
16.2
To build a simple query.........................................................................................................344
16.2.1
To create a combined query.................................................................................................345
16.2.2
Quick reference to objects...................................................................................................345
16.2.3
Editing an existing query.......................................................................................................347
16.3
To edit an existing query......................................................................................................347
16.3.1
Viewing the SQL behind a query..........................................................................................347
16.4
To view the SQL when you create a query...........................................................................347
16.4.1
To view the SQL after you have created a query..................................................................348
16.4.2
Query filters and prompts.....................................................................................................348
16.5
Creating query filters............................................................................................................348
16.5.1
Building prompts..................................................................................................................349
16.5.2
Combining query filters and prompts....................................................................................350
16.5.3
Using And or Or to combine query filters.............................................................................351
16.5.4
Quick reference to query filter operators..............................................................................352
16.5.5
Editing and removing query filters.........................................................................................354
16.5.6
Filtering data using subqueries and database ranking...........................................................354
16.6
What is a subquery?.............................................................................................................355
16.6.1
Building a subquery..............................................................................................................355
16.6.2
What is a database ranking?.................................................................................................357
16.6.3
Creating a database ranking.................................................................................................358
16.6.4
Creating and Updating OLAP Reports................................................................................361Chapter 17
OLAP reporting with Crystal Reports...................................................................................361
17.1
OLAP grid objects................................................................................................................361
17.1.1
Creating an OLAP report......................................................................................................362
17.2
To create an OLAP report....................................................................................................362
17.2.1
Specifying the data source...................................................................................................362
17.2.2
Defining the structure of the grid..........................................................................................363
17.2.3
Setting sliced dimensions and specifying the number of grids..............................................365
17.2.4
Applying a predefined style..................................................................................................366
17.2.5
Inserting a chart...................................................................................................................367
17.2.6
Updating an OLAP report.....................................................................................................368
17.3
To update a cube location in an OLAP grid object................................................................368
17.3.1
Formatting data in an OLAP grid...........................................................................................369
17.4
2013-05-0612
Contents

Changing the background color of a dimension....................................................................370
17.4.1
Creating an alias for a dimension..........................................................................................371
17.4.2
Formatting grid lines.............................................................................................................371
17.4.3
Labeling dimensions.............................................................................................................372
17.4.4
Changing the view of OLAP data..........................................................................................372
17.5
To show or hide dimension members ..................................................................................372
17.5.1
To create asymmetry in an OLAP grid..................................................................................373
17.5.2
To add totals to an OLAP grid..............................................................................................373
17.5.3
To change the display format for member names.................................................................373
17.5.4
To alter the data displayed in the OLAP grid.........................................................................374
17.5.5
To define the order of fields in the OLAP grid ......................................................................374
17.5.6
Sorting and filtering OLAP grid data.....................................................................................374
17.6
Sorting data in an OLAP grid................................................................................................374
17.6.1
Filtering data in an OLAP grid...............................................................................................376
17.6.2
Adding calculations to OLAP grids.......................................................................................377
17.7
Printing, Exporting, and Viewing Reports............................................................................379Chapter 18
Distributing reports..............................................................................................................379
18.1
Printing a report...................................................................................................................379
18.1.1
Faxing a report.....................................................................................................................379
18.1.2
Exporting a report.................................................................................................................380
18.1.3
Working with Web folders....................................................................................................390
18.1.4
Working with Enterprise folders............................................................................................391
18.1.5
Viewing reports....................................................................................................................393
18.2
Report Parts and other Report objects.................................................................................394
18.2.1
Creating an Enterprise Hyperlink..........................................................................................405
18.2.2
Using Smart View to view a report in the CMC....................................................................406
18.2.3
Using smart tags..................................................................................................................406
18.3
To use smart tags with a Crystal Reports object..................................................................407
18.3.1
Report Alerts.......................................................................................................................409Chapter 19
About Report Alerts.............................................................................................................409
19.1
Working with Report Alerts..................................................................................................409
19.2
Creating Report Alerts.........................................................................................................409
19.2.1
Editing Report Alerts............................................................................................................411
19.2.2
Deleting Report Alerts..........................................................................................................412
19.2.3
Viewing Report Alerts..........................................................................................................412
19.2.4
Referring to Report Alerts in formulas..................................................................................413
19.2.5
2013-05-0613
Contents

Using Formulas...................................................................................................................415Chapter 20
Formulas overview...............................................................................................................415
20.1
Typical uses for formulas......................................................................................................415
20.1.1
Formula components and syntax..........................................................................................416
20.2
Formula components............................................................................................................416
20.2.1
Formula syntax.....................................................................................................................417
20.2.2
User Function Libraries in formulas......................................................................................418
20.3
Specifying formulas..............................................................................................................419
20.4
Working with the Formula Workshop....................................................................................420
20.4.1
Working with the Formula Editor...........................................................................................424
20.4.2
Creating and modifying formulas..........................................................................................428
20.5
To create a formula and insert it into a report.......................................................................428
20.5.1
Creating a formula in the Formula Expert..............................................................................429
20.5.2
Editing formulas....................................................................................................................431
20.5.3
Searching for formula text....................................................................................................431
20.5.4
Copying formulas.................................................................................................................432
20.5.5
Deleting formulas.................................................................................................................434
20.6
Removing the working formula from your report...................................................................435
20.6.1
Deleting the formula specification.........................................................................................435
20.6.2
Debugging formulas.............................................................................................................435
20.7
Debugging evaluation time errors.........................................................................................435
20.7.1
Debugging tutorial................................................................................................................436
20.7.2
Error Messages and Formula Compiler Warnings.................................................................440
20.8
Parameter Fields and Prompts............................................................................................453Chapter 21
Parameter and prompt overview...........................................................................................453
21.1
Parameter field considerations.............................................................................................453
21.1.1
Prompt considerations.........................................................................................................454
21.1.2
Data and non-data parameters.............................................................................................455
21.1.3
Optional parameters.............................................................................................................456
21.1.4
Understanding dynamic prompts..........................................................................................456
21.2
Understanding lists of values................................................................................................459
21.3
List-of-values types..............................................................................................................459
21.3.1
Determining which list-of-values type to use.........................................................................461
21.3.2
Lists of values and prompt groups contrasted......................................................................462
21.3.3
Creating a parameter with a static prompt............................................................................463
21.4
To create a parameter with a static prompt .........................................................................463
21.4.1
To incorporate the parameter into the record selection filter.................................................465
21.4.2
To incorporate the parameter into a saved data selection formula........................................466
21.4.3
2013-05-0614
Contents

Creating a parameter with a dynamic prompt.......................................................................466
21.5
To create a parameter with a dynamic prompt......................................................................467
21.5.1
Creating a parameter with a cascading list of values............................................................468
21.6
To create a parameter with a cascading list of values...........................................................469
21.6.1
The Parameter Panel............................................................................................................471
21.7
Working with lists of values..................................................................................................471
21.8
Sharing common lists of values within a report.....................................................................472
21.8.1
Using separate value and description fields..........................................................................473
21.8.2
Using command objects as list-of-values data sources.........................................................474
21.8.3
Null handling........................................................................................................................474
21.8.4
Long lists of values..............................................................................................................475
21.8.5
Best practices for prompting................................................................................................476
21.9
Unmanaged reports.............................................................................................................476
21.9.1
Managed reports..................................................................................................................476
21.9.2
Converting unmanaged reports to managed reports.............................................................477
21.9.3
Deploying managed reports with dynamic prompts..............................................................478
21.9.4
Deleting parameter fields.....................................................................................................478
21.10
To delete a parameter that is not used in a formula..............................................................478
21.10.1
To delete a parameter used with the Select Expert...............................................................478
21.10.2
To delete a parameter that is used in a formula....................................................................479
21.10.3
Responding to parameter field prompts................................................................................479
21.11
Previewing a report for the first time....................................................................................479
21.11.1
Refreshing report data.........................................................................................................480
21.11.2
Advanced parameter features..............................................................................................481
21.12
Creating a parameter with multiple prompting values............................................................481
21.12.1
Applying conditional formatting using parameter fields.........................................................482
21.12.2
Creating a report title using parameter fields........................................................................483
21.12.3
Specifying single or ranges of values...................................................................................483
21.12.4
Incorporating a parameter into a formula..............................................................................484
21.12.5
Defining sort order using parameter fields............................................................................485
21.12.6
Defining entry type and format using the Edit Mask..............................................................486
21.12.7
Creating a saved-data record filter using parameter fields....................................................487
21.12.8
To create a parameter appearing on the Parameter Panel....................................................488
21.12.9
To incorporate the parameter into a saved data selection formula........................................489
21.12.10
Adding dynamic grouping using parameter fields..................................................................489
21.12.11
Subreports...........................................................................................................................491Chapter 22
What are subreports?...........................................................................................................491
22.1
Unlinked vs. linked subreports.............................................................................................491
22.1.1
How subreport linking works................................................................................................493
22.1.2
Inserting subreports.............................................................................................................494
22.2
2013-05-0615
Contents

Previewing subreports..........................................................................................................495
22.2.1
Saving a subreport as a primary report.................................................................................496
22.2.2
Updating subreports.............................................................................................................496
22.2.3
Linking a subreport to the data in the primary report............................................................497
22.3
To link a subreport to the data in the primary report.............................................................498
22.3.1
Linking a subreport to the main report without modifying the selection formula....................499
22.4
To link a subreport to a main report without modifying the selection formula........................499
22.4.1
Combining unrelated reports by using subreports................................................................499
22.5
To combine two unrelated reports........................................................................................500
22.5.1
To combine three or more unrelated reports........................................................................500
22.5.2
Using subreports with unlinkable data..................................................................................500
22.6
Linking to/from a formula field..............................................................................................501
22.6.1
Linking unindexed tables......................................................................................................502
22.6.2
Creating an on-demand subreport........................................................................................502
22.7
To create an on-demand subreport.......................................................................................503
22.7.1
Adding captions to on-demand subreports...........................................................................503
22.8
To add a caption...................................................................................................................503
22.8.1
Showing different views of the same data in a report...........................................................504
22.9
Understanding Databases...................................................................................................505Chapter 23
Databases overview.............................................................................................................505
23.1
Relational database basics...................................................................................................505
23.1.1
Indexed tables......................................................................................................................506
23.1.2
Using SQL and SQL databases............................................................................................509
23.2
What is SQL?.......................................................................................................................509
23.2.1
SQL DBMS.........................................................................................................................511
23.2.2
How does Crystal Reports use SQL?...................................................................................513
23.2.3
The SQL language...............................................................................................................514
23.2.4
Defining an SQL Command..................................................................................................516
23.2.5
Changing data sources.........................................................................................................519
23.3
To change the data source...................................................................................................520
23.3.1
Working with aliases............................................................................................................521
23.4
Linking tables.......................................................................................................................522
23.5
Link from and link to.............................................................................................................523
23.5.1
Link relationships.................................................................................................................523
23.5.2
Performance considerations in one-to-many links.................................................................524
23.5.3
Data file considerations........................................................................................................526
23.5.4
SQL database considerations..............................................................................................528
23.5.5
Performance considerations for all reports...........................................................................529
23.5.6
The Database Expert Links tab.............................................................................................531
23.5.7
Linking indexed tables..........................................................................................................531
23.5.8
2013-05-0616
Contents

Link processing order...........................................................................................................532
23.5.9
Linking options.....................................................................................................................533
23.5.10
Server-side processing........................................................................................................547
23.6
How server-side grouping affects the SQL query.................................................................548
23.6.1
Mapping database fields.......................................................................................................549
23.7
About the Map Fields dialog box..........................................................................................550
23.7.1
Remapping processes..........................................................................................................550
23.7.2
Remapping altered database fields.......................................................................................552
23.7.3
Saved Data Indexes.............................................................................................................553
23.8
How Report Indexing works.................................................................................................554
23.8.1
Considerations for using Saved Data Indexes......................................................................554
23.8.2
Indexing the right field(s)......................................................................................................555
23.8.3
Unicode support in Crystal Reports.....................................................................................556
23.9
Working with databases.......................................................................................................556
23.10
Using Access queries..........................................................................................................556
23.10.1
Using ODBC data sources...................................................................................................559
23.10.2
Advanced database features................................................................................................562
23.11
One-to-many links ...............................................................................................................562
23.11.1
ACT! databases...................................................................................................................563
23.11.2
Reporting on an NT Event Log.............................................................................................564
23.11.3
For additional information.....................................................................................................565
23.12
Integrating Business Applications with Crystal Reports.....................................................567Chapter 24
Integrating with SAP.............................................................................................................567
24.1
Introduction..........................................................................................................................567
24.1.1
Add-Ons..............................................................................................................................572
24.1.2
Reporting with SAP..............................................................................................................572
24.1.3
Integrating with Oracle E-Business Suite..............................................................................631
24.2
Overview..............................................................................................................................631
24.2.1
To access data in SAP Crystal Reports................................................................................632
24.2.2
Integrating with Siebel..........................................................................................................632
24.3
Connecting to Siebel............................................................................................................632
24.3.1
Configuring the connection..................................................................................................635
24.3.2
Selecting business components...........................................................................................639
24.3.3
Refreshing reports with Siebel data......................................................................................639
24.3.4
Updating reports created in earlier versions of Crystal Reports............................................640
24.3.5
Security...............................................................................................................................641
24.3.6
Views...................................................................................................................................641
24.3.7
Using Siebel formatting........................................................................................................642
24.3.8
Linking tables in reports.......................................................................................................644
24.3.9
Multi-value columns.............................................................................................................646
24.3.10
2013-05-0617
Contents

Data Types..........................................................................................................................646
24.3.11
Integrating with PeopleSoft..................................................................................................648
24.4
Overview..............................................................................................................................648
24.4.1
To access data in SAP Crystal Reports................................................................................648
24.4.2
Integrating with JD Edwards.................................................................................................650
24.5
Overview..............................................................................................................................650
24.5.1
To access data in SAP Crystal Reports................................................................................651
24.5.2
Accessing Data Sources.....................................................................................................653Chapter 25
Introduction..........................................................................................................................653
25.1
Six types of data..................................................................................................................653
25.1.1
Direct access database files................................................................................................654
25.2
Advantages..........................................................................................................................654
25.2.1
Disadvantages.....................................................................................................................654
25.2.2
Three layers.........................................................................................................................655
25.2.3
Common database formats..................................................................................................656
25.2.4
ODBC data sources.............................................................................................................665
25.3
Advantages..........................................................................................................................666
25.3.1
Disadvantages.....................................................................................................................666
25.3.2
Five layers............................................................................................................................667
25.3.3
Installing database clients.....................................................................................................669
25.3.4
Common ODBC database formats......................................................................................670
25.3.5
JDBC data sources .............................................................................................................673
25.4
JNDI....................................................................................................................................674
25.4.1
Five layers............................................................................................................................674
25.4.2
Supported JDBC database formats.....................................................................................675
25.4.3
Configuring the Crystal Reports JDBC driver.......................................................................676
25.4.4
Business Objects universes.................................................................................................676
25.5
Business Views...................................................................................................................677
25.6
Crystal SQL Designer files...................................................................................................678
25.7
Crystal Dictionary files.........................................................................................................679
25.8
Report Processing Model....................................................................................................681Chapter 26
Overview..............................................................................................................................681
26.1
What is a "pass"?.................................................................................................................681
26.1.1
Pre-pass 1...........................................................................................................................681
26.1.2
Pass 1..................................................................................................................................681
26.1.3
Pre-pass 2...........................................................................................................................682
26.1.4
Pass 2..................................................................................................................................682
26.1.5
Pass 3..................................................................................................................................683
26.1.6
2013-05-0618
Contents

Crystal Reports Error Messages.........................................................................................685Appendix A
Drive:\filename.extension.....................................................................................................685
A.1
Drive:\test.rpt......................................................................................................................685
A.2
Failed to load database connector........................................................................................686
A.3
Failed to open the connection. Details: [Database Vendor Code: <vendor code number>]...686
A.4
Failed to retrieve data from the database. Details: [Database Vendor Code: <vendor code
number>].............................................................................................................................687
A.5
Creating Accessible Reports...............................................................................................689Chapter 27
About accessibility...............................................................................................................689
27.1
Benefits of accessible reports..............................................................................................689
27.1.1
About the accessibility guidelines.........................................................................................690
27.1.2
Accessibility and Business Objects products.......................................................................691
27.1.3
Improving report accessibility...............................................................................................692
27.2
Placing objects in reports.....................................................................................................692
27.2.1
Text......................................................................................................................................694
27.2.2
Color....................................................................................................................................697
27.2.3
Navigation............................................................................................................................699
27.2.4
Parameter fields...................................................................................................................699
27.2.5
Designing for flexibility.........................................................................................................700
27.3
To create an accessibility parameter field.............................................................................700
27.3.1
Accessibility and conditional formatting................................................................................701
27.3.2
Accessibility and suppressing sections.................................................................................702
27.3.3
Accessibility and subreports.................................................................................................703
27.3.4
Improving data table accessibility.........................................................................................703
27.4
Text objects and data table values........................................................................................704
27.4.1
Other data table design considerations................................................................................708
27.4.2
Accessibility and BusinessObjects Business Intelligence platform........................................709
27.5
Setting accessible preferences for SAP BusinessObjects Business Intelligence platform.....709
27.5.1
Accessibility and customization............................................................................................710
27.6
Resources...........................................................................................................................711
27.7
More Information.................................................................................................................713Appendix B
Index 715
2013-05-0619
Contents

2013-05-0620
Contents

Introduction to SAP Crystal Reports 2013
1.1 About Crystal Reports
SAP Crystal Reports 2013 (Crystal Reports) is designed to work with your database to help you analyze
and interpret important information. Crystal Reports makes it easy to create simple reports, and, it also
has the comprehensive tools you need to produce complex or specialized reports.
Create any report you can imagine
Crystal Reports is designed to produce the report you want from virtually any data source. Built-in report
experts guide you step by step through building reports and completing common reporting tasks.
Formulas, cross-tabs, subreports, and conditional formatting help make sense of data and uncover
important relationships that might otherwise be hidden. Geographic maps and graphs communicate
information visually when words and numbers are simply not enough.
Extend reporting to the Web
The flexibility of Crystal Reports doesn't end with creating reports — your reports can be published in
a variety of formats including Microsoft Word and Excel, E-mail and even over the Web. Advanced Web
reporting lets other members of your workgroup view and update shared reports inside their web browser.
Incorporate reports into applications
Application and web developers can save time and meet their users needs by integrating the report
processing power of Crystal Reports into their database applications. Support for most popular
development languages makes it easy to add reporting to any application.
Whether it's the web master in IT, the promotion manager in marketing, the database administrator in
finance or the CEO, Crystal Reports is a powerful tool designed to help everyone analyze and interpret
the information that's important to them.
1.2 About the Crystal Reports documentation
The Crystal Reports documentation includes procedures for typical reporting tasks such as placing
fields, formatting reports, and sorting records. It also contains information on more specific areas of
interest such as advanced formula creation and accessing different types of data. Use the documentation
2013-05-0621
Introduction to SAP Crystal Reports 2013

as a reference for your basic reporting needs as well as an introduction to new concepts in report
creation.
1.2.1 Locate information quickly
• Access online help from the Crystal Reports help menu.
Use the Contents tab to view all major sections in the online help and drill down to specific headings
within each section, the Index tab to view topics in alphabetical order, and the Search tab to enter
a keyword to view all the sections that relate to the keyword.
• Access a PDF version of the Crystal Reports documentation online at help.sap.com.
The PDF version contains a subset of the topics found in the online help, along with additional
sections—such as a Quick Start—that can help you learn Crystal Reports.
1.2.2 Sample Reports
Many topics in the Crystal Reports documentation include a list of related sample reports. Use these
reports to illustrate concepts the topic describes. The sample reports can be adapted to your own needs.
Sample reports are located on the SAP Business Objects Support web site.
2013-05-0622
Introduction to SAP Crystal Reports 2013

Quick Start
2.1 Learning how to use Crystal Reports
You can teach yourself how to use Crystal Reports by choosing from the methods available in this
section:
• You can study the sample reports and sample database included with Crystal Reports.
You will find the sample reports and sample database for Crystal Reports at the SAP Business
Objects Support web site.
• You can use the detailed descriptions and instructions in the Quick start for new users.
• You can use the summaries and topic cross-references in the Quick start for advanced
users—especially useful if you're already familiar with reporting concepts.
Each method is a helpful way to learn and understand Crystal Reports and, although any one might be
enough to get you up and running, you can always come back to this section and consult the other
methods as you need them.
2.1.1 Sample data - Xtreme.mdb
A sample database, Xtreme.mdb, is available for you to use while you are learning Crystal Reports.
Xtreme.mdb is a Microsoft Access database and all of the necessary drivers are included. You should
be able to open the database directly and begin designing reports. Virtually all of the examples in this
manual are based on Xtreme.mdb data.
Xtreme.mdb is located on the SAP Business ObjectsSupport web site.
Xtreme.mdb is a database that contains data for Xtreme Mountain Bikes, a fictitious manufacturer of
mountain bikes and accessories.
Note:
The sample data has been designed to illustrate various reporting concepts in a training environment,
not to teach database design. While there are alternative ways of designing a database, this design
was selected to keep the tutorials and examples focused on reporting, not on data manipulation.
2013-05-0623
Quick Start

2.2 Report Creation Wizards
The tutorials in this section show you how to build a report from scratch. As a complement or an
alternative, however, you may want to use the Report Creation Wizards available on the Start Page.
There are four Report Creation Wizards:
• Standard
• Cross-Tab
• Mailing Label
• OLAP
Each wizard guides you through the creation of a report by providing a series of screens. Many of the
wizards have screens unique to a specific type of report. For example, the Mailing Labels Report
Creation Wizard has a screen that allows you to specify the type of mailing label you want to use.
Note:
After you've clicked the Finish button in a Report Creation Wizard, you can click the Stop button on the
Navigation Tools toolbar if you don't want the program to gather all the data from your data source.
This is useful if you want to make adjustments to the report layout that the wizard created.
2.2.1 Standard
The Standard Report Creation Wizard is the most generic of the wizards. It guides you through choosing
a data source and linking database tables. It also helps you add fields and specify the grouping,
summarization (totals), and sorting criteria you want to use. Finally, the Standard Report Creation
Wizard leads you through chart creation and record selection.
The Templates screen contains predefined layouts for you to apply to your report to give it more impact.
2.2.2 Cross-Tab
The Cross-Tab Report Creation Wizard guides you through the creation of a report in which your data
is displayed as a cross-tab object. Two special screens (Cross-Tab and Grid Style) help you create
and format the cross-tab itself.
2013-05-0624
Quick Start

2.2.3 Mailing Label
The Mailing Labels Report Creation Wizard lets you create a report that is formatted to print on any
size mailing label. You can use the Label screen to select a commercial label type, or you can define
your own layout of rows and columns for any multi-column style report.
2.2.4 OLAP
The OLAP Report Creation Wizard lets you create a report in which your OLAP data is displayed as a
grid object. Although similar to the Cross-Tab Report Creation Wizard in several ways, the OLAP Report
Creation Wizard appears to be different due to the requirements of working with OLAP data sources.
You first specify the location of your OLAP data, and then you choose the dimensions you want to
include in the grid. Next you filter the report data and choose the style of the grid object, which you can
also customize. Finally, you can define labels for your grid and insert a chart, if you wish.
2.3 Quick start for new users
The following tutorial has been designed to give you confidence when creating your first report.
In this tutorial, you will get an introduction to the program as you create a Customer List report. The
Customer List is one of the most basic business reports and typically has information such as Customer
Name, City, Region, and Contact Name.
You begin by learning the basic concepts: selecting a database, placing some fields on the report, and
then selecting specific records to be included. You will then learn how to:
• Insert and move database fields.
• Add and format a title.
• Display a report in the Preview tab so you can fine-tune your work.
• Use the Select Expert to ensure the report includes only the data you need.
• Move objects.
• Group and sort data.
• Insert pictures.
• Print a report.
2013-05-0625
Quick Start

2.3.1 Before you begin
This tutorial assumes you are familiar with Microsoft Windows and uses conventional terms and
procedures common to the Windows environment. If you are not familiar with Windows, please refer
to the documentation that came with Microsoft Windows for further explanation.
The default font for all report sections in the program is set to Arial, 10 point. If you have changed the
default font, or if your printer does not support this font, the field size, field spacing, and screen shots
will look different than those included in this tutorial.
This tutorial has been designed using Microsoft Windows 2000. Screen shots may vary slightly if you
are using a different platform.
If you are not familiar with the Crystal Reports environment, review Formatting, which describes working
with the grid, using guidelines, and formatting activities.
2.3.2 Creating the report
1.
In Windows, click Start > Programs > SAP Business Intelligence > Crystal Reports, and then
select Crystal Reports 2013.
The "Start Page" appears.
2.
In the "Start a New Report" area, click Blank Report.
The Database Expert dialog box appears.
Note:
You can create reports based on database files, SQL/ODBC data sources, Business Views, and a
variety of other data sources.
2.3.2.1 Selecting a database to use
The next step in creating a report is to select a database. Use the Xtreme.mdb sample database for
this tutorial.
The Xtreme.mdb file is located on the SAP Business Objects Support web site.
Copy Xtreme.mdb to a location on your machine that you can access for the tutorial.
2013-05-0626
Quick Start

2.3.2.1.1 To select a database
1.
In the Database Expert dialog box, expand the Create New Connection folder and then expand
the Database Files folder; then search for the Xtreme.mdb sample database.
Note:
• You have to use the Open dialog box to find the Xtreme database.
• If you wish to see database and server properties after you have selected a database, right-click
the database node in the Database Expert and select Properties from the shortcut menu.
2.
Expand the Tables node of the Xtreme.mdb connection to see a list of tables.
Because you are dealing only with customers in this tutorial, you will select the Customer table.
3.
Select Customer and click the > arrow to add it to the Selected Tables list, and then click OK.
The Design tab of the Report Designer appears.
4.
Click Field Explorer on the Standard toolbar.
The Field Explorer dialog box appears.
Note:
Depending on how it appeared when you last used Crystal Reports, the Field Explorer dialog box
might be docked or in floating mode. For more information about docking explorers, see Opening
and docking explorers.
2013-05-0627
Quick Start

2.3.2.2 Report sections
The Design tab is divided into five sections: Report Header (RH), Page Header (PH), Details (D), Report
Footer (RF), and Page Footer (PF). If at any time you are unsure of the report section in which you are
working, simply look at the shaded area to the left of the report which always displays either the section
names or the initials that designate the names. See Design tab.
If the Short Section Names check box is selected in the Design View area of the Options dialog box,
then the Report Header, Page Header, Details, Report Footer and Page Footer section names will
appear as RH, PH, D, RF and PF respectively. If this check box is not selected, follow these steps:
2.3.2.3 Inserting a field
You'll use the Field Explorer dialog box to insert database fields when you create a new report.
This dialog box is set to remain on-screen until you close it. All the tables available for use are listed in
this box.
You will now start placing objects on the report by inserting the Customer Name field.
2.3.2.3.1 To insert a field
1.
Expand the Database Fields node in the Field Explorer dialog box and expand a table.
2.
Highlight a field name by clicking the name once.
When you highlight a field name, you can review a subset of the values for that field as well as the
field type and size by right-clicking the field and selecting Browse Data from the shortcut menu.
2013-05-0628
Quick Start

3.
Click the Customer Name field and drag it into the Details section of the report.
An object frame appears with the Arrow cursor as you drag the field onto the report:
• The object frame represents the object you have just selected for placement.
• The size of the object frame approximates the size of the data in the field selected.
4.
Move the object frame as far to the left as you can in the Details section.
If you move the field too far to the left, the Arrow cursor turns into a Stop cursor, indicating that you
cannot drag the field that far. Keep in mind that you cannot place any objects outside the page
margin.
The Design tab should look similar to this:
2.3.2.4 Understanding fields
Before going any further, take a look at the field you just placed in the Details section:
2013-05-0629
Quick Start

• First of all, the object frame indicates that when the report is printed, a field value will appear where
the box is positioned.
• If you haven't selected the Show Field Names check box on the Layout tab of the Options dialog
box, the object frame contains Xs to indicate that the database field contains a text string. Other
data types have different character representations. For example, a currency data type is represented
by $55,555.56.
• If your report is not showing field names, the number of Xs in the object frame is the data width, the
maximum number of characters in the field as defined by the database. Whether or not your report
shows field names, the width of the object frame is the field width (the amount of space allocated
to the field for printing). Initially it is set to the width needed to display the maximum number of
characters in the field (using the font selected for the field). You can change this width by resizing
the field.
• The size of the characters or Xs indicates the point size selected for the characters in the field.
• The font and style (Bold, Underline, and so on) used in displaying the characters or Xs indicate the
font and style selected for the characters in the field. Later in this tutorial you will learn how to make
changes to these properties.
• The line spacing is adjusted to the point size selected for the characters in the field.
2.3.2.5 Adding additional fields
Next, you will insert two additional fields in the report. This time, however, you will use the Ctrl-click
combination to add them at the same time.
2.3.2.5.1 To add additional fields
1.
Highlight the City field in the Field Explorer dialog box, press the Ctrl key on your keyboard, and
then highlight the Country field. Release the Ctrl key.
If you scroll through the field list, you will notice that both fields remain selected.
Note:
Using the Ctrl-click combination allows you to select a non-continuous range of fields. The Shift-click
combination can be used to select several fields from the list that are contiguous.
2.
Drag the fields to place them.
As the cursor is moved over the report, an object frame appears along with the Arrow cursor.
3.
Place the fields to the right of the Customer Name field.
Both fields appear in the Details section of the report in the same order in which they are listed in
the Field Explorer dialog box.
2013-05-0630
Quick Start

2.3.2.6 Selecting fields
When a field is selected, the object frame appears with a handle (box) on its right, left, top, and bottom
edge. These handles indicate that the field is selected, and therefore active. To do anything with a field
(change the font, move it, and so on), you first have to select it:
• Position the cursor inside the object frame and click once. The handles appear, indicating the object
is selected.
• Move the cursor away from the object frame and click in an empty part of the window. The handles
disappear.
That's all it takes to select and deselect objects.
2.3.2.7 Resizing fields
To resize the field, follow these steps:
1.
Click the Customer Name field in the Details section to select it.
2.
Press the Ctrl key and click the field heading to select both objects.
3.
Move the cursor over the resizing handle on the right edge of the fields until the cursor turns into a
Resizing cursor.
4.
Resize the fields to the right until they are approximately two inches in length.
2.3.2.8 Reviewing your work
Now let's see how the report looks with three fields placed and positioned.
1.
Click Print Preview on the Standard toolbar to activate the Preview tab.
The screen should look similar to this:
2013-05-0631
Quick Start

Note:
The first time you preview a report, you must click Print Preview on the Standard toolbar to activate
the Preview tab. The Preview tab appears to the right of the Design tab. You can then switch between
designing and previewing the report by clicking the corresponding tab.
You have the beginnings of a customer list report, but you still have several fields to add.
2.
When you are finished reviewing the report, return to the Design tab by clicking it.
2.3.2.9 Displaying field names
Field pictures (object frames containing character representations) have been discussed, but there may
be times when you want to see the field names in the Design tab.
2.3.2.9.1 To display field names
1.
On the File menu, click Options.
The Options dialog box appears with the Layout tab active.
2.
Select the Show Field Names check box and click OK.
Now in the Design tab you will see the actual field names instead of character representations (X,
$, #, and so on).
2.3.2.10 Combining database fields in a text object
2013-05-0632
Quick Start

Instead of adding the Contact First Name and Contact Last Name fields as separate objects, you can
insert both fields in a text object. This allows you to control the formatting of both fields by making
changes to only one object. When you insert fields in a text object, the fields are automatically trimmed
(they do not have any extra white space on either side). This is important because a field is a fixed size
but the data in the fields can vary in size, leaving various amounts of unwanted white space.
2.3.2.10.1 To combine fields in a text object
1.
Click Insert Text Object on the Insert Tools toolbar. As you move the cursor over the report,
an object frame appears next to it.
2.
Insert the field to the right of the fields in the Details section.
As you drag the field, the Design tab automatically scrolls to the right, if necessary. When you click
to place the object, a text object appears and the horizontal ruler of the Design tab changes to a
ruler/tab selector that is used for editing the text object. If you click an empty area of the report or a
field object, the standard Design tab ruler appears.
3.
Click once on the border of the text object to select it for resizing. Handles appear on all sides of
the object.
4.
Move the cursor over the right sizing handle of the text object and increase the width by about 1
inch. You may need to scroll to the right and continue resizing.
5.
Double-click inside the text object to select it for editing. Notice the insertion point is now flashing
within the text object.
6.
Select the Contact Last Name field in the Field Explorer dialog box. Remember, you can move the
Field Explorer dialog box by dragging and dropping it by its title bar.
7.
Drag the field to the text object.
8.
Move the cursor over the text object until the cursor becomes a Drag and Drop cursor.
9.
Release the mouse button to place the field in the text object. The cursor now appears after the
Contact Last Name field, within the text object.
10.
Type a comma and a space after Contact Last Name.
11.
In the Field Explorer dialog box, highlight the Contact First Name field.
12.
Drag the field to the text object.
13.
Move the cursor over the text object until the cursor becomes a Drag and Drop cursor. Move the
cursor to the right of the comma and space you just typed, and release the mouse button. The field
will be inserted to the right of the comma and space.
14.
Click the Preview tab to look at the fields you just placed.
The report should now look similar to this:
2013-05-0633
Quick Start

2.3.2.11 Adding summary information
The next step is to add summary information to your report. Adding summary information allows you
to specify the author, title, and subject of the report, as well as any keywords or comments related to
the report. When you add summary information, users can find information related to the report quickly.
2.3.2.11.1 To add summary information
1.
On the File menu, click Summary Info.
The Document Properties dialog box appears with the Summary tab active.
2013-05-0634
Quick Start

2.
Enter information about your report in the text boxes provided. Be sure to enter the title "Customer
List" in the Title text box. This information will be used in the next section of the tutorial.
3.
Click OK when finished.
2.3.2.12 Adding a title
As you can see, the report looks incomplete without a title. Although you can add a title using a text
object, you can also tell the program to take the title information directly from the Title text box in the
Document Properties dialog box.
2.3.2.12.1 To add a title
1.
Click the Design tab.
2.
In the Field Explorer, scroll down to Special Fields and expand it.
3.
Choose Report Title.
4.
Drag the cursor over the report. An object frame appears.
5.
Position the object frame in the upper left-hand corner of the Page Header (PH) section of the report
and release the mouse button to place the object.
6.
Click the Preview tab or Refresh to review your changes.
The report title object now displays the title that you entered in the Title text box of the Document
Properties dialog box.
2.3.2.13 Formatting objects
Now you can format the report title. This time, however, you will remain in the Preview tab to do the
work. This will make it easier to see your work while you are formatting the title.
2.3.2.13.1 To format an object
1.
To center the title, you will first need to expand the Title field so that it's about the same width as
the data in your report. To do this, select the object by clicking it.
2.
Position the cursor on the right edge of the object until the cursor turns into a Resizing cursor. Drag
the right edge of the field box until it is even with the right edge of the data in the Contact Name
field object.
You have created a large field that extends from the left edge to the right edge of the report.
2013-05-0635
Quick Start

3.
With the report title object still selected, click Align Center on the Formatting toolbar. The title
is centered within the object.
4.
Right-click the object and choose Format Field from the shortcut menu.
5.
When the Format Editor appears, click the Font tab.
6.
Set the report title to a larger, bolder version of the active font by selecting Bold from the Style list
and 16 (or a point size suitable to the font you are using) from the Size list.
7.
Change the color of the text by selecting Maroon from the Color palette. Notice that the Sample
box shows an example of how the text will look.
8.
Click OK when finished.
9.
Resize the report title object vertically to accommodate the increased size of the title.
The title is now formatted to stand out on the report.
2.3.2.14 Adding a field heading
As you can see, the Contact Name field is the only field without a heading. In this section you will create
a heading.
2.3.2.14.1 To add a field heading
1.
Click Insert Text Object on the Insert Tools toolbar.
2.
Insert the text object in the Page Header section directly above the Contact Name field.
3.
Click Underline on the Formatting toolbar, and then type Contact Name into the text object.
4.
Click your cursor outside the text object.
The Contact Name field now has a heading that looks just like the other field titles.
2013-05-0636
Quick Start

2.3.2.15 Saving the report
1.
Click Save on the Standard toolbar to save your work.
Since this is the first time you are saving the report, the Save As dialog box appears displaying the
default directory where the file will be saved. Notice that a default file name, based on the report
title you defined earlier, is also displayed.
2.
Type Custlist.rpt in the File name box and click Save.
Your report is saved to the default directory or another directory you chose.
3.
Click the Preview tab to view the report.
The report should now look similar to the following:
Congratulations! You have just created a basic listing report. You will continue to refine this report
throughout the rest of this tutorial.
2.3.3 Record Selection
Crystal Reports allows you to limit or restrict the records that are to be included in a report. In this section
you will learn how to:
• Select the records you want included in the report.
• Save a report, including the selection criteria.
2013-05-0637
Quick Start

For example, it may be useful to have a customer list that only lists customers from the USA. The
sample data contains records from the United States and International customers. It is easy to restrict
lists like this using the Select Expert.
2.3.3.1 Entering the selection criteria
When you scroll through the report, you will see that it contains information for customers from many
different countries. In this step, you will limit the number of countries displayed to the USA.
2.3.3.1.1 To enter selection criteria
1.
To begin, click the Design tab to return to design mode.
2.
Click an empty area of the report to make sure all fields are deselected.
3.
Click Select Expert on the Expert Tools toolbar.
The Choose Field dialog box appears.
This dialog box lists all the fields currently in the report in the Report Fields section and then lists all
fields that are available from each table in the database fields section.
4.
Since you are going to base record selection on the country field, select Country in the Fields list
and click OK.
The Select Expert appears.
2013-05-0638
Quick Start

Imagine that you are completing the following sentence:
Select all records where a customer's country is
You complete the sentence with the condition you want the program to use when selecting records
for your report. Right now the condition is any value, which implies there is no restriction on the
record selection.
5.
Click the arrow on the operators box to see what other options you have. Since you want only those
records where the Country is USA, select the is equal to condition.
A new box appears on the right. The dialog box sentence now reads:
Select all records where a customer's country is equal to
All that you need to complete the sentence is the value USA.
6.
Click the arrow on the empty list. A list of all the country values appears. Select USA from the list.
The sentence now reads:
Select all records where a customer's country is equal to USA
7.
Click OK to return to the Design tab.
8.
Click the Preview tab to review the results of your work.
The Change In Record Selection Formula dialog box appears.
9.
Click Refresh Data.
10.
Save this version of the report without overwriting the original report by choosing Save As from the
File menu and giving the new report the name USA.rpt.
Congratulations! You have started formatting your report and have added selection criteria to it. More
than that, you have learned how to manipulate your data. By now, you have a good idea of the powerful
kinds of reports you can prepare.
2.3.3.2 Deleting a field
2013-05-0639
Quick Start

Now that the report contains only records from the USA, displaying the Country field in the body of the
report is not necessary. You can delete this field before continuing.
2.3.3.2.1 To delete a field
1.
Select the Country field and the Country column heading using the Ctrl-click combination.
2.
Press Delete on your keyboard.
That is all it takes to delete fields from the report.
The report should now look similar to this:
2.3.3.3 Balancing field spacing
Now that the Country field has been deleted, there is a large amount of white space between the City
and Contact Name fields. You might be satisfied with the spacing as it stands, but it might be more
readable if the columns were better balanced across the page.
2.3.3.3.1 To balance field spacing
1.
Return to the Design tab. Select the Contact Name field and its field heading by using the Ctrl-click
combination.
2.
Place the cursor over one of the two highlighted text objects and drag them to the left, closer to the
City field.
3.
Click the Preview tab and review your work again.
The report should look similar to this:
2013-05-0640
Quick Start
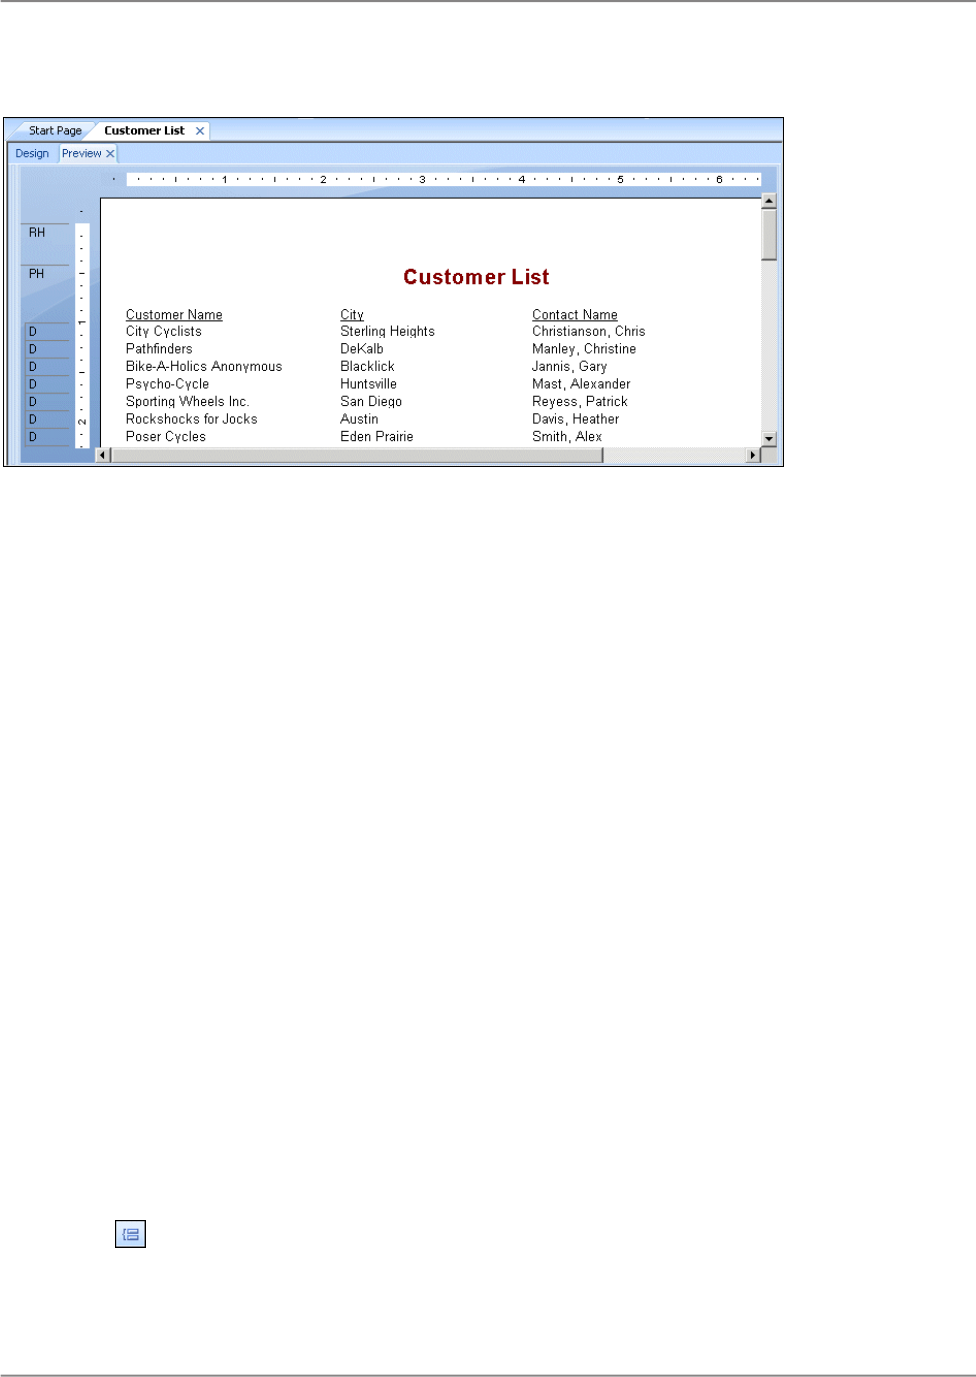
The spacing between the fields is much better, but it looks as if the report title is off-center.
4.
Click the report title object to select it.
5.
Position the cursor on the right handle of the object until the cursor turns into a Resizing cursor.
Drag the right edge of the object frame until it is even with the right edge of the data in the Contact
Name field object.
The report title automatically centers itself based on the size of the object.
2.3.4 Grouping and sorting
Data in reports can be grouped and sorted in a variety of ways. Sorting and grouping tools provide a
great deal of flexibility for customizing reports.
2.3.4.1 Grouping the report
In many reports you need to break the data into groups in order to make it easier to read and to
understand. Crystal Reports lets you do this easily. For this customer list, you will group the customers
by region and then sort the customers alphabetically within each group.
2.3.4.1.1 To group a report
1.
While on the Design tab, click Insert Group on the Insert Tools toolbar.
The Insert Group dialog box appears.
2013-05-0641
Quick Start

2.
Select Region from the Customer table in the first drop-down list.
The program takes all records with the same value in the region field and places them together in
a group on the report.
3.
Select in ascending order from the second drop-down list.
The region grouping will be displayed on the report in alphabetic ascending order.
4.
Click OK.
Notice that two new sections now appear in the Design tab: GH1 (Group Header #1) and GF1 (Group
Footer #1). This is how the program shows that the report has been grouped.
5.
Click the Preview tab to see what the report looks like.
2013-05-0642
Quick Start

6.
If the group tree is not visible, select Toggle Group Tree on the Standard toolbar to see the
groups included in the report.
You can view the group of interest by clicking on the group name in the Group Tree. For example, to
see the Texas customer group, click TX in the Group Tree. The program jumps to the Texas group,
displaying that group in the Preview tab. The Group Tree allows you to quickly jump to a specific group
of interest instead of scrolling through the report looking for the group. For more information on the
group tree, see Group Tree.
Note:
For many reports, you will want to insert summaries, subtotals and grand totals. For example, when
creating a sales report rather than a customer list, you would want to calculate the total sales amount
for each region. See Sorting, Grouping, and Totaling.
2.3.4.2 Understanding "live" group headers
When a group is inserted, a group name field is automatically inserted in the Group Header section of
the report. The group name field displays the current group's name. For example, if you group by region,
and preview the report, the group header for the CA (California) group shows "CA."
The group field name is automatically formatted to stand out from the records in the group.
2.3.4.3 Sorting records
In a typical customer list report, customer names are listed alphabetically. In this example, you will sort
the customer names alphabetically within each region.
2.3.4.3.1 To sort records
1.
While on the Preview tab, click Record Sort Expert on the Expert Tools toolbar.
The Record Sort Expert appears.
2013-05-0643
Quick Start
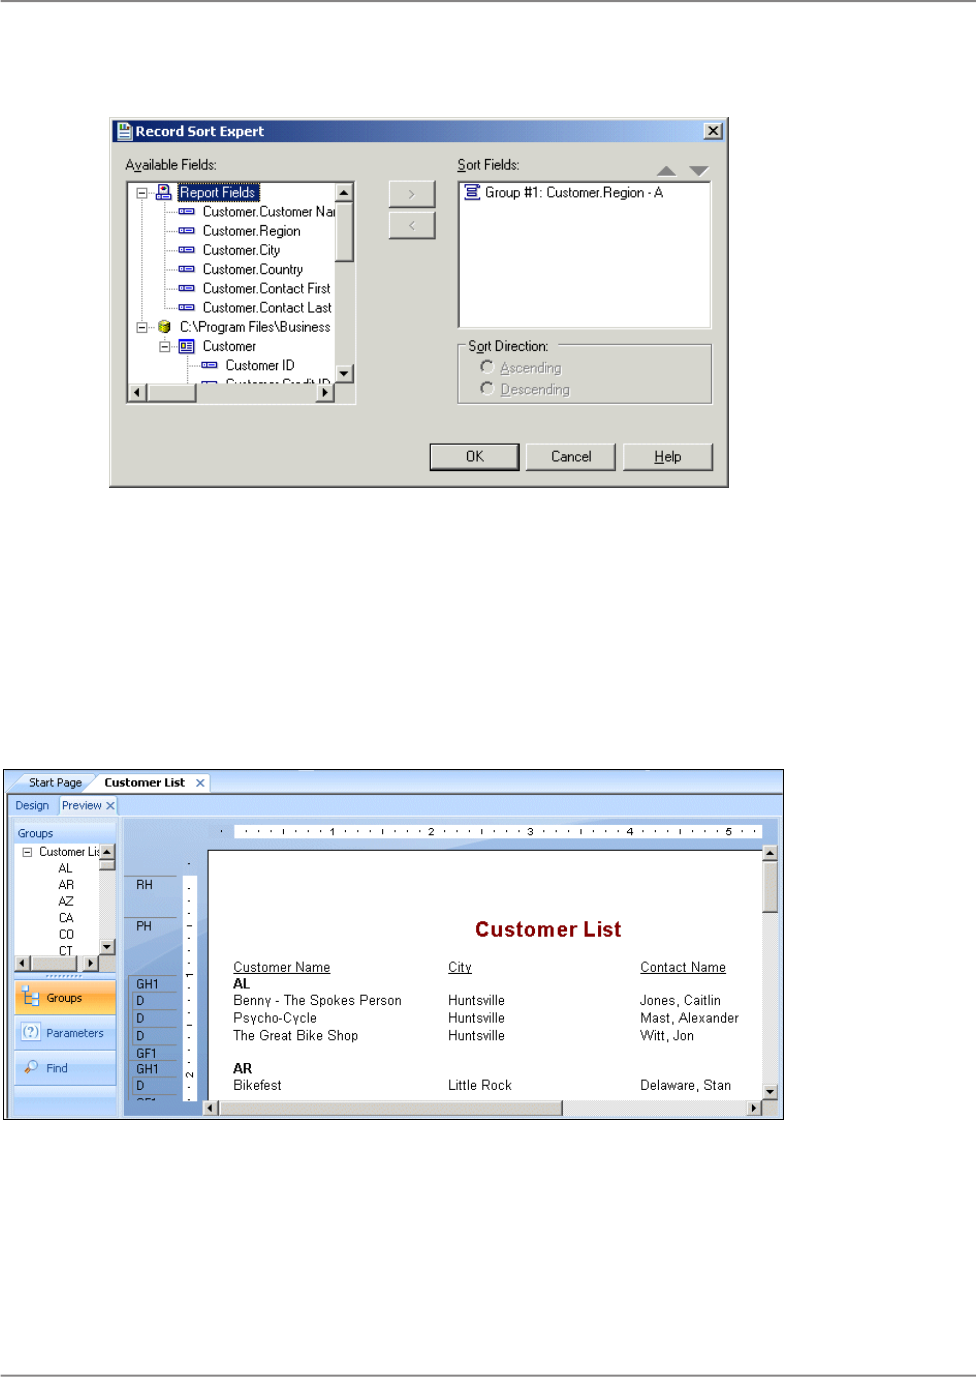
The Available Fields list box displays all fields currently on your report and all the fields in the data
source. You can choose to sort based on any of these fields.
The Sort Fields list box displays the fields that are already sorted in the report. Since the region field
has already been sorted, the sorting you are about to do will be within each region, and not for the
entire report.
2.
Highlight the Customer Name field and click the > arrow button to add it to the Sort Fields list.
3.
Select Ascending for the Sort Direction and click OK. The report should now look similar to the
following:
Notice that the records within each group are in alphabetic order.
2013-05-0644
Quick Start

2.3.5 Completing the report
You have just one step left to complete the report. A company logo needs to be added to the first page
of the report.
2.3.5.1 Inserting a company logo
In this section, you will place a company logo at the top of the first page of the report.
2.3.5.1.1 To insert a company logo
1.
While on the Design tab, click Insert Picture on the Insert Tools toolbar.
The Open dialog box appears.
2.
Choose a bitmap logo (.bmp) file and click Open.
An object frame appears as you move the cursor over the report. The object frame represents the
logo you will place.
3.
Position the object frame in the upper left-hand corner of the Report Header (RH) section of the
report and click once to place it.
Placing the logo in the Report Header (RH) section ensures that the logo is printed only on the first
page of the report.
Note:
Although there does not appear to be enough room in the Report Header (RH) section when you
place the graphic, the section will automatically expand to accommodate the picture.
4.
Click the Preview tab to view the report.
The final report should look something like this (with the logo that you chose in step 2):
2013-05-0645
Quick Start

5.
Save the report by clicking Save on the Standard toolbar.
You have just completed your first report.
2.4 Quick start for advanced users
If you are an experienced Windows user who wants to get right into the program, follow these steps to
set up a report for the first time.
If you're not an experienced user, check the Quick start for new users.
2.4.1 Choosing a report type and data source
1.
In Windows, click Start > Programs > SAP Business Intelligence > Crystal Reports, and then
select Crystal Reports 2013.
2.
Click Blank Report to open the Database Expert dialog box.
As an alternative to creating a blank report, you can choose one of four Report Creation Wizards.
After choosing a wizard, you can build your report on a variety of data sources.
3.
Browse through the contents of the Database Expert to find the data source you want to use for
your report.
4.
Select a table you want to use in your report and click the > arrow to add it to the Selected Tables
list.
2013-05-0646
Quick Start

5.
After you have added all the tables you want to work with, click OK on the Database Expert.
Note:
If you select more than one table in the Database Expert dialog box, the Links tab appears. For
more information on linking, see Linking multiple tables.
The Design tab appears with Report Header, Page Header, Details, Page Footer, and Report Footer
areas. A report is created by inserting and formatting items in each of these areas.
Note:
To use additional database tables for a report and match them up on a record-by-record basis,
click Database Expert on the Expert Tools toolbar, select the table(s), and then set up the links on the
Links tab when it appears.
2.4.2 Working with report elements on the Design tab
1.
Each of the default report areas contains a single section. To add additional sections, click
Section Expert on the Expert Tools toolbar and use the Section Expert to add the desired sections.
Once you have added sections to an area, you can move, merge, and delete them in the Section
Expert. See Designing with guidelines .
2.
To turn the grid on or off, choose the Options command from the File menu and select or clear the
Grid check box in the Design View area of the Layout tab when the Options dialog box appears.
See Using the grid.
3.
If you are working with the grid off and you want to use snap-to guidelines for positioning objects,
click the top or left ruler wherever you want guidelines to appear.
Some further ways you can use guidelines:
• Drag a field to a guideline until it snaps to the guideline.
• Drag the guideline arrow to move the guideline (and any objects that are snapped to it).
• Drag the guideline arrow away from the ruler to remove the guideline. See Designing with
guidelines .
4.
If the Field Explorer dialog box is not visible, click Field Explorer on the Standard toolbar.
Expand the Database Fields node to display a list of fields. To speed the entry of multiple fields, this
box will remain on-screen until you close it. This dialog box can be moved to a new location or
resized, if you wish. See Placing data on the report.
5.
Select the field(s) you want to appear on the report.
You can select and place them one at a time, or use the Shift-click combination to select a number
of contiguous fields, or the Ctrl-click combination to select fields from the list at random. Drag and
drop is also active. Place the fields in the Details section where you want them to appear.
2013-05-0647
Quick Start

When you place multiple fields, they appear in the same order that they appear in the Field Explorer
dialog box. The program marks the position of each field with a rectangular frame. The characters
in the frame indicate whether the field is text (XXX...), number (555...), currency ($555...), date
(12/31/99), time (00:00:00), DateTime (12/31/99 00:00:00), or Boolean (T/F).
Note:
• The field names and field types can be viewed by selecting the Show Field Names check box
on in the Options dialog box (Layout tab).
• The program automatically places field titles in the Page Header section unless the Insert Detail
Field Headings check box is not selected in the Options dialog box (Layout tab).
• If additional Details sections are added to the report, field titles will only be placed in the Page
Header section for fields in the Details A (the original) section of your report.
6.
Once the objects are in place, you may want to adjust the report sections. To do this, right-click the
shaded area to the left of the section ruler and use the shortcut menu that appears:
• To expand a section to accommodate an additional line, choose the Insert Line command.
• To have the program automatically align the objects in the section horizontally, choose the Arrange
Lines command.
• To reduce the size of a section to eliminate unnecessary white space above and below objects,
choose the Fit Section command. See Using white space between rows.
7.
To generate a report title, you must first enter the title in the Document Properties dialog box. On
the File menu, click Summary Info. Enter a title in the Title text box of the Document Properties
dialog box. Click OK.
8.
Choose Report Title from the Special Fields list in the Field Explorer. A rectangular placement frame
appears when you move the cursor over your report. Click once in the Report Header (RH) section
to place the report title. The report title field contains the text that you typed in the Title text box of
the Document Properties dialog box. See Adding a title page to the report.
9.
To see how the results will print, click Print Preview on the Standard toolbar.
To speed processing time while building a report, you can preview the report using only a small
subset of the available data. To do this, go to the File menu, point to Print and then click Preview
Sample. See Preview tab.
In either case, the program takes you to the Preview tab. You can fine-tune a report in the Preview
tab while viewing the results as actual report data. You can also close the Preview tab and continue
working on the report in the Design tab.
2.4.3 Using other reporting features
1.
If you want to format a field, change the placement or width of a field, or insert a summary, click the
field to select it. Handles appear on the top, bottom, and sides of each selected field:
2013-05-0648
Quick Start

To change the placement of the field(s), use the mouse to drag the field placement frame to its
new position.
•
• To change the width of the field, use the mouse to drag the right or left handle.
• Right-click the field to format or to summarize it. A shortcut menu appears listing commands for
formatting and summarizing the field.
Tip:
Many font and formatting options are available on the formatting toolbar.
Note:
To apply formatting only under certain conditions, click Conditional Formula next to the formatting
property in the Format Editor, and create a formula that defines those conditions. See Working with
conditional formatting.
2.
To create a formula that makes data calculations or comparisons, select Formula Fields in the Field
Explorer.
Note:
You can also click Formula Workshop on the Expert Tools toolbar to work with formulas, custom
functions, SQL expressions, and so on.
3.
Click New. The Formula Name dialog box appears. Enter a name for the formula and click OK.
The Formula Workshop appears with the Formula Editor active.
4.
Enter the formula in the Formula Editor. Enter fields, operators, and functions by selecting them
from their respective lists or by typing them in. You can check the formula syntax by clicking Check.
5.
When you are finished editing, click Save and close to return to the Field Explorer dialog box.
6.
Click Insert to Report to place the formula just like you would a database field. See Using
Formulas.
7.
To insert a subreport (a report within a report), click Insert Subreport on the Insert Tools toolbar
and choose an existing report to import as a subreport or use the Report Creation Wizard to create
a new subreport. See Inserting subreports.
If you want the records in a subreport to match up with the records in a primary report, click the Link
tab of the Insert Subreport dialog box and specify the link when the tab appears.
8.
To insert a cross-tab object in a report, click Insert Cross-Tab on the Insert Tools toolbar and
set up the cross-tab in the Cross-Tab Expert when it appears. See Cross-Tab Objects.
9.
To create a parameter field (a field that prompts you for a value whenever you retrieve data for
a report), click Field Explorer on the Standard toolbar, then select Parameter Fields in the Field
Explorer dialog box when it appears. Click New to set up a parameter field. Once created, you can
insert the parameter field in a report like a database field or select it from the Fields list in the Formula
Workshop.
2013-05-0649
Quick Start

Parameter fields can be used in reports (as title or label prompts), in selection formulas (as selection
criteria prompts), and in formulas (for a variety of purposes including specifying sort fields). See
Parameter Fields and Prompts.
10.
To add a chart, click Insert Chart on the Insert Tools toolbar. See Charting.
11.
To add a map, click Insert Map on the Insert Tools toolbar. See Mapping.
12.
To insert a spreadsheet, picture, or other OLE object that you can edit from within the Report Designer
using the tools from the object's native application, choose OLE Object from the Insert menu. See
OLE, and Working with static OLE objects.
13.
To change the record sort order, click Record Sort Expert on the Expert Tools toolbar. The
Record Sort Expert appears. Highlight the field(s) you want to use for sorting the report data and
the sort direction. See Sorting single and multiple fields.
14.
To limit the report to specific records (for example, the records of California customers who
have year-to-date sales greater than $10,000), click the first field on which you want your selection
to be based and then click Select Expert on the Expert Tools toolbar. When the Select Expert
appears, set up the record selection criteria.
15.
To print the report, click Print on the Standard toolbar.
That's it! It is that easy to build a report.
2013-05-0650
Quick Start

Report Design Concepts
3.1 Basic report design
The purpose of this section is to suggest a structured approach to preparing a Crystal report. This
approach includes the following elements:
• Deciding on the content of the report.
• Developing a prototype on paper.
This section has been designed to provide a conceptual understanding of the reporting process.
3.2 Deciding on the content of the report
Before you do anything else, you should outline the information you want the report to provide. The
following sections provide a guide to making that outline.
Note:
A report (.rpt) file might contain sensitive business data. You are advised to protect access to the file
by using one of these methods:
• Manage the file with SAP BusinessObjects Business Intelligence platform server.
• Apply file security.
• Apply operating system-level encryption.
3.2.1 Stating the purpose
What is the overall purpose of the report?
Reports are management tools. Their purpose is to help you quickly grasp the essential elements and
relationships found in raw data, to help you make effective decisions. For a report to be effective, it has
to present the correct data in a logical way. If it presents the wrong data, or if it presents the right data
2013-05-0651
Report Design Concepts

in a haphazard manner, the report may slow the decision-making process or may even encourage
incorrect decisions.
A good starting place in the development of a report is to write out the purpose of the report in a sentence
or two. The purpose statement helps you focus on your primary needs, and it gives the report both a
starting point and a goal.
Here are some examples of purpose statements.
• The purpose of this report is to show monthly and year-to-date sales by sales representatives,
compare this year's numbers to last year's, and flag representatives whose sales figures do not
meet company standards.
• The purpose of this report is to show sales activity for each item in inventory, and to suggest reorder
quantities based on that activity.
• The purpose of this report is to calculate bowling averages and handicaps for each member of the
bowling league.
Defining the purpose of the report before you start is a critical step in the overall process.
Who is going to read the report?
A single report is often used by many individuals. A detailed, company-wide sales report, for example,
may be used by sales representatives, the regional sales manager, the national sales manager, and
the Chief Operating Officer (COO).
These individuals will be interested in different aspects of the report:
• A sales representative will use the report to evaluate individual sales performance and compare this
performance to that of other representatives in the region.
• The regional sales manager will use the report to evaluate regional representatives and compare
the region's performance to that of other regions.
• The national sales manager will use the report to evaluate the performance of regional managers
and compare overall sales to the current sales forecasts.
• The COO will use the report to evaluate the performance of the Vice-President of Marketing and
the sales department as a whole, and to project such things as manufacturing needs and warehouse
locations.
Since each user of the report has different interests, it is important to plan the report so it includes the
information each user is looking for.
3.2.2 Determining the layout of the report
What is the report title going to be?
Write out a working title for the report. You may decide to change it later, but at least you will have a
title to use when creating the prototype report.
2013-05-0652
Report Design Concepts

What identifying information is needed in the header and footer?
You may wish to include the print date, information on who prepared the report, a block of text to describe
the purpose of the report, the range of data covered, or something similar. If you are going to include
such information, write it down so you can use it in preparing your prototype.
The information can come from a variety of sources, depending on the kind of information you plan to
use.
• Information on who prepared the report might be drawn from individual data fields in the database
table(s) used. If it is to be drawn from a database table, what table? Or, what combination of tables?
• A block of text can be created as a text object and placed anywhere on the report.
• Crystal Reports can generate information such as the print date or page numbers.
3.2.3 Finding the data
What data do you want to use in the report?
Do you know the type of database you are reporting from? Will you be reporting off a data file,
SQL/ODBC, or another data source?
If you do not know, ask the database administrator in your organization for help in setting up the database
type and location of the data. For more information, see Accessing Data Sources in the
Crystal Reports
Online Help
.
Are you familiar enough with the data to find the necessary information? When looking for a Customer
Contact name, can the field be found in a database table?
If not, your MIS professional, database administrator, or co-workers will have to help you become
familiar with the data.
What specific data should appear in the body of the report?
The body should contain all the data needed to fulfill the statement of purpose you wrote for the report.
It should also contain all of the data needed by the various users that you have identified.
This step requires you to look at the available database table(s). Crystal Reports allows you to combine
data from different databases when you create reports, so you have a great deal of flexibility in your
work.
• Much of the data in a typical report is taken directly from data fields. Which data fields will be used,
and where are they located?
• Other data will be calculated based on data fields. Which data fields will be used in the calculations?
• Still other data will be placed directly into the report using text objects (headings, notes, labels, and
so on).
2013-05-0653
Report Design Concepts

Does the data exist or does it need to be calculated?
Some report information can be drawn directly from data fields (sales information, for example); other
information will have to be calculated based on data field values (for example, sales commission, based
on the relationship of sales to quota). In your planning, it can be helpful to segregate or flag data that
needs to be calculated from that which can be used directly. See Specifying formulas.
What types of fields contain data?
You should take the time to get to know the data type for data fields that will be used in your calculations.
Since formula functions and operators work with specific kinds of data, it is important to recognize the
data type you are working with, before you start any calculations. For example, some functions require
numeric data, while others work with only string fields. For more information on specific functions and
operators, search for "Functions" and "Operators," or for the function or operator by name in the
Crystal
Reports Online Help
.
3.2.4 Manipulating the data
There are several ways to manipulate data when you design a report. The following sections list some
options you may want to consider.
Do you want the data organized into groups?
How? By customer? By date? By hierarchy? Or by other criteria? Crystal Reports provides several
options for grouping data in a report. See Grouping data.
Do you want the data sorted based on record or group values?
Crystal Reports gives you both alternatives. See Understanding sort options.
Do you want the report to contain only specific records or groups?
Crystal Reports gives you the opportunity to base a report on all records in a given database, or on a
limited set of records from the database. Crystal Reports can be used to select records based on simple
date ranges or comparisons, or to create complex formulas to identify the records to be included. Take
a few minutes to determine the records needed for the report and list the criteria to be used for selecting
those records. See Selecting records.
Do you want to summarize the data?
Do you want to total, average, count, or determine the maximum or minimum value included in all the
values in any column on the report?
Crystal Reports allows you to do this, and it also allows the grand total (or the grand total average,
grand total count, and so on) to be placed at the bottom of the selected column. See Calculating a
percentage.
What information should be flagged on the report?
You may want to call attention to some data by flagging it on the report. For example, non-moving
inventory items are often flagged on inventory reports so they can be given special attention. You might
2013-05-0654
Report Design Concepts

want to flag each item that has shown no activity during the last month, during the last three months,
or during some other defined period. To flag information, identify it and any conditions that will trigger
the flagging.
How do you want information flagged?
You may want to flag items with an asterisk or some other symbol, or you may want a word to appear
as a flag. In any case, you should write out flagging instructions so they are handy.
Crystal Reports gives you the opportunity to underline report elements, and change the font type, size,
or color used for specific report items. It allows you to put borders around items and to draw lines and
boxes (to break the report into sections), set off headings, and so on. All of these formatting tools can
be used to highlight key data on a report. See Formatting.
3.2.5 Determining printing area characteristics
Each report area has its own printing characteristics. It is important to understand these characteristics
because they affect when and how often different report objects get printed.
3.2.5.1 In what order will the areas print on the report?
Areas print in the order they appear on the Design tab (top to bottom). If there is more than one section
in an area, the sections print in the order they appear. For example, if you have three Report Header
sections, all three of those sections will print, in order, before the section(s) in the Page Header area
begin to print.
3.2.5.2 How often do report objects print?
The way objects print will determine how you design your report. This will help you decide where to
place charts, Cross-Tabs, and formulas to get specific results.
Report Header
Objects placed in the Report Header area print once, at the beginning of the report.
• Charts and Cross-Tabs placed in this area contain data for the entire report.
Note:
Both charts and Cross-Tabs can filter report data by using a Group Sort; in such cases, the data
shown in the chart or Cross-Tab is a subset of the data for the entire report.
2013-05-0655
Report Design Concepts

• Formulas placed in this area are evaluated once, at the beginning of the report.
Page Header
Objects placed in the Page Header area print at the beginning of each new page.
• Charts or Cross-Tabs cannot be placed in this section.
• Formulas placed in this area are evaluated once per page, at the beginning of each new page.
Group Header
Objects placed in the Group Header area print at the beginning of each new group.
• Charts and Cross-Tabs placed in this area contain data just for the group.
• Formulas placed in this area are evaluated once for each group, at the beginning of the group.
Details area
Objects placed in the Details area print with each new record.
• Charts or Cross-Tabs cannot be placed in this area.
• Formulas placed in this area are evaluated once for each record.
Group Footer
Objects placed in the Group Footer area print at the end of each group.
• Charts and Cross-Tabs placed in this area contain data just for the group.
• Formulas placed in this area are evaluated once for each group, at the end of the group.
Report Footer
Objects placed in the Report Footer area print once at the end of the report.
• Charts and Cross-Tabs placed in this area contain data for the entire report.
Note:
Both charts and Cross-Tabs can filter report data by using a Group Sort; in such cases, the data
shown in the chart or Cross-Tab is a subset of the data for the entire report.
• Formulas placed in this area are evaluated once, at the end of the report.
Page Footer
Objects placed in the Page Footer area print at the bottom of each page.
• Charts and Cross-Tabs cannot be placed in this area.
• Formulas placed in this area are evaluated once per page, at the end of each new page.
2013-05-0656
Report Design Concepts

3.3 Developing a prototype on paper
While a paper prototype is useful regardless of your level of expertise with Crystal Reports, it is particularly
valuable when you are first learning the program. With the paper prototype in hand, you can put your
full effort into learning and using the commands, rather than into trying to design and learn at the same
time.
3.3.1 To design a paper prototype
1.
Get the same size paper you will be using for the finished report.
2.
Position the title and other descriptive header information, using boxes or lines to represent report
elements.
3.
Position the footer information.
4.
Review the page layout for balance.
5.
Look at the information you intend to include in the body of the report:
• Count the number of fields being used and estimate the appropriate spacing between fields.
• Use rectangles to pencil in the fields within the estimated spacing.
• Change the spacing if you need to.
• Decide on a logical sequence for presenting the data in the body of the report.
• Label the fields to indicate that sequence.
6.
Use small boxes to indicate group values and totals.
7.
Place random flags in the column where you want flags to appear.
8.
Darken any elements you want highlighted to make them stand out from the rest of the prototype.
9.
Review the finished product for layout and balance, and make changes as needed.
2013-05-0657
Report Design Concepts

2013-05-0658
Report Design Concepts

Introduction to Reporting
4.1 Report creation options
Each time you create a new report, you have three options:
• Use a Report Creation Wizard.
• Use another report as a model.
• Create a report from scratch.
You will probably use each option at some time.
Report Creation Wizards
The Report Creation Wizards help create reports as quickly as possible and many new users and
developers alike prefer to create the majority of their reports using them. All you have to do is choose
the wizard that most closely matches your report type. The wizard walks you through the process of
creating reports step-by-step.
Another report
To build a new report based on one that already exists, another report can be used as a model. Open
the report you want to use in this way by selecting the Open File option and save it to a new file using
Save As (found on the File menu). This method is useful to:
• Create a new report with a different grouping or different record selection than that of an existing
report.
• Reconstruct a report based on an earlier time period using the same report structure used today.
• Create an entirely new report based on a set of databases that are linked in another report. You can
create a report and delete the fields without disturbing the underlying links. Then, without relinking,
you can build all your new reports based on this report.
Crystal Reports also lets you format a report by applying a template. See Using a template for more
information.
New report
The Blank Report option is used to create a report from scratch. This is useful when you want the full
flexibility and control of building a report from the ground up, or when a report type is different from the
many report types available in the wizards.
2013-05-0659
Introduction to Reporting

4.2 Choosing data sources and database fields
Crystal Reports makes it simple to select data sources and database fields by providing easy-to-use
functionality in the Database Expert dialog box and the Field Explorer dialog box. Each of these dialog
boxes uses the familiar Windows tree structure to allow you to navigate through the possible choices.
4.2.1 The Database Expert
The Database Expert provides an integrated tree view of all data sources you can use with Crystal
Reports. In the Database Expert, you can select from the following as a data source for your report:
• A currently connected data source.
• An SQL command that has been saved to the BusinessObjects Enterprise Repository.
• A data source that has been added to your Favorites folder.
• A recently accessed data source (the Database Expert automatically maintains a list of such data
sources for you).
• An existing data source (for example, a data file residing locally, or an ODBC data source that has
already been set up).
In the Database Expert, you can also specify links between database tables when you have selected
more than one table for your report.
The Database Expert is made up of two tabs: the Data tab and the Links tab.
4.2.1.1 Data tab
Tree View
The Data tab of the Database Expert shows a tree view of possible data sources you can select when
creating a report. The tree—in the Available Data Sources list—is made up of folders for:
• My Connections
• Create New Connection
The Create New Connection folder contains subfolders for many popular data sources. Among these,
you'll find:
• Access/Excel (DAO)
2013-05-0660
Introduction to Reporting

• Database Files
• ODBC (RDO)
• OLAP
• OLE DB (ADO)
Note:
The data source options available in the Create New Connection folder depend on the data access
components selected during installation.
For a brief description of each of these folders and subfolders, see Selecting the data source.
Shortcut Menu
You can right-click any item in the Available Data Sources list of the Database Expert to see a shortcut
menu with the following options:
• Add to Report
Use this option to add a table or stored procedure to your new report. This option is also available
by clicking the > arrow on the Database Expert.
• Add Command to Report
Use this option to add a Table object that has been created using an SQL command.
• Make New Connection
Use this option to create a new connection.
• Remove from Report
Use this option to remove a table or stored procedure from your report. This option is also available
by clicking the < arrow on the Database Expert.
• Properties
Use this option to obtain detailed information on the selected item.
• Rename Connection
Use this option to rename a data source connection.
• Delete Connection
Use this option to remove a data source connection.
Note:
Database connections which have been connected to or referenced in an open report cannot be
deleted.
• Remove from repository
Use this option to delete an existing SQL command from the SAP BusinessObjects Enterprise
Repository.
• Rename repository object
2013-05-0661
Introduction to Reporting

Use this option to rename an existing SQL command in the SAP BusinessObjects Enterprise
Repository.
• Options
Use this option to set the global options that appear on the Database tab of the Options dialog box.
• Refresh
Use this option to refresh the list of available data sources in the Database Expert.
4.2.1.2 Links tab
Database tables are linked so records from one database match related records from another. For
example, if you activate a Suppliers table and a Product table, the databases are linked so that each
product (from the Product table) can be matched up with the supplier (from the Supplier table) that
made the product.
The majority of reports will probably require data from two or more tables, so linking will be necessary.
The process of linking is made easy by using the Links tab of the Database Expert. See Linking tables.
4.2.2 The Field Explorer
Use the Field Explorer dialog box to insert, modify or delete fields on the Design and Preview tabs of
Crystal Reports. To see the Field Explorer, select the Field Explorer command from the View menu.
4.2.2.1 Tree View
The Field Explorer shows a tree view of database fields and special fields that you can add to your
report. It also shows formula fields, SQL expression fields, parameter fields, running total fields, and
group name fields that you have defined for use in your report.
Fields that have already been added to the report, or fields that have been used by other fields (such
as formula fields, groups, running total fields, summaries, and so on) have a green check mark next to
them.
2013-05-0662
Introduction to Reporting

4.2.2.2 Toolbar and Shortcut Menu
The Field Explorer's toolbar provides buttons with tool tips and hot-key combinations. You can right-click
any item in the tree view to bring up a shortcut menu.
The toolbar offers these functions:
• Insert to Report
Use this option to add a field to the report. You can insert more than one field at a time by selecting
multiple fields, right-clicking, and choosing Insert to Report.
Alternatively, to insert a field, you can drag and drop it in the Design or Preview tabs.
• Browse
Use this option to browse data for a database field, formula field or SQL expression field.
Note:
On the shortcut menu, this option is called Browse Data.
• New
Use this option to create a formula field, SQL expression field, parameter field or running total field.
• Edit
Use this option to modify an existing formula field, SQL expression field, parameter field or running
total field.
• Duplicate
Use this option to make a copy of the formula that you have selected in the Field Explorer. When
the copy is created, you can rename it and edit it.
• Rename
Use this option to modify the name of an existing formula field, SQL expression field, parameter
field or running total field.
• Delete
Use this option to remove a formula field, SQL expression field, parameter field or running total field.
You can also select multiple fields, right-click, and choose Delete to remove them all at once.
The shortcut menus for the fields in the Field Explorer offer additional functions that are not on the
toolbar, including the following options:
• Find in Formulas
Use this option to find occurrences of the selected item throughout all of the formulas in your report.
• Set Prompt Order
2013-05-0663
Introduction to Reporting

Use this option to open the Set Prompt Order dialog box, in which you can change the prompt order
of your parameter fields.
• Show Field Type
Use this option to see the field type (string, number, and so on) when you're looking at a list of
database fields. The length of string fields is included in brackets at the end of their names.
• Sort Fields Alphabetically
Use this option to display table fields in alphabetical order (instead of the order they appear in the
table).
• Sort Tables Alphabetically
Use this option to display database tables in alphabetical order (instead of the order they appear in
the database).
• Refresh
Use this option to refresh the list of available fields in the Field Explorer.
4.2.2.3 Group Name Fields
You can insert an existing Group Name field shown in the Field Explorer by right-clicking it and selecting
Insert to Report. Unlike a formula field, parameter field or running total field, however, you cannot create
a Group Name field through the Field Explorer. (A Group Name field is created when you insert a group.)
4.3 About the report design environment
4.3.1 Design tab
When working with Crystal Reports, you will probably use the Design tab more than any other part of
the program.
2013-05-0664
Introduction to Reporting

The Design tab is the place you do most of the initial work when creating a report. It designates and
labels the various sections of the report. You can do the initial formatting, place objects in the sections
where you want them to appear, specify sorting, grouping, and totaling needs, and so forth.
The Design tab provides a very efficient environment for designing a report because you work in the
tab with data representations, not with data itself. When a field is placed on the report, the program
uses a frame to identify the field on the tab; it does not retrieve the data. Thus, you can add and delete
fields and other objects, move them around, set up complex formulas, and more, without tying up the
computer or network resources needed to gather the data.
The report created in the Design tab is a kind of virtual report; it has the structure and instructions for
creating the final report, but it is not the report itself. To turn the Design tab report into a final report or
into a report that you can fine-tune, you "just add data." You do this whenever you preview the report,
print it, or output it in any other way. The actual data will now appear in the report.
4.3.1.1 Design tab areas
When you first begin creating a report, Crystal Reports automatically creates five areas in the Design
tab.
• Report Header
This section is generally used for the report title and other information you want to appear at the
beginning of the report. It can also be used for charts and cross-tabs that include data for the entire
report.
• Page Header
This section is generally used for information that you want to appear at the top of each page. This
can include such things as chapter names, the name of the document, and other similar information.
This section can also be used to display field titles above the fields on a report.
• Details
2013-05-0665
Introduction to Reporting

This section is used for the body of the report, and is printed once per record. The bulk of the report
data generally appears in this section.
• Report Footer
This section is used for information you want to appear only once at the end of the report (such as
grand totals) and for charts and cross-tabs that include data for the entire report.
• Page Footer
This section usually contains the page number and any other information you want to appear on the
bottom of each page.
If a group, summary, or subtotal is added to the report, the program creates two additional sections:
• Group Header
This section typically holds the group name field, and can be used to display charts or cross-tabs
that include data specific to the group. It is printed once at the beginning of a group.
• Group Footer
This section generally holds the summary value, if any, and can be used to display charts or
cross-tabs. It is printed once at the end of a group.
When a group, summary, or subtotal is added, the Group Header area appears directly above the
Details area and the Group Footer area appears directly below the Details area.
If you set up additional groups, the program creates new group areas between the Details area and
the existing Group Header and Group Footer area(s).
2013-05-0666
Introduction to Reporting

Like the original areas, each of these newly added areas can contain one or more sections. By default,
they each contain a single section.
4.3.1.2 Identifying and working with areas and sections
By default, each area contains only a single section. The name for that section appears directly to the
left of the section. If you have multiple sections in an area, the sections are designated as a, b, c, and
so forth.
Note:
• Initials, such as RH, PH, D, PF, RF, and so on, are used to identify each section if you have selected
the Short Section Names check box in the Design View area of the Options dialog box.
• If you right-click the shaded area containing a section name, a shortcut menu appears with
section-specific options.
If you have selected the Show Rulers options on the Layout tab of the Options dialog box, the program
displays a section ruler immediately to the left of each section. The section ruler is used to add, remove,
and move guidelines, and to provide a visual reference when you are placing objects. See Designing
with guidelines .
Whenever a new section is added, the program creates a ruler for that section. See Using multiple
sections in reports .
2013-05-0667
Introduction to Reporting

4.3.1.3 Other Design tab capabilities
There are several other capabilities built into the Design tab. With the Design tab, you can:
• Resize a section by dragging its boundary. See Resizing a section.
• Split a section (create two sections from one) by clicking its left boundary. See Splitting a section.
• Add horizontal and vertical guidelines by clicking the rulers. See Designing with guidelines .
• Zoom in and out on a report at any magnification from 25% to 400% of the original size. See Using
the zoom feature.
4.3.2 Preview tab
To preview a report before printing it, click Print Preview on the Standard toolbar.
The program gathers the data, makes the necessary calculations, and displays the report in the Preview
tab. With the data in place, you can review the spacing and formatting of your report and see the actual
results of all your summaries, formula calculations, and record and group selections.
In true WYSIWYG (What You See Is What You Get) fashion, you can work directly on this live data,
fine-tuning it until the report has the exact look you want.
The program works with data in the following manner:
• The first time the Preview tab is used, it retrieves data from your underlying data source(s) and
saves it with the report (unless you have set up the program not to save data).
• From that point on, the program uses the saved data whenever you preview the report unless you
specifically refresh it or add a field that requires the program to retrieve new data.
4.3.2.1 Standard view
2013-05-0668
Introduction to Reporting

In standard view, the report is displayed a page at a time. Using the navigation buttons in the Preview
tab, you can move to the beginning or end of the report, or you can move backward and forward through
the report one page at a time. For shorter reports or reports in which you're primarily interested in seeing
the "bottom line" totals, the standard view provides all of the functionality you need.
The Data Age indicator
The Data Age indicator indicates the date the data was last refreshed or initially retrieved, whichever
is the most recent. If the data was initially retrieved or refreshed today, it indicates the time it happened.
4.3.2.2 Preview Panel
The Preview Panel houses the Group Tree, the Parameter Panel, and a Find tab.
4.3.2.2.1 Group Tree
2013-05-0669
Introduction to Reporting

The Group Tree can be shown or hidden using the Toggle Preview Panel button on the Standard
toolbar.
The Group Tree presents a split screen:
• The right pane displays the report.
• The left pane displays a high level outline of the report, showing the hierarchy of groups and
subgroups in a familiar tree format.
The Group Tree normally displays the names of the groups and subgroups you created in your report.
You can, however, customize these names using the Options tab of the Insert Group or Change
Group Options dialog box. For more information on customizing group names in the Group Tree, see
Grouping data.
When you click the tree node for the group that interests you, the program jumps immediately to the
part of the report that contains the information for that group. For longer reports or reports in which you
wish to jump back and forth between different groups, the smart navigation features of the Group Tree
make your work extremely efficient.
4.3.2.2.2 The Parameter Panel
The Parameter Panel lets users interactively format and filter report data by changing parameter values.
It is located within the Preview Panel.
In the Create New Parameter and Edit Parameter dialog boxes, you can specify parameters to display
on the Parameter Panel via the Show on (Viewer) Panel option. You can choose one of several settings:
• Do not show
The parameter is not visible on the panel. Users must refresh the report to change the parameter
values.
• Editable
Users can view and change the parameter values on the panel.
• Read only
Users can view the parameter values on the panel, but cannot change them.
Note:
Do not show is the default setting for a new parameter.
The Parameter Panel displays all parameters that have been set to Editable or Read only. Depending
on the type of parameter, users can add, delete, or modify parameter values either by using the dropdown
menus and applying their changes or by clicking the Advanced Dialog button.
The following are some of the more commonly used types of parameters that must be modified by
clicking the Advanced Dialog button:
• Parameters with ranged values.
2013-05-0670
Introduction to Reporting

• Dynamic parameters that use cascading prompts.
On the panel, data parameters are differentiated from non-data parameters with a database icon. When
a user modifies the value of a data parameter, the report refreshes and accesses the database to make
the corresponding changes. When a user modifies the value of a non-data parameter, the report is
formatted or filtered based on saved data within the report. It does not access the database.
4.3.2.2.3 Find tab
Use the Find tab to search your report for specific words or phrases.
Click the magnifying-glass button, or press Enter, to start the search. If you want to narrow your result
set, click the down arrow to select Match Case or Match Whole Word Only.
Each result in the list displays the location in the Group Tree where it is found. Double-click a result to
go to that spot in the report. You can click the Stop button while you are searching. Switching to a
different report or tab while searching also stops the search.
4.3.2.3 Comparisons with the Design tab
You have the same formatting capabilities in the Preview tab as you do in the Design tab. Menus (both
menu bar and shortcut menus) and toolbars remain active, providing essentially the same functionality
you have when working with a report in the Design tab. However, when you are making numerous
changes, it is quicker to make the changes in the Design tab. Some additional things to consider are:
• The Design tab and Preview tab are tied together internally. Any changes made in one are reflected
in the other.
• The Preview tab has a single vertical ruler at the left of the tab rather than the individual section
rulers seen in the Design tab. The functionality of the ruler is the same.
• The Preview tab identifies report sections in the shaded area to the left of the data. With a quick
look you can tell which report section the data is printing from. While section names appear only
once in the Design tab, they print each time a section prints in the Preview tab.
• The Record counter, the Data Age indicator (see Standard view), and the Page Forward/Page Back
controls (see Preview tab), are all active in the Preview tab.
• The Preview tab highlights every value when you select a field; whereas, only the field frame is
highlighted in the Design tab.
Working in the Preview tab has a different feel from working in the Design tab.
Each field in a database contains dozens, hundreds, or even thousands of values, depending on the
number of records in the database. When you place a field in the Design tab, a single field frame
represents all those values. When you highlight the field, sizing handles appear on the frame and the
frame changes color.
2013-05-0671
Introduction to Reporting

In the Preview tab, however, you are working with the actual data. Instead of a field frame representing
many field values, the values themselves appear. Some additional things to consider are:
• When you highlight a field or formula field value, you are actually selecting every value in the field:
• The program places a sizing frame around the specific value you select.
• It highlights every other value in the field.
• Likewise, when you select a summary value, you are actually selecting all the related summary
values:
• The program places a sizing frame around the specific value you select.
• It highlights all the related summary values.
Aside from the differences in appearance, the process of building and modifying a report is the same
in both the Design tab and the Preview tab. You should find it easy to work with your reports in both
places.
4.3.3 HTML Preview tab
To see an HTML rendering of your Crystal report as it will appear when published to the web, click
HTML Preview on the Standard toolbar.
When you need to make sure that your report design is appropriate and correct over the web in a
zero-client environment, the HTML Preview option lets you see an instant rendering of your report to
HTML without leaving the Crystal Reports design environment. Unlike the Preview tab, which shows
the true report format, the HTML Preview tab shows a converted format. By switching between the two
tabs, you can make adjustments in your report design to yield the best results on the web.
In the case of reports that are published to SAP BusinessObjects Business Intelligence platform
(managed reports), you don't have do any special configuration to make the HTML Preview feature
work.
Note:
The guest account in SAP BusinessObjects Business Intelligence platform must be enabled before you
can use the HTML Preview feature.
For stand-alone reports (unmanaged reports), the program must use the Report Application Sever
(RAS) to generate the preview. In this case, you need to configure the HTML Preview feature. Do this
in the Smart Tag & HTML Preview tab of the Options dialog box in Crystal Reports.
2013-05-0672
Introduction to Reporting

For information about how to configure the HTML Preview Options, search the Crystal Reports online
help for “Smart Tag & HTML Preview tab (Options dialog box)”.
4.4 Creating a new report
4.4.1 Selecting the data source
After deciding which option you want to use for creating your report (see Report creation options), the
next step is to select a data source to use.
Most data sources can be chosen through the Database Expert dialog box. The Database Expert
appears when you create a report from scratch using Blank Report, or when you choose Database
Expert from the Database menu.
Note:
You also select a data source in the Report Creation Wizards. The Data screen in all of the Report
Creation Wizards, except the OLAP Report Creation Wizard, is much like the Database Expert dialog
box.
4.4.1.1 To select a data source
1.
Choose Database Expert from the Database menu.
The Database Expert dialog box appears.
2.
Use the tree view in the Available Data Sources list of the Data screen to select your data source:
• My Connections
This folder shows a list of data sources you are currently connected to.
• Create New Connection
This folder shows subfolders for various data sources you can connect to.
Some popular choices in the Create New Connection folder are described here:
• Access/Excel (DAO)
This option lets you connect to a supported database type (Access, dBASE, Excel, Lotus, and
so on). You can create a new connection using the Make New Connection option.
2013-05-0673
Introduction to Reporting

• Database Files
This option shows a list of standard PC databases that reside locally. You can use Find Database
File to browse for a PC database using the Open dialog box.
• ODBC (RDO)
This option shows a list of ODBC data sources you have already configured for use.
• OLAP
This option opens the OLAP Connection Browser so you can choose an OLAP cube as a data
source.
• OLE DB (ADO)
This option shows a list of OLE DB providers you have already configured for use. You can also
specify a Microsoft Data Link file to use. For some of the OLE DB providers, you will have the
option to connect using "Integrated Security". No user ID or password is required with this option,
but it does require that Database Authentication is enabled on the server. Please consult your
Database Administrator on how to enable and configure this function.
• Repository
This folder shows you the contents of your repository through the BusinessObjects Enterprise
Explorer.
Note:
The data source options available in the Create New Connections folder depend on the data access
components selected during installation.
4.4.2 Adding tables
After selecting the data source, you can add one or more tables to base your report on.
4.4.2.1 To add a table
1.
Choose Database Expert from the Database menu.
The Database Expert dialog box appears.
2.
On the Data tab, search for the database you want to use in your report. See Selecting the data
source.
3.
In the Available Data Sources list, select the table you want to add to your report and click the >
arrow to add it to the Selected Tables list.
2013-05-0674
Introduction to Reporting

You can insert more than one table at a time by selecting multiple tables, right-clicking, and choosing
Add to Report. You can also drag and drop tables to the Selected Tables list.
4.4.3 Linking multiple tables
If the report contains data from two or more database tables, they need to be linked at this point when
creating reports.
Note:
It isn't necessary to link tables in reports created from a query or command because any links required
by the data have already been processed.
4.4.3.1 To add and link multiple tables
1.
Choose Database Expert from the Database menu.
The Database Expert dialog box appears.
2.
On the Data tab, select the tables you want to add to your report. See Adding tables.
The Links tab appears in the Database Expert.
3.
Click the Links tab to display the databases currently available for linking.
Crystal Reports automatically links tables by name or key when possible.
2013-05-0675
Introduction to Reporting

4.
To create links manually, drag a field from one table to a field in another table. If successful, a link
line is created. If unsuccessful, a message is issued.
Note:
You can link tables by table name or by foreign key information.
5.
If you've deleted links and you want to recreate them automatically, click Link.
6.
Click OK when finished.
Note:
When manually creating links, the field you are linking "to" must be of the same data type as the
field you are linking from. When a native connection is used, the field you are linking "to" does not
have to be indexed. For more information, see Indexed tables.
The Database Expert closes, and you are returned to your report. The linked databases are now
available for use in your report. If you are not satisfied with the link, you can modify it using the Links
tab of the Database Expert.
Related Topics
• Understanding Databases
• Linking options
2013-05-0676
Introduction to Reporting

4.4.4 Placing data on the report
Placing data on a report is a very important task. You need to know what type of data should be placed
on the report and where on the report it should be placed.
Note:
A report (.rpt) file might contain sensitive business data. You are advised to protect access to the file
by using one of these methods:
• Manage the file with SAP BusinessObjects Business Intelligence platform server.
• Apply file security.
• Apply operating system-level encryption.
4.4.4.1 Database fields
Much of the data placed on a report are database fields, displaying data as it is stored in the database.
Normally, database fields will be placed in the Detail section, but under certain circumstances, they will
be placed in other sections of the report.
4.4.4.1.1 To insert a database field
1.
On the Standard toolbar, click Field Explorer.
The Field Explorer dialog box appears. To speed the report building process, this dialog box remains
on-screen until you close it. You can move this dialog box wherever you wish.
2.
Expand the Database Fields folder to see all the tables chosen from the database(s).
3.
Expand the individual tables to see all the fields they contain.
4.
Select the field you want to appear in the report.
5.
Click Browse to review the values in the selected field.
6.
Click Insert to Report to place it in the report.
4.4.4.2 Formula fields
To display data that is a calculated value, you need to create a formula field and place that formula field
on the report. For example, if the database only stores the order dates and ship dates for orders but
you need to display the number of days it takes to ship the order, you must create a formula field that
2013-05-0677
Introduction to Reporting

will calculate the number of days between ordering and shipping. This is just one example of the use
of formula fields. See Using Formulas, for an introduction to formulas.
4.4.4.3 SQL Expression fields
SQL expressions are like formulas, but they are written in Structured Query Language (SQL), not in
the Crystal Reports formula language. An SQL expression can be used to query the database for
specific sets of data. You can sort, group, and select based on SQL expression fields.
4.4.4.3.1 To create an SQL Expression field
1.
On the Standard toolbar, click Field Explorer.
The Field Explorer dialog box appears.
2.
Scroll down to SQL Expression Fields and highlight it. Click New.
The SQL Expression Name dialog box appears.
3.
Enter a name in the Name box, and then click OK.
The Formula Workshop appears with the SQL Expression Editor active.
4.
Type the expression in the SQL Expression Editor.
Note:
For an overview of the formula language, see Formula components and syntax.
5.
Click Save.
2013-05-0678
Introduction to Reporting

4.4.4.4 Parameter fields
To prompt the user of a report to enter information, create a parameter field. Think of a parameter as
a question that the user needs to answer before the report is generated. The information users enter,
or the way they respond, determines what appears in the report. For example, in a report used by
salespeople, there might be a parameter that asks the user to choose a region. The report would return
the results for the specific region, instead of returning the results for all of the regions. See Parameter
Fields and Prompts for an introduction to parameter fields.
4.4.4.5 Running total fields
To display a total that evaluates each record and provides a running sum of all the values in a field (or
all the values in a certain set of values), a running total field needs to be created and placed in the
report. If the first three values in a field were 2, 4, and 6, a running total would print 2, and then 6 (the
sum of 2 + 4), and then 12 (the sum of 2 + 4 + 6). See Running Totals, for an introduction to running
totals.
4.4.4.6 Special fields
To display information such as Page Numbers, Print Date, and Report Comments use the commands
in the Special Fields tree view of the Field Explorer dialog box.
4.4.4.6.1 To insert a special field
Crystal Reports allows you to easily insert Page Number, Record Number, Group Number, Print Date,
and Total Page Count fields, among others, into your report.
1.
On the Standard toolbar, click Field Explorer.
The Field Explorer dialog box appears.
2.
Scroll down to Special Fields and expand it by clicking.
2013-05-0679
Introduction to Reporting
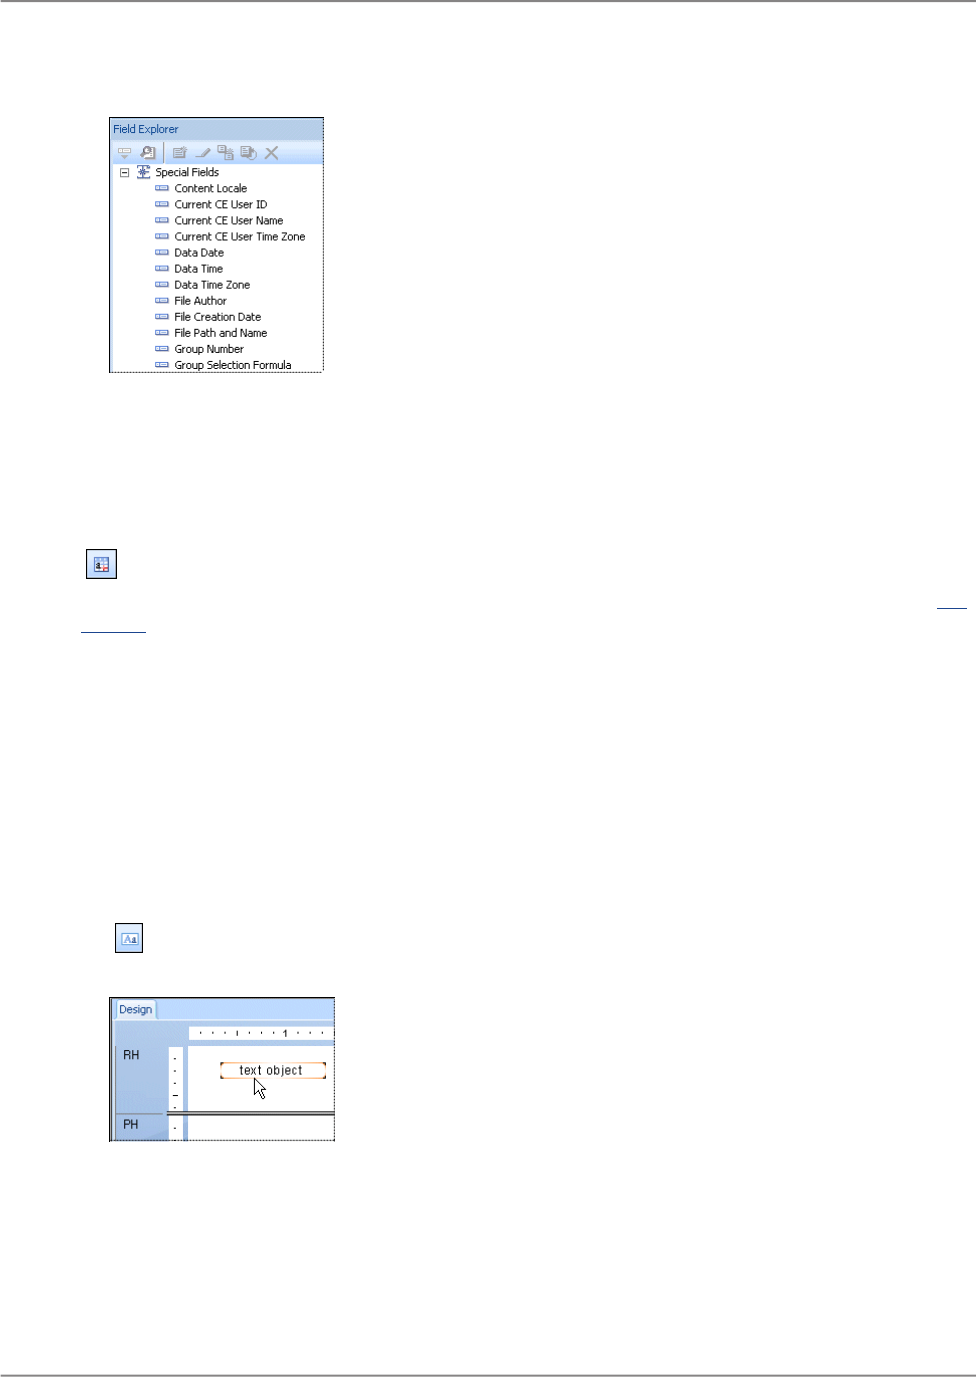
3.
Choose a command from the Special Fields list to insert in the report.
Each special field is inserted into the report as an object. An object frame appears. You can now
place it on the report.
Note:
To change the formatting of an inserted object, click the object to select it and click Format on the
Expert Tools toolbar. The Format Editor appears where you can make the desired changes. See For
matting.
4.4.4.7 Text objects
Text objects are used in reports for a multitude of purposes. They are a powerful way of inserting titles;
labeling summaries and other data on your report; and of easily combining database fields.
4.4.4.7.1 To insert a text object
1.
On the Insert Tools toolbar, click Insert Text Object. A cursor appears.
2.
Position the cursor where you want the text object to appear in the report.
Click once on the border of the text object to select it for resizing and moving.
Double-click inside the text object to select it for editing. The Design tab ruler changes to a text
object ruler sized to the length of the selected object. To the left, a tab indicator appears. By clicking
2013-05-0680
Introduction to Reporting

the tab indicator, you can cycle through the four tab options available. Once you have chosen the
desired tab, click the position on the ruler where you want to insert it.
The ruler allows you to add indents and align text within the text object.
Note:
When you first insert the text object into the report, the object is automatically selected for editing.
4.4.4.8 Picture fields
When designing reports, there will be times when you want to include a picture. For example, you may
wish to put a company logo in the report header.
4.4.4.8.1 To insert a picture
1.
On the Insert Tools toolbar, click Insert Picture.
The Open dialog box appears.
2.
Select the desired picture file from the file list and click Open to return to the report.
An object frame appears with the picture inside, ready to be positioned.
3.
Position the picture object where you want it to appear in the report and left-click once.
4.4.4.9 Hyperlink fields
You can select a report object on the Design or Preview tab and create a hyperlink to another location.
The hyperlink is saved with your report and is available to other users as a way of viewing additional
information.
2013-05-0681
Introduction to Reporting

Note:
• Crystal Reports lets you create hyperlinks with Relative URLs, so your web reports retain
independence from their location on any particular server.
• You can use the option "A Website on the Internet" to connect to SAP BusinessObjects, Web
Intelligence, and Analysis workspace documents (this is also known as report linking). Click Create
enterprise hyperlink to create these hyperlinks in Crystal Reports.
4.4.4.9.1 To create a hyperlink field
1.
Select a report object on the Design or Preview tab.
2.
On the Format menu, click Hyperlink.
The Format Editor dialog box appears with the Hyperlink tab active.
3.
Click the type of hyperlink you want to create.
The available types in the upper area are:
• No Hyperlink
This is the default option. There is no hyperlink associated with the selected report object.
• A Website on the Internet
Select this option if you want your report object to be linked to a static web address. Use the
formula button to create a URL based on a field value. For example, you might enter the following
formula if your Customer Name field contained information that would create a series of meaningful
URLs:
"http://www." + {Customer.Customer Name} + ".com"
Note:
You can also use this option to connect to SAP BusinessObjects, Web Intelligence, and Analysis
workspace documents (this is also known as report linking). Click Create enterprise hyperlink
to create these hyperlinks in Crystal Reports.
Tip:
Alternatively, you can use the openDocument function in the "Formula Workshop" to create
hyperlinks.
• Current Website Field Value
Select this option if you want the program to create a hyperlink out of the field you selected. The
field must be stored as a proper hyperlink in your data source.
• An E-mail Address
Select this option if you want to create a "mailto" address from the field you selected. Use the
formula button to create an address based on a field value.
• A File
Select this option to create a hyperlink to a file on a specific computer or networked computer.
Use the formula button to create a file path based on a field value.
2013-05-0682
Introduction to Reporting

You can also use a hyperlink of this type to run an EXE with a command-line parameter. Enter
the path and application name, and follow it by the parameter for the command.
• Current E-mail Field Value
Select this option if you want the program to create an email hyperlink out of the field you selected.
The field must be stored as a proper email address in your data source.
The available types in the DHTML Viewer Only area are:
• Report Part Drilldown
For information about how to use this option, see The Report Part Drilldown option.
• Another Report Object
For information about how to use this option, see The Another Report Object option.
Note:
Not all hyperlink types are available at all times. The object you select and its location on the report
determine which types are available.
4.
After you have chosen a hyperlink type, enter the appropriate hyperlink information (the URL of a
web site, for example).
5.
Click OK when you are finished.
The hyperlink is inserted as appropriate. Click it on the report to go to the web site, to send an e-mail,
and so on. For information about how to use the hyperlink types in the DHTML Viewer Only area, see
Setting up navigation.
4.4.5 BLOB (Binary Large Object) fields
A BLOB field is a database field whose data consists of Binary Large Objects—such as bitmap graphics,
images, OLE objects, metafiles, and so on. Inserting a BLOB field into your report allows you to access
these binary objects as you would other data types.
Note:
Crystal Reports can also access BLOB objects by reference (that is, dynamically through a file path),
so that you do not need to store the BLOB objects in your database. For more information, see Making
a static OLE object dynamic.
In general, Crystal Reports allows you to access BLOB fields containing:
• Device-independent bitmaps (DIB).
• JPEG, TIFF, or PNG images.
In addition, if your data resides in a Microsoft Access database, then Crystal Reports enables you to
report on BLOB fields containing OLE 1 and 2 objects and metafiles.
2013-05-0683
Introduction to Reporting

You insert BLOB fields as you would any other database field. For details, see To insert a database
field.
A BLOB field object differs from other database field objects in that it offers options to control cropping,
scaling, and sizing—just like an inserted picture or OLE object. To access these options, right-click the
BLOB field object, select Format Graphic from the shortcut menu, and click the Picture tab.
Note:
To retain the ability to activate and edit an OLE object with its server application, you should insert the
object into your report independently, either by linking or by embedding, rather than inserting it in a
BLOB field. For more information about inserting linked and embedded OLE objects, see Inserting OLE
objects into reports.
4.4.6 Formatting data
At this point in creating a report, you may want to do some basic formatting. Perhaps you would like to
change the font size and style of a text object used as a title. Or, if you have a number field, such as a
sales figure, you might want to place a dollar sign before the number or change the number of decimal
places displayed.
4.4.7 Record selection
Record selection, the task of paring down the data to include only the data required for your report, is
a crucial step in report creation. You will rarely want a listing of all the information in a database. Most
often you will be interested in only the sales in a given time period or for a certain product, and so on.
For example, a sales report may be designed to only include sales from one product line for the last
calendar month.
4.4.8 Grouping, sorting, and summarizing data
Once a basic report is created, you will want to organize the data by grouping related information,
sorting individual records, summarizing, subtotaling, and grand totaling.
Grouping records
To organize the data, you may want to group related data together. For example, after grouping a
customer list by region, you might divide the list into regional groups. That way, a sales manager for
one region could quickly locate the appropriate region group and focus exclusively on the customers
within that region.
2013-05-0684
Introduction to Reporting

Sorting records
Crystal Reports allows you to specify the order in which you want the records on your report displayed.
For example, after grouping by region, you might sort the records within each region in alphabetic order
by Customer Name. Many of your reports will use some type of sorting. Depending on the report, you
will sort the records in a list or sort in conjunction with grouping.
Summaries, subtotals, and grand totals
Many reports use some sort of totaling. For example, in a North American sales report grouped by
state, you might want to calculate the total dollar amount sold in each state. You do this by creating a
subtotal on the sales field. Summaries are also used at the group level, allowing you to calculate
averages, counts, and other group (aggregate) values. For example, in a sales report you may want to
calculate an average of sales per state (average summary on the sales field) and calculate the number
of products sold in the state (distinct count of the product name field).
4.4.9 Using the drill-down option on summarized data
You can drill down on your data, to show the data behind individual groups, using the Drill-down cursor.
See Sorting, Grouping, and Totaling.
4.4.9.1 Drill-down cursor
Crystal Reports allows you to drill down on group or summary information in the Preview tab in both
the Standard and the Group Tree. When you position the cursor over any summary value that you can
drill down on, the program displays a Drill-down cursor.
Tip:
Group headers appear on the Drill-down tab just as they do in the main report itself.
If you then double-click, the program reveals the details behind that specific summary value. For example,
if the Drill-down cursor becomes active over the city summary, you can double-click to see the details
behind that summary.
• If you have only a single summary, you can look at the summary or at the data from the individual
records that are summarized.
• If you have multiple summaries, you can look at the summaries behind summaries (the city summaries
that make up the region summaries, for example), or at the data from the individual records that are
summarized.
2013-05-0685
Introduction to Reporting

4.4.10 Using the zoom feature
You can easily zoom in on a report. You can choose any magnification from 25% to 400%. This feature
is active in both the Design and Preview tabs.
To zoom the report in or out, set the zoom level in the Zoom Control box found on the Standard
toolbar.
It is helpful to view reports at low magnifications in order to get an overall picture of the layout of your
report. Views at higher magnifications focus attention on the details of the report.
4.4.11 Inserting page headers and footers
You can use page headers and footers by placing the information in the Page Header or Page Footer
sections of the Design tab.
• Information to appear only on the first page of the report goes in the Report Header (RH).
• Information to appear only on the last page of the report goes in the Report Footer (RF).
• Information to appear at the top of every page goes in the Page Header (PH).
• Information to appear at the bottom of every page goes in the Page Footer (PF).
Text, fields, or formulas can be used in these sections just as in the Details section.
Related Topics
• Creating footers after the first page
2013-05-0686
Introduction to Reporting

4.4.12 Adding a title page to the report
Crystal Reports provides a quick, easy way to add a title page to a report by selecting Report Title from
the Special Fields in the Field Explorer dialog box. In order to use this field, you must have a title entered
in the Summary tab of the Document Properties dialog box. See Adding summary information to the
report.
4.4.12.1 To add a report title
1.
On the Standard toolbar, click Field Explorer.
The Field Explorer dialog box appears.
2.
Scroll down to Special Fields and expand it by clicking.
3.
Select Report Title, and click Insert to Report. An object frame appears when the cursor is moved
over the report.
4.
Move the object frame to the Report Header section and click once to place the frame.
5.
With the report title selected, click Section Expert on the Expert Tools toolbar.
The Section Expert appears.
6.
With the Report Header section highlighted, select the New Page After check box.
Now the title will appear on the first page and the report will begin on the second page.
4.4.13 Adding summary information to the report
2013-05-0687
Introduction to Reporting

There may be times when you want to include non-printing comments with a report (a personal note to
the report recipient, a note to explain more thoroughly the data on which the report is based, a report
title, a comment about some particular data on the report, and so on).
Summary Info on the File menu provides a facility for including anything from a short note to hundreds
of lines of text with your report. The comments do not print with the report; they remain in the Summary
tab of the Document Properties dialog box where they can be reviewed on demand.
When you choose Summary Info, the Document Properties dialog box appears with the Summary tab
active.
Enter the desired information and click OK when finished to return to your report.
4.5 Exploring reports and working with multiple reports
Crystal Reports lets you work with your existing reports through the Report Explorer, the Workbench,
and the Dependency Checker.
This section describes these tools and provides some general information about opening and docking
each of the explorers that are available in Crystal Reports. For more information, see Opening and
docking explorers.
2013-05-0688
Introduction to Reporting

4.5.1 The Report Explorer
The content of the Report Explorer represents the content of the report in a tree view. The root node
is the report itself, while the first-level nodes represent the report's sections. Within each section, the
report's fields and objects are listed. Any item you select in the tree view will be selected in the report
(in either Design or Preview modes).
You can modify report fields and objects by selecting them in the Report Explorer. When you right-click
the selected item, you see a menu that contains the actions you can carry out on the item. For example,
if you right-click a text object, the menu will contain the options to edit the text, to format its font or color,
and so on. Likewise, if you right-click a section node, the menu will contain the options to hide, suppress,
format and so on.
Note:
You cannot add additional fields or report objects when using the Report Explorer, but you can delete
them.
You can select multiple fields for formatting by using Shift-click or Ctrl-click.
4.5.1.1 Toolbar
The Report Explorer's toolbar provides buttons with tool tips. These buttons let you expand or collapse
your report's tree view and choose the report items to display by type:
•
Expand
Use this option to expand all child nodes of the tree view under the selected node. If you select this
option while the root node is highlighted, all remaining nodes are expanded. If you select this option
while a child node is highlighted, only the nodes that are part of the child are expanded.
Note:
This option has no effect if selected while a report object is highlighted, or if the selected node has
no children.
•
Show/Hide Data Fields
Use this option to show or hide data fields in your report. Data fields include formula fields, summary
fields, and text objects.
•
Show/Hide Graphical Objects
Use this option to show or hide graphical objects in your report. Graphical objects include charts,
maps, boxes, lines, BLOB fields, and OLE objects.
2013-05-0689
Introduction to Reporting

•
Show/Hide Grids and Subreports
Use this option to show or hide cross-tabs, OLAP grids, and subreports in your report.
Note:
•
Items connected to an SAP BusinessObjects Enterprise Repository are shown with the repository
icon beside them.
• Items with hyperlinks are shown as blue text with a solid underline. Items with Report Part hyperlinks
are shown as green text with a dashed underline.
4.5.2 The Workbench
In the Workbench, you can create projects that contain one or more reports. Use the options on the
toolbar to add, remove, or rename folders, reports, and object packages. You can reorganize the files
in a folder or folders by dragging and dropping them where you want them to appear. You can also
drag report files from Windows Explorer and drop them into the folder of your choice in the Workbench.
4.5.2.1 Toolbar
The toolbar in the Workbench provides the following options:
•
Add Report
Use this option to add a new object to the Workbench:
• Add Existing Report
When you select this option, the Open dialog box appears so that you can search for a Crystal
report that you have previously created.
• Add Current Report
When you select this option, the program creates a root node that is called Untitled Project. It
then adds the current active report to that project.
Note:
This option is available only when there is an active report.
• Add New Project
When you select this option, the program adds a new folder under the root node that is called
Untitled Project. You can add reports to this folder. Project folders offer a way to organize the
reports in the Workbench.
2013-05-0690
Introduction to Reporting

•
Open
Use this option to open the report or report package that you have selected in the project folders.
•
Check Dependencies
Use this option to initiate the Dependency Checker. The option is available for individual reports or
for folders of reports. Crystal Reports begins checking the report(s) immediately and displays the
results in the Dependency Checker. For more information, see The Dependency Checker.
4.5.2.2 Shortcut Menus
You can right-click any item in the projects area of the Workbench to see a shortcut menu. Many of the
options that are available on the shortcut menu are also available on the toolbar. This section describes
only the additional options that are not available on the toolbar.
• Add Object Package
When you select this option, the program prompts you to log on to your SAP BusinessObjects
Business Intelligence platform system. When you have connected to your system, you can choose
an object package to add to the Workbench. For more information about object packages, see the
SAP BusinessObjects Business Intelligence Platform Administrator Guide
.
• Publish to SAP BusinessObjects Business Intelligence platform
Use this option to publish a folder of reports to SAP BusinessObjects Business Intelligence platform.
You can publish your reports individually or as an object package. (Objects packages can be
scheduled in SAP BusinessObjects Business Intelligence platform as a single entity.) When you
choose this option, the "Publish Object" dialog box appears.
For information about using this dialog box, search the Crystal Reports online help for “Publish
Object dialog box”.
• Remove
Use this option to remove a report, report package, or folder from the projects area.
Note:
• You cannot undo this option.
• When you remove a folder, you remove all of the items in it at the same time.
• Rename
Use this option to rename a folder in the projects area.
2013-05-0691
Introduction to Reporting

4.5.3 The Dependency Checker
The Dependency Checker appears when you check a report or project for errors in the Workbench, or
when you select the command on the Report menu for a report that you have open in Crystal Reports.
The Dependency Checker registers several types of errors:
• Report part hyperlink errors
• Repository object errors
• Formula compilation errors
Errors listed in the Dependency Checker show the following information:
• Error type.
MeaningIcon
Success. The Dependency Checker has verified
that there are no errors in the file.
Warning. The Dependency Checker has found
something in the file that might be a problem.
You can verify the warning, but you don't have
to fix it to have the report to run correctly.
Error. The Dependency Checker has found an
error that you should fix so that the report will
run correctly.
• Description of the error.
• Location of the file that contains the error.
Double-click an error to open the target report, and go to the report object so that you can fix the problem.
If the report object cannot be found (because, for example, you've deleted part of the report since
checking for errors), you receive a message that recommends you run the check again.
4.5.3.1 Shortcut Menu
2013-05-0692
Introduction to Reporting

When you right-click a message in the Dependency Checker, a shortcut menu appears:
• Go To
Use this option to open the report that contains the error and to go to the object that is causing the
problem. You can also select a message and press Enter or double-click to open the report.
• Sort By
Use this option to sort the messages by type, number, description, or location.
• Clear
Use this option to remove the selected message.
• Clear All
Use this option to remove all of the messages.
• Copy
Use this option to copy the message to the clipboard so that you can paste it into another application.
• Options
Use this option to open the Dependency Checker tab of the Options dialog box. Use this tab to select
the conditions that you want to check for when you run the Dependency Checker.
For more information about the options, search the Crystal Reports Online Help for the topic
"Dependency Checker tab (Options dialog box)."
4.5.4 Opening and docking explorers
Crystal Reports includes these explorers and tools that you can use to see various reports and report
objects:
• The Field Explorer
• The Report Explorer
• The Repository Explorer
• The Workbench
• The Dependency Checker
Open any of these explorers by using the commands on the View menu or the buttons on the Standard
toolbar. If the explorer is closed, its command or button opens it; if the expert is already open, its
command or button sets focus to it.
After installation, each explorer opens in a docked position in the Report Designer. You can dock
explorers in any area of the designer by dragging them to a new location.
2013-05-0693
Introduction to Reporting

Double-click an explorer's title bar to change between docked and free-floating mode. In free-floating
mode, the explorer can be dragged to any position. When you drag the explorer, a placement frame
shows you where it will be placed. You can also resize an explorer by dragging any of its edges with
the Resizing cursor.
Note:
When you double-click the title bar of a free-floating explorer, the program docks it where it was when
you last used Crystal Reports.
You can create a single, multi-tabbed explorer from the Field Explorer, the Report Explorer, the Repository
Explorer, the Workbench, and the Dependency Checker by dragging the explorers on top of each other.
This multi-tabbed explorer can be used in docked or free-floating mode.
Click the tabs in the amalgamated explorer to change focus from one explorer type to another; the
name in the title bar changes accordingly to show you which explorer you're currently using.
4.6 Beyond basic reports
Once you are comfortable with the basics of reporting, you will be ready to investigate the more powerful
reporting features of Crystal Reports, including:
• Charts (see Charting)
• OLE objects (see OLE)
• Form letters (see Form letters)
• Subreports (see Subreports)
• Cross-tabs (see Cross-Tab Objects)
• Multi-section reports (see Multiple Section Reports)
2013-05-0694
Introduction to Reporting

SAP BusinessObjects Enterprise Repository
5.1 What is the SAP BusinessObjects Enterprise Repository?
The SAP BusinessObjects Enterprise Repository is a database in which you manage shared report
objects. You can refresh a report's repository objects with the latest version from your SAP
BusinessObjects Enterprise Repository when you publish reports to SAP BusinessObjects Business
Intelligence platform.
The SAP BusinessObjects Enterprise Repository is hosted by the Central Management Server (CMS)
system database in SAP BusinessObjects Business Intelligence platform.
The object types that the repository supports include the following items:
• Text objects
• Bitmaps
• Custom functions
• Commands (queries)
Note:
Business Views and list-of-values objects are also stored in the SAP BusinessObjects Enterprise
Repository. You can use Business Views in Crystal Reports, but you create them in the Business View
Manager. You can create and use lists of values in Crystal Reports, but you add them to the repository
through the Business View Manager.
By maintaining a shared repository of report objects, you can modify a particular object and update all
reports containing that object as they are opened for use. A central location for report objects also helps
with the task of managing your data—an important benefit in maximizing productivity and minimizing
costs at your company.
5.1.1 Work flow
Although there are many ways to use the SAP BusinessObjects Enterprise Repository, this sample
work flow will acquaint you with some of the things you might want to do:
2013-05-0695
SAP BusinessObjects Enterprise Repository

• Set up subfolders and subcategories for your repository
The "Repository Explorer "displays the contents of your SAP BusinessObjects Enterprise Repository
as a tree with folders, subfolders, categories, and subcategories. The following folders and categories
are supplied through SAP BusinessObjects Business Intelligence platform:
• Repository Items
• Enterprise Items
• Categories
• Personal Categories
You can add subfolders and subcategories.
• Add report objects to your repository
There are different ways to do this depending on the type of object you want to add:
• Select a text object or bitmap image and drag it to a folder or choose "Add to Repository" from
the shortcut menu.
• Select a Custom Function in the Formula Workshop and click the "Add to Repository" button.
• Create or modify a command in the Database Expert and, once it appears in the Selected Tables
list, right-click it and choose the "Add to Repository" option.
• Add repository objects to a report
There are different ways to do this, depending on the type of object:
• Text objects and bitmap images can be dragged to the report from the "Repository Explorer".
• Custom functions can be added through the "Formula Workshop".
• Commands can be added though the "Database Expert".
• Lists of values and prompt groups can be added to parameter fields by selecting them from the
appropriate lists in the "Create New Parameter" or "Edit Parameter" dialog boxes.
• Update report objects in your repository
Again, there are different ways to do this, depending on the type of object:
• Text objects and bitmap images can be dragged back to the original repository object.
• Custom functions can be updated through its user interface.
• Commands can be updated and added back to the repository through the "Database Expert".
5.2 Accessing the SAP BusinessObjects Enterprise Repository
The repository supplied by Crystal Reports is set up when you install. You don't have to do anything
additional before you use the repository.
2013-05-0696
SAP BusinessObjects Enterprise Repository
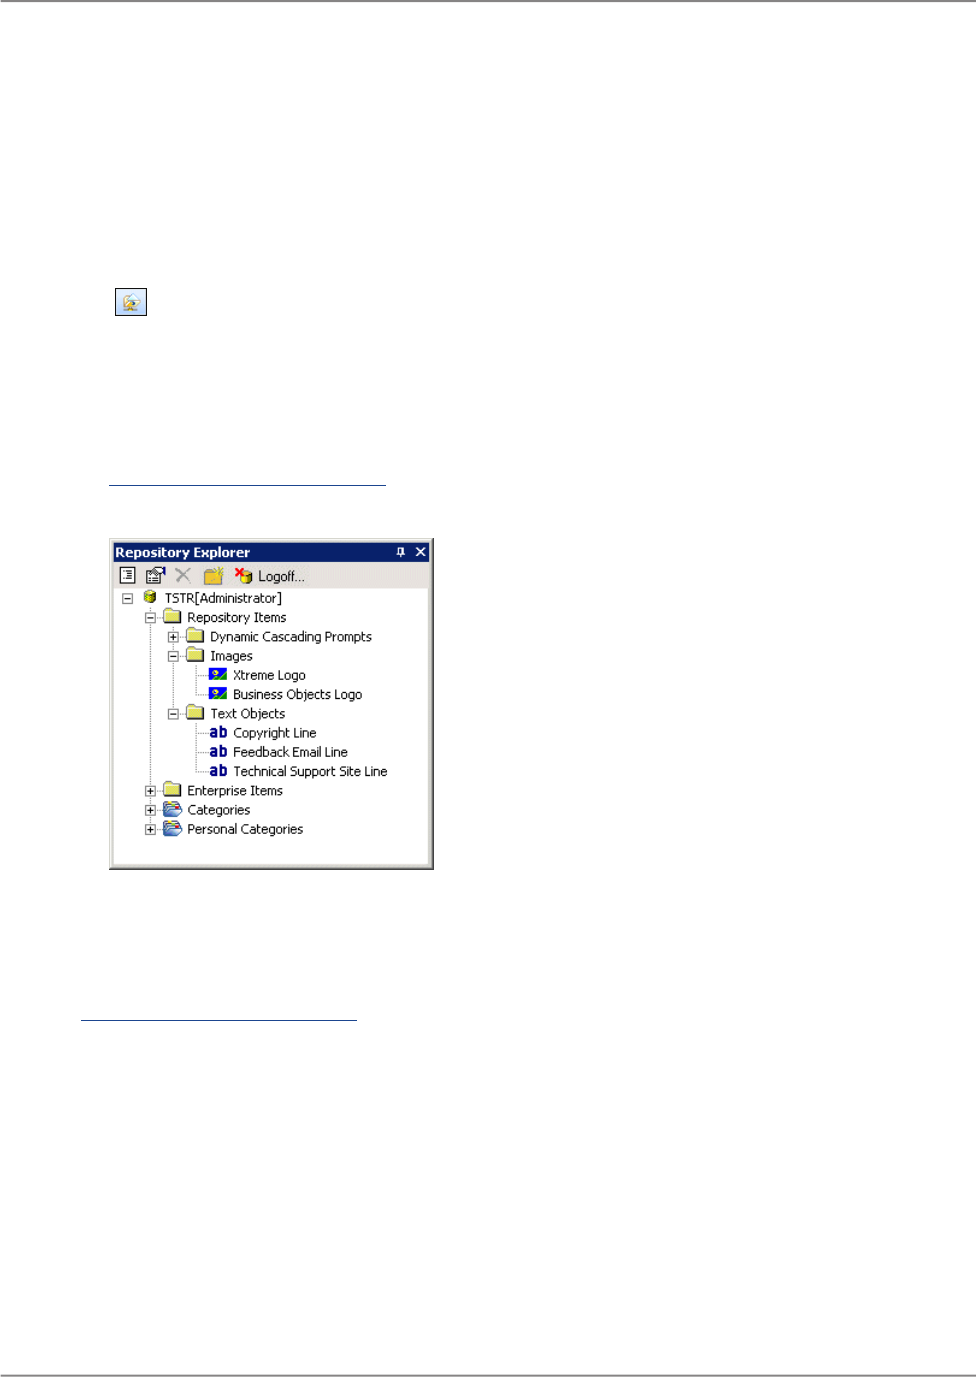
5.2.1 To open the SAP BusinessObjects Enterprise Repository
1.
Start Crystal Reports and open a report.
2.
Click the Repository Explorer button on the Standard toolbar.
Tip:
Another way to do this is to click the Repository Explorer option under the View menu.
3.
Click Logon to connect to SAP BusinessObjects Business Intelligence platform.
For information about how to log on to SAP BusinessObjects Business Intelligence platform, see
Working with Enterprise folders.
The Repository Explorer appears.
4.
Expand nodes to see the repository contents.
The "Repository Explorer" might appear in a docked position in the Report Designer depending on
where it was when you last used Crystal Reports. For more information about docking explorers, see
Opening and docking explorers.
Hover your mouse's cursor over any object in the "Repository Explorer" to see a tooltip. Tooltips include
Author and Description information for text objects and bitmaps; for commands, tooltips include the
complete text of the SQL statement.
5.3 Repository Explorer toolbar
2013-05-0697
SAP BusinessObjects Enterprise Repository

The Repository Explorer's toolbar provides buttons with tool tips. These buttons let you add new folders
or categories, search for items, and so on:
• Change view settings
Use this option to open the View Settings dialog box. Use this dialog box to limit the type of repository
items displayed in the Repository Explorer. You can also select options to sort multiple items by
name or by type.
• Advanced filtering
Use this option to display filtering options at the bottom of the Repository Explorer. Use these filters
to find specific items by words from the Name or Author fields in the Add Item dialog box. For
information about adding or changing an item's name or author, see Adding items to the repository
and Modifying objects in the repository.
Note:
Text entered in the filtering fields of this option is not case sensitive.
• Delete the item/folder
Use this option to permanently remove the selected item or folder from the repository. When you
delete a folder, you delete all the items it contains. For more information about deleting items from
the repository, see Deleting items from the repository.
• Insert a new folder
Use this option to add a new subfolder to the repository. For information, see Adding subfolders and
subcategories to the repository.
Note:
This option is called "Insert a new category" when you have selected a category in the repository
tree.
• Logoff Server
Use this option to log off the SAP BusinessObjects Business Intelligence platform server that you
are connected to. When you are logged off, this option is called Logon; use it to reconnect to your
SAP BusinessObjects Business Intelligence platform server or to connect to a different server.
5.4 Adding subfolders and subcategories to the repository
You can organize the contents of the repository by creating subfolders and subcategories in its tree
view.
Folders are objects that you can use to separate content into logical groups. Like folders, categories
are objects that you can use to organize documents. You can associate documents with multiple
categories, and you can create subcategories within categories.
SAP BusinessObjects Business Intelligence platform provides the following types of categories:
2013-05-0698
SAP BusinessObjects Enterprise Repository

• Corporate categories are created by the administrator, or other users who have been granted access
to these categories. If you have the appropriate rights, you can create corporate categories.
• Personal categories can be created by each user to organize his or her own personal documents.
5.4.1 To add a new subfolder or subcategory
1.
In the Repository Explorer, select an existing node, and click Insert a new folder or Insert a new
category on the Repository Explorer's toolbar.
Tip:
The insert button changes automatically from folder to category depending on the type of object that
you select.
A new subfolder or subcategory is added to the repository tree. (If your repository items are not
sorted, the new subfolder or subcategory is added to the bottom of the selected node. If your
repository items are sorted by type, the new subfolder or subcategory is added alphabetically with
the default name New Folder.)
2.
Name your new subfolder or subcategory and hit the Enter key.
5.5 Adding items to the repository
You can add text objects and bitmap images to the repository by dragging them from your report to the
appropriate repository folder. A dialog box appears so you can add identifying information about the
object.
Custom functions are added to the repository through the Formula Workshop and commands are added
through the Database Expert.
Once report items are in the repository, they can be shared between many reports. Each person who
uses Crystal Reports can connect to the repository and choose items to add to a report.
When you add an object to the repository, that object becomes "connected" to the repository. As long
as an object remains connected, you can update any report that uses that object with the latest version
in the repository.
5.5.1 Adding a text object or bitmap image
1.
Select a text object or bitmap image in your report and drag it to the appropriate folder in the
Repository Explorer.
2013-05-0699
SAP BusinessObjects Enterprise Repository

2.
In the Name field of the Object Information dialog box, create a name for your object or image.
Note:
You cannot use these characters in your object's name: # " { } ; /
3.
Enter an author and description if you want, and then click OK.
Tip:
Author and description information appears in tooltips and can be searched for using the Advanced
filtering option.
You'll see that your text object or bitmap image has been added to the appropriate folder.
5.5.2 Adding a text object or bitmap image - another method
You could have added the text object or bitmap image without dragging and dropping it.
1.
Select a text object or bitmap image in your report and click Add to Repository from the shortcut
menu.
The Add Item dialog box appears.
Notice that, because you did not drag the object to a specific repository folder, this dialog box contains
an area to select a location from.
2.
In the Name field, create a name for your object or image.
Note:
You cannot use these characters in your object's name: # " { } ; /
3.
In the Location area, select a repository folder, and then click OK.
You'll see that your text object or bitmap image has been added to the appropriate folder.
If you try to edit any of the objects you added to the repository, you'll see that you can't make changes;
the objects are in read-only mode. This is true of any report object that is stored in the repository: as
long as it is connected to the repository it can't be changed in the report. If you right-click the object in
the report and choose "Disconnect from Repository" from the shortcut menu, the item is disconnected
from the repository and becomes editable. If you want other reports to be updated with the edited report
object, you must add it back to the repository.
5.5.3 Adding a custom function
1.
In the Formula Workshop, expand the Report Custom Functions node and select the custom
function you want to add to the repository.
2013-05-06100
SAP BusinessObjects Enterprise Repository

2.
Click the Add to Repository button.
You'll see that your custom function has been added to the Repository Custom Functions node.
Tip:
• You can also add a custom function to the repository by dragging it from the Report Custom
Functions node—in the Workshop Tree—and dropping it on a Repository Custom Functions
node.
•
The custom function icon in the Report Custom Functions node changes to indicate that the
custom function exists in the repository.
Note:
You must add all custom functions to the Repository Custom Functions node that is provided with
Crystal Reports.
5.5.4 Adding a command
1.
In the Selected Tables area of the Database Expert, select the command you want to add to the
repository.
2.
Right-click the command and select Add to Repository.
3.
In the Add Item dialog box, specify a name and repository location for the command.
4.
In the Location area, select a repository folder, and then click OK.
You'll find the command in the SAP BusinessObjects Enterprise Explorer, the Repository Explorer,
the Database Expert, and the Set Datasource Location dialog box.
5.6 Using repository objects in reports
Once you have an object or a collection of objects added to the repository, you can start using them in
your Crystal reports. Each type of repository object is added through its own user interface. In the case
of text objects and bitmap images, you simply drag them from the Repository Explorer to a report.
Custom functions are selected when you work in the Formula Workshop, and commands are selected
in the SAP BusinessObjects Enterprise Explorer, the Database Expert, or the Set Datasource Location
dialog box. You can select list-of-values objects from within the Create New Parameter or Edit Parameter
dialog boxes.
When you add a repository object to a report, it remains connected to the repository and is in read-only
mode. To edit the object, you must disconnect it from the repository and unlock its formatting.
2013-05-06101
SAP BusinessObjects Enterprise Repository

Note:
• To reconnect a report object that has been disconnected from its repository, re-add the object or
update the repository copy. Objects that remain disconnected from the repository cannot be
automatically updated when the report is next opened.
•
You can see that a report object is connected to the repository by opening the Report Explorer
and looking for it; if the object has an icon in front of it, it is connected to the repository.
This section shows you how to add a bitmap image, a custom function, or a command to a new report.
It also shows you how to add a list of values to a parameter.
5.6.1 Adding a text object or a bitmap image to a report
1.
Click the Repository Explorer button on the Standard toolbar.
Tip:
Another way to do this is to click the Repository Explorer option under the View menu.
2.
Log on to SAP BusinessObjects Business Intelligence platform if you have not done so already.
For information about how to log on to SAP BusinessObjects Business Intelligence platform, see
Working with Enterprise folders.
3.
Expand the appropriate folder in the Repository Explorer and drag a text object or bitmap image to
your report.
Note:
Folders in your SAP BusinessObjects Enterprise Repository do not have to be named to represent the
objects they hold; you can use a name of your choice. See Adding subfolders and subcategories to the
repository for more information.
5.6.2 Adding a custom function to a report
1.
Click the Formula Workshop button on the Expert Tools toolbar.
Tip:
Another way to do this is to click the Formula Workshop option under the Report menu.
2.
In the Formula Workshop, expand the Repository Custom Functions node until you find the custom
function you want to add.
3.
Right-click the custom function and click Add to Report from its shortcut menu.
If the custom function you are adding to your report requires other custom functions from the
repository, they can be added at the same time.
2013-05-06102
SAP BusinessObjects Enterprise Repository

You'll see your custom function has been added to the Report Custom Functions node of the Formula
Workshop.
Note:
You can also add custom functions to a report while creating formulas in the Formula Workshop. For
more information about this method, see Creating a formula in the Formula Expert.
5.6.3 Adding a command to a report
1.
Click the Database Expert button on the Expert Tools toolbar.
Tip:
Another way to do this is to click the Database Expert option under the Database menu.
2.
In the Database Expert, expand the Repository folder.
Tip:
If the SAP BusinessObjects Enterprise Explorer doesn't open immediately, double-click Make New
Connection.
3.
In the SAP BusinessObjects Enterprise Explorer, expand folders until you find the command you
want to add, and then click Open.
You'll see your command in the Available Data Sources area of the Database Expert. When the command
is in this area, you can added it to your report as you would add any other data source. For more
information, see Selecting the data source.
5.6.4 Adding a list of values to a parameter
1.
In the Field Explorer, select Parameter Fields and click New.
2.
In the List of Values area, click Dynamic.
3.
Click Existing and choose a repository list of values from the tree view that appears.
Note:
If the list is empty (you cannot connect to a repository, or your report does not contain an existing
list of values), this option is not available.
5.7 Modifying objects in the repository
2013-05-06103
SAP BusinessObjects Enterprise Repository

You can modify repository objects by disconnecting them, changing them in a report, and adding them
back to the repository. As well, you can rename objects and move them to different folders directly in
the repository.
Note:
Be aware that when you modify an object and add it back to the repository, your changes affect all
those who use that same repository: a renamed object is renamed for all users, and reports that contain
the modified object may be updated upon opening them in the Report Designer.
5.7.1 To modify a repository object
Note:
This procedure shows you how to modify and update a text object in the repository. Custom functions
and commands are modified and updated in their respective user interfaces; in each case, you must
first disconnect the custom function or command from the repository, make the modifications, and then
add the custom function or command back to the repository.
1.
From the Repository Explorer, drag any text object into a report.
2.
Right-click the text object in the report and select Disconnect from Repository from the shortcut
menu.
3.
Double-click the text object and modify its text.
4.
Drag and drop the text object from the report to the folder containing the text object in the repository.
When you drop the text object, the Add or Update Object dialog box appears.
5.
Click Update.
6.
In the Modify Item dialog box, make any changes you require and click OK.
7.
Right-click the text object in the repository and click Properties from its shortcut menu.
Notice that the date and time in the Modified area have changed to correspond to the time you added
the text object back to the repository.
5.8 Updating connected repository objects in reports
Repository objects that are used in a report and are connected to that report's repository can be updated
automatically when opening the report in Crystal Reports. This behavior is controlled by an Options
setting and is global for all reports.
Note:
Objects that are used in a report but are disconnected from the repository are not automatically updated
when the report is opened.
2013-05-06104
SAP BusinessObjects Enterprise Repository

5.8.1 To set the update option
1.
On the File menu, click Options.
The Options dialog box appears.
2.
Click the Reporting tab.
3.
Select the Update Connected Repository Objects on Open check box.
4.
Click OK.
If you don't want to use this global option, you can also update a report's repository objects by selecting
the Update Repository Objects option on the Open dialog box for an individual report.
Note:
When you open a report that contains a command that is stored in the repository, and you have specified
that you want to Update Connected Repository Objects on Open, only the definition of the command
is automatically refreshed; the data that the command returns is not updated until you click the Refresh
button in the report.
5.9 Deleting items from the repository
Any object you store in the repository can be deleted from that repository without removing it from the
reports that use it. Once you remove an object from the repository, it is removed for all users.
Note:
• When you delete an object from the repository, it appears to remain connected in the reports that
use it. When you try to update repository objects for those reports, a warning message is shown in
the Missing Repository Items dialog box so you can quickly identify the object. Use the Report
Explorer dialog box to find the object in the report; then you can disconnect it.
• If you have deleted an object from the repository, creating a new object with the same name and
adding it back to the repository does not relink that object to your reports. Each repository object
has a unique ID; linking is not done by name.
5.9.1 To delete an object from the repository
1.
Click the Repository Explorer button on the Standard toolbar.
2013-05-06105
SAP BusinessObjects Enterprise Repository

Tip:
Another way to do this is to click the Repository Explorer option under the View menu.
2.
In the appropriate folder, select the object you want to remove and press the Delete key.
You are asked to confirm the deletion.
3.
Click the Yes button.
The object is removed from the repository.
You can also delete a repository object by right-clicking it and selecting Delete from the shortcut menu.
5.10 Using Undo in the repository
You cannot undo any action that updates the repository. You can undo anything that affects only the
report and not the repository. For example, you can undo the disconnect activity.
2013-05-06106
SAP BusinessObjects Enterprise Repository

Designing Optimized Web Reports
6.1 Overview
Whether you distribute your enterprise reports over a local network, a corporate Intranet, or the Web,
you can use Crystal Reports' powerful, built-in performance features to deliver web reporting speed.
Crystal Reports automatically provides these major performance advantages—even if you don't apply
any of the strategies set out in this section:
• Page-on-demand technology
Page-on-demand report access lets users download only the specific report pages they need to
see, thus improving response times and reducing web traffic. Further, placeholders and partial page
technology allow you to view report pages and data over the Web immediately, without having to
wait for the processing of large objects, such as graphics and subreports.
• Optimized, multithreaded Report Engine
The Crystal Report Engine's multithreading capabilities and thread-safe database drivers allow you
to continue working on your important tasks, while many other operations are processed
simultaneously in the background. The Report Engine also minimizes the number of passes made
through the data, speeds up processing with improved memory management, and handles subreports
and parameters as efficiently as possible.
In addition to these built-in features, the Key strategies for optimizing web reports discussed in the
following sections bring additional performance benefits, which are often substantial. When you design
new reports (or improve reports created in older versions of Crystal Reports) in accordance with these
strategies, reports run faster and tie up fewer processing resources. Consequently, report users can
easily access the data they need—faster than ever.
Tip:
If you're new to web reporting, or to reporting in general, reading this section will prepare you for future
reporting tasks—you'll gain important insight into designing faster, better reports.
Note:
Understanding databases and how they work is often important when considering performance. See
Databases overview for background information.
2013-05-06107
Designing Optimized Web Reports

6.1.1 Key strategies for optimizing web reports
• As your company grows, Crystal Reports and SAP BusinessObjects Business Intelligence platform
can grow along with you. For details, see Scale with SAP BusinessObjects Business Intelligence
platform .
• For tips and considerations on how to create fast, interactive reports, see Making the right design
choices.
• For information about getting the most out of your existing database, see Streamlining your reporting
environment.
• To minimize data transfer and enhance report performance, see Using enhanced record selection
formulas .
• To decrease the processing and data transfer times of grouped, sorted, or totaled reports, see
Improving grouping, sorting, and totaling.
In general, report performance issues are similar, no matter how you distribute your reports. By following
these strategies, you'll notice significant improvements not only in multi-user web environments, but
also in single-user situations.
6.2 Scale with SAP BusinessObjects Business Intelligence platform
SAP BusinessObjects Business Intelligence platform provides a flexible and efficient way to deliver
your reports over the web or to integrate them into custom web applications.
The Report Application Server (RAS) provides a rich set of server-based reporting services that let you
tightly integrate reporting into your custom web applications. RAS provides a base set of BusinessObjects
Business Intelligence platform services, focused on report processing, application integration, and
run-time report modification.
You can extend your application even further using the following advanced services available in other
editions of SAP BusinessObjects Business Intelligence platform:
• Security
SAP BusinessObjects Business Intelligence platform provides granular group, user, and data-level
security to help you protect sensitive reports and deliver a more personalized end-user experience.
• Scheduling
SAP BusinessObjects Business Intelligence platform incorporates a flexible time- and event-based
scheduling system to allow you to process large reports during off hours and to avoid unnecessary
2013-05-06108
Designing Optimized Web Reports

database hits. (The Report Application Server provides on-demand reporting, so every viewing
request results in a separate query on your database.)
• Versioning
Versioning works closely with scheduling to store "instances" of a report. Versioning not only reduces
the number of database hits required to serve users, but also allows you to keep an archive of report
instances for historical reference.
• Clustering
SAP BusinessObjects Business Intelligence platform incorporates proven clustering and
load-balancing technology to help you deliver a highly available, reliable information delivery system.
• Scalability
SAP BusinessObjects Business Intelligence platform is built on a distributed, multi-server architecture,
allowing you to scale up on a single machine (by adding processors) or scale out over multiple
machines to handle heavier user loads.
• Management
SAP BusinessObjects Business Intelligence platform incorporates extensive administration and
management controls that allow you to organize content, set up complex schedules and security,
and tune the system for optimal performance.
• External (third-party) authentication
SAP BusinessObjects Business Intelligence platform allows you to leverage your existing security
system to manage users and groups. All authentication can be delegated to a third-party NT or
LDAP system.
6.2.1 Evaluation times for date functions in SAP BusinessObjects Business Intelligence
platform
Different date and time functions available in Crystal Reports are evaluated at different stages during
report processing. Some are evaluated when a scheduled report is processed, or when a report instance
is refreshed: this evaluation time is known as "WhileReadingRecords." Others are evaluated each time
a report page is formatted for display in a report viewer or a browser: this evaluation time is known as
"WhilePrintingRecords."
If you use SAP BusinessObjects Business Intelligence platform to generate report instances and notice
that date or time functions are not evaluating to the values that you expect, consider the following:
• The current date and time are always read from the clock that is locally accessible to the Report
Engine—that is, from the clock on the computer that processes the report. In SAP BusinessObjects
Business Intelligence platform , the Job Server processes scheduled reports against the database,
and the Page Server processes on-demand reports against the database. The Page Server also
formats individual pages of report instances when users view them.
2013-05-06109
Designing Optimized Web Reports

• When a scheduled report is processed, all date and time formulas are evaluated by the Job Server
in order to generate the report instance. When you simply view the resultant report instance, none
of the formulas are re-evaluated.
• When you view a cached report page, none of the date functions are re-evaluated, because the
records have already been read and the page has already been formatted.
• If you use date and/or time functions in a report's selection formula, the report's data is dependent
upon the return values of those formulas. Consequently, when you view a report instance at a later
date, the function may cause the report data to be updated from the database.
• To ensure that date and time functions return the values that you expect, you can force the evaluation
time through the use of the WhileReadingRecords and WhilePrintingRecords functions.
For more information, see the "Functions" and "Report Processing Model" sections of the Crystal
Reports Online Help.
6.3 Making the right design choices
This section offers design options and considerations that will help improve the performance of your
reports. The topics covered range from basic suggestions, such as updating reports created in older
versions of Crystal Reports to the latest file format, to more involved decisions, such as whether to use
live or saved data, and how to use subreports efficiently.
When designing your reports, and especially when designing reports for the Web, you should allow
report users to drive the data they see. In other words, display summarized information, so each user
can navigate the report quickly and then drill down to access additional data. In this way, web traffic
and response times are minimized, because only the data requested by the user is transferred from
the database server.
These are only a few of the benefits of designing user-driven reports:
• Report users gain interactive control over the type and quantity of information they view over the
Web.
• Data transfer and network traffic decrease, because only the information requested by users is
returned from the database server.
• When users need real-time reporting of live data over the Web, user-oriented reports respond quickly
and communicate efficiently with the database server.
• Reports become more useful, because each user customizes the report's contents, thereby creating
a reporting solution specific to his or her particular decision-making problem.
6.3.1 Using faster report formats
2013-05-06110
Designing Optimized Web Reports

The quickest way to help improve the performance of reports created in older versions of Crystal Reports
is to save them in the latest Crystal Reports format. Crystal Reports has been enhanced to process
reports faster than ever before: update your older reports to take advantage of these enhancements.
To update the format of an older report, just open it in Crystal Reports and select Save from the File
menu. The older version of the report will be replaced with an updated version.
Note:
If for some reason you need to keep a report in its original file format, use the Save As command
(instead of Save) and enter a new name for the updated version of the report.
6.3.2 Choosing between live and saved data
When reporting over the Web, the choice to use live or saved data is one of the most important decisions
you'll make. Whichever choice you make, however, Crystal Reports displays the first page as quickly
as possible, so you can see your report while the rest of the data is being processed.
6.3.2.1 Live data
Live reporting gives users real-time access to live data, straight from the database server. Use live data
to keep users up-to-date on constantly changing data, so they can access information that's accurate
to the second. For instance, if the managers of a large distribution center need to keep track of inventory
shipped on a continual basis, then live reporting is the way to give them the information they need.
Crystal Reports supports live reporting. However, you should first consider whether or not you want all
of your users hitting the database server on a continual basis. If the data isn't rapidly or constantly
changing, then all those requests to the database do little more than increase network traffic and
consume server resources. In such cases, you may prefer to use reports with saved data.
To ensure the efficiency of real-time reporting, read all of the suggestions in this chapter. These topics,
however, are of particular importance:
• Taking advantage of on-demand subreports
• Performing grouping on server
• Incorporating parameter fields into record selection formulas
6.3.2.2 Saved data
2013-05-06111
Designing Optimized Web Reports

Reports with saved data are useful for dealing with data that isn't continually updated. When users
navigate through reports with saved data, and drill down for details on columns or charts, they don't
access the database server directly; instead, they access the saved data. Consequently, reports with
saved data not only minimize data transfer over the network, but also lighten the database server's
workload.
You can schedule these reports within SAP BusinessObjects Business Intelligence platform, so they
automatically refresh from the database on a predetermined basis. For example, if your sales database
is only updated once a day, or once a week, then you can run the report on a similar schedule and save
it with data. Sales representatives then always have access to current sales data, but they aren't hitting
the database every time they open a report. Alternatively, you can refresh reports with saved data on
an as-needed basis.
Saved data is discarded and refreshed when you perform any of these tasks in a report:
• Select the Refresh command.
• Change your database logon.
• Change any of the report's data parameters.
• Add a new field that doesn't exist in the saved data.
• Drill down in a report where "Perform Grouping On Server" is selected, and the details section is
suppressed.
• Verify the database—if the database structure has changed drastically.
• Change the linking parameter on a subreport (the subreport is refreshed).
• Change the order of groups (only for reports in the Report Application Server).
If you do use reports with saved data, incorporate the other suggestions in this section to make sure
your reports are designed for optimum performance.
To save a report with data, first make sure the Save Data with Report option is selected on the File
menu; then Save your report.
6.3.3 Designing summary reports
Designing and distributing summary reports is a relatively easy way to ensure that users quickly find
the data they need over the Web. A summary report can include as much data as any other report.
However, by hiding a summary report's Details section, you avoid overwhelming users with data they
may not immediately need.
When the Details section is hidden, users navigate with the Group tree first, to locate the desired data.
Then, by drilling down on the report, they can request specific data, which is returned quickly without
unnecessary records. This is especially important to improving navigation of long summary reports,
which might consist of hundreds, thousands, or even tens of thousands of pages.
2013-05-06112
Designing Optimized Web Reports

To facilitate navigation in this way, you first need to group the data and insert the summary fields you
want to include in your report. For detailed information and instructions, see Grouping data and
Summarizing grouped data.
Once you've grouped and summarized your report data, hide the Details section (and any other large
report sections) so that users can easily navigate to the data that's important to them.
6.3.3.1 To hide details in a summary report
1.
Open your report in Crystal Reports.
If you haven't yet created a grouped and summarized report, open Group.rpt from the Feature
Examples samples folder.
2.
On the Report menu, click Section Expert to open the Section Expert.
3.
In the Sections list, click Details.
4.
On the Section Expert's Common tab, select the Hide (Drill-Down OK) check box.
5.
Click OK.
You'll notice the details are now hidden. To view the details, navigate through the report using the Group
tree, and then drill down on the appropriate area of the report.
Note:
For details on minimizing data transfer with summary reports, see Performing grouping on server.
6.3.4 Using subreports carefully
A subreport is an excellent way to include additional data in a main report. Performance issues relating
to subreports vary depending on the type of subreport used.
For general information on subreporting, see Subreports.
6.3.4.1 Taking advantage of on-demand subreports
If your report has a section that handles a large number of records, you can put that section into an
on-demand subreport. An on-demand subreport appears as a hyperlink in the primary report. When
you open the primary report, no data is retrieved for the on-demand subreport until you drill down on
the hyperlink.
2013-05-06113
Designing Optimized Web Reports

For example, when designing a report that shows each employee's quarterly sales for each product
and each product type, you might also want to track each employee's progress by including weekly
sales information. This additional data, however, may not be of interest to many users viewing the
report. In such a case, extract the weekly sales portion of the report and attach it as an on-demand
subreport. Detailed information about weekly sales is retrieved from the database only when a user
drills down on the on-demand subreport.
Many report objects—such as large cross-tabs, OLAP grids, advanced charts, and maps—are ideal
candidates to include in on-demand subreports, so that the object is not processed until you drill down.
To insert an on-demand subreport, see Inserting subreports and Creating an on-demand subreport.
Tip:
You could also place such report objects in a hidden Details section of a report that uses the Perform
Grouping On Server option. When you do this, the database server performs the majority of the
processing, and only a subset of the records is transferred from the server to the local machine (other
records are retrieved when you drill down to a hidden section).
6.3.4.2 Using linked subreports
When a subreport is linked, Crystal Reports coordinates the data in the subreport with the matching
records in the primary report. If you need to use regular linked subreports—that is, linked subreports
that are not on-demand subreports—you should consider these guidelines:
• If the additional data provided by a regular linked subreport is useful to relatively few users, create
a linked on-demand subreport instead. Users who need to see the extra data click a hyperlink to
view the subreport; users who don't need to see the extra data won't have to download it from the
database server.
• In some cases, placing regular linked subreports in the Details section of a main report may hinder
performance—especially when your main report contains many records. (This is because you're
creating a separate subreport for each record, and a separate query must be run for each database
record in the main report.) As an alternative, consider using linked on-demand subreports in the
Details section of your main report.
6.3.4.3 Linking tables instead of linking subreports
Whenever possible, coordinate your report data by linking database tables on the Links tab of the
Database Expert, rather than by linking regular subreports—that is, subreports that aren't on-demand
subreports—to the main report. Since each subreport is run as a separate report, linked tables often
have a performance advantage.
2013-05-06114
Designing Optimized Web Reports

6.3.4.3.1 For more information
• For further general guidelines, see Database links vs. subreports in one-to-many situations.
• For complete details, see Performance considerations in one-to-many links.
6.3.5 Using other design elements effectively
Maps
Map rendering is a single-threaded operation that does not scale well. Although maps are supported,
you need to be careful in considering the overall effect a map in your report will have on performance.
Report Templates
If you will be applying the same template to multiple reports, it is best to open the report once and cache
it, because the template only needs to be read-only.
Including "Page N of M" or "Total Page Count"
If you include the special fields "Page N of M" or "Total Page Count" in your report, the report needs to
finish processing before it can calculate this value. Avoid using these special fields in your report unless
the report is very small or you absolutely require the value.
6.3.6 Designing reports to maximize data sharing
SAP BusinessObjects Business Intelligence platform has data-sharing functionality that improves
performance by reducing the number of database calls that are made in a system with multiple users.
Data can be shared between users of a report object only if certain conditions are met. Try to maximize
data sharing by designing reports such that the conditions for data sharing are met as often as possible,
without compromising different user's need for report information.
When reports are processed by the Page Server, data is shared between users of a report when these
conditions are met:
• Users view a report using the same database logon information.
• Users view a report using the same parameters.
• Users view a report using the same page layout options.
• Users view a report using the same locale settings.
2013-05-06115
Designing Optimized Web Reports

Reports viewed using the DHTML viewer, the ActiveX viewer, or the Java viewer are processed using
the Page Server. These viewers do not allow users to change the page layout or locale of a report.
However, it is possible to develop custom viewer applications that provide this functionality.
When reports are processed by the Report Application Server (RAS), data is shared between users of
a report when these conditions are met:
• Users view a report using the same database logon information.
• Users view a report using the same parameters.
• Users view a report using the same locale settings.
• Users do not modify the report.
Reports viewed using the Advanced DHTML viewer (or your own custom application that permits report
viewing and modification) are processed using the Report Application Server.
6.4 Streamlining your reporting environment
Another step to ensuring that report users receive their information quickly is to assess your reporting
environment. What kind of database do you use? How is data organized within the database? How are
you connecting to the data you need to report off? How are you linking your database tables? By taking
these important considerations into account, you can significantly minimize the amount of data that
must physically travel across the network.
6.4.1 Selecting the fastest database and connection
To improve reporting performance, utilize your database to its full potential by having it do the majority
of your report processing. Ideally, Structured Query Language (SQL) databases are the most efficient
for carrying out this task.
For details on SQL databases, see Using SQL and SQL databases.
6.4.2 Using table indexes
You can also improve the way your data is organized within the database. For optimum processing
speed, report off indexed fields on your SQL database. Using table indexes is an easy way to increase
the speed of data access and to reduce the time it takes for Crystal Reports to evaluate data.
2013-05-06116
Designing Optimized Web Reports

For a complete description of how table indexing works, see Indexed tables.
6.4.3 Improving table-linking choices
When you add multiple database tables to your report, you link the tables on a common field so that
records from one table match related records from another. (Table linking works best if your database
tables are indexed.) Linking your database tables in this way is usually much faster than incorporating
linked subreports into your main report.
When you link two or more tables, you want your report to read as few records as possible, while at
the same time finding all matching records. The best ways to adhere to this guideline are to assess
your reporting needs and to plan your strategy before creating your report. When you know exactly
what you need from your data source, Crystal Reports makes it easy to get that information.
There are many other specific issues to consider when linking tables. These additional considerations,
however, are largely contingent upon your reporting environment. In other words, the steps to optimal
table-linking performance depend upon your database type, the possibility of indexing tables, and the
join type required between tables. You'll find complete descriptions for various reporting scenarios in
the section entitled Linking tables.
In the majority of reporting scenarios, the following general procedures should ensure that your tables
are linked for improved if not optimal performance.
6.4.3.1 To link tables effectively
1.
Ensure that each database table is indexed on the field you are going to use.
2.
Add the database tables to your report, and then link from the primary table to the lookup table on
a common field. (Do this instead of inserting a linked subreport and binding it to the data in your
primary report.)
3.
Use a record selection formula that sets range limits on the indexed field in the primary table. This
minimizes the number of records in the primary table for which Crystal Reports must find matching
records in the lookup table.
6.4.4 Using thread-safe database drivers
If you share and refresh reports over the web, open them using thread-safe database drivers whenever
possible. The Crystal Report Engine supports multiple threads. Thus, when you make multiple data
2013-05-06117
Designing Optimized Web Reports

requests through thread-safe database drivers, the Report Engine can process all of the requests
simultaneously. As the result, you'll be able to view your reports sooner.
The following generic database drivers are thread-safe:
• crdb_odbc.dll (ODBC)
• crdb_jdbc.dll (JDBC)
• crdb_ado.dll (OLE DB)
ODBC connections to the following database types assume that the ODBC database driver is also
thread-safe and, therefore, operate in a multi-threaded manner:
• Microsoft SQL Server
• Oracle
• DB2
• Teradata
• Sybase
Note:
It is also assumed that the database drivers used with JDBC and OLE DB are always thread-safe and,
therefore, always operate in a multi-threaded manner.
The following native database drivers are thread-safe:
• crdb_ado_plus.dll (ADO.NET data provider)
• crdb_com.dll (COM data provider)
• crdb_db2cli.dll (DB2 Unicode)
• crdb_javabean (Java Bean data provider)
• crdb_xml (XML)
• crdb_olap.dll (OLAP)
• crdb_oracle.dll (Oracle)
• crdb_p2ssby10.dll (Sybase)
Note:
Check the Release Notes in the Crystal Reports product distribution for updates to these lists; more
database drivers may be added if they are found to be thread-safe during testing.
6.4.5 Using stored procedures for faster processing
2013-05-06118
Designing Optimized Web Reports

A stored procedure is a compiled SQL program, consisting of one or more SQL statements, which
resides and runs on your SQL server. Although stored procedures can take time to set up properly,
they can be incredibly powerful.
The advantages of using stored procedures are most noticeable when reporting off large sets of data,
or when running reports that demand long, complex calculations. In such cases, you should ideally use
a predefined stored procedure that performs the complex work for you on the database server.
Because stored procedures reside on your SQL server, you may need to ask your Administrator about
accessing or setting up a stored procedure.
• For more information on stored procedures, see Stored procedures.
6.5 Using enhanced record selection formulas
The most important thing you can do to speed up report processing is to limit the amount of data that
is returned from the database. Your primary tool for doing this is the record selection formula.
Crystal Reports analyzes your record selection formula and generates an SQL query from it. This SQL
query is then processed by the database, which sends the resulting records back to Crystal Reports.
Crystal Reports then evaluates the record selection formula locally for each of the records retrieved
from the database, thereby calculating the set of records used to generate the report.
Unnecessary records are eliminated at two stages: at the database with the SQL query and within
Crystal Reports by the record selection formula. For speed, you want as many records as possible to
be eliminated in the first stage. By designing your record selection formula effectively, you can off-load
much of the processing to the database server, thus eliminating unnecessary records before returning
them to Crystal Reports. This is commonly called "pushing record selection down to the database
server."
This section offers several tips to ensure that your record selection formulas can be pushed down to
the database server.
6.5.1 Pushing down record selection—an example
This example demonstrates the benefits of writing record selection formulas that can be pushed down
to the database server.
In the Orders table of the Xtreme sample database, there are 2192 records, of which 181 have order
dates prior to 2001. Suppose you want to report on only those records. On the one hand, you could
use this record selection formula:
Year ({Orders.Order Date}) < 2001
2013-05-06119
Designing Optimized Web Reports

The SQL query generated will send all 2192 records to Crystal Reports, and then the record selection
formula will reduce this to 181. To see this, click Show SQL Query on the Database menu and notice
that the SQL query has no WHERE clause. This is because Crystal Reports is not able to push down
the Year ( ) function in the WHERE clause.
On the other hand, this record selection formula generates the same report:
{Orders.Order Date} < #Jan 1, 2001#
This second formula, however, can be performed on the database server, so it is pushed down. The
SQL query generated will send only 181 records to Crystal Reports. So, when the record selection
formula is evaluated by Crystal Reports, no further records need to be eliminated. Click Show SQL
Query on the Database menu and notice that the resulting SQL query has a WHERE clause.
As this example shows, your report's processing speed improves when you enhance your record
selection formula. In this case, both formulas generate the same report, but the second takes advantages
of the power and optimizations that the database server can use when handling its own data.
Tip:
See the next section for additional information and limitations when setting up record selection requests.
Note:
If you are new to record selection formulas, you may prefer to begin with the Select Expert or the sample
record selection formula templates. For further details, along with an introduction to record selection,
see Selecting records.
6.5.2 Record selection performance tips
Consider the following performance-related items when setting up record selection requests:
6.5.2.1 General
• To push down record selection, you must select "Use Indexes or Server for Speed" in the Report
Options dialog box (available on the File menu).
• In record selection formulas, avoid data type conversions on fields that are not parameter fields.
For example, avoid using ToText( ) to convert a numeric database field to a string database field.
• You are able to push down some record selection formulas that use constant expressions.
2013-05-06120
Designing Optimized Web Reports

6.5.2.2 PC Databases
• You can only push down record selection on indexed fields.
• You can only push down AND clauses (not OR).
6.5.2.3 SQL Databases
• You can push down record selection on indexed or non-indexed fields.
• Your SQL server will respond faster if you use indexed fields.
• You can push down AND and OR clauses.
• Record selection formulas containing some types of embedded formulas can be pushed down.
• You should incorporate SQL Expression fields to push down formula calculations necessary for the
record selection.
• On the Database menu, click Show SQL Query to view the SQL that will be sent to the database
server.
6.5.3 Strategies for writing efficient record selection formulas
Note:
This section assumes that you are familiar with the Select Expert and that you are reporting off of a
SQL database.
Consider the following points when creating a record selection formula:
Consideration 1
Any record selection formula that you generate completely with the Select Expert, without writing pieces
of the formula yourself, can be pushed down.
This case actually follows from the points below. However, you can write more types of record selection
formulas using the tips below than is possible with the Select Expert. To do this, you need to edit the
record selection formula directly with the Formula Workshop or from within the text area that appears
when you click Show Formula in the Select Expert.
2013-05-06121
Designing Optimized Web Reports

To open the Formula Workshop to modify record selection, click the Report menu, point to Selection
Formulas, and then select Record from the submenu.
Consideration 2
To open the Formula Workshop to modify record selection, click the Report menu, point to Selection
Formulas, and then select Record from the submenu.
Any selection formula that is of the form: DataBaseField SupportedOperator ConstantOrPa
rameterExpression can be pushed down.
Of course DataBaseField is just a database field. SupportedOperator is any of =, <>, <, <=, >,
>=, StartsWith, Like or In.
ConstantOrParameterExpression is any expression that involves constant values, operators,
functions, and parameter fields. It cannot involve variables, control structures, or fields other than
parameter fields. By their very definition, constant and parameter expressions can be evaluated without
accessing the database.
Note:
A constant or parameter expression can evaluate to a simple value, a range value, an array value, or
an array of range values. Here are some examples of such expressions:
{?number parameter} - 3
Year ({?run date})
CurrentDate + 5
DateDiff ("q", CurrentDate, CDate("Jan 1, 1996"))
Month (Maximum ({?date range parameter}) + 15)
["Canada", "Mexico", "USA", {?enter a country}]
1000 To 5000
[5000 To 10000, 20000 To 30000, 50000 To 60000]
A complete example:
{Orders.Order Date} >= CurrentDate - 3
The program can also push down an expression that just contains a Boolean field (without the operator
and constant parts).
{Orders.Shipped}
Not {Orders.Shipped}
Consideration 3
IsNull (DataBaseField) can be pushed down.
Consideration 4
SqlExpression SupportedOperator ConstantOrParameterExpression can be pushed
down.
For example, the selection formula {@ExtendedPrice} > 1000 cannot be pushed down if {@Ex
tendedPrice} = (Quantity * Price). However, if the formula @ExtendedPrice is replaced
with the equivalent SQL Expression, then your record selection formula will be pushed down.
2013-05-06122
Designing Optimized Web Reports

Consideration 5
When using multiple expressions that follow the above considerations, separate them with AND and
OR operators—you can also use NOT. You can have several of each, and you can use parentheses
to give priority. For example:
{Orders.Order ID} < Minimum({?number range}) Or
{Orders.Order Amount} >= 1000
(IsNull({Customer.Region}) Or
{Customer.Region} = "BC") And
{Customer.Last Year's Sales} > 2000
Related Topics
• Troubleshooting record selection formulas
6.5.3.1 To add a parameter field to your record selection formula
1.
Open the sample report Group By Intervals.rpt.
Take a moment to navigate the Group tree and see how the data is organized; notice also, in the
bottom right of the Crystal Reports window, that 269 records were returned for this report.
Note:
You'll see this number only if you have the Status Bar option selected on the View menu.
Now click the Design tab.
2.
On the View menu, click Field Explorer.
3.
In the Field Explorer, right-click Parameter Fields and select New from the shortcut menu.
The Create New Parameter dialog box appears.
4.
For the Name of the parameter, type SalesQuota.
5.
Click the Type list and select Number.
6.
In the Options area, go to the Prompt Text option and type What was last year's sales quota?
7.
In the Options area, make sure that the Allow discrete values option is True, and then click OK.
Note:
You've now created the parameter field. The rest of these procedures describe how to add the
parameter field to the record selection formula with the Select Expert.
8.
On the Report menu, click Select Expert.
The Choose Field dialog box appears.
9.
Select the Customer.Last Year's Sales field, and then click OK.
The Select Expert appears.
10.
On the Customer.Last Year's Sales tab, click the drop-down list and select is greater than.
2013-05-06123
Designing Optimized Web Reports

A new drop-down list appears.
11.
Click this second list and select {?SalesQuota}.
Tip:
Click the Show Formula button to view the new record selection formula, which appears as:
{Customer.Last Year's Sales} > {?SalesQuota}. Instead of using the Select Expert, you could have
created this formula yourself in the Record Selection Formula Editor. (To see the editor, open the
Formula Workshop and select Record Selection from the Selection Formulas folder.)
12.
Click OK in the Select Expert.
You've now added your parameter field to the record selection formula. When you switch to Preview
mode, or click the Refresh button, you will be prompted for new parameter values. You can then enter
a numeric value representing last year's sales quota. The resulting report will display only those
customers whose Last Year's Sales exceeds the numeric value you specify.
For instance, if you respond to the parameter by entering 40000, then the report will display only those
customers whose sales exceeded $40,000 last year. Notice also, in the bottom right of the Crystal
Reports window, that only 58 records are returned for your report, instead of the 270 records that were
returned before you put the parameter field into a record selection formula.
By enhancing this report, you've retrieved all the information you needed and, at the same time, you've
ensured that the fewest number of records is transferred from the database server.
Related Topics
• Advanced parameter features
• Parameter and prompt overview
• Record Selection
6.5.4 Incorporating parameter fields into record selection formulas
Instead of displaying all of a report's data every time the report is opened, you can create parameter
fields that prompt users to specify the data they want to see. To decrease the amount of data transferred
from the database server, incorporate these parameter fields right into your record selection formula.
In general, parameter fields provide interactivity for users, who respond to the parameter prompts in
order to specify the data they want to see. However, by incorporating your parameter fields right into
your record selection formula, you not only provide interactivity, but you also decrease data transfer
and increase performance.
You can add a parameter field to your record selection formula by using the Select Expert or the Record
Selection Formula Workshop. When using the Record Selection Formula Workshop, you treat the
parameter field as you would any other field.
In the following example, you will create a parameter field and then add it to the record selection formula
with the Select Expert.
2013-05-06124
Designing Optimized Web Reports

6.5.5 Using SQL expressions where appropriate
SQL expressions are like formulas, but they are written in Structured Query Language (SQL). They are
useful in optimizing report performance because the tasks they execute are normally performed on the
database server (as opposed to a regular formula, which is sometimes executed on the local machine).
Don't use SQL expressions exclusively, because Crystal Reports includes its own formula language,
which is much more powerful than standard SQL. Both Crystal Syntax and Basic Syntax allow you to
enhance and hone your formulas in ways that are either difficult or impossible with SQL. In certain
circumstances, however, creating and using SQL Expression fields can speed up the processing of
your reports.
6.5.5.1 Key uses of SQL Expression fields
To maintain optimum report processing speeds, avoid using formulas (whether Crystal or Basic syntax)
within record selection formulas. Instead, replace the original formula with an equivalent SQL Expression
field, and then incorporate the SQL Expression field into your record selection formula. Doing so will
greatly improve the chances of your record selection being pushed down to the server.
In addition, avoid sorting, grouping, or totaling on a formula field (whether Crystal or Basic syntax).
Instead, replace the original formula field with an equivalent SQL Expression field, and then sort, group,
or total on the SQL Expression Field. Again, this will greatly improve the chances of the processing
being done on the server.
Finally, if your database supports Case Logic, and your report needs to summarize an If-Then-Else
formula calculation, replace the formula with an SQL Expression field. In such cases, SQL Expression
fields enable Crystal Reports to perform the report's grouping on the server. For more information, see
Using SQL Expressions for Case Logic.
Related Topics
• The SQL language
• SQL Expression fields
• Using enhanced record selection formulas
6.6 Improving grouping, sorting, and totaling
2013-05-06125
Designing Optimized Web Reports

6.6.1 Performing grouping on server
If you're reporting in real-time off live data over the Web, reduce the amount of data transferred from
the database server by using the Perform Grouping on Server option. With this option, much data
processing is off-loaded to the database server and only a subset of data is read initially. Detail data is
returned from the database only when you drill down in a report.
Note:
Server-side processing works only for sorted and grouped reports that are based on SQL data sources.
6.6.1.1 To enable server-side processing
1.
On the File menu, click Report Options.
2.
Select Perform Grouping on Server on the Report Options dialog box.
This check box is inactive if Use Indexes or Server for Speed is not selected.
Tip:
When Use Indexes or Server for Speed is selected, you can quickly enable Perform Grouping On
Server from the Database menu.
3.
Click OK.
6.6.2 Benefits of grouping on server—an example
The following example describes a typical reporting scenario wherein grouping on server can significantly
reduce the amount of unnecessary data transferred from the database server.
6.6.2.1 To decrease data transfer by grouping on server
1.
Open the sample report Group.rpt.
Look in the bottom right corner of the Crystal Reports window and notice that 269 records are
returned for this report.
2013-05-06126
Designing Optimized Web Reports

Note:
You'll see this number only if you have the Status Bar option selected on the View menu.
2.
On the Report menu, click Section Expert to access the Section Expert.
3.
In the Sections list, select Details.
4.
On the Common tab, select Hide (Drill-Down OK). This hides the report's Details section, so that
only group header displays in the report. (In this case, the report is grouped by Country.)
5.
Click OK in the Section Expert. The Details records will disappear from the report.
6.
Press F5 to refresh the report data (or click the Refresh button on the toolbar).
Notice that 269 records are still returned for the report, even though the Detail records are hidden
from view.
7.
On the Database menu, click Perform Grouping on Server.
Now notice that only 71 records are returned for the report. The grouping (by Country) has been
performed on the database server, and fewer records have been transferred to the report.
8.
Drill down on a country by double-clicking the report.
Tip:
When drill down is available, your cursor turns into a magnifying glass.
Crystal Reports retrieves the appropriate Detail records as you need them.
For instance, if you drill down on Australia, Crystal Reports quickly retrieves the seven records that
make up the group.
By hiding the Details section of this report, you've created a summary report that's easy for users to
navigate. Each user can first locate the Country with which he or she is concerned, and can then drill
down to retrieve valuable details.
Moreover, by enabling the Perform Grouping on Server option, you've ensured that the initial processing
is completed on the database server. Consequently, only the necessary records are transferred to the
report.
For more information on server-side processing, see Server-side processing.
6.6.3 Using SQL Expressions for groups, sorts, and totals
For reports using Perform Grouping on Server, avoid sorting, grouping, or totaling on a formula field
(whether Crystal or Basic syntax). Instead, replace the original formula field with an equivalent SQL
Expression Field, and then sort, group, or total on the SQL Expression field. This will greatly improve
the chances of the processing being done on the server.
For details on when else to use SQL Expressions, see Using SQL expressions where appropriate.
2013-05-06127
Designing Optimized Web Reports

6.6.4 Using SQL Expressions for Case Logic
If your database supports Case Logic, and your report needs to summarize an If-Then-Else formula
calculation, replace the formula with an SQL Expression field. In such cases, SQL Expression fields
enable Crystal Reports to perform the report's grouping on the server.
For instance, suppose that you're reporting off of an MS SQL Server 7 database, which supports Case
Logic. You need to include an If-Then-Else calculation in your report, and you need to summarize that
calculation for each group in the report. By performing the calculation with an SQL Expression field of
the following form, you use your database's ability to process Case Logic:
CASE DatabaseTable. "DatabaseField "
WHEN 'SpecifiedValue' THEN Calculation1
ELSE Calculation2
END
If a record's DatabaseField value is equal to SpecifiedValue, then Calculation1 is performed;
for all other records, Calculation2 is performed. By incorporating the SQL Expression field, you take
advantage of your database server's ability to process Case Logic. Your report's grouping consequently
takes place on the server, even when you summarize the SQL Expression field elsewhere in the report.
Note:
The SQL syntax in this example is specific to MS SQL Server 7. You may need to refer to your database
documentation or consult with your Administrator in order to determine the syntax appropriate to your
database.
6.6.5 Inserting summary and running total fields where possible
Where possible, avoid creating formulas with global variables to calculate summaries or running totals.
Instead, create summaries by clicking the Insert menu and then selecting the appropriate command
(Subtotal, Grand Total, or Summary). Create running total fields by opening the Field Explorer,
right-clicking Running Total Fields, and then selecting New from the shortcut menu.
For general details on summarizing data, see Sorting, Grouping, and Totaling and Running Totals.
2013-05-06128
Designing Optimized Web Reports

Record Selection
7.1 Selecting records
When a field is selected to appear on a report, field values from every record in the active table(s) are
printed by default. In many cases, you may not want to include all the values, but only a subset of those
values. For example, you may want to include:
• Records only for a specific group of customers.
• Records for a specific range of account numbers out of the total number of records in the database.
• Values from only those records that fall within a particular date range.
7.1.1 Options for selecting records
Crystal Reports includes a very sophisticated formula language that you can use to specify virtually
any type of record selection. However, you may not always need the flexibility in record selection that
the formula language provides. The Select Expert is designed for such instances.
You can select records in one of two ways:
• Using the Select Expert
• Using formulas
Once you are familiar with the Select Expert and formulas, you can use your record selection techniques
to improve the performance of your reports.
For additional performance tips and advanced record selection strategies, see Using enhanced record
selection formulas .
7.1.2 Determining which field(s) to use
2013-05-06129
Record Selection

When you select records, you are basing your report only on those records that meet some conditions
that you have set. You base those conditions on the kind of information you want in the finished report.
Assume, for example, that you want a report that only shows data from California. The challenge is to
find the best way to identify those records that come from California.
• If the table used in a report has a State or Region field, you can specify in your request that the
program use only those records in which the value in the state field is equal to California (Region is
equal to CA).
• If the table does not have a State field and you still want to report only on California data, there may
be another way to identify that data.
• If the table has a Postal Code field, you could base your record selection on the range of ZIP
codes that apply to California (Postal Code is between n and N).
• If the table has an Area Code field, you could base your record selection on California Area
Codes (Area Code is one of x, y,....z).
Note:
• If the Area Code is stored in the telephone number field, you will not be able to do this same record
selection using the Select Expert based on the Area Code. You will have to create a record selection
formula using the formula language to extract the Area Code part of the phone number and then do
record selection based on that.
• As a general rule, if you can base your record selection on a number of fields (as in this example),
you should select an indexed field instead of a field that is not indexed for better performance.
7.1.3 Using the Select Expert
The Select Expert makes it easy to specify the records you want included in your report. When you
work with the Select Expert, you select the field to which you want to apply selection conditions and
then you specify those conditions.
The Select Expert can be used to set up simple record selection requests. For example:
• Customers from Arizona.
• Orders in the first quarter.
• Sales over $10,000.
The Select Expert can also be used to set up some sophisticated requests:
• Customers whose names start with "A", "M", or "S."
• Customers from California or Florida who ordered in July.
These are all range limit requests. One or more constants define the range. The program compares
the field value in each record to the constant(s) and rejects records with values outside the range. The
2013-05-06130
Record Selection

report is limited to values within the range. You can set up all of these types of record selection requests
without any previous knowledge of the formula language.
Note:
The Select Expert can be used to set up both record selection and group selection requests. When a
group name or summary field is selected, the program knows that the selection criteria set up is intended
for group selection. In all other cases, the program knows that you are setting up record selection.
7.1.3.1 To set up record selection using the Select Expert
1.
On the Expert Tools toolbar, click Select Expert.
The Select Expert dialog box appears.
Note:
If you click the Select Expert button without first highlighting a field in your report, the Choose Field
dialog box appears. Highlight the field on which you want to base record selection and click OK.
The Select Expert appears.
2.
Use the drop-down lists to enter your selection criteria for the indicated field.
3.
Click OK when finished.
Tip:
To base record selection on more than one field, click the New tab. Select the next field from the
Choose Field dialog box.
A selection formula is generated based on your specifications, limiting the report to the records you
indicated.
Note:
To view the selection formula, click the Show Formula button. The Select Expert expands to show
the formula. You can modify the formula in the area that appears, or you can click the Formula Editor
button to modify it in the Formula Editor.
2013-05-06131
Record Selection

7.1.4 Using formulas
7.1.4.1 To set up record selection using a formula
1.
On the Report menu, point to Selection Formulas and click Record.
2.
In the Record Selection Formula Editor, enter the formula by typing in the components or selecting
them from the component trees.
Note:
The resulting formula must be Boolean; that is, it must return either a True or False value.
3.
Click Check to identify any errors in the formula.
4.
Fix any syntax errors the Formula Checker identifies.
5.
When the formula has the correct syntax, click Save.
7.1.4.2 Further information about formulas
• For sample record and group selection templates, see Using formula templates.
• For complete instructions on creating formulas, see Using Formulas.
• For advanced record selection strategies and performance tips, see Using enhanced record selection
formulas .
7.1.5 Interaction of the Select Expert and the Formula Editor
The Select Expert and the Record/Group Selection Formula Editor are interactive. That is, record
selection criteria you enter via the Select Expert automatically generates a record selection formula
which can be reviewed and modified. Likewise, record selection formulas and modifications to existing
record selection formulas automatically update the selection criteria in the Select Expert.
Because of this interactivity, you can use the two tools together as a tutorial for learning the formula
language.
2013-05-06132
Record Selection

7.1.5.1 To view the Select Expert formula
1.
Right-click the field on which you want to view record selection.
2.
Click Select Expert.
3.
Click the Show Formula button.
The Select Expert expands so you can review the formula the program generated based on your
selection criteria.
4.
Click the Hide Formula button when you are done with your review.
5.
Use the Select Expert to change your selection formula.
6.
Review the updated formula by clicking the Show Formula button again.
7.
To make changes to the formula, click the Formula Editor button in the expanded Select Expert
and use the tools in the Formula Workshop to make your formula changes.
Note:
Selection formula components that do not fit any of the fixed criteria in the Select Expert will not be
translated. For example, if part of your record selection formula extracts the last four characters in a
customer number, the section of the formula code that performs that extraction will not be converted
to Select Expert selection criteria.
2013-05-06133
Record Selection

7.1.6 Saved data selection formulas
Saved data selection formulas filter report data after the records have been stored in the report. Like
record selection formulas, they can be created using both the Select Expert and formulas.
Unlike record selection formulas, any change to a saved data selection formula does not cause a refresh
to the database. Instead, the report's saved data is used for all subsequent filtering. Saved data selection
formulas are used with parameters to create interactive report filters that you can customize.
Optional parameters
You can combine saved data selection formulas and optional parameters. For more information on
optional parameters, see Optional parameters.
7.2 Using formula templates
7.2.1 Record selection formula templates
The following sample formulas can be used as templates to help you create your own selection formulas
using the Formula Workshop. These examples illustrate different selections that you could do, not
necessarily the best selections.
7.2.1.1 Selecting records using character strings
{file.FIELD} startswith "C"
Selects those records in which the value in the {file.FIELD} field begins with the character "C" (includes
values like CyclePath, Corp. and Cyclist's Trail Co.; excludes values like Bob's Bikes Ltd. and Feel
Great Bikes, Inc.).
not ({file.FIELD} startswith "C")
2013-05-06134
Record Selection

Selects those records in which the value in the {file.FIELD} field does not begin with the character "C"
(includes values like Bob's Bikes Ltd. and Feel Great Bikes, Inc.; excludes values like CyclePath, Corp.
and Cyclist's Trail Co.).
"999" in {file.FIELD}[3 to 5]
Selects those records in which the 3rd through 5th digits of the {file.FIELD} field is equal to "999"
(includes values like 10999, 70999, and 00999; excludes values like 99901 and 19990).
"Cycle" in {file.FIELD}
Selects those records in which the value in the {file.FIELD} field contains the string "Cycle" (includes
values such as CyclePath Corp. and CycleSporin, Inc.; excludes values like Cyclist's Trail Co. and Feel
Great Bikes, Inc.).
7.2.1.2 Selecting records using numbers
Single values
{file.FIELD} > 99999
Selects those records in which the value in the {file.FIELD} field is greater than 99999.
{file.FIELD} < 99999
Selects those records in which the value in the {file.FIELD} field is less than 99999.
Range of values
{file.FIELD} > 11111 and {file.FIELD} < 99999
Selects those records in which the value in the {file.FIELD} field is greater than 11111 but less than
99999 (neither 11111 or 99999 is included in the range of values).
{file.FIELD} >= 11111 and {file.FIELD} <= 99999
Selects those records in which the value in the {file.FIELD} field is greater than 11111 but less than
99999 (both 11111 and 99999 are included in the range of values).
7.2.1.3 Selecting records using dates
The Month, Day, and Year functions can all be used in examples like the following:
Year ({file.DATE}) < 1999
Selects those records in which the year found in the {file.DATE} field is earlier than 1999.
Year ({file.DATE}) > 1992 and Year ({file.DATE}) < 1996
2013-05-06135
Record Selection

Selects those records in which the year found in the {file.DATE} field falls between 1992 and 1996
(1992 and 1996 not included).
Year({file.DATE}) >= 1992 and Year({file.DATE}) <= 1996
Selects those records in which the year found in the {file.DATE} field falls between 1992 and 1996
(1992 and 1996 are included).
Month({file.DATE}) in 1 to 4
Selects those records in which the month found in the {file.DATE} field is one of the first four months
of the year (includes January, February, March, and April).
Month({file.DATE}) in [1,4]
Selects those records in which the month found in the {file.DATE} field is the first or fourth month of the
year (includes January and April, excludes February and March).
7.2.1.4 Selecting records using preset date ranges
The preset date ranges can be used to create selection formulas similar to these:
{file.DATE} in LastFullMonth
Selects those records in which the date found in the {file.DATE} field falls within the last full month. (If
the month is May, this selects all records with an April date.)
not({file.DATE} in LastFullMonth)
Selects all records except those in which the date found in the {file.DATE} field falls within the last full
month (if the month is May, this selects all records except those with an April date).
7.2.1.5 Selecting records using date/number/character combinations
These formulas simply "mix and match" formulas from the categories above.
"C" in {file.FIELD}[1] and Month({file.DATE}) in [1,4]
Selects those records in which the value in the {file.FIELD} field begins with "C" and the month is either
January or April. For example, if this kind of formula was used with an order database, you could be
asking for a report showing all customers whose names begin with "C" and who placed orders in January
or in April.
"AOK" in {file.HISTORY}[3 to 5] and {file.OPENCRED} >= 5000
Selects those records in which the {file.HISTORY} field shows the characters "AOK" as the 3, 4, and 5
characters and the {file.OPENCRED} field (the amount of available credit) is at least 5000.
2013-05-06136
Record Selection

These templates can be used as they are (with your own data), or they can be combined to create
complex formulas.
7.3 Pushing down record selection to the database server
The drivers provided with Crystal Reports for SQL data sources allow "pushing down" record selection
to the database server. When you specify a record selection formula in a report based on an SQL data
source, Crystal Reports analyzes it, generates a SQL query from it and passes the SQL query to the
database server. Record selection is then carried out in two stages:
• The first stage of record selection takes place when the database server processes the SQL query
and returns a set of records to Crystal Reports.
• In the second stage, Crystal Reports further evaluates locally the record selection formula for the
set of records returned from the database server.
Since database servers are usually faster machines than workstations, it is to your advantage to specify
record selection formulas that can be processed by the server in the first stage. Doing so minimizes
record selection on the local machine in the second stage. This process is commonly known as "pushing
record selection down to the database server." The following kinds of record selections can be pushed
down to the server:
• Selections with indexed and non-indexed fields (indexed fields provide faster response).
• SQL queries with AND and OR clauses.
• SQL expression fields that carry out formula calculations for record selection. (For the types of SQL
expressions supported by your SQL server, consult the documentation provided with the server.)
• For complete details on pushing your record selection formulas down to the database server, see
Using enhanced record selection formulas .
7.4 Troubleshooting record selection formulas
To troubleshoot your selection formula, you should first begin by making sure that all of the fields
referenced in the selection formula are placed on your report. Then delete the selection formula and
test it as you rebuild it, step by step.
7.4.1 To troubleshoot record selection formulas
2013-05-06137
Record Selection

1.
Write down the record selection formula on paper. You will use this written copy to help you
reconstruct the selection formula one step at a time.
2.
Remove the record selection formula from your report by deleting the formula from the Record/Group
Selection Formula Editor in the Formula Workshop.
3.
Click Close when finished in the Formula Workshop.
4.
Make certain that all fields referenced in the record selection formula (the selectors) are on the report
physically and are not hidden.
For example, if one of the selectors is:
{customer.POSTAL CODE} > "80000"
but the {customer.POSTAL CODE} field is not used on your report (as in the case of a sales report
that uses the postal code to define territories but does not include the postal code in the report data),
then insert the {customer.POSTAL CODE} field into the report.
Or, if one of the fields referenced in the selection formula is on the report but is hidden, unhide it by
deselecting the Suppress option in the Format Editor for that field.
5.
Print the report and verify that the data in those fields which are referenced in the selection formula
print satisfactorily. Make certain that all the data prints. For example, if there are x total records in
the database you should have x records printing for each of the referenced fields. This establishes
a baseline against which you can compare the results of printing with the selection formula.
6.
When you are sure that you are getting satisfactory results without using the selection formula, you
can enter the selection formula using only one of the selectors.
For example, to use this as the final selection formula:
{customer.POSTAL CODE} > "80000" and {customer.CONTACT LAST NAME}[1] = "C" and {customer.LAST YEAR'S
SALES} >= 5000
this formula will select all of those records that show a Postal code greater than 80000, a value in
the {customer.CONTACT LAST NAME} field beginning with "C", and a value in the {customer.LAST
YEAR'S SALES} field greater than or equal to 5000.
You might start with this as the first test selection formula:
{customer.POSTAL CODE} > "80000"
Print the report and evaluate the data that prints when you have only one selector activated. Does
the {customer.POSTAL CODE} field show only ZIP codes greater than 80000?
• If it does, then you know that this part of the selection formula is working.
• If it does not, then troubleshoot this part of the selection formula.
7.
Once the selection formula with one selector activated is working properly, add a second selector.
For example, the new selection formula might look like this:
{customer.POSTAL CODE} > "80000" and {customer.CONTACT LAST NAME}[1] = "C"
8.
Preview the report and evaluate the data that prints when you have two selectors activated. Evaluate
the data in the {customer.CONTACT LAST NAME} field (since you already evaluated
{customer.POSTAL CODE} in the last step).
2013-05-06138
Record Selection

Does the {customer.CONTACT LAST NAME} field show only text strings beginning with the letter
"C"?
• If it does, then this part of the selection formula is working.
• If it does not, then troubleshoot this part of the selection formula.
9.
Once the selection formula with two selectors activated is working properly, add a third selector,
then a fourth, and so on, until you have tested each selector in the selection formula.
7.4.2 Correcting selections that do not generate data
You may encounter a situation in which you create a record selection formula and, while header and
footer information prints on your report, no detail information appears. The problem is the selection
formula is rejecting all records. This usually occurs because of an error in the creation of the selection
formula.
7.4.2.1 Correcting uppercase/lowercase inconsistency
Record selection formulas are case sensitive. That is, "Bob" matches only with "Bob". It does not match
with "bob", "BOB", "BoB", "bOB", "boB", or "BOb". Thus, if your selection formula is set to include only
those records with "BOB" in the {customer.CONTACT FIRST NAME} field, but all the entries in the
{customer.CONTACT FIRST NAME} field are mixed case ("Bob", for example), the selection formula
will find no matches and thus will not print any details for the report.
You can solve this problem by using the UpperCase (str) or LowerCase (str) functions in your selection
formula to convert field data to a consistent case before the program begins its selection. For example,
if you were using this formula:
{customer.CONTACT FIRST NAME} = "BOB"
you can change the formula to this:
UpperCase({customer.CONTACT FIRST NAME}) = "BOB"
This second formula first converts the value of the {customer.CONTACT FIRST NAME} field to upper
case characters and then checks to see if the resulting value in that field is equal to "BOB". Using this
formula, any instance of the three letters "b," "o," and "b" will be a match, regardless of case, because
the case will be converted to uppercase.
You could use the LowerCase function in a similar manner to match with "bob."
Check your selection formula closely and make sure you have the correct case for any text you are
trying to match. If in doubt, use the UpperCase (or LowerCase) function to assure consistency and
proper matching.
2013-05-06139
Record Selection

Another formula which performs much the same functions is the following:
"BOB" in UpperCase({customer.CONTACT FIRST NAME})
7.4.2.2 Unwanted spaces appear in selection formula
Spaces are characters, and when you include spaces in the search key of a record selection formula,
the formula looks for records with the exact match in the selected field, spaces and all. For example,
the following formula:
"Mr . " in {customer.TITLE}
will not find any matches with the form of address "Mr." because there is an extra space in the search
key between the letter "r" and the period. Likewise, "Ph. D" will not match "Ph.D".
Check your selection formula closely, and make sure that the spaces in the selection formula match
the spaces in the fields you are trying to match.
7.4.2.3 Using If statements in selection formulas
When creating record selection formulas that include If statements, always include the Else keyword;
otherwise, no records or unexpected records may be returned. For example, a record selection such
as If {parameter field} = "less than 100" then {field} < 100 evaluates as False
and returns no records. To correct this problem, complete the formula with Else True.
2013-05-06140
Record Selection

Sorting, Grouping, and Totaling
8.1 Sorting data
Sorting means placing data in some kind of order to help you find and evaluate it.
When you first insert a database field into your report, the data within the fields appears in the order in
which it was originally entered into the database. Locating information in this kind of report is difficult.
It is much easier to review or find information when you can see it sorted in a logical format. For example,
you may want to have a customer list sorted alphabetically by name or by country.
8.1.1 Understanding sort options
When you sort, the program asks you to define two things:
• The field you want the sort to be based on (sort field).
• The sort direction.
8.1.1.1 Sorting data
Sorting means placing data in some kind of order to help you find and evaluate it.
When you first insert a database field into your report, the data within the fields appears in the order in
which it was originally entered into the database. Locating information in this kind of report is difficult.
It is much easier to review or find information when you can see it sorted in a logical format. For example,
you may want to have a customer list sorted alphabetically by name or by country.
2013-05-06141
Sorting, Grouping, and Totaling

8.1.1.2 Sort field
A sort field is the field that determines the order in which data appears on your report. Almost any field
can be used as a sort field, including formula fields. A field's data type determines the method in which
the data from that field is sorted.
Note:
You cannot sort on memo or BLOB fields.
Sort OrderField Type
blanks
punctuation
numbers
uppercase letter
lowercase letters
Single-character string fields
two letters
three letters
four letters, and so on
For example:
• "123" comes before "124"
• " " (blank) comes before "a"
• "aa" comes before "aaa"
Multiple character string field
numeric orderCurrency fields
numeric orderNumber fields
chronological orderDate fields
chronological order
same-date values sorted by time
DateTime fields
2013-05-06142
Sorting, Grouping, and Totaling

Sort OrderField Type
chronological orderTime fields
False values (0)
True values (1)
Boolean comparison fields
null values
non-null values
Null values
Note:
If sorting and grouping are performed on the database server, sort order may vary when Unicode or
UTF-8 data is used. The order applied depends on the rules in place for your data source. In certain
cases, Unicode data is sorted by its binary value, but it can also be sorted according to a particular
locale setting. Refer to the documentation for your data source for details on how Unicode data fields
are sorted.
8.1.1.3 Sort Direction
Direction refers to the order in which the values are displayed, once sorted.
• Ascending
Ascending order means smallest to largest (1 to 9, A to Z, False to True). The program sorts the
records in ascending order based on the values in the sort field you select.
• Descending
Descending order means largest to smallest (9 to 1, Z to A, True to False). The program sorts the
records in descending order based on the values in the sort field you select.
8.1.2 Sorting single and multiple fields
In single field sorting, all the records used in the report are sorted based on the values in a single field.
Sorting an inventory report by stock number or sorting a customer list by customer number are examples
of single field sorts.
2013-05-06143
Sorting, Grouping, and Totaling

In multiple field sorts, the Report Designer first sorts the records based on the values in the first field
selected, putting them in ascending or descending order as specified. When two or more records have
the same field value in the first sort field, the program then sorts those records based on the value in
the second sort field.
For example, if you choose to sort first by the {customer.COUNTRY} field and then by the
{customer.REGION} field, both in ascending order, the report would appear with countries listed in
alphabetic order, and regions within each country listed in alphabetic order. Any other fields, such as
the postal codes within each region, would remain unsorted.
You create single or multiple field sorts using the same procedure.
8.1.2.1 To sort your data
1.
On the Report menu, click Record Sort Expert.
The Record Sort Expert appears.
2.
Highlight the field to be sorted from the Available Fields area.
3.
Click the > arrow.
The selected field is added to the Sort Fields list.
4.
Specify the sort direction.
5.
If sorting by more than one field, highlight the second field you want the data to be sorted by and
add it to the Sort Fields list.
6.
If you want to change the order of fields in the Sort Fields list, highlight the field you want to move
and click the arrow buttons to move it up or down.
2013-05-06144
Sorting, Grouping, and Totaling

Tip:
The order of the fields listed in the Sort fields box is the order by which data will be sorted.
7.
As you add each field to the Sort Fields list, specify the sort direction.
8.
Click OK when finished.
Records are sorted based on the values in the Sort Fields list.
8.1.3 Sort controls
You may want to design your report so that users can modify a sort field or sort direction without
refreshing information from the database. You can do this using a "Sort Control".
A "Sort Control" is particularly useful for several reasons:
• It allows users to sort report data for further analysis without leaving the canvas of the report.
• It eliminates processing demand on the database.
• It reduces the time users spend waiting for data to be sorted.
• It allows users to sort fields in the report even if they do not have a connection or rights to access
the database at the time of viewing.
When planning to include a "Sort Control" in your report, it is important to consider the following points:
• Sort controls apply across an entire record set; you cannot sort only one group.
• Sort controls cannot be used in sub-reports.
• Sort controls cannot be created within a cross-tab or an OLAP grid.
• The use of sort controls causes any open drill-down tabs to close (a warning prompt alerts users).
8.1.3.1 To create a Sort Control
1.
Once the data is grouped, on the Report menu, click Record Sort Expert.
The "Record Sort Expert" appears.
2013-05-06145
Sorting, Grouping, and Totaling

Note:
Sort fields that begin with "Group" specify that the sort was done automatically when the data was
grouped.
2.
Highlight the fields that you want to sort by and click the > arrow to add them to the Sort Fields list.
The order of the fields in the Sort Fields list is the initial order by which data is sorted.
Note:
To enable a Sort Control on a field, that field must be included in the Sort Fields list.
3.
Click OK when finished.
4.
Create your Sort Control:
• If you want to use an existing text object:
a.
On your report, right-click the text object that you would like to use as a Sort Control.
b.
Click Bind Sort Control.
The Sort Control dialog box appears.
c.
Select a sort field and click OK.
• If you want to add a new text object:
a.
On the Insert menu, click Sort Control.
b.
Select a sort field and click OK.
c.
Click and drag your cursor to the report location where you would like to insert the Sort
Control.
d.
Enter a name for the new Sort Control, and click outside the text object to complete the
process.
5.
Repeat Step 4 for any other sort controls you want to create.
Users can sort the fields you have selected by clicking the sort arrows that appear beside the text object.
The report promotes the selected field temporarily to the top of the sort order. When a second "Sort
Control" is used, the first is returned to its original position in the sort order and the second is promoted
to the top sort.
2013-05-06146
Sorting, Grouping, and Totaling

Note:
Grouping hierarchy is not affected by "Sort Control".
8.1.3.2 To remove a sort control
1.
Right-click the text object that contains the existing Sort Control.
2.
Click Bind Sort Control.
The "Sort Control" dialog box appears.
3.
Click < Not Interactive >.
4.
Click OK to return to your report.
The "Sort Control" is removed from the report.
8.2 Grouping data
Grouped data is data that is sorted and broken up into meaningful groups. In a customer list, for example,
a group might consist of all those customers living in the same Zip Code, or in the same Region. In a
sales report, a group might consist of all the orders placed by the same customer, or all of the orders
generated by a particular sales representative.
8.2.1 Grouping data
Grouped data is data that is sorted and broken up into meaningful groups. In a customer list, for example,
a group might consist of all those customers living in the same Zip Code, or in the same Region. In a
sales report, a group might consist of all the orders placed by the same customer, or all of the orders
generated by a particular sales representative.
8.2.1.1 To group data
1.
On the Insert menu, click Group.
The Insert Group dialog box appears.
2013-05-06147
Sorting, Grouping, and Totaling

2.
Select the field you want the data grouped by from the top drop-down list.
3.
Select the sort direction from the second drop-down list.
Note:
If you want to use a formula for the sort order of your group, see Sorting groups conditionally.
4.
If you want to show a different value in the group header, click the Options tab.
Note:
By default, the group header of the report will display the value of the field you are grouping on.
5.
Select the Customize Group Name Field check box and choose a new group name.
For example, if you grouped by {Customer.CustomerID}, at each change of a group you will see the
corresponding customer ID. If you want to display a different value (customer ID as well as customer
name), customize the group name field by choosing an alternate data field, or creating a formula.
Tip:
To hide the group header name, right-click the group header, select Format Field, and click Suppress
on the Common tab of the Format Editor.
6.
Click OK.
If your records within each group are unsorted, you need to sort the records within each group. See
Sorting records within groups.
Related Topics
• Grouping data in intervals
• Creating group headers
2013-05-06148
Sorting, Grouping, and Totaling

8.2.2 Creating custom groups
Usually data is sorted based on the values from a field in the report. Sometimes, however, you may
not want to group data based on the values found in one of the fields on your report. For example:
• The field you want to group on does not exist.
For example, your report may contain a City field and a State field, but no Country field, although
you need to group by country.
• The field exists, but you do not want to group on the values in that field.
For example, you may have a Color field on your report that includes specific color names (Logan
Green, Sky Blue, Emerald Green, Navy Blue, and so on) but you want all shades of each color to
appear as a single group (Greens, Blues, Reds, and so on). In this case you can build custom groups
and manually assign the records you want to be in each group.
• The field exists, but you want to select specific values or ranges of values for each group.
For example, you might want one group to contain records where gross sales are less than a certain
value, a second group where gross sales are greater than a certain value, and a final group where
gross sales fall between two values. In this case, you can build your groups using the same range
of selection facilities that are available to you for building record selection queries.
Specified order grouping provides a solution to these custom sorting and grouping challenges. It enables
you to create both the customized groups that will appear on a report and the records that each group
will contain. The only limitation is that a record can be assigned to only one group.
To follow a tutorial where you create custom groups to rank customers by the amount of business they
did in the previous year, see Grouping data in intervals.
8.2.2.1 To create a custom group
1.
On the Insert menu, click Group.
The Insert Group dialog box appears.
2.
Select the field you want the data grouped by from the top drop-down list.
3.
Select in specified order as your sort option from the second drop-down list.
4.
On the Specified Order tab, enter the name of the group in the Named Group field.
5.
Click New.
6.
In the Define Named Group dialog box, use the drop-down lists to select the data to be part of the
group.
2013-05-06149
Sorting, Grouping, and Totaling

7.
Click the <New> tab to add more selection criteria to your specified group, if necessary.
8.
Click OK.
9.
Click New to create more custom groups as necessary.
10.
Click the Others tab to specify how you want to organize the data that is not part of the group(s)
you defined.
11.
Click OK.
8.2.3 Sorting groups conditionally
Although it is often sufficient to choose the sort order for a group in your report when you create the
group, there may be times when you want your users to choose their own group sort order.
For example, if you group a sales report by invoice date, you might want your users to choose whether
they see that data from earliest invoice date to most recent invoice date (ascending order) or most
recent invoice date to earliest invoice date (descending order).
To create a conditional group sort order for this report, you might create a new parameter to prompt for
the user's selection, and then pass this selection to a conditional group sorting formula.
8.2.3.1 To sort a group conditionally
1.
Open or create the report that you want to sort conditionally.
In the case of the example mentioned in this section, open or create a report that contains invoice
information.
2.
In the Field Explorer, select Parameter Fields, and click New.
3.
Create a string parameter that contains the sorting options that you want your users to see.
For this example, create a parameter called Sort Order that has two values: Ascending and
Descending.
Tip:
For information about how to create parameters, see Creating a parameter with a static prompt.
4.
Click OK to save your parameter.
5.
On the Insert menu, click Group.
6.
In the Insert Group dialog box, select the field that you want to group on.
For this example, select your invoice date field.
2013-05-06150
Sorting, Grouping, and Totaling

7.
Select Use a Formula as Group Sort Order, and click the Conditional Formula button next to
it.
Note:
This option is not available if you choose "in specified order" as the sort order for your group.
8.
In the Formula Workshop, enter your conditional formula text.
For this example, enter this text:
If {?Sort Order} = "Ascending" then crAscendingOrder else crDescendingOrder
9.
Click Save and close to return to your report.
10.
Click OK to save your group.
11.
When you are prompted to select a Sort Order, select the option that you want, and click OK.
Your report appears with groups for the field that you selected in the Insert Group dialog box and sorted
in the order that you selected in your parameter prompt. To select a different sort order, click the Refresh
button and choose "Prompt for new parameter values." The groups in your report are resorted to comply
with the new order option that you selected.
8.2.4 Sorting records within groups
Once you have grouped your data, you can easily sort the records within the groups to further organize
the information.
8.2.4.1 To sort records within groups
1.
Once the data is grouped, on the Report menu, click RecordSort Expert.
The Record Sort Expert appears.
2013-05-06151
Sorting, Grouping, and Totaling

Note:
Sort fields that begin with "Group" specify that the sort was done automatically when the data was
grouped.
2.
Highlight the field you want the records within the groups sorted by and click the > arrow to add it
to the Sort Fields list.
Note:
The order of the fields in the Sort Fields box is the order by which data will be sorted.
3.
Specify the sort direction.
4.
Click OK when finished.
8.2.5 Group selection
When you group or summarize data, all the groups in the report are included by default. There may be
times, however, when you do not want to include all the groups. For example:
• You might want to see only those groups that have certain group names, or whose summarized
values meet a certain condition.
• You might want to see only the groups with the highest summary values, or the lowest.
You can select the groups that appear in the report in two different ways:
• By using the Select Expert.
• By using selection formulas.
Note:
For faster results, limit records through record selection before creating groups. See Selecting records.
2013-05-06152
Sorting, Grouping, and Totaling

8.2.5.1 Using the Select Expert
The Select Expert can be used to select groups of records in the same way that you select individual
records.
When you are setting up group selection criteria, instead of basing the selection criteria on standard
fields, as you do for record selection, you base the criteria on group name fields or summary fields.
• If you have grouped your data but have not summarized it, you can only set up group selection
based on the group name field. For example, you may want to select only those groups whose
Region is Massachusetts:
GroupName ({Customer.REGION}) = "MA"
• If you have summarized your data, you can set up group selection based on either the group name
field or the summary field. For example:
Sum({Customer.LAST YEAR'S SALES}, {Customer.REGION}) > 10000
Note:
The Select Expert can be used to set up record selection and group selection requests. When a group
name or summary field is selected, the program knows that the selection criteria you set up is intended
for group selection. In all other cases, the program knows that you are setting up record selection.
8.2.5.1.1 To set up group selection using the Select Expert
1.
Right-click the summary field on which you want to base group selection and choose Select
Expert from the shortcut menu.
The Select Expert dialog box appears.
Note:
If you click the Select Expert button without first highlighting a summary field in your report, the
Choose Field dialog box appears.
2.
Use the drop-down list to enter your selection criteria for the indicated field.
2013-05-06153
Sorting, Grouping, and Totaling

3.
To base the group selection on more than one field, click the New tab and choose the next field
from the Choose Field dialog box.
Note:
If you have not already previewed the report or refreshed the data, there will not be any data
saved with the report. Without the data, the program cannot calculate group values; thus, no values
appear when you click the arrow in the right drop-down list. In this situation, you will have to type in
the values you want. If you want real values to work with, you will need to preview your report first.
This will calculate the actual summary values available for you to work with.
4.
When you are finished, click OK in the Select Expert to return to the report.
8.2.5.2 Using selection formulas
With the Group Selection Formula Editor, you can build your group selection request using group fields,
group name fields, and other formulas. As with record selection formulas, your only restriction is that
the formula you create must be Boolean; that is, it must return either a True or False value.
8.2.5.2.1 To create a record or group selection formula
1.
On the Report menu, point to Selection Formulas.
2.
Click Record to create a record selection formula.
- or -
Click Group to create a group selection formula.
The Formula Workshop appears.
3.
Enter your selection formula in the Group Selection Formula Editor.
Note:
The resulting formula must be Boolean; that is, it must return either a True or False value.
4.
Click Check to identify any errors in the formula.
5.
Fix any syntax errors the Formula Checker identifies.
6.
When the formula has the correct syntax, click Save.
When the program runs the report, it will include only those records or groups of records that you
specified.
2013-05-06154
Sorting, Grouping, and Totaling

8.2.5.3 Troubleshooting group selection formulas
In some cases, no values will print when using a group selection formula, even though there are values
that match the selection criteria. Typically, in these cases:
• The group selection formula references another formula.
• The referenced formula is one that calculates the value of each group as a percentage of the total
value of all groups (in other words a subtotal as a percentage of a grand total).
8.2.5.3.1 To correct a group selection formula
1.
Use Xtreme.mdb to create a report that includes the following fields:
{customer.CUSTOMER NAME}
{customer.REGION}
{orders.ORDER ID}
{orders.ORDER AMOUNT}
Note:
Xtreme.mdb is located on the SAP Business Objects Support web site.
For each order, the report shows the customer that placed the order, the region in which that customer
is located, the order ID number, and the amount of the order.
2.
Group the report by the {customer.REGION} field.
3.
Insert a summary that subtotals the {orders.ORDER AMOUNT} field for each {customer.REGION}
group.
The program calculates a subtotal in the {orders.ORDER AMOUNT} field every time the region
changes. See Subtotaling data.
4.
Insert a grand total on the {orders.ORDER AMOUNT} field to see the total value of all orders placed.
5.
Create a formula named Percent that calculates each subtotal as a percentage of the grand total to
see the value of the orders for each region group as a percentage of all orders placed.
Sum({orders.ORDER AMOUNT}, {customer.REGION})
% Sum({orders.ORDER AMOUNT})
6.
Place the formula in the Group Footer section of the report.
7.
Reference the formula (@Percent) in a group selection formula that selects only those groups for
which the percentage (of subtotal to grand total) is less than 5% in order to find out which regions
individually contributed less than 5% of total sales:
{@Percent} < 5
When you click Check, you will receive the following error message:
This formula cannot be used because it must be evaluated later.
2013-05-06155
Sorting, Grouping, and Totaling

8.
Instead of using the formula name (in this case @Percent) in the group selection formula, enter the
formula itself (the formula named @Percent). Thus, instead of using the group selection formula:
{@Percent} < 5
use the group selection formula:
Sum({orders.ORDER AMOUNT}, {customer.REGION})
% Sum({orders.ORDER AMOUNT}) < 5
Now when you print, only the regions that contributed less than 5% will print.
8.2.6 Grouping data in intervals
You may want to group your data into intervals. Age groups, time periods, and sales categories are
some of the interval groupings that can be created. In this example, you will rank customers by the
amount of business they did in the previous year.
This example uses specified order grouping. This kind of grouping lets you specify the records that will
be included in each group. You define the intervals you want and the program will do the rest.
8.2.6.1 To group data in intervals
1.
To get started, create a report using the sample data, Xtreme.mdb. Link the Customer table and
place the following fields from left to right in the Details section:
{customer.CUSTOMER NAME}
{customer.REGION}
{customer.POSTAL CODE}
{customer.COUNTRY}
{customer.LAST YEAR'S SALES}
Note:
Xtreme.mdb is located on the SAP Business Objects Support web site.
2.
On the Insert menu, click Group.
3.
Because you want to set up intervals based on the previous year's sales, select Last Year's Sales
as the sort-and-group-by field from the drop-down list on the Insert Group dialog box.
4.
Select in specified order from the second drop-down list.
The Specified Order tab appears in the Insert Group dialog box.
2013-05-06156
Sorting, Grouping, and Totaling

5.
Click the New button.
The Define Named Group dialog box appears.
6.
Type "Less than $10,000" in the Group Name field.
This is the name that will appear as the Group Name field value for the group.
7.
Since the first group is to contain only those records that have a Last Year's Sales figure of less
than $10,000, set the fields so your condition reads:
is less than 10000
8.
Click OK to return to the Specified Order Tab.
9.
Click New.
The Define Named Group dialog box reappears.
10.
Set up a second group that contains values between $10,000 and $25,000.
• Type "$10,000 to $25,000" in the Group Name field.
• Set the first field so the condition reads: is between.
2013-05-06157
Sorting, Grouping, and Totaling

• Specify a range of values:
• Type "10000" in the top field.
• Type "25000" in the bottom field.
11.
Click OK to return to the Specified Order tab.
12.
Click New.
The Define Named Group dialog box reappears.
13.
Set up the final group that contains all values over $25,000.
• Type "Over $25,000" in the Group Name field.
• Set the first field so the condition reads: is greater than.
• Type "25000".
14.
Click OK to return to the Specified Order Tab.
15.
Click OK.
The report is grouped by interval in a specified order.
8.2.7 Grouping by the first letter of a company name
You might want to break your data into groups based on the first letter of the company name. For
example, in a customer list you might want all the "A" customers in a group, then all the "B" customers,
and so forth. To do this requires the use of a formula.
Do not worry if you are unfamiliar with formulas. This text will show you what formula you need here
and how to enter it.
You can learn more about creating and editing formulas in Formulas overview.
You are going to create a formula that will extract the first letter of each customer's name. Then you
will group the data using that formula field as the sort-and-group-by field. The program will sort the data
based on the first letter of each customer name and start a new group whenever that letter changes.
8.2.7.1 To group data by the first letter of a company name
1.
To get started, create a report using the sample data, Xtreme.mdb. Link the Customer table and
place the following fields from left to right in the Details section:
{customer.CUSTOMER NAME}
{customer.REGION}
2013-05-06158
Sorting, Grouping, and Totaling

{customer.POSTAL CODE}
{customer.COUNTRY}
Note:
Xtreme.mdb is located on the SAP Business Objects Support web site.
2.
On the View menu, click Field Explorer.
The Field Explorer dialog box appears.
3.
Select Formula Fields and click New.
4.
In the Formula Name dialog box, enter the name you want to identify the formula, for example "First
Letter," and then click OK.
The Formula Workshop appears with the Formula Editor active.
5.
Type the following formula into the Formula text box:
{Customer.Customer Name}[1]
6.
Click Save and close to return to your report.
7.
On the Insert menu, click Group.
The Insert Group dialog box appears.
8.
Select the formula field as the field you want your data grouped by from the first drop-down list.
9.
Select the sort direction from the second drop-down list.
10.
Click OK.
You return to your report with the data grouped by the formula field as specified. The data is broken
into groups based on the first letter in the customer's name. The formula provides a live header for
every group.
For more information on live headers, see Live headers.
Related Topics
• Formulas overview
• Grouping data
• Grouping data in intervals
• Creating group headers
8.2.8 Grouping data hierarchically
2013-05-06159
Sorting, Grouping, and Totaling

Characteristics of the data needed for hierarchical grouping
You can group data in a report to show hierarchical relationships. When you group data hierarchically,
Crystal Reports sorts information based on the relationship between two fields. A hierarchical relationship
must be inherent in the data that you use for the report:
• Parent and child fields must be of the same data type for the program to recognize a relationship
between them.
• The data in the parent field must be a subset of the data in the child field.
• For the top level of a hierarchy to appear in a report, the value must appear in the child data, and
the corresponding row in the parent data must be empty.
• There cannot be any circular logic in the data (that is, A cannot be related to B, while B is related to
C, and C is related back to A).
For example, if you want to show the hierarchical relationship of the people who work in a department,
you could group data by employee name (the child field) and specify the hierarchy by using the field
that lists whom the employee reports to (the parent field). Your database tables might look like the
following example.
Supervisor (parent)Employee (child)
ThomasJane
Mina
ThomasGerard
ThomasAlbert
MinaThomas
ThomasBeth
ThomasTeresa
ThomasGareth
ThomasValerie
MinaGillian
2013-05-06160
Sorting, Grouping, and Totaling

Supervisor (parent)Employee (child)
GillianFrances
GillianRuth
MinaMargaret
MargaretPaul
MargaretCharles
The Employee and Supervisor fields contain overlapping data that implies a hierarchical relationship.
There are 15 unique employee names, with four of these names also appearing as supervisors (Mina,
Thomas, Gillian, and Margaret). Three employees report to Mina, seven employees report to Thomas,
two employees report to Gillian, and two employees report to Margaret.
Note:
Mina has no corresponding Supervisor. This data implies that Mina is a top-level supervisor who does
not report to anyone else in this table.
If you group a Crystal report on the Employee field, you can further sort the data to show the hierarchical
relationship between these employees and their supervisors.
Characteristics of a report that you have grouped hierarchically
In addition to a visual representation of the hierarchy inherent in your data, a Crystal report that you
have grouped hierarchically has several other characteristics:
• When you drill down on a group in the hierarchy, the drill-down view also shows the records that
are lower in the hierarchy.
• The report contains hierarchical group footers that include the records that are lower in the hierarchy
of each group. You can summarize data across the hierarchies.
• Use the conditional-X-position feature to ensure that the indenting you set to show hierarchical
relationships does not affect other fields in same section of your report.
• Hierarchical levels are supported in the formula language through the use of the GroupingLevel and
HierarchyLevel functions.
Note:
You cannot use hierarchical summaries in formulas.
2013-05-06161
Sorting, Grouping, and Totaling

8.2.8.1 To group data hierarchically
1.
Create or open a report that contains the data you want to group and sort hierarchically.
2.
On the Insert menu, click Group.
3.
In the Insert Group dialog box, select the field that you want to use as the basis of your hierarchy
(the child field).
For example, if you want to see the hierarchical structure of a company's employees, select the
employee field.
4.
Select in ascending order.
By default, the group header of the report displays the value of the field you are grouping on.
5.
If you want to show a different value in the group header, click the Options tab and select the
Customize Group Name Field check box.
For example, if you grouped by the employee field, at each change of a group you will see the
corresponding employee name. If you want to display a different value (employee ID instead of
employee name), customize the group name field by choosing an alternate data field, or by creating
a formula.
6.
Click OK.
The group you created is added to the report.
2013-05-06162
Sorting, Grouping, and Totaling

7.
On the Report menu, click Hierarchical Grouping Options.
8.
In the Available Groups list of the Hierarchical Options dialog box, select the group you want to
organize hierarchically.
9.
Select the Sort Data Hierarchically check box.
10.
In the Parent ID Field list, select the field by which you want the Instance ID Field organized.
For example, for an employee hierarchical report, you might select the data field listing the supervisor
to whom the employee reports.
Note:
The Instance ID Field and Parent ID Field must be of the same data type. For example, if the Instance
ID Field holds string data, then the Parent ID Field must also hold string data.
11.
In the Group Indent field, enter the amount you want to indent for each subgroup.
2013-05-06163
Sorting, Grouping, and Totaling

The value that you enter in the Group Indent field affects all other objects that are in the same area
as your hierarchical group. For example, if your report contains a salary field on the same line as
the name of the employee, the salary field is also indented when you use the employee field to
create a hierarchical group. To indent only the hierarchy records and not the other objects, leave
this value as 0 (zero) and use the conditional-X-position feature.
12.
Click OK.
The report data is now grouped hierarchically.
Note:
In this example, the Details section in the report has been hidden to show the hierarchical sorting
more clearly.
The report is now grouped by employee name and further sorted to show the supervisor hierarchy. You
can see that Mina, whose employee data had no supervisor data associate with it, has been sorted at
the top of the list. Under Mina's name is each supervisor who reports to her; and under each of those
supervisors is a list of employees who reports to him or her.
2013-05-06164
Sorting, Grouping, and Totaling

Note:
The level at which a name appears in the hierarchy of this report is determined by the number of
employees who report to him or her. Those employees with no one reporting to them are at the lowest
level in the hierarchy.
If you want to, you can now calculate summary fields across your new hierarchical grouping. When
inserting a subtotal, grand total, or summary in the usual manner, select the "Summarize across
hierarchy" option. For more information, see Summarizing grouped data and Subtotaling.
8.2.8.2 To indent a hierarchy without affecting other fields
Note:
For this procedure to work, you must ensure that the value in the Group Indent field of the Hierarchical
Group Options dialog box is set to 0 (zero).
1.
Right-click the field that you grouped hierarchically, and select Size and Position.
2.
Click the Conditional Formula button next to the X position value field.
3.
In the Formula Workshop, enter your conditional X position formula text.
For example, enter formula text such as this:
numbervar hLevel := HierarchyLevel (1);
numbervar deltaX := 0;
if (hLevel > 1) then
deltaX := (hLevel - 1) * 0.4;
deltaX := deltaX * 1440;
Note:
• There are several ways that you can create this formula; this code is an example of one way.
• Positions are measured in twips; there are 1440 twips in an inch.
Search the online help for "HierarchyLevel (GroupingLevel)" to learn more about the function used
in this example.
4.
Click Save and close to return to your report.
5.
Click OK to save your position setting.
Crystal Reports moves the values in your hierarchical data to new positions based on their level in the
hierarchy, but leaves other objects that are on the same lines where you originally placed them.
8.2.9 Editing groups
1.
On the Report menu, click Group Expert.
2.
In the Group By list of the Group Expert dialog box, select the group you want to edit.
2013-05-06165
Sorting, Grouping, and Totaling

3.
Click Options.
4.
In the Change Group Options dialog box, edit the group as necessary.
5.
Click OK to close the Change Group Options dialog box and again to close the Group Expert dialog
box.
The report reflects the changes you have made to the group.
8.3 Summarizing grouped data
One of the primary purposes for breaking data into groups is to run calculations on each group of records
instead of on all the records in the report.
When the program summarizes data, it sorts the data, breaks it into groups, and then summarizes the
values in each group. It does this all automatically.
The program includes a number of summarizing options. Depending on the data type of the field you
plan to summarize, you can:
• Sum the values in each group.
• Count all the values or only those values that are distinct from one another.
• Determine the maximum, minimum, average, or Nth largest value.
• Calculate up to two kinds of standard deviations and variances.
For example:
• Customer list reports: determine the number of customers in each state. The summary would count
the distinct customers in each state group.
• Order reports: determine the average order placed each month. The summary would calculate the
size of the average order for each month group.
• Sales reports: determine the total sales per sales representative. The summary would sum or subtotal
the order amounts for each sales representative group.
Note:
You can also calculate summary fields across hierarchical groupings. To do so, select "Summarize
across hierarchy" in the Insert Summary dialog box.
8.3.1 To summarize grouped data
1.
On the Insert menu, click Summary.
2013-05-06166
Sorting, Grouping, and Totaling

The Insert Summary dialog box appears.
2.
Select the desired field to summarize from the Choose the field to summarize list.
3.
Select a summary operation from the Calculate this summary list.
4.
Select a location in which to place the summary from the Summary location list.
Tip:
• You can create a new group for your report by clicking the Insert Group button.
• You can add your summary to all group levels, or you can add it only once to the level you select
as your location.
5.
If you want to display your summary value as a percentage of a total, select Show as a percentage
of from the Options area, and then select a total field from the list.
For more information about percentages, see Percentages.
6.
If you want to summarize across a hierarchy, select Summarize across hierarchy.
For more information about hierarchies, see Grouping data hierarchically.
7.
Click OK when finished.
Related Topics
• Subtotaling data
8.3.2 Ordering groups by summarized values
Groups can be organized in either ascending or descending order by summary value. For example, in
an orders report, if you subtotal the order amount by state, you could order the groups:
• From lowest to highest order amount (ascending).
• From highest to lowest order amount (descending).
You order the groups in a report by summary values using the Group Sort Expert command on the
Report menu.
8.3.2.1 To order groups by summary value
1.
Click Group Sort Expert on the Expert Tools toolbar.
The Group Sort Expert dialog box appears with a tab for each of the groups in the report that has a
summary.
2013-05-06167
Sorting, Grouping, and Totaling

2.
Click the tab for the group you want to sort.
3.
Select the All option from the drop-down list on the left.
4.
Choose the summary that you want to base your selection on from the "based on" drop-down list
on the right.
The "based on" drop-down list on the right is for those cases in which you have multiple summaries
within a single group section. For example, in an orders report, you might sum and average the
orders for each customer and then display both the sum and the average in the same group section.
In such a case, you would select the sum or the average from this drop-down list.
5.
Specify the sort direction.
6.
To select a second group sort, repeat Steps 2-5.
When you run the report, the program will order the groups based on the summary value(s) specified.
8.3.3 Selecting top or bottom N groups or percentages
At times, you might want to show only the top or bottom groups or percentage values in a report: the
fastest selling product lines, the countries that account for the top 25 percent of sales, the states that
generate the most orders, and so on. Because this kind of selection is so popular, the program includes
the Group Sort Expert for setting it up easily.
There is one other element to consider when setting up top N: what to do with all the records from other
groups that do not fit the top N or bottom N criteria you have set. You need to decide whether to eliminate
those records from your report entirely or to lump them all together into a single group. The program
enables you to choose either option.
Note:
• A report must contain a summary value in order to be able to perform a top N or bottom N selection.
See Summarizing grouped data.
• It is recommended that you do not use a group that is sorted hierarchically in a top or bottom N
selection. The integrity of your hierarchical group sort might be affected by the top or bottom N
selection.
8.3.3.1 To select the top or bottom N groups
Note:
This procedure shows you how to select top or bottom N groups. Top or bottom percentages work the
same way except that you define the percentage value instead of the number of groups.
1.
Create a report and summarize the data as desired. When you summarize the data, the program
breaks the data into groups and summarizes each group.
2013-05-06168
Sorting, Grouping, and Totaling

With top N groups, you are instructing the program to display those groups that have the highest
summary values (Top N).
•
• With bottom N groups, you are instructing the program to display those groups that have the
lowest summary values (Bottom N).
2.
Click the Group Sort Expert button on Expert Tools toolbar.
The Group Sort Expert appears with a tab for your group.
Note:
If you have multiple groups, the program will display a tab for each of the groups.
3.
Choose Top N or Bottom N from the first drop-down list.
4.
Choose the summary that you want to base your selection on from the "based on" drop-down list
on the right.
The "based on" drop-down list on the right is for those cases in which you have multiple summaries
within a single group section. For example, in an orders report, you might sum and average the
orders for each customer and then display both the sum and the average in the same group section.
In such a case, you would select the sum or the average from this drop-down list.
5.
In the Where N is text box, enter the number of groups you want to display. For example:
• To report on the three fastest selling product lines, set N to be equal to three.
• To report on the five least productive sales regions, set N to be equal to five.
6.
Click the Include Others, with the name check box and enter a name if you want to group all the
other records into a single group.
7.
Select Include ties to accommodate groups whose summarized values are equal.
For example, suppose you had the following groups:
2013-05-06169
Sorting, Grouping, and Totaling

• Order 1 = 100
• Order 2 = 90
• Order 3 = 80
• Order 4 = 80
If you set your top N to be three, but you do not select "Include ties," your report will show Order 1,
Order 2, and Order 3.
If, in the same scenario, you do select "Include ties," your report will show Order 1, Order 2, Order
3, and Order 4 even though N is set as three. In this way, the program accommodates the equal
values of orders 3 and 4.
8.
Click OK when finished.
When the program runs the report, it will include only those groups that you specified.
8.3.4 Selecting top or bottom groups or percentages conditionally
If you want your users to choose their own value for a Top N, a Bottom N, or a top or bottom percentage,
create a parameter to prompt for the value that Crystal Reports can then pass to a conditional selection
formula.
Note:
• For groups, the top or bottom N value must be between 1 and 32,766.
• For percentages, the top or bottom N value must be between 0 and 100.
8.3.4.1 To select a conditional number of groups or percentage value
1.
Open or create the report that you want to use for the conditional value or percentage selection.
Note:
This report must contain a group and summary information as described in Selecting top or bottom
N groups or percentages.
2.
In the Field Explorer, select Parameter Fields, and click New.
3.
Create a number parameter.
Tip:
For information about how to create parameters, see Creating a parameter with a static prompt.
4.
Click OK to save your parameter.
2013-05-06170
Sorting, Grouping, and Totaling

5.
On the Report menu, click Group Sort Expert.
6.
In the Group Sort Expert, select the type of group sort that you want.
Choose any option except No Sort or All.
7.
Click the Conditional Formula button next to the N or Percentage value field.
8.
In the Formula Workshop, enter the parameter field that you created in step 3.
9.
Click Save and close to return to your report.
10.
Click OK to save your group sort.
11.
When you are prompted to enter a number or percentage, enter the value that you want, and click
OK.
Your report appears with only the number of groups that match the value you entered in your parameter
prompt. To enter a different value, click the Refresh button and choose "Prompt for new parameter
values." The groups in your report are refreshed to show the new value that you entered.
8.4 Subtotaling
A subtotal is a summary that totals or sums numeric values in a group.
Note:
If you are creating a subtotal using database tables that are grouped in a one-to-many linking relationship,
you may need to use a running total instead of a subtotal. See Creating running totals in a one-to-many
linking relationship.
8.4.1 Subtotaling data
In this example you will subtotal Last Year's Sales by Country.
8.4.1.1 To subtotal data
1.
To get started, create a report using the sample data, Xtreme.mdb. Link the Customer table and
place the following fields from left to right in the Details section:
{customer.CUSTOMER NAME}
{customer.REGION}
{customer.POSTAL CODE}
{customer.COUNTRY}
{customer.LAST YEAR'S SALES}
2013-05-06171
Sorting, Grouping, and Totaling

Note:
Xtreme.mdb is located on the SAP Business Objects Support web site.
2.
Right-click the Last Year's Sales field, point to Insert and choose Summary from the shortcut menu.
The Insert Summary dialog box appears with the chosen field listed as the field to be summarized.
3.
Click Insert Group.
The Insert Group dialog box appears so you can specify the group you want to add to your report.
4.
Choose the field you want the data grouped by, specify a sort direction and then click OK when
finished.
5.
On the Insert Summary dialog box, select the group you just created from the Summary location
list and then click OK.
The values in each group are now subtotaled.
8.4.2 Extending prices and subtotaling the extensions
In an orders report or invoice, you may need to extend the prices for individual line items and then
subtotal the extensions. You do this by using a simple formula to extend the prices, and then you subtotal
the formula field.
8.4.2.1 To extend the price and subtotal the extensions
1.
To get started, create a report using the sample data, Xtreme.mdb. Link the Orders table and place
the following fields from left to right in the Details section:
{Orders.CUSTOMER ID}
{Orders_Detail.PRODUCT ID}
{Orders_Detail.QUANTITY}
{Orders_Detail.UNIT PRICE}
Note:
Xtreme.mdb is located on the SAP Business Objects Support web site.
2.
To create the formula for extending the prices, go to the View menu and select Field Explorer.
The Field Explorer dialog box appears.
3.
Select Formula Fields and click New.
The Formula Name dialog box appears.
4.
Enter the name you want to identify the formula, and then click OK.
2013-05-06172
Sorting, Grouping, and Totaling

The Formula Workshop appears with the Formula Editor active.
5.
Enter the following formula into the Formula text box:
{Orders_Detail.Quantity} * {Orders_Detail.Unit Price}
6.
Click Save and close to return to the Field Explorer dialog box.
Your formula is listed in the Formula Fields node.
7.
Drag your formula field to the right of the Unit Price field in the Details section of the report.
8.
To subtotal your extension formula, right-click the formula field, point to Insert and choose Summary
from the shortcut menu.
The Insert Summary dialog box appears.
9.
Click Insert Group and create a group on the {orders.ORDER DATE} field.
10.
Choose for each week as the group interval.
Note:
"The section will be printed" drop-down box will not be activated until you choose the Order Date
field.
11.
Click OK to return to the Insert Summary dialog box.
12.
Select the group you just created from the Summary location list and then click OK.
Your data will be sorted by date and grouped in one week intervals.
8.5 Percentages
2013-05-06173
Sorting, Grouping, and Totaling

8.5.1 Calculating a percentage
You can calculate the percentage of one group within a broader grouping. For example, you can show
the percentage of sales in each city based on the total sales for each country. Or, you can see what
percentage of the grand total of sales each country contributes.
8.5.1.1 To calculate a percentage
1.
On the Insert menu, click Summary.
The Insert Summary dialog box appears.
2.
Select the field for which you want to calculate the sum.
For example, you may want to insert a field which calculates the sum of last year's sales.
3.
Select Sum in the Calculate this summary list.
4.
Select the summary location.
Note:
The summary location cannot be Grand Total (Report Footer) when you are calculating a percentage.
5.
Click the Show as a percentage of check box.
6.
Select the group you want the percentage based on.
You can choose to show a percentage of a group within another group, or show a percentage of
the grand total.
2013-05-06174
Sorting, Grouping, and Totaling

7.
Click OK. The summary percentage field is added to your report.
8.6 Group headers
8.6.1 Creating group headers
Whenever you create a group, a subtotal, or a summary, the program creates both a Group Footer
(GF) section (where it places any subtotal or summary value), and a Group Header (GH) section (where
it automatically places the group name/header). Group Headers are useful, even necessary, if you want
your report data to be clear and easily understood. Though the program creates a group header
automatically, you may find that you would like to change or modify the header to suit your needs.
In this section, you will learn how to create the most common kinds of group headers.
2013-05-06175
Sorting, Grouping, and Totaling

8.6.1.1 Standard headers
A standard header is a block of text that is used to identify each group in a rather generic kind of way.
"Customer," "State," and "Monthly Orders" are all examples of this kind of header.
While the header is somewhat descriptive ("Region Sales Figures" means it is a regional group), you
never know what region is in the group without first looking at the details in the group.
8.6.1.1.1 To create a standard header
1.
Click the Insert Text Object button on the Insert Tools toolbar.
2.
When the object pointer appears, move the object frame into the Group Header section.
3.
Enter the text you want to use for the header.
4.
Click outside the frame when finished to complete the process. Now when you run the report, the
same header will appear at the beginning of each group.
8.6.1.2 Live headers
A live header is a header that changes based on the content of the group. If the data is subtotaled by
region, for example, a live header would typically identify the region detailed in each group. Thus, the
Arizona group would have a header identifying the group as Arizona data, the California group would
have a header identifying the group as California data, and so on.
Note:
When creating a group, the program automatically inserts a group name field in the Group Header
section unless you have toggled the option off using the Options command on the File menu. The
information that follows details how to manually insert such a section (if you do not have the program
insert one automatically) and how to create different kinds of live headers for different needs.
2013-05-06176
Sorting, Grouping, and Totaling

Group name only
The easiest live header to create is one based on identifying the value of the group field.
8.6.1.2.1 To create a live header by group name only
1.
On the View menu, click Field Explorer.
2.
In the Field Explorer dialog box, expand the Group Name Fields folder.
3.
Select the Group Name field that matches the group you are working with and drag it into the Group
Header section for that group.
When you run the report, the group field value identifier will appear as the group header for each
region group.
8.6.1.2.2 Group name with text
A more complex type of live header combines a field value and text. A typical group header of this kind
for data broken down by region would be, "Sales for California" or "Customers in Postal Code 60606".
Creating these headers involves three steps:
• Insert a text object in the Group Header section.
• Type in the text you want to appear.
• Enter the Group Name field in the text field where you want it to appear in the Group Header.
For example, if you want your header to read "Sales for" and then the name of the region in the current
group (Sales for AZ, Sales for CA, and so forth), follow these steps:
To create a live header with group name using text
1.
Click the Insert Text Object button on the Insert Tools toolbar.
2.
Place the object frame into the Group Header section for the group.
3.
Type in the desired text with a space after it.
4.
Click the Field Explorer button on the Standard toolbar.
5.
In the Field Explorer dialog box, expand the Group Name Fields folder.
6.
Select the Group Name field that matches the group you are working with and drag it into the text
object, immediately after the text and the space you entered.
Tip:
Expand the size of the text box to fit both the text and the group field.
7.
Format the text object as you want it to appear.
When you run the report, the program will create a live header (with text) for each of your groups.
2013-05-06177
Sorting, Grouping, and Totaling

8.6.1.2.3 Live headers for groups based on a formula
When you create a group and use a formula field as a sort-and-group-by field, the program automatically
creates a group name field based on the value returned by the formula.
For example, if you create this formula:
{customer.CUSTOMER NAME}[1]
and then group on the formula, the program will group your data based on the first letter in the Customer
Name field.
To create a live group header for a group based on a formula, simply insert the group name field in the
Group Header section.
When you run the report, the "A" group will have the letter "A" as a header, the "B" group will have the
letter "B", and so on. For more information, see Grouping by the first letter of a company name and
Grouping data in intervals.
8.6.1.3 Headers for custom groups
The final type of header is a header for the types of custom groups created when data is grouped in a
specified order. When using specified order grouping, both the name for each group and the records
that belong in it are specified. As in the other grouping situations, the program creates a group name
field for each group based on the group names specified.
8.6.1.3.1 To create a header for custom groups
1.
On the View menu, click Field Explorer.
2.
In the Field Explorer dialog box, expand the Group Name Fields folder.
3.
Select the Group Name field for the custom group and drag it into the Group Header section for that
group.
The program automatically applies each of the group names you assigned to the appropriate groups.
Note:
Make certain that when you assign the names to the groups using the Define Named Group dialog box,
the names you assign are the names you want to appear as group headers.
2013-05-06178
Sorting, Grouping, and Totaling

8.6.2 Suppressing group headers
You have the option to hide group headers in your report.
8.6.2.1 To suppress group headers
1.
Right-click the group header and select Format Field.
2.
In the Format Editor, on the Common tab, click the Suppress check box.
3.
Click OK.
Tip:
To show the group header again, clear the Suppress check box.
8.6.3 Drilling-down on group headers
To make report viewing easier, you can hide the details of your report and only have the group headers
visible. When necessary, you can click on the group header to view the report details.
8.6.3.1 To drill-down on group headers
2013-05-06179
Sorting, Grouping, and Totaling

1.
Right-click the gray Details section to the left of the report.
2.
Select Hide (Drill-Down OK).
3.
Click Refresh.
When you place the cursor over a group header, the cursor becomes a magnifying glass.
4.
Double-click the group header to drill-down to the detail information.
A drill-down tab appears in the Report Designer. Click the Design or Preview tab to return to that
view.
Related Topics
• Using the drill-down option on summarized data
2013-05-06180
Sorting, Grouping, and Totaling

Running Totals
9.1 Understanding running totals
Running total fields are similar to summary fields but allow more control over how the total is calculated
and when it is reset. Running total fields are specifically suited to perform the following totaling functions:
• Show values of a total accumulate as it is calculated record by record.
• Total a value independent of the report's grouping.
• Total a value conditionally.
• Total a value after a group selection formula has been applied.
• Total a value from the driving table in a one-to-many linking relationship.
9.1.1 How running totals work
A running total field is created with the Running Total Expert. The Running Total Expert creates a
running total field by asking you to select a field to summarize, the summary operation to use, a condition
upon which to base the evaluation, and a condition upon which to reset the evaluation.
Note:
A running total field can be used on database fields and first-pass formulas, but cannot be used on
second-pass formulas or formulas that reference other second-pass formulas.
9.1.1.1 Placement of running total fields
The calculation of a Running Total field is determined by the settings selected in the Running Total
Expert. However, where you place the running total affects the value that appears on the report. For
example, if a Running Total field that evaluates every record and never resets (a grand total) in the
Report Header, only the value of the first record will appear. Placing the same Running Total field in
2013-05-06181
Running Totals

the Report Footer returns the desired value. The Running Total field is properly calculated in both cases,
but it is displayed too soon in the first case.
The following list summarizes the records that are included in the calculation when a running total is
placed in various report sections. This list assumes the running total is not reset.
Records included in the running total calcu-
lation
Report section
The first record in the reportReport Header
All records up to and including the first record on
the current page
Page Header
All records up to and including the first record in
the current group
Group Header
All records up to and including the current recordDetails
All records up to and including the last record in
the current group
Group Footer
All records up to and including the last record on
the current page
Page Footer
All records in the reportReport Footer
9.2 Creating running totals
Running totals are totals that can be displayed on a record by record basis. They total all records (in
the report, in the group, and so on) up to and including the current record.
9.2.1 Creating running totals in a list
2013-05-06182
Running Totals

The most basic form of a running total is a running total maintained throughout a list. In this tutorial,
you will create this kind of report by setting up a running total for a list of order amounts.
Note:
Running total fields are prefixed by the # sign.
9.2.1.1 To create a running total in a list
1.
To get started, create a report using the sample database, Xtreme.mdb. Link the Customer and
Orders tables, and then place the following fields from left to right in the Details section:
{customer.CUSTOMER NAME}
{orders.ORDER ID}
{orders.ORDER AMOUNT}
Note:
Xtreme.mdb is located on the SAP Business Objects Support web site.
2.
On the View menu, click Field Explorer.
The Field Explorer dialog box appears.
3.
Select Running Total Fields and click New.
The Create Running Total Field dialog box appears.
4.
Enter the name "TotalOrders" in the Running Total Name box.
5.
Highlight Orders.Order Amount in the Available Tables and Fields box, and use the first arrow
button to move it over to the Field to summarize box.
6.
Select sum from the Type of summary list.
7.
In the Evaluate section of the dialog box, click On change of field, and select Orders.Order ID as
the On change of field.
The running total will execute each time this field changes.
8.
In the Reset section of the dialog box, click Never (this gives you a running total that never resets;
that is, the running total continues throughout the report).
9.
Click OK to save the running total field.
The program returns you to the Field Explorer dialog box.
10.
Insert the running total field in the Details section of the report, just to the right of Orders.Order
Amount.
On your report, each row in the running total column displays the current record value added to the
previous values. This total continues, unbroken, through the report.
2013-05-06183
Running Totals

9.2.2 Creating running totals for a group
Another common use for running totals is tallying items in a group. The running total starts with the first
item in the group and ends with the last. Then it starts all over again for the next group, then the next,
and so on.
In this tutorial, you will create a report that:
• Maintains a running total of customer orders.
• Groups customer orders and resets the running total for each group.
• Displays the subtotal for each customer group.
9.2.2.1 To create a running total for a group
1.
To get started, create a report using the sample data, Xtreme.mdb.
Link the Customers and Orders tables and place the following fields from left to right in the Details
section:
{customer.CUSTOMER NAME}
{orders.ORDER ID}
{orders.ORDER AMOUNT}
Note:
Xtreme.mdb is located on the SAP Business Objects Support web site.
2.
On the Insert menu, click Group and group on the Customer.Customer Name field.
3.
On the View menu, click Field Explorer.
The Field Explorer dialog box appears.
4.
Select Running Total Fields and click New.
The Create Running Total Field dialog box appears.
5.
Enter the name "GroupRunningTotal" in the Running Total Name box.
6.
Highlight Orders.Order Amount in the Available Tables and Fields box, and use the first arrow
button to move it over to the Field to summarize box.
7.
Select sum from the Type of summary list.
8.
In the Evaluate section of the dialog box, click For each record.
9.
In the Reset section of the dialog box, click On change of group and accept the default group
name.
10.
Click OK to save the running total field.
2013-05-06184
Running Totals

You return to the Field Explorer dialog box.
11.
Place the running total field in the Details section of your report, just to the right of the Orders.Order
Amount field.
Note:
If you want to view a grand total of each group, place the running total field in the Group Footer
section of your report.
9.2.3 Creating conditional running totals
There may be times when you have a list of values, and you only want to subtotal some of the values
in the list. For example:
• You have a list that contains both Canadian and U.S. customers.
• You want to keep customer records sorted alphabetically based on customer name.
• You do not want to break the data into groups based on the country.
• You want a total of the values from just the Canadian records.
• You also want a total of the values from just the U.S. records.
To accomplish this, create two running totals, one to keep a running total of the U.S. records, and one
to keep a running total of the Canadian records.
• USTotal
Maintains a running total of the U.S. records.
• CanadaTotal
Maintains a running total of the Canadian records.
9.2.3.1 To create a conditional running total
1.
To get started, create a report using the sample database, Xtreme.mdb. Link the Customer table
and then place the following fields from left to right in the Details section:
{customer.CUSTOMER NAME}
{customer.COUNTRY}
{customer.LAST YEAR'S SALES}
Note:
Xtreme.mdb is located on the SAP Business Objects Support web site.
2.
On the Report menu, click Record Sort Expert.
2013-05-06185
Running Totals

Tip:
Another way to do this is to click the Record Sort Expert button on the Expert Tools toolbar.
3.
Sort the records based on the Customer.Customer Name field.
4.
On the View menu, click Field Explorer.
The Field Explorer dialog box appears.
5.
Select Running Total Fields and click New.
The Create Running Total Field dialog box appears.
6.
Enter the name "USTotal" in the Running Total Name box.
7.
Highlight Customer.Last Year's Sales in the Available Tables and Fields box, and use the first
arrow button to move it over to the Field to summarize box.
8.
Select sum from the Type of summary list.
9.
In the Evaluate section of the dialog box, click Use a formula and then click the Formula
button.
The Formula Workshop appears with Running Total Condition Formula active.
10.
Enter the following formula in the Formula box:
{Customer.Country} = "USA"
This tells the program to evaluate the running total each time it comes to a record where
Customer.Country is equal to "USA." The running total will ignore all other records (such as records
for Canada).
11.
When the formula has the correct syntax, click Save and close.
You return to the Create Running Total Field dialog box.
12.
In the Reset section of the dialog box, click Never.
13.
Click OK to save the running total field.
The program returns you to the Field Explorer dialog box.
14.
Place the running total field in the Details section of your report.
15.
Now create the "CanadaTotal" running total field using the process outlined in steps 5-13. The only
difference is that this time you will set the evaluation formula to:
{Customer.Country} = "Canada"
16.
When you are finished, place the #CanadaTotal field in the Details section of your report
Note:
If you only want to see a grand total of the Canadian and American sales, place the two running
total fields you created in the Report Footer section of your report.
2013-05-06186
Running Totals

9.2.4 Creating running totals in a one-to-many linking relationship
A one-to-many linking relationship occurs in linked tables when a single record in one table can be
matched with many records in another table. For example, a one-to-many link might occur when you
link a customer table to an orders table. It wouldn't be unusual in such a case for each customer in the
primary table to have many orders in the second (lookup) table. In your report, the field values from the
primary table are repeated for each new field value in the lookup table.
Creating a subtotal on a field from the primary table provides an incorrect result because the repeated
values are included in the calculation. You can avoid this problem by creating a running total.
This concept can be demonstrated with the sample Xtreme database by using the Customer and Orders
tables.
9.2.4.1 To create a running total in a one-to-many linking relationship
1.
From the Field Explorer dialog box, place the following fields from left to right in the Details section
of your report:
{customer.CUSTOMER NAME}
{customer.LAST YEAR'S SALES}
{orders.ORDER ID}
{orders.ORDER AMOUNT}
2.
On the Insert Tools toolbar, click Insert Group and create a group based on the
Customer.Customer Name field.
3.
Right-click the Customer.Last Year's Sales field and select Summary from the Insert submenu.
4.
Choose Group #1: Customer.Customer Name - A as the location for your summary.
If you look at the subtotals for each group, you will notice they aren't accurate. This is because the
Customer.Last Year's Sales field is duplicated for each order in the report. Follow the rest of this
procedure to see how a running total produces an accurate result in the same situation.
5.
In the Field Explorer dialog box, select Running Total Fields and click New.
The Create Running Total Field dialog box appears.
6.
Enter the name "LYSrunning" in the Running Total Name box.
7.
Highlight Customer.Last Year's Sales in the Available Tables and Fields box, and use the first
arrow button to move it over to the Field to summarize box.
8.
Select sum from the Type of Summary list.
9.
In the Evaluate section of the dialog box, click On change of field and add the Customer.Customer
Name field from the Available Tables and Fields box.
2013-05-06187
Running Totals

10.
In the Reset section of the dialog box, click On change of group and choose Group #1:
Customer.Customer Name - A.
11.
Click OK to save the Running Total field.
12.
Place the running total in the Group Footer section.
Compare the running total amount with the subtotal amount for each group. You will see the running
total is accurate while the subtotal is not.
9.3 Creating running totals using a formula
If you have suppressed data, or your data is based on a formula that occurs WhilePrintingRecords, you
should create a running total formula rather than using the Create Running Total Field dialog box.
When you create a running total manually, you need to create three formulas:
• A summary formula.
• A reset formula to set a variable to zero.
• A display formula to display the variable.
In the following procedure, you will create a report that performs the following functions:
• Maintains a running total of customer orders.
• Groups customer orders and resets the running total for each group.
• Displays the subtotal for each order (the last running total for that order).
9.3.1 To create running totals using a formula
1.
Create a report using the sample data, Xtreme.mdb. Link the Customers and Orders tables and
place the following fields from left to right in the Details section:
{customer.CUSTOMER NAME}
{orders.ORDER ID}
{orders.ORDER AMOUNT}
Note:
Xtreme.mdb is located on the SAP Business Objects Support web site.
2.
On the View menu, click Field Explorer.
3.
Select Formula Fields in the Field Explorer dialog box and click New.
4.
Name the formula "RunningTotal" and click Use Editor.
The Formula Workshop appears with Formula Editor active.
2013-05-06188
Running Totals

5.
Enter the following into the Formula box:
WhilePrintingRecords;
CurrencyVar Amount;
Amount := Amount + {Orders.Order Amount};
6.
Click the Save and close button on the Formula Workshop.
7.
Place this formula in the Details section of your report, just to the right of the Orders.Order Amount
field.
This formula prints the running total of the values in the Order Amount field.
8.
On the Insert menu, click Group and group the report on the Customer.Customer Name field.
9.
In the Formula Workshop, create "AmountReset":
WhilePrintingRecords;
CurrencyVar Amount := 0;
This formula says:
Set the value in the Amount variable to 0.
10.
Place this formula in the Group Header #1 section of your report.
Because the Group Header #1 section appears once for every group, @AmountReset will execute
each time the group changes. Thus, the Amount variable is reset to 0 each time a new group begins.
11.
Select the @AmountReset formula on the report and use the Format Editor to suppress it so that it
will not appear in the final print-out.
12.
In the Formula Workshop, create "AmountDisplay":
WhilePrintingRecords;
CurrencyVar Amount;
This formula simply displays the current value of the Amount variable at any time.
13.
Place this formula in the Group Footer #1 section of your report.
Because the Group Footer #1 section appears once for every group, @AmountDisplay will execute
each time a group ends. Thus, the value stored in the Amount variable will be printed each time the
group changes.
Note:
This formula prints the same value that @RunningTotal prints as the running total for the last record
in each group. But since it is printing it in the Group Footer section, it acts as a group subtotal, not
as a running total.
2013-05-06189
Running Totals

On your report, each row in the running total column displays the current record value added to the
previous values. The running total starts fresh with each new group, and the final running total for
each group becomes the subtotal for that group.
2013-05-06190
Running Totals

Multiple Section Reports
10.1 About sections
Crystal Reports provides five design areas to use when building your report:
• Report Header
• Page Header
• Details
• Report Footer
• Page Footer
Each area contains a single section when you first create a new report. You cannot delete any of these
original sections but you can hide them or add to them. Once you have added sections, you can delete
them, move them in relation to other similar sections, or merge related sections together.
10.2 Working with sections
2013-05-06191
Multiple Section Reports

Many of the procedures in this section show you how to work with sections in the Section Expert.
Sections can also be inserted, deleted, and so on by right-clicking the shaded area to the left of the
section in the Design or Preview tabs and choosing the appropriate option from the shortcut menu.
10.2.1 Inserting a section
1.
Click Section Expert on the Expert Tools toolbar.
The Section Expert appears with a list of all the sections in the report. When there are more than
one of any kind of section, the sections are lettered A, B, C, and so on.
Note:
The program enables only those options (free form, new page before, and so on) that apply to the
highlighted section.
2.
Highlight the section you want to insert a section after.
For example, to add another Details section, highlight the existing Details section.
3.
Click Insert.
A new section is inserted immediately below the highlighted section.
10.2.2 Deleting a section
1.
Click Section Expert on the Expert Tools toolbar.
The Section Expert appears with a list of all the sections in the report. When there are more than
one of any kind of section, the sections are lettered A, B, C, and so on.
Note:
The program enables only those options (free form, new page before, and so on) that apply to the
highlighted section.
2.
Highlight the section you want to delete.
3.
Click Delete.
The program removes the highlighted section from the report.
2013-05-06192
Multiple Section Reports

10.2.3 Moving a section
1.
Click Section Expert on the Expert Tools toolbar.
The Section Expert appears with a list of all the sections in the report. When there are more than
one of any kind of section, the sections are lettered A, B, C, and so on.
Note:
The program enables only those options (free form, new page before, and so on) that apply to the
highlighted section.
2.
Highlight the section you want to move.
3.
Click the Up or Down arrow to move the section.
Note:
• You can only move a section up or down within an area.
• The letters that identify the sections describe their relative (as opposed to original) position. Thus,
if you move a "C" section up, it becomes a "B" section. It loses its original "C" designation.
• You can also move sections by dragging and dropping them in the Report Designer.
10.2.4 Merging two related sections
There may be times when you have placed objects in two sections (where they print sequentially) and
you want to put them all in a single section (where they print simultaneously). You can merge the two
sections and then rearrange the objects as needed in the new section.
10.2.4.1 To merge related sections
1.
Click Section Expert on the Expert Tools toolbar.
The Section Expert appears with a list of all the sections in the report. When there are more than
one of any kind of section, the sections are lettered A, B, C, and so on.
Note:
The program enables only those options (free form, new page before, and so on) that apply to the
highlighted section.
2.
Move the sections so the two sections you want to merge follow each other in the list.
2013-05-06193
Multiple Section Reports

3.
Highlight the top section.
4.
With Section (B) highlighted, click Merge and Section (C) will be merged with Section (B) to form
one section.
5.
Rearrange the objects as needed.
10.3 Splitting and resizing sections
A section can be split into two or more sections and/or resized easily in the Design tab.
10.3.1 Splitting a section
1.
Move the pointer over the left boundary of the section you want to split.
2.
When the pointer becomes a Section Splitting cursor, click the boundary and drag the pointer into
the section.
3.
When a horizontal line appears, drag it up or down to split the section the way you want it.
2013-05-06194
Multiple Section Reports

10.3.2 Resizing a section
1.
Move the pointer over the bottom boundary of the section you want to resize.
2.
When the pointer becomes a Resizing cursor, drag the boundary to make the section bigger or
smaller as you wish.
10.3.2.1 Resizing a section to remove white space
If you have one or more objects in a section and you want to resize the section to remove unnecessary
white space, right-click in the shaded area to the left of the section in the Design and Preview tabs and
choose Fit Section from the shortcut menu. The program automatically resizes the section, moving the
bottom boundary of the section to the baseline of the bottom object in the section.
A section automatically expands vertically in two instances:
• When you place an object and the object is bigger (vertically) than the section you place it in.
• When you expand an object (vertically) so it becomes bigger than the section it resides in.
Note:
• You cannot resize a section smaller than the combined height of all the objects in the section.
• You can also remove white space at the bottom of a Page Footer by selecting Clamp Page Footer
on the Common tab of the Section Expert.
2013-05-06195
Multiple Section Reports

10.4 Using multiple sections in reports
Certain reporting tasks are performed most efficiently by creating multiple sections within an area.
Once you understand the power of multiple sections, you will discover even more ways to produce the
effects you want.
Related Topics
• Working with sections
10.4.1 Keeping variable length objects from overwriting each other
When subreports or other variable length objects are placed above other objects in one section of the
report while the Can Grow option for the variable length object is toggled on in the Format Editor, that
object may overprint objects positioned directly below it unless you have:
• Expanded the section to fit the maximum size of the object.
• Spaced the objects, allowing enough space for the first object to complete printing before the second
one begins.
You can eliminate this overprinting problem by creating multiple sections in an area and placing objects
below the variable length object in their own section(s).
Now, when the report runs, the section with the variable length object will finish printing before the
section below it prints and you will get the results you want..
2013-05-06196
Multiple Section Reports

Note:
Many report objects can use the Can Grow option and can, therefore, cause overprinting:
• Text fields
• Formula fields
• Memo fields
• BLOB fields
• Subreports
• Cross-Tabs
• OLAP grids
10.4.2 Eliminating blank lines when fields are empty
It is very common to have two address lines in a customer table, one for street address (Address 1),
and one that can be used for a suite number or mail stop (Address 2). Address 1 usually contains a
value, but Address 2 is often blank. If you create a customer list using this data and stack the fields on
top of one another in mailing label format, those customer records with an empty Address 2 field will
print with a blank line. You can eliminate this blank line either by using multiple sections, or by
suppressing blank lines.
10.4.2.1 To eliminate blank lines by using multiple sections
1.
Use the Section Expert to create two new Details sections so that you have a total of three.
See Working with sections.
2.
Place the Address 2 field in the middle section and the other data in the sections above and below
it as you want it to appear in the report.
3.
In the Section expert, highlight the middle section.
4.
On the Common tab, select the Suppress Blank Section check box.
Now, when the report prints, if the Address 2 section is blank, the program will not print it and you will
not get unwanted blank lines in the report.
Note:
If the report section you want to suppress contains a blank subreport, use the Suppress Blank Subreport
option, found on the Subreport tab of the Format Editor, as well as the Suppress Blank Section option.
2013-05-06197
Multiple Section Reports

10.4.3 Adding blank lines conditionally
Use multiple sections to print a blank line on your report under specific conditions. For example, you
may want to insert a blank line after every fifth record in the report.
10.4.3.1 To add blank lines conditionally
1.
Use the Section Expert to create two Details sections. See Working with sections.
2.
Place the report detail data in the top section.
3.
Leave the second section empty.
4.
In the Section expert, highlight the second section.
5.
On the Common tab, select the Suppress (No Drill-Down) check box then click the conditional
formatting button to its right.
6.
Enter the following formula in the Format Formula Editor:
Remainder (RecordNumber,5) <> 0
This formula divides each record number by 5. If the division produces a remainder, it suppresses
the blank section. But if the division produces no remainder, a zero (which it will for every fifth record
printed), the program prints the second section, thus inserting a blank line.
Note:
To insert a blank line under different conditions, you can modify your formula appropriately. See Working
with conditional formatting.
10.5 Form letters
While form letters themselves are not necessarily multi-section reports, they are often used in
multi-section reports to generate custom mailings. The topic Printing conditional messages in form
letters, explains how to use multiple form letters or multiple versions of the same form letter for custom
mailings.
Form letters often use text objects to hold the content of the report. The following sections provide an
introduction to text objects and demonstrate how to use them in form letters.
2013-05-06198
Multiple Section Reports

10.5.1 Working with text objects
You will use many of the capabilities of text objects when creating form letters. A brief discussion of
text objects should make it easier for you to create the form letter in the next section. Some things to
consider are:
• A text object can contain both text and fields; you will use both in this example.
• You can resize text objects; you will be resizing the text object so that it prints as a letter.
10.5.1.1 Move/Resize mode
When the object is in the move/resize mode, it appears as a solid frame with resizing handles.
In this mode, you can resize the object by dragging any of the resizing handles, or you can move it by
placing the cursor inside the object and dragging it to a new location. You can also insert fields in this
mode, but you cannot insert text. You put a text object into the move/resize mode by clicking it when it
is inactive.
10.5.1.2 Edit mode
When the object is in the edit mode, it appears as a solid frame without sizing handles, and an in-place
ruler appears at the top of the tab (if you have selected the Show Rulers options in the Options dialog
box).
When you first place a text object, the program sets it in the edit mode. You can also put a text object
into the edit mode by double-clicking it when it's inactive or in the move/resize mode. Finally, you can
put a text object in edit mode by right-clicking it and selecting Edit Text from its shortcut menu.
Each text object contains word processor capabilities, including the ability to change the fonts for
individual characters and fields, and automatic word wrap. In the edit mode you can insert text and
such non-text objects as database fields and formulas. Whenever the object is in edit mode, it contains
an insertion point, a flashing vertical line that indicates the position at which typed text or inserted fields
will begin.
2013-05-06199
Multiple Section Reports

The insertion point moves as you type, automatically staying to the right of the last character. It also
moves when you insert a field, automatically staying to the right of the field. It moves one character
position at a time when you press the space bar. It moves down one line, to the inside left edge of the
text object, when you press Enter (this action inserts a carriage return). It moves to the cursor position
when you click anywhere within the existing text.
As you work through the tutorials for multiple sections, it is always expected that you will type or place
fields at the existing insertion point, unless otherwise indicated.
• To select text within a text object (to delete it, to change a font, and so on), position the cursor over
the text and, when the I-beam cursor appears, drag the cursor to highlight the text you want to select.
• To select a field which is inside a text object, position the cursor over the field and, when the I-beam
cursor appears, right-click.
• To insert text, type in the desired text and it will appear at the insertion point.
Note:
It is critical that you see the Drag and drop cursor before placing the field. If it does not appear, you
might place the field so that it overlays the text object instead of being inserted into it. It may appear
to be inside the text object, but if you move the object the field will not move with it.
• The insertion point is tied into the Drag and drop cursor. If you have existing text or fields in the text
object, the insertion point moves as you move the Drag and drop cursor, enabling you to pick the
exact position where you want to place the field. The program always places the field at the insertion
point.
• You can leave edit mode by clicking outside of the text frame. You can also click Ctrl+Enter.
10.5.2 Creating a form letter using a text object
The following section shows you how to create a form letter.
You are going to use a text object to create a form letter. The form letter you create will be tied to a
database table so that each letter will be customized with company information from a different record.
If you have difficulty performing any of the steps, please see Working with text objects.
2013-05-06200
Multiple Section Reports

10.5.2.1 To create a form letter
The letter will consist of a date, an inside address, a salutation, a one paragraph letter body, and a
closing section.
1.
Create a blank report. Use the Customer table of Xtreme.mdb.
The Design tab appears.
2.
Since you do not want field titles to appear above the fields that you insert into the letter, clear the
Insert Detail Field Headings check box on the Layout tab of the Options dialog box.
3.
Insert a text object into the Details section of the report.
4.
Click the text object frame to put the object in move/resize mode.
5.
Drag the resizing handle on the right side of the object to the right edge of the Design tab. This will
make the object about eight inches wide, the approximate width of a page. You may have to stop
resizing, scroll the window, and resize some more to accomplish this.
2013-05-06201
Multiple Section Reports

6.
Double-click inside the text object to place it in edit mode. It is now ready for you to begin your work.
The insertion point appears at the extreme left, inside the object.
10.5.2.2 Inserting a date
1.
To insert a date into the letter, expand Special Fields in the Field Explorer dialog box and scroll
until you find Print Date.
2.
Click Print Date and drag the placement frame into the text object and place it at the insertion point.
Note:
To change the way the date is formatted in the letter, double-click the text object to select it. Then
right-click the Print Date field and choose Format {Print Date} from the shortcut menu. Make your
modifications on the Date tab of the Format Editor when it appears.
3.
Press Enter twice to insert some white space between the date and the inside address and to move
the insertion point down within the text object.
Tip:
You might have to resize the Details section and the text object if you have not selected the Can
Grow option for the text object in the Format Editor.
10.5.2.3 Creating an inside address
1.
To create the inside address, drag database fields into the text object from the Customer table in
the Field Explorer dialog box.
2013-05-06202
Multiple Section Reports

2.
Drag in the Address 1 field and place it at the insertion point, and press Enter. The insertion point
moves down to the line below.
3.
Drag in the City field and place it at the insertion point.
4.
Type a comma, followed by a space.
5.
Drag in the Region field and place it at the insertion point.
6.
Type in two spaces.
7.
Finally, drag in the Postal Code field, place it at the insertion point, and press Enter. The insertion
point moves down to the line below.
8.
Press Enter one more time to move the insertion point down one more line to the position where
the salutation should start. This completes the inside address.
Note:
When a field is placed within a text object, it is automatically trimmed on both the left and right sides,
so that it contains no extra white space.
10.5.2.4 Creating a salutation
1.
Press Enter four times to move the insertion point down.
2.
Type in the word "Dear" and a space (do not include the quotation marks).
3.
In the Field Explorer dialog box, highlight the Contact Title field from the Customer table and drag
it into the text object, placing it immediately after the space.
4.
Insert a space. The program positions the insertion point immediately after the space.
5.
In the Field Explorer dialog box, drag the Contact Last Name field into the text object and place it
at the insertion point. The insertion point moves to the right of the field.
6.
Type a colon ":" at the insertion point (without the quotation marks) and press Enter twice to move
the insertion point down two lines.
2013-05-06203
Multiple Section Reports

10.5.2.5 Creating the letter body
1.
Now type "Your company" (do not include the quotation marks) and type a comma followed by a
space.
2.
Drag the Customer Name field into the text object and place it at the insertion point, just after the
space.
3.
Type a comma, followed by a space.
4.
Type the following text (do not include the quotation marks): "helped make this year an outstanding
year for Xtreme Mountain Bikes, Inc. I want to thank you and your staff for your support. I hope next
year will be a banner year for you."
5.
Press Enter twice.
6.
Type "Sincerely yours" (without the quotation marks), followed by a comma, and then press Enter
four times.
7.
Finally, to complete the form letter, type your name.
The Design tab should look similar to this:
2013-05-06204
Multiple Section Reports
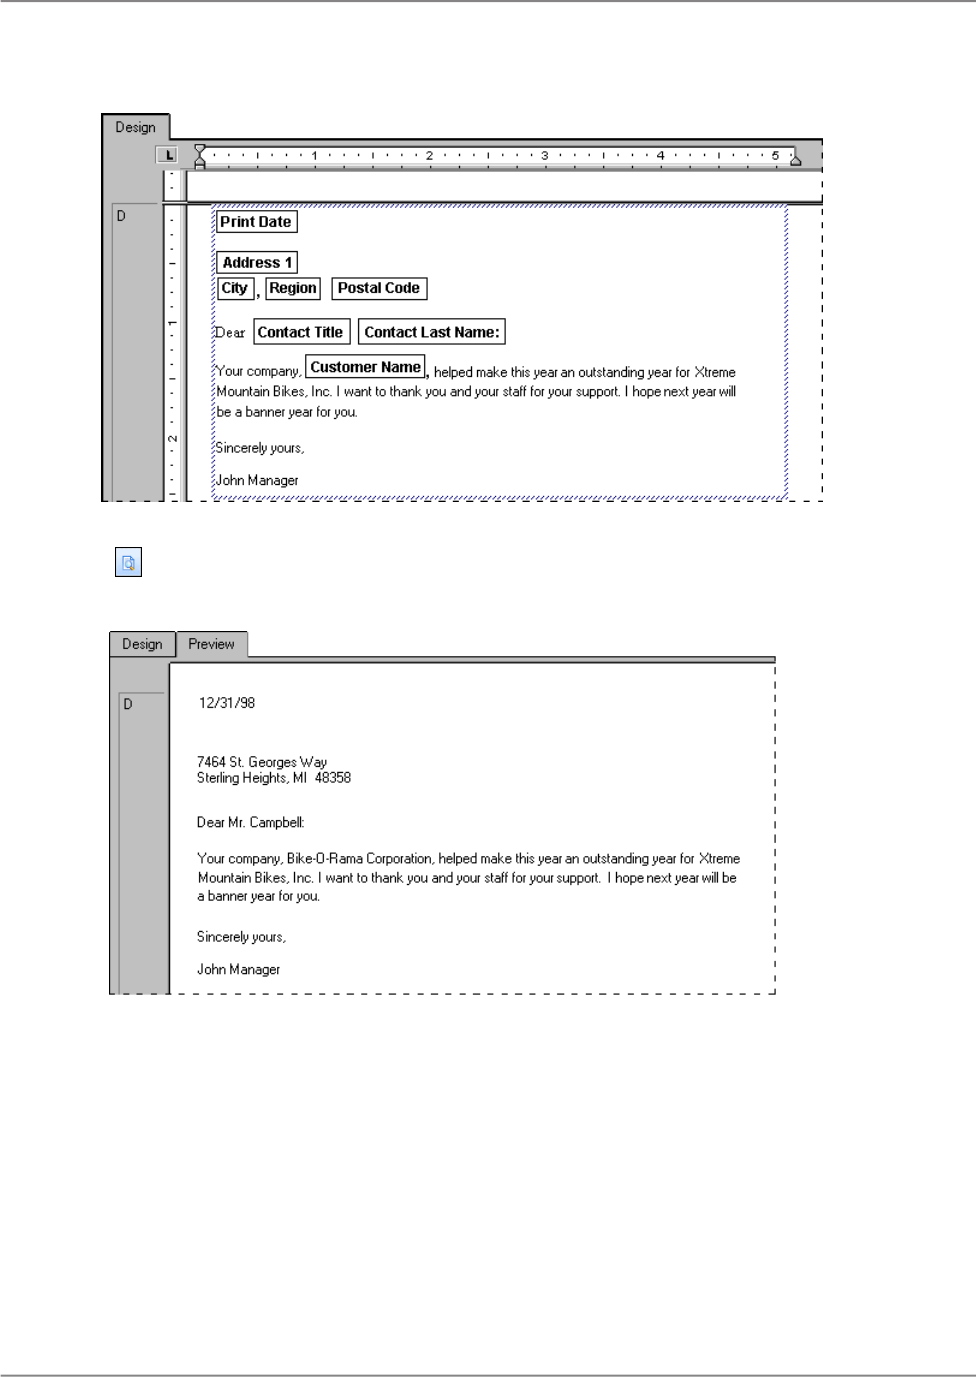
8.
Click Print Preview on the Standard toolbar to preview the form letter.
It should look similar to this:
10.5.3 Printing conditional messages in form letters
It is likely that you will want to print conditional messages in form letters. For example, you may want
to encourage customers with available credit to buy more and those who are over their credit limit to
bring their accounts down below the limit once again. You can create both of these letters within a single
report.
2013-05-06205
Multiple Section Reports

10.5.3.1 To create a conditional message
1.
Use the Section Expert to insert a second Details section in the report. See Working with
sections.
2.
Create two form letters. Place a letter that encourages customers to buy more in the Details A section
of the report; place a letter that encourages customers to bring their balance down in the Details B
section of the report. See Creating a form letter using a text object.
3.
Use the Section Expert to format the Details sections so that each is suppressed under certain
conditions. For example, consider the situation where you want to print one of two letters.
• Format the first section to be suppressed when the balance is less than the credit limit.
• Format the second section to be suppressed when the balance is more than the credit limit.
Now, when a record indicates available credit, the "buy more" letter will print. When the account is over
the credit limit, the "over limit" letter will print. And when the customer is right at the credit limit, nothing
will print at all.
Related Topics
• Working with conditional formatting
2013-05-06206
Multiple Section Reports

Formatting
11.1 Formatting concepts
This section explains how to format a report. Formatting refers to changes you can make to the layout
and design of a report, as well as the appearance of text, objects, or entire report sections.
You can use formatting to do many things, including:
• Dividing sections of a report.
• Calling attention to certain data.
• Changing the presentation of dates, numbers, Boolean values, currency values, and text strings.
• Hiding unwanted sections.
• Giving the report a professional appearance.
The following topics describe the types of formatting you can do with Crystal Reports, giving step-by-step
instructions for performing a variety of formatting tasks.
Note:
There are many date formats you can choose to use on an English report, but if you send the report to
a Japanese system, there may be some formatting irregularities. Not all English date formats are
viewable on a Japanese system, and the same is true going from Japanese to English. For instance,
abbreviated English months do not appear on a Japanese system and Japanese eras in short format
do not appear on an English system.
11.2 Using a template
A template is an existing report file whose formatting can be added to a new report. At the same time,
the formatting of the template report's fields and report objects are applied to the new report. Use
templates to give any number of reports a consistent look without having to format each one individually.
For additional information about templates, see Template considerations.
2013-05-06207
Formatting

11.2.1 Applying a template
When you create a new report in the Standard Report Creation Wizard, you can apply a template as
an optional step. You can also apply a template later by using the Template Expert. You can choose
from a number of predefined templates, or you can use an existing Crystal report as a template.
11.2.1.1 To apply a template in the Standard Report Creation Wizard
1.
Click New on the Standard toolbar.
2.
Choose data, fields, grouping fields, and so on, until the wizard displays the Template screen.
3.
In the Available Templates list, click a predefined template name to see an example of it in the
Preview area.
By default, the sample templates shipped with Crystal Reports are installed at \Program Files\SAP
BusinessObjects\Crystal Reports 14.0\Templates.
4.
If you want to apply a template based on an existing Crystal report, click Browse.
5.
In the Open dialog box, select a Crystal report (.rpt) file and click Open.
The report is added to the list of Available Templates.
Note:
If a template name and preview picture were saved (in the Document Properties dialog box) with
the report you selected as a template, you will see this information on the Template screen.
6.
Click Finish.
Your report appears with its data formatted to match the template you selected.
Note:
Formatting is not applied if the report you chose does not meet the requirements for a template.
11.2.1.2 To apply a template to an existing report
1.
On the Report menu, click Template Expert.
The Template Expert appears.
2013-05-06208
Formatting

Tip:
Another way to do this is to click the Template Expert button on the Expert Tools toolbar.
As was the case with the Template screen, you can choose from a number of predefined templates,
or you can click the Browse button to search for an existing report to use as a template.
2.
Choose a template and click OK.
Note:
Any drill-down tabs, alerts, or analyzer views that are open will be closed before the template is
applied.
11.2.2 Removing an applied template
Perhaps, after applying a template, you don't like the changes made to your report. As long as you
haven't exited Crystal Reports since you applied the template, you can remove it from your report.
11.2.2.1 To remove an applied template
1.
On the Report menu, click Template Expert.
Tip:
Another way to do this is to click the Template Expert button on the Expert Tools toolbar.
2.
Choose Undo the current template and click OK.
The chosen template's features are removed and your report reverts back to the formatting it had
when you first opened it.
Note:
To remove a template, you must use this option; the Undo command is not available from the Edit
menu.
11.2.3 Reapplying the last template selected
If you want to reapply the last template you selected during a session of Crystal Reports, you can simply
select an option on the Template Expert.
2013-05-06209
Formatting

11.2.3.1 To reapply the last template selected
1.
On the Report menu, click Template Expert.
Tip:
Another way to do this is to click the Template Expert button on the Expert Tools toolbar.
2.
Choose Re-apply the last template and click OK.
11.2.4 Using Template Field Objects
You can use Template Field Objects to create more flexible report templates. These report objects do
not refer to existing database fields; you simply put them in your template report and format them as
you require. When you apply the template to another report, Crystal Reports displays that report's data
with the formatting you specified. Therefore, when you design a template, you don't have to know what
data might be in the report you'll eventually apply it to—you use Template Field Objects to take care
of the possibilities for you.
Note:
Template Field Objects are applied only to result fields: database fields, parameter fields, SQL
statements, and formulas. Special Fields are not considered result fields.
11.2.4.1 To add a Template Field Object to a template report
1.
On the Insert menu, click Template Field Object.
A placement frame is attached to your cursor.
2.
Place the Template Field Object frame on your template report.
A Template Field Object can be placed in any report section.
3.
Right-click the object and click Format Template Field from its shortcut menu.
A list of formatting options appears. You can choose any of the options; when you do, the appropriate
tab of the Format Editor appears.
Tip:
You can select multiple Template Field Objects and apply your formatting choices to all of the objects.
2013-05-06210
Formatting

4.
Specify the formatting for your Template Field Object as you require.
For information about how to apply formatting, see Working with absolute formatting.
For each Template Field Object you create, a special formula field is created. You can see this formula
field in the Formula Workshop. If you want to use sample data in your report to see how your formatting
will look, you can reference database fields in these formulas.
Note:
If you want to apply different formatting to a number of fields within the same report section, you should
use a different Template Field Object for each field.
11.2.4.2 To add sample data to a Template Field Object formula
1.
In the Field Explorer, expand the Formula Fields node, select a Template Field Object, and
click Edit.
Tip:
In the Formula Fields node of the Field Explorer and the Formula Workshop, Template Field Objects
appear as <TemplateField>.
2.
In the Formula Editor, replace the Space(10) section of the argument with a database field of the
type you want to see in your sample, save your change, and close the Formula Workshop.
3.
Refresh your report's data.
11.2.5 Template considerations
If an existing report is used as a template, these report objects will be applied to the new report:
• Fields
• Groups
• Group charts
• Summary fields
• Hyperlinks
• Bitmaps
• Lines, boxes, borders
• Static OLE objects
2013-05-06211
Formatting
If an existing report is used as a template, these report objects will not be applied to the new report:
• Detail charts
• Subreports
• OLAP grids
• Cross-tabs
• Maps
• Embedded OLE objects
• BLOB fields
• Specified order grouping
• Advanced summaries (such as Top Ns, Percentages, and Running Totals)
The formatting and objects from an existing report used as a template can override choices you made
in the Standard Report Creation Wizard. For example, if you had selected "No Chart" on the Chart
screen of the wizard, but then applied a template report that includes a chart, the template report will
override your selection and the new report will contain a chart.
Further, a chart in a template report overrides the charting summary value selected on the Chart screen
of the wizard. The order in which you select your data fields in the wizard generally determines which
summary field becomes the default value for your chart. Once the template has been applied, the first
summary field in the report becomes the charting summary value even if you selected a different value
in the wizard.
ResultIf the target report has...If the Template has...
Overwrite/ApplyGroup ChartGroup Chart
Overwrite/Apply
No Chart
• Group & summary
Group Chart
Chart retainedGroup ChartNo Chart
Overwrite/Blank sectionNo Chart
Advanced Chart
• Using group & summary in
report
Overwrite/Blank sectionAdvanced Chart
Advanced Chart
• Not using group & summary
in report
2013-05-06212
Formatting
ResultIf the target report has...If the Template has...
Overwrite/ApplyAdvanced Chart
Advanced Chart
• Using group & summary in
report
Chart retainedAdvanced ChartNo Chart
Cross-Tab/OLAP Grid retainedCross-Tab/OLAP gridCross-Tab/OLAP grid
Cross-Tab/OLAP Grid retainedCross-Tab/OLAP gridNo Cross-Tab/OLAP grid
Overwrite/Blank sectionNo Cross-Tab/OLAP gridCross-Tab/OLAP grid
Map retainedMapMap
Map retainedMapNo Map
Overwrite/Blank sectionNo MapMap
Subreport retainedSubreportSubreport
Subreport retainedSubreportNo Subreport
Overwrite/Blank sectionNo SubreportSubreport
11.3 Using the Report Design Environment
This section describes several things to keep in mind when designing reports that are distributed to
different environments.
2013-05-06213
Formatting

11.3.1 Section characteristics
A report consists of several sections, including the Report Header, Page Header, Group Header, Details,
Group Footer, Page Footer, and Report Footer.
Each report section is made up of a series of lines. When a text-based object is placed in a section, it
is placed on a line in such a way that the text is aligned to the baseline. The line's height is then adjusted
by the printer driver so that it is high enough to accommodate the object.
• If you place another text-based object on the same line with a font size larger than that of the first
object, the line's height extends to accommodate the second object.
• If you place another text-based object on the same line with a font size even larger than the previous
two objects, the line's height extends to accommodate the third object.
A line's height is determined by the text-based object with the largest font size on the line.
As you add text-based objects to a report, either in the same section or other sections, the line height
adjusts to accommodate the various fonts. Since this vertical spacing is set up by the printer driver, it
is difficult to create reports designed for pre-printed forms when they are printed in various environments.
When designing reports, you should do the following:
• Always print a test page.
• Keep all font sizes the same.
• Be sure to print pre-printed forms on the same machine.
11.3.2 Making an object underlay a following section
Using this example, you can make a logo underlay multiple sections. This procedure is similar to the
one for inserting a company watermark to serve as a report background.
To make an object underlay a following section, first place the object in the section above the section
you want it to underlay. Then select the Underlay Following Sections check box in the Section Expert
for the section in which the object is placed.
11.3.2.1 To create a basic report
1.
Create a report using the Customer table in Xtreme.mdb.
2013-05-06214
Formatting

The Xtreme.mdb file is located on the SAP Business Objects Support web site.
2.
Place {customer.CUSTOMER NAME} and {customer.LAST YEAR'S SALES} side-by-side in the
Details section of the report.
3.
To remove unnecessary objects from this example, delete the field titles that the program places in
the Page Header section of each field.
4.
On the Insert menu, click Group to break the data into regional groups.
5.
On the Common tab of the Insert Group dialog box, select {customer.REGION}.
6.
Click OK.
11.3.2.2 To insert a picture onto the report
1.
On the Insert menu, click Picture.
Tip:
Another way to do this is to click the Insert Picture button on the Insert Tools toolbar.
2.
Select an image file, and then place it in the Page Header section, to the right of the fields in the
report body.
Note:
In this example, the picture is placed to the right of the fields to avoid underlaying the text. When
you are working with a watermark, a subdued picture designed to be nearly invisible, place it directly
above the text.
3.
On the Standard toolbar, click Print Preview.
The picture prints in the Page Header section of each report page.
11.3.2.3 To make the picture underlay the following section
1.
On the Report menu, click Section Expert.
The Section Expert dialog box appears.
Tip:
Another way to do this is to click the Section Expert button on the Expert Tools toolbar.
2.
In the Sections list, click Page Header, then select the Underlay Following Sections check box.
3.
Click OK to preview the report again.
2013-05-06215
Formatting

The picture now prints in both the first Group Header and the following few Details sections, next to
(instead of above) the text in the body of the report.
Note:
Using the technique of placing a picture to the right of the body of the report, you can set up a chart
or an employee picture to print beside the details pertaining to that chart or employee.
4.
Once you are finished previewing the report, return to the Design tab.
5.
Resize the picture vertically to make it two or three times larger, then preview the report again.
The bitmap file now underlays more sections.
The area in which the picture underlays depends on the following conditions:
• The size of the picture.
• The section in which the picture was originally placed.
• The position of the picture in the section.
By modifying size and placement of an object, you can create a variety of visual effects, using the
underlay feature.
11.3.3 Pre-printed forms
If you print on pre-printed forms, you will be able to:
• Scan a form.
• Place it in the report as a bitmap.
• Use the underlay feature to line up the bitmap and report, as well as move objects anywhere you
want them to appear.
• Eliminate the need to print the forms separately by printing the report and the form as a single unit.
11.3.4 Multiple columns
Instead of having your data print straight down the page, you can set up multiple columns and have
the data flow from column to column.
2013-05-06216
Formatting

11.3.4.1 To create a multiple-column report
1.
Open the report you want to format with multiple columns.
2.
On the Report menu, click Section Expert.
Tip:
Another way to do this is to click the Section Expert button on the Expert Tools toolbar.
3.
In the Section Expert, highlight Details, and then select Format with Multiple Columns.
A Layout tab is added to the Section Expert.
4.
Click the Layout tab and set the Width you want your column to be.
Keep in mind the width of your paper when deciding your column width. For example, if you have
three fields in your Details section, and they take up four inches of space, limit the width of the
column to under four and a half inches so that all the field information can be seen.
5.
Set the Horizontal and/or Vertical gap you want to maintain between each record in your column.
6.
In the Printing Direction area, choose a direction.
7.
If the report you're formatting contains grouping, select Format Groups with multiple column.
8.
Click OK.
When you preview the report, you'll see that the field headers appear only for the first column. To have
field headers for the second column, insert a text object.
11.3.5 Hiding report sections
Crystal Reports has three properties you can set in the Section Expert to hide report sections.
11.3.5.1 Hide (Drill-Down OK)
The Hide property hides a section whenever you run the report. For example, in a summary report, the
Hide property can be used to display only the summaries, but not the details behind the summaries.
When the Hide property is applied to a section, it becomes visible when the Drill-down cursor is used
to drill down on the section contents. This property is absolute; it cannot be conditionally applied using
a formula.
2013-05-06217
Formatting

11.3.5.2 Suppress (No Drill-Down)
The Suppress property also hides a section when you run the report. Unlike the Hide property, however,
you cannot apply the Suppress property, then drill down to reveal the section contents. This property
can be applied absolutely, or conditionally using a formula. This is useful for writing form letters. For
example, in a form letter, you might create two Details sections: one to suppress when sales are equal
to or over $X and one to suppress when sales are under $X.
11.3.5.3 Suppress Blank Section
The Suppress Blank Section property hides a section whenever there is nothing in it. If something is
placed within the section and it produces a value in your report, then it becomes visible.
11.3.6 Hiding report objects
Crystal Reports has three formatting options in the Format Editor for hiding individual objects.
11.3.6.1 Suppress If Duplicated (Common tab)
The Suppress If Duplicated property prevents a field value from printing if it is identical to a duplicate
of the value that comes immediately before it in an iteration of the same section.
The value does not print, but the space in which it would have printed remains.
2013-05-06218
Formatting

Note:
• This option does not work for text fields that contain embedded fields.
• This option compares record values, not formatted field values. The program ignores the option in
the first Detail section of a formatted page.
11.3.6.2 Suppress If Zero (Number tab)
Tip:
To find this option, click the Number tab of the Format Editor, then click the Customize button.
The Suppress If Zero property prevents a value from printing if it is a zero value. The value does not
print, but the space in which it would have printed remains. To remove the blank space, select the
Suppress Blank Section check box in the Section Expert.
2013-05-06219
Formatting

Note:
This will only work if there are no other objects in the section.
11.3.6.3 Suppress (Common tab)
The Suppress property hides an object when you run the report. For example, it is common to apply
this property to formulas that are needed to do some report calculations, but that you do not want to
print when you run the report. When you select this property, the selected object does not print.
Note:
You can click the Conditional Formula button for any of these properties and create a formula that will
make the setting conditional on some event. See Working with conditional formatting.
To set these properties, select the object, then click Format from the Expert Tools toolbar to open the
Format Editor dialog box. When the Format Editor appears, set the properties.
11.3.7 Placing text-based objects
2013-05-06220
Formatting

When a text-based object is placed on a report, the object is represented by an object frame. The height
of the object frame is based on the height of the font. The width, however, is determined differently,
depending on the object you are working on.
• For database fields that are not memo fields, the width is initially determined by the width of the field
as defined in the database, and by the average character width as provided by the selected font
and font size.
For example, you have a database field called {customer.LAST NAME} and your database defines
this field as a text field with a length of 35 characters. When you place this field on your report, the
width of the boundary is 35 times the average character width of the font and font size that the
database field is formatted to. Remember that this is the initial default boundary width. The width
can always be resized to increase or decrease as you see fit.
• For text-based objects, the default width is approximately 19 average character widths wide. Text
objects are different from database fields in that their width automatically expands as you enter in
text and/or database fields into the object. As with all other text-based objects, the width can be
resized by the user.
• For different number fields (double, single, integer, long integer, and byte) the default widths are all
different. As with all objects, the width can be resized by the user.
11.3.7.1 Preventing the truncation of text inside an object
Whether the default widths are accepted or the text-based objects are resized, a problem could arise
if the text inside the object prints right to the edge of the object frame. While the report may look fine
on the machine it was designed on, when the report is printed using another printer driver that measures
the font wider, the length of the text grows, but the object frame remains fixed. The resulting text is
cut-off or truncated.
11.3.7.1.1 To prevent the truncation of text inside an object
1.
Right-click the text object you want to format to bring up the shortcut menu.
Tip:
Another way to do this is to click the Format button on the Expert Tools toolbar.
2.
On the shortcut menu, click Format Text.
The Format Editor dialog box appears.
3.
On the Common tab, select the Can Grow check box.
4.
Click OK to save your changes.
The object is then formatted to print on multiple lines. If the text prints wider than the object, the text
wraps onto additional lines.
2013-05-06221
Formatting

11.3.7.2 Preventing breaks in non-spacing text inside an object
For text strings that do not contain spaces, such as single words, the text string is broken at the edge
of the object frame before the line starts to wrap.
11.3.7.2.1 To prevent the breaks in non-spacing text inside an object
1.
Select the object you want to format.
2.
Expand the object frame to make it wider than the widest block of text inside the frame.
There are many times when the actual text in a database field is far less than the maximum amount
the field can contain. For example, a {table.LAST NAME} field is designed with a field size of 80 and
the longest name in the database is 28 characters. In this case, when you first place the field in your
report, the field is 80 times the average character width. Reduce the width of the field, but include
enough space to account for growth.
While each of these options offers an effective solution when dealing with a single text-based object in
a section, there are still design considerations to take into account when placing more than one object
in a section. When sizing an object, consider its placement with regard to other objects in the section.
Avoid designing reports where the space between each object is very tight. Leave room for growth by
expanding the width of the object by approximately 5 per cent. Or, if this is not possible, consider
reducing the size of the font or placing each object in its own subsection.
11.3.7.3 Suppressing blank lines in embedded fields
Because you can embed fields in text objects, you might encounter cases where an empty field causes
a blank line in a text object. You can suppress blank instances of such embedded fields.
Note:
The suppression of embedded field blank lines is designed to remove blank lines within a text object if
the text object contains an entirely blank field alone on a line followed by a carriage return.
2013-05-06222
Formatting

11.3.7.3.1 To suppress blank lines in embedded fields
1.
Open your report in the Design tab, and click the desired text object—that is, the text object that
causes blank lines to show for some records.
Tip:
To ensure that you have clicked a text object, look for the word Text in the status bar at the bottom
left corner of the screen.
2.
Right-click the text object and, on the shortcut menu, click Format Text.
3.
Select the Suppress Embedded Field Blank Lines option in the Format Editor, and then click OK.
Now, when the report prints, unwanted blank lines will no longer appear in place of empty embedded
fields. You can confirm your changes in the Preview tab.
Before suppressing blank lines, the Address2 field prints a blank line if it is empty.
After suppressing blank lines, the Address2 field does not print if it is empty.
11.3.8 Placing multi-line, text-based objects
While text-based objects that are formatted to print on multiple lines follow the same design rules as
other objects, they have one additional characteristic to be considered. If the printer driver expands or
contracts the spacing of the text, word wrapping may differ, changing the number of lines necessary to
print the object in order to accommodate growth or shrinkage.
When placing multi-line text-based objects, you could encounter problems if other objects in the same
section are placed directly below them.
2013-05-06223
Formatting

Unlike single-line text-based objects, expanding the object frame of a multi-line text-based object to
accommodate growth is not a viable option. When you do this, the line width increases according to
the expanded boundaries.
So, when possible, place multi-line text-based objects at the bottom of a section. If they require more
lines to print, the section expands downward to accommodate the growth, and they do not endanger
other objects.
11.3.9 Importing text-based objects from a file
Using Crystal Reports, you can import a formatted, text-based object from an existing file onto your
report.
11.3.9.1 To import text-based objects from a file
1.
Double-click the text-based object you want to format to put it in edit mode, then right-click it to bring
up the shortcut menu.
2.
On the shortcut menu, click Insert from file.
3.
In the Open dialog box that appears, select the file in which your text-based object is stored, then
click Open.
2013-05-06224
Formatting

The object is imported from the file into the text object on your report.
11.3.10 Spacing between text-based objects
Use the grid and guidelines options to help evenly align text-based objects.
You can select the Snap To Grid option, set the grid to a maximum of one inch, and make the grid
visible or invisible on the Design tab, Preview tab, or both. For more information on working with grids,
see Using the grid.
You can also work without a grid, placing objects wherever you want them on a report. You may want
to work in a free-form environment while retaining the ability to align objects, or to move or resize them
as a group. You can do this using guidelines. See Designing with guidelines .
11.3.10.1 Using the grid
The grid is a series of row and column coordinates. When the grid is selected and the Snap To Grid
option is selected on the Layout tab of the Options dialog box, Crystal Reports enables you to place
text-based objects only at these coordinates, not between them. You can then space data on your
report and align objects as needed. If you attempt to place an object between grid coordinates, the
object "snaps" to the grid; that is, the object automatically moves to the nearest set of row and column
coordinates.
Each report contains a design grid. You can select the grid on or off, as well as set it to different sizes
when required. By default, the grid is not selected. See Selecting the grid.
Once set, the grid remains the same size for all sections. It is measured from the upper-left corner of
each section and continues down and to the right, until the end of the section. A new grid of the same
size then starts from the upper-left corner of the next section, and so on, through the end of the report.
If you select the Snap To Grid option, the following conditions occur:
• The upper-left corner of all newly placed, text-based and OLE objects snap to a grid point.
• Objects placed on a report before the Snap To Grid option is selected do not snap to the nearest
grid point. They remain in the same place.
• If you resize an object, the side or sides that you are resizing snap to the nearest grid point.
11.3.10.2 Selecting the grid
2013-05-06225
Formatting

The Design and Preview tabs have an underlying grid structure that you can activate on the Layout tab
in the Options dialog box.
11.3.10.2.1 To select the grid
1.
On the File menu, click Options.
The Options dialog box appears.
2.
On the Layout tab, in the Grid options area, activate the snap to grid feature, or specify the grid
size.
3.
To show the underlying grid structure on the Design or Preview tab, select Grid in the Design View
or Preview areas.
4.
Click OK to save your changes.
Tip:
Another way to do this is to select the Grid commands from the View menu. You can also right-click an
empty space on the Design or Preview tabs and select the command from the shortcut menu.
11.3.10.3 Designing with guidelines
Crystal Reports provides guidelines to help you align and size report objects with accuracy. Guidelines
are non-printing lines that you can place anywhere on the Design and Preview tabs to aid in alignment.
They have a snap property that automatically snaps objects to them.
11.3.10.4 Viewing guidelines
You can view guidelines on the Design and Preview tabs by selecting the view options in the Options
dialog box.
11.3.10.4.1 Viewing guidelines
1.
On the File menu, click Options.
The Options dialog box appears.
2.
On the Layout tab, in the Design View area, select the Guidelines check box and/or the Guidelines
check box in the Preview area.
3.
Click OK to save your changes.
Tip:
Another way to do this is to select a Guidelines command from the View menu.
2013-05-06226
Formatting

11.3.10.5 Inserting guidelines
Although you can and should insert manual guidelines whenever necessary, Crystal Reports will
automatically insert guidelines in certain situations:
• Whenever you add a field or formula field to a report, the program creates a guideline at the left
edge of the field frame and snaps the field and field title to it.
• When a field is summarized, the program snaps the summary to the same guideline to ensure proper
alignment.
• When you right-click the shaded areas to the left of a section, then select the Arrange Lines option
from the shortcut menu, the program creates one or more horizontal guidelines in the section and
snaps the fields to them.
11.3.10.5.1 To insert, move, and remove guidelines manually
1.
In the Design or Preview tab, click the ruler at the top to activate a vertical guideline; click the ruler
on the left to activate a horizontal guideline.
Notice that each guideline is attached to an arrowhead on its originating ruler.
Note:
If guidelines don't appear, ensure that the appropriate Guideline option is selected on the View
menu. On the Preview tab, you must select an object to see a guideline.
2.
To position a guideline, drag its arrowhead along the ruler to the desired location.
3.
To delete a guideline, drag its arrowhead away from the ruler.
Note:
If you select the Snap To Grid option, you can only insert or move guidelines in grid increments.
11.3.10.6 Snapping objects to guidelines
2013-05-06227
Formatting
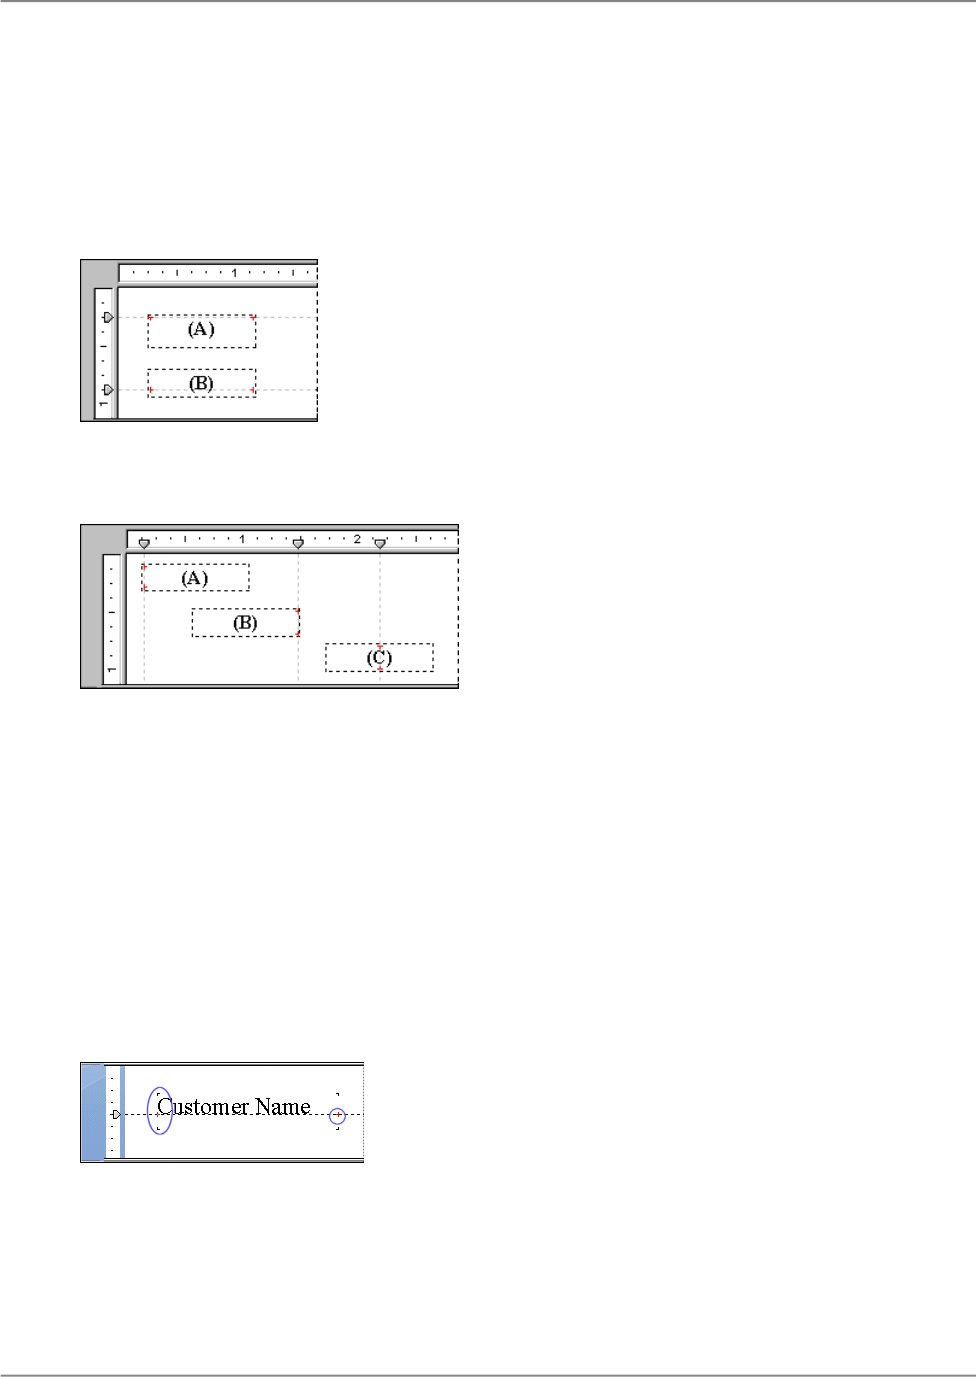
To snap an object to a guideline, drag the report object onto the guideline until the object's edge sits
atop the guideline. Snapping enables you not only to align report objects accurately, but also to re-position
and re-size multiple objects together. Once several objects are snapped to a guideline, you can move
all the objects by moving the guideline.
You can snap either the top or the bottom of an object to a horizontal guideline.
You can snap an object's left side, right side, or vertical midline (the invisible line that bisects an object
vertically) to a vertical guideline.
11.3.10.6.1 To snap objects to a guideline
1.
Insert a guideline by clicking one of the rulers.
2.
Drag the report object onto the guideline, so that one of the object's edges is on the guideline.
The snap property of guidelines works differently for text-based objects than for other objects, such as
OLE objects. When a single-line text-based object snaps to a guideline, it is the baseline of the text,
not the object frame, that snaps to the guideline. When a multi-line text-based object snaps to a guideline,
either the baseline of the text or the object frame can be snapped to the guideline.
You can tell if a text-based object is snapped to a horizontal guideline by looking for the special indicators
positioned on either side of the object directly at the baseline (as circled in the image below) in Design
view. If the object is snapped to a vertical guideline, the special indicators appear along the side of the
object.
To place several text objects of different font sizes on one line with their baselines lined up, snap each
object's baseline to the same horizontal guideline.
2013-05-06228
Formatting

11.3.10.7 Positioning objects using guidelines
Once you've snapped one or more objects to a guideline, you can move all the objects at once by
moving the guideline. To move the guideline, drag its arrowhead along the ruler.
Note:
When a guideline is moved, any object that is snapped to it is moved as well. But, if you move an object
that is snapped to a guideline, the guideline does not move.
11.3.10.8 To resize objects using guidelines
1.
Create a guideline.
2.
Snap one side of the object to that guideline.
3.
Create a second guideline to the right of the object.
Note:
The guideline should not be touching the object.
4.
Click the object to activate the sizing handles.
5.
Drag the resizing handle over to the second guideline so that the object snaps to the guideline.
6.
For each additional object you want to snap to both guidelines, repeat Steps 2 through 5.
7.
If the objects are not the desired size, drag one or both of the guidelines until the objects are the
correct size.
11.3.10.8.1 To resize objects using guidelines
1.
Create a guideline.
2013-05-06229
Formatting

2.
Snap one side of the object to that guideline.
3.
Create a second guideline to the right of the object.
Note:
The guideline should not be touching the object.
4.
Click the object to activate the sizing handles.
5.
Drag the resizing handle over to the second guideline so that the object snaps to the guideline.
6.
For each additional object you want to snap to both guidelines, repeat Steps 2 through 5.
7.
If the objects are not the desired size, drag one or both of the guidelines until the objects are the
correct size.
11.3.10.9 Indenting lines
Using Crystal Reports, you can control line indentation for memo fields, string fields, and text-based
objects. For objects, you have the option of indenting lines for a particular paragraph by positioning the
cursor at the start of that paragraph. Or, if you select an object in its entirety, you can apply the same
indenting specifications to all the paragraphs within that object.
Keep in mind that any line following a carriage return will be considered the first line of a new paragraph.
11.3.10.9.1 To indent lines
1.
Right-click the field or object you want to format to bring up the shortcut menu.
2.
On the shortcut menu, click Format text.
The Format Editor dialog box appears.
3.
Click the Paragraph tab.
4.
In the Indentations area, you can indent the first line of the paragraph; indent every paragraph line
from the left edge of the object; and indent every paragraph line from the right edge of the object.
2013-05-06230
Formatting

Note:
• Only indentation values within the range of the field or object width are accepted.
• When you select the "Right to Left" reading order, indents are measured from the opposite side
of the object. That is, a left indentation is measured from the right side of the object.
5.
Click OK to save your changes.
11.3.11 To allow for overflow field representation
1.
Right-click the currency field or number field you want to format to bring up the shortcut menu.
2.
On the shortcut menu, click Format Field.
The Format Editor dialog box appears with the Number tab open.
3.
Click the Customize button.
The Custom Style dialog box appears with the Number tab open.
4.
To allow overflow field representation, clear the Allow Field Clipping check box.
Note:
You also have the option to click the Conditional Formatting button to enter a formula in the
Format Editor. In the Format Formula Workshop, you can specify that field clipping will be disabled
only when certain conditions are met.
5.
Click OK to save your changes.
To view the results, refresh the report. If you disabled field clipping, any numeric/currency field values
that are larger than the field objects containing them will be represented by number signs (######).
11.3.11.1 To allow for overflow field representation
1.
Right-click the currency field or number field you want to format to bring up the shortcut menu.
2.
On the shortcut menu, click Format Field.
The Format Editor dialog box appears with the Number tab open.
3.
Click the Customize button.
The Custom Style dialog box appears with the Number tab open.
4.
To allow overflow field representation, clear the Allow Field Clipping check box.
2013-05-06231
Formatting

Note:
You also have the option to click the Conditional Formatting button to enter a formula in the
Format Editor. In the Format Formula Workshop, you can specify that field clipping will be disabled
only when certain conditions are met.
5.
Click OK to save your changes.
To view the results, refresh the report. If you disabled field clipping, any numeric/currency field values
that are larger than the field objects containing them will be represented by number signs (######).
11.3.12 Selecting multiple objects
You can select multiple objects, including text, field, chart, map, bitmap, OLAP grid, Cross-Tab and
OLE objects, to format them together.
Once you have selected multiple objects, you can move, align, size, cut, and copy and paste them as
a group. You can also change their font, color, and paragraph style.
Objects are moved, aligned, and sized based on a "main" object, which is usually the last object you
select. You can change the main object to another by right-clicking the desired object.
11.3.12.1 To select multiple objects
1.
Click one object, and Ctrl+click the other objects you want to select.
Note:
You can also lasso a number of objects by left-clicking and dragging your cursor over an area.
2.
Right-click the main object.
3.
On the short-cut menu, select the appropriate formatting option.
11.3.12.2 To select all objects in a section
1.
On either the Design or Preview tab, right-click the gray area to the left of the section you want to
work with.
2.
From the shortcut menu, select Select All Sections Objects.
All report objects in that section are selected.
2013-05-06232
Formatting

11.3.13 Vertical placement
On the Common tab of the Format Editor, you can use the text rotation options to vertically align the
fields and text-based objects on your report.
When you select a text rotation of 90 degrees, the text shifts 90 degrees in a counter-clockwise direction.
When you select a text rotation of 270 degrees, the text shifts 270 degrees in a counter-clockwise
direction.
Note:
• If text rotation is left at 0 degrees, your report is horizontally formatted, left to right.
• For text rotation of text-based objects, the Can Grow option that prevents the truncation of text inside
an object is automatically cleared. For more information on the Can Grow option, see Preventing
the truncation of text inside an object.
• Vertically formatted text that spans over the edge of the page cannot be displayed as part of your
report.
11.3.14 Inserting character and line spacing
With Crystal Reports, you can specify the amount of spacing between characters or lines for memo
fields, string fields, and text-based objects.
11.3.14.1 To insert character and line spacing
1.
Right-click the field or object you want to format to bring up the shortcut menu.
2.
On the shortcut menu, click Format Field.
The Format Editor dialog box appears.
3.
Click the Font tab.
You will use this tab to set up the character spacing values.
4.
In the Spacing area, in the Character spacing exactly field, specify the value n that each character
occupies.
2013-05-06233
Formatting

The value n is defined as the distance in number of points measured from the start of one character
to the start of the next. When you change the character spacing, you change only the spacing
between adjacent characters, not the font size of the characters.
For example, if you specify a 14-point font with a character spacing of 14 points, each character will
remain as a 14-point font size, occupying a space that is 14 points wide.
5.
Click the Paragraph tab.
You will use this tab to set up the line spacing values.
6.
In the Spacing area, in the Line spacing field, specify the line spacing as a multiple of the font size
you are using, or as an exact number of points.
7.
Click OK to save your changes.
11.3.15 Setting fractional font sizes
On the Font tab of the Format Editor, you can select a fractional font size for database fields and
text-based objects on your report.
11.3.15.1 To set fractional font sizes
1.
Right-click the field or object you want to format to bring up the shortcut menu.
2.
On the shortcut menu, click Format Field.
The Format Editor dialog box appears.
3.
Click the Font tab.
4.
In the Size list, type the desired fractional font size for the field or object.
Note:
The number you type must be between 1 and 1638. Crystal Reports will automatically round all
fractional entries to the nearest 0.5. Consequently, in your report, you can use the fractional font
sizes 1.5, 2.5, 3.5, and so on, up to 1637.5.
5.
Click OK to save your changes.
Note:
When setting fractional font sizes for individual database fields and text-based objects that you've
already placed on your report, you must make your changes manually—that is, by following these
procedures. (This is because the existing font settings of objects in your report will override your default
Options.) However, you can use the Fonts tab of the Options dialog box to adjust your default font
settings: these default Options will affect the new reports that you create, along with any new objects
that you add to an existing report.
2013-05-06234
Formatting

11.3.16 Setting page size and page orientation
You can view and print your reports using either portrait or landscape orientation, and in a variety of
page sizes.
You may also set different page orientation for each section in your report. This is useful for formatting
certain sections to display charts or other graphics.
Specify these options using the Page Setup command from the File menu.
11.3.16.1 To set page size and page orientation
1.
On the File menu, click Page Setup.
The Page Setup dialog box appears.
2.
In the Page Size box, select your page size.
3.
In the Page Orientation box, select your page orientation.
4.
In the Margins box, select your margins.
For information on conditional margins, see Changing margins conditionally.
11.3.16.2 To set page orientation by section
1.
On the Report menu, click Section Expert.
The Section Expert appears.
Tip:
Another way to do this is to click the Section Expert button on the Expert Tools toolbar.
2.
In the Sections list, select the section to be modified.
3.
On the Paging tab, select the desired page orientation.
Note:
This option is not available for the Page Header and Pager Footer.
2013-05-06235
Formatting

11.3.17 Setting page margins
Margins are the write spaces on the left, right, top, and bottom of the page. Crystal Reports gives you
the option of setting margins to meet your specifications.
11.3.17.1 To set specific margins
1.
On the File menu, click Page Setup.
The Page Setup dialog box appears.
2.
Change the default page margins to fit your needs.
3.
Click OK to save your changes.
Page margins can also be controlled by use of conditional formulas. See Changing margins conditionally.
Note:
• All margins are calculated from the page edge. Thus, a left margin of .25 inches causes the printing
to start exactly one quarter inch in from the edge of the page.
• You can select the Adjust Automatically check box if you want Crystal Reports to adjust the report's
margins automatically the next time you change the page size. If you choose a new page size that
is large enough for the current printable area, Crystal Reports increases or decreases the margins
by enlarging or reducing the left/right and top/bottom margins by the same factor. If you choose a
new page size that is smaller than the current printable area, Crystal Reports fills the entire page
by reducing the margins to 0. If you next choose a bigger page, this (reduced) printable area is kept
and the left/right, top/bottom margin ratios become 1:1.
11.3.18 TrueType fonts
Designing your report with printer-specific fonts can lead to problems when using different printers. The
fonts may not be supported by the other printers, or if they are supported, the fonts may not be installed
on the printers.
During the printing process, if you encounter printer-specific fonts that are unrecognizable to the printer
driver, Crystal Reports substitutes the fonts, creating inconsistent results. To avoid this situation, only
common TrueType fonts should be used when designing reports.
2013-05-06236
Formatting

11.3.19 Printer drivers
11.3.19.1 Updating printer drivers
In order to maintain performance, Crystal Reports queries the printer driver for each of the font elements
(font metrics), such as average character height, character width, height of the ascenders and
descenders, internal leading, and so on. A problem may develop if using an older printer driver that
does not return the font metrics accurately. If you are experiencing problems when printing (missing
fields, incorrect formatting, and so on), it is recommended that you obtain and install the most recently
updated drivers for your printer. In many cases, the newer printer drivers provide accurate font metrics
and any printing issues are quickly resolved.
11.3.19.2 Inconsistencies due to printer drivers
Inconsistencies may occur if different printer drivers are used to create and print your reports. These
inconsistencies are a result of the various methods that individual printer drivers use to measure text
metrics such as font size. When printed, text-based objects may be misaligned, truncated, or overprint
each other. Examples of text-based objects include string or character fields, text objects, memo fields,
numeric fields, and formula fields.
Problems such as these may arise when you have:
• Two identical printers, but each one is using a different printer driver.
• Two different printers using the same printer driver.
• Two different printers using different printer drivers.
• One printer driver that uses the TrueType font and a second printer driver that maps TrueType fonts
to PostScript fonts.
• Two identical printers using the same printer driver, but each one is printing from a different version
of Microsoft Windows.
• Two identical printers using the same printer driver, but the printer drivers are different versions.
• Two identical printers, two identical printer drivers, and two identical operating systems, but the
resolution of the video drivers is different.
Therefore, while a document using one printer driver may require six full lines to display a block of text:
2013-05-06237
Formatting

• Using a second printer driver that measures fonts narrower could result in the same block of text
requiring less than six full lines.
• Using a third printer driver that measures fonts wider could require more than six full lines.
The goal of the report distributor is to design reports that accommodate printer driver dependency and
still print consistently using different printer drivers. To do this, Crystal Reports provides several design
solutions. If taken into account when creating your report, these solutions can ensure proper printing
and distribution for your report in almost any environment.
For reports that will be viewed online, you can avoid inconsistencies from printer drivers by disabling
the report's reliance on a printer driver. For more information on disabling a printer driver, see Formatting
a report for web viewing.
11.3.20 Formatting a report for web viewing
If your report will be viewed online, you may choose to format your report for web viewing. You can
create custom page sizes and adjust margins for a viewer's screen without being restricted to
printer-specific settings. Disabling reliance on a printer driver also prevents inconsistencies that can
occur if your report is viewed with a different printer driver than the one you created it with.
11.3.20.1 To format a report for web viewing
1.
On the File menu, click Page Setup.
The Page Setup dialog box appears.
2.
In the Printer Options box, select the No Printer check box.
3.
Select your desired page size, page orientation, and page margins.
Note:
• Reports formatted for web viewing can also be printed. If the custom page size is larger than the
printed page size, your report will be scaled down to fit the page. If the custom page size is
smaller than the printed page size, a portion of your report will be enlarged to fit the printed page
size.
• Exported reports will retain custom page formatting except for reports exported to XLS format.
11.4 Formatting properties
2013-05-06238
Formatting

You can set formatting properties using the Format Editor for objects and the Section Expert for report
sections. In most cases, you can set one of two types of properties:
• Absolute (always apply the property).
• Conditional (apply the property only if certain criteria are met).
11.5 Working with absolute formatting
Absolute formatting is formatting that applies under any condition. This type of formatting property
always follows a "select, then apply" procedure. For example, you select what it is that you want to
format (object or section), then you apply the formatting to the selection using property settings.
You can use the following dialog boxes to format your reports:
• Format Editor to format field values.
• Section Expert to format entire sections.
• Highlighting Expert to conditionally format all types of fields.
Each of these dialog boxes contains a number of different formatting properties, as well as the tools
for turning the properties on or off and specifying attributes.
11.5.1 Adding borders, color, and shading to a field
Crystal Reports allows you to add borders, color, and shading to fields on your report in order to
emphasize important data and create professional-looking reports.
11.5.1.1 To add borders, color, and shading to a field
1.
Right-click the field you want to format to bring up the shortcut menu.
2.
On the shortcut menu, click Format Field.
The Format Editor dialog box appears.
3.
Click the Border tab.
4.
Select the line style, color, and background color of the field.
5.
Click OK to save your changes.
2013-05-06239
Formatting

11.5.2 Making a report, section, area, or object read-only
You can make a report, section, area, or object read-only so it can't be formatted. When you set this
option, choices in the Format Editor become inactive. The formatting options that are usually available
on the toolbars or shortcut menus are also suppressed for the report or object.
Note:
This feature is for your convenience in protecting report formatting; it is not intended to be used as
report security.
11.5.2.1 To make a report read-only
1.
On the File menu, select Report Options.
2.
Select Read-only.
11.5.2.2 To make a section or area read-only
1.
On the Report menu, select Section Expert.
2.
Select the section or area that you want to make read-only.
3.
On the Common tab, select Read-only.
Note:
When a section is read-only, you can move it, cut it, and delete it, but you cannot make changes
within the section. When an area is read-only, all sections in the area are read-only; therefore, you
cannot insert another section, nor can you move, cut, or delete an existing section.
11.5.2.3 To make an object read-only
1.
Right-click the object you want to make read-only.
2.
On the shortcut menu, click Format Field.
The Format Editor dialog box appears.
3.
On the Common tab, select Read-only.
2013-05-06240
Formatting

Note:
•
You can also do this by clicking the Lock Format button on the Formatting toolbar.
• When a report object is read-only, you can move it, copy it, cut it, delete it, browse its data, and
select it, but you cannot format it.
11.5.3 Locking an object's size and position
You can lock the position of the selected report object so it can't be moved. When you set this option,
you cannot drag the object in the Report Designer and the Size and Position command becomes
inactive.
11.5.3.1 To lock an object's size and position
1.
Select the object whose size and position you want to lock.
2.
On the Formatting toolbar, click Lock Size/Position.
11.5.4 Changing your default field formats
Crystal Reports allows you to display database fields in almost any format on your report. This section
describes how to use the Options command to control the default format settings that Crystal Reports
uses when you add a field to any report. In the Options dialog box, you can set the default formats for
database fields of the following type: String, Number, Currency, Date, Time, Date and Time, and Boolean.
Note:
When you change default field formats, your new settings affect only the objects that you subsequently
add to a report. To format fields that you've already added to a report, you must right-click the field in
the report and select Format Field from the shortcut menu.
11.5.4.1 To specify default formats for fields
1.
On the File menu, click Options.
2013-05-06241
Formatting

2.
In the Options dialog box, click the Fields tab.
3.
Click the button appropriate to the type of field you want to format (String, Number, Currency, Date,
Time, Date and Time, or Boolean).
The Format Editor appears.
4.
Use the Format Editor's tabs to specify the formats you want.
5.
Click OK.
11.5.4.2 Setting default formats for Date, Time, and Date and Time fields
The following procedures first describe how to specify standard formats for Date, Time, and Date and
Time fields, and then describe how to customize the formats for such fields.
Note:
These default settings will affect only the objects that you subsequently add to a report. To format fields
that you've already added to a report, you must right-click the field in the report and select Format Field
from the shortcut menu.
11.5.4.2.1 To set standard default formats for Date, Time, and Date and Time fields
1.
On the File menu, click Options.
2.
In the Options dialog box, click the Fields tab.
3.
To open the Format Editor, click the button appropriate to the field you want to format (Date, Time,
or Date and Time).
Note:
If you click the Date and Time button in the Format Editor, then any subsequent changes will affect
"Date and Time" fields only. You must click Date or Time to format independent date fields or time
fields.
4.
In the Format Editor dialog box, click the Date and Time tab.
5.
Select a predefined format from the list (or click Customize to create your preferred format). When
you click a new format, you can preview the results in the Sample area of the Format Editor.
Note:
From the list of predefined formats, you can choose the System Default settings to ensure that
Crystal Reports uses the formats dictated by Windows. You can alter your system's settings in the
Regional Settings Properties dialog box, located in the Control Panel.
6.
Once you've selected a format, click OK in the Format Editor dialog box.
7.
Click OK in the Options dialog box.
Now, when you add Date, Time, or Date and Time fields to a report, Crystal Reports should use the
format you specified.
2013-05-06242
Formatting

11.5.4.2.2 To customize formats for Date, Time, and Date and Time fields
1.
On the File menu, click Options.
2.
In the Options dialog box, click the Fields tab.
3.
Open the Format Editor by clicking the button appropriate to the field you want to format (Date,
Time, or Date and Time).
4.
In the Format Editor dialog box, click the Date and Time tab.
5.
Click Customize to open the Custom Style dialog box.
Note:
If you chose to format "Date and Time" fields at Step 3, then you will see three tabs in the Custom
Style dialog box (Date and Time, Date, and Time). The formats specified in these tabs apply only
to the two elements of "Date and Time" fields, and will not affect the formats specified for independent
date fields or time fields.
6.
Create your preferred format by adjusting the various options in the Custom Style dialog box.
7.
Once you've finished designing your format, click OK in the Custom Style dialog box.
8.
Click OK in the Format Editor dialog box.
9.
To format another type of field, click the appropriate button in the Options dialog box. Otherwise,
click OK to return to Crystal Reports.
Now, when you add Date, Time, or Date and Time fields to your reports, Crystal Reports should use
the customized format that you created.
11.5.5 Adding and editing lines
Crystal Reports allows you to add lines to a report to emphasize important data and create
professional-looking reports. Lines can run horizontally or vertically. For a vertical line to be broken
across several pages, the report section that the line ends in must not be on the same page that it starts
on. For example, if a line runs from a group header to the corresponding group footer, the line continues
on the top of each subsequent page—just below the page header—until the group footer is encountered.
11.5.5.1 To add lines to a report
1.
On the Insert Tools toolbar, click Insert Line.
2013-05-06243
Formatting

2.
Use the pencil cursor to draw the line where desired.
Note:
You cannot draw diagonal lines.
11.5.5.2 To edit lines on a report
1.
Right-click the line you want to format to bring up the shortcut menu.
2.
On the shortcut menu, click Format Line.
The Format Editor dialog box appears.
3.
On the Line tab, make the desired changes to the line.
4.
Click OK to save your changes.
11.5.6 Adding and editing boxes
Crystal Reports allows you to add boxes to a report to emphasize important data and create
professional-looking reports.
11.5.6.1 To add boxes to a report
2013-05-06244
Formatting

1.
On the Insert Tools toolbar, click Insert Box.
2.
Use the pencil cursor to draw the box where desired.
11.5.6.2 To edit boxes on a report
1.
Right-click the box you want to format to bring up the shortcut menu.
2.
On the shortcut menu, click Format Box.
The Format Editor dialog box appears.
3.
On the Box tab, make the desired changes to the box.
4.
Click OK to save your changes.
11.5.7 Expected behavior of line and box formatting
This section lists the expected behavior of line and box formatting for some common cases.
Note:
This table uses Short Section Names, for more information about this convention, see Identifying and
working with areas and sections.
2013-05-06245
Formatting

EndStartBetween these sections
In the bottom section, or if that
section is suppressed, at the top
of the next visible section.
In the top section, or if that sec-
tion is suppressed, at the top of
the next visible section before
the bottom section (including the
bottom section).
• RH to PH
• RH to RF
• RH to PF
• PH to RF
• PH to PF
• RH to PH
In the last instance of the
GH/D/GF on a page, or if these
sections are suppressed, before
the first footer section.
In the top section, or if that sec-
tion is suppressed, at the top of
the next visible header section
(RH or PH). If these sections are
suppressed, the first visible
GH/D/GF section.
• RH to GH/D/GF
• PH to GH/D/GF
In the bottom section, or if that
section is suppressed, at the top
of the next visible section.
In the first instance of a
GH/D/GF section on a page, or
if these sections are sup-
pressed, at the top of the first
visible footer section (RF or
PF)—provided that the section
is not after the bottom section.
• GH/D/GF to RF
• GH/D/GF to PF
In the first instance of the GH3
section, or if that section is sup-
pressed, at the top of the next
visible GH/D/GF section. If these
sections are suppressed, at the
top of the first RH/PH/RF/PF.
In every instance of the GH2
section, or if that section is sup-
pressed, at the top of any
GH/D/GF section before the end
section.
• GH2 to GH3
In the first instance of the D
section, or if that section is sup-
pressed, at the top of the next
visible GH/D/GF section. If these
sections are suppressed, at the
top of the first RH/PH/RF/PF.
In every instance of the GH2
section, or if that section is sup-
pressed, at the top of any
GH/D/GF section before the end
section.
• GH2 to D
2013-05-06246
Formatting

EndStartBetween these sections
In the first instance of the GF3
section, or if that section is sup-
pressed, at the top of the next
visible GH/D/GF section. If these
sections are suppressed, at the
top of the first RH/PH/RF/PF.
In every instance of the GH2
section, or if that section is sup-
pressed, at the top of any
GH/D/GF section before the end
section.
• GH2 to GF3
In the GF2 section that corre-
sponds to the GH2 section, or if
that section is suppressed, at
the top of the next visible
GH/D/GF section. If these sec-
tions are suppressed, at the top
of the first RH/PH/RF/PF.
In every instance of the GH2
section, or if that section is sup-
pressed, at the top of any
GH/D/GF section before the end
section.
• GH2 to GF2
In the end section, or if that
section is suppressed, at the top
of the next visible GH/D/GF
section. If these sections are
suppressed, at the top of the
first RH/PH/RF/PF.
In the first instance of the GH2
section in group one, or if that
section is suppressed, at the top
of any GH/D/GF section before
the end section.
• GH2 to GF1
In the end section, or if that
section is suppressed, at the top
of the next visible GH/D/GF
section. If these sections are
suppressed, at the top of the
first RH/PH/RF/PF.
In the first instance of the D
section in group two, or if that
section is suppressed, at the top
of any GH/D/GF section before
the end section.
• D to GF2
In the end section, or if that
section is suppressed, at the top
of the next visible GH/D/GF
section. If these sections are
suppressed, at the top of the
first RH/PH/RF/PF.
In the first instance of the GH2
section in group one, or if that
section is suppressed, at the top
of any GH/D/GF section before
the end section.
• GF2 to GF1
11.5.8 Adding shapes to a report
2013-05-06247
Formatting

When designing report formats in Crystal Reports, you can insert a variety of shapes such as circles,
ellipses, and boxes with rounded corners, as part of your report. This is especially useful for formatting
reports in languages that require these shapes to effectively communicate.
11.5.8.1 To add shapes to a report
1.
Add a box to your report.
See Adding and editing boxes.
2.
Right-click the box to bring up the shortcut menu.
3.
On the shortcut menu, click Format Box.
4.
In the Format Editor that appears, click the Rounding tab.
5.
Select a number between 0 and 100 in the Rounding box, or move the slider to the right to increase
the curvature of the box corners.
The box that you started with gradually changes to an ellipse or circle, depending on how far you
move the slider to the right.
Note:
If you have specified rounding for a box, you cannot use the Drop Shadow option that is usually
available on the Box tab of the Format Editor.
6.
Once the appropriate shape is created, click OK to save your changes.
11.5.9 Scaling, cropping, and sizing objects
When you create or modify a Crystal report, you can insert a variety of OLE objects. For more information
about OLE objects and how to insert them in your report, see OLE. Once an OLE object is present in
your report, you can scale, crop, or size it.
11.5.9.1 To scale, crop, or size an object
1.
Add a picture or other OLE object to your report.
See Inserting OLE objects into reports.
Note:
This procedure also applies to BLOB field objects.
2013-05-06248
Formatting

2.
Right-click the object and select Format Graphic from the shortcut menu.
3.
In the Format Editor, click the Picture tab.
4.
To crop the object, specify the size of the piece that you want to cut from its top, bottom, left, and/or
right side.
Note:
Cropping begins at the outer edge of the object. Positive numbers cut into the object, while negative
numbers add the specified amount of white space between the outer edge of the object and the
frame.
5.
To Scale the object as a percentage of the original height and width, enter the new scaling
percentages.
For example, if your object is one inch wide, that width is automatically assigned a width scaling
value of 100%. To double the width of the object, change Scaling Width to 200% (twice the size of
the original). Likewise, to reduce the width of the object to half, change Scaling Width to 50%.
6.
To resize the object, enter a new width and height.
For example, if your object is a one inch square, each of the Size settings will initially be set at one
inch. To double the length and width of the object (to make a two inch square), reset the Size settings
to two inches each. To reduce the size of the object to a half inch square, reset the Size settings to
a half inch each.
11.5.10 Using conventional accounting formats
As a way of supporting the conventions used in the accounting profession, Crystal Reports lets you
decide on how to display the currency symbol, negative values, and zero values on your financial
reports. You can also set up your report to reverse the signs for credit and debit amounts.
11.5.10.1 To use accounting conventions in a report
1.
Right-click the currency field or number field you want to format to bring up the shortcut menu.
2.
On the shortcut menu, click Format Field.
The Format Editor dialog box appears with the Number tab open.
3.
In the Style area, select how you want the system number format to appear for either positive or
negative values.
4.
In the Currency Symbol (system default) area, specify how you want the currency symbol to appear
with the values on your report.
5.
Click OK to save your changes.
2013-05-06249
Formatting

11.5.10.2 To customize the accounting conventions for a report
1.
Right-click the currency field or number field you want to format to bring up the shortcut menu.
2.
On the shortcut menu, click Format Field.
The Format Editor dialog box appears with the Number tab open.
3.
Click the Customize button.
The Custom Style dialog box appears with the Number tab open.
4.
Select the Use Accounting Format check box.
Once you select this option, the following conditions occur:
• In the Negatives list, how the negative values appear on your report are determined by the
Windows locale settings. The negative values are represented by either a minus sign or brackets.
• In the Show Zero Values as list, the dash symbol is automatically selected to represent zero
values on your report.
• On the Currency Symbol tab of the Custom Style dialog box, the currency symbol is positioned
on the left-side of the currency and numeric values.
Note:
Changes made to the Windows locale settings are implemented only after you exit and restart Crystal
Reports.
5.
Select the Reverse Sign for Display check box to reverse the signs for debit and credit amounts
in your financial reports.
6.
Click OK to save your changes.
7.
Click OK again to return to your report.
11.5.11 Repeating report objects on horizontal pages
Some report objects, such as cross-tabs and OLAP grids, can expand horizontally over a number of
pages. Crystal Reports lets you designate other report objects that don't expand horizontally, such as
text objects, field objects, OLE objects, charts, maps, lines, boxes, and so on, to be repeated on each
additional horizontal page that the cross-tab or OLAP grid creates. For example, if your report's page
footer includes an image, a text object, and a page number, you can use the Format Editor to make
Crystal Reports repeat these objects on each horizontal page.
2013-05-06250
Formatting

11.5.11.1 To repeat objects on horizontal pages
1.
Right-click the report object you want to repeat.
2.
On the shortcut menu, click Format Field, or the appropriate format option.
Note:
Formatting options are not available if the object you select is connected to the BusinessObjects
Enterprise Repository. For information about modifying an object in the repository, see Modifying
objects in the repository.
3.
On the Common tab of the Format Editor, select the Repeat on Horizontal Pages check box.
For a line or a box, the Repeat on Horizontal Pages option appears on the Line or Box tab.
4.
Click OK to save your changes.
Now, if a cross-tab or OLAP grid makes your report expand horizontally, the object you formatted is
repeated on each horizontal page.
• The repeated copies of a report object cannot be moved; you must move the original object to move
the copies.
• You can format any copy of a repeated report object, but changes you make are applied to all copies.
• Report objects in a section with the Relative Positions option selected in the Section Expert cannot
be repeated.
11.5.11.2 Numbering horizontal pages
A Special Field called Horizontal Page Number lets you number horizontal pages.
11.5.11.2.1 To number horizontal pages
1.
In the Field Explorer, scroll down to Special Fields and expand the node by clicking it.
2.
Choose Horizontal Page Number from the list and insert it in your report.
Note:
The Repeat on Horizontal Pages option is automatically turned on when you insert the Horizontal Page
Number field this way. If you cut and paste a Horizontal Page Number field, or if you insert such a field
into another field or text object, the Repeat on Horizontal Pages option is not automatically turned on.
2013-05-06251
Formatting

11.5.12 Using white space between rows
The height of a section in relation to the objects within it affects the amount of white space that appears
between rows on the report.
The free-form Design tab lets you add and delete white space in two ways:
• Using the Resizing cursor to resize the area on the Design tab.
• Changing the option in the Section Expert.
Note:
You can also right-click the shaded area to the left of the section and select Fit Section from the shortcut
menu. The program automatically resizes the section so that the bottom boundary is even with the
baseline of the bottom object in the section.
11.5.12.1 Adding white space by resizing
To add extra white space between rows in the report, move the pointer over the lower section boundary
line. The pointer changes to a Resizing cursor. When the Resizing cursor appears, drag the section
boundary downward to add extra white space.
Note:
White space can also be added to a section by right-clicking the shaded area to the left of the section
and selecting Insert Line from the shortcut menu. The program resizes the section automatically, adding
the amount of space necessary to hold a line of typical database fields.
2013-05-06252
Formatting

11.5.12.2 Deleting white space by resizing
To delete unnecessary white space within a section, move the pointer over the lower section boundary
line. The pointer changes to a Resizing cursor. When the Resizing cursor appears, drag the section
boundary upward to remove extra white space.
11.5.12.3 Deleting white space by suppressing a section
If an entire section is blank, you can eliminate the unnecessary white space that the Page Footer would
occupy by suppressing the section in the Section Expert.
If you are not putting anything into the Page Footer section of the report, select the Clamp Page Footer
option in the Section Expert to eliminate white space at the bottom of your report pages.
11.5.12.3.1 To delete white space by suppressing a section
1.
On the Report menu, click Section Expert.
The Section Expert appears.
Tip:
Another way to do this is to click the Section Expert button on the Expert Tools toolbar.
2.
In the Sections area, click the section you want to suppress.
3.
On the Common tab, select the Suppress (No Drill-Down) check box.
2013-05-06253
Formatting

4.
Click OK to return to your report.
The blank section will no longer be printed.
11.5.12.3.2 To delete white space by clamping the Page Footer
1.
On the Report menu, click Section Expert.
The Section Expert appears.
Tip:
Another way to do this is to click the Section Expert button on the Expert Tools toolbar.
2.
In the Sections area, click Page Footer.
3.
Click Clamp Page Footer.
4.
Click OK to return to your report.
The report eliminates white space by placing the Page Footer directly beneath the last visible section.
11.6 Working with conditional formatting
Conditional formatting is formatting that applies only under certain conditions. For example, in a report
you may only want:
• Customer balances printed in red if they are past due.
• The dates to appear in Day, Month, Year format if the customer is Canadian.
• Background color to appear on every other line.
Crystal Reports makes it easy to apply conditional formatting in these and hundreds of other situations.
With absolute formatting, you follow the "select, then apply" procedure. For conditional formatting, you
follow the same general procedure, but you go a step further and set up conditions that determine
whether or not the formatting will be applied. You specify these conditions using simple formulas.
For more information on creating formulas using Crystal or Basic syntax, see the online help.
When a conditional formatting formula is set up, the formula overrides any fixed settings you have made
in the Format Editor. For example, if you select the Suppress option, then set up a conditional formula
for the Suppress option, the property will still apply only if the condition in the formula is met.
Crystal Reports enables you to set both on and off properties and set attribute properties conditionally.
However, each of these requires a different kind of formula.
2013-05-06254
Formatting

11.6.1 Conditional on or off properties
A conditional on or off property tests to see if a condition has been met. It is on if the condition is met,
off if the condition is not met. There is no middle ground. Use Boolean formulas for this kind of formatting.
Crystal syntax example
condition
Basic syntax example
formula = condition
The program tests each value to see if it meets the condition and it returns a "yes" or "no" answer. It
then applies the property to every value that returns a "yes" answer.
11.6.2 Conditional attribute properties
A conditional attribute property tests to see which of two or more conditions is met. The program then
applies the formatting appropriate to the condition. For example, assume that you want values under
quota printed in red and all other values printed in black. The program tests to see whether the value
is under quota or not. If it is under quota, then it applies the red attribute; if it is not, then it applies the
black attribute.
Use an If-Then-Else formula for this kind of conditional formatting.
Crystal syntax example
If Condition A Then
crRed
Else
crBlack
Basic syntax example
If Condition A Then
formula = crRed
Else
formula = crBlack
End If
When conditional attribute properties are set up, Crystal Reports loads a selection of attributes into the
Functions list in the Formula Workshop. Double-click any of these attributes to add them to a formula.
For example, if you are setting horizontal alignment conditionally, the Functions list contains attributes
such as DefaultHorAligned, LeftAligned, and Justified. If you are setting borders conditionally, the
Functions list contains attributes such as NoLine, SingleLine, and DashedLine.
2013-05-06255
Formatting
Note:
Always include the Else keyword in conditional formulas; otherwise, values that don't meet the If condition
may not retain their original format. To retain the original format of values that don't meet your If condition,
use the DefaultAttribute function.
Crystal syntax example
If Condition A Then
crRed
Else
DefaultAttribute
Basic syntax example
If Condition A Then
formula = crRed
Else
formula = DefaultAttribute
End If
You can take this kind of property one step further. You can specify a list of conditions and a property
for each; you are not limited to two conditions. For example, if you have a number field on your report
that contains sales figures from countries around the world, you can specify the number attribute(s)
that you want to apply to each country. In this case, your conditions would specify that if it is from
Country A, the program should apply the Country A attribute; if it is from Country B, the Country B
attribute; if it is from Country C, the Country C attribute, and so on.
With more than two alternatives, use this kind of formula:
Crystal syntax example
If Condition A Then
crRed
Else If Condition B Then
crBlack
Else If Condition C Then
crGreen
Else
crBlue
Basic syntax example
If Condition A Then
formula = crRed
ElseIf Condition B Then
formula = crBlack
ElseIf Condition C Then
formula = crGreen
Else
formula = crBlue
End If
Use a multi-condition If-Then-Else formula for this kind of conditional formatting.
11.6.2.1 To change fonts conditionally
1.
Right-click the field you want to format to bring up the shortcut menu.
2.
On the shortcut menu, click Format Field.
The Format Editor dialog box appears.
2013-05-06256
Formatting

3.
Click the Font tab.
4.
To change any of the font options, click the appropriate Formula button, located on the right side
of the dialog box.
5.
In the Formula Workshop, you can specify that conditional fonts will change only when certain
conditions are met.
6.
Click Save and close.
Note:
• If there is an error in the formula, a message box appears, asking if you want to save anyway.
If you click No, a second message box is displayed, detailing the error.
• If there is no error in the formula, you are returned to the Format Editor. Note that the Formula
button has changed. This indicates that a formula has been entered for that property.
7.
Click OK to return to your report.
11.6.3 Changing margins conditionally
Page margins can be controlled conditionally by use of formula.
Margins based on page number
The following formula checks whether a page number is even or odd and sets the margins accordingly:
if the page is an even number, the margin is set to one inch; if the page is an odd number, the margin
is set to two inches.
If Remainder(pagenumber,2) = 0 then 1440 else 2880
Margins based on page orientation
The following formula checks for page orientation and sets the margins accordingly: if the orientation
is portrait, the margin is set to one inch; if the orientation is landscape, the margin is set to two inches.
If CurrentPageOrientation = crPortrait then 1440 else 2880
Note:
Margin position is measured in twips; there are 1440 twips in an inch.
11.6.3.1 To change margins conditionally
1.
On the File menu, click Page Setup.
The Page Setup dialog box appears.
2.
Click the Conditional Formula button next to the margin you wish to change.
2013-05-06257
Formatting

3.
In the Formula Workshop, enter your conditional margin formula text.
4.
Click Save and close to return to your report.
5.
Click OK to apply your new settings.
11.6.4 Changing X position conditionally
You can change the X position (that is, the horizontal position from the left margin) for an object based
on a condition. You might do this when you want objects to appear in different columns when their
values meet a certain condition; for example, orders that shipped on time appear in the first column,
while orders that shipped late appear in a second column.
Note:
You cannot conditionally change the X position of line or box objects.
11.6.4.1 To conditionally change the X position of an object
1.
Right-click the field that you want to move conditionally, and select Size and Position.
2.
Click the Conditional Formula button next to the X position value field.
3.
In the Formula Workshop, enter your conditional X position formula text.
For example, to move orders that were shipped late to a second column, enter formula text such as
this:
If (Orders.Ship Date) < CDateTime (2004, 01, 01, 02, 10, 11) then 4320
Note:
The number 4320 represents the new position that you want to define as the second column. The
position is measured in twips; there are 1440 twips in an inch.
4.
Click Save and close to return to your report.
5.
Click OK to save your position setting.
Crystal Reports moves objects that meet your condition to a new position, but leaves those objects that
don't meet the condition where you originally placed them.
11.6.5 Creating footers after the first page
2013-05-06258
Formatting

You may choose to print a page footer on all pages except the first page. You can do this by formatting
the Page Footer section conditionally, using an on or off property.
11.6.5.1 To create footers after the first page
1.
Place the field you want displayed as a page footer in the Page Footer section of the report.
2.
On the Report menu, click Section Expert.
Tip:
Another way to do this is to click the Section Expert button on the Expert Tools toolbar.
The Section Expert dialog box appears.
3.
In the Sections area, click Page Footer.
4.
To open the Formula Workshop, click the Formula button, located to the right of the Suppress (No
Drill-Down) check box.
5.
Enter the following formula in the Format Formula Editor:
Crystal syntax example:
PageNumber = 1
Basic syntax example:
formula = PageNumber = 1
This formula suppresses the page footer on the first page, but not on any of the other pages.
6.
Click Save and close.
Note:
• If there is an error in the formula, a message box appears, asking if you want to save anyway.
If you click No, a second message box is displayed, detailing the error.
• If there is no error in the formula, you are returned to the Section Expert. Note that the Formula
button has changed. This indicates that a formula has been entered for that property.
7.
On the Standard toolbar, click Preview to preview the report and ensure that the page footer
appears on all pages but the first.
Note:
• If you have a multi-line page footer and have inserted the lines into separate Page Footer sections,
you will need to suppress each section conditionally, using the formula above.
• To create a page header that appears on all pages but the first, place the header information in the
Page Header section and then suppress that section conditionally, using the same formula that was
used for suppressing the Page Footer section.
2013-05-06259
Formatting

11.6.6 Using the Highlighting Expert
The Highlighting Expert enables you to apply conditional formatting to all types of report fields (Number,
Currency, String, Boolean, Date, Time, and Date and Time fields). With the expert, you format the
selected field either by specifying a condition based on that field's value, or by specifying a condition
based on the value of a different report field. In other words, the expert enables you create the following
formula: If the value of field X meets condition A, then apply the specified formatting to the field selected
on the report.
When used for conditional formatting, the Highlighting Expert allows you to:
• Modify several attributes at once, without writing a formula.
• Highlight all field types used in the report.
• Format font style, background color, font color, and border style.
• Format a field based on its own values or the values of another field.
• Highlight a cross-tab or OLAP cell based on row and column heading values.
• Enter values using your locale-specific number format (such as 1,224.23 for North American users).
• Enter dates numerically or textually (January 12, 2001, or Jan 12, 2001).
• Undo highlighting quickly.
When you need to conditionally format report fields, the Highlighting Expert is quicker and easier to use
than the Formula Workshop. The Highlighting Expert is most commonly used to highlight field values
that are in some way distinguished from other values in the report. You might, for example, highlight
your key customers by printing the {Customer.Last Year's Sales} field with a red background whenever
the sales value exceeds $50,000. Alternatively, to draw attention to outstanding orders, you might bold
the {Product.Product Name} field whenever the {Orders.Shipped} value is False.
The Highlighting Expert, however, is not as flexible as the Formula Workshop. To use the formatting
capabilities of Crystal Reports to their full potential, create your own conditional formatting formulas
with the Formula Workshop (accessible through the Format Editor dialog box). For complete details,
see Using Formulas.
11.6.6.1 Conditionally formatting fields using the Highlighting Expert
The Highlighting Expert is a quick alternative to the Formula Workshop; it allows you to conditionally
format any of your report fields. The Highlighting Expert essentially enables you create the following
formula: If the value of field X meets condition A, then apply the specified formatting to the field selected
on the report.
2013-05-06260
Formatting

The dialog box is divided into two areas: the Item list area displays the formula; the Item editor area
allows you to specify the formula. The Item editor area includes a Sample field that displays the formatting
specifications being applied.
11.6.6.1.1 To conditionally format fields using the Highlighting Expert
1.
To open the Highlighting Expert, right-click the field you want to format and select Highlighting
Expert from the shortcut menu.
Tip:
You can also start the expert by clicking the Highlighting button on the Expert Tools toolbar, or
by clicking Highlighting Expert on the Format menu.
When opened, the expert is set to format the field that is currently selected on the report.
2.
In the Highlighting Expert, click New to create a new conditional formula with default settings.
3.
In the Item editor area, click the Value of list and select the field that you want to base your condition
on.
The field chosen here is the field upon which your condition is based; this field need not be the field
that is being formatted. To create a condition based on the values of the field that is being formatted,
select "this field" from the list. To base your condition on a different report field, select it from the list
of available fields.
Note:
The "Value of" list displays only those fields that you have added to the report.
4.
Select a comparison from the second list (is equal to, is less than, and so on).
This comparative statement works as the operator in the conditional formula created by the expert.
2013-05-06261
Formatting

5.
Complete the condition by entering the desired value in the box.
Note:
If the field selected in the "Value of" list is not numeric, the text box turns into a list of available values,
from which you must select one.
6.
In the Font style, Font color, Background, and Border lists, specify the formatting changes that
you want to apply to the selected field when your condition is met.
7.
Repeat steps 3 and 4 if you want to apply multiple highlighting conditions to the selected field.
Note:
You can use the expert's Remove button to delete highlighting formulas from the list.
8.
Use the Priority arrows to specify the order in which you want Crystal Reports to apply your
conditions. For details, see Setting highlighting priorities.
9.
Click OK to return to your report.
11.6.6.2 Setting highlighting priorities
The Priority buttons in the Item list area of the Highlighting Expert allow you to set priorities for your
formulas. This is useful when you have two or more formulas that could offer conflicting results in some
situations.
For example, suppose that you highlight the Unit Price field on the report. You assign to this field a
highlighting formula that shows a yellow background when a unit price is greater than $100. Then, on
this same report, you create another highlighting formula that shows a red background when a unit
price is greater than $200. Considering that 100 is a subset of 200, you could have Unit Price fields
with yellow backgrounds when, in fact, those fields should have red backgrounds. In other words, a
unit price of $300 could receive either a red or a yellow background, depending on which formula has
been assigned priority.
11.6.6.2.1 To set priorities for highlighting formulas
1.
On the Format menu, click Highlighting Expert.
2.
In the Item list area, select one of the conditional highlighting formulas that you have created.
3.
Click the Priority arrows to move the selected formula to a position above or below the other
formula(s).
Note:
A formula has priority over another formula when it is higher in the Items list area.
4.
Click OK.
5.
Click the Preview tab or refresh the report to see the highlighting changes.
2013-05-06262
Formatting

11.6.7 Undo/Redo activities
Crystal Reports includes multiple levels of undo. With multiple levels of undo, you can undo any number
of changes to an object, in reverse order, until you have your report in the condition you want it.
The program also has a redo feature that reverses an undo. If you move an object, for example, and
do not like its new position, you can click Undo to move it back to its original position. If you then change
your mind, you can click Redo to restore the latest change.
The Undo and Redo buttons have lists that allow you to undo or redo a number of changes at one time.
•
To undo an action, click Undo on the Standard toolbar.
The first time the button is clicked, it reverses the most recent change made to the report. Each
additional time the button is clicked, it reverses the next most recent change.
To undo several actions at once, click the arrow button to display the list of actions. Select the series
of actions you wish to undo.
•
To redo a change after you have undone it, click Redo on the Standard toolbar.
The program disables the Undo button and the Undo/Redo commands whenever there is nothing
to undo/redo or when you have made a change that cannot be reversed.
To redo several actions at once, click the arrow button to display the list of actions. Select the series
of actions you wish to redo.
Note:
You can only undo or redo actions in order from the most recent backward. You cannot undo an action
without undoing more recent actions.
11.7 Using the Format Painter
Use the Format Painter to copy absolute or conditional formatting properties from one report object to
one or more target objects. The Format Painter button is activated on the Standard toolbar when you
select a source object in your report. If you apply formatting to a target field that is not the same as your
source field, only the common properties are applied. For example, if your source field is a Boolean
field and your target field is a currency field, only the common font and border properties are changed;
Boolean properties are not applied and currency properties are not set.
Note:
• The Format Painter does not copy hyperlink information to a target object or field.
• The Format Painter does not copy formatting that is applied through use of the Highlighting Expert.
2013-05-06263
Formatting

• The Format Painter does not copy formatting from text/template objects to database fields.
• The Format Painter can use any object (including Repository objects, read-only objects, and objects
contained in read-only sections) as a source of formatting (however, formatting cannot be applied
to these objects).
• When using a "Date and Time" field as your source, a target field's date or time properties are
changed; the reverse is also true (that is, a Date field or a Time field used as your source also affects
the date and time properties of a "Date and Time" field).
The following is a list of source report objects and field and the applicable targets you can use with the
Format Painter.
Target object or fieldSource object or field
Report field (not in a cross-tab)Report field (not in a cross-tab)
Report field in a cross-tabReport field in a cross-tab
Template fieldTemplate field
Text object (not in a cross-tab)Text object (not in a cross-tab)
Text object in a cross-tabText object in a cross-tab
Object in an OLAP grid headerObject in an OLAP grid header
Line objectLine object
Box objectBox object
OLE or BLOB fieldOLE or BLOB field
SubreportSubreport
Chart, map, OLAP grid, or cross-tabChart, map, OLAP grid, or cross-tab
11.7.1 To copy and apply formatting
2013-05-06264
Formatting

1.
Select a source object or field in your report and click Format Painter.
Tip:
You can also select Format Painter from the shortcut menu.
Note:
• The Format Painter button is not available until you select an object or field.
• Click the button a second time, or press ESC, to exit the Format Painter.
2.
Click the target object or field you want to apply formatting to.
When you move your mouse over your report, the cursor changes to a Stop cursor if the object or
field cannot be used as a target.
Note:
• You cannot apply formatting to read-only objects or fields.
• Double-click the Format Painter button, or hold the ALT key down if you want to apply formatting
to more than one object or field.
11.8 Working with barcodes
Barcodes allow companies to use computers to track products and sales. Specially designed scanners
read the barcode and the computer translates it into a human-readable form.
The Crystal Reports install includes the formula and fonts necessary for supporting Code39 barcodes.
You can add barcodes to your reports to be used for activities such as managing your inventory or
creating package labels.
Code39 is a basic barcode format supported by most scanners on the market. For support of additional
barcode types, such as UPC, please contact your preferred barcode vendor.
11.8.1 Adding a barcode
You can apply a barcode to an existing field or add a new field to the report specifically for the barcode.
You will need to consider the following information before adding a barcode:
• When a field is converted to a barcode, the default size changes to accommodate 16 characters at
24 pts.
This may cause the new data to overlap existing fields if there is not enough space between fields.
• Barcodes can be applied to number and string fields only.
The barcode cannot be applied to Currency, DateTime, or other field types.
2013-05-06265
Formatting

• To undo changing a field to a barcode, you must use the Undo command right after you use Change
to Barcode.
If you perform any other actions after you change the field to a barcode, you must either delete the
field item or use the Format Field option to reformat the appearance.
Related Topics
• Changing the appearance of a barcode
• Removing a barcode
11.8.1.1 To add a barcode
1.
In the report, right-click the field to use for the barcode.
If the desired field is not in the report, use the Field Explorer to add the field to your report.
2.
On the shortcut menu, select Change to Barcode.
The Select Barcode Type dialog box appears.
3.
Select the barcode type from the list.
4.
Click OK.
The field is changed to display barcodes instead of characters.
11.8.2 Changing the appearance of a barcode
You can use the Format Field option to change the appearance of a barcode.
There are many reasons to change the appearance of a barcode including the following:
• To change the size so that the barcode is not too large or too small for a scanner to read.
• To display the barcode in a different color.
Related Topics
• Adding a barcode
• Removing a barcode
11.8.2.1 To change the appearance of a barcode
2013-05-06266
Formatting

1.
Right-click the barcode field that you would like to reformat.
2.
From the shortcut menu, select Format Field.
The Format Editor appears.
3.
Set your desired border, font size and color, or other options.
4.
Click OK.
11.8.3 Removing a barcode
If you applied the barcode to the wrong field, or you decide that you do not want to have a barcode,
you can use Format Field to change the field back to a regular font.
Related Topics
• Adding a barcode
• Changing the appearance of a barcode
11.8.3.1 To change a barcode back to a regular font
1.
Right-click the barcode field that you would like to reformat.
2.
From the shortcut menu, select Format Field.
The Format Editor appears.
3.
Select the Common tab.
4.
In the Display String area, click the red formula editor button.
The Formula Editor appears.
5.
Delete the string in the Formula text window and then click Save and Close.
6.
Select the Font tab
7.
Change the font and size to the desired size, and then click OK .
8.
On the report, resize the field to a an appropriate length.
2013-05-06267
Formatting

2013-05-06268
Formatting

Charting
12.1 Charting concepts
Crystal Reports enables you to include sophisticated, colorful charts in your reports. You can use charts
any time you want to improve the usefulness of a report.
12.1.1 Charting overview
Crystal Reports enables you to include sophisticated, colorful charts in your reports. You can use charts
any time you want to improve the usefulness of a report.
For example, if you have a sales report grouped by Region with a subtotal of Last Year's Sales for each
region, you can quickly create a chart that will display Sales per Region.
You can chart on the following:
• Summary and subtotal fields.
• Detail, formula, and Running Total fields.
• Cross-Tab summaries.
2013-05-06269
Charting

• OLAP data.
You will typically chart on summary and subtotal information at the group level. However, depending
on the type of data you are working with, you can create an Advanced, Cross-Tab, or OLAP grid chart
for your report.
12.1.2 Chart layouts
The Chart Expert provides four layouts that correspond to certain sets of data.
You can create charts with any of the following layouts, and depending on the data you are using, you
can change the chart from one layout to another.
Advanced
Use the Advanced layout when you have multiple chart values or when you do not have any group or
summary fields in the report.
The Advanced chart layout supports one or two condition fields: with these condition fields, you can
create a 2-D, 3-D, or pie chart. Other specific functions with the Advanced layout include:
• Values can be grouped in ascending, descending, or specified order, as well as by Top N or Sort
totals.
• Values can be plotted for each record.
• Values can be plotted as a grand total for all records.
• Charts can be based on formula and Running Total fields.
Group
The Group layout is a simplified layout in which you show a summary on change of field for topics such
as Country.
Note:
In order to create a chart using the Group layout, you must have at least one group and at least one
summary field for that group.
Cross-Tab
Use the Cross-Tab layout to chart on a Cross-Tab object. A Cross-Tab chart uses the fields in the
cross-tab for its condition and summary fields.
OLAP
Use the OLAP layout to chart on an OLAP grid. An OLAP chart uses the fields in the OLAP grid for its
condition and summary fields.
Note:
Your report must include an OLAP grid before you can create an OLAP chart.
2013-05-06270
Charting

12.1.3 Chart types
Different sets of data are particularly suited to a certain chart type. The following is an overview of the
main chart types and their most common uses.
Bar
Most bar charts (also known as a column chart) display or compare several sets of data. Two useful
bar charts are the Side-by-Side bar chart and the Stacked bar chart.
• Side-by-Side bar chart
A Side-by-Side bar chart displays data as a series of vertical bars. This type of chart is best suited
for showing data for several sets over a period of time (for example, last year's sales figures for AZ,
CA, OR, and WA).
• Stacked bar chart
A Stacked bar chart displays data as a series of vertical bars. This type of chart is best suited for
representing three series of data, each series represented by a color stacked in a single bar (for
example, sales for 1997, 1998, and 1999).
Line
A line chart displays data as a series of points connected by a line. This type of chart is best suited for
showing data for a large number of groups (for example, total sales over the past several years).
Area
An area chart displays data as areas filled with color or patterns. This type of chart is best suited for
showing data for a limited number of groups (for example, percentage of total sales for AZ, CA, OR,
and WA).
Pie
A pie chart displays data as a pie, split and filled with color or patterns. Pie charts are typically used for
one group of data (for example, the percentage of sales for the entire inventory); however, you have
the option to choose multiple pie charts for multiple groups of data.
Doughnut
A doughnut chart is similar to a pie chart, displaying data as sections of a circle or doughnut. If, for
example, you charted sales by region on a particular report, you would see the total number of sales
(the figure) in the center of the doughnut and the regions as colored sections of the doughnut. As with
the pie chart, you have the option to choose multiple doughnut charts for multiple groups of data.
3-D Riser
A 3-D Riser chart displays data in a series of 3-dimensional objects, lined up side-by-side, in a
3-dimensional plane. The 3-D Riser chart shows the extremes in your report data. For example, the
differences between sales by customer by country are visually dynamic when presented in this chart.
2013-05-06271
Charting

3-D Surface
3-D Surface charts present a topographic view of multiple sets of data. If, for example, you need a chart
to show the number of sales by customer by country, in a visually dynamic and relational format, you
might consider using the 3-D Surface chart.
XY Scatter
An XY Scatter chart is a collective of plotted points that represent specific data in a pool of information.
The XY Scatter chart allows the user to consider a larger scope of data for the purpose of determining
trends. For example, if you input customer information, including sales, products, countries, months,
and years, you would have a collective of plotted points that represents the pool of customer information.
Viewing all of this data on an XY Scatter chart would allow you to speculate as to why certain products
were selling better than others or why certain regions were purchasing more than others.
Radar
A radar chart positions group data, such as countries or customers, at the perimeter of the radar. The
radar chart then places numeric values, increasing in value, from the center of the radar to the perimeter.
In this way, the user can determine, at a glance, how specific group data relates to the whole of the
group data.
Bubble
A bubble chart (an extension of the XY Scatter chart type) displays data as a series of bubbles, where
the size of the bubble is proportional to the amount of data. A bubble chart would be very effective with
the number of products sold in a certain region; the larger the bubble, the greater the number of products
sold in that region.
Stock
A stock chart presents high and low values for data. It is useful for monitoring financial or sales activities.
Note:
Crystal Reports offers two possible formats for stock charts: High-Low and High-Low-Open-Close. Each
of these types requires a series of values in the order specified in its name.
Numeric Axis
A numeric axis chart is a bar, line, or area chart that uses a numeric field or a date/time field as its "On
change of" field. Numeric axis charts provide a way of scaling your X-axis values, thus creating a true
numeric X-axis or a true date/time X-axis.
Gauge
A gauge chart presents values graphically as points on a gauge. Gauge charts, like pie charts, are
typically used for one group of data (for example, the percentage of sales for the entire inventory).
Gantt
A Gantt chart is a horizontal bar chart often used to provide a graphical illustration of a schedule. The
horizontal axis shows a time span, while the vertical axis shows a series of tasks or events. Horizontal
bars on the chart represent event sequences and time spans for each item on the vertical axis. You
should use only date fields when creating a Gantt chart. The field you choose for the data axis should
be set to "For Each Record," and the start and end-date fields should be added to the "Show value(s)"
area of the Chart Expert's Data tab.
2013-05-06272
Charting

Funnel
Funnel charts are often used to represent stages in a sales process. For example, the amount of
potential revenue shown for each stage. This type of chart can also be useful in identifying potential
problem areas in an organization's sales processes. A funnel chart is similar to a stacked bar chart in
that it represents 100% of the summary values for the groups included in the chart.
Histogram
A histogram is a type of bar chart used to depict how measurements vary from the mean value. It can
help to identify the cause of problems in a process by the shape of the distribution as well as the width
(deviation) of the distribution. In a histogram, the frequency is represented by the area of a bar rather
than the height of the bar.
12.1.4 Where to place a chart
The placement of a chart determines which data is displayed and where it is printed. For example, a
chart placed in the Report Header section includes the data for the entire report, while a chart that is
placed in a Group Header or in a Group Footer section displays only the group specific data.
Note:
• If your report contains subreports, you can place charts in those subreports as well. See Subreports.
• By default, when you insert a chart or chart object frame, it is placed in the Report Header.
12.1.5 Drill-down with charts
Not only is charting a means of presenting data—it is also an analysis tool. Move your cursor over a
section of the group chart on the Preview tab, so that the pointer becomes a Drill-down cursor, then
double-click to view the underlying details for that section of the chart.
12.1.6 Drill-down with legends
If the chart consists of one or more group fields, you can use the chart legend to drill down on individual
groups. Double-click the drill-down cursor on the markers and text in the legend to view the details
about that section of the chart.
2013-05-06273
Charting

12.2 Creating charts
When you insert a chart in a report, you may see one of the following options:
• A chart object frame in the Report Header.
Once you have placed the chart frame, the Chart Expert dialog box appears. For more information
on where to place a chart in the report, see Where to place a chart .
• A chart automatically inserted in the Report Header.
In some situations, such as when there is at least one group and one summarized field in your report,
a chart is automatically added to the Report Header, and the Chart Expert dialog box does not
appear. This usually happens when you chart on Cross-Tab summaries or when you chart on an
OLAP cube, but it may also happen when you chart on summary or subtotal fields.
12.2.1 Charting on details or formula fields (Advanced layout)
The Advanced layout allows you to create a chart based on specific values. Since charts are a good
way to display summarized information, they are often based on a summary field in your report. With
an Advanced layout, you can create a chart without the need for a summary field by using values that
appear in the Details section of your report.
To create a chart based on the Advanced layout, you must specify two things:
• Conditions (there can be two).
• Values (there can be multiple values).
Condition
The condition is used to indicate when to plot the point. For example, a chart showing last year's sales
for your customers uses the Customer Name field as the condition. Each time the condition changes
(the customer name changes), a point is plotted.
You also have the option of plotting a point for each record, or plotting one point for all records.
Value
The Advanced chart uses the value to indicate what information is plotted as the points on your chart.
For example, to create a chart showing last year's sales for your customers, the Last Year's Sales field
would be the value.
2013-05-06274
Charting

12.2.2 Charting on summary or subtotal fields (Group layout)
Many of the charts you create are based on summary or subtotals within your report. In order to create
these charts, you must have a summary or subtotal already inserted into your report in a group header
or footer. For more information on inserting summaries and subtotals, see Summarizing grouped data
and Subtotaling.
12.2.2.1 To chart on a summary or subtotal field
1.
On the Insert menu, click Chart.
An object frame appears in the Report Header area.
Tip:
Another way to create a chart is to click the Insert Chart button on the Insert Tools toolbar.
2.
Drag the frame to the desired position in the Report Header, Group Header, or Group Footer.
The Chart Expert dialog box appears.
Note:
You may see a default chart in the Report Header section rather than the Chart Expert dialog box.
To select a different chart type, right-click the default chart, and then click Chart Expert. The Chart
Expert dialog box appears.
3.
On the Type tab, in the Chart type list, select a chart type.
Click the chart subtype that best illustrates your data. See Chart types.
4.
Click the Data tab.
5.
In the Layout area, click Group, if it is not already selected.
6.
In the Data area, in the On change of list, click the group field you want to base your chart on; then,
in the Show list, click the summary field you want to display on your chart.
7.
If the Axes and Options tabs appear, you can customize some of the chart's properties, such as
the scaling of the axes, the legend, and the data points.
8.
Click the Text tab.
9.
Accept the default title information or add new titles to your chart.
10.
Click OK.
Note:
When your chart is inserted, it may cover a portion of the report. Move and resize the chart so that it
fits properly within the report.
2013-05-06275
Charting

12.2.3 Charting on Cross-Tab summaries (Cross-Tab layout)
Crystal Reports allows you to include a chart based on summary values in your Cross-Tab report. For
example, with a Cross-Tab that shows the amount of a certain product sold in each region of the United
States, you may want to include a chart showing the percentage of total sales provided by each region
for that product.
To create a Cross-Tab chart, you must first have a Cross-Tab in your report. For more information, see
Cross-Tab Objects.
12.2.3.1 To chart on a Cross-Tab summary
1.
Select the Cross-Tab on which you want to chart.
2.
On the Insert menu, click Chart.
An object frame appears in the Report Header area.
Tip:
Another way to create a chart is to click the Insert Chart button on the Insert Tools toolbar.
3.
Drag the frame to the desired position in the Report Header.
The Chart Expert dialog box appears.
Note:
You may see a default chart in the Report Header section rather than the Chart Expert dialog box.
To select a different chart type, right-click the default chart, and then click Chart Expert. The Chart
Expert dialog box appears.
4.
On the Type tab, in the Chart type list, select a chart type.
Click the chart subtype that best illustrates your data. See Chart types.
5.
Click the Data tab.
6.
In the Layout area, click Cross-Tab, if it is not already selected.
7.
In the Data area, in the On change of list, click the group field you want to base your chart on.
8.
If necessary, in the Subdivided by list, click a secondary row or column you want to base your chart
on.
9.
In the Show list, click the summary field you want to display on your chart.
10.
If the Axes and Options tabs appear, you can customize some of the chart's properties, such as
the scaling of the axes, the legend, and the data points.
11.
Click the Text tab.
2013-05-06276
Charting

12.
Accept the default title information or add new titles to your chart.
13.
Click OK.
Note:
When your chart is inserted, it may cover a portion of the report. Move and resize the chart so that it
fits properly within the report.
12.2.4 Charting on an OLAP cube (OLAP layout)
The OLAP layout lets you chart on an OLAP grid. In order to create an OLAP chart, you must first have
an OLAP grid in your report. For more information, see Creating an OLAP report.
12.2.4.1 To chart on an OLAP cube
1.
Select the OLAP grid on which you want to chart.
2.
On the Insert menu, click Chart.
An object frame appears in the Report Header area.
Tip:
Another way to create a chart is to click the Insert Chart button on the Insert Tools toolbar.
3.
Drag the frame to the desired position in the Report Header.
The Chart Expert dialog box appears.
Note:
You may see a default chart in the Report Header section rather than the Chart Expert dialog box.
To select a different chart type, right-click the default chart, and then click Chart Expert. The Chart
Expert dialog box appears.
4.
On the Type tab, in the Chart type list, select a chart type. Then click the chart subtype that best
illustrates your data. See Chart types.
5.
Click the Data tab.
6.
In the Layout area, click the OLAP button, if it is not already selected.
7.
In the Data area, in the On change of list, click the field you want to base your chart on.
8.
If necessary, in the Subdivided by list, click a secondary row or column you want to base your chart
on.
Note:
Be sure that the chart type selected in Step 3 supports a secondary charting field.
2013-05-06277
Charting

9.
If the Axes and Options tabs appear, you can customize some of the chart's properties, such as
the scaling of the axes, the legend, and the data points.
10.
Click the Text tab.
Accept the default title information or add new titles to your chart.
11.
Click OK.
Note:
When your chart is inserted, it may cover a portion of the report. Move and resize the chart so that it
fits properly within the report.
12.3 Working with charts
Once you have created a chart, you may want to add a new title, headings, or a legend, change fonts,
or even change the type of chart. Crystal Reports provides many options for working with your existing
charts.
12.3.1 Editing charts using the Chart Expert
Editing charts with the Chart Expert allows you to return to the expert in which you designed your chart.
You can modify many of your original choices, such as the type of chart to display, the data on which
the chart is based, and so on.
12.3.1.1 To edit a chart using the Chart Expert
1.
Right-click the chart to bring up the shortcut menu.
2.
On the shortcut menu, click Chart Expert.
3.
In the Chart Expert dialog box, make the desired changes.
4.
Click OK.
12.3.2 Editing charts using the Chart Options menu items
2013-05-06278
Charting

Some of the editing options available in the Chart Expert are also available directly from the Chart
Options menu. This menu, which is available when you right-click a chart, also contains many advanced
formatting options.
The following procedures show you how to access the various options that are the Chart Options. For
more information about how to use these features, click Help in the various dialog boxes to open the
Chart Help. The Chart Help (Chart.chm) is installed by default in the \Program Files\SAP Busi
nessObjects\Crystal Reports\ChartSupport\Help\language directory.
12.3.2.1 To change chart formatting
1.
Right-click your chart, and then select Chart Options.
2.
Click the appropriate tab to change appearance, titles, data labels, and so on.
12.3.2.2 To change Numeric Axis Grid options
1.
Right-click your chart, and then select Chart Options.
2.
Click the appropriate tab to change gridlines, axes, and so on.
12.3.2.3 To change chart titles
1.
Right-click your chart, and then select Chart Options.
2.
Click the Titles tab and make your changes.
12.3.3 Editing charts using other menu items
12.3.3.1 To apply a new template
1.
Right-click your chart and select Load Template from the menu.
2013-05-06279
Charting

2.
The Custom templates dialog box appears.
The options on the Custom tab represent directory locations under \Program Files\SAP
BusinessObjects\Crystal Reports 14.0\Templates where custom chart files are stored.
Note:
The custom charts are available only if you selected Custom Charting when installing Crystal Reports.
12.3.3.2 To format a selected chart object
1.
Select a line, area, or text object in your chart.
2.
Right-click the specified object, and then click Format < object >.
For example, you will see Format Pie Slice if you select a pie slice, and Format Series Marker if you
select an item within an area chart, bar chart, and so on.
3.
Click the appropriate tab to make changes to the format.
12.3.3.3 To change series options
1.
Select a riser item (area, bar, line, marker, pie slice, and so on) or a legend marker.
2.
Right-click the specified area, and then select Series Options.
Note:
The Series option is not available unless you select a riser or marker as outlined in the previous
step, and may not be available for some chart types.
3.
Click the appropriate tab to change appearance, data labels, and so on.
12.3.3.4 To choose a viewing angle for a 3D chart
• Right-click your chart, then select 3D Viewing Angle from the menu.
12.3.4 Using the zooming features with bar and line charts
2013-05-06280
Charting

On the Preview tab, you can find commands for zooming bar charts and line charts within your report.
You have the ability to zoom in and out on these chart types at any time, with each time being referred
to as instance-specific. If you decide to save the instance of the chart that has been zoomed in or out,
you must save the data with the report.
12.3.4.1 To zoom in and out on a bar or line chart
1.
On the Preview tab, right-click the bar or line chart to bring up the shortcut menu.
2.
On the shortcut menu, click Zoom In.
3.
Drag the Zoom In cursor around a section of the chart to enclose it within the tracking rectangle.
The chart zooms in to the section you selected.
4.
Repeat the previous step to zoom in further.
Note:
To see adjacent areas on a zoomed-in chart view (neighboring bars in a bar chart, for example),
use the Pan option on the shortcut menu. Pull the Pan cursor to the left or right to move in that
direction.
5.
To zoom out on a chart, right-click the chart to bring up the shortcut menu.
6.
On the shortcut menu, click Zoom Out.
7.
With the Zoom Out cursor, click the chart.
The chart zooms out one level of magnification.
8.
Click the chart again to zoom out further.
12.3.5 Auto-arranging charts
If you move or resize chart objects on the Preview tab, select the Auto-Arrange Chart feature to reset
the chart.
12.3.5.1 To auto-arrange a chart
1.
On the Preview tab, right-click the chart to bring up the shortcut menu.
2.
On the shortcut menu, click Auto-Arrange Chart.
Crystal Reports resets the chart to its original size and position.
2013-05-06281
Charting

12.3.6 Formatting charts
12.3.6.1 Changing the border of a chart
1.
On the Design or Preview tab, right-click the chart to bring up the shortcut menu.
2.
On the shortcut menu, click Format Background.
3.
On the Format Editor dialog box, click the Border tab to see its options.
4.
Change the line style, color, or thickness.
5.
Click OK to save your changes.
Crystal Reports returns you to the report and implements your changes.
12.3.6.2 Conditionally formatting a chart
1.
On the Design or Preview tab, right-click the chart to bring up the shortcut menu.
2.
On the shortcut menu, click Chart Expert and select the Color Highlight tab.
For information about the expert, search the online help for Chart Color Format Expert.
Note:
• The option to apply conditional formatting is not available for every chart type.
• An area chart must have two "On change of" values for conditional formatting to appear.
• If your chart type is line, the chart must have data markers before you can see conditional
formatting.
• After you apply conditional formatting, you must select "Color by Group" on the Look tab of the
Chart Options dialog box before you will be able to see your formatting. To set this option,
right-click your chart, point to Chart Options on the shortcut menu, and select General from the
submenu. This note applies to line, 3-D Riser, and 3-D Surface charts with one "On change of"
field, as well as to bar, numeric axis, 3-D Surface, radar, stock, and charts with two summaries.
3.
Click OK.
2013-05-06282
Charting

12.3.6.3 Changing the chart's legend text
1.
On the Preview tab, click the text in your chart's legend to select it.
Tip:
Be sure to select the text and not the entire legend.
2.
Right-click the legend text and select Edit Axis Label from the shortcut menu.
3.
In the Label Aliasing dialog box, add the text you want to see in the Displayed Label field.
4.
Click OK.
12.3.7 Using the underlay feature with charts
Since charts can print only in certain sections of your report, the underlay feature gives you more control
in the overall look of your report. Instead of having a chart print ahead of the data it represents, it can
appear next to the data for a more comprehensible report.
This is how your report looks when you underlay a chart with report data.
2013-05-06283
Charting

2013-05-06284
Charting

Mapping
13.1 Mapping concepts
13.1.1 Mapping overview
With Crystal Reports, you can include geographic maps in reports. Maps help you analyze report data
and identify trends more efficiently. For example, you could create a map that shows sales by region.
You would then be able to:
• Use one of the five map types to analyze the data.
• Adjust the appearance and organization of the map (allowing you to better identify trends).
• Drill down on the map regions to view underlying data.
13.1.2 Map layouts
The Map Expert provides four layouts that correspond to certain sets of data.
You can create maps with any of the following layouts, and depending on the data you are using, you
can change the map from one layout to another.
Advanced
Use the Advanced layout when using multiple map values or when you do not have any groups or
summaries in the report.
Group
The Group layout is a simplified layout in which you show a summary on change of a geographic field
(such as Region).
2013-05-06285
Mapping

Note:
In order to create a map using the Group layout, you must have at least one group and at least one
summary field for that group.
Cross-Tab
Use the Cross-Tab layout when mapping on a Cross-Tab object. A Cross-Tab map does not require
groups or summary fields.
OLAP
Use the OLAP layout when mapping on an OLAP grid. An OLAP map does not require groups or
summary fields.
Note:
If there is no map associated with the data you specify, then an empty block will appear unless the
section that the map is placed in has been formatted to suppress if blank.
13.1.3 Map types
The Map Expert also provides five basic map types, each suitable for a different strategy of data analysis.
When deciding which map type best fits your report, you should consider the type of data you want to
analyze. For example, if you want the map to display one data item for each geographic division (city,
state, country, and so on), then you might use a Ranged, Dot Density, or Graduated map. On the other
hand, if you want the map to display more than one value for each new geographic division, then you
could use a Pie Chart map or a Bar Chart map. The following is an overview of the main map types
and their most common uses.
Ranged
A Ranged map breaks the data into ranges, assigns a specific color to each range, then color codes
each geographic area on the map to display the range. For example, you could create a map that
displays Last Year's Sales by Region. If you have sales ranging from zero to 100,000, you might give
the map five ranges, with equal intervals of 20,000 each. You could use shades of red (going from dark
to light red) to color code each region according to those sales figures. Then you could use this map
to see where sales are the highest.
With equal intervals, you might end up with all your regions ranging between zero and 20,000, except
perhaps one region (for example, California) that might have exceptionally high sales (such as 98,000).
This map would be a very distorted representation of the data. A more useful map would have ranges
like 0-5000, 5000-10000, 10000-15000, 15000-20000, and over 20000. It is important to carefully define
your ranges.
Note:
The end value for each division is repeated as the start value for the next division; the actual value is
included in the group it starts. That is, the ranges in the previous example are actually: 0-4999,
5000-9999, and so on.
There are four different distribution methods for ranged maps.
2013-05-06286
Mapping

• Equal count
This option assigns intervals in such a way that the same number of regions (or as close to the same
number of regions as possible) appear in each interval. In other words, this option would assign
intervals so that each color on the map is assigned to the same number of regions. The numeric
quantity of the summary values in each interval may or may not be equal, depending on the individual
regions and their summary values.
• Equal ranges
This option assigns intervals in such a way that the summary values in each interval are numerically
equal. The number of regions in each interval may or may not be equal, depending on the individual
regions and their summary values.
• Natural break
This option assigns intervals using an algorithm that attempts to minimize the difference between
the summary values and the average of the summary values for each interval.
• Standard deviation
This option assigns intervals in such a way that the middle interval breaks at the mean (or average)
of the data values, and the intervals above and below the middle range are one standard deviation
above or below the mean. Standard deviation is the square root of the variance. It projects how
various values in a set of values deviate from the mean for that set.
Dot Density
A Dot Density map displays a dot for each occurrence of a specified item. For example, you might
create a United States map that shows one dot for each shipbuilder in the nation. In states like
Tennessee, there would be no dots. However, in some coastal states, such as South Carolina, you
might be able to count the dots on the map, since their dispersal would be fairly wide.
The purpose of a Dot Density map is to provide an overall impression of the distribution of the specified
item. A Dot Density map is much like a nighttime satellite photo of the United States, where you can
see the lights of all the cities. Such a map is not a very accurate means of communicating information
(particularly if you have a large number of items), but it is a good way to give an overview of the
distribution.
Graduated
A Graduated map is much like a Ranged map; it shows one symbol per instance of a specified item.
This symbol is a circle by default, but you can choose a different symbol if you prefer. Each symbol is
proportional in size to the value of the item it represents (within a range of three sizes).
A Graduated map communicates the same information as the Ranged map, but you would usually
create a Ranged map for a case in which the geographic areas have distinct geographic boundaries
(as in the case of Regions), while you would use a Graduated map for displaying data that is linked to
points rather than precise areas (as in the case of Cities).
For example, a map of an individual region could use graduated circles to represent the sales for each
office. The size of each circle would be proportional to the sales (or to the sales range) of the office it
represents. On this map, an office with a sales figure of $70,000 might have a large circle, and an office
with a sales figure of $20,000 might have a small circle. So, a Graduated map provides a more efficient
2013-05-06287
Mapping

representation of point data (e.g. Cities) than a Ranged map does, and it uses sized symbols rather
than colors to distinguish variations in the values of the items it represents.
Pie Chart
A Pie Chart map displays a pie chart over each geographic area. The pie charts represent data items
that make up a whole. Each slice of the pie represents an individual data item and shows that item's
percentage in the whole. For example, you could create a Pie Chart map showing heating fuel types
by region. You might have four types of heating fuel (four slices in each pie): electricity, gas, wood, and
solar. Each region would then have a pie chart showing the breakdown of heating fuel types within that
region. Washington state would probably use a high percentage (a large slice of the pie) of electricity
because of the hydropower in that region, while Idaho would probably use a high percentage (a large
slice of the pie) of natural gas.
You can use this map type to compare the distribution of several items within a particular region. You
can also specify that the pie charts be sized proportionately so that, as with the symbols in a Graduated
map, the pie charts will appear in various sizes, depending on the underlying data values. This will allow
you to compare the totals between regions.
Bar Chart
A Bar Chart map works like a Pie Chart map, but may be more useful for certain sets of data. Typically,
you would use a Bar Chart map for items that do not total 100%; that is, for data items that do not make
a whole, or for data items that are unrelated. For example, you could create a Bar Chart map that
displays use of heating fuel by region. You might choose to analyze use of three types of fuel: electricity,
gas, and solar. Each bar chart on the map could contain individual bars for each of these types. In this
example, the data items (electricity, gas, and solar) do not comprise a whole. There may be other types
of fuel used in these regions, such as wood, but this map only focuses on three of them. Also, the
purpose of the map is to compare each region's use of each fuel type with that of every other region.
In a Pie Chart map, you could show these three fuel types as percentages of the entire fuel use within
each region, and though you could compare the percentages for each region, you would probably not
be able to compare the actual values for each region because each region would have the same total
value (100%).
13.1.4 Where to place a map
When you choose where to place the map, you determine the amount of data that will be included in
the map. For example, if you place the map in the Report Header section, the map includes data for
the entire report. If you place it in a Group Header or Group Footer section, it displays group-specific
data. This choice will also determine whether the map prints once for the entire report, or many times
(once for each instance of a given group).
Note:
If your report contains subreports, you can place maps in those subreports as well.
2013-05-06288
Mapping

13.1.5 Drill-down with maps
Not only is mapping a means of presenting data—it is also an analysis tool. Move your cursor over a
section of the map on the Preview tab, so that the pointer becomes a Drill-down cursor, then double-click
to view the underlying details for that section of the map.
Note:
If you drill down on a region that has no data associated with it, you will get a message saying, "There
are no detail records for that {Region Name}."
13.2 Creating maps
The process for creating a map varies depending on the data you are mapping on. The following sections
detail the mapping process for each map layout.
Mapping on details fields (Advanced layout)
The Advanced layout allows you to create a map based on specific values. With an Advanced layout,
you can create a map without the need for a summary field by using values that appear in the Details
section of your report.
To create a map based on the Advanced layout, you must specify two things:
• Conditions (there can be two).
• Value (there must be only one value).
Condition
The condition is used to indicate where to plot the data on a map. This condition must be a string field.
In order for a map to be generated, the field should contain geographic information. For example, a
map showing last year's sales for each country uses the Country field as the condition. Each time the
condition changes (the country changes), that area on the map is highlighted.
Value
The Advanced layout uses the value to indicate what information is mapped when the area on the map
is highlighted. For example, to create a map showing last year's sales for the countries, the Last Year's
Sales field would be the value.
13.2.1 Mapping on group fields (Group layout)
2013-05-06289
Mapping

To map on a group, you can use the Group layout, in which you show a summary (such as Last Year's
Sales) on change of a geographic field (such as Region). In order to create a map using the Group
layout, you must have at least one group and at least one summary field for that group.
13.2.1.1 To map on a group
1.
On the Insert menu, click Map.
Tip:
Another way to do this is to click the Insert Map button on the Insert Tools toolbar.
The Map Expert dialog box appears.
2.
On the Data tab, in the Layout area, click Group, if it is not already selected.
3.
In the Placement area, in the Place map list, specify how often your map appears on the report,
then click Header or Footer to specify where to place your map.
4.
In the Data area, in the On change of list, click the group field you want to base your map on, then
in the Show list, click the summary field you want to display on your map.
5.
Click the Type tab.
6.
Click the map type that best illustrates your data (Ranged, Dot Density, or Graduated). See Map
types.
7.
In the Options area, apply formatting options to your map.
8.
Click the Text tab.
9.
In the Map title field, enter a title for your map.
10.
In the Legend area, you can click one of the following options:
• Full legend to show a detailed legend on your map.
• Compact legend to show a condensed legend on your map.
• No legend to exclude the legend from your map.
11.
If you click Full legend, click Made by map to have Crystal Reports create a legend title based on
your map, or click Specify to enter your own legend title and subtitle.
12.
Click OK.
Your map is placed in the Header or Footer section of the report, depending on your selection in
Step 3.
13.2.2 Mapping on Cross-Tab summaries (Cross-Tab layout)
2013-05-06290
Mapping

With the Cross-Tab layout, you can map on a Cross-Tab summary field. For example, with a Cross-Tab
that shows the total number of items of a product sold in each region of the United States, you may
want to include a map that shows the percentage of the total sales of the product provided by each
region.
In order to create a Cross-Tab map you must first have a Cross-Tab in your report. For more information
about Cross-Tabs, see Cross-Tab Objects.
13.2.2.1 To map on a Cross-Tab summary
1.
On the Insert menu, click Map.
Tip:
Another way to do this is to click the Insert Map button on the Insert Tools toolbar.
The Map Expert dialog box appears.
2.
On the Data tab, in the Layout area, click Cross-Tab, if it is not already selected.
3.
In the Placement area, click Header or Footer to specify where to place your map.
4.
In the Data area, in the Geographic field list, click a geographic field to supply the geographic areas
for your map.
5.
If necessary, in the Subdivided by list, click another field to map on.
Crystal Reports uses this field to subdivide the pie or bar charts appearing on your map.
6.
In the Map on list, click a summary field to supply the numeric data for your map.
7.
Click the Type tab.
8.
Click the map type that best illustrates your data. See Map types.
• If you plan to map on only one field, be sure to select None from the "Subdivided by" list, then
choose either the Ranged, Dot Density, or Graduated map type.
• If you plan to map on two fields, be sure to select an additional field from the "Subdivided by"
list, then choose either the Pie Chart or Bar Chart map type.
9.
In the Options area, apply formatting options to your map.
10.
Click the Text tab.
11.
In the Map title field, enter a title for your map.
12.
In the Legend area, you can click one of the following options:
• Full legend to show a detailed legend on your map.
• Compact legend to show a condensed legend on your map.
• No legend to exclude the legend from your map.
13.
If you click Full legend, click Made by map to have Crystal Reports create a legend title based on
your map, or click Specify to enter your own legend title and subtitle.
2013-05-06291
Mapping

14.
Click OK.
Your map is placed in the Header or Footer section of the report, depending on your selection in
Step 3.
13.2.3 Mapping on an OLAP cube (OLAP layout)
Using the OLAP layout, you can map on an OLAP grid. In order to create an OLAP map, you must first
have an OLAP grid in your report. For more information about OLAP grids, see Creating an OLAP
report.
13.2.3.1 To map on an OLAP cube
1.
On the Insert menu, click Map.
Tip:
Another way to do this is to click the Insert Map button on the Insert Tools toolbar.
The Map Expert dialog box appears.
2.
On the Data tab, in the Layout area, click OLAP, if it is not already selected.
3.
In the Placement area, click Header or Footer to specify where to place your map.
4.
In the Data area, click the On change of list and select the field on which you want to base your
map.
Note:
This field should contain geographic information, such as Country.
5.
If necessary, click the Subdivided by list and select a secondary row or column to incorporate into
your map.
Note:
Choosing to subdivide by a secondary mapping field, either row or column, will affect the map types
available in Step 8.
6.
Click the Type tab.
7.
Click the map type that best illustrates your data. If there is no secondary mapping field, you can
choose Ranged, Dot Density, or Graduated; if there is a secondary mapping field, you can choose
Pie Chart or Bar Chart. See Map types.
8.
In the Options area, apply formatting options to your map.
9.
Click the Text tab.
10.
In the Map title field, enter a title for your map.
2013-05-06292
Mapping

11.
In the Legend area, you can click one of the following options:
• Full legend to show a detailed legend on your map.
• Compact legend to show a condensed legend on your map.
• No legend to exclude the legend from your map.
Note:
If you click Full legend, click "Made by map" to have Crystal Reports create a legend title based on
your map, or click Specify to enter your own legend title and subtitle.
12.
Click OK.
Your map is placed in the Header or Footer section of the report, depending on your selection in
Step 3.
13.3 Working with maps
Once you have created a map, you may want to add a new title, headings, and a legend, and you may
want to change fonts, or even the map type. Crystal Reports provides many options for working with
your existing maps.
13.3.1 Editing maps using the Map Expert
Editing maps with the Map Expert allows you to return to the expert in which you designed your map.
You can modify many of your original choices, such as the type of map to display, the data on which
the map is based, and so on. From either the Design or Preview tab, you can open the Map Expert and
make your modifications.
13.3.1.1 To edit a map using the Map Expert
1.
Right-click the map to bring up the shortcut menu.
2.
On the shortcut menu, click Map Expert.
3.
In the Map Expert dialog box, make the desired changes.
4.
Click OK.
2013-05-06293
Mapping

13.3.2 Changing the map title
1.
On the Preview tab, right-click the map to bring up the shortcut menu.
2.
On the shortcut menu, choose Title.
3.
In the Change Map Title dialog box, enter a new title.
4.
Click OK to save your changes.
Crystal Reports returns you to the Preview tab and implements your changes.
13.3.3 Changing the map type
You can change the map type and set the properties for that map directly from the menu that appears
when you right-click a map on the Preview tab. For example, if you want to see how the data of a
Ranged map would look if it were presented in a Dot Density style, you can rearrange the map without
having to return to the Map Expert and rework the format.
13.3.3.1 To change the map type
1.
On the Preview tab, right-click the map to bring up the shortcut menu.
2.
On the shortcut menu, choose Type.
The Customize Map dialog box appears.
3.
In the Map type list, click the new map type.
4.
In the Options area, apply formatting options to your new map.
The properties made available to you vary depending on the map you have selected.
5.
Click OK to save your changes.
Crystal Reports returns you to the Preview tab and implements your changes.
13.3.4 Changing map layers
2013-05-06294
Mapping

In Crystal Reports, maps are made up of a number of layers. You can stack these layers on top of each
other to create a more detailed map. For example, you might want to see the names of major cities in
every country; to do this, you could add a layer that contains city names. This layer sits on top of the
basic world map to provide further information.
You can specify which of the provided map layers you want to see, and you can rearrange the order
of the layers that you have selected.
13.3.4.1 To change map layers
1.
On the Preview tab, right-click the map to bring up the shortcut menu.
2.
On the shortcut menu, and choose Layers.
The Layer Control dialog box appears.
3.
In the Layers list, click Up or Down to arrange the order of the map layers.
Be aware that some map layers contain non-transparent sections that can obscure the detail of
other layers. For example, the Ocean layer is mostly non-transparent; if you place it higher in the
layers list, it will block many of the other layers (the other layers seem to disappear, but they are
merely obscured by the Ocean layer).
4.
In the Properties area, set the properties for each map layer, specifying whether the layer is visible
and whether it is automatically labeled.
The Visible option specifies whether the layer appears. The Automatic Labels option specifies
whether a predefined label appears (for example, labels for the names of major world cities).
5.
If necessary, click Display to open the Display Properties dialog box.
2013-05-06295
Mapping

Use this dialog box to set the default display mode and zoom range (the minimum and maximum
possible magnification) for the layer in question, then click OK to return to the Layer Control dialog
box.
6.
Click OK to save your changes.
Crystal Reports returns you to the Preview tab and implements your changes.
13.3.5 Resolving data mismatches
Sometimes the map you are working with uses a different geographic name from the one used in the
database. For example, a map of Europe may use "United Kingdom" while the database uses the
abbreviation "U.K." Until you resolve the data mismatch, the map will not be able to display any
information for the selected geographic region.
13.3.5.1 To resolve data mismatches
1.
On the Preview tab, right-click the map to bring up the shortcut menu.
2.
On the shortcut menu, and choose Resolve Mismatch.
The Resolve Map Mismatch dialog box appears.
3.
Click the Resolve Mismatch tab to see a listing the geographic names that do not correspond between
the database and map.
4.
In the Assign this Field Name list, click the name you want to resolve.
5.
To assign the heading, click a keyword from the To this Map Name list.
6.
If there is a match, click Match.
The new assignment is displayed in the Matched results part of the Resolve Mismatch tab.
7.
Once you are finished resolving the data mismatches, click OK.
The map can now display data for the selected geographic region.
13.3.6 Changing the geographic map
If you prefer to have your data values presented with a different geographic map, specify your changes
using the Change Map tab of the Resolve Map Mismatch dialog box.
2013-05-06296
Mapping

13.3.6.1 To change the geographic map
1.
On the Preview tab, right-click the map to bring up the shortcut menu.
2.
On the shortcut menu, click Resolve Mismatch.
The Resolve Map Mismatch dialog box appears; the Change Map tab displays the name of the
current map you are using, and a list of replacement maps that you can choose from.
3.
In the Available maps list, click the new map you want to use.
4.
Click OK to save your changes.
Crystal Reports returns you to the Preview tab and implements your changes.
13.3.7 Zooming in and out on a map
1.
On the Preview tab, right-click a map to bring up the shortcut menu.
2.
On the shortcut menu, click Zoom In.
3.
Drag the selection cursor around the map section you want to see.
The map zooms in one level of magnification.
4.
Drag another selection to zoom in further.
5.
To zoom out on a map, right-click the map to bring up the shortcut menu.
6.
On the shortcut menu, click Zoom Out.
7.
Click the map.
The map zooms out a level of magnification.
8.
Click the map again to zoom out further.
Note:
• If a map occurs once for each instance of a group, any panning or zooming settings you specify are
instance-specific. In other words, if you zoom in on the map in one group header, this setting is only
for that group header. None of the headers have been changed. This way you can set each map to
different settings.
• If the Save Data with Report option is selected from the File menu, your panning and zooming
settings will be saved with the report. If the option is not selected, then only the default map settings
will be saved.
2013-05-06297
Mapping

13.3.8 Panning a map
1.
On the Preview tab, right-click a map to bring up the shortcut menu.
2.
On the shortcut menu, click Pan.
3.
Drag the panning cursor to the desired map section.
13.3.9 Centering a map
1.
On the Preview tab, right-click a map to bring up the shortcut menu.
2.
On the shortcut menu, click Center Map.
13.3.10 Hiding and showing the Map Navigator
The Map Navigator provides a small-scale version of the currently displayed map, so that you can select
areas you'd like to pan. By panning, you can quickly drag to change the focus of your map as you
require. You can then return your map to the center of the display area by using the Center Map
command.
2013-05-06298
Mapping

You have the option of hiding or showing the Map Navigator.
13.3.10.1 To hide the Map Navigator
1.
On the Preview tab, right-click the map to bring up the shortcut menu.
2.
On the shortcut menu, click Map Navigator.
The Map Navigator is removed from the Preview tab.
13.3.10.2 To show the Map Navigator
1.
On the Preview tab, right-click the map to bring up the shortcut menu.
2.
On the shortcut menu, click Map Navigator.
The Map Navigator is displayed on the Preview tab.
2013-05-06299
Mapping

13.3.11 Changing the border of a map
1.
On the Design or Preview tab, right-click the map to bring up the shortcut menu.
2.
On the shortcut menu, click Format Map.
3.
On the Format Editor dialog box, click the Border tab to see its options.
4.
Change the line style, color, background color, and add or remove a drop shadow from the map
border.
5.
Click OK to save your changes.
Crystal Reports returns you to the report and implements your changes.
13.3.12 To underlay a map
1.
Create your map and place it in the Report Header section.
For more information, see Creating maps.
2.
On the Report menu, click Section Expert.
Tip:
Another way to do this is to click the Section Expert button on the Expert Tools toolbar.
The Section Expert dialog box appears.
3.
In the Sections area, click Report Header, then select the Underlay Following Sections check
box.
4.
Click OK.
Crystal Reports returns you to the report. Your map will now underlay the sections below it.
5.
If necessary, move or resize the map.
2013-05-06300
Mapping

OLE
14.1 OLE overview
Object Linking and Embedding (OLE) enables you to insert objects (OLE objects) into a report from
other applications (OLE server applications) and then use those applications from within Crystal Reports
to edit the objects if necessary.
If you were not using OLE, you would have to exit Crystal Reports, open the original application, change
the object, return to Crystal Reports, delete the object originally inserted, and then insert the newly
revised object.
Note:
If you intend to use your Crystal report in SAP BusinessObjects Business Intelligence platform or through
the Report Application Server (RAS), copy the source file to a network folder that is accessible to the
network account(s) under which the processing servers (Job Server, Page Server, RAS) are running.
Ensure that report designers' accounts also have permission to the network folder. When you insert
the linked OLE object in Crystal Reports, use a UNC path.
14.1.1 OLE terminology
Before you work with OLE objects in Crystal Reports, it might be helpful to review some terminology:
• OLE
OLE is an acronym for Object Linking and Embedding. It refers to the ability to create compound
documents; that is, documents that contain elements from other applications that can be edited
using the original application.
• OLE Object
An OLE object is, broadly speaking, a presentation of data that was created in another application
and that maintains a relationship with the application that was used to create it. A bitmap created in
Paint, an Excel spreadsheet, or a graph from MS Graph may all be OLE objects if they are inserted
in the receiving document as OLE objects. If they are not inserted as OLE objects, they retain no
relationship with the original application.
2013-05-06301
OLE

• OLE Container Application
An OLE container application is one that can contain and process OLE objects created in other
applications (such as Paint or Excel). Crystal Reports is a container application.
• Container Document
A container document is a document that was created using the container application and that
contains one or more OLE objects.
• OLE Server Application
An OLE server application is an application that allows its documents to be inserted into an OLE
container document as OLE objects. Microsoft Word and Excel are examples of applications that
are both OLE servers and OLE containers. That is, they can both create new OLE objects and they
can contain OLE objects created elsewhere.
• Server Document
The server document is a file created in the server application that stores the original OLE object.
14.1.2 Types of OLE objects
• Static object
A static OLE object is a picture of an object that can be displayed and printed, but not edited in place.
It does not have a connection to a server application. There are two kinds of static objects: static
bitmaps and static metafiles.
• Embedded object
An embedded object contains a representation of the object, as well as information that defines the
content. It does not have a connection to the original object in the server document. As a general
rule, use embedded objects when you need to edit the object independently of the original server
document.
• Linked object
A linked object contains a representation of the data and a link to the file where it originated. As a
general rule, use linked objects when the data in the server document is changing and you want the
object in your report to be updated when you open the report.
14.1.3 General OLE considerations
There are several points to keep in mind when utilizing OLE functionality.
2013-05-06302
OLE

• When you double-click an embedded OLE object, the object is activated for editing and the Report
Designer merges its menus and toolbars with those of the object's server application. If the OLE
server application does not support this behavior, the object appears in a separate window. When
you are finished editing, click outside the object and the Report Designer toolbars reappear.
• When you double-click a linked OLE object, the program opens the object's server application with
the object displayed and ready for editing. You cannot edit a linked object in place in Crystal Reports
because you are working on the original object. Since the object could be linked to multiple documents,
displaying the original in the server application limits access to one editor at a time.
14.2 Inserting OLE objects into reports
There are several ways to insert OLE objects into an application.
• The OLE Object choice on the Insert menu can be used to import an existing object or create a new
one. You can place either embedded or linked objects using this method.
• Paste Special on the Edit menu can be used to copy or cut the object from an OLE server application
and paste it in a report. If the object can be pasted in multiple formats, you need to decide which
format to use. For example, when inserting text from a Microsoft Word document, you can paste
the text as Microsoft Word document text (which can be edited in Word), or as a metafile, which is
simply a non-editable picture of the text. Use Paste Special to place either embedded or linked
objects.
Note:
When inserting selected information (portions of larger files), it is best to use Copy and Paste Special
editing. When inserting entire files, click OLE Object from the Insert menu.
14.2.1 To copy and paste OLE objects
This procedure assumes that you have Microsoft Excel or another spreadsheet program on your
computer that is an OLE server application.
1.
Open both Crystal Reports and Microsoft Excel.
2.
Open an existing report in Crystal Reports.
3.
Create a spreadsheet in Microsoft Excel by typing the numbers one through ten (1-10) in cells A1
through A10.
4.
Select cells A1 through A10, right-click and select Copy from the shortcut menu in Excel.
5.
Go to Crystal Reports and select Paste from the Edit menu.
6.
Place the cells into the Details section of the report.
7.
Right-click the spreadsheet object in the report and observe that it is identified as an OLE object
and that the third command from the last identifies it as a Worksheet Object.
2013-05-06303
OLE

8.
Double-click the spreadsheet object.
The menus and toolbars change to a combination of those from the OLE server application and
Crystal Reports. You can now edit the object in-place. The object is an embedded object. Any
changes you make to the object will not affect the original.
9.
Click outside the object when you are finished.
The menus and toolbars change back to those of Crystal Reports. Any changes you made while
editing are saved.
14.3 How OLE objects are represented in a report
An OLE object is displayed in a report in any of several different formats depending on how you chose
to insert the object.
• If you have chosen to display the object as an icon, the icon will appear in the report. Users can
choose to edit the object later by double-clicking the icon.
• If the object was created from an existing file, the data from that file (or an icon) is displayed in the
report. This data can be edited by double-clicking the object or its icon.
• If you are creating a new object, the application for the object type that you chose will open, and
you can begin designing the object. When you are finished, close or exit the application. The object
(or its icon) will be displayed in the report.
14.4 Editing OLE objects in reports
14.4.1 In-place editing
In-place editing is the ability to change an OLE object's properties from within an OLE container
application (such as Crystal Reports). The container application's menu items change to provide the
editing tools from the server application so that you can make changes easily.
When an OLE object is placed in a report, the object becomes part of the report. To edit the object,
double-click it and then modify it using the editing tools found in the object's original application or from
a similar application that allows in-place editing. You can edit an OLE object only if you have the
corresponding server application installed on your computer. You can view and print a report containing
an OLE object even if you don't have the server application installed.
2013-05-06304
OLE

14.4.2 Dynamic OLE menu commands
When you have an OLE object selected, there is a submenu on the Edit menu that provides commands
for the object. The name of this submenu reflects the type of the OLE object. The commands on the
submenu also vary according to the type of object.
The object may be described as a Document object, Bitmap Image object, Picture object, Worksheet
object, or something similarly descriptive:
• If the object is embedded, the Edit menu displays those commands that are available to that type
of embedded object.
• If the object is linked, the Edit menu displays commands for that type of linked object.
Commands on the context menus change in a similar fashion.
These dynamic commands are provided to give you more control when working with OLE objects.
14.4.3 OLE and the Insert Picture command
When the OLE Object command on the Insert menu is used to place pictures in a report, the picture
will be converted to an embedded or linked object associated with Microsoft Paint (or another image
editing application).
When the Picture command on the Insert menu is used to place pictures in a report, the Report Designer
converts them into static objects.
Static objects cannot be edited. To edit a static object, it has to be converted into an editable type of
object using the Convert command on the Edit menu.
14.5 Working with static OLE objects
You can insert a number of different types of static OLE objects into your report. Crystal Reports supports
these pixel-based image formats:
• Windows Bitmap (BMP)
• TIFF
• JPEG
• PNG
2013-05-06305
OLE

As well, Crystal Reports supports this vector-based image format:
• Windows Metafiles (both WMF and the newer enhanced metafile format).
Note:
Wide static OLE objects can span pages. This functionality may result in two or more horizontal pages
in your report. If this do not want this effect, you should resize your static OLE object. As well, it is
recommended that you do not use the Repeat on Horizontal Pages option for any static OLE object
that will span several pages.
14.5.1 Inserting a static OLE object
1.
Open or create a report that you want to insert a static OLE object in.
2.
On the Insert menu, click Picture.
Tip:
Another way to do this is to click the picture button on the Insert Tools toolbar.
The Open dialog box appears.
3.
Select a picture (.bmp, .tiff, .jpg, .png, or . wmf) from a directory that you have access to.
4.
Click Open.
5.
When the object frame appears, place the picture in your report.
6.
Right-click the picture, and notice that the picture is identified as an OLE object on the shortcut
menu.
When you double-click the object, nothing happens. A static OLE object cannot be edited.
14.5.2 Making a static OLE object dynamic
A dynamic static OLE object is a picture that you access in Crystal Reports by use of a file path or URL.
Typically, you use this option when you have the path to your pictures stored as a string field in a
database (that is, you do not have the actual objects stored in the database). You can also use this
option when you have pictures stored on a network share, and you know these objects change
occasionally.
The functionality of these dynamic static OLE objects (or dynamic graphics) is created in Crystal Reports
through the use of a conditional formatting formula that allows you to link to static OLE objects by
reference.
Note:
• This feature is activated when you refresh your report data; therefore, you may not notice a change
in the static OLE object until you click the Refresh button in Crystal Reports.
2013-05-06306
OLE

• When you schedule a report that contains a dynamic static OLE object in SAP BusinessObjects
Business Intelligence platform, the instances that are created contain the version of the static OLE
object as it existed in your Crystal report when you scheduled it. SAP BusinessObjects Business
Intelligence platform does not update the object dynamically for each instance.
• Reports that use an absolute or a relative path for a dynamic static OLE object are not supported
in an SAP BusinessObjects Business Intelligence platform environment for this release. If you plan
to publish reports that contain dynamic static OLE objects to SAP BusinessObjects Business
Intelligence platform, it is recommend that you use URL links for your OLE objects.
14.5.2.1 To make a static OLE object dynamic
1.
Right-click the static OLE object that you inserted, and choose Format Graphic from the shortcut
menu.
Note:
You begin the process of making a static OLE object dynamic by inserting the object into your report
as usual. This object becomes the default object. If Crystal Reports cannot find the dynamic reference
to the object, it uses the default object instead.
2.
In the Format Editor, click the Picture tab, and then click the Conditional Formula button
adjacent to the Graphic Location label.
3.
In the Formula Workshop, create the path to your static OLE object.
For example, if your path is stored in a database field, add that field to the formula.
4.
Click Save and close to return to the Format Editor.
5.
Click OK to return to your report.
6.
Click Refresh to update the reference link to your static OLE object.
14.5.3 Converting a static OLE object to a bitmap image object
1.
Right-click the static OLE object that you inserted, and choose Convert Picture Object from the
shortcut menu.
The Convert dialog box appears.
2.
Select Paintbrush Picture in the Object Type list, and click OK.
You have just converted a static OLE object to a modifiable OLE object.
Note:
This option does not appear if the original file was a metafile.
2013-05-06307
OLE

3.
Right-click the object you have just converted.
The command on the shortcut menu is now Bitmap Image Object.
4.
Double-click the object.
Microsoft Paint, or another graphics application installed on your machine, opens.
14.6 Working with embedded vs. linked objects
Since embedded and linked objects each have different properties, it is important for you to consider
the capabilities of each when deciding which OLE format to use.
14.6.1 Embedded objects
An embedded object can be created from within Crystal Reports or by using a file that already exists.
If you use an existing file, the object is copied to the report.
When changes are made to an embedded object it does not affect the original file and vice versa. The
changes are made only to the object within your report.
14.6.1.1 To insert an embedded OLE object
1.
Click the Design tab.
2.
On the Insert menu, click OLE Object.
The Insert Object dialog box appears.
3.
Select Create From File.
The dialog box changes, allowing you to either type in an object name or browse.
4.
Click Browse and choose a bitmap file (BMP).
5.
Click Open to return to the Insert Object dialog box.
6.
Click OK to return to the report.
An object frame appears.
7.
Place the object in your report.
8.
Right-click this picture and observe that it is also identified as an OLE Object on the shortcut menu.
2013-05-06308
OLE

The third command from the bottom of the shortcut menu identifies it as a Bitmap Image Object. It
is an embedded OLE object.
9.
Double-click the object.
You have remained in Crystal Reports but the menus and tools have merged with Microsoft Paint,
or those of another graphics package installed on your machine. These tools can be used to edit
the bitmap in place. Remember that even though you are working with the tools of the OLE server
application, you are not working on the original file; you are working with a copy and nothing you do
here will affect the original.
14.6.2 Linked objects
When a linked object is inserted into a report, Windows copies a snapshot of the data (not the data
itself) from a file that already exists. The image of the object is added to your report along with a reference
to the data used to create it. The actual data remains with the original file.
When the object is activated from within a report, the original file is opened inside the application that
was used to create it. Any changes you make directly affect the original file also.
If you want the data in an object to remain available to other applications, and always reflect the most
current changes to the data, link the object to the report. An automatic link is refreshed from the source
file every time the report is loaded; a manual link is refreshed only when you request it. You can force
a refresh, break a link, or redefine the link in the Edit Links dialog box.
When you have a linked object and you break the link using the Links dialog box, all connections to the
original data in the server document are broken. A linked object in a container application is merely a
representation of that object and a link between the object and the server document. When you break
the link you're left with only the representation, with no relationship to the original data or to the editing
capabilities of the server application. In this situation, Crystal Reports turns the object into a static object,
a stand-alone object that can neither be edited using OLE capabilities nor converted into an editable
OLE object.
14.6.2.1 To link a bitmap image object
1.
On the Insert menu, click OLE Object.
The Insert Object dialog box appears.
2.
Select Create From File.
The dialog box changes, enabling you to enter an object name or browse.
3.
Click Browse and choose a bitmap file (BMP).
2013-05-06309
OLE

4.
Click Open to return to the Insert Object dialog box.
5.
Select the Link check box.
6.
Click OK to return to the report.
An object frame appears.
7.
Place this object in your report.
8.
Right-click this object and observe that this object is identified as an OLE object.
The third command from the bottom of the shortcut menu identifies this as a Linked Bitmap Image
Object.
9.
Double-click the object.
Microsoft Paint or the graphics application you are using opens, displaying the original file. Any
changes you make to the original will be reflected in the object that appears in your report.
14.7 Integrating Shockwave Flash (SWF) objects
Flash technology is a popular way to add animation to web pages. Flash files can be viewed in a
standalone Flash Player, inserted into web pages or inserted into Crystal Reports.
Flash files have a .swf extension. To modify an SWF, you will need the original source file and a Flash
authoring tool.
You can either embed an SWF or link to an SWF in any section of a Crystal Reports report.
When you embed the object, you can bind it to the report, but you may be able to bind to only a single
variable. You can bind to multiple values in a cross-tab, but you cannot automatically extract the values.
To bind to multiple values, you should use an SWF object that has been created with Xcelsius 2008.
When you link to an object, you will see a static representation of the data. If the SWF object that you
link to is updated, you must close and reopen your report to view the changes.
There are restrictions for SWFs created using the Crystal Reports data connection in Xcelsius 2008.
Those SWFs can be added to the following sections only:
• Report header
• Group header
• Group footer
• Report footer
Note:
• You must have Adobe Flash Player 9 installed on your machine to test the functionality of the Flash
object.
• To view a report that contains a Flash object, you need a viewer that supports Flash rendering such
as the .Net Webform or the Java DHTML viewers.
2013-05-06310
OLE

• Reports that are exported or printed will display the default image that you have set instead of the
SWF object.
The only format that will display SWF objects in exported reports is PDF. However, if the object
contains data binding to the report, the default image is displayed instead of the SWF.
14.7.1 Printing Shockwave Flash (SWF) objects
Crystal Reports allows you to print SWF objects in your report without the need to first export the report
to PDF. The "Print Flash Objects for Current Page" option in the "Print Setup" dialog allows you to print
the SWF object that you are currently viewing. The state that you set your SWF object to is the state
that it will be printed.
The printing option can print SWF objects that have data binding as well as SWF objects that do not
have data binding.
Note:
The Flash printing option only prints SWF objects on the page that you are currently viewing. If you
print the entire report, SWF objects on other pages of the report will print as SWF fallback images.
14.7.1.1 To print Shockwave Flash (SWF) objects
1.
Select the page with the SWF object that you want to print.
2.
Adjust the SWF to your desired settings.
3.
From the "File" menu, select Print.
The "Print Setup" dialog box opens.
4.
Ensure that Print Flash Objects for Current Page is selected.
5.
Click Print.
14.7.2 Adding an Xcelsius SWF object to a report
Shockwave Flash (SWF) files cannot be created within Crystal Reports, but they can be displayed.
The "Design" tab displays a placeholder image of the SWF, and the "Preview" tab displays the actual
SWF file.
2013-05-06311
OLE

Note:
In the "Design" view, if you choose to insert an SWF that contains an embedded movie or sound, you
will hear the sound, but you will not see the movie play. This may cause an echo when you switch to
the "Preview" view.
Please consult with your System Administrator to find out how to resolve this issue, or check the Business
Objects support site for more information.
14.7.2.1 To add an Xcelsius SWF object to a report
1.
On the Insert menu, click Flash.
The Insert Flash Object dialog box appears.
Note:
Use one of the following options as an alternative method for inserting a flash object:
•
On the Insert Tools toolbar, click the Insert Flash Object button.
• Right-click in the report and from the context menu, select Insert Flash Object.
2.
Enter the full path for the flash object. If you do not know the exact path, click Browse to find the
desired file.
3.
Select either embed or link, and then click OK.
The flash object is added to the report.
4.
Drag the object frame to the position where you wish to place the flash object.
14.7.3 Using data binding to bind an Xcelsius SWF object to a report
Data can be sent from a report to an SWF, but not from an SWF to a report. The parameters in the
SWF are extracted to set the name of the parameter and the format of the data, such as cell, row, or
table.
There are three ways to bind data to Flash variables within the SWF object:
• Bind to a cross-tab in the SWF.
A user interface that is like the cross-tab expert allows you to map rows, columns, and summarized
fields to Xcelsius variables.
• Bind to an external cross-tab.
You can bind data to a cross-tab within the report.
• Bind to a single value.
2013-05-06312
OLE

You can bind data to one detail item in the report. Select fields from the tables to bind to existing
variables in the "Flash Data Expert".
Note:
If a recurring field is selected, only the first instance is sent.
14.7.3.1 To bind data to a cross-tab
1.
Right-click the SWF object and select Flash Data Expert.
The Flash Data Binding Expert appears.
2.
Select a data field and drag it to a row or column of the cross-tab.
3.
When you have finished adding data fields to the cross-tab, click OK.
14.7.3.2 To bind data to an external cross-tab
1.
Right-click the SWF object and select Flash Data Expert.
The Flash Data Binding Expert appears.
2.
Select the Use Existing Cross-Tab check box.
3.
From the drop-down list, select the cross-tab to use.
4.
Click OK.
14.7.3.3 To bind data to a single value
1.
Right-click the SWF object and select Flash Data Expert.
The Flash Data Binding Expert appears.
2.
For each variable that is listed, select a field or type a value.
3.
When finished, click OK.
2013-05-06313
OLE

2013-05-06314
OLE

Cross-Tab Objects
15.1 What is a Cross-Tab object?
A Cross-Tab object is a grid that returns values based on the criteria you specify. Data is presented in
compact rows and columns. This format makes it easy to compare data and identify trends. It is made
up of three elements:
• Rows
• Columns
• Summary fields
• The rows in a Cross-Tab run horizontally (from side to side). In the example above, "Gloves" is a
row.
• The columns in a Cross-Tab run vertically (up and down). In the example above, "USA" is a column.
• The summary fields are found at the intersection of rows and columns. The value found at each
intersection represents a summary (sum, count, and so on) of those records that meet the row and
the column criteria. In the example above, the value at the intersection of "Gloves" and "USA" is
four, the number of gloves sold in the USA.
A Cross-Tab also includes several totals:
2013-05-06315
Cross-Tab Objects
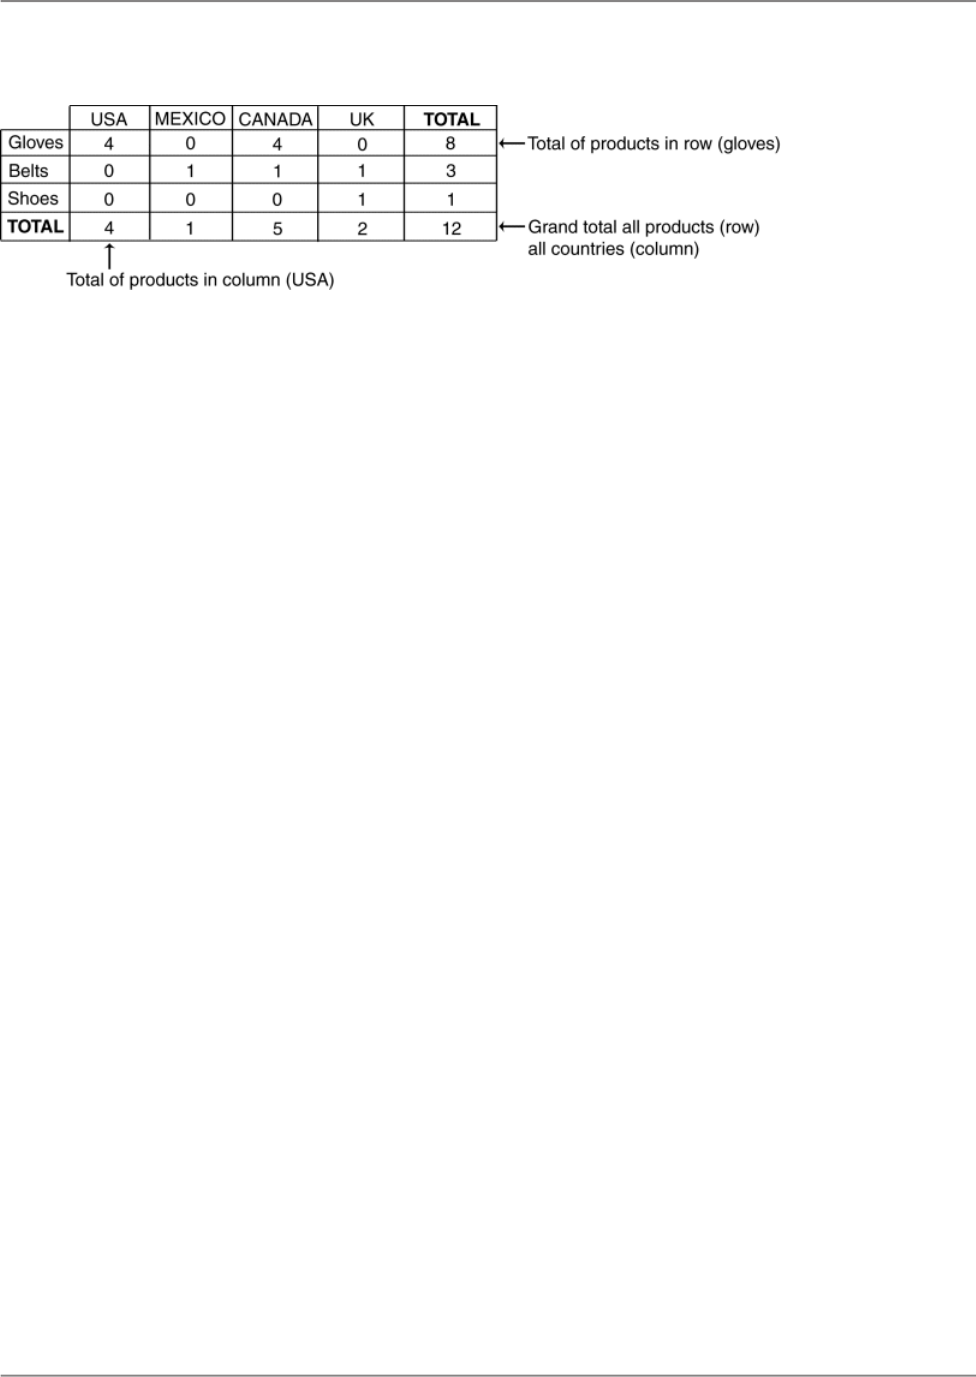
• At the end of each row is a total for that row. In the example above, this total represents a single
product sold in all countries. At the end of the "Gloves" row is the value 8, the total number of gloves
sold in all countries.
Note:
The total column can appear at the beginning of each row.
• At the bottom of each column is a total for that column. In the example above, this total represents
all products sold in a single country. The value at the bottom of the "USA" column is four, the total
number of products (gloves, belts and shoes) sold in the USA.
Note:
The total column can appear at the top of each column.
• At the intersection of the Totals column (totals for the products) and the Totals row (totals for the
countries) is a grand total. In the example above, the value at the intersection of the Total Column
and Total Row is 12, the total number of all products sold in all countries.
15.2 Cross-Tab example
This example demonstrates how you can use a Cross-Tab object to make it easier to understand
complex data. The goal of this report is to analyze the unit sales of five different bicycle locks in four
different regions (a unit sales of locks by region report). For greater clarity, only the most essential
information in these reports has been included:
• The region from which the order came.
• The name of the lock.
• The quantity ordered.
The first way of looking at the data is in the most basic of all reports, a columnar report with no grouping
or sorting.
15.2.1 Report of order data - no sorting/grouping
2013-05-06316
Cross-Tab Objects

This report presents details. Each row represents an individual order. There are many orders from each
of the regions for different locks. But because there is no summary information, it is nearly impossible
to get any useful information out of a report like this.
The next logical step is to group the data in some way. You can group it by region, or by product line.
The following section shows a look at both of these options.
15.2.2 Report of order data - grouped by region
This report uses the data seen in the first report, but here the data is grouped by region. All the orders
in each region are grouped together, but each regional group contains orders for different types of locks.
Because the groups contain different kinds of data, summarizing the Quantity field will determine the
total number of locks sold per Region, but not the total of each type.
2013-05-06317
Cross-Tab Objects

Each region group contains orders for different kinds of locks.
15.2.3 Report of order data - grouped by product
This report groups the data by product. Each group displays all the orders for a specific product. At first
it appears that this might be useful, but then it becomes clear that each product group includes orders
from several different regions.
The information is helpful, and it brings you closer to your goal, but you are still a long way from having
the information you need.
2013-05-06318
Cross-Tab Objects

Each product group contains orders for many regions.
15.2.4 Report of order data - grouped by region and product
This report is the logical next step. If the By Region report contains multiple products in each region
group, and the By Product report contains multiple regions in each product group, then it seems to
make sense to combine the two. Doing that, you group first by Region and then by Product.
2013-05-06319
Cross-Tab Objects

Each group contains orders for one product for one region. But the data is all spread out and remains
difficult to analyze. This information is useful, and with a little work you can use a report like this to get
the comparison information you need. However, a Cross-Tab offers a better solution.
15.2.5 Order data in a Cross-Tab object
With Cross-Tabs, all the information you need is provided in a compact format. The report shows the
products sold in each region and what the unit sales were. It is easy to see, for example, that Guardian
XL "U" Locks are not popular at all in BC but they are the biggest seller in Florida, or that Alabama is
being outsold by California in every lock category.
2013-05-06320
Cross-Tab Objects

In this Cross-Tab:
• Product names make up the row headings.
• Regions make up the column headings.
• The value at each row/column intersection is the sum of all the orders for a particular product for a
particular region; for example, the total number of Guardian Mini Locks purchased in British Columbia.
• The total at the end of each row is the total of all of the purchases for one product in all regions; for
example, the total number of Guardian ATB Locks purchased in Alabama, British Columbia, California,
and Florida combined.
• The total at the bottom of each column is the total number of all kinds of locks ordered in one region;
for example, the number of locks of all kinds purchased in California.
• The total in the bottom right corner is the grand total showing the total unit sales of all five locks in
all four regions.
The report is compact, and enables you to compare your customers' purchasing habits quickly.
15.3 Creating a Cross-Tab report
This section provides you with the steps to create a Cross-Tab object in a new report and how to add
a Cross-Tab object to an existing report.
Things to keep in mind when using Cross-Tab objects:
• You can drag report fields into or out of Cross-Tab objects.
• You can have multiple rows, columns, and summarized fields.
• You can use print-time formulas as your rows or columns.
2013-05-06321
Cross-Tab Objects

• You can use Running Total fields as your summarized field.
• You can include a group sort (top or bottom N) on the rows in your Cross-Tab.
Note:
Group sorting cannot be applied to columns.
• You can insert as many Cross-Tab objects in a report as you need.
• You can insert the Cross-Tab into either the Report Header or Footer, or the Group Header or Footer.
• You can place Cross-Tab objects in subreports. This is useful when you want to refer to the results
from another report.
15.3.1 To create a new cross-tab report
• On the Start Page, click Cross-Tab Report Wizard.
The Cross-Tab Report Creation Wizard appears.
15.3.2 To add a Cross-Tab to an existing report
1.
Open your report.
This example uses the Group By Intervals.rpt included in the Feature Examples directory.
2.
Click the Design tab.
3.
On the Insert menu, click Cross-Tab.
Tip:
Another way to do this is to click the Insert Cross-Tab button on the Insert Tools toolbar.
An object frame appears with the Arrow cursor as you drag the Cross-Tab object into the report.
4.
Place the object frame in an empty area in the Group Header #1 and click to release it.
An empty Cross-Tab object appears in your report. You can drag fields from your report or from the
Field Explorer into your Cross-Tab. This example uses Customer Name, Country, and Last Year's
Sales from the Customer table.
5.
In the Field Explorer, select Customer Name and drag it to the Cross-Tab.
This field will be your column value.
6.
Drag the field to the upper-right-hand corner of the Cross-Tab object.
You'll see a placement arrow to show you where the field will appear when you drop it.
2013-05-06322
Cross-Tab Objects

Once you have clicked to release the field, it appears to the right of the column that you selected.
7.
In the Field Explorer, select Country and drag it to the Cross-Tab.
This field will be your row value.
8.
Drag the field to the lower-left-hand corner of the Cross-Tab object, and click to release it.
9.
Finally, drag Last Year's Sales to the Insert Summary cells of the Cross-Tab, and click to release
it.
Tip:
Notice that all of the cells change color when you position the field over them.
10.
Click the Preview tab to see your Cross-Tab.
15.3.3 Specifying the data source
1.
On the Data screen, locate the data source you want to use.
This example uses the Xtreme Sample Database.
For information on how to select a data source, see Selecting the data source.
2.
Select the tables that contain the fields to include in the report.
2013-05-06323
Cross-Tab Objects

Tip:
Use the Ctrl-click combination to pick a non-continuous range of fields and the Shift-click combination
to pick a continuous list of fields.
This example uses Customer, Orders, Orders Detail and Product.
3.
Click the > arrow to add the selected tables.
4.
Click Next.
The Link screen appears.
15.3.4 Modifying the links
1.
In this example, check to make sure that the Customer table is linked to the Product table via the
Orders and Orders Detail tables.
If you do not like the linking that Crystal Reports has automatically suggested, change it by clicking
Clear Links, and then select the fields that you would like to link together.
2.
Click Next.
The Cross-Tab screen appears.
15.3.5 Adding a chart
1.
Select the kind of chart you want to see in your report:
• Bar Chart
• Line Chart
• Pie Chart
Note:
If you don't want to add a chart, leave No Chart selected and skip to Selecting records.
2.
Change the default charting information to suit your report.
For more information about creating a group chart, see Charting on summary or subtotal fields
(Group layout).
3.
Click Next.
The Record Selection screen appears.
2013-05-06324
Cross-Tab Objects

15.3.6 Selecting records
Use this screen to apply selection conditions. This limits the results that are returned in your report to
only those records that you are interested in.
1.
Select the field to apply selection to.
For this example choose Region.
2.
Click the > arrow.
The field is added to the Filter Fields area and the filter types list appears below it.
3.
From the filter types list choose a filter method.
For this example, choose "is one of" as the filter method.
4.
In the filter values list that appears, select the value(s) you want to filter on and click Add.
For this example, choose AZ, CA, and OR from the drop-down list.
The report will provide you with a breakdown and summary of accessory and bicycle sales for
Arizona, California, and Oregon.
5.
Click Next.
The Grid Style screen appears.
15.3.7 Defining the structure of the Cross-Tab
Add fields from the Available Fields area to the Rows, Columns, and Summary Fields areas.
1.
From the Customer table, select Region; then click the > arrow next to the Rows area.
The Region field is added to the Rows area.
Tip:
You can also add a field to the different Cross-Tab areas by selecting it and dragging it to the
Columns, Rows, or Summary Fields areas.
2.
From the Product table, select Product Class; then click the > arrow next to the Columns area.
The Product Class field is added to the Columns area.
3.
From the Orders table, select Order Amount; then click the > arrow next to the Summary Fields
area.
The Orders Amount is added to the Summary Fields area.
2013-05-06325
Cross-Tab Objects

4.
Select the summary operation you want to perform on Order Amount from the list beneath the
Summary Fields area.
5.
Click Next.
The Chart screen appears.
15.3.8 Applying a predefined style and finishing the report
1.
Select a style.
For this example choose Original.
2.
Click Finish.
The Cross-Tab report appears in the Preview tab.
3.
If you do not want the Cross-Tab to appear in the Report Header, click the Design tab, and move
the Cross-Tab to the Report Footer.
Note:
• You can also place your Cross-Tab in the Group Header or Footer.
• If you place the Cross-Tab in the Report Footer, unsuppress the footer by right-clicking in the
Report Footer's gray area and selecting Don't Suppress.
4.
Click the Preview tab to view the report.
15.3.9 Adding a Cross-Tab to an existing report using the Cross-Tab Expert
15.3.9.1 To add a Cross-Tab to an existing report using the Cross-Tab Expert
In this example, a Cross-Tab is added to an existing report to show the sales in North America compared
to the rest of the world. However, instead of defining the report by dragging fields into it, you will use
the Cross-Tab Expert.
1.
Open your report.
This example uses the Group By Intervals.rpt included in the Feature Examples directory.
2.
Click the Design tab.
3.
On the Insert menu, click Cross-Tab.
2013-05-06326
Cross-Tab Objects

Tip:
Another way to do this is to click the Insert Cross-Tab button on the Insert Tools toolbar.
An object frame appears with the Arrow cursor as you drag the Cross-Tab object into the report.
4.
Place the object frame in an empty area in the Report Header and click to release it.
An empty Cross-Tab object appears in your report.
5.
Right-click the Cross-Tab and select Cross-Tab Expert from the shortcut menu.
The Cross-Tab Expert appears. This dialog box is made up of three tabs: Cross-Tab, Style, and
Customize Style.
15.3.9.2 Defining the structure of the Cross-Tab
Add fields to the Rows, Columns, and Summarized Fields areas.
1.
From the Available Fields list, select Country; then click the > arrow next to the Rows area.
The Country field is added to the Rows area.
Tip:
You can also add a field to the different Cross-Tab areas by selecting it and dragging it to the
Columns, Rows, or Summarized Fields areas.
2.
From the Available Fields list, select Last Year's Sales; then click the > arrow next to the
Summarized Fields area.
The Last Year's Sales field is added to the Summarized Fields area.
3.
Apply additional structure:
• Click Country in the Rows area.
• Click Group Options.
• Select in specified order from the drop-down list.
• Type North America for the name of the Named Group.
• Click New.
• Choose is one of from the drop-down list.
• Select Canada, Mexico, and USA from the drop-down list.
2013-05-06327
Cross-Tab Objects

• Click OK to close the Define Named Group dialog box.
• Click OK to close the Cross-Tab Group Options dialog box.
15.3.9.3 Choosing a predefined style
1.
Click the Style tab.
2.
Select a style.
15.3.9.4 Applying a custom style
1.
Click the Customize Style tab.
2.
Customize the style as desired.
15.3.9.5 Finishing the Cross-Tab
1.
Click OK.
2.
On the Report menu, click Refresh Report Data.
The updated report appears.
2013-05-06328
Cross-Tab Objects

15.4 Working with Cross-Tabs
This section describes ways you can work with a Cross-Tab once you've added it to your report.
15.4.1 Showing values as percentages
1.
Right-click the blank top-left area of a Cross-Tab and select Cross-Tab Expert from the shortcut
menu.
The Cross-Tab Expert appears.
2.
On the Cross-Tab tab, select a summarized field; then click Change Summary.
3.
In the Edit Summary dialog box, select the Show as percentage of option, and choose the summary
field you want to base the percentage on.
4.
Choose Row or Column depending on whether you want your percentage values to be calculated
horizontally (row) or vertically (column).
5.
Click OK to close the Edit Summary dialog box.
6.
Click OK to return to your Cross-Tab.
Summarized field values are now displayed as percentages on your Cross-Tab.
Tip:
You can also access the Edit Summary dialog box directly from your Cross-Tab by selecting the summary
field and choosing Edit Summary from the shortcut menu.
15.4.2 Abbreviating large summarized fields
Because the values in a Cross-Tab's summarized fields are often very large, Crystal Reports lets you
abbreviate such values.
Note:
To complete this procedure, the report you're working with must include the custom function called cd
FormatCurrencyUsingScaling. The sample report called Custom Functions.rpt includes this
function.
1.
If there is no cross-tab object in the report, insert one in the Report Header.
Use Customer.Country for the Row, and Orders.Order Amount for the summarized field.
2013-05-06329
Cross-Tab Objects
2.
Right-click the summarized field you want to abbreviate and choose Format Field from the shortcut
menu.
The Format Editor appears.
3.
On the Common tab, click the conditional formatting button adjacent to Display String.
4.
In the Functions tree of the Format Formula Editor, select cdFormatCurrencyUsingScaling from the
Custom Functions folder.
5.
Complete the custom function's arguments as follows:
cdFormatCurrencyUsingScaling (CurrentFieldValue,1,"K","M")
• As the first argument, choose CurrentFieldValue from the Formatting Functions folder of the
Functions tree. This argument defines the actual value to be summarized.
• As the second argument, enter the number of decimal places you want to display on your
Cross-Tab.
• As the third and fourth arguments, enter the strings (surrounded by quotation marks) that you
want to display as thousands and millions symbols.
6.
Click Check to identify any errors in the formula.
7.
Fix any syntax errors the Formula Checker identifies.
8.
When the formula has the correct syntax, click Save and close on the Formula Workshop toolbar.
You return to the Format Editor dialog box.
9.
Click OK to return to your Cross-Tab.
Your summarized field values appear abbreviated as defined.
Note:
You can create your own custom function, or you can copy and modify the provided sample to abbreviate
a summarized field. In general, using a custom function is not a requirement of working with the Display
String feature. You can write any Display String formula you need as long as its return value is a string.
15.4.3 Customizing row/column labels
By default, row and column labels are derived from the data on which you base your Cross-Tab. You
can, however, customize row and column labels.
1.
Right-click the row or column whose label you want to customize and choose Format Field from
the shortcut menu.
The Format Editor appears.
2.
On the Common tab, click the conditional formatting button adjacent to Display String.
3.
In the Format Formula Editor, create formula text that describes the custom names you want to use
as well as the conditions under which these names should be applied.
2013-05-06330
Cross-Tab Objects

For more information about how to do this, see Working with conditional formatting.
4.
Click Check to identify any errors in the formula.
5.
Fix any syntax errors the Formula Checker identifies.
6.
When the formula has the correct syntax, click Save and close on the Formula Workshop toolbar.
You return to the Format Editor dialog box.
7.
Click OK to return to your Cross-Tab.
Your customized row and column names appear when the conditions you set are matched.
15.4.4 Using running totals in Cross-Tabs
Running Total fields can be useful as summary fields in Cross-Tab objects. Create your Cross-Tab as
shown in Creating a Cross-Tab report, but choose a running total field as your Summary Field.
Note:
You cannot use Running Total fields as columns or rows in a Cross-Tab.
If you want a running total that totals down the Cross-Tab's columns, you must sort the records in the
Cross-Tab by Column and then Row.
15.4.4.1 To total down columns
1.
Right-click the blank top-left area of a Cross-Tab and select Cross-Tab Expert from the shortcut
menu.
2.
On the Cross-Tab tab of the Cross-Tab Expert, make sure you have added a Running Total field
to the Summarized Fields area.
3.
Click OK to return to the Cross-Tab in your report.
4.
Click Record Sort Expert and sort your Cross-Tab by the field you designated as a Column
in the Cross-Tab Expert.
5.
Create a second sort on the field you designated as a Row in the Cross-Tab Expert.
If you want a running total that totals across the Cross-Tab's rows, you must sort the records in the
Cross-Tab by Row and then Column.
2013-05-06331
Cross-Tab Objects

15.4.4.2 To total across rows
1.
Repeat steps 1 to 3 of the previous procedure.
2.
Click Record Sort Expert and sort your Cross-Tab by the field you designated as a Row in the
Cross-Tab Expert.
3.
Create a second sort on the field you designated as a Column in the Cross-Tab Expert.
If you add a Group Sort (top or bottom N sort) based on a Running Total field, the sort is carried out on
the running total values as shown in the Cross-Tab's Row/Column Total areas—it is not based on the
summary field's totals. Also, in this case, the running total results appear correctly only in the total data
and not in the cell data.
15.4.5 Printing Cross-Tabs that span multiple pages
When you create a Cross-Tab that is wider or longer than the specified page size, the program
automatically spans the printing across enough pages to accommodate the size of the Cross-Tab. In
the Preview tab, a line will appear at each page break. For ease in reading, column headings will be
repeated on subsequent pages. Row headings can also be repeated using the Keep Columns Together
option.
15.4.5.1 To repeat row labels
1.
Right-click the blank top-left area of the Cross-Tab and select Cross-Tab Expert from the shortcut
menu.
The Cross-Tab Expert appears.
2.
Click the Customize Style tab.
3.
Select the Repeat Row Labels check box, if desired.
Crystal Reports lets you designate report objects that don't expand horizontally, such as text objects,
field objects, OLE objects, charts, maps, lines, boxes, and so on, to be repeated on each additional
horizontal page that a Cross-Tab creates. For more information, see Repeating report objects on
horizontal pages.
2013-05-06332
Cross-Tab Objects

15.5 Formatting Cross-Tabs
Crystal Reports has powerful formatting capabilities that can be applied to Cross-Tabs. The following
sections describe some key procedures.
By applying such formatting as background color, borders, and fonts, you can emphasize important
data and create professional-looking, easy-to-understand Cross-Tabs. For more information, see
Formatting properties.
You can also use the Highlighting Expert to apply conditional formatting to Cross-Tab cells. To access
the Highlighting Expert, right-click the cell you want to format and, on the shortcut menu, click Highlighting
Expert. For more details, see Using the Highlighting Expert.
15.5.1 Changing width, height, and alignment of Cross-Tab cells
1.
Click a cell within the Cross-Tab to activate the sizing handles.
2.
Click and drag one of the sizing handles to expand the width or height of the cell.
3.
Click an alignment option on the Formatting toolbar to change the alignment of the data in the cell.
You can choose between left, right, center, and justified alignment.
Note:
Changing one cell affects all like cells. For example, changing the width of one summary field cell
changes all other summary field cells at the same time.
15.5.2 Formatting background color of entire rows/columns
Use background colors to emphasize rows or columns within your Cross-Tab.
1.
Right-click the blank top-left area of the Cross-Tab and select Cross-Tab Expert from the shortcut
menu.
The Cross-Tab Expert appears.
2.
Click the Customize Style tab.
3.
Click the row (in the "Rows" area) or column (in the "Columns" area), and select a color from the
Background Color drop-down list.
4.
Click OK to return to the Cross-Tab.
The row/column is formatted as specified.
2013-05-06333
Cross-Tab Objects

15.5.3 Formatting fields individually
1.
Right-click the field you want to format and choose Format Field from the shortcut menu.
The Format Editor appears.
2.
In the Format Editor, make font, background, borders, numbering, currency symbols, and printing
characteristics choices.
3.
Click OK to return to the Cross-Tab.
The field is formatted as specified.
15.5.4 Formatting several fields at one time
1.
Use the Shift-click method to highlight the desired fields.
2.
Right-click any one of them and choose Format Objects from the shortcut menu.
The Format Editor appears.
3.
In the Format Editor, make font, background, borders, numbering, currency symbols, and printing
characteristics choices.
4.
Click OK to return to the Cross-Tab.
The fields are formatted as specified.
15.5.5 Suppressing Cross-Tab data
This section provides you with the steps required to suppress data in your report. You can suppress:
• Empty rows and columns.
• Row and column grand totals.
• Subtotals and their labels.
15.5.5.1 To suppress empty rows and columns
2013-05-06334
Cross-Tab Objects

1.
Right-click the blank top-left area of the Cross-Tab and select Cross-Tab Expert from the shortcut
menu.
The Cross-Tab Expert appears.
2.
Click the Customize Style tab.
3.
Select either the Suppress Empty Rows or Suppress Empty Columns check box.
4.
Click OK.
Now, when you print the report, empty rows and/or columns will not appear.
15.5.5.2 To suppress row and column grand totals
1.
Right-click the blank top-left area of the Cross-Tab and select Cross-Tab Expert from the shortcut
menu.
The Cross-Tab Expert appears.
2.
Click the Customize Style tab.
3.
Select either the Suppress Row Grand Totals or Suppress Column Grand Totals check boxes.
4.
Click OK.
15.5.5.3 To suppress subtotals and their labels
If you have more than two groups in your Cross-Tab you can suppress the subtotal and label for one
of them.
1.
Right-click the blank top-left area of the Cross-Tab and select Cross-Tab Expert from the shortcut
menu.
The Cross-Tab Expert appears.
2.
Click the Customize Style tab.
3.
Click the field whose subtotal you want to suppress.
The Suppress Subtotal and the Suppress Label check boxes become active.
4.
In the Group Options area, select the Suppress Subtotal check box.
5.
Click the Suppress Label check box to suppress the label associated with subtotal.
6.
Click OK.
2013-05-06335
Cross-Tab Objects

15.5.6 Displaying summarized fields horizontally
If you have two or more summarized fields in your Cross-Tab, you can display their values horizontally
instead of vertically (the default).
1.
Right-click the blank top-left area of the Cross-Tab and select Cross-Tab Expert from the shortcut
menu.
The Cross-Tab Expert appears.
2.
Click the Customize Style tab.
3.
In the Summarized Fields area, select Horizontal.
4.
Click the Show Labels check box if you want to display labels for the summarized fields.
Labels are displayed in the direction you chose for the summarized fields.
5.
Click OK.
15.6 Advanced Cross-Tab features
There are several ways to add even more information to your Cross-Tabs. This section covers several
advanced Cross-Tab features.
Related Topics
• Calculated Members
• Embedded Summaries
15.6.1 Calculated Members
You can add rows or columns to your Cross-Tab by inserting a Calculated Member. These rows or
columns can contain custom calculations (for example, the difference in sales between two regions) or
can be used entirely for formatting purposes (for example, inserting a blank row every three lines to
increase readability).
You have complete flexibility in designing your own calculation formulas and can choose whether they
appear only once or repeat regularly in the Cross-Tab.
2013-05-06336
Cross-Tab Objects

Related Topics
• Calculation Formulas
• Header Formulas
• Insertion Formulas
• Value Formulas
15.6.1.1 To add a Calculated Member to your Cross-Tab
1.
In your Cross-Tab, right-click the row or column header you would like to use as the first value of
your Calculated Member.
For example, if you wanted to create a Calculated Member for the difference between Sales and
Sales Returns, the desired formula would be Sales - Sales Returns. In this example, you would
right-click the Sales header.
2.
On the shortcut menu, point to Calculated Member, and select the chosen value as your first value.
In this example, you would select Sales as your first value.
3.
In your Cross-Tab, right-click the row or column header you would like to use as the second value
of your Calculated Member.
In this example, you would select Sales Returns as your second value.
4.
On the shortcut menu, point to Calculated Member, and select the desired calculation.
In this example, you would select Difference of "Sales" and "Sales Returns" as the desired
calculation.
A row or column that displays the results of the selected calculation appears in your Cross-Tab .
15.6.1.2 To add a blank row or column to your Cross-Tab
1.
In your Cross-Tab, right-click the header immediately preceding the desired location of your blank
row or column.
2.
On the shortcut menu, point to Calculated Member, and depending on whether you have clicked
a row or a column, click either Insert Row or Insert Column.
A blank row or column appears in your Cross-Tab.
15.6.1.3 To change the processing order of Calculated Members
2013-05-06337
Cross-Tab Objects

1.
Right-click the top-left corner of your Cross-Tab.
2.
On the shortcut menu, point to Advanced Calculations, and click Calculated Member.
The Cross-Tab Calculated Members Expert appears.
3.
In the Calculated Members box, use the arrows to change the processing order of the Calculated
Members.
4.
Click OK to save your changes and return to your report.
The Cross-Tab recalculates the values of the Calculated Members.
Note:
Changing the processing order of Calculated Members does not cause a database refresh.
15.6.1.4 Calculation Formulas
Calculation Formulas are mathematical formulas that Crystal Reports uses to determine Calculated
Member cell values. You can choose between several pre-defined formulas or design your own in the
Formula Workshop.
The pre-defined formulas are as follows:
• Sum of
• Difference of
• Product of
• Quotient of
Crystal Reports is equipped with a variety of functions to help you design your own formulas.
15.6.1.4.1 To edit a Calculation Formula
1.
In the Calculated Member you would like to edit, right-click any cell except for the header.
2.
On the shortcut menu, point to Calculated Member, and click Edit Calculation Formula.
The Formula Workshop appears.
3.
In the Formula Workshop, enter the desired Calculation Formula.
4.
Click Save and close to return to your report.
The Calculated Member displays the results of the new Calculation Formula.
15.6.1.5 Header Formulas
Header Formulas determine the visible row or column header for a Calculated Member.
2013-05-06338
Cross-Tab Objects

15.6.1.5.1 To edit a Header Formula
1.
Right-click the header of the Calculated Member you would like to edit.
2.
On the shortcut menu, point to Calculated Member, and click Edit Header Formula.
The Formula Workshop appears.
3.
In the Formula Workshop, enter your desired header name in quotations.
Note:
You can also control your header formulaically. A Header Formula must return a string.
4.
Click Save and close to return to your report.
The Calculated Member header displays the result of the Header Formula.
15.6.1.6 Value Formulas
If you want to reference a Calculated Member in a formula, you must assign a value to it. Value
Formulas assign values to Calculated Members for this purpose.
15.6.1.6.1 To edit a Group Value Formula
1.
Right-click the header of the Calculated Member you would like to edit.
2.
On the shortcut menu, point to Calculated Member, and depending on whether you have clicked
a row or a column, click Edit Row Value Formula or Edit Column Value Formula.
The Formula Workshop appears.
3.
In the Formula Workshop, enter your desired value.
Note:
You can also control your value formulaically. A Value Formula must be of the same type as the
row/column grouping field that it is inserted into.
4.
Click Save and close to return to your report.
The Calculated Member retains the result of your Value Formula.
Note:
If you have not edited the Header Formula for a Calculated Member, the visible header displays the
result of the Value Formula. When you edit the Header Formula, it overrides the Value Formula as
the visible header.
15.6.1.7 Insertion Formulas
2013-05-06339
Cross-Tab Objects

Insertion formulas determine where a Calculated Member appears in a Cross-Tab. In most cases,
a Calculated Member appears only once. However, you can set it to appear in multiple locations or in
a repeating pattern.
15.6.1.7.1 To edit an Insertion Formula
1.
Right-click the header of the Calculated Member you would like to edit.
2.
On the shortcut menu, point to Calculated Member, and click Edit Insertion Formula.
The Formula Workshop appears.
3.
In the Formula Workshop, enter your desired formula.
For example, the following formula inserts a Calculated Member after the country field for Canada:
GetColumnGroupIndexOf(CurrentRowIndex) = 1 and GridRowColumnValue("Customer.Country") = "Canada"
4.
Click Save and close to return to your report.
The Calculated Member appears in the locations specified by the Insertion Formula.
15.6.2 Embedded Summaries
You can add an additional calculation to your Cross-Tab by inserting an Embedded Summary.
Unlike Calculated Members, Embedded Summaries do not add rows or columns to your Cross-Tab.
Instead, they cause additional calculations to appear within each cell of the Cross-Tab.
For example, in a report showing regional sales, you could insert a calculation for each region that
shows the percentage of total sales for the country.
15.6.2.1 To add an Embedded Summary to your Cross-Tab
1.
In your Cross-Tab, right-click any cell except for a header.
2.
On the shortcut menu, point to Embedded Summary, and click Insert Embedded Summary.
A blank Embedded Summary appears in the Cross-Tab.
3.
In the Embedded Summary, right-click the text that says "Edit this formula."
4.
Point to Embedded Summary, and click Edit Calculation Formula.
The Formula Workshop appears.
5.
In the Formula Workshop, enter the desired Calculation Formula.
6.
Click Save and close to return to your report.
The Embedded Summary displays the results of the new Calculation Formula.
2013-05-06340
Cross-Tab Objects

15.6.2.2 To change the processing order of Embedded Summaries
If you have multiple Embedded Summaries in your Cross-Tab, the order in which they are calculated
can affect your results. You can change the processing order of Embedded Summaries in the
Embedded Summaries dialog box.
1.
Right-click the top-left corner of your Cross-Tab.
2.
On the shortcut menu, point to Advanced Calculations, and click Embedded Summary.
The Embedded Summaries dialog box appears.
3.
In the Summaries box, use the arrows to change the processing order of the summaries.
4.
Click OK to save your changes and return to your report.
The Cross-Tab recalculates the values of the Embedded Summaries in the new processing order.
Note:
Changing the processing order of Embedded Summaries does not cause a refresh from the database.
2013-05-06341
Cross-Tab Objects

2013-05-06342
Cross-Tab Objects

Building Queries
16.1 Connecting to a universe
You access the Business Objects Query Panel in Crystal Reports through the Database Expert. Once
you have selected Universes from the Create New Connection node, you are prompted to log onto SAP
BusinessObjects Business Intelligence platform, after which you can select a universe and design your
query.
Crystal Reports can connect to multilingual universes and report off of them, but it cannot take advantage
of the multilingual attributes. Crystal Reports will display multilingual field names and other metadata
content only in the primary language of the universe.
You can only base new documents and queries on universes for which you have been granted the
custom right, Create / Edit Query.
Note:
If you are a user of Web Intelligence and you are using the Query Panel in Crystal Reports, you will
encounter some differences in behavior from what you might expect in Web Intelligence.
16.1.1 To connect to a universe
1.
In Crystal Reports, on the File menu, click New, and then click Blank Report.
2.
In the Database Expert, double-click Create New Connection.
3.
Double-click Universes to view a list of universes you have the right to base new reports on.
4.
Log on to SAP BusinessObjects Business Intelligence platform if you have not done so already.
For information about how to log on to SAP BusinessObjects Business Intelligence platform, see
Working with Enterprise folders.
5.
Select the universe that you want to base your query on, and then click Open.
The Business Objects Query Panel appears.
2013-05-06343
Building Queries

16.2 Defining the data selection for a query
You build queries in the Query Panel by using objects in a Business Objects universe. The objects in
the universe are a graphical representation of the information available in a database. The objects in
the universe are mapped to the table columns and rows in the database.
You can only base new documents and queries on universes for which you have been granted the
custom right, Create / Edit Query.
The Query Panel is divided into several panes:
• The pane on the left shows a tree view of the objects that your universe contains. You cannot add
new objects or edit existing objects in the Query Panel. For information about the types of objects
that might appear in this pane, see Quick reference to objects.
Note:
You can see all available objects in this pane by selecting "All objects." If you want to see how objects
relate to each other, select "Hierarchies." This option provides you with a visual representation of
the hierarchical structure of objects if such a structure is present in the universe.
• The Result Objects pane is where you place the objects that you want as part of your query.
• The Query Filters pane is where you place the objects that you want to use to filter the data that is
returned from your universe. You can define your filter when you add an object to this pane.
16.2.1 To build a simple query
1.
In the Query Name field, enter a name for your query.
Note:
Crystal Reports uses the query name as the name of the SQL Command that it creates for your
report. Once you have created your query in the Query Panel, you will see this name in the Available
Data Sources and Selected Tables areas of the Database Expert.
2.
Select an object in the left-hand pane and double-click it or drag it into the Result Objects pane.
Objects that appear in the Result Objects pane become fields that you report on in your Crystal
report.
3.
Repeat the previous step for each object that you want to include in the query.
4.
Select an object in the left-hand pane, or in the Result Objects pane, and drag it into the Query
Filters pane.
2013-05-06344
Building Queries
Add filters to the Query Filters pane to restrict the data your query returns based on the object that
you selected. Filtering limits the data that a user can see and reduces the runtime of queries. For
information about adding filters, see Creating query filters.
5.
Click OK.
6.
If your query contains prompts, select your prompt value(s) in the Enter Parameter Values dialog
box.
For information about using the Enter Parameter Values dialog box, search for the dialog box by
name in the Crystal Reports Online Help.
7.
If your data source is secure, use the connection dialog box to log on to the database that your
universe uses.
For information about using the supported connection dialog boxes, search for "Data source
connectivity dialog boxes" in the Crystal Reports Online Help.
You can create a number of queries in the Query Panel that Crystal Reports combines through the use
of a Union join.
16.2.2 To create a combined query
•
Create a simple query and click Add a combined query.
A new pane is added to the Query Panel under the tree view. You can switch between your query
definitions by clicking the nodes in this pane.
Note:
• The objects in the result panel of the first query are copied into the new query. The program does
not copy existing query filters.
• When combining result objects of different datatypes from two queries into one query, the OK
button may be grayed out, and you may not be able to generate a report. For example, Query1
contains a string and a number and Query2 contains a string and a date.
Before trying to combine the queries, ensure that the objects in both queries have the same
datatype.
16.2.3 Quick reference to objects
An object is a named component that maps to data or a derivation of data in the database. For example,
an object may represent a column in a database table, or it may be the summary of the values in a
column.
2013-05-06345
Building Queries

You use objects in a query to retrieve data for your reports. For example, some of the objects in a
human resources universe might be Names, Addresses, and Salaries.
Objects can represent different types of information.
Note:
• Object properties are defined in the BusinessObjects Designer, but are not taken into account by
the Query Panel in Crystal Reports.
• Objects cannot be defined directly in the Query Panel. Use the BusinessObjects Designer to define
objects in a universe.
DescriptionExamplesObject
This object retrieves the data
that provides the basis for anal-
ysis in a report. Dimension ob-
jects typically retrieve character-
type data (for example, cus-
tomer names, resort names, or
dates).
Dimension
This object provides descriptive
data about a dimension. A detail
is always attached to the dimen-
sion for which it provides addi-
tional information. For example,
Age is a detail object that is as-
sociated with the Customer di-
mension. Address provides ad-
ditional information on cus-
tomers.
Detail
This object retrieves numeric
data that is the result of calcula-
tions on data in the database.
For example, Revenue is the
calculation of the number of
items sold multiplied by item
price. Measure objects are often
located in a Measures class.
Measure
2013-05-06346
Building Queries

16.3 Editing an existing query
You can return to the Query Panel to change an existing query, provided you have been granted the
custom right, Create / Edit Query. You can add or remove an object, or you can add, edit, or remove
a filter.
16.3.1 To edit an existing query
1.
In Crystal Reports, open a report created with a universe as a data source, go to the Database
menu, and click Query Panel.
2.
Log on to SAP BusinessObjects Business Intelligence platform if you have not done so already.
For information about how to log on to SAP BusinessObjects Business Intelligence platform, see
Working with Enterprise folders.
3.
In the Query Panel, edit your query as necessary.
4.
When you have finished editing your query, click OK.
5.
Click OK in the Database Expert to return to your report.
Changes that you made in your query are reflected in Crystal Reports.
Note:
If you remove objects from your query that you have used in your Crystal report, you must remove
these objects from the report.
16.4 Viewing the SQL behind a query
When you build a query, Crystal Reports automatically generates the SQL that corresponds to the query
and saves it as a Crystal SQL Command object.
For more information about SQL Command objects, search for "Defining an SQL Command" in the
Crystal Reports Online Help.
16.4.1 To view the SQL when you create a query
2013-05-06347
Building Queries

•
In the Query Panel, click View SQL.
The SQL dialog box appears; it contains the SQL that constitutes your query. Use this option when
you want to check the SQL as you create a query.
16.4.2 To view the SQL after you have created a query
• In Crystal Reports, open a report created with a universe as a data source, go to the Database
menu, and click Show SQL Query.
You can see the SQL in the Show SQL Query dialog box.
Or
In Crystal Reports, open a report created with a universe as a data source, go to the Database
menu, and click Database Expert.
Once you are in the Database Expert, right-click your query in the Selected Tables list and select
View Command. You can see the SQL in the View Command dialog box.
16.5 Query filters and prompts
16.5.1 Creating query filters
You can use the following types of filters in a query:
• Predefined filters
These filters are created by your administrator.
• Custom filters
You define these filters while you are creating the query.
• Prompts
Prompts are dynamic filters that you define to display a question or a list of values; users can select
different filter value(s) each time they refresh the report.
2013-05-06348
Building Queries

16.5.1.1 To add a predefined filter to a query
1.
Double-click the objects you want to use in your report, or drag them to the Results Objects pane.
For step-by-step instructions on selecting objects to build a query, see Defining the data selection
for a query.
2.
Drag a predefined filter to the Query Filters pane.
When you run the query, the data corresponding to the query filters you selected is returned to the
report.
Note:
Predefined filters are created and edited by your administrator. As a user of the Query Panel, you cannot
view the component parts of predefined filters, neither can you edit them.
16.5.1.2 To create a custom filter using the Filter Editor
1.
Select the object you want to filter and drag it to the Query Filters pane.
The Filter Editor appears. The name of the object you selected is displayed beneath the "Filtered
object" text.
2.
Select an Operator from the list.
For a description and example of each operator, see Quick reference to query filter operators.
3.
Select Constant or Value(s) from list.
4.
Depending on the operator you selected, type a single value or multiple values in the Type a value
field.
5.
Click OK to confirm the properties of the custom filter.
The new filter displays in the Query Filters pane.
16.5.2 Building prompts
A prompt is a dynamic filter that displays a question every time you refresh the data in a report. You
respond to prompts by typing or selecting the value(s) you want to view before you refresh the data.
Crystal Reports retrieves only the values you specified from the database and returns those values to
the report.
2013-05-06349
Building Queries

Tip:
Prompts allow multiple users view a single report but specify a different sub-set of the database
information. Prompts also reduce the time it takes for the data to be retrieved from the database.
16.5.2.1 To create a prompt
1.
Select the object you want to apply a prompt on and drag it to the Query Filters pane.
For example, if you want to allow users to specify the geographical region for the report, drag the
Region field to the Query Filters pane.
The Filter Editor appears. By default, the name of the filter is the name of the filtered object.
2.
Select an operator from the list.
See Quick reference to query filter operators.
Note:
You cannot use the following operators for prompts: Is null, Is not null, Both, and Except.
3.
Under Operator type, select Prompt.
The Prompt text field shows the default message.
4.
If you want to change the default message, edit it to word a question.
For example, you might ask "Which region do you want to see data for?"
5.
Check Select only from list if you want your prompt to display a list of values from which users can
select value(s).
Use this option to prevent users from typing a value that might not exist in the database.
6.
Click OK to confirm the prompt.
The prompt appears at each report refresh.
16.5.3 Combining query filters and prompts
You can apply multiple filters and prompts on a single query.
16.5.3.1 To combine filters and/or prompts
2013-05-06350
Building Queries

1.
Create each query filter and/or prompt.
For step-by-step information on how to create filters and prompts, see Creating query filters or
Building prompts.
By default, the Query Panel combines the filters and prompts with the And operator. You can leave
the And operator or change the operator to Or. See Using And or Or to combine query filters.
2.
If necessary, change the operator to Or by double-clicking the And operator.
Or now displays as the operator. The prompts appear when you click OK, or when you refresh the
report data.
16.5.4 Using And or Or to combine query filters
This table explains the difference between the And and the Or operators.
SelectExampleRetrieve this data
And
Customers who ordered sup-
plies in Q1 and in Q2 (the data
you retrieve will include: cus-
tomers who placed orders in
both Q1 and Q2).
Data true for both filters.
Or
Customers who ordered sup-
plies in: Q1 or Q2 (the data you
retrieve will include: customers
who placed orders in Q1only;
customers who placed orders
only in Q2, and; customers who
placed orders in both Q1 and
Q2).
Data true for any one of the fil-
ters.
2013-05-06351
Building Queries

16.5.5 Quick reference to query filter operators
The following table will help you select the operator you need to define a query filter.
Filter createdSelectExampleValues to retrieve
<Country> Equal to USEqual to
Retrieve data for the
US only.
Values equal to a value
you specify.
<Quarter> Different
from Q4
Different from
Retrieve data for all
quarters except Q4.
Values different from a
value you specify.
<Customer Age>
Greater than 60
Greater than
Retrieve data for cus-
tomers aged over 60.
Values greater than a
value you specify.
<Revenue> Greater
than or equal to
1500000
Greater than or equal
to
Retrieve data for rev-
enue starting from
$1.5M upward.
Values greater than or
equal to a value you
specify.
<Exam Grade> Less
than 40
Less than
Retrieve data for exam
grades below 40.
Values lower than a
value you specify.
<Age> Less than or
equal to 30
Less than or equal to
Retrieve customers
whose age is 30 or
less.
Values lower than or
equal to a value you
specify.
<Weeks> Between 25
and 36
Between
Retrieve the weeks
starting at week 25 and
finishing at 36 (includ-
ing week 25 and week
36).
Values between two
values you specify that
includes those two val-
ues.
<Weeks> Not Between
25 and 36
Not between
Retrieve all the weeks
of the year, except for
weeks 25 through 36
(week 25 and week 36
are not included).
Values outside the
range of two values
you specify.
2013-05-06352
Building Queries

Filter createdSelectExampleValues to retrieve
<Country> In list 'US;
Japan; UK'
In list
Retrieve data for only
the following countries:
the US, Japan, and the
UK.
Values that are the
same as several values
you specify.
<Country> Not in list
'US; Japan; UK'
Not in list
Don't retrieve data for
the following countries:
the US, Japan, and the
UK.
Values that are differ-
ent from the multiple
values you specify.
<Children> Is nullIs null
Retrieve customers
without children (the
children column in the
database has no data
entry).
Values for which there
is no value entered in
the database.
<Children> Is not NullIs not Null
Retrieve customers
with children (the chil-
dren column in the
database has a data
entry).
Values for which a val-
ue was entered in the
database.
<DOB> Matches pat-
tern, '72'
Matches pattern
Retrieve customers
whose date of birth is
1972.
Values that includes a
specific string.
<DOB> Different from
pattern, '72'
Different from pattern
Retrieve customers
whose date of birth is
not 1972.
Values that don't in-
clude a specific string.
<Account Type> Both
"fixed" and "mobile"
Both
Retrieve Telco cus-
tomers who have both
a fixed telephone and
a mobile phone.
Values that correspond
to two values you
specify.
<Account Type> "fixed"
Except "mobile"
Except
Retrieve Telco cus-
tomers who have a
fixed telephone, but
don't have a mobile
phone.
Values that correspond
to a single value and
do not correspond to
another value you
specify.
2013-05-06353
Building Queries

16.5.6 Editing and removing query filters
You can edit and remove filters on queries.
16.5.6.1 To edit a query filter
1.
Double-click the filter you want to edit.
The Filter Editor appears.
2.
Change the definition of the filter in the Filter Editor.
For information on how to define filters, see Creating query filters.
3.
Click OK to confirm your changes.
The modified query appears in the Query Filters pane.
16.5.6.2 To remove a query filter
• Drag the filter you want to remove and drop it onto the left-hand pane.
The filter is removed from the query definition and no longer appears on the Query Filters pane.
16.6 Filtering data using subqueries and database ranking
This section explains how to work with more advanced types of query filters. It covers the following
advanced query filters:
• Subqueries
• Database rankings
Subqueries and database rankings allow you to create filters that are much more powerful than standard
query filters.
2013-05-06354
Building Queries

16.6.1 What is a subquery?
A subquery is a more flexible kind of query filter that allows you to restrict values in more sophisticated
ways than with an ordinary query filter.
Subqueries are more powerful than ordinary query filters for the following reasons:
• They allow you to compare the values of the object whose values are used to restrict the query with
values from other objects.
• They allow you to restrict the values returned by the subquery with a WHERE clause.
Subqueries allow you to pose complex questions that are difficult or impossible to formulate with simple
query filters. For example: what is the list of customers and their associated revenue where the customer
purchased a service that had previously been reserved (by any customer) in Q1 of 2003?
16.6.2 Building a subquery
You build a subquery in the Query Filters pane of the Query Panel.
Note:
You can mix subqueries and other types of query filter in the Query Filters pane.
16.6.2.1 To build a subquery
1.
Add the objects that you want to appear in the query to the Result Objects pane.
2.
Select the object that you want to filter with a subquery, and then click Add a subquery.
The subquery outline appears in the Query Filters pane. By default the object you selected appears
as the Filter object and Filter By object. For more information on the Filter Object and Filter By object,
see Subquery parameters.
3.
To add a WHERE condition to the subquery, drag a query object to the white area of the subquery
outline.
Note:
You can use an existing subquery or standard query filter as a WHERE condition in a subquery. To
do so, drag and drop the existing filter or subquery to the white area of the subquery outline.
4.
Select the operator and values used to filter the object in the WHERE condition.
2013-05-06355
Building Queries
Note:
For more information on query filter operators and values, see Query filters and prompts.
5.
Click Add a subquery to add an additional subquery to the query filter.
By default the two subqueries are linked in an AND relationship. Click the AND operator to toggle
between AND and OR.
In addition to linking subqueries in AND or OR relationships, you can nest them (create subqueries
within subqueries) by dragging an existing subquery to the white area of the subquery outline. In
this case the inner subquery becomes part of the WHERE condition of the outer subquery.
16.6.2.2 Subquery parameters
A subquery or set of subqueries contains the following parameters:
DescriptionParameter
The object whose values are used to filter the re-
sult objects.
You can include more than one Filter Object. If
you do, Crystal Reports concatenates the values
of the objects you specify.
Filter Object(s)
The object that determines which Filter Object
values the subquery returns.
You can include more than one Filter By object.
If you do, Crystal Reports concatenates the values
of the objects you specify.
Filter By Object(s)
2013-05-06356
Building Queries
DescriptionParameter
The operator that specifies the relationship be-
tween the Filter object and the Filter By object.
Because of database restrictions you cannot use
certain combinations of operators and Filter By
objects together. For example, if you use the
Equal To operator with a Filter By object that re-
turns multiple values, the database rejects the
SQL because this type of subquery requires the
Filter By object to return one value only.
In cases where the generated SQL is rejected by
the database, you see an error message showing
the error description returned by the database.
Operator
An additional condition that constrains the list of
values of the Filter By object. You can use ordi-
nary report objects, predefined conditions or ex-
isting query filters (including subqueries) in the
WHERE condition.
WHERE condition (optional)
If there is more than one subquery, determines
the relationship between the subqueries.
AND - the conditions in all of the subqueries must
be satisfied.
OR - the conditions in any one of the subqueries
must be satisfied.
Relationship operator
16.6.3 What is a database ranking?
Database rankings allow you to answer questions like "what are the top three customers, based on the
revenue they generated for each year?" at the query level, without the need to return data that falls
outside the ranking to Crystal Reports. You can then filter this data using a ranking.
When you rank data you sort and filter it according to ranking criteria. This process is much like selecting
Top or Bottom N values when sorting groups in Crystal Reports. For more information, see Selecting
top or bottom N groups or percentages.
2013-05-06357
Building Queries

A database ranking allows you to specify a ranking at the query and database level so that the data
returned to Crystal Reports by the query is already ranked. This has the following advantages:
• Ranking data can be processing-intensive. By ranking at the database level you allow the server,
which is typically far more powerful than the client machine, to perform this processing.
• Pre-ranking data reduces the amount of data retrieved across the network and stored in Crystal
Reports.
Note:
• You can perform a database ranking only if your database supports it. If this is not the case, the
"Add a top bottom" button is disabled on the Query Panel toolbar. Databases that support ranking
are Oracle, DB2, Teradata and Redbrick.
• Crystal Reports uses the SQL-99 Rank function in ranking SQL.
• SQL is the query language supported by all relational databases (RDBMS), although each database
has its own syntax.
16.6.4 Creating a database ranking
You create a database ranking in the Query Filters pane of the Query Panel.
Note:
You can mix database rankings and other types of query filter in the Query Filters pane.
16.6.4.1 To create a database ranking
1.
Add the objects that you want to appear in your query to the Result Objects pane of the Query Panel.
2.
Select the object that you want to rank by.
3.
Click Add a database ranking on the toolbar.
The ranking outline appears in the Query Filters pane. The object that you selected appears as the
ranking dimension, and the first measure in the query appears as the ranking measure in the "Based
on" list.
Note:
The "Add a database ranking" button is disabled if your database does not support ranking.
4.
Select the ranking direction (Top or Bottom).
5.
Type the number of records you want the ranking to return in the box next to Top/Bottom.
2013-05-06358
Building Queries

Note:
You can specify a prompt instead of a constant by clicking the arrow next to the number. When you
select a prompt, the user must enter the ranking number when they run the query. For more
information on prompts, see Building prompts.
6.
Drag the object that provides the calculation context for the measure to the For each box.
This dimension is optional.
Note:
To display the "For each" box, click the arrow to the right of the "Based on" measure.
7.
Drag any objects that you want to include in the WHERE restriction to the white area of the ranking
outline. For more information on the WHERE restriction, see the explanation under What is a
subquery?.
16.6.4.2 Ranking parameters
The following table describes the parameters from left to right in the ranking:
DescriptionParameter
Ranking order.
Top - ranks in descending order.
Bottom - ranks in ascending order.
Top/Bottom
The number of records to return in the ranking.
For example, the top 10.
Number of records
The object used in the ranking. For example, if
the object is Region and the ranking is Top 10,
the ranking returns the top 10 regions.
Ranking object
The measure by which the ranking object is
ranked. For example, if the measure is Revenue
and the object is Region, Crystal Reports ranks
regions by the amount of revenue they generate.
Based on
2013-05-06359
Building Queries

DescriptionParameter
The object that specifies additional calculation
context for the ranking. For example, if the ranking
object is Region, the measure is Revenue and
the For Each dimension is Country, Crystal Re-
ports ranks regions by revenue within each
country.
For Each (optional)
Additional restriction on the values returned in the
ranking that appears below the other parameters.
For example, a ranking of regions with a condition
that restricts Country to "USA" ranks only those
regions in the USA.
WHERE condition (optional)
2013-05-06360
Building Queries

Creating and Updating OLAP Reports
17.1 OLAP reporting with Crystal Reports
Although relational databases such as SQL servers and PC databases are the most common sources
of data, Online Analytical Processing (OLAP) and Multi-Dimensional Data are rapidly becoming the
popular data-storage and analysis formats. Crystal Reports provides the same access and reporting
features for OLAP data sources that it provides for relational data.
Note:
The term OLAP is used in this topic to refer to all common forms of OLAP and Multi-Dimensional Data
storage and access systems.
Crystal Reports supports access to OLAP data through direct connection and Open OLAP gateways.
A direct connection requires an installed OLAP client and uses DLLs located on your local machine,
whereas the Open OLAP gateway doesn't require either. With an Open OLAP connection, data access
is achieved through a Name Server host that communicates with Crystal Reports and your OLAP data
source. Set up an Open OLAP connection on the Advanced Settings tab of the Connection Properties
dialog box.
For direct connections, Crystal Reports supports many OLAP server types. These types are displayed
in the Server Type list of the Connection Properties dialog box. This list is dynamic and will show those
server types for which you have an installed client.
Note:
Crystal Reports can open OLAP reports that were created in previous versions. However, while Crystal
Reports 9 can open version 10 OLAP reports with saved data, it cannot refresh them.
17.1.1 OLAP grid objects
When you design a report with OLAP data, Crystal Reports creates a primary report containing one or
more OLAP grid objects. OLAP grid objects look and act much like Cross-Tab objects, but they are
designed specifically for OLAP data.
2013-05-06361
Creating and Updating OLAP Reports

OLAP grid objects provide true multi-dimensional reporting. Add dimensions to either axis to analyze
three, four, or more dimensions in a single OLAP grid. Or instead of viewing multiple dimensions within
one OLAP grid, create multiple OLAP grids within the same report.
Note:
When Crystal Reports displays an OLAP grid, it can do so quickly if the grid is long (down many pages)
instead of wide (across many pages). When the grid is long, the program processes it on a page-by-page
basis. When the grid is wide, the program must gather all the data before it can display a page. This
may require significantly more processing time.
17.2 Creating an OLAP report
OLAP reports are created using the OLAP Report Creation Wizard or the OLAP Expert. Before you
start creating your report, ensure you have the following information:
• OLAP Type
• Server/Database name
• User ID
• Password
• Parameters (applies only to OLE DB for OLAP)
Tip:
You can return to the OLAP Report Creation Wizard by selecting the OLAP Design Wizard option on
the Report menu. Do this if you want to change your page dimensions, or if you want to change parameter
values.
17.2.1 To create an OLAP report
• On the Start Page, click OLAP Cube Report Wizard.
The OLAP Report Creation Wizard appears with the OLAP Data screen active.
17.2.2 Specifying the data source
Use the OLAP Data screen to define the OLAP data source.
1.
Click Select Cube.
2013-05-06362
Creating and Updating OLAP Reports

The OLAP Connection Browser appears.
2.
Browse your OLAP server for the cube you want to connect to.
If your server isn't in the list, click Add. In the Connection Properties dialog box, provide the server
information; then click OK.
3.
Select the desired cube and click Open.
The OLAP Data screen reappears with the supplied data source information.
4.
Click Next.
Note:
You can also click "Select CAR File" on the OLAP Data screen. If you choose this option, the Open
dialog box appears. Search for a file created in OLAP Intelligence Professional.
17.2.3 Defining the structure of the grid
Use the Rows/Columns screen to define how your data is structured within the grid. You can place the
dimensions into either the Columns or Rows areas.
Tip:
It is also possible to drag and drop the dimensions into either the Rows or Columns area.
1.
Select a dimension to appear in the report.
2.
Click the > arrow adjacent to either the Rows or the Columns areas, depending on where you would
like the dimension to be located.
3.
Continue adding dimensions to the Rows and Columns areas.
2013-05-06363
Creating and Updating OLAP Reports

4.
Click the Up and Down arrow buttons associated with the Rows and Columns areas to arrange the
order of the dimensions.
Note:
If you accidentally add a dimension to either the Rows or Columns area, click the < arrow to return
it to the Dimensions list.
5.
Select a dimension in either the Rows or the Columns areas and click Select Row Members or
Select Column Members to specify the members to be included in your report.
The Member Selector dialog box appears.
6.
Select the members you would like to include.
7.
Click OK.
8.
Select a dimension in either the Rows or the Columns areas and click Create/Edit Parameter to
create a parameter for use with the dimension.
The Create Parameter Field dialog box appears.
9.
Select default values, prompting text, and other options, and then click OK.
2013-05-06364
Creating and Updating OLAP Reports

Note:
• Once you have created a parameter, access to the Member Selector dialog box is disabled for
the dimension until you delete the parameter.
• If you create a row/column parameter, the View Cube command and the Cube View tab are not
available.
10.
If you want to delete a parameter, select the appropriate dimension and click Delete.
When you click OK in the Delete Link to Parameter Field dialog box, the program removes the
parameter description from the dimension.
11.
Click Next.
The Slice/Page screen appears.
17.2.4 Setting sliced dimensions and specifying the number of grids
Use this screen to set sliced dimensions and to specify the number of grids that are required.
The Slice area determines the boundaries that will be placed on your report. For example, if you have
a time dimension that is made up of fiscal quarter members, you could specify the report return the
results for a specific quarter.
Note:
If all of your members were used in the Rows/Column tab, nothing will appear here.
The Page area enables you to determine the number of grids and the subject of each. For example, if
you have a product dimension, you could put this in the page area and specify two different products.
This would result in two grids with the same rows, columns, and formatting, but each one would be
based on a different product.
17.2.4.1 To specify a slice
1.
To determine the member that is going to be used as the slice, select a dimension in the Slice list
and click Select Slice, or double-click a dimension in the Slice list.
The Member Selector dialog box appears.
2.
Select the appropriate member, expanding the structure if necessary.
3.
Click OK.
4.
Click Next if you do not want to add a page. The Style screen appears.
2013-05-06365
Creating and Updating OLAP Reports

17.2.4.2 To add a page
1.
Use the > arrow to add dimension(s) to the Page list.
The Member Selector dialog box appears.
2.
Expand the dimension's structure and select the appropriate members.
3.
Click OK.
17.2.4.3 To add a parameter
You can create a parameter field to link to any dimension. When you add a parameter to a dimension
in your OLAP grid, users are prompted to select a value when refreshing report data.
1.
Click the Create/Edit button.
2.
Select default values, prompting text, and other options, and then click OK.
3.
Click Next.
The Style screen appears.
Note:
Once you have created a parameter, access to the Member Selector dialog box is disabled for the
dimension until you delete the parameter.
17.2.5 Applying a predefined style
1.
Select a predefined style for the grid from the list.
Tip:
If you do not want to use a predefined style, click Next.
A preview of the color scheme you select appears on the right.
2013-05-06366
Creating and Updating OLAP Reports

Note:
The color of the style you select may not appear correctly if your screen resolution is set to 256
colors. Increase the resolution to correct this.
2.
Click Next.
The Chart screen appears.
17.2.6 Inserting a chart
1.
Select the kind of chart you want to add to your report from the options shown on the Chart screen.
Tip:
If you do not want to insert a chart, click Finish.
2.
Add a title for your chart.
3.
In the On change of list, select the dimension you want to base your chart on.
4.
If necessary, in the Subdivided by list, click a secondary row or column you want to base your chart
on.
2013-05-06367
Creating and Updating OLAP Reports

Note:
Be sure that the chart type selected in Step 1 supports a secondary charting field.
5.
Click Other Dimensions to define field values for any dimensions you've used in your OLAP grid
but not in your chart.
For more information refer to Charting on an OLAP cube (OLAP layout) and Creating charts.
6.
To finalize your report, click Finish.
17.3 Updating an OLAP report
The location of the OLAP data accessed by your report may change. Some possible scenarios include:
• The location of the OLAP server or database may change due to restructuring of Information System
resources.
• Another cube instance may have been successfully processed and reflect more current information.
• New reports may be developed on a smaller database that represents a subset or production version
of the primary OLAP database, then ported over to the actual working database to report on real
data.
Before updating your report, it is important to ensure that it is compatible with the data. Some things to
look for include:
• Removing dimensions contained in the report that are not in the cube.
• Removing fields referred to explicitly in the design of the report, such as a formula.
Note:
If a report contains subreports or grids, and the database used for them has changed name or location,
you must update each subreport or grid.
17.3.1 To update a cube location in an OLAP grid object
1.
Select the grid by clicking on the border.
2.
From the Database menu, click Set OLAP Cube Location.
Tip:
You can also right-click the grid and select Set OLAP Cube Location.
The Confirm Command dialog box appears.
3.
Click Yes.
The Set OLAP Cube Location dialog box appears.
2013-05-06368
Creating and Updating OLAP Reports

4.
Click Select.
The OLAP Connection Browser appears.
5.
Browse your OLAP server for the cube you want to connect to.
If your server isn't in the list, click Add. In the Connection Properties dialog box, provide the server
information; then click OK.
6.
Select the desired cube and click Open.
The Set OLAP Cube Location dialog box reappears.
7.
Click OK.
If your report contains multiple OLAP grids that are based on the same cube, the program prompts
you to update the remaining grids to the new location.
Finally, if the location of your report's relational database is the same as the location of your cube, you
are prompted to change the location of the relational database to match the new location of the cube.
Making sure that the location of the relational database and the OLAP cube match ensures that your
data remains synchronized. The program can change the location automatically, or you can change it
manually in the Set Datasource Location dialog box.
17.3.2 To update the database location
1.
In the Set Datasource Location dialog box, expand the Create New Connection folder in the "Replace
with" area.
2.
Expand the OLAP folder and search for the new cube location.
Tip:
You can double-click the Make New Connection option to search for the cube in the OLAP Connection
Browser.
3.
Select the data source name, or an individual table, and click Update.
The data source name is changed in the Current Data Source area.
4.
Click Close.
17.4 Formatting data in an OLAP grid
There are several ways to add formatting to rows and columns in an OLAP grid:
• Use the Highlighting Expert to apply conditional formatting to all types of report fields: Number,
Currency, String, Boolean, Date, Time, and DateTime fields.
2013-05-06369
Creating and Updating OLAP Reports

To access the Highlighting Expert, right-click the field you want to format and, on the shortcut menu,
click Highlighting Expert. For more details, see Using the Highlighting Expert.
• Use the Format Editor to apply absolute formatting to fields in the grid. Absolute formatting is applied
under all conditions, irrespective of the data values in the field.
To access the Format Editor, right-click the field you want to format; then, on the shortcut menu,
click Format Field. For more details, see Working with absolute formatting.
• Use the Formula Workshop to write your own conditional formatting formulas with Crystal or Basic
syntax. The Formula Workshop gives you maximum control over the formatting of the OLAP grid.
To access the Formula Workshop, open the Format Editor and click the appropriate Formula button.
For more details, see Working with conditional formatting.
• Use the OLAP Expert to reformat the entire OLAP grid. This expert provides all of the formatting
options that are available in the OLAP Report Creation Wizard.
To access the OLAP Expert, select the entire grid object by clicking one of its borders. Right-click
the selected grid and, on the shortcut menu, click OLAP Grid Expert.
The OLAP Expert has two tabs not found in the OLAP Report Creation Wizard. Use the Customize
Style and Labels tabs to format your OLAP grid.
As well as letting you format an OLAP grid's rows and columns, Crystal Reports lets you designate
report objects that don't expand horizontally, such as text objects, field objects, OLE objects, charts,
maps, lines, boxes, and so on, to be repeated on each additional horizontal page that the OLAP grid
creates. For more information, see Repeating report objects on horizontal pages.
17.4.1 Changing the background color of a dimension
1.
On the Customize Style tab of the OLAP Expert, select a dimension.
2013-05-06370
Creating and Updating OLAP Reports

2.
In the Group Options area, select the color from the Background Color list.
3.
Click OK if you have finished customizing your grid.
17.4.2 Creating an alias for a dimension
You can create aliases to shorten long dimension names. This is useful when you plan on referring to
a dimension in a conditional formatting formula (by using the GridRowColumnValue function).
1.
On the Customize Style tab of the OLAP Expert, select the dimension.
2.
In the Group Options area, enter an alias name in the Alias for Formulas field.
3.
Click OK if you have finished customizing your grid.
17.4.3 Formatting grid lines
In the Format Grid Lines dialog box, you can define whether the lines show or not, as well as the color,
style, and width.
2013-05-06371
Creating and Updating OLAP Reports

1.
On the Customize Style tab of the OLAP Expert, click Format Grid Lines.
The Format Grid Lines dialog box appears.
2.
From the list, choose the description of the area where you would like the lines to appear, or click
the appropriate area in the Format Grid Line diagram.
3.
Select the Draw check box to have your lines appear in the report.
4.
Select the color, style, and width.
5.
Click OK.
6.
Click OK if you have finished customizing your grid.
17.4.4 Labeling dimensions
In the Labels tab, you are able to define which dimensions will be labeled and how they will be displayed
in the grid. The dimensions available to you are the ones that have been designated as a page or slice.
1.
Using the arrow buttons, move the dimensions to the Unlabeled and Labeled areas as required.
2.
Make changes to the appearance of the label by using the options available in the Label Position
and Label Spacing areas.
3.
Click OK if you have finished customizing your grid.
17.5 Changing the view of OLAP data
When analyzing OLAP data in your report, there are several basic ways to change how the data is
displayed in the grid.
Note:
The methods described here let you manipulate your OLAP grid directly from the Preview tab of Crystal
Reports. You can also carry out the same and additional, more advanced, functionality on the Cube
View tab.
Search the online help for "Using the OLAP Worksheet" to learn more about the functionality available
on the Cube View tab.
17.5.1 To show or hide dimension members
1.
Right-click the dimension whose members you want to show or hide.
2.
On the shortcut menu, click Expand Member or Collapse Member.
2013-05-06372
Creating and Updating OLAP Reports

The dimension expands to show its members, or collapses to hide them.
Tip:
You can also double-click parent dimensions to drill down into the hierarchical data displayed in the
OLAP grid.
17.5.2 To create asymmetry in an OLAP grid
Using asymmetry, you can display different inner dimension members for any number of outer
dimensions.
Note:
You can create asymmetry only on stacked dimensions.
1.
Right-click the member that you want to remove.
2.
On the shortcut menu, point to Hide or Show and then select the appropriate option.
For information about how to use these options, search the online help for "Creating asymmetry"
and "Restoring symmetry."
17.5.3 To add totals to an OLAP grid
1.
Right-click the dimension you want to see totals for.
2.
On the shortcut menu, select Automatic Totals.
A submenu appears with options for the kind of totals you can add.
3.
Select the option you want.
A "Total" row or column (or both) is added to your OLAP grid. To remove totals later, select No Totals.
17.5.4 To change the display format for member names
1.
Right-click the dimension name.
2.
On the shortcut menu, point to Display Members Using, and then click one of the display options:
• Caption
• Name
• Caption : Name
2013-05-06373
Creating and Updating OLAP Reports

• Unique Name
For information about names and captions, search the online help for "Changing member captions."
17.5.5 To alter the data displayed in the OLAP grid
1.
Drag and drop rows and columns to rearrange the data in the OLAP grid.
2.
Drag and drop dimensions to and from the OLAP Labels area to add or remove data from the grid.
On the Preview tab, the OLAP Labels area is at the upper-left corner of the OLAP grid.
17.5.6 To define the order of fields in the OLAP grid
1.
Expand the row or column dimension whose fields you want to reorder.
2.
Right-click the dimension and, on the shortcut menu, click Reorder Displayed Members.
Note:
You cannot reorder members for dimensions that you have created row or column parameters for.
3.
In the Reorder Displayed Members dialog box, select fields and click the Up and Down arrows to
rearrange the members that are displayed in the grid.
4.
Click OK to affect your changes and return to the OLAP grid.
17.6 Sorting and filtering OLAP grid data
The sorting capabilities of the OLAP grid enable you to order data by row and column values. If you
want to limit the data based on particular field values, add one or more filters to the grid. Filters also
allow you to perform top or bottom N analysis (by actual values and by percentage).
17.6.1 Sorting data in an OLAP grid
Use the OLAP grid's sorting capabilities to quickly arrange grid data in a useful manner. You can add,
edit, and remove sorts by right-clicking the appropriate row or column member and selecting from the
2013-05-06374
Creating and Updating OLAP Reports

shortcut menu. You can sort data in ascending or descending order, and you can specify whether or
not you want to break grid hierarchies.
In the following grid, for instance, an ascending sort has been added to the Budget column.
In this case, the OLAP grid respects the parent/child relationships between grid members and sorts the
data values accordingly. (Frozen Goods precedes Bakery, but Pastry follows Frozen Goods.)
In the next example, the Budget column remains sorted in ascending order; in this case, however, the
Break Hierarchies option is selected.
Now the Report Designer disregards parent/child relationships between grid members and sorts on the
basis of data value alone. (Frozen Goods still precedes Bakery, but Pastry precedes all others.)
You can add up to three sorts to grid rows and up to three sorts to grid columns. In each case, the first
sort takes precedence, and each subsidiary sort serves to further differentiate between grid data. If you
add a fourth sort to a row or to a column, your first three are removed from the grid, and the new sort
becomes the single, primary sort.
Tip:
To locate a sorted row or column, move the mouse pointer over the OLAP grid. When you reach a
sorted member, the pointer turns into a double-arrow.
2013-05-06375
Creating and Updating OLAP Reports

17.6.1.1 To sort data in the OLAP grid
1.
Right-click the row or column member that you want to sort by.
2.
On the shortcut menu, point to Add First Sort.
3.
From the submenu, select from the available sort options:
• Ascending
• Descending
• Ascending, Break Hierarchies
• Descending, Break Hierarchies
Note:
An ascending sort on a grid row orders data values from lowest to highest, left to right. An ascending
sort on a column orders data values from lowest to highest, top to bottom.
Search the online help for "Sorting data" in the "Using the OLAP Worksheet" section to learn more
about sorting.
17.6.2 Filtering data in an OLAP grid
Use filters to exclude grid data that are not important, or to display only the data that you want to see.
You can filter grid data by actual values, or you can choose to exclude or display the top or bottom N,
or the top or bottom N%.
17.6.2.1 To add a filter
1.
Right-click the field whose values you want to filter.
2.
On the shortcut menu, click Add Filter.
3.
In the Define Filter dialog box, use the Filter Type list to specify how you want to filter the data.
You can filter data by "Actual values," or by selecting "Top/bottom n" or "Top/bottom n%."
4.
Use the Filter Definition options to specify which rows or columns you want to exclude or display.
5.
Click OK to add the filter and return to the OLAP grid.
2013-05-06376
Creating and Updating OLAP Reports

Tip:
• To locate a filtered row or column, move the mouse pointer over the OLAP grid. When you reach a
filtered row or column, the pointer turns into an X.
• If you filter all the cells in your OLAP grid, right-click the empty grid and select Remove All Filters
from the shortcut menu.
Search the online help for "Filtering data" in the "Using the OLAP Worksheet" section to learn more
about filtering.
17.7 Adding calculations to OLAP grids
Calculated members enable you to perform specific calculations on OLAP data and to display the results
in rows or columns that are added to the OLAP grid. You can create a quick calculation, such as a
Variance member calculated by subtracting Budget from Sales. Or you can use functions to perform
complex Statistical Analysis or Time Series calculations.
Search the online help for "Adding calculated members" in the "Using the OLAP Worksheet" section
to learn more about calculated members.
2013-05-06377
Creating and Updating OLAP Reports

2013-05-06378
Creating and Updating OLAP Reports

Printing, Exporting, and Viewing Reports
18.1 Distributing reports
Crystal Reports enables you to distribute your report using a variety of methods.
18.1.1 Printing a report
1.
On the File menu, select Print.
Tip:
Another way to do this is to click the Print button on the Standard toolbar.
The Print dialog box appears.
2.
Choose the appropriate settings, and then click OK.
The Printing Report dialog box appears showing the progress of your print job.
For information about printers and printer drivers, see these topics:
Related Topics
• Printer drivers
18.1.2 Faxing a report
Many fax applications, such as Microsoft Fax and Delrina WinFax, allow you to set up a printer driver
that will fax documents over a modem. When using one of these applications, you can fax a report from
Crystal Reports.
2013-05-06379
Printing, Exporting, and Viewing Reports

18.1.2.1 To fax a report
1.
On the File menu, click Print.
The Print dialog box appears.
2.
In the Print dialog box, click Find Printer.
The Find Printers dialog box appears. Use this dialog box to select your fax driver.
3.
Click OK.
You are returned to the Print dialog box.
4.
Choose the appropriate settings, and then click OK.
Your fax application appears, prompting you to select a cover page and to fill in the appropriate fax
information.
18.1.3 Exporting a report
Finished reports can be exported to a number of popular formats, such as spreadsheet, word processor,
HTML, ODBC, and common data interchange formats. This makes the distribution of information easier.
For example, you may want to use the report data to project trends in a spreadsheet package or to
enhance the presentation of data in a desktop publishing package.
Note:
Crystal Reports lets you insert objects anywhere on the report page. When you export to formats such
as Microsoft Word, Microsoft Excel, and HTML, however, objects that you placed between lines are
moved to the closest line in the output. To alleviate the formatting problems this behavior could cause,
it is recommended that you use Guidelines when designing your reports. For more information, see
Designing with guidelines .
The exporting process requires you to specify a format and a destination. The format determines the
file type, and the destination determines where the file is located.
18.1.3.1 Export format types
The export formats supported by Crystal Reports can be broadly categorized in two groups: page-based
formats and record-based formats.
2013-05-06380
Printing, Exporting, and Viewing Reports

Page-based formats tend to produce a more exact output. The emphasis of these formats is layout
representation and formatting. Formatting refers to attributes such as font style, text color, text alignment,
background color, and so on. Layout refers to object position, object size, and the relationship between
these attributes and other objects. Depending on the format you choose, it may not be possible for the
program to preserve all layout and formatting perfectly, but page-based formats, in general, preserve
these properties as closely as possible.
With record-based formats, the emphasis is on data rather than the layout and formatting. However, in
some formats—such as Microsoft Excel - Data only—you will notice that some formatting is exported.
Some of the record-based formats are only data-exchange formats.
Crystal Reports (RPT)
Exporting to Crystal Reports format is much like using the Save As feature with the "Save Data with
Report" option selected. This format exports (saves) your report with the current data without modifying
the original report.
Crystal Reports Read-only (RPTR)
Crystal Reports Read-Only (RPTR) reports are Crystal reports that can be viewed with report viewer
applications, but cannot be opened by the Crystal Reports designer. This enables you to protect your
intellectual property by preventing users from modifying the report or obtaining information about
proprietary business logic that is stored in the report definition
HTML 3.2 and HTML 4.0
HTML export formats are page based. The HTML 4.0 format preserves the layout and formatting of the
report by using DHTML. The HTML 3.2 format, however, cannot maintain all of the layout precisely.
The HTML 3.2 format is intended for backward compatibility with older browsers that do not support
HTML 4.0. All of the images in your report are saved externally and a hyperlink is inserted in the exported
HTML output. Therefore, this export format generates more than one file in the output.
Microsoft Excel (97-2003)
Microsoft Excel format is a page-based format. This format converts your report contents into Excel
cells on a page-by-page basis. Contents from multiple pages are exported to the same Excel worksheet.
If a worksheet becomes full and there is more data to export, the export program creates multiple
worksheets to accommodate the data. If a report object covers more than one cell, the export program
merges cells to represent a report object. Microsoft Excel has a limit of 256 columns in a worksheet;
therefore, any report object (or part of it) that is added to cells beyond 256 columns is not exported.
This export format retains most of the formatting, but it does not export line and box objects from your
report.
Microsoft Excel (97-2003) Data-only
Microsoft Excel (97-2003) Data-only is a record-based format that concentrates on data. However,
this format does export most of the formatting as well. Unlike the Microsoft Excel format, this format
does not merge cells; each object is added to only one cell. The data-only format can also export certain
kinds of summaries in Crystal Reports as Excel functions. The summaries that are supported are SUM,
AVERAGE, COUNT, MIN, and MAX.
2013-05-06381
Printing, Exporting, and Viewing Reports

To get the best output from Excel export formats, you should design your reports in an Excel-friendly
way. For more information, refer to the Technical Brief called "Exporting to Microsoft Excel" found on
the SAP Business Objects Support site.
Microsoft Excel Workbook Data-only
Microsoft Excel Workbook Data-only (.xlsx) is a record-based format that concentrates on data.
However, this format does export most of the formatting as well. The data-only format does not merge
cells; each object is added to only one cell. The data-only format can also export certain kinds of
summaries in Crystal Reports as Excel functions. The summaries that are supported are SUM,
AVERAGE, COUNT, MIN, and MAX.
Microsoft Word (97-2003)
Microsoft Word is a page-based, exact format that produces an RTF (Rich Text Format) file. The
exported file contains text and drawing objects to represent report objects. Individual objects are placed
in text frames. This format is intended for use in applications such as fill-out forms where the space for
entering text is reserved as empty text objects.
Almost all of the formatting is retained in this export format. Text objects cannot, however, be placed
outside the left edge of the page. Therefore, if you have text objects in your report that are placed before
the left edge of the printable area, they will be pushed right. (This is most noticeable in reports with
wide pages.)
Microsoft Word (97-2003) - Editable
The Microsoft Word - Editable format is different from the Microsoft Word format; it is a page-based
format, but not all of the layout and formatting are preserved in the output. This format converts all of
the report object contents to text lines. Unlike Microsoft Word format, this format does not use text
frames. Text formatting is retained, but attributes such as background color, fill pattern, and so on may
not be retained. All images in your report are inlined with the textual content and, therefore, the images
automatically shift to accommodate text when the document is edited in Microsoft Word. This format
does not export line and box objects from your report. As well, the special fields Page Number and
Page N of M do not work when exported in this format.
The Microsoft Word - Editable format has an option to insert page breaks at the end of each report
page. This option may not correspond to the page breaks created by Microsoft Word; the option is used
mainly to separate your report-page contents.
ODBC
ODBC is a record-based, data-exchange format. When you use this format, you can export your report
data to any ODBC-compliant database.
PDF
PDF format is a page-based format. The exported documents are intended for printing and redistribution.
PDF format will export both layout and formatting in a manner that is consistent with how the report
looks on the Preview tab. PDF format embeds the TrueType fonts that appear in the document.
(Non-TrueType fonts are not supported.) This export format does not support Microsoft font-linking
technology—which is used to provide support for some extended character sets such as Chinese HKCS.
Therefore, the fonts used in the report must contain all of the required glyphs. These URI types are
supported for hyperlinks: "http:", "https:" and "mailto:".
2013-05-06382
Printing, Exporting, and Viewing Reports

Record Style - Columns with spaces and Record Style - Columns without spaces
The record-style formats export report data as text. These formats export data only from Group and
Details areas. The output contains one line per record in the database (for the report). The record-style
formats are used mainly for data exchange.
Report Definition
The Report Definition format exports your report to a text file that contains a brief description of the
report's design view. This format is maintained only for compatibility with Crystal Reports 5.0.
Rich Text Format (RTF)
The Rich Text Format (RTF) format is similar to the Microsoft Word (97-2003) format.
Separated Values (CSV)
The Separated Values format is a record-based, data-exchange format. It exports the report object
contents as a set of values separated by separator and delimiter characters that you specify. (When a
comma (,) is used to separate fields, the format is known as Comma Separated Values (CSV); this
export format is popular among Microsoft Excel users.)
Like record-style formats, the Separated Values format also creates one line of values for each record
in your report. A record contains all of the fields in each section of your report as seen in the Design
view. That is, fields in the Report Header section are exported first, followed by the Page Header section,
the Group Header section, the Details section, the Group Footer section, the Report Footer section,
and finally, the Page Footer section.
The Separated Values format cannot be used to export reports with cross-tabs or OLAP grids; nor can
it be used to export reports with subreports in Page Header or Page Footer sections.
Note:
Standard Mode of the "Separated Values" format respects conditional suppression but only for report
content. The data is suppressed, but a row is printed in the report with the field delimiters. For example,
if your field delimiter is a comma and your report has four columns, you will see a blank row that contains
four commas.
Tab Separated Text (TTX)
The Tab Separated Text format is similar to the Text format. This format preserves the layout of your
report but with some differences. In the Text format, multi-line text objects are exported to multiple lines.
In this format, multi-line text objects are exported in a single line; all string values are surrounded by
double quotes (""); and the values themselves are separated by tab characters. TTX files can be opened
in Microsoft Excel.
Text
Text format is a record-based format. Its output is plain text; therefore formatting is not retained. However,
this format can preserve some of your report's layout. Text format assumes that a font of a constant
dimension is used throughout the export. The Characters Per Inch (CPI) option specifies the number
of characters that can be fit in a linear inch of horizontal space, and thus determines the dimension of
the font.
2013-05-06383
Printing, Exporting, and Viewing Reports

This format also provides an option for pagination. If you select this option, a page break is inserted in
the output after every specified number of lines. Page breaks in this format may not correspond to the
pagination of your report.
XML Legacy
XML is used primarily for data exchange. It is a record-based format that uses the Crystal XML Schema.
18.1.3.2 Destination
The destination determines the export location of your report. Crystal Report enables you to choose
one of six destinations. They include:
• Application
• Disk file
• Exchange Folder
• Lotus Domino
• Lotus Domino Mail
• MAPI
18.1.3.3 Exporting to an application
If you export to an application, the program exports the report to a temporary file in the specified format
and then opens the file in the appropriate application.
Note:
• When exporting to an application, the output opens with the program that is associated with its file
extension as specified on the File Types tab of your operating system's Folder Options.
• When exporting in ODBC format, Application and Disk file are the same.
• You will need to specify a file path if you are exporting in HTML format.
• The file name of the report and the file name of the temporary file cannot be the same.
The sections below provide instructions on how to export a report to the Microsoft Excel (XLS) format
for each of the different destination types.
18.1.3.3.1 To export to an application
1.
Open the report you would like to export.
2.
On the File menu, point to Export, and then click Export Report.
2013-05-06384
Printing, Exporting, and Viewing Reports

Tip:
Another way to do this is to click the Export button on the Standard toolbar.
The Export dialog box appears.
3.
Select the export format type from the Format drop-down list.
In this case, choose Microsoft Excel (XLS).
4.
Select Application from the Destination drop-down list.
5.
Click OK.
The Excel Format Options dialog box appears.
Note:
• The options in the "Column width" area let you define the width of the Excel cells in your output
based on a point width (a constant width) or a width determined by objects in various sections
of your Crystal report.
• Selecting "Whole Report" does not necessarily emulate the layout of your Crystal report. Rather,
the Excel cell width is based on objects found in any section of your report. Likewise, for example,
selecting "Details" creates cell widths based on the objects found only in the report's Details
section.
6.
Change the formatting options as needed.
7.
Click OK.
The Exporting Records dialog box appears.
Tip:
Click Cancel Exporting to cancel the export process.
The program exports the report and opens it in the appropriate application. In this example, Microsoft
Excel opens with the exported data.
18.1.3.4 Exporting to a disk file
If you export to a disk file, the program saves the report to the disk or diskette you have specified.
18.1.3.4.1 To export to a disk file
1.
Open the report you would like to export.
2.
On the File menu, point to Export, and then click Export Report.
Tip:
Another way to do this is to click the Export button on the Standard toolbar.
The Export dialog box appears.
2013-05-06385
Printing, Exporting, and Viewing Reports

3.
Select the export format type from the Format drop-down list.
In this case, choose Microsoft Excel (XLS).
4.
Select Disk file from the Destination drop-down list.
5.
Click OK.
The Excel Format Options dialog box appears.
For more information about this dialog box, see step 5 in Exporting to an application.
6.
Change the formatting options as needed.
7.
Click OK.
The Select Export File dialog box appears.
8.
Select the appropriate directory.
9.
Enter the File name.
10.
Click Save.
Tip:
Click Cancel Exporting to cancel the export process.
The program exports the report and saves it in the designated directory.
18.1.3.5 Exporting to a Microsoft Exchange folder
Crystal Reports enables you to export a report file to a Microsoft Exchange folder. You select the folder,
and the report is stored there in the format that you specify. A Microsoft Exchange folder can contain
standard notes (mail), files, and instances of Microsoft Exchange forms.
18.1.3.5.1 To export to a Microsoft Exchange folder
1.
Open the report you would like to export.
2.
On the File menu, point to Export, and then click Export Report.
Tip:
Another way to do this is to click the Export button on the Standard toolbar.
The Export dialog box appears.
3.
Select the export format type from the Format drop-down list.
In this case, choose Microsoft Excel (XLS).
4.
Select Exchange Folder from the Destination drop-down list.
5.
Click OK.
The Excel Format Options dialog box appears.
2013-05-06386
Printing, Exporting, and Viewing Reports

For more information about this dialog box, see step 5 in Exporting to an application.
6.
Change the formatting options as needed.
7.
Click OK.
The Choose Profile dialog box appears.
Note:
You will be prompted by the Microsoft Outlook Setup Expert if Microsoft Exchange, Microsoft Mail,
or Internet E-mail is not set up on your machine.
8.
Select the desired profile from the Profile Name drop-down list.
If the profile is not listed, click New to create it.
9.
Click OK when finished.
10.
When the Select a Folder dialog box appears, select the folder in the profile in which you want the
report to appear, and click OK.
The report is exported to the Microsoft Exchange folder you selected. The exported report can now be
accessed through the Microsoft Exchange client.
18.1.3.6 Exporting to MAPI (Microsoft Mail)
Note:
This option works only if you have a mail client installed (Microsoft Outlook, Microsoft Mail, or Exchange).
Because the exported report is attached to an email message, you must also have an email account
configured properly.
1.
Open the report you would like to export.
2.
On the File menu, point to Export, and then click Export Report.
Tip:
Another way to do this is to click the Export button on the Standard toolbar.
The Export dialog box appears.
3.
Select the export format type from the Format drop-down list.
In this case, choose Microsoft Excel (XLS).
4.
Select Microsoft Mail (MAPI) from the Destination drop-down list.
5.
Click OK.
The Excel Format Options dialog box appears.
For more information about this dialog box, see step 5 in Exporting to an application.
6.
Change the formatting options as needed.
7.
Click OK.
2013-05-06387
Printing, Exporting, and Viewing Reports

The Send Mail dialog box appears.
8.
Enter the address details, then click Send.
The Exporting Records dialog box appears.
Tip:
Click Cancel Exporting to cancel the export process.
18.1.3.7 Exporting to HTML
By exporting reports in HTML format, Crystal Reports provides you with a new option for rapid, convenient
distribution of important company data. Once exported, your reports become accessible with many of
the most popular Web browsers, including Netscape and Microsoft Internet Explorer.
18.1.3.7.1 To export to HTML
1.
With the report you want exported active, go to the File menu, point to Export, and then click Export
Report.
Tip:
Another way to do this is to click the Export button on the Standard toolbar.
The Export dialog box appears.
2.
From the Format drop-down list, select HTML 3.2 or HTML 4.0.
3.
Select a destination from the Destination drop-down list.
The rest of this section assumes you select Disk file to store the HTML document in a directory on
a web server.
4.
Click OK.
The Select Export Files dialog box appears. When exported to HTML format, a report is saved as
separate HTML pages. If you prefer, clear the check box to have the entire report saved to one file.
Because the report is saved as separate HTML pages by default, the program asks you for the name
of a directory for an export destination, and uses default names for the HTML files. The initial HTML
page will be saved as Base File Name.html. This is the file you open if you want to view your report
through your Web browser.
Note:
When you are exporting to a single file (that is, you have cleared the Separate HTML Pages check
box) all blank space in headers and footers, as well as top and bottom page margins, is included.
If you don't want to see blank spaces in your HTML file, suppress empty header and footer sections
and set the top and bottom page margins to zero in the Page Setup dialog box.
5.
Select an existing directory, or create a new directory for your report.
6.
To navigate through separate HTML files, click the Page navigator option.
2013-05-06388
Printing, Exporting, and Viewing Reports

7.
Click OK.
The program exports the report to HTML format.
18.1.3.8 Exporting to an ODBC data source
Crystal Reports allows you to export reports to any ODBC data source. If you have an ODBC data
source set up for a database or data format, you can export your report to that data format through
ODBC.
For instance, you may have an ODBC data source set up through ODBC Administrator that you normally
use to access database tables designed in Microsoft SQL Server. Using the Export dialog box, however,
you can select your SQL Server data source and export your report as a new SQL Server database
table.
Note:
You must have an ODBC data source set up through ODBC Administrator in order for the program to
export to a particular ODBC database format. See How to set up an ODBC data source.
Exporting to an ODBC data source allows you to:
• Change data from a centralized database format into a format compatible with a local DBMS
application.
• Change data from a local database format into a format compatible with a centralized database.
• Create a new database table that can be used as a separate data set in future reporting.
• Create a mini data-warehouse.
• Manipulate database data by filtering records, adding formulas, and removing fields to create a new
database table that provides the data you need most for your work.
18.1.3.8.1 To export to an ODBC data source
1.
With the report you want exported active, go to the File menu, point to Export, and then click Export
Report.
Tip:
Another way to do this is to click the Export button on the Standard toolbar.
The Export dialog box appears.
2.
From the Format drop-down list, select ODBC.
Note:
Destination is ignored when you are exporting a report to an ODBC data source. You do not need
to make any changes to the Destination edit box.
3.
Click OK in the Export dialog box.
2013-05-06389
Printing, Exporting, and Viewing Reports

4.
If your ODBC data source specifies a particular database, the report will be exported to that database.
Otherwise, the ODBC Formats dialog box appears. Select the database to which this report will be
added as a new table, and then click OK.
5.
If the ODBC data source you selected requires a Logon ID and password, the Login or SQL Server
Login dialog box appears. Enter your ID and Password, and then click OK.
The Enter ODBC Table Name dialog box appears.
6.
Enter the name you want to give to the new table in the database, and then click OK.
The program exports the report as a new table to the database you specified.
Note:
If your report contains a binary field, a Cross-Tab, or an OLAP grid, you will be unable to export it to
an ODBC data source successfully.
18.1.4 Working with Web folders
You have the ability to open and save reports using Web Folders if you:
• Are running Windows 2000 (or higher) or have Office 2000 (or higher) installed.
• Have access to a web server that is configured to support Web Folders.
• Add a Web Folder from this server into your Web Folders folder.
18.1.4.1 To open your report
1.
On the File menu, click Open.
The Open dialog box appears.
2.
Click Web Folders.
3.
Open the folder that contains the report.
4.
Double-click to open the report.
18.1.4.2 To save your report
1.
On the File menu, click Save As.
2013-05-06390
Printing, Exporting, and Viewing Reports

The Save As dialog box appears.
2.
Click Web Folders.
3.
Locate the folder you would like to save the report to.
4.
Enter the file name.
5.
Click Save.
Note:
After making changes to a report in a Web Folder, you must save the changes to the same file in the
same Web Folder.
18.1.5 Working with Enterprise folders
Another way to distribute your reports is through SAP BusinessObjects Business Intelligence platform.
When you publish a report to SAP BusinessObjects Business Intelligence platform, you can deliver it
to end users via any web application—intranet, extranet, Internet or corporate portal.
Crystal Reports facilitates the publication of reports through the Enterprise option found in the Open
and Save As dialog boxes and through the Workbench. For more information about publishing through
the Workbench, see The Workbench.
When you choose the Enterprise option in the Open dialog box, you can select any published report to
make changes to it. The same option in the Save As dialog box lets you save a modified report back
to its original location, or it lets you save a new report to an Enterprise folder, which, in essence, is the
same as publishing the report to SAP BusinessObjects Business Intelligence platform.
18.1.5.1 Opening a report in an Enterprise folder
You can open reports from SAP BusinessObjects Business Intelligence platform folders in Crystal
Reports. Crystal Reports displays the appropriate SAP BusinessObjects Business Intelligence platform
folders in the Open dialog box.
18.1.5.1.1 To open a report in an Enterprise folder
1.
On the File menu, click Open.
2.
In the Open dialog box, click Enterprise.
If you have not already logged on to SAP BusinessObjects Business Intelligence platform, the "Log
On to SAP BusinessObjects Enterprise" dialog box appears.
2013-05-06391
Printing, Exporting, and Viewing Reports

3.
In the System field, enter or select the name of the SAP BusinessObjects Business Intelligence
platform system that you want to connect to.
4.
Enter your user name and password.
5.
Click the Authentication list to select the appropriate authentication type.
Enterprise authentication requires a user name and password that is recognized by SAP
BusinessObjects Business Intelligence platform.
LDAP authentication requires a user name and password that is recognized by an LDAP directory
server.
Windows Active Directory (AD) authentication requires a user name and password that is recognized
by Windows AD.
Windows NT authentication requires a user name and password that is recognized by Windows NT.
6.
Click OK.
The Enterprise folders appear and you can select a report to open in Crystal Reports.
Note:
• To find a specific report, highlight a folder and select Find from its shortcut menu. You can then use
the Find dialog box to enter the report's name or a part of its name.
• To limit the risk of expanding a folder that contains many hundreds of reports, use the “batch” options
on the folder's shortcut menu:
• First Batch displays the first 100 objects in the selected folder.
• Next Batch displays the next 100 objects in the selected folder.
• Previous Batch displays the previous 100 objects in the selected folder.
• Last Batch displays the last 100 objects in the selected folder.
2013-05-06392
Printing, Exporting, and Viewing Reports

• Select the “Update Repository Objects” option to ensure that the report's repository objects are
updated when the report is opened in the future. For more information about the SAP BusinessObjects
Enterprise Repository, see SAP BusinessObjects Enterprise Repository.
18.1.5.2 Saving a report to an Enterprise folder
You can save Crystal reports to SAP BusinessObjects Business Intelligence platform folders. Use the
Save As dialog box to save a modified report back to its original location, or use it to save a new report
to an SAP BusinessObjects Business Intelligence platform folder. (Saving a report to an SAP
BusinessObjects Business Intelligence platform folder is the same as publishing the report to SAP
BusinessObjects Business Intelligence platform.)
18.1.5.2.1 To save a report to an Enterprise folder
1.
On the File menu, click Save As.
2.
In the Save As dialog box, click Enterprise.
3.
If you have not already logged onto SAP BusinessObjects Business Intelligence platform, do so
now.
For information about how to log onto SAP BusinessObjects Business Intelligence platform, see
Opening a report in an Enterprise folder.
4.
When the Enterprise folders appear, select a folder to save your report in.
5.
Enter a file name for your report.
6.
Select Enable Repository Refresh if you want your report's repository objects to be updated when
the report is opened again in Crystal Reports or scheduled in SAP BusinessObjects Business
Intelligence platform.
For more information about the SAP BusinessObjects Enterprise Repository, see SAP
BusinessObjects Enterprise Repository.
7.
Click Save to publish your report to SAP BusinessObjects Business Intelligence platform.
18.2 Viewing reports
You can view Crystal reports using a number of report viewers available through the stand-alone Report
Application Server (RAS) or SAP BusinessObjects Business Intelligence platform and the SAP
BusinessObjects Business Intelligence platform Software Development Kit (SDK). For information about
the Crystal Report Viewers, see the
Report Application Server Viewer Help
or the viewer online help
in the SAP BusinessObjects Business Intelligence platform SDK documentation.
2013-05-06393
Printing, Exporting, and Viewing Reports

In general, the Crystal Report Viewers are page viewers that let you see complete pages of your Crystal
reports. However, one viewer—the Report Part Viewer—lets you see specific report objects without
viewing the entire page. Report objects displayed in such a way are referred to as Report Parts.
18.2.1 Report Parts and other Report objects
18.2.1.1 What are Report Parts?
Report objects displayed by themselves in a viewer—without the rest of the report page—are referred
to as Report Parts. More precisely, however, Report Parts are objects that use hyperlinks to point from
a home report object to a destination object.
Report Parts work with the DHTML viewer subset of the Crystal Report Viewers to expand the navigation
possibilities within and between reports. Report Part hyperlinks can link to other objects in the current
report or to objects in any other report. This linking lets you create a guided path through your reports
that shows only specific information at each stop along the path.
Viewing Report Parts instead of the whole page is a powerful feature that allows you to seamlessly
integrate reports into portal and wireless applications.
18.2.1.1.1 Report Part Viewer
The Report Part Viewer is a viewer that lets you display Report Parts without the rest of the report page.
You can integrate this viewer into web applications so that your users see only specific report objects
without having to see the rest of the report.
For the most part, you set up the Report Part hyperlinks in the Report Designer, but you take advantage
of their functionality in the report viewers.
18.2.1.2 Navigating Report Parts and report objects
The navigation functionality in Crystal Reports lets you move to other report object(s) in the same report,
or to object(s) in another report—with a specified data context. In this last case, the other report must
be managed in SAP BusinessObjects Business Intelligence platform, or must be part of a stand-alone
Report Application Server environment. This navigation is available only in the DHTML viewers
(zero-client, server-side viewers). Its advantage is that you can link directly from one object to another;
the viewer passes the required data context so you go to the object and data that is relevant.
2013-05-06394
Printing, Exporting, and Viewing Reports

Report Parts use this navigation functionality when linking between Report Part objects. The key
difference between Report Part navigation and regular (page) navigation is that, when navigating with
Report Parts (using the Report Part Viewer), you see only the objects identified as Report Parts. In
regular navigation (using the page viewers or the Advanced DHTML Viewer), you go to the identified
object(s), but you see the entire page.
18.2.1.2.1 Setting up navigation
Navigation (page or Report Part) is set up on the Hyperlink tab of the Format Editor dialog box.
In the DHTML Viewer Only area of the Hyperlink tab, you can select one of two options:
• Report Part Drilldown
The Report Part Drilldown option is available for summary fields, group charts and maps, and fields
in your report's group header or group footer. This option is relevant only to Report Parts; regular
navigation (using the page view) drills down by default. For more information, see Report Part-specific
navigation.
• Another Report Object
You can use the Another Report Object option for both Report Part and page navigation. This option
lets you specify the destination object(s) you want to navigate to and the data context to pass.
When you select the Report Part Drilldown option, the "Hyperlink information" area contains these
options:
• Available Fields
The Available Fields area lists, as a tree view, all the sections in your report that contain report
objects you can use for Report Part drill down. You select objects from this area and add them to
the Fields to Display area.
• Fields to Display
The Fields to Display area lists, as a tree view, the section and objects that you have selected for
drilling down on.
See The Report Part Drilldown option for information about how to use these options.
When you select the Another Report Object option, the "Hyperlink information" area contains these
options:
• Paste the Report Part link
Use the Past Link button to add detailed information about a report object that you previously selected
and copied. The pasted information depends, in part, on the option you select from the list associated
with the button.
• Select From
After you paste link information, the Select From field contains the path and file name of the report
you selected and copied from (it is blank when the current report is referenced). You add information
to this field by pasting a report part link; otherwise it is not accessible.
2013-05-06395
Printing, Exporting, and Viewing Reports
• Report Title
The Report Title field defaults to the title of the report specified in the Select From field (it contains
the text <Current Report> when the current report is referenced). If a report title was not defined in
the Document Properties dialog box, the field defaults to the report's file name. You add information
to this field by pasting a report part link; otherwise it is not accessible.
• Object Name
By adding one or more objects to this field, you are identifying the destination objects for your
navigation. In page navigation, this information determines what object you move to in the page.
For Report Part navigation, this information determines what object(s) the viewer displays upon
navigation (the viewer displays only the identified objects).
You can select any of the following report object types in the Object Name field (you can select one
or more objects from the same report section):
• Field objects
• Charts or maps
• Bitmaps
• Cross-tabs
• Text objects
You cannot select the following report object types as destinations:
• Objects inside the Page Header or Page Footer.
• Lines or boxes.
• Subreports or any object inside a subreport.
• Entire sections (you must select the objects inside the section individually).
You can add specific information in one of two ways:
• You can type the object name(s) as they appear in the Report Explorer.
• You can copy report object(s) from the current report or another and paste its information into
the object field.
• Data Context
The program normally completes the Data Context field when you paste information for the destination
object(s). You can also customize this option by using the Conditional Formula button. For more
information, see Data context formats.
See The Another Report Object option for information about how to use these options.
Note:
Report objects with hyperlinks defined are shown in the Report Explorer as blue text with a solid
underline. Objects with Report Part hyperlinks are shown as green text with a dashed underline.
2013-05-06396
Printing, Exporting, and Viewing Reports

18.2.1.2.2 Report Part-specific navigation
Report Parts use the Crystal Reports navigation functionality. However, some special cases apply only
to Report Parts:
• The viewer displays only the object identified as the destination object.
• You must specify Initial Report Part Settings for each report that is the first stop on the Report Part
navigation path.
18.2.1.3 The Report Part Drilldown option
The Report Part Drilldown option lets you define a hyperlink so that the Report Part Viewer can emulate
the drill-down functionality of Crystal Reports. The Report Part Viewer displays only destination objects;
therefore, to make drill down work, you need to define a navigation path from a home object to one or
more destination objects. When you have multiple destination objects, they must all reside in the same
report section.
The Report Part Drilldown option does not affect the DHTML page viewers since the option emulates
the default Crystal Reports behavior for drill down (which the page viewers already support). Page
viewers, however, do not limit which objects are displayed—they always show all report objects.
Note:
Use the Report Part Drilldown option only to navigate between objects in the same report.
Because the Report Part Viewer shows only destination objects, you must define Initial Report Part
Settings (that is, a default home object) for a report before your Report Part Drilldown hyperlinks can
work. A report's Initial Report Part Settings define the object that appears first in the Report Part Viewer.
Think of this object as the place you'll begin your path of drill-down hyperlinks from.
18.2.1.3.1 To define Initial Report Part Settings
1.
Open the report whose default home object you want to define.
2.
Right-click the object you want to set as the default home object and select Copy from its shortcut
menu.
3.
On the File menu, click Report Options.
4.
In the Initial Report Part Settings area of the Report Options dialog box, click Paste Link.
The program pastes the name and data context of the report object you selected as your home
object into the appropriate fields.
Tip:
For more information about data contexts, see Data context formats.
Include another object from the same section of the report by entering a semi-colon (;) and typing
the name of the object.
2013-05-06397
Printing, Exporting, and Viewing Reports

5.
Click OK.
18.2.1.3.2 To create a Report Part Drilldown hyperlink
Note:
Before you begin this procedure, be sure to read Setting up navigation to acquaint yourself with the
limitations of creating this type of hyperlink.
1.
Open a report and select the intended destination object; then click the Format button on the
Expert Tools toolbar.
Tip:
You can also do this by selecting Format Field from the Format menu.
2.
In the Format Editor, click the Hyperlink tab.
3.
In the DHTML Viewer Only area, select Report Part Drilldown.
The "Hyperlink information" area changes to show the fields available for this type of hyperlink.
The Available Fields area shows only the sections and report objects you can select for drill down.
In general, these objects include field objects, charts, maps, bitmaps, cross-tabs, and text objects
contained in the next section down (that is, for example, objects in group two when the object you
selected is in group one).
2013-05-06398
Printing, Exporting, and Viewing Reports

Note:
The Available Fields area does not show suppressed report objects.
4.
In the Available Fields area, select the section or report object(s) you want to use as your drill down
destination.
Tip:
Use the Report Explorer to quickly identify the default names assigned to each of your report
objects. To open the Report Explorer, click its button on the Standard toolbar.
You can add all the objects in a section by selecting the section node. If you expand the section
node, you can select one or more of the objects that it contains.
5.
Use the arrow buttons to move the selected section or object(s) to the Fields to Display area.
For ease of identification, the program creates a section node in the Fields to Display area. This
node contains the objects that you selected in the Available Fields area.
6.
If you want to add another object to the Fields to Display area, select it in the Available Fields list
and drag it into position.
Note:
• The position an object has in the Fields to Display area determines how it appears in the Report
Part Viewer; top to bottom in the Fields to Display area equates to left to right in the viewer. Use
the arrows above the Fields to Display area to change the order of objects. (Note that a
programmer can alter this default behavior through the PreserveLayout property of the Report
Part Viewer.)
• The Fields to Display area can contain only one section at a time. If you try to add a second
section or an object from a second section, it replaces any existing section in the Fields to Display
area.
7.
Click OK.
You have established a hyperlink from your report's home object to a destination object or objects. In
the Report Part Viewer, you will see the home object first, and when you click it for drill down, you will
see the destination object(s).
18.2.1.4 The Another Report Object option
The Another Report Object option lets you define a hyperlink path for linking objects in the same or
different reports. If you are defining a hyperlink path to a different report, that report must be managed
in SAP BusinessObjects Business Intelligence platform, or it must be part of a stand-alone Report
Application Server environment. The Report Part Viewer displays only the objects you specify. Like the
Report Part Drilldown option, all destination objects must be from the same report section.
2013-05-06399
Printing, Exporting, and Viewing Reports

Note:
• When using a stand-alone Report Application Server environment, it is recommended that all reports
navigated to and from using the Another Report Object option reside in the default Report Application
Server report directory. Placing reports in this directory ensures that the linked reports can be easily
migrated to an SAP BusinessObjects Business Intelligence platform environment.
• The DHTML page viewer also uses the Another Report Object option for navigation purposes.
• You cannot use the Another Report Object option for an entire cross-tab or OLAP grid object; you
can, however, use it for any individual cell in a cross-tab or OLAP grid.
Work flow
Because the Another Report Object option allows you to create hyperlinks between objects in different
reports managed in SAP BusinessObjects Business Intelligence platform, it requires more set up on
the Hyperlink tab. This is an overview of the steps you have to complete to set up your hyperlink
successfully.
• Open the report that contains the object you want to be the destination object and copy it.
• Open the report that contains the home object, select it, and open the Format Editor.
• On the Hyperlink tab, paste the information from the destination object into the appropriate fields.
The following procedure shows you how to do all of these steps.
18.2.1.4.1 To create an Another Report Object hyperlink
Note:
Before you begin this procedure, be sure to read Setting up navigation to acquaint yourself with the
limitations of creating this type of hyperlink.
1.
Open your source and target reports.
Your source report is the report you copy an object from; the target report is the report you add the
hyperlink information to.
When you view your target report in the Report Part Viewer, you first see its home object. When
you drill down on that object, you go to the destination object you selected in the source report.
2.
In your source report, right-click the intended destination object and select Copy from its shortcut
menu.
3.
In your target report, select the intended home object; then click the Format button on the
Expert Tools toolbar.
Tip:
You can also do this by selecting Format Field from the Format menu.
4.
In the Format Editor, click the Hyperlink tab, and then select the Another Report Object option.
5.
In the "Hyperlink information" area, click Paste Link.
Note:
The Paste Link button is unavailable if you have not copied a destination object as shown in step
2.
2013-05-06400
Printing, Exporting, and Viewing Reports

The program pastes the identifying information from the destination object you selected in the source
report into the appropriate fields.
The Paste Link button includes a list of options that you can use when pasting a link to the destination
object. Depending on the type of link you are creating (for example, a link to a specific data context
rather than a link to a generic data context), you may see these options:
• Context Report Part
This is the default option; it is selected when you click Paste Link without viewing the other list
options. Use this option to paste a link that includes the most complete data context that the
program can determine. For more information, see Context Report Part option scenarios.
• Design View Report Part
Use this option to paste a link that includes a generic data context (that is, a data context that
does not point to a specific record). Use this option when you want a broad data context, or when
data is not yet present in your source report.
• Preview Report Part
Use this option to paste a link that includes a specific data context (that is, a data context that
points to a specific record). Use this option when you want a narrow data context, or when data
is present in your source report.
2013-05-06401
Printing, Exporting, and Viewing Reports

Note:
If you choose the Design View Report Part option (or if you choose the Context Report Part option
for an object copied from a report's Design view) and your source and target reports have different
data structures, you'll see the Report Part Map Fields dialog box. Each field in the Unmapped Fields
area represents a group in your source report. Use this dialog box to map these groups to fields in
your target report. When you've mapped all the groups, the OK button is available, and you can
proceed.
6.
If you want to add other fields from the same section of the source report, click the Object Name
field and move the cursor to the end of the existing text. Enter a semi-colon (;) and then the name
of the field(s).
Note:
The order of objects in the Object Name field determines how they appear in the Report Part Viewer;
left to right in the Object Name field equates to left to right in the viewer.
7.
You can broaden your Data Context by using an asterisk (*) to represent all records in a group.
For example, if your Data Context is /USA/CA/Changing Gears (which will show only that specific
detail record), you could change it to /USA/CA/* to show all detail records within that group.
Tip:
• You might find it more useful to copy your hyperlink information from the Design view because
the data context will be more general (that is, you won't be copying only a specific record as you
might on the Preview view).
• If your report has a group selection formula, check the data context for your destination object
to ensure it contains the correct child index.
• For more information, see Data context formats.
8.
Click OK.
You have established a hyperlink from your home object to a destination object or objects. In the Report
Part Viewer, you see the home object first, and when you click it for drill down, you see the destination
object(s).
18.2.1.5 Context Report Part option scenarios
When pasting linking information for a Report Part, the Context Report Part option mainly affects the
data context of the link; the Select From field (the report URI) and the Object Name field are always
the same for any of the choices available in the Paste Link list. This section provides various scenarios
and describes how the program creates a data context for each.
Scenario 1
If your source report contains data (that is, if the report is in Preview view), the Context Report Part
data context (in the target report) is the source report's Preview data context for all children of the
selected field. For example, you might see this in the Data Context field: /Country[USA]/Region[*].
2013-05-06402
Printing, Exporting, and Viewing Reports

Otherwise, the program uses the source report's Design view data context as the Context Report Part
data context in the target report.
Scenario 2
If your source and target reports are the same report, and the object you choose as your source is from
the Preview view, when the target object you choose to link to is in a higher level than the source object,
the data context is left empty. For example, when the source data context is /Country[Aus
tralia]/ChildIndex[5], and the target data context is /Country[Australia], the Context
Report Part data context is left empty.
Scenario 3
If your source and target reports are the same report, and the object you choose as your source is from
the Preview view, when the target object you choose to link to is in a lower level than the source object,
the data context pasted is a Design view data context (in the form of a formula). For example, when
the source data context is /Country[Australia], and the target data context is /Country[Aus
tralia]/ChildIndex[5], the Context Report Part data context is "/"+{Customer.Country}.
Cross-tabs
If the object you copy in your source report is part of a cross-tab, the Context Report Part data context
is based on the selected object embedded in the cross-tab. Crystal Reports creates the data context
by tracking if the selected object in the cross-tab is a row, column, or cell. Next, the program retrieves
row and column names. Then it parses the Design view data context. Finally, it generates the Context
Report Part data context by adding the GridRowColumnValue function if the group in the data context
formula appears in the row or column names retrieved earlier. You might see, for example, a data
context such as:
"/"+GridRowColumnValue("Customer.Country")+"/"+GridRowColumnValue("Customer.Region")
18.2.1.6 Data context formats
• Normally, a data context formula appears as follows:
"/" + {Table.Field} + "/" + {Table.Field}
• You can also use these formats:
• XPath-like format:
/USA/Bicycle
• Strongly-Typed format:
/Country[USA]/Product Class[Bicycle]
Note:
You can add detail-level information in 0-based format:
/USA/Bicycle/ChildIndex[4]
2013-05-06403
Printing, Exporting, and Viewing Reports

Note:
You can also use a wildcard to identify all instances:
/USA/*
• For cross-tab objects, you can use navigation on cells, columns, or rows. To define the data context,
use the GridRowColumnValue formatting function. For example:
"/" + GridRowColumnValue ("Supplier.Country") + "/" + GridRowColumnValue ("Product.Product Class").
18.2.1.7 Hyperlinks displayed in the viewers
This section summarizes information about the hyperlink options and how they work in the page viewers
and the Report Part Viewer.
Differences between the hyperlink options
Report Part DrilldownAnother Report Object
This option allows the selection of one or more
report objects.
This option allows the selection of one or more
report objects.
Destination objects must be from the same report
section.
Destination objects must be from the same report
section.
The location of the section that contains the des-
tination objects must be in the immediately next,
lower-group level from the source object.
The location of the section that contains the des-
tination objects has no restriction:
• The section can be located anywhere in the
report.
• The section can be in a group level above or
below the source object.
The object must be in the same report.
The object can be in a different report that is
managed in SAP BusinessObjects Business Intel-
ligence platform or is part of a stand-alone Report
Application Server (RAS).
2013-05-06404
Printing, Exporting, and Viewing Reports

Differences between how the viewers display hyperlinks
Report Part ViewerPage viewers
Another Report Object:
• Navigates to destination objects and shows
only the destination objects.
Another Report Object:
• Navigates to destination objects and shows
contents of the entire page.
Report Part Drilldown:
• Navigates to destination objects and shows
only the destination objects.
Report Part Drilldown:
• Navigates (drills down) to the group and shows
the complete contents of the group.
Default drill down (no hyperlink):
• Not available.
Default drill down (no hyperlink):
• Group drill down from a group header or foot-
er, chart, or map displays the group view.
• Subreport drill down displays the subreport
view.
18.2.2 Creating an Enterprise Hyperlink
You can create hyperlinks from a report to enterprise documents such as Crystal Reports, Interactive
Analysis and other documents.
Note:
In order for this feature to work, SAP BusinessObjects Business Intelligence platform needs to be
running.
18.2.2.1 To create an Enterprise Hyperlink
1.
Select a report object on the Design or Preview tab.
2.
On the Format menu, click Hyperlink.
The "Format Editor" dialog box appears with the Hyperlink tab active.
3.
On the "Hyperlink type" section, select the option A Website on the Internet.
4.
Click Create enterprise hyperlink.
2013-05-06405
Printing, Exporting, and Viewing Reports

5.
Click Browse.
The "Open" dialog box appears.
6.
Click My Connections to add a new connection to the Enterprise.
If you already have a connection, click Enterprise.
7.
Navigate to the enterprise document that you wish to open and click Open.
The "Document ID" and "Document Name" fields are filled out with the CUID and name of the
selected document respectively.
8.
On the "Hyperlink Settings" section change the different options to create the hyperlink with the
specified settings.
9.
On the "Parameter Settings" section select the parameter values, if the selected document has
parameters.
10.
Click OK.
18.2.3 Using Smart View to view a report in the CMC
The "Smart View" setting in the Central Management Console (CMC) allows an administrator to change
BI launch pad report viewing behavior from viewing the latest instance of a report to refreshing report
content from the data source.
1.
In the Central Management Console, click Applications.
2.
On the "Applications" page, double-click Crystal Reports Configuration.
The "Properties: Crystal Reports Configuration" dialog box appears.
3.
Under "Properties", select BI launch pad.
4.
Under "Smart View", perform one of the following actions:
• To view the last successful instance when you double-click a publication in BI launch pad, select
View Latest Instance. If no successful instance exists, the publication is refreshed against its
data source. This is the default view.
• To always refresh a publication against its data source (regardless of whether an instance exists)
when you double-click the publication in BI launch pad, select View Object.
5.
Click Save & Close.
18.3 Using smart tags
Crystal Reports lets you take advantage of smart tags in Office XP. When you paste a chart, a text
object, or a field object into an Office XP application, you can view data from the host report after
selecting a smart tag option. This table summarizes the options available to you.
2013-05-06406
Printing, Exporting, and Viewing Reports

Crystal Reports object typeSmart tag optionOffice XP application
Text object
Field object
Chart
View
Refresh
Word
Text object
Field object
View
Refresh
Excel
Text object
Field object
Chart
View
Refresh (only when creating a
message)
Outlook
Before you can use smart tags, web server options must be configured on the Smart Tag tab of the
Options dialog box. As well, an .asp or .jsp page must be created for viewing report details. Normally,
these tasks should be carried out by your system administrator.
Note:
The reports you want to use with smart tags must exist on the web server named in the Options dialog
box in a directory that mirrors their real location, or the web server must be configured to accept a UNC
path.
18.3.1 To use smart tags with a Crystal Reports object
1.
Open the Crystal report that contains the object you want to copy to an Office XP application.
2.
On the File menu, click Options and ensure that the options in the Smart Tag Web Server Options
area on the Smart Tag & HTML Preview tab have been configured:
• Your web server must be named.
• A virtual directory must be named (a default is provided).
• A viewing page must be named (a default is provided).
3.
On the Preview tab of Crystal Reports, right-click the text object, field object, or chart you want to
copy and select Copy Smart Tag from its shortcut menu.
4.
Open the appropriate Office XP application, and paste the report object into a document, worksheet,
or email message.
2013-05-06407
Printing, Exporting, and Viewing Reports

Note:
See the table in this section for limitations about which report objects can be pasted into each Office
XP application.
5.
In your Office XP application, choose the appropriate smart tag from the options for the pasted report
object.
Note:
See the table in this section for limitations about which smart tags are available in each Office XP
application.
The .asp or .jsp page named in the Options dialog box appears showing the appropriate information
from the host Crystal report.
2013-05-06408
Printing, Exporting, and Viewing Reports

Report Alerts
19.1 About Report Alerts
Report Alerts are custom messages created in Crystal Reports that appear when certain conditions
are met by data in a report. Report Alerts may indicate action to be taken by the user or information
about report data.
Report Alerts are created from formulas that evaluate conditions you specify. If the condition is true,
the alert is triggered and its message is displayed. Messages can be text strings or formulas that
combine text and report fields.
Once a Report Alert is triggered, it's not evaluated again until you refresh your report's data.
Because Report Alerts are specific to each report, you decide when to use them and when not to. They
can be useful to point out important information, such as sales that fall above or below a limit. And the
message is created by you, so it can be specific to your data.
19.2 Working with Report Alerts
This section focuses on the tasks you'll need to undertake in order to use Report Alerts.
19.2.1 Creating Report Alerts
You must complete three steps when creating a Report Alert:
• Name the alert.
• Define the condition that triggers the alert.
• Create the message you want to appear when the alert is triggered (this step is optional).
2013-05-06409
Report Alerts

19.2.1.1 To create a Report Alert
1.
On the Report menu, point to Alerts and then click Create or Modify Alerts.
The Create Alerts dialog box appears.
2.
Click New.
The Create Alert dialog box appears.
3.
Enter a name for your new alert in the Name box.
4.
Enter your alert message in the Message box.
The Message box lets you enter a message to be used as a default. If you want the same message
to appear every time your alert is triggered, enter it in the Message box.
If, however, you want to use a formula so the message is customized with data elements, see the
next step.
5.
If you want to use a formula to create an alert message, click the formula button to the right of
Message.
The Formula Workshop appears. For information on how to use the editor, see Working with the
Formula Editor.
6.
Enter your alert message formula.
For example, if you want to see the message "Country is a star performer" (where Country is the
name of a specific country), you might create the following formula:
({Customer.Country}) + " is a star performer"
Note:
• The result of an alert message formula must be a string.
• The DefaultAttribute function can be used to refer to a message added in the Message box. For
example, if the message in your Message box is " is a star performer," your alert message formula
might be:
({Customer.Country}) + DefaultAttribute
This formula relies on the text you enter in the Message box; that text becomes the DefaultAttribute.
Note:
Message condition formulas can be created using either Crystal Syntax or Basic Syntax.
7.
Click Save and close to return to the Create Alert dialog box.
8.
In the Create Alert dialog box, click Condition.
The Formula Workshop appears.
9.
Enter your alert condition formula.
2013-05-06410
Report Alerts

Alert formulas can be based on recurring records or on summary fields, but cannot be based on
print-time fields, such as running totals or print time formulas. Alert formulas cannot have shared
variables.
If an alert formula is based on a summary field, any recurring fields used must be constant over the
summary field. For example, if you are grouping on Country and Region, you might create an alert
such as:
Sum ({Customer.Last Year's Sales}, {Customer.Region}) > 10000
In this case, your formula can refer to either Country or Region, but not City or Customer Name
since these are not constant.
Note:
Alert condition formulas can be created using either Crystal Syntax or Basic Syntax.
10.
Clear the Enable check box if you do not want the alert to be evaluated.
Otherwise, leave it selected.
11.
Click OK to save your alert.
You are returned to the Create Alerts dialog box and your new alert is listed. You can see its name
and status (Enabled or Disabled).
Only enabled and disabled alerts appear in the Create Alerts dialog box. If an alert is triggered, it is
seen in the Report Alerts dialog box.
19.2.2 Editing Report Alerts
1.
On the Report menu, point to Alerts and then click Create or Modify Alerts.
2013-05-06411
Report Alerts

2.
In the Create Alerts dialog box, select the alert you want to edit and click Edit.
Tip:
Double-clicking an alert also lets you edit it.
3.
Make the changes you want in the Edit Alert dialog box.
4.
Click OK to save your changes.
Note:
If the alert has already been triggered, editing it removes it from the Report Alerts dialog box.
19.2.3 Deleting Report Alerts
1.
On the Report menu, point to Alerts and then click Create or Modify Alerts.
2.
In the Create Alerts dialog box, select the alert you want to delete and click Delete.
The selected alert is removed from the Create Alerts dialog box.
Note:
If the alert has already been triggered, deleting it removes it from the Report Alerts dialog box as well.
19.2.4 Viewing Report Alerts
You can view triggered Report Alerts by:
• Refreshing your report's data.
• Selecting Triggered Alerts from the Alerts submenu of the Report menu.
Note:
If you want to view alerts when report data is refreshed, you must select "Display Alerts on Refresh"
on the Reporting tab of the Options dialog box (this option is also available on the Report Options dialog
box).
19.2.4.1 To view Report Alerts
1.
On the Report menu, point to Alerts and then click Triggered Alerts.
The Report Alerts dialog box appears.
2013-05-06412
Report Alerts

2.
Select the alert whose records you want to see.
3.
Click View Records.
A new report tab is opened showing the report record(s) that triggered the alert. If the record is
hidden, the record's group is shown but drill down is not performed.
Note:
If you select more than one triggered alert before clicking the View Records button, the results are
generated by performing a Boolean AND operation on the selected alerts.
4.
To return to the Report Alerts dialog box, click the Preview tab.
5.
Click Close to remove the Report Alerts dialog box.
19.2.5 Referring to Report Alerts in formulas
Alerts can be referred to in formulas. Any formula that references an alert becomes a print time formula.
The following functions are available:
• IsAlertEnabled( )
• IsAlertTriggered( )
• AlertMessage( )
These functions behave the same as alerts created in the Create Alerts dialog box:
• IsAlertTriggered("AlertName") is true only for the records on which the alert is triggered
• AlertMessage("AlertName") displays the message for a record when the alert is true.
Because alerts are not field objects (you cannot drop them into the report), alerts are represented
differently from report fields in the Formula Workshop. In the Functions tree, you'll see an Alerts heading
where the functions themselves appear. Available alerts are listed by name below that.
2013-05-06413
Report Alerts

2013-05-06414
Report Alerts

Using Formulas
20.1 Formulas overview
In many cases, the data needed for a report already exists in database table fields. For example, to
prepare an order list you would place the appropriate fields on the report.
Sometimes, however, you need to put data on the report that does not exist in any of the data fields.
In such cases, you need to create a formula. For example, to calculate the number of days it takes to
process each order, you need a formula that determines the number of days between the order date
and the ship date. Crystal Reports makes it easy for you to create such a formula.
20.1.1 Typical uses for formulas
There are many uses for formulas. If you have a need for specialized data manipulation, you can do it
with a formula.
Creating calculated fields to add to your report
To calculate a price discounted 15%:
Crystal syntax example:
{Orders_Detail.Unit Price}*.85
Basic syntax example:
formula = {Orders_Detail.Unit Price}*.85
Formatting text on a report
To change all the values in the Customer Name field to uppercase:
Crystal syntax example:
UpperCase ({Customer.Customer Name})
Basic syntax example:
formula = UCase ({Customer.Customer Name})
2013-05-06415
Using Formulas

Pulling out a portion, or portions, of a text string
To extract the first letter of the customer name:
Crystal syntax example:
{Customer.Customer Name} [1]
Basic syntax example:
formula = {Customer.Customer Name} (1)
Extracting parts of a date
To determine what month an order was placed:
Crystal syntax example:
Month ({Orders.Order Date})
Basic syntax example:
formula = Month ({Orders.Order Date})
Using a custom function
To convert $500 from U.S. currency to Canadian:
Crystal syntax example:
cdConvertUSToCanadian (500)
Basic syntax example:
formula = cdConvertUSToCanadian (500)
20.2 Formula components and syntax
Formulas contain two critical parts: the components and the syntax. The components are the pieces
that you add to create a formula while the syntax is the rules that you follow to organize the components.
20.2.1 Formula components
Creating a formula in Crystal Reports is like creating one in any spreadsheet application. You can use
any of the following components in your formula:
Fields
Example: {customer.CUSTOMER LAST NAME}, {customer.LAST YEAR'S SALES}
2013-05-06416
Using Formulas

Numbers
Example: 1, 2, 3.1416
Text
Example: "Quantity", ":", "your text"
Operators
Example: + (add), / (divide), -x (negate)
Operators are actions you can use in your formulas.
Functions
Example: Round (x), Trim (x)
Functions perform calculations such as average, sum, and count. All functions available are listed with
their arguments and are arranged by their use.
Custom functions
Example: cdFirstDayofMonth, cdStatutoryHolidays
Custom functions provide a way to share and reuse formula logic. They can be stored in the SAP
BusinessObjects Enterprise Repository and then added to a report. Once in the report, custom functions
can be used in the Formula Expert when creating formulas.
Control Structures
Example: "If" and "Select", "For" loops
Group field values
Example: Average (fld, condFld), Sum (fld, condFld, "condition")
Group field values summarize a group. For example, you could use group field values to find the
percentage of the grand total contributed by each group.
Other formulas
Example: {@GrossProfit}, {@QUOTA}
20.2.2 Formula syntax
Syntax rules are used to create correct formula. Some basic rules are:
• Enclose text strings in quotation marks.
• Enclose arguments in parentheses (where applicable).
• Referenced formulas are identified with a leading @ sign.
2013-05-06417
Using Formulas

20.2.2.1 Crystal and Basic syntax
When creating formulas, you have the option of using either Crystal or Basic syntax. Almost any formula
written with one syntax can be written with the other. Reports can contain formulas that use Basic syntax
as well as formulas that use Crystal syntax.
Crystal syntax is the formula language included in all versions of Crystal Reports.
If you are familiar with Microsoft Visual Basic or other versions of Basic, then Basic syntax may be more
familiar to you. In general, Basic syntax is modeled on Visual Basic except that it has specific extensions
to handle reporting.
If you are already comfortable with Crystal syntax, you can continue to use it, and benefit from the new
functions, operators and control structures inspired by Visual Basic.
Note:
• Record selection and group selection formulas cannot be written in Basic syntax.
• Report processing is not slowed down by using Basic syntax. Reports using Basic syntax formulas
can run on any machine that Crystal Reports runs on.
• Using Basic syntax formulas does not require distributing any additional files with your reports.
20.2.2.2 For more information
• To learn about Basic syntax, see Creating Formulas with Basic syntax in the online help.
• To learn about Crystal syntax, see Creating Formulas with Crystal syntax in the online help.
20.3 User Function Libraries in formulas
Crystal Reports lets developers create User Function Libraries (UFLs) that are recognized by the
Formula Editor. A UFL is a library of functions that is created by a developer to address a specific need.
UFLs can be programmed in a COM or a Java environment.
Crystal Reports lets you see COM UFLs or Java UFLs in the Formula Editor, but not both at the same
time. (You can also choose to see no UFLs.)
2013-05-06418
Using Formulas

Note:
Java UFLs are not supported in the Report Application Server (RAS) and the Crystal Page Server, so
if a report has a formula in it, and that formula uses a Java UFL, the report may not run in SAP
BusinessObjects Businiess Intelligence platform because the formula will fail to compile.
For details about developing Java UFLs and configuring Crystal Reports to use a UFL, see the
Java
Reporting Component Developer's Guide
.
Note:
After you have completed the configuration outlined in the Developer's Guide, you must return to Crystal
Reports, point to the File menu, and select Options. On the Formula Editor tab, go to UFL Support and
select Java UFLs Only.
20.4 Specifying formulas
There are several different kinds of formulas in Crystal Reports: report, formatting, selection, search,
running total condition, and alert formulas. The majority of formulas in a report are report formulas and
conditional formatting formulas.
Report formulas
Report formulas are formulas that you create to stand alone in a report. For example, a formula that
calculates the days between the order date and the shipping date is a report formula.
Conditional formatting formulas
Formatting formulas change the layout and design of a report, as well as the appearance of text,
database fields, objects, or entire report sections. You format text through the Format Editor. If you
need to create a formatting formula, you access the Formula Workshop from the Format Editor. See
Working with conditional formatting.
Note:
If you open the Formula Workshop from the Format Editor, you cannot create a different type of formula,
nor can you modify or delete existing formulas. You can, however, view any formula for reference.
Selection formulas
Selection formulas specify and limit the records and groups that appear in a report. You can either enter
these formulas directly or specify the selection using the Select Expert. Crystal Reports then generates
the record selection and group selection formula. You have the option to manually edit these formulas,
but you must use Crystal syntax. See Selecting records.
Search formulas
Search formulas help you locate data in your report. Like selection formulas, you normally do not enter
these formulas directly, but instead specify the search criteria using the Search Expert. Crystal Reports
generates the formula. You have the option to manually edit these formulas, but you must use Crystal
syntax.
2013-05-06419
Using Formulas

Note:
If you already know Basic syntax, you need to know only a small amount of Crystal syntax to modify
most selection and search formulas.
Running Total condition formulas
Running Total condition formulas let you define the condition upon which your running total will be
evaluated or reset. See Creating conditional running totals.
Alerting formulas
Alerting formulas help you define conditions and messages for report alerts. See About Report Alerts.
20.4.1 Working with the Formula Workshop
You can create many different kinds of formulas in the Formula Workshop. The workshop consists of
a toolbar, a tree that lists the types of formulas you can create or modify, and an area for defining the
formula itself.
Note:
Search formulas and Running Total condition formulas are created and maintained through the Search
Expert and the Create (or Edit) Running Total Field dialog box. These features open the Formula
Workshop so you can work with its familiar user interface, but you cannot add or maintain these kinds
of formulas directly from the main Formula Workshop.
20.4.1.1 Accessing the Formula Workshop
There are many ways to access the Formula Workshop. You see it when you add new Formula Fields,
when you define selection formulas, when you work with custom functions, and so on.
You can open the Formula Workshop by itself before you begin adding specific kinds of formulas.
20.4.1.1.1 To access the Formula Workshop
1.
On the Report menu, click Formula Workshop.
Tip:
Another way to do this is to click the Formula Workshop button on the Expert Tools toolbar.
The Formula Workshop appears.
2.
Click New and select the kind of formula you want to create from the list that appears.
Tip:
You can also select the appropriate folder in the Workshop Tree, and then click the New button.
2013-05-06420
Using Formulas

The appropriate editor or dialog box appears.
20.4.1.2 Workshop Tree
The Workshop Tree contains folders for each type of formula you can create in Crystal Reports. It also
contains folders for custom functions and SQL Expressions. If the workshop appears as the result of
using a specific command (for example, you've selected the Record command on the Selection Formulas
submenu), the appropriate folder in the tree is selected, and the appropriate version of the Formula
Editor appears.
Expand any folder in the tree to see the formulas that already exist. New formulas can be added, and
existing formulas can be edited or deleted as needed.
Tip:
The Workshop Tree can be docked. By default, it appears docked on the left-hand side of the Formula
Workshop, but you can manually dock it on the right-hand side. In free-floating mode, the Workshop
Tree can be dragged to any location in the workshop.
20.4.1.3 Formula Workshop buttons
The main toolbar in the Formula Workshop is made up of three smaller toolbars. Each of these toolbars
contains a set of buttons that is relevant to specific actions: working with the Formula Workshop as a
whole, working with the Workshop Tree, or working with an editor. Individual buttons are available or
unavailable based on the task you are undertaking. Each toolbar can be moved and docked as you
require.
The buttons for the General Toolbar of the Formula Workshop perform the following functions:
Closes the Formula Workshop after prompting
you to save changes. If you save changes, your
formula is checked for errors.
Saves the formula, SQL Expression, or custom
function.
Creates a new formula of the type selected from
the list. Also used to create a new custom function
or SQL Expression.
2013-05-06421
Using Formulas

Shows or hides the Workshop Tree.
Toggles display between Custom Function Editor
and Custom Function Properties dialog box.
Custom functions and formulas (where possible)
are displayed in the selected mode until this but-
ton is clicked again.
Opens the Formula Expert. Use the Formula Ex-
pert to help you create a formula based on a
custom function.
Note:
This button is not available when creating a cus-
tom function.
Opens online help for the Formula Workshop dia-
log box.
The buttons for the Workshop Tree Toolbar of the Formula Workshop perform the following functions:
Lets you rename the selected formula, custom
function, or SQL Expression.
Deletes the selected formula, custom function, or
SQL Expression.
Expands the selected node in the Workshop Tree.
Also works with multiple node selections.
Shows or hides report object nodes in the Format-
ting Formulas folder if the objects do not have
formulas associated with them.
Opens the Add Custom Function to Repository
dialog box so you can select the repository to add
the custom function to.
Adds the selected repository custom function to
the report.
2013-05-06422
Using Formulas

The buttons for the Expressions Editor Toolbar of the Formula Workshop perform the following functions:
Tests the syntax of the formula or custom function
and identifies syntax errors if they are found.
Undoes the last action performed.
Redoes the last action.
When you select a field from the Report Fields
window and click the Browse Data button, a dialog
box appears with a list of the values for the select-
ed field.
View values for the selected field and select indi-
vidual values to insert into your formula.
Note:
This button is not available for custom functions.
Searches the Formula Editor for a specified word,
number, or formula string.
Inserts a bookmark at the beginning of a selected
formula line. Click the button again to remove the
bookmark.
Jumps to the next bookmark.
Jumps to the previous bookmark.
Deletes all bookmarks in the current formula.
Arranges all Report Fields, Functions, and Oper-
ators trees in alphabetical order.
Hides or views the Report Fields tree.
Note:
This button is not available for custom functions.
2013-05-06423
Using Formulas

Hides or views the Functions tree.
Hides or views the Operators tree.
Hides or views the result set of a global formula
search.
Allows you to select Crystal syntax or Basic syn-
tax as your formula syntax.
Allows you to select Exceptions For Null or Default
Values For Nulls as a method for dealing with null
values in your data.
Comments out the highlighted selection of a for-
mula. Commented lines are not evaluated as part
of the formula.
20.4.2 Working with the Formula Editor
The Formula Editor is a component of the Formula Workshop. Use the Formula Editor to create and
modify the content of formulas.
20.4.2.1 Understanding the sections of the Formula Editor
The Formula Editor contains four main windows.
Description of contentsWindow
Report fields contain all database fields accessible
for your report. They also contain any formulas
or groups already created for the report.
Report Fields
2013-05-06424
Using Formulas

Description of contentsWindow
Functions are prebuilt procedures that return val-
ues. They perform calculations such as average,
sum, count, sin, trim, and uppercase.
Custom functions are also listed in this window.
Functions
Operators are the "action verbs" you use in formu-
las. They describe an operation or an action to
take place between two or more values.
Examples of operators: add, subtract, less than,
and greater than.
Operators
Area where you create a formula.Formula text window
20.4.2.2 Choosing the syntax
The Expressions Editor Toolbar of the Formula Workshop contains the drop-down list where you choose
either Crystal or Basic syntax for the formula you are creating.
Note:
Changing the syntax from Crystal syntax to Basic syntax or vice versa will change the list of functions
in the Functions window as well as the list of operators in the Operators window. The functions and
operators differ from syntax to syntax.
The available report fields remain the same since the report fields are available to each syntax.
Setting the default syntax
When you open the Formula Editor, Crystal syntax appears as the syntax default. If you want to change
the syntax default, select Options from the File menu, then click the Reporting tab. Choose the preferred
syntax from the Formula Language drop-down list and click OK. When you access the Formula Editor,
the syntax you selected appears as the default.
20.4.2.3 Entering formula components
2013-05-06425
Using Formulas

The Report Fields, Functions, and Operators tree at the top of the Formula Editor contain the primary
formula components. Double-click any component from these trees to add this component to your
formula.
For example, if you set the syntax to Basic syntax and double-click the Operators > Control Structures
> Multi-Line If in the Operators tree, the following text is transferred to the Formula text window with
the cursor between the If and Then:
If | Then
ElseIf Then
Else
End If
The above text helps you organize the parts needed to write your formula.
20.4.2.4 Formula Editor buttons
For a list of the buttons you can use in the Formula Editor, see the Expressions Editor Toolbar section
of Formula Workshop buttons.
20.4.2.5 Changing the font size of the Formula Editor
The Options dialog box (File menu) allows you to change the font size and the background/foreground
color of text, comments, and keywords in the Formula Editor.
20.4.2.6 Formula Editor Key Controls
The Formula Editor accepts the following key controls:
Action PerformedKeyboard Combination
Opens Browse dialog box for highlighted field.
Alt+B
Checks formula for errors.
Alt+C
Opens or closes the Shows Field tree.
Alt+F
2013-05-06426
Using Formulas

Action PerformedKeyboard Combination
Comments out or removes comments from current
line
Alt+M
Sorts contents of trees.
Alt+O
Opens or closes the Shows Operator tree.
Alt+P
Saves formula without closing Formula Editor.
Alt+S
Opens or closes the Shows Function tree.
Alt+U
Selects all.
Ctrl+A
Copies.
Ctrl+C
Goes to the end of the last line of the formula.
Ctrl+End
Opens the Find dialog box (same as clicking the
Find or Replace button).
Ctrl+F
Sets bookmark.
Ctrl+F2
Clears all bookmarks.
Ctrl+Shift+F2
Goes to the beginning of file.
Ctrl+Home
Goes to the beginning of the left word (+Shift key
will do the selection).
Ctrl+Left Arrow
Opens Formula Name dialog box, or another ap-
propriate dialog box, to create a new formula.
Ctrl+N
Saves formula and closes Formula Workshop.
Ctrl+S
Sets focus to the syntax name list box.Ctrl+T
2013-05-06427
Using Formulas
Action PerformedKeyboard Combination
Changes focus to next control box (reverse order
of Ctrl-Tab).
Ctrl+Shift+Tab
Changes focus to next control box.
Ctrl+Tab
Pastes.
Ctrl+V
Cuts.
Ctrl+X
Undoes an action.
Ctrl+Z
Repeats an action.
Ctrl+Shift+Z
Keyword Auto Complete—shows a list of the
functions available.
Ctrl+Space
Goes to end of line.
End
Copies a selected object from a list to the formula
text box.
Enter
Finds next item as defined in the Find dialog box.
F3
Goes to previous bookmark.
Shift+F2
20.5 Creating and modifying formulas
20.5.1 To create a formula and insert it into a report
2013-05-06428
Using Formulas
1.
On the View menu, click Field Explorer.
2.
In the Field Explorer dialog box, select Formula Fields and click New.
3.
In the Formula Name dialog box, enter the name you want to identify the formula by, and then click
OK.
The Formula Workshop appears with the Formula Editor active.
4.
On the Expressions Editor Toolbar, choose either Crystal or Basic syntax.
If you are unsure which syntax to choose see Formula syntax.
5.
Enter the formula by typing in the components or selecting them from the component trees.
Tip:
• Ctrl+Space will bring up a list of the available functions. If you've already started typing it will
bring up a list of keywords that are possible matches for what you've already typed.
• A list of available fields automatically appears when you enter an open brace bracket. Ctrl+Space
will bring up the list again if you previously pressed Esc to clear it.
6.
Click Check to identify any errors in the formula.
7.
Fix any syntax errors the Formula Checker identifies.
8.
When the formula has the correct syntax, click Save and close on the Formula Workshop toolbar.
9.
Select the new formula in the Field Explorer dialog box, and drag it to where you want it to appear
on your report.
Note:
A formula that is placed on a report is indicated by @ (for example, @ProcessTime) on the Design tab.
20.5.2 Creating a formula in the Formula Expert
The Formula Expert is a component of the Formula Workshop. Use the Formula Expert to create and
modify formulas based on custom functions.
Note:
To learn about the Formula Expert's user interface, see Formula Expert in the online help.
20.5.2.1 To create a formula in the Formula Expert
Note:
Before you begin this procedure, ensure you have a custom function in your report or in the SAP
BusinessObjects Enterprise Repository you have access to.
2013-05-06429
Using Formulas

1.
On the Report menu, click Formula Workshop.
Tip:
Another way to do this is to click the Formula Workshop button on the Expert Tools toolbar.
2.
Select Formula Fields in the Workshop Tree and click New.
3.
In the Formula Name dialog box, enter the name you want to identify the formula by, and then click
OK.
The Formula Expert appears with the Formula Editor active.
4.
Click Use Expert/Editor on the toolbar.
The Formula Expert appears.
5.
In the Custom Function area, choose the custom function you want to base your formula on.
You can choose a Report Custom Function (a custom function that exists in the current report) or
a Repository Custom Function (a custom function that is stored in the repository).
Note:
If you select a Repository Custom Function, that custom function is added to the current report. If
that custom function requires other custom functions from the repository, they can be added as well.
6.
In the Function Arguments area, specify a value for each argument in the appropriate Value field.
You can enter constant values directly, or you can select predefined values or report fields from the
associated list.
7.
Click Save to save the formula to the Formula Fields folder of the Formula Workshop.
2013-05-06430
Using Formulas

You can now use this formula in your report just as you would use a formula you created in the Formula
Editor.
20.5.3 Editing formulas
1.
On the View menu, click Field Explorer.
The Field Explorer dialog box appears.
2.
Right-click the formula you want to edit and choose Edit.
The Formula Workshop appears with the Formula Editor active.
3.
In the Formula Editor, edit the formula.
4.
Click Check to identify any errors in the formula.
5.
Fix any syntax errors the Formula Checker identifies.
6.
When the formula has the correct syntax, click Save and close on the Formula Workshop toolbar.
20.5.4 Searching for formula text
You can use the Find dialog box to carry out a number of different activities:
• Search for text or characters in the Field, Function, or Operator trees.
• Search for text or characters that you want to mark or replace in the formula, Custom Function, or
SQL Expression that you have open.
• Search for text or characters across all SQL Expressions in a report.
• Search for text or characters across all formulas and Custom Functions in a report.
When you search for text across all formulas, the results appear in a pane at the bottom of the Formula
Workshop. (You can dock the results pane in other locations). When you click an item in the results
pane, Crystal Reports opens the appropriate formula and highlights the matching text.
Tip:
You can open the Formula Workshop to search across all formulas from the Field Explorer and from
the body of a report. To do this, select a formula field, right-click it, and choose the "Find in Formulas"
option.
2013-05-06431
Using Formulas

20.5.4.1 To search and replace text
1.
On the View menu, click Field Explorer.
The Field Explorer dialog box appears.
2.
Right-click the formula you want to edit and choose Edit.
The Formula Workshop appears with the Formula Editor active.
3.
On the Expressions Editor Toolbar, click Find or Replace to open a Find dialog box.
From this dialog box, you can search and replace text within the Formula text box.
4.
Enter the text that you want to search for.
5.
Select Edit Text from the Search list.
6.
If you want to mark all occurrences of the search text, click Mark All.
7.
If you want to replace all occurrences of the search text with the contents of the "Replace with" text
box, click Replace All.
20.5.5 Copying formulas
20.5.5.1 To copy an existing formula
Crystal Reports lets you copy an existing formula and then modify it to create a new formula.
1.
Choose View from the main menu and select Field Explorer.
The Field Explorer dialog box appears.
2.
Select an existing formula in the Formula Fields list, right-click it, and select Duplicate from the
shortcut menu.
Crystal Reports creates a copy of the formula by appending a number to the end of the formula's
name.
3.
Click Edit to modify the formula by changing its definition.
Note:
You can also rename the formula in either the Formula Workshop or the Field Explorer.
2013-05-06432
Using Formulas

4.
When the formula has the correct syntax, click Save and close on the Formula Workshop toolbar.
20.5.5.2 To copy formulas from online help
Since the formulas you develop using the Formula Editor are text, you can copy useful online formulas
directly into the Formula Editor and then modify them to fit your needs.
1.
On the Help menu, click Crystal Reports Help.
The Crystal Reports online help appears.
2.
Click the Index tab.
3.
Enter formulas in the keyword field and click Display.
4.
Scroll through the formula topics until you locate the formula you want to copy.
5.
Highlight the formula, right-click, and choose Copy from the menu.
Windows places a copy of the selected text on the Clipboard.
6.
Return to Crystal Reports, choose View from the main menu and select Field Explorer.
The Field Explorer dialog box appears.
7.
Select Formula Fields and click the New button.
The Formula Name dialog box appears.
8.
Enter the name you want to identify the formula by, and then click OK.
The Formula Workshop appears with the Formula Editor active.
9.
Place the insertion point where you want the text to appear in the Formula text box of the Formula
Editor and press Ctrl+V to paste the text from the Clipboard.
10.
Modify the formula by changing the fields, formulas, group fields, conditional statements, and text
strings as necessary for use with the data in the new report.
11.
When the formula has the correct syntax, click Save and close on the Formula Workshop toolbar.
20.5.5.3 To copy a formula from one report to another
1.
Select the formula field you want to copy in the report.
2.
On the Edit menu, click Copy.
3.
Open the report you want to copy the formula to.
4.
Choose Paste from the Edit menu.
5.
When the program displays the object frame, drag the formula to the new location.
2013-05-06433
Using Formulas

6.
To make changes to the formula, right-click the formula and choose Edit Formula from the shortcut
menu.
The Formula Workshop appears with the Formula Editor active.
7.
Delete the old values and type in the new values, or select them from the Fields, Functions, and/or
Operators tree.
8.
Click Save and close on the Formula Workshop toolbar when finished.
20.5.5.4 Key points for editing a copy of a formula
When making changes, use the following points as a guide:
• All fields, formulas, and group fields referenced in the formula copy must actually exist in the new
report. This means that any database referenced in the original formula (or a database with the
same structure, field names, and alias) must be active in the new report.
• If such a database is not active, you must change the field, formula, and group field references in
the formula copy to correspond to elements in your new report.
• If the formula contains conditional elements, make certain that the conditions apply to the data in
the new report. For example, if the formula in your old report performed an action when the quantity
was greater than 100, make sure that the greater than 100 condition makes sense in the new formula.
When modifying a formula, you may find that greater than 10 or greater than 2000 makes more
sense with your new data.
• If you are using the formula with new data, and if your report contains statements similar to the
following:
If {file.FIELD} = "text string"
Make sure that the text strings used in the formula match values that actually exist in the new data.
20.6 Deleting formulas
When a formula is created and added to a report, the Report Designer:
• Stores the specification for creating the formula, using the name you assigned to it.
• Places a working copy of that formula at the point you specify in the report. A working copy is any
occurrence of the formula in the report.
In order to completely delete formulas, you must delete the specification and all working copies of the
formula.
2013-05-06434
Using Formulas

Note:
You cannot delete the specification without deleting all working copies of the formula.
20.6.1 Removing the working formula from your report
1.
Right-click the formula you want to delete from the report.
2.
Select Delete.
Note:
Even after the working copies of a formula have been deleted from the report, the formula specification
remains unchanged. The specification is listed in the Field Explorer dialog box. It is available if you wish
to enter the formula in the report again.
20.6.2 Deleting the formula specification
1.
Choose View from the main menu and select Field Explorer.
The Field Explorer dialog box appears.
2.
Right-click the formula you want to delete and choose Delete.
Note:
A dialog box appears if this formula is currently in use in a report. If you delete this formula, you will
delete all references of it in reports. Click Yes to delete.
20.7 Debugging formulas
For help on debugging formulas that occur when you save your formula, see the Debugging tutorial.
For help on debugging evaluation time errors that invoke the formula editor stack list and assisted
debugging, see Debugging evaluation time errors.
20.7.1 Debugging evaluation time errors
2013-05-06435
Using Formulas

When the Formula Workshop is being displayed as a result of an evaluation time error, the Workshop
Tree will contain a call stack. The root of the tree provides a description of the error which occurred.
The nodes in the tree provide the names of the custom functions and/or formulas which were being
evaluated when the error occurred. The custom function/formula at the top of the call stack is where
the error was detected. The custom function/formula next in the stack has invoked the custom
function/formula above it in the stack. If you select a custom function/formula node in the tree, the text
of the custom function/formula will be displayed in the editor window and the text of the expression
being evaluated when the error occurred will be highlighted. If you expand a custom function/formula
node in the tree, the variables being used in the custom function/formula will be shown along with the
value they had at the time the error occurred.
20.7.1.1 Example of an evaluation time error
Using the sample report "Custom Functions.rpt", create a new formula that divides 1 by the result of
the @Calendar Days Between function. The function would look like this in Basic syntax:
formula = 1/{@Calendar Days Between}
It would look like this in Crystal syntax:
1/{@Calendar Days Between}
Insert this formula into the details section of the report and preview it. You'll get a division by zero error
and the formula editor will be invoked with the call stack on the left hand side.
20.7.2 Debugging tutorial
Follow the example below to learn the necessary steps for debugging a formula. After completing this
exercise, use the same principles to debug your own formulas.
20.7.2.1 About this tutorial
• This tutorial uses the Xtreme.mdb sample database.
• This tutorial uses Crystal syntax.
• The following formula is the formula you will test for errors:
If ({customer.CUSTOMER NAME} [1 to 2 = "Bi" and
ToText({customer,CUSTOMER ID}) [1] = "6") Or
({customer.CUSTOMER NAME} [1] = 'Ro" and
ToText({customer.CUSTOMER ID}) [1] = "5")
"PREFERRED CUSTOMER"
2013-05-06436
Using Formulas

Else
"DOES NOT FIT CRITERIA"
If correct, this formula should pick out all customers whose names begin with "Bi" and whose customer
IDs begin with "6" as well as those companies whose names begin with "Ro" and whose customer IDs
begin with "5". When printing the field, those selections will read "PREFERRED CUSTOMER", while
the rest will read "DOES NOT FIT CRITERIA".
You will now break down the formula to check and see that each condition of the formula is working
individually.
20.7.2.2 Formula1
1.
To get started, create a report using the Customer table in Xtreme.mdb and place the following
fields from left to right in the Details section:
{customer.CUSTOMER ID}
{customer.CUSTOMER NAME}
To test each portion of the formula, you will place a new formula field next to these two fields in the
report.
2.
Create a new formula called Formula1.
3.
Type the following in the Formula text box of the Formula Editor:
If {customer.CUSTOMER NAME} [1 to 2 = "Bi" Then
"TRUE"
Else
"FALSE"
4.
Click Check to test for errors. You will receive the following error message:
The ] is missing.
5.
Correct the formula by inserting the missing " ] " after the 2.
6.
Click Check again. You will receive the following message:
No errors found.
7.
Click Save and close on the Formula Workshop toolbar.
8.
Insert the corrected formula field to the right of the two data fields in the Details section of your report.
9.
Click Print Preview on the Standard toolbar to check the values in the report and compare the
fields to see if the field values returned by @Formula1 are correct.
You will find "TRUE" listed next to the customer names that begin with "Bi" and "FALSE" next to all the
others. Now you will check the other portions of the formula. Create Formula2, Formula3, and Formula4,
by following Steps 1 - 9, using the formulas specified below for each.
Insert each formula field on the same line of the Details section for easy comparison. Check each one
for errors, fix as needed, and make sure the values returned are correct before moving on to Formula2.
2013-05-06437
Using Formulas

20.7.2.3 Formula2
1.
Create a new formula called Formula2.
2.
Type the following in the Formula text box of the Formula Editor:
If ToText({customer,CUSTOMER ID}) [1] = "6" Then
"TRUE"
Else
"FALSE"
3.
Click Check to test for errors. You will receive the following error message:
This field name is not known.
4.
Correct the formula by replacing the comma (,) in the field name with a period (.).
5.
Click Check again. The formula should now be error-free.
6.
Place the formula to the right of the @Formula1 field.
7.
Click Print Preview on the Standard toolbar to check the values in the report and compare the
fields to see if the field values returned by @Formula2 are correct.
You should see "TRUE" next to all customer numbers that begin with 6 and "FALSE" next to all customer
numbers that do not begin with 6.
20.7.2.4 Formula3
1.
Create a new formula called Formula3.
2.
Type the following in the Formula text box of the Formula Editor:
If {customer.CUSTOMER NAME} [1 to 2] = 'Ro" Then
"TRUE"
Else
"FALSE"
3.
Click Check to test for errors. You will receive the following error message:
The matching ' for this string is missing.
4.
Correct the formula by changing the single quote (') before Ro to a double quote (").
5.
Click Check again. The formula should now be error-free.
6.
Place the formula to the right of the @Formula2 field.
7.
Click Print Preview on the Standard toolbar to see the values in the report and compare the
fields to check if the field values returned by @Formula3 are correct.
2013-05-06438
Using Formulas

You should see "TRUE" next to all Customer names that begin with "Ro" and "FALSE" next to all
Customer names that do not begin with "Ro".
20.7.2.5 Formula4
1.
Create a new formula called Formula4.
2.
Type the following in the Formula text box of the Formula Editor:
If ToText({customer.CUSTOMER ID}) [1] = "5"
"TRUE"
Else
"FALSE"
3.
Click Check to test for errors. You will receive the following error message:
The word 'then' is missing.
4.
Correct the formula by typing in the word "Then" at the end of the first line after "5".
5.
Click Check again. The formula should now be error-free.
6.
Place the formula to the right of the @Formula3 field.
7.
Click Print Preview on the Standard toolbar to see the values in the report and compare the
fields to check if the field values returned by @Formula4 are correct.
You should see "TRUE" next to all Customer IDs that begin with 5 and "FALSE" next to all Customer
IDs that do not begin with 5.
Now that the formulas are error-free and the field values returned are correct, you will create a formula
that links the separate components together. You will begin by linking the first two formulas (@Formula1
and @Formula2) and then you will add @Formula3 and @Formula4 to create the final formula
@FinalFormula.
20.7.2.6 Formula1+2
1.
Create a new formula called Formula1+2.
2.
Type the following in the Formula text box of the Formula Editor:
If {customer.CUSTOMER NAME} [1 to 2] = "Bi" and
ToText({customer.CUSTOMER ID}) [1] = "6" Then
"TRUE"
Else
"FALSE"
3.
Place the formula to the right of the @Formula4 field.
You should see "TRUE" next to each customer whose name begins with Bi and Id begins with 6, and
"FALSE" next to all Customer IDs that do not meet this criteria.
2013-05-06439
Using Formulas

If this formula is working correctly, you can create one last formula adding the code from @Formula3
and @Formula4.
20.7.2.7 FinalFormula
1.
Create a new formula called FinalFormula.
2.
Type the following in the Formula text box of the Formula Editor:
If ({customer.CUSTOMER NAME} [1 to 2] = "Bi" and
ToText({customer.CUSTOMER ID}) [1] = "6") or
({customer.CUSTOMER NAME} [1 to 2] = "Ro" and
ToText({customer.CUSTOMER ID}) [1] = "5") Then
"PREFERRED CUSTOMER"
Else
"DOESN'T FIT CRITERIA";
3.
Place the formula where you want it to appear in the Details section of the report. You can now
delete all other formula fields from the report. See Deleting formulas.
You can use this same process of condition-by-condition testing for any formulas as a means of
systematically checking them.
20.8 Error Messages and Formula Compiler Warnings
A ) is missing.
Parentheses must be used in pairs; each opening parenthesis must be matched with a closing
parenthesis. One of your opening parentheses is not matched by a closing parenthesis. Insert the
missing parenthesis and recheck.
A ] is missing.
Brackets must be used in pairs; each opening bracket must be matched with a closing bracket. One of
your opening brackets is not matched by a closing bracket. Insert the missing bracket and recheck.
A Boolean range variable is not allowed.
You have entered a Boolean range variable. Range variables are allowed in all data types other than
Boolean. Either change the data type to something other than Boolean, or enter a Boolean item variable
to replace the Boolean range variable.
A day number must be between 1 and the number of days in the month.
You have entered a day number that does not fit the month. The Formula Checker displays this warning
if, for the month of January, for example, you enter a day number of zero (0) or a number 32 or greater.
Change the day number to fit the month and recheck.
2013-05-06440
Using Formulas

A field is required here.
You have entered something in your formula other than a field at a position where a field is expected.
Correct the problem and recheck.
A formula cannot refer to itself, either directly or indirectly.
You cannot enter a formula that refers to itself. For example, in creating the formula @Profit, you cannot
use @Profit as the argument to a function. Remove the reference and recheck.
A function is required here.
The Formula Editor is expecting a function but none was entered. Review your formula and enter the
required function or correct the formula if it is in error.
A month number must be between 1 and 12.
You have entered a month number that falls outside the allowable range. Enter a month number between
1 and 12 and recheck.
A string can be at most 65534 characters long.
The program allows strings in formulas to be up to 65534 characters long. You have entered a string
that exceeds that limit. Reduce the length of the string and recheck.
A subscript must be between 1 and the length of the string.
You have entered a subscript number that specifies a character that does not exist. If you enter a
subscript that references the 6th or the 8th character in a five character string, for example, you will get
this warning. Change the subscript to a value that exists and recheck.
Note:
A subscript can be a negative number if that number is a negative between -1 and the negative length
of the string. For example, if the string is three characters long, you can use -1, -2, or -3 as a subscript.
A subscript must be between 1 and the size of the array.
You have entered a subscript that specifies an array item that does not exist. If you enter a subscript
that references the 6th or 8th item in a five item array, for example, you will get this warning. Change
the subscript to a value that exists and recheck.
Note:
A subscript can be a negative number if that number is a negative between -1 and the negative size of
the array. For example, if the array is [1,2,3], you can use -1, -2, or -3 as a subscript.
A subtotal condition is not allowed here.
You have entered a subtotal condition for a subtotal that uses something other than a date or Boolean
field as the sort and group by field. Your subtotal does not require a condition. Delete the condition and
continue.
A subtotal condition must be a string.
You have entered a subtotal condition that is not in string format. Make certain when you enter the
condition in the formula that it is surrounded by single or double quotation marks.
2013-05-06441
Using Formulas

A variable cannot be redeclared with a different type.
You have declared a variable with the same name but a different data type than a variable already
declared. This is not allowed. Either change the name of the variable or change the data type so it
conforms with the original data type.
A variable is required here.
You have used the assignment operator (:=) in a formula without preceding it with a variable. The
program expects to see a variable immediately before (to the left of) the assignment operator. Enter a
variable and try again.
A variable name is expected here.
You have declared a variable data type without declaring a variable name. You must enter a variable
name to complete the declaration. Enter the variable name and continue.
Access denied.
DOS will not allow access to a file specified. Make certain the file is not in use by another program (or
another user on a network), and/or make certain you have the right network permissions and try again.
An error occurred when calling the custom function 'sampleFunction'.
An error occurred in your report when it tried to call the custom function specified. Please see the
debugger in the Formula Workshop for help with the error.
Cannot allocate memory.
This message typically indicates that there is not enough memory available. Close any reports that are
not needed, and exit any programs that are not essential. Then try again.
Cannot reallocate memory.
This message typically indicates that there is not enough memory available. Close any reports that are
not needed, and exit any programs that are not essential. Then try again.
Custom function, a return value must be specified by assigning a value to the function name.
You must assign a return value to the function.
Dates must be between year 1 and year 9999.
You have entered a date that falls outside the allowable range. Enter a date that falls within the range
of years 1 to 9999 (including the end values), and then recheck.
Disk full.
You have attempted to save a report to a disk that is full. Either save to a different disk, or delete
unnecessary files from the current disk and try again.
Division by zero.
You have entered a formula that attempts a division by zero. The program does not allow such a division.
Edit the formula so it does not attempt to divide by zero, and then recheck.
2013-05-06442
Using Formulas

To avoid this type of problem, you can use a test such as this:
If {file.FORECAST} = 0 Then
0
Else
{file.SALES} / {file.FORECAST}
Error in formula code. Please contact Business Objects, Information Management Group.
There is something unusual about the formula that was not foreseen. Please save the formula text that
produced this warning and contact the company.
Error in parse tree. Please contact Business Objects, Information Management Group.
In parsing your formula, the program encountered a situation that the parse tree could not process.
Please save the formula text that produced this warning and contact the company.
Field still in use.
The field you are requesting is currently in use. Try again once the field becomes available.
Fields cannot be used within a custom function.
You have tried to use a field within a custom function. Fields cannot be used in custom functions.
File name already in use. Please close the window for xxx before saving under this name.
You have tried to save a file under the name of a file already in use in an open report. Close that report
first, and then try again.
File not found.
The file name you specified cannot be found. Either the filename or the path is incorrect. Enter the
correct filename/path and try again. In some instances the file WBTRVDEF.DLL is missing from your
directory. This file is required for reading Data Dictionary files along with WBTRCALL.DLL.
File permission error.
You have requested a file for which you do not have permission. You must gain the necessary permission
before you can activate the file.
Incorrect Borland Custom Control DLL (BWCC.DLL) installed. Version m.n or higher required.
The program is finding and using a version of BWCC.DLL that is too old for proper program operation.
Here's how this can happen:
BWCC.DLL is installed in the CRW directory (the same directory in which CRW.EXE or CRW32.EXE
resides) during program installation.
The CRW directory is added to the end of the path statement in AUTOEXEC.BAT during installation (if
you allowed the installation program to update the path statement).
If an older version of BWCC.DLL has been installed in the Windows directory, the Windows System
directory, or a directory that appears earlier in the path than the CRW directory (the result of an earlier
installation), the program picks up that version, not the newer version in the CRW directory.
2013-05-06443
Using Formulas

To correct this problem
The correct version of BWCC.DLL is shipped with Crystal Reports. To correct the problem, delete older
versions of BWCC.DLL that reside in directories earlier in the path than CRW.
If this does not solve the problem, move the latest version of BWCC.DLL from the CRW directory to
the Window's directory.
Internal Error: PrintDlg fail: 4100.
There is no printer driver installed in the Windows Control Panel. When Crystal Reports opens a report,
it looks for the printer that was saved with the report. If that printer cannot be found, it looks for the
default printer. If there is no default printer set, the error message results.
Insufficient memory available.
There is not enough memory available to do what you want the program to do. Free up memory and
try again.
Invalid DOS version.
You are using a version of DOS earlier than Version 3.0. Install DOS Version 3.0 or higher and try
again.
Invalid file handle.
You have specified a file handle that does not exist. Enter the correct file handle and continue.
No default printer selected. You may use the Control Panel to select a default printer.
Please use the Control Panel to select a printer and start the program again.
You cannot begin to utilize the program unless you have a default printer selected. Trying to start the
program without a default printer results in this error message.
To select a default printer.
Click the Printers icon in the Windows Control Panel; the Printers dialog box appears with all installed
printers listed in the Installed Printers box.
If you have not yet installed the printer, install it first, and then double-click its listing.
Note:
• A printer must first be given the status Active before it can be selected as the default printer.
• For additional information in installing printers and default printers, please refer to the documentation
that came with Microsoft Windows.
Non unique table reference: tablename.
This is usually caused if a table name contains an underscore or is more than 15 characters long, or
starts with a number.
Not enough arguments have been given to this function.
The function requires more arguments than you have entered. Enter the missing argument(s) and
recheck.
2013-05-06444
Using Formulas

Not enough memory.
There is not enough memory available to process the command. Close any reports that are not needed,
and exit any programs that are not essential. Then try again.
Numeric overflow.
An intermediate result or the final result cannot be represented because it is too big. Restructure or
subdivide the formula to create smaller results, and then recheck.
Only local variables can be used within a custom function.
A custom function cannot refer to variables not defined in the custom function.
Physical database not found.
The program is unable to locate either a DLL or the database. Check to make certain that the directories
that hold these files are listed in the path statement.
Please cancel printing before closing.
Your Report Engine call is attempting to close a job while it is still in progress. Make certain that you
cancel the printing before you close the print job.
Printer not available.
There are problems connecting to the selected printer. Reselect the printer through the Windows Control
Panel and try again.
Report file already exists. Overwrite sample.rpt?
You are attempting to save a report under the same name as an existing report. This will overwrite the
existing report and make it no longer available. Click Yes to overwrite the report, No to stop the saving
process to give you a chance to select a different name.
Report has changed. Save changes to sample.rpt before closing?
You are attempting to close a report window without first saving it, even though you have made changes
to the report since you opened it. The changes will be lost unless you save the report before closing.
Click Yes to save the changes, No to close the report without saving the changes.
'sampleFunction' must be assigned a value within the custom function.
You must assign a value to the function within in the custom function.
Sorry, this feature is not yet implemented. Try again later.
You have attempted to use a feature that has not been implemented in the current release. Wait till an
upgrade that implements the feature and try again.
The formula cannot be evaluated at the time specified.
You are trying to force a field, formula, or function to be evaluated earlier than is possible. Evaluation
time functions can only force a later evaluation time, never an earlier one. Change the formula to
accommodate the required evaluation time.
2013-05-06445
Using Formulas

The formula is too complex. Try simplifying it.
The formula could not be evaluated because it exceeds the limit of 50 pending operations. Pending
operations are operations that are on hold due to order of precedence rules; they will be performed
once the operations with higher level precedence are finished.
Sometimes it is possible to rearrange the formula and calculate the same value without requiring as
many pending operations. As a very simplified example, in the formula 2+3*4, the addition cannot be
performed until the multiplication has been done. The addition thus becomes pending, on hold until the
multiplication is complete. If the formula is written as 3*4+2 instead, the operations can be performed
left-to-right with the same result, thus eliminating the pending operation.
Correct the formula and recheck.
The matching } for this field name is missing.
Field names must be enclosed in braces { }. You have entered one of the required braces but not the
other. Insert the missing brace and recheck.
The matching ' for this string is missing.
A string that begins with a ' must end with a ' before the end of the line. You have used the ' in one of
those positions but not the other. Insert the missing punctuation and recheck.
The matching " for this string is missing.
A string that begins with a " must end with a " before the end of the line. You have used the " in one of
those positions but not the other. Insert the missing punctuation and recheck.
The number of copies of the string is too large or not an integer.
Using the ReplicateString function, you have requested too many copies or you are requesting a
non-integer number of copies. Lower the number of copies requested or specify an integer number of
copies and try again.
The number of days is too large or not an integer.
When adding days to dates, or subtracting days from dates, you can use only an integer number of
days (a whole number); you cannot add or subtract non-integer numbers of days (1/2 days, 3.6 days,
and so on). Additionally, once you add or subtract days from a date, the resulting date must fall within
the allowable (year) date range, 0000-9999. If you enter a non-integer number of days or if your result
falls outside the allowable range, the Formula Editor displays this warning. Correct the problem and
recheck.
The number of decimal places is too large or not an integer.
The second argument to the Round(x, # places) or ToText(x, # places) functions must be a small integer
(whole number). You have entered a number as the second argument (# places) that specifies too
many decimal places or that is not an integer. Change the number to a small integer and recheck.
The record selection formula cannot include 'PageNumber', 'RecordNumber', 'GroupNumber',
'Previous', or 'Next'.
You cannot include the following Print State functions in your record selection formula: PageNumber,
RecordNumber, GroupNumber, Previous, or Next. Eliminate the field(s) and recheck.
2013-05-06446
Using Formulas

The record selection formula cannot include a summary field.
You have included a summary field in a record selection formula. The program does not allow this.
Remove the summary field and recheck.
The remaining text does not appear to be part of the formula.
You have provided a formula operand (the item on which a formula operation is to be performed) where
none is expected. Often this means that you have forgotten an operator, or an earlier part of a function,
or some required syntax item. Correct the error and then recheck.
The result of a formula cannot be a range.
You have created a formula that results in a range. A formula must result in a single value. Correct the
formula and recheck.
The result of a formula cannot be an array.
You have created a formula that results in an array. A formula must result in a single value. Correct the
formula and recheck.
The result of the selection formula must be a Boolean.
You have created a selection formula that returns something other than a Boolean value. Reconstruct
the formula using comparison operators (=, and so on) and recheck.
The special variable field could not be created.
This message typically indicates that there is not enough memory available. Close any reports that are
not needed, and exit any programs that are not essential. Then try again.
The string is non-numeric.
The argument to the ToNumber function must be a number stored as a string (for example, a customer
number, an ID number, and so on). The string may be preceded by a minus sign and may contain
leading and trailing blanks. You have used an argument that is non-numeric and therefore cannot be
converted to a number. Change the argument to numeric and recheck.
The summary field could not be created.
This message typically indicates that there is not enough memory available. Close any reports that are
not needed, and exit any programs that are not essential. Then try again.
The variable could not be created.
The variable you declared could not be created. Check the spelling and syntax of your declaration
statement and try again.
The word 'Else' is missing.
In an If-Then-Else expression, you have left out (or misplaced) the 'Else' component and the formula
will not function. Insert (or reposition) the 'Else' component and recheck.
The word 'Then' is missing.
In an If-Then-Else expression, you have left out (or misplaced) the 'Then' component and the formula
will not function. Insert (or reposition) the 'Then' component and recheck.
2013-05-06447
Using Formulas

There are too many characters in this field name.
A field name may have at most 254 characters. You have entered a field name that exceeds that
number. Enter a field name that has an allowable number of characters and try again.
There are too many characters in this string.
Strings in formulas are allowed to be up to 65534 characters long. You have entered a string that
exceeds that limit. Reduce the length of the string (or break it into 2 or more concatenated strings) and
recheck.
There are too many letters and digits in this name.
A variable name can have at most 254 characters. You have entered a name that exceeds that number.
Shorten the name to conform to the limit and continue.
There is an error in this formula. Please edit it for more details.
You have tried to accept a formula (via the Accept button in the Formula Editor) that contains an
uncorrected error. Correct the error that was indicated and try again.
There is an error in this custom function. Please edit it for more details.
You have tried to save a custom function that has an error in it. Correct the error that was indicated
and try again.
There must be a subtotal section that matches this field.
You have entered a subtotal in a formula without there being a corresponding subtotal in the report
itself. Any subtotal you enter in a formula must duplicate a subtotal already in your report. Add the
required subtotal to the report and then re-enter the formula, or delete the formula, and then recheck.
This array must be subscripted. For example: Array [i].
You have entered an array without enclosing it in brackets. Enclose the array in brackets and recheck.
This field cannot be summarized.
You have entered a summary field that does not already exist in your report. Any summary field you
enter in a formula must duplicate a summary field already in your report. Either enter the summary field
in your report first and then re-enter it in the formula, or do not enter the summary field in the formula
at all.
This field cannot be used as a subtotal condition field.
The field you are entering as a condition field causes the subtotal in the formula not to match any
subtotal in the report. Any subtotal you enter in a formula must duplicate a subtotal already in your
report. Either enter the subtotal in your report first and then re-enter it in the formula, or do not enter
the subtotal in the formula at all.
This field cannot be used because it must be evaluated later.
You are trying to force a field, formula, or function to be evaluated earlier than is possible. Evaluation
time functions can only force a later evaluation time, never an earlier one. Change the formula to
accommodate the required evaluation time.
2013-05-06448
Using Formulas

This field has no previous or next value.
You have used a field for which there is no "previous" value as the argument for the Previous or
PreviousIsNull function, or you have used a field for which there is no "next" value as the argument for
the Next or NextIsNull function. To use either of those functions, replace the argument with a field that
contains the appropriate values.
This field must be in the same section as the current formula.
Since the field was put into the formula as an operand, it has been moved to a section where it is no
longer a valid operand.
This field name is not known.
You have entered a field name that does not appear in any of the active databases. Correct the spelling
of the field name and/or its alias, and then recheck. Or, to enter a field name from a database that is
not currently active, activate the database first and then re-enter the field name.
This formula cannot be used because it must be evaluated later.
You are trying to force a field, formula, or function to be evaluated earlier than is possible. Evaluation
time functions can only force a later evaluation time, never an earlier one. Change the formula to
accommodate the required evaluation time.
This function cannot be used because it must be evaluated later.
You are trying to force a field, formula, or function to be evaluated earlier than is possible. Evaluation
time functions can only force a later evaluation time, never an earlier one. Change the formula to
accommodate the required evaluation time.
This function cannot be used within a custom function.
You have tried to use a function or formula that will not work in a custom function, that is it is not
"stateless".
This group section cannot be printed because its condition field is non-existent or invalid.
Your report contains a group section that is based on a condition field that is either no longer in the
report or changed so it is invalid for the group section. Review your grouping criteria to identify and
correct the source of the problem.
This subtotal condition is not known.
You have entered a subtotal condition that does not appear anywhere in your report. Any subtotal you
enter in a formula must duplicate a subtotal already in your report. Change the condition and recheck.
Too many arguments have been given to this function.
You have entered an array as the argument to a non-array function. This kind of problem can occur,
for example, if you forget to use brackets (the required syntax items for an array) to enclose an array.
The Formula Checker sees the array values as arguments to a non-array function and displays the
error message.
Too many items have been given for this array.
The program allows up to 50 values in an array. You have exceeded this limit. Reduce the number of
values in the array and recheck.
2013-05-06449
Using Formulas

Too many open files.
You have too many open files (databases, reports) given the number of files you specified in the
CONFIG.SYS FILES = statement. To prevent this error from recurring, either use fewer files or increase
the number of files specified in the FILES = statement.
Missing or incorrect operand warnings.
The following warnings appear when the Formula Checker expects to find a specific kind of operand
(the item on which a formula operation is to be performed), and finds something different. For example,
the formula 5>a is comparing a number to text (the old comparing apples to oranges analogy). When
the Formula Checker sees that the number five is being compared to something, it expects that something
to be another number. If anything other than a number appears, it displays the warning: "A number is
required here."
Depending on the formula that you enter, you might see one of the following messages:
• A number is required here.
• A Boolean array is required here.
• A Boolean is required here.
• A currency amount is required here.
• A currency array is required here.
• A currency range is required here.
• A date array is required here.
• A date is required here.
• A date range is required here.
• A number array is required here.
• A number array or currency array is required here.
• A number, currency amount, Boolean value, or string is expected here.
• A number, currency amount, Boolean, date, or string is required here.
• A number, currency amount, date, or string is required here.
• A number, currency amount, or date is required here.
• A number field or currency amount field is required here.
• A number is required here.
• A number or currency amount is required here.
• A number range is required here.
• A string array is required here.
• A string is required here.
• A string or an array of values is required here.
• An array of values is required here.
2013-05-06450
Using Formulas

• The custom function name 'sampleFunction' is expected here.
2013-05-06451
Using Formulas

2013-05-06452
Using Formulas

Parameter Fields and Prompts
21.1 Parameter and prompt overview
Parameters are Crystal Reports fields that you can use in a Crystal Reports formula. As a formula
component, a parameter must have a value before the program can process the report. By using
parameters in formulas, selection formulas, and in the report itself, you can create a single report that
changes its behavior depending on the values entered by your users. Parameter fields can also be
used in subreports.
Prompts are elements that help users set a value for report parameters. Prompts are different from
parameters in several ways:
• Prompts are not used directly by a Crystal Reports formula.
• Prompts include user-interface settings that help you determine the appearance of the prompting
dialog box that your users see.
• Prompts include an optional list of values that your users can choose from. This list of values can
be a static list that is stored in each report, or a dynamic list that is retrieved from a database (this
type of prompt includes multi-level cascading lists that are also retrieved from a database).
• Prompts can be set so that the parameter itself is optional.
When your users select values in the prompting dialog box, they are setting values for prompts. The
Crystal Reports prompting engine then assigns that value to the corresponding parameter, which is
finally used by the report.
When you create and edit a parameter field, you work with one parameter and one or more prompts.
21.1.1 Parameter field considerations
There are a number of things to keep in mind when working with parameter fields:
• Parameter fields support the following data types:
• Boolean: Requires a yes/no or true/false answer.
Example: Include planned budget numbers in the summary?
2013-05-06453
Parameter Fields and Prompts

• Currency: Requires a dollar amount.
Example: Display customers with sales over XXXXX.
• Date: Requires an answer in a date format.
Example: Enter the start and end dates of the quarter.
• DateTime: Requires both date and time.
Example: Display statistics for 07/04/1999 between 1:00pm-2:00pm.
• Number: Requires a numeric value.
Example: Enter the customer identification number.
• String: Requires a text answer.
Example: Enter the region.
• Time: Requires an answer using a time format
Example: Display the total number of calls from 1:00pm-2:00pm.
• Parameter field prompting text can be up to four lines long with approximately 60-70 characters per
line (depending on character width, up to the 254 character limit). Text over one line in length will
automatically word wrap.
• You can create a list of values from which users can choose the parameter value rather than having
them enter it manually. Lists of values can be static (embedded in each report), dynamic (refreshed
from a database on demand), scheduled (refreshed from a database on a recurring schedule), or
partially scheduled (portions of a list of values can be scheduled, while other portions remain
on-demand). Scheduled and partially scheduled lists of values are administered through the Business
View Manager. For more information, see the
Business Views Administrator's Guide
.
• A parameter field does not have to be placed in a report in order to be used in a record or group
selection formula. You create the parameter field and then enter it in your formula as you would any
other field.
• A parameter field does not have to be placed in a report in order to be used in a record or group
selection formula. You create the parameter field and then enter it in your formula as you would any
other field.
• A parameter field can be set to be optional so that users are not forced to enter a value when
prompted.
21.1.2 Prompt considerations
There are a number of things to keep in mind when working with prompts:
• Prompts can be static or dynamic. As well, a dynamic prompt can have a cascading list of values.
For a description of each option, see these topics:
2013-05-06454
Parameter Fields and Prompts

• Creating a parameter with a static prompt.
• Creating a parameter with a dynamic prompt.
• Creating a parameter with a cascading list of values.
• Dynamic prompts contain lists of values that you can use for a particular report or for many reports.
You share a list of values by adding it to the BusinessObjects Enterprise Repository.
• A list of values can be scheduled for automatic updates through the Business View Manager. For
more information about scheduling a list of values, see the
Business Views Administrator's Guide
.
• A list of values can form a cascading prompt; that is, you can create a prompt whose final value is
determined through a sequence of choices. For example, users might first be prompted to pick a
country before the choices for region appear. The users might then need to pick a region before the
choices for city appear, and so on.
21.1.3 Data and non-data parameters
Depending on how parameters are used, they are marked as either data parameters or non-data
parameters. How these parameters are used within a report will impact whether the report data will
refresh upon changing parameter values.
Data parameters are used in:
• Record selection formulas, directly or indirectly (by way of being referenced within a formula)
• Command objects
• Stored procedures
• Universe parameters
Changes made to the value of a data parameter require a report refresh to fetch new data from the
database. For example, a report will be refreshed when a data parameter is used to generate a query.
Non-data parameters are used in:
• Saved data selection formulas
• Conditional formulas
• Parameters placed on the report
Changes made to the value of a non-data parameter will filter the saved data of the report and will not
require a refresh. This process minimizes the processing demand on the database. For example, a title
is a non-data parameter.
Note:
Non-data parameters change the presentation of existing data. It is best to use them only in a way that
makes sense for the report. For example, do not filter using a saved data selection formula to display
values that are below 100,000 if you have a record selection formula that only selects values above
100,000 from the database. Using selection formulas improperly may provide confusing results, or even
blank pages.
2013-05-06455
Parameter Fields and Prompts

21.1.4 Optional parameters
Crystal Reports supports optional parameters. An optional parameter is a prompted value that does
not have to be supplied by the user.
Report designers should provide some guidance to the end user that a parameter is optional by adding
this information to the prompt text.
Optional parameters are treated by Crystal Reports as optional anywhere within the report that they
are used. You cannot set one instance of the parameter to optional and another to mandatory.
Note:
• After you set a parameter to optional, if you use the "Select Expert", the system will automatically
add the selection formula for you using the HasValue() function.
The "Formula Workshop Editor" does not automatically add the formula. Only the "Select Expert"
automatically adds the formula for you.
• If you change the parameter from optional to mandatory, the HasValue() function is not automatically
removed from your formula.
Handling a parameter with no value
When the report engine evaluates any formula which references an optional parameter that does not
have a value, it generates a runtime error. All formulas that reference an optional parameter should
first use the HasValue() function to check if that parameter has a value before evaluating it. This
includes record selection formulas and saved data formulas.
Note:
The system will not automatically drop a statement from the SQL WHERE clause. It is the report
designer’s responsibility to decide which statement to leave out based on HasValue() testing.
21.2 Understanding dynamic prompts
Both dynamic prompts and cascading lists of values are available in Crystal Reports. These features
let you populate the lists of values associated with a prompt from a data source outside of your report.
(Static lists of values that are stored in your report are also available in Crystal Reports.)
This dynamic capability is available to all Crystal Reports users—whether or not they have the added
capabilities of SAP BusinessObjects Business Intelligence platform. When Crystal report files are stored
in SAP BusinessObjects Business Intelligence platform, additional dynamic prompting features are
available. The following table shows which features are available with each product.
2013-05-06456
Parameter Fields and Prompts

Note:
In the table, and elsewhere in this section, the term managed report is used to describe reports that
are stored in a SAP BusinessObjects Business Intelligence platform environment, while unmanaged
report is used to describe reports that are stored outside such an environment.
Available when Crystal re-
ports are published to SAP
BusinessObjects Business
Intelligence platform?
Available when Crystal re-
ports are stored outside of
SAP BusinessObjects Busi-
ness Intelligence platform?
Feature
YesYes
Create dynamic prompts and
cascading lists of values.
YesYes
Reuse list of value definitions
within a single report at design
time.
YesNo
Reuse list of value definitions
within multiple reports at design
time.
YesNoSchedule lists of values.
No
All lists of values that are used
by managed reports are based
on Business Views; however
Business Views can themselves
be based on command objects.
In this way, lists of values can
be indirectly based on command
objects.
Yes
Populate lists of values from
command objects.
NoYes
Populate lists of values from re-
port fields.
YesNo
Populate list of values from
Business Views.
YesNo
Cache lists of values at report
run time, and share that list
among multiple executing re-
ports.
2013-05-06457
Parameter Fields and Prompts

Available when Crystal re-
ports are published to SAP
BusinessObjects Business
Intelligence platform?
Available when Crystal re-
ports are stored outside of
SAP BusinessObjects Busi-
ness Intelligence platform?
Feature
YesNo
Schedule lists of values to up-
date themselves on a regular
basis.
YesNo
Schedule portions of lists of
values to update themselves on
a regular basis, while the remain-
ing portions retrieve their values
from the database on demand.
Some components in the Crystal Reports and SAP BusinessObjects Business Intelligence platform
products support the execution of reports with dynamic prompts and cascading lists of values:
• All viewers except for the Java Applet viewer.
Note:
Reports that use dynamic prompts and cascading lists of values run in the Java Applet viewer; they
will not, however, have pick lists where dynamic lists of values should appear.
The supported viewers are as follows:
• ActiveX
• .NET Winform
• .NET Webform
• Java, COM, and JSF DHTML page viewers
• Java and COM Advanced DHTML Viewer
• The BI launch pad and Central Management Console scheduling interfaces in SAP BusinessObjects
Business Intelligence platform.
• The Report Designer Component (RDC).
• Crystal Reports XI R2 and later.
These components support the design of reports with dynamic prompts and cascading lists of values.
• Crystal Reports XI R2 and later.
• The integrated Visual Studio .NET designer.
• Business View Manager.
2013-05-06458
Parameter Fields and Prompts

Note:
While the dynamic capability is not available with SAP BusinessObjects BI Interactive Analysis or with
full-client products, Crystal reports that are based on universes can use the dynamic prompting
capabilities described throughout this section.
21.3 Understanding lists of values
List-of-values objects describe how to return a set of values from a data source:
• They provide the values for prompts in the prompting dialog box.
• They can be either static (the values are stored in the report), or dynamic (the values are stored
outside the report in a database).
• They are used for both single-level dynamic prompts, and multi-level cascading prompts.
For example, a list of countries could be a dynamic prompt, while a hierarchical list of countries,
regions, and cities could be a dynamic prompt with a cascading list of values.
Crystal Reports supports three data sources for list-of-values objects:
• Report fields (only for unmanaged reports).
• Command objects (only for unmanaged reports).
• Business Views (only for managed reports).
A list of values can have one or more levels. If there are multiple levels in the list of values, then each
level constrains the next.
You can think of a list of values as the definition of the data needed to populate all levels of a cascading
list. In Crystal Reports, a cascading relationship is defined by a single list-of-values object, not by
multiple queries that are linked together by a common key. Although the list of values is defined as a
single entity, data is not necessarily fetched from the data source in a single query.
Note:
• List-of-values objects are not affected by report record selection or group selection formulas. These
formulas affect the report data, not data used for prompt-time lists of values.
• If a data connection is broken or reset, Crystal Reports does not attempt to create or update the
dynamic list-of-values object and instead reverts to a static list.
21.3.1 List-of-values types
There are two different types of list-of-values objects:
2013-05-06459
Parameter Fields and Prompts

• Unmanaged lists of values are stored within each report file.
If you do not have SAP BusinessObjects Business Intelligence platform, or if you never publish your
reports to SAP BusinessObjects Business Intelligence platform, you use an unmanaged list-of-values
object. Unmanaged list-of-values objects can use report fields or command objects as a data source.
• Managed lists of values are stored within SAP BusinessObjects Business Intelligence platform.
Every report that you store in SAP BusinessObjects Business Intelligence platform uses managed
list-of-values objects. All managed list-of-values objects are based on a Business View, even if the
report itself does not use a Business View. Managed list-of-values objects have a number of features
that are not available to unmanaged list-of-values objects.
Managed list of val-
ues
Unmanaged list of values
Feature
Business ViewsCommand objectsReport fields
Yes
The database is
queried for each level
as the user selects
values in the prompt-
ing dialog box (provid-
ed the Business View
is not based on a
command object).
No
The database is
queried for all values
in all levels of the list
at one time.
Yes
The database is
queried for each level
as the user selects
values in the prompt-
ing dialog box.
Database query per
list-of-value level.
Yes
Business Views sup-
port filters.
Yes
Any filter that can be
represented in SQL
can be used.
No
All of the values in the
report fields that are
also in the list of val-
ues definition are
used.
At design time, specify
a filter for the list of
values.
Yes
If the Business View
contains parameters,
the value(s) are
prompted for a report-
view time.
Yes
If the command object
contains parameters,
the value(s) are
prompted for at report-
view time.
No
At report-view time,
prompt for additional
information needed by
the list of values.
2013-05-06460
Parameter Fields and Prompts

Managed list of val-
ues
Unmanaged list of values
Feature
Business ViewsCommand objectsReport fields
Yes
Because managed
lists of values are
based on Business
Views, they inherit the
view-time security ca-
pabilities of Business
Views.
NoNo
Display different val-
ues to different users.
Yes
The scheduling capa-
bility comes from the
Business View Manag-
er, not the Central
Management Console
(CMC) where reports
are scheduled.
NoNo
Schedule the list of
values to update on a
recurring schedule.
YesNoNo
Partially schedule the
list of values to update
only certain portions of
the list on a recurring
schedule.
21.3.2 Determining which list-of-values type to use
Different reporting problems require different prompting solutions, depending on the amount of data in
the lists of values. This table provides a rough guide to which list-of-values design you should use.
2013-05-06461
Parameter Fields and Prompts

Managed list of val-
ues
Unmanaged list of values
Description
Business ViewsCommand objectsReport fields
Well suited.
You can define filtering
within the source Busi-
ness View.
Well suited.
You can define filtering
within a command ob-
ject. (That command
objects return the data
for all levels in the list
is not a problem for
single-level lists.)
Not well suited.
Because report fields
cannot be filtered, any
filtering of the list that
you require must be
done outside of Crystal
Reports in a database
view.
Single-level code ta-
bles. (A table that has
hundreds of semi-static
values in a single lev-
el.)
Well suited.
Business-View-based
lists of values can sup-
port both filtering and
level-by-level data re-
trieval.
Well suited.
Provided that the total
data volume for all lev-
els in the list is not too
large. If there is too
much data, you could
encounter performance
issues because com-
mand-object-based
lists of values retrieve
data for all levels in one
trip to the database.
Well suited.
Provided that the data
filtering is done outside
of Crystal Reports, re-
port fields are well suit-
ed to multi-level cascad-
ing code tables be-
cause they retrieve da-
ta one level at a time.
Multi level-cascading
code tables. (A table
that has hundreds of
semi-static values in
multiple levels.)
Well suited.
Partially scheduled lists
of values excel in this
situation, where the se-
mi-static part of the da-
ta can be scheduled,
and the most dynamic
part can be retrieved
on-demand.
Not well suited.
Because command ob-
jects retrieve their data
in one trip to the
database, there could
be performance issues
when you use them
against very large ta-
bles.
Well suited.
Provided that the filter-
ing is done outside of
Crystal Reports in a
database view, and
provided that there is a
multi-level hierarchy to
the data.
Fact tables. (These ta-
bles tend to be very
large, dynamic tables
with millions of values
in multiple levels.)
21.3.3 Lists of values and prompt groups contrasted
2013-05-06462
Parameter Fields and Prompts

Lists of values are the data part of a prompt; the values from your data that your users will see and
select from.
Prompt groups, on the other hand, are the presentation part of a prompt. Crystal Reports treats prompt
groups as separate objects so that you can share the same list of values with different presentations.
For example, you can have a Shipping City prompt, and a Customer City prompt. Perhaps you allow
for multiple customer cities, but only a single shipping city in your report. You can design this report so
that it uses a single city list of values, but with two different prompt groups (or presentations styles).
For more information about using prompt groups, see Sharing common lists of values within a report.
21.4 Creating a parameter with a static prompt
A static prompt is one that always contains the same values. For example, if your parameter prompts
for a country value, you could create a static prompt because the country list represents a set of values
that does not change often.
Use the following steps to create a parameter with a static prompt that lets users see a list of customers
that they can select a specific country from.
This procedure is made up of two sets of steps. The first is creating the parameter, and the second is
using the Select Expert to incorporate the parameter into the record selection filter.
21.4.1 To create a parameter with a static prompt
1.
Open the sample report called Group.rpt.
Sample reports are located on the SAP Business Objects Support web site.
2.
On the View menu, click Field Explorer.
Tip:
Another way to do this is to click the Field Explorer button on the Standard Toolbar.
The Field Explorer dialog box appears.
3.
Select Parameter Fields and click New.
The Create New Parameter dialog box appears.
4.
Enter a name for the parameter in the Name field (up to 255 alphanumeric characters).
This example uses Country.
5.
Select the appropriate Type from the list.
2013-05-06463
Parameter Fields and Prompts

This example uses String.
Note:
When creating a parameter whose Type is either Date or DateTime, you can change the date format
to suit your needs. For details, see Changing your default field formats.
6.
From the Value Field list, select Country.
7.
Click Actions and select Append all database values to move all of the countries in the sample
database to the Values area.
This example will enable the user to choose from any of the countries. If you want to limit the selection,
manually enter only the countries that you would like the user to choose from.
8.
In the Value Options area, enter the desired prompting text in the Prompt Text field (up to 255
alphanumeric characters).
This is the text that appears in the "Enter prompt values" dialog box when the report is refreshed.
This example uses the default value.
9.
Click OK.
10.
Return to the Field Explorer dialog box, and drag the Country parameter into your report.
The "Enter prompt values" dialog box appears.
2013-05-06464
Parameter Fields and Prompts

Note:
If you don't want to see the parameter field you dropped in your report, place it in a section you can
suppress, such as a report header or footer.
11.
Select the country to base the report on.
This example uses Brazil.
12.
Click OK.
21.4.2 To incorporate the parameter into the record selection filter
1.
On the Report menu, click Select Expert.
Tip:
Another way to do this is to click the Select Expert button on the Expert Tools toolbar.
The Choose Field dialog box appears.
2.
Select Country from the Customer table, then click OK.
The Select Expert appears.
3.
Choose is equal to from the drop-down list.
4.
Choose the parameter from the adjacent drop-down list.
This example uses {?Country}.
2013-05-06465
Parameter Fields and Prompts

5.
Click OK.
The report appears with the information for Brazil.
With parameter fields, you can create a single report that can be customized quickly to meet a variety
of needs.
21.4.3 To incorporate the parameter into a saved data selection formula
1.
On the Report menu, point to Select Expert and then click Saved Data.
The Choose Field dialog box appears.
2.
Highlight the field on which you want to base record selection and click OK.
The Select Expert appears.
3.
Use the drop-down lists to enter your selection criteria for the indicated field.
4.
Choose the parameter from the adjacent drop-down list and click OK.
If the parameter is being referenced for the first time, the Enter Values dialog box appears.
5.
Select your initial values and click OK.
Crystal Reports immediately filters the report data according to your selection criteria.
21.5 Creating a parameter with a dynamic prompt
The values of a dynamic prompt are retrieved from the data source and are not stored within the report.
For example, if you are prompting for customer name, you could create a dynamic prompt because the
names in your customer database probably change frequently.
Dynamic prompts can be authored in Crystal Reports. You do not need SAP BusinessObjects Business
Intelligence platform or Crystal Reports Server to author dynamic prompts. When Crystal Reports is
installed on the same machine as Microsoft Visual Studio, you can use the embedded Crystal Reports
2013-05-06466
Parameter Fields and Prompts

designer to author dynamic prompts. When Crystal Reports is used with Crystal Reports Server or the
SAP BI platform Server, additional features are available. For more information, see Managed reports.
Use the following steps to create a parameter that uses a dynamic prompt. As part of the procedure,
you will create a list of values.
21.5.1 To create a parameter with a dynamic prompt
1.
Open the sample report called Group.rpt.
Sample reports are located on the SAP Business Objects Support web site.
2.
On the View menu, click Field Explorer.
The Field Explorer dialog box appears.
3.
Select Parameter Fields and click New.
The Create New Parameter dialog box appears.
4.
Enter a name for the parameter in the Name field (up to 255 alphanumeric characters).
This example uses Region.
5.
In the List of Values area, click Dynamic.
6.
Ensure that New is selected in the Choose a Data Source area.
Note:
If your report already contains a list of values, or if you want to pick a list of values from your
repository, you can select Existing and choose an existing list of values from the tree structure.
7.
Click Insert, and from the Value list, select Region.
8.
In the Value Options area, enter the desired prompting text in the Prompt Text field (up to 255
alphanumeric characters).
This is the text that appears in the "Enter prompt values" dialog box when the report is refreshed.
This example uses "Select a Region."
2013-05-06467
Parameter Fields and Prompts

9.
Click OK.
10.
Return to the Field Explorer dialog box, and drag the Region parameter into your report.
Note:
If you don't want to see the parameter field you dropped in your report, place it in a section you can
suppress, such as a report header or footer.
When you look at your dynamic prompt within Crystal Reports, it does not seem to be much different
from a static prompt. In the background, however, Crystal Reports stores the information about the list
of values that you created for this prompt. When the report engine requires a parameter that has a
dynamic prompt, it will access the data source and populate the list of values automatically. This will
be displayed on the end user prompt page. If you choose to publish the report to SAP BusinessObjects
Business Intelligence platform or Crystal Reports Server, the list of values becomes a separate entity
that you can optionally schedule in Business Views Manager.
21.6 Creating a parameter with a cascading list of values
A dynamic prompt can include a cascading list of values, which adds additional levels of selection for
your users. For example, if you are prompting for a city value, but you also need to know which country
2013-05-06468
Parameter Fields and Prompts

and region that city comes from, you could create a dynamic and cascading prompt. In this case, you
first prompt for a country, and when that value has been selected, the program prompts for a region by
showing only the regions that apply to the selected country. Finally, when a region value has been
selected, the program prompts for a city by showing only the cities that apply to the selected region. In
this way, you can be sure that your user picks the correct city (for instance, Vancouver, Washington,
USA rather than Vancouver, British Columbia, Canada).
As with a dynamic prompt that has only one value, you are able to create or specify a cascading list of
values that you can schedule for updates as often as you like through the Business View Manager. For
more information about scheduling a list of values, see the
Business Views Administrator's Guide
.
Use the following steps to create a parameter that uses a dynamic prompt and a cascading list of values.
21.6.1 To create a parameter with a cascading list of values
1.
Open the sample report called Group.rpt.
Sample reports are located on the SAP Business Objects Support web site.
2.
On the View menu, click Field Explorer.
The Field Explorer dialog box appears.
3.
Select Parameter Fields and click New.
The Create New Parameter dialog box appears.
4.
Enter a name for the parameter in the Name field (up to 255 alphanumeric characters).
This example uses Supplier City.
5.
In the List of Values area, click Dynamic.
6.
Enter prompting text for your prompt group in the Prompt Group Text field.
This example uses "Choose the City that your supplier is located in."
Note:
Prompt groups let you use cascading list of values for other cascading prompts. For example, if you
set up such a list of values for an address prompt, you might want to use the list for both shipping
and billing addresses. In this case, you could create two prompt groups for the same list of values;
you might call one prompt group Shipping Address and the other Billing Address.
7.
Ensure that New is selected in the Choose a Data Source area.
Note:
If your report already contains a list of values, or if you want to pick a list of values from your
repository, you can select Existing and choose an existing list of values from the tree structure.
8.
Click Insert.
2013-05-06469
Parameter Fields and Prompts

The program automatically expands the Value list. You use this area to define the fields that make
up your cascading list of values. This example uses a cascade of Country, Region, and City.
9.
From the Value list, select Country.
10.
Click the blank field under Country and select Region.
11.
Click the blank field under Region and select City.
12.
In the Parameters area, click City to bind the field that contains the City value to the parameter.
In this step, you are choosing the field in your cascading hierarchy that should be bound to the
parameter field that you are creating. Because this particular parameter is intended to provide Crystal
Reports with a city value, you bind the parameter to City.
13.
In the Prompt Text field (in the Value Options area), enter additional prompting text for each of the
fields in your cascading list of values.
This is the text that appears in the "Enter prompt values" dialog box when the report is refreshed.
14.
Click OK.
15.
Return to the Field Explorer dialog box, and drag the Supplier City parameter into your report.
Note:
If you don't want to see the parameter field you dropped in your report, place it in a section you can
suppress, such as a report header or footer.
2013-05-06470
Parameter Fields and Prompts

21.7 The Parameter Panel
The Parameter Panel lets users interactively format and filter report data by changing parameter values.
It is located within the Preview Panel.
In the Create New Parameter and Edit Parameter dialog boxes, you can specify parameters to display
on the Parameter Panel via the Show on (Viewer) Panel option. You can choose one of several settings:
• Do not show
The parameter is not visible on the panel. Users must refresh the report to change the parameter
values.
• Editable
Users can view and change the parameter values on the panel.
• Read only
Users can view the parameter values on the panel, but cannot change them.
Note:
Do not show is the default setting for a new parameter.
The Parameter Panel displays all parameters that have been set to Editable or Read only. Depending
on the type of parameter, users can add, delete, or modify parameter values either by using the dropdown
menus and applying their changes or by clicking the Advanced Dialog button.
The following are some of the more commonly used types of parameters that must be modified by
clicking the Advanced Dialog button:
• Parameters with ranged values.
• Dynamic parameters that use cascading prompts.
On the panel, data parameters are differentiated from non-data parameters with a database icon. When
a user modifies the value of a data parameter, the report refreshes and accesses the database to make
the corresponding changes. When a user modifies the value of a non-data parameter, the report is
formatted or filtered based on saved data within the report. It does not access the database.
21.8 Working with lists of values
Dynamic prompts use lists of values. You can create a list of values in either Crystal Reports or in the
Business View Manager. Crystal Reports refreshes the data in a list of values when you open a report
that contains a dynamic prompt; however, you can also refresh the data in a list of values by scheduling
it in the Business View Manager. For more information, see
Using Business Views
.
2013-05-06471
Parameter Fields and Prompts

You can add lists of values to SAP BusinessObjects Business Intelligence platform or Crystal Reports
Server in several ways:
• You can create a list of values when you design a report, and then you can save the report to an
Enterprise folder. For more information, see Saving a report to an Enterprise folder.
• You can create a list of values in the Business View Manager. For more information, see
Using
Business Views
.
• You can create a list of values when you design a report, and then you can add it to SAP
BusinessObjects Business Intelligence platform through the Central Management Console (CMC).
For more information, see the
SAP BusinessObjects Business Intelligence Platform Administrator
Guide
.
• You can migrate lists of values from one environment to another by using the Business Views
Manager Import/Export facility. For more information, see the
SAP BusinessObjects Business
Intelligence Platform Administrator Guide
.
21.8.1 Sharing common lists of values within a report
You can use a single list-of-values object for many unrelated prompts within a single report. For example,
in a report that shows shipments from suppliers to customers, shipments can go from a supplier in one
city to a customer in another city. You would want your report to prompt for both supplier city and
customer city; both have the same set of values. Because there are many hundreds of cities in the
database, you can break up this long list of values into countries, regions, and cities. In that way, your
users can navigate through hundreds of values by selecting from three shorter lists.
21.8.1.1 To share a common list of values within a report
1.
Create a report that contains fields for Country, Region, and City.
2.
In the Field Explorer, select Parameter Fields and click New.
The Create New Parameter dialog box appears.
3.
Enter a name for the parameter in the Name field.
This example uses SupplierCity.
4.
In the List of Values area, click Dynamic.
5.
Enter prompting text for your prompt group in the Prompt Group Text field.
This example uses "Choose the City that your supplier is located in."
6.
Click Insert, and from the Value list, select Country.
2013-05-06472
Parameter Fields and Prompts

7.
Click the blank field under Country and select Region, and then click the blank field under Region
and select City.
8.
In the Parameter Binding area, ensure that only the City value is bound.
9.
Click OK.
10.
Return to the Field Explorer dialog box, select Parameter Fields, and click New.
11.
Enter a name for the second parameter in the Name field.
This example uses CustomerCity.
12.
In the List of Values area, click Dynamic.
13.
Enter prompting text for your new prompt group in the Prompt Group Text field.
This example uses "Choose the City that your customer is located in."
14.
Select Existing, and select the list of values that you created in steps 6 through 9.
15.
Click OK.
You have created two prompts: a Country, Region, City hierarchy for the {?SupplierCity} parameter,
and a second Country, Region, City hierarchy for the {?CustomerCity} parameter. By reusing the
list-of-values object, you saved time and improved performance time in Crystal Reports.
Note:
You can also use an existing list of values if you have another parameter field that should have a country
value. For example, if you add a {?DivisionCountry} parameter to indicate the corporate division that
you want to report on, you could use the same list-of-values object in your report. You would bind this
parameter to the top-level value in your hierarchy—that is, the Country level of the Country, Region,
City hierarchy.
21.8.2 Using separate value and description fields
It is common in relational databases to make use of code fields that represent values. These codes are
often numeric or text strings that cannot be read by your users. For such cases, you can create separate
value and description fields in your list of values definition. You set the value field to the parameter; the
description field appears in the prompting dialog box. How the description field appears in the prompting
dialog box is controlled by the prompt option "Prompt with Description Only." When set to True, only
the descriptions are visible; when set to False, both the values and descriptions are visible.
21.8.2.1 To set separate value and description fields
1.
Open the sample report called Group.rpt.
Sample reports are located on the SAP Business Objects Support web site.
2013-05-06473
Parameter Fields and Prompts

2.
In the Field Explorer, select Parameter Fields and click New.
The Create New Parameter dialog box appears.
3.
Enter a name for the parameter in the Name field.
This example uses Customer Name.
4.
In the List of Values area, click Dynamic.
5.
Click Insert and, in the Value field, select Customer ID.
6.
In the Description field, select Customer Name.
7.
In the Value Options area, set the Prompt with Description Only option to True.
8.
Click OK.
When your users see this prompt in the prompting dialog box, they do not see values from the Customer
ID field (the field on which the parameter is based), but rather, they see a list of customer names.
21.8.3 Using command objects as list-of-values data sources
Crystal Reports supports command objects as data sources for unmanaged lists of values. To use this
feature, you first create a command object using the Database Expert to return the values that you want
in your list-of-values object.
For more information see "Defining an SQL Command" in the online help.
The query you create should return at least one database field per level in the new list-of-values object.
For example, if you want to build a Country, Region, City list-of-values object, your query should return
at least three columns from your database: Country, Region, and City. You need to return all three
values in a single select statement. There is no need for an order by clause, because the prompting
engine sorts the values according to your specifications.
Note:
It is not necessary to link your command object to your report fields. In general, command objects that
you use only to populate lists of values do not need to be linked to your report. However, if you want
to use a column from this command object in your report, you need to link the command object to the
report.
All the command objects defined in your report appear in the value fields drop-down list, and in the
description fields drop-down list in the Create New Parameter dialog box. You can then associate your
list of values with the command object.
21.8.4 Null handling
2013-05-06474
Parameter Fields and Prompts

Null values in the data returned by the list of values are displayed as "null" in the drop-down list for that
prompt. Your users can select these values, and any parameters associated with that prompt receive
the null value. You can test for this functionality in the Crystal Reports formula language with the IsNull
function.
For more information, see "IsNull (fld)" in the online help.
21.8.5 Long lists of values
Because the number of items in a list of values (LOV) can be very large, numbering in the hundreds or
thousands, Crystal Reports handles these long LOVs by retrieving smaller batches of values at a time.
Crystal Reports displays a single batch of LOVs, and provides two options to the user to control the
list: the batch number and a simple text filter for limiting the number of items in the list.
The default number of items per batch retrieved in a long LOV is 200; however, you can change this
default number.
Changing the number of items in a long LOV
There are two methods for changing the number of items in a long LOVs.
When prompting the user, Crystal Reports retrieves the long LOV batch size from this Windows registry
location:
HKEY_CURRENT_USER\Software\Business Objects\Suite 12.0\Crystal Reports\Re
portView
If it does not already exist, create the DWord value called PromptingLOVBatchSize, and set the
value to the number of items in a batch.
Note:
Be careful to select Decimal as the base value before entering the batch size.
You can create or change a parameter in the Tomcat configuration file to set the batch size for long
LOVs. Open the following file:
{CR_install_folder}/Tomcat/webapps/CrystalReports/WEB-INF/web.xml
If it does not already exist, create this parameter:
<context-param>
<param-name>crystal_max_number_list_of_values</param-name>
<param-value>{number}</param-value>
</context-param>
Where {number} in the above example is the number of items in the batch.
2013-05-06475
Parameter Fields and Prompts

21.9 Best practices for prompting
21.9.1 Unmanaged reports
Unmanaged reports are reports that you store outside of SAP BusinessObjects Business Intelligence
platform. These reports can use lists of values that you define within the report, or lists of values that
you have stored in the SAP BusinessObjects Enterprise Repository. (You create report lists of values
in Crystal Reports when you use the "Create New Parameter" dialog box. You create repository lists
of values in the Business Views Manager.)
Lists of values defined within a report have the following properties:
• They can be based on command objects or report fields.
• They are always stored within the .rpt file.
• They cannot be shared between reports.
If your unmanaged report also uses a repository-based list of values, the report will prompt you to log
on to the repository whenever it is opened. This process is required so that Crystal Reports can locate
the list-of-values object.
To maximize performance and scalability of unmanaged reports, you should reuse list-of-value objects
within a single report wherever possible. For information about how to do this, see Sharing common
lists of values within a report.
21.9.2 Managed reports
Managed reports are reports that you store within SAP BusinessObjects Business Intelligence platform.
Lists of values used in managed reports have the following properties:
• They are always stored in the repository.
• They can be shared between reports.
• They are based on Business Views.
To maximize performance and manageability of your managed reports, the following practices are
recommended:
• Define your list-of-values objects in Business View Manager, not Crystal Reports.
2013-05-06476
Parameter Fields and Prompts

• Build a separate Business View to provide lists of values for all of your reports. The only fields that
you need in this Business View are those that you use for prompting. See the
Business Views
Administrator's Guide
for information about how to create a Business View.
• Create managed list-of-values objects for each dynamic prompt that you intend to use in your report.
These objects are visible to Crystal Reports users when they design parameters and prompts. If
you need a list of values for a Country > Region > City hierarchy, and a Country pick list, you can
satisfy both needs with a single list-of-values object.
Defining your list-of-values objects in Business View Manager has the following benefits:
• You have control over the metadata that is used to define the prompting list of values.
• You can apply row-level security (if desired) to the Business View that is used for prompting.
• You can separate metadata design from report design. A metadata designer can be responsible for
authoring the list-of-values definitions, and the report designer can be responsible for authoring the
report.
• This method minimizes the number of metadata objects you need to create to support prompting.
21.9.3 Converting unmanaged reports to managed reports
You can convert an unmanaged report to a managed report in the following ways:
• Publish one or more reports with the Publishing Wizard.
• Save the report to SAP BusinessObjects Business Intelligence platform using the Crystal ReportsSave
As command.
• Create a new report object from within the BI launch pad portal.
• Create a new report object from within the Central Management Console portal.
In all of these cases, these actions are carried out on the prompt object in your unmanaged report:
• List of values (LOV) objects that are defined in the report are converted to repository lists of values.
A Business View, Business Element, Data Foundation, and Data Connection object is created.
• If the same LOV object already exists in the repository, no duplicate object is created. Instead, your
report references the existing LOV object.
• LOV objects that are repository-based are unchanged.
• Prompt groups that are defined in the report are converted to repository prompt groups.
• Prompt groups that are repository-based are unchanged.
• All of the new repository-based Business View objects, LOV objects, and prompt-group objects are
created in the repository folder called Dynamic Cascading Prompts.
2013-05-06477
Parameter Fields and Prompts

21.9.4 Deploying managed reports with dynamic prompts
Repository-based lists of values and prompt groups are repository objects like any other. When managed
reports are migrated from one repository to another using the Import Wizard, the list-of-values and
prompt-group objects are imported as well. This functionality makes it easy to migrate reports from
system to system. SAP BusinessObjects Business Intelligence platform tracks the objects that a report
depends on, and imports these objects to the destination system if needed.
Business Views Manager has been enhanced to support the import and export of lists of values and
prompt groups. For more information, see the
Business Views Administrator's Guide
.
21.10 Deleting parameter fields
There are several methods for deleting parameters within a report. The type of parameter you are
deleting determines the method you can use.
21.10.1 To delete a parameter that is not used in a formula
1.
On the View menu, click Field Explorer.
The Field Explorer appears.
2.
Expand the Parameter Fields folder and click the parameter you want to delete.
3.
Click Delete.
If the parameter is used in your report, a Crystal Reports dialog box appears confirming whether
you want to delete the parameter.
4.
Click Yes.
This parameter is removed from the Parameter Fields folder and from your report.
21.10.2 To delete a parameter used with the Select Expert
1.
On the Report menu, click Select Expert.
2013-05-06478
Parameter Fields and Prompts

Tip:
Another way to do this is to click the Select Expert button on the Expert Tools toolbar.
The Select Expert dialog box appears.
2.
Choose the tab whose selection criteria uses the parameter you want to delete.
3.
Click Delete.
4.
Click OK to close the Select Expert.
5.
On the View menu, click Field Explorer.
6.
Expand the Parameter Fields folder and click the parameter you want to delete.
7.
Click Delete.
21.10.3 To delete a parameter that is used in a formula
1.
On the View menu, click Field Explorer.
The Field Explorer appears.
2.
In the Formula Fields folder, select the formula that contains the parameter you want to delete.
3.
Click Edit and delete the parameter field from the formula.
Note:
If the parameter is used in more than one formula, it must be deleted from each formula.
4.
Close the Formula Workshop.
5.
Expand the Parameter Fields folder and click the parameter you want to delete.
6.
Click Delete.
21.11 Responding to parameter field prompts
21.11.1 Previewing a report for the first time
When you preview a report for the first time, the Enter Prompt Values dialog box appears, prompting
you for a value.
• If you specified a default value when you created the parameter field, the program will use that value
unless you specify a new one.
2013-05-06479
Parameter Fields and Prompts

• If you did not specify a default value, the program will not refresh the data until you supply a new
value.
Note:
If the parameter is a string value type, without a default value, and the "Allow discrete values" field is
True, an empty string appears.
21.11.2 Refreshing report data
When you refresh data from the Preview tab, the Refresh Report Data dialog box appears.
Select the "Use current parameter values" option to use the current parameter value.
Select the "Prompt for new parameter values" option to enter a new parameter value. When you select
this option and click OK, the Enter Prompt Values dialog box appears.
• Enter String values exactly as they will appear in the field. If the parameter field allows multiple
values, you can enter additional parameter values using the Add button.
• Enter Boolean values using the following format: TRUE or FALSE.
• Enter Number values exactly as they will appear in the field.
• Enter Currency values exactly as they will appear in the field.
• Enter Date values to match the format used on-screen. If the format is unspecified, enter as Date
(Year, Month, Day). For example, Date (1997, 5, 21). To access the calendar, click the drop-down
arrow beside the date.
• Enter Time values to match the format used on-screen. If the format is unspecified, enter as Time
(Hour, Minutes, Seconds AM/PM). For example, Time (4:32:12 PM). You can also select the unit of
time and then use the up and down arrows to scroll through the numbers.
• Enter DateTime values using the following format: Date (Year, Month, Day), Time (Hour, Minutes,
Seconds AM/PM). For example, Date (1997, 5, 21), Time (4:32:12 PM). You can also enter DateTime
values by using the associated drop-down arrow to access the calendar, and the up and down arrows
to scroll through the time.
2013-05-06480
Parameter Fields and Prompts

Note:
The drop-down arrow to access the calendar for dates and the up and down arrows to scroll for
times will only be available if you have the correct version (4.70 or later) of comctl32.dll.
To use the current value displayed, click OK, or, to use a different value from the one displayed, type
a new value in the text box, and click OK.
• If the parameter field is range limited, then you can only enter values within a certain range. The
range limit is specified in the Set Default Value dialog box when creating or editing a parameter.
• If the parameter is a string value type, you can limit the values the user is able to enter by using the
length limit option or by using an edit mask to restrict the format.
The program now runs the report using the new value(s) you specified.
21.12 Advanced parameter features
There are a variety of ways that parameters can be used within a report. This section covers some of
the advanced methods of using parameters.
21.12.1 Creating a parameter with multiple prompting values
1.
On the View menu, click Field Explorer.
2.
Select Parameter Fields and click New.
3.
Enter a Name for your parameter.
4.
Select a value type from the Type list.
5.
From the Value Field list, select the table and field that you want to use to obtain your prompting
values.
6.
Add the values from the field you selected by clicking Actions and choosing Append all database
values.
You can also import values, or you can create your own in the Value area under the Options button.
7.
In the Value Options area, select the Allow multiple values option and set its value to True to
enable your uses to enter more than one prompting value for this parameter.
Both discrete and range type values are allowed individually or in combination.
Note:
For details on single or range values, see Specifying single or ranges of values.
2013-05-06481
Parameter Fields and Prompts

8.
Click OK.
21.12.2 Applying conditional formatting using parameter fields
Parameter fields can be used to create conditional formatting formulas. You can customize these
formulas whenever you refresh the report data. A conditional formatting formula could be used for
color-flagging data that meets certain conditions. For example:
• Sales representatives who sell more than 10% over quota.
• Customers who have not ordered in the last quarter.
• Inventory items that have not had any movement in the last month.
If the conditions under which you flag these items never change, you do not need to use parameter
fields. You can just use formulas (for text flags) or conditional formatting (for border flags). However,
to change the conditions from report to report, you need to use parameter fields in formulas and
conditional formatting formulas.
21.12.2.1 To apply conditional formatting using parameter fields
1.
Create the parameter field of the data type you need for the formula.
2.
Create the formula and use the parameter field in place of the fixed value you would normally use.
For example, to be prompted for all the customers whose last year's sales were over a certain
value, and to print their names in red, select the Last Year's Sales field and click Format from the
Expert Tools toolbar.
The Format Editor appears.
3.
Click the Conditional formula button next to the Color property on the Font tab, and format the
field using a conditional formatting formula like this:
If {customer.LAST YEAR'S SALES} > {?SalesTarget} Then
Red
Else
Black
Now, when you refresh the data, the program will prompt you for the value that triggers the color flag
(known as the threshold value). It then runs the report and flags all the customers that had sales last
year above the threshold figure. You can change the figure each time you run the report and the program
will flag a different set of Customer Names.
For more information see "Conditional formatting functions" in the online help.
2013-05-06482
Parameter Fields and Prompts

21.12.3 Creating a report title using parameter fields
Crystal Reports allows you to use parameter fields to create a report title that can be changed each
time the report is refreshed.
21.12.3.1 To create a report title using parameter fields
1.
On the View menu, click Field Explorer.
The Field Explorer appears.
2.
Select Parameter Fields and click New.
The Create New Parameter dialog box appears.
3.
Type a name for the parameter field in the Name field.
4.
Select String from the Type list.
5.
To specify a default title, click Click here to add item in the Value area and type the desired text.
Continue adding titles as required.
6.
Click OK.
7.
Return to the Field Explorer, and then place the parameter field in the Page Header section of the
report to have the title appear on every page, or in the Report Header section if you want the title
to appear on only the first page of the report.
Now, when you refresh the data, the program will prompt you for a report title. If you wish, you can
change the title each time you run the report.
21.12.4 Specifying single or ranges of values
You can create parameters that require users to enter a single (discrete) value, or a range of values.
If you then include these parameters in your report's record selection, you can help users find specific
information. For example, in the case of a record selection parameter than uses a discrete value, a
user might enter a single country name to see sales figures for only that country. In the case of a record
selection parameter that uses a range of values, a user might enter a range of countries (for example,
Canada and France) to see sales figures for all the countries in the range (in this case, Chili, China,
Denmark, England, and so on).
2013-05-06483
Parameter Fields and Prompts

21.12.4.1 To specify single or range values
1.
Select the Allow discrete values option or the Allow range values option to specify whether the
parameter field will accept a range of values.
• If you select "Allow discrete values," the parameter field will accept single values (rather than
ranges of values).
• If you select "Allow range values," then when you are prompted for parameter values, you can
enter a start value and an end value. For example, if you enter the values "5" and "10", the range
is 5-10, and a report that uses this parameter for record selection will display all records with
values between 5 and 10. This also works for string parameter fields. With a start value of "A"
and an end value of "E", a report that uses this parameter for record selection will display all
records within an alphabetical range of A-E.
Note:
If the "Allow multiple values" and the "Allow discrete values" options are selected, the parameter
field will accept multiple single values. In this case, you can enter more than one value, but these
values will be evaluated individually and will not be interpreted as a range. If the "Allow multiple
values" and "Allow range values" options are selected, the parameter field will accept multiple ranges.
2.
If applicable, select the Min Length and/or Max Length options to designate the length of the field.
• For a Currency or Number parameter field, options for entering the "Min Value" and "Max Value"
appear.
• For a Date, DateTime, or Time parameter field, options for entering the "Start" and "End" values
appear.
21.12.5 Incorporating a parameter into a formula
1.
On the View menu, click Field Explorer.
The Field Explorer appears.
2.
Select Parameter Fields and click New.
The Create New Parameter dialog box appears.
3.
Create a parameter field and save it.
4.
Select Formula Fields and click New.
The Formula Name dialog box appears.
5.
Enter the name of the formula, and then click OK.
2013-05-06484
Parameter Fields and Prompts

6.
Create a formula using the parameter field as you would any constant value. For example, rather
than creating a formula that hard-codes the country name:
{customer.COUNTRY} = "USA"
Use a parameter field instead of "USA".
{customer.COUNTRY} = {?Country}
To do this double-click the database field, press =, then double-click the parameter.
Tip:
Identify parameter fields easily by looking for (?).
7.
Click Save and Close on the Formula Workshop.
The Field Explorer dialog box appears. The name of the formula you have just created is highlighted
in the Formula list box.
8.
Drag and drop the formula into the report.
9.
Click Refresh to generate the report.
A dialog box appears, prompting you for values.
21.12.6 Defining sort order using parameter fields
To set the sort order using parameter fields, you need to first create a formula that includes a parameter
field and then sort based on that formula. For example, assume that you have a customer list report
based on the Customer table. For each customer, you show the Customer Name, City, Region, Country,
and Phone Number. You want to be able to sort the report by Country, by Region, or by City, depending
on your needs at the time.
1.
Create a parameter field and call it SortField.
2.
Select String from the Type list.
You may want to limit the number of characters the user can type to one.
3.
To do this, type the numeral 1 into the Min Length and Max Length text boxes and click OK.
Now the parameter field will only accept single-character values. The field will accept "C" as a value,
but not "City."
4.
In the Prompting Text field, enter a prompt similar to this:
Type R to sort by Region or C to sort by City; otherwise, data will be sorted by Country.
5.
Create a formula similar to this and call it Sort:
If {?SortField} = "C" Then {customer.CITY}
Else
If {?SortField} = "R" Then {customer.REGION}
Else
{customer.COUNTRY}
2013-05-06485
Parameter Fields and Prompts

This formula prompts for a value for the parameter field {?SortField}. If you enter "C", the formula
will sort by the City field. If you enter "R" it will sort by the Region field. If you enter anything else,
or do not enter anything at all, the formula will sort by the Country field.
For more information see "If statements" in the online help.
6.
Place the formula in the Report Header section of the report and select Suppress (No
Drill-Down) in the Section Expert so that it does not print.
7.
Click Sort Records.
8.
Choose your formula and click Add.
9.
Click OK.
Now when you run the report, the program will prompt you for a sort field, the formula will return a value
based on your selection, and the sort facility will use that value as your sort field.
21.12.7 Defining entry type and format using the Edit Mask
1.
On the View menu, click Field Explorer.
2.
Select Parameter Fields and click New.
The Create New Parameter dialog box appears.
3.
Enter the Name and value Type.
4.
For a string parameter field, you can choose to enter an edit mask in the Edit mask field, rather
than specifying a range.
An edit mask can be any of a set of masking characters used to restrict the values you can enter
as parameter values (the edit mask also limits the values you can enter as default prompting values).
You can enter any of the following masking characters, or any combination of them:
• "A" (allows an alphanumeric character and requires the entry of a character in the parameter
value).
• "a" (allows an alphanumeric character and does not require the entry of a character in the
parameter value).
• "0" (allows a digit [0 to 9] and requires the entry of a character in the parameter value).
• "9" (allows a digit or a space, and does not require the entry of a character in the parameter
value).
• "#" (allows a digit, space, or plus/minus sign, and does not require the entry of a character in the
parameter value).
• "L" (allows a letter [A to Z], and requires the entry of a character in the parameter value).
• "?" (allows a letter, and does not require the entry of a character in the parameter value).
2013-05-06486
Parameter Fields and Prompts

• "&" (allows any character or space, and requires the entry of a character in the parameter value).
• "C" (allows any character or space, and does not require the entry of a character in the parameter
value).
• ". , : ; - /" (separator characters). Inserting separator characters into an edit mask is something
like hard coding the formatting for the parameter field. When the field is placed on the report, the
separator character will appear in the field object frame, like this: LLLL/0000. This example depicts
an edit mask that requires four letters followed by four numbers.
• "<" (causes subsequent characters to be converted to lowercase).
• ">" (causes subsequent characters to be converted to uppercase).
• "\" (causes the subsequent character to be displayed as a literal). For example, the edit mask
"\A" would display a parameter value of "A." If the edit mask is "00\A00," then a valid parameter
value would consist of two digits, the letter "A," and then two additional digits.
• "Password". Allows you to set the edit mask to "Password," you can create conditional formulas
specifying that certain sections of the report become visible only when certain user passwords
are entered.
Note:
Some of the edit mask characters require that you enter a character in their place (when entering a
parameter value), while others allow you to leave a space, if needed. For example, if the edit mask
is 000099, you can enter a parameter value with four digits, five digits, or six digits, since the '9' edit
mask character does not require the entry of a character. However, since '0' does require such an
entry, you could not enter a parameter value with less than four digits.
5.
Click OK.
6.
Return to the Field Explorer, and drag the parameter into the report.
21.12.8 Creating a saved-data record filter using parameter fields
You can design your report so that users can filter fields and records without refreshing information
from the database. Saved-data record filters combine the use of saved data selection formulas and the
Parameter Panel.
This feature is particularly useful for several reasons:
• It allows users to filter and re-filter report data without leaving the canvas of the report.
• It eliminates processing demand on the database.
• It reduces the time users spend waiting for data to be filtered.
• It allows users to filter records in the report even if they do not have a connection or rights to access
the database at the time of viewing.
When planning to include a saved-data record filter in your report, it is important to consider the following
points:
2013-05-06487
Parameter Fields and Prompts

• To prevent report refreshing to the database, only non-data parameters should be added to the
Parameter Panel.
• Exported reports retain all recently applied parameter changes.
• Sub-report parameters cannot be shown on the Parameter Panel.
21.12.8.1 To create a saved-data record filter using parameter fields
• Combine the tasks below to create an interactive saved-data record filter.
a. Create a parameter appearing on the Parameter Panel
b. Incorporate a parameter into a saved data selection formula
Related Topics
• To create a parameter appearing on the Parameter Panel
• To incorporate the parameter into a saved data selection formula
21.12.9 To create a parameter appearing on the Parameter Panel
1.
On the View menu, click Field Explorer.
Tip:
Another way to do this is to click the Field Explorer button on the Standard Toolbar.
The Field Explorer dialog box appears.
2.
Select Parameter Fields and click New.
The Create New Parameter dialog box appears.
3.
Enter a name for the parameter in the Name field (up to 255 alphanumeric characters).
4.
Select the appropriate Type from the list.
Note:
When creating a parameter whose Type is either Date or DateTime, you can change the date format
to suit your needs.
5.
From the Value Field list, select a value.
6.
Click Actions, and select Append all database values to move all of the applicable values to the
Values area.
This example will enable the user to choose from any of the values. If you want to limit the selection,
manually enter only the values that you would like the user to choose from.
2013-05-06488
Parameter Fields and Prompts

7.
Select Editable from the Show on (Viewer) Panel list.
This example will enable the user to edit the parameter value on the Parameter Panel. If you want
to show the parameter on the panel, but do not want to allow the user to edit it, select Read only
for this option.
8.
Click OK.
9.
Return to the Field Explorer dialog box, and drag the parameter onto your report.
The Enter prompt values dialog box appears.
Note:
If you don't want to see the parameter field you dropped in your report, place it in a section you can
suppress, such as a report header or footer.
Tip:
You don't need to drag the parameter onto the report if you plan on referencing it in a conditional
formatting formula or a selection formula. If you have set the parameter options to Editable or Read
only on the Parameter Panel, using the parameter in a formula will automatically activate it on the
panel.
The parameter now appears on the Parameter Panel.
21.12.10 To incorporate the parameter into a saved data selection formula
1.
On the Report menu, point to Select Expert and then click Saved Data.
The Choose Field dialog box appears.
2.
Highlight the field on which you want to base record selection and click OK.
The Select Expert appears.
3.
Use the drop-down lists to enter your selection criteria for the indicated field.
4.
Choose the parameter from the adjacent drop-down list and click OK.
If the parameter is being referenced for the first time, the Enter Values dialog box appears.
5.
Select your initial values and click OK.
Crystal Reports immediately filters the report data according to your selection criteria.
21.12.11 Adding dynamic grouping using parameter fields
You can design your report so that users can change the grouping presentation of the report without
refreshing information from the database. For instance, users can move from a customer-focused view
of the report to either a region-focused or an order-focused view. Dynamic grouping combines the use
of group selection formulas and the Parameter Panel.
2013-05-06489
Parameter Fields and Prompts

21.12.11.1 To add dynamic grouping using parameter fields
1.
Create a report using the sample data, Xtreme.mdb, and place the following fields from left to right
in the Details section:
{Customer.Customer Name}
{Customer.Country}
{Orders.Order ID}
{Orders.Order Date}
{Orders.Order Amount}
2.
Create a new parameter field and call it GroupBy.
3.
Select String from the Type list.
4.
Add the following values to your parameter:
• Customer
• Country
• Order
5.
Select Editable from the Show on (Viewer) Panel list, and click OK.
6.
Create a new formula field and call it GroupField.
7.
Type the following formula into the Formula text box.
If {?GroupBy} = 'Customer' then
{Customer.Customer Name}
Else if {?GroupBy} = 'Country' then
{Customer.Country}
Else if {?GroupBy} = 'Order' then
ToText({Orders.Order ID})
Note:
Crystal Reports formulas do not allow conditions to return different data types. Both the Customer
Name and Country fields return strings, so the ToText function must be used to convert the Order
ID from a number to a string as well.
8.
Save your formula and close the Formula Workshop.
9.
In the Group Expert, select the GroupField formula as your group field, and click OK.
10.
Customize summary fields and section formatting as you like.
Users can now change the grouping presentation of the report by modifying the GroupBy parameter
value on the Parameter Panel.
Note:
Changing parameter values will not cause a database refresh as long as the parameter is a non-data
parameter.
Related Topics
• Data and non-data parameters
2013-05-06490
Parameter Fields and Prompts

Subreports
22.1 What are subreports?
A subreport is a report within a report. The process for creating a subreport is similar to the process of
creating a regular report. A subreport can have most of the characteristics of a report, including its own
record selection criteria. The only differences between a subreport and a primary report are that a
subreport:
• Is inserted as an object into a primary report; it cannot stand on its own (although a subreport can
be saved as a primary report).
• Can be placed in any report section and the entire subreport will print in that section.
• Cannot contain another subreport.
• Does not have Page Header or Page Footer sections.
There are four instances in which a subreport would typically be used:
• To combine unrelated reports into a single report. See Combining unrelated reports by using
subreports.
• To coordinate data that cannot otherwise be linked. See Using subreports with unlinkable data.
• To present different views of the same data within a single report. See Showing different views of
the same data in a report.
• To perform one-to-many lookups from a field that is not indexed on the lookup field.
Note:
You can increase the performance of reports containing subreports by using on-demand subreports
instead of regular, in-place subreports.
22.1.1 Unlinked vs. linked subreports
2013-05-06491
Subreports

22.1.1.1 Unlinked
Unlinked subreports are free-standing; their data is not in any way coordinated with the data of the
primary report.
In unlinked subreports, there is no attempt to match up the records in one report with records in the
other. An unlinked subreport does not have to use the same data as the primary report; it can use the
same data source or a different data source entirely. In addition, the subreport is not limited to reporting
on a single table. An unlinked subreport can be based on a single table or on multiple tables. Regardless
of the underlying data sources, the reports are treated as unrelated.
22.1.1.2 Linked
Linked subreports are just the opposite; their data is coordinated. The program matches up the records
in the subreport with records in the primary report. If you create a primary report with customer information
and a subreport with order information and link them, the program creates a subreport for each customer
and includes in that subreport all the orders for that customer.
22.1.1.3 Database links vs. subreports in one-to-many situations
When two tables in a report have a one-to-many relationship, the program retrieves the data in different
ways depending on:
• Data source.
• Index situation.
• Record selection criteria.
• Whether you are creating a single report based on linked tables or a primary report that contains a
subreport.
When you are considering whether to use a subreport or linked tables, you need to understand the
ramifications of each. These issues are discussed fully in Performance considerations in one-to-many
links.
As a general rule, if you have indexed tables, linked indexed fields, or range limiting record selection
criteria based on the indexed fields, the program needs to read the same number of records whether
you are linking tables in a single report or using subreports. Since each subreport is run as a separate
report, linked tables may have a performance advantage. See Indexed tables.
2013-05-06492
Subreports

22.1.2 How subreport linking works
When you link a subreport to a primary report, the program creates the link by using a parameter field.
When a subreport link field is selected, the program creates:
• A parameter field in the subreport which is then used to retrieve values passed to it by the primary
report.
• A record selection formula for the subreport using the parameter field.
• The selection formula limits the subreport to those records in which the link field is equal to the
parameter field value.
When the report is run, the program finds the first primary field record it needs and passes the value
in the link field to the parameter field in the subreport. The program then creates the subreport with
record selection based on the parameter field value. Here is an example:
• You create a report that shows customer data and a subreport that shows order data and then you
link the two reports using the Customer ID field.
• When you run the report, the program finds the first customer record it needs and passes the
Customer ID value from that record to the subreport parameter field.
• The program runs the Orders subreport. Since the subreport selection formula selects only those
records in which the Customer ID value is equal to the parameter field value, and since that parameter
field value is equal to the Customer ID in the first record in the primary report, the subreport contains
only those records that have the same customer ID. Namely, those records that are orders for the
first customer.
• When the subreport is finished, the program locates the second record it needs in the primary report,
prints the customer data, and then passes this customer's ID number to the parameter field.
• The program then runs a subreport including only those order records for the second customer.
• The process continues until the report is finished.
• All of this parameter field manipulation takes place behind the scenes. You simply pick the fields
that will link the primary report with the subreport and the program does the rest. The values are
passed without the parameter field prompting you for a value.
Note:
If you have a linked subreport and you click the Print Preview button on the Standard toolbar (from
the Subreport Design tab), the program runs the subreport on its own, without waiting to receive a
parameter field value from the primary report and without evaluating the tab text formula. In this case,
the program displays the Enter Parameter Values dialog box and prompts you for a value.
The value entered in the box is the value the program uses to run the subreport.
2013-05-06493
Subreports

22.2 Inserting subreports
1.
On the Insert menu, click Subreport.
Tip:
Another way to do this is to click the Insert Subreport button on the Insert Tools Toolbar.
The Insert Subreport dialog box appears.
2.
To choose an existing subreport, click Choose an existing report and type the name. If you do not
know the name, click the Browse button and locate it in the dialog box that appears.
To create a new subreport, click "Create a subreport with the Report Wizard" and type a name; then
click the Report Wizard button. See Creating a new report for information about using a wizard to
create a report.
3.
Choose On-demand subreport (similar to a hyperlink) to have the ability to retrieve the data on
the subreport when needed. Otherwise, all the subreport data will appear with the report.
4.
Click OK.
The program displays an object frame.
5.
Move the frame where you want it to appear in the report and click once to place it.
The program creates a Subreport Design tab, which is labeled with the subreport name. To edit the
report, click the design tab and make your modifications.
2013-05-06494
Subreports

6.
Click the Preview tab to see your report.
7.
If you chose On-demand subreport (similar to a hyperlink), click the subreport preview tab to see
your subreport.
This tab is labeled with the name of your subreport.
Note:
Using on-demand subreports will increase the performance of reports that contain subreports.
For information about creating a custom caption for the Subreport Preview Tab, see Adding captions
to on-demand subreports.
22.2.1 Previewing subreports
There may be times when you want to preview a subreport on its own instead of previewing it as a part
of the main report. For example, you may want to preview the subreport in order to view and analyze
the data for a particular set of parameter values.
22.2.1.1 To preview a subreport
1.
Click the subreport's Design tab.
This tab is labeled with the name of your subreport.
2.
Click Print Preview on the Standard toolbar.
The program displays a preview of the selected subreport.
2013-05-06495
Subreports

22.2.2 Saving a subreport as a primary report
You may find it advantageous to save a subreport as a primary report for the sake of distributing the
information to a variety of audiences. For example, the primary report containing the subreport may be
relevant for a stockholders meeting at the end of the fiscal year; however, the data contained in the
subreport may be relevant for everyday use by your managers. In such cases, it is easy to save a
subreport as a primary report.
22.2.2.1 To save a subreport as a primary report
1.
In the Design tab, right-click the subreport and click Save Subreport As from the shortcut menu.
The Save As dialog box appears.
2.
Search for the appropriate directory in the Save As dialog box.
3.
Type a new name for the subreport.
4.
Click Save.
The program saves the subreport as a primary report so that you can open it separately when
necessary.
22.2.3 Updating subreports
In order to maintain the most up-to-date subreports, you can manually update the subreport data.
However, you may want to re-import a subreport automatically when opening the main report.
Note:
Re-importing is available only for subreports that were created from a report file.
Re-importing not only updates the data, but updates the formatting, grouping, and structure of the
subreport if any changes have been made. If you change the report the subreport was originally based
on, you can have these changes reflected in the report containing the subreport.
You can either globally specify that all subreports should be re-imported, or set the automatic re-import
for an individual subreport.
2013-05-06496
Subreports

22.2.3.1 To manually update the subreport data
You can update your subreport data at any time.
1.
On the Design tab, right-click the subreport.
2.
Click Re-import subreport from the shortcut menu.
3.
Click Yes to update the subreport data.
22.2.3.2 To globally update subreports when opening a main report
1.
On the File menu, click Options.
2.
In the Options dialog box, click the Reporting tab.
3.
Click Re-import Subreport on Open.
4.
Click OK.
Any subreport will be updated when its main report is opened and refreshed.
22.2.3.3 To update a specific subreport when opening a main report
1.
From the Format menu, click Format Subreport.
2.
In the Format Editor dialog box, click the Subreport tab.
3.
Click Re-import When Opening.
The current subreport will be updated when the main report is opened and refreshed.
22.3 Linking a subreport to the data in the primary report
Frequently, the data in a subreport supplements the data in the primary report. You might, for example,
have customer data in a primary report and then use subreports to show the orders for each customer.
In such cases, you will need to coordinate the data in the primary report with the data in the subreport
so that the orders in each subreport match up with the correct customer.
2013-05-06497
Subreports

To do this, you need to specify a field that is common to both the subreport and the primary report. With
the Subreport Links dialog box, you create a link between the two common fields. Crystal Reports uses
the link to match up records from the primary report to those in the subreport. The link makes certain
that the "orders" data in the subreport sits on the same row as the corresponding "customer" data in
the primary report.
22.3.1 To link a subreport to the data in the primary report
1.
If you are creating a new subreport or importing an existing report as a subreport, from the Insert
menu, click Subreport. Choose or create a report and click the Link tab.
- or -
If you have already placed a subreport in the primary report, but did not create a link at setup,
navigate to the Subreport Links dialog box by choosing Subreport Links from the Edit menu.
The Subreport Links dialog box appears.
2.
Choose the subreport you want to link from the For subreport list (if it is not already selected).
3.
Select the field you want used as a link field in the primary (containing) report from the Available
Fields list.
4.
Click the > arrow.
The field is added to the "Field(s) to link to" list box, and is now selected as a link field.
5.
Repeat steps 3 and 4 for each additional link, as desired.
6.
Use the Field link section (which will only appear if you have selected a link field) to set up the link
for each link field:
• Select the field you want linked to the primary report from the "Subreport parameter field to use."
• Select the "Select data in subreport based on field" check box on and select a field from the
adjacent drop-down list to organize the subreport data based on a specific field (this is the quick
equivalent of using the Select Expert). If nothing is specified here, the subreport will adopt the
organization of the primary report.
7.
Click OK.
When you run the report, the program will coordinate the data in the primary report with the data in the
subreport.
Note:
The field type of the Containing Report field determines which subreport fields are visible. Because the
Report Designer reads dates as either strings, dates, or date/time fields, you must make sure your
subreport parameter field type matches the field type set up in Report Options in the main report for
the field you want linked.
2013-05-06498
Subreports

22.4 Linking a subreport to the main report without modifying the selection formula
Crystal Reports uses a parameter field mechanism for linking subreports to main reports.
When linking a main report field that is not a parameter field to a subreport field, the program:
• Automatically creates a parameter field to complete the link.
• Modifies the subreport record selection formula to select those records in which the subreport field
is equal to the parameter field value.
The need for a parameter field is implied; it is called an "Implicit Link" situation.
At times, you may wish to use a linked parameter field in a subreport without using it as part of the
selection formula for the subreport. For instance, you may want the main report to pass in a summary
value that can be used in calculations by the subreport, or you may want the main report to pass in the
title of the subreport.
When you link a field in the main report to a parameter field that you have created in the subreport, the
program:
• Checks the link you have specified.
• Does not create any additional parameter fields.
• Does not modify the subreport record selection formula.
Specifying a link is called an "Explicit Link" situation.
22.4.1 To link a subreport to a main report without modifying the selection formula
1.
Create a parameter field in the subreport.
2.
Link a field in the main report to that parameter field.
22.5 Combining unrelated reports by using subreports
At times, you may wish to combine unrelated reports into a single report. For example, you may want
to create a single report that presents:
• Sales grouped by sales representative.
• Sales grouped by item.
2013-05-06499
Subreports

While both reports deal with sales data, there is no real linear relationship between the reports.
Subreports can be used to combine unrelated reports into a single report like this. While the reports
could be based on the same data set, they do not have to be. They could each be based on entirely
different data sets.
Each of these reports is free-standing; the data in any of the reports is not linked in any way to data in
another report. This is the easiest of the subreport options to work with.
22.5.1 To combine two unrelated reports
1.
Create the report you want printed first as the primary report.
2.
Import an existing report for use as a subreport or create a new subreport.
3.
Place the subreport into the Report Footer and it will print immediately after the primary report.
22.5.2 To combine three or more unrelated reports
1.
Create the report you want printed first as the primary report.
2.
Import or create each of the other reports you want to use as subreports.
3.
Use the Section Expert to insert enough Report Footer sections to match the number of subreports
that you are using.
For example, if you want to use three subreports, insert two new Report Footer sections so that you
have a total of three Report Footer sections.
4.
In Report Footer A, place the subreport you want printed immediately after the primary report. In
Report Footer B, place the subreport you want printed next, and so forth.
The primary report will print first and then the subreports in the order that you placed them in the
report.
Note:
Subreports can be placed side-by-side in the same Report Footer section. They will print next to
each other at the end of the report.
5.
Place the subreports into the Report Footer sections and they will print sequentially after the primary
report.
22.6 Using subreports with unlinkable data
2013-05-06500
Subreports

Tables can be linked in a report as long as the following criteria are met:
• The link fields are both database fields.
• The link fields contain similar data.
• The link fields are the same length.
• The link field in the link to (lookup) table is indexed (PC databases only).
Linking tables is rarely a problem. However, there are some circumstances in which you cannot
coordinate data from different tables because the data does not meet the linking criteria.
For example, linking to or from a formula field, or linking two unindexed tables cannot be done in a
single report. Subreports must be used.
22.6.1 Linking to/from a formula field
There are situations in which you may need to link to or from a formula (calculated) field. For example,
an employee ID could be an 11 character value that consists of a two-character department code
followed by the employee's nine-character Social Security Number (for example, HR555347487).
The formula language makes it easy to extract the Social Security Number from this field:
{employee.EMPLOYEE ID} [-9 to -1]
- or -
{employee.EMPLOYEE ID} [3 to 12]
For the value HR555347487, either formula would return the value 555347487.
While the return value is a valid Social Security Number, the fact that it comes from a formula prevents
you from using the field to link to a Social Security Number field in another table. You can report on
and coordinate the values in the two tables, however, by using a subreport.
22.6.1.1 To link to/from a formula field
1.
Create the primary report using a table that includes the Social Security Number field.
2.
Create (or import) a subreport using the formula that extracts the Social Security Number from the
Employee ID field (for this example, {@EXTRACT}).
See Inserting subreports.
3.
Place the subreport where you want it to appear in the primary report.
2013-05-06501
Subreports

4.
Link the subreport to the primary report by linking the Social Security Number field in the primary
report ({file.SSN}) to the formula that extracts the number in the subreport ({@EXTRACT}). See
Linking a subreport to the main report without modifying the selection formula.
22.6.2 Linking unindexed tables
When using PC (not SQL or ODBC) databases, the link field in the lookup database needs to be indexed
in order to create a valid link. You cannot link the tables in a single report when two tables contain
related data yet neither is indexed on the field which you want to use as a link field, or when the primary
table is indexed but the lookup table is not. You must use subreports if you want to coordinate the data
in both tables.
Note:
It is important to note that linking unindexed tables or linking from an indexed primary table to an
unindexed lookup table may cause inefficient reporting. If your data set is large, this kind of report will
take considerable time to run. Use this technique only if you do not have other options.
22.6.2.1 To link unindexed tables
1.
Create the primary report.
2.
Create (or import) the subreport and insert it into the primary report.
See Inserting subreports.
3.
Use the unindexed fields (or the indexed field in the primary table and the unindexed field in the
lookup table) to link the subreport to the primary report. See Linking a subreport to the data in the
primary report.
22.7 Creating an on-demand subreport
On-demand subreports can be especially useful when you want to create a report that contains multiple
subreports. In this case, you can choose to have these subreports appear only as hyperlinks.
The actual data is not read from the database until the user drills down on the hyperlink. This way only
data for on-demand subreports that are actually viewed will be retrieved from the database. This makes
the subreports much more manageable.
Note:
Data for an on-demand subreport is not saved unless the subreport is actually open in a preview window.
2013-05-06502
Subreports

22.7.1 To create an on-demand subreport
1.
Place an ordinary subreport in your primary report.
2.
Click the Format button on the Expert Tools toolbar.
The Format Editor dialog box appears.
3.
Click the Subreport tab and select the On-demand subreport check box.
4.
Click OK.
22.8 Adding captions to on-demand subreports
To further organize a report, captions can be created for the Subreport Preview tab and for the
placeholder frame of an on-demand subreport.
Captions are written by using formulas. Both placeholder frame captions and Subreport Preview tab
captions can include field names from the main report.
A tab text caption replaces the subreport file name caption on the Subreport Preview tab.
Note:
Placeholder frame captions only apply to on-demand subreports, while tab text captions apply to both
on-demand subreports and regular subreports. Since the data from a regular subreport is visible on the
Preview tab, there is no need for a frame caption when you format a regular subreport.
22.8.1 To add a caption
1.
Select the subreport and click the Format button on the Expert Tools toolbar.
The Format Editor dialog box appears.
2.
Click the Subreport tab.
3.
You can enter either an on-demand subreport caption or a preview tab caption by clicking the
appropriate Formula button and opening the Formula Workshop.
4.
Enter your formula in the Formula text box.
Crystal syntax formula example:
"More Information About " + {Customer.Customer Name}
2013-05-06503
Subreports

Basic syntax formula example:
formula = "More Information About" + {Customer.Customer Name}
Using the Xtreme.mdb sample database, these formulas would give you a caption like "More
Information About Pathfinders" or "More Information About Rockshocks for Jocks."
5.
Click Check to check the formula for errors. If the program finds an error, it will prompt you
with a message box detailing the nature of the error.
6.
After fixing any errors, click Save and close.
7.
Click OK to return to the report.
Note:
A tab text formula is only evaluated when you drill-down on a subreport. If you preview a subreport
separately from the primary report, the formula will not be evaluated.
22.9 Showing different views of the same data in a report
Subreports can be used to provide a different view of the data in the primary report. For example, you
might want to show summary values at the top of a report and details at the bottom.
This can be done in a variety of ways. The two easiest methods are:
• By creating the summary report as the primary report and the details report as the subreport. In this
method, the details subreport would be placed in the Report Footer section.
• By creating the details report as the primary report and the summary report as the subreport. In this
method, the summary report would be placed in the Report Header section.
Use the appropriate link fields to link the report and coordinate the data.
2013-05-06504
Subreports

Understanding Databases
23.1 Databases overview
Though there are hundreds of Database Management Systems (DBMS) available, Crystal Reports
eliminates many of the differences once it connects to the actual database files. The process of working
with database files, tables, fields, and records is much the same, regardless of the actual type of data
being accessed.
This section discusses several concepts and tasks common to working with database files. Using
database aliases, locating moved or renamed database files, working with indexed tables, and linking
tables are subjects common to anyone who designs reports in Crystal Reports. Using SQL and SQL
databases, is especially important for anyone who accesses data in SQL databases and other database
formats that are accessed through ODBC.
23.1.1 Relational database basics
The most popular architecture for database files used in the corporate world is based on the relational
model. Applications that allow you to create databases with the relational model are, therefore, often
referred to as Relational Database Management Systems (RDBMS).
In a relational database, data is organized in a system of rows and columns. The rows are called records,
and the columns are called fields. Each record contains a collection of related data, all information
relating to a specific customer, for example. Each field refers to a common type of data that exists in
all records, the names of the customers, for example. Records and fields are stored in a database table.
The following diagram illustrates the basic relational database model:
2013-05-06505
Understanding Databases

Often, data in two different tables can be related by a common field. For example, a Customers table
will have a Customer ID for each customer, and an Orders table will have the Customer ID of each
customer who placed an order, demonstrating a relationship between tables. The two tables can be
linked by a common field see Linking tables.
The following diagram displays how two tables can have a relationship:
23.1.2 Indexed tables
2013-05-06506
Understanding Databases

Creating indexes for database tables can increase the speed of data access and reduce the time it
takes for the program to evaluate data. Some DBMS applications automatically index your database
tables, while others require that you create an index yourself. For the best report generation performance,
make sure each of your database tables has a corresponding index.
Note:
Some DBMS applications do not support indexed tables. Refer to the documentation for your DBMS
to find out if it supports indexes and how to create them. If your DBMS documentation does not mention
indexed tables, it may not support them, and you should link tables based on common fields. The Links
tab of the Database Expert can also help you determine if your tables include indexes.
Indexes organize the records in a relational database table so that data can be located easier. For
example, assume you have a table with the following data:
AmountCustomerOrder#
25141.50Allez Distribution10444
19164.30BG Mountain Inc.10470
8233.50Sierra Mountain10485
24580.50Mountain Toad10488
7911.80SFB Inc.10495
1956.20La Bomba de Bicicleta10501
1683.60BG Mountain Inc.10511
19766.20Sierra Bicycle Group10544
29759.55Mountain Tops Inc.10568
12763.95Sierra Bicycle Group10579
The information in this table is organized according to the Order# field. This is fine anytime you want
to look up information in the table based on order numbers. However, what if you want to look up
information specific to a certain customer?
Say you want to look up all orders made by Sierra Bicycle Group. The database engine must begin by
looking at the first order number in the list and checking to see if the customer name matches the
2013-05-06507
Understanding Databases

request. If not, it goes to the second order number, and checks that customer name. When an order
number is reached that contains the correct customer name, the database engine retrieves the
information, then continues to the next order number. Using this technique, both the Order# field and
the Customer field must be read for every single record in the table. This takes a long time and a large
amount of computer processing effort for examining extensive database tables with thousands, or even
millions of records.
Instead, you can create an index for the table based on the Customer field. Such an index might look
like this:
Pointer to Order#Customer
10444Allez Distribution
10470BG Mountain Inc.
10511BG Mountain Inc.
10501La Bomba de Bicicleta
10488Mountain Toad
10568Mountain Tops Inc.
10495SFB Inc.
10544Sierra Bicycle Group
10579Sierra Bicycle Group
10485Sierra Mountain
In this index, information is organized by customers, not order numbers. Also, notice that the second
column actually contains pointers to specific order numbers in the original table. By using this index,
the database engine can search just the information in the Customer column until it finds the customer
you are interested in, Sierra Bicycle Group.
For each correct customer entry the database engine finds in the index, it looks up the matching order
in the table according to the pointer in the second column of the index. Only the orders for the correct
customer are read. Finally, since information in the index is organized according to the customer names,
2013-05-06508
Understanding Databases

the database engine does not need to continue searching through the index or the table as soon as it
finds an index entry that does not match the requested customer.
The advantage of this highly organized search through a database table according to an index is speed.
Using indexes speeds up data retrieval and report generation, important factors when reporting on large
database files.
23.2 Using SQL and SQL databases
Perhaps the most popular and most powerful database formats are DBMS applications based on the
Structured Query Language (SQL). SQL databases usually work over a client/server network architecture,
providing an SQL Server to create, store, and manipulate database files, tables, fields and records,
and an SQL Client interface allowing workstation users not only to design and work with database files,
but also to retrieve useful and meaningful data that will help them in their everyday work.
23.2.1 What is SQL?
SQL is a query language designed for organizing, managing, developing and querying large relational
databases over computer networks. SQL is a common language in the Information Science (IS) and
Information Management industry. The language has been standardized by the American National
Standards Institute (ANSI) and the International Standards Organization (ISO), meaning that there are
specific features that must be present in any version of SQL produced by a software company in order
for that version to be officially called SQL. Many software vendors add more advanced features to their
version of SQL in an effort to improve the language and attract customers, but it must retain the original
standards established by ANSI and ISO.
SQL is not a true computer language. It cannot be used to create stand-alone computer applications
or operating systems. SQL is often referred to as a sub-language, since it can be used within other
languages or applications. Most importantly, the purpose of the SQL language is specific to working
with relational databases.
The syntax of the SQL language is built on a system of sending SQL statements to the SQL database
server. Each statement is a request to perform a database operation, such as creating a database file,
adding tables and fields to a database, adding records to tables, or retrieving data from databases. The
SQL server analyzes the SQL statement and performs the required operation. For example, if the
statement is a request for data, the server gathers the data and returns it to the client workstation for
the user to view.
2013-05-06509
Understanding Databases

An SQL query is an SQL statement designed specifically to request data from one or more SQL
databases. Some SQL applications require that you type in an SQL query directly using a text editor,
while others provide graphical user interfaces that lead you through the process of querying an SQL
database. In the latter case, the application must create an SQL statement based on the information
you provide. This statement is the actual SQL query, and it is the SQL query that is used to request the
data. Crystal Reports falls into both categories of SQL-compliant applications.
23.2.1.1 Client/server architecture
One of the most powerful features of SQL DBMS applications is their ability to efficiently use the
client/server architecture of a network.
A simple network structure consists of one or more network servers that provide a common location
where all users on the network can obtain data and applications. Many network servers also provide
network security, automated services such as backing up data, and network resource monitoring to
provide the best service possible to all workstations on the network. Because of the high processing
demands required by a network server, the computer used as the server is often a high-powered, fast
machine that may contain multiple processors, multiple hard drives, and multiple CD-ROM drives.
A network client is a single computer workstation that is used regularly by one or more company
employees. A user works on the client and accesses data and applications from the server over the
network. Large processing jobs that require a lot of time and resources are handled by the server, and
2013-05-06510
Understanding Databases

the finished results are sent back to the client. This provides more efficient time management for users
because the local workstation has less processing time and more "up" time available to the user.
Many modern computer applications are based on this client/server architecture. A simple client/server
application has two parts: a server-based application that is located on a network server machine, and
a client-based application that is located on a user's workstation. The server application handles complex,
time-consuming, or power-demanding processes, taking advantage of the network server's power and
resources, while the client application provides an easy-to-use user interface designed to help get the
work done faster and better than it could otherwise be done.
Often, a client/server application will be available with a certain number of seats, depending on the cost
of the application. Each seat represents either a single client workstation, or a single client user
(depending on the software vendors' specifications) that can be connected to the client/server software.
Software vendors often sell additional seats for their applications, each seat coming with a complete
set of client application software.
Do not confuse server applications with network server computers. Both are often referred to as servers.
However, a server application resides on a network server, taking advantage of the hardware and
operating system capabilities of the server machine, while a network server is a physical machine to
which network clients are connected by cables or some other connection device.
23.2.2 SQL DBMS
An SQL Database Management System is a common example of a client/server software package. A
standard SQL DBMS will include an SQL server application that handles all the actual work of building
and working with databases and database data. The DBMS will also include at least one set of SQL
client software (one seat) that can connect to the SQL server over your network. SQL client software
usually consists of, at the very least, an SQL statement editor that you can use to write and execute
SQL statements, and an underlying communications layer that works with the SQL server application
over the network.
When you execute an SQL statement, the client software passes the statement to the communications
layer, which sends the statement over the network to the server software. The SQL server analyzes
2013-05-06511
Understanding Databases
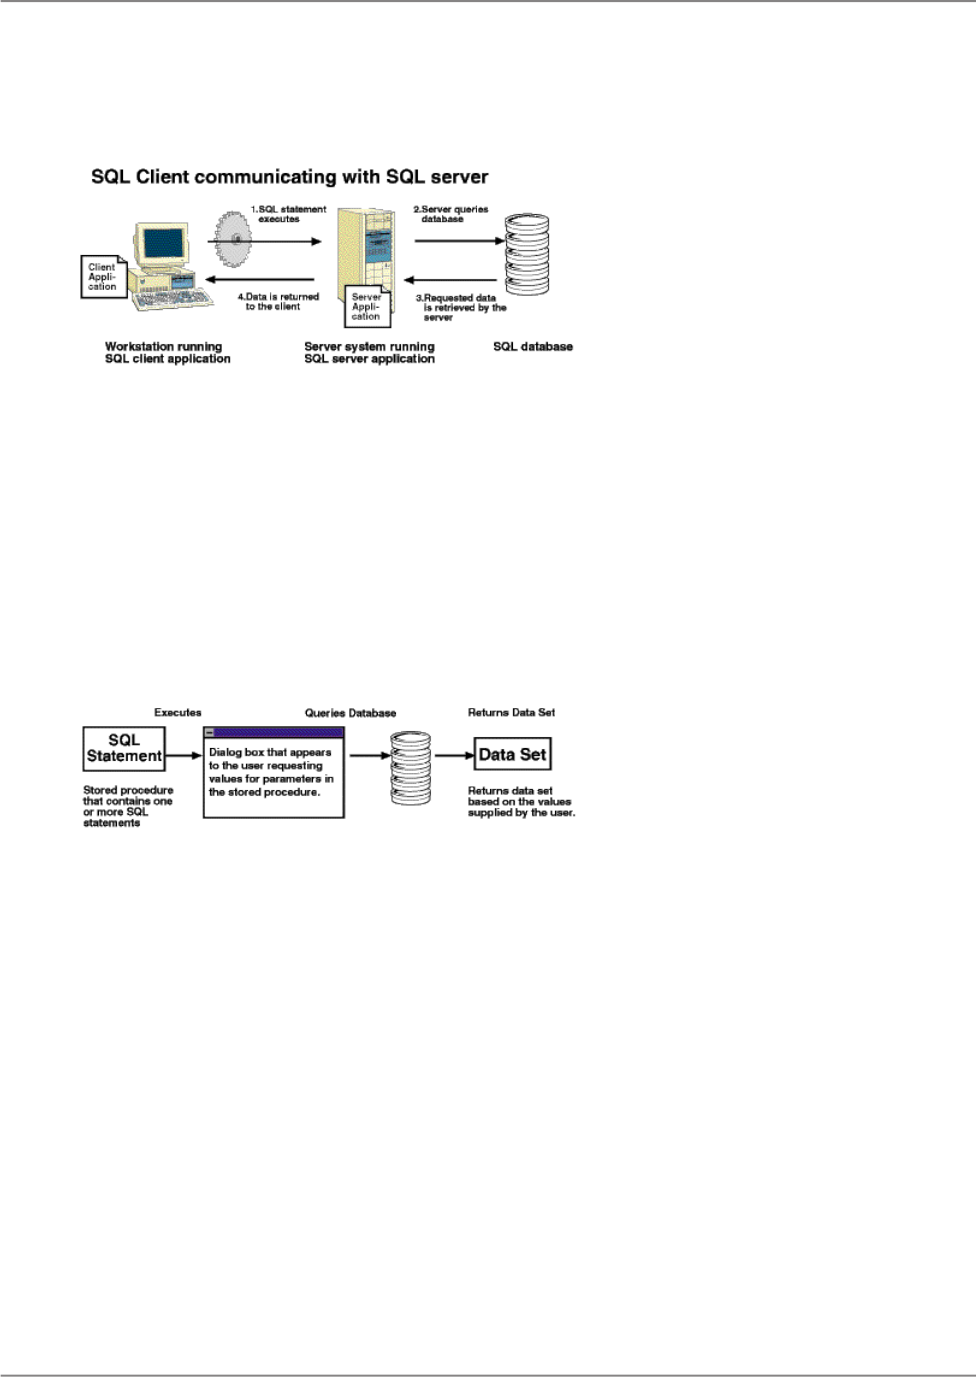
the statement, performs the requested operation, and returns any data requested to the client software.
If the server returns any data, the client software displays the data to the user.
23.2.2.1 Stored procedures
In addition to the common relational database attributes (tables, fields, records, and so on) many SQL
DBMS systems support stored procedures. A stored procedure is a compiled SQL program consisting
of one or more SQL statements. A stored procedure can be used to define an SQL query that you can
use over and over again. Furthermore, variables, conditional expressions, and variable arguments can
be defined in the stored procedure so that you are prompted to provide information before the procedure
is executed.
Since stored procedures can return a result set, they can provide a specific set of data when executed.
In fact, Crystal Reports allows you to execute a stored procedure on an SQL database and use the
returned data to design a report. If the stored procedure is designed to prompt a user for information
to base its query on, Crystal Reports will prompt you for that information when you select the stored
procedure for your report.
23.2.2.1.1 To select an SQL stored procedure
1.
Choose Options from the File menu.
The Options dialog box appears.
2.
Click the Database tab and ensure that Stored Procedures is selected.
Selecting "Stored Procedures" automatically displays any available stored procedures when you
log on to an SQL database.
3.
In addition, you can specify Table name LIKE and Owner LIKE options if you wish.
2013-05-06512
Understanding Databases

• "Table name LIKE" is based on the SQL LIKE clause. This option allows you to specify the kinds
of table names you want to appear in the Choose SQL Table dialog box. You can use the
underscore character (_) or the percent sign character (%) as wildcards with this function. The
underscore character specifies any single character, while the percent sign signifies any character
string. For example, DAV_ matches DAVE only, while DAV% matches DAVE and DAVID. Table
name LIKE C% would display only those tables that have a table name beginning with the letter
C.
• "Owner LIKE" is also based on the SQL LIKE clause. The Owner LIKE option allows you to select
the Owner (or Creator or Alias) of the table, not the table name itself. For example Owner LIKE
C% would display only those tables that have an owner beginning with the letter C.
Note:
For more information on the SQL LIKE clause, refer to your SQL documentation.
4.
Click OK to exit the Options dialog box.
5.
On the Start Page, click Blank Report.
6.
Locate and select the SQL Server data source that contains the stored procedure you want to use.
7.
Click Next to go to the Connection Information dialog box.
8.
Enter the required information to log in.
Note:
You can also connect the SQL data source by selecting the Integrated Security checkbox. No user
ID or password is required with this option, but it does require that Database Authentication is enabled
on the server. Please consult your Database Administrator on how to enable and configure this
function.
9.
Click Finish.
23.2.2.1.2 To change a parameter in a stored procedure
1.
Highlight an SQL stored procedure in the Stored Procedures folder, and click the > arrow to add it
to the Selected Tables list.
The Enter Parameter Values dialog box appears.
2.
Highlight a parameter in the Parameter Fields list.
3.
Assign a value by typing into the Discrete Value box and then click OK.
You are returned to the Database Expert.
4.
Click OK and create your report using the fields in the stored procedure.
The first time you refresh your report's data the parameter you entered is used. Only the records that
satisfy that value are used in your report. Subsequent refreshing prompts for new parameter values.
23.2.3 How does Crystal Reports use SQL?
2013-05-06513
Understanding Databases

When you connect to an SQL database, Crystal Reports acts as an SQL client application, connecting
to your SQL server through your network.
When you design a report that accesses SQL data, Crystal Reports builds an SQL query. This query
can be seen by choosing Show SQL Query from the Database menu.
This SQL query is a representation of the SQL statement that Crystal Reports sends to the SQL server.
By interpreting as much as possible from the report design into an SQL query, Crystal Reports can
off-load much of the report processing onto the server machine. Rather than having to sift through an
entire database to find the data you requested, Crystal Reports lets the server do the sifting and gets
back a much smaller set of data, thus reducing the time and resources your workstation must use in
order to finish the report.
23.2.4 The SQL language
Since Crystal Reports uses the SQL language to access client/server databases through ODBC, you
can better understand the report generating process by understanding some of the SQL clauses
(commands) used:
23.2.4.1 SELECT
The SELECT clause indicates specific data items to retrieve from the database tables. The item retrieved
may be the values in a database field (column), or it may be the result of a calculation performed while
gathering the data. For example:
SELECT
TABLEA.'CUSTNAME',
TABLEA.'STATE'
23.2.4.2 DISTINCT
The DISTINCT clause forces the query to retrieve only unique (distinct) sets of data. When using the
DISTINCT clause, a row of results will be retrieved only once. The previous SELECT statement can
be modified to use the DISTINCT clause:
SELECT DISTINCT
TABLEA.'CUSTNAME',
TABLEA.'STATE'
2013-05-06514
Understanding Databases

23.2.4.3 FROM
The FROM clause indicates the sources of the database fields specified in the SELECT clause. FROM
lists actual database tables that include the fields and records containing the requested data. The FROM
clause generated by Crystal Reports precedes the name of each table with the alias it uses to identify
the table in your report. The following example illustrates the FROM clause used with the SELECT
clause:
SELECT
TABLEA.'CUSTNAME',
TABLEA.'STATE'
FROM
'TABLEA' TABLEA
23.2.4.4 WHERE
The WHERE clause has two purposes:
• To specify record selection criteria.
• To show how two database tables are joined.
When WHERE is used to specify record selection criteria, it includes a search condition in order to
determine which records (rows of data) are to be retrieved. For example:
SELECT
MYTABLE.'SALESPERSON',
MYTABLE.'SALESTOTAL'
FROM
'MYTABLE' MYTABLE
WHERE
MYTABLE.'SALESTOTAL' < 10000.00
When WHERE is used to specify how two tables are linked, an SQL join operator sits between the two
table names. See Linking options.
The following is an example of the WHERE clause joining two tables:
SELECT
CUSTOMER.'CUST_ID',
CUSTOMER.'CUST_NAME',
ORDERS.'AMOUNT'
FROM
'CUSTOMER' CUSTOMER,
'ORDERS' ORDERS
WHERE
CUSTOMER.'CUST_ID' = ORDERS.'CUST_ID'
2013-05-06515
Understanding Databases

23.2.4.5 ORDER BY
The ORDER BY clause specifies that the database records retrieved be sorted according to the values
in a specific field. If you do not use the ORDER BY clause, the program retrieves records in the order
in which they appear in the original database. If you specify more than one field after the ORDER BY
clause, the program sorts the records according to the values in the first field specified, then, within
that sort, the program sorts the records by the values in the second field specified, and so on. The
following SQL statement uses the ORDER BY clause:
SELECT
MYTABLE.'COMPANY',
MYTABLE.'CITY',
MYTABLE.'STATE'
FROM
'MYTABLE' MYTABLE
ORDER BY
MYTABLE.'STATE' ASC,
MYTABLE.'CITY' ASC
Note:
ASC indicates that the values in the field are sorted in ascending order rather than descending order
(DESC). Ascending order sorts letters from A to Z and numbers from 0 to 9.
23.2.4.6 GROUP BY
The GROUP BY clause retrieves a set of summary data. Instead of retrieving the data itself, GROUP
BY groups the data and summarizes each group with an SQL aggregate function. The server returns
only the summarization information for each group to Crystal Reports.
For example:
SELECT
MYTABLE.'STATE',
MYTABLE.'ZIPCODE',
SUM (MYTABLE.'SALES')
FROM
'MYTABLE' MYTABLE
GROUP BY
MYTABLE.'STATE',
MYTABLE.'ZIPCODE'
23.2.5 Defining an SQL Command
If the database you are using supports a query language such as SQL, you can write your own command
which will be represented in Crystal Reports as a Table object. This allows database users complete
2013-05-06516
Understanding Databases

control of the data processing that gets pushed down to the database server. A user who has experience
with databases and the SQL language can write a highly optimized command that can considerably
reduce the size of the set of data returned from the server.
You can write your own command by using the "Add Command" node in the "Database Expert" to
create a virtual table which will represent the results of processing the command. Once the command
has been created, you can store it in the SAP BusinessObjects Enterprise Repository so that it can be
shared between many users.
When you use a virtual table that was created as a Command, or when you use a Command from the
SAP BusinessObjects Enterprise Repository, Crystal Reports does not alter the syntax of the SQL
submitted to the server (that is, it does not automatically add quoting or escape characters). This
behavior also applies to parameters used in Commands. Therefore, you must add the quoting and
escape characters that are necessary for your database driver.
Note:
• Some of the Crystal Reports native database drivers do not support the Add Command feature:
• DB2 Server
• Sybase Server
• Informix Online Server
• The Add command feature is susceptible to SQL Injection attacks.
Many web pages use SQL Injection to insert user parameters into SQL queries that run against the
relational database. For example, a login webpage takes a user name and password and executes
an SQL Injection to the database to authenticate the information. An attacker can put a value in the
username or password field that adversely changes the SQL query that runs against the database.
23.2.5.1 To create a command object
1.
In the Database Expert, expand the Create New Connection folder and browse the subfolders to
locate your data source.
2.
Log on to your data source if necessary.
3.
Under your data source, double-click the Add Command node.
4.
In the "Add Command to Report dialog box", enter an appropriate query/command for the data
source you have opened.
For example:
SELECT
Customer.`Customer ID`,
Customer.`Customer Name`,
Customer.`Last Year's Sales`,
Customer.`Region`,
Customer.`Country`,
Orders.`Order Amount`,
Orders.`Customer ID`,
Orders.`Order Date`
FROM
2013-05-06517
Understanding Databases

Customer Customer INNER JOIN Orders Orders ON
Customer.`Customer ID` = Orders.`Customer ID`
WHERE
(Customer.`Country` = 'USA' OR
Customer.`Country` = 'Canada') AND
Customer.`Last Year's Sales` < 10000.
ORDER BY
Customer.`Country` ASC,
Customer.`Region` ASC
Note:
The use of double or single quotes (and other SQL syntax) is determined by the database driver
used by your report. You must, however, manually add the quotes and other elements of the syntax
as you create the command.
5.
Optionally, you can create a parameter for your command by clicking Create and entering information
in the "Command Parameter dialog box".
For more information about creating parameters, see To create a parameter for a command object.
6.
Click OK.
You are returned to the Report Designer. In the Field Explorer, under Database Fields, a Command
table appears listing the database fields you specified.
Note:
• To construct the virtual table from your Command, the command must be executed once. If the
command has parameters, you will be prompted to enter values for each one.
• By default, your command is called Command. You can change its alias by selecting it and
pressing F2.
23.2.5.2 To edit a command object
1.
In the Selected Tables area of the Database Expert, select the command you want to edit.
2.
Right-click the command and select Edit Command from the shortcut menu.
Note:
If the command is stored in the BusinessObjects Enterprise Repository, you must disconnect it
before editing. For more information, see Modifying objects in the repository.
3.
Make the changes you want in the Modify Command dialog box and click OK when you're done.
23.2.5.3 To create a parameter for a command object
You can create a parameter field while working in the Add Command to Report dialog box or the Modify
Command dialog box.
2013-05-06518
Understanding Databases

1.
In the Parameter List area of the appropriate command dialog box, click Create.
2.
In the Command Parameter dialog box, enter the following information in the fields provided:
• Parameter Name
Enter the name you want to identify your parameter by.
• Prompting Text
Enter the text you want to appear when the program prompts you.
• Value Type
Select the data type of the parameter field.
• Default Value
Enter the value you want the program to use if you do not supply a new value. This is an optional
step.
3.
Click OK.
Your parameter is added to the Parameter List. You can modify or delete it by returning to the Modify
Command dialog box.
23.2.5.4 To add a parameter to a command object
1.
Place the cursor in the query text in the spot where you want to insert the parameter.
2.
Double-click the parameter's name in the Parameter List.
The parameter is added where your cursor is sitting. It should look like this:
WHERE
Customer.`Country` = '{?CountryParam}'
Note:
You must manually add quotes and other elements of syntax as you create your command.
If you want to change the parameter field you've created, go to the Field Explorer dialog box and select
it from the Parameter Fields node. See Parameter Fields and Prompts for more information.
23.3 Changing data sources
When a database file is moved or renamed, Crystal Reports will not be able to find the data the next
time the report is printed. On other occasions, a report may be created on one machine where all of
the database data is stored in a certain directory, then the report is copied or moved to another machine
2013-05-06519
Understanding Databases

that stores the same data in a different directory. In any of these events, you need to verify the location
of the database files accessed by the report and reset the alias pointers to the new database location
or name.
The Verify Database command on the Database menu checks the alias pointers stored in a report file
to verify that the database files expected are located in the indicated directories. If the databases are
not found in the specified location, the program notifies you of the discrepancies.
Use the Set Datasource Location command on the Database menu to change the alias pointers stored
by Crystal Reports. The Set Datasource Location command provides a simple way to indicate the new
name or location of database files. In addition, the Set Datasource Location command automatically
converts your database driver to the data source you have chosen. For example, you can automatically
convert a direct access data source to an ODBC data source using the Set Datasource Location
command.
23.3.1 To change the data source
1.
On the Database menu, choose Set Datasource Location.
The Set Location dialog box appears with the database tables currently used in the report shown in
the Current Data Source area. The main report is shown as the root node.
2.
Highlight the database or table in the Current Data Source area that you want to replace.
Tip:
If you want to set the database location to the location of the active report, expand the report's
Properties node and right-click the Database Name field. Select "Edit" to manually enter a location,
2013-05-06520
Understanding Databases

"Same as Report" to set the location to a local drive, or "Convert to UNC" to set the location to a
mapped drive.
3.
Highlight the database or table in the "Replace with" area that you want to use instead.
4.
Click Update.
This button is available only when like items are selected (that is, if you select a table in the upper
list, you must select a table in the lower list).
Once the Update button is clicked, the new data source information is updated in the Current Data
Source list.
5.
Repeat steps 2 to 4 if necessary.
23.4 Working with aliases
For a variety of reasons, database names and locations get changed. If you create a report, then change
the name or location of a table or file, the Report Designer must be able to find the new name or location.
This is especially important when you create formulas in your report that access a table that has been
renamed or moved. To fix the reference for a single field would not be difficult, but to find every formula
that uses that field could be a difficult and time consuming task.
To solve this problem, the Report Designer uses aliases to refer to database tables and files. Aliases
are pointers, internal devices that tell the program where it should look for a database field. Now, if you
change the name or location of the database, you simply reset the pointer. See Changing data sources.
The name of the alias does not change, so your formulas are not affected. The Report Designer looks
to the alias for the location and name, goes to the new location for the database field, and executes
the formula without a problem.
2013-05-06521
Understanding Databases

The Report Designer automatically assigns default alias names to database tables when you first select
the table or file. By default, an alias matches the original name of the table. In databases where the
database table is a separate file (for instance, dBASE), the name of the database file is used without
the file name extension. For example, if you are using the dBASE database file Company.dbf, the
program will assign a default alias name of Company to the file. You can accept the default alias or
assign a new one to the database table.
You can change an alias at any time using the Database Expert. However, if you have already created
formulas in your report using the original alias name, you will need to edit the formulas to use the new
alias.
23.5 Linking tables
You link tables so records from one table will match related records from another. For example, if you
activate an Orders table and a Customers table, you link the tables so that each order (from the Orders
table) can be matched up with the customer (from the Customer table) that made the order.
When you link, you are using a field that is common to both tables. Crystal Reports uses the link to
match up records from one table with those from the other. In this example, the link assures that the
data in each row of the report refers to the same order.
2013-05-06522
Understanding Databases

23.5.1 Link from and link to
When you link two tables, you link from one table to another table. The from table is used as a primary
table, while the to table acts as a lookup table where records are looked up by the primary table. In a
simple link, the Report Designer examines the first record in the primary table and finds all matching
records in the lookup table. Once all matches have been found in the lookup table for the first record
in the primary table, all matches in the lookup table for the next record in the primary table are found.
23.5.2 Link relationships
When you link records from one table to another table, the records will typically fall under one of two
relationship types: one-to-one or one-to-many.
23.5.2.1 One-to-one relationships
In a one-to-one relationship between records in two linked tables, for every record in the primary table
there is only one matching record in the lookup table (based on the linked fields). For example, in the
Xtreme.mdb database, the Employee table can be linked to the Employee Addresses table based on
the Employee ID field in each table. The Employee table contains information about employees at the
company, the positions they hold, their salaries, hiring information, and so on. The Employee Addresses
table contains each employee's home address. There is only one record for each employee in each of
these tables. Therefore, if the Employee table is linked to the Employee Addresses table, only one
record will be found in the Employee Addresses table for each record in the Employee table. This is a
one-to-one relationship.
23.5.2.2 One-to-many relationships
In a one-to-many relationship between records in two linked tables, for every record in the primary table,
there may be more than one matching record in the lookup table, based on the linked fields. In the
Xtreme.mdb database, the Customer table can be linked to the Orders table based on the Customer
ID field in each table. The Customer table contains information about each customer that has placed
an order with the company. The Orders table contains information about orders that customers have
2013-05-06523
Understanding Databases

placed. Since customers can place more than one order, there may be more than one record in the
Orders table for each customer record in the Customers table. This is a one-to-many relationship.
23.5.3 Performance considerations in one-to-many links
The information provided in this section is intended to help you maximize processing speed and minimize
network traffic when you are running your reports. You will learn about the best ways to use selection
formulas and indexes in one-to-many situations to make your reporting more efficient. If you do not use
the information in this section, your reports may end up processing dozens or even thousands more
records than necessary.
When a one-to-many situation exists between two database tables and the program matches up records
from the tables, there are a number of factors that determine how many records the program reads and
evaluates.
The tables that follow show the effects of the different factors on the number of records the program
ultimately has to read. The charts are based on these assumptions:
• Table A contains 26 records (one for each letter in the alphabet).
• Table B contains 2600 records (100 matching records for every record in Table A).
• The scenario is to produce a report that finds two specific records in Table A and the 200 records
(100+100) in Table B that match those two records in Table A.
In a best case scenario, the program would only have to read about 200 records to accomplish the
task.
In a worst case scenario the program would have to read about 67,600 records to accomplish the
same task.
Note:
The performance considerations for data files are different from the considerations for SQL databases.
A data file is any non-SQL database that is accessed directly from Crystal Reports. For the purpose of
this discussion, an SQL database is any database capable of accepting SQL commands accessed
directly from Crystal Reports or through ODBC as well as any other database types that are accessed
through ODBC.
For a better understanding of the difference between direct access databases and ODBC data sources,
see Accessing Data Sources in the online help.
23.5.3.1 Extended descriptions of chart columns
The performance charts use the following columns:
2013-05-06524
Understanding Databases

• Linking or Subreport
Are you creating a report from linked databases or are you inserting a subreport and binding it to
the data in your primary report?
• Selection Formula
Does your primary report include a record selection formula that sets range limits on the key (indexed)
field in Table A?
• Index A
Is Table A on the field you are going to use indexed to match up the records?
• Index B
Is Table B on the field you are going to use indexed to match up the records?
• Reads A
How many records does the program have to read out of Table A to find the two records it is looking
for?
• For each A reads in B
How many records does the program have to read in Table B to find the 200 records it is looking
for?
• Total Records Read
What is the total number of records the program has to process to complete the task?
PC Data
Total
Records
Read
For each A
reads in B
Reads AIndex BIndex A
Selection
Formula
Link
ing/Subre
port
2600
100
(26*100)
26YesYes or NoNoLinking
2600
100
(26*100)
26YesNoYesLinking
200100 (2*100)2YesYesYesLinking
67,600
2600
(26*2600)
26NoNoNoSubreport
2013-05-06525
Understanding Databases
Total
Records
Read
For each A
reads in B
Reads AIndex BIndex A
Selection
Formula
Link
ing/Subre
port
67,600
2600
(26*2600)
2NoYesNoSubreport
2600
100
(26*100)
26YesYesNoSubreport
5200
2600
(2*2600)
2NoNoYesSubreport
2600
100
(26*100)
26YesNoYesSubreport
200100 (2*100)2YesYesYesSubreport
SQL Data
Total Records
Read
For each A
reads in B
Reads A
Selection Formu-
la
Linking/Subre
port
2600100 (26*100)26NoLinking
200100 (2*100)2YesLinking
2600100 (26*100)26NoSubreport
200100 (2*100)2YesSubreport
23.5.4 Data file considerations
When working with data files, one-to-many links can occur when you link tables in a single report or
when you add a subreport to your report.
2013-05-06526
Understanding Databases

23.5.4.1 Linking data files
When retrieving data from linked data files in one-to-many situations, the program uses the following
process:
• If there is a selection formula, the program parses the selection formula and passes what it can
down to the database DLL. This is generally range limit information. Consider the following record
selection formula:
{customer.REGION} in "CA" to "IL" AND
Remainder ({customer.CUSTOMER ID},2)=0
In this formula, the part before the "and" operator contains range selection criteria for the Region
field. The region must fall alphabetically between "CA" and "IL." The program passes this kind of
condition down to either the database DLL (for PC data) or the server (for SQL data). See Record
Selection.
The second half of the selection formula, however, requires processing that must be done in the
Report Engine. It uses a built-in function to manipulate and evaluate a field value and it cannot be
done in the database DLL or the server. The program does not pass this condition to the database
DLL.
• If there is an index on Table A, and the range limit selection condition is based on the indexed field
({customer.REGION} in this example), the program goes directly to the record it is seeking in Table
A (the first CA record) and reads it.
• For that record, the program locates the first matching record in Table B, using the Table B index.
• The program passes this merged record (A+B) back to the Report Designer, which tests the
record against the entire selection formula.
• The program then reads the second matching record and passes the merged record on, and
then reads the third matching record, and so on, until it has read all of the matching records.
• The program then returns to Table A and reads the next record. There is no need to test the
record to see if it meets the CA condition; the field is indexed and the records are in alphabetic
order. But the program tests the record to see if it goes beyond the "IL" condition (for example,
could the next record be from Mississippi or Tennessee?). If the record is still within the specified
range, the program begins the matching process again for that record.
• The program continues the process until it has located all targeted Table A records and the
matching Table B records.
To find two records in Table A and the 100 records in Table B that match the Table A records,
the program reads 200 records.
• If there is no index on Table A, or if there is an index but the range limit selection condition is not
based on the indexed field, the program reads the first record it finds.
• For that record, the program uses the Table B index to locate the first matching record in Table
B.
2013-05-06527
Understanding Databases

• The program passes this merged record (A+B) back to the Report Engine, which tests it against
the entire selection formula.
• The program then locates the second matching record in Table B and passes that merged record
back, then the third record, and so on, until it has located, merged, and passed back all the
records in Table B that match the first record in Table A.
• The program then moves on to the next record in Table A and begins the matching and merging
process all over again.
To find two records in Table A and the 100 records in Table B that match the Table A records,
the program reads 2600 records.
23.5.4.2 Subreports and data files
If your primary report is based on Table A, the subreport is based on Table B, and the records are
linked, your primary considerations are as follows:
• The number of subreports that are run by the program is determined by the index and the selection
formula situation in the primary report:
• If Table A is indexed, and if the primary report has a selection formula that passes down range
limit conditions for the indexed field, the program runs two subreports.
• If Table A is not indexed, or if Table A is indexed but the selection formula does not pass down
range limit conditions for the indexed field, the program runs 26 subreports.
• The number of records read for each subreport is determined by the index situation on Table B:
• If you have an index on Table B, the program will read only the matching records (100) when it
runs a subreport.
• If you do not have an index on Table B, the program will always read every record in Table B
(2600) when it runs a subreport.
23.5.5 SQL database considerations
Since indexes are not critical with SQL data, the primary concern with both linked tables and subreports
is whether or not there is a selection formula in the primary report that puts range limits on Table A.
See Linking data files .
2013-05-06528
Understanding Databases

23.5.5.1 Linked SQL tables
If there are range limit conditions in the selection formula, the program passes those conditions down
to the server.
• If there is a selection formula that puts range limits on Table A, the server locates the records in
Table A that satisfy the selection criteria (2), matches them up with the appropriate records in Table
B (100), and returns 200 merged records to the Report Engine.
• If there is no selection formula, or if there is a selection formula that does not put range limits on
Table A, the server matches up each record in Table A (26) with the appropriate records in Table
B (100), and returns 2600 merged records to the Report Engine.
In either case, the Report Engine will then apply the entire selection formula to the merged records.
23.5.5.2 Subreports and SQL databases
If you are creating a primary report based on Table A and a subreport based on Table B:
• The number of subreports that are run is determined by the selection formula situation in the primary
report:
• If there is a selection formula and it passes down range limits on Table A, the program runs a
subreport only for those records that satisfy range limit conditions (2).
• If there is no selection formula, or if the selection formula does not pass down range limits on
Table A, the program runs a subreport for every record in Table A (26).
• The number of records read by each subreport remains the same regardless of whether there was
range limit selection on Table A. Each subreport will read only those records in Table B that match
each record read in Table A (100).
23.5.6 Performance considerations for all reports
23.5.6.1 Consideration 1
2013-05-06529
Understanding Databases

With both data files and SQL databases, the program parses the entire selection formula and passes
down whatever parts of the criteria it is able to translate (pass), wherever they may physically appear
in the formula. Thus, if the formula finds criteria it can pass, then criteria that it cannot, then criteria that
it can, it passes down the first part, skips the second, and then passes down the third.
• In the case of data files, the program passes down the criteria that it can to the database translation
layer.
• In the case of SQL databases, the program passes down to the server the criteria that it can in the
form of a WHERE clause.
While there are exceptions, as a general rule the program can pass down any part of the record selection
formula that compares a field with a constant. Typically, this means that it can pass down any kind of
record selection criteria that can be set up in the Select Expert (equal to, one of, less than, greater than,
less than or equal, greater than or equal, between, starting with, or like constant).
There are two special selection formula situations that you need to consider. In these situations, the
record selection formula includes multiple conditions, some of which can be passed down while others
cannot.
• AND situations
{customer.REGION} = "CA" and
{customer.CUSTOMER ID}[3 to 5] = "777")
In this situation, the program sees that it can pass down the condition before the And operator but
not the condition after. Since the only records that will meet the second condition will have to meet
the first as well, the program passes down the first condition, retrieves the data set that satisfies the
condition, and then applies the second condition only to the retrieved data. The rule for AND situations
is that the program passes down whatever conditions it can.
Note:
If all of the conditions in an AND situation can be satisfied on the server or in the database DLL, the
program passes them all down.
• OR situations
{customer.REGION} = "CA" or
{customer.CUSTOMER ID}[3 to 5] = "777")
In this situation, the program also sees that it can pass down the condition before the Or operator
but not the condition after. Since there are records that can satisfy the second condition without
satisfying the first, passing the first condition down does not make any sense because it will retrieve
an incomplete data set. In other words, even if it retrieves all the data that satisfies the first condition,
it will still have to retrieve all the data in the table(s) before it can apply the second condition in Report
Designer. Thus, instead of duplicating parts of the data retrieval, the program passes nothing down.
It retrieves all the data and then runs both tests in Report Designer. The rule for OR situations is
that the program either passes down all the tests, or none of the tests.
Note:
If all the tests in an OR situation can be performed on the server or in the database DLL, the program
passes them all down.
2013-05-06530
Understanding Databases

23.5.6.2 Consideration 2
To make certain the program can use the index on Table A to enhance performance, make certain:
• There is a selection formula.
• There are range limits in the selection formula on the key (indexed) field in Table A.
• Use Indexes is selected in the Options dialog box.
23.5.6.3 Consideration 3
If the fields you are using from Table A are not indexed, but there is an indexed field that you can use
in your record selection request, use that field. For example, assume that you have three products
(Product 1, Product 2, and Product 3) and you want to identify all sales of Product 2 in the U.S. There
is no index on the Product field but there is an index on the Order Date field. Since you know that
Product 2 did not begin shipping until July of 1995, you can improve speed by limiting your report to
orders placed in and after July 1995 using the selection formula. In such a case, the program uses the
Order Date index to retrieve only those orders from July 1995 and afterward (a small subset of the
entire database) and then searches for the occurrences of Product 2 in that subset, not in the entire
database.
23.5.7 The Database Expert Links tab
The Database Expert Links tab lets you easily link two or more tables. Choose the Database Expert
from the Database menu to display all current tables; then choose the Links tab to display all current
links.
The easiest way to link database tables is to select Auto Link in the Database Expert Links tab. Auto
Link automatically chooses links for your tables based on common fields in tables or indexed fields (if
your database supports indexed fields).
23.5.8 Linking indexed tables
2013-05-06531
Understanding Databases

When you are linking direct-access database tables, you link from a primary table to a field in the lookup
table. The link field in the primary table can be indexed, but does not have to be. The link field in the
lookup table does not have to be indexed, either, unless you aren't using a native driver for your
connection.
In addition, the fields used to link two tables must have the same data type. For example, you can link
a string field in one table to a string field in another table, or a numeric field in one table to a numeric
field in another table, but you cannot link a numeric field in one table to a string field in another table.
• Some DBMS applications allow you to convert the field value to another data type in the index. For
instance, the field in the table can be numeric, while the index converts the field value to a string.
However, if you choose to use that field to link to another table, you must link to a field of the original
data type. You cannot link a string value to a numeric field that has been converted to a string in the
index.
• If you are linking tables from two different ODBC data sources, MS SQL Server and Oracle, for
example, you can only use string fields to link the tables. String fields are stored in databases in the
same manner, regardless of the data source. Other types of values, however, may not be stored
the same way in different data sources, so you cannot link different data sources in Crystal Reports
using anything other than string values.
• When linking direct-access database tables using native drivers (non-SQL), the only join type
available is Left Outer join.
23.5.8.1 Changing the index used in linking
When using the Smart Linking feature to link tables using a field that is a component of multiple indexes
(two or more), Crystal Reports selects one of the indexes for the link. That index may or may not be
the one you want to use. Delete the link made by the Smart Linking feature and manually link the tables.
See Linking multiple tables for more information.
Note:
Not all DBMS applications support indexed tables. Verify that your database uses indexes before trying
to select an index for linking. Refer to your DBMS documentation to find out if your DBMS can use
indexes, and to learn how to create them.
23.5.9 Link processing order
When there is more than one link, Crystal Reports needs to know in what order it should process the
links. By default, the processing order matches the order in which the links appear on the Links tab.
Use the arrow buttons in the Links Order dialog box to change the default order.
For example, if you have chosen the Credit, Customer, Orders, and Orders Details tables from the
Xtreme sample database, the links tab shows the tables linked as follows.
2013-05-06532
Understanding Databases

In this case, the links will be processed first between the Credit/Customer tables, then between the
Customer/Orders tables, and finally between the Orders/Orders Details tables. The Links Order dialog
box shows you this default order and allows you to change the positions in the processing hierarchy
as you require.
Note:
Different link orders may result in different data sets returned for use in your report. As well, link order
has a significant effect on performance.
23.5.10 Linking options
Crystal Reports enables you to specify the type of join and type of link you want to use when linking
tables. You can also enforce the use of tables in your joins. Joins and links indicates how linked fields
in two tables are compared when records are read. Join, enforce, and link options can be specified in
the Link Options dialog box. Using the various join enforcement options can ensure that linked tables
are included in the SQL query, even when none of the fields in the table are used in the report.
Note:
When you link fields using joins, no indexed fields are required.
The join types are:
• Inner join
• Left Outer join
• Right Outer join
• Full Outer join
The enforce join options are:
• Not Enforced
2013-05-06533
Understanding Databases

• Enforced From
• Enforced To
• Enforced Both
The link types are:
• Equal [=] link
• Greater Than [>] link
• Greater Than Or Equal [>=] link
• Less Than [<] link
• Less Than Or Equal [<=] link
• Not Equal [!=] link
23.5.10.1 Inner join
An Inner join is the standard type of join. The result set from an Inner join includes all the records in
which the linked field value in both tables is an exact match. For instance, you can use an Inner join to
view all customers and the orders they have placed. You will not get a match for any customer who
has not placed orders.
Orders TableCustomer TableCustomer Table
Order AmountCustomer NameCustomer ID
25141.50Allez Distribution52
19164.30BG Mountain Inc.53
1683.60BG Mountain Inc.53
15716.40Hansen MTB Inc.57
1956.20La Bomba de Bicicleta58
24580.50Mountain Toad60
7911.80SFB Inc.62
19766.20Sierra Bicycle Group63
2013-05-06534
Understanding Databases

Orders TableCustomer TableCustomer Table
Order AmountCustomer NameCustomer ID
12763.95Sierra Bicycle Group63
8233.50Sierra Mountain64
23.5.10.2 Left Outer join
The result set from a Left Outer join includes all the records in which the linked field value in both tables
is an exact match. It also includes a row for every record in the primary (left) table for which the linked
field value has no match in the lookup table. For instance, you can use a Left Outer join to view all
customers and the orders they have placed, but you also get a row for every customer who has not
placed any orders. These customers appear at the end of the list with blanks in the fields that would
otherwise hold order information:
Orders TableCustomer TableCustomer Table
Order AmountCustomer NameCustomer ID
25141.50Allez Distribution52
19164.30BG Mountain Inc.53
1683.60BG Mountain Inc.53
15716.40Hansen MTB Inc.57
1956.20La Bomba de Bicicleta58
24580.50Mountain Toad60
7911.80SFB Inc.62
2013-05-06535
Understanding Databases

Orders TableCustomer TableCustomer Table
Order AmountCustomer NameCustomer ID
19766.20Sierra Bicycle Group63
12763.95Sierra Bicycle Group63
8233.50Sierra Mountain64
Bicicletas Aztecas54
Deely MTB Inc.55
Note:
Left Outer and Right Outer joins are handled differently in the SQL language from other join types. If
the database is accessed through ODBC, Crystal Reports uses ODBC syntax in the SQL statement.
If you are connecting to an SQL database directly (not through ODBC), Crystal Reports uses a syntax
native to the database. For more information about what an Outer join looks like in an SQL statement,
refer to Microsoft ODBC documentation or to the documentation for your SQL database.
23.5.10.3 Right Outer join
The result set from a Right Outer join includes all the records in which the linked field value in both
tables is an exact match. It also includes a row for every record in the lookup (right) table for which the
linked field value has no match in the primary table. If you link the Customer table to the Orders table,
you get one row in the table for each order a customer has placed. You also get a row for every order
found that cannot be linked to a customer. Theoretically, this should not happen, but if an inexperienced
sales person forgot to assign a customer ID to an order, you can quickly locate that order with a Right
Outer join. The resulting table leaves a blank in any of the Customer fields for the order without a
customer.
2013-05-06536
Understanding Databases

Orders TableOrders TableCustomer Table
Order AmountOrder IDCustomer ID
25141.50652
19164.301153
1683.602153
15716.40457
1956.202058
24580.501660
7911.801962
19766.202863
12763.953263
8233.501464
10320.8725
Note:
Left Outer and Right Outer joins are handled differently in the SQL language from other join types. If
the database is accessed through ODBC, Crystal Reports uses ODBC syntax in the SQL statement.
If you are connecting to a SQL database directly (not through ODBC), Crystal Reports uses a syntax
native to the database. For more information about what an Outer join looks like in an SQL statement,
refer to Microsoft ODBC documentation or to the documentation for your SQL database.
23.5.10.4 Full Outer join
2013-05-06537
Understanding Databases

A Full Outer join is a bidirectional outer join where you can see all records in your linked tables. The
result set from a Full Outer join includes all the records in which the linked field value in both tables is
an exact match. It also includes a row for every record in the primary (left) table for which the linked
field value has no match in the lookup table, and a row for every record in the lookup (right) table for
which the linked field value has no match in the primary table. If you link the Customer table to the
Orders table, you get one row in the table for each order a customer has placed. You also get a row
for every order found that cannot be linked to a customer, and a row for every customer for whom an
order cannot be found.
Orders TableOrders TableCustomer Table
Order AmountOrder IDCustomer ID
25141.50652
19164.301153
1683.602153
15716.40457
1956.202058
24580.501660
7911.801962
19766.202863
12763.953263
8233.501464
65
66
10320.8725
2013-05-06538
Understanding Databases

23.5.10.5 Not Enforced
When you select this option, the link you've created is used only if it's explicitly required by the Select
statement. Your users can create reports based on the selected tables without restriction (that is, without
enforcement based on other tables). This is the default option.
23.5.10.6 Enforced From
When you select this option, if the to table for the link is used, the link is enforced. For example, if you
create a link from TableA to TableB using Enforce From and select only a field from TableB, the Select
statement will still include the join to TableA because it is enforced. Conversely, selecting only from
TableA with the same join condition will not cause the join to TableB to be enforced.
Note:
For an explanation of from and to tables, see Link from and link to.
23.5.10.7 Enforced To
When you select this option, if the from table for the link is used, the link is enforced. For example, if
you create a link from TableA to TableB using Enforce To and select only a field from TableA, the join
to TableB will be enforced, and the Select statement that is generated will include both tables.
Note:
For an explanation of from and to tables, see Link from and link to.
23.5.10.8 Enforced Both
When you select this option, if either the from table or the to table for this link is used, the link is enforced.
2013-05-06539
Understanding Databases

23.5.10.9 Equal [=] link
The result set from an Equal link includes all the records where the linked field value in both tables is
an exact match. In the following example, the Customer table is linked to the Orders table by the
Customer ID field. When the program finds a Customer ID in the Orders table that matches a Customer
ID in the Customer table, it displays information for the corresponding records in both tables.
SQL uses the following syntax to describe an Equal link:
SELECT Customer.'Customer ID',
Customer.'Customer Name',
Orders.'Order Amount'
FROM 'Customer' Customer,
'Orders' Orders
WHERE Customer.Customer ID =
Orders.Customer ID
This statement produces the following data:
Orders TableCustomer TableCustomer Table
Order AmountCustomer NameCustomer ID
25141.50Allez Distribution52
19164.30BG Mountain Inc.53
1683.60BG Mountain Inc.53
15716.40Hansen MTB Inc.57
1956.20La Bomba de Bicicleta58
24580.50Mountain Toad60
7911.80SFB Inc.62
19766.20Sierra Bicycle Group63
12763.95Sierra Bicycle Group63
2013-05-06540
Understanding Databases

Orders TableCustomer TableCustomer Table
Order AmountCustomer NameCustomer ID
8233.50Sierra Mountain64
23.5.10.10 Greater Than [>] link
The result set from a Greater Than link includes all records in which the linked field value from the
primary table is greater than the linked field value in the lookup table. As an example, a company may
want to compare the salaries made by all their sales representatives to the salaries made by all their
sales managers. The company executives want to make sure no sales representative is making more
money than any manager.
With this in mind, you can link the SalesRep table to the Manager table by the Salary field in each table
using a Greater Than link:
SELECT SalesRep.'Last Name',
SalesRep.'Salary',
Manager.'Last Name',
Manager.'Salary'
FROM 'SalesRep' SalesRep,
'Manager' Manager
WHERE SalesRep.'Salary' >
Manager.'Salary'
This SQL statement might produce data similar to this:
Manager TableManager TableSalesRep TableSalesRep Table
SalaryLast NameSalaryLast Name
$32,000.00Fuller$35,000.00Davolio
$30,000.00Brid$35,000.00Davolio
$29,500.00Buchanan$35,000.00Davolio
$45,000.00Hellstern$48,300.00Dodsworth
2013-05-06541
Understanding Databases

Manager TableManager TableSalesRep TableSalesRep Table
SalaryLast NameSalaryLast Name
$32,000.00Fuller$48,300.00Dodsworth
$30,000.00Brid$48,300.00Dodsworth
$29,500.00Buchanan$48,300.00Dodsworth
$35,000.00Martin$48,300.00Dodsworth
$29,500.00Buchanan$30,000.00Patterson
In this table, there is no relationship established between sales representatives and sales managers.
Since all managers have seniority over all sales representatives, a company might find it necessary to
check if any representatives make more money than any managers, evidence of a salary problem that
needs to be remedied.
23.5.10.11 Greater Than Or Equal [>=] link
The result set from a Greater Than Or Equal link includes all records in which the linked field value in
the primary table is greater than or equal to the linked field value in the lookup table. The example here
is identical to the example for the Greater Than join, except that it uses the Greater Than Or Equal link:
SELECT SalesRep.'Last Name',
SalesRep.'Salary',
Manager.'Last Name',
Manager.'Salary'
FROM 'SalesRep' SalesRep,
'Manager' Manager
WHERE SalesRep.'Salary' >=
Manager.'Salary'
This statement might produce data such as this:
2013-05-06542
Understanding Databases

Manager TableManager TableSalesRep TableSalesRep Table
SalaryLast NameSalaryLast Name
$32,000.00Fuller$35,000.00Davolio
$30,000.00Brid$35,000.00Davolio
$29,500.00Buchanan$35,000.00Davolio
$35,000.00Martin$35,000.00Davolio
$45,000.00Hellstern$48,300.00Dodsworth
$32,000.00Fuller$48,300.00Dodsworth
$30,000.00Brid$48,300.00Dodsworth
$29,500.00Buchanan$48,300.00Dodsworth
$35,000.00Martin$48,300.00Dodsworth
$30,000.00Brid$30,000.00Patterson
$29,500.00Buchanan$30,000.00Patterson
23.5.10.12 Less Than [<] link
The result set from a Less Than link includes all records in which the linked field value in the primary
table is less than the linked field value in the lookup table. Using the Less Than link, you can compare
sales representative and manager salaries in a different direction. Once again, the Salary field in each
2013-05-06543
Understanding Databases

table is used as the link field. This time, though, you link from the Manager table to the SalesRep table
using a Less Than link on the linked Salary fields:
SELECT Manager.'Last Name',
Manager.'Salary',
SalesRep.'Last Name',
SalesRep.'Salary'
FROM 'Manager' Manager,
'SalesRep' SalesRep
WHERE Manager.'Salary' <
SalesRep.'Salary'
This SQL statement produces a slightly different table than that produced by the Greater Than link:
SalesRep TableSalesRep TableManager TableManager Table
SalaryLast NameSalaryLast Name
$35,000.00Davolio$32,000.00Fuller
$48,300.00Dodsworth$32,000.00Fuller
$35,000.00Davolio$30,000.00Brid
$48,300.00Dodsworth$30,000.00Brid
$35,000.00Davolio$29,500.00Buchanan
$48,300.00Dodsworth$29,500.00Buchanan
$30,000.00Patterson$29,500.00Buchanan
$48,300.00Dodsworth$35,000.00Martin
$48,300.00Dodsworth$45,000.00Hellstern
23.5.10.13 Less Than Or Equal [<=] link
2013-05-06544
Understanding Databases

The result set from a Less Than Or Equal link includes all records in which the linked field value in the
primary table is less than or equal to the linked field value in the lookup table. The example here is
identical to the example for the Less Than link, except that it uses the Less Than Or Equal link:
SELECT Manager.'Last Name',
Manager.'Salary',
SalesRep.'Last Name',
SalesRep.'Salary'
FROM 'Manager' Manager,
'SalesRep' SalesRep
WHERE Manager.'Salary' <=
SalesRep.'Salary'
This SQL statement produces data similar to the following:
SalesRep TableSalesRep TableManager TableManager Table
SalaryLast NameSalaryLast Name
$35,000.00Davolio$32,000.00Fuller
$48,300.00Dodsworth$32,000.00Fuller
$35,000.00Davolio$30,000.00Brid
$48,300.00Dodsworth$30,000.00Brid
$30,000.00Patterson$30,000.00Brid
$35,000.00Davolio$29,500.00Buchanan
$48,300.00Dodsworth$29,500.00Buchanan
$30,000.00Patterson$29,500.00Buchanan
$35,000.00Davolio$35,000.00Martin
$48,300.00Dodsworth$35,000.00Martin
$48,300.00Dodsworth$45,000.00Hellstern
2013-05-06545
Understanding Databases

23.5.10.14 Not Equal [!=] link
The result set from a Not Equal link includes all records in which the linked field value in the primary
table is not equal to the linked field value in the lookup table. This type of link can be used to find possible
combinations of items when a table is joined to itself (a self-join). For example, a company can have a
table listing all products they sell. When they decide to hold a sale where their customers buy one item
and get the second item half price, they may need a list of all possible two item combinations:
SELECT Product1.'Product Name',
Product2.'Product Name',
FROM 'Product' Product1
'Product' Product2
WHERE Product1.'Product Name' !=
Product2.'Product Name'
In this SQL statement, the Product table is opened twice. The first time, it is given the alias name
Product1. The second time, it is given the alias name Product2. Then the Product Name field is used
to link from the Product1 table to the Product2 table. This is the same table, but since it has been opened
twice using different aliases, Crystal Reports considers it two separate tables. A Not Equal link is used
to link the tables by the Product Name field. As a result, each product is paired with every other product
offered, but is not paired with itself:
Product2Product1
Product NameProduct Name
Xtreme Mtn LockXtreme Adult Helmet
InFlux Lycra GloveXtreme Adult Helmet
Roadster Micro Mtn SaddleXtreme Adult Helmet
Xtreme Adult HelmetXtreme Mtn Lock
InFlux Lycra GloveXtreme Mtn Lock
Roadster Micro Mtn SaddleXtreme Mtn Lock
Xtreme Adult HelmetInFlux Lycra Glove
Xtreme Mtn LockInFlux Lycra Glove
2013-05-06546
Understanding Databases

Product2Product1
Product NameProduct Name
Roadster Micro Mtn SaddleInFlux Lycra Glove
Xtreme Adult HelmetRoadster Micro Mtn Saddle
Xtreme Mtn LockRoadster Micro Mtn Saddle
InFlux Lycra GloveRoadster Micro Mtn Saddle
Note:
The symbol != is used to represent a Not Equal link, if the ODBC data source driver for the data being
accessed supports this symbol. If not, the default symbol <> is used to represent a Not Equal link.
23.6 Server-side processing
Server-side processing allows you to set up a report that performs the majority of its processing on the
server and pushes only relevant details to your computer.
Server-side processing provides you with a number of benefits:
• Less time connected to the server.
• Less memory needed to process the report on your computer.
• Lower transfer time from the server to the client.
Here's how server-side processing works: by using SQL pass-through technology to send an SQL
statement to the database server and retrieve an initial set of data, Crystal Reports off-loads much of
the data retrieval and sorting work onto the server system, thus freeing up local memory and resources
for more important tasks. That is why server-side processing works only for reports that have been
sorted and grouped; if a report has not been sorted and grouped (for example, if it is a simple list report),
then there is no processing to push to the server. You should also note that server-side processing
works only for reports based on SQL data sources.
Note:
• This description applies only to off-loading grouping and sorting to the server.
• Large amounts of server resources can be used for the temporary databases required when pushing
grouping to the server.
2013-05-06547
Understanding Databases

Keep in mind that in order to perform the grouping on the server, your report must conform to the
following conditions:
• The Perform Grouping on Server option (in the Options dialog box) is enabled. For more information,
see Enabling server-side processing.
• The report uses some form of grouping.
• The report is at least partially hidden (at the very least, the Details section must be hidden). Since
the server will process those sections that are hidden, the greater the portion of the report that is
visible, the greater the amount of processing that must take place on the client side. If the Details
section is shown, server-side processing will not be possible.
• In some cases, formula fields must be processed on the client side. If grouping is based on a formula
field, or if a formula is used in a summary field, then all the records must be transferred to the client
side before the formula can be evaluated. This will increase the amount of time required to run the
report. Therefore, you may want to use SQL expressions as an alternative to formulas.
Note:
Formulas used for record selection are an exception and can be pushed down to the server.
• For a report to be processed on the server, any running totals appearing in the report must be based
on summary fields (since the data needed for the running totals will be pulled over to the client side).
• For a report to be processed on the server, the report must contain only summary fields of these
types: Sum, Maximum, Minimum, Count.
• The report does not contain specified value grouping.
Note:
• When you drill-down on a hidden section of a report, with the processing being done on the server,
connection to the server will be automatically initiated. If the client is disconnected from the server
(for example, if you download a report onto your laptop and you work on it from a remote location),
then drilling-down on data will produce an error since the database is not available.
• If you save a report that has been partially processed on the server using the Save Data with Report
option, the program will save only those records that have been transferred to the client side. In
other words, if you have drilled-down on a hidden section and there is a tab for that data in Crystal
Reports (indicating the data has been transferred), those records will be saved with the report.
23.6.1 How server-side grouping affects the SQL query
When a report pushes most of its processing to the server, this by necessity alters the SQL query. Thus,
when the Perform Grouping on Server option is enabled, individual aspects of server-side processing
will modify the SQL statement in different ways.
• If you select Use Indexes Or Server For Speed (in the Report Options dialog box), the program adds
an ORDER BY clause to the SQL statement and a WHERE clause for the record selection formula,
if possible.
2013-05-06548
Understanding Databases

• If you group on a linkable data type in the DBMS, the program adds a GROUP BY clause to the
SQL statement. The program uses the GROUP BY clause to perform the grouping on the server.
• If you summarize on a linkable data type, the program adds a summary field to the SELECT clause
of the SQL statement.
• If you drill-down on a linkable data type, the program adds a WHERE clause to the SQL statement.
• If you group in descending order on a linkable data type, the program adds an ORDER BY clause
to the SQL statement.
The statement also varies between tabs:
• If you are working in the Preview tab, the statement includes the GROUP BY clause, as well as any
aggregates that the report is pushing to the server.
• If you are drilling-down, the statement varies depending on the underlying data and the level of
drill-down. With each drill-down, the WHERE criteria changes. Also, if you drill-down to the details,
the statement will not include a GROUP BY clause (since you no longer have any groups on that
drill-down tab).
To view the current SQL statement for the active tab, choose Show SQL Query from the Database
menu. The Show SQL Query dialog box appears, displaying the SQL statement.
Note:
You can use the Formula Workshop to edit SQL expressions to be processed on the server.
23.6.1.1 Enabling server-side processing
1.
On the File menu, click Report Options.
2.
Select Perform Grouping on Server on the Report Options dialog box.
This check box is inactive if Use Indexes or Server for Speed is not selected.
3.
Click OK.
Note:
You can also enable or disable this option quickly by selecting or deselecting Perform Grouping on
Server on the Database menu as needed. If Use Indexes or Server for Speed is not selected in the
Report Options dialog box, this command is inactive.
23.7 Mapping database fields
The Map Fields dialog box allows you to link report fields to their corresponding database fields when
you have made changes to the structure of the database, or when you have created a report based on
2013-05-06549
Understanding Databases

one database from a template of another report based on some other database that has the same table
and field structure. In this way, the dialog box helps you to make sure your reports print with the current
version of the active database.
When you first create a report, the report draws its fields from the database as it exists at the time. If
you change the structure of the database after you create the report, the program needs to adapt the
report to the new structure.
23.7.1 About the Map Fields dialog box
The Map Fields dialog box contains four boxes:
• The upper-left box displays the names of all unmapped report fields (for which the program detects
a change in the active database). The top name is selected by default.
• The upper-right box displays the names of unmapped database fields (in which the program detects
a change). Since the Match Type box is selected by default, this box displays only the names of
unmapped database fields of the same type as the unmapped report field you selected in the
upper-left box. To display all unmapped database fields, regardless of type, clear the Match Type
box.
• The lower-left box displays the names of mapped report fields. When you map fields in the upper
boxes, they appear in the lower boxes.
• The lower-right box displays the names of mapped database fields. When you map fields in the
upper boxes, they appear in the lower boxes.
For each database field that you have changed, highlight the report field and the database field in the
upper sections and click Map. The field names move from the upper boxes to the lower boxes.
You do not have to remap every report field. For example, if you delete a database field, it is not
necessary to remap its corresponding report field, since you will not need that field in your report. You
can click OK to close the dialog box without remapping each field listed in the upper-left box.
On some occasions, you might want to unmap or unlink report and database fields that you have already
mapped. For example, you might mistakenly map the wrong fields or want to map a report field to a
database field that you have already mapped. In these cases, you can select a report field in the lower
boxes (the program then automatically selects the database field) and click Unmap. The field names
will move from the lower boxes to the upper boxes.
Note:
Crystal Reports does not automatically refresh the report data when you close the Map Fields dialog
box. To refresh your data, click Refresh on the Standard toolbar.
23.7.2 Remapping processes
2013-05-06550
Understanding Databases

If you make changes to the active database or universe fields that require you to remap the corresponding
report fields, you can display the Map Fields dialog box by choosing any of these commands from the
Database menu:
• Verify Database
• Verify on First Refresh
• Set Datasource Location
Note:
There is also a global option called Verify When Database Driver Upgraded (set on Database tab of
the Options dialog box) that can make the Map Fields dialog box appear when you first refresh a report's
data after updating its database driver.
You can use each of these commands for a specific function; however, any of these commands will
open the Map Fields dialog box if the program detects a mismatch between the field names in the report
and the field names in the database or universe. In order to detect any possible mismatches, the program
checks each field name in the report against the field names in the database or universe. If one of the
field names does not match any of the field names in the database or universe, the Map Fields dialog
box appears.
Note:
Report fields that are left unmapped are removed from the report.
23.7.2.1 Using the Verify Database process
When you choose Verify Database from the Database menu, the program checks the active databases
or universes, and reports. If it detects changes, the report must be adapted to prevent errors.
The program displays the Map Fields dialog box when it detects either of these types of changes to the
database or universe:
• The name of a field that is used in the report has changed.
• The database or universe has been upsized from a PC data source to an SQL data source.
For a tutorial on the Map Fields dialog box, see Remapping altered database fields. Crystal Reports
automatically adapts the report (and does not display the Map Fields dialog box) if it detects any of
these changes:
• Fields have been added to the database or universe.
• Fields that are not used in the report have been deleted from the database or universe.
• Field positions have changed in the database or universe.
• Data types have changed for fields in the database or universe.
2013-05-06551
Understanding Databases

23.7.2.2 Using the Verify on First Refresh process
Verify on First Refresh triggers the Verify Database command the first time you refresh your report data
per session:
• If there is a check mark beside Verify on First Refresh, the option is active (the option is active by
default for new reports).
• If there is no check mark beside it, the option is inactive.
23.7.2.3 Using the Set Datasource Location process
When you choose Set Datasource Location from the Database menu and specify a new location for
the active database or universe, the program checks the database or universe for changes.
Set Datasource Location displays the Map Fields dialog box when it detects any of the following changes
in the database structure:
• A field has been deleted.
• A field has been renamed.
• The database or universe is completely new.
Note:
The program checks for these changes only if the databases or universes have different names or if
the name has changed. If the databases or universes have the same name, the Map Fields dialog box
does not appear, and you need to verify the database or universe when you have finished setting the
location. For more information, see Using the Verify Database process.
23.7.3 Remapping altered database fields
Use the Map Fields dialog box to remap existing report fields in the active database or universe if they
have been altered.
2013-05-06552
Understanding Databases

23.7.3.1 To remap an altered database field
1.
With the report active in the Design tab, choose Verify Database from the Database menu.
The Verify Database message box appears.
• If the program detects no changes in the active database, the message box displays this message:
"The database is up to date." In this case, click OK and return to your work.
• If the program detects a change(s) in the active database, the message box displays this message:
"The database file ["table name"] has changed. Proceeding to fix up the report!"
2.
Click OK.
If the program detects that a field name has been altered in the active database, the Map Fields
dialog box appears.
Note:
The program automatically adapts the report to changes in other data within the database (number
of fields, field position, data type, and so on). It is not necessary to remap fields in which these
changes have been made.
3.
Highlight the first report field that you want to remap in the upper-left box.
4.
In the upper-right box, highlight the unmapped database field to which you want to remap the selected
report field.
5.
Click Map.
The highlighted report and database fields no longer appear in the upper boxes. Instead, they appear
in the corresponding lower boxes.
6.
Repeat Steps 3 through 5 for each unmapped report field you want remapped.
Note:
If the names of any report fields remain in the upper-left box when you exit the dialog box, the
program removes them from your report.
7.
Click OK.
The program remaps the report fields to the altered database fields.
23.8 Saved Data Indexes
You can increase the performance of a Crystal report by indexing its saved data. When you create a
Saved Data Index on a particular field, Crystal Reports can more efficiently filter on that field. In particular,
2013-05-06553
Understanding Databases

you will achieve considerable performance gains—especially in larger reports—by indexing fields that
are referred to by record selection formulas.
Note:
The benefits of Saved Data Indexes are largely unnoticeable in reports whose record selection returns
fewer than 10,000 records.
Saved Data Indexes are especially useful when you schedule your Crystal reports for viewing through
SAP BusinessObjects Business Intelligence platform. For example, you want to provide your users with
information about yearly sales for North America, so you create a report. You also want sales
representatives to see figures for their individual regions, but you don't want them to see figures for
other regions, so you create a selection formula to limit the report. After you schedule the report in SAP
BusinessObjects Business Intelligence platform and sales representatives view its instances, they see
only figures for their own regions. If you had also created Saved Data Indexes, the representatives
would see their records without having to wait for all records to be loaded.
In other words, the Saved Data Indexes allow a subset of the report's data to be accessed by a user.
The indexes are invoked by applying a selection formula in SAP BusinessObjects Business Intelligence
platform at view time (that is, the selection formula applies a filter to an indexed field). These selection
formulas can be applied by setting them in a report viewer, or by setting them through a report processing
extension. (For information about report processing extensions, see the
SAP BusinessObjects Business
Intelligence Platform .NET SDK Developer Guide
.)
23.8.1 How Report Indexing works
With a non-indexed report, Crystal Reports has to look at every record in order to locate values that
meet specified criteria. For instance, when a user requests a particular subset of the saved data, or
when a user requests the report but only has rights to access certain records, Crystal Reports filters
the saved data by checking each record for the appropriate values.
If you have indexed the saved data by one or more fields, however, Crystal Reports already knows
which records contain particular values. Consequently, when a user accesses a particular subset of
the saved data from the indexed field, Crystal Reports can locate and format the appropriate records
more efficiently.
Once you have created Saved Data Indexes, they work entirely in the background. Users don't know
that the saved data is indexed, and the grouping, sorting, or formatting of the report doesn't change at
all. The indexes merely allow Crystal Reports to locate particular records quickly, without passing
through the saved data in its entirety.
23.8.2 Considerations for using Saved Data Indexes
There are some things that you should consider before deciding to use Saved Data Indexes:
2013-05-06554
Understanding Databases

• Indexes work best in scenarios where a report contains a large set of data, but only small subsets
of the data are viewed at one time.
• Large, complex reports can overload the Crystal Reports report engine.
For example, creating a large report with a selection formula that returns 90% of the report's data
will probably take up more memory and disk space than a report file without indexes. In such a case,
report processing will be slower.
• Indexes require disk space; this disk space can add up to more than the space required for the data
itself. You trade the speed of applying selection formulas for the size of your report files.
• The Crystal Page and RAS servers are limited in how much caching occurs for different users when
selection formulas are applied. Therefore, when a user views a report file with a selection formula
and the Page Server takes up a certain amount of RAM, adding more users could cause the Page
Server to use even more RAM.
23.8.3 Indexing the right field(s)
These guidelines describe the best ways to index saved data and what to avoid when indexing:
• Index fields that users frequently add to their record selection formulas.
• Index fields that are referred to by the report's record selection formula.
• Don't index all of the fields in the report.
Doing so can result in increased processing times. It is best to index only on the fields that meet the
criteria specified above. If all of the fields meet these criteria, then you should prioritize the fields
and index only some of them.
• Don't index fields that contain unique values only.
For instance, don't index a field such as "Last Year's Sales," whose values are likely to be distinct
from one another. If you do so, a separate index is created for each and every value in the field.
23.8.3.1 To index saved data
1.
Open your report in the Crystal Reports.
2.
On the Report menu, click Report Bursting Indexes.
3.
In the Saved Data Indexes dialog box, select the fields that you want indexed within the saved data.
4.
Click OK to return to Crystal Reports.
5.
If you want to create the index immediately, refresh and save the report.
2013-05-06555
Understanding Databases

23.9 Unicode support in Crystal Reports
Crystal Reports supports Unicode by converting data from non-Unicode databases as it accesses it
(this data conversion happens within Crystal Reports; the data in your database is not affected).
Conversion is done using the identifier of the non-Unicode data and the machine's locale setting (usually
found in the Control Panel's Regional Settings). To take advantage of the Unicode support in Crystal
Reports, ensure the locale setting is correct on each machine that uses Crystal Reports.
23.10 Working with databases
This section introduces several common procedures related to accessing database files from within
Crystal Reports. Where practical, step-by-step instructions are provided.
23.10.1 Using Access queries
23.10.1.1 Opening Access queries through DAO
Microsoft Access queries can be used in Crystal Reports as separate data sets, just like Access tables.
When you open an Access database through the DAO engine, any queries in the database can
automatically be read.
23.10.1.1.1 To open an Access query through DAO
1.
On the Start Page, click Blank Report.
2.
In the Database Expert dialog box, locate, highlight, and then expand the Microsoft Access database
(*.mdb) file that contains the query you want to use in your report.
Note:
If your database requires a user name and password, or any other log on information, a log on dialog
box appears.
3.
Highlight the query in the Views folder and any tables you want to include in your report and click
the > arrow.
2013-05-06556
Understanding Databases

4.
Click OK when you are finished with the Database Expert dialog box.
The Field Explorer dialog box appears.
Note:
The Links tab appears in the Database Expert if you have selected several queries and tables.
All of the queries and tables you highlighted from your Access database appear in the Field Explorer
dialog box.
5.
Locate your query in the Database Fields list, and double-click its name.
The query expands to display all the fields it contains.
6.
Highlight any fields you want to use in your report and add them to the Design tab.
Note:
You cannot use Access Action queries or Update queries in Crystal Reports. However, you can use
Access Select queries, Cross-tab queries, and Parameter queries. For more information about Parameter
queries, see Opening Access Parameter queries.
23.10.1.2 Opening Access queries through ODBC
ODBC gives you more control over which parts of a database you can use. For this reason, using an
Access query through ODBC may require a few extra steps.
23.10.1.2.1 To open an Access query through ODBC
1.
On the File menu, click Options.
2.
Click the Database tab.
3.
Ensure that the Views check box is selected.
Selecting "Views" automatically displays any available queries in your Access database.
4.
In addition, you can specify Table name LIKE and Owner LIKE options, if you wish.
• "Table name LIKE" is based on the SQL LIKE clause. This option allows you to specify the kinds
of table names you want to appear in the Choose SQL Table dialog box. You can use the
underscore character (_) or the percent sign character (%) as wildcards with this function. The
underscore character specifies any single character, while the percent sign signifies any character
string. For example, DAV_ matches DAVE only, while DAV% matches DAVE and DAVID. Table
name LIKE C% displays only those tables that have a table name beginning with the letter C.
• "Owner LIKE" is also based on the SQL LIKE clause. Owner LIKE allows you to select the Owner
(or Creator or Alias) of the table, not the table name itself. For example Owner LIKE C% displays
only those tables that have an owner beginning with the letter C.
5.
Click OK to exit the Options dialog box.
6.
Create a new report and choose ODBC as the data source for your Access database.
2013-05-06557
Understanding Databases

7.
Locate and select the data source that contains the Access query you want to use.
Note:
If your database requires a user name and password, or any other log on information, click Next to
go to the Connection Information dialog box.
Tip:
Choosing an ODBC data source and entering connection information automatically logs you onto
the server.
8.
Highlight your query in the Views folder, click the > arrow, and then click OK.
The Design tab appears along with the Field Explorer dialog box. Your Access query, and all fields
associated with that query, appear under "Database Fields."
Note:
You cannot use Access Action queries or Update queries in Crystal Reports. However, you can use
Access Select queries and Cross-tab queries.
23.10.1.3 Opening Access Parameter queries
Access Parameter queries can be opened only when you open an Access database via ODBC. Make
sure you have an ODBC data source set up for your Access database before attempting this procedure.
See Setting up an ODBC data source.
Note:
When you design a Parameter query in Access, you must provide a prompt for the query and specify
a data type for the parameter. First, with your query open in Design View in Microsoft Access, enter a
prompt in the Criteria cell for the field that will act as a parameter. Then, choose Parameters from the
Query menu in Access, and specify a data type for the parameter you just created. Make sure the
prompt appears exactly as it does in the Criteria cell. For complete instructions, refer to your Access
documentation. If you do not set up your Parameter query correctly, Crystal Reports will not be able to
use it.
23.10.1.3.1 To open an Access Parameter query
1.
In Crystal Reports, choose Options from the File menu.
The Options dialog box appears.
2.
Click the Database tab.
3.
Ensure that the Stored Procedures check box is selected.
Selecting "Stored Procedures" automatically displays any available stored procedures when you
log on to an ODBC data source. Crystal Reports treats Access Parameter queries much like it treats
SQL stored procedures. So, to use a Parameter query, the Stored Procedures check box must be
selected.
2013-05-06558
Understanding Databases

4.
In addition, you can specify Table name LIKE and Owner LIKE options if you wish.
• "Table name LIKE" is based on the SQL LIKE clause. This option allows you to specify the kinds
of table names you want to appear in the Choose SQL Table dialog box. You can use the
underscore character (_) or the percent sign character (%) as wildcards with this function. The
underscore character specifies any single character, while the percent sign signifies any character
string. For example, DAV_ matches DAVE only, while DAV% matches DAVE and DAVID. Table
name LIKE C% displays only those tables that have a table name beginning with the letter C.
• "Owner LIKE" is also based on the SQL LIKE clause. Owner LIKE allows you to select the Owner
(or Creator or Alias) of the table, not the table name itself. For example Owner LIKE C% displays
only those tables that have an owner beginning with the letter C.
5.
Click OK to exit the Options dialog box.
6.
On the Start Page, click Blank Report.
7.
Locate and select the ODBC data source that contains the Access Parameter query you want to
use.
Note:
If your database requires a user name and password, or any other log on information, click Next to
go to the Connection Information dialog box.
Tip:
Choosing an ODBC data source and entering connection information automatically logs you onto
the server.
8.
Highlight your Parameter query in the Stored Procedures folder, click the > arrow, and then click
OK.
9.
Create your report using the fields in the Parameter query.
10.
On the Standard toolbar, click Refresh to update the report's data.
The Enter Prompt Values dialog box appears.
11.
Assign a value by typing into the field and then click OK.
Your report appears. Only the records that satisfy the parameter values you specified in the Enter
Parameter Values dialog box are used in your report.
Tip:
You can change parameter values at any time by choosing Stored Procedure Parameters from the
Database menu.
Note:
You cannot use Access Action queries or Update queries in Crystal Reports. However, you can use
Access Select queries and Cross-tab queries.
23.10.2 Using ODBC data sources
2013-05-06559
Understanding Databases

23.10.2.1 Setting up an ODBC data source
To set up an ODBC data source, you must first have an ODBC driver installed for the type of data you
want to use. Many DBMS applications automatically install and set up ODBC drivers. If you are not
sure whether ODBC drivers have been installed for your data, refer to the documentation that came
with your DBMS application.
23.10.2.1.1 To set up an ODBC data source
1.
Open the ODBC Data Source Administrator, which is usually found under Start > Programs >
Administrative Tools > Data Sources (ODBC), or Start > Settings > Control Panel > Data Sources
(ODBC).
Note:
Crystal Reports installs version 3.520 of the ODBC Data Source Administrator. If you have a different
version, steps in this procedure will vary slightly.
2.
Click Add to add a new ODBC data source.
The Create New Data Source dialog box appears.
3.
Choose the ODBC driver appropriate for your data type from this list.
4.
Click Finish when finished.
If a driver does not appear for your data type, then the ODBC driver has not been correctly installed.
Refer to the documentation for your DBMS application.
An ODBC Data Source Setup dialog box that is specific to the ODBC driver you selected appears.
Note:
If an error message appears instead of the Setup dialog box, you may not have the correct ODBC
drivers installed on your system for the type of data you selected.
5.
Type the name for your new ODBC data source in the Data Source Name box.
Note:
The dialog box that appears may look different from the one shown here, depending on the type of
data you are using. This dialog box is specific to the Access ODBC driver. For more information
about using the dialog box that appears for your data, click Help.
6.
Click OK when finished.
23.10.2.2 Checking settings for an ODBC data source
2013-05-06560
Understanding Databases

1.
Open the ODBC Data Source Administrator, which is usually found under Start > Programs >
Administrative Tools > Data Sources (ODBC), or Start > Settings > Control Panel > Data Sources
(ODBC).
2.
Highlight the appropriate data source from the User Data Sources list (on the User DSN tab).
3.
Click Configure.
The ODBC Data Source Setup dialog box that appears is specific to the data source you selected,
and contains controls and information for setting up your data source.
4.
Check the settings in this dialog box to make sure the information matches your system and database.
5.
Make any changes necessary, and then click OK.
6.
Click OK to close the ODBC Data Source Administrator dialog box.
23.10.2.3 Logging on to an ODBC data source
1.
Choose Log On or Off Server from the Database menu.
If no report is open, choose Log On or Off Server from the File menu.
The Data Explorer dialog box appears.
2.
Choose the ODBC database file you want to open and click Log On.
If the data source requires a user name and password, or any other log on information, a log on
dialog box appears.
3.
Type in the log on information you usually use to access this database, and click OK.
If you did not specify a database with the ODBC data source, the Select Database dialog box appears.
Select the database file and then click OK.
23.10.2.4 Adding an ODBC database table to a report
1.
Choose Database Expert from the Database menu.
The Database Expert dialog box appears.
2.
Expand the Create New Connection folder, and then expand the ODBC (RDO) folder.
The ODBC (RDO) dialog box appears.
3.
Choose the data source you want to open by Data Source Name or File DSN.
4.
Click Next if the data source requires a user name and password, or other logon information.
5.
Type in the log on information you usually use to access this database, and click Finish.
2013-05-06561
Understanding Databases

If you did not specify a database with the ODBC data source, the Select Database dialog box appears.
Select the database file and then click OK.
6.
In the Database Expert, select and link database tables as usual.
23.10.2.5 Logging off an ODBC data source
1.
Choose Log On or Off Server from the Database menu.
If no report is open, choose Log On of Off Server from the File menu.
The Data Explorer dialog box appears.
2.
Highlight the ODBC data source you want to log off from this list.
3.
Click Log Off.
4.
Click Close when finished with the Data Explorer dialog box.
23.11 Advanced database features
23.11.1 One-to-many links
This tutorial demonstrates how to set up an A to B, A to C report using the Customer, Credit, and Orders
tables in the Xtreme.mdb sample database. Use the instructions here as a guideline for creating A to
B, A to C reports with your own database files.
1.
On the Start Page, click Blank Report.
2.
In the Database Expert dialog box, expand the Create New Connection folder, and then expand
the Database Files folder.
3.
In the Database Files folder, double-click Find Database File.
4.
Use the Open dialog box to locate and highlight the Xtreme.mdb database file and expand its Tables
folder.
5.
Highlight the Credit table and add it to the Selected Tables area.
6.
Repeat the previous step for both the Customer and Orders tables.
7.
When all three tables have been added, click the links tab on the Database Expert dialog box.
8.
If the tables are linked by default, click Clear Links.
9.
Manually link the Customer Credit ID field in the Credit table to the Customer ID field in each of
the other two tables.
2013-05-06562
Understanding Databases

10.
Click Order Links.
The Order Links dialog box appears.
11.
Select a link and use the Up or Down arrow to arrange the links in the order you want.
12.
Click OK to return to the Database Expert Links tab.
13.
Click OK to close the Database Expert.
You have now established an A to B, A to C relationship among the three tables.
23.11.2 ACT! databases
ACT! is a powerful Contact Management application that stores all your contact information in a database
format similar to xBASE databases (dBASE, Clipper, and FoxPro).
Note:
Versions of ACT! before and including version 2 require the use a file called Crw.act which is not needed
in newer versions. Choose the appropriate procedure based on the version of ACT! you are using.
23.11.2.1 To use an ACT! 2 database
1.
On the Start Page, click Blank Report.
2.
In the Database Expert dialog box, expand the Create New Connection folder, and then expand
the Database Files folder.
3.
In the Database Files folder, double-click Find Database File.
4.
Use the Open dialog box to locate and highlight the file Crw.act. By default, this file is installed in
the Windows or Winnt System 32 directory. Click Open when finished.
The Choose File for ACT! dialog box appears.
5.
Use this dialog box to locate and highlight your ACT! database.
6.
Click OK.
The Design tab appears in the application window. Create your report using fields from your ACT!
database.
23.11.2.2 To use ACT! databases newer than version 2
1.
On the Start Page, click Blank Report.
2013-05-06563
Understanding Databases

2.
In the Database Expert dialog box, expand the Create New Connection folder, and then expand
the ACT! 3.0 folder.
3.
Use the Open dialog box to locate and highlight your ACT! database. Click Open when finished.
The database you chose appears in the Database Expert dialog box.
4.
Highlight the table you want to use in your report and click Add.
5.
Click Close on the Database Expert.
The Design tab appears in the application window. Create your report using fields from your ACT!
database.
23.11.3 Reporting on an NT Event Log
If you are running on a Windows NT machine, Crystal Reports gives you the ability to generate reports
based on the NT Event Log.
1.
On the Start Page, click Blank Report.
2.
In the Database Expert dialog box, expand the Create New Connection folder.
3.
Double-click either NT Archived Event Log or NT Current Event Log.
• Choose NT Archived Event Log to report on a previously archived NT Event Log. If you choose
this option the Select Archived NT Event Log dialog box appears, allowing you to navigate to the
file you want to report on.
• Choose NT Current Event Log to report on the most recent NT Event Log.
4.
If you chose to report on the NT Current Event Log, the Select Current Event Log dialog box
appears:
5.
The computer referenced in the Computer(s) box is the computer on which the sample report is
based. To change the computer, expand the Microsoft Windows Network tree.
The directory structure expands to display the network group to which your computer is connected.
6.
Expand the network group to display individual machines connected to the group.
7.
Select the NT machine for which you would like to create an NT Event Log Report.
When you select a machine, that name appears in the Computer(s) box.
Three tables become available on the Database Expert dialog box:
• Application
• Security
• System
Use these tables to create your report based on the NT Current Event Log.
2013-05-06564
Understanding Databases

Note:
• In order to report on the Security table, you need to have the User Right of "Manage auditing and
security log" added to your Policy in NT.
• The data that you will see is the same data that is seen from the NT Event Viewer.
23.12 For additional information
This section has only touched on some of the more important aspects of database access, relational
databases, and SQL. If you are interested in learning more about database topics, refer to the
documentation provided with your DBMS application.
Note:
In addition, there are hundreds of books available on the market that discuss database theory and
design in depth. Look for the computer-related section at your local bookstore.
2013-05-06565
Understanding Databases

2013-05-06566
Understanding Databases

Integrating Business Applications with Crystal Reports
Crystal Reports is the program that you use to create and format Crystal reports, and SAP
BusinessObjects Business Intelligence platform is the multi-tier system that allows you to distribute
these reports over the Web in a secure and managed environment. The SAP BusinessObjects Business
Intelligence Platform 4.0 Integration with the following business applications provides components that
enable you to combine the functionality of Crystal Reports and SAP BusinessObjects Business
Intelligence Platform 4.0 to work with your choice of business application:
• SAP
• JD Edwards (JDE) System
• Oracle E-Business Suite (EBS)
• PeopleSoft (PSFT)
• Siebel
Unlike in earlier releases, the integration for each application listed above has been integrated with the
SAP BusinessObjects Business Intelligence Platform 4.0 install. The SAP BusinessObjects Business
Intelligence Platform 4.0 install program provides integration for SAP, JDE, EBS, PSFT, and Siebel .
You can use SAP BusinessObjects Business Intelligence platform to configure administrative tasks
and use Crystal Reports to configure access to data in the applications. You can begin to work with the
data from different applications in Crystal Reports and/or SAP BusinessObjects Business Intelligence
Platform 4.0.
Refer to the following guides to learn how to perform administrative tasks for individual applications:
•
SAP BusinessObjects Business Intelligence Platform Administrator Guide
•
SAP BusinessObjects Business Intelligence Platform User's Guide
•
SAP BusinessObjects Business Intelligence Suite Master Guide
•
SAP BusinessObjects Business Intelligence Platform 4.0 Installation Guide
24.1 Integrating with SAP
24.1.1 Introduction
2013-05-06567
Integrating Business Applications with Crystal Reports

SAP BusinessObjects 3.x Integration for SAP Solutions provides support for specific SAP
BusinessObjects Business Intelligence platform products and delivers improvements in the areas of
usability, implementation, and administration.
This section's focus is to provide a high level overview of the key new features and enhancements that
are specific to SAP BusinessObjects Enterprise XI Integration for SAP Solutions for Crystal Reports.
SAP BusinessObjects Enterprise XI Integration for SAP Solutions provides you with powerful
report-design tools and a framework for managing, scheduling, and distributing your reports over the
Web. As such, it enables you to extract additional value from your SAP Business Information Warehouse
(BW) and R/3 data and share it with users across the enterprise.
24.1.1.1 Reporting off SAP Data
This section shows how to connect to SAP from Crystal Reports, how to create reports off your SAP
data with the Data Access Components, and how to access your reports through BI launch pad. The
section also discusses the sample reports and the configuration options in Crystal Reports.
24.1.1.1.1 Overview of the Data Access Components drivers
The Data Access Components consist of the InfoSet Query driver, OLAP ABAPI driver, Open SQL
driver, ODS driver, and the BW MDX Query driver. These drivers enable you to design reports off your
SAP tables, ABAP functions, ABAP data clusters, ABAP queries, InfoSets, Operational Data Stores,
and cubes. With the BW MDX Query driver, you can design formatted Crystal reports that are based
on the data that is stored in SAP Business Information Warehouse (BW).
The Crystal reports that you create can be refreshed against the current SAP data by any user who
has installed the drivers along with Crystal Reports. You can also schedule these reports within SAP
BusinessObjects Business Intelligence platform, so your users can access customized reports with
current data on a regular basis.
This section includes the following topics:
• Connecting to SAP with Crystal Reports
• Crystal Reports configuration options
Note:
The procedures in this section are based on Crystal Reports.
24.1.1.1.2 Connecting to SAP with Crystal Reports
Once you have installed Crystal Reports, you can start Crystal Reports and select a driver for your
report. There are two ways to select a driver in Crystal Reports: use one of the Report Wizards, or
select Log On Server from the File or Database menu. Both methods are described below.
Note:
Crystal Reports includes several integrated tools that allow you to report off your data.
2013-05-06568
Integrating Business Applications with Crystal Reports

Using the Report Wizards
1.
Start Crystal Reports.
2.
Click the Start Page tab if the Start Page is not already visible in Crystal Reports.
3.
In the New Reports area, click Blank Report.
The "Database Expert" dialog box appears.
4.
Expand Create New Connection, then expand the folder that corresponds to the driver that you
want to use:
• To use the Info Set driver, expand "SAP Info sets."
• To use the Open SQL driver, expand "SAP Table, Cluster, or Function."
• To use the ODS driver, expand "SAP Operational Data Store."
• To use the BW MDX Query driver, expand "SAP BW MDX Query."
Once you've selected a driver, the "SAP System Logon" dialog box appears. For more details, see
Logging on to the SAP server.
Using the Log On Server command
1.
Start Crystal Reports.
2.
On the File menu (or Database menu, if a report is already open), click Log On or Off Server.
3.
In the Data Explorer, expand Create New Connection. Then, expand the folder that corresponds
to the driver that you want to use:
• To use the Info Set driver, expand "SAP Info sets."
• To use the Open SQL driver, expand "SAP Table, Cluster, or Function."
• To use the ODS driver, expand "SAP Operational Data Store."
• To use the BW MDX Query driver, expand "SAP BW MDX Query."
Once you've selected a driver, the "SAP System Logon" dialog box appears. For more details, see
Logging on to the SAP server.
Logging on to the SAP server
Regardless of which SAP driver you select, you must specify the SAP system that you want to report
off and provide valid R/3 or BW user credentials for that system. Each driver prompts you for this logon
information before it allows you to select the elements that you want to include in the report. Your user
credentials are also requested when you run any existing reports that are built off SAP data sources.
To log on to the SAP server
1.
Once you have selected a driver, the SAP System Logon dialog box appears.
2.
Select the SAP system that you want to report off and click Next.
2013-05-06569
Integrating Business Applications with Crystal Reports

Note:
If your SAP administrator has not configured SAP Logon, your SAP system will not appear in the
Available SAP systems list. For more information about this, see the
BusinessObjects XI Integration
for SAP Installation Guide
.
The next "SAP System Logon" dialog box prompts you for user logon credentials.
3.
In the Client field, type your usual three-digit SAP client number.
4.
In the Username and Password fields, type your usual SAP logon credentials, then click Next.
Note:
When selecting Secure Network Communication (SNC) enabled entries, the password field will be
disabled.
The next "SAP System Logon" dialog box prompts you for extended logon parameters.
5.
If you want the SAP Communication Library to create trace files for all client/server communication
(for troubleshooting purposes), select the Generate RFC trace files check box.
6.
Click Finish.
Crystal Reports logs you onto the SAP system and displays the connection in the Data Explorer (or
in the Available Data Sources list of a Report Wizard).
Note:
It is strongly recommended that you filter the tables that are displayed under the new connection by
right-clicking the connection, selecting Options, and modifying the appropriate settings in the "Options"
dialog box. You can choose not to specify filter options for the tables that are returned to the Data
Explorer; however, if the SAP system contains numerous tables, a significant wait may occur while
Crystal Reports retrieves the list of data sources from your SAP system.
24.1.1.1.3 Crystal Reports configuration options
When you install Crystal Reports, you may need to change your global reporting options to improve
the experience of reporting off SAP. The steps in this section show how to configure Crystal Reports
to list tables and fields by both name and description. The section also shows how to filter the tables
that are displayed in the Data Explorer.
Your SAP system may contain thousands of tables, each with a predefined technical name. The options
that are described in this section ensure that you can select specific tables for a report without having
to search through a lengthy list.
To change configuration options
1.
On the File menu, click Options.
The "Options" dialog box appears.
2013-05-06570
Integrating Business Applications with Crystal Reports

2.
Click the Database tab.
3.
In the Data Explorer area, select the check boxes for the types of data that you want to make available
for the report.
4.
Use the Table name LIKE and/or the Owner LIKE fields to select only a subset of the available
data types. Use any of the following techniques when filtering:
• Type full or partial names of tables.
• Add wildcards to select multiple queries or InfoSets: use a percentage sign (%) to denote any
number of characters; use an underscore (_) to denote a single character. (The % and _ wildcards
correspond respectively to the * and ? wildcards that are used within Windows.)
• Clear both fields and click OK to proceed without filtering. Note, however, that there is a limit to
the number of objects that can be displayed in the Data Explorer. If the number of queries or
InfoSets in SAP exceeds this limit (which is by default 8000), you may receive an Out of Memory
error or a blank Data Explorer.
5.
In the Tables and Fields area, select Show Both.
6.
Click OK.
2013-05-06571
Integrating Business Applications with Crystal Reports

24.1.2 Add-Ons
The Add-Ons distribution contains the setup program and additional documentation for the components
that integrate with your SAP system. The setup program determines which SAP BusinessObjects
Business Intelligence platform products are already installed, and then installs the add-on components
as required.
The add-on components are:
• Data Access
This component provides database drivers that are designed specifically for reporting off SAP data.
Crystal Reports drivers are included for OpenSQL, InfoSet, BW MDX, and ODS. Crystal Reports
drivers need to be installed on the machines that host the Crystal Reports servers.
• Crystal Reports SAP Toolbar
Integrated within Crystal Reports, the SAP Tools toolbar facilitates tasks associated with reporting
off BW queries. It allows you to log on to BW and work with its data sources, save reports to BW,
and publish reports immediately to SAP BusinessObjects Business Intelligence platform via BW.
Note:
SAP Business Explorer must be installed on the same machine as SAP Crystal Reports for the
Crystal Reports SAP Toolbar to work correctly.
Related Topics
• Reporting off InfoSets, Operational Data Stores, and MDX cubes
• Reporting off other SAP data sources
24.1.3 Reporting with SAP
This section describes the key features provided by Crystal Reports to report off SAP systems.
24.1.3.1 Reporting off InfoSets, Operational Data Stores, and MDX cubes
Crystal Reports provides connectivity to your SAP data through three database drivers— the InfoSet
driver, the ODS driver, and the MDX driver:
2013-05-06572
Integrating Business Applications with Crystal Reports

Note:
The BW Query driver is not supported in the current and future releases. The MDX driver provides the
same function set as the BW Query driver with enhancements. You can migrate the existing BW Query
reports to MDX driver.
• The InfoSet driver provides Crystal Reports with another means of accessing SAP data sources:
this driver can access R/3 InfoSets (previously known as Functional Areas) and ABAP Queries. You
access this driver through the Data Explorer in Crystal Reports .
• The Operational Data Store (ODS) driver allows you to use existing ODS objects from your BW Data
Warehouse as a data source in Crystal Reports.
• The SAP BW MDX Query driver helps you report off BW cubes and queries. By writing reports with
the MDX Query driver, you gain direct access to BW cubes, display attributes, and multiple structures.
You will be able to use SAP BW system as a data source through the MDX driver on Crystal
ReportsC++ stack. By providing required SAP system information and credential, you will be able
to create connection to the SAP system, achieve the common features of SAP System as a data
source through MDX driver such as create report, view and schedule report etc in the SAP system.
One advantage of these drivers is that they allow business users to report off predefined views of your
SAP data. Tables and fields are first logically grouped by an SAP content expert into queries, InfoSets,
and so on. You then make these data sources accessible to users who are designing reports with
Crystal Reports.
These drivers are also included in the add-ons for SAP BusinessObjects Business Intelligence platform
(the Data Access feature), so the SAP BusinessObjects Business Intelligence platform processing
servers can successfully run the your reports against your SAP systems. These drivers allow you to
work with Crystal Reports.
Note:
Before you can design or process reports with the InfoSet or OpenSQL drivers, you must install the
corresponding transport file on the SAP system.
Related Topics
• Add-Ons
• http://help.sap.com
24.1.3.1.1 Reporting off BW Queries and Cubes: MDX Query Driver
This section introduces you to Crystal Reports and the integrated features of the MDX Query Driver. It
shows how to format and build reports off a BW query and hierarchy.
MDX Query driver overview
The SAP BW MDX Query driver helps you report off BW cubes and queries. By writing reports with the
MDX Query driver, you gain direct access to BW cubes. You can also now use display attributes,
Multiple Structures, and Free Characteristics in your Crystal reports.
2013-05-06573
Integrating Business Applications with Crystal Reports

Additionally, the MDX Query driver allows you to create reports from queries that contain hierarchy
variables and hierarchy node variables. The driver creates specific fields that allow you to specify pick
lists for your variables in Crystal Reports.
Formatted reporting overview
With the BW MDX Query driver, you can design formatted Crystal reports that are based on the data
that is stored in SAP Business Information Warehouse (BW). You base these reports either on the
queries that you create with SAP's Business Explorer (BEx) Query Designer or directly on cubes. Once
you have designed your Crystal reports, you can save them to SAP BusinessObjects Business
Intelligence platform and, if required, target them for translation in order to make them available to users
in multiple languages.
This section focuses on Crystal Reports and the task of using the MDX Query driver to select BW
queries and cubes as data sources for Crystal reports. This section ends with a series of tutorials that
guide you through the creation of reports off a sample query.
Note:
It is recommended that you complete the tutorials in sequential order because each tutorial builds on
the query and report you built in the previous tutorial.
SAP BusinessObjects Business Intelligence platform allows you to share Crystal reports over the Web
so that all users can view your formatted content. For details about publishing reports to SAP
BusinessObjects Business Intelligence platform, see Publishing Reports.
Your BW queries may contain SAP variables that appear as parameters in SAP BusinessObjects
Business Intelligence platform and Crystal Reports. To accommodate these variables in the BI platform,
BusinessObjects Integration for SAP Solutions employs dynamic pick lists. A dynamic pick list provides
you with a list of possible values to choose for a parameter (variable). Additionally, the values that are
displayed in a dynamic pick list correspond to your user rights—you see only the pick list values that
you have the rights to as defined by SAP BW security settings.
Note:
In Crystal Reports, the pick lists are static but in SAP BusinessObjects Business Intelligence platform
they are dynamic.
Accessing BW queries for reporting
This section outlines the ways in which you can create BW queries and select existing BW queries to
use as data sources for you Crystal reports. To access the BEx Query Designer to create new queries
you can use the Programs menu to navigate to it. To select existing queries you can use the Database
Explorer in Crystal Reports.
Creating new queries for Crystal Reports
You can use "Programs" menu to open the "Query Designer".
To create a BW query directly from the BEx Query Designer
1.
Go to Start > Programs > Business Explorer > Query Designer.
2013-05-06574
Integrating Business Applications with Crystal Reports

2.
When prompted, log on to your SAP BW system.
3.
On the Query Designer's toolbar, click New Query.
The "New Query: Select InfoProvider" dialog box displays the InfoAreas and InfoProviders that are
available on your system.
4.
Select the InfoProvider on which you want to base your query, then click OK.
5.
Define your query by selecting measures and characteristics from the Key Figure and Dimensions
lists and dragging them to the Columns area.
Note:
When you create a new query for reporting purposes, it is recommended that you place Key Figures
in the Columns area of the Query Designer and Characteristics in the Rows area.
6.
Click Query Properties.
7.
Click the Extended tab and ensure that Allow External Access to this Query is selected.
This option allows other programs, like Crystal Reports, to access this query.
8.
Click Save Query.
9.
In the "Save Query" dialog box, click Roles and select the role where you want to save the query.
10.
Type a Description and a Technical Name for the query, then click Save.
The Technical Name must uniquely identify the query—that is, the name can appear only once
across all InfoProviders in BW. The Technical Name can be up to 30 characters long and must begin
with a letter.
Selecting BW Queries for a report
There are two ways you can access BW queries to use as Crystal Reports data sources. You can use
the SAP Tools toolbar in "Crystal Reports" or you can use the Database Explorer in Crystal Reports.
Using the SAP Tools toolbar to select an MDX query
Note:
• The tutorials in this section use the SAP Tools toolbar to create new queries for reporting. However,
when creating new queries you can use whichever method you prefer.
• Before you can see a query in the Database Explorer, you will need to set the “Allow External access
to the Query” option in its properties.
1.
On the SAP menu click Create New Report from a Query.
2.
When prompted, log on to your SAP BW system.
The "Select Query for your Crystal Report" dialog box displays the queries that are available through
your Favorites, Roles, and InfoAreas in BW.
3.
Select the query with the data that you want to report off, then click OK.
2013-05-06575
Integrating Business Applications with Crystal Reports

Crystal Reports generates a report that uses your query as its data source. The report opens in the
Design tab of "Crystal Reports". You can now add fields, titles, charts, and other objects to the
report.
Using the Database Expert to select an MDX query
1.
On the File menu in Crystal Reports, click New and then click Blank Report.
The Database Expert appears.
2.
Under Available Data Sources, expand Create New Connection and then expand SAP BW MDX
Query.
The "SAP System Logon" dialog box appears.
3.
Select the appropriate BW system and click Next.
The next" SAP logon" dialog box prompts you for user credentials
4.
Type your usual SAP user credentials in the Client, Username, and Password fields, then click
Next.
Tip:
To set the logon language, you must specify your Preferred Viewing Local in Crystal Reports under
View > Preferred Viewing Local.
The next "SAP logon" dialog box asks you whether you would like to generate RFC trace files.
5.
If you want the SAP Communication Library to create trace files for all client/server communication
(for troubleshooting purposes), select the Generate RFC trace files check box.
6.
Click Finish.
You are returned to the "Database Expert". There are now two entries under your SAP BW MDX
Query connection. One is labeled CU (Cubes) and the other is labeled (QC) Queries.
7.
Expand QC (Queries) to reveal the defined MDX BW Queries that are available as report data
sources.
Tip:
If no items are found, check the Options setting of the Data Explorer.
a. Right-click QC (Queries) and click Options.
This opens the "Options" dialog box with only the Database tab visible.
b. In the Data Explorer area, ensure that Stored Procedures is selected and then click OK.
You are returned to the Database Expert.
c. Select SAP BW MDX Query and press the F5 key to refresh the Database Expert.
d. Expand Current Connections and then expand QC (Queries).
Now there are lists of available queries.
8.
Select the query that you want to report off and click the right-arrow button.
2013-05-06576
Integrating Business Applications with Crystal Reports

9.
Click OK.
"Crystal Reports" generates a blank report that uses your query as its data source. You can now
add objects to the report.
Showing field descriptions and technical field names
In Crystal Reports you can choose to identify fields by their description, name, or both. In some cases
you may prefer to show both and in other cases you may prefer to use just one. For example, when
working with Multiple Structures, it is recommended that you show only the descriptions. The Global
Unique Identifiers (GUID) that SAP assigns to Multiple Structures are reflected in Crystal Reports and
can be difficult to work with.
To adjust the field name and description settings
1.
On the File menu, click Options.
The "Options" dialog box appears, with the Layout tab active.
2.
Click the Database tab.
3.
In the “Tables and Fields” area, select Show Name, Show Description, or Show Both.
4.
Click OK.
Tip:
For more information about formatted reporting, see the SAP Library > Business Information Warehouse
> Business Explorer > Formatted Reporting: Crystal Reports Integration.
Tips regarding field names in Crystal Reports
When you are viewing attribute names in Crystal Reports, the number that the attribute name is preceded
by gives you information about what kind of information the field contains.
• 2 means that the attribute is the member key
• 1, 4, or 5 means that the attribute is a member description
When you are viewing characteristic names in Crystal Reports, if the characteristic name is followed
by many spaces and then the name of a hierarchy, the characteristic contains that hierarchy.
For example, if the Material characteristic contains the HIGHTECH hierarchy, it appears as [0Material
HIGHTECH].
The following fields are used for hierarchical grouping and parameter binding when there is a hierarchy
node variable on a characteristic. These fields should not be used for reporting.
• NodeId
• Parent NodeId
• MemberUniqueName
2013-05-06577
Integrating Business Applications with Crystal Reports

Note:
Putting the MemberUniqueName on a report will cause performance issues.
When a query contains a hierarchy variable, the MDX Query driver creates an extra field called
Hierarchies in Crystal Reports that allows you to create a list of values for the variable.
The Hierarchies field has the following attributes:
• Hierarchy names
• Hierarchy descriptions
This field has no purpose other than to create lists of values for hierarchy variables. This field should
not be used for reporting.
Selecting cubes for reports
If you or someone else in your organization has defined one or more cubes for reporting purposes
within BW, you can select them as data sources for new Crystal Reports.
To select an existing query for a report
1.
On the File menu in Crystal Reports, click New and then click Blank Report.
The "Database Expert" appears.
2.
Under “Available Data Sources”, expand Create New Connection and then expand SAP BW MDX
Query.
The "SAP System Logon" dialog box appears.
3.
Select the appropriate BW system and click Next.
The next "SAP logon" dialog box prompts you for user credentials
4.
Type your usual SAP user credentials in the Client, Username, and Password, fields, then click
Next.
Tip:
To set the logon language, you must specify your Preferred Viewing Local in Crystal Reports under
View > Preferred Viewing Local.
The next "SAP logon "dialog box asks you whether you would like to generate RFC trace files.
5.
If you want the SAP Communication Library to create trace files for all client/server communication
(for troubleshooting purposes), select the Generate RFC trace files check box.
6.
Click Finish.
You are returned to the "Database Expert". There are now two entries under your SAP BW MDX
Query connection. One is labeled CU (Cubes) and the other is labeled (QC) Queries.
7.
Expand CU (Cubes) to see the defined BW cubes that are available.
Tip:
If no items are found, check the Options setting of the Data Explorer.
2013-05-06578
Integrating Business Applications with Crystal Reports

a. Right-click CU (Cubes) and click Options.
b. This opens the "Options" dialog box with only the Database tab visible.
c. In the “Data Explorer” area, ensure that Stored Procedures is selected and then click OK.
d. You are returned to the "Database Expert".
e. Select SAP BW MDX Query and press the F5 key to refresh the Database Expert.
f. Expand Current Connections and then expand CU (Cubes).
g. Now there are lists of available cubes.
8.
Select the cube that you want to report off and click the right-arrow button.
9.
Click OK.
"Crystal Reports" generates a blank report that uses your cube as its data source. You can now add
objects to the report.
Multiple Structures and Crystal Reports
The MDX Query driver recognizes Multiple Structures and allows you to use them in your Crystal reports.
Multiple Structures show in Crystal Reports as a single dimension. That is, they show with no attributes.
The structure consists only of the members that are in the query.
Saving reports to BW
After designing a report based on a query, you can save the report to a role in BW. At the same time,
you can prepare the report for translation or automatically publish it to SAP BusinessObjects Business
Intelligence platform.
Before saving your report, check its title by clicking Summary Info on the File menu. The title that appears
here is displayed to users in SAP BusinessObjects Business Intelligence platform. The technical name
of the query is used as the default title, but you can replace it with a descriptive title that is more
meaningful to SAP users.
Tip:
Use the Save As command on the File menu to save the report to disk.
To save a report to BW
1.
On the SAP menu, click Save Report.
Note:
You may be prompted to logon to the SAP system again to choose a role to publish the report to.
This is necessary after accessing the SAP toolbar the first time after a report is created.
2.
In the "Save a Crystal Report to BW" dialog box, select the role where you want to save the new
Crystal report.
3.
Type a Description for the report, then click Save.
Depending on your connection settings, the "Save to BW options" dialog box may appear.
4.
Select from the available options:
2013-05-06579
Integrating Business Applications with Crystal Reports

• Prepare this report for translation
When you select this option, the strings in your report are extracted and made available for
translation within SAP. For details, see Designing reports for translation.
• Automatically publish to SAP BusinessObjects Business Intelligence platform
For more information on publishing reports, see Publishing Reports.
If you are unable to publish your report to SAP BusinessObjects Business Intelligence platform,
you may need to consult with your administrator about licensing.
• Don't show this dialog again
If you select this option now, you can modify your default settings later by clicking Settings on
the SAP menu.
5.
Click OK.
Building a report off a BW query
This tutorial provides an introduction to reporting off a query using the BW MDX Query driver. You will
perform the following tasks in this tutorial:
• Create a query
• Select the query as a data source for a Crystal report
• Insert database fields
• Group and sort data
• Summarize data
• Preview the report
How to create a simple BW query
This section guides you through the process of creating a query, saving it to BW, and releasing it for
use by Crystal Reports.
To create a simple BW query
1.
Go to Start > Programs > Business Explorer > Query Designer.
2.
When prompted, log on to your SAP BW system.
The "Query Designer" opens.
3.
On the Query Designer's toolbar, click New Query.
The "New Query: Select InfoProvider "dialog box displays the InfoAreas and InfoProviders that are
available on your system.
4.
Select the Customer-Cube and click OK.
2013-05-06580
Integrating Business Applications with Crystal Reports

Note:
The location of the Customer-Cube varies, so you may need to browse to find it.
5.
Select the following characteristics from the Dimensions list, and drag them to the “Rows” area:
• Division
• Material
Tip:
You can find Division under the Sales area data dimension.
6.
Select the following measures from the Key Figure list, and drag them to the Columns area:
• Invoiced quantity
• Sales Volume
7.
Click Query Properties.
8.
Click the Extended tab and ensure that Allow External Access to this Query is selected.
This option allows other programs, like Crystal Reports, to access this query.
To save the query in BW
1.
Click Save Query.
2.
In the "Save Query" dialog box, click Roles and select the role where you want to save the query.
3.
Type a Description, such as Sample Material query
4.
Type a Technical Name, such as MATERIALSAMPLE01.
The Technical Name must uniquely identify the query—that is, the name can appear only once
across all InfoProviders in BW. The Technical Name can be up to 30 characters long and must begin
with a letter.
5.
Click Save.
To use the query in Crystal Reports
• Click Quit and Use Query.
Crystal Reports generates a report that uses your query as its data source. The report opens in the
Design tab of Crystal Reports. You can now add fields, titles, charts, and other objects to the report.
How to create a new report based on the query
This section guides you through the process of creating a new report based on the query you created
in the last section, How to create a simple BW query.
To create a new report
• On the View menu, click Field Explorer.
2013-05-06581
Integrating Business Applications with Crystal Reports

The "Field Explorer" appears. Expand Database Fields and Sample Material query to see the list of
fields available for your report.
Tip:
To change how the fields are identified in Crystal Reports, see Showing field descriptions and
technical field names.
To select fields for the report
1.
Expand Key Figures.
2.
Drag Invoiced Quantity from the "Field Explorer" and place it in the Details section of the report.
3.
Click the Refresh button to view the result set.
Only one value is returned on the report. This value represents the aggregated value of this Key
Figure across all Characteristics in the cube. To display more detailed results, you must group the
data on one or more dimensions.
To group and sort data
Note:
If you group on an attribute value, report performance is degraded. This occurs because the MDX query
is slow to return data. To retain processing speed, it is recommended that you group on the Member
Caption field whenever possible, as outlined in this tutorial.
1.
On the Insert menu click Group.
The Insert Group dialog box appears.
2.
On the first list click Division.
This field is the Member Caption for Division.
3.
On the second list click in ascending order.
4.
Click OK.
5.
On the Insert menu click Group.
6.
On the first list click Material.
This field is the Member Caption for Material.
7.
On the second list click in ascending order.
8.
Click the Refresh button to view the result set.
When you view this report, the records are first grouped according to the value in the Division
characteristic. The resultant groups are then displayed in the report in ascending alphabetical order.
The records in each Division group are further divided into secondary groups based on the values
in the Material dimension. The resultant groups are also sorted in ascending alphabetical order.
2013-05-06582
Integrating Business Applications with Crystal Reports

Tip:
If you want to see the MDX query statement that the MDX Query driver is passing to the server, you
can use the Show SQL Query option in CR. To see the query, on the Database menu, click Show SQL
Query.
This MDX statement can be tested directly against SAP BW using the transaction mdxtest.
How to summarize data and save report
This section guides you through the process of summarizing data and saving report based on the report
you created in the last section, How to create a new report based on the query.
To summarize the data
1.
On the Insert menu click Summary.
2.
The Insert Summary dialog box appears.
3.
In the Choose the field to summarize list, select Invoiced Quantity.
4.
In the Calculate this summary list, select Sum.
5.
In the Summary Location list, select Group #1:[Field Name].
In this case, [Field Name] indicates the name of the field that the group is based on.
6.
Click the Refresh button to view the result set.
When you view the report, there is one summary in Group Footer 1.This summary represents a sum
of the Invoiced Quantity for each Division.
To save your report
• On the SAP menu, click Save Report, and save the report to a role in BW.
For details, see Saving reports to BW.
You may want to resize or reposition report elements, or further modify the report's design. You can,
for instance, select and drag the borders of columns and column headings in order to resize them in
the Preview tab; or, you can quickly display only a subset of the data by filtering the records with the
Select Expert.
The
Crystal Reports Online Help
provides extensive conceptual and procedural information, tutorials,
and examples to help you use Crystal Reports to its fullest potential. Access the help by pressing F1
anywhere within Crystal Reports.
Building a report off a BW hierarchy
This tutorial demonstrates how to report off a BW query with a hierarchy using the MDX Query driver
in Crystal Reports.
In this tutorial you will:
• Create a simple BW query with a hierarchy.
2013-05-06583
Integrating Business Applications with Crystal Reports

• Create a new report and group the data hierarchically.
• Insert a summary.
• Adjust object positioning dynamically.
Note:
This tutorial builds on the topics covered in Building a report off a BW query, which provides more
details on steps such as logging on to your SAP system, selecting the Customer-Cube and saving
queries.
How to create a simple BW query with a hierarchy
This section uses the query that you created in the last tutorial, Building a report off a BW query. You
will be adding a hierarchy to the query on the Material dimension.
To create a BW query with a hierarchy
1.
Go to Start > Programs > Business Explorer > Query Designer.
2.
Click Open Query.
3.
Select the query you created in the last tutorial.
If you have not created a query, see Building a report off a BW query.
4.
In the Rows area, right-click Material and click Properties.
The "Characteristic Properties" dialog box appears.
5.
Next to the Hierarchy Name field, click the Values button.
The "Select Hierarchy" dialog box appears.
6.
In the Available Hierarchies list, select Material class and click OK.
You are returned to the "Characteristic Properties " dialog box.
7.
Click OK and then click Save Query As... to save your query to the appropriate location.
For this example, in the Description field, type Simple Hierarchy for MDX, and in the Technical Name
field, type HIERARCHY_SIMPLE_MDX.
8.
Click Quit and Use Query.
You now have a simple query with three possible levels of hierarchy. You can display the query in either
the SAP Business Explorer Analyzer or as a dataset in Crystal Reports.
How to build a report off the BW hierarchy
The report that you build in this section starts using the same field as the report you created in Building
a report off a BW query. The difference comes with the grouping. Instead of grouping the data like you
did in the previous tutorial, you will group the data hierarchically. This way, the hierarchy that exists in
the data is reflected in the report.
2013-05-06584
Integrating Business Applications with Crystal Reports

This tutorial will use the following fields to create a hierarchical display:
• Hierarchy Name Node ID
This field reflects the child values.
• Hierarchy Name Parent ID
This field reflects the parent values. Combined with the Actual Node ID, Crystal Reports uses these
fields to determine the hierarchy based on the information received from the SAP BW query.
• Hierarchy Name
This field contains the captions of the hierarchy members.
To build a hierarchy report off the BW hierarchy
• On the View menu, click Field Explorer.
The "Field Explorer" appears. Expand Database Fields and Simple Hierarchy for MDX to see the
list of fields available for your report.
Tip:
You may want to set the field name and description display options to make it easier to select fields.
To change how the fields are identified in Crystal Reports, see Showing field descriptions and
technical field names
To select fields for the report
1.
Expand Key Figures.
2.
Drag Invoiced Quantity from the Field Explorer and place it in the Details section of the report.
To group and sort data
1.
On the Insert menu click Group.
The "Insert Group" dialog box appears.
2.
On the first list click Material Node ID.
3.
On the second list click in ascending order.
4.
Click the Options tab and select the Customize Group Name field.
5.
From the Choose from Existing field list, select Material.
Material is the hierarchy name, or Member Caption.
6.
Click OK.
7.
On the Report menu click Hierarchical Grouping Options.
The "Hierarchical Group Options" dialog box appears.
8.
In the Available Groups area, ensure that Material Node ID is selected.
Material Node ID is probably the only group listed.
2013-05-06585
Integrating Business Applications with Crystal Reports

9.
Select the Sort Data Hierarchically check box.
10.
In the Parent ID field, select Material Parent Node ID.
11.
In the Group Indent: field, type the amount that you would like each hierarchy level to be indented.
This entry depends on how you want your report to look and on what unit of measurement you are
using in CR.
12.
Click the Refresh button to view the result set.
The result set for the report is now displayed hierarchically.
How to summarize data
This section guides you through the process of summarizing data based on the query you created in
the last section, How to build a report off the BW hierarchy.
To summarize the data
1.
On the Insert menu click Summary.
2.
The Insert Summary dialog box appears.
3.
In the Choose the field to summarize list, select Invoiced Quantity.
4.
In the Calculate this summary list, select Sum.
5.
In the Summary Location list, select Group #1:[Field Name].
In this case, [Field Name] indicates the name of the field that the group is based on.
Note:
You do not need to select Summarize across hierarchy in order to have the data summarized correctly
in this example because Crystal Reports can recognize the Hierarchy node summaries that the SAP
BW data delivers.
The report now displays the summary data across the hierarchy. However, the summary values are
indented. To fix this see, How to indent a hierarchy without affecting other fields.
An important note about group summaries
If you mix hierarchical grouping with regular grouping and insert a summary at the regular group level,
the summary may be incorrect. That is, the existing summaries are summarized again along with the
detail records.
In this case, you must use server-side calculated summaries at the regular group level.
How to indent a hierarchy without affecting other fields
This procedure demonstrates how to indent a hierarchy while keeping all other fields on a report in their
original positions.
2013-05-06586
Integrating Business Applications with Crystal Reports

To indent a hierarchy without affecting other fields
1.
On the Report menu, click Hierarchical Grouping Options.
2.
Ensure that the Group Indent field is set to zero.
3.
Click OK.
The report now displays the data without any indent.
4.
Right-click the group header field and click Size and Position.
5.
Click the Conditional Formula button beside the X position value field.
6.
In the Formula Workshop, enter the formula:
HierarchyLevel (GroupingLevel({[Hierarchy Name] Node ID})) * 250
Note:
• The field {[Hierarchy Name] Node ID} appears with its technical name in the formula.
• Positions are measured in twips; there are 1440 twips in an inch.
• The report now displays the summary data in its original position and the group headers
hierarchically.
Building a report off a BW query with a hierarchy node variable
When you design your reports, you might want to give users the opportunity to restrict the amount of
data that is returned by Crystal Reports. To do this, you can create a hierarchy node variable in your
query. This variable will be treated as a parameter in Crystal Reports.
You will perform the following tasks in this tutorial:
• Create a query with a hierarchy node variable
• Create a new report based on this query
• Bind the hierarchy node variable to the MemberUniqueName field in Crystal Reports.
• Preview the report
Note:
This tutorial builds on the query that you built in the previous tutorial. If you have not built a query yet,
follow the steps outlined in How to create a simple BW query and How to create a simple BW query
with a hierarchy.
How to create a query with a hierarchy node variable
This section guides you through the process of creating a hierarchy node variable on the Material
hierarchy. When you report off this query using Crystal Reports, you will receive a prompt to select a
hierarchy node to use for the report data.
To create a hierarchy node variable
1.
Go to Start > Programs > Business Explorer > Query Designer.
2013-05-06587
Integrating Business Applications with Crystal Reports

2.
Click Open Query.
3.
Select the query you created in the last tutorial.
Note:
If you have not created a query, complete the steps outlined in How to create a simple BW query
and How to create a simple BW query with a hierarchy.
4.
In the Rows area, right-click Material and click Restrict.
The Selection for [Dimension] dialog box appears.
5.
Ensure that the Selection field is set to Single Values, and that the Hierarchy field is set to the
hierarchy you created for this dimension.
In this example, the hierarchy is Material class.
6.
Click the Variable tab.
7.
Right-click in the white space and click New Variable.
The SAP BW Variables Wizard opens.
8.
Click Next on the Introduction window.
9.
Ensure that the Type of Variable field says Hierarchy Node.
10.
Fill in the rest of the fields as follows:
• In the Variable Name field, type a name such as HNV01.
• In the Variable Description field, type a name such as Test Hierarchy Node Variable.
• In the Processing by field, ensure it says User Entry/Default Value.
• In the Characteristic field, ensure it says Material.
11.
Click Next.
The Details window appears.
12.
On the Variable Entry is list click Optional or Mandatory.
13.
Click Next to accept the other default values.
The "Default Values" window appears.
14.
Click Next to accept the default values.
15.
Click Finish to create the variable.
You are returned to the "Selection for Dimension" dialog box. Your new hierarchy node variable is
visible in the variable list.
To add the hierarchy node variable to the query
1.
Click the hierarchy node variable named Test Hierarchy Node Variable.
2.
Click the right arrow to move the variable to the Selection area of the dialog box.
3.
Click OK.
2013-05-06588
Integrating Business Applications with Crystal Reports

You are returned to the BEx Query Designer. Your new hierarchy node variable is visible in the
Rows area under the Material characteristic. You are now ready to save the query.
4.
Click Save Query As.... to save the query with a new name and description.
For this example, in the Description field, type Simple Hierarchy w Node Variable, and in the Technical
Name field, type HIERARCHY_SIMPLE_HNV.
5.
Click Quit and Use Query.
You now have a query with a simple hierarchy on Material class and a hierarchy node variable based
on the Material class hierarchy.
How to build a report off the query with a hierarchy node variable
This section guides you through the process of creating a list of default values for the parameter that
appears in "Crystal Reports".
1.
Create the same report that you created in How to build a report off the BW hierarchy except you
are now using the query called Simple Hierarchy w Node Variable as the data source.
2.
Click the Refresh button when you have finished designing the report.
Note:
If your variable is optional, ensure that the Set to Null check box is clear when you select a parameter
value. The Set to Null check box overrides any value you select from the list of default parameter
values. This check box is not always cleared when you select a parameter value.
Building a report off a BW query with a hierarchy variable and a hierarchy node variable
This tutorial guides you through adding a hierarchy variable to the query you created in the last tutorial.
The hierarchy variable allows users to choose what hierarchy they would like Crystal Reports to use
when displaying the data. The hierarchy node variable allows users to then choose what node of the
hierarchy they would like to see data from.
You will perform the following tasks in this tutorial:
• Add a hierarchy variable to your existing query
• Create a new report based on this query
• Bind the hierarchy node variable to the MemberUniqueName field.
• Bind the hierarchy variable to the Hierarchies field.
• Preview the report
Note:
This tutorial builds on the query that you built in the previous tutorial. If you have not built a query yet,
follow the steps outlined in How to create a simple BW query, How to create a simple BW query with
a hierarchy, and How to create a query with a hierarchy node variable.
2013-05-06589
Integrating Business Applications with Crystal Reports

How to create a hierarchy variable
This section guides you through the process of creating a hierarchy variable on your existing query and
resetting the hierarchy node variable to correspond to this new hierarchy variable.
In the last tutorial, you set the hierarchy node variable to the Material class hierarchy because that is
the hierarchy that existed in the query. In this tutorial you will change the hierarchy of the query from
the Material class hierarchy to a variable. To avoid unexpected behavior, the hierarchy node variable
should be based on the same hierarchy as the query. Therefore, you will change the hierarchy node
variable to reflect the new hierarchy variable in this query.
To create a hierarchy variable
1.
Go to Start > Programs > Business Explorer > Query Designer.
2.
Click Open Query.
3.
Select the query you created in the last tutorial.
This query already contains a hierarchy and a hierarchy node variable.
If you have not created a query, complete the steps outlined in How to create a simple BW query,
How to create a simple BW query with a hierarchy and How to create a query with a hierarchy node
variable.
4.
In the Rows area, right-click Material and click Properties.
The "Properties for Characteristic Material" dialog box appears.
5.
Click the Values icon.
The "Select Hierarchy" dialog box appears.
6.
Select the Variables check box and then click the New Variable icon.
The SAP BW Variables Wizard appears.
7.
Ensure that the Type of Variable field says Hierarchy.
8.
Fill in the rest of the fields as follows:
• In the Variable Name field, type a name such as HV01.
• In the Variable Description field, type a name such as Test Hierarchy Variable.
• In the Processing by field, ensure it says User Entry/Default Value.
• In the Characteristic field, ensure it says Material.
9.
Click Next.
The "Details" window appears.
10.
On the Variable Entry is list click Optional or Mandatory.
The "Default Values" window appears.
11.
Click Next to accept the default values.
2013-05-06590
Integrating Business Applications with Crystal Reports

12.
Click Finish to create the variable.
You are returned to the "Select Hierarchy" dialog box. Your new hierarchy variable is visible in the
Name list.
13.
Select the new hierarchy variable from the Name list and click OK.
In this example, the hierarchy variable name appears as HV01(Test Hierarchy Variable).
Now that the display hierarchy is set to a variable rather than the Material class hierarchy, you must
reset the hierarchy node variable to the new hierarchy variable.
To set the hierarchy node variable
1.
In the Rows area, click the Test Hierarchy Node Variable, and click Restrict.
The "Selection for Material" dialog box appears.
2.
In the Selection area, right-click the Test Hierarchy Node Variable.
3.
Click Select Variable Hierarchy.
4.
Select the Variables check box to expose the variable hierarchies in the Name list.
5.
From the Name list, click the hierarchy variable you created earlier in this tutorial.
In this example, the hierarchy name is HV01 (Test Hierarchy Variable).
6.
Click Save Query As... and name the query Simple Hierarchy Variable w HN Variable.
7.
Click Quit and Use Query.
You now have a simple query that will prompt the user to choose a particular hierarchy to use when
displaying results and to restrict that result set to a particular hierarchy node.
How to build a report off the query with a hierarchy variable and hierarchy node variable
This section guides you through the process of creating a basic report off your new query and creating
a list of default values for the hierarchy variable in Crystal Reports.
To build a report off the query with a hierarchy variable and hierarchy node variable
1.
Create the same report that you created in Building a report off a BW query except you are now
using the query called Simple Hierarchy Variable w HN Variable as the data source.
2.
Click the Refresh button.
You are presented with two parameter prompts. One prompts you to enter a value for the hierarchy
node variable and one prompts you to enter a value for the hierarchy variable.
3.
Select a value for the Hierarchy parameter.
Note:
Be sure to select this value first because the Hierarchy Node values are set based on the selection
you make here.
4.
Select a value for the Hierarchy Node parameter.
2013-05-06591
Integrating Business Applications with Crystal Reports

Crystal Reports and variable pick lists
Crystal Reports does not create default pick lists for any BW variables that are in your query.
Note:
You do not need to do this when viewing the report in SAP BusinessObjects Business Intelligence
platform. In SAP BusinessObjects Business Intelligence platform the pick list is dynamic.
Creating default values list for hierarchy node variable
To create a list of default values for the hierarchy node variable
Note:
This procedure is based on the query you created in Building a report off a BW query with a hierarchy
variable and a hierarchy node variable.
1.
In the Field Explorer, expand Parameter Fields, and right-click [HNV01].
The parameter, [HNV01], in CR represents the hierarchy node variable you created for this query.
2.
Click Edit.
The Edit Parameter dialog box opens.
3.
Ensure that the List of Values field is set to Static.
4.
From the Value Field list, select Material MemberUniqueName.
The attributes appear with their technical names in this list.
5.
From the Description Field list, select Material, which is the Member Caption field.
The attributes appear with their technical names in this list.
6.
Click Actions and then click Append all database values.
The Value and Description lists are populated with values from the BW system.
7.
In the Values Options area, set the Prompt Text to the message you would like users to receive in
the parameter prompt.
8.
Ensure that Allow custom values and Allow multiple values are set to False.
9.
Click OK.
Now when you refresh the report and are presented with the parameter prompt, you are able to pick
the parameter value from a list of values.
Note:
If your variable is optional, ensure that the Set to Null check box is clear when you select a parameter
value. The Set to Null check box overrides any value you select from the list of default parameter values.
This check box is not always cleared when you select a parameter value.
2013-05-06592
Integrating Business Applications with Crystal Reports

Creating list of default values for hierarchy variable
Note:
This procedure is based on the query you created in Building a report off a BW query with a hierarchy
variable and a hierarchy node variable.
When a query contains a hierarchy variable, the MDX Query driver creates an extra field called
Hierarchies in Crystal Reports that allows you to create a list of values for the variable.
1.
In the Field Explorer, expand Parameter Fields, and right-click [HV01].
The parameter, [HV01], in CR represents the hierarchy variable you created for this query.
2.
Click Edit.
The Edit Parameter dialog box opens.
3.
Ensure that the List of Values field is set to Static.
4.
From the Value list, select Hierarchies-[0MATERIAL].
5.
From the Description list, select Hierarchies-[0MATERIAL]-Description.
6.
Click Actions and then click Append all database values.
The Value and Description lists are populated with values from the BW system.
7.
In the Values Options area, set the Prompt Text to the message you would like users to receive in
the parameter prompt.
8.
Ensure that Allow customer values and Allow multiple values set to False.
9.
Click OK.
To create a list of default values for the hierarchy node variable
• Repeat the steps outlined in the task To create a list of default values for the hierarchy node variable
.
Now when you refresh the report, you are presented with two prompts, each with a list of default
values.
24.1.3.1.2 Reporting off Operational Data Stores
This section introduces the Operational Data Store Driver and how to report off it.
Operational Data Store driver overview
The Operational Data Store (ODS) driver allows you to use existing ODS objects from your BW Data
Warehouse as a data source in Crystal Reports. ODS objects are collections of info objects that act as
smaller organizational units for the data in your BW Data Warehouse. Through this driver, the user can
design multiple reports by quickly referencing the same ODS objects.
Reports that are based on ODS objects behave similarly to reports that are based on stored procedures
in mainstream databases. Because the data stored in the ODS objects is not multidimensional and
2013-05-06593
Integrating Business Applications with Crystal Reports

contains no parameters, it can be accessed and reported from quickly. This driver also pushes record
selection to the server, which further speeds up report processing.
Selecting an ODS object
1.
Start Crystal Reports.
2.
Connect to SAP as outlined in Using the Log On Server command.
Select SAP Operational Data Store in the Data Explorer.
3.
Click Options.
2013-05-06594
Integrating Business Applications with Crystal Reports

The "Options" dialog box appears with only the Database tab displayed.
Tip:
If you chose to use the report wizard, right-click SAP Operational Data Stores and click Options.
4.
In the Data Explorer area, select the options for the types of data that you want to make available
for the report.
In this case, ensure that Stored Procedures is selected.
5.
Use the Table name LIKE and Owner LIKE fields to select only a subset of the available data types.
Use any of the following techniques when filtering:
• Type full or partial names of tables.
• Add wildcards to select multiple ODS objects.
• Use a percentage sign (%) to denote any number of characters.
• Use an underscore (_)to denote a single character.
2013-05-06595
Integrating Business Applications with Crystal Reports

Note:
The % and _ wildcards correspond respectively to the asterisk (*) and question mark (?) wildcards
used in Windows. The % and _ wildcards correspond respectively to the asterisk (*) and plus
sign (+) wildcards in SAP.
• Clear both fields and click OK to proceed without filtering.
6.
In the Tables and Fields area, click Show Both.
7.
When you have specified the ODS that you want to see, click OK.
The Data Explorer displays the selected tables with descriptions defined by the SAP administrator.
8.
Click Close.
9.
Open a new, blank report.
The Database Expert opens.
2013-05-06596
Integrating Business Applications with Crystal Reports

10.
In the Available Data Sources area, double-click the ODS that you want to use as a data source for
the report.
The ODS moves to the Selected Tables area.
11.
Click OK.
You can now add fields and continue to design your report.
24.1.3.1.3 Reporting off InfoSets and SAP Queries
This section describes the combined InfoSet/ABAP Query driver and shows how to select an InfoSet
or an SAP query as a data source for a Crystal report.
InfoSet Query driver overview
The combined InfoSet/ABAP Query driver allows you to use an existing SAP query or InfoSet (previously
known as a Functional Area) as a data source for a Crystal report. The SAP query or InfoSet is built
within SAP by a content expert, who then makes the data set available to the business user. Through
this driver, the user can design multiple reports by quickly referencing the same query or InfoSet.
Because an InfoSet can be built on top of a logical database in SAP, it can inherit all of the business
logic and security that is programmed into the logical database. However, the report that is designed
through the driver can contain only as much data as the SAP query or InfoSet has been designed to
retrieve.
2013-05-06597
Integrating Business Applications with Crystal Reports

Reports that are based on SAP queries and InfoSets behave similarly to reports that are based on
stored procedures in mainstream databases. You can insert subreports that are based on different
queries or InfoSets into the main report.
Note:
• If you want to join two or more InfoSets or SAP queries, you should consider creating a brand new
InfoSet or SAP query instead. The new join will be processed on the SAP server allowing the report
to respond faster.
• Your SAP queries and InfoSets may contain parameters that you can use to limit the data that is
returned from the SAP system. For example, you might specify a date range to get data for only a
certain period. If parameters are included in the SAP query or InfoSet, Crystal Reports prompts you
to specify the values that you want to include in the query.
Tip:
You can use transaction SQ02 to create an InfoSet in SAP, and transaction SQ01 to create an SAP
query. For more information about designing SAP queries and InfoSets, refer to your SAP documentation.
Accessing an InfoSet or SAP query
User groups are groups that are managed in SAP. They allow you to control user access to InfoSets
and SAP queries
An SAP query can belong only to a single user group (which must be shared with the InfoSet that the
SAP query is based on). In contrast, InfoSets can belong to multiple user groups. For a user to report
off an InfoSet (or SAP query based on an InfoSet), the user and the InfoSet/SAP query must belong to
a common user group.
Tip:
To associate existing InfoSets and users with additional user groups in SAP, use transaction SQ03.
Selecting an InfoSet or SAP query in Crystal Reports
1.
Start Crystal Reports.
2.
Connect to SAP as instructed in Using the Log On Server command. Select the SAP InfoSet driver,
and provide your user credentials.
The "Data Explorer" dialog box appears.
3.
Click Options.
The "Options" dialog box appears with only the Database tab displayed.
2013-05-06598
Integrating Business Applications with Crystal Reports

4.
In the Data Explorer area, select the check boxes for the types of data that you want to make available
for the report.
5.
Use the Table name LIKE field to select only a subset of the available data types. Use any of the
following techniques when filtering:
• Type full or partial names of tables.
• Add wildcards to select multiple queries or InfoSets: use a percentage sign (%) to denote any
number of characters; use an underscore (_) to denote a single character. (The % and _ wildcards
correspond respectively to the * and ? wildcards that are used within Windows. The % and _
wildcards also correspond respectively to the * and + wildcards that are used within SAP.)
• Clear both fields and click OK to proceed without filtering. Note, however, that there is a limit to
the number of objects that can be displayed in the Data Explorer. If the number of queries or
InfoSets in SAP exceeds this limit (which is by default 8000), you may receive an Out of Memory
error or a blank Data Explorer.
Note:
The InfoSet driver does not make use of the Owner LIKE field.
6.
In the Tables and Fields area, select Show Both.
7.
When you have specified the data sources that you want to see, click OK.
2013-05-06599
Integrating Business Applications with Crystal Reports
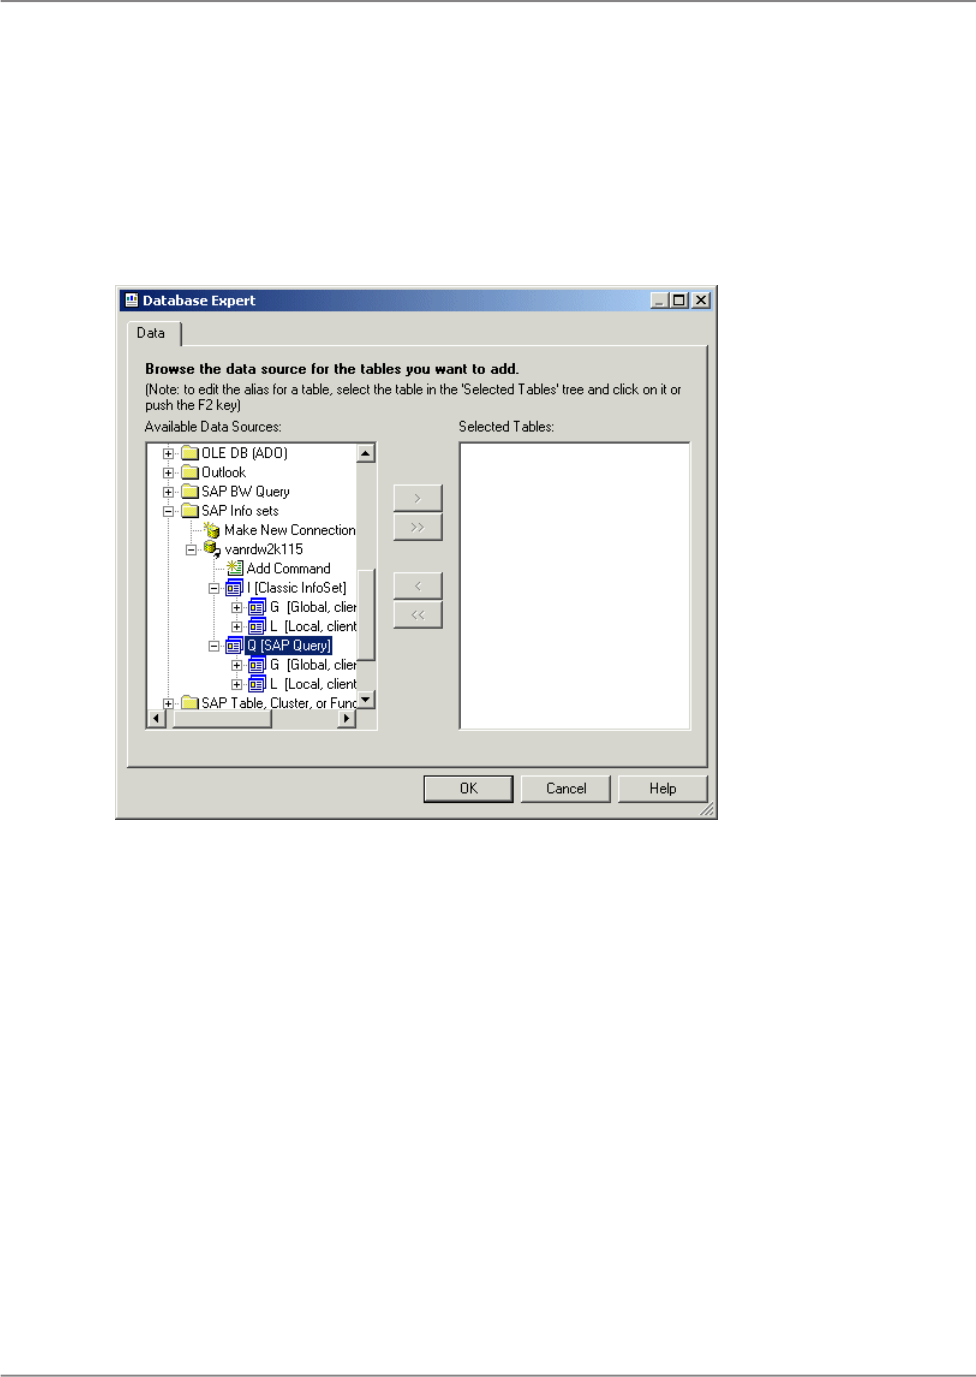
The Data Explorer displays the selected queries or InfoSets, along with the descriptions defined by
the SAP administrator.
8.
Click Close.
9.
Open a new, blank report.
The Database Expert appears.
Tip:
You can also add InfoSets or SAP queries to existing reports. To do so, open the desired report
and, on the Database menu, select Database Expert.
10.
In the Available Data Sources area, locate the query or InfoSet that you want to use as a data source
for the report:
• Expand either I (for Info Set) or Q (for SAP query).
• Expand either G (to search in the Global area) or L (to search in the Local area).
Note:
Queries and InfoSets in the Local area are client-dependent.
11.
Double-click the query or InfoSet that you want to use as a data source for the report.
Note:
If the query or InfoSet contains parameters, the Enter Parameter Values dialog box will prompt you
for information. Use the dialog box to specify the data that you want to include, and then click OK.
12.
In the "Data Explorer" dialog box, click OK.
2013-05-06600
Integrating Business Applications with Crystal Reports

Tip:
For additional information about parameters and general report design topics, see the
Crystal Reports
Online Help
.
24.1.3.2 Reporting off other SAP data sources
In addition to the previously mentioned drivers, Crystal Reports provides the Open SQL driver, which
allows you to report off additional SAP data sources from within Crystal Reports.
24.1.3.2.1 Reporting off tables, views, clusters, and functions
The Open SQL driver is the most powerful of the drivers due to the flexibility it provides for accessing
data in SAP. This flexibility, however, results in a higher level of complexity than with the InfoSet driver.
When you create reports that use the Open SQL driver, you gain easy access to SAP's transparent
tables, pool tables, cluster tables, and views. Users who are currently involved with the production of
ABAP reports will find it easy to build reports quickly with this driver.
Advanced functionality in the driver also allows reporting against ABAP functions and ABAP data
clusters. ABAP developers can use these features to perform advanced tasks such as reporting against
data clusters in HR.
Open SQL driver overview
The Open SQL driver is the most powerful of the SAP BusinessObjects Enterprise XI Integration for
SAP Solutions drivers because of the flexibility that it provides for accessing data in SAP. By writing
reports with the Open SQL driver, you gain easy access to SAP's transparent tables, pool tables, cluster
tables, and views. If you are currently involved with the production of ABAP reports, you will find it easy
to quickly build reports with this driver.
The advanced functionality of the driver allows you to report against ABAP functions and ABAP data
clusters. ABAP developers can therefore perform advanced tasks such as reporting against data clusters
in HR. The Cluster Definition tool is provided as part of the server installation for users who need to
add, edit, and delete data cluster definitions. Developers can also utilize ABAP to augment report
processing.
Additionally, the Open SQL driver provides the ability to secure the data to which users have access.
You can place limitations either on individual tables, or, at a more granular level, on the individual rows
within a table. For more information about using the Security Definition Editor to customize your own
set of data access authorizations, see the “Defining Security for the Data Access Kit” section in the
SAP BusinessObjects Business Intelligence Platform Installation Guide
.
2013-05-06601
Integrating Business Applications with Crystal Reports

Objects supported by the Open SQL driver
The Open SQL driver provides access to several low-level objects within SAP: transparent tables, pool
and cluster tables, views, and ABAP data clusters and functions.
Transparent tables
This type of database object is similar to the traditional database table. Transparent tables contain the
majority of the SAP application data from which you can derive Business Intelligence. Most SAP
applications use one or more transparent tables to store and retrieve business transactions. You can
link these tables to other transparent tables in order to pull information from other application areas of
the SAP system.
Pool and cluster tables
Pool and cluster tables are made up of a logical grouping of other database tables. They are primarily
used to store application configuration and control information rather than the actual application data.
Because these tables are only a logical view of several tables combined, they are accessible only
through the Open SQL driver. Native database access does not provide the same view of this data.
Views
A view appears as one table with a list of fields, but actually consists of several tables linked together.
Views provide a more abstract view of the data and allow you to build reports without having to worry
about linking multiple tables in a report. Views are maintained within SAP and need to be configured
before you use them for reporting. For more information about views, see your SAP documentation.
ABAP data clusters and functions
Reporting off ABAP data clusters and functions are advanced topics that usually require some
understanding of the ABAP programming language. For details, see Reporting off ABAP functions and
Reporting off ABAP data clusters.
Selecting tables, views, functions, and clusters
Once you have selected the Open SQL driver and provided valid SAP user credentials, use the Options
dialog box to choose the tables, views, functions, or clusters that you want to add to the report. You
can filter by the type of table and by the actual table name. Note that, in this situation, table also refers
to views, ABAP data clusters, and ABAP functions.
To select tables, views, functions, and clusters
1.
Start Crystal Reports.
2.
Click the Start Page tab if the Start Page is not already visible in Crystal Reports.
3.
Click Blank Report in the New Reports area.
The "Database Expert" dialog box appears.
2013-05-06602
Integrating Business Applications with Crystal Reports

4.
In the Create New Connection folder, expand SAP Table, Cluster, or Function.
The "SAP System Logon" dialog box appears.
5.
Log on to an SAP system, provide your user logon credentials, and specify extended logon parameters
as prompted. Then, click Finish.
You return to the "Database Expert" dialog box.
6.
Right-click the connection you created and select Options.
The "Options" dialog box appears, with only the Database tab displayed.
7.
In the Data Explorer area, select the check boxes for the types of data that you want to make available
to the report.
8.
Use the Table name LIKE field to select only a subset of the available data types. Use any of the
following techniques when filtering:
• Type full or partial names of tables.
• Add wildcards to select multiple queries or InfoSets: use a percentage sign (%) to denote any
number of characters; use an underscore (_) to denote a single character. (The % and _ wildcards
correspond respectively to the * and ? wildcards that are used within Windows. The % and _
wildcards also correspond respectively to the * and + wildcards that are used within SAP.)
• Clear the field and click OK to proceed without filtering. Note, however, that there is a limit to the
number of objects that can be displayed in the Data Explorer. If the number of queries or InfoSets
in SAP exceeds this limit (which is by default 8000), you may receive an Out of Memory error or
a blank Data Explorer.
9.
In the Tables and Fields area, select Show Description.
10.
Click OK.
The Database Expert displays the selected clusters, tables, or functions, along with the descriptions
that were defined by the SAP administrator. Three branches appear under the data connection that
you created:
• ABAP Function modules
• Data Clusters
• Data Dictionary
11.
In the Available Data Sources area, double-click the tables, clusters, or functions that you want to
add to the report.
Tip:
You can also CTRL-click multiple tables and then click >.
12.
Click OK.
If you selected multiple tables for the report, you must provide table-linking information. For more details,
see Linking tables and views. If you selected a single table, you can now add fields to the report.
2013-05-06603
Integrating Business Applications with Crystal Reports

Linking tables and views
Reports that are based on SAP tables (transparent, pool, and cluster tables, as well as views) behave
similarly to reports that are based on mainstream databases. If you include more than one table or view
in a report, you must describe the relationship between the tables by using the Links tab in the Database
Expert in Crystal Reports.
Due to the standardized field-naming conventions that are used by SAP, you may find that the Auto-Link
feature (on the Links tab of the Database Expert) generates unnecessary links between tables.
To clear Auto-Links
1.
On the Database menu, click Database Expert.
2.
On the Links tab, click Clear Links.
3.
Click OK.
Note:
The Links tab appears in the Database Expert only when two or more tables are selected for the report.
The following client field and language field features are specific to SAP tables.
Client field
Most tables in SAP contain a client field (native field name is MANDT). Because individual SAP systems
can be configured to hold data for multiple clients, the client field specifies which rows of data in a table
are for which clients. The Open SQL driver automatically handles this configuration. When you connect
to SAP, you are prompted to provide your client number: this information eliminates the need to create
a selection formula that filters the clients. As well, if a report contains multiple tables, you do not need
to include a link on the client field—this, too, is automatically handled by the Open SQL driver.
Language field
Some tables in SAP, specifically those that contain text descriptions, have multiple entries—one for
each language that is installed on the SAP system. Consequently, with these tables you must create
a selection formula on the Language Key (native field name is SPRAS) and specify the language that
you want to display. For example:
{table.spras} = "E"
For additional help on table-linking and on general report design topics, see the
Crystal Reports Online
Help
.
Reporting off ABAP functions
Reporting off ABAP Functions is an advanced topic that requires an understanding of the ABAP
programming language.
While technically not a table, an ABAP function is often used in SAP reporting to provide calculations,
and to retrieve data that is based on parameters that are passed into the function (for example, an
employee number passed to a function that returns the employee's address). For this reason, the Open
2013-05-06604
Integrating Business Applications with Crystal Reports

SQL driver provides the ability to call ABAP functions that have defined return types and to display their
results. ABAP functions are also useful in situations where complex pre-processing of the data must
occur before viewing, or in circumstances where you may want to further optimize the performance of
a query.
How it works
Using the steps listed in Selecting tables, views, functions, and clusters, select a function. In the Database
Expert's Available Data Sources area, right-click ABAP Function modules and select Options. Then,
type the full or partial function name in the Table name LIKE field. When you add it to the report, the
function appears on the Links tab of the Database Expert just like a table (assuming there is more than
one table or function already added to the report). All the input and output parameters are displayed
as fields in the table.
Specify the input parameters either by linking them to another table's fields or by adding them to a
record selection formula. If the output of the function is one or more tables, the "virtual table" consists
of rows that are the cross-product of the values in all the tables. If the output of the function is one or
more values or structure instances, the "virtual table" consists of a single row that contains all the
values/structure values.
Limitations
For functions to be used in a report, they must meet two conditions:
• Functions must have defined return types for each of the output parameters.
• Functions must not have whole tables as input parameters.
Note:
If a function does not meet the first condition, you can write a "wrapper" function with defined return
types, and then call the original function from within the wrapper function.
Finally, the ability to call entire programs is not supported—you may call individual functions only.
Examples
The following examples illustrate the different types of ABAP functions that can be called by the Open
SQL driver and show how they appear in Crystal Reports.
Functions with values as inputs and outputs
Function F
Importing
VALUE(NAME) TYPE C
VALUE(DEPARTMENT) TYPE C
Exporting
VALUE(Years_of_service) TYPE I
VALUE(Age) TYPE I
This function would appear as a table called "F" with the following schema:
2013-05-06605
Integrating Business Applications with Crystal Reports
TypeField
StringName
StringDepartment
IntegerYears_of_service
IntegerAge
The first two fields, Name and Department, are input parameters. You must either link to them from
another table (or function), or specify them with a record selection formula (for example, {F.Name} =
"Richard").
For example, if table "T" contains departments that are over budget, you can link {T.Department} to
{F.Department} and have a record selection formula that specifies {F.Name} = "Richard". This
formula will get the years of service and age of all people named Richard in departments over budget.
Functions with values as inputs and outputs and in/out (CHANGING) parameters
Function F
IMPORTING
VALUE(NAME) TYPE C
VALUE(DEPARTMENT) TYPE C
EXPORTING
VALUE(Years_of_service) TYPE I
VALUE(Age) TYPE I
CHANGING
DATEFIELD TYPE D
This function would appear as a table called "F" with the following schema:
TypeField
StringName
StringDepartment
IntegerYears_of_service
IntegerAge
2013-05-06606
Integrating Business Applications with Crystal Reports

TypeField
DateDateField_In
DateDateField_Out
When working with the Name, Department, and DateField_In fields, you must either link them to another
table, or specify them in a record selection formula.
For example, if table "T" contains departments that are over budget, you can link {T.Department} to
{F.Department} and have a record selection formula that specifies {F.Name} = "Richard" and
DateField = Date(1999,04,14). This formula will get the years of service, age, and start date of
all people named Richard in departments over budget on April 14, 1999.
Functions with structures as inputs and outputs
Function F
IMPORTING
VALUE(ADDRESS) LIKE S_ADDR STRUCTURE S_ADDR
EXPORTING
VALUE(CONTACTINFO) LIKE S_CINFO STRUCTURE S_CINFO
S_CINFO is defined as:
PHONE(20) TYPE C
EMAIL(100) TYPE C
S_ADDR is defined as:
STREET(100) TYPE C
ZIPCODE(6) TYPE N
This function would appear as a table called "F" with the following schema:
TypeField
StringAddress.street
IntegerAddress.zipcode
StringContactInfo.Phone
StringContactInfo.email
As before, you must either link the street and zip code fields to or from another table, or define them in
a record selection formula.
2013-05-06607
Integrating Business Applications with Crystal Reports

Functions with a table as their output
Function F
IMPORTING
VALUE(NAME) TYPE C
EXPORTING
VALUE(GENDER) TYPE C
TABLES
POSITIONS STRUCTURE S_POSN
S_POSN is defined as:
TITLE(20) TYPE C
STARTDATE TYPE D
In this case, the function takes a name as an argument and returns the age and position of that person.
Suppose that Tom's gender is male, and that the Positions table returned by F for Tom contains:
StartDateTitle
1/1/93Mail Clerk
3/4/95Manager, Mail
7/12/98VP, Mail
When the function is called, the result will be a table called "F" that contains:
Positions.StartDatePositions.TitleGenderName
1/1/93Mail ClerkMTom
3/4/95Manager, MailMTom
7/12/98VP, MailMTom
Functions with multiple tables as their output
Function F
IMPORTING
VALUE(NAME) TYPE C
EXPORTING
VALUE(GENDER) TYPE C
TABLES
POSITIONS STRUCTURE S_POSN
OPTIONS STRUCTURE S_OPTN
S_POSN is defined as before and S_OPTN is defined as:
2013-05-06608
Integrating Business Applications with Crystal Reports

GRANTDATE TYPE D
NUMBER TYPE I
Suppose that the data from Positions is as before, and the Options table looks like:
NumberGrantDate
10004/4/93
153005/6/97
When the function is called, the result will be a table called "F" that contains:
Options.
Number
Options.
GrantDate
Positions.
StartDate
Positions.Ti
tle
GenderName
10004/4/931/1/93Mail ClerkMTom
10004/4/933/4/95Manager, MailMTom
10004/4/937/12/98VP, MailMTom
153005/6/971/1/93Mail ClerkMTom
153005/6/973/4/95Manager, MailMTom
153005/6/977/12/98VP, MailMTom
Reporting off ABAP data clusters
Reporting off ABAP data clusters is an advanced topic that requires an understanding of the ABAP
programming language.
What is a data cluster?
Unlike most of the SAP system, the Human Resources module stores much of its data in ABAP data
clusters, rather than in data dictionary tables such as transparent, pool, or cluster tables. Data clusters
are actually stored in some transparent tables. Any such transparent table can contain many different
2013-05-06609
Integrating Business Applications with Crystal Reports

types of clusters. Each cluster of data is stored in encoded binary fields. A cluster can contain any
number of individual components or pieces of data, which may range from single values to structures
to tables.
You can access a data cluster in an ABAP program by running the ABAP command IMPORT. This
command takes parameters—such as cluster database name, cluster ID, and so on—as well as a list
of pieces of data to import. The IMPORT command also copies the contents of the data cluster into
local variables within the calling code. A typical transparent table that contains cluster data has a
structure similar to the following:
data clusterdata lengthuser dataline counterkeyareaclient
The combination of transparent table name and area identifies which type of cluster to import, while
the key identifies the specific cluster. For HR, the cluster key is typically some combination of personnel
number and something else. The key is stored in a single text field, but may actually represent more
than one logical key field (for example, personnel number + a sequence number for HR Payroll data).
How it works
The difficulty in working with clusters from a generic, relational data access point of view is that the
definition of the clusters is not stored in a repository such as the ABAP dictionary (unlike the definitions
of transparent, pool, and cluster tables, for instance). Furthermore, the format of these clusters may
change from site to site due to customizations. Finally it is fundamentally difficult to map these as tables
in the relational sense because, although the data represented is relational, it is stored in independent
clusters in an almost hierarchical form.
In order to overcome these issues, the individual components of data clusters must be mapped as
tables. You can do this by creating a dictionary of the clusters on a particular SAP system.
Mapping ABAP data clusters
The Cluster Definition tool (transaction ZCDD) enables you to create a dictionary of the data clusters
on your SAP system. Once you have added a data cluster to the dictionary, you can select the cluster
in Crystal Reports and report off its data with the Open SQL driver. You will usually require prior
experience with ABAP programming because you need to find the cluster definitions within R/3 before
you enter them with the Cluster Definition tool.
The following procedures show how to map the SALDO table (Time balances per period) to your
dictionary of data clusters with the Cluster Definition tool. The SALDO table is located in the B2 (PDC
Data (Month)) cluster area of the ABAP data cluster that is stored in the PCL2 (HR cluster 2) transparent
table. In this case, PCL2 is the cluster database, B2 is the cluster area or type, and SALDO is the table.
The procedures listed below correspond to SAP R/3 4.6b:
Creating a new cluster entry in the dictionary
This section guides you through the process of defining a new cluster entry in the dictionary.
2013-05-06610
Integrating Business Applications with Crystal Reports

To create a new cluster entry in the dictionary
1.
From the SAPGUI, execute transaction ZCDD.
The Cluster Definition tool displays its "View Cluster Id Table" screen.
2.
Click Add to create a new entry.
The "Edit Cluster ID Record" screen appears.
3.
In the Cluster Database field, type the name of the table in which the ABAP data cluster is stored.
For this example, type PCL2.
Note:
To find out which transparent table contains a required ABAP data cluster, ask a subject matter
expert about the module on which you are working. Or, if you are trying to locate the data from a
particular program (such as an SAP report like RPC11XE0), look for the table in the ABAP code.
When you find the table, look at the data in the RELID field for a list of cluster areas.
4.
In the Cluster Area field, type the name of the cluster area or RELID.
For this example, type B2.
5.
Click Save and exit the Cluster Definition tool.
You now need to find the key to the cluster area. Specifically, you need the name of the dictionary
structure or table in which the key fields are stored, and you need the names of those key fields. To
locate the cluster area's key fields, go to the next section, Locating the cluster area's key fields.
Locating the cluster area's key fields
This section guides you through the process of locating the cluster area's key fields based on the new
cluster entry you created in the last section, Creating a new cluster entry in the dictionary.
There are several ways to find this information within SAP. This example uses the Object Navigator to
locate the key information for the B2 cluster area.
To locate the cluster area's key fields
1.
Execute transaction SE80 to access the Object Navigator.
2.
Select Program from the list and type the name of the program that holds the key information related
to the cluster area.
For this example, type RPCLSTB2, which is the program that holds the key information for the B2
cluster area.
3.
Press Enter.
The Object Navigator displays the information for the specified program.
4.
In the Object name list, expand the Fields folder.
5.
Double-click the entry that corresponds to your cluster area's key.
2013-05-06611
Integrating Business Applications with Crystal Reports

For this example, double-click the B2-KEY entry.
The relevant ABAP code is displayed.
6.
In the ABAP code, look for the heading that denotes the beginning of the cluster area's key, and
note the structure that is included in the following line.
For this example, look under the heading DATA: BEGIN OF B2-KEY for the line INCLUDE
STRUCTURE PC2B0 (highlighted in the image above). This shows that the PC2B0 structure contains
the fields of the key.
Now that you've located the name of the structure that holds the key fields, you need to determine
the names of those key fields.
7.
Create a new session in R/3 and execute transaction SE11 to access the ABAP/4 Dictionary.
The "ABAP Dictionary: Initial" Screen appears.
8.
Select Database table and type the name of the structure that contains the key fields.
For this example, type PC2B0.
9.
Click Display.
The "Dictionary: Display Structure" screen appears.
10.
Make a note of the names of the key fields displayed in the Component column.
In this case, the four key fields are PERNR, PABRJ, PABRP, CLTYP.
You now need to add the key fields to your new dictionary entry in the Cluster Definition tool. To add
these key fields to the dictionary entry, go to next section, Adding the key fields to the dictionary entry.
Adding the key fields to the dictionary entry
This section guides you through the process of adding the key fields to the dictionary entry based on
the key fields that you noted in the last section, Locating the cluster area's key fields.
Following are the steps involved in adding the four key fields to the dictionary entry that you created
for the B2 cluster area.
To add the key fields to the dictionary entry
1.
In the SAP Easy Access screen, execute transaction ZCDD to access the Cluster Definition tool.
2.
In the "View Cluster Id Table" screen, select the new entry that you created.
For this example, select the PCL2 B2 entry.
3.
Click Edit.
The" View Cluster Record" screen appears.
4.
Click New Cluster Key.
The "Edit Cluster Key Record" screen appears.
2013-05-06612
Integrating Business Applications with Crystal Reports

5.
In the Key Number field, type the sequence number of the key field that you want to specify.
For this example, type 001 (this is the first entry for this cluster area's key).
6.
In the Key Name field, type the name that you want to appear when you use this key field in Crystal
Reports.
For this example, type K_PERNR.
Tip:
In general, follow a naming convention. For instance, start a key field name with K_ to specify it as
a key field, as has been done here.
7.
Use the Reference Table field to define the key field's data type by referencing an existing field of
the same type in another table.
For this example, type PC2B0, because it is the name of the structure that holds the Reference
Field.
8.
In the Reference Field field, type the name of the field to which you want to refer. This field must
exist in the Reference Table.
For this example, type PERNR.
Note:
If the key field is not already defined in the data dictionary, and if you do not define it by referencing
an existing field, you can manually specify the ABAP type and Length in order to define the key
field's data type. In this example, the key field is defined by reference, so you can ignore the ABAP
type and Length fields.
9.
Click Save; then click Back to return to the View Cluster Record screen.
10.
Repeat steps 4 to 9 for each field in the key. In the Key Number field, be sure to increment the
sequence number by one every time you define a new key field for this cluster area.
The values for each field in this example are:
Reference FieldReference TableKey NameKey Number
PABRJPC2B0PABRJ002
PABRPPC2B0PABRP003
CLTYPPC2B0CLTYP004
Once you have entered all of the definitions, the "View Cluster Record" screen looks like this.
2013-05-06613
Integrating Business Applications with Crystal Reports

Now you need to determine the structure of the table that you want to access. In this example, the table
in question is SALDO. There are several ways to determine the SALDO table's structure within SAP.
The next section Determining the structure of the cluster table explains one way.
Determining the structure of the cluster table
This section guides you through the process of determining the structure of the cluster table based on
the cluster entry you created in the previous section. This example below again uses the Object Navigator
to locate the required information about the SALDO table.
To determine the structure of the cluster table
1.
In the SAP Easy Access screen, execute transaction SE80 to access the Object Navigator.
2.
Select Program from the list and type the name of the program that holds the key information related
to the cluster area.
For this example, type RPCLSTB2, which is the program that holds the key information for the B2
cluster area and its SALDO table.
3.
In the Object name list, expand the Fields folder.
4.
Double-click the entry that corresponds to the table that you want to access.
For this example, double-click the SALDO entry.
The relevant ABAP code is displayed.
5.
In the ABAP code, look for the heading that denotes the beginning of the table, and note the structure
that is included in the following line.
For this example, look under the heading DATA: BEGIN OF SALDO OCCURS 50 for the line
INCLUDE STRUCTURE PC2B5 (highlighted in the image above). This shows that the PC2B5
structure defines the fields of the SALDO table.
Now that you've determined which structure defines the fields of the table you want to report off, you
must add this information to your new dictionary entry by following the steps in section, Adding the table
to the dictionary entry.
Adding the table to the dictionary entry
This section guides you through the process of adding the table to the dictionary entry based on the
cluster table's structure you created in the last section, Determining the structure of the cluster table.
To add the table to the dictionary entry
1.
In the SAP Easy Access screen, execute transaction ZCDD to access the Cluster Definition tool.
2.
In the "View Cluster Id Table" screen, select your new entry.
For this example, select the PCL2 B2 entry.
3.
Click Edit.
2013-05-06614
Integrating Business Applications with Crystal Reports

4.
In the "View Cluster Record" screen, click New Cluster Data.
The "Edit Cluster Data Record" screen appears.
5.
In the Piece Name field, type the name of the table as it appears in the cluster area.
For this example, type SALDO.
6.
In the Display Name field, type the name of the table as you want it to appear in Crystal Reports .
For this example, type B2SALDO.
Tip:
In general, use a naming convention. For instance, combine the table name with the name of the
cluster area, as has been done here (in case there is another SALDO table in a different cluster
area).
7.
In the Piece Class field, type the abbreviation appropriate to the data piece: (T)able, (S)tructure, or
(B)asic type.
For this example, type T.
8.
Use the Reference Table field to define the structure of the new data piece by referencing an existing
structure of the same type in another table.
For this example, type PC2B5.
Note:
In this example, you need not complete the remaining fields (Reference Field, ABAP Type, and
Length). Use these fields to add specific information if the structure of the table is not defined in the
data dictionary.
9.
Click Save; then click Back to return to the "View Cluster Record" screen.
Now that you have entered all of the definitions, you have finished creating your new dictionary entry
in the Cluster Definition tool. The "View Cluster Record " screen appears.
When you create a new report with the Open SQL driver, you can report off your customized ABAP
data cluster by searching for the table named B2SALDO.
Although it takes some time to define each data cluster, keep in mind that once the definition is complete
all users can access the cluster—regardless of whether or not they have ABAP experience.
Defining Security for the Open SQL driver
This section shows how to use the Security Definition Editor to define table-level and row-level security
for specific SAP tables when you access them using the Open SQL driver. The Security Definition Editor
enables you to maintain your current SAP security levels when you deploy the Open SQL driver.
Security Definition Editor overview
When you deploy the Data Access component and distribute the database drivers, you allow SAP users
to access the data stored within your SAP R/3, mySAP ERP, and BW systems. By default, the Open
2013-05-06615
Integrating Business Applications with Crystal Reports

SQL driver provides an open reporting environment where there are no data access restrictions. (You
can, however, easily reverse this default behavior with the Security Definition Editor's Global Lock
feature, which initially restricts users from accessing all SAP tables.
If you need to deploy a security model that regulates users' access to SAP data, use the Security
Definition Editor (transaction /CRYSTAL/RLS) to restrict data access at the table level and at the row
level. The Security Definition Editor defines security for transparent tables, pool tables, cluster tables,
and tables containing data clusters (for instance, PCL2). The restrictions that you specify are enforced
whenever a user attempts to connect to SAP with the Open SQL driver, whether to design, refresh, or
schedule a Crystal report. Thus, in order to design, refresh, or schedule a Crystal report against R/3,
mySAP ERP or BW, users require access to all of the tables referred to by the report.
Data access restrictions that you define using the Security Definition Editor are applied on a per-client
basis. That is, the restrictions you apply affect all users who access SAP using the same client used
to define the restrictions.
In previous versions of BusinessObjects Enterprise, data access restrictions were client-independent.
To preserve restrictions that you defined using earlier versions of this tool, follow the instructions in
Migrating your existing security model before continuing.
Note:
The Security Definition Editor is provided by the Security Definition Editor transport, which you import
into your SAP system when you set up the Data Access.
Migrating your existing security model
To continue to use the data access restrictions that you defined using a previous version of SAP
BusinessObjects XI Integration (using the ZRLS transaction), you can import these restrictions into
client-dependent form using /CRYSTAL/RLS. Import these data restrictions before using /CRYSTAL/RLS
to create or modify additional restrictions. Any changes you made using /CRYSTAL/RLS will be
overwritten when you import the global restrictions.
To apply your global data access restrictions to additional clients, import these restrictions once for
each client.
To migrate data access restrictions
1.
Enter the transaction /CRYSTAL/RLS in your SAP system.
2.
Under the Extras menu, select Import Global Data.
A dialog appears, warning you that importing these restrictions will overwrite any restrictions you
have defined using /CRYSTAL/RLS.
3.
Click Yes.
Your global, client-independent data access restrictions are imported.
2013-05-06616
Integrating Business Applications with Crystal Reports

Choosing your table-level security model
For enhanced flexibility, the Security Definition Editor provides a Global Lock feature, which allows you
to define the basis of your data access security model in one of two ways:
• Global Lock disabled
This open security model initially provides all users with access to all tables. To customize the model
to match your current SAP security configuration, you can prevent users from accessing particular
tables on a table-by-table basis. When you first deploy the Data Access , the Global Lock is disabled
by default.
• Global Lock enabled
This closed security model initially denies all users access to all tables. To customize the model to
match your current SAP security conventions, you can authorize users to access particular tables
on a table-by-table basis. Additionally, you can specify a list of custom functions that users can still
report off when the Global Lock is enabled.
Once you have enabled or disabled the Global Lock, you can refine the security model by customizing
data access authorizations for particular tables.
To enable/disable the Global Lock
1.
From the SAPGUI, execute transaction /CRYSTAL/RLS.
The "Security Definition Editor" appears.
2013-05-06617
Integrating Business Applications with Crystal Reports

2.
You now have two options:
• If you want to enable the Global Lock, select the Allow access only to the tables specified
above option.
• If you want to disable the Global Lock, ensure that the Allow access only to the tables specified
above option is not selected.
Now that you've chosen an open or closed basis for your security model, you can customize
authorizations for particular users and tables, thereby allowing or disallowing data access in order to
match your SAP security conventions.
2013-05-06618
Integrating Business Applications with Crystal Reports

Customizing authorizations for specific tables
Whether you have enabled or disabled the Global Lock feature, you may need to customize the data
access authorizations for one or more SAP tables. If the Global Lock is enabled, you will need to allow
all or some users to access particular tables. (Otherwise, users will be unable to design or refresh
reports against the SAP system.) Alternatively, if the Global Lock is disabled, you may need to prevent
all or some users from accessing tables that contain sensitive data.
In either case, whether you want to secure a table or to permit access to a table, you must use an
authorization object for that purpose. (You can customize a new authorization object, or reuse an existing
one.) Then, using the Security Definition Editor, you associate the authorization object with the table
in question. Finally, you incorporate the new authorization object into your current configuration of user
profiles or roles.
Essentially, by associating an authorization object with an SAP table, you define that table as an
exception to the Global Lock settings that you have made within the Security Definition Editor. In other
words, once you've associated an authorization object with a table, that table is withheld from all
users—regardless of your Global Lock settings. You must then use the authorization object according
to your usual SAP security conventions in order to provide particular users with access to the SAP
table.
To customize authorizations for a specific table
1.
Create a new authorization object.
For this example, create an authorization object called ZTABCHK that consists of one authorization
field called TABLE. The ZTABCHK authorization is being used to secure the VBAK table from all
but a particular subset of users.
Note:
Use transaction SU21 to create the authorization object, or see the SAP Help for more information
on creating authorization objects.
2.
From SAP, execute transaction /CRYSTAL/RLS.
The "Security Definition Editor" screen appears.
2013-05-06619
Integrating Business Applications with Crystal Reports

You will now associate your new authorization object with an SAP table.
3.
In the Table name field, type the name of the table whose security definition you will customize.
For this example, type VBAK.
4.
Click Create.
The "Authorization entries" screen appears
2013-05-06620
Integrating Business Applications with Crystal Reports

5.
Click Create.
The "Authorization Object entry" dialog box appears.
6.
Click Reference to an authorization object.
The "Authorization Object entry" screen appears.
2013-05-06621
Integrating Business Applications with Crystal Reports

7.
In the Authorization object name field, type the name of the authorization object that you created
in step 1.
For this example, type ZTABCHK.
8.
Click Create.
The "Authorization field values" screen appears.
2013-05-06622
Integrating Business Applications with Crystal Reports

9.
In the Field value list, type the name of the table whose security definition you want to customize.
For this example, type VBAK.
10.
Click Save.
You have now associated your customized authorization object with a specific SAP table.
11.
Exit the Security Definition Editor.
12.
Following your usual procedure, incorporate the new authorization object into your configuration of
user profiles or roles.
For instance, following this example, you would apply the ZTABCHK authorization object to the
subset of users who need to access the VBAK table.
Depending on the version of R/3 or mySAP ERP that you are using, and the SAP authorization
model that you have already deployed, you can accomplish this in various ways:
• Attach the new authorization object to a new role that you in turn add to each user's security
profile.
• Attach the new authorization object to a new profile that you in turn add to each user's security
profile.
The end result is that the authorization is added to the master user data, so the database drivers
can adhere to your customized data access restrictions.
2013-05-06623
Integrating Business Applications with Crystal Reports

Note:
Regardless of the method you use, ensure that your new authorization holds the name of the correct
database table in its TABLE field value. In this example, the VBAK table must be specified.
Customizing authorizations for specific functions
When the Global Lock feature is disabled, report designers essentially have the freedom to call any
function on the SAP system. To restrict the functions available to report off, enable the Global Lock.
This restricts users from calling any functions on the SAP system. In the /CRYSTAL/AUTHFCN table,
you can specify a list of functions that are exceptions to the Global Lock. That is, you can specify a list
of functions that users are able to call. To access the list of functions, use the /CRYSTAL/RLS tool and
go to Extras > Function modules.
Defining table authorizations by group
The Security Definition Editor provides two ways for you to quickly define table authorizations for tables
that require similar levels of security:
• You can reference a table to any other table whose data access authorizations you have already
defined.
The Reference to an already defined table or group option is provided in the "Select authorization
entry type" screen, which appears in the Security Definition Editor when you create an authorization
entry for a table.
• You can reference multiple tables to a group table that acts as a security template.
To create a group table, execute transaction /CRYSTAL/RLS and specify a nonexistent table name
in the Editor. (When the specified table does not exist, the Editor assumes instead that you are
creating a group or template.) The main screen listing all the definitions will show the table type as
group. You can now share security levels by referencing existing tables to this security template.
Applying row-level security
Sometimes table-level security does not allow you to secure data in a way that corresponds with the
security privileges of your SAP users: you may need to grant all users access to a particular table, while
at the same time limiting a subset of those users to a certain portion of the table's data. To accomplish
this, use the Security Definition Editor to define an additional level of security for the individual rows of
data.
In general, row-level security is based on a particular field within a table. For instance, you might need
to prevent users from seeing data for all customers within a Sales table. To enable this type of restriction,
you create an authorization object and use the Security Definition Editor to associate the object with
the Customer field in the Sales table. Then, when you apply the new authorization object to each user's
profile or role, you specify the Customer values for those customers whose Sales records the user is
permitted to view. When the user designs or refreshes reports against the Sales table, data is returned
only for those customers that you have specified.
2013-05-06624
Integrating Business Applications with Crystal Reports

Essentially, by associating an authorization object with a field within an SAP table, you define that table
as an exception to the Global Lock settings that you have made within the Security Definition Editor.
In other words, once you've associated an authorization object with a field, the parent table is secured
from all users—regardless of your Global Lock settings. You must then use the authorization object
according to your usual SAP security conventions in order to provide particular users with access to
rows of data within the SAP table.
You can secure rows in a table by using authorization objects, custom functions, or both.
Securing rows using authorization objects
In order to define row-level security for tables, you can create an authorization object and use the
Security Definition Editor to associate the object with one of the table's fields. You then apply the new
authorization object to the roles or profiles of SAP users who need to access any of the table's data.
When you apply the authorization object, you specify the rows of data that each user is permitted to
access.
To define row-level security using an authorization object
1.
Create a new authorization object.
For this example, create an authorization object called Z_BUKRS that consists of one authorization
field called BUKRS. This authorization is being used to secure the GLT0 table based on the values
in the BUKRS (Company Codes) field.
Note:
Use transaction SU21 to create the authorization object, or see the SAPGUI Help for more information
on creating authorization objects.
2.
Execute transaction /CRYSTAL/RLS to access the Security Definition Editor.
3.
In the Table name field, type the name of the table that contains the rows you want to secure.
For this example, type GLT0.
Note:
You can now use wildcards to specify the table name. This is an efficient way to apply an authorization
to multiple tables with similar names simultaneously. Use * to specify zero or more characters and
+ to specify one character.
4.
Click Create.
5.
In the "Authorization entries" screen, click Create.
6.
In the "Select authorization entry type" screen, click Reference to an authorization object.
7.
Click OK to access the "Authorization Object entry" screen.
8.
In the Authorization object name field, type the name of the authorization that you created in step
1.
For this example, you would type Z_BUKRS.
9.
Click Create.
2013-05-06625
Integrating Business Applications with Crystal Reports

The "Authorization field values" screen appears.
10.
In the Field value list, type the equals sign (=) and the name of the field that you want to secure.
For this example, you would type =BUKRS.
Tip:
To view a list of available fields, right-click the Field value list and, on the shortcut menu, click Possible
entries. Double-click the desired field (in this case, BUKRS) to insert it along with the required equals
sign (=).
11.
Click Save.
12.
Exit the Security Definition Editor.
13.
Following your usual procedure, apply the new authorization object to the profiles or roles of the
appropriate users.
For instance, following this example, you would apply the Z_BUKRS authorization object to each
user who needs to access rows of data within the GLT0 table. When you apply the authorization
object, you enter the appropriate Company Code values into the BUKRS authorization field, thereby
specifying the Company Codes that the specified user is authorized to access.
Depending on the version of R/3 or mySAP ERP that you are using, and the SAP authorization
model that you have already deployed, you can accomplish this in various ways:
• Attach the new authorization to a new role that you in turn add to each user's security profile.
• Attach the new authorization to a new profile that you in turn add to each user's security profile.
The end result is that the authorization is added to the master user data, so the database drivers
can adhere to your customized data access restrictions.
Securing rows using custom security exits
In addition to, or instead of using authorization-based restrictions for tables, you can secure rows using
custom security exits. That is, you can map table fields to function parameters so that you can define
the call to one function to handle the post filtering for any table.
Note:
• You must give a value (either constant or field-mapped) for all non-optional parameters.
• Make mappings between compatible types. For example, do not link a function parameter for a date
to a number field. Mapping incompatible types results in a failure at runtime.
The following example shows how to map table fields to function parameters in a custom security exit.
To define row-level security using a custom security exit
1.
Execute transaction /CRYSTAL/RLS.
2.
In the Table name field, type the name of the data table whose rows you want to secure.
For this example, type PA0000 to secure the rows in that table.
2013-05-06626
Integrating Business Applications with Crystal Reports

Note:
You can now use wildcards to specify the table name. This is an efficient way to apply an authorization
to multiple tables with similar names simultaneously. Use * to specify zero or more characters and
+ to specify one character.
3.
Click Create.
The "Authorization entries" screen appears.
This screen lists the authorization entries (if any) that are currently applied to the table.
4.
Click Custom exit.
The "Edit custom function security exit mappings" window appears.
5.
In the Function name field, type the name of the function that you want to use to secure the table,
and then click Transfer.
For this example, type HR_CHECK_AUTHORITY_INFTY.
6.
For each necessary parameter, specify a value or field to map to that parameter.
In this example make the entries listed in the table below:
Field nameImported parameter name
'0000'
INFTY
=PERNR
PERNR
=SUBTY
SUBTY
7.
Click Save.
You are returned to the "Authorization entries" screen, which now indicates that there is an active
custom security exit for this table.
When a user attempts to access a table secured by a custom security exit, the driver checks the
appropriate field(s) in the table. The field values you mapped are passed as parameters to the
function you selected, in this example HR_CHECK_AUTHORITY_INFTY. When authorization
restrictions are combined with the values you mapped, the authorization restrictions filters the results
first, and then the mapped values further filter the results.
2013-05-06627
Integrating Business Applications with Crystal Reports

24.1.3.3 Reporting with SAP BW
24.1.3.3.1 Designing and Translating Reports
This section introduces you to the Report Wizards in Crystal Reports and provides reporting details
that are relevant within SAP environments. The section also shows how to prepare reports for translation
and how to conditionally modify the report's design based on the user's logon language.
Designing reports for translation
If your BW system supports users in multiple languages, you may want to prepare your reports for
translation within BW. Once you publish the translated reports to SAP BusinessObjects Business
Intelligence platform, SAP users can view the reports that correspond to their preferred viewing locale.
This section describes how to prepare your report for translation, and how to use a report's
LanguageCode% formula to make language-specific modifications to reports.
Preparing reports for translation
When you save a report to BW, you are given the option to prepare the report for translation. When
you select this option, Crystal Reports extracts the string contents from all the text objects that you have
inserted into the report (and replaces the original strings with placeholders in the .rpt file). Use the
standard translation transactions within BW to access the language table that contains the original
strings and translate them into all the languages that you require. Once you finish this process, the
translated strings will be inserted back into the report when you publish to SAP BusinessObjects Business
Intelligence platform.
When you publish a translated report from BW to SAP BusinessObjects Business Intelligence platform,
the BW Report Publisher receives a single .rpt file, the original report strings, a list of destination
languages, and all the translated report strings from BW. For each language, the BW Report Publisher
copies the original .rpt file and replaces the placeholders with the corresponding report strings. The BW
Report Publisher also marks each report with a language code (for details, see Conditional formatting
with the LanguageCode% formula). The BW Report Publisher then generates multiple .rpt files (one
for each language), and publishes each of these objects to SAP BusinessObjects Business Intelligence
platform.
Note:
When users refresh or schedule translated reports, new data is retrieved from BW, but the report strings
are not refreshed. To update the translations of your report strings, publish the reports again from BW
to SAP BusinessObjects Business Intelligence platform.
To prepare all reports for translation
1.
Start Crystal Reports and open a report that you want to prepare for translation.
2.
On the SAP menu, click Settings.
2013-05-06628
Integrating Business Applications with Crystal Reports

The Settings dialog box appears.
3.
Ensure that Prepare reports for translation on server is selected.
This option changes your default settings, so reports are always prepared for translation on the
server.
If you prefer to select this option for individual reports, clear the Suppress save dialog option. You
are then prompted with a Prepare this report for translation option every time you save a report
to BW.
4.
Click OK.
5.
On the SAP menu, click Save Report and proceed as usual.
Conditional formatting with the LanguageCode% formula
When you first create a report that is based on a BW query, Crystal Reports automatically generates
a formula named LanguageCode%. You can find this formula in the Field Explorer. Rather than
performing a calculation, this formula consists of a string value—a single letter—that serves to associate
the report with a particular logon language.
When you first create and design your report, the formula contains the code for your current language
("E" for English, "D" for German, and so on). This is the report's master language. When you prepare
reports for translation and subsequently publish them to SAP BusinessObjects Business Intelligence
platform, the BW Report Publisher modifies the LanguageCode% formula in each translated report.
When an SAP user views a Crystal report or logs on to BI launch pad, the application filters the available
reports: if a translated report is available in the user's logon language, it is displayed for the user; if a
translated report is unavailable, the report appears in its master language.
The LanguageCode% formula is intended to provide you, the report designer, with a tool for conditionally
formatting reports in ways that accommodate users with different logon languages. For example,
suppose that your report displays values from a Product Category field, the string values of which are
translated within SAP. As a report designer, the difficulty lies in that the German strings are longer than
the equivalent English strings.
To solve this problem, you could use the LanguageCode% to conditionally reduce the font size for the
translated version of the report (as demonstrated in the following steps). Alternatively, you could insert
two Details sections—each containing the same database fields—and increase the width of the fields
in the second section to accommodate for the longer German strings. Your conditional formatting formula
would then show/hide the Details sections according to the report's language.
Note:
For complete instructions on conditionally formatting fields and using the Format Editor, see the
Crystal
Reports Online Help
.
To reduce a field's font size conditionally
1.
Open the report in Crystal Reports, and click the Design tab.
2.
In the Details section of the report, right-click the field that contains the font that you want to
conditionally format.
2013-05-06629
Integrating Business Applications with Crystal Reports

3.
On the shortcut menu, click Format Field.
The "Format Editor" dialog box appears.
4.
Click the Font tab.
5.
Click the Formula button that corresponds to the Size field.
The Formula Workshop opens a new formula and names it Font Size.
6.
In the text area, type this formula (which uses Crystal Syntax):
if {@LanguageCode%} = "D"
then 10
else 12
This formula ensures that the font size of the field that is currently selected is reduced from 12 pts
to 10 pts when the user's logon language is German (or when the user schedules a German instance
of the report).
7.
Click Save and close.
24.1.3.3.2 Publishing Reports
This section describes how to publish Crystal reports to SAP BusinessObjects Business Intelligence
platform. It also describes how to view those reports from SAP BusinessObjects Enterprise BI launch
pad and through other applications.
Publishing predefined reports to SAP BusinessObjects Business Intelligence platform
There are several ways to publish valid Crystal report files to SAP BusinessObjects Business Intelligence
platform:
• When you open a report in Crystal Reports, you can simultaneously save it to BW and publish it to
SAP BusinessObjects Business Intelligence platform.
• If you have already added a number of reports to BW, you can publish them in batches to SAP
BusinessObjects Business Intelligence platform. For details, see Batch publishing reports from BW.
• You can add Crystal reports to the system through the Publishing Wizard, the Central Management
Console, or the Import Wizard. For details, see the
SAP BusinessObjects Business Intelligence
Platform Administrator Guide
(admin.pdf in the docs directory of your SAP BusinessObjects
Business Intelligence platform product distribution).
Batch publishing reports from BW
You can publish large numbers of Crystal reports using the Content Administration Workbench. For
more information on the Content Administration Workbench, see the “Configuring publishing in the
Content Administration Workbench” section of the
SAP BusinessObjects Business Intelligence Platform
Administrator Guide.
2013-05-06630
Integrating Business Applications with Crystal Reports

Migrating development content to a production BW system
If you have deployed SAP BusinessObjects Enterprise Integration for SAP Solutions in your development
BW environment, you can import your reporting content to the SAP BusinessObjects Business Intelligence
platform system that is configured for use with your production BW environment.
Before importing your content, consider the following:
• BW treats Crystal reports (.rpt files) as native objects. If the Crystal reports are stored in the repository
of your development BW system, you can transport the BW content and then batch publish the
reports to SAP BusinessObjects Business Intelligence platform. (For details about transporting
content between BW systems, see the SAP Library.) This procedure ensures that the database
information for each report is updated by the BW Report Publisher.
• If you have deleted some or all of the Crystal reports from the repository of your development BW
system, you can use the Upgrade Manager to import the report objects from one SAP BusinessObjects
Enterprise installation to another. When using the Upgrade Manager, be sure to set the correct
database information on each of the report files that you import.
• If the number of report files that you want to migrate is small, you may find it easier to change each
report's database information in the Central Management Console (CMC). (Go to the Objects
management area, locate the report, and click the Database link on its Process tab.)
After you migrate your content, use the Content Administration Workbench to perform maintenance on
your reports. Report maintenance tasks include synchronizing information about reports between SAP
BusinessObjects Business Intelligence platform and BW (Update status), deleting unwanted reports
(Delete reports), and updating reports migrated from previous versions of SAP BusinessObjects
Enterprise (Post-migration).
For more information about maintaining you reports, refer to the
SAP BusinessObjects Business
Intelligence Platform Administrator Guide
.
24.2 Integrating with Oracle E-Business Suite
24.2.1 Overview
If you installed the Data Connectivity feature of the SAP BusinessObjects XI Integration for Oracle
E-Business Suite, you can work with Oracle EBS data in SAP Crystal Reports.
2013-05-06631
Integrating Business Applications with Crystal Reports

24.2.2 To access data in SAP Crystal Reports
1.
Start Crystal Reports.
2.
On the Start Page, click Blank Report.
3.
In the Database Expert, expand Create New Connection.
4.
Provide the information in the following table.
ActionField
Type the name of the server that hosts your Oracle EBS system.Host
Type the port number that the server uses for the SML listenerPort
Type the name of the environment that you want to access in the system.
Environ
ment
Type your user name.User
Type your password.Password
Type the name of the role that you want to access in the system.Role
5.
Click Finish.
You can now create Crystal reports with data from your Oracle EBS system.
Once you have connected to a data source, you can save the connection in your Favorites folder. In
the Database Expert, right-click the connection, and click Add to Favorites.
For details on using SAP Crystal Reports please see the
SAP Crystal Reports 2013 User Guide
.
To enable Unicode support, you must configure your system as described in the
SAP Crystal Reports
2013 User Guide
and the
SAP BusinessObjects Business Intelligence Platform 4.0 Installation Guide
.
24.3 Integrating with Siebel
24.3.1 Connecting to Siebel
2013-05-06632
Integrating Business Applications with Crystal Reports

Generating reports using the Integration product provides easy access to the data within Siebel. Users
who are currently involved with the production of reports using Siebel or other tools will find it easy to
build reports quickly with the driver included in the Integration product.
This section discusses how to connect to Siebel with the driver, and also describes advanced features
such as controlling visibility, using Siebel formatting features, and connecting to an active Siebel
Mobile/Dedicated Web Client.
24.3.1.1 Creating a connection in SAP Crystal Reports
Once you've installed the Integration product on a machine running the SAP Crystal Reports designer,
you must create a connection to Siebel for your report. There are two ways to create a connection in
SAP Crystal Reports: use one of the Report Wizards, or select Log On Server from the File or Database
menu. Both methods are described below.
24.3.1.1.1 Using the Report Wizards
1.
Launch SAP Crystal Reports.
2.
On the Start Page, click Report Wizard.
The Standard Report Creation Wizard dialog box appears.
Tip:
To create a specific type of report, select the appropriate Wizard.
3.
In the Available Data Sources list, expand Create New Connection and double-click Siebel
eBusiness Applications.
The Connection Information dialog box appears.
4.
In the Connection Type area, select Server, Local, or Local (Active Dedicated Session).
Note:
This example illustrates how to create a Server connection type. To decide which connection type
to select, and for details on how to create the other types of connections, see Configuring the
connection.
5.
In the Connection Name field, type a name for the connection.
6.
Click Next.
The Connection Details dialog box opens.
7.
Type your Siebel user name and password in the appropriate fields.
8.
In the Connection String field, type the connection string for your Siebel Server.
9.
If you are using a Server connection, type the name of your Siebel repository in the Repository
field.
You can leave this field blank if you are using the default name of "Siebel Repository" for your
repository. Otherwise, type the name of your repository.
2013-05-06633
Integrating Business Applications with Crystal Reports

10.
If desired, select Apply Current Query or Restrict to Current Selection.
Note:
You must select Apply Current Query to display the Restrict to Current Selection option.
11.
Click Finish to return to the Standard Report Creation Wizard.
Tip:
Once you have configured the Siebel connection, you can store the connection in the Favorites folder.
24.3.1.1.2 Using the Log On Server command
If you prefer not to use the Report Wizards, connect to Siebel using the Log On Server command.
1.
Launch SAP Crystal Reports.
2.
On the File menu (or Database menu, if a report is already open), click Log On or Off Server.
3.
In the Data Explorer, expand Create New Connection.
4.
Expand Siebel eBusiness Applications.
The Connection Information dialog box appears.
5.
In the Connection Type area, select Server, Local, or Local (Active Dedicated Session).
Note:
This example describes how to create a Server connection type and helps you decide which
connection type to select and for details on how to create the other types of connections.
6.
In the Connection Name field, type a name for the connection.
7.
Click Next.
The Connection Details dialog opens.
8.
Type your Siebel user name and password in the appropriate fields.
9.
In the Connection String field, type the connection string for your Siebel Server.
10.
If you are using a Server connection, type the name of your Siebel repository in the Repository
field.
You can leave this field blank if you are using the default name of "Siebel Repository" for your
repository. Otherwise, type the name of your repository.
11.
If desired, select Apply Current Query or Restrict to Current Selection.
Note:
You must select Apply Current Query to display the Restrict to Current Selection option.
12.
Click Finish to return to the Data Explorer.
Tip:
Once you have configured the connection to Siebel, you can store the connection in the Favorites folder.
2013-05-06634
Integrating Business Applications with Crystal Reports

24.3.2 Configuring the connection
The Integration product supports the following connection types:
• Server
• Local
• Local (Active Dedicated Session)
24.3.2.1 Connection names
When you open a connection to a data source, Crystal Reports automatically assigns a name to the
connection in the Connection Name field of the Siebel eBusiness Applications Connection Information
dialog box. By default, the first connection is named SIEBEL1, and additional connections opened in
the same session are named SIEBEL2, SIEBEL3, and so on. To give your connections distinct and
descriptive names, you can edit the Connection Name field when connecting.
If you do not ensure that your connections have different names, you may experience problems when
refreshing your reports.
For example, if you refresh a Crystal report with the connection name SIEBEL1, Crystal Reports will
prompt you for the location of the data source before refreshing the report. If you do not close this report
before opening and refreshing a second Crystal report with the same connection name (in this example,
SIEBEL1), the second report will be refreshed using the first report's data source.
Therefore, it is recommended that you either give your connections distinct names, or that you do not
open two reports with the same connection name concurrently.
24.3.2.2 Server
The Server connection type connects directly to the Siebel server. It is available only if the appropriate
Siebel EAI components are installed on the workstation.
When using the Server connection type, all data is accessed directly from the server, thus making it
ideal for reports that are to be published to SAP BusinessObjects Business Intelligence platform and
delivered through HTML, DHTML, or other zero-client technologies.
If you select the Server connection type when connecting to Crystal Reports, the Connection Details
dialog box will require a connection string.
2013-05-06635
Integrating Business Applications with Crystal Reports

24.3.2.2.1 Connection String
In the Connection String field, enter the connection string used to connect to the Siebel Server. Depending
on your Siebel configuration, you may be able to find connection strings for your server in a file named
eapps.cfg, which is located on your Siebel web server. For more details, see the Siebel Bookshelf.
24.3.2.3 Local
The Local connection type connects to the Siebel Mobile/Dedicated Web Client and accesses data
from any of the available data sources, such as Local database, Server database, and Sample database.
To use this connection type, the complete Siebel Mobile/Dedicated Web Client must be installed on
the same machine as Crystal Reports.
When using this connection, all data is accessed through the Siebel Mobile/Dedicated Web Client, thus
making report design possible without impacting the Siebel servers.
Note:
• Before a report created using the Local connection type can be published to SAP BusinessObjects
Business Intelligence platform, the connection type must be changed to Server.
• If you are creating a local Siebel database for use with a Crystal Reports local connection, when
extracting the database make sure you set the Extract all Repository Tables parameter to True.
This parameter is usually set to False by default, and this will prevent your Siebel data from functioning
properly with a Crystal Reports local connection.
If you select the Local connection type when connecting to Crystal Reports, the Connection Details
dialog box has the following fields:
• Config File
• Data Source
24.3.2.3.1 Config File
In the Config File field, enter the full filename and path to the configuration file used by the Siebel
Mobile/Dedicated Web Client. For example:
C:\Program Files\Siebel\7.7\web client\BIN\ENU\siebel.cfg
Data Source
The Data Source field contains the data source as selected when logging on to the Siebel
Mobile/Dedicated Web Client. These data sources are defined in the configuration file entered in the
Config File field. Examples of data sources are: Server, Local, and Sample.
2013-05-06636
Integrating Business Applications with Crystal Reports

Note:
Selecting the Server data source in the Data Source field continues to use the Siebel Mobile/Dedicated
Web Client to connect and will require a Set Location operation on the report before it is published to
a SAP BusinessObjects Business Intelligence platform server.
To find your configuration file
1.
Right-click the icon you use to start Siebel.
2.
From the shortcut menu, click Properties.
The Siebel Properties dialog box appears. On the Shortcut tab, the Target field contains the filename
and path to the configuration file.
Local (Active Dedicated Session)
The Local (Active Dedicated Session) connection type is a refinement of the Local connection type,
and requires the complete Siebel Mobile/Dedicated Web Client. This connection type allows reports to
be opened and run from within the Siebel Mobile/Dedicated Web Client without the user having to log
on to Siebel again. The Local (Active Dedicated Session) connection type is provided for use with the
Crystal Reports Local Viewer application. When designing reports against a local data source, use the
Local connection type.
Since the Local (Active Dedicated Session) connection type connects directly to the first Siebel
Mobile/Dedicated Web Client that is running, it does not require a user name and password. If more
than one Siebel Mobile/Dedicated Web Client is running concurrently, it is not possible to specify which
client Crystal Reports will connect to.
Note:
Before a report created using the Local (Active Dedicated Session) connection type can be published
to SAP BusinessObjects Business Intelligence platform, the connection type must be changed to Server.
24.3.2.4 Queries and Selections
The Connection Details dialog box allows you to configure how the report will act when operated from
the Siebel Mobile/Dedicated Web Client included with the Integration product or BI launch pad. These
settings have no effect when refreshing reports from within Crystal Reports or SAP BusinessObjects
Business Intelligence platform itself. They are used only when reports are linked to Siebel views and
accessed via the contextual awareness feature.
Two options are available:
• Apply Current Query
• Restrict to Current Selection
2013-05-06637
Integrating Business Applications with Crystal Reports

Note:
• If Apply Current Query is not selected, Restrict to Current Selection is not available.
• When you view a report using the Siebel Mobile Web Client and the BI launch pad, the report
always uses the query and selection options that you chose when you created the report.
• To use the Apply Current Query functionality in the BI launch pad, the report must use the same
Business Component as the Siebel view that you link it to.
24.3.2.4.1 Apply Current Query
Siebel allows a user to filter information displayed in any view by applying a query. If Apply Current
Query is selected when using the Server connection type, the query applied in Siebel is applied to the
Crystal report when the report is published to SAP BusinessObjects Business Intelligence platform.
For example, if a query in Siebel has restricted the list of Accounts to only those that begin with "A",
such as shown in the image below, only these accounts will be visible in the Crystal report.
Note:
• Apply Current Query takes effect only if the same business component is being used in the report
and in the current Siebel view; otherwise the a "Database Connector Error" message will display if
you attempt to view or schedule a report.
• Apply Current Query applies only to Crystal reports that are linked to Siebel views.
24.3.2.4.2 Restrict to Current Selection
If you select Apply Current Query, you can also choose to select Restrict to Current Selection. Selecting
Restrict to Current Selection further restricts the records displayed in a Crystal report to the record
highlighted in Siebel. This allows you to select a single record and produce reports on its elements.
For example, if you apply a query that restricts the list of Accounts to only those that begin with "A,"
and then further highlight a specific record in your view and select both Apply Current Query and Restrict
to Current Selection when connecting to Crystal Reports with the Local (Active Dedicated Session)
connection type, the Crystal report will show information only for this record. If you select both Apply
Current Query and Restrict to Current Selection when connecting to Crystal Reports with the Server
connection type, the record that is highlighted in Siebel is applied to the Crystal report but will only be
visible after the report has been published to SAP BusinessObjects Business Intelligence platform.
2013-05-06638
Integrating Business Applications with Crystal Reports

If there is no active selection for the business component being viewed in Crystal Reports, then this
restriction has no effect and the same records are returned as if this option was not selected.
Note:
If you apply any filtering to the Crystal report, the selection is lost, and the report behaves as though
Restrict to Current Selection was not selected.
24.3.3 Selecting business components
Once a connection is completed, Crystal Reports displays the list of business objects and business
components available. SAP BusinessObjects Business Intelligence platform and business components
are displayed in a tree structure, with business components shown under the business object that they
are a part of. This is formatted as:
business object.business component
You add business components to a report in the same way that you add tables to a report. If you select
multiple business components to place them in a report, you must link the business components. See
Linking tables in reports for details.
24.3.3.1 Filtering business components
If you apply a filter to the list of business components, it reduces only the number of business components
in the tree structure. All business objects will still be visible. Filtering business components should not
be necessary in most cases.
Tip:
If you apply a filter, it is applied to all data sources. Remember to reset the Options so that your search
will not be restricted when you connect to other business components at a later time.
24.3.4 Refreshing reports with Siebel data
You can modify the sample reports so that they report off the data stored in your Siebel environment.
This requires you to set each report's database location, so that it points to the Siebel system.
2013-05-06639
Integrating Business Applications with Crystal Reports

24.3.4.1 To change the connection information in Crystal Reports
1.
From the Database menu, select Set Datasource Location.
The Set Datasource Location dialog box appears.
2.
In the Current Data Source area, select the data source whose connection you want to change.
3.
If you already have a replacement connection configured (that is, one that uses the same business
components and a Server connection type), select it in the Replace with area, click Update, and
skip to step 9.
4.
If you do not, expand Create New Connection and double-click Siebel eBusiness Applications.
The Connection Information dialog box opens.
5.
Select your Connection Type, choose a connection name, and then click Next.
6.
Enter the rest of your connection details such as User name, Password, Connection String, for your
connection to Siebel.
7.
Click Finish to return to the Set Datasource Location dialog box.
8.
Under the new connection, select the business component that was used in the original report and
click Update.
9.
Refresh the report to verify that the connection has been updated and the report retrieves the correct
data.
10.
Save the report.
24.3.5 Updating reports created in earlier versions of Crystal Reports
It is recommended that you reset the datasource location of reports created with Crystal Reports 8.5
and earlier versions of the Integration product. To do so, you must reset each report's database location.
24.3.5.1 To change the connection information in Crystal Reports
1.
From the Database menu, select Set Datasource Location.
The Set Datasource Location dialog box appears.
2.
In the Current Data Source area, select the data source whose connection you want to change.
2013-05-06640
Integrating Business Applications with Crystal Reports

3.
If you already have a replacement connection configured (that is, one that uses the same business
components and the correct connection type for your Siebel environment), select it in the Replace
with area, click Update, and skip to step 9.
4.
If you do not, expand Create New Connection and double-click Siebel eBusiness Applications.
The Connection Information dialog box appears.
5.
Select your Connection Type, choose a connection name, and then click Next.
6.
Enter the rest of your connection details such as User name, Password, Connection String, and
language for your connection to Siebel.
7.
Click Finish to return to the Set Datasource Location dialog box.
8.
Under the new connection, select the business component that was used in the original report and
click Update.
9.
Refresh the report to verify that the connection has been updated and the report retrieves the correct
data.
10.
Save the report.
24.3.6 Security
Crystal Reports supports Siebel's security to ensure that sensitive information can be managed. Every
time users run reports against Siebel data, they must log on with valid Siebel user credentials. This
ensures that users are able to access only the information that they are permitted to by their Siebel
credentials.
Note:
In the case of the Local (Active Dedicated Session) option, there is no logon prompt, as the user has
already logged on using the Siebel Mobile/Dedicated Web Client.
24.3.7 Views
Crystal Reports allows reports to be produced with any of Siebel's available visibility settings. These
settings can be changed for any given report. Thus, a single report can be filtered to show different
views of its information. For example, a report showing Accounts can be filtered so that only the accounts
available in the My Accounts view or the My Team's Accounts view are visible.
24.3.7.1 The View Mode field
2013-05-06641
Integrating Business Applications with Crystal Reports

In each table, there is a field called View Mode. This field is designed to be a filter that allows the visibility
to be changed. For example, if you want the report to show the PersonalView, you can add a selection
to set the View Mode field to PersonalView.
Note:
When accessing data from Siebel, Crystal Reports represents business components as tables. Crystal
Reports does not access Siebel tables when using the Integration product connection.
If the View Mode field is placed onto a report, it will always show the current visibility, which is AllView
by default.
24.3.7.1.1 To set up record selection using the Select Expert
1.
On the Report menu, click Select Expert.
The Select Expert dialog box appears.
Note:
If you click the Select Expert button without first highlighting a field in your report, the Choose Field
dialog box appears. Highlight the field on which you want to base record selection (in this example,
Account_Account._ViewMode), and click OK. The Select Expert appears.
2.
Use the drop-down lists to enter your selection criteria. In the example above, the View Mode field
is set to PersonalView.
Note:
View Mode is not a true database column and has certain restrictions. Each table can have only
one view mode, so it is not possible to use filters that employ options other than "is equal to," and
only a single filter can be used for each table.
Because of these restrictions, the following type of formula is not supported:
View Mode = PersonalView OR View Mode = SalesRepView
3.
Click OK when finished.
A selection formula is generated based on your specifications, limiting the report to the records you
indicated.
Note:
To view the selection formula, click Show Formula in the Select Expert. The Select Expert expands
to show the formula. Click the Formula Editor button to modify the formula.
Note:
Separate tables can use different view modes.
For more information about visibility, see the Siebel Bookshelf.
24.3.8 Using Siebel formatting
2013-05-06642
Integrating Business Applications with Crystal Reports

Siebel provides a mechanism that formats information for the user based on preferences defined within
the Siebel system. For example, currency fields are formatted to show the correct currency symbol,
numbers and dates are adjusted to the display style of the user's nation, and textual information may
also be modified.
Although much of Siebel's formatting can be replicated inside Crystal Reports, doing so can be time
consuming. Instead, you can simply convert table fields into the representation that Siebel would display.
This is done by inserting an SQL expression field.
24.3.8.1 To insert an SQL expression field
1.
Open the report in SAP Crystal Reports.
2.
From the View menu, select Field Explorer.
3.
Right-click SQL Expression Fields.
4.
From the shortcut menu, select New.
The SQL Expression Name dialog box appears.
5.
Type in a name for the column you are adding to the table and click OK.
The SQL Expression Editor appears. It has five panes:
• the navigation pane at left
• the Report Fields, Functions, and Operators panes across the top
• the Formula text pane at the bottom.
6.
In the Functions pane, expand System.
7.
Double-click the Format function.
In the Formula text pane, the text Format() appears with a flashing cursor after the last parenthesis.
8.
Move the cursor between the parentheses ().
9.
In the Report Fields pane, double-click the field you wish to format.
In the Formula text pane, the name of the field you selected appears between the parentheses. It
is now part of a function.
Note:
• Only the format function shown below is supported by the driver included in the Integration
product.
• Format expression is not a true SQL expression supported by Siebel. So it is not possible to
create complex expressions other than those involving a single field.
Because of these restrictions, the following types of expressions are not supported:
Format('Account_Revenue'.'Revenue') + " USD"
2013-05-06643
Integrating Business Applications with Crystal Reports

10.
Click Save and close.
11.
The new field appears under the SQL Expression Fields category. It can now be dragged and
dropped onto the report.
24.3.9 Linking tables in reports
Siebel does not present its data as relational database tables, but rather as a series of objects called
business components. When accessing Siebel data using this Integration product, Crystal Reports
represents each business component as a table.
You can use a variety of link types to link these tables in reports and subreports. Because business
components are not relational tables, these linking operations are performed by Crystal Reports on the
client side. For more information on linking tables, see your Crystal Reports documentation.
In addition to the client-side linking performed by Crystal Reports, Siebel allows multiple business
components to be programmatically linked if the business components have a parent-child relationship.
Doing so allows users to improve report performance, and in some cases report from child business
components that would otherwise be impossible to report off directly.
You can report off Siebel parent and child business components by linking parent business components
to child business components. For details, see Reporting off parent-child business components.
24.3.9.1 Additional Siebel business components
Siebel provides a mechanism for generating additional business components that combine data at the
object level. For more information, see the Siebel Bookshelf.
24.3.9.2 Reporting off parent-child business components
The SAP BusinessObjects Business Intelligence platform allows you to report off Siebel business
components with parent-child relationships. When you define a link between parent and child business
components in Crystal Reports, the Siebel server returns only the subset of data relevant to the parent
and child components, significantly improving report performance.
You can report off parent-child business components by linking parent business components to child
business components in the following ways:
• By opening the child business component using the same business object that is used to open the
parent business component.
2013-05-06644
Integrating Business Applications with Crystal Reports

• By opening the child business component associated with the parent's Multi Value field, identified
with a name that represents the child business component.
• By opening the child business component associated with the parent's Pick List Value field, identified
with a name that represents the child business component.
24.3.9.2.1 Using the same business object
To open multiple business components with parent-child relationships using the same business object,
the components must be linked.
In this example, the three business components are opened using the same business object that was
used to open the top-level parent component (Account_Account).
24.3.9.2.2 Using the parent's Multi Value field
To open a child component by using its parent's Multi Value field, you must first link the parent component
to the child component, then set the record selection on the child component to specify the name of
the parent's Multi Value field that you want to use.
To open a child business component using its parent's Multi Value field
1.
In Crystal Reports, link the parent and child business components.
2.
On the Report menu, click Selection Formulas and then click Record.
3.
In the Field Tree pane of the Record Selection Formula Editor, expand the Siebel database field
tree.
4.
Expand the child business component.
5.
Double-click the _Multi Value field to add it to the formula.
6.
Type an equals sign and quotation mark (= "), the name of the parent's Multi Value field that you
want to use, and then a closing quotation mark.
7.
Click Save and close.
Note:
_Multi Value and _Pick List Value are not true database columns and therefore have certain restrictions.
Each child business component can use only one of _Multi Value or _Pick List Value to specify the
associated parent field. So it is not possible to use complex filters that employ options other than "is
equal to", and only a single filter can be used for each business component.
24.3.9.2.3 Using the parent's Pick List Value field
To open a child component by using its parent's Pick List Value field, you must first link the parent
component to the child component, then set the record selection on the child component to specify the
name of the parent's Pick List Value field that you want to use.
To open a child business component using its parent's Pick List Value field
1.
In Crystal Reports, link the parent and child business components.
2.
On the Report menu, click Selection Formulas and then Record.
2013-05-06645
Integrating Business Applications with Crystal Reports

3.
In the Field Tree pane of the Record Selection Formula Editor, expand the Siebel database field
tree.
4.
Expand the child business component.
5.
Double-click the _Pick List Value field to add it to the formula.
6.
Type an equals sign and quotation mark (= "), the name of the parent's Pick List Value field that you
want to use, and then a closing quotation mark.
7.
Click Save and close.
Note:
_Multi Value and _Pick List Value are not true database columns and therefore have certain restrictions.
Each child business component can use only one of _Multi Value or _Pick List Value to specify the
associated parent field. So it is not possible to use complex filters that employ options other than "is
equal to", and only a single filter can be used for each business component.
24.3.10 Multi-value columns
There are certain columns within the tables that are displayed through the Siebel driver that represent
multiple values. Crystal Reports will normally display the primary value for these fields. If no primary
ID field is defined, Crystal Reports will display one of the values, but this value is not predictable.
By default, Crystal Reports tries to improve performance by having any sort performed on the server.
In the case of multi-value columns where no primary value has been defined, this will fail. It is necessary
to make any report that needs to sort using multi-value columns perform the sorting on the client.
24.3.10.1 To perform sorting on the client
1.
From the File menu in Crystal Reports, click Report Options.
2.
In the Report Options dialog box, clear the Use Indexes Or Server For Speed check box.
3.
Make sure the Always Sort Locally check box is selected.
4.
Click OK.
24.3.11 Data Types
2013-05-06646
Integrating Business Applications with Crystal Reports

24.3.11.1 Mapping Siebel data types to Crystal Reports types
Siebel supports a range of data types within its business components. These are converted to Crystal
Reports data types for presentation of the table equivalents. The following table shows the conversions.
Crystal Reports TypeSiebel Type
BooleanDTYPE_BOOL
NumberDTYPE_INTEGER
NumberDTYPE_NUMBER
CurrencyDTYPE_CURRENCY
DateDTYPE_DATE
TimeDTYPE_TIME
Date-timeDTYPE_DATETIME
StringDTYPE_ID
StringDTYPE_PHONE
StringDTYPE_TEXT
MemoDTYPE_NOTE
Date-timeDTYPE_UTCDATETIME
Note:
DTYPE_PHONE in Siebel is a number. However, for the value to be meaningful, it is necessary to apply
Siebel formatting to the field. To reduce the effort required to add a SQL expression for every
2013-05-06647
Integrating Business Applications with Crystal Reports

DTYPE_PHONE element, Crystal Reports automatically applies the format and returns the value as a
string.
When filtering the phone type field, the Crystal report automatically removes the formatting and converts
the value into a number. For example:
[Phone Number] = (123) 456-7890
will be filtered as
[Phone Number] = 1234567890
24.4 Integrating with PeopleSoft
24.4.1 Overview
If you installed the Data Connectivity feature of SAP BusinessObjects Business Intelligence platform
4.x, you can work with PeopleSoft data in SAP Crystal Reports.
24.4.2 To access data in SAP Crystal Reports
1.
Start SAP Crystal Reports.
2.
On the Start Page, click Blank Report.
3.
In the Database Expert, expand Create New Connection.
4.
Double-click the data source type that corresponds to your installation:
• If you installed the integration product on a PeopleSoft Enterprise (PeopleTools 8.46-8.49)
environment, click PeopleSoft Enterprise, and provide the following information:
2013-05-06648
Integrating Business Applications with Crystal Reports

ActionField
Type the appropriate URL to connect to the
Query Access Services through the PeopleSoft
Integration Gateway. (For example, type
http://webserver/PSIGW/QueryListen
ingConnector.)
Note:
This URL is specified when you configure the
Query Access Services in PeopleSoft.
Server
Type your user name.User
Type your password.Password
• If you installed the integration product on a PeopleSoft Enterprise (PeopleTools 8.21-8.45)
environment, click PeopleSoft Query, and provide the following information:
ActionField
Type //server:port , where server is the
name of your PeopleSoft Application Server,
and port is the JSL port number that the
server uses for the Jolt listener.
Server
Type your user name.User
Type your password.Password
• If you installed the integration on a PeopleTools 8.50 environment, click PeopleSoft Query, and
provide the following information:
2013-05-06649
Integrating Business Applications with Crystal Reports

ActionField
Type the appropriate URL to connect to the
Query Access Services through the PeopleSoft
Integration Gateway. (For example, type
http://webserver/PSIGW/PeopleSoftSer
viceListeningConnector.)
Server
Type your user name.User
Type your password.Password
5.
Click Finish.
You can now create Crystal reports with data from your PeopleSoft Enterprise system.
Note:
Private queries in PeopleSoft Enterprise are marked with an asterisk (*) to distinguish them from
public queries.
Once you have connected to a data source, you can save the connection in your Favorites folder. In
the Database Expert, right-click the connection, and click Add to Favorites.
For details on using Crystal Reports please see the
Crystal Reports User's Guide
.
To enable Unicode support, you must configure your system as described in the
Crystal Reports User's
Guide
and the
SAP BusinessObjects Business Intelligence platform 4.0 Installation Guide
.
24.5 Integrating with JD Edwards
24.5.1 Overview
If you installed the Data Connectivity feature of the SAP BusinessObjects Enterpise XI, you can work
with JD Edwards EnterpriseOne data in SAP Crystal Reports.
2013-05-06650
Integrating Business Applications with Crystal Reports

24.5.2 To access data in SAP Crystal Reports
1.
Start SAP Crystal Reports.
2.
On the Start Page, click Blank Report.
3.
In the Database Expert, expand Create New Connection.
4.
Provide the information in the following table.
ActionField
Type the name of the server that hosts your EnterpriseOne system.Host
Type the port number that the JD Edwards EnterpriseOne server uses for the XML
listener
Port
Type the name of the JD Edwards EnterpriseOne environment that you want to
access in the system.
Environ
ment
Type your user name.User
Type your password.Password
Type the name of the JD Edwards EnterpriseOne role that you want to access in
the system.
Role
5.
Click Finish.
You can now create Crystal reports with data from your JD Edwards EnterpriseOne Enterprise
system.
Once you have connected to a data source, you can save the connection in your Favorites folder. In
the Database Expert, right-click the connection, and click Add to Favorites.
For details on using Crystal Reports please see the
SAP Crystal Reports 2013 User Guide
.
To enable Unicode support, you must configure your system as described in the
SAP Crystal Reports
2013 User Guide
and the
SAP BusinessObjects Business Intelligence Platform 4.0 Installation Guide
.
2013-05-06651
Integrating Business Applications with Crystal Reports

2013-05-06652
Integrating Business Applications with Crystal Reports

Accessing Data Sources
25.1 Introduction
Crystal Reports can access data stored in almost any common database format, as well as many
uncommon formats. This section discusses the many different types of data that Crystal Reports can
access, and explains the data access layers involved in connecting to the data. If you are not sure what
Database Management System (DBMS) your company uses, contact your IT manager or your network
administrator.
The principal purpose of Crystal Reports is simply to access data stored in databases and to produce
reports on that data. This goal is one of the oldest uses of computers and remains one of the most
common and most necessary. Crystal Reports is designed to make that task easier, less time-consuming,
and more powerful.
This idea of accessing data remains at the root of every report produced. By understanding how Crystal
Reports accesses data, you will gain a better knowledge of the reporting process, as well as a better
knowledge of the type of data with which the program can work.
In addition, understanding the data access process will help you troubleshoot problems you may
encounter while trying to open a particular database file. This is especially useful for IT managers, or
for anyone who provides data access support for a group of users.
Most of the information in this section is designed for experienced Crystal Reports users and IT managers,
and covers technical aspects of Database Management Systems (DBMS) and data storage techniques.
A familiarity with computers, the Windows operating system, and at least one DBMS application is
assumed.
25.1.1 Six types of data
The data that Crystal Reports can access falls into six general categories:
• Direct access database files
• ODBC data sources
• OLE DB
2013-05-06653
Accessing Data Sources

• Business Views
• Crystal SQL Designer files
• Crystal Dictionary files
Each type of data must be accessed using a specific set of Dynamic Link Libraries (DLLs) and other
data access-related files. Once you understand the process the program uses to access each type of
data, you will have a better understanding of the report creation process and the elements used to
create powerful reports with your data.
Note:
When accessing any type of data, Crystal Reports relies on the database drivers to provide field names,
field types, and field lengths. This information is provided by either the database engine or the ODBC
database driver.
25.2 Direct access database files
Crystal Reports can access many of the most common PC database formats directly. In other words,
the program has the built-in capabilities needed to directly open database files and tables designed in
dBASE, FoxPro, Clipper, Pervasive, Paradox, and Microsoft Access, among others. This functionality
exists as soon as you install Crystal Reports. Once the program is installed on your system, you can
immediately begin creating reports based on these databases by selecting the appropriate file.
25.2.1 Advantages
Accessing the database directly is the fastest way to read the data. Crystal Reports only needs to talk
to a single data access layer that provides contact with the data. Report results can be obtained quickly
in almost any system environment.
In addition, data access is simple. Direct access database files are point-and-click data sources. You
need only select the required database files, and Crystal Reports will read all the stored data.
25.2.2 Disadvantages
When you access a database directly through Crystal Reports, only that database type can be used
by the report. You cannot switch to a different type of database or table without creating a new report.
2013-05-06654
Accessing Data Sources

For example, if you design a report based on Pervasive data, you cannot change the tables accessed
by the report to Access data. Crystal Reports communicates with Pervasive data using Pervasive-specific
syntax, a syntax that is not compatible with Access data.
If you access data through ODBC, on the other hand, the syntax used is always the SQL language,
regardless of the actual database type. See ODBC data sources.
25.2.3 Three layers
Direct access of database files from Crystal Reports requires three layers:
• Crystal Reports
• Data translation
• Database
Crystal Reports uses the data translation layer to talk to the database and access its data.
25.2.3.1 Crystal Reports
Crystal Reports operates as an interface through which you can format, arrange, select, and sort the
data stored in database files. It obtains data by communicating with one or more files in the data
translation layer that can actually read the database. Since Crystal Reports can work with many forms
of data, it must rely on other files in order to work directly with the data. Crystal Reports can then use
a native method of communication to talk to the translation files.
25.2.3.2 Data translation
Data is translated through a set of DLLs specific to Crystal Reports. The program uses the DLLs specific
to a certain data type to understand how data is organized for that type and to present it correctly when
your report is printed, previewed, or exported.
Note:
Crystal Reports comes with all the data translation files for each of the direct access database types
that it supports.
2013-05-06655
Accessing Data Sources

25.2.3.3 Database
The database file consists of one or more tables. Different DBMS applications store database information
differently. For example, dBASE stores each database table as a separate file. Access, on the other
hand, can store several tables, along with queries, macros, and other database elements, all in a single
file.
When Crystal Reports accesses a database file directly, it automatically retrieves information about all
of the tables and fields in that file. You may not use all of the tables or fields, but the program will make
them available to you. In other words, when a dBASE file is opened, only one table in the dBASE file
is available. However, when an Access file is opened, every table in that file is available, even if you
never use them all.
Note:
Crystal Reports will also open queries in an Access database through the DAO engine or ODBC and
will allow you to report on query fields, as with table fields. See DAO and Access.
25.2.4 Common database formats
Although Crystal Reports uses the same three-tiered system for obtaining data from all direct access
database file formats, each format requires a different set of DLLs. However, some formats expand the
basic three-tiered structure.
The following sections cover the systems used by Crystal Reports to access data from some of the
most popular database formats.
25.2.4.1 Microsoft Access
Microsoft Access provides several means for opening its database files. Each method has its advantages
and disadvantages, and the technique that you should use may depend on how your data is set up.
Below is a description of how to open Access data from Crystal Reports through the DAO engine.
Another technique uses Microsoft's Open Database Connectivity (ODBC) standard, and is described
in Access.
Note:
When you open an Access database using the DAO engine, Crystal Reports opens the entire database
and loads information about all tables and queries from the database. To do this, Crystal Reports must
reserve a large section of your computer's memory (called a buffer) in advance.
2013-05-06656
Accessing Data Sources

25.2.4.2 dBASE, FoxPro, Clipper
Crystal Reports has been designed to open dBASE data simply and directly through the xBase engine
(inside crdb_p2bxbse.dll). FoxPro and Clipper are dBASE compatible database formats, and Crystal
Reports uses the same DLL to access files created by any of these three DBMS applications.
Note:
The crdb_p2bxbse.dll translation layer supports FoxPro files up through version 2.6. See Visual FoxPro
for versions after 2.6.
The file crdb_p2bxbse.dll handles all translation between Crystal Reports and the dBASE, FoxPro, or
Clipper files. Each database file contains only a single database table, but there is no limit to the number
of files that can be accessed by a report.
Note:
dBASE data can also be accessed through the Borland Database Engine (BDE) using the translation
file crdb_p2bbde.dll. To see how the BDE communicates with database data, see Paradox. The BDE,
however, does not support FoxPro or Clipper data.
25.2.4.3 Paradox
Files created with Paradox (.DB) are made available to other applications through the Borland Database
Engine (BDE). The BDE does the actual work with the Paradox data, retrieving the requested tables
and fields. Since the BDE works so closely with the actual data, it combines with the Paradox database
file to create the database layer in the three layer data access model. Crystal Reports accesses the
BDE through the crdb_p2bbde.dll translation file.
Note:
Crystal Reports does not install the BDE. It must be installed separately from a third-party application.
25.2.4.4 DAO
Microsoft's Data Access Object (DAO) Engine for versions of Access 2.0 and later is the part of the
Microsoft Access Database Management System that actually handles your database data. As a user,
you usually do not work directly with the DAO engine. It acts as a gateway through which Access data
is made available to applications. Since the DAO engine is so closely tied to Access data, Crystal
Reports considers it a part of the actual database.
2013-05-06657
Accessing Data Sources

DAO uses Microsoft's Object Linking and Embedding (OLE) technology to provide access to Access
data through an object-oriented approach.
In addition to Access database tables, Crystal Reports can open and use Access queries through DAO.
If you are not familiar with Access queries, refer to your Access documentation. Search also for the
topic called "Opening Access queries through DAO" in the
Crystal Reports Online Help
.
Note:
• Access Parameter queries and Cross-tab queries can only be opened through an ODBC connection.
Search for the topic called "Opening Access queries through DAO" in the
Crystal Reports Online
Help
for more information. Access Action queries are not supported by Crystal Reports.
• When opening Access queries in a report, make sure the Views and Stored Procedures options are
toggled on using the Database tab of the Options dialog box in Crystal Reports. This ensures that
the queries will be visible when you open the Access database.
To translate information and data to and from DAO, the Report Designer uses the DAO translation file
crdb_dao.dll.
Secured Microsoft Access Databases
If you will be using secured Access databases, the SystemDB parameter in the Windows Registry
database must be set to point at the path where the System.mdw (Access 95 and later) file is located.
On Windows NT, the SystemDB parameter is located in the following Registry key:
• Access 97
\\HKEY_LOCAL_MACHINE\Software\Microsoft\Office\8.0\Access\Jet\3.5\Engines
• Access 2000
\\HKEY_LOCAL_MACHINE\Software\Microsoft\Office\9.0\Access\Jet\4.0\Engines
25.2.4.5 Pervasive
Crystal Reports connects to the Pervasive (formerly Btrieve) engine through the translation files
crdb_p2bbtrv.dll, p2bbtrv.dll, and p2ctbtrv.dll.
The Pervasive engine is a complex collection of DLLs and EXEs that are specific to the version of
Pervasive you are using. For more information on the different Pervasive engine files, refer to your
Pervasive documentation.
Note:
• Pervasive must be configured correctly for Crystal Reports to read Pervasive databases. If Pervasive
is already configured correctly on your system, Crystal Reports can use your Pervasive data
immediately upon installation. Crystal Reports automatically installs the Pervasive files that it requires
to read Pervasive data. Refer to your Pervasive documentation to make sure the Pervasive engine
is configured correctly.
2013-05-06658
Accessing Data Sources

• When you open a Pervasive database, Crystal Reports opens the entire database and loads
information about all the tables in the database. To do this, Crystal Reports must reserve a large
section of your computer's memory, called a buffer, in advance. Computer memory restrictions limit
this buffer to 65,536 bytes (64K). This restricts the size of your Pervasive database to about 80
tables, depending on the number of fields in each table.
Pervasive DDF files
Crystal Reports does not determine the definitions of Pervasive data files directly from the data files
themselves. It needs a set of Pervasive Data Definition Files (.DDF) that contain file, field, and index
information. Crystal Reports uses Wbtrvdef.dll and Sbtrvdef.dll to parse these DDF files. The following
are the required DDFs which must all reside in the same directory:
• File.ddf
• Field.ddf
• Index.ddf
A set of DDFs normally contain definitions for multiple Pervasive data files. Once one of the DDFs is
selected when creating a new report, Crystal Reports immediately adds all the data files defined in that
DDF into the report. Crystal Reports also takes the path defined in the DDFs as the default path of the
data files. The DDFs and data files can reside in different locations.
Note:
Be sure to study your Pervasive documentation for more information on Pervasive DDFs and on
configuring the Pervasive engine.
25.2.4.6 Exchange
Exchange is Microsoft's successor to MS Mail. Exchange, however, includes not only e-mail, but also
management of group scheduling, electronic forms, groupware, and Internet connectivity. An Exchange
folder can contain standard notes (mail), files, and instances of Exchange forms. All of this data is stored
in the Exchange Information Store.
Note:
Exchange 2000 can be accessed through ADO.
Crystal Reports can report on data contained in the Exchange Information Store. Exchange data sources
available for reporting include:
• Message Tracking Logs
• Address Lists
• Personal Address Books
• Global Address Lists
• Distribution Lists
2013-05-06659
Accessing Data Sources

• Exchange Folder Contents
• Mail messages
• Exchange Form applications
• Properties of OLE documents
• Exchange Administrator
• Properties of Exchange mailboxes on the Exchange Server
• Properties of public folders on the Exchange Server
• Replica list of public folders
• ACL (Access Control List) of public folders
You can use each Exchange data source like a database table and you can link each Exchange data
source to other data sources. For example, you can join the Message Tracking Log to an Address List
by using an e-mail address as the link field.
The data translation file used to access the Exchange data source depends on the data source that is
being accessed. The following table lists each of the Exchange data translation files and describes their
purpose:
Data sourceFile name
Exchange Server Message Tracking Logscrdb_p2strack.dll
Exchange Folders and Address Bookcrdb_p2smapi.dll
Exchange Server Mailbox Admincrdb_p2sexsrm.dll
Exchange Server Public Folders Admincrdb_p2sexsrp.dll
Exchange Public Folder Replicacrdb_p2srepl.dll
Public Folders Access Control Lists (ACL)crdb_p2sacl.dll
Physical Server DLL for Microsoft Outlook
crdb_p2soutlk.dll
p2soutlk.dll
Exchange translation files work directly with the Microsoft Messaging API (MAPI). MAPI acts as a
database engine for Exchange data.
2013-05-06660
Accessing Data Sources

How Crystal Reports treats Exchange data
Crystal Reports treats Exchange Administrator data (Public Folder Admin, Public Folder ACL, Public
Folder Replica, and Mailbox Admin server types) as a physical database server. To access this data,
you must log on using a SQL/ODBC server and select the appropriate tables from the Choose SQL
Table dialog box.
When you log on to any of the Exchange Administrator servers, you must select a profile (or profiles).
Each profile represents an Exchange Server.
Note:
Refer to your Microsoft Exchange documentation for more information about how to set up and create
Exchange profiles.
25.2.4.7 Outlook
Microsoft Outlook provides powerful organization and information management tools in the form of
e-mail, calendars, task lists and other popular tools.
Crystal Reports lets you report on your Outlook data by providing the translation files crdb_p2soutlk.dll
and p2soutlk.dll. Because Outlook data is stored in a flat file system, the translation file accesses it
directly.
Note:
You must have Microsoft Outlook installed, or available through UNC (universal naming convention)
read-access. UNC is a standard format for paths that include a local area network file server. The basic
syntax is: \\server\share\path\filename
25.2.4.8 ACT!
ACT! contact management software stores information in a relational database format similar to the
xBase format. See dBASE, FoxPro, Clipper. Crystal Reports can read this data and lets you produce
reports based on your contact information.
ACT! databases newer than version 2
Versions of ACT! newer than 2 do not use an intermediate step in the translation layer. The translation
files used for all ACT! databases higher than version 2 are crdb_p2bact3.dll, p2bact3.dll, and p2iract3.dll.
For more information, search for the topic called "ACT! databases" in the
Crystal Reports Online Help
.
2013-05-06661
Accessing Data Sources

25.2.4.9 Oracle
Crystal Reports supports direct access to Oracle SQL databases. This accessibility is provided by the
crdb_oracle.dll translation file. This file communicate with the Oracle database driver, which works
directly with Oracle databases and clients, retrieving the data you need for your report.
Note:
• In order for Crystal Reports to use Oracle SQL databases, the Oracle client software must be installed
on your system, and the location of the Oracle client must be in the PATH statement of your
Autoexec.bat file.
• When logging on to Oracle using crdb_oracle.dll, the date format is changed to match the default
date/time format of Crystal Reports.
25.2.4.10 Sybase Adaptive Server
Crystal Reports opens SQL data created by Sybase Adaptive Server directly through the
crdb_p2ssyb10.dll, installed with Crystal Reports. This translation file works with the Sybase database
drivers to read Sybase Adaptive Server data. If your Sybase server is correctly configured, you will be
able to read Sybase data as soon as Crystal Reports is installed.
25.2.4.11 Lotus Domino
Lotus Domino is a powerful groupware application used for communication and information sharing
between departments in an organization.
A Lotus Domino database can be read by Crystal Reports using either a native driver or an ODBC
driver. For information about the ODBC driver, see Lotus Domino.
Choosing Lotus Domino during installation adds the translation file crdb_p2snote.dll.
Note:
• Nextpwd.dll and the Lotus API DLL (Lcppn201.dll) are installed in the Lotus Domino executable
directory.
• The following line is added to the Notes.ini file:
EXTMGR_ADDINS=extpwd
2013-05-06662
Accessing Data Sources

Note:
The Lotus Domino executable and data directories are added to the PATH.
25.2.4.12 Informix Online Server
The Informix Online Server provides client/server capabilities along with SQL compliance.
Crystal Reports opens SQL data created by Informix through the crdb_p2sifmx.dll, installed with Crystal
Reports. This translation file works with the Informix database drivers to read Informix data. You must
have the Informix client installed and configured properly before using this translation file.
25.2.4.13 DB2 Server
IBM's DB2 Server is an SQL compliant, client/server application that is part of IBM's popular database
management suite.
Crystal Reports opens SQL data created by DB2 through the crdb_p2sdb2.dll, installed with Crystal
Reports. This translation file works with the DB2 database drivers to read DB2 data. You must have
the DB2 client installed and configured properly before using this translation file.
25.2.4.14 Active Data
Crystal Reports can be used to report off ActiveX data sources, including ActiveX Data Objects (ADO),
Remote Data Objects (RDO), and Data Access Objects (DAO). Reports created off these data sources
can be used in Visual Basic applications that use these ActiveX data sources. Visual Basic applications,
Crystal Reports also supports Crystal Data Objects (CDO), which are sets of relational data created at
runtime using Visual Basic arrays.
Crystal Reports also offers the ability to create reports without specifying an actual data source. This
is supported through the use of a Data Definition file, which is an ASCII text file with placeholders to
represent database fields. By using reports created off a Data Definition File, an application developer
has the flexibility of specifying the actual data source at runtime.
Crystal Reports provides these translation files for Active Data reporting:
2013-05-06663
Accessing Data Sources

DescriptionFile
For Microsoft ActiveX Data Objectscrdb_fielddef.dll
For Microsoft ActiveX Data Objectscrdb_ado.dll
For Crystal Data Object
Crystal Data Object COM DLL
crdb_cdo.dll
cdo32.dll
For Microsoft Data Access Objectscrdb_dao.dll
For ODBCcrdb_odbc.dll
These translation files works with a different set of drivers for each data source.
25.2.4.15 Local file system
You can use Crystal Reports to report on files located on your system or network drives including
information such as file name, version number, date, and so on.
The translation file crdb_filesystem.dll is provided by Crystal Reports for reporting on your local file
system.
Note:
You must have UNC (universal naming convention) read-access to your local file system. UNC is a
standard format for paths that include a local area network file server. The basic syntax is: \\serv
er\share\path\filename
25.2.4.16 NT Event Log
If using Windows NT version 3.51 or later, you can use Crystal Reports to report on the NT Event Log.
The Event Log is a database used by network administrators to record and keep track of different types
of events that can occur on a Windows NT Workstation or on a Windows NT server.
2013-05-06664
Accessing Data Sources

Crystal Reports provides the translation files crdb_p2sevta.dll (archived log) and crdb_p2sevtc (current
log) for working with NT Event Log data. These files communicate with the Event Logging API in
Advapi32.dll, a part of the Windows NT operating system.
25.2.4.17 Microsoft IIS/Proxy log file
If you use Microsoft Internet Information Server (MS IIS), or Microsoft Proxy, you can use Crystal Reports
to report on the log files. These log files keep track of different types of events that occur when using
a web server and browser.
The translation file Crystal Reports provides for MS IIS and Proxy log files is crdb_p2smsiis.dll. Because
log file data is normally stored in a flat file system, the translation file accesses it directly.
Note:
You must have UNC (universal naming convention) read-access to your local file system. UNC is a
standard format for paths that include a local area network file server. The basic syntax is: \\serv
er\share\path\filename
25.2.4.18 Web/IIS log files
You can use Crystal Reports to report on Web log files. These log files keep track of different types of
events that occur when using a web server and browser.
The translation file Crystal Reports provides for Web/IIS log files is crdb_p2swblg.dll. Because log file
data is normally stored in a flat file system, the translation file accesses it directly.
Note:
You must have UNC (universal naming convention) read-access to your local file system. UNC is a
standard format for paths that include a local area network file server. The basic syntax is: \\serv
er\share\path\filename.
25.3 ODBC data sources
Open Database Connectivity (ODBC) is a standard developed by the Microsoft Corporation through
which many different types of data can be accessed by a single application. An application need only
communicate with one set of files (ODBC) to be able to work with any source of data that can be
accessed by ODBC.
2013-05-06665
Accessing Data Sources

There are hundreds of Database Management Systems (DBMS) available for personal computers, and
thousands of applications that access DBMS data. Normally, a company that designs an application
that accesses data, such as Crystal Reports, must develop a means for the application to communicate
with each type of data that a customer might want to use. Crystal Reports does this with the databases
that it can access directly.
On the other hand, if a DBMS simply provides a means by which ODBC can access its data, the DBMS
data becomes an ODBC data source. Any application that can communicate with ODBC (such as
Crystal Reports), will instantly have access to any ODBC data source. With ODBC drivers available for
most common DBMS products, the range of data types that Crystal Reports can use is almost unlimited.
25.3.1 Advantages
Perhaps the biggest advantage to accessing data through ODBC is the ability to access a wide range
of data with just one interface. Since most popular Database Management Systems now offer ODBC
drivers, with more appearing every day, Crystal Reports can use any type of data you have.
Because of the extreme flexibility built into ODBC, you can use the same report file with different ODBC
data sources. For example, you might design a report using an Oracle data source, and later, if your
company switches to Microsoft SQL Server, you can simply change the ODBC data source used by
your report. The only requirement is that the new data source must have the same structure (tables
and fields) that the original data source had (although table names can be different). For more information,
search for the topic called "Changing the data source accessed by a report" in the
Crystal Reports
Online Help
.
Experienced SQL (Structured Query Language) programmers also benefit from the ODBC standard.
Since Crystal Reports uses SQL to communicate with ODBC, SQL programmers and Database
Administrators can view and edit the SQL statements sent to ODBC, controlling exactly how data is
retrieved from the data source.
Finally, by using SQL pass-through technology to send an SQL statement to ODBC and retrieve an
initial set of data, Crystal Reports off-loads much of the data retrieval and sorting work on to the server
system, freeing up local memory and resources for more important tasks. In addition, only the data
specified by the SQL statement is returned to Crystal Reports, reducing network traffic and the use of
network resources. By working more efficiently with the original data, Crystal Reports saves you time
and effort, and lets you concentrate on the design process and other more important work.
25.3.2 Disadvantages
There are many layers involved in passing data through ODBC from a database to an application. First,
Crystal Reports must request some data. The request must be translated by the ODBC translation layer
into a format that ODBC understands (an SQL statement). ODBC must determine where the requested
data exists, and pass the request on to the ODBC data source. For more information, see DBMS
2013-05-06666
Accessing Data Sources

translation (ODBC data source) layer. The data source must analyze the request and translate it again
into a format that can be understood by the DBMS. This complex process can fail at any of several
possible levels.
In addition, ODBC data sources must be correctly configured and set up in the Odbc.ini and Odbcinst.ini
files before they can be used. If you create a report on one system and try to open it on another system
that does not have the same ODBC data source set up, Crystal Reports will not be able to connect to
the data.
When working with ODBC, you should also be aware that the SQL language used by ODBC is based
on the standards set for the SQL language by the American National Standards Institute (ANSI). Some
SQL-based DBMS applications, however, provide additional features to the SQL language that are
specific to that DBMS. If your data uses features unique to your DBMS, ODBC will not be able to
translate those features (though in many cases it will still retrieve most of the data). See The SQL
language.
25.3.3 Five layers
The process by which Crystal Reports accesses data from an ODBC data source consists of five layers:
• Crystal Reports layer
• ODBC translation layer
• ODBC layer
• DBMS translation (ODBC data source) layer
• Database layer
By using the Structured Query Language (SQL), all five layers can conveniently pass data from the
database to your report.
25.3.3.1 Crystal Reports layer
When working with ODBC data, Crystal Reports generates an SQL statement that requests the
appropriate data from ODBC. The powerful SQL generator built into Crystal Reports is designed to
create an SQL statement that will let the ODBC data source or ODBC itself do as much of the report
generation as possible, returning only the data needed to produce the report.
2013-05-06667
Accessing Data Sources

25.3.3.2 ODBC translation layer
Crystal Reports uses the Dynamic Link Library crdb_odbc.dll to communicate with ODBC. This file is
unique to Crystal Reports environment and provides your report with access to any ODBC data source.
This is the driver that actually passes data to and from ODBC.
25.3.3.3 ODBC layer
ODBC is a set of several DLLs and INI files built into the Windows environment that act as a gateway
through which database requests and data can pass. Any database file or format that is to be used via
ODBC must be set up as an ODBC data source.
Although information regarding data sources is recorded in Odbc.ini and Odbcinst.ini, 32-bit ODBC
uses the Windows Registry database to retrieve information about individual data sources.
Note:
For more information on ODBC and the ODBC files, see the Microsoft ODBC documentation.
ODBC uses the SQL language for all transactions between Crystal Reports and ODBC. Even if the
database does not normally use SQL to create and work with tables, the ODBC driver provided by the
database (the DBMS translation layer) must communicate with ODBC using SQL. For most users, this
feature of ODBC is transparent, but more advanced users often take advantage of the features of the
SQL language used by ODBC.
25.3.3.4 DBMS translation (ODBC data source) layer
This layer consists of one or more drivers provided by a DBMS that allow ODBC to communicate with
the database. Crystal Reports ships with several ODBC drivers for many of the most common database
formats. If you are unsure whether you can use an ODBC driver to access the data in your database,
refer to the documentation for your DBMS application. Most DBMS applications that run on a
Windows-based platform offer an ODBC driver.
When a DBMS provides an ODBC driver, it must register the driver with ODBC on the machine on
which it has been installed. It does this by assigning a name to the driver and recording the filename
in the Odbcinst.ini file. Usually, this step is handled automatically when the DBMS application is installed
on the system. However, your network system or DBMS application may require that you register the
ODBC driver manually with the ODBC Setup application. For more information about registering an
ODBC driver with ODBC, refer to the documentation for your DBMS.
2013-05-06668
Accessing Data Sources

Once an ODBC driver is registered, you need to establish an ODBC data source using that driver. The
ODBC data source is the object that you connect to when accessing data from Crystal Reports through
ODBC. Data sources are recorded in the Odbc.ini file. The data source keeps track of the DBMS
translation files (ODBC drivers) and, sometimes, the database itself. An ODBC data source can specify
just a database format, such as Oracle, Sybase SQL, or MS SQL Server. Some users, however, prefer
to actually specify a particular database. In this case, the ODBC data source extends across both the
DBMS translation layer, and the database layer.
If you are using a client/server database, such as an SQL server, the ODBC drivers communicate with
the database server through the Database Communication layer, the same layer that your database
client uses to communicate with the database server.
Note:
ODBC drivers find their specific DBMS client files on the local machine mainly through key directories
that the DBMS client has installed in the search path. The important thing to remember is that a
workstation client on a local PC must be able to connect to its server successfully. If you are not sure
how to verify this, contact your IT manager.
For Crystal Reports and the ODBC drivers, it does not matter what kind of platform your database
server exists on. It is the DBMS client that connects and communicates with the server; Crystal Reports
and the drivers need only communicate with the DBMS client. For more information, see Using SQL
and SQL databases.
25.3.3.5 Database layer
The database file which the ODBC data source refers to can be located anywhere on a system. Once
the ODBC data source is set up, Crystal Reports does not need to know the actual location and format
of the data. Thus, the database can have any format and can be located anywhere on a network, as
long as ODBC can communicate with it through the ODBC data source.
25.3.4 Installing database clients
Ideally, your database client should be installed and configured before you install Crystal Reports. If,
however, you've installed Crystal Reports first, you can ensure the proper configuration of the Crystal
Reports ODBC Data Source Name (DSN) by following this procedure.
25.3.4.1 To ensure correct ODBC DSN configuration
2013-05-06669
Accessing Data Sources

1.
On the Start menu, select Settings, select Control Panel, then double-click Add or Remove
Programs.
2.
Select Crystal Reports and click Change.
3.
In the Crystal Reports Setup dialog box, click Add/Remove.
4.
Expand the Data Access folder and select the appropriate data access option.
For example, if you have installed the Informix database client, select Informix from the Data Access
folder.
5.
Click the selected data access option and choose Entire feature will be unavailable.
An X appears next to the option and the Feature Description area includes a remark that the feature
will be completely removed.
6.
Click Next on this dialog box and the following one.
The data access option you selected is removed.
7.
Repeat steps 2 through 4.
8.
Click the selected data access option and choose Will be installed on local hard drive.
The X next to the option is removed and the Feature Description area includes a remark that the
feature will be installed.
9.
Click Next on this dialog box and the following one.
The data access option you selected is reinstalled and its ODBC DSN is configured properly.
25.3.5 Common ODBC database formats
25.3.5.1 Access
Although Microsoft Access files can be opened directly by Crystal Reports (see Microsoft Access ), you
may wish to use ODBC for these files instead. When communicating with Access databases, ODBC
uses a translation file that communicates with the Microsoft Jet Database Engine through the DAO (see
DAO). The Jet Database Engine is an example of a DBMS-specific ODBC driver.
The Jet engine is the part of the Access DBMS that does all of the actual work with an Access database.
Jet is a required component for working with Access data. Since the Jet engine is an integral part of all
Access databases, it is shown here as part of the database layer.
2013-05-06670
Accessing Data Sources

25.3.5.2 Excel
You can convert Microsoft Excel spreadsheets into databases that can be read by Crystal Reports
through ODBC. In Excel 4.0 and earlier, use the Set Database command on the Data menu. In Excel
5.0 and later, use Define on the Name submenu of the Insert menu. Once converted, spreadsheet rows
become records, and spreadsheet columns become fields. (For more information on converting your
spreadsheets to database format, refer to your Excel documentation). Once the spreadsheet is converted,
you can set up an ODBC data source for the file, and then select it from Crystal Reports.
Note:
If you are using Excel 7 or later, you can export your spreadsheets as Access database tables, and
read them from Crystal Reports as you would read any other Access tables. For more information, refer
to your Excel documentation.
You can set up an ODBC data source for Excel spreadsheets using the DAO engine. The DAO engine
is installed on your system when you install Crystal Reports. However, you must set up an ODBC data
source manually for your Excel spreadsheet. Search for the topic called "Setting up an ODBC data
source" in the
Crystal Reports Online Help
.
25.3.5.3 Informix
Crystal Reports accesses Informix databases through ODBC. The Informix client should be installed
on your machine. Otherwise, Crystal Reports will provide the driver that ODBC uses to communicate
with the Informix database engine.
Note:
The Informix ODBC driver is part of the DataDirect drivers download that is available from the Business
Objects Download Center at:
http://www.businessobjects.com/products/downloadcenter
25.3.5.4 SQL databases through DataDirect
There are many different SQL Database Management Systems available on the market, and most of
them can be accessed through ODBC. Crystal Reports provides several DataDirect ODBC drivers
through download, allowing you to access many of the most popular SQL databases, including:
• Informix
2013-05-06671
Accessing Data Sources

• Oracle
• Sybase
• Microsoft SQL Server
• DB2
Crystal Reports still communicates with ODBC through the crdb_odbc.dll translation file, but the
DataDirect drivers provide ODBC with easy access to the actual databases.
Note:
If you are using an SQL database not accessed by the DataDirect drivers, refer to your DBMS
documentation for more information about the required ODBC drivers.
Do not confuse SQL databases with the SQL language. Structured Query Language (SQL) is a
specialized computer language used to design, build, and read database files. See Using SQL and
SQL databases.
SQL databases are any collection of computer applications that depend on the SQL language for
database creation and manipulation. SQL DBMS applications are usually designed to run as large
client/server applications spread across a network.
To open an SQL database, ODBC uses a set of DataDirect ODBC support drivers (these are the same
for every SQL database format), a DataDirect ODBC driver specific to the database format, and the
Database Communication layer that actually communicates directly to the database file. The files
provided for this DBMS translation layer are all DataDirect drivers.
Note:
• ODBC does not have to use the DataDirect drivers to access the SQL databases shown here. Most
SQL DBMS applications provide their own ODBC drivers.
• DataDirect drivers are available as a download from the Business Objects Download Center at:
http://www.businessobjects.com/products/downloadcenter
25.3.5.5 Visual FoxPro
Microsoft Visual FoxPro data is accessed through ODBC, while FoxPro data from version 2.6 and earlier
is accessed directly through the xBase engine. If you are using FoxPro version 2.6 or earlier, see
dBASE, FoxPro, Clipper.
25.3.5.6 Lotus Domino
2013-05-06672
Accessing Data Sources

A Lotus Domino database can be read by Crystal Reports through ODBC. For Windows, the Lotus
Domino DBMS translation layer consists of three files:
• Nsql32.dll
• Nsqlv32.dll
• Nsqlc32.dll
These files use the drivers installed by the Lotus Notes client to work with the Lotus Domino database.
The client component of Lotus Domino must be installed on the local machine.
Note:
The Domino Server can be substituted for the Lotus Notes client in the database layer.
25.3.5.7 OLE DB
OLE DB is a database connectivity entity from Microsoft similar in conception to ODBC.
Note:
• OLE DB is a connectivity methodology and not a database. Like ODBC, it facilitates the exchange
of data created in other database management systems by providing an interface layer.
• OLE DB requires the use of an OLE DB provider, which is the OLE DB equivalent of an ODBC driver.
• There are two ways to connect using an OLE DB provider. You can connect using a username and
password, and depending on the provider, you may also be able to connect using "Integrated
Security". No user ID or password is required with "Integrated Security", but it does require that
Database Authentication is enabled on the server. Please consult your Database Administrator on
how to enable and configure this function.
25.4 JDBC data sources
Java Database Connectivity (JDBC) is a Java API developed by Sun Microsystems that acts as an
interface between a developer's Java code and a database. JDBC provides a mechanism for the
developer to use to connect to a specified database, request information about the database, and then
select information from it.
JDBC is similar to Microsoft's Open Database Connectivity (ODBC) and is fast becoming the standard
for database-independent connectivity between Java applications and SQL-based databases.
JDBC shares many of the advantages of ODBC, but it has a unique advantage in its ability to provide
platform-independent access to any database that has a JDBC driver available to it.
Note:
The Crystal Reports JDBC driver requires version 1.4 of the JDK.
2013-05-06673
Accessing Data Sources

25.4.1 JNDI
The Java Naming and Directory Interface (JNDI) provides an interface that you can use to seamlessly
connect to diverse naming and directory services within your company. Most importantly for reporting
purposes, JNDI contains a repository for holding JDBC connection strings; when you provide these
predefined connection strings through JNDI, your users will not be called on to provide connection URLs
and class names when connecting to a data source.
JNDI can also be used to employ the more advanced connection-pooling type connections to a database.
In either case, JNDI returns a valid connection to your database.
Note:
Check the Platforms.txt file in the Crystal Reports product distribution for a list of supported JNDI
servers.
25.4.2 Five layers
The process by which Crystal Reports accesses data from a JDBC data source consists of five layers.
• Crystal Reports layer
• JDBC translation layer
• JDBC layer
• DBMS translation (JDBC data source) layer
• Database layer
25.4.2.1 Crystal Reports layer
The Crystal Reports layer is database-driver independent, but it is used to drive all of the remaining
layers.
25.4.2.2 JDBC translation layer
2013-05-06674
Accessing Data Sources

Crystal Reports uses the Dynamic Link Library crdb_jdbc.dll to communicate with JDBC. This file
is unique to Crystal Reports environment and provides your report with access to any JDBC data source.
This is the driver that actually passes data to and from JDBC.
25.4.2.3 JDBC layer
JDBC acts as a gateway through which database requests and data can pass.
Note:
For more information on JDBC and the JDBC files, see the Sun Microsystems web site.
JDBC uses the SQL language for all transactions between Crystal Reports and JDBC. Even if the
database does not normally use SQL to create and work with tables, the JDBC driver provided by the
database (the DBMS translation layer) must communicate with JDBC using SQL. For most users, this
feature of JDBC is transparent, but more advanced users often take advantage of the features of the
SQL language used by JDBC.
25.4.2.4 DBMS translation (JDBC data source) layer
This layer consists of one or more drivers provided by a DBMS that allow JDBC to communicate with
the database. If you are unsure whether you can use an JDBC driver to access the data in your database,
refer to the documentation for your DBMS application.
25.4.2.5 Database layer
The database file which the JDBC data source refers to can be located anywhere on a system. Once
the JDBC data source is set up, Crystal Reports does not need to know the actual location and format
of the data. Thus, the database can have any format and can be located anywhere on a network, as
long as JDBC can communicate with it through the JDBC data source.
25.4.3 Supported JDBC database formats
There are many different SQL Database Management Systems available on the market, and many of
them can be accessed through JDBC. Crystal Reports communicates with JDBC through the
2013-05-06675
Accessing Data Sources

crdb_jdbc.dll translation file, which has been designed to work with any fully JDBC-compliant driver.
Crystal Reports officially supports third-party JDBC-compliant database drivers provided with:
• IBM DB2
• Oracle
• Microsoft SQL Server
• BEA LiquidData for WebLogic
Note:
Check the Release Notes in the Crystal Reports product distribution for specific version requirements
and for updates to this list; more database drivers may be added as testing progresses.
25.4.4 Configuring the Crystal Reports JDBC driver
When you install Crystal Reports, the following Crystal Reports JDBC driver files are added to your
system:
• In the \Program Files\Business Objects\common\3.5\bin directory:
• crdb_jdbc.dll
• crdb_jdbc_res_en.dll
• In the \Program Files\Business Objects\common\3.5\java directory:
• CRConfig.xml
• In the \Program Files\Business Objects\common\3.5\java\lib directory:
• CRDBJavaServer.jar
25.4.4.1 CRConfig.xml configuration for JDBC/JNDI
After installing the Crystal Reports JDBC driver, you must configure the CRConfig.xml file before the
driver will work. See the CRConfig.xml Tag Reference in the
Crystal Reports Online Help
for a complete
list of tags. The main tags that you must configure are JavaDir, Classpath, and IORFileLocation.
25.5 Business Objects universes
2013-05-06676
Accessing Data Sources

You can create a Crystal report from a Business Objects universe. Crystal Reports lets you select a
universe and design a query from it using a tool called the Business Objects Query Panel. This query
forms the basis of a SQL statement that is saved as a Crystal SQL Command object. For more
information about SQL Command objects, search for the topic called "Defining an SQL Command" in
the
Crystal Reports Online Help
.
Note:
• When you report off a universe in Crystal Reports, the query that is produced is based on the structure
of the database the universe references as it was when you designed the report. If the universe
changes, you must return to the Query Panel to propagate the changes in the report. See Editing
an existing query for more information.
• If the universe contains security that is created and managed through BusinessObjects Supervisor,
the rights applied to the current report are always the rights of the person designing the report.
• When you report off a universe in Crystal Reports, Interactive Analysis server groups are not
supported (PServer, JServer groups are supported).
This version of the Query Panel in Crystal Reports supports ODBC database connections (including
Sybase and Informix ODBC) as well as OLE DB, DB2 native, and Oracle native connections.
To learn how to begin reporting off a universe in Crystal Reports, see Connecting to a universe.
25.6 Business Views
Business Views are collections of components created in Business View Manager—a flexible and
reliable multi-tier system. Business View Manager lets companies build detailed and specific Business
Views that help report designers and end users access the information they require.
Using Business Views, you can integrate data from disparate sources. You can also bring together data
from multiple data collection platforms and application boundaries so that the differences in data
resolution, coverage, and structure between collection methods are eliminated.
Business View Manager, a thick-client application, enables administrators to create and modify Data
Connections, Dynamic Data Connections, Data Foundations, Business Elements, and Business Views.
Note:
A Business View is defined as the following collection of components:
• Data Connections
• Dynamic Data Connections
• Data Foundations
• Business Elements
Users can access Business Views through products such as Crystal Reports and the Report Application
Server.
2013-05-06677
Accessing Data Sources

For detailed information about Business Views and how to create them, see the
Business Views
Administrator's Guide
.
Note:
• When you save a report that is based on a Business View, the Save As dialog box contains an
option called "Disconnect view security." Selecting this option disconnects the report from the Central
Management Server (CMS) so that users are not prompted for logon when they open the report.
Once a report is disconnected from the CMS, you cannot reconnect to BusinessObjects Business
Intelligence platform and its security features, nor can you refresh the report's data. This is a useful
option for times when you might want to share data that is normally secured, but you don't want
those who receive the report to be able to refresh the data later.
• It is the responsibility of the System Administrator, or the report designer who has Administrator
rights, to save reports based on Business Views to a secure location. If the Administrator creates a
report based a Business View that has row- or column-level security, saving the report with saved
data to a non-secure location and then disconnecting from SAP BusinessObjects Business Intelligence
platform makes the report and all of its data available to any user.
25.7 Crystal SQL Designer files
The Crystal SQL Designer file is a query which is simply a request for a specific set of data from a
database. Once the data is gathered, it can be stored as a Crystal SQL Designer file (.qry). The Crystal
SQL Designer file can then be used much like a database table. The data it gathers from your SQL
databases becomes a new data set that can be added to reports.
Note:
• Crystal SQL Designer files were created by a legacy program in Crystal Reports. While the program
is no longer supported, you can still use the resulting QRY files as report data sources.
• Crystal Reports also provides the ability to create SQL Commands; you can define your own SQL
statement to create a virtual table to use as a data source for your reports. These commands can
be stored in the BusinessObjects Enterprise Repository and shared between many users. For more
information, search for the topic called "Defining an SQL Command" in the
Crystal Reports Online
Help
.
A Crystal SQL Designer file gathers data from ODBC data sources (such as SQL servers) by means
of SQL (Structured Query Language). The SQL DBMS handles all of the actual data gathering, sorting,
and grouping, according to the instructions in the SQL statement. Only the final set of data is stored as
a query file.
Note:
If you are not familiar with SQL, see Linking options.
First, you refine an SQL statement and create a query file that contains only the data you need. Then
you design your reports based on the query file instead of on the original databases. Most of the data
gathering process is done on the SQL server when you design the query. When you design your report,
the Report Designer only needs to work with a small set of data, saving you time and trouble.
2013-05-06678
Accessing Data Sources

Note:
The file crdb_query.dll must be installed before you can use query files in your reports.
25.8 Crystal Dictionary files
A dictionary (.dc5) file is a structured and simplified view of organizational data that you can create for
any of the individuals in your organization that are using Crystal Reports. With a dictionary, end users
only see the subset of tables and fields they need.
A dictionary is an optional source of data for Crystal Reports. It provides a convenient filter, clarifying
and simplifying complex data access techniques for end users, but the user can still access data directly
from the database. Dictionaries simply provide all the convenience without the headaches.
Note:
Crystal Dictionary files were created by a legacy program in Crystal Reports. While the program is no
longer supported, you can still use the resulting DC5 files as report data sources.
Once created, the dictionary acts as a filter, providing a view of complex data that is clear and easy for
any user to understand. The complexity of your data will not stop end users from creating powerful
reports.
Note:
The file crdb_dictionary.dll must be installed before you can use dictionary files in your reports.
Crystal Reports reads the dictionary file by using the P2ixbse.dll file. This translation file is based on
the xBase engine used to access dBASE, FoxPro and Clipper databases, but it provides all the flexibility
needed to read dictionaries. See dBASE, FoxPro, Clipper.
Note:
If you upgraded from an earlier version of Crystal Reports that allowed dictionary files, the older dictionary
files (.dct) were based on the Pervasive engine. If you convert those older files to new dictionary files,
the new files will use the xBase translation layer instead of Pervasive. However, the Pervasive engine
installed by the earlier version of Crystal Reports must remain on your system for the new dictionary
application to read the older dictionary files.
The Database Access layer is the layer through which the dictionary file actually reads the original
database data. Dictionaries must read database data using the same routes that Crystal Reports uses
to read the data. The sections on direct access database layers and ODBC data sources describe the
files dictionaries need for reading data.
2013-05-06679
Accessing Data Sources

2013-05-06680
Accessing Data Sources

Report Processing Model
26.1 Overview
Crystal Reports uses a three-pass reporting method to generate reports. The sections below describe
what happens during each step of this process. To see a visual representation, refer to the flow-chart
at the end of this section.
26.1.1 What is a "pass"?
A pass is a process that Crystal Reports uses each time the data is read or manipulated. Depending
on the complexity of the report Crystal Reports may make 1, 2, or 3 passes over the data. This feature
allows for complex reporting and formula manipulation.
26.1.2 Pre-pass 1
When previewing a report, the first elements to be evaluated are "constant" formulas. Constant formulas
are those that have a constant value for the entire report. They do not change from record to record.
For example, 100* 30 would be a constant formula. Constant formulas are evaluated at the beginning
of the print generation process and are never evaluated again. This process is known as
"BeforeReadingRecords." If you were to place a constant formula field (i.e., 100*30) in the Details
section, the result would be 3000 for each record displayed.
26.1.3 Pass 1
After the "BeforeReadingRecords" process has taken place, Crystal Reports begins reading the database
records. During the record reading process, the following will occur:
2013-05-06681
Report Processing Model

• Record retrieval. Where possible record selection and sorting are pushed down to the database in
this step.
• Evaluation of recurring formulas. These formulas are those that contain database fields but do not
contain references to subtotals or summary information. This evaluation time is known as
"WhileReadingRecords." Formulas that contain references to subtotals or summary information are
processed in the second pass.
• Application of the record selection locally. If the record selection is too complex to be pushed down
to the database, it is applied by Crystal Reports in this step.
• Application of the saved data record selection formulas. When records return to the report, they are
further filtered through any existing saved data formulas.
• Sorting, grouping, and totaling. In this step, Crystal Reports sorts the records, separates them into
groups, and then calculates the subtotals and summaries needed for each group.
• Cross-Tab, chart, and map generation. Only Cross-Tabs, charts, and maps that are based entirely
on database fields and recurring formulas are generated in Pass 1. If these objects include running
totals and/or PrintTime formulas, they are generated in Pass 2.
• Storage of saved data. After the totaling process is complete, all of the records and totals are stored
in memory and to temporary files. Crystal Reports does not read the database again, but instead
uses this saved data during all subsequent processing.
26.1.4 Pre-pass 2
During Pre-Pass 2, Crystal Reports orders the groups in the report for Top/Bottom N or Hierarchical
Grouping. The records are not read in this process, instead Crystal Reports only looks at group instances
from Pass 1, and takes the Top N as appropriate, or orders the groups based on the Hierarchical
Grouping settings specified.
26.1.5 Pass 2
Crystal Reports enters the second pass through the data to format pages. The pages are formatted on
demand. This means that Crystal Reports will not format a page until it is requested by the user, or until
it is required for the total page count in Pass 3.
During page formatting, Crystal Reports does the following:
• Group selection formulas.
• Running totals.
• Calculation of formulas marked "WhilePrinting Records."
2013-05-06682
Report Processing Model

These are formulas that contain references to subtotals or summary information, also known as
"PrintTime" formulas. This evaluation time is known as "WhilePrinting Records."
• Cross-Tabs, charts, and maps.
Cross-Tabs, charts, and maps that include running totals and/or PrintTime formulas, and charts that
are based on Cross-Tabs are generated in Pass 2.
• OLAP grids.
• Subreports.
• Generation of Pages on Demand.
Note:
• Subtotals, grand totals, and summaries may appear to be incorrect if the report has a group selection
formula. This occurs because the grand totals and summaries are calculated during Pass 1, but the
group selection formula filters the data again in Pass 2. Running total fields can be used instead of
summaries to total data in reports with a group selection formula.
• You can use on-demand subreports to ensure that your main report remains a single-pass report.
With on-demand subreports, Crystal Reports must still make a second pass through the data;
however, this second pass does not begin until you drill down on the subreport. Consequently, you
can increase the performance of reports that contain subreports by using on-demand subreports.
26.1.6 Pass 3
In the third, and final pass, the total page count is determined. This applies to reports that use the total
page count, or Page N of M special fields.
2013-05-06683
Report Processing Model

2013-05-06684
Report Processing Model

Crystal Reports Error Messages
A.1 Drive:\filename.extension
This document could not be opened. It does not appear to be a Crystal Reports document.
Context
Occurs when attempting to open a Crystal report file that does not have an RPT extension.
Reason
This error occurs because the report has become corrupted.
Resolution
A backup copy of the report must be used in place of the corrupted copy.
A.2 Drive:\test.rpt
This document could not be opened. It does not appear to be a Crystal Report document.
The document has the expected extension (RPT), but it seems to be corrupted. If this report used to
work, try opening it with a different version of Crystal Reports; if that does not work, contact your
administrator.
Context
Occurs when attempting to open a Crystal report file that has an RPT extension.
Reason
This error occurs because the report has become corrupted.
Resolution
A backup copy of the report must be used in place of the corrupted copy.
2013-05-06685
Crystal Reports Error Messages

A.3 Failed to load database connector
Reason
The database connector is not available on the machine that is processing the report.
The database client software required by the database connector is not available on the machine that
is processing the report.
Context
Occurs when refreshing or previewing a Crystal report that does not contain saved data.
Resolution
Ensure that the database connector used by the report is installed on all machines where the report
can be run.
Ensure that the necessary database client software required by the database connector is installed and
in the PATH environment system variable on all machines where the report can be run.
A.4 Failed to open the connection. Details: [Database Vendor Code: <vendor code
number>]
Reason
• The data source required by the report is unavailable or improperly configured on the machine that
is processing the report.
• The database server required by the report is unavailable.
• The database client is installed but improperly configured on the machine that is processing the
report. For example a DB2 database alias, Oracle tnsnames entry or Sybase DSEDIT entry is missing
or improperly configured.
Context
Occurs when refreshing or previewing a Crystal report that does not contain saved data.
Resolution
• Ensure that the data source required by the report is available and properly configured on all machines
where the report can be run. For example, the ODBC data source or JNDI data source exists and
connectivity can be proven from a client test tool.
• Ensure that the database server required by the report is running and that connectivity can be proven
from a client test tool on all machines where the report can be run.
2013-05-06686
Crystal Reports Error Messages

A.5 Failed to retrieve data from the database. Details: [Database Vendor Code: <vendor
code number>]
Context
Occurs when refreshing or previewing a Crystal report that does not contain saved data.
Reason
The report SQL queries that have been sent to the server cannot be executed, because an error was
returned by the database server after it processed the queries. For example, a field/table/procedure
required by the report is missing, or the queries contain syntax errors.
Resolution
Ensure the report is using the correct connection information. For example, the data source name,
server name, database name, and user name are correct.
In a database client test tool, ensure that the fields, tables, and procedures used by the report exist,
and that SQL queries can be executed against them.
In the Crystal Reports designer, verify that the SQL query, as shown under the Database menu Show
SQL Query option does not contain syntax errors.
If the SQL query shown in Crystal Reports is valid, execute the same SQL query through a database
client test tool.
2013-05-06687
Crystal Reports Error Messages

2013-05-06688
Crystal Reports Error Messages

Creating Accessible Reports
27.1 About accessibility
When you create Crystal reports for a large audience across the organization—and around the
world—you need to account for the diverse needs of that audience. Report designers often create
reports for specific languages, countries, job tasks, or work groups, but it is also important to consider
the accessibility requirements of users.
Report users may have physical, sensory, or cognitive limitations that affect their ability to access the
Web. They may not be able to see, move, or hear. They may have low vision or limited movement.
Some people have dyslexia, color-blindness, or seizure disorders; others have difficulty reading or
understanding text. They may have a combination of disabilities, with varying levels of severity.
People with disabilities often use assistive technologies: products or techniques that help people perform
tasks they cannot perform otherwise. Assistive technologies include adaptive software programs such
as screen readers (which translate text into audible output), screen magnifiers, and speech-recognition
software. People with disabilities may also use special browsers that allow only text or voice-based
navigation. They may use assistive devices such as refreshable Braille displays, or alternative keyboards
that use "sip-and-puff" switches or "eyegaze" technology.
To meet the reporting needs of people with disabilities, your reports should be designed to work with
as many assistive technologies as possible.
Despite the wide range of potential accessibility issues, you can use the techniques described in this
section to create reports that are useful for everyone.
27.1.1 Benefits of accessible reports
As more business and government leaders adopt new standards for delivering web content to people
with disabilities, accessible design is becoming critical to information management and delivery.
Accessible design provides many benefits:
• Accessible reports are easier for everyone to use.
2013-05-06689
Creating Accessible Reports

Many accessibility guidelines result in improved usability. An accessible report must provide logical
and consistent navigation. Its content must be clearly written and easy to understand.
• Accessible reports are more compatible with a variety of technologies, new and old.
Accessible content is easier to export to simple formats that are more compatible with mobile phone
browsers, personal digital assistants (PDAs), and other devices with low-bandwidth connections.
Some people may not have a keyboard or a mouse. They may have a text-only screen, a small
screen, or a slow Internet connection. Accessible design makes it easier for people with limited
technology to access information.
• Accessible content is easier to reuse for other formats.
In the viewers, accessible reports are more accurately copied or exported to other formats.
• Accessible reports improve server efficiency.
You may reduce the number of HTTP requests on the server, by providing clear navigation so people
can find. what they need faster. Providing text-only alternatives can reduce the number of graphics,
which take up valuable bandwidth.
• Recent initiatives indicate a worldwide trend towards providing accessible web content.
More companies are making accessibility a requirement for their web content, especially in the
United States, where the government introduced section 508 of the Rehabilitation Act. Accessibility
is quickly becoming an essential part of web content delivery.
• You may be legally required to provide accessible content.
Each year, more countries introduce anti-discrimination laws that ensure equal opportunities for
people with disabilities. Even if you are not legally required to meet accessibility guidelines, you may
want to do business with an organization that is required to adhere to them.
• Creating accessible reports is easier than modifying existing reports to make them accessible.
If you build accessible features into your reports now, it will be significantly less expensive than to
redesign existing reports later.
27.1.2 About the accessibility guidelines
The most comprehensive accessibility guidelines are the Web Content Accessibility Guidelines (WCAG),
developed by the international World Wide Web Consortium (W3C). The WCAG is widely considered
the definitive set of recommendations for delivering web content to people with disabilities. The WCAG
has influenced the development of similar web content standards around the world.
Organizations and governments worldwide are adopting the accessibility recommendations of the W3C.
In Australia, the Disability Discrimination Act includes standards for web site accessibility. Similar
guidelines have been introduced in the United Kingdom and throughout Europe. In Canada, all
government web content is now developed according to the Common Look and Feel (CLF) initiative,
which is largely based on the W3C's Web Content Accessibility Guidelines. Taking web accessibility a
2013-05-06690
Creating Accessible Reports

step further, the United States government introduced legislation in the form of Section 508 of the
Rehabilitation Act, which ensures the right to accessible government web content.
Common to all guidelines is a focus on providing web content that is useful for all people, regardless
of disability or impairment. For reports, accessible design is focused on the same key concepts:
• Content must be easy to understand and navigate.
• Text equivalents or alternatives should be provided for non-text objects.
• Objects should be logically organized to clarify relationships between objects.
• Reports must not rely on any one specific type of hardware, such as a mouse, a keyboard, or a color
screen.
For more information on specific accessibility guidelines, see Resources.
27.1.3 Accessibility and Business Objects products
Business Objects products allow you to design accessible reports and deliver them to your users via
the Web. By observing accessibility guidelines, you can use Crystal Reports to create reports that are
accessible to users with disabilities. You can then publish these reports to the BI platform Server, where
people with disabilities can view them on the Web using the BusinessObjects Business Intelligence
platform web desktop and the DHTML viewers.
The reports in this section were created in Crystal Reports and tested using screen readers (including
JAWS 4.5).
However, Crystal Reports does not currently provide complete accessibility for report designers with
disabilities.
The BusinessObjects Business Intelligence platform management components, including the
BusinessObjects Business Intelligence platform Central Management Console (CMC) and the Central
Configuration Manager (CCM), do not currently provide access for people with disabilities. The ActiveX
and Java viewers are also not accessible.
In the BusinessObjects Business Intelligence platform web desktop, the main user interface for working
with reports through BusinessObjects Business Intelligence platform, the ability to log on and view
reports is accessible for most users. However, other areas, such as new account sign up and scheduling,
may not be accessible.
Note:
Although you can use many of the same design guidelines to improve the accessibility of OLAP
Intelligence Professional reports, Worksheets are difficult to format for accessibility. Crystal Reports is
the recommended option for delivering reports to people with disabilities.
2013-05-06691
Creating Accessible Reports

27.2 Improving report accessibility
To begin improving the accessibility of your Crystal reports, start with accessibility guidelines that are
quick and easy to implement. A small change in your design conventions or company template may
have a significant impact on accessibility.
Simple navigation and clearly-written content are critical for accessibility, but they are easy to implement
and useful for all report users.
The following sections provide tips and guidelines on how to design reports with accessibility in mind.
Click the appropriate link to jump to that section:
• Placing objects in reports
• Text
• Color
• Navigation
• Parameter fields
27.2.1 Placing objects in reports
There are a few general guidelines to keep in mind when you place objects on a report.
27.2.1.1 Organizing objects logically
When you place objects on reports, make sure their placement is clear and logical, especially when
you need to imply a relationship between two objects in a report. For example, if you include a text
description of a chart, ensure that it is close enough to the chart to make the connection clear.
Many assistive technologies read from left to right and from top to bottom; therefore, if you include a
text description and title for a chart, you should decide which one you want the user to read first. This
will ensure that the objects in a report are read in the correct order.
2013-05-06692
Creating Accessible Reports

27.2.1.2 Placing objects in order
When you publish a report to SAP BusinessObjects Business Intelligence platform, the HTML version
organizes the objects in the report according to the consecutive order that you added them in Crystal
Reports, not according to where they were positioned on the report. The report appears the same on
the screen, but the underlying HTML code lists the reports objects in the order they were inserted.
Instead of reading the report from left to right and top to bottom, screen readers and other assistive
devices may follow the order specified in the HTML. To make a report accessible, you must add objects
to reports in the order that you want a screen reader to read them.
For example, you place Quarter, Year, and Invoice fields in the Details section and then add the report
title "Invoices by Quarter" to the Report Header. When you publish the report to the BI platform Server,
it looks the same as it did in Crystal Reports, but the underlying HTML displays the database field
headings first, followed by the title. Instead of reading the report title first, a screen reader reads the
headings first: "Quarter, Year, Invoice, Invoices by Quarter."
To avoid this, insert the "Invoices by Quarter" title first. Before you add the data table, you could provide
an introductory text object that describes the table. Finally, add the fields to the Details section. The
report will now make more sense in a screen reader, which will read "Invoices by Quarter. The following
table lists our invoices for each quarter. Quarter, Year, Invoice.", and then read the data. (For details
on providing accessible data tables, see Improving data table accessibility.)
Therefore, to create accessible reports, you must plan the order of your report before you begin working
in Crystal Reports. Plan it on paper. Make sure you know which objects you want to add and where
you want them. Include all calculations, images, and charts on your plan. When you create a new report
based on your plan, you can start adding objects from the upper left corner and work your way to the
bottom right corner of the report. Once the objects are placed, you can make changes to them afterwards
without affecting their order.
Note:
If you create a text-only alternative of your report, add it to your report as a subreport and, most
importantly, add the subreport before you add any other object to your report. For further details, see
Text.
After you add all objects to the report, you can test their placement order by tabbing through the objects.
27.2.1.2.1 To test the placement order of objects in a report
1.
Make sure no objects in the report are selected.
2.
Press the Tab key.
Crystal Reports selects the object that was placed on the report first.
3.
Tab through the remaining objects.
The order that Crystal Reports uses to tab through the objects is the same order adopted by a screen
reader that views the published version of the report.
2013-05-06693
Creating Accessible Reports

27.2.2 Text
The most common accessibility issue encountered by report designers is also one of the easiest to
resolve: providing text-only versions of non-text objects. A non-text object is an object that conveys
meaning through a picture or sound. Non-text objects include pictures, charts, graphical buttons,
graphical representations of text, sounds, animations, and audio or video clips.
People who use assistive technologies are accustomed to text-only substitutes and, therefore, will
respond well to the text-only alternatives you provide.
There are a number of ways you can use text to substantially improve your reports' accessibility:
• Provide text equivalents for objects in reports.
• Provide text alternatives for reports.
• Ensure that text is written and formatted clearly.
Text is a useful tool for creating accessible reports. Most assistive technologies require text input,
including screen readers, speech synthesizers, and Braille displays. You can easily resize and format
text, and text is the most flexible medium for import and export.
27.2.2.1 Providing text equivalents
When you create reports, there are many opportunities to use text equivalents to clarify non-text objects.
• Place a descriptive text object next to a non-text object, and be sure to add them to the report in
consecutive order (for more details see Placing objects in order).
Whenever possible, a text equivalent should communicate the same information as its corresponding
object in the report. If a report displays data in a pie chart, for example, include a text box next to
the chart that summarizes its contents.
Describe the purpose of the non-text object. For example, if an image performs an action when you
click it, describe the action. For a button that opens your web site, provide a text box labeled "Click
to view our web site".
• If a report includes audio links, provide a transcript for significant audio clips.
• If a report links to a multimedia or video presentation, provide a transcript. You may also want to
provide captioning for the audio portion and an audio description of the visual portion. Captioning
should be synchronized with the audio.
2013-05-06694
Creating Accessible Reports

27.2.2.2 Providing text-only alternatives
If there are too many non-text objects on a report, or if you do not have the resources to integrate
accessible design into all of your reports, then you can provide complete text-only alternatives. For
reports that represent data using only charts and graphics, for example, you can provide a link to a
text-only alternative that provides the same data in data tables and text objects.
Whenever possible, a text-only alternative should provide the same information as the original report.
The information conveyed through images in the main report should also be described using text objects
on the alternative report.
Note:
If you cannot produce a complete text-only version of the report, you can still improve accessibility by
providing a descriptive summary of key information or conclusions illustrated by the report.
It is good practice to provide the text-only alternative on a subreport, linked from the top left corner of
the main report, so the user has the opportunity to switch to the text-only version as soon as possible.
Add the subreport to the report before any other object to ensure that a screen reader will read it first.
If you want the subreport link to appear only for people using screen readers or similar software, you
can create a subreport link that is the same color as the background color. The link will appear as a
small blank space, but a screen reader will read the text for the link.
27.2.2.2.1 To add a text-only alternative to a subreport
1.
Create a text-only version of the report and save it.
2.
Open a new report.
3.
On the Insert menu, click Subreport.
4.
In the Insert Subreport dialog box, select Choose an existing report and click Browse to locate
the report you created in step 1.
5.
Click the subreport, then choose Format Subreport from the Format menu.
6.
In the Format Editor, on the Subreport tab, select On-demand Subreport.
7.
To hide the subreport link, on the Font tab, choose the color that matches the background color of
the report.
Note:
Instead of hiding the subreport link, you can conditionally suppress the section that contains the
subreport. For details, see Accessibility and subreports.
27.2.2.3 Using punctuation
2013-05-06695
Creating Accessible Reports

To improve the logical flow of spoken text, you may need to add extra punctuation to create pauses.
Without extra punctuation, screen readers may read several text objects as one continuous sentence,
making the content difficult to understand. For example, information in data tables may be read without
stop. To prevent this, you can break up information in data tables by inserting periods between fields.
Certain punctuation marks are read aloud, which may be distracting if used too frequently. For example,
when a screen reader reads a colon ":", it may read it aloud as "colon" instead of a pause. You can
change the amount of spoken punctuation in your screen reader's settings.
To troubleshoot your report's punctuation, it is good practice to read the report using a screen reader.
Do objects run together too quickly? Or are there too many pauses? Are any punctuation marks read
aloud? Does this improve or deter from the usability of the report?
27.2.2.4 Formatting text
After you create text equivalents or alternatives for non-text objects, ensure that the text is clearly written
and easy to read. Observe the following design guidelines:
• Use a larger font.
Although people with visual impairments can use the Zoom feature to increase the size of the report,
they will not need to magnify the report as much if the font size is larger. For example, chart labels
or legends can appear in a small font by default. For general legibility, it is good practice to use a
font larger than 8 point. For accessibility, ensure that text is larger than 11 point.
• Use a "sans serif" font.
Simple fonts such as Arial and Helvetica can be easier to read than serif fonts like Times or Palatino.
• Choose left or justified alignment.
Left-aligned or justified text is easier to read than centered or right-aligned text.
• Ensure that text follows the guidelines for color usage. For details, see Color.
Note:
You can allow users to choose different font settings using a parameter and conditional formatting. For
details, see Accessibility and conditional formatting.
27.2.2.5 Finding the right balance between text and non-text objects
Text equivalents are very flexible and often the best solution for accessibility, but they are not always
necessary or preferred.
2013-05-06696
Creating Accessible Reports

Not all non-text objects require text equivalents. You need to include text alternatives only for non-text
objects that provide information or navigation elements that the user cannot do without. Images used
for decorative purposes do not need a text description. If a report has a watermark image that acts as
a background for the data, you do not need to provide a text equivalent. Adding text descriptions for
decorative objects can produce unnecessary clutter.
Text versions of visual or auditory objects in reports should be used as a complement to the object—not
as a replacement. You do not need to remove non-text objects. Visual objects in reports can be very
helpful, especially for people with learning disabilities such as attention deficit disorder, or for people
who are deaf. People with hearing impairments may be accustomed to visual communication such as
sign language, and may find images more useful than text.
No one presentation method can meet the needs of all users. Audio clips can be very useful for people
with visual impairments, but people with hearing impairments will be unable to use them. To help both
groups, provide a combination of audio and text. Multimedia presentations may provide audio information
for people with visual impairments, as well as video information for people who are deaf or hard of
hearing. Multimedia presentations are particularly effective for people with attention deficit disorder.
However, people with certain mental health disabilities may be distracted by visual or audio objects.
The best approach is to communicate the same information with both text and non-text objects. Add
descriptive text to support the images, and add images that support the text.
If text objects begin to overwhelm your report, you may want to provide a complete text-only version in
a separate report or a subreport. For details, see Providing text-only alternatives.
To learn more strategies on how to choose presentation methods that meet the needs of a variety of
audiences, see Designing for flexibility.
27.2.3 Color
The colors you choose for objects in reports can have a significant impact on accessibility for people
with visual impairments, low vision, or color blindness. Ensure that your reports can be understood
when viewed without color.
27.2.3.1 Contrasting colors
Users with limited vision may be unable to distinguish between colors. To test the color contrast in your
report, print or view a black and white copy. You should be able to distinguish between values or fields
displayed in different colors (in a pie chart, for example).
If you cannot distinguish between colors on the report, try different colors or use gray shading. If this
does not resolve the issue, you can change other characteristics.
2013-05-06697
Creating Accessible Reports

For text, use the Format Editor to change the font, size, or style. You can add borders, underlining, or
background shading to differentiate text objects from each other.
For charts, use a combination of shading and patterns. You can automatically convert a color chart to
a black and white one using the Chart Expert, or you can select values individually and choose your
own patterns.
27.2.3.1.1 To convert a chart into black and white
1.
Select the chart and choose Chart Expert from the Format menu.
2.
In the Chart Expert, click the Options tab.
3.
In the "Chart color" area, select Black and white, and then click OK.
The chart colors convert to a variety of high-contrast pattern and color fills.
27.2.3.1.2 To change the fill for a chart value
1.
Select the chart, then click the shaded area you want to change.
2.
On the Chart menu, point to Chart Options, and then click Format Background.
3.
In the Format Background dialog box, on the Fill tab, choose a color and click Pattern.
4.
In the Choose A Pattern dialog box, click a pattern, then click OK.
Note:
You can also select a texture, gradient, or picture as a fill for the chart value. See the
Chart Help
for
more information.
27.2.3.2 Using color to convey information
Do not use color as the only identifying characteristic for critical information in a report.
For example, a text object may instruct users to "click the green button" to open a subreport. Users with
limited vision cannot tell which button is green. The button should be recognizable by another defining
characteristic besides its color. For example, you can change the button graphic to a shape that is not
used elsewhere on the report, and instruct users to "click the green arrow button". This solution provides
color information for people who can distinguish colors, and extra information for people who cannot.
Other common situations where color may be used to provide important information include:
• Highlighting
To highlight particular values in a table, do not change only the color of the value. If you highlight
outstanding invoices in red, for example, they may look the same as the paid invoices to someone
with limited vision. In the Highlighting Expert dialog box, change a font characteristic other than
color, such as font style.
• Hyperlinks
2013-05-06698
Creating Accessible Reports

Using color as the only method for identifying hyperlinks may also cause problems for color-blind
users. When you print your report in black and white, check the hyperlinks to ensure that they are
still visible.
• Identifying important areas of the report
Do not organize a report by using color as a background or as a separator between different sections
or areas. Instead of using color to identify sections, establish clear and consistent navigation for the
entire report.
27.2.4 Navigation
As with other aspects of accessible design, providing several alternative navigation methods can help
you meet the reporting needs of more people. The W3C recommends including several different
navigation methods. On the other hand, simplicity is critical for intuitive navigation. Section 508
recommends simple navigation that uses the least number of navigation links possible. Either approach
can be effective for your reports, as long as you maintain clarity and consistency.
You may want to use report parts to navigate a report (or to connect several reports). If you provide a
series of links in a page header, keep in mind that screen-reading software will reread the navigation
information every time the user refreshes the page or views a new page. In this case, simple navigation
is preferable.
For a large report, you could provide a list of navigation links as a table of contents in the report header.
More extensive navigation can be useful when you have a large volume of data. To allow users to skip
the list, you could start with a "Skip the table of contents" link that jumps ahead to the first page header.
In general, report navigation should follow these guidelines:
• Identify the target of each link.
• Provide information at the start of the report that describes the layout and navigation.
• Use navigation consistently.
• Provide the opportunity to skip repetitive navigation links.
27.2.5 Parameter fields
When you include parameter fields in a report, make sure they are clear and simple. Although parameter
fields can be a useful tool for providing accessible content, they can also introduce several accessibility
concerns. It is important to test all parameter fields for accessibility.
Parameter fields should follow these guidelines:
2013-05-06699
Creating Accessible Reports

• Provide a list of default values for the user to choose from.
Avoid requiring the user to type a value for a parameter. When users provide their own values, they
need to make sure the format of the value will be recognized by the parameter field. A list of default
values is easier to use, and it ensures that the user chooses from values with valid formats.
• Try to avoid complex parameter fields.
A complex parameter field may be more accessible when it is broken down into multiple parameters.
When you test the accessibility of your parameter fields, pay particular attention to parameters that
require a range. It may be easier to understand if you provide two parameter fields that prompt for
discrete values for the top and bottom of the range, rather than ask the user to choose both values
in the same parameter field.
• For date fields, do not allow users to choose their own values.
The calendar used to select date values is not currently accessible. Provide a pick-list of default
date values. Using a list of default values also helps avoid invalid date formats.
27.3 Designing for flexibility
Flexibility is the key to providing accessible reports. Because different users require different levels of
accessibility, it is good practice to provide a variety of presentation styles and methods to meet the
needs of as many people as possible. For a detailed report, however, you may not be able to provide
multiple presentation styles without cluttering the report with extra objects.
To address this problem, plan the degree to which you want to integrate accessible formats into your
reports. You can provide accessible formatting for each object, for each section, or as a subreport. You
can then allow users to choose their own accessibility options using a parameter field that prompts
them to choose whether or not to display accessible formats.
Using this parameter field, you can conditionally format objects, or conditionally suppress sections that
address different access needs. Or you can provide different display options by using subreports.
27.3.1 To create an accessibility parameter field
1.
In Crystal Reports, on the View menu, click Field Explorer.
2.
In the Field Explorer, right-click Parameter Fields and click New.
3.
In the Create New Parameter dialog box, type the parameter name ( Access , for example).
4.
Ensure that the Type is set to String.
5.
In the Value area, create Yes and No values.
6.
In the Value Options area, add prompting text in the Prompt Text field (for example, Do you want
to enable accessible formatting for this report? ).
2013-05-06700
Creating Accessible Reports

7.
Click OK in the Create New Parameter dialog box.
27.3.2 Accessibility and conditional formatting
Using the accessibility parameter field in simple formulas, you can provide multiple formats for any
object in a report. If a user chooses "Yes" when prompted by the parameter, the conditional formulas
will ensure that the objects are modified with accessible formatting conventions. If a user chooses "No",
then the report appears without accessible formatting, perhaps in the standard company template.
For accessible text formatting, you can follow the guidelines suggested by this section and by the W3C,
or you can survey your report users to determine the formats that work best for them. After you determine
the formatting options you want to use, you can create conditional formulas that define the options. For
example, you can display all database fields in a large Arial font, in white text on a black background,
with the Can Grow option enabled.
The following procedure creates a conditional formatting formula based on the ?Access parameter field.
The formula increases the font size if the ?Access parameter field is set to "Yes". You can use similar
formulas to change colors, add borders, or enable the Can Grow setting. For complete instructions on
conditionally formatting fields and using the Format Formula Editor, see the
Crystal Reports Online
Help
.
Note:
If text objects are too small to accommodate the enlarged font, you can use a similar conditional
formatting formula to enable the Can Grow setting, which appears on the Common tab of the Format
Editor.
27.3.2.1 To apply accessible settings to font size conditionally
1.
Open the report in the Design tab of Crystal Reports.
2.
In the Details section, right-click the field you want to conditionally format, and select Format Field.
3.
In the Format Editor, click the Font tab.
4.
Click the Formula button that corresponds to the Size list.
The Format Formula Editor opens a new formula named Font Size.
5.
In the Formula text window, type this formula (which uses Crystal Syntax):
if {?Access} = "Yes"
then 20
else 10
This formula ensures that the font size for the currently selected field is increased from 10 point to
20 point when the user chooses to display accessible formatting.
2013-05-06701
Creating Accessible Reports

6.
Click Save and close.
7.
Click OK in the Format Editor.
27.3.3 Accessibility and suppressing sections
Instead of formatting individual objects conditionally, you can create separate sections for accessible
versions of the report content, then use the accessibility parameter field to conditionally suppress
sections. The accessible and non-accessible sections can be suppressed or shown, based on the
parameter value the user selects.
Creating separate sections for accessible versions of report content may be more time-consuming, but
there are a few situations where suppressing sections conditionally can be more practical than formatting
on the object level:
• If a report contains many objects, suppressing sections may require fewer conditional formulas.
• Not all settings and features can be formatted conditionally. By suppressing sections, however, you
can make any formatting changes you want.
• You may want to provide completely different types of information for people viewing the accessible
version of the report. For example, you may want to split visual and audio objects into two different
sections and conditionally suppress them based on the parameter value the user chooses.
27.3.3.1 To suppress an accessible section
1.
Right-click the left boundary of the section you want to suppress conditionally, and click Section
Expert.
2.
In the Section Expert, click the Formula button that corresponds to the Suppress (No
Drill-Down) setting.
The Format Formula Editor opens a new formula named Suppress (No Drill-Down).
3.
In the Formula text window, type this formula (which uses Crystal Syntax):
if {?Access} = "No" then True
This formula selects the Suppress option if the user chooses not to view accessible report content.
4.
Click Save and close.
5.
Click OK in the Section Expert.
2013-05-06702
Creating Accessible Reports

27.3.4 Accessibility and subreports
Accessible report design may become too cumbersome using conditionally formatted objects and
suppressed sections. Two situations in particular may be problematic:
• To make the report accessible, you may need to change the overall organization of the report
sections, or you may need to provide different objects.
• If the report contains a large number of objects or sections, it may take too much time to create
conditional formulas for all of them.
For example, if a report contains many non-text objects displayed in a complex series of groups and
sections, you may want to provide a text-only version that uses different objects and a simplified group
structure to meet accessibility guidelines. The easiest way to address this problem is to create a subreport
that displays the accessible version of the report and place the subreport at the beginning of the main
report. For details on creating a text-only accessible subreport, see Providing text-only alternatives.
If you want only screen readers to be able to see the subreport, you can hide it by changing the subreport
link to the same color as the background. Alternatively, you can use the ?Access parameter field to
allow users to choose whether or not the subreport appears in the report. Place the subreport in its own
section and conditionally suppress the section based on the ?Access parameter field. For details, see
Accessibility and suppressing sections.
27.4 Improving data table accessibility
Large tables of data can be difficult to interpret if a person is using a non-visual means of accessing
the web, such as a screen reader. People using screen magnifiers or the Zoom feature may also find
data tables hard to navigate because they cannot see the table headings at all times. It can easily
become difficult to associate the value that a screen reader is reading with the corresponding column
and row headings. Users need to be able to understand the data value's position in the table and its
relationship to other values.
To improve data table navigation, you can use text objects to provide contextual information with each
value. Using conditional formatting or suppression, you can create a report that displays these objects
only if the user chooses to view them. Other design guidelines can help make large tables of data easier
to understand, such as providing summary paragraphs and expanded column headings.
Note:
This section uses terminology consistent with the W3C accessibility guidelines. In these guidelines, the
term data table refers to values arranged in columns and rows. In Crystal Reports, data tables take the
form of group or page headings combined with database fields in the Details section. Do not confuse
data tables with database tables, which are data sources used by Crystal Reports.
2013-05-06703
Creating Accessible Reports

27.4.1 Text objects and data table values
You can make a large table easier to understand and navigate by adding text objects that provide
information about each value in the table.
Include whatever information is necessary to establish the meaning and context of the value displayed.
When appropriate, include information that describes column headings or neighboring fields. For
example, if a report displays employee names and salaries, you can add a text object before the Salary
database field that reads "{Last Name}'s salary is ". The user can determine the context and meaning
of the value by reading the accompanying text object.
Ensure that your text objects use punctuation that will make the content easier to understand when
read aloud by a screen reader. Without accessibility-orientated punctuation, data tables may be read
as one long sentence, making navigation and interpretation very difficult. For example, you can add
periods after values so a screen reader will pause between columns and rows. For details, see Using
punctuation.
As with all objects in reports, the order in which you place text objects on the report can affect
accessibility. Screen readers read the objects in the order they were originally added. (For details, see
Placing objects in order.) The correct placement order is critical when you add a text object that identifies
the contents of a particular column in a data table. If you add the text objects at the end of the design
process, they may be read after the columns that they refer to. When you add text objects that describe
values in a report, ensure that you place them on the report in the order that you want them to be read.
Before you can create an accessible data table, you must plan your report in advance, determining
which objects and database fields you want to include. Because objects must be placed in the order
you want them to be read, planning your content for accessibility is essential. As part of this planning,
it is good practice to choose how you will use text objects to identify data table values. You can simply
add text objects before each database field. Or you can conditionally suppress text objects or use
formulas to combine text objects and values.
27.4.1.1 Labeling data tables with text objects
Before each field, add a text object that describes the field's position in the table. In the following
example, the text box provides information about the Employee ID number. When the report is read
with a screen reader, each number is preceded by the brief explanation in the text box.
2013-05-06704
Creating Accessible Reports

Providing extra information for each value can make a data table appear cluttered for people without
vision impairments, so you may want to hide the extra text objects by changing the font color to the
same color as the background. The extra text is invisible, but is still detected and read by screen readers.
27.4.1.2 Labeling data tables conditionally
Although adding text objects is relatively easy to implement, it does not address all accessibility concerns.
Invisible text is read by screen readers, but does not help people with limited vision. You can allow the
user to choose whether or not to display text descriptions in the data table by conditionally formatting
or suppressing text objects.
Make sure your report includes an accessibility parameter field. For instructions on how to create the
?Access accessibility parameter field, see Designing for flexibility.
2013-05-06705
Creating Accessible Reports

You can use the parameter field to suppress the text objects conditionally. While it has the same effect
as changing the font color to the background color, conditionally-suppressed text also allows you to
use the parameter field to specify other formatting options such as font size and style.
To display the text objects only when the user chooses Yes for the ?Access parameter field, the following
report uses a simple conditional formula to enable the Suppress option on the Common tab of the
Format Editor.
{?Access}="No"
The formula must be added for each text object you want to suppress.
When the user chooses Yes for the ?Access parameter field, the text objects are not suppressed; the
data table displays text descriptions.
Note:
The report shown also uses the ?Access parameter field to enable the Can Grow option (also on the
Common tab of the Format Editor) and increase the font size for people with visual impairments.
When the user chooses No for the ?Access parameter field, the conditional formula suppresses the
text objects, leaving spaces in the report in place of the text objects.
27.4.1.3 Labeling data tables with formulas
Another method for adding explanatory text to a data table is to create formulas that combine text,
database fields, and conditional formatting. By adding the text and the database fields together in a
conditional formula based on the ?Access parameter, you can provide optional text for values in a table
without leaving blank spaces in the report. Using formulas also reduces the number of objects on the
report, making it easier to maintain the proper placement order.
Note:
Do not use this method if the report has summary fields or calculated fields. Although formulas provide
the best display of data, they can interfere with calculations because the data is converted to text.
2013-05-06706
Creating Accessible Reports

The following report uses formulas placed in the Details section that combine the database fields and
the extra text. When the user chooses Yes for the ?Access parameter field, each formula builds a string
that includes the description and the value.
This report uses the following formulas:
@Employee ID
If {?Access}="Yes" then "Employee ID "
+ ToText({Employee.Employee ID},0) + ". "
else ToText({Employee.Employee ID},0)
@Last Name
If {?Access}="Yes" then "Employee last name is "
+ {Employee.Last Name} + "."
else {Employee.Last Name}
@Salary
If {?Access}="Yes" then {Employee.Last Name} + "'s Salary is " + ToText({Employee.Salary}) + "."
else ToText({Employee.Salary})
Notice the added punctuation. The periods at the end of each formula improve screen reader legibility
by creating a pause between fields.
Note:
• The report also uses the ?Access parameter field to enable the Can Grow option and increase the
font size.
• In @Employee ID, ?Access parameter field has been set to "0" to enable the Can Grow option and
increase the font size.
When the user chooses No for the ?Access parameter field, the formula returns only the data. The
report does not display blank spaces in place of the conditional text objects. Both versions of the report
are easy to read.
2013-05-06707
Creating Accessible Reports

27.4.2 Other data table design considerations
In addition to labeling data values with text objects, other report design techniques can help you create
data tables that are easier to understand and navigate.
• Include an introductory paragraph that summarizes the content of the table. The summary should
be brief: one or two sentences if possible.
• Ensure that headings provide enough information to clearly identify the values that they label.
• To test a table's accessibility, read its headings and values in a linear fashion from left to right and
from top to bottom. For example, if a report displays last and first name fields for each customer, it
may read better if it displays first name followed by last name. Whenever possible, test the report
using assistive technologies such as screen reading software.
The final accessible report includes a summary of the data table.
2013-05-06708
Creating Accessible Reports

To display the table summary conditionally, the report designer divided the Page Header into two
sections. The first page header is suppressed when the ?Access parameter field is set to No . The
second page header is suppressed if the user chooses Yes . For details, see Accessibility and
suppressing sections.
27.5 Accessibility and BusinessObjects Business Intelligence platform
Designing accessible reports is only part of the solution. You need to make sure that you deliver reports
through an accessible interface that follows the same design guidelines.
Although the administrative components of SAP BusinessObjects Business Intelligence platform and
the scheduling functionality in the BI platform Server web desktop are not currently accessible to
everyone, the SAP BusinessObjects Business Intelligence platform web desktop and the DHTML viewer
allow for accessible access to reports over the Web.
Several enhancements have been made to the BI platform Server to account for accessibility issues.
Text descriptions are now provided in ALT tags for the toolbar buttons and other images. Descriptions
for text boxes are clearer, and shortcut links are provided in the DHTML viewer so you can navigate
past the toolbar and group tree.
27.5.1 Setting accessible preferences for SAP BusinessObjects Business Intelligence
platform
For the best accessibility support in SAP BusinessObjects Business Intelligence platform, you need to
set certain display preferences.
2013-05-06709
Creating Accessible Reports

For the BI platform Server web desktop, display objects in the Action view. The Action view is more
accessible because it provides a text list of the available reports and does not use shortcut menus for
report commands. Depending on your users' needs, you may also want to reduce the number of reports
displayed on each page.
For viewing reports, choose the DHTML viewer as the default viewer in your preferences.
Note:
You must have your own account on the system in order to set preferences.
27.5.1.1 To set accessible preferences for SAP BusinessObjects Business
Intelligence platform
1.
Log on to SAP BusinessObjects Business Intelligence platform.
2.
On the title bar, click Preferences.
3.
On the General Preferences page, in the "On my desktop, show me" area, select Action view.
4.
To reduce the number of reports displayed on each page, type a number in the text box next to the
Action view option.
5.
Click the Crystal Report Preferences link.
6.
In the "View my reports using the" area, select the DHTML viewer.
7.
Click Apply.
27.6 Accessibility and customization
When you customize Crystal reports or the SAP BusinessObjects Business Intelligence platform web
desktop, or if you incorporate the BI platform Server into an existing web site, ensure that your changes
follow the accessibility guidelines set forth by the U.S. Access Board in section 508, or the W3C's Web
Accessibility Initiative.
If you customize Crystal reports or the SAP BusinessObjects Business Intelligence platform web desktop
extensively, you may encounter other accessibility issues. For online resources that provide
comprehensive accessibility guidelines, see Resources. The following list provides some common
accessibility issues that may cause problems when you customize Crystal Reports or SAP
BusinessObjects Business Intelligence platform content.
• Frames
Frames should be clearly labeled, for easier identification and navigation. Provide text at the top of
the frame that describes its purpose. For example, if a frame provides a list of links to different
countries, you can clarify its purpose clear by adding text to the frame, such as a title ("Countries")
or short instructions ("Click a country for details").
2013-05-06710
Creating Accessible Reports

• Style sheets
If you have a visual impairment, you can create a style sheet with specific viewing preferences to
accommodate the disability. For example, you could create a style sheet that displays all web pages
in a large font with white characters on a black background. Users cannot apply personalized style
sheets to Crystal reports, but the viewers provide a Zoom button that enables people with visual
impairments to increase the magnification to suit their needs. You can also allow users to choose
from different formatting options using conditional formatting. For details, see Accessibility and
conditional formatting.
• Scripts
If you modify Crystal content to include a script that displays content or an interactive object, ensure
that the script is identified by text that conveys the purpose of the script. Make sure that pages with
scripts are still usable when the scripts are turned off or unsupported. For more information about
scripts and accessibility, see Resources.
• Image maps
Server-side image maps identify active regions using coordinates, which are not meaningful to a
screen reader. Client-side image maps provide better accessibility because you can assign a link
or URL to each active region within the image map.
• Electronic forms
Electronic forms can present difficulties for screen readers, and must be set up carefully. When you
label a component in a form, ensure the label is clearly located next to the form component. For
example, for a Search box, ensure that the "Search" title appears alongside the appropriate text
box.
• Applets and plug-ins
If a report needs an applet, plug-in, or other application on the client machine in order to interpret
page content, the plug-in or applet must follow accessibility guidelines.
If you attach multimedia or other additional resource files to your report, such as PDF or Real Audio
files, provide a link to install the required plug-ins or software, and ensure that the required software
also meets accessibility design standards.
• Flickering
Flickering images can trigger seizures for people with seizure disorders. The W3C recommends to
avoid use of images that flicker or flash between four and 59 times per second.
• Search engine placement
Do not use hidden text to enhance your web site's placement in search engines. Hidden text reduces
readability, because it is read by the screen readers. Also, hidden text is actively discouraged by
popular search engines such as Google, and thus offers little benefit.
27.7 Resources
2013-05-06711
Creating Accessible Reports

This section focuses on how you can create and distribute accessible reports with Crystal software.
The report design techniques in the section were tested using JAWS 4.5. It is good practice to test all
accessible reports using JAWS and other assistive technologies whenever possible.
To make all of your Web communications accessible, consult the detailed guidelines available through
the W3C or from your government's web site.
• World Wide Web Consortium's Web Accessibility Initiative:
http://www.w3.org/WAI/
• the United States Access Board's web site for Section 508:
http://www.access-board.gov/sec508/guide/
• the Government of Canada Internet Guide:
http://www.tbs-sct.gc.ca/clf2-nsi2/index-eng.asp
2013-05-06712
Creating Accessible Reports
More Information
LocationInformation Resource
http://www.sap.com
SAP BusinessObjects product infor-
mation
Navigate to http://help.sap.com/businessobjects and on the "SAP Busi-
nessObjects Overview" side panel click All Products.
You can access the most up-to-date documentation covering all SAP
BusinessObjects products and their deployment at the SAP Help Portal.
You can download PDF versions or installable HTML libraries.
Certain guides are stored on the SAP Service Marketplace and are not
available from the SAP Help Portal. These guides are listed on the Help
Portal accompanied by a link to the SAP Service Marketplace. Customers
with a maintenance agreement have an authorized user ID to access
this site. To obtain an ID, contact your customer support representative.
SAP Help Portal
http://service.sap.com/bosap-support > Documentation
• Installation guides: https://service.sap.com/bosap-instguides
• Release notes: http://service.sap.com/releasenotes
The SAP Service Marketplace stores certain installation guides, upgrade
and migration guides, deployment guides, release notes and Supported
Platforms documents. Customers with a maintenance agreement have
an authorized user ID to access this site. Contact your customer support
representative to obtain an ID. If you are redirected to the SAP Service
Marketplace from the SAP Help Portal, use the menu in the navigation
pane on the left to locate the category containing the documentation you
want to access.
SAP Service Marketplace
https://cw.sdn.sap.com/cw/community/docupedia
Docupedia provides additional documentation resources, a collaborative
authoring environment, and an interactive feedback channel.
Docupedia
https://boc.sdn.sap.com/
https://www.sdn.sap.com/irj/sdn/businessobjects-sdklibrary
Developer resources
2013-05-06713
More Information

LocationInformation Resource
https://www.sdn.sap.com/irj/boc/businessobjects-articles
These articles were formerly known as technical papers.
SAP BusinessObjects articles on
the SAP Community Network
https://service.sap.com/notes
These notes were formerly known as Knowledge Base articles.
Notes
https://www.sdn.sap.com/irj/scn/forums
Forums on the SAP Community
Network
http://www.sap.com/services/education
From traditional classroom learning to targeted e-learning seminars, we
can offer a training package to suit your learning needs and preferred
learning style.
Training
http://service.sap.com/bosap-support
The SAP Support Portal contains information about Customer Support
programs and services. It also has links to a wide range of technical in-
formation and downloads. Customers with a maintenance agreement
have an authorized user ID to access this site. To obtain an ID, contact
your customer support representative.
Online customer support
http://www.sap.com/services/bysubject/businessobjectsconsulting
Consultants can accompany you from the initial analysis stage to the
delivery of your deployment project. Expertise is available in topics such
as relational and multidimensional databases, connectivity, database
design tools, and customized embedding technology.
Consulting
2013-05-06714
More Information

Index
3-D Riser chart 271
3-D Surface chart 271
A
A to B, A to C link, setting up 562
ABAP data clusters
and the Cluster Definition tool 610
and the Open SQL driver 601
described 602, 609
mapping as tables 610
reporting off 609
selecting for reports 602
ABAP functions
and the Open SQL driver 601
calculations and functions 604
described 602, 604
examples 605
selecting for reports 605
ABAP queries
and parameters 597
and subreports 597
reporting off 572
absolute formatting 239
access
database 656, 670
via ODBC 670
via the DAO Engine 657
Access 656
Access queries, opening 558
through DAO 556
through ODBC 557
accessibility 689
and BusinessObjects Enterprise
709
and Crystal Reports 689
benefits of 689
design considerations 692
guidelines 690
resources 712
accounting conventions, using 249
ACT! database 563, 661
ActiveX Data Objects 663
ADO 663
Alerts. See Report Alerts 409
alias 521
alignment, modifying for cells 333
and accessibility 703
applying current query 637
architecture 510
client/server 510
architecture
(continued)
relational model 505
area chart 271
areas, identifying 67
ascending sort order 143
assistive technology 689
attribute properties, conditional 255
B
background colors, formatting
(rows/columns) 333
bar chart 271
zooming 281
Bar Chart map 286
barcodes 265
adding 265
changing the appearance of 266
removing 267
Basic syntax
creating formula 429
batch publishing 630
batch size, lists of values 475
BeforeReadingRecords 681
bitmap image objects 99
adding to repository 99
inserting from repository 102
linked 309
blank lines 197
deleting 197
suppressing 222
BLOB fields 83
borders 239
adding 239
changing 282
for charts 282
Bottom N 168
selecting groups 168
selecting groups conditionally 170
selecting percentages 168
selecting percentages conditionally
170
sorting 682
boxes
expected formatting behavior 245
bubble chart 271
business components 644
additional 644
parent and child 644
selecting 639
Business Views 677
BusinessObjects Enterprise
scheduling reports 568
buttons 421
Expressions Editor Toolbar
(Formula Workshop) 421
Formula Workshop 421
General Toolbar (Formula
Workshop) 421
Workshop Tree Toolbar (Formula
Workshop) 421
BW
reporting off queries 572
BW queries
and formatted reporting 574
connection settings 574
creating for reports 580
default report title 579
dynamic pick lists 574
field descriptions and technical
names 577
selecting for reports 578
with hierarchy 584
with hierarchy node variable 589
with hierarchy variable 590
BW Query driver, connection settings
574
BW query, design with hierarchy 584
C
calculated fields, linking to/from 501
calculations, and ABAP functions 604
call stack 435
captions, adding to subreports 503
Case Logic 128
cells 333
modifying
alignment 333
height 333
width 333
changing
data sources 519
character spacing 233
character strings, to select records 134
Chart Expert 270
modifying charts with 278
chart layouts 270
Advanced 270
Cross-Tab 270, 276
Group 270, 275
OLAP 270, 277
2013-05-06715

charts
auto-arranging 281
changing border 282
conditionally formatting 282
creating 274
on an OLAP cube 277
on Cross-Tab summaries 276
on subtotal fields 275
on summary fields 275
drilling down 273
modifying 282
legend text 283
with Chart Expert 278
with Chart Options commands
278
placing 273
types 271
3-D Riser 271
3-D Surface 271
area 271
bar 271
bar, zooming 281
bubble 271
doughnut 271
funnel 271
Gantt 271
gauge 271
histogram 271
line 271
line, zooming 281
numeric axis 271
pie 271
radar 271
stock 271
using underlay feature with 283
XY Scatter 271
zooming features 281
child business components 644
clauses 514
DISTINCT 514
FROM 515
GROUP BY 516
ORDER BY 516
SELECT 514
WHERE 515
client field 604
client/server architecture 510
and Informix Online Server 663
server 547
server-side processing 547
Clipper 657
Cluster Definition tool 610
tutorial 611
using 610
cluster tables 602
selecting for reports 602
clusters. See ABAP data clusters 609
color
adding 239
and accessibility 697
contrast 697
columns, multi-value 646
combining, sorting and grouping 147
commands 516, 574
adding from repository 103
adding to repository 101
dynamic OLE menu 305
OLE 305
Picture 305
components
Security Definition Editor 615
conditional attribute properties 255
conditional formatting 254, 629
for accessibility 701
using Highlighting Expert 260
with page margins 257
with parameter fields 482
conditional group sorting 150
conditional messages, printing in form
letters 205
conditional on/off properties 255
conditional running totals, creating for
group 185
configuration file 636
configuration options 570, 574
connecting 568, 637
to the SAP system 568
with Local (Active Dedicated
Session) connection type 637
with Local connection type 636
with Server connection type 635
Connection Info dialog box 633
connection names 635
connection settings 574
connection strings 636
connection types 635
Local 636
Local (Active Dedicated Session)
637
Server 635
connections, creating 633
constant formulas 681
Context Report Part, user scenarios
402
contrast, color 697
creating
reports 568
Cross-Tab Calculated Members 336
Calculation Formulas 338
Header Formulas 338
Insertion Formulas 340
Value Formulas 339
Cross-Tab Report Wizard 24
cross-tab report, creating 321
cross-tabs 315
customizing row/column labels 330
formatting 333
individual fields 334
row/column background color
333
inserting chart 276
inserting map 291
modifying cells
alignment 333
height 333
width 333
printing cross-tabs that span
multiple pages 332
summarized fields 329
abbreviating 329
display direction 336
using running totals in 331
values as percentages 329
working with 329
Crystal Dictionary files, ODBC data
sources 679
Crystal Reports
accessing data 648, 651
Unicode support 632, 648, 651
working with 650
Crystal Reports (RPT)
exporting to 380
Crystal SQL Designer files, ODBC data
sources 678
Crystal syntax
creating formula 429
currency fields, formatting with
Highlighting Expert 260
custom functions
adding
to repository 100
using in Formula Expert 429
customizing
security definitions 615
D
DAO Engine, Microsoft Access 657
DAO, opening Access queries 556
data 143
ascending sort order 143
BLOB fields 83
creating custom groups 149
cross-tabs 315
descending sort order 143
formatting for accessibility 703
formatting for reports 84
2013-05-06716
Index

data
(continued)
grouping 41, 147
hierarchically 159
in intervals 156
on first letter of name 158
linking 75
live 111
minimizing transfer 107
placing on report 77
refreshing report 480
saved 112
selecting records for reports 84
sorting records within groups of
151
subtotaling grouped 171
summarizing grouped 166
data access 568
connecting with the Data Access
Components 568
Data Access Components 568
connecting to SAP 568
Data Access Objects (DAO) 657
data access restrictions 615
data age indicator 68
data clusters. See ABAP data clusters
609
data files, linking 527
data mismatches, resolving in maps
296
data parameters 455
data sources 520, 568, 572, 601, 653
ABAP data clusters 601
ABAP functions 601
changing 519, 520
cubes 578
JDBC 673
native 654
ODBC 665
ODS 594
OLE DB 673
Operational Data Store 594
selecting 636
setting up ODBC 560
transparent, pool, and cluster
tables 601
views 601
data transfer, minimizing 107
data translation, Crystal Reports 655
data types 647
data, accessing 651
database clients, installing 669
database fields 33, 77
combining in text object 33
inserting 28
placing on the report 77
remapping altered fields 552
database file
locating 519
database files 654
direct access 654
database location, setting for reports
639
Database Management Systems, SQL
511
database ranking 358
creating 358
defined 357
parameters 359
database tables 561
adding to a report (ODBC) 561
index 506
database types 656
Access 656
ACT! 661
ActiveX Data Objects 664
Btrieve. See Pervasive 658
dBASE, FoxPro, Clipper 657
Informix 671
Lotus Domino 662, 672
Microsoft Access 670
Microsoft Excel 671
Microsoft Exchange 659
Microsoft Proxy (IIS) 665
NT Event Log 664
Oracle 7/8 662
Paradox 657
Pervasive 658
SQL 671
Sybase Adaptive Server 662
Visual FoxPro 672
Web/IIS log files 665
databases 505
alias 521
and performance 116
changing name and location 521
logical 597
relational 505
sample 23
selecting 26
thread-safe drivers 117
DataDirect drivers
ODBC 671
Date fields
formatting 242
date ranges, for record selection 136
Date/Time fields
formatting 242
dates, to select records 135
DB2 server 663
dBASE 657
DBMS, SQL 511
defining security 615
deleting 197
blank lines 197
sections 192
Dependency Checker, using 92
descending sort order 143
design solutions 213
Design Tab
areas 65
compared to Preview Tab 71
displaying field names 32
sections 28
designing reports 51, 53, 239, 568
absolute formatting 239
adding
a title page 87
captions to subreports 503
field headings 36
summary information 34, 87
title 35
and accessibility 692
balancing field spacing 40
changing
chart border 282
map titles 294
charting
on a subtotal field 275
on a summary field 275
on an OLAP cube 277
on Cross-Tab summaries 276
conditional formatting 254
conditional on/off properties 255
creating prototypes 57
deciding on content 51
deleting 40
fields 40
sections 192
formatting
objects 35
formatting, data 84
hiding
report objects 218
report sections 217
how OLE objects are represented
304
inserting 30, 81
additional fields 30
database fields 28
hyperlink fields 81
OLE objects in 303
sections 192
linking two or more database tables
75
manipulating data 54
merging related sections 193
modifying chart legend text 283
moving sections 193
2013-05-06717
Index

designing reports
(continued)
multiple columns 216
organizing data 84
placing 273
charts 273
data 77
database fields on 77
formula fields 77
maps 288
parameter fields 79
running total fields 79
special fields 79
SQL expression fields 78
text objects 80
printing characteristics 55
record selection 84
resizing 31, 252
fields 31
sections to add white space
252
sections to delete white space
253
selecting multiple objects 232
spacing between text-based
objects 225
splitting and resizing sections 194
suppressing sections to delete
white space 253
using 65
Design Tab areas 65
HTML Preview Tab 72
multiple sections in 196
Preview Tab before printing 68
Details section 65
dictionaries of data clusters 610
direct access database 654
files 654
linking 531
tables 531
disabilities. See accessibility 689
Display database field by, configuration
options 570
DISTINCT clause 514
docking explorers 93
Dot Density map 286
doughnut chart 271
drilling down
on summarized data 85
with charts 273
with maps 289
drivers 568
connecting to SAP 568
Data Access Components 568
MDX Query 573
Open SQL driver 601
Operational Data Store 593
drivers
(continued)
selecting for reports 568
drivers, selecting for reports 633
dynamic pick lists 574
dynamic prompting, overview 456
E
edit mode (text objects) 199
embedded fields, suppressing blank
lines 222
Embedded Summaries 340
embedded, vs. linked objects 308
enforced both 539
enforced join options 539
enforced both 539
enforced from 539
enforced to 539
not enforced 539
Enterprise folders 391
opening reports with 391
saving or publishing reports to 393
Enterprise Hyperlink
Creating 405
equal count, on Ranged map 286
equal link 540
equal ranges option, Ranged map 286
error messages 440
described 685
Excel 671
database 671
via ODBC 671
Exchange
with Crystal Reports 659
Exchange Folder, exporting to 386
experts
chart 271, 278
highlighting 260
map 286
select 130
top N/sort group 167
explorers, docking 93
exporting 384
destinations 384
format types for exporting 380
Microsoft Excel Workbook
Data-only (.xlsx) 380
reports 380
to a disk file 385
to an application 384
to an Exchange Folder 386
to an ODBC data source 389
to Crystal Reports (RPT) 380
to fax 379
to HTML 380, 388
to Microsoft Excel (97-2003 ) 380
exporting
(continued)
to Microsoft Excel (97-2003)
Data-only 380
to Microsoft Mail 387
to Microsoft Word (97-2003) 380
to Microsoft Word (97-2003) -
Editable 380
to ODBC 380
to PDF 380
to Record Style (REC) 380
to Report Definition (TXT) 380
to Rich Text Format (RTF) 380
to Separated Values (CSV) 380
to Tab Separated Text (TTX) 380
to Text (TXT) 380
to XML 380
to XML (Legacy) 380
F
faxing reports 379
field descriptions 577
field headings, inserting 36
field names, displaying 32
field spacing, balancing 40
fields 83, 643
accessing BLOB data 83
alias 521
appearance 29
changing default formats 241
deleting 40
formatting 334
individual in cross-tab 334
inserting 28
additional 30
linking to/from calculated 501
locking size and position 241
making read-only 240
resizing 31
selecting 31
SQL expression 643
View Mode 642
File Save As dialog box 37
files, locating 519
filters 376
adding to OLAP grid 376
combining with prompts 350
creating 348
editing 354
reference to operators 352
removing 354
using And or Or to combine 351
Find tab 71
Flash objects 310
binding to an Xcelsius SWF 312
inserting in reports 311
2013-05-06718
Index

fonts
setting fractional sizes 234
footers, creating after the page 258
form letters
inserting a date 202
inserting address 202
printing conditional messages 205
salutation 203
using text objects 199
Format Painter, using 263
formats, changing field defaults 241
formatted reporting 574
formatting 207
absolute 239
accounting conventions 249
adding 198
blank lines conditionally 198
lines 243
shapes 248
and accessibility 696
applying Siebel 643
background color rows/columns in
cross-tab 333
borders, color, and shading 239
conditional formatting 254
conditionally with Highlighting
Expert 260
conditionally with parameter fields
482
cross-tab fields individually 334
cross-tabs 315, 333
data for reports 84
deleting blank lines 197
horizontal pages 250
modifying lines 243
objects 35
OLAP grid 369
properties 239
reports for web viewing 238
setting highlighting priorities 262
translated reports 629
using the Format Painter 263
with the LanguageCode% formula
629
formatting cells
alignment 333
height 333
width 333
formula compiler warnings 440
Formula Editor 424
key controls 426
Formula Expert 429
formula fields
inserting 77
linking to/from 501
Formula Workshop 420
buttons 421
Expressions Editor Toolbar buttons
421
General Toolbar buttons 421
Workshop Tree 421
Workshop Tree Toolbar buttons
421
formulas 415
adding 429
and running totals 128
and summaries 128
Boolean 255
components 416
entering 425
constant 681
copying 433
existing 432
from one report to another 433
from online help 433
creating 429
in Formula Expert 429
running total 188
debugging 435
evaluation time errors 435
deleting 434
editing 431
copies of formulas 434
enhanced record selection 119
for record selection 129
Formula Editor 424
Formula Expert 429
Formula Workshop 420
global search 431
inserting in reports 429
LanguageCode% 629
pushing down selection 119
removing 435
searching and replacing text 431
syntax 417
choosing 425
troubleshooting 137
types of 419
alerting formulas 419
conditional formatting formulas
419
report formulas 419
running total condition formulas
419
search formulas 419
selection formulas 419
typical uses 415
when to avoid 127
with parameter fields 453
FoxPro 657
FROM clause 515
full outer join 538
functions. See also ABAP functions
602
funnel chart 271
G
Gantt chart 271
gauge chart 271
geographic areas on Pie Chart maps
286
global lock feature 617
global variables
when to avoid 128
Graduated map 286
graphics 248
cropping 248
inserting 45
scaling 248
sizing 248
greater than link 541
greater than or equal to link 542
grid 372
OLAP 372
GROUP BY clause 516
Group Footer section 65
Group Header section 65
group headers
custom, creating 178
drilling-down 179
live 43
standard group headers 176
suppressing 179
group selection formulas 154
creating 154
troubleshooting 155
group sorting 682
group values, sorting summarized 167
grouping 147
and performance 125
data in intervals 156
hierarchically 159
on first letter of name 158
reports 41
with SQL expressions 127
groups
creating 185
conditional running totals for
185
custom 149
running totals 184
running totals using formula
188
editing 165
selecting with Select Expert 153
2013-05-06719
Index

groups
(continued)
sorting
conditionally 150
records within 151
subtotaling 171
guidelines 226
designing with 226
inserting 227
positioning objects with 229
snapping objects to 227
viewing 226
H
headers 176
creating standard group 176
custom group, creating 178
drilling-down 179
live group headers 176
suppressing 179
height, modifying for cells 333
hiding
group headers 179
report objects 218
hierarchies
creating in BW query 584
in BW queries 583
reporting off 584
with hierarchy node variable 587,
589
Hierarchy Node Variable 587
building report from 587, 589
creating query with 587
Hierarchy Variable 589
building report from 589, 591
creating 590
highlighting exceptions and
accessibility 698
Highlighting Expert 260
conditional formatting 260
setting priorities 262
histogram chart 271
horizontal pages 251
numbering 251
repeating objects 250
HTML Preview Tab 72
HTML, exporting to 380, 388
Human Resources modules, and data
clusters 609
hyperlink fields
creating enterprise hyperlinks 81,
82
inserting 81
I
If-Then-Else with Case Logic 128
images 99
adding to repository 99
dynamic 306
inserting
from repository 102
in a report 306
Import Wizard 631
importing 631
BW content 631
text-based objects from a file 224
indexed tables 506
linking 531
indexes, for performance 116
Informix 671
database 671
Online Server 663
via ODBC 671
InfoSet driver, selecting data sources
598
InfoSets 572
and parameters 597
and subreports 597
selecting for reports 598
inner join 534
input parameters, and ABAP functions
605
Insert menu
OLE object 305
Picture command 305
inserting 377
filters to OLAP grid 376
installing, database clients 669
Integrated Security 73, 512, 673
intervals, grouping data in 156
J
Java Database Connectivity. See
JDBC 673
Java Naming and Directory Interface.
See JNDI 674
JDBC data sources 673
JNDI, description 674
join types 533
full outer 538
inner 534
left outer 535
right outer 536
K
key controls for Formula Editor 426
L
language field 604
LanguageCode% formula 629
languages 628
SQL 514
translated reports 628
layouts 270
chart 270
map 285
left outer join 535
less than link 543
less than or equal to link 544
limitations, and ABAP functions 605
line chart 271
zooming 281
line spacing 233
lines 243
adding 243
adding blank conditional 198
expected formatting behavior 245
modifying 243
link relationships 523
link types 533
equal 540
greater than 541
greater than or equal to 542
less than 543
less than or equal to 544
not equal to 546
linked 309
bitmap image object 309
SQL tables 529
subreports and performance 114
vs. embedded objects 308
linking 527, 604
client field 604
data files 527
from table 523
indexed tables 531
language field 604
one-to-many 492, 523, 562
one-to-one 523
SQL database considerations 528
subreport to primary report 497
subreports 492
tables 75, 522, 644
tables and views 604
tables for performance 117
to table 523
to/from calculated fields 501
to/from formula field 501
two or more database tables 75
unindexed tables 502
Visual Linking Expert 531
linking options 533
2013-05-06720
Index

lists of values 103
adding from repository 103
command objects as data source
474
long lists 475
null handling 475
overview 459
separate values and descriptions
473
sharing common lists 472
types 459
working with 471
live data 111
live group headers 43
creating 176
Local (Active Dedicated Session)
connection type 637
Local connection type 636
locking down tables 617
Log On Server command 569, 634
logging on to SAP 569
logical databases 597
logon dialog box 569, 570
logos, inserting 45
long lists of values 475
Lotus Domino 662, 672
via ODBC 672
M
Mailing Labels Report Wizard 25
MANDT field 604
Map Expert 286
editing maps with 293
map layouts 285
Advanced 285
Cross-Tab 285
Group 285
OLAP 285
Map Navigator 298
hiding 298
showing 298
map types 285
Bar Chart 286
Dot Density 286
Graduated 286
Pie Chart 286
Ranged 286
mapping ABAP data clusters 610
maps
centering 298
changing
geographic maps 296
layers 295
titles 294
type 294
maps
(continued)
creating
on group fields with Group
layout 290
on OLAP cube with OLAP
layout 292
data mismatches 296
drilling down 289
editing with Map Expert 293
inserting on Cross-Tabs 291
panning 298
types of 286
where to place 288
zooming in and out 297
margins 236
MDX cubes 572
MDX Query driver 573
connection settings 574
menu commands, dynamic OLE 305
Microsoft 656
Access database 656, 670
Excel database 671
Exchange 659
Outlook 661
Proxy (IIS) 665
Microsoft Excel (97-2003) Data-only,
exporting to 380
Microsoft Excel (97-2003), exporting
to 380
Microsoft Excel Workbook Data-only,
exporting to 380
Microsoft Mail, exporting to 387
Microsoft Word (97-2003) - Editable,
exporting to 380
Microsoft Word (97-2003), exporting
to 380
migrating reporting content in BW 631
mobile web client 637
modes 199
edit 199
move/resize 199
MS Mail 659
multi-pass reporting 681
multi-value columns 646
multidimensional data, reporting off
573
multilingual universes 343
multiple column reports 216
multiple sections 191
deleting blank lines 197
using in reports 196
Multiple Structures 579
N
naming, report titles 579
natural break option, Ranged map 286
navigation 394
Another Report Object 399
data context formats 403
Report Part Drilldown 397
setting up 395
navigation, and accessibility 699
networks, client/server 510
non-text objects 694
not enforced 539
not equal to link 546
NT Event Log 664
NT Event Log, reporting on 564
numbers 135
formatting 249
in record selection 135
numeric axis chart 271
numeric values, using accounting
conventions 249
O
Object Package, adding to Workbench
91
objects 226
and guidelines 226
changing X position conditionally
258
copying and pasting OLE 303
cropping 248
dynamic OLE 306
formatting 35
linked bitmap image 309
linked vs. embedded (OLE) 308
merging related sections 193
OLE 301
positioning with guidelines 229
quick reference 345
scaling 248
snapping to guidelines 227
static OLE 306
variable length 196
ODBC 380, 671
exporting to 380
Informix 671
Lotus Domino 672
Microsoft Access 670
Microsoft Excel 671
opening Access queries 557
SQL databases 671
Visual FoxPro 672
ODBC data sources 561, 665
adding tables 561
checking settings for 560
exporting to 389
logging off 562
2013-05-06721
Index

ODBC data sources
(continued)
logging on to 561
setting up 560
ODS driver 593, 594
overview 593
selecting data source 594
OLAP 372
changing view of grid 372
creating OLAP report 362
reporting 361
updating database location 368
OLAP cube 277
charting on 277
mapping on 292
OLAP data 376
filtering 376
sorting 374
OLAP grid 377
filtering 376
formatting 369
inserting calculations 377
sorting 374
OLAP Report Wizard 25
OLE 301
and the Picture command 305
dynamic menu commands 305
functionality 302
linked vs. embedded objects 308
OLE DB 673
OLE objects 303
copying and pasting 303
dynamic 306
inserting in reports 303
linked vs. embedded 308
representation in reports 304
static 306
on-demand subreports, for
performance 113
on/off properties, conditional 255
one-to-many links 562
performance considerations 524
processes 527
Open Database Connectivity. See
ODBC 665
Open SQL driver 601, 615
and ABAP functions 604
and the Cluster Definition tool 610
default security model 615
defining security 615
objects supported by 602
overview 601
selecting data sources 602
Operational Data Store driver 593
selecting data source 594
operators, reference to query filters
352
optional parameters 456
options, configuring Crystal Reports
570, 574, 577
Oracle 7/8 662
ORDER BY clause 516
P
Page Footer, section 65
page footers 86
creating after first page 258
Page Header, section 65
page headers 86
page margins 236
Paradox database 657
parameter fields 453
and ABAP functions 604
and ABAP queries 597
and accessibility 700
and InfoSets 597
conditional formatting with 482, 701
creating 483
report title with 483
with a cascading list of values
468
with a dynamic prompt 466
with a static prompt 463
deleting 478
filtering data 124
for performance 124
formatting date/time fields in 242
inserting 79
manually creating default values
592
responding to prompts 479
setting sort order with 485
subreport linking 493
using 124
in record selection 124
using to link subreports 493
Parameter Panel 70, 471
parameter queries, Access 558
parent business components 644
pass 681
pass 1 681
pass 2 682
pass 3 683
pre-pass 1 681
pre-pass 2 682
PDF, exporting to 380
PeopleSoft 648
performance 119
considerations for record selection
119, 120
considerations for reports 529
design considerations 110
performance
(continued)
key strategies 108
optimizing 107
table linking choices 117
using table indexes 116
with subreports 113
Pervasive database 658
Picture command and OLE 305
pictures 45, 248
cropping 248
inserting 45
inserting dynamically 306
scaling 248
sizing 248
pie chart 271
map 286
placing multi-line, text-based objects
223
placing text-based objects 220
pool tables 602
selecting for reports 602
pre-printed forms 216
pre-processing, ABAP functions 604
predefined reports
publishing 630
Prepare this report for translation 579
Preview Panel 69
Find tab 71
Group Tree 69
Parameter Panel 70, 471
Preview Tab 31, 68
compared to Design Tab 71
standard view 68
printer drivers 237
inconsistencies 237
printing 332
cross-tabs that span multiple pages
332
landscape orientation 235
portrait orientation 235
printer drivers considerations 237
report area characteristics 55
procedures, stored 118
prompt groups, described 463
prompting 454
best practices 476
considerations 454
creating a dynamic prompt 466
creating a dynamic prompt that
cascades 468
creating a static prompt 463
overview 453
prompts 349
building 349
combining with filters 350
2013-05-06722
Index

properties
conditional attribute 255
conditional on/off 255
prototypes, developing on paper 57
publishing 630
in batches 630
predefined reports 630
publishing to SAP BusinessObjects
Enterprise. See Enterprise Folders
391
Publishing Wizard 630
Q
queries 344
apply current 638
building 344
creating a combined query 344
defining data selection 344
design with hierarchy 584
editing 347
filters 348
object quick reference 345
prompts 348
running 344
viewing SQL 347
query
SQL 643
query filters. See filters 348
query prompts. See prompts 349
R
radar chart 271
Ranged map 286
equal count 286
equal ranges option 286
natural break option 286
standard deviation option 286
RDBMS applications 505
re-importing subreports 496
record reading process 681
record selection 38, 129
on client field (MANDT) 604
on language field (SPRAS) 604
performance tips 120
pushing down 119
setting up 129
using formulas 132
using Select Expert 130
record selection formulas 121, 154
advanced 121
creating 154
fine-tuning 139
for performance 119
strategies for writing 121
record selection formulas
(continued)
troubleshooting 137
unwanted spaces 140
uppercase/lowercase
inconsistencies 139
using If statements in 140
working with parameter fields 453
Record Style (REC), exporting to 380
records 182
creating running totals 182
linking relationships 523
restricting to current selection 638
selecting 134
by character strings 134
by date 135
by numbers 135
with date/number/character
combinations 136
with preset date ranges 136
setting up selection 129
sorting 43
single fields 143
within groups 151
refreshing data 453
parameter fields 453
report data 480
refreshing reports 639
Rehabilitation Act, Section 508 690,
712
relational databases 505
index 506
Report Alerts 409
creating 409
deleting 412
editing 411
referring to in formulas 413
viewing 412
Report Definition (TXT), exporting to
380
report design environment
design solutions 213
importing text-based objects from
a file 224
placing multi-line, text-based
objects 223
placing text-based objects 220
pre-printed forms 216
section characteristics 214
setting page orientation and paper
size 235
setting page orientation by section
235
TrueType fonts 236
report design, key strategies 108
report designer 568
connecting to SAP 568
report designer
(continued)
logging on to SAP 569
report experts. See experts 24
Report Footer, section 65
Report Header, section 65
report objects and accessibility 692
Report Part navigation 397
Report Part Viewer 394
Report Parts 394
Context Report Part scenarios 402
report sections 28, 191
adding 191
deleting 191
Details 65
Group Footer 65
Group Header 65
merging 191
moving 191
Page Footer 65
Page Header 65
printing characteristics 55
Report Footer 65
Report Header 65
Report Wizards
selecting drivers 569
report wizards, creating connections
633
reporting 681
multi-pass 681
NT Event Log 564
off ABAP data clusters 609
off ABAP functions 604
off BW queries 580
off SAP data 572
off tables, views, clusters, and
functions 601
two-pass 681
reports 239, 568, 633
absolute formatting 239
basic design 51
changing 521
database locations 521
database names 521
map titles 294
conditional formatting 254
creating 23, 568, 572
new 26
new with Quick Start 46
off BW hierarchies 583
off hierarchy node variables
587
off hierarchy variables 589
off Operational Data Stores 593
off SAP data 568
creating a connection 633
creating an OLAP report 362
2013-05-06723
Index

reports
(continued)
deciding on content 51
deleting sections 192
design considerations for
performance 110
exporting 380
to a disk file 385
to an application 384
to an Exchange folder 386
to Microsoft Mail 387
faxing 379
finding data 53
formatting 84
data 84
with a template 207
formatting for web viewing 238
formula fields on 77
Group Tree, to display 69
grouping 147
data 147
how OLE objects are represented
304
inserting 28, 81
a title page 87
database fields 28
hyperlink fields 81
OLE objects 303
sections 192
summary information 87
title 35
layout 52
making read-only 240
manipulating data 54
merging related sections 193
migrating with BW content 631
moving sections 193
optimizing performance 107
organizing data 84
page headers and footers 86
parameter fields on 79
performance considerations 529
placing 77
charts 273
data on 77
database fields on 77
maps 288
special fields on 79
SQL expression fields 78
text objects on 80
preparing for translation 628
previewing for the first time 479
printing area characteristics 55
publishing 630
refreshing data 480
refreshing samples 639
reports
(continued)
reporting off BW’s multidimensional
data 573
running total fields on 79
saving 37
saving to BW 579
scheduling 568
selecting 568
a driver 568
an SAP system 569
database 26
selecting a driver 633
setting database location 639
splitting and resizing sections 194
standard view to display 68
stating purpose 51
subreport linking 493
summarize for usability 112
titles 579
translating 628
tutorial on creating 580, 583, 587,
589
updating repository objects in 104
updating to current version 640
using 196
HTML Preview Tab 72
multiple sections in 196
OLAP data 361
Preview Tab before printing 68
repository objects in 101
subreports to combine
unrelated 499
text objects to create form
letters 199
zooming in and out on 86
repository 95
accessing repository 96
adding items 99
bitmap image 99
command 101
custom function 100
text object 99
adding subcategories 98
adding subfolders 98
using undo 106
work flow 95
repository objects 95
deleting 105
modifying 104
updating in report 104
using in reports 101
resizing 31
fields 31
objects 199
sections 252
to add white space 252
resizing
(continued)
sections
(continued)
to delete white space 253
restrictions 615
data access 615
row-level 624
table-level 617
return types, using wrapper functions
605
Rich Text Format (RTF), exporting to
380
right outer join 536
row-level security 624, 625
authorization objects, using 625
custom security exits, using 626
overview 624
rows 252
adding/deleting white space
between 252
running totals 181
creating 182
for a group 184
using formula 188
one-to-many linking 187
S
sample data 23
sample reports 568, 639
refreshing 639
SAP BusinessObjects Enterprise
clustering 108
evaluating date functions 109
LDAP 108
load balancing 108
management 108
publishing reports to 630
scaling 108
scheduling 108
security 108
versioning 108
SAP BusinessObjects Enterprise
Repository. See repository 95
SAP BW
connection settings 574
migrating systems 631
publishing reports from 630
SAP parameters 587, 591
Hierarchy Node variable 587
Hierarchy variable 591
SAP system 568
connecting with the drivers 568
logging on with the drivers 569
SAP System Logon dialog box 569,
570
SAP Tools toolbar 572, 574
2013-05-06724
Index

Save As dialog box 37
Save dialog box 37
saved data 112
Saved Data Indexes 553
choosing fields to index 555
considerations 554
saving reports 37
scheduling reports 568
screen readers 689
Section 508, Rehabilitation Act 690,
712
sections 214
accessibility 702
deleting 192
Details 65
identifying 67
inserting 192
making read-only 240
merging two related 193
moving 193
multiple in report 196
Page Header 65
Report Header 65
resizing 195
resizing to delete white space 253
splitting 194
suppressing to delete white space
253
security 641
defining 615
global lock feature 617
migrating from client-independent
model 616
preserving existing restrictions 616
row-level restrictions 624
table-level restrictions 617
Security Definition Editor
description 615
SELECT clause 514
Select Expert 130, 153
and Formula Editor 132
for group selection 153
selecting 578
ABAP functions 605
ABAP queries 598
an SAP system 569
BW queries 578
cubes 578
drivers for reports 568
InfoSets 598
multiple objects 232
stored procedure from an SQL
database 512
tables, views, functions, and
clusters 602
selection criteria 38
selection formulas 119, 453
and performance 119
parameter fields 453
range limit conditions 529
saved data 134
saved data selection formulas 134
troubleshooting 137
Separated Values (CSV), exporting to
380
Server connection type 635
server-side processing 116, 547
server, log on command 569, 634
settings, for connecting to BW 574
shapes, adding 248
Shockwave Flash Objects (SWF) 310
binding to an Xcelsius SWF 312
inserting in reports 311
Xcelsius 311
Siebel formatting, applying 643
Siebel Mobile Web Client 637
Siebel security 641
Smart Linking 531, 604
linking tables with multiple indexes
532
smart tags 406
Smart View 406
snapping objects to guidelines 227
sort orders 143
ascending 143
descending 143
using parameter fields to set 485
sorting 125, 682
and performance 125
Bottom N 682
group 682
groups conditionally 150
OLAP grid 374
records 43
records within groups 151
reports 41
single fields 143
Top N 682
with SQL expressions 127
sorting, on client 646
spacing between text-based objects
225
indenting lines 230
selecting the grid 226
SPRAS field 604
SQL 509
and Crystal Reports 514
database considerations when
linking 528
databases 529, 671
selecting a stored procedure
from 512
SQL
(continued)
databases
(continued)
using 509
databases via ODBC 671
DBMS 511
join types 533
language 514
server-side grouping 548
stored procedures 118, 512
using expressions 125
SQL commands 516
SQL expression fields
for Case Logic 128
for performance 125
placing on reports 78
SQL expression fields, inserting 643
SQL Injection 516
SQL link types 533
SQL query, editing 514
SQL statements 514
DISTINCT clause 514
FROM clause 515
GROUP BY clause 516
ORDER BY clause 516
SELECT clause 514
WHERE clause 515
SQL stored procedures
parameters, changing 512, 513
SQL, viewing 347
standard deviation option, Ranged
map 286
standard group headers, creating 176
Standard Report Wizard 24
stock chart 271
stored procedures 512
and performance 118
selecting from an SQL database
512
subquery 355
building 355
defined 355
parameters 356
subreports 491
adding captions to 503
and accessibility 695, 703
and SQL databases 529
caution when using 113
creating on-demand 502
different views of same data 504
for performance 113
inserting 494
linked vs. unlinked 491
linking 114, 497
to data in primary reports 497
2013-05-06725
Index

subreports
(continued)
linking
(continued)
to main report without
modifying selection formula
499
manually updating 497
one-to-many vs. database links 492
previewing 495
re-importing 496
saving as primary report 496
updating linked reports 496
using 499
to combine unrelated reports
499
with unlinkable data 501
when to use 491
subtotal fields, charting on 275
subtotaling grouped data 171
summarized data, drilling down on 85
summarized group values, sorting 167
summarizing grouped data 166
summary fields, charting on 275
summary information, adding 34
summary reports, for usability 112
Sybase Adaptive Server 662
T
Tab Separated Text (TTX), exporting
to 380
table indexes, for performance 116
table-level security 617
tables 74, 604, 619, 703
adding 74
alias 521
customizing authorizations 619
defining security by group 624
deleting blank lines 197
indexed 506
link from 523
link processing order 532
link to 523
linked SQL 529
linking 522, 531, 604, 644
for performance 117
records 523
two 75
unindexed 502
locking down 617
selecting for reports 601
Visual Linking Expert 531
tabs
differences between Preview and
Design 71
technical field names 577
Template Field Object 210
templates 207
applying 208
considerations 211
reapplying 209
removing 209
Text (TXT), exporting to 380
text objects 199
adding to repository 99
combining database fields in 33
edit mode 199
formatting for accessibility 696
inserting
from repository 102
move/resize mode 199
placing on the report 80, 694
using to create form letter 200
text-based objects, using guidelines
226
thread-safe database drivers 117
Time fields
formatting 242
titles
adding a title page 87
inserting 35
maps 294
titles, of reports 579
toolbar 574
SAP Tools 572
Top N 168
selecting groups 168
selecting groups conditionally 170
selecting percentages 168
selecting percentages conditionally
170
sorting 682
Top N/Sort Group Expert 167
totaling
and performance 125
with SQL expressions 127
totals, running 181
transaction ZCDD, Cluster Definition
tool 610
translated reports 628
formatting 629
preparing 628
transparent tables 602
described 602
selecting for reports 602
troubleshooting 137, 605
ABAP functions 605
configuration options 570, 574
group selection formulas 155
record selection formulas 137
TrueType fonts 236
tutorial 580, 587, 589
MDX Query driver 583
building hierarchical report 583
building report with hierarchy
node variable 587
building report with hierarchy
variable 589
building simple report 580
two-pass reporting 681
U
underlay feature 283
using with charts 283
undo/redo activities 263
Unicode support 556
universes
connecting to 343
in Crystal Reports, overview 677
multilingual 343
updating reports to current version 640
User Function Libraries (UFLs) 418
V
values 143
ascending sort order 143
creating custom groups 149
descending sort order 143
parameter fields 453
sort direction 143
sorting single fields 143
sorting summarized group 167
variable
pick list, creating in Crystal Reports
592
variable length objects 196
vertical placement 233
View Mode field 642
views 602, 641
in SAP, described 602
linking 604
reporting off 601
Visual FoxPro database 672
Visual Linking Expert 531
W
Web Accessibility Initiative 712
Web Content Accessibility Guidelines
690
Web Folders, working with 390
web reports, optimizing performance
107
Web/IIS log files 665
2013-05-06726
Index

WHERE clause 515
white space 252
adding to sections by resizing 252
deleting by resizing 253
deleting by suppressing a section
253
width, modifying cross-tab 333
wizards 24
cross-tab 24
mailing labels 25
OLAP 25
report 633
wizards
(continued)
standard 24
wizards, report 569
Workbench, using 90
wrapper functions, defining return
types 605
X
Xcelsius, inserting objects in reports
311
XML, exporting to 380
Xtreme.mdb 23
XY Scatter chart 271
Z
ZCDD, Cluster Definition tool 610
zooming features 281
2013-05-06727
Index

2013-05-06728
Index
