
Concur Invoice: Printed
Invoice Configuration
Setup Guide
Last Revised: November 1, 2022
Applies to these SAP Concur solutions:
Concur Expense
Professional/Premium edition
Standard edition
Concur Travel
Professional/Premium edition
Standard edition
Concur Invoice
Professional/Premium edition
Standard edition
Concur Request
Professional/Premium edition
Standard edition

Concur Invoice: Printed Invoice Configuration Setup Guide i
Last Revised: November 1, 2022
© 2004 - 2024 SAP Concur All rights reserved.
Table of Contents
Section 1: Permissions ................................................................................................1
Section 2: Overview 1
Default Printed Invoices Templates ............................................................................... 2
Sections of a Default Printed Invoice............................................................................. 3
Section 3: Configuration Process .................................................................................3
Section 4: Printed Invoice Tool ...................................................................................4
Differences Between Configurable Printed Expense Reports and Configurable Printed
Invoices .................................................................................................................... 4
Access Printed Invoices ............................................................................................... 4
Section 5: Print Formats ..............................................................................................6
Print Format Components ............................................................................................ 6
Add a Print Format ..................................................................................................... 6
Edit Print Format Content ............................................................................................ 8
Invoice Text Content Type .................................................................................... 13
Invoice Form Data Content Type ........................................................................... 14
Invoice List Data Content Type ............................................................................. 18
Invoice Barcode Content Type .............................................................................. 27
Edit a Print Format ................................................................................................... 29
Delete a Print Format ................................................................................................ 30
Assign a Print Format to a Policy ................................................................................ 31
Section 6: Print Templates ........................................................................................ 31
Before You Begin...................................................................................................... 32
Content Types and Content IDs.................................................................................. 33
Change the Template Code ........................................................................................ 34
Before You Begin................................................................................................. 34
Components of the Template Code ........................................................................ 35
Default Templates .................................................................................................... 35
Access Print Templates ............................................................................................. 36
Add a Template ........................................................................................................ 36
Add a New Content ID ......................................................................................... 38
Split a Content ID into Two .................................................................................. 39
Section 7: Print Condition Editor ............................................................................... 39
Work With Print Condition Rules and Content IDs ......................................................... 39
Understand Conditional Expressions ...................................................................... 40
The Condition Page.............................................................................................. 42
Access the Printed Invoices Condition Editor ........................................................... 43

ii Concur Invoice: Printed Invoice Configuration Setup Guide
Last Revised: November 1, 2022
© 2004 - 2024 SAP Concur All rights reserved.
Create a Conditional Rule in the Editor ................................................................... 44
Assign the Rule to a Content Type ......................................................................... 45

Concur Invoice: Printed Invoice Configuration Setup Guide iii
Last Revised: November 1, 2022
© 2004 - 2024 SAP Concur All rights reserved.
Revision History
Date
Notes/Comments/Changes
November 1, 2022
Removed references to faxing as part of the Fax Feature Decommissioning on
November 1, 2022.
September 20, 2022
Clarified content in the Configure Allocation Details section for fields that can be
added to a printed invoice. Minor edits throughout.
January 21, 2022
Updated the copyright year; no other changes; cover date not updated
February 17, 2021
Updated the copyright year; no other changes; cover date not updated
Augut 31, 2020
Added notes that the fax feature is not available to clients onboarded after June
30, 2020. Other general updates.
April 17, 2020
Renamed the Authorization Request check box to Request on the guide’s title
page; cover date not updated
January 31, 2020
Removed references to graphics since these are no longer supported.
January 6, 2020
Updated the copyright; no other changes; cover date not updated
May 11, 2019
Changed the term "payment request" to "invoice" on the admin pages as part of
the new user experience for Concur Invoice including images.
April 13, 2019
Changed the term "payment request" to "invoice" where applicable as part of
the new user experience for Concur Invoice including images.
February 9, 2019
Changed the term "Concur" to "SAP Concur".
January 29, 2019
Updated the copyright; no other changes; cover date not updated
April 6, 2018
Changed the check boxes on the front cover; no other changes; cover date not
updated
January 10, 2018
Updated the copyright; no other changes; cover date not updated
December 14, 2016
Changed copyright and cover; no other content changes.
October 17, 2016
Added notes and clarifications in various places.
February 23, 2016
Updated syntax in table.
February 19, 2016
Attendee section can now be added to printed payment requests.
December 11, 2015
New guide.

Section 1: Permissions
Concur Invoice: Printed Invoice Configuration Setup Guide 1
Last Revised: November 1, 2022
© 2004 - 2024 SAP Concur All rights reserved.
Printed Invoice Configuration
NOTE: Multiple SAP Concur product versions and UI themes are available, so this
content might contain images or procedures that do not precisely match your
implementation. For example, when SAP Fiori UI themes are implemented, home
page navigation is consolidated under the SAP Concur Home menu.
Section 1: Permissions
A company administrator may or may not have the correct permissions to use this
feature. The administrator may have limited permissions, for example, they can
affect only certain groups and/or use only certain options (view but not create or
edit).
If a company administrator needs to use this feature and does not have the proper
permissions, they should contact the company's SAP Concur administrator.
In addition, the administrator should be aware that some of the tasks described in
this guide can be completed only by SAP Concur staff. In this case, the client must
initiate a service request with SAP Concur support.
Section 2: Overview
A printed invoice is an invoice that has been formatted for printing. Users print
invoices from the Actions menu, which appears when an invoice is opened in Concur
Invoice.

Section 2: Overview
2 Concur Invoice: Printed Invoice Configuration Setup Guide
Last Revised: November 1, 2022
© 2004 - 2024 SAP Concur All rights reserved.
When the user selects Print from the Actions menu, the system shows the print
option formats available in Concur Invoice. When the user clicks on the option,
Concur Invoice opens the invoice in a separate browser window that displays a
preview of the invoice from within which the user can print the invoice by clicking the
Print button.
Many companies need to modify the data and text on the invoices to meet specific
needs of their company or of different organizations within their company. The
Printed Invoice feature allows the administrator to change the configuration of
existing printed invoices and add new printed invoices.
Once the printed invoices are configured, selected invoices can be made available for
use with specific policies, so the user is presented with the appropriate formats to
select from based on the policy assigned to the invoice.
To activate or inactivate printed invoices for a policy, refer to the Assign to a
Policy section of this guide.
Default Printed Invoices Templates
There are several default printed invoice templates that come with the system:
• Detailed Invoice lists all the line items included on the invoice. It is a list of
all line items created for an invoice.

Section 3: Configuration Process
Concur Invoice: Printed Invoice Configuration Setup Guide 3
Last Revised: November 1, 2022
© 2004 - 2024 SAP Concur All rights reserved.
• Invoice lists a summary view of the invoice information.
NOTE: The fields that appear on the sample invoice in the figures below will vary
depending on the fields defined in the configuration process. They are highly
customizable and can represent many different views.
A printed invoice is comprised of two main components:
• A Print Template that provides the HTML instructions for the layout of the
page, and that requires programming skills to modify. In most cases, there is
no need to modify the print templates.
• A Print Format that provides the text and fields to be included within the
layout defined in a print template, and the style information for the font, font
size, and alignment of the text. Print formats are similar to data entry forms,
where the administrator defines the fields to be included on the form. Print
formats are commonly modified by the company to suit their needs.
Sections of a Default Printed Invoice
Each printed invoice is separated into distinct sections, which some of the invoices
may or may not have:
• Barcode: Depending on the configuration required by your company, a single
barcode or multiple barcodes may appear on the page.
• Page Header: Displays general information about the invoice, such as the
Invoice Name or other invoice-level information.
• Invoice Summary: Displays, in table format, a summary of lists, including a
total amount where a numeric field is added to the fields.
• Invoice Header: Contains some invoice-level information that is required on
the invoice, such as Payment Request Title, Description, and/or Invoice ID.
• Invoice Details: Contains a list of line items included in the invoice.
• Instructional Text: Contains text information for the invoice, such as how to
submit required invoice images, or an assertion that all the invoices to be
paid are legitimate business expenses.
Section 3: Configuration Process
If the default printed invoices do not contain the information or are not laid out in
the way that your company needs, you can modify the default invoices or create new
print invoice formats that can be used for different policies.
The process of modifying a printed invoice is as follows:
1. (Optional) Copy one of the system print templates, if modifications are
required.
2. (Optional) Modify the copied template, if required.

Section 4: Printed Invoice Tool
4 Concur Invoice: Printed Invoice Configuration Setup Guide
Last Revised: November 1, 2022
© 2004 - 2024 SAP Concur All rights reserved.
3. Copy one of the system print formats.
4. Modify the copied print format.
5. Mark the appropriate print format as active for a policy in the Policies tool.
Section 4: Printed Invoice Tool
The Printed Invoice feature is used to create or modify the templates and the
formats.
Differences Between Configurable Printed Expense Reports and
Configurable Printed Invoices
The configuration capabilities for printed expense reports and printed invoices are
extensive. While most capabilities are the same, there are a few differences:
• Summary Data Tables: May be created by specifying a totals grouping for
printed reports, but may not be created for printed invoices
• Grouping Sequences: A field may be selected to define a grouping sequence
for printed reports, but not for printed invoices
• Grouping feature: Available for Concur Expense, but not Concur Invoice
• Itemization feature: Available for Concur Expense, but not Concur Invoice
Access Printed Invoices
To access the Printed Invoices page:
1. Click Administration > Invoice and then click Printed Invoices.

Section 4: Printed Invoice Tool
Concur Invoice: Printed Invoice Configuration Setup Guide 5
Last Revised: November 1, 2022
© 2004 - 2024 SAP Concur All rights reserved.
The Printed Invoices page appears.
NOTE: Only the Global Invoice Configuration administrator can make edits in the
Print Templates section of Printed Invoices page. If required, submit a
service request to change template configuration.

Section 5: Print Formats
6 Concur Invoice: Printed Invoice Configuration Setup Guide
Last Revised: November 1, 2022
© 2004 - 2024 SAP Concur All rights reserved.
Section 5: Print Formats
Print formats define the text, fields, and barcodes used on a printed invoice. Each
print format utilizes a single print template which defines the layout of the printed
invoice, to position the fields, text, and barcodes that are displayed on the page.
Each print format is owned by the Global or Group administrator who created it. A
Global print format can be viewed by a Group administrator but can only be edited
by the Global administrator. A print format created by one Group administrator
cannot be viewed by Group administrators of other groups but can be viewed by the
Global administrator.
Print Format Components
There are two main components to creating or modifying a print format:
• General information: This defines the template used, the name of the print
format, and whether the employee can choose to print line items or
allocations.
• Content: This includes the fields that are displayed, the orientation of the
barcode, and the instructional text. This is generally the information that
appears on the printed invoice.
Add a Print Format
There are two ways to add a new print format:
• New: Add a new print format
• Copy: Use an existing format, copy it, and modify its content. Copying an
existing format that is similar to the desired format is simpler than
configuring the entire print format from scratch.
To add a print format:
1. Click the Print Formats tab on the Printed Invoices page.
2. Click New to add a new print format or select an existing format and click
Copy to copy that print format.
3. On the Add Print Format or Edit Print Format page (depending on choice),
complete all applicable fields.
Field
Description
Print Format Name
Type a unique name. This name is displayed to the
employee.
Description (optional)
Type a description of this format.

Section 5: Print Formats
Concur Invoice: Printed Invoice Configuration Setup Guide 7
Last Revised: November 1, 2022
© 2004 - 2024 SAP Concur All rights reserved.
Field
Description
Print Template
Select the print template to use. The option you select
here defines the content that appears on the invoice. You
can configure the appearance of the content in a later
step.
NOTES:
• If you change the template associated with an existing
format, any content IDs or fields not available in the
new template are automatically removed from the
invoice format.
For more information, see the Print Templates section
of this document.
Always append
currency code to
amounts
If selected, any amount field you choose to add to the
invoice appears with the currency alpha code beside it,
such as USD or CAD.
For all List Content
Line Item
If Employee can choose to print line item is selected,
then the printed invoice will by default display a Show
Line Items check box that is selected (enabled). The
employee has the option of clearing (disabling) this check
box to prevent the printing of line items.
If Always print Line Item is selected, when the
employee chooses the format the line item from the
invoice are displayed to the employee on the invoice. The
employee cannot override this option.
Allocation
If Employee can choose to print Allocation is selected
(enabled), then the printed invoice will by default display a
Show Allocations check box that is cleared (disabled).
The employee has the option of selecting this check box to
allow the printing of line item allocations.
If Do not print Allocation is selected, when the
employee chooses the format, the allocations from the
invoice are never displayed to the employee on the
invoice. The employee cannot override this option.
Editable By
Displays the group rights that an administrator must have
to modify a print format.
4. (Optional) Click Preview Layout to display the template layout that you
have chosen. A separate browser window appears with the layout. This option
is useful as a reference for the layout and names of the various content
sections.

Section 5: Print Formats
8 Concur Invoice: Printed Invoice Configuration Setup Guide
Last Revised: November 1, 2022
© 2004 - 2024 SAP Concur All rights reserved.
5. Click Close at the top right of the page to close this window.
To create a new template or make changes to the existing template,
refer to the Print Templates section of this guide.
6. Click Save to save your changes. You are returned to Print Formats.
Edit Print Format Content
For print formats that you create or copy, you can edit the content that is printed on
the invoice by changing the content format, adding informational text and headings,
and changing which fields appear on the printed invoice.

Section 5: Print Formats
Concur Invoice: Printed Invoice Configuration Setup Guide 9
Last Revised: November 1, 2022
© 2004 - 2024 SAP Concur All rights reserved.
NOTE: You cannot edit the default print formats. If you select one of the default print
formats, the Modify Content button changes to the View Content button
and you can view, but not modify, the content.
To edit one of the default print formats, make a copy of the format and edit
the copy.
For the syntax required to implement the IDs discussed below, refer to
Content Types and Content IDs in Section 6: Printed Templates.
To edit the content that appears on a printed invoice, you can click the Modify
Content or Modify Fields buttons:
• Modify Content: The Modify Content button enables you to add headings,
change the attributes applied to form field data by assigning styles, add
informational notes, and assign a print condition if print conditions are
available.
For more information about print conditions, refer to Section 7: Print
Condition Editor.
You can modify the following aspects of content:
NOTE: The aspects that are available to be edited depend on the type of
content you are modifying, for example, if you are modifying invoice
details you can edit the heading, assign styles to form fields, and
assign a print condition rule to the invoice details if print conditions are
available.
Heading: Text that is displayed directly above the fields for this section
on the printed invoice.
Note Text: Text that appears on the printed invoice, for example
instructional text about where to send a paper invoice.
Form Field Data: Displays areas where you can list invoice-level data
from the invoice and employee forms.
List Data: Displays the list of expenses that are included on the invoice.
Summary Data: Displays, in table format, a summary of lists, including a
total amount where a numeric field is added to the fields.
Barcode: Defines the orientation and sizing of the barcode necessary for
scanning.

Section 5: Print Formats
10 Concur Invoice: Printed Invoice Configuration Setup Guide
Last Revised: November 1, 2022
© 2004 - 2024 SAP Concur All rights reserved.
Approval Flow Data: Displays the approval flow associated with the
invoice.
Audit Trail: Displays audit trail data, including confirmation agreement
acceptance records, to the printed invoice. This data appears in a non-
configurable preset format.
NOTE: The type is determined by the template and cannot be changed in the
print format section.
• Modify Fields: Enables you to add or remove fields that appear on the
invoice. This is applicable only for Form Data, Summary Data, and List Data.
To edit the content of a printed invoice:
1. On the Printed Invoices page, select the print format you want to edit, and
then click Modify Content.

Section 5: Print Formats
Concur Invoice: Printed Invoice Configuration Setup Guide 11
Last Revised: November 1, 2022
© 2004 - 2024 SAP Concur All rights reserved.
The Print Format Content page appears.
2. Select the content you want to edit and then click Modify Content.

Section 5: Print Formats
12 Concur Invoice: Printed Invoice Configuration Setup Guide
Last Revised: November 1, 2022
© 2004 - 2024 SAP Concur All rights reserved.
The Edit Content for print format window appears.
NOTE: You cannot remove content on this page. However, if you leave a
section blank, that section does not appear on the printed invoice.
3. Do one of the following:
Edit Information: Select a row in the Content ID list and click Modify
Content to edit the content. The Edit Content for print format page
appears. Depending on the content type, the page varies.
Add or Remove Fields: Select a row and click Modify Fields to open the
Edit fields for print format page where you can add, remove, and
change the order of the fields that appear on the printed invoice.

Section 5: Print Formats
Concur Invoice: Printed Invoice Configuration Setup Guide 13
Last Revised: November 1, 2022
© 2004 - 2024 SAP Concur All rights reserved.
4. Click Save to save your changes.
Invoice Text Content Type
The text content type is used for instructional text or a note that can appear at the
top of the page.
To edit text content
1. Select an invoice with Text data content and select a Text Content ID type
such as TopNote, BottomNote, or Note2.
2. Click Modify Content. The Edit Content for print format page appears.
3. Complete all required fields:
Field
Description
Content
ID
Displays the name of the content ID (default).
Content
Type
Text (default)

Section 5: Print Formats
14 Concur Invoice: Printed Invoice Configuration Setup Guide
Last Revised: November 1, 2022
© 2004 - 2024 SAP Concur All rights reserved.
Field
Description
Print
Condition
Rule
The print condition rule associated with the content type. If the content
type does not meet the rule, it is excluded from the printed invoice.
Text
Type the text to be displayed on the printed invoice. This text is the
same for every invoice that is printed. Maximum length is 1,000
characters.
You can use some special character tags that are replaced by the
equivalent HTML tags. The supported special character tags are:
Purpose
Special Tags
HTML Tag Inserted
Bold
[b] [/b]
<b> </b>
Italic
[i] [/i]
<i> </i>
Underlined
[u] [/u]
<u> </u>
Numbered list
[ol] [/ol]
<ol> </ol>
Bulleted list
[ul] [/ul]
<ul> </ul>
List item
[li] [/li]
<li> </li>
Line space
[br]
<br>
Anchor tag
[a name=] [/a]
(a name=value) (/a}
Link
[a href= value] [/a]
(a href=value) (/a)
NOTE: All characters in the square brackets MUST be in lower case.
Text
Style
A style variable from the available print styles that determines the font,
color, and alignment of the text.
Style
Attributes
Identifies the styles that this field is comprised of as defined in the style
sheet. This field is not editable but rather displayed for your reference.
4. Click Save.
Invoice Form Data Content Type
Form Data content type allows the user to add fields, such as Remit To, Invoice
Date, and Invoice Number, to the printed invoice.

Section 5: Print Formats
Concur Invoice: Printed Invoice Configuration Setup Guide 15
Last Revised: November 1, 2022
© 2004 - 2024 SAP Concur All rights reserved.
Field Access
The field access settings of a field (Hidden, Read-only) and the role of the user
printing the invoice control whether that field is displayed on the printed invoice. If
you have a field marked as Hidden as the field access for the employee role in the
configuration, then when you select it to appear on the printed invoice, it does not
actually appear on the printed invoice for the end user. This is the same for the
approver and processor roles if a processor or approver is printing the invoice.
If you want a Hidden field to appear on the printed invoice for any of these roles,
then you must modify the field access within Administration > Invoice > Forms
and Fields > Fields and mark it as Read-only or Modify and not Hidden.
Changing the label associated with a field name requires the Global Invoice
Configuration administrator role. For more information, refer to the Concur
Invoice: Forms and Fields Setup Guide.

Section 5: Print Formats
16 Concur Invoice: Printed Invoice Configuration Setup Guide
Last Revised: November 1, 2022
© 2004 - 2024 SAP Concur All rights reserved.
NOTE: Some default fields within the format, such as invoice totals, may have a field
access as Hidden by default, and should be modified to Read-only if you want
them to be displayed on the printed invoice. This should be done as part of
the configuration process. This may also require modification of the forms
using these fields, to mark the field as hidden on the form if you have set the
field access from Hidden to Read-only or Modify on the field settings.
To edit form data content:
1. Select an invoice with Form Data content and select a Form Data content type
such as TopNote, BottomNote, or Note2.
2. Click Modify Content. The Edit Content for print format page appears.
3. Complete all required fields:
Field
Description
Content ID
Displays the name of the content ID.
Content Type
Displays the content type you selected, that is Form Data.

Section 5: Print Formats
Concur Invoice: Printed Invoice Configuration Setup Guide 17
Last Revised: November 1, 2022
© 2004 - 2024 SAP Concur All rights reserved.
Field
Description
Heading
Text that is displayed directly above the fields for this
section on the printed invoice. If the style is centered,
then the heading is centered to the width of the form data
fields. Maximum length is 256 characters.
Print Condition Rule
The print condition rule associated with the content type.
If the content type does not meet the rule, it is excluded
from the printed invoice.
Heading Style
The style that determines the font, color, and alignment of
the heading text.
Form Field Label Style
The style that determines the font, color, and alignment
for each field label that appears in this section.
Form Field Data Style
The style that determines the font, color, and alignment
for the field data for each field that appears in this section.
Style Attribute fields
Each Style Attribute field identifies the styles used for
each style as identified in the style sheet. These fields are
not editable but displayed for your reference.
4. Click Save to close the Edit Content for print format page.
5. With the same field selected, now click Modify Fields. The Edit Fields for
Print Format page appears, displaying all the fields that will appear on the
printed invoice.
6. Click Add Fields to add additional fields to display on the printed invoice. The
Add Field page appears.
7. Select all the fields you want displayed on the printed invoice, then click
Done.

Section 5: Print Formats
18 Concur Invoice: Printed Invoice Configuration Setup Guide
Last Revised: November 1, 2022
© 2004 - 2024 SAP Concur All rights reserved.
8. To remove a field from the invoice format, select a field, and then click
Remove Fields.
9. To reorder the field, select it and use the Up and Down arrows to reorder the
field, noting its new position under Display Order.
10. Click Save when done adding, removing, and reordering the fields.
Invoice List Data Content Type
The List Data content type is used for areas that have a list of line items included on
the invoice. List entries may be sorted in ascending order by specifying one or more
designated fields to sort the list by. If desired, a representative icon may also be
added as a column to the list. Icons replace longer field labels and act identically,
calling out the list item status visually while using a minimum of visual space.

Section 5: Print Formats
Concur Invoice: Printed Invoice Configuration Setup Guide 19
Last Revised: November 1, 2022
© 2004 - 2024 SAP Concur All rights reserved.
For a List Data content type, you add the fields, such as tax, vendor, attendees,
business purpose, and amount that you want to appear on the printed invoice.
To edit list data content:
1. Select a format with List data content and select a List data content type such
as Line Items.
2. Click Modify Content. The Edit Content for print format page appears.

Section 5: Print Formats
20 Concur Invoice: Printed Invoice Configuration Setup Guide
Last Revised: November 1, 2022
© 2004 - 2024 SAP Concur All rights reserved.
3. Complete all required fields:
Field
Description
Content ID
Displays the name of the content ID
Content Type
Invoice List Data
Heading
Text that is displayed directly above the fields for this
section on the printed invoice. If the style is centered,
then the heading it centered to the width of the form data
fields. Maximum length is 256 characters.
No Items Message
Text that you want displayed on the printed invoice if
there are no items in the invoice to be printed in this
section. If this field is blank, and no items match the list at
print time, then nothing appears in this section. Maximum
length is 256 characters.
Print Condition Rule
The print condition rule associated with the content type.
If the content type does not meet the rule, it is excluded
from the printed invoice.
Heading Style
The style that determines the font, color, and alignment of
the heading.
Grouping Header Style
The style that determines the font, color, and alignment of
the grouped column headings (Not applicable to Concur
Invoice).
List Field Label Style
The style that determines the font, color, and alignment
for each list field label that appears in this section.
List Field Data Style
The style that determines the font, color, and alignment
for the data for each field that appears in this section.
Style Attribute fields
for each Style (above)
Each Style Attribute field identifies the styles used for
each style as identified in the style sheet. These fields are
not editable but displayed for your reference.
Enable customization
of allocation details for
expenses
If selected, allows customization of allocation fields,
specifying what details appear and how they are
displayed.
Include divider line
between expenses
If selected, a divider line is placed between each row of
expenses in the list.
4. Click Save to close the Edit Content for print format page.
5. With the same field selected, now click Modify Fields - the Edit Fields for
Print Format page appears, displaying all the fields that will appear on the
printed invoice.
6. Click Add Fields to add additional fields to display on the printed invoice.

Section 5: Print Formats
Concur Invoice: Printed Invoice Configuration Setup Guide 21
Last Revised: November 1, 2022
© 2004 - 2024 SAP Concur All rights reserved.
The Add Fields page appears.
7. Select all the fields you want displayed on the printed invoice, then click
Done.
8. To remove a field from the invoice format, select a field, and then click
Remove Fields.
9. Decide on the display and sorting order for the list data.
Display Order: Sets the order, left to right, of the columns making up
the list data.
Sort Order: Sets the field(s) that dictate the order in which the list is
sorted. You can choose more than one. In the following example, the sort
order is Client, then Project. For rows where the client value is the same,
the sort order falls to Project since this is the second sort order criteria.

Section 5: Print Formats
22 Concur Invoice: Printed Invoice Configuration Setup Guide
Last Revised: November 1, 2022
© 2004 - 2024 SAP Concur All rights reserved.
Print Below Entry Row: The list data content section of a printed invoice
can include additional list data fields below the entry row in the format
"Field Label: Field Content". The appearance of this additional data
appears as a list-type format as shown in the figure below.
Display Value: Include the code associated with a list item in their
printed invoices. Choices include the name and long or short code, and
each may be displayed and printed either alone or alongside the name.
Seven variants are available, including name or long or short code, or a
combination of either the long or short code alongside the name.
10. Click Save.
NOTE: Fields that may have multiple entries such as attendees, allocations,
comments, and exceptions are printed on the line following the line
item.
NOTE: When allocations are printed, the following disclaimer is also printed at
the bottom of the list content and cannot be removed: The sum of
allocation amounts may not exactly match the expense amount due to
rounding.
CONFIGURE ALLOCATION DETAILS
When displaying allocations on a printed invoice, the administrator can decide to add
fields and specify the order in which they should appear in the Allocations section of
the invoice. Administrators can add the following fields: Percentage, Account Code,
and custom fields.
Allocation fields are presented in a list format for each allocation within the
Allocations section of the printed invoices as shown in the figure below.
To configure allocation details:
1. On the Print Formats tab, select the desired print format.
2. Click Modify Contents.
3. Select the desired List Data field.

Section 5: Print Formats
Concur Invoice: Printed Invoice Configuration Setup Guide 23
Last Revised: November 1, 2022
© 2004 - 2024 SAP Concur All rights reserved.
4. Click Modify Fields.
5. Click Add Fields.

Section 5: Print Formats
24 Concur Invoice: Printed Invoice Configuration Setup Guide
Last Revised: November 1, 2022
© 2004 - 2024 SAP Concur All rights reserved.
6. Select the Allocations field.
7. Click Done.
8. Click Save.
9. Click Modify Content.
10. Select (enable) the Enable customization of allocation details for
expenses check box.
11. Click Save. This Modify Allocation Fields button now displays.

Section 5: Print Formats
Concur Invoice: Printed Invoice Configuration Setup Guide 25
Last Revised: November 1, 2022
© 2004 - 2024 SAP Concur All rights reserved.
12. Click Modify Allocation Fields.
13. Click Add Fields.
14. On the Add Fields page, select the desired fields.
15. Click Done.
16. On the Edit Fields for print format page, use the arrows in the Sequence
Order column to arrange the allocation field display.
17. Click Save.

Section 5: Print Formats
26 Concur Invoice: Printed Invoice Configuration Setup Guide
Last Revised: November 1, 2022
© 2004 - 2024 SAP Concur All rights reserved.
ADD A DIVIDER LINE BETWEEN EXPENSES IN LIST DATA
A line dividing sections can be added to a printed invoice wherever expense data
needs to be separated to help in differentiating data areas. The dividing lines
separate the invoice line items.
To add the divider line between invoice entries:
1. On Print Formats, select the desired printed invoice format.
2. Click Modify Content.
3. Select a List Data content ID then click Modify Content.
4. Select the Include divider line between expenses check box.

Section 5: Print Formats
Concur Invoice: Printed Invoice Configuration Setup Guide 27
Last Revised: November 1, 2022
© 2004 - 2024 SAP Concur All rights reserved.
5. Click Save.
6. Click Done to return to the Print Formats page.
Invoice Barcode Content Type
An Invoice Barcode content type is used for the barcodes you want to add to the
printed invoice. Multiple barcodes can be added if needed by adding the content type
to the template. The barcode can be set up vertically or horizontally.
To edit barcode content:
1. Select an invoice with Barcode data content and select a Barcode data
content type such as Invoice Barcode.
2. Click Modify Content. The Edit Content for print format page appears.
3. Complete all required fields:
Field
Description
Content ID
Varies depending on what content ID you selected.
Content Type
Barcode

Section 5: Print Formats
28 Concur Invoice: Printed Invoice Configuration Setup Guide
Last Revised: November 1, 2022
© 2004 - 2024 SAP Concur All rights reserved.
Field
Description
Field used to generate
barcode
This determines what data value are used to generate the
barcode.
The choices are:
Option
Table
Column
Request ID
CTP_REQUEST
REQUEST_ID
Request
Key
CTP_REQUEST
RQT_Key
Company
ID
CT_SITE_SETTING
VALUE where
TYPE= IMAGING
and NAME=
COMPANY_ID
Barcode orientation
If Horizontal, it appears along the top of the printed
invoice. If Vertical, it appears vertically along the left-hand
side of the printed invoice.
Split into two parts
For greater clarity, the barcode data used for vertical
barcodes can be split into two equal parts, each displayed
separately. For example, the 20-character Request ID:
1x2x3x4x5x6x7x8x9x0x
can be split into two parts, each 10 characters:
1x2x3x4x5x
6x7x8x9x0x
This does not apply to horizontal barcodes.
Auto size
For ease of sizing, selecting this check box expands the
barcode width to the space available based on the page
size. This allows the barcode to fill to the paper size for
both A4 and letter size paper.
Note that the field expands to the space available but does
not contract to fit the page, so when using this option, it is
best to size the barcode width to smaller than the
expected page size. If a barcode height is defined, then
selecting auto size has no effect.
Barcode Width
The longest dimension of the barcode, its length from the
first bar to the last bar, in pixels. The maximum value is
999 pixels.
Barcode Height
The shortest dimension of the barcode, the height of each
bar, in pixels. The maximum value is 999 pixels.
4. Click Save.

Section 5: Print Formats
Concur Invoice: Printed Invoice Configuration Setup Guide 29
Last Revised: November 1, 2022
© 2004 - 2024 SAP Concur All rights reserved.
Edit a Print Format
You cannot edit any of the default print formats, only view them. To modify a default
format, make a copy of the format then edit the copy.
You can edit print formats in the following ways:
• Change text or barcode orientation or size
• Add note text
• Add or remove fields
• Change styles
To edit the content:
1. On the Printed Invoices page, click the name of a new or copied print
format you want to edit, and then click Modify Content. The Print Format
Content page appears.
2. Click on the print format content you want to edit and then click Modify
Content or Modify Fields.
3. Make the desired changes.
4. Click Save.
5. Click Done.
To edit print format styles:
1. On the Print Formats tab, select a new or copied print format.
2. Click Modify Content. The Print Format Content page appears.
3. Select the content you want to modify and then click Modify Content. The
Edit Content for print format page appears.
4. Make the desired changes.
5. Click Save.
6. Click Done.
To change the fields that appear on the printed invoice:
1. On the Print Formats tab, select a new or copied print format.
2. Click Modify Content. The Print Format Content page appears.
3. Select the content you want to modify and then click Modify Fields. The Edit
Fields for print format page appears.

Section 5: Print Formats
30 Concur Invoice: Printed Invoice Configuration Setup Guide
Last Revised: November 1, 2022
© 2004 - 2024 SAP Concur All rights reserved.
4. Do one of the following:
Remove the desired fields.
Add the desired fields.
5. Click Save.
6. Click Done.
Delete a Print Format
You cannot delete any of the three default print formats, but you can delete any print
formats that you have created. You cannot delete a print format that another Group
administrator or Global administrator created.
You must make the format inactive from the policy before you can delete the print
format.
Once deleted, a print format is no longer available for use anywhere in the system.
To delete a print format:
1. On the Printed Invoices page, select the format you want to delete.
2. Click Remove.
3. In the Remove Print Format window, click Yes.
4. The print format is deleted from the system.

Section 6: Print Templates
Concur Invoice: Printed Invoice Configuration Setup Guide 31
Last Revised: November 1, 2022
© 2004 - 2024 SAP Concur All rights reserved.
Assign a Print Format to a Policy
Once you have modified or created a new printed format, you can assign it to the
policy that will use it when users create invoices. The policy configuration decides if
the Detailed Invoice Default Report is available for selection by the user.
NOTE: Any custom report that the admin creates will display for the user if the
admin has activated the report in the Policies tool. Default reports are the
only conditional reports.
For more information, refer to the Concur Invoice: Policies Setup Guide.
Section 6: Print Templates
The print template defines the form and layout that appear on the printed invoice.
When viewing the layout, you see only the components of the printed invoice, and
not the details, such as the fields or the text that will appear.
You use Print Templates mainly for the following:
• Adding new sections to the printed invoice
• Separating sections into multiple sections
• Changing location of the sections
• Adding white space padding around content, using the HTML padding property
It is not necessary to use the Print Templates for the following, but rather use Print
Formats for these things:
• Do not embed text into the HTML—it is not localized. Instead, create a text
content ID and add the text in the Print Format.
• Do not change the style of text in HTML by using the style property. Instead,
use one of the text styles in PrintStyles.css, or create a new one (requires
customization).
• It is not necessary to use the Templates to delete sections from the template.
To remove a section, you simply do not have to include any information
within the Print Format section.

Section 6: Print Templates
32 Concur Invoice: Printed Invoice Configuration Setup Guide
Last Revised: November 1, 2022
© 2004 - 2024 SAP Concur All rights reserved.
A template is source code. It is a block of text that contains variable name
references to the content defined by the print format. The variables are surrounded
by HTML tags that provide the layout and formatting control.
Before You Begin
• You should have HTML or programming knowledge before you attempt to
modify any print templates. HTML knowledge is helpful in modifying print
formats when modifying text variables, but not necessary.
• You must be a Global Configuration administrator to modify a print template;
however, you only have to be a Group Configuration administrator to change
a print format. Each administrator can add, modify, view, and delete any print
formats that they created, but can only view the formats that another
administrator created.

Section 6: Print Templates
Concur Invoice: Printed Invoice Configuration Setup Guide 33
Last Revised: November 1, 2022
© 2004 - 2024 SAP Concur All rights reserved.
Content Types and Content IDs
The template is made of content IDs and content types encased in HTML tables and
table cells. Content IDs, such as PaymentRequestTitle and Note2 can be any
terminology you want, but the content types can only be one of those types outlined
below. You should become familiar with the content types in order to make changes
within the template:
Section
Description
Invoice Text
Displays as text on the printed invoice, such
as printed date/time of the invoice.
Syntax: $rtext_XXXX
(where XXXX is the content section name,
such as $rtext_TopNote)
Invoice Form Data
Displays areas where you can list invoice-
level data from the invoice and employee
forms.
Syntax: $rformdata_XXXX
(where XXXX is the content section name,
such as $rformdata_InvoiceTitle)
Invoice List Data
Displays the list of expenses included on the
invoice.
Syntax: $rlistdata_XXXX
(where XXXX is the content section name,
such as $rlistdata_ReportEntries)
Summary
Displays invoice-level information, typically
the invoice amount totals for the invoice, in
table format.
Syntax: $rsummarydata_XXXX
(where XXXX is the content section name,
such as $rsummarydata_ReportSummary)
Invoice Barcode
Defines the orientation and sizing of the
barcode necessary for scanning.
Syntax: $rbarcode_XXXX
(where XXXX is the content section name,
such as $rbarcode_Barcode)

Section 6: Print Templates
34 Concur Invoice: Printed Invoice Configuration Setup Guide
Last Revised: November 1, 2022
© 2004 - 2024 SAP Concur All rights reserved.
Section
Description
Approval Flow Data
Displays the approval flow associated with the
report.
Syntax: $rapproval_XXXX
(where XXXX is the content section name,
such as $rapproval_Workflow)
Audit Trail
Displays audit trail data, including
confirmation agreement acceptance records,
to the printed invoice. This data appears in a
non-configurable preset format.
Syntax: $rauditdata_XXXX
(where XXXX is the content section name,
such as $rauditdata_AuditTrail)
NOTE: The printed invoice will create the
audit trail information based on the role of the
user who is printing the report. For example,
a processor sees more types of information
on the audit trail than a submitter. When the
processor prints the report, their audit trail
section will contain more details than when
the submitter prints the same report.
Change the Template Code
Before You Begin
Before you begin changing the template code, you should be aware of a few things
to reduce the amount of errors and make coding easier:
• It is highly recommended that you are well-versed in HTML and programming.
• You can use any HTML editor by copying and pasting the template code into
the editor. Once complete, you can copy the code back into the Print
Templates section of the Invoice Configuration Administrator within Concur
Invoice.
If you copy the text from Concur Invoice, paste the text within the Body
tags of the HTML editor. When you paste it back into the system, we
recommend that you only paste what is in between the Body tags.
• We recommend that you edit the Print Templates only for things that you
cannot edit using the Print Format section, such as adding borders to
sections, splitting up data, and moving sections around. You can use Print
Formats for editing styles, alignment, and fonts.

Section 6: Print Templates
Concur Invoice: Printed Invoice Configuration Setup Guide 35
Last Revised: November 1, 2022
© 2004 - 2024 SAP Concur All rights reserved.
Components of the Template Code
In the template code, each variable has a content type attached to it preceded by a
dollar sign ($), such as: $rtext_TopNote
When adding a new section or editing an existing section, it must contain the dollar
sign ($), then the content type, an underscore, and then a unique name, for example
<tr><td>$rtext_TopNote</td></tr>. When you add a new section, it creates its
own table cell, but you can create a table cell or table for the new parameter as well.
The name specified after the underscore will display as the section label in the
Preview Layout view:
The section heading that appears to the user in the printed invoice is configured by
clicking the Modify Content button on the Print Format page.
For more information, refer to the Edit Print Format Content section of this
guide.
Default Templates
There are several default templates:
• Detailed Invoice
• Invoice
Default templates can be copied to create a new template.
Once a template is created, you can create or edit a format and identify the details of
the template, such as the fields that will be seen, the location and size of the
barcode if any, and the instructional text.
NOTE: If you have an imaging configuration created within Image Handling, you can
create multiple print formats in the Print Formats section, but you cannot
manipulate the template.
For more information, refer to the Print Format section of this guide.

Section 6: Print Templates
36 Concur Invoice: Printed Invoice Configuration Setup Guide
Last Revised: November 1, 2022
© 2004 - 2024 SAP Concur All rights reserved.
Access Print Templates
To access print templates:
On the Printed Invoices page, click the Print Templates tab.
Add a Template
To add a template, you must copy an existing one. To familiarize yourself with the
existing system templates, click the template name, click the View button, and then
click Preview Layout. A separate browser window appears with the layout.

Section 6: Print Templates
Concur Invoice: Printed Invoice Configuration Setup Guide 37
Last Revised: November 1, 2022
© 2004 - 2024 SAP Concur All rights reserved.
To add a new template:
1. On the Print Templates page, select the desired template.
2. Click Copy. The Edit Print Template page appears.
3. Complete the required fields.
Field
Description
Name
Type the name of the new template. This name appears in
Print Formats when editing the format. It does not appear
to the employee.
Template Code
Edit the code within this field. HTML and programming
knowledge is required before you begin editing any
template code. Refer to procedures in this section for
more information.
Preview Layout
Click to view the template layout.
4. Click Save. The new template appears alongside the existing templates.

Section 6: Print Templates
38 Concur Invoice: Printed Invoice Configuration Setup Guide
Last Revised: November 1, 2022
© 2004 - 2024 SAP Concur All rights reserved.
Add a New Content ID
To add a new content ID to the template code:
1. On the Edit Print Template page, click in the Template Code field.
NOTE: As stated in the Before You Begin section, you can copy and paste this
entire code into an HTML editor or edit it within this field. If you
choose to use another editor, be sure to copy the entire text and copy
it within the Body tags.
2. Copy a part of the code that has the same type of content type you want to
create, such as text or barcode, and paste it in the area that you want to
create. Be sure to include the entire cell and/or table.
3. Change the Content ID to a unique ID, such as TopNote to BottomNote, but
be sure to keep the space after the name.
4. Make any other necessary HTML changes.
5. Paste the edited section between the body tags back into the field.
6. Click Preview Layout to view the layout with your new addition.
NOTE: When you add a new section to the template, that new section appears
in the Print Formats section to allow you to further edit the content as
with any other content section.

Section 7: Print Condition Editor
Concur Invoice: Printed Invoice Configuration Setup Guide 39
Last Revised: November 1, 2022
© 2004 - 2024 SAP Concur All rights reserved.
7. Click Save.
Split a Content ID into Two
To split a content ID into two sections:
1. On the Edit Print Template page, click in the Template Code field.
NOTE: As stated in the Before You Begin section, you can copy and paste this
entire code into an HTML editor or edit it within this field. If you
choose to use another editor, be sure to copy the entire text and copy
it within the Body tags.
2. Copy a part of the code that has the same type of content type you want to
create, such as text or barcode, and paste it in the area that you want to
create. Be sure to grab the entire cell and/or table.
3. Make edits to one of the cells to give the copy a unique content ID name. All
content IDs must be unique within a single template.
4. Click Preview Layout to view the layout with your new addition of the
element in two places.
5. Click Save.
6. Click the Print Formats tab and edit the two sections to include the
information that you want in each section.
NOTE: When you add a new section to the template, that new section appears
in the Print Formats section to allow you to further edit the content.
For more information, refer to the Print Formats section of this guide.
Section 7: Print Condition Editor
The Print Condition Editor can be used to create print condition rules that apply to
the content included in a printed invoice. The rules are designed to control what
invoice data is included in an invoice by allowing rules to be set at the content ID
level. These rules are triggered when the criteria are met and typically offer a useful
informational message associated with the rule. Rules are available globally and may
be applied to multiple invoices and within the invoices, to multiple content IDs.
Work With Print Condition Rules and Content IDs
Condition rules may be set to display or hide the Text Data, Form Data, List Data,
and Summary Data content IDs. However, rules applied to the List Data and
Summary Data content IDs may also be used to include or hide either line item or an
entire section.
Section 7: Print Condition Editor
40 Concur Invoice: Printed Invoice Configuration Setup Guide
Last Revised: November 1, 2022
© 2004 - 2024 SAP Concur All rights reserved.
This means that for all content IDs, when a rule is met, the content is included in the
printed invoice. However, for List Data and Summary Data content ID types, line
items are filtered from the list if they do not meet the condition. If all line items do
not meet the condition, the entire list is filtered from the invoice.
NOTE: Use the No Items Message option for List Data and Summary Data content
types to insert a message where line items are excluded from the printed
invoice when they do not meet a rule; this text will appear in their place.
Understand Conditional Expressions
When creating or editing conditional expressions, consider the following:
• There is no limit to the number of conditions that comprise a total expression.
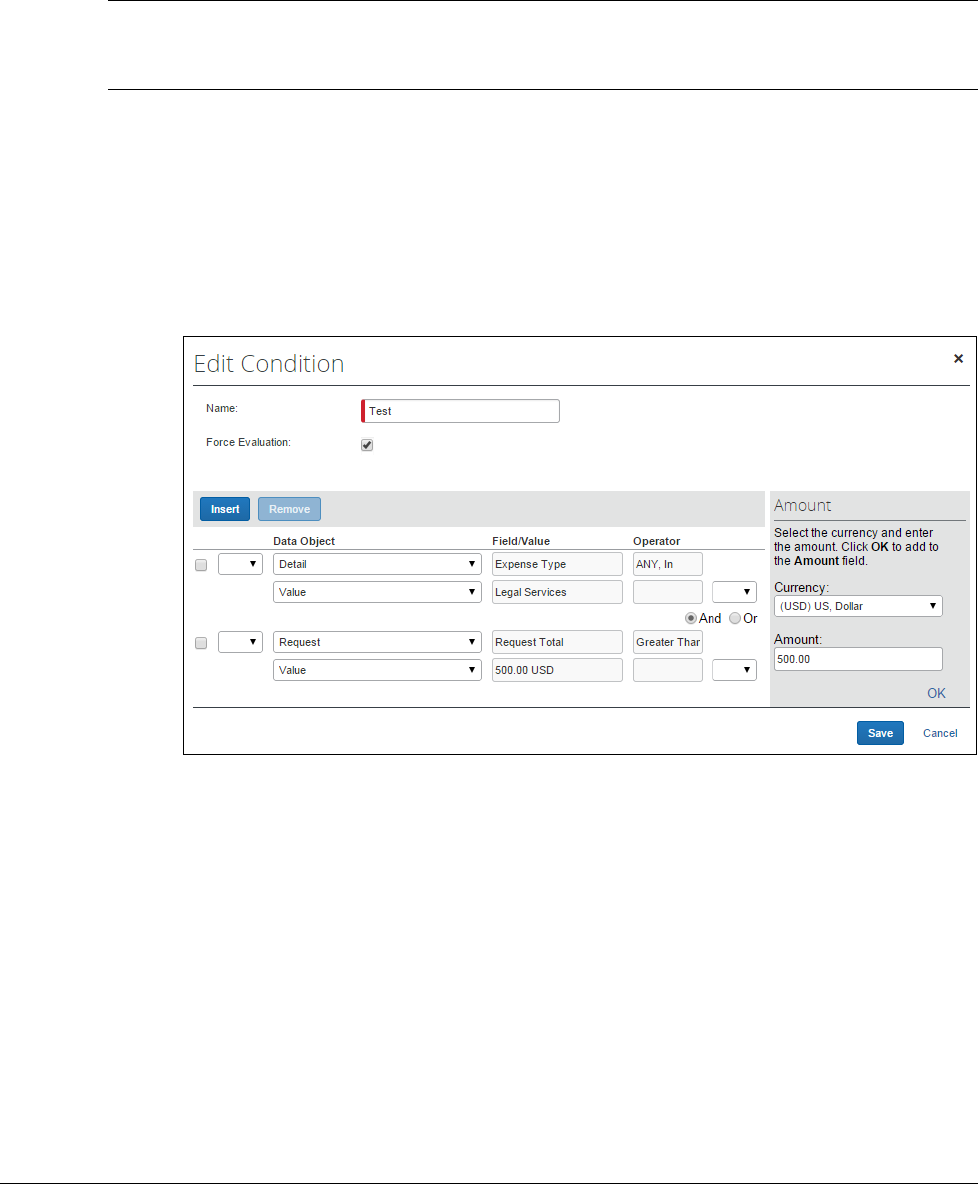
The conditional expression for "Legal Service greater than 500.00 USD" is:
(Expense Type equals Legal Service) and (Request Total is greater
than 500.00 USD)
It is composed of two conditions, separated by the Boolean separator of and.
• Most conditions are comprised of a field, then an operator, and then a value.
For example:
(Field) Expense Type (operator) equals (value) Legal Service
A field consists of a data object (essentially a database table) and fields in
that data object (essentially a database column). The field selected
defines the data type of the condition (number, text, date, and so on).
An operator is one of several pre-defined comparison operators (equals,
not equals, is greater than, and so on). The list of operators changes
depending on the type of data being compared.
An operator is further defined by Any and Every depending on the type of
data being compared. For example, a Report Submit event combined with
an Entry data object and Amount field/value results in an Operator value

Section 7: Print Condition Editor
Concur Invoice: Printed Invoice Configuration Setup Guide 41
Last Revised: November 1, 2022
© 2004 - 2024 SAP Concur All rights reserved.
that can have multiple values and thus multiple interpretations. In this
circumstance, the report level condition will trigger the rule as follows:
• ANY: Where a single expense of many associated with the report is
true for the operator. As "the amount is greater than" for any expense
causes the rule to be triggered
• EVERY: Where all expenses associated with the report are true for the
operator. As "the amount is greater than" for every expense causes
the rule to be triggered
A value is a constant and – like the field – can be of any data type. The
data type of the value must match the data type of the field.
If a second field is used in the condition, its data type must match that of
the first field.
• When a conditional expression is composed of multiple conditions, each
condition is separated by either and or or.
• Parentheses are optional and are used to define the order of operation for the
and/or operators. If the parentheses are omitted, and/or operations are
carried out left to right. There is no precedence of and over or. The evaluation
of the expression is simply left to right.
• If a conditional expression contains parentheses, the count of left parentheses
must match the count of right parentheses. There can be up to three
parentheses for both left and right sides.
Example of correct placement of parentheses and total left/right count:
(Condition 1) and (Condition 2)
Examples of incorrect parentheses even though the total left/right count
matches:
Condition1 ) And ( Condition2
Condition1 ) And ( Condition2 ) Or ( Condition3
( Condition1 )) And ( Condition2
• Conditional expressions must be precise to include or exclude all necessary
criteria. If a rule does not apply to personal expenses, then the condition
must exclude personal expenses.

Section 7: Print Condition Editor
42 Concur Invoice: Printed Invoice Configuration Setup Guide
Last Revised: November 1, 2022
© 2004 - 2024 SAP Concur All rights reserved.
The Condition Page
The Condition page in Print Condition Rules is similar to the Condition page used
for Audit Rules and Invoice Processor.
Table 1: Description of the Condition page
Field
Description
A: Left Parenthesis
Up to three parentheses, depending on the complexity
B: Data Object
The choices that appear in this list are based on the event that
triggers the rule:
• Detail
• Detail Allocation
• Employee
• Request
• Request Exception
• Vendor Remittance
• Vendor Ship From
C: Field/Value
Select an item from the helper pane that appears. The information
that appears in this pane is based upon the selection made in the
Data Object list.
D: Operator
Select an item from the helper pane that appears. The information
that appears in this pane is based upon your previous choices.
NOTES:
• If you use the In or Not In operators for expense types, you
can select multiple check boxes to include as many expense
types as are required. Refer to Additional Samples of Custom
Audits in this guide.
• The Within operator defines a set of dates for the system to
check against when evaluating the rule. For example, if you use
Within Today -2 to evaluate the Request Submit Date, the
system will look for the submit dates within the two ends of the
range: Today, and two days earlier.
E: Data Object
The system provides the option that best suits the previous choices.
Change it if necessary.

Section 7: Print Condition Editor
Concur Invoice: Printed Invoice Configuration Setup Guide 43
Last Revised: November 1, 2022
© 2004 - 2024 SAP Concur All rights reserved.
Field
Description
F: Field/Value
Select an item from the helper pane that appears. The information
that appears in this pane is based upon the selection made in the
Data Object list.
G: Right Parenthesis
Select zero to three parentheses, depending on the complexity of
the condition.
H: And/Or
Select either option to join the current condition to the next
condition.
Access the Printed Invoices Condition Editor
To access the Printed Invoices Condition Editor:
On the Printed Invoices page, click Print Condition Rules.
On this page, the user can create, view, or remove print condition rules depending
on privileges.

Section 7: Print Condition Editor
44 Concur Invoice: Printed Invoice Configuration Setup Guide
Last Revised: November 1, 2022
© 2004 - 2024 SAP Concur All rights reserved.
Create a Conditional Rule in the Editor
Group administrators can only create print reminder rules if given "create" rights on
role assignment. If they do not have permissions, then the New button is grayed out
and inactive.
To create a conditional rule:
1. Click New. The General step appears.
2. Fill in the fields:
Field
Description/Action
Print Condition Rule Name
Enter the name for the new print
condition rule.
Editable By
Select the group(s) that can edit the print
condition rule.

Section 7: Print Condition Editor
Concur Invoice: Printed Invoice Configuration Setup Guide 45
Last Revised: November 1, 2022
© 2004 - 2024 SAP Concur All rights reserved.
3. Click Next. The Conditions page appears.
4. Create the necessary conditions.
For more information, refer to the Understand Conditional Expressions
and The Condition Page sections of this guide.
5. Click Done to return to the Print Condition Rules List page.
Assign the Rule to a Content Type
Content Types consist of Text, Form Data, List Data, Summary Data, Barcode,
Itinerary List Data, and Approval Flow Data. Each content type may be associated
with a conditional rule in their respective Edit Content pages.
To Assign a rule to a Content Type:
1. On the Printed Invoices page, select the desired print format.
2. Click Modify Content.
3. Select the desired content ID.
4. Click Modify Content.

Section 7: Print Condition Editor
46 Concur Invoice: Printed Invoice Configuration Setup Guide
Last Revised: November 1, 2022
© 2004 - 2024 SAP Concur All rights reserved.
5. Select the rule you will apply by selecting it from the Print Condition Rule
list.
6. Click Save.
7. Click Done to return to the Print Formats page.
☼
