
PUBLIC
2020-07-01
Getting Started with SAP Cloud Platform
Integration (CF Trial)
© 2020 SAP SE or an SAP aliate company. All rights reserved.
THE BEST RUN
Content
1 Initial Setup of a Trial Account in Cloud Foundry Environment ......................... 4
1.1 Subscribing to Process Integration.................................................5
Unsubscribing the Service....................................................5
1.2 Conguring User Access to the Application .......................................... 6
1.3 Provisioning the Tenant.........................................................7
1.4 Creating Service Instances...................................................... 7
2 Get Started with Integration Flow Development....................................10
2.1 Overview of the SAP Cloud Platform Integration Web UI................................. 11
2.2 Create an Integration Package...................................................15
2.3 Create the Integration Flow..................................................... 16
2.4 Smoke Test Scenario..........................................................18
Add a Timer Start Event.....................................................19
Create a Content Modier to Dene the Message Body............................... 21
Create a Script Step to Log the Payload..........................................22
Save and Deploy the Integration Flow........................................... 24
Monitor Message Processing................................................. 26
2.5 Smoke Test Scenario with External Data Source.......................................27
Create a Content Modier to Dene the Message Body...............................29
Create a Content Modier to Add a Header....................................... 30
Create the Outbound OData Channel ...........................................30
Create the Script Step to Log the Payload........................................ 35
Run the Integration Flow and Monitor the Message Processing..........................36
2.6 Timer-Initiated Scenario with a Mail Receiver........................................ 39
Update the Tenant Keystore with the Certicates Required by the Mail Server...............41
Create and Deploy a User Credentials Artifact for the E-Mail Account.....................43
Create the Mail Receiver Channel..............................................44
Monitor Message Processing................................................. 47
2.7 Sender-Initiated Scenario (with HTTPS Sender Adapter)................................48
Authorize the HTTP Client to Call the Integration Flow Endpoint in the Cloud Foundry
Environment.............................................................49
Create the HTTPS Sender Channel.............................................52
Add the JSON to XML Converter...............................................53
Send the HTTP Request and Process the Integration Flow.............................54
3 Security in the Cloud Foundry Environment.......................................57
3.1 Technical Landscape..........................................................58
2
PUBLIC
Getting Started with SAP Cloud Platform Integration (CF Trial)
Content
3.2 Security Aspects of Processes...................................................60
3.3 Security Aspects of Data, Data Flow...............................................60
3.4 Identity and Access Management.................................................64
Persona................................................................66
3.5 Data Storage Security.........................................................77
3.6 Data Protection and Privacy.....................................................78
Types of Stored Data.......................................................80
Specic Data Assets.......................................................80
3.7 Other Security-Related Information...............................................82
Getting Started with SAP Cloud Platform Integration (CF Trial)
Content
PUBLIC 3
1 Initial Setup of a Trial Account in Cloud
Foundry Environment
Quickly get started with a trial account in Cloud Foundry (CF) Environment.
This quick start guide provides all the information you need to quickly onboard after registering for a free trial
account with SAP Cloud Platform Integration.
Here you nd an overview of tasks that you would perform while creating a subaccount in Cloud Foundry
environment.
Trial accounts are intended for personal exploration, and not for production use or team development. The
features included in a trial account are limited, compared to an enterprise account. Consider the following
before using a trial account:
● Every trial user gets one trial account only.
● Cloud Foundry trial accounts expire after 30 days. You can extend the trial period to a maximum of 90
days, after which your account is automatically deleted.
● Usage of runtime resources are limited only for functional evaluations. Processing of large message
payloads is not supported.
● A subaccount in your trial account is created automatically. Each subaccount is associated with exactly
one Cloud Foundry organization in which you can create additional spaces.
● You can manage members in your trial account.
● You can activate Enterprise Messaging with limited capabilities.
● You can use production and beta services in trial accounts.
● A trial account includes 4 GB of memory for applications.
● You can use 8 GB of instance memory.
● SAP does not provide support to establish secure connection using private keys and authentication based
on inbound client certicate. It’s recommended to use basic authentication for allowing a client to
authenticate itself against the CF server based on user credentials (clientid and clientsecret)
● You can use a maximum number of 10 JMS queues.
● There is no service level agreement with regards to the availability of the platform.
For more information about the regions that are available for trial accounts, see Regions and API Endpoints
Available for the Cloud Foundry Environment.
Related Information
Subscribing to Process Integration [page 5]
Conguring User Access to the Application [page 6]
Provisioning the Tenant [page 7]
Creating Service Instances [page 7]
4
PUBLIC
Getting Started with SAP Cloud Platform Integration (CF Trial)
Initial Setup of a Trial Account in Cloud Foundry Environment

1.1 Subscribing to Process Integration
Subscribe to the Process Integration application from the Subscriptions page in the SAP Cloud Platform
cockpit.
Prerequisites
● You have signed up for a free trial account with SAP Cloud Platform Integration in the Cloud Foundry
environment.
● You have navigated to the subaccount in the Cloud Foundry environment.
Procedure
1. In the navigation area of the subaccount, choose Subscriptions.
The following information is displayed for the business applications to which your global account is entitled
in the Cloud Foundry environment:
○ The name and short description of the application.
○ Subscribed / Not subscribed: The status of the application, indicating whether the subscription is
active in your subaccount in the current region.
2. Choose the Process Integration tile to open its Overview page.
3. Choose Subscribe. Wait for the subscription to complete and once done successfully, you will see the
Process Integration tile is shown as Subscribed.
Note
To login to the Cloud Integration application, you have to assign the relevant roles rst.
4. Choose Go to Application to provisioning application. For more information, see Provisioning the Tenant
[page 7].
Unsubscribing the Service
You choose Unsubscribe in the Overview page page to decommission the tenant. Before you unsubscribe the
Process Integration service, make sure you have deleted the Process Integration runtime service instances.
During this process you would have noticed the Subscribe button available that might encourage you to choose
it. You need to refrain yourself from choosing the button until the tenant is successfully decommissioned.
Getting Started with SAP Cloud Platform Integration (CF Trial)
Initial Setup of a Trial Account in Cloud Foundry Environment
PUBLIC 5

1.2 Conguring User Access to the Application
Create and modify application roles and assign users to these roles.
Prerequisites
You are subscribed to Process Integration SaaS application in the Cloud Foundry environment.
Context
As an administrator of the Cloud Foundry environment of SAP Cloud Platform Integration, you can group
application roles in role collections. Typically, these role collections provide authorizations for certain types of
users.
Once you have created a role collection, you can pick the roles that apply to the typical job of an integration
developer. Since the roles are application-based, you must select the application to see which roles come with
the role template of this application. You are free to add roles from multiple applications to your role collection.
Finally, you assign the role collection to the users provided by the SAP ID service.
Procedure
1. Go to your subaccount and choose Security Role Collections.
2. To create a new role collection, choose New Role Collection and enter a name relevant to the role.
3. Add roles to newly created role collection by selecting the role name and then choose Add Role.
4. Select the application identier (prexed with it) and the role template (AuthGroup_Administrator).
5. Add AuthGroup_Administrator, AuthGroup_IntegrationDeveloper and AuthGroup_BusinessExpert as roles to
the role collection. These roles are required to execute the test samples described in the Get Started with
Integration Flow Development Guide. For more information about the dierent roles, see Overview of
Authorization Groups.
6. Choose Save.
7. To assign the role collections to the user (e-mail address) go to your subaccount, and choose Security
Trust Conguration SAP ID Service .
8. Choose Role Collection Assignment, and enter the user's e-mail address.
9. Choose Show Assignments, to see the role collections that are currently assigned to this user.
Note
For rst time users, choose Show Assignments and add the user to the SAP ID Service provider.
6
PUBLIC
Getting Started with SAP Cloud Platform Integration (CF Trial)
Initial Setup of a Trial Account in Cloud Foundry Environment

10. Choose Assign Role Collection, to assign a role collection for the user.
1.3 Provisioning the Tenant
Provision a Cloud Integration tenant and receive a consumer-specic URL to access the application.
Prerequisites
You have created the role collection and have assigned it to the users provided by the SAP ID service.
Procedure
1. In the navigation area of the subaccount, choose Subscriptions and go to the Process Integration tile, and
choose Go to Application.
2. The the provisioning application opens in a new browser instance.
For more information on subscribing Process Integration, see Subscribing to Process Integration [page 5].
3. To log on to the application, enter your credentials (use e-mail address assigned while conguring the role
collection).
4. Choose Provision. Once the provision is done use the Tenant URL to access the SAP Cloud Platform
Integration Web UI.
After successful provisioning of the tenant, you can create and deploy integration ows.
Note
Provisioning of Cloud Integration tenant happens only if the subdomain name length is less than or
equal to 16 characters.
1.4 Creating Service Instances
Use services in the Cloud Cockpit to create service plan, service instances and service keys.
Context
Create Process Integration runtime service instances to access the endpoints after deploying the integration
ows..
Getting Started with SAP Cloud Platform Integration (CF Trial)
Initial Setup of a Trial Account in Cloud Foundry Environment
PUBLIC 7

Procedure
1. You need to assign service plan for a specic subaccounts associated with process integration service.
1. In your Global Account, choose Entitlements to assign service plan to specic subaccounts.
2. To add service plan to a subaccount choose Edit, and under the Process Integration Runtime for the
relevant subaccount select integration-ow from the service plan.
Note
If your subaccount is not visible here, then you haven't created a Cloud Foundry organization yet.
To create one you need to choose Enable Cloud Foundry from the subaccount Overview menu.
3. Save the changes.
2. (Optional) Create space in Cloud Foundry environment to control use of resources. A space sets the scope
to x the share of resources to be consumed by a particular subaccount within a Cloud Foundry
organization.
Note
For a trial account a space by name dev is created as default. Perform the procedure below to create a
new space.
1. Choose the subaccount, in which you would like to create a new space.
2. Choose Spaces New Space .
3. Enter a space name and select the permissions you would like to assign to your ID.
4. Save the changes.
Note
Allocating space quota plans helps you to better manage resources of subaccount under an Cloud
Foundry organisation. For more information , see Change Space Quota Plans.
3. Use spaces that are available to the subaccount, and access them using the cockpit.
1. Navigate to the newly created space, in which you want to create a service instance.
Note
Before creating a runtime instance, ensure your tenant provisioning is successful.
2. Choose the space and navigate Services Service Marketplace Process Integration Runtime .
3. In Process Integration Runtime service instance, choose Instances New Instance .
4. Choose a Service Plan from the dropdown list, then choose Next.
5. In the Specify Parameter menu, you must enter the below command in the text area to assign roles and
then choose Next. This authorizes the sender system to call a tenant and allows to process the
messages on the tenant.
Source Code
{
"roles":[
"ESBMessaging.send"
]
8
PUBLIC
Getting Started with SAP Cloud Platform Integration (CF Trial)
Initial Setup of a Trial Account in Cloud Foundry Environment

}
Note
The role name is case-sensitive and the authentication mode used is basic authentication.
6. In the Assign Application menu, to bind the new service instance by default None selected and then
choose Next.
7. Enter a name for your instance and choose Finish.
4. Create service keys to generate credentials to communicate directly with the Process Integration Runtime
service instance. When conguring the service key, you use a client certicate (exported from the sender
keystore).
1. Choose Instances, from the list then select an instance you are creating a key for.
2. In the navigation area, choose Service Keys and then choose Create Service Key.
3. Enter a name for the service key.
Note
○ As user credentials, for basic authentication mode, use the values of clientid and
clientsecret.
○ To use principal propogation as an authentication mode for an On-Premise service for a given
user:
○ Fire the authentication call with grant type password from the ‘Process Integration
Runtime’ service key.
POST <tokenurl from service key from Process Integration Runtime>?
grant_type=password&username=<email address of the
user>&password=<password of the username>
Basic authentication with UserName/Password: <clientid from service
key from Process Integration Runtime>/< clientsecret from service
key from Process Integration Runtime>
○ Use the access token obtained from the response above to trigger the integration process
to propagation user’s email identity.
Note
○ Ensure the user has role MessagingSend assigned.
○ The identity propagated of the user is the email address
4. Save your changes.
The Service Key will show now the role.
Getting Started with SAP Cloud Platform Integration (CF Trial)
Initial Setup of a Trial Account in Cloud Foundry Environment
PUBLIC 9

2 Get Started with Integration Flow
Development
Learn how to develop and run your rst integration ow.
Note
These exercises apply for both cases when you use SAP Cloud Platform Integration in the Neo and in the
Cloud Foundry environment.
However, note that at certain steps there are specic things to consider depending on the environment.
Whenever this is the case, it is indicated in this documentation.
A key part of an SAP Cloud Platform Integration project is to develop integration ows. An integration ow
allows you to specify how a message is processed on a tenant. The SAP Cloud Platform Integration Web UI
provides a modeling environment that allows you to design the details of message processing (its senders and
receivers as well as the individual processing steps) with a graphical user interface.
This section shows you step-by-step how to develop and run your rst, simple integration ows. In other words,
it gives you an introduction to the tasks of an integration developer. We show you the design of four integration
ows, with increasing complexity.
Note
The rst three integration ows are initiated by a timer and don't have a sender. This means that all tasks
related to setting up a sender system to SAP Cloud Platform Integration can be omitted.
The fourth integration ow is initiated by a request from a sender system which is simulated by an HTTP
client.
To complete the tasks, you use the SAP Cloud Platform Integration Web UI.
Before designing any integration ow of this section, you need to create an integration package rst and, within
this integration package, create an integration ow. When you have created the integration ow, you add the
steps as described for the specic integration ow exercise.
● The rst exercise shows you how to perform a simple smoke test to check whether your tenant cluster is
working correctly and that it processes messages in the expected way. A simple message is created with
the text Hello World! in the message body. The integration ow has no receiver. To check if the message
has been processed successfully, you can go to the monitoring application and check for the message
content there.
More information: Smoke Test Scenario [page 18]
● The second exercise shows you how to extend the smoke test scenario by adding an outbound call to an
external data source. The integration ow requests data exposed by the external component through an
OData application programming interface (API). The message body is created based on that data and, like
in the rst exercise, can be displayed by the monitoring application.
More information: Smoke Test Scenario with External Data Source [page 27]
10
PUBLIC
Getting Started with SAP Cloud Platform Integration (CF Trial)
Get Started with Integration Flow Development

● The third exercise is a simple enhancement and modication of second integration ow. It has an e-mail
receiver so that you receive the message (processed by SAP Cloud Platform Integration) in an e-mail
account of your choice.
More information: Timer-Initiated Scenario with a Mail Receiver [page 39]
● The last exercise is a simple integration ow which also has a sender component. The sender in this
example is simulated by an HTTP client installed on your computer.
More information: Sender-Initiated Scenario (with HTTPS Sender Adapter) [page 48]
The exercises are designed so that you can do all four of them independently. All steps are described one-by-
one. But you can also start with the rst one and, successively, enhance it to derive the second and the thirs
scenario out of the rst one.
Note
Prerequisites:
● You have been given access to an SAP Cloud Platform Integration tenant and have integration
developer permissions assigned to your user (authorization group
AuthGroup_IntegrationDeveloper).
● Authorization group AuthGroup_BusinessExpert has been assigned to your user (to allow to assess
message processing log attachments).
● You have set up an e-mail account that you can use as the receiver system for the integration ow (only
required for third exercise with the Mail adapter).
● You have opened the SAP Cloud Platform Integration Web UI (the Web UI URL ends with /itspaces).
Related Information
Overview of the SAP Cloud Platform Integration Web UI [page 11]
Smoke Test Scenario [page 18]
Smoke Test Scenario with External Data Source [page 27]
Timer-Initiated Scenario with a Mail Receiver [page 39]
2.1 Overview of the SAP Cloud Platform Integration Web UI
The SAP Cloud Platform Integration Web UI is your one-stop shop for integration development.
Note that the URL to access the Web UI ends with /itspaces.
When you open the Web UI, the following page is displayed.
Getting Started with SAP Cloud Platform Integration (CF Trial)
Get Started with Integration Flow Development
PUBLIC 11

The Web UI comprises the following sections:
● Discover
Here, you can nd predened integration content provided by SAP that you can use out of the box and
adapt to your requirements. As the Getting Started documentation focuses on how to design your own
integration content, we do not go into any more detail on this section.
● Design
This is where you design your integration content. As you progress through the exercise in the Getting
Started documentation, you will spend most of your time in this section. It contains the graphical
integration ow modeling environment.
● Monitor
This is where you can monitor your integration ow. You also use this section to manage additional artifacts
that you need to deploy on your tenant to complement your integration ows (for example, User Credential
artifacts to congure connections using basic authentication).
Design Section
When you go to the Design section, you nd a list of integration packages dened for the tenant.
When you select an integration package, you can nd the integration ows (and other artifacts) dened for the
package (on the Artifacts tab).
In this Getting Started documentation, we assume that you have not yet dened an integration package for
your integration content. Therefore, the rst step is to dene an integration package.
Monitor Section
The Monitor section (also referred to as Operations view) has several subsections, each one containing several
tiles. These subsections allow you to perform various tasks that are required for an integration project in
addition to integration content design.
12
PUBLIC
Getting Started with SAP Cloud Platform Integration (CF Trial)
Get Started with Integration Flow Development

When you work in the Neo environment, the SAP Cloud Platform Integration section has the following
appearance:
Getting Started with SAP Cloud Platform Integration (CF Trial)
Get Started with Integration Flow Development
PUBLIC 13

When you work in the Cloud Foundry environment, the SAP Cloud Platform Integration section has the
following appearance:
● Monitor Message Processing
When you select a tile in this section, you nd all messages that have been processed by all integration
ows deployed on the tenant. You can nd out whether messages have been processed successfully for
your integration ow and analyze the situation if not.
● Manage Integration Content
When you select a tile in this section, you nd all deployed integration ows and can check whether
deployment was successful. You can also nd the endpoint address for your integration ow (which you
need if you want to congure the endpoint in the connected sender system).
● Manage Security
14
PUBLIC
Getting Started with SAP Cloud Platform Integration (CF Trial)
Get Started with Integration Flow Development

○ The Security Material tile contains security-related artifacts that are required on the tenant in addition
to the security-relevant settings in your integration ow. In the course of the following exercise, you will
create and deploy a User Credentials artifact to dene the user name and password for the mail
account that is addressed by the Mail receiver adapter of the integration ow.
○ The Keystore tile shows the content of the tenant keystore, which contains key pairs and certicates
required to set up connections that are protected using certicate-based authentication. In the
exercise, we need to add certicates when setting up the connection to the e-mail receiver.
○ The Connectivity Tests (only available in the Neo environment) tile allows you to test outbound
connections (from SAP Cloud Platform Integration to a receiver system). We use the connectivity test
tool to retrieve the certicates of the e-mail receiver that need to be imported into the tenant keystore.
There are other sections and tiles that are required for additional tasks, but these are not required in the
Getting Started exercise, so we will not look at them in any more detail here.
2.2 Create an Integration Package
Create an integration package that contains your integration ows.
An integration package is used like a folder for your integration content (integration ows, value mappings, and
OData services). You can transport an integration package, for example, if you want to design your integration
content on a test tenant rst and then transport it to a production tenant.
1. Open the Web UI using the hyperlink provided to you in the mail from SAP (the links ends with /
itspaces).
2. Go to the Design section of the Web UI.
3. Choose Create.
4. Enter a name and description for your integration package and choose Save.
Getting Started with SAP Cloud Platform Integration (CF Trial)
Get Started with Integration Flow Development
PUBLIC 15

2.3 Create the Integration Flow
Create the integration ow as part of your integration package.
1. Open the Web UI, go to the (Design) section.
2. Select the integration package and choose Edit.
3. Go to the Artifacts tab and choose Add Integration Flow .
16
PUBLIC
Getting Started with SAP Cloud Platform Integration (CF Trial)
Get Started with Integration Flow Development

4. Provide a name and description for the integration ow and choose OK.
The integration ow is added to the list of artifacts for the selected integration package.
5. Select the integration ow from the list.
An integration ow template opens that contains the following shapes: Sender (this represents your
sender system), Receiver (this represents a receiver system), Integration Process (this will later contain all
the processing steps that dene how a message is processed on the tenant). The Integration Process
shape contains a Start and an End event.
Getting Started with SAP Cloud Platform Integration (CF Trial)
Get Started with Integration Flow Development
PUBLIC 17

If you select a shape in the integration ow modeling area, the properties of the selected shape are displayed in
the section below the modeling area. If you click the area outside of the shapes, the properties are displayed
that are related to the integration ow as a whole (as shown in the gure above).
To start modeling, choose Edit. Notice that a palette appears to the left of the integration ow model. This
palette provides access to all integration ow step shapes that you can add to the model.
2.4 Smoke Test Scenario
This is a very simple test to verify that your SAP Cloud Platform Integration is working as expected. You do not
need any receiver system to perform this test.
In this scenario, you create a Hello World text and write it into the message body (scheduled on deployment of
the integration ow). The result is written into the message processing log which you can directly inspect with
the message monitoring application.
Caution
This integration scenario is designed to show how to quickly (without much eort) set up and run an
integration ow without the need to congure and connect to any receiver system. It uses a Script step to
store the message payload in the message processing log (to enable you to easily check in the message
monitoring application if the message was processed without any errors).
Note that this is not according to standard best practice. When designing productive scenarios, don't store
the message payload in the message processing log. This can cause severe issues with memory
consumption. The reason is that tasks such as message processing and message monitoring share the
same memory and CPU which are available on your tenant.
In the course of this exercise, you develop the following integration ow.
To make it as easy as possible for you to develop this rst integration ow, you don't need to congure any
sender system. That saves the eort for you to set up a dedicated sender system and to connect it to SAP
Cloud Platform Integration. Instead of this, message processing is triggered by a Timer event, and the inbound
message payload is created within the integration ow, in a dedicated Content Modier step.
Furthermore, it is also not required that you set up any receiver system. To enable you to check if the message
has been processed correctly, you will congure the integration so that the message payload is written into the
message processing log (where you can easily inspect it using the Monitor application of the Web UI).
18
PUBLIC
Getting Started with SAP Cloud Platform Integration (CF Trial)
Get Started with Integration Flow Development

This is how the integration ow will process the message at runtime:
1. The Timer event triggers the processing of the message (according to the settings of the Timer's
scheduler).
2. The Content Modier step creates a message with a simple text content (Hello World!).
3. The Groovy Script step logs the payload of the message (that means, it writes the message content into
the message processing log).
When you have nished the integration ow design, you save and deploy the integration ow.
You can then monitor message processing.
Related Information
Create a Content Modier to Dene the Message Body [page 21]
Create a Script Step to Log the Payload [page 22]
Save and Deploy the Integration Flow [page 24]
Monitor Message Processing [page 26]
2.4.1 Add a Timer Start Event
1. Open the integration ow model (Edit mode), select the Sender shape, and choose the recycle bin icon (to
remove the Sender shape).
2. In the same way, remove the Start event.
3. In the palette, select the Events entry, and then select the Timer shape.
Getting Started with SAP Cloud Platform Integration (CF Trial)
Get Started with Integration Flow Development
PUBLIC 19

4. Place the Timer shape in the Integration Process shape (at the point where the Start event was previously
located).
5. In the properties section of the Timer event (displayed below the integration ow model when the Timer
event is selected in the model), go to the Scheduler tab.
6. Make sure that the option Run Once is selected.
Note
You can, of course, try out the other settings, which enable the Timer to start message processing
periodically. However, take care when selecting these options and you have added a receiver to your
scenario. For example, in another demo scenario provided in this documentation, the receiver of the
message is an e-mail account, and you don't want your e-mail account to be inundated with
periodically generated e-mails.
20
PUBLIC
Getting Started with SAP Cloud Platform Integration (CF Trial)
Get Started with Integration Flow Development

2.4.2 Create a Content Modier to Dene the Message Body
Add a Content Modier step to create the message body.
As the integration ow has no sender, we use a Content Modier to create a message from scratch.
1. To add a Content Modier, go to the palette, choose the Message Transformers icon, and select the Content
Modier icon.
2. Place the Content Modier in the model after the Timer Start event.
3. In the Content Modier properties section, go to the Message Body tab and enter the following string
sequence in the entry eld:
Hello World!
This simulates the inbound XML message.
4. Connect the Timer event with the Content Modier. To do this, select the Timer event.
Getting Started with SAP Cloud Platform Integration (CF Trial)
Get Started with Integration Flow Development
PUBLIC 21

5. Click the arrow icon, and drag and drop the cursor to the Content Modier.
2.4.3 Create a Script Step to Log the Payload
Add a Script step to log the message payload.
With a Groovy Script step, you can congure the integration in such a way that the payload of the message is
written to the message processing log as attachment.
1. To add a Script step (containing a Groovy script), go to the palette and choose the Message Transformers
icon and select the Script icon.
2. In the Script submenu, select Groovy Script.
3. Place the Script step shape after the Content Modier step and connect both shapes.
4. Select the Script step.
The context icons are displayed.
22
PUBLIC
Getting Started with SAP Cloud Platform Integration (CF Trial)
Get Started with Integration Flow Development

5. Choose the + icon.
6. The default script coding of the step is displayed.
7. Replace this content by the script provided in the coding example below.
import com.sap.gateway.ip.core.customdev.util.Message;
import java.util.HashMap;
def Message processData(Message message)
{
def body = message.getBody(java.lang.String) as String;
def messageLog = messageLogFactory.getMessageLog(message);
if(messageLog != null)
{
messageLog.addAttachmentAsString("Log current Payload:", body, "text/
plain");
}
return message;
}
8. Choose OK.
The integration ow model is again displayed.
Getting Started with SAP Cloud Platform Integration (CF Trial)
Get Started with Integration Flow Development
PUBLIC 23

2.4.4 Save and Deploy the Integration Flow
Save and deploy the integration ow on the tenant to be able to process it.
1. When you have nished modeling, click Save.
On successful save, a corresponding status message is displayed.
2. Click Deploy.
A message is displayed that asks you to conrm this action.
Another message is displayed when the validation has been performed and the integration ow
deployment has been triggered.
After successful deployment, a status message is displayed.
Note
In case of a modeling error, instead of this message a Validation Failed message is displayed.
Only when you have xed the error, deployment of the integration ow is triggered.
3. Chose the Operations view to check the status of the deployment.
24
PUBLIC
Getting Started with SAP Cloud Platform Integration (CF Trial)
Get Started with Integration Flow Development

4. Click a tile in section Manage Integration Content.
You can check the deployment status of your integration ow.
It will change from Starting to Started.
There is an alternative approach to deploy an integration ow.
Open the integration package that contains the integration ow to deploy. Go to the Artifacts tab, click the
Actions button (next to the name of the integration ow which you like to deploy) and select Deploy.
Getting Started with SAP Cloud Platform Integration (CF Trial)
Get Started with Integration Flow Development
PUBLIC 25

2.4.5 Monitor Message Processing
Run the integration ow and check the result of message processing.
When the integration ow has been deployed successfully, the message is processed without any further
trigger (based on the settings of the timer).
1. Go to the Operations view and select a tile under Monitor Message Processing.
If your integration ow has been processed successfully, the status Completed should be shown.
2. Select the integration ow and analyze the details area to the right of the integration ow list.
26
PUBLIC
Getting Started with SAP Cloud Platform Integration (CF Trial)
Get Started with Integration Flow Development

3. Under Attachments, click Log current Payload.
You should see the message content, which consists of the following text:
Hello World!
This shows you that the message has been processed correctly.
2.5 Smoke Test Scenario with External Data Source
This is a very simple test to verify that your SAP Cloud Platform Integration is working as expected. You do not
need any receiver system to perform this test.
In this scenario, you access an OData service and get information about a product (for a specic product ID).
The result is written into the message processing log which you can directly inspect with the message
monitoring application.
Caution
This integration scenario is designed to show how to quickly (without much eort) set up and run an
integration ow without the need to congure and connect to any receiver system. It uses a Script step to
store the message payload in the message processing log (to enable you to easily check in the message
monitoring application if the message was processed without any errors).
Note that this is not according to standard best practice. When designing productive scenarios, don't store
the message payload in the message processing log. This can cause severe issues with memory
consumption. The reason is that tasks such as message processing and message monitoring share the
same memory and CPU which are available on your tenant.
In the course of this exercise, you develop the following integration ow.
Getting Started with SAP Cloud Platform Integration (CF Trial)
Get Started with Integration Flow Development
PUBLIC 27
To make it as easy as possible for you to develop this rst integration ow, you don't need to congure any
sender system. That saves the eort for you to set up a dedicated sender system and to connect it to SAP
Cloud Platform Integration. Instead of this, message processing is triggered by a Timer event, and the inbound
message payload is created within the integration ow, in a dedicated Content Modier step.
Furthermore, it is also not required that you set up any receiver system. To enable you to check if the message
has been processed correctly, you will congure the integration so that the message payload is written into the
message processing log (where you can easily inspect it using the Monitor application of the Web UI).
This is how the integration ow will process the message at runtime:
1. The Timer event triggers the processing of the message (according to the settings of the Timer's
scheduler).
2. The rst Content Modier step creates a message with only one element, a productIdentifier (to
identify a product from the product catalog).
The actual value of the productIdentifier is hard-coded in this step. If you like to process the
integration ow with another product identier, you need to change the value in this step and re-deploy the
integration ow again. This is the drawback which results from abstaining from a dedicated sender system.
3. The second Content Modier creates a message header (which we also call productIdentifier) and
writes the actual value of the productIdentifier element into it. This header will be used in the
subsequent step.
4. The Request Reply step passes over the message to an external data source and retrieves data (about
products) from there.
The external data source is represented by the lower WebShop shape.
The external data source supports the Open DataProtocol (OData). For our scenario, we use the ESPM
WebShop, which is based on the Enterprise Sales and Procurement Model (ESPM) provided by SAP. The
demo application can be accessed at the following address: https://refapp-espm-ui-
cf.cfapps.eu10.hana.ondemand.com/webshop/index.html
For the connection to the WebShop, an OData receiver channel is used. To query for exactly one product
(for the product identier provided with the inbound message), the header that has been created in the
preceding Content Modier is used.
5. The OData service provides the details of one specic product (according to the product identier provided
with the inbound message).
6. The Groovy Script step logs the payload of the message (that means, it writes the message content into
the message processing log).
You can then run the integration ow and monitor message processing as described under: Run the Integration
Flow and Monitor the Message Processing [page 36].
Related Information
Create the Script Step to Log the Payload [page 35]
Run the Integration Flow and Monitor the Message Processing [page 36]
28
PUBLIC
Getting Started with SAP Cloud Platform Integration (CF Trial)
Get Started with Integration Flow Development

2.5.1 Create a Content Modier to Dene the Message Body
Add a Content Modier step to create the message body.
As the integration ow has no sender, we use a Content Modier to create a message from scratch.
1. To add a Content Modier, go to the palette, choose the Message Transformers icon, and select the Content
Modier icon.
2. Place the Content Modier in the model after the Timer Start event.
3. In the Content Modier properties section, go to the Message Body tab and enter the following string
sequence in the entry eld:
Sample Code
<root>
<productIdentifier>HT-1080</productIdentifier>
</root>
This simulates the inbound XML message.
4. Connect the Timer event with the Content Modier. To do this, select the Timer event, click the arrow icon,
and drag and drop the cursor to the Content Modier.
Getting Started with SAP Cloud Platform Integration (CF Trial)
Get Started with Integration Flow Development
PUBLIC 29

2.5.2 Create a Content Modier to Add a Header
Add a Content Modier to your model to dene a header, which will be used in a later step to lter data from the
external source.
If you remember, our input message has only one eld: productIdentifier. This eld will contain a product
identier that we want to use to lter the results from the WebShop application.
To make this number available to the integration framework during message processing, SAP Cloud Platform
Integration provides the option to store the value of productIdentifier from the incoming message either
in the message header or in a data container referred to as an exchange property.
We use the rst option, and to prepare the message accordingly we use a Content Modier.
1. Add a second Content Modier (after the rst one) to the integration ow model.
2. In the properties section of the second Content Modier, go to the Message Header tab and choose Add.
3. Specify the following parameters:
○ Name: Enter any name, for example, productIdentifier. This is the name of the header that will be
created by the Content Modier step.
○ Type: Select XPath.
Tip
In this example, you use an XML Path Language (XPath) expression to address a dedicated
element of your inbound message. XPath allows you to address any element in an XML structure
by using a well-dened syntax. The expression //<element name> addresses all elements with
name <element name> in the XML document.
○ Data Type: Enter java.lang.String.
○ Value: Enter //productIdentifier (which is the XPath expression that points to the
productIdentifier eld in the inbound message).
4. Connect the rst Content Modier (which denes the message body) with the second one.
In other words, the Content Modier creates a header with the name productIdentifier, which will contain
the value of the productIdentifier eld of the incoming message.
2.5.3 Create the Outbound OData Channel
To call the external data source, add a Request Reply step to the integration ow model and connect this step
with the external system using an OData channel.
Note
Follow this procedure in case you use SAP Cloud Platform Integration in the Neo environment.
30
PUBLIC
Getting Started with SAP Cloud Platform Integration (CF Trial)
Get Started with Integration Flow Development

To congure SAP Cloud Platform Integration to send a request message to the external OData service (to
retrieve the required data), you need to do the following:
● Create a Request Reply step.
● Connect the Request Reply step to a Receiver shape and select the OData adapter type.
● Congure the OData adapter to specify how the OData API of the external service should be called (to
dene query options, for example).
Remember
There are currently certain limitations when working in the Cloud Foundry environment. For more
information on the limitations, see SAP Note
2752867 .
1. Go to the palette and select the Call entry.
2. Select External Call and in the submenu choose Request Reply.
3. Place the Request Reply shape between the second Content Modier and the End event in the model.
Furthermore, connect the second Content Modier with the Request Reply step and the Request Reply
step with the End event.
4. Move the Receiver shape closer to the Request Reply shape (below the Request Reply shape but outside
the Integration Process shape, as shown in the overall integration ow model under Smoke Test Scenario
with External Data Source [page 27]).
5. Connect the Request Reply shape to the Receiver shape (by selecting the Request Reply shape, clicking
the arrow icon, and dragging and dropping the cursor on the Receiver shape).
6. In the next dialog, choose adapter type OData.
Getting Started with SAP Cloud Platform Integration (CF Trial)
Get Started with Integration Flow Development
PUBLIC 31

7. In the next dialo, as Message Protocol select OData V2.
Note
This adapter supports dierent versions of the OData protocol. We select version 2.0.
8. Go to the Connection tab of the OData adapter and enter the following as the Address:
https://refapp-espm-ui-cf.cfapps.eu10.hana.ondemand.com/espm-cloud-web/espm.svc
Tip
This is the endpoint address of the ESPM WebShop's OData application programming interface.
9. Go to the Processing tab.
10. Next to Resource Path, choose Select.
The Query Editor opens, where you can conveniently dene the OData query.
The Address eld is already populated with the value you just entered
11. Make sure that Remote is selected as the Connection Source, and choose Step 2.
The system connects to the WebShop service and retrieves the metadata from its OData API.
12. Choose the Search icon in the Select Entity eld.
32
PUBLIC
Getting Started with SAP Cloud Platform Integration (CF Trial)
Get Started with Integration Flow Development

Select Products.
13. A list of the available elements is provided, using the information from the OData API..
Choose a set of elements for which you want to retrieve data (for example, all elements, as shown in the
next gure) and choose Step 3.
Getting Started with SAP Cloud Platform Integration (CF Trial)
Get Started with Integration Flow Development
PUBLIC 33

14. Choose the copy icon in the Filter By eld and select ProductId.
15. In the next eld, select Equal.
16. In the third eld, enter an expression that allows the integration framework to access the message header
productIdentifier that you created in the preceding Content Modier step.
${header.productIdentifier}
Tip
The dollar sign and the curled brackets indicate that we are dealing with Apache's Simple Expression
Language, which is often used in SAP Cloud Platform Integration. In particular, here you see a dynamic
parameter, which has the following eect: The value of the header productIdentifier (which is
identical to the value of the
productIdentifier eld of the incoming message) is used dynamically
at runtime to dene the OData query.
17. Choose Finish.
34
PUBLIC
Getting Started with SAP Cloud Platform Integration (CF Trial)
Get Started with Integration Flow Development

2.5.4 Create the Script Step to Log the Payload
Add a Script step to log the message payload.
With a Groovy Script step, you can congure the integration in such a way that the payload of the message is
written to the message processing log.
1. To add a Script step (containing a Groovy script), go to the palette and choose the Message Transformers
icon and select the Script icon.
2. In the Script submenu, select Groovy Script.
3. Place the Script Step shape after the Request Reply step and connect both shapes.
4. Select the Script step.
The context icons are displayed.
5. Choose the + icon.
6. The default script coding of the step is displayed.
Getting Started with SAP Cloud Platform Integration (CF Trial)
Get Started with Integration Flow Development
PUBLIC 35

7. Replace this content by the script provided in the coding example below.
import com.sap.gateway.ip.core.customdev.util.Message;
import java.util.HashMap;
def Message processData(Message message)
{
def body = message.getBody(java.lang.String) as String;
def messageLog = messageLogFactory.getMessageLog(message);
if(messageLog != null)
{
messageLog.addAttachmentAsString("Log current Payload:", body, "text/
plain");
}
return message;
}
8. Choose OK.
The integration ow model is again displayed.
9. Save and deploy the integration ow.
2.5.5 Run the Integration Flow and Monitor the Message
Processing
Run the integration ow and check the result of message processing.
When the integration ow has been deployed successfully, the message is processed without any further
trigger (based on the settings of the timer).
1. When you have saved and deployed your integration ow, check the deployment status. Go to the Monitor
section of the Web UI and select a tile under Manage Integration Content.
36
PUBLIC
Getting Started with SAP Cloud Platform Integration (CF Trial)
Get Started with Integration Flow Development

2. As soon as deployment has nished, the status Started should be displayed for your integration ow.
3. Go back to the overview page of the Web UI Monitor section and select a tile under Monitor Message
Processing.
If your integration ow has been processed successfully, the status Completed should be shown.
Getting Started with SAP Cloud Platform Integration (CF Trial)
Get Started with Integration Flow Development
PUBLIC 37

4. Select the integration ow and analyze the details area to the right of the integration ow list.
5. Under Attachments, click Log current Payload.
You should see the message content, which consists of the details of the product associated with the value
of productIdentifier entered in the rst Content Modier.
38
PUBLIC
Getting Started with SAP Cloud Platform Integration (CF Trial)
Get Started with Integration Flow Development

This shows you that the message has been processed correctly.
2.6 Timer-Initiated Scenario with a Mail Receiver
Create a simple integration scenario that is initiated by a timer, retrieves data from an external source, and
sends the result to an e-mail account (as the receiver system).
A typical challenge addressed by an integration scenario is to retrieve data from a certain source (for example,
product details from a product catalog on a vendor's site) using certain lter criteria. We use the integration
ow described in this section to address such a use case.
In the course of this exercise, you develop the following integration ow:
To make it as easy as possible for you to develop this integration ow, you don't need to congure a sender
system. This saves you the eort of setting up a dedicated sender system and connecting it to SAP Cloud
Platform Integration. Instead, message processing is triggered by a Timer event, and the inbound message is
created within the integration ow, in a dedicated Content Modier step.
Getting Started with SAP Cloud Platform Integration (CF Trial)
Get Started with Integration Flow Development
PUBLIC 39
As a prerequisite to use the Mail adapter, you need to take care of the following things.
● Update the tenant keystore with the certicates required by the mail server.
● Create and deploy a User Credentials artifact that contains the credentials of the mail account.
This is how the integration ow processes the message at runtime:
1. The Timer event triggers the processing of the message (according to the settings of the Timer's
scheduler).
2. The rst Content Modier step creates a message with only one element: a productIdentifier (to
identify a product from the product catalog).
The actual value of the productIdentifier is hard-coded in this step. If you want to process the
integration ow with another product identier, you need to change the value in this step and redeploy the
integration ow. This is the drawback of not having a dedicated sender system.
3. The second Content Modier step creates a message header (which we also call productIdentifier)
and writes the actual value of the productIdentifier element into it. This header is used in the
subsequent step.
4. The Request Reply step passes the message to an external data source from which it retrieves data (about
products).
The external data source is represented by the lower WebShop shape.
The external data source supports the Open DataProtocol (OData). For our scenario, we use the ESPM
WebShop, which is based on the Enterprise Sales and Procurement Model (ESPM) provided by SAP. The
demo application can be accessed at the following address: https://refapp-espm-ui-
cf.cfapps.eu10.hana.ondemand.com/webshop/index.html
An OData receiver channel is used to connect to the WebShop. The header that was created in the
preceding Content Modier is used to query exactly one product (using the product identier provided with
the inbound message).
5. The OData service provides the details of this product.
6. Finally, the result of the request is forwarded to an e-mail account using the Mail receiver adapter (the e-
mail server is represented by the Mail_Ser … shape on the right in the integration ow model).
When you have nished integration ow design, you can monitor message processing.
This integration ow introduces you to a number of important aspects of integration development, such as
dening an OData query and using a message header to dynamically query an OData source.
Related Information
Update the Tenant Keystore with the Certicates Required by the Mail Server [page 41]
Create and Deploy a User Credentials Artifact for the E-Mail Account [page 43]
Create the Mail Receiver Channel [page 44]
Monitor Message Processing [page 47]
40
PUBLIC
Getting Started with SAP Cloud Platform Integration (CF Trial)
Get Started with Integration Flow Development

2.6.1 Update the Tenant Keystore with the Certicates
Required by the Mail Server
Add the required server root certicates (required by the e-mail provider) to the tenant keystore.
The tenant keystore contains the key pairs and certicates that are required (on the tenant side) to establish
trusted communication with the connected systems.
When establishing the connection to the SAP Cloud Platform Integration tenant, the e-mail server needs to
authenticate itself against SAP Cloud Platform Integration using a digital server certicate. For this purpose,
the tenant keystore must contain a root certicate that is also trusted by the e-mail server.
You can download the required certicates usually on a dedicated section of the email provider's website. You
might search for server certicate to get more information. However, note that the procedure might dier
depending on the email provider.
Get the E-Mail Servers' Certicate
To get the e-mail servers' root certicate, you can do the following:
1. Open the website that hosts the mail account you like to address with the Mail adapter.
2. In the browser address eld, click the lock icon and select Certicate (Valid) (example for using Google
Chrome).
3. In tab Certication Path doubleclick the uppermost node (which is the root certicate).
Getting Started with SAP Cloud Platform Integration (CF Trial)
Get Started with Integration Flow Development
PUBLIC 41

4. Click Details and select Copy to File ....
5. In the wizard, click Next.
6. On the next screen, keep the setting DER encoded binary X.509 (.CER) and click Next.
7. Choose a directory on your computer where to store the certicate le and a name.
8. Click Next and then Finish.
The root certicate is stored as le with extension .cer on your computer.
Finally, you need to import the downloaded certicates to the tenant keystore. To do this, open the Keystore
monitor.
1. Go to the Monitor section of the Web UI and select the Keystore tile under Manage Security.
All certicates that are already included in the keystore are displayed. If you have only recently started
working with SAP Cloud Platform Integration, these are the certicates provided by SAP initially when
providing the tenant for you.
2. Choose Add Certicate .
42
PUBLIC
Getting Started with SAP Cloud Platform Integration (CF Trial)
Get Started with Integration Flow Development

3. Browse to the certicate stored on your computer, provide an alias (to identify the certicate in the
keystore) and choose Deploy.
The certicate is added (under the alias name) to the list of keystore entries.
4. Repeat this task for all certicates that you have downloaded.
Note
You might also need to change the settings of your e-mail account so that the mail server accepts
connections to remote applications with a lower security level (for example, for Yahoo mail, this is the Less
Secure Apps setting). If you don't do this, the integration ow might raise an error during processing.
Note
If you don't upload the required root certicate to the tenant keystore and try to execute the integration
ow (when having nished its design), message processing will fail with the following error message
starting with:
Sample Code
javax.mail.MessagingException: Could not connect to SMTP host:
smtp.mail.yahoo.com, port: 465;
nested exception is:
javax.net.ssl.SSLHandshakeException ...
2.6.2 Create and Deploy a User Credentials Artifact for the E-
Mail Account
Deploy a User Credentials artifact that contains the user name and password for your receiver mail account.
1. Go to the Monitor section of the Web UI and select the Security Material tile under Manage Security.
Getting Started with SAP Cloud Platform Integration (CF Trial)
Get Started with Integration Flow Development
PUBLIC 43

2. Choose Add User Credentials .
3. As Name, enter the User Credentials name that you specied in the Mail receiver adapter, and as User
enter the e-mail account user name (also specied in the elds From and To in the Mail receiver adapter).
Also provide the password of the mail account.
Note
Storing the user name and password in a separate artifact increases the security level of integration
development.
4. Choose Deploy.
2.6.3 Create the Mail Receiver Channel
Add a Mail receiver channel to enable the integration ow to send messages to an e-mail account.
1. First, add a second receiver to represent the e-mail account. In the integration ow model (in Edit mode),
select the Participants entry from the palette and select Receiver.
2. Place the Receiver shape on the right side of the model, outside the Integration Process shape.
You can rename the shape to Mail_Receiver (for example).
44
PUBLIC
Getting Started with SAP Cloud Platform Integration (CF Trial)
Get Started with Integration Flow Development

3. Select the End event, click the arrow button and drag and drop the cursor on the Receiver shape.
4. Select Mail as the Adapter Type.
5. In the Mail adapter properties section (below the model), go to the Connection tab and specify the
following Mail adapter parameters.
The gure shows example settings, which are explained further below.
Getting Started with SAP Cloud Platform Integration (CF Trial)
Get Started with Integration Flow Development
PUBLIC 45

○ Address: Enter the address of your mail provider, followed by a colon and the port number. The
example in the gure shows the address for Yahoo Mail (smtp.mail.yahoo.com:465) and SMTP
protocol.
○ Protection: Select SMTPS.
○ Authentication: Select Plain User/Password.
○ Credential Name: Enter a name for a User Credentials artifact that you will create in a subsequent step,
for example, MyCredentials.
The User Credentials artifact will contain the user name and password for the e-mail account to which
the message is to be sent.
○ From and To: Enter the mail address of the e-mail account that should receive the message.
○ Subject: Enter a meaningful text.
Keep the default settings for the other parameters.
6. Save and deploy the integration ow.
46
PUBLIC
Getting Started with SAP Cloud Platform Integration (CF Trial)
Get Started with Integration Flow Development

2.6.4 Monitor Message Processing
As you use a Timer event to trigger the message processing, the integration ow is processed as soon as it is
deployed.
1. To check whether the processing has been executed correctly, go to your e-mail account. You should nd a
mail with the following content:
2. Finally, check how the message was processed by opening the Monitor section of the Web UI.
3. Choose a tile under Monitor Message Processing and you should nd your message with the integration
ow name.
4. Open the integration ow in Edit mode, click the rst Content Modier and on the Message Body tab
change the value of the productIdentier to HT-2001 and redeploy the integration ow.
5. Once the integration ow has been deployed successfully, you should receive an e-mail with details about
another product.
Getting Started with SAP Cloud Platform Integration (CF Trial)
Get Started with Integration Flow Development
PUBLIC 47

2.7 Sender-Initiated Scenario (with HTTPS Sender
Adapter)
Create a simple integration scenario that is initiated by a sender (using the HTTPS sender adapter).
With the following steps, you can easily modify and extend the previously built integration ow with the email
receiver (Timer-Initiated Scenario with a Mail Receiver).
The gure shows the integration ow model that you get as a result of this exercise.
In the modied integration ow, an HTTP client instead of a Timer event triggers message processing.
Furthermore (to simplify the design), we have merged the steps processed by two dierent Content Modier
steps in the previously built integration ow into one Content Modier step.
Note
As a prerequisite to execute this integration ow in the Cloud Foundry environment, you need to authorize
the sender system (HTTP client) to call the integration ow endpoint. For that purpose, you create a service
instance on SAP Cloud Platform and generate service key credentials (which can then be used by the HTTP
client to call the integration ow endpoint).
This is how the integration ow processes the message at runtime:
1. The HTTP client (represented by the Sender shape) sends an HTTP request to SAP Cloud Platform
Integration through an HTTPS sender channel. The HTTPS request body, which is in JavaScript Object
Notation (JSON) format, contains a product identier.
2. The JSON-to-XML converter transforms the request body into XML format (which can be processed in the
following step, the Content Modier).
3. The Content Modier creates a message header (which we also call productIdentifier) and writes the
actual value of the productIdentifier element into it. This header is used in the subsequent step.
In this exercise, you use one Content Modier to create the header and to write the message body.
4. The Request Reply step passes the message to an external data source and retrieves data (about orders)
from there.
The external data source supports the Open DataProtocol (OData). For our scenario, we use the ESPM
WebShop, which is based on the Enterprise Sales and Procurement Model (ESPM) provided by SAP. The
48
PUBLIC
Getting Started with SAP Cloud Platform Integration (CF Trial)
Get Started with Integration Flow Development

demo application can be accessed at the following address: https://refapp-espm-ui-
cf.cfapps.eu10.hana.ondemand.com/webshop/index.html
5. An OData receiver channel is used for the connection to the OData source. To query for exactly one
product (for the product identier provided with the inbound message), the header that was created in the
preceding Content Modier is used.
6. The OData service provides the details of one specic product, which is identied by the actual value of the
productIdentifier eld (provided with the inbound HTTP request).
7. Finally, the result of the request is forwarded to an e-mail account using the Mail receiver adapter (the e-
mail server is represented by the right Mail … shape in the integration ow model).
When you have nished the integration ow design, you can send the message through the HTTP client.
Related Information
Timer-Initiated Scenario with a Mail Receiver [page 39]
Authorize the HTTP Client to Call the Integration Flow Endpoint in the Cloud Foundry Environment [page 49]
Create the HTTPS Sender Channel [page 52]
Add the JSON to XML Converter [page 53]
Create the Mail Receiver Channel [page 44]
Send the HTTP Request and Process the Integration Flow [page 54]
2.7.1 Authorize the HTTP Client to Call the Integration Flow
Endpoint in the Cloud Foundry Environment
You perform these steps to authorize the sender (HTTP client) to call the SAP Cloud Platform Integration
integration ow endpoint.
Note
You need to perform these steps only in case you use SAP Cloud Platform Integration in the Cloud Foundry
environment.
These steps imply that you create a service instance on SAP Cloud Platform and generte a service key for it.
The credentials which you get as a result can be used by the HTTP client to call the integration ow endpoint.
Create Service Instance
In the context of this scenario, you can think of the service instance as a technical user that can be associated
with the sending system's (HTTP client's) request.
You perform the following steps using SAP Cloud Platform Cockpit.
Getting Started with SAP Cloud Platform Integration (CF Trial)
Get Started with Integration Flow Development
PUBLIC 49

1. Choose your space and navigate to Services Service Marketplace and select the tile Process
Integration Runtime.
2. In case a service instance is not available yet, create a new one.
Select Instances New Instance .
3. Choose Next.
4. Enter the below command in the entry eld.
Sample Code
{
"roles":[
"ESBMessaging.send"
]
}
With this command, you associate the service instance with the role ESBMessaging.send which is
required to call an integration ow endoint.
5. Choose Next and on the next screen again choose Next.
50
PUBLIC
Getting Started with SAP Cloud Platform Integration (CF Trial)
Get Started with Integration Flow Development

6. Enter an instance name and choose Finish.
Create Service Key
With this step, you generate credentials to communicate with a service instance.
The sender application (HTTP client) uses these credentials (clientid and clientsecret) to access the
SAP Cloud Platform Integration integration ow endpoint.
1. Select the instance.
2. Choose Service Keys.
3. Choose Create Service Key.
4. Enter a name for the service key.
5. Choose Save.
The service key is created.
You need to copy the values of clientid and clientsecret to your clipboard or to a text editor for later
reference.
These values specify the credentials of the user associated with the sending application.
Getting Started with SAP Cloud Platform Integration (CF Trial)
Get Started with Integration Flow Development
PUBLIC 51

2.7.2 Create the HTTPS Sender Channel
Add an HTTPS sender channel to enable the integration ow to receive HTTP requests.
1. Select the integration ow and choose Edit.
2. Click the Sender shape. The context icons for the Sender appear.
Note
If you choose the information icon, the version of the integration ow component is displayed.
Do not confuse the version of an individual integration ow component with the software version of
SAP Cloud Platform Integration. An integration ow component gets a new version each time a new
feature is added to it by SAP. Let's imagine a situation where you started modeling an integration ow
some time ago and now want to continue working on it. Let's assume that SAP has updated the
software in the meantime. A new version of an integration ow step or shape that you have used is now
available, containing a new feature. You can continue to use the old component version, but if you want
to use the new feature you need to update to the new version.
3. Click the arrow icon and drag and drop the cursor on the Start event.
The list of available adapter types is displayed in a dialog.
4. Choose adapter type HTTPS .
The properties of the adapter are shown below the model.
5. Go to the Connection tab.
52
PUBLIC
Getting Started with SAP Cloud Platform Integration (CF Trial)
Get Started with Integration Flow Development
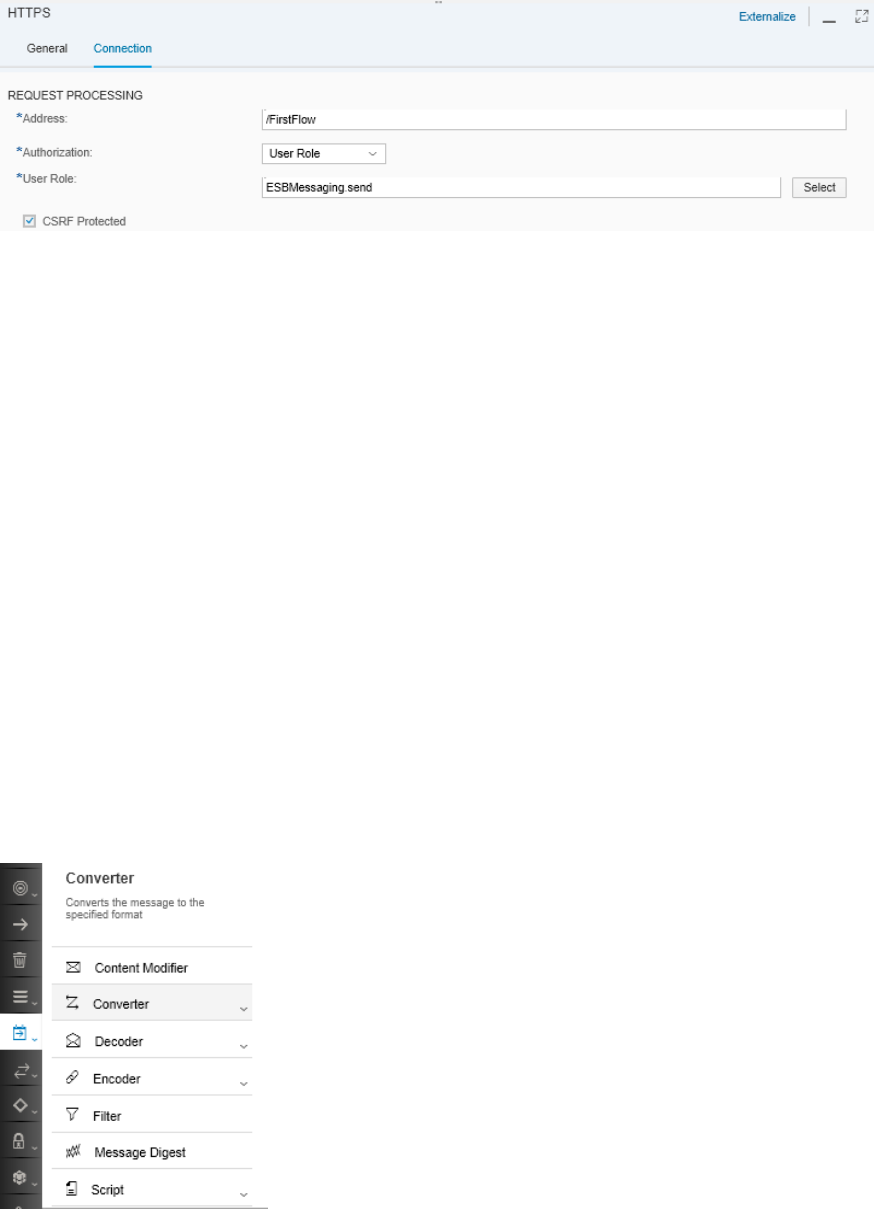
Specify the following parameters:
○ Address: This parameter denes the endpoint under which the integration ow can be called from the
sender. Start the address with a slash, for example,/FirstFlow.
○ Authorization and User Role: You want to congure your rst integration ow so that the inbound
request is authenticated using basic authentication (based on user credentials). To keep it simple, you
use your dialog user. During onboarding, you also made sure that the role ESBMessaging.send was
assigned to your user (and this setting was also used when conguring the HTTP client).
○ CSRF Protected: Keep this option selected (default setting). It ensures that your integration ow is
protected against Cross-Site-Request-Forgery, a kind of attack where a malicious party can perform
harmful actions by masquerading as the logged in user (the user specied for the HTTP client in our
case).
2.7.3 Add the JSON to XML Converter
Add a JSON-to-XML converter to convert the HTTP request, which is in JavaScript Object Notation (JSON)
format, to XML for further processing.
With the HTTP client, we send a POST request with a request body in JSON format. To enable the subsequent
steps to process the message, it needs to be converted to XML rst. To perform the required conversion, you
can use the JSON-to-XML converter.
1. In the palette, select the Message Transformers entry and then choose Converter.
2. In the submenu, choose JSON to XML Converter.
Getting Started with SAP Cloud Platform Integration (CF Trial)
Get Started with Integration Flow Development
PUBLIC 53
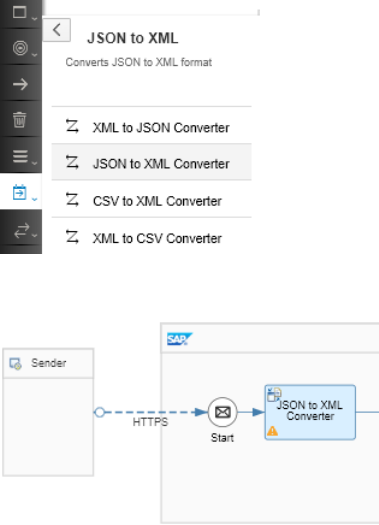
3. In the integration ow model, place the shape inside the Integration Process shape after the Start event.
The model should now look like this:
2.7.4 Send the HTTP Request and Process the Integration
Flow
Set up an HTTP client using Postman and send the HTTP request.
1. Install an HTTP client on your computer.
2. Since the HTTPS sender adapter is congured to expect User Role authorization, the authentication mode
used is basic authentication (with user credentials).
Select the corresponding authentication mode for your HTTP client.
Depending on whether you work in the Neo or the Cloud Foundry environment, the way how to get the
required credentials diers.
○ Neo environment:
Specify the credentials of the user that is associated with the inbound HTTP request and that has been
assigned the role ESBMessaging.send in SAP Cloud Platform Cockpit .
○ Cloud Foundry environment:
As credentials, enter the values of clientid and clientsecret that have been generated when you
created the service key during onboarding.
The following gure shows the related dialog from SAP Cloud Platform Cockpit.
54
PUBLIC
Getting Started with SAP Cloud Platform Integration (CF Trial)
Get Started with Integration Flow Development

3. As you have selected CSRF Protected in the HTTPS adapter, you need to fetch a CSRF token.
The CSRF token is then used to place the POST request for your integration ow.
1. Find out the endpoint address of the integration ow. To do this, go to the Monitor section of the Web
UI.
2. Choose a tile under Manage Integration Content.
3. Select your integration ow. It should be displayed in the list of deployed artifacts with status Started.
4. Copy the endpoint URL to the clipboard.
The URL should end with /http/<Address specified in the HTTPS adapter>.
4. Using your HTTP client, send a GET request to the endpoint address.
Make sure that you send a header with the key X-CSRF-token and the value fetch with the request.
5. You should receive the CSRF token.
You can now send the POST request to the integration ow.
1. Specify the same authentication settings as for the GET request above.
Getting Started with SAP Cloud Platform Integration (CF Trial)
Get Started with Integration Flow Development
PUBLIC 55

2. Specify the following HTTP request body (JSON format):
Sample Code
{
"productIdentifier": "HT-1080"
}
3. Copy the value of the CSRF token (obtained from the GET request above) to the clipboard.
4. Add a header to the request.
In the Key eld, enter X-CSRF-Token and in the Value eld, enter the value of the CSRF token from your
clipboard.
5. Send the request.
You should get the details of the product with productIdentier HT-1080.
6. Go to the e-mail account specied in the Mail adapter. You should have received an e-mail like this:
7. Place another POST request with a body containing productIdentier HT-2001, and you receive details of
another product.
8. Finally, check how the message was processed by opening the Monitor section of the Web UI.
Choose a tile under Monitor Message Processing and you should nd your message with the integration
ow name.
56
PUBLIC
Getting Started with SAP Cloud Platform Integration (CF Trial)
Get Started with Integration Flow Development

3 Security in the Cloud Foundry
Environment
Note
These instructions are relevant only when you use SAP Cloud Platform Integration in the Cloud Foundry
environment.
This section describes the security-related aspects of the integration platform and shows which measures you
can take to protect customer data that is passed through the platform during the execution of an integration
scenario.
Customers who use SAP Cloud Platform Integration agree that a signicant part of their (and their customers')
sensitive data is processed by and stored within an infrastructure not owned by themselves.
The core task of an integration platform is to serve as the transit place for messages, which may contain
sensitive customer data. First and foremost, these messages must be protected against eavesdropping and
unauthorized access.
Therefore, the integration platform must fulll the following main requirements:
● The integration infrastructure is already designed and built in such a way that it meets the highest security
standards.
In particular, it must be guaranteed that the technical system landscape, the communication between the
components of the integration platform, and the storage locations of messages are secure.
● The processes related to the usage of Cloud Integration meet the highest security standards.
This relates to the processes at SAP that are related to the development and upgrade of the Cloud
Integration software, the processes related to the provisioning and operation of the customers' virtual
environment by the infrastructure provider, and the customer onboarding process during which customers
set up secure connections between their infrastructure and SAP's integration platform.
● Customers have several options to congure how messages are exchanged within an integration scenario
so that the involved data is protected at the highest level.
In particular, when designing integration ows, customers can choose between several options to protect
messages by establishing secure communication channels (transport-level security) and by conguring
digital encryption and digital signing of messages (message-level security).
This documentation summarizes the measures that are taken by SAP to fulll these requirements.
Related Information
Technical Landscape [page 58]
Security Aspects of Processes [page 60]
Security Aspects of Data, Data Flow [page 60]
Identity and Access Management [page 64]
Data Storage Security [page 77]
Getting Started with SAP Cloud Platform Integration (CF Trial)
Security in the Cloud Foundry Environment
PUBLIC 57

Data Protection and Privacy [page 78]
Other Security-Related Information [page 82]
3.1 Technical Landscape
The technical infrastructure comprises a set of technical components that can communicate with each other
and with remote components in a secure way based on certain protocols such as HTTPS or SFTP, for example.
Note
These instructions are relevant only when you use SAP Cloud Platform Integration in the Cloud Foundry
environment.
Components and Communication Paths
In technical terms, the integration platform is designed as a containerized and clustered integration platform in
the cloud. Messages processed by integration ows from dierent customers are handled on dierent parts of
the platform (referred to as tenants).
Tenants processing integration ows from dierent customers are strictly separated from each other in terms
of CPU, data storage and user access.
The following gure shows a bird's eyes view on the technical architecture.
58
PUBLIC
Getting Started with SAP Cloud Platform Integration (CF Trial)
Security in the Cloud Foundry Environment
These are the basic constituents of the virtual platform:
● A multi tenant-capable application comprises a set of microservices (not depicted in the gure) that
accomplish tasks related to the management of a tenant and the preparation of monitoring data. It takes
requests from the dialog users (for example, when an integration developer deploys an integration ow
using the Web user interface).
These microservices run on an application that can be shared across multiple customer tenants.
● A worker (runtime container) processes messages that are exchanged with external systems. Therefore,
the worker is connected to the external systems. In other words, workers process customer data that
might be condential and has to be protected.
Workers are operated within customer-specic tenants. These tenantsare strictly separated from each
other.
As a consequence of this cluster design, the following main communication paths are active during the
operation of an integration scenario:
● Communication of tenant cluster and remote components
You can use both cloud systems and on-premise systems (such as on-premise SAP systems) as remote
components.
Remote receiver systems are directly connected to a worker through a protocol, which depends on the
type of the designed receiver adapter.
For inbound communication from a sender targeting Cloud Integration, a load balancer is interconnected
between remote sender systems and the involved SAP Cloud Platform components. The load balancer
terminates incoming Transport Layer Security (TLS) requests and establishes new ones.
Various secure technical protocols can be used for these communication paths. Depending on the adapter
type, the following protocols are available:
● Hyper Text Transfer Protocol (HTTP) over Transport Layer Security (TLS), which is referred to as HTTPS
● SSH File Transfer Protocol (SFTP) for the exchange of data with an SFTP server
● Simple Mail Transfer Protocol (SMTP), Post Oce Protocol (POP)3, and Internet Message Access Protocol
(IMAP) for the exchange of data with mail servers
User Access
In addition to the above mentioned components that interact with each other when messages are being
processed and exchanged between the involved systems, additional components come into play when a dialog
user accesses the infrastructure (for example, when an administrator accesses monitoring data or when an
integration developer deploys an integration artifact).
People with dierent roles can access the infrastructure – both on the side of the infrastructure provider and
on the customer side. Human access points (for dialog users) are:
● Dedicated experts at the side of the infrastructure provider access the infrastructure to provide a tenant
for the customer.
● Experts on the customer side access the infrastructure to design and deploy integration content and to
monitor an integration scenario at runtime (integration developers and tenant administrators).
Getting Started with SAP Cloud Platform Integration (CF Trial)
Security in the Cloud Foundry Environment
PUBLIC 59

3.2 Security Aspects of Processes
Processes that are related to the provisioning, update, and usage of the cloud-based integration platform meet
the highest security standards.
Cloud Integration is compliant with various SAP-internal technical policies, procedures, directives, guidelines,
and product standards.
For example, SAP software is developed in compliance with the SAP Secure Development Lifecycle
(SDLC) ,which helps to implement measures such as test-driven development and threat modeling.
SAP certies that the development, maintenance, and operations of Cloud Integration comply with the
requirements of the following standards:
● SAP Cloud Platform ISO/IEC 27001:2013
● SAP Cloud Platform: ISO/IEC 27018:2019
● SAP Cloud Platform: ISO/IEC 27017:2015
● SAP Cloud Platform C5 Audit Report 2018 H2
● SAP Cloud Platform TISAX
● SAP Cloud Platform SOC 1 (ISAE3402) Audit Report 2019 H1
● SAP Cloud Platform SOC 2 Audit Report 2019 H1
● SAP Cloud Platform: ISO/IEC 22301:2012
● SAP Development: ISO 9001:2015 certicate
More information: SAP Trust Center
3.3 Security Aspects of Data, Data Flow
All data in transit, either exchanged with remote components or internal, can be protected by methods such as
encryption.
Note
These instructions are relevant only when you use SAP Cloud Platform Integration in the Cloud Foundry
environment.
During a scenario, the connected remote systems exchange data with each other based on the congured
transport protocol. These protocols support dierent options to protect the exchanged data against
unauthorized access. In addition to security at the transport level, the content of the exchanged messages can
also be protected by means of digital encryption and signature.
Transport-Level Security
Each adapter allows you to set up a specic security level based on the underlying transport protocol.
60
PUBLIC
Getting Started with SAP Cloud Platform Integration (CF Trial)
Security in the Cloud Foundry Environment

Transport-Level Security Options
Transport Protocol Transport-Level Security
SFTP (Secure Shell File Transfer
Protocol)
This protocol is supported by the SFTP sender and receiver adapter.
Secure Shell (SSH) is used to securely transfer les in an open network.
SSH uses a symmetric key length with at least 128 bits to protect FTP communication.
Default length of asymetric keys provided by SAP is 2048 bits..
Supported authentication methods:
● User name/password authentication (where the SFTP server authenticates the call
ing component based on the user name and password)
● Public key authentication (where the SFTP server authenticates the calling compo
nent based on a public key)
Secure data transfer with SFTP is based on a combination of symmetric and asymmetric
keys. Symmetric (session) keys are used to encrypt and decrypt data within a session.
Asymmetric key pairs are used to encrypt and decrypt the session keys.
When asymmetric key pairs are used, SFTP also ensures that only authorized public keys
are used by the involved participants.
Supported versions:
● SSH version 2 (as specied at http://tools.ietf.org/html/rfc4251)
● SSH File Transfer Protocol (SFTP) version 3 or higher
Getting Started with SAP Cloud Platform Integration (CF Trial)
Security in the Cloud Foundry Environment
PUBLIC 61

Transport Protocol Transport-Level Security
HTTP(S) (Hypertext Transfer
Protocol Secure)
This protocol is supported by all adapters that allow communication over HTTPS (for ex
ample, the IDoc adapter, the SOAP adapters, and the HTTP adapter).
You can protect communication using Transport Layer Security (TLS). In this case, a
symmetric key length of at least 128 bits is used (which is technically enforced). Default
length of asymetric keys provided by SAP is 2048 bits.
Note
SAP Cloud Platform Integration supports TLS 1.1, and 1.2 for inbound and outbound
communication for all HTTP(S)-based channels.
Note
The HTTP receiver adapter also allows you to use HTTP URLs. However, we do not
recommend using this option when transferring condential data (including the
password for basic authentication).
Also, if the network is not entirely trusted, there is no way to verify whether the result
of an HTTP request originates from a trustworthy source. Therefore, we do not rec
ommend using this option for productive scenarios over the Internet.
Receiver adapters also support principal propagation via SAP Cloud Platform Connector.
Various authentication options (basic authentication using user credentials, client certi-
cates, or OAuth) are supported depending on the selected sender or receiver adapter.
Caution
Consider that we do not recommend to use basic authentication in productive sce
narios because of the following security aspects:
Basic authentication has the risk that authentication credentials, for example, pass
words, are sent in clear text. Using TLS (transport-layer security, also referred to as
Secure Sockets Layer) as transport-level encryption method (when using HTTPS as
protocol) makes sure that this information is nevertheless encrypted on the trans
port path. However, the authentication credentials might become visible to SAP-in
ternal administrators at points in the network where the TLS connection is termi
nated, for example, load balancers. If logging is not done properly at such devices,
the authentication credentials might become part of log les. Also network monitor
ing tools used at such devices might expose the authentication information to ad
ministrators. Furthermore, the person to whom the authentication credentials be
long (in the example above, the password owner) needs to maintain the password in
a secure place.
SMTP (Simple Mail Transfer Pro
tocol)
These protocols are supported for the exchange of e-mails (in combination with the Mail
adapter).
Transport encryption is supported via the STARTTLS extended operation.
POP3 (Post Oce Protocol )
62 PUBLIC
Getting Started with SAP Cloud Platform Integration (CF Trial)
Security in the Cloud Foundry Environment

Transport Protocol Transport-Level Security
IMAP (Internet Message Access
Protocol )
To authenticate against the e-mail server, you can send user name and password in plain
text or encrypted (the latter only in case the e-mail server supports this option).
Note
The (optional) password-based authentication only applies to communication be
tween the Cloud Integration system and the mail server. Communication between
mail servers is usually not authenticated. Therefore, you must not assume that data
received by mail comes from a trustworthy source, unless other security measures
(such as digital signatures at message level) are applied.
Message-Level Security
On top of the transport-level security options, you can also secure the communication at message level, where
the content of the exchanged messages can also be protected by means of digital encryption and signatures.
Various security standards are available to do this, as summarized in the table below.
To congure message-level security options, you use dedicated integration ow steps (for example, the
Encryptor and Signer step types).
The following standards and algorithms are supported:
Message-Level Security Standards and Algorithms
Standard
Security Feature
PKCS#7/CMS Enveloped Data and Signed Data Encryption/decryption of message content
Signing/verication of payload
PKCS#7/CMS Enveloped and Signed Data Encryption/decryption and signing/verication of payload
Open Pretty Good Privacy (PGP)
Encryption/decryption of message content
Encryption/decryption and signing/verication of message
XML Signature Signing/verication of payload
WS-Security Signing/verication of SOAP body
Getting Started with SAP Cloud Platform Integration (CF Trial)
Security in the Cloud Foundry Environment
PUBLIC 63

3.4 Identity and Access Management
Identity and access management features of SAP Cloud Platform are used during the lifecycle of an integration
scenario.
Note
These instructions are relevant only when you use SAP Cloud Platform Integration in the Cloud Foundry
environment.
Access Management
Dialog users who access the platform are authenticated against an identity provider. SAP Identity Service (ID
Service) is used by default. SAP ID Service is the central service for the process of managing identities and
their lifecycles.
User Management and Authorizations
Access to dedicated functions of the platform is controlled and protected by authorization checks. A number of
authorization groups are available to manage the authorizations of dialog users. An authorization group is
based on a persona and denes a set of dedicated permissions relating to the tasks that come into play during
the lifecycle of an integration project.
Note
Example:
If the logged-in user has to perform tasks such as designing and deploying integration ows, the user must
be assigned the authorization group AuthGroup.IntegrationDeveloper.
Authorization for the Integration Developer
The tasks of persons with integration developer permissions (short: integration developers) constitute a key
part of the SAP Cloud Platform Integration lifecycle. Permissions for the integration developer (who is in charge
of modeling integration ows) are contained in the authorization group
AuthGroup.IntegrationDeveloper.
Note that the roles contained in this authorization group give an integration developer full control over message
processing during runtime.
During integration ow modeling, the integration developer denes how messages are mapped, which
credentials are used, and to which recipients messages are sent. The set of roles provides very powerful
permissions and in some cases allows the integration developer to access sensitive data.
64
PUBLIC
Getting Started with SAP Cloud Platform Integration (CF Trial)
Security in the Cloud Foundry Environment

Note
The integration developer can control which credentials are to be used in connections with basic
authentication by deploying the associated User Credentials artifacts on the tenant. These artifacts contain
user names and passwords. Note that, however, a password specied in a User Credentials is never
displayed. Furthermore, passwords cannot be downloaded (by either using the user interface or the
application programming interface). The integration developer, although having full control over the
integration ow, does not have access to credentials of another tenant of the same customer.
Therefore, apply the following measures when designing integration ows for security-sensitive areas:
● Don't give the integration developer access to productive systems.
● Consider applying a four-eyes principle and implement a review process before deploying integration ows
to production.
● An integration developer has the option to develop integration ows on a separate development or test
tenant. These integration ows can then be transported to the productive tenant by another person.
● Don’t share the same secret credentials between tenants with dierent security levels (for example,
between test tenant and productive tenant).
● If you suspect a security violation, check the audit log to nd out which user deployed the integration ow
in question.
● If read-only access is required to analyze issues in the productive system, use the authorization group
AuthGroup.ReadOnly.
Tip
Instead of using the predened authorization groups, you can tailor the permissions to your own
requirements by applying elementary roles that are dened for individual tasks.
More information:
Authentication and Authorization Options for Inbound Calls
When a sender system calls the integration platform using HTTPS-based (inbound) requests, there are
dierent ways for the calling sender to authenticate itself against the integration platform. The options are
basic authentication, OAuth, and SAML.
Note
● Authentication
Veries the identity of the calling entity.
● Authorization
Checks what a user or other entity is authorized to do (for example, as dened by roles assigned to it).
In other words, the authorization check evaluates the access rights of a user or other entity.
Getting Started with SAP Cloud Platform Integration (CF Trial)
Security in the Cloud Foundry Environment
PUBLIC 65

Related Information
Persona [page 66]
3.4.1 Persona
When you perform user management tasks using SAP Cloud Platform Cockpit, you nd a set of pre-dened
roles that you can assign to users of the account. According to the main tasks associated with integration
projects, these roles are associated to certain persona relevant for an integration project.
Persona cover the dierent tasks associated with an integration project.
Note
In the dierent environments, these persona are mapped to dierent objects.
● In the Neo environment, a persona is realized by an authorization group (beginnig with the string
AuthGroup).
● In the CLoud Foundry environment, a persona ia realized by role collection.
Authorization Groups
Persona Authorization Group (Neo)
Role Collection (Cloud
Foundry) Description
Business expert AuthGroup.BusinessExpert PI_Business_Expert
Enables a business expert to
perform business tasks like,
for example, examining the
payload.
This includes tasks like:
● Monitoring integration
ows and the status of
integration artifacts
● Reading the message
payload and attach
ments
66 PUBLIC
Getting Started with SAP Cloud Platform Integration (CF Trial)
Security in the Cloud Foundry Environment

Persona Authorization Group (Neo)
Role Collection (Cloud
Foundry) Description
Administrator AuthGroup.Administrator PI_Administrator Enables the administrator of
the tenant cluster (also refer
red to as the
tenant adminis
trator) to connect to a cluster
and to perform administra
tive tasks on the cluster.
This includes tasks like:
● Monitoring integration
ows and the status of
integration artifacts
● Deploying security con
tent
● Deploying integration
content (such like inte
gration ows, for exam
ple)
● Deleting messages from
transient data store
Integration developer
AuthGroup.IntegrationDevel
oper
PI_Integration_Developer Enables an integration devel
oper to connect to a cluster
using Integration Designer
and to display, download and
deploy artifacts (for example,
integration ows).
This authorization group is
required for accessing web
tooling of Cloud Integration.
This includes tasks like:
● Monitoring integration
ows and the status of
integration artifacts
● Deploying integration
content (such like inte
gration ows, for exam
ple)
Read only persona
AuthGroup.ReadOnly PI_Read_Only Enables you to connect to a
tenant and to monitor mes
sages.
This authorization group en
ables you to access (read-
only) the Data Store viewer.
Getting Started with SAP Cloud Platform Integration (CF Trial)
Security in the Cloud Foundry Environment
PUBLIC 67
Persona Authorization Group (Neo)
Role Collection (Cloud
Foundry) Description
System developer AuthGroup.SystemDeveloper n.a. Enables a system developer
to perform tasks required for
system support.
This includes tasks like:
● Monitoring integration
ows and the status of
integration artifacts
● Restarting subsystems
of the tenant cluster
● Software development
tasks on VMs of the ten
ant cluster
This authorization group en
ables you to access (read-
only) the Data Store viewer.
Note
System developer tasks
are typically required in
the support case by SAP
experts who are sup
posed to perform tasks
like debugging (for ex
ample) on the tenant
cluster.
Partner Directory administra
tor
AuthGroup.TenantPartnerDir
ectoryCongurator
n.a. Enables the Partner Direc
tory sdministrator to read
and write Partner Directory
content.
Note
In order to enable a sender system to process messages on a tenant using HTTPS/basic authentication,
you need to assign to the associated user the role ESBmessaging.send. This role needs to be assigned to
each (technical) user that is supposed to connect to Cloud Integration.
3.4.1.1 Tasks and Permissions
The following table provides an overview of which roles are required in order to accomplish the various tasks
related to SAP Cloud Platform Integration. It is also indicated in how far the tasks and roles are relevant for the
main persona dened for Cloud Integration.
68
PUBLIC
Getting Started with SAP Cloud Platform Integration (CF Trial)
Security in the Cloud Foundry Environment

In the dierent environments, these persona are mapped to dierent objects.
● In the Neo environment, a persona is realized by an authorization group (beginning with the string
AuthGroup).
● In the Cloud Foundry environment, a persona ia realized by role collection.
The mapping of the persona to the authorization groups (Neo) or role collections (Cloud Foundry) is described
under .
In the dierent environments, the permissions to execute certain tasks are given by dierent objects.
● In the Neo environment, a permission to execute a task is given by a role.
● In the Cloud Foundry environment, a permission to execute a task is given by a role template.
Tasks and Permissions
Area Task Role (Neo)
Role-Templates
(Cloud Foundry)
Persona
Discover View packages WebToolingCata
log.OverviewRead
CatalogPackagesRead
Integration Developer
Business Expert
Supporter/System De
veloper
Tenant Administrator
Discover View package artifacts WebToolingCata
log.OverviewRead
WebToolingCata
log.DetailsRead
CatalogPackageArti
factsRead
Integration Developer
Business Expert
Supporter/System De
veloper
Tenant Administrator
Discover Copy package to work
space
WebToolingCata
log.OverviewRead
WebToolingWork
space.Write
CatalogPackagesCopy
Integration Developer
Design View packages and
package artifacts
WebToolingWork
space.Read
WorkspacePackages
Read
Integration Developer
Business Expert
Supporter/System De
veloper
Tenant Administrator
Design Create, edit, import,
export, delete package
with its artifacts
WebToolingWork
space.Read
WebToolingWork
space.Write
WorkspacePackagesE
dit
Integration Developer
Getting Started with SAP Cloud Platform Integration (CF Trial)
Security in the Cloud Foundry Environment
PUBLIC 69

Area Task Role (Neo)
Role-Templates
(Cloud Foundry)
Persona
Design Update package WebToolingWork
space.Read
WebToolingWork
space.Write
WorkspacePackagesE
dit
Integration Developer
Design Congure artifacts (in
tegration ows and
value mappings)
WebToolingWork
space.Read
WebTooling.Integra
tionFlowCongure
WorkspacePackages
Congure
Integration Developer
Design Deploy/undeploy arti
facts
WebToolingWork
space.Read
NodeManager.read
GenerationAnd
Build.generationand
buildcontent
NodeManager.deploy
content
WorkspaceArtifactsDe
ploy
Integration Developer
Tenant Administrator
Design Export Package for
transport
WebToolingWork
space.Read
TransportModule.read
TransportModule.write
Note
The role Integra
tionContent.Trans
port is deprecated.
WorkspacePackages
Transport
n.a.
Design Import package from
transport
WebToolingWork
space.Read
TransportModule.read
TransportModule.write
Note
The role Integra
tionContent.Trans
port is deprecated.
WorkspacePackages
Transport
n.a.
70 PUBLIC
Getting Started with SAP Cloud Platform Integration (CF Trial)
Security in the Cloud Foundry Environment

Area Task Role (Neo)
Role-Templates
(Cloud Foundry)
Persona
Design Update Package from
transport
WebToolingWork
space.Read
TransportModule.read
TransportModule.write
Note
The role Integra
tionContent.Trans
port is deprecated.
WorkspacePackages
Transport
n.a.
Monitor View Monitor Overview IntegrationOperation
Server.read
NodeManager.read
MonitoringDataRead
Integration Developer
Business Expert
Supporter/System De
veloper
Tenant Administrator
Monitor View message proc
essing logs
IntegrationOperation
Server.read
MonitoringDataRead
Integration Developer
Business Expert
Supporter/System De
veloper
Tenant Administrator
Monitor View payload of stored
messages from mes
sage storage (also
trace and message
processing log attach
ments)
esbmessagestor
age.read
Business Expert
Monitor View tasks IntegrationOperation
Server.read
NodeManager.read
MonitoringDataRead
Integration Developer
Business Expert
Supporter/System De
veloper
Tenant Administrator
Getting Started with SAP Cloud Platform Integration (CF Trial)
Security in the Cloud Foundry Environment
PUBLIC 71

Area Task Role (Neo)
Role-Templates
(Cloud Foundry)
Persona
Monitor View tail log IntegrationOperation
Server.read
NodeManager.read
MonitoringDataRead
Integration Developer
Business Expert
Supporter/System De
veloper
Tenant Administrator
Monitor View deployed artifact
list
IntegrationOperation
Server.read
NodeManager.read
MonitoringDataRead
Integration Developer
Business Expert
Supporter/System De
veloper
Tenant Administrator
Monitor View deployed integra
tion ow in graphical
editor
IntegrationOperation
Server.read
NodeManager.read
MonitoringDataRead
Integration Developer
Business Expert
Supporter/System De
veloper
Tenant Administrator
Monitor Download deployed in
tegration ow
IntegrationOperation
Server.read
NodeManager.read
MonitoringDataRead
Integration Developer
Business Expert
Supporter/System De
veloper
Tenant Administrator
Monitor View deployed security
material
IntegrationOperation
Server.read
NodeManager.read
MonitoringDataRead
Integration Developer
Business Expert
Supporter/System De
veloper
Tenant Administrator
Monitor Add credentials IntegrationOperation
Server.read
NodeManager.deploy
credentials
NodeManager.deploy
content
CredentialsEdit
Integration Developer
Tenant Administrator
72 PUBLIC
Getting Started with SAP Cloud Platform Integration (CF Trial)
Security in the Cloud Foundry Environment

Area Task Role (Neo)
Role-Templates
(Cloud Foundry)
Persona
Monitor Add known host, key
store, PGP keyring arti
facts
IntegrationOperation
Server.read
NodeManager.deploy
securitycontent
NodeManager.deploy
content
SecurityMaterialEdit
Tenant Administrator
Monitor Edit credentials IntegrationOperation
Server.read
NodeManager.deploy
credentials
NodeManager.readcre
dentials
NodeManager.deploy
content
CredentialsEdit
Integration Developer
Tenant Administrator
Monitor Undeploy credentials IntegrationOperation
Server.read
NodeManager.deploy
content
NodeManager.deploy
credentials
CredentialsEdit
Tenant Administrator
Monitor Undeploy known host,
keystore, PGP keyring
artifacts
IntegrationOperation
Server.read
NodeManager.deploy
content
NodeManager.deploy
securitycontent
SecurityMaterialEdit
Tenant Administrator
Monitor Download keystore,
public/prviate keyring,
known host, .. artifact
IntegrationOperation
Server.read
NodeManager.read
NodeManager.readse
curitycontent
SecurityMaterialDown
load
Tenant Administrator
Getting Started with SAP Cloud Platform Integration (CF Trial)
Security in the Cloud Foundry Environment
PUBLIC 73
Area Task Role (Neo)
Role-Templates
(Cloud Foundry)
Persona
Monitor View certicate-to-
user mappings
IntegrationOperation
Server.read
NodeManager.read
MonitoringDataRead
Integration Developer
Business Expert
Supporter/System De
veloper
Tenant Administrator
Monitor Create/edit/delete cer
ticate-to-user map
pings
IntegrationOperation
Server.read
NodeManager.deploy
securitycontent
NodeManager.read
SecurityMaterialEdit
Tenant Administrator
Monitor
View keystore entries
IntegrationOperation
Server.read
NodeManager.read
MonitoringDataRead
Integration Developer
Business Expert
Supporter/System De
veloper
Tenant Administrator
Monitor Download public key
store entries
IntegrationOperation
Server.read
NodeManager.read
MonitoringDataRead
Integration Developer
Business Expert
Supporter/System De
veloper
Tenant Administrator
Monitor Add/replace/delete
keystore entries
IntegrationOperation
Server.read
NodeManager.deploy
securitycontent
Tenant Administrator
Monitor View access policies IntegrationOperation
Server.read
AccessPolicies.Read
Integration Developer
Supporter/System De
veloper
Tenant Administrator
Monitor Maintain access poli
cies
IntegrationOperation
Server.read
AccessPolicies.Write
Tenant Administrator
74 PUBLIC
Getting Started with SAP Cloud Platform Integration (CF Trial)
Security in the Cloud Foundry Environment

Area Task Role (Neo)
Role-Templates
(Cloud Foundry)
Persona
Monitor View data store en
tries/variables
IntegrationOperation
Server.read
ESBDataStore.read
DataStorePayloads
Read
Integration Developer
Business Expert
Supporter/System De
veloper
Tenant Administrator
Monitor View data store entries
- message payload/
variables-content
IntegrationOperation
Server.read
ESBDataStore.read
Payload
DataStorePayloads
Read
Business Expert
Monitor Delete data store en
tries/variables
IntegrationOperation
Server.read
ESBDataStore.read
ESBDataStore.delete
DataStoresAnd
QueuesDelete
Tenant Administrator
Monitor View payload of stored
messages from mes
sage store
esbmessagestor
age.read
MessagePayloadsRead
Business Expert
Monitor View trace congura-
tion
IntegrationOperation
Server.read
NodeManager.read
CongurationSer-
vice.RuntimeBusiness
ParameterRead
TraceConguration-
Read
Integration Developer
Business Expert
Supporter/System De
veloper
Tenant Administrator
Monitor Edit trace congura-
tion
(enable/disable trace)
IntegrationOperation
Server.read
NodeManager.read
CongurationSer-
vice.RuntimeBusiness
ParameterRead
CongurationSer-
vice.RuntimeBusiness
ParameterWrite
TraceCongurationEdit
Integration Developer
Business Expert
Tenant Administrator
Monitor Add/Edit/undeploy
number ranges
IntegrationOperation
Server.read
NodeManager.deploy
content
MonitoringArtifactsDe
ploy
Integration Developer
Tenant Administrator
Getting Started with SAP Cloud Platform Integration (CF Trial)
Security in the Cloud Foundry Environment
PUBLIC 75

Area Task Role (Neo)
Role-Templates
(Cloud Foundry)
Persona
Monitor View number ranges IntegrationOperation
Server.read
MonitoringDataRead
Integration Developer
Business Expert
Supporter/System De
veloper
Tenant Administrator
Monitor Retry queues IntegrationOperation
Server.read
ESBDataStore.read
ESBDataStore.retry
QueuesRetry
Integration Developer
Tenant Administrator
Monitor Delete queues IntegrationOperation
Server.read
ESBDataStore.read
ESBDataStore.delete
DataStoresAnd
QueuesDelete
Tenant Administrator
Monitor View queues IntegrationOperation
Server.read
ESBDataStore.read
DataStoresAnd
QueuesRead
Integration Developer
Business Expert
Supporter/System De
veloper
Tenant Administrator
Monitor View runtime process
ing locks
IntegrationOperation
Server.read
MessageProcessing
Locks.Read
MessageProcessin
gLocksRead
Integration Developer
Supporter/System De
veloper
Tenant Administrator
Monitor Delete runtime proc
essing locks
IntegrationOperation
Server.read
MessageProcessing
Locks.Delete
MessageProcessin
gLocksDelete
Tenant Administrator
Monitor Test connectivity IntegrationOperation
Server.read
NodeManager.deploy
credentials
MonitoringDataRead
(only for tests without
authentication)
CredentialsEdit
Integration Developer
Tenant Administrator
76 PUBLIC
Getting Started with SAP Cloud Platform Integration (CF Trial)
Security in the Cloud Foundry Environment

Area Task Role (Neo)
Role-Templates
(Cloud Foundry)
Persona
Monitor Change log level IntegrationOperation
Server.read
CongurationSer-
vice.RuntimeBusiness
ParameterWrite
NodeManager.read
Integration Developer
Business Expert
Tenant Administrator
Monitor View audit log entries IntegrationOperation
Server.read
AuditLog.Read
AuditLogRead
Tenant Administrator
Settings View/change product
prole
WebToolingSetting
sProductProfiles.save
tenantconguration
Tenant Administrator
Settings Set ntransport system WebToolingSetting
sProductProfiles.save
tenantconguration
Tenant Administrator
3.5 Data Storage Security
Customer data can be stored in dedicated steps during message processing.
Note
These instructions are relevant only when you use SAP Cloud Platform Integration in the Cloud Foundry
environment.
Customer data stored at rest is strictly separated and isolated for each tenant. Although dierent tenants
might share a common physical infrastructure, each tenant stores its data in a separate schema.
For certain use cases the customer can congure if the data at rest is encrypted.
Message content can be stored encrypted. If this security measure is congured, the encryption key that is
generated automatically is unique for each tenant and is renewed periodically.
Data storage encryption uses AES and a key length of 256 bits. The encryption key is not stored in the same
location as the encrypted data.
Getting Started with SAP Cloud Platform Integration (CF Trial)
Security in the Cloud Foundry Environment
PUBLIC 77

Kinds of Stored Data
The following kinds of data can be stored during the execution of an integration scenario:
● Message content
The runtime node writes message content data to the database in dedicated steps of an integration ow.
There is the option to either store message content for a longer time period (the default is 30 days) or
temporarily. Temporarily stored message content can be used for subsequent message processing steps.
Such steps can then also read message content from the database.
There is the option to congure the retention period of the message content.
● Monitoring data
During message processing, the runtime node also writes monitoring data to the database (which is stored
by default for 30 days). Monitoring data comprises the message processing log (MPL), which records the
executed processing steps.
3.6 Data Protection and Privacy
Various types of customer data are processed by and stored on the integration platform at dierent times. This
data gets the highest level of protection, and SAP takes dedicated measures to guarantee this security level.
Note
These instructions are relevant only when you use SAP Cloud Platform Integration in the Cloud Foundry
environment.
General Information
Governments place legal requirements on industry to protect data and privacy. We provide features and
functions to help you meet these requirements.
Caution
SAP does not provide legal advice in any form. SAP software supports data protection compliance by
providing security features and data protection-relevant functions, such as blocking and deletion of
personal data. In many cases, compliance with applicable data protection and privacy laws is not covered
by a product feature. Furthermore, this information should not be taken as advice or a recommendation
regarding additional features that would be required in specic IT environments. Decisions related to data
protection must be made on a case-by-case basis, taking into consideration the given system landscape
and the applicable legal requirements. Denitions and other terms used in this documentation are not
taken from a specic legal source.
Caution
We assume that you have not maintained any data related to an individual in the tools provided by SAP
Cloud Platform Integration (for example, when using the Web UI to design integration content).
78
PUBLIC
Getting Started with SAP Cloud Platform Integration (CF Trial)
Security in the Cloud Foundry Environment

We expect that sensitive personal data can only be included in message payloads. This responsibility lies
exclusively with you as the operator of an integration scenario using SAP Cloud Platform Integration and
remains your responsibility. If you include sensitive personal data within payloads or message attachments,
SAP Cloud Platform Integration may store this information on your behalf. This applies also for data
maintained in the tools provided by SAP Cloud Platform Integration, however, data within payloads can be
protected by enabling encrypted storage.
The knowledge of sensitive personal data lies exclusively with you and remains your responsibility.
The tools of SAP Cloud Platform Integration only use technical users or data without any references to
individuals.
User Consent
We assume that software operators, such as SAP customers, collect and store the consent of data subjects,
before collecting their personal data. A data privacy specialist can later determine whether data subjects have
granted, withdrawn, or denied consent.
Information Report
An information report is a collection of data relating to a data subject. A data privacy specialist may be required
to provide such a report or an application may oer a self-service. SAP Cloud Platform Integration assumes
that software operators, such as SAP customers, can provide such information.
Erasure of Personal Data
When handling personal data, consider the legislation in the dierent countries where your organization
operates. After the data has passed the end of purpose, regulations may require you to delete the data.
However, additional regulations may require you to keep the data longer. During this period you must block
access to the data by unauthorized persons until the end of the retention period, when the data is nally
deleted.
Data stored on the SAP Cloud Platform Integration platform is only stored for a limited time period (referred to
as retention time).
For more information on the retention times for the various kinds of data stored by SAP Cloud Platform
Integration, see Specic Data Assets [page 80].
Getting Started with SAP Cloud Platform Integration (CF Trial)
Security in the Cloud Foundry Environment
PUBLIC 79

3.6.1 Types of Stored Data
Dierent kinds of data, such as message content or monitoring data, can be stored during the operation of an
integration scenario.
Note
These instructions are relevant only when you use SAP Cloud Platform Integration in the Cloud Foundry
environment.
Such data needs to be considered as sensitive data as it can contain personal information. The following list
provides examples:
● Message content
Messages processed on a runtime node typically contain business data of an integration scenario and
therefore can contain sensitive customer data such as addresses, names, or nancial information.
When this data is at-rest, it can be stored encrypted. Note, however, that in some use cases the customer
can congure that the data is not encrypted.
When this data is in-transit, several measures can be taken, such as digital message signing or message
content encryption.
● Monitoring data
The message processing log records the processing steps of an integration ow. Only users assigned to
this tenant and with dedicated permissions can access this data.
● Other data, such as the content of log les
Note
Personal data processed by and stored on the integration platform is handled according to the Data
Processing Agreement, which you can nd at http://www.sap.com/about/agreements.html under SAP
Cloud Services Customers.
Due to the tenant isolation concept, data from dierent customers (stored in dierent tenants) is strictly
isolated. Additionally, SAP has no access to data stored in customer tenants.
The customer can grant people outside its organization permissions to execute specic tasks on its cluster (for
example, to SAP employees to execute error analysis tasks in support cases).
For more information, see the document SAP Cloud Platform Security: Trust Matters under Data
Governance and Legal Compliance .
3.6.2 Specic Data Assets
Dierent kinds of data are stored in the SAP Cloud Platform Integration infrastructure during the lifecycle of an
integration project.
Note
These instructions are relevant only when you use SAP Cloud Platform Integration in the Cloud Foundry
environment.
80
PUBLIC
Getting Started with SAP Cloud Platform Integration (CF Trial)
Security in the Cloud Foundry Environment

The following table lists the dierent kinds and attributes such like storage location and retention time, for
example.
Data Assets
Data Description
Logical Storage
Classication Retention Time
Message processing
log
Structured information
on the processing of a
message
Log data 30 days
Message processing
log attachments
Data attached to a
message processing
log during runtime
Message store Log data
Business data
30 days
Integration ow tracing
data
Information on the
message ow (includ
ing the message pay
load) and on errors
that occurred during
message processing
Trace store Log data
Business data
60 minutes
Integration content
(design time)
Integration ow mod
els and value map
pings created or edited
by an integration de
veloper
Workspace Conguration data Unlimited
Integration content
(runtime)
Camel XML represen
tation of integration
ows and other design
time entities (as de
ployed on a runtime
node)
Conguration data Unlimited
Data stored by Data
Store operations step
Message content
stored in dedicated
steps in an integration
ow (contains informa
tion such as message
GUID, message proc
essing log GUID, ten
ant ID, time stamp, and
payload).
Is used for further
message processing in
subsequent steps in an
integration ow.
Data store Business data Can be dened by inte
gration developer (de
fault value: 90 days)
Getting Started with SAP Cloud Platform Integration (CF Trial)
Security in the Cloud Foundry Environment
PUBLIC 81

Data Description
Logical Storage
Classication Retention Time
Data stored by Persist
step
Message content
stored in dedicated
steps in an integration
ow (contains informa
tion such as message
GUID, message proc
essing log GUID, ten
ant ID, time stamp, and
payload)
Can be accessed and
analyzed after mes
sage processing.
Message store Business data 90 days
Lock entries Lock entries that are
created (in the in-prog
ress repository) to
avoid the same mes
sage being processed
several times in paral
lel (for example, by dif
ferent runtime nodes)
3.7 Other Security-Related Information
Note
These instructions are relevant only when you use SAP Cloud Platform Integration in the Cloud Foundry
environment.
User Interface Security
Cloud Integration provides user interfaces for designing and deploying message ows, and monitoring them at
runtime.
A Web tool (Web UI) is available to accomplish these tasks. The Web UI is implemented using JavaScript and
HTML (UI5).
This user interface is built to prevent vulnerabilities such as cross-site scripting (XSS) and cross-site request
forgery (XSRF). The built-in security capabilities of these technologies are used together with secure design
and coding principles.
82
PUBLIC
Getting Started with SAP Cloud Platform Integration (CF Trial)
Security in the Cloud Foundry Environment

Note
You cannot use application programming interfaces (APIs) in the Cloud Foundry environment to access
certain functions of Cloud Integration.
Getting Started with SAP Cloud Platform Integration (CF Trial)
Security in the Cloud Foundry Environment
PUBLIC 83

Important Disclaimers and Legal Information
Hyperlinks
Some links are classied by an icon and/or a mouseover text. These links provide additional information.
About the icons:
● Links with the icon : You are entering a Web site that is not hosted by SAP. By using such links, you agree (unless expressly stated otherwise in your
agreements with SAP) to this:
● The content of the linked-to site is not SAP documentation. You may not infer any product claims against SAP based on this information.
● SAP does not agree or disagree with the content on the linked-to site, nor does SAP warrant the availability and correctness. SAP shall not be liable for any
damages caused by the use of such content unless damages have been caused by SAP's gross negligence or willful misconduct.
● Links with the icon : You are leaving the documentation for that particular SAP product or service and are entering a SAP-hosted Web site. By using such
links, you agree that (unless expressly stated otherwise in your agreements with SAP) you may not infer any product claims against SAP based on this
information.
Videos Hosted on External Platforms
Some videos may point to third-party video hosting platforms. SAP cannot guarantee the future availability of videos stored on these platforms. Furthermore, any
advertisements or other content hosted on these platforms (for example, suggested videos or by navigating to other videos hosted on the same site), are not within
the control or responsibility of SAP.
Beta and Other Experimental Features
Experimental features are not part of the ocially delivered scope that SAP guarantees for future releases. This means that experimental features may be changed by
SAP at any time for any reason without notice. Experimental features are not for productive use. You may not demonstrate, test, examine, evaluate or otherwise use
the experimental features in a live operating environment or with data that has not been suciently backed up.
The purpose of experimental features is to get feedback early on, allowing customers and partners to inuence the future product accordingly. By providing your
feedback (e.g. in the SAP Community), you accept that intellectual property rights of the contributions or derivative works shall remain the exclusive property of SAP.
Example Code
Any software coding and/or code snippets are examples. They are not for productive use. The example code is only intended to better explain and visualize the syntax
and phrasing rules. SAP does not warrant the correctness and completeness of the example code. SAP shall not be liable for errors or damages caused by the use of
example code unless damages have been caused by SAP's gross negligence or willful misconduct.
Gender-Related Language
We try not to use gender-specic word forms and formulations. As appropriate for context and readability, SAP may use masculine word forms to refer to all genders.
84
PUBLIC
Getting Started with SAP Cloud Platform Integration (CF Trial)
Important Disclaimers and Legal Information
Getting Started with SAP Cloud Platform Integration (CF Trial)
Important Disclaimers and Legal Information
PUBLIC 85

www.sap.com/contactsap
© 2020 SAP SE or an SAP aliate company. All rights reserved.
No part of this publication may be reproduced or transmitted in any form
or for any purpose without the express permission of SAP SE or an SAP
aliate company. The information contained herein may be changed
without prior notice.
Some software products marketed by SAP SE and its distributors
contain proprietary software components of other software vendors.
National product specications may vary.
These materials are provided by SAP SE or an SAP aliate company for
informational purposes only, without representation or warranty of any
kind, and SAP or its aliated companies shall not be liable for errors or
omissions with respect to the materials. The only warranties for SAP or
SAP aliate company products and services are those that are set forth
in the express warranty statements accompanying such products and
services, if any. Nothing herein should be construed as constituting an
additional warranty.
SAP and other SAP products and services mentioned herein as well as
their respective logos are trademarks or registered trademarks of SAP
SE (or an SAP aliate company) in Germany and other countries. All
other product and service names mentioned are the trademarks of their
respective companies.
Please see https://www.sap.com/about/legal/trademark.html for
additional trademark information and notices.
THE BEST RUN
