
LDS.org Notes and Journal
How-to Guide
Version 1.0
Last updated: 1/21/2013
ics-user-education@ldschurch.org
The Church of Jesus Christ of Latter-day Saints
© 2012 Intellectual Reserve Inc.
English approval: 8/12

Table of Contents
Notes and Journal Help ii
The Notes and Journal Toolbar iii
Access Notes and Journal iii
About Notebooks, Tags, and Types iv
How-to Guide v
Getting Help v
Annotating Content vi
Annotate Content vi
Managing Notebooks ix
Add a New Notebook x
Move Items from Unassigned Items to a Notebook x
Move Items from One Notebook to Another xi
Rearrange the Order of Notebook Items xi
Update or Delete Notebooks xi
Managing Tags xiii
More About Tags xiii
Update or Delete Tags xiv
Adding Journal Entries xv
Add a Journal Entry xv
Migrating Personal Journals into Notes and Journal xvi
Filtering the View xvii
About Types xvii
Filter Your View xvii
Search for Keywords xviii
Change the Scope of a Highlight xviii
Jump Back and Forth Between Notes and Journal and LDS.org xix
Bookmarking Articles xxi
Bookmark an Article xxi
Bookmarks on LDS.org and Bookmarks in the Gospel Library Apps xxii
Printing and Downloading Content xxiii
Print Notebook Content xxiii
Print Journal Entries xxiv
Download Notebook Items xxiv
Frequently Asked Questions xxvi

Notes and Journal Help
LDS.org Notes and Journal How-to Guide
Page ii
Notes and Journal Help
As you’re reading content on LDS.org, such as scriptures or lessons,
you can highlight the content, add a few notes, and save this
information to your Notes and Journal. Notes and Journal is your
own personal, private space on LDS.org to collect your gospel
content and notes.
Figure 1. Notes and Journal allows you to gather resources you're reading on
LDS.org into one place.

Notes and Journal Help
LDS.org Notes and Journal How-to Guide
Page iii
Note: The previous name for Notes and Journal was My
Study Notebook. This previous term has not been updated in
the videos. However, the functionality has not changed.
Notes and Journal is helpful if you're doing research for a talk or
lesson and are browsing resources across LDS.org, or if you're just
studying the gospel and want a better way to organize your notes
and annotated verses online.
The Notes and Journal Toolbar
Look for this Notes and Journal toolbar to appear when you're
reading content on LDS.org:
Figure 2. Notes and Journal toolbar
Currently this toolbar appears only when you're reading four types
of content:
l
Scriptures
l
Magazine articles
l
Lessons
l
Conference addresses
Note: Notes and Journal toolbar does not appear for any
other type of content, such as the Handbook, Study by Topic,
Study Helps, Bible Dictionary, or other content. The scope of
what you can add to Notes and Journal will be expanded in a
later release.
The appearance of the toolbar indicates that you can add this
content to your Notes and Journal.
Access Notes and Journal
You can view your Notes and Journal in two ways:

Notes and Journal Help
LDS.org Notes and Journal How-to Guide
Page iv
l
Go to Sign In/Tools> Notes and Journal.
l
Click Open Notebook on the Notes and Journal footer
toolbar. (This toolbar appears when you're signed in to the
site and are viewing a conference address, lesson, magazine
article, or scripture.)
Tip: If you hold down the Ctrl key while clicking Open
Notebook, Notes and Journal will open in a new tab. This can
make it easier to switch back and forth between the LDS.org
content you're marking and Notes and Journal view.
About Notebooks, Tags, and Types
Notes and Journal uses the terms notebooks, types, and tags to
describe various features that organize and filter your content.
Figure 3. Notes and Journal uses these terms: notebooks, types, and tags.
Notebooks are like folders to group content in. For more
information, see "Managing Notebooks" on page ix. Types refer to
the type of annotation, and include bookmarks, highlights, journal
entries, or links. For more information about types, see "Filtering the

Notes and Journal Help
LDS.org Notes and Journal How-to Guide
Page v
View" on page xvii. Tags are labels that you add to content. When
you click a tag, you see all content that includes the tag. For more
information, see "Managing Tags" on page xiii.
How-to Guide
To view the online help in a printer-friendly PDF format, see the
Notes and Journal How-to Guide.
Getting Help
For help with Notes and Journal, you can use the LDSTech Forum to
ask questions, raise concerns, or look for information. To access the
forum, click the LDSTech Notes and Journal Forum link in the lower-
right corner of any page of the online help. Sign in with your LDS
Account to post a new thread.

Annotating Content
LDS.org Notes and Journal How-to Guide
Page vi
Annotating Content
You can highlight passages on conference talks, lessons, scriptures,
and magazine articles and add them to Notes and Journal. The
highlights will appear in Notes and Journal, with a link pointing
back to the full article.
Annotate Content
1. Navigate to a scripture, magazine article, lesson, or conference
address.
2. Highlight the content you want to add to the Study Notebook.
Figure 4. Highlighting a passage
3. After you highlight the passage, a small pop-up window
appears.

Annotating Content
LDS.org Notes and Journal How-to Guide
Page vii
Figure 5. A pop-up window first appears.
4. Do one of the following:
l
To highlight the verse, click a highlight color square. The
highlight is automatically saved to the All Items section
of Notes and Journal, but it is not included in a specific
notebook, nor will it have notes or tags. You can add
those details in Notes and Journal later.
l
To highlight and annotate the verse, click Add
Note/Tag. A larger window appears, where you can
add a note, tags, and assign it to notebook. After
completing the details, click Save.
Figure 6. Clicking Edit Note/Tag expands the pop-up window with
more options.

Annotating Content
LDS.org Notes and Journal How-to Guide
Page viii
Note:
Unfortunately, the highlighter tool still has some bugs. You
cannot highlight indented/italicized quotes or lists.

Managing Notebooks
LDS.org Notes and Journal How-to Guide
Page ix
Managing Notebooks
Notebooks act as organizing folders to group your highlights,
bookmarks, and journal entries. When you select a notebook, you
see only the items you have added to that notebook.
Figure 7. Notebooks allow you to organize your Notes and Journal items in
various folders.
For example, suppose you're preparing a talk on the priesthood.
You might want to create a notebook called "Priesthood" and then
add your study items to that notebook. When you finish your
research, you can see all items added to this notebook in one view.
Unlike with tags, which appear in alphabetical order, notebooks
appear by date, with the latest notebooks on top.

Managing Notebooks
LDS.org Notes and Journal How-to Guide
Page x
Note: Notebooks are unique to the desktop view. In the
Gospel Library iOSmobile app, the closest equivalent to a
notebook is a document. When you mark verses in the Gospel
Library iOSapp, you cannot add them to a notebook.You can
only add them to a document. Documents do not appear in
the desktop view, and notebooks do not appear in the mobile
view.
Add a New Notebook
You can add a new notebook in two ways. If you're in Notes and
Journal view, click the Add button next to the Notebooks section in
the sidebar.
You can also add a new notebook while you're highlighting a
passage. As you highlight a passage, in the Add to box, click the
down arrow, type the notebook name in the Add new notebook text
box, and then click Add.
Figure 8. Adding a new notebook
Move Items from Unassigned Items to a
Notebook
When you mark a passage, unless you add it to a specific notebook,
the item appears under Unassigned Items. To move items out of
Unassigned into specific notebooks, you edit the item and select the

Managing Notebooks
LDS.org Notes and Journal How-to Guide
Page xi
notebooks it should appear in.
1. If you haven't created the notebook you want to move the
item to, click Add Notebook next to Notebooks in the
sidebar and add the notebooks you need.
2. Under Notebooks in the sidebar, click Unassigned Items to
view all items that need to be assigned to a notebook.
3. Click the unassigned item you want to move, and then click
Edit.
4. Below In notebooks, select the check boxes next to the
notebooks you want the item to appear inside of.
5. Click Save.
Move Items from One Notebook to Another
1. Click the item you want to move.
2. Click Edit.
3. In the "In notebooks" area, update your selections, and then
click Save.
Rearrange the Order of Notebook Items
In Notes and Journal view, the All Items folder shows the latest item
you added at the top of Notes and Journal. As long as you are
viewing a notebook (rather than All Items), you can rearrange the
order of Notes and Journal items by simply dragging the items into
the arrangement you want.
Update or Delete Notebooks
To update or delete a notebook, click the arrow to the right of the
notebook name, and then click Delete.

Managing Notebooks
LDS.org Notes and Journal How-to Guide
Page xii
Figure 9. Options for deleting a notebook.
If you delete a notebook, its contents are returned to the
Unassigned Items notebook. Note that you cannot change the All
Items and Unassigned Items notebooks, as they are permanent.

Managing Tags
LDS.org Notes and Journal How-to Guide
Page xiii
Managing Tags
Tags are keywords that you add to content to associate the content
in the same general group. When you click a tag, you see all items
that have the same tag. Tags in Notes and Journal work similarly to
tags in other web applications, such as tags on blogs.
More About Tags
Tags are similar to notebooks, but they allow you to organize your
content with even more granular detail. Suppose you have a
notebook called Family. In this notebook, you have hundreds of
items. With so much content, it would be hard to find what you're
looking for.
Tags can help make sense of large amounts of content in your
notebooks. For example, in your Family notebook, you might label
the content with various tags: Family Home Evening, Recreational
Activities, Child Interviews, Agency, Discipline Strategies, and so on.
When you click your Family notebook, all the tags associated with
content in that notebook appear in the sidebar. (Tags not used in
that notebook are hidden.) You can then click a tag to see all
notebook content that has that tag.
You can be creative in the way you use tags. For example, suppose
you're gathering research for a talk on tithing. You could add all the
content to a notebook called tithing, and then also tag each item
with speaker names, dates, locations, formats, or venues.
In summary, tags provide the micro-filters for organizing and
sorting your notebook content.

Managing Tags
LDS.org Notes and Journal How-to Guide
Page xiv
Tip: If you're using the Gospel Library apps to study the
gospel as well, consider using tags instead of notebooks, since
both Android and iOS apps use tags but neither uses
notebooks.
Update or Delete Tags
To update or delete a tag, you have to modify all instances of the
tag. It's not possible to edit the tag in one place and have that
change occur automatically in all instances of that tag. Likewise, to
delete a tag, you must remove all instances of the tag.
1. In Notes and Journal sidebar (under "Tags"), click the tag you
want to edit.
2. Click one of the items that has the tag.
3. Click Edit.
4. In the "Tagged with" box, either change or delete the tag.
When you start typing, any tags with matching names appear.
5. Click Save.

Adding Journal Entries
LDS.org Notes and Journal How-to Guide
Page xv
Adding Journal Entries
Journal entries allow you to capture your thoughts and reflections
as you're studying the gospel. Journal entries are independent of
any particular page you're viewing. You must type journal entries in
plain text, without any bold, underline, italic, or bullet formatting.
Add a Journal Entry
1. Click the Journal entry button on Notes and Journal toolbar
in the footer.
Figure 10. Journal entry button
2. If you don't see the toolbar (because you're not on a scripture,
talk, conference address, or lesson page), go to Sign
in/Tools> Study > Notes and Journal and then click Add
journal entry.
3. Add tags and select a notebook as desired. (See for more

Adding Journal Entries
LDS.org Notes and Journal How-to Guide
Page xvi
information about these terms.)
4. Type your journal entry.
Note: Journal entries have a word limit of about 600
words. However, there isn't an indicator to let you know
you have passed the word limit. Longer entries are
simply truncated when you click Save. To avoid losing
data, keep your journal entries below 600 words, or type
them in a separate word processor and paste them into
the Journal Entry box when you've finished.
5. Click Save.
Migrating Personal Journals into Notes and
Journal
Some have asked whether they could import their journals into this
new tool to ensure a safe and permanent home for their journal
content. Migrating your personal journal content into Notes and
Journal is not recommended. The journal entries don't allow
unlimited text, don't offer rich text formatting, and do not
timestamp the entries. The journal feature is simple at best and is
not intended to support volumes of personal journals migrated into
it.

Filtering the View
LDS.org Notes and Journal How-to Guide
Page xvii
Filtering the View
Notes and Journal shows all the content you've added in the main
viewing area. On the left you can limit the content that appears by
selecting the notebooks, types, or tags you want to view. These
selections will filter what appears in the main content area.
About Types
Types refer to the kinds of content that you add to Notes and
Journal. There are three types of content:
l
Highlights: Passages that you select from a larger article,
lesson, or chapter.
l
Bookmarks: Links to entire articles, lessons, or chapters.
l
Journal entries: Your own thoughts, independent of any
content you're reading.
When you're viewing Notes and Journal, you select types to filter
the items you see. However, you cannot change a Notes and Journal
item from one type to another.
Filter Your View
You can make multiple selections to control the view:
l
If you select a notebook, all content from that notebook
appears. (The content under Types and Tags narrows
according to the notebook's contents.)

Filtering the View
LDS.org Notes and Journal How-to Guide
Page xviii
l
If you select a notebook and a tag, only content that is within
the notebook that has the tag you selected appears.
l
If you select a notebook, a type, and a tag, only content that is
within that notebook with both the tag and type you selected
appears.
l
If you select a notebook and two tags, content that is within
the notebook that has either tag you selected appears.
Knowing how to narrow the view in your Notes and Journal
becomes more important as your Notes and Journal content grows.
Search for Keywords
1. At the top of Notes and Journal view is a Search box. To
search for content:
2. Click the notebook you want to search (for example, All Items).
3. Type in some keywords, and then press your Enter key.
4. Any items matching your search in that notebook appear.
Change the Scope of a Highlight
1. In Notes and Journal, browse to the item whose highlight you
want to change.
2. Click Edit.
3. Click Edit highlight.

Filtering the View
LDS.org Notes and Journal How-to Guide
Page xix
Figure 11. Edit highlight
You're directed to the page on LDS.org with the highlighted
passage.
4. Move your mouse over the highlighted passage, and drag the
blue circles to the place you want them.
5. Move your cursor over the passage, and then click Edit
Note/Tag on the dialog box that appears.
6. In the dialog box, click Save.
Jump Back and Forth Between Notes and
Journal and LDS.org
When you click the Open Notebook button on the Notes and
Journal toolbar in the footer, the Notebook opens in your same
browser window rather than in a new tab. However, some readers
like to easily toggle or jump back and forth between the content
they're marking on LDS.org (such as a scripture) and their Notes
and Journal.
You can jump back and forth by opening Notes and Journal in a
new tab or window. To do this, before you click Open Notebook,
hold down your Ctrl key as you click with your mouse. This will
open the notebook in a new tab or window.

Filtering the View
LDS.org Notes and Journal How-to Guide
Page xx
As a general tip for browsing websites, holding down your Ctrl key
before you click a link will always open the link's destination in a
new tab or window. In your browser settings, you can usually set
your preferences to determine whether the link opens a new tab or
an entirely new window.

Bookmarking Articles
LDS.org Notes and Journal How-to Guide
Page xxi
Bookmarking Articles
Bookmarks are links that point back to an entire article, lesson,
conference address, or scripture. Bookmarks don't point to specific
passages, but rather to the page as a whole. When you bookmark
articles on LDS.org, Notes and Journal shows the title, the first few
sentences, and a link back to the content.
Bookmark an Article
1. Navigate to the page you want to bookmark. It must be a
conference address, magazine article, lesson, or scripture
chapter.
2. Click Bookmark on the footer toolbar.
Figure 12. Bookmark button
3. Click + Add Bookmark.

Bookmarking Articles
LDS.org Notes and Journal How-to Guide
Page xxii
4. If desired, change the name of the bookmarked page.
5. If desired, click Details in the lower-left corner to expand the
bookmarking options. Add a note, tags, and notebook for the
bookmark.
6. Click Save.
The article you bookmarked receives a bookmark icon on the
page to let you know you've bookmarked it. You can drag this
bookmark icon to the place you want it (such as a key passage in
the article). A link to the article is added to Notes and Journal.
Bookmarks on LDS.org and Bookmarks in the
Gospel Library Apps
Your Notes and Jourbookmarks sync to the GospelLibrary iOSand
Android apps. However, the concept of bookmarks differs slightly
between Notes and Journal and the apps.
On Notes and Journal, bookmarks are links to your favorite articles,
so the feature aligns more with social bookmarking tools (such as
Delicious). In the apps, however, bookmarks are more like
placeholders to remind yourself where you left off reading. They
aren't intended to hold dozens of links.
Printing and Downloading Content
LDS.org Notes and Journal How-to Guide
Page xxiii
Printing and Downloading
Content
You can print the content in your notebooks. The Print button
formats the content into a printer-friendly view. Note that you can
only print content within a notebook. If you select a tag and click
Print, the print view will not restrict the items to that tag.
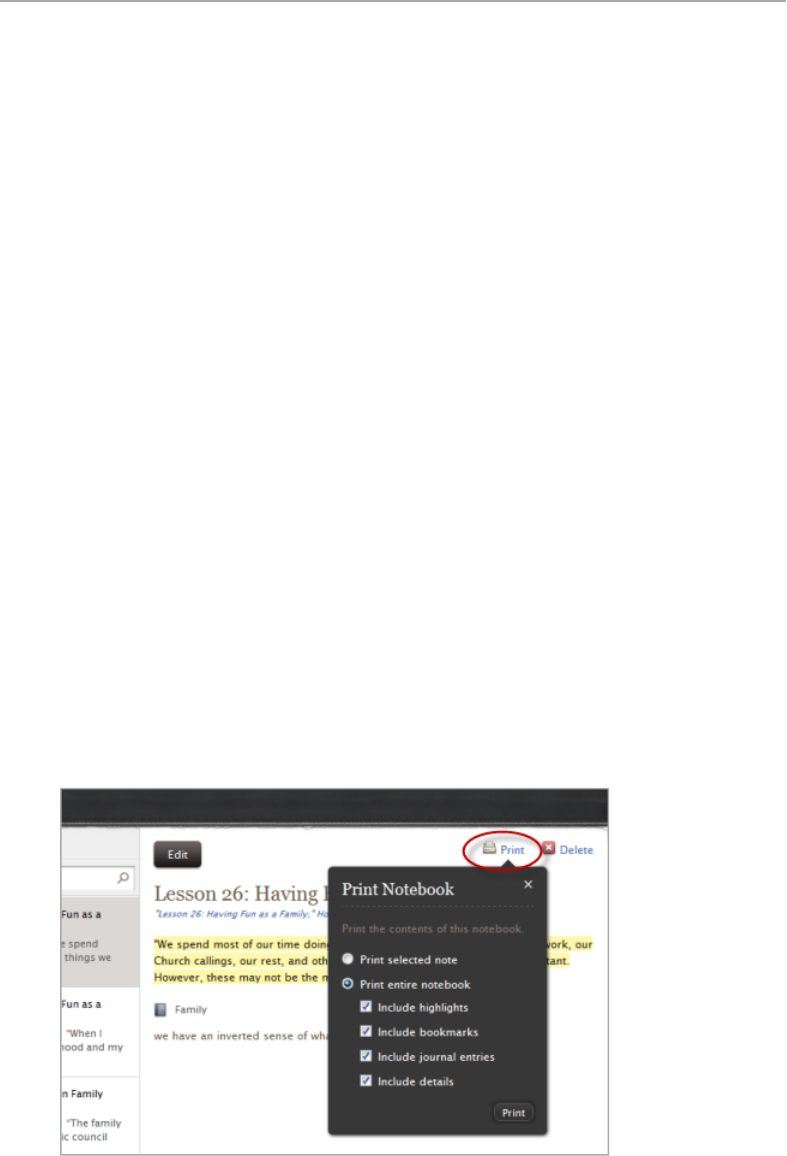
Print Notebook Content
1. Click the notebook that has the items you want to print.
2. Click the Print button.
Figure 13. The Print button

Printing and Downloading Content
LDS.org Notes and Journal How-to Guide
Page xxiv
3. Select the items you want included in the print view.
4. Click Print. The content is formatted in a printer-friendly
format.
5. Print the page using your browser's print controls.
l
In Firefox, go to File > Print.
l
In Internet Explorer, click the Print button.
l
In Chrome, click the wrench icon in the upper-right
corner and select Print.
Print Journal Entries
1. In the sidebar, click All Items.
2. Click the Print button.
3. Clear all check boxes except Include journal entries.
4. Click Print.
5. Print the page using your browser's print controls.
l
In Firefox, go to File > Print.
l
In Internet Explorer, click the Print button.
l
In Chrome, click the wrench icon in the upper-right
corner and select Print.
Download Notebook Items
You can download your notebook content in a Microsoft Word, RTF
(Rich Text Format), or XML file.
1. Click the arrow next to the notebook that has the items you
want to download.

Printing and Downloading Content
LDS.org Notes and Journal How-to Guide
Page xxv
Figure 14. Downloading notebook content
2. Select the type of items you want to include in the download.
3. Select the download format:
l
DOCX: Microsoft Word.
l
RTF: A cross-platform word processing format.
l
Backup (XML): A code view of the content. Useful only
for backup, restore, and sharing (these features will be
later added to Notes and Journal).
4. Click Download.

Frequently Asked Questions
LDS.org Notes and Journal How-to Guide
Page xxvi
Frequently Asked
Questions
The following are frequently asked questions about Notes and
Journal.
I don't see the Study toolbar even though I'm signed in.
The toolbar appears only when you're viewing scriptures,
conference talks, magazine articles, or lessons.
Why do I have to sign in so often?
To avoid resource overload on the servers, you're automatically
signed out of the site after a period of inactivity.
Does Notes and Journal sync with Gospel Library on the
iPhone and other mobile devices?
Yes, currently the highlights you make with Gospel Library
content on the iPhone and Android devices do sync with Notes
and Journal. However, the sync has not been completed for some
other platforms, such as Blackberry.
Can I share Notes and Journal content with someone else?
No, currently you cannot share your Notes and Journal content.
However, sharing will be added in a future release.

Frequently Asked Questions
LDS.org Notes and Journal How-to Guide
Page xxvii
Why would I want to download an XML version of Notes
and Journal?
The XML version is only for backup or restores. But this will also
facilitate sharing when the feature is added.
Can I add cross-references or hyperlinks in my notes?
No, your Notes and Journal entries are restricted to text only. You
can add a URL, but it won't be clickable.
I can't access Notes and Journal. I keep getting an error.
If you can't access Notes and Journal, try clearing your cookies
and browsing history (or try another browser entirely) and
attempt to sign in again.
Can I see a timestamp on Notes and Journal items?
Currently none of Notes and Journal items (bookmarks,
highlights, or journal entries) have timestamps.

