
Nerdio NME-200
Certification Exam
Curriculum
Last Revised: August 2024

Table of Contents
Copyright 11
Introduction 12
About Nerdio Manager 13
Directory and Identity Management 15
Entra ID - Definition of Terms 15
Customers With a Cloud-Only Environment 16
Customers With Existing Servers and Applications and/or Virtual Desktops 16
Enable Active Directory Functionality in Azure 16
Do-it-yourself AD in Azure 17
Azure Active Directory Domain Services (AAD DS) PaaS 17
Configure Entra Domain Services for use with AVD 20
Preliminary Considerations 20
Entra Domain Services Design Principals 21
Create an Entra Domain Services Domain 22
Configure Nerdio Manager for Entra Domain Services 24
Installation and Getting Started 26
Nerdio Manager Installation Guide 26
Companion Video 26
Prerequisites 26
Install Nerdio Manager from the Azure Marketplace 27
Initialize Nerdio Manager 28
Configure Nerdio Manager Settings 30
2

Nerdio Manager Edition Management 35
Update the Nerdio Manager Application 36
Nerdio Manager Updates FAQs 36
Method 1: Deploy Button 37
Method 2: Use Azure Cloud Shell (v2.10+) 37
Method 3: Standalone PowerShell Update 38
Method 4: Manual "Zip Push" Deployment 39
Method 5: Manual Azure Cloud Shell Deployment 42
Rollback to a Previous Version 44
Nerdio Manager Default Deployment Resources and Costs 45
Setup and Settings 46
Harden Nerdio Manager 46
Harden App Service 49
Harden Azure Storage Account 52
Harden SQL 56
Back Up and Restore Nerdio Manager Configuration 58
Prerequisites 59
App Service and SQL DB Backup 60
Key Vault Backup 63
App Service Restore 64
Key Vault Restore 64
Alerts and Notifications 66
Create a New Condition 66
Examples of Conditions 68
3

Create a New Action 70
Configure Azure Monitor Alerts for AVD Resources 71
Resource Selection Rules Management 74
Create a Resource Selection Rule 75
Manage Resource Selection Rules 78
Manage Schedules for Tasks 79
Create Multiple Schedules for a Task 79
Manage Task Schedules 81
UI Overview 83
Summary Dashboard 87
Individualize Your UI Themes 89
Create a Custom View 89
Create a Custom View from an Existing Page 94
Change a Custom View 95
Change Custom Views Display Properties 95
Desktop Images 98
Management and Lifecycle Tasks for Imported Desktop Images 98
Typical Desktop Image Lifecycle 98
Endpoint Management Software Integration 100
Import Images from the Azure Library 101
Import Custom Azure Managed Images 106
Import an Existing VM 107
Desktop Images Set as Image 110
Desktop Images Scripted Actions 114
4

Desktop Images Manually Uninstall AVD Agent 116
Use Azure to Backup and Restore Desktop Images 117
Create a Desktop Image Backup Policy 117
Manually Backup a Desktop Image 118
Restore a Desktop Image from Azure 119
Clone Desktop Images 120
Desktop Images Change Log Feature 124
Refresh Desktop Images from the Azure Marketplace 125
Stage Desktop Images 126
Enable Desktop Image Staging 127
Edit Desktop Image Staging Auto-activation Settings 128
Deploy an Inactive Staged Desktop Image 129
FSLogix and User Profile Management 130
FSLogix Settings and Configuration 131
Automated FSLogix Deployment and Per-Host Pool Customization 135
FSLogix Shrink VHD/VHDX Containers (Scripted Action) 140
Scripted Actions Overview 142
Create a New Scripted Action 143
View and Edit Existing Scripted Actions 146
Clone a Scripted Action 147
Scripted Actions Groups 147
Apply Scripted Actions 147
Scripted Actions Groups 150
Default Scripts for Nerdio Manager 151
5

Considerations for Scripted Actions 153
Considerations for Window Scripted Actions 153
Considerations for Azure Scripted Actions 153
Scripted Actions Azure Runbooks Variables Integration 156
Scripted Actions Global Secure Variables 158
Troubleshoot Scripts 159
Azure Runbooks Logs 159
Troubleshoot Azure Runbooks 160
Troubleshoot Windows Scripts 161
Upgrade Azure Az PowerShell Module 162
Scripted Actions for Windows Scripts 163
Custom Script Extensions 164
Scripted Actions for Azure Runbooks 166
Renew the Azure Runbook Scripted Actions Automation Certificate 168
Scripted Actions for Windows 365 169
Host Pools 173
Workspace Management 173
Create a Workspace 173
Manage Workspaces 174
Create Static Host Pools Without Auto-Scaling 175
Convert a Static Host Pool to Dynamic 179
Add a New Session Host to a Static Host Pool 180
Create Dynamic Host Pools 182
Enable Dynamic Host Pool Auto-scaling 186
6

Enable Personal Host Pool Auto-scaling 199
Auto-scale: Cost Optimization Session Host VM OS Disk Storage 217
Auto-scale History for Dynamic Host Pools 220
Auto-scale Session Host Scale In-Out Restrictions 224
Add a New Session Host to a Dynamic Host Pool 224
Host Pool Disaster Recovery 227
Host Pool Backup 230
Clone Host Pools 231
Bulk Host Actions 233
Resize/Re-image a Host Pool 235
Restart a Host Pool 238
Power On a Host Pool 239
Power Off a Host Pool 240
Exclude Session Host VMs from Auto-scale During Power On/Off 241
Host Pool AVD Configuration 242
Host Pool VM Deployment 245
Run Bulk Host Scripted Actions 252
Manage Host Pool User Assignments 254
Apply Host Changes Without Re-Imaging 256
Configure the Host Pool's Active Directory Settings 257
Start VM on Connect for Pooled Host Pools 258
Configure User Session Time Limits 259
Publish Remote Applications to Users 262
Add App Groups to Host Pools 262
7

Publish RemoteApps to Users 263
Accelerated Networking on Session Host VMs 265
Security 267
Azure Permissions and Nerdio Manager 267
Installation Permissions 267
Subscription Permissions 269
Configuration Permissions 270
Ongoing Use Permissions 272
Role-based Access Control (RBAC) in Nerdio Manager 272
Companion Video 273
Users and Roles Management 273
Add Users to Roles/Workspaces 274
Edit a User's Roles/Workspaces 275
Remove User Access 275
Role-based Access Control (RBAC) Custom Roles 276
Manage User Sessions 278
Windows 365 281
Windows 365 - Enable and Configure Cloud PCs 281
Enable Windows 365 in Nerdio Manager 281
Hide or Display Individual Cloud PC Hosts Page 283
Configure a Windows 365 Network Connection 285
Manage Windows 365 Network Connections 286
Create a Provisioning Policy 287
Edit a Provisioning Policy 288
8

Assign Licenses to Users 289
Access Assigned Cloud PCs 290
Manage Cloud PCs 290
Windows 365 - Use and Configure Desktop Images for Cloud PCs 291
Create a Desktop Image for Cloud PC 291
Manage Desktop Image for Cloud PC 293
Windows 365 - User Settings Policies 296
MSIX App Attach 299
Create and Manage MSIX App Attach Images and Host Pool Assignments 299
Sample VHD(X) Packages and Certificate 299
Upload an MSIX App Attach Image File 300
Upload an MSIX Package File 302
Assign an App to a Host Pool 302
Assign an App Attach v2 App to Users and Groups 303
Use the App Attach v2 Package Wizard 304
Create a New Version of an App 305
Change to a New Version of an App 306
Upload a New Image Version of an App 307
Storage 308
Create and Manage Configured Azure Files Shares 308
Auto-scale for Azure Files Storage Premium 313
Auto-scale History for Azure Files Shares 316
Create and Manage Configured Azure NetApp Files 318
Auto-scale for Azure NetApp Files 320
9


Copyright
Copyright © 2024 by Nerdio, Inc. All Rights Reserved.
The “original instructions” of this manual are published in the English language.
The information conveyed in this document has been carefully checked and is believed to be reliable at the time of
printing. However, Nerdio, Inc. makes no warranty regarding the information set forth in this document and assumes no
responsibility for any errors or inaccuracies contained herein. Nerdio, Inc. is not obligated to update or correct any
information contained in this document. Nerdio, Inc. reserves the right to change products or specifications at any time
without notice.
No part of this document may be reproduced in any form for any purpose without the prior written permission of Nerdio,
Inc.
The Nerdio, Inc. logo and all Nerdio, Inc. product and service names listed herein are either registered trademarks or
trademarks of Nerdio, Inc., or its subsidiaries. All other marks are the property of their respective owners.
Mention of third-party products or services is for informational purposes only and does not constitute an endorsement
or recommendation.
11

Introduction
Welcome to the Nerdio Manager for Enterprise NME-200 exam curriculum. This curriculum is
intended to give you a comprehensive understanding of Nerdio Manager, Microsoft Azure Virtual
Desktops, and their various available functions. This curriculum emphasizes the "how to."
The test focuses on the technical configuration and tasks you can, and will, need to execute when
deploying, managing, and optimizing your AVD and Windows 365 cloud desktop environments.
The test is intended to challenge your retention of critical concepts, features, and methods you
will need to successfully work with Nerdio Manager, Azure Virtual Desktops and Windows 365
Cloud PCs.
We highly recommend that you pay close attention when reviewing the curriculum. There are
many critical details that will appear in the exam. Simply skimming through the material will most
likely be reflected in the outcome of your exam. In addition to the knowledge shared in the
curriculum, we expect our test takers to be hands-on Nerdio Manager users. Experience using
Nerdio Manager will be invaluable to pass the exam.
Best of luck!
Note: We assume you have the latest version of Nerdio Manager. Some features may not be
available in certain versions, so please consult the Help Center for details.
12

About Nerdio Manager
Nerdio Manager for Enterprise is a deployment, management, and auto-scaling platform for
Azure Virtual Desktop (AVD) and Windows 365 Cloud PC.
Tip: Nerdio Manager for Enterprise is commonly referred to as Nerdio Manager or NME.
Nerdio Manager allows IT professionals and system integrators to deploy, manage, and auto-
scale large AVD and Windows 365 Cloud PC desktop environments in the Enterprise. Nerdio
Manager can be connected to an existing environment or used to configure a new deployment.
You can operationalize large AVD and Cloud PC deployments through a powerful and intuitive UI
used by engineering and help desk staff to deploy the environment and provide on-going user
management. Capabilities such as desktop image management, performance monitoring, and
user session control eliminate the need for complex scripting and speed up response to end-
users.
Nerdio Manager reduces Azure costs with scheduled and event-driven auto-scaling and speeds
deployment with a guided setup wizard reducing the engineering workload. Azure compute and
storage costs can be reduced by up to 75% and deployment time from weeks to hours. Additional
savings result from consolidating user management and monitoring tools and eliminating third-
party apps.
And with Nerdio Manager you can reinforce existing security policies, compliance, and address
data residency concerns. Nerdio Manager for Enterprise is deployed as an all-PaaS, secure
Azure application inside the customer’s own subscription in a geographic location of their choice.
No user data ever leaves the Azure environment and there is no third- party access to the
deployment.
13

Nerdio Manager is Veracode verified
14

Directory and Identity Management
To design, build, and maintain an AVD and Cloud PC environment using Nerdio Manager, it is
important to have a good understanding of directory and identity concepts. It is important to
understand concepts such Azure AD, AD Domain Services (on-prem), and Azure AD DS.
In general, Active Directory is a complex topic. Microsoft’s multiple directory solutions and
deployment models with extremely similar sounding names only make matters even more
confusing.
Entra ID - Definition of Terms
Active Directory Domain Services (Windows Server / on-premises)
l
Standard Active Directory role on a traditional Windows server machine that is managed
with tools like Active Directory users and computers, sites and services, domains, and
trusts.
l
Contains user, group, contact, and computer objects.
l
Traditional Windows desktops and servers join this AD.
l
Users and Groups can be synchronized with Entra ID using Entra ID Connect.
Entra ID – Microsoft Cloud Directory Services
l
Despite its similar name to traditional Active Directory, this is a different service that is
hosted by Microsoft and is the top-level object in the Microsoft Cloud (O365, D365, and
Azure).
l
Contains user, group, and contact objects.
l
Windows 10 and 11 computers can join Entra ID, while older operating system machines
cannot.
l
Can be synchronized with a traditional AD via the ADConnect tool, so the same username
and password can be used for both (with password hash synchronization enabled).
15

Entra Domain Services
l
An Azure-hosted, Microsoft-managed AD DS.
l
Most of the same capabilities as traditional, on-premises AD DS with some limitations due
to the lack of administrative access to the actual domain controller, which Microsoft
manages.
l
Automatically synchronizes with Entra ID, which may be synchronized with on an on-
premises AD DS, and allows VMs running in Azure to join it regardless of the type of
Windows OS (for example, Windows 11/10/8/7 or Server 2008/2012/2016/2019).
Customers With a Cloud-Only Environment
Entra ID is required to use any of the Microsoft Cloud services (Office 365, Azure Virtual Desktop
(AVD), Dynamics 365, etc.). When users access these cloud services, all user authentication
begins in Entra ID.
For organizations with “cloud native” deployments, the user information (for example, username,
password, group membership, etc.) only resides in Entra ID and is not synchronized with any
other directory. If the customer does not have on-premises, line-of-business (LOB) application
servers and is not looking to implement virtual desktops in Azure, this Entra ID-only scenario may
be sufficient and fairly simple.
Customers With Existing Servers and Applications and/or Virtual
Desktops
Most customers start out with existing LOB applications running on-premises and want to migrate
these workloads to Azure, reinstall them on new VMs running in Azure, or implement virtual
desktops in Azure with AVD. Prior to winter of 2021, AAD alone was not sufficient as LOB servers
and virtual desktop VMs must join an Entra Domain Services domain to function and be
manageable. Microsoft now supports Entra ID Joined for AVD session hosts, with support for
Entra ID Joined for Azure files expected soon (as of November 2021).
Enable Active Directory Functionality in Azure
The following methods are available to enable AD functionality in Azure:
16

l
Do-it-yourself AD in Azure.
l
Entra Domain Services PaaS.
Do-it-yourself AD in Azure
Conceptually, the easiest way to create an Azure deployment is:
l
Connect to the on-premises network with a site-to-site VPN.
l
Deploy a new VM in Azure.
l
Join it to the existing AD domain via the VPN.
l
Promote it to a domain controller and configure the proper sites/subnets/etc.
What you end up with is an AD deployment that spans both the on-premises network and the
Azure deployment with the ability to move server VMs from on-premises to Azure without having
to rejoin them to a new domain and without disrupting users’ connectivity to these VMs.
The challenge with this deployment lies in the difficulty of implementation, the need to manage
new domain controllers, and the cost of additional VMs to run these domain controllers. The
advantage is the easy-to-understand deployment for anyone who has managed Active Directory
before and complete flexibility with full administrative access.
Azure Active Directory Domain Services (AAD DS) PaaS
To address the challenges with the do-it-yourself AD in Azure method, Microsoft introduced Entra
Domain Services--not to be confused with Entra ID.
Entra Domain Services is a PaaS offering in Azure that is operated, monitored, and updated by
Microsoft with administrators having limited access. The advantage of Entra Domain Services is
that it does not require VMs to be deployed and managed and it does not rely on a VPN to
synchronize with an on-premises domain.
When Entra Domain Services is deployed in an Azure subscription, Microsoft creates a pair of
high-availability domain controllers and synchronizes the user data from Entra ID.
Entra Domain Services is a new domain that contains read-only copies of users, groups, and
password hashes that reside in Entra ID. It synchronizes this data at 20-minute intervals. Azure
VMs can be joined to this new domain and existing usernames and passwords can be used to
17


Important:
l
Microsoft deploys and manages an Active Directory for you, so you don’t have
administrative access to it but can connect to manage it with traditional AD management
tools (for example, Active Directory Users and Computers or Group Policy
Management).
l
Entra Domain Services is a new domain that has your existing domain’s user objects, if
synced using Entra ID Connect.
l
User objects that are synchronized from Entra ID to this new domain are read-only.
They can only be modified in the source AD (if Entra ID Connect is in use) or Entra ID (if
the customer is cloud-only).
l
When you create VMs in Azure, they join this new domain. They are not part of your
existing domain that is on-premises, only the new domain that is in Azure.
l
Servers that are joined to your existing on-premises domain are not part of the new
Entra Domain Services domain- -only user objects are replicated. There is no trust
enabling authentication between the Entra Domain Services and on-premises AD DS
environments.
l
When doing a lift-and-shift migration of a server from on-premises to Azure with Entra
Domain Services enabled, you need to join the server to the new domain and then
existing users can be entitled to access it. This requires making changes to the server.
l
You need a “management VM” running in Azure with RSAT installed to manage your
new Entra Domain Services domain.
l
Active Directory Federation Services (AD_FS) functionality, which enables single sign in
Office 365, is not supported.
l
Directory Schema extensions are not supported.
l
There is no way to fail-over the Entra Domain Services domain to another Azure region
in case of a regional outage.
l
Once deployed, there is no way to pause Entra Domain Services to save on costs
without deleting the deployment.
19

Configure Entra Domain Services for use with AVD
This section applies when you have one of the following situations:
l
You have a cloud-only environment. That is, you only have Entra ID and you do not have an
on-premises Active Directory with Azure AD Connect.
l
You do not want to connect your on-premises domain to the Azure cloud via a VPN.
If any of the above applies, then the Entra Domain Services service provides the Active Directory
component required by the Azure Virtual Desktop.
Preliminary Considerations
Important: When you use Entra Domain Services with cloud-only environments, all your AVD
users are required to reset their passwords before they can use AVD. This is because the
password hashes must be regenerated to be compatible with ADDS (traditional AD). This is
one time only after Entra Domain Services has been provisioned. See the Microsoft
documentation for details.
l
Entra Domain Services' lowest tier is "standard." This tier's retail cost is a fixed rate of
~$110/month (As of January 2021, prices may vary.) Generally, this tier covers most
environments that are under 25,000 AD objects and 3,000 auth/hour. More pricing details
can be found here.
l
You do not have Domain Admin rights over the AD. However, you are given all the
necessary management rights to join machines to a domain, edit GPOs and OUs, etc.
l
Entra Domain Services is a one-way sync. Changes made directly to the AD are not
synchronized back up to your Entra ID. Likewise, changes such as adding users, GPOs,
OUs, etc. are persistent. However, if the Entra Domain Services is deleted, the changes
are lost.
l
If there are domain-level changes that must be made, such as adding GPOs or OUs, a
"Management VM" must be created with RSAT installed to edit the AD. See this Microsoft
article for more information.
20

l
Entra Domain Services cannot be moved to another resource group or subscription. It
must be deleted and recreated. Keep this in mind if you are using a temporary RG or
subscription for PoC purposes.
l
The domain name cannot be changed. If you are building a PoC and wish to use a
temporary domain name, you must delete and recreate the domain.
Entra Domain Services Design Principals
Entra Domain Services is a way to provide domain services such as LDAP, Kerberos/NTLM,
domain join, and group policy to various other Azure resources that require them. It takes your
cloud-only Entra ID and presents it as if it were a "traditional" or "on-premises" Active Directory to
VMs and apps in Azure. It can be thought of as "Active Directory-as-a-service."
This is a sample configuration of Entra Domain Services.
21

Notes:
l
The subnet that Entra Domain Services uses for its endpoints must be separate from
your other subnets. It must contain only Entra Domain Services endpoints. Do not
attempt to add VMs to this subnet. In addition, it is recommended that you do not link
this subnet to your Nerdio Manager environment in the Settings section.
l
You must set the DNS settings on your virtual network to point to the AD DS endpoints,
so that your VMs can resolve the domain.
l
Entra Domain Services is a resource object. It can be placed in a resource group and
likewise deleted. It is recommended that you set a "lock" to prevent accidental deletion
of this resource.
Create an Entra Domain Services Domain
It is recommended that you follow the Microsoft Guide when creating the environment:
22

Tip: You need a separate subnet to use for your session hosts. For better organization, before
you create your Entra Domain Services, you can make the VNet with two subnets as shown in
this example (substitute the IP ranges and names as desired):
In the Networking tab, specify the VNet and Subnet you previously created.
23

Configure Nerdio Manager for Entra Domain Services
When Entra Domain Services is up and running, Nerdio Manager must be configured to utilize it.
To configure Nerdio Manager for Entra Domain Services:
1. Navigate to the Settings > Azure environment.
2. Make sure that the Display non-AD synched users option is set to Enabled.
24

Note: This allows you to assign users that are cloud-only within Nerdio. Without this
setting, users do not appear within the system's web portal for assignments or roles.
Related Topics
Entra Domain Services Pricing
Tutorial: Enable User Accounts for Entra Domain Services
Tutorial: Join a Windows Server VM to an Entra Domain Services Managed Domain
25

Installation and Getting Started
This section contains topics that help you install and get started using Nerdio Manager.
Nerdio Manager Installation Guide
This section guides you through the process of installing Nerdio Manager in your Azure
subscription and initializing Nerdio Manager.
By following these steps, you are registering an Enterprise Application in your own Azure tenant,
in a subscription that you select, and into a new resource group. Once the install is complete, you
gain access to a URL and are able to sign in to the Nerdio Manager web application.
Nerdio Manager is installed and billed through the Azure Marketplace.
The installation process can be broken down into the following phases:
l
Confirm you meet the prerequisites before you start installing Nerdio Manager.
l
Install the Nerdio Manager application from the Azure Marketplace listing.
l
Initialize the installation by running an Azure PowerShell script.
l
Register your installation with our licensing servers and configure the Nerdio Manager
settings.
Companion Video
Select this link to view the video.
Prerequisites
Note: Sign in to your Azure portal as a Global Administrator before starting the install process.
l
You must be a subscription owner of an Azure subscription where you intend to install the
Nerdio Manager from the Azure Marketplace.
26

l
The Azure subscription must be able to deploy Azure SQL, App Service, Key Vault,
Application Insights, and Automation Account in the Azure region you select during the
install process.
l
You must have a virtual network and subnet available to deploy AVD session host VMs.
You are prompted to select this virtual network and subnet during the installation process.
l
You must have a Windows Active Directory or Entra Domain Services deployment
accessible from the virtual network where AVD session host VMs are deployed. The
custom default DNS server setting specified on the virtual network subnet must point to an
AD-aware DNS server.
l
If using Windows Active Directory, Active Directory must be synchronized with Entra ID.
l
You need an Active Directory user account with rights to join and unjoin VMs from the
domain. This user account must be able to create computer objects in at least one OU in
the AD domain and be able to disable these computer objects.
l
You need an SMB file storage location for FSLogix Profile containers. This SMB share can
be on a file server VM, Azure Files, Azure NetApp Files, or any other location accessible via
a UNC path (for example, \\server.domain.local\share\profiles). The server name must be
in FQDN format. This file share must be located in Azure in the same region as the AVD
session host's VMs. If you do not have a file storage location available, this step can be
skipped during installation, and Nerdio Manager can create Azure Files or NetApp Files
after the installation.
l
The Microsoft Desktop Virtualization resource provider must be registered in your Azure
subscription.
Install Nerdio Manager from the Azure Marketplace
Nerdio Manager is installed from the Azure Marketplace.
To install Nerdio Manager:
1. In the Azure Marketplace, search for Nerdio Manager for Enterprise.
2. Select Create to start the installation process.
3. Enter the following information:
27

l
Subscription: From the drop-down list, select the subscription where you want to
install Nerdio Manager.
l
Resource Group: Select Create new to create a new resource group.
l
Region: From the drop- down list, select the region closest to you or where the
majority of your administrators are located.
Note: This region is where the Nerdio Manager web application is located, and
does not determine the location of the AVD hosts.
4. Once you have entered all the desired information, select Next: Review + create.
5. Review your selections and select Create.
Note: A confirmation window displays informing you that the deployment is in progress.
The deployment usually takes about 10 minutes.
6.
When the deployment is complete, select Go to resource group.
7. Locate and select the App service.
8.
Select Browse or select the URL to navigate to your installation of Nerdio Manager.
Initialize Nerdio Manager
When Nerdio Manager for Enterprise is deployed to your Azure subscription, the following steps
must be performed to initialize your installation of Nerdio Manager.
Note: If you wish to use Entra ID app registration or Split Identity, skip to "To initialize Nerdio
Manager (Entra ID app registration or Split Identity): " on the next page.
To initialize Nerdio Manager (Typical):
28

1. Sign in to Azure as the Global Administrator and the subscription Owner.
2. Select the copy button to copy the command.
3.
Select Launch Azure Cloud Shell.
4.
If required, select PowerShell (not Bash) and create a storage account for the shell history.
5.
Paste the PowerShell command and press Enter.
Note: Several commands flash by. The script should take about 10 minutes to run.
6. When the script completes, you are returned to the prompt. The message Deployment
completed successfully is displayed.
7. Select the URL in the confirmation message. Alternatively, return to the open tab in the
browser and refresh the page. You are now ready for the next phase of the installation
process-- "Configure Nerdio Manager Settings" on the next page.
To initialize Nerdio Manager (Entra ID app registration or Split Identity):
29

1. Sign in to Azure as the Global Administrator and the subscription Owner.
2.
Select Show advanced.
3. For Entra ID app registration:
l
Use existing Entra ID app registration: Select this option.
l
App ID: Type the App ID.
l
App Secret: Type the App secret.
l
Service Principal ID: Type the service principal ID.
4. For Split Identity:
l
Split Identity: Select this option.
l
Identity Tenant ID: Type the identity tenant ID.
5.
Select Download script (Az).
6. From your local machine, locate and run the downloaded script.
7. Select the URL in the confirmation message. Alternatively, return to the open tab in the
browser and refresh the page. You are now ready for the next phase of the installation
process.
Configure Nerdio Manager Settings
Nerdio Manager is now installed. The next step is to configure various application settings.
When you navigate to the URL, you see a window similar to this:
30

You already provided certain settings in the previous steps. Those settings are checked off, which
indicates they are completed. The settings that need your attention are unchecked. As you
complete a setting, the system automatically checks off that setting.
31

Note: You do not have to provide the settings all at once. You can safely return to this page at
any point. Your settings are retained and you won't need to enter the settings again. This page
is displayed every time your return to the URL of the app service until all the steps have been
completed.
To configure the Nerdio Manager settings:
1. In the Nerdio Manager registration section:
l
Select Click to register.
l
Enter your registration information.
l
Once you have entered all your registration information, select Register.
2. In the Network section:
l
Select none selected.
l
Resource Group: From the drop-down list, select the resource group.
l
Network: From the drop-down list, select the network.
l
Subnet: From the drop-down list, select the subnet.
l
Once you have entered all your VNet information, select OK.
3. In the Resource Group section:
Tip: By default, the same resource group contains both the Nerdio Manager resources
(for example, app services) and the AVD session host VMs. It is recommended that you
create a new resource group in the Azure portal and use it for the AVD session host
VMs.
l
Select the resource group name.
l
Resource group: From the drop- down list, select the resource group for the
32

AVD session host VMs.
l
Once you have selected the resource group, select OK.
4. In the Directory section:
Note: The Active Directory, Entra Domain Services, or native Entra ID user account
must have permission to create computer objects in the domain. Nerdio Manager uses
these credentials when joining computers to the domain.
In addition, when using Active Directory, the user account needs some extra
permissions to join Azure Files shares to the directory.
l
Select none selected.
l
Enter your Active Directory, Entra Domain Services, or native Entra ID information.
l
Once you have entered all the desired information, select OK.
5. In the File storage section:
Note: You can provide your FSLogix file storage information or a UNC path to an
existing file share accessible from the VNet. If you don't have a file share ready, select
the option to skip this step.
l
Select none selected.
l
Skip this step for now: Select this option to skip this step and configure the file
storage later.
l
Use Cloud Cache: Select this option to enable FSLogix Cloud Cache in the host
pools, and the session hosts within those host pools, that use this FSLogix profile.
Tip: For performance reasons, it is strongly recommended that you use Premium
SSD and Ephemeral OS disks when Cloud Cache is enabled. (Standard SSD
disks might be sufficient in very small environments or a testing scenarios.)
33

Note: See the following Microsoft document for more information about FSLogix
Cloud Cache.
Cloud Cache allows you to specify multiple profile storage locations. It
asynchronously replicates the profiles and makes the profiles available in multiple
storage locations at the same time. So, if one of the locations is not available, the
session host automatically fails over to one of the alternate locations.
l
Configure session hosts registry for Entra ID joined storage: Select this option to
enable Entra ID Kerberos functionality and Entra ID account credentials loading.
Note: See this Microsoft document for more information.
l
FSLogix Profiles path: From the drop-down list, select an Azure Files share or Azure
NetApp Files volumes. Alternatively, type in a UNC path.
Note: You can specify up to 4 paths. In addition, use the arrows to change the
order of the paths. The profiles are created in all of these locations.
l
Once you have entered all the desired information, select OK.
6. Optionally, in the Windows 365 Enterprise section:
l
Select Enable.
l
Review the prerequisites.
l
Enable Windows 365 License Optimization: Optionally, toggle this option on.
l
Select OK.
7. In the AVD Object Model section, from the drop-down list, select the appropriate option.
To complete the installation process:
34

1.
Once you have configured all the settings noted above, select Done.
2. Select the link that is provided.
3. Accept the consents.
4. Select the box on the previous page that is complete.
5.
Select OK.
Note: If there are any errors, please repeat the process. It sometimes takes several
minutes. You can retry it a few times until the consents are validated.
The installation is now complete, and you are ready to start using Nerdio Manager.
Nerdio Manager Edition Management
Nerdio Manager has two editions-- Core and Premium. The Nerdio Manager Premium edition
has all the features found in the Core edition, plus many others.
Please see our website for details about the features and pricing.
Warning: Downgrading from Premium to Core could result in loss of functionality. For
example, advanced cost optimization features are not supported in the Core edition.
Therefore, if a customer downgrades to Core, and they were making use of features such as
Azure Capacity Extender, these features are no longer available
Nerdio Manager allows you to change your edition at any time.
To change your edition of Nerdio Manager:
1. Navigate to Settings > Nerdio environment.
2. In the Product edition tile, select the Product edition name.
3. Review the confirmation pop-up.
35

Tip: When downgrading to Core, the confirmation pop-up displays a detailed list of the
functionality you lose access to. Be sure to review it carefully before proceeding.
4.
When you are ready to change your edition, select OK.
Your edition of Nerdio Manager is changed.
Note: Prior to version 6.0 of Nerdio Manager, customers could purchase either the
Standard or Premium editions of the product. The licensing options described above
only apply to new Nerdio Manager installations for version 6.0 and later.
Update the Nerdio Manager Application
Nerdio releases regular updates for Nerdio Manager, but it does not automatically update itself.
Instead, it gives version control to the administrators. There are several methods that can be used
to update Nerdio Manager to the latest version. Due to possible restrictions in some
environments, alternative methods may be required.
Nerdio Manager Updates FAQs
Will updating Nerdio Manager interrupt currently active sessions or kick
off users?
No. The update process only affects the Nerdio Manager App Service. User sessions are
handled by the AVD service, which is managed and hosted separately by Microsoft. The only
interruptions that occur affect the Nerdio management console. In addition, the auto- scale
automation is unable to perform actions during the update process. Auto-scale automation safely
continues automatically after the update process is completed.
How long does the update process take?
Using the Automation Account, the process generally takes ~3-7 minutes, as all actions are
performed in Azure. When done manually, using the standalone installer through PowerShell, this
36

time is affected by local variables such as the internet connection and client machine's hardware.
The data files are roughly 120-160MB in size.
It may take several minutes for Nerdio Manager to complete processing background updates and
the portal to be available again after the update has been successfully applied.
Can I skip over versions when updating?
Yes. All updates are cumulative, and it is recommended that you skip intermediate versions and
go directly to the latest Generally Available release. For example, you can update directly from
2.2.0 to 2.10.1.
Can I rollback to a previous version?
Starting with version 6.3, you can rollback to a previous version, but you can only rollback to 6.2
or later. For example, 6.4 can be rolled back to 6.3 or 6.2, but not earlier. See "Rollback to a
Previous Version " on page 44for details.
Method 1: Deploy Button
The simplest method for updating Nerdio Manager is to use the Deploy button.
Note: This process must be done as a user with Contributor or Automation Operator rights to
the Azure automation account deployed by Nerdio Manager.
To update using the Deploy button:
1. Navigate to Updates.
2. Locate the latest version and select Deploy.
3. Monitor the Azure automation job, under the Output tab, and watch until the Status is
reported as Completed.
Method 2: Use Azure Cloud Shell (v2.10+)
You may use Azure Cloud Shell to update Nerdio Manager.
37

Note: This process must be done as a user with Contributor rights to the Nerdio Manager App
Service.
To update using Azure Cloud Shell:
1. Navigate to Updates.
2. Locate the latest version and from the action menu select Azure Cloud Shell.
3.
Select the copy script icon to copy the script to the clipboard.
4.
Select Launch Azure Cloud Shell.
5. In Azure Cloud Shell, paste the script and press Enter.
6. When the script completes, refresh the Updates page.
Method 3: Standalone PowerShell Update
You may use PowerShell to update Nerdio Manager.
Note: This process must be done as a user with Contributor rights to Nerdio Manager’s
deployment resource group.
To update using PowerShell:
38

1. Navigate to Updates.
2. Locate the latest version and from the action menu select Download Installer.
The installer is downloaded as a zip file to your browser's default download folder.
3. Right-click on the downloaded zip file and select Properties.
4.
At the bottom of the General tab, select Unblock and then select OK.
5. Extract the zip file to a location on the C: drive.
6. Open PowerShell.
7. Change the directory to the folder with the extracted installer.
8. Run DeployUpdate.ps1 and follow the instructions.
9. When the install completes, refresh the Updates page.
Method 4: Manual "Zip Push" Deployment
You may use the Zip Push tool in the Azure portal to update Nerdio Manager.
Note: This process must be done as a user with Contributor rights to Nerdio Manager App
Service.
To update using manual "zip push" on the app service:
1. Navigate to Updates.
2. Locate the latest version and from the action menu select Download Installer.
The installer is downloaded as a zip file to your browser's default download folder.
3. Right-click on the downloaded zip file and select Properties.
4.
At the bottom of the General tab, select Unblock and then select OK.
5. Extract the zip file to a location on the C: drive.
6. Within the folder, locate the site.zip file.
39

Note: Do not extract or unzip the site.zip file.
7. In the Azure portal, find the nmw-app-xxxxxxx App Service(xxxxxxx is the unique ID).
8. Within the menu on the left- hand side of the App Service blade, scroll down to the
Development Tools section.
9. Select Advanced Tools.
10.
Select Go to open the Kudu service console.
11. In the top toolbar, select Tools > Zip Push Deploy.
40

12. In the file explorer dialog, drag the site.zip file obtained above into this folder.
Warning:
It is very important to only drag the site.zip file
. Do NOT drag the
package.standalone*.zip file because that causes Nerdio Manager to not run
successfully.
The file explorer dialog changes like this:
13. The lower section of the page updates to reflect the package uploading and deploying. Wait
until the final task shows "Deployment successful."
14. In the Azure portal, return to the App Service blade.,
15. On the left menu, scroll down to find WebJobs in the Settings section.
16. Select the Provision job and make sure that its status is Running. If it is Stopped, right-
click the job and select Start.
41

Note: If the WebJob named provision is missing, the wrong zip file was uploaded to
Nerdio Manager's app service. Verify and re-upload the site.zip file only (do not upload
the full package.standalone*.zip file).
17. Return to the Nerdio Manager site and refresh your browser to confirm the site is online and
accessible.
Method 5: Manual Azure Cloud Shell Deployment
You can use Azure Cloud Shell to update Nerdio Manager.
Note: This process must be done as a user with Contributor rights to Nerdio Manager App
Service.
To update using Azure Cloud Shell:
1. Open Azure Cloud Shell.
2. Customize and run the script below.
3. When the script finishes running, return to the Nerdio Manager site and refresh your
browser to confirm the site is online and accessible.
42

$sourceUri = "Obtain URL from Nerdio support (nme.support@getnerdio.com)"
$subscriptionId = "Your Subscription ID containing the NMW app service"
$resourceGroupName = "Resource Group name that contains NMW app service"
$webAppName = "WebApp Name (e.g. nwm-app-xxxxxxxxxxxx)"
$version = "App version to update to (e.g. 2.10.0)"
$webjobName = "Provision"
Set-PSDebug -Strict
$ErrorActionPreference = "stop"
Write-Output "Downloading package"
$folderName = (New-Guid).ToString()
$packageZipPath = Join-Path -Path $Home -ChildPath ($folderName + ".zip")
$packageDestPath = Join-Path -Path $Home -ChildPath ($folderName)
$packageDestVersionPath = Join-Path -Path $packageDestPath -ChildPath "version.txt"
$packageDestAppPath = Join-Path -Path $packageDestPath -ChildPath "app.zip"
Write-Output "Destanation: $packageZipPath"
Invoke-WebRequest -Uri $sourceUri -OutFile $packageZipPath
Expand-Archive -Path $packageZipPath -DestinationPath $packageDestPath
az account set -s $subscriptionId
az configure --defaults group=$resourceGroupName web=$webAppName
Write-Output "Stop web job"
az webapp webjob continuous stop --webjob-name $webjobName
Start-Sleep -Seconds 10
43

Write-Output "Stop web app"
az webapp stop
Start-Sleep -Seconds 10
Write-Output "Deploy package"
az webapp deployment source config-zip --src $packageDestAppPath
Start-Sleep -Seconds 10
Write-Output "Start web app"
az webapp start
Start-Sleep -Seconds 10
Write-Output "Start web job"
az webapp webjob continuous start --webjob-name $webjobName
Start-Sleep -Seconds 10
Write-Output "Remove temp files"
Remove-Item -Path $packageZipPath
Remove-Item -Path $packageDestPath -Recurse
Write- Output "Version $version completed successfully. Return to
https://$webAppName.azurewebsites.net and refresh the browser page."
Rollback to a Previous Version
Starting with version 6.3, you can rollback to a previous version, but you can only rollback to 6.2
or later. For example, 6.4 can be rolled back to 6.3 or 6.2, but not earlier.
To rollback to a previous version:
1. Navigate to Updates.
2. Locate the version you wish to rollback to and select Deploy.
44

3. Monitor the Azure automation job, under the Output tab, and watch until the Status is
reported as Completed.
Nerdio Manager Default Deployment Resources and
Costs
When you install the Nerdio Manager application from the Azure Marketplace, the following
resources are automatically created.
l
Automation Account
l
SQL Server and SQL Database (S1)
l
Application Insights
l
App Service Plan and App Service (B3)
l
Key Vault
The initial deployment is sized to accommodate thousands of AVD users. The SQL Database and
App Service have some Azure costs associated with them.
l
App Service (B3) - $219/month (list price)
l
SQL Database (S1) - $29/month (list price)
For small-scale pilot deployments, you can scale down the App Service as low as B1 ($55/month)
and SQL Database as small as B ($5/month). This can be done live in the Azure portal without
shutting down the application. However, keep in mind that this may have an impact on how
responsive Nerdio Manager might be with such small resource sizes.
For large deployments (10,000+ AVD users), you can increase the size of the SQL Database and
App Service.
45

Setup and Settings
This section contains topics that help you set up Nerdio Manager.
Harden Nerdio Manager
By restricting network traffic, Nerdio Manager can be hardened in the following areas:
l
Storage Accounts: These are used by both AVD and Nerdio Manager to store various
sorts of data. Most notably, storage accounts are used for holding end-user's FSLogix
Profiles, boot diagnostics, custom scripted actions, and MSIX app attach packages.
l
SQL: Nerdio Manager relies on communication between two Azure PaaS services: Azure
App Service and Azure SQL Database. By default, this communication is encrypted with
Transport Layer Security, and data at rest is also encrypted using Transparent Data
Encryption.
l
App Service: The entry point into the Nerdio Manager application is the App Service. By
default, the Nerdio Manager App Service is protected with Entra ID authentication,
including MFA and conditional access, and is accessible from any internet location.
l
Key Vaults: Key Vaults allow for the secure storage and access of secrets. These include
API keys, passwords, and certificates. SQL connectivity is also dependent on the key vault
due to this being the storage location for the SQL connection string.
Note: This topic discusses hardening Nerdio Manager using a script. You may manually
harden Nerdio Manager components. For details, see the following topics:
l
"Harden Azure Storage Account" on page 52
l
"Harden SQL" on page 56
l
"Harden App Service" on page 49
An Azure runbooks script is available to add private endpoints and service endpoints to allow the
Nerdio Manager app service to communicate with the SQL database and the Azure Key Vault
over a private network, with no traffic routed over the public internet. Access to the SQL database
and the Azure Key Vault is restricted to the private network.
46

Note: When enabling private endpoints, if the storage account that stores scripted actions is
made private, then Azure runbooks scripted actions stop working. The fix for this is to use the
Hybrid Worker option with scripted actions. The Hybrid Worker VM needs to be on a VNet that
has access to the storage account. If using the private endpoint script, that means the Hybrid
Worker VM needs to be on the peered VNet or the private endpoints VNet that the private
endpoint script creates.
Requirements
l
The App Service Plan, which is essentially the "performance tier" for the server that is
hosting the app, must support VNet integration. Please see this Microsoft article for details
on supported plans.
l
A virtual network (VNet) that can be used to connect to the App Service and the Storage
Account. This virtual network needs outbound access for Nerdio Manager to talk to Nerdio
licensing servers via HTTPS (TCP/443).
Warning: Variables specified in clear text are visible in the Azure Automation logs. To pass
sensitive data use Global Secure Variables. See "Scripted Actions Global Secure Variables"
on page 158 for details.
To harden Nerdio Manager:
1. Navigate to Scripted Actions > Azure runbooks.
2. Find the script Enable Private Endpoints.
3. From the action menu, select either Run now or Schedule.
4. Enter the following optional values:
47

l
PeerVnetId: Optionally, type the Resource ID for an existing network.
Note: This is the Resource ID of the VNet to peer to the private endpoint VNet.
Supplying a Resource ID for an existing network causes that network to be
peered to the new private network. Nerdio recommends against peering to other
production networks in hardened scenarios, unless (1) access to storage account
has been restricted, or (2) the app service has been configured as private.
l
StorageAccountResource: Optionally, type the storage account to be included in
private endpoint subnet.
Note: Access to this storage account is restricted to Nerdio Manager and peered
VNets. This parameter only accepts a single storage account, which should be an
Azure Files location.
l
MakeAppServicePrivate: Set to true to limit access to the Nerdio Manager
application.
Note: If set to true, only hosts on the VNet created by this script, or on peered
VNets, are able to access the app service URL.
5.
Once you have entered all the desired information, select Run now (not scheduled) or Save
& close (scheduled).
Nerdio Manager is Veracode verified
48

Harden App Service
Nerdio Manager consists of a number of PaaS services. The entry point into the Nerdio Manager
application is the App Service. By default, the Nerdio Manager app service is protected with
Entra ID authentication, including MFA and conditional access, and is accessible from any
internet location. It is possible to further protect the Nerdio Manager app service by using Access
Restrictions or enabling a Private Endpoint.
Note: Azure app services also have FTP services enabled by default. These can be fully
disabled for Nerdio Manager.
Requirements
To use VNet integration, in some instances, the App service plan must be Standard, Premium,
PremiumV2, or PremiumV3. Please note that some Basic plans support Vnet integration. See
this Microsoft article for details. In addition, see Upgrade the Azure App Service for upgrade
options.
Configure Access restrictions on the Nerdio Manager App Service
1. In the Azure portal, locate the Nerdio Manager App Service resource.
Note: It typically has a name in the following format: nmw-app-xxxxxxxxx.
2. Within the menu on the left-hand side of the App Service blade, scroll down to the Settings
section.
3. Select Networking.
Note: By default, the configuration is to allow all access.
4. In the Inbound Traffic section, select Access restriction.
5.
Select + Add.
49

6. Type the Name and Description of the new rule.
7. Ensure that Action is set to Allow.
8. Specify the source IP address block to allow access.
Note: This automatically adds a new "Deny All" rule to the list to prevent access from all
other locations.
9.
Select Add rule.
10. Once all rules have been applied, navigate to the nmw-app-*.scm.azurewebsites.net tab.
11. Select the Same restrictions as option to restrict access to the administrative console as
well.
After a few minutes, only whitelisted IP ranges are able to connect to the Nerdio Manager
application.
Create a Private Endpoint on the Nerdio Manager App Service
1. In the Azure portal, locate the Nerdio Manager App Service resource.
Note: It typically has a name in the following format: nmw-app-xxxxxxxxx.
2. Within the menu on the left-hand side of the App Service blade, scroll down to the Settings
section.
3. Select Networking.
4. In the Inbound Traffic section, select Add.
5. Type a custom Name for the private endpoint.
6. Choose the Subscription containing your VNet.
7. Select the VNet and Subnet where the private endpoint should be attached.
50

8. Optionally, depending on your VNet DNS configuration, you may be able to select the
option for Integrate with private DNS zone.
Notes:
l
Most customers specify custom DNS servers targeting their internal AD
environment, in which case this option may be disabled.
l
If Integrate with private DNS zone is not enabled, be sure that the DNS is
properly configured to resolve your private endpoint. See Azure Private Endpoint
DNS Configuration for details.
9.
Select OK to save the private endpoint.
After a few minutes, any connections to Nerdio Manager's app service routing to the public IP
addresses is rejected. Only connections that resolve your Nerdio Manager URL to the private
endpoint IP address succeed.
Disable FTP Services on the Nerdio Manager App Service
1. In the Azure portal, locate the Nerdio Manager App Service resource.
Note: It typically has a name in the following format: nmw-app-xxxxxxxxx.
2. Within the menu on the left-hand side of the App Service blade, scroll down to the Settings
section.
3. Select Configuration.
4. Navigate to the General settings tab.
5. On the FTP state selector, change the option from All allowed (default) to Disabled.
6.
Select Save.
FTP services are now disabled for Nerdio Manager's app service.
Related Topics
"Harden Nerdio Manager" on page 46
51

"Harden Azure Storage Account" below
"Harden SQL" on page 56
Harden Azure Storage Account
Storage Accounts are used by both AVD and Nerdio Manager to store various sorts of data. Most
notably, storage accounts are used for holding end user's FSLogix Profiles, boot diagnostics,
custom scripted actions, and MSIX app attach packages. This topic covers key steps and
important considerations when implementing tighter security for common scenarios using storage
accounts.
Requirements
l
The App Service Plan (essentially the "performance tier" for the server that is hosting the
App) needs to be upgraded from the default of Basic (B3), to Standard or Premium. This
means increased operating costs. See Upgrade the Azure App Service for details.
l
A virtual network (VNet) that can be used to connect the App Service and the Storage
Account. This virtual network also needs outbound access for Nerdio Manager to talk to the
Nerdio licensing servers via HTTPS (TCP/443). The licensing server URL is https://nwp-
web-app.azurewebsites.net/.
Warning: Without VNet integration, Nerdio Manager is unable to connect to a storage account
with network restrictions enabled. See this Microsoft article for more information.
Enable VNet Integration for Nerdio Manager's App Service
1. In the Azure portal, locate the Nerdio Manager App Service resource.
Note: It typically has a name in the following format: nmw-app-xxxxxxxxx.
2. Within the menu on the left-hand side of the App Service blade, scroll down to the Settings
section.
52

3. Select Networking.
4. In VNet Integration, select Click here to configure.
5. In VNet Configuration, select Add VNet.
6. Select the VNet you wish to use.
7.
Select OK.
Note: VNet integration requires a subnet delegated specifically for use with app
services. This cannot be shared with any other Azure resources. The subnet selected
for integration needs to be /28 or larger. It may be necessary to add an additional subnet
that is compatible for the integration if there are no unused subnets or subnets not
delegated for other services. In this example, there was already a VNet used for session
hosts, which still had unallocated IP address ranges within the address block, so a new
subnet was created specifically for the app service VNet integration.
When the VNet is successfully integrated, the page should look something like this:
53

Harden the Storage Account
Warning: Incorrectly implementing this restriction can cause session hosts to lose access to
FSLogix profiles, user data, MSIX apps, software data, etc. Be sure to take these new network
restrictions into consideration before proceeding.
1. In the Azure portal, navigate Storage accounts.
2. Locate and select the storage account you wish to harden.
3. Within the menu on the left-hand side of the Storage accounts blade, scroll down to the
Security + networking section.
4. Select Networking.
54

5. In the Firewalls and virtual networks tab, enter the following:
l
Allow access from: Select Selected networks.
l
Select + Add existing virtual network.
l
Virtual networks: From the drop-down list, select the VNet(s) and Subnets you wish
to use.
Note: If the storage account contains user profiles, be sure to link all subnet(s)
containing AVD session hosts, to ensure FSLogix can mount the user profiles
successfully.
l
Select Enable.
Note: If you receive a message like this, that means it will take time for the
changes to fully take effect. This is normal and expected.
6.
Once you have entered all the desired information, select Save.
7. In Nerdio Manager, refresh the console and check the storage account locations.
Alternatively, attempt to perform an action that previously led to an error due to improper
storage account restrictions, such as linking an MSIX App Attach storage location or
enabling storage auto-scaling.
Related Topics
"Harden Nerdio Manager" on page 46
"Harden App Service" on page 49
"Harden SQL" on the next page
55

Harden SQL
Nerdio Manager relies on communication between two Azure PaaS services: Azure App Service
and Azure SQL Database. By default, this communication is encrypted with Transport Layer
Security, and data at rest is also encrypted using Transparent Data Encryption.
In order to further protect communication between the App Service instance and the SQL
database, it is possible to restrict network traffic in two different ways, as detailed in this article.
l
Add the App Service’s Outbound IP addresses to the Azure SQL Server’s firewall. This
method ensures that only requests from your Nerdio Manager instance’s IPs are able to
reach the server. However, the Azure App Service is hosted on shared infrastructure. Any
other App Services deployed to the same cluster as Nerdio Manager shares the same
outbound IPs.
Note: IP addresses associated with the app service cluster may change or update over
time. It may be required to periodically update the firewall with any changes to cluster IP
addresses. We recommend using VNet and Subnet whitelisting to avoid this
inconvenience.
l
Route traffic from the App Service using a VNet. Create an Azure SQL service endpoint
in the VNet. Traffic to the SQL Server can then be restricted to allow only traffic coming
from the VNet.
Restrict SQL Traffic to App Service Outbound IPs
In order to restrict SQL traffic to the App Service's IP addresses, we first must discover the IPs the
app is using.
1. Optionally, run the following PowerShell or CloudShell command:
Login-AzAccount
(Get- AzWebApp - ResourceGroup <group_ name> - name <app_
name>).OutboundIpAddresses
56

This returns several IPs associated with your Nerdio Manager App Service. Outbound
requests might come from any of the IPs shown.
2. In Azure portal, search for SQL Servers, and find the nmw-app-sql-* server.
3. Within the menu on the left-hand side of the SQL Server blade, scroll down to the Security
section.
4. Select Networking.
5. In the Public access tab, enter the following information:
l
Select Selected networks. (default option)
l
Enter a rule for each IP address associated with your App Service.
l
Unselect Allow Azure services and resources to access this server.
6.
Once you have entered all the IPs, select Save.
Traffic to the SQL Server is now restricted to these addresses.
Routing App Service Traffic through a VNet
If restricting traffic to your App Service's outbound IPs is not adequate for your security needs,
you can route all App Service traffic through a VNet, and restrict SQL traffic to that VNet.
Notes:
l
VNet integration requires the App Service to be a Standard plan or higher. See Upgrade
the Azure App Service for details.
l
An existing or new VNet may be used for the VNet integration.
Enable VNet Integration for Nerdio Manager's App Service
See "Enable VNet Integration for Nerdio Manager's App Service" on page 52 for details.
Harden the SQL Server
57

1. In Azure portal, search for SQL Servers, and find the nmw-app-sql-* server.
2. Within the menu on the left-hand side of the SQL Server blade, scroll down to the Security
section.
3. Select Networking.
4. In the Public access tab, enter the following information:
l
Select Selected networks. (default option)
l
Add the desired Virtual networks and Firewall rules.
l
Unselect Allow Azure services and resources to access this server.
5.
Once you have entered all the desired information, select Save.
Traffic from the Nerdio Manager App Service is now routed through your virtual network to
the SQL Server service endpoint. Only traffic from your virtual network is allowed to
connect to the database.
Related Topics
"Harden Nerdio Manager" on page 46
"Harden App Service" on page 49
"Harden Azure Storage Account" on page 52
Back Up and Restore Nerdio Manager Configuration
This topic discusses how to back up and restore the Nerdio Manager configuration.
Nerdio Manager is an Azure application consisting of several PaaS services. When backing up
Nerdio Manager, the following components should be considered:
l
Azure Key Vault: This contains service principal secrets and AD domain joiner user
account passwords. The contents of the Key Vault are fairly static and do not need to be
backed up on a regular basis.
l
Azure SQL Database: This contains auto-scale configuration (for example, scheduling),
logs, and auto-scale history data. The relevant contents of the database change when
auto-scale settings are modified. A recurring backup is recommended.
58

l
Azure App Service: This runs the Nerdio Manager application and does not contain actual
data beyond the application binaries. The contents of the app service change when the
application is upgraded to the latest version.
Tip: The recommended method for backing up Nerdio Manager is to enable App Service
backups and directly retrieve contents of the Key Vault used by Nerdio Manager to a .zip file.
SQL database backups are automatically included with the App service backups. Otherwise,
you need to perform the procedures described below.
Prerequisites
Scripts Download:
l
Select this link to download the zip file that contains the scripts used in the steps below.
Once you download the zip file, unzip it on your local computer.
Azure:
l
The app service plan must be a Standard or Premium one (for example, S3 or P2V2)
because only standard and premium plans support the built- in Back Up and Restore
functionality. By default, Nerdio Manager is deployed using a Basic plan (B3), which does
not support backups.
l
A non-guest account with at least Contributor role permissions on the Key Vault, which can
be inherited from the subscription the Key Vault is tied to.
l
A storage account used by the app-service-backup.ps1 script needs to be created.
l
If the SQL Server has been hardened (limiting network access to known VNets & IPs only),
all IP addresses associated with the app service cluster must be added as permitted IPs on
the SQL Server firewall (associated IP addresses are displayed under the Networking tab
of the app service). Otherwise, the backup services for the app service are unable to
connect to the SQL server and save the backup successfully.
l
App service backups occur in the app service cluster, and do not use any configured
private endpoints or VNet integration.
59

Local System:
l
PowerShell 6.2.4 or PowerShell 5.1 for Windows
l
The entire Azure PowerShell Module "Az", or individual modules "Az.Accounts",
"Az.KeyVault", "Az.Resources", "Az.Storage", and "Az.Websites". See this MS Doc
for details
l
.Net Framework 4.7.2 or better
App Service and SQL DB Backup
The following procedure backs up the App Service and SQL database.
To back up the App Service and SQL database:
1. Locate the downloaded script app-service-backup.ps1 on your local computer.
2. Obtain the following values:
l
Azure Subscription ID: Nerdio Manager > Settings >Azure environment > Azure
subscriptions tile.
Note: Both the app service and backup storage account should be located in the
same Azure subscription.
l
App Service Resource Group Name: Nerdio Manager > Settings >Azure
environment > Linked resource groups tile.
l
App Service Name: Azure portal > Resource groups > Look up the name.
l
Storage Account Resource Group: Azure portal > Resource groups > Look up the
name.
Note: This can be the same as the app service resource group.
l
Storage Account Name: Azure portal > Resource groups > Look up the name.
60

3. On your local computer, run the script app-service-backup.ps1 and supply the values as
requested.
Note: When prompted for a sign in, supply an account with permissions to the app
service and storage account. A user with Contributor permissions on the subscription is
recommended.
4. After script execution, backups of the app service and SQL database are performed
automatically daily with a retention of 10 days.
Note: By default, the script sets a retention period of 10 days and occurs every day at
the time you ran the script. This can be changed by navigating to the Backups blade
under settings in the App Service portal and selecting Configure. Ensure the SQL
connection string is present before selecting Save. If the value is missing, it can be
retrieved from the Key Vault provisioned by Nerdio, under the name 'ConnectionStrings-
-DefaultConnection'.
61

62

Key Vault Backup
The Key Vault is backed up using a PowerShell script that retrieves the secrets and certificates
stored in the Key Vault and saves the contents to a local zip file named keyvault-backup.zip in
the same directory the script is run in. The contents of the zip file are encrypted and can only be
decrypted in Azure.
To back up the Key Vault:
1. Locate the downloaded script key-vault-backup.ps1 on your local computer.
2. Obtain the following values:
l
Azure Subscription ID: Nerdio Manager > Settings >Azure environment > Azure
subscriptions tile.
63

l
Key Vault Name: Azure portal > Look up the name.
3. On your local computer, run the script key-vault-backup.ps1 and supply the values as
requested.
Note: When prompted for a sign in, supply an non-guest account with Access policies
and permissions for the Key Vault. A user with Owner role is recommended.
4. After script execution, the backup file keyvault-backup.zip is present in the directory.
Note: Be sure to save the backup file (keyvault-backup.zip) to be used in a future
restore, if needed.
App Service Restore
Restoring the App Service can be done using the portal option within the App Service, or using
the files stored in the storage account under the blob container nmw-backup.
See these articles for additional details:
l
Restore an app in Azure.
l
Restore deleted App Service app Using PowerShell
Key Vault Restore
The following procedure restores the Key Vault from a backup.
To restore the Key Vault from a backup:
1. Locate the downloaded script key-vault-restore.ps1 on your local computer.
2. Move the key-vault-restore.ps1 script to the same directory as the keyvault-backup.zip file.
3. Run the script key-vault-restore.ps1.
64

Note: The script only restores secrets and certificates that do not exist. If they have
been deleted, but not purged, you receive a conflict error from the script. When restoring
to a key vault with existing values, those values are not be overwritten.
Note: Old secrets can be restored manually from the portal by selecting the "Older Versions"
of the secret. This is useful if a specific value has been changed and needs to be reverted,
such as the password used by the AD account.
65

Alerts and Notifications
Nerdio Manager Notifications allow you to define rules to generate email alerts based on various
conditions and actions, such as failed tasks, auto-scale actions, or role changes. Select whom to
notify based on tasks, statuses, resources, etc. Notifications are defined by a condition and a
corresponding action or actions to be triggered when the condition occurs.
Note: You must enable email notifications before you start to configure conditions and actions.
See Configure Email Notifications for details.
Create a New Condition
Conditions allow you to specify which actions or states will trigger a notification.
To create a new condition:
1. Navigate to Notifications > Conditions.
2.
Select Add.
3. Enter the following information:
66

l
Name: Type the name of the condition.
Note: You need to specify this name when creating a corresponding notification
action.
l
Targets: From the drop-down list, select the target(s).
Note: The targets can include all tenants or workspaces, or they can be confined
to a specific tenant or workspace, or a single host pool.
l
Tasks: From the drop-down list, select the task(s).
Note: These are the action or actions that are evaluated. Examples include Add
host, Disconnect user session, Stop VM, etc.
l
Run By (User): From the drop-down list, select the interactive user(s) or background
process(es) that triggered the task.
l
Statuses: From the drop-down list, select the status(es) (for example, completed,
error, or canceled) that this condition should match.
l
Exclusion Keywords: Type the exclusion keyword (s) to be used to suppress
notifications that contain these keyword(s).
Note: The keywords help to detect and suppress false positives.
4.
Once you have entered the desired information, select OK.
The condition is created.
Note: From the Notifications Conditions page, you may edit or delete conditions.
67

Examples of Conditions
Auto-scale errors: This condition triggers when any task started by the Auto-scale User results in
an error.
Role Changes: This condition triggers when any changes are made to user roles.
68

Failed Desktop Image Creation: This condition triggers when either the "Power off & set as
image" or the "Update 'set as image' schedule configuration" tasks end in an error.
69

Create a New Action
Actions are the .notifications to send out if a condition is matched.
To create a new action:
1. Navigate to Notifications > Actions.
2.
Select Add.
3. Enter the following information:
l
Conditions: From the drop-down list, select the conditions(s) to match.
l
Include task detail: Select this option to include the task detail in the body of the
email and attach it as a JSON file.
l
Send emails on event: Toggle this option On to send emails on event.
70

l
Send From: From the drop-down list, select a linked email address that is used
to send the notification.
Note: Only linked mailboxes in are displayed. See Configure Email
Notifications for details.
l
Send To: Type the email address(es) to send the notifications to.
Note: Multiple emails can be specified separated by commas.
l
Trigger webhook on event: Toggle this option On to trigger a webhook on event.
Note: See Configure Microsoft Teams Notifications Using Webhooks for details
about configuring webhooks.
l
Webhook: From the drop- down list, select the webhook to send the
notifications to.
4.
Once you have entered the desired information, select OK.
The action is created.
Note: From the Notifications Actions page, you may edit, deactivate, or delete actions.
Configure Azure Monitor Alerts for AVD Resources
Azure Monitor is a comprehensive native monitoring solution that can be utilized to send alerts for
given parameters. See this Microsoft article for details.
Of the many capabilities Azure Monitor possesses, AVD administrators and engineers are most
interested in its ability to monitor session host VMs, storage accounts, and other resources used
by Nerdio Manager and AVD. While Nerdio Manager does not incorporate alert functionality, it is
possible to construct custom Azure monitor alerts to achieve the same desired effect.
The following table shows some examples of Azure monitoring.
71
Area to Monitor Azure Signal Description
Session Host VMs Data IOPS This is a common issue with some VM sizes
because the VM disk bandwidth is too low,
and loading a large FSLogix profile causes
long sign in times. By monitoring for this, you
can determine if you have under-provisioned
the session host VMs.
Storage Account
Metrics (FSLogix
Profiles and
AppAttach)
Used Capacity You can set a GB size threshold that is near
the quota.
Note: In most cases the quota is created to an
excessively large size as IOPS performance is
tied to file share quota size. This alert is not
useful for these situations. However for cost-
savings or smaller environments, a small
quota or standard-tier may be provisioned.
For example, set the threshold to 2 GB (make
sure to select the correct value under "Unit",
default is GB, not GiB). The granularity and
frequency of evaluation can be set as desired.
SQL Databases
(Nerdio
ManagerApp
Backend)
DTU Percentage SQL databases can be monitored as well. For
some operations, such as viewing auto-scale
history, a large amount of logs may be queried
and parsed, causing a large demand for
DTUs.
SQL tends to be notoriously tricky to evaluate
in terms of performance. However, this
monitoring should suffice to detect a
significant throttling of DTUs which affects
Nerdio Manager's functionality, and can
manifest itself in errors such as "Execution
72

Area to Monitor Azure Signal Description
Timeout Expired."
App Service (Nerdio
Manager
Application)
N/A See "To create a Service Health Alert" on the
next page below.
To create an Alert Rule:
1. In the Azure portal, navigate to Virtual machines.
2. Select the VM you wish to work with.
3. On the blade on the left side, in the Monitoring section, select Alerts.
4. Select + Create > Alert rule.
5. Enter the following information in the following tabs:
l
Scope: Select the scope.
Note: When creating Alert rules, you can select multiple resources of the same
type. For example, you may want to select all VMs in this resource group. Doing
so means the alerting does not need to be enabled on each VM individually. This
is entirely up to your discretion.
l
Condition: Select the condition to monitor. See the table above.
Note: After selecting the specific value to be measured, you are then prompted for
additional parameters. These settings need to be adjusted depending on your
specific situation. See this Microsoft article for details.
l
Actions: Select the actions to take. For example, you can create a simple email
notification.
73

Note: If no action groups have been previously created, you can do that now. See
this Microsoft article for details.
l
Details: Enter the Alert rule name, description, etc.
Note: Severity is up to your preference, as it is used to sort alerts from the Alerts
panel. See this Microsoft article for details.
l
Review + create: Review the information and select Create.
The Alert Rule is created.
To create a Service Health Alert
1. In the Azure portal, navigate to Service Health.
2. Select + Add service health alert.
3. Enter the Conditions, Actions, and Alert rule details as desired.
4.
Once you have entered all the required information, select Create alert rule.
Resource Selection Rules Management
Nerdio Manager allows you to create recommendation and filtering rules to assist with the
selection of VM sizes and OS disks when creating host pools or adding session host VMs.
Resource selection rules can be used to suggest the best VM for a specific AVD use-case, while
taking into account core availability. They can also be used to limit the types of VMs and OS disks
that can be used globally in a workspace, or even at the host pool level.
The VMs can be filtered based on vCPU availability in a selected subscription and region,
processor, VM family & version, number of cores & GB of RAM, and local temp storage. OS disks
can be filtered based on storage type (premium, standard, SSD, HDD, or Ephemeral) and disk
size.
For example, when adding dynamic host pool, you can filter the VM Size or OS Disk choices by
selecting the desired Resource Selection Rule(s).
74

Create a Resource Selection Rule
A resource selection rule must be created in order to use it for recommendations and filtering.
To create a resource selection rule:
1. Navigate to Settings > Resources rules.
2. Select Add.
3. Enter the following information:
l
Name: Type the rule's name.
l
Description: Type the rule's description.
l
Scope: From the drop-down list, select the scope of the rule.
75

Notes:
l
Show if no explicit rules: Display this rule's selection in all VM size and OS
disk drop-down lists unless a rule with an explicit scope applies.
l
Show everywhere: Display this rule's selections in all VM size and OS disk
drop-down lists.
l
Desktop images: Display this rule's selections when working with VMs on
the Desktop Images page.
l
Temporary VMs: Display this rule's selections when working with
temporary VMs.
l
Individual Workspace or Host Pool: Only display this rule's selections for
the selected workspace(s) or host pool(s).
l
Show costs: From the drop-down list, select Yes to display the monthly cost, instead
of the size tier, in the VM Size drop-down list.
Note: This only applies if this rule is the top selected one.
l
Selected by Default: From the drop-down list, select Yes to automatically check this
rule when opening any drop-down selection list where this rule applies. Select No
and this rule is not automatically checked.
l
VM Size Drop- Down Selection Rules: Toggle to define the VM size rules for
filtering.
l
Processor: From the drop-down list, select the processor manufacturer.
l
VM Family Version: From the drop-down list, select the VM family version(s).
l
VM Family Type: From the drop-down list, select the individual VM families or
use-case optimized VM families.
l
Exclude VM Type: From the drop-down list, select the excluded individual VM
families.
76

l
CPU Cores: From the drop-down list, select the number of CPU cores.
Note: All VMs that match the number of cores, or fall out in between the
selection and next power of 2, are displayed. For example, selecting 4
cores matches VMs with 4 and 6 cores.
l
RAM (GB): From the drop-down list, select the size of the RAM.
Note: All VMs that match the size of the RAM, or fall out in between the
selection and next power of 2, are displayed. For example, selecting 4 GB
RAM matches VMs with 4 and 6 GB of RAM.
l
Local Storage: From the drop- down list, select whether the VMs have
temporary local storage.
Note:
l
Yes: Filter for VMs with local temporary storage.
l
No: Filter for VMs without local temporary storage.
l
VM Availability: From the drop-down list, select the availability type.
Note:
l
Based on subscription & region only: Do not validate core quota
allocation. Only ensure that the VM type is available in the selected
subscription and region.
l
Based on CPU core quota: Dynamically validate that there is
sufficient core quota available in the selected subscription and region
and only display those VMs that can be deployed.
l
Sort By: From the drop-down list, select the sort criteria.
77

Note: Alphabetical is a stand-alone sort criteria. The other options can be
combined.
l
Disk Size Drop- Down Selection Rules: Toggle to define the disk size rules for
filtering.
l
Storage Type: From the drop-down list, select the storage type(s).
l
OS Disk Size: From the drop-down list, select the disk size(s).
Note: For Ephemeral OS disks, the disk size may not match the exact
selection. In such cases, the EOSD sizes that fall out in between the
selection and the next power of 2 are displayed. For example, selecting 64
GB matches EOSD of 75 GB.
4.
Once you have entered all the desired information, select OK.
The resource selection rule is created.
Manage Resource Selection Rules
From the Resource Selection Rules table, you can do the following:
l
Edit: Edit the rule.
Note: Built-in rules cannot be edited. You need to copy the rule and edit the copy.
l
Clone: Create a copy of the rule.
l
Disable: Disable the rule.
Note: Disabled rules are not displayed on any drop-down selection lists.
l
Enable: Enable a disabled rule.
78

l
Delete: Delete the rule.
l
Change the Order: Move the bands up and down as desired.
Note: This is the order the selections are shown in the drop-down boxes when creating
a host pool or session host VM.
Manage Schedules for Tasks
Nerdio Manager supports the ability to configure schedules for tasks.
The schedule can contain one or multiple entries, as shown in these examples:
l
You can create a schedule to power off a host today at 18:00.
l
You can create a schedule to run the same scripted action on a host pool on Monday at
7:00 AM, Tuesday at 9:00 PM, and Sunday at 3:00 AM.
l
You can create a schedule to restart hosts Monday and Thursday at 23:00 and have it recur
every week.
Some of the functions that allow for multiple-entry schedules are:
l
Desktop Images: Run scripted action
l
Scripted Actions: Run Azure Runbook
l
Host Pools: Resize or re-image, Power on/off, Restart hosts, Send message, Log off all
hosts, Activate/Deactivate hosts, Run scripted action
l
Session Hosts (Excluding hybrid): Resize or re-image, Power on/off, Restart hosts, Send
message, Activate/Deactivate hosts, Run scripted action
l
Advisor: Resize session host, Resize host pool
Create Multiple Schedules for a Task
Nerdio Manager allows you to create multiple schedules for a number of tasks.
To create multiple schedules for a task:
79

1. Navigate to the task you wish to perform.
Note: In this example, we are restarting a session host. As noted above, multiple
schedules can be created for a number of tasks.
2. Select the Schedule tab.
3. In the Schedule section, enter the desired schedule.
80

l
Start Date: Type the date to start.
l
Time Zone: From the drop-down list, select the time zone for the Start time.
l
Start Time: From the drop-down lists, select the time to start.
l
Repeat: From the drop-down list, select whether to run this operation once or repeat
it on a recurring schedule.
Note: The drop-down has the option After Patch Tuesday. This allows you to
create a recurring schedule based on Patch Tuesday.
l
Day of Week: From the drop-down list, select the day for the recurring schedule.
l
Days After: If you selected After Patch Tuesday, type the number of days after
Patch Tuesday to run the scheduled task.
4.
Once you have entered the schedule, select Save.
Schedule 1 is added to the task.
5. If you want to add additional entries, at the top, to the right of Schedule, select the Add
Schedule icon.
6. Add and save the next schedule, and repeat for all the desired schedule entries.
Manage Task Schedules
Nerdio Manager allows you to manage task schedules. This includes changing and deleting
schedule entries.
81

To manage task schedules:
1. Navigate to the task with the schedule that you wish to work with.
2.
On the list (for example, hosts, host pools, etc.), select the Schedule icon.
3. In the schedule list, select the schedule you wish to work with.
4. Change or remove the schedule entry as desired.
5. Alternatively, open the task (for example, restart a session host) and in the Schedule tab,
from the drop-down list, select the schedule entry you wish to change or remove.
6.
Once you have made the desired changes, select Save.
82

UI Overview
Nerdio Manager's UI is feature rich and customizable.
Time Zone
Nerdio Manager displays all date and time information in your local time zone as indicated by
your browser. Please check your browser settings or your personal device settings if the time
zone in Nerdio Manager seems incorrect.
Menu
Select the Menu icon to expand and collapse the main menu.
Help
Select the Help icon to display the Nerdio Manager help center.
Breadcrumbs
You can select anywhere on the breadcrumbs to return to an earlier page in your navigation flow.
For example:
Table Footer
Many tables have footers that allow you to quickly navigate through the table and set the page
size. In addition, some tables show the total number of rows in the table.
83
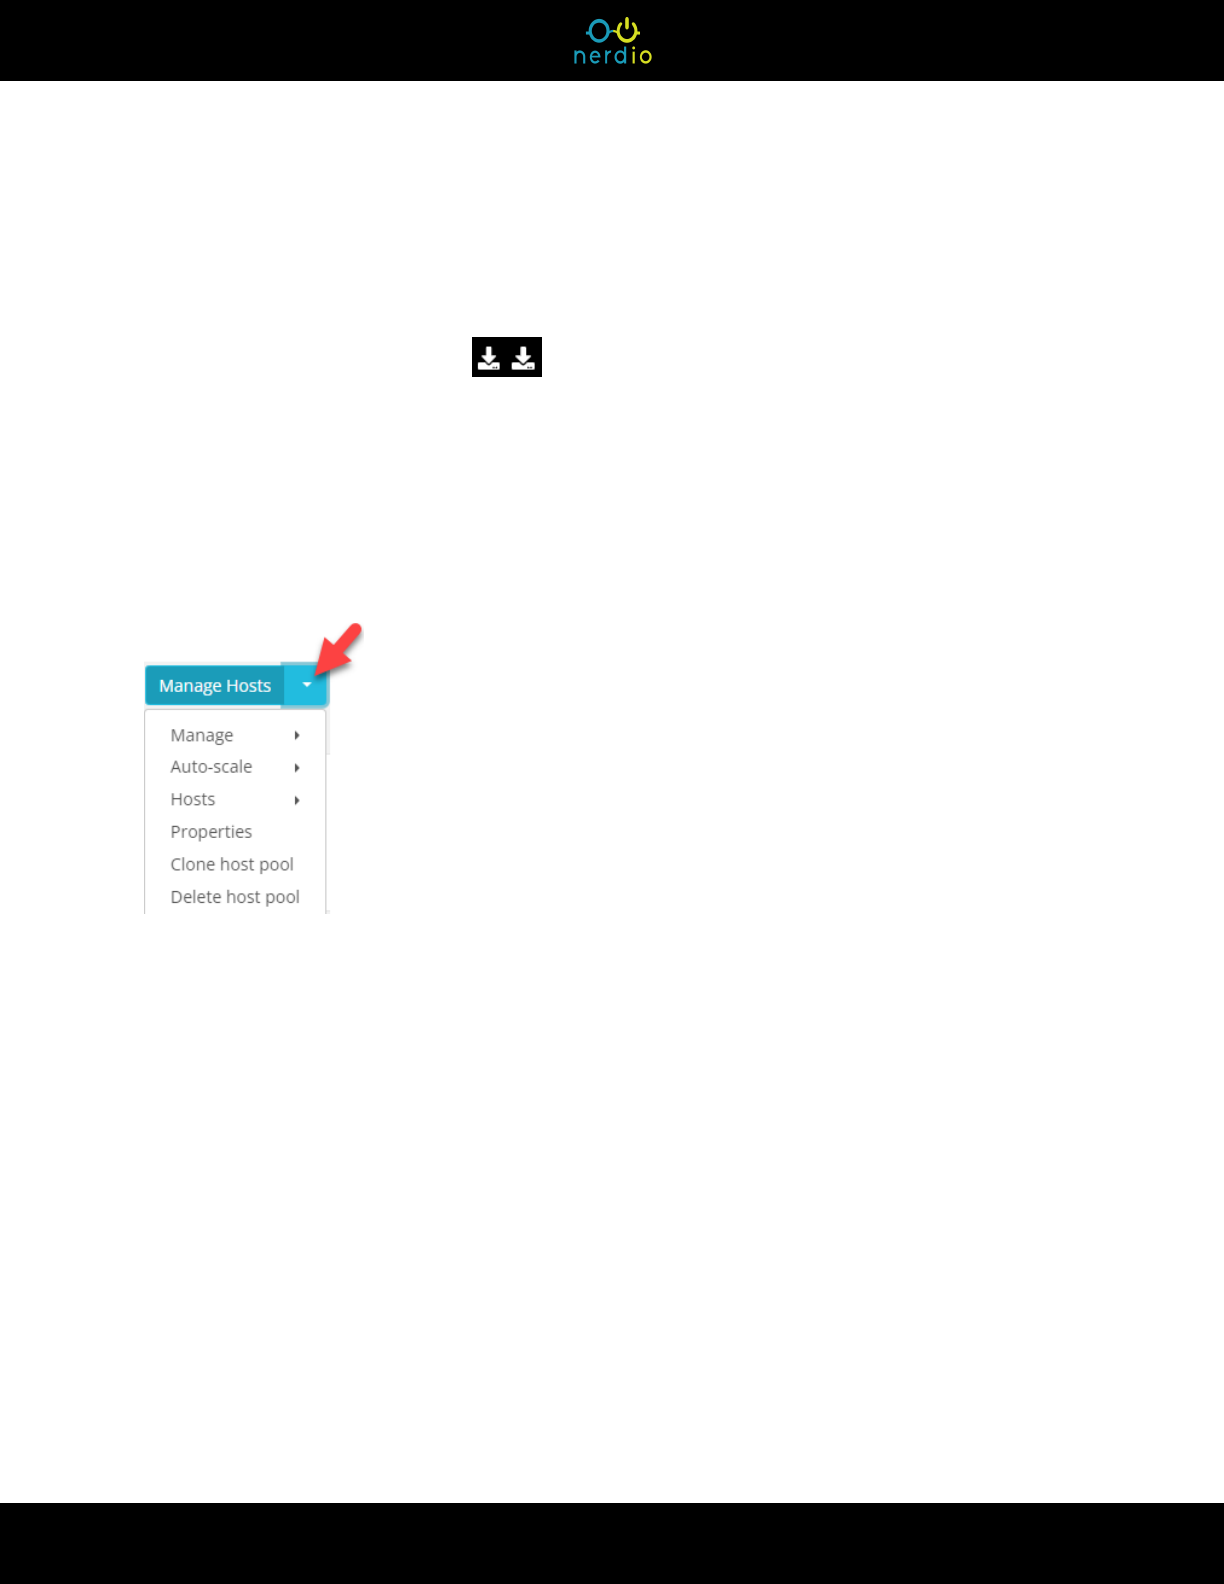
Tasks
The Tasks section displays a log of the tasks related to the page in reverse chronological order.
For example, the Workspaces page displays the log of the tasks performed on the Workspaces.
Select either of the export buttons to export the tasks table in JSON or CSV format.
See "Logs Module" on page 326 for details.
Action Menu
Several pages have an Action Menu on each row in the table. For example, the Dynamic Host
Pools page, select the down arrow to view the Action Menu.
Global Search Bar
At the top of every page, the Global Search bar allows you to search for resources, objects, and
settings, and to quickly navigate to your desired location.
84

Search and Filter
Many pages have search and filter features that allow you to quickly find the information you are
looking for. For example, the Session Hosts page can be searched and filtered as follows:
85

Notes:
l
Select the search/filter display toggle icons to toggle the search/filter section of
the page on or off.
l
Use built-in search field on all pages to filter items displayed in the table. For example,
you can find hosts using a specific image. The search matches are highlighted.
l
You can search for “not contains” strings. For example, you can search for hosts that
don not contain “avd” in the name by searching for “-avd”.
Refresh
Select the Refresh icon to refresh the table that is displayed.
Tool Tip
Select the Tool Tip icon to see a pop-up window with valuable information about the field the
tool tip is associated with.
Sort a Table
In a table column header, select the Sort icon to sort the table in ascending or descending
order by that column.
Add New
Where applicable, select the Add New icon to add a new item. For example, to add a new
session host or a new provisioning policy.
Display Last Login Date
Where applicable, you can display the last login for session host VMs or user sessions. In the
upper right corner, select the Add Last User Login column button.
86

Custom Views
Nerdio Manager allows administrators to create custom views that best represents their
workflows. Multiple views can be created and one of the views can be designated as the default
view.
For example, if you manage host pools across several Workspaces, there is no need to keep
jumping back to the Workspaces list to switch from one Workspace to the next to work with all the
host pools. With custom views, you can combine similar data on a single page across the
environment.
See "Create a Custom View" on page 89 for details.
Custom Views based on an Existing Page
Nerdio Manager allows administrators to create a custom view from an existing page. For
example, you may be viewing a filtered list of host pools and you want to save the page as a
custom view.
See "Create a Custom View from an Existing Page" on page 94 for details.
Individualize Your UI Themes
Nerdio Manager allows you to individualize your UI themes.
See "Individualize Your UI Themes" on page 89 for details.
Summary Dashboard
Nerdio Manager's Summary Dashboard displays summary information about usage and savings
in all the workspaces or AVD tenants. The Summary Dashboard allows you to view the summary
information, drill down to view details, and export usage and savings data in a CSV file.
To view the summary dashboard:
87

1. Navigate to Dashboard.
2. Select either All workspaces or All AVD tenants.
3. In Time Range, select the desired time range to display.
The following information is displayed:
l
Auto-Scale Savings: This is the savings from auto-scaling over the selected period of time.
The costs are based on Azure pay-as-you-go list prices. Static host pool information is not
included.
l
Savings: Select the information icon to see host pool, file share, and NetApp Files
savings information.
l
Named user cost: This is the projected per-named user monthly cost taking into
account the auto-scale savings. This is based on Azure pay-as-you-go list prices.
l
Concurrent user cost: This is the projected per-concurrent user monthly cost taking
into the account auto-scale savings. This is based on Azure pay- as-you-go list
prices.
l
Monthly active user cost: This is the calculated active user monthly cost taking into
account auto-scale savings. This is based on Azure pay-as-you-go list prices. Static
host pool information is not included.
l
Current Host Pools Counts: This is a summary of the host pools and session hosts,
broken down by the type of desktop experience.
l
Hover: You can hover over any part of any graph to see its details. For example:
l
Select any point on any graph to display the Usage Details window. These are the
details for the Workspaces or Tenants at the selected point in time.
l
Select Export details to export a usage details CSV file to your browser's default
download folder.
88

l
Select export: At the bottom of the dashboard, select Select export to export the desired
report as a CSV file into your browser's default download folder.
Individualize Your UI Themes
Nerdio Manager allows you to individualize your UI themes.
Note: Prior to version 3.2, this was a global setting and any themes that were created prior to
version 3.2 stay exactly as is. Starting with version 3.2, any changes to the themes only apply
to the individual user.
To individualize your UI themes:
1. Navigate to Settings > Theme.
2. Enter the following information:
l
Enable personal theme: Select this option to allow users to create personal,
customized themes. Unselect this option to force a global UI theme for all users as
defined by an administrator and prohibit users from configuring personal themes.
l
(1) Themes: From the drop-down list, select one of the preconfigured themes or
Custom.
l
For the Custom theme, modify the other sections as desired.
Note: You can do no harm by individualizing your theme, so experiment as much
as you want. You can always revert back to one of the preconfigured themes.
3.
Once you have entered all the desired changes, select Apply.
Create a Custom View
Nerdio Manager allows administrators to create custom views that best represents their
workflows. Multiple views can be created and one of the views can be designated as the default
view.
89

For example, if you manage host pools across several Workspaces, there is no need to keep
jumping back to the Workspaces list to switch from one Workspace to the next to work with all the
host pools. With custom views, you can combine similar data on a single page across the
environment.
Note: You can run bulk actions like Run script, Restart, and Power off on session hosts in
custom views.
To create custom views:
1. Navigate to Settings > Custom views.
2.
Select Add custom view.
3. Enter the following information:
l
Name: Type the custom view's name.
l
Description: Type the description of the custom view.
l
Type: From the drop-down list, select the type of information you want to see in the
custom view.
Note: The following types are available -- Host Pool, Session Host, User Session,
Scheduled Tasks, RemoteApps, Desktop Images, and UEM Intune Devices.
Each type has different customization options, as explained below.
l
Visible To: From the drop-down list, select who should be able to see this custom
view.
90

Note: You can make this custom view visible to any of the following:
l
Only you.
l
Everyone.
l
Users assigned to built-in roles.
l
Users assigned to custom roles.
l
Sort by Column: From the drop-down list, select the column in the table to sort the
contents by.
l
Sort Direction: From the drop-down list, select the sort direction.
l
Page Size: From the drop-down list, select the page size for the custom view.
l
For Host Pool, enter the following information:
l
Workspace Scope: From the drop-down list, select the workspaces to include
in the custom view. The default is Any.
l
Host Pool Type: From the drop-down list, select whether the custom view is
for dynamic or static host pools.
l
Desktop Experience: From the drop-down list, select the desktop experience
(s) of the host pools that should be displayed in the custom view.
l
Search: Optionally, type the search string to limit the results of the items
displayed in the custom view.
l
Resource Group: From the drop-down list, select which resource group(s)
should be included in the custom view. The default is Any.
l
For Session Host, enter the following information:
l
Workspace Scope: From the drop-down list, select the workspaces to include
in the custom view. The default is Any.
l
Host Pool Scope: From the drop-down list, select the host pools to be included
in the custom view within the selected workspaces. The default is Any.
91

l
Search: Optionally, type the search string to limit the results of the items
displayed in the custom view.
l
Status: From the drop-down list, select the statuses to be included in the
custom view. The default is All Statuses.
l
Drain Mode: Select these options to include the desired drain mode of session
hosts.
l
Sessions: Indicate if you want to include session hosts with sessions and the
number of user sessions.
l
Date Provisioned: Optionally, filter by the date session hosts were
provisioned.
l
For User Session, enter the following information:
l
Workspace Scope: From the drop-down list, select the workspaces to include
in the custom view. The default is Any.
l
Host Pool Scope: From the drop-down list, select the host pools to be included
in the custom view within the selected workspaces. The default is Any.
l
Search: Optionally, type the search string to limit the results of the items
displayed in the custom view.
l
Session Status: Select the desired user session statuses to include in the
custom view.
l
For Scheduled Tasks, enter the following information:
l
Search by Resource:Optionally, type the resource name to limit the results of
the items displayed in the custom view.
l
Filter by Resource Type and Task Type: From the drop-down list, select the
resource type and task type to be included in the custom view. The default is
Any.
l
Filter by Scope: From the drop-down list, select the scope to be included in the
custom view. The default is Any.
92

l
Filter by Next Run Date: From the drop-down list, select the next run date to
be included in the custom view. The default is All time.
l
For RemoteApps, enter the following information:
l
Search:Optionally, type the search string to limit the results of the items
displayed in the custom view.
l
Workspace Scope: From the drop- down list, select the workspaces to be
included in the custom view. The default is Any.
l
Host Pool Scope: From the drop-down list, select the host pools to be included
in the custom view within the selected workspaces. The default is Any.
l
Maintenance Mode: Select the maintenance modes to be included in the
custom view.
l
For Desktop Images, enter the following information:
l
Search:Optionally, type the search string to limit the results of the items
displayed in the custom view.
l
Tag:Optionally, type the tags to limit the results of the items displayed in the
custom view.
l
For UEM Intune Devices, enter the following information:
l
Search:Optionally, type the search string to limit the results of the items
displayed in the custom view.
l
Filter by Status: From the drop-down list, select the statuses to be included in
the custom view.
l
Filter by Device Type: From the drop-down list, select the device types to be
included in the custom view..
l
Filter by Free Space: Type the free space range to be included in the custom
view.
l
Filter by Assigned User: From the drop-down list, select the assigned users to
be included in the custom view.
93

l
Filter by Status: From the drop-down list, select the statuses to be included in
the custom view..
l
Set this view as the default page: Select this option to automatically open this page
when you launch Nerdio Manager
4.
Once you have entered all the desired information, select Save & close.
The new custom view is now available at the top of the main menu.
Create a Custom View from an Existing Page
Nerdio Manager allows administrators to create a custom view from an existing page. For
example, you may be viewing a filtered list of host pools and you want to save the page as a
custom view.
For detailed information about custom views, please see "Create a Custom View" on page 89.
To create a custom view from an existing page:
1. Navigate to the page you wish to use as the template for the custom page.
Note: For example, navigate to the list of dynamic host pools for a particular workspace.
2. In the host pools example, type your search phrase, select the Filter By Types, select the
Filter by Resource Group, etc.
3. Once the page displays the information you want, in the upper right side, select the edit
custom view button.
Note: All the changes you made on the page are loaded in the edit window.
4. Type the Name of the new custom view.
94
5. Review all the options to confirm they are as desired and make any necessary changes.
6.
Once you have entered all the desired information, select Save & close.
Change a Custom View
Nerdio Manager allows administrators to change an existing custom view.
For detailed information about custom views, please see "Create a Custom View" on page 89.
To change a custom view:
1. Navigate to Settings > Custom views.
2. In the Custom views section, select the custom view you wish to edit.
3.
Make the desired changes and select Save & close.
4. Alternatively, when you are viewing a custom view page, make the changes you wish to
save. For example, type a search filter.
5. In the upper right side, select the edit custom view button.
Note: All the changes you made on the custom view page are loaded in the edit window.
6. Review all the options to confirm they are as desired and make any necessary changes.
7.
Once you have entered all the desired information, select Save & close.
Change Custom Views Display Properties
Nerdio Manager allows the administrators to change the following display properties of custom
views.
95

l
Icon: You can change the custom view's icon.
l
Display Order: You can change the order the custom views are displayed on the main
menu.
l
Grouping: You may arrange multiple custom views under a single collapsible item called a
group.
For detailed information about custom views, please see "Create a Custom View" on page 89.
To change a custom view's icon:
1. Navigate to Settings > Custom views.
2. Select the icon of the custom view you wish to change.
3. In the pop-up list of icons, select the new icon you wish to use.
4.
Select Confirm.
To change a custom view's display order:
1. Navigate to Settings > Custom views.
2.
Select and hold the custom view's .
3. Drag and drop the custom view to the desired location.
96

To create a group of custom views:
1. Navigate to Settings > Custom views.
2. Select Add group.
3. Select the new group's name to change it.
4.
For each custom view you wish to add to the group, select and hold the custom view's ,
then drag and drop it under the group.
Note: You can remove a custom view from a group by dragging and dropping it outside
the group.
5. Optionally, select Sort to sort the custom views within the group in ascending or
descending order.
6. Optionally, select the group's icon to change it.
7. Optionally, select the Up- Down arrownext to the group's name to display or hide the
custom views within the group.
97

Desktop Images
This section discusses topics related to desktop images. We will discuss the various import and
lifecycle management options, as well as different ways to automate certain tasks in more
advanced scenarios.
After creating a new Workspace, the next step in building out an AVD environment is to create
one or multiple host pools housing your virtual machines (see "Host Pools" on page 173 for more
information). Virtual machines are created based on a desktop image, which holds the operating
system, your applications, and anything else you might want to add. For this to work, we first need
to create at least one desktop image.
Before we continue, it is important to understand that images can be created or imported in
different ways. Also note, that even when there are no images imported into Nerdio Manager, the
custom Azure images part of your subscription can be used to build new host pools and re-image
existing host pools in exactly the same way as with imported images. However, if you do choose
to import your images into Nerdio Manager, you can take advantage of many different
management features otherwise not available.
In addition, when images are imported into Nerdio Manager all of your management and lifecycle
activities are done using a single management portal.
Once an image is created or imported, regardless of the type of image (we'll explain in more detail
going forward), creating new host pools and re-imaging existing host pools is done in the same
way. In the sections below we will walk you through it step by step.
Management and Lifecycle Tasks for Imported Desktop
Images
No matter where your desktop images are imported from, their management and lifecycle tasks
are the same.
Typical Desktop Image Lifecycle
1. Import the desktop image.
See any of the following for detailed information:
98

l
"Import Images from the Azure Library" on page 101
l
"Import Custom Azure Managed Images" on page 106
l
"Import an Existing VM" on page 107
2. Power on the desktop image.
l
Navigate to Desktop Images.
l
Locate the desktop image you wish to power on.
l
Select Power on.
l
Optionally, select Back up VM before powering on.
Note: Selecting this option makes a backup of the desktop image VM before it is
powered on, which creates a snapshot of the current configuration. The first
backup process may take a long time.
The VM powers on.
3. Use the VM's IP address or name to connect to it using RDP and make all the desired
changes.
4. Select Power off & set as image.
See "Desktop Images Set as Image" on page 110 for details.
Note: An extensive automation process begins that commits the changes to an image
object. This includes many tasks you would have had to do manually like Sysprep and
sealing the image.
You can see the job's progress in the logs. See "Desktop Images Change Log Feature"
on page 124 for details about the logs.
5. Once the image is set, you can use it to build new host pools or re-image an existing host
pool.
See the following for detailed information.
99

l
"Create Dynamic Host Pools" on page 182
l
"Create Static Host Pools Without Auto-Scaling" on page 175
l
"Resize/Re-image a Host Pool" on page 235
Endpoint Management Software Integration
Nerdio Manager allows you to utilize the power of an endpoint management tool (for example,
Microsoft's Endpoint Configuration Manager or Ivanti's Endpoint Manager) to leverage its power
to work with Nerdio Manager.
Endpoint Management Software Integration Example
Patch Tuesday, when Microsoft releases its monthly software updates, occurs on the second
Tuesday of each month at about 10 AM Pacific Standard Time. You can use your endpoint
management tool, along with Nerdio Manager, to fully automate applying the Windows Updates
to the desktop image and re-imaging the host pools with the updated desktop image.
Note: This is just one example of the many things you can do using these built-in automation
tools.
l
In Nerdio Manager, when you perform the Set as image function, be sure to select the
Leave desktop image VM running option. This leaves the VM running after the Set as
image task completes and the endpoint management tool can access the VM and change
the image.
l
In the endpoint management tool, create a recurring scheduled job/runbook on Patch
Tuesday to apply the Windows Updates.
l
In Nerdio Manager, configure the Set as image function for the desktop image to be a
recurring job that starts shortly after the endpoint management tool's job completes. See
"Desktop Images Set as Image" on page 110 for details about configuring the job.
l
In Nerdio Manager, configure the Re-image Hosts function for the host pool to be recurring
job that starts shortly after the Set as image process completes. See "Resize/Re-image a
Host Pool" on page 235 for details about configuring the job.
100

So, by creating three recurring scheduled jobs you can apply the Windows Updates to the VM, set
the VM image, and then update the host pool with the updated desktop image every month.
Import Images from the Azure Library
Nerdio Manager allows you to import a desktop image from the Azure library into a Workspace.
To import an image from the Azure library:
1. Navigate to Desktop Images.
2. Select Add from Azure library.
3. Enter the following information:
Note: For several of the required parameters, you may filter the available choices by
using the Resource Selection Rules. For example, you may filter the VM Size or
OS Disk choices for Intel RAM-optimized VMs only. See "Resource Selection Rules
Management" on page 74 for details.
l
Name: Type the desktop image's name.
l
Description: Type the description.
l
Network: From the drop-down list, select the network to which the VM connects.
Note: The VM is created in the Azure region associated with the network.
l
Azure Image: From the drop-down list, select the desired image.
Note: Select the image based on the Windows OS supported by AVD. EVD =
Enterprise Virtual Desktop (aka Windows 10 multi- session). Office Pro Plus
contains a pre-installed Office 365 version of Pro Plus that is activated as users
with appropriate licensing sign in to the desktop.
101

l
VM Size: From the drop-down list, select the size.
l
OS Disk: From the drop-down list, select the disk.
l
Resource Group: From the drop-down list, select the resource group to contain the
network interface cards of the VM.
l
Security type: From the drop-down list, select the security option that best suits your
desktop image VM.
Note:
l
Standard is set by default. Additional security options are only available for
generation 2 VMs with the Geographic distribution & Azure compute
gallery option enabled.
l
The Trusted launch and Confidential virtual machines security options
help improve the security of Azure generation 2 virtual machines. However,
additional security features they provide also have some limitations, such
as the lack of support for backup, managed disks, and ephemeral OS disks.
To learn more, see:
l
Trusted launch for Azure virtual machines
l
About Azure confidential VMs
l
Secure Boot: Select this option to enable Secure Boot, which helps protect your VMs
against boot kits, rootkits, and kernel-level malware.
l
vTPM: Select this option to enable Virtual Trusted Platform Module (vTPM), which is
TPM 2.0 compliant and validates your VM boot integrity apart from securely storing
keys and secrets.
l
Integrity Monitoring: Select this option to enable cryptographic attestation and
verification of VM boot integrity along with monitoring alerts if the VM didn't boot
because the attestation failed with the defined baseline.
l
OS State: From the drop-down list, select the OS state.
102

Note:
l
Generalized images have had the machine and user-specific information
removed by running a command on the VM.
l
Specialized images have not been through the process to remove machine
and user-specific information.
l
Join to AD: Deselecting this means the VM is not joined to AD during the creation
process. This prevents AD GPOs from applying to the image before it is created. Be
sure to specify local administrator credentials below to be able to connect to the VM,
since it won't be a member of the AD domain.
l
Do not create image object: Select this option to only create a desktop image VM
but not create an image object.
Note: You need to create the image object. Select Power off and set as image
after the VM is created before this desktop image can be used for session host
creation. If you skip image creation, you can make changes to the VM before it is
converted to an image.
l
Skip removal of local profiles: Select this option to bypass this step and not remove
local user profiles before running Sysprep.
Note: During the image creation process, Nerdio Manager removes all local user
profiles. This increases the likelihood of Sysprep success. Selecting this option
bypasses this step. If there are any partially installed APPX apps on the image
VM, Sysprep will fail to remove them.
l
Enable time zone redirection: Select this option to enable time zone redirection on
the image. This allows each user to see their local device's time zone inside of their
AVD desktop session.
103

l
Set time zone: Select this option to set the time zone of the VM and then, from the
drop-down list, select the time zone.
l
Install MSIX app attach certificates: Select this option to install all the stored
certificates on the VM, if applicable.
Note: To view the stored certificates, navigate to MSIX App Attach > Certificates.
l
Optimize disk type when desktop image is stopped: Select this option to
downgrade the OS disk type when the desktop image is stopped in order to save
money. When the VM starts, the OS disk type are changed back to the selected one.
l
Provide custom credentials for a local administrator user: Toggle this option on to
enter the username and password.
l
Geographic distribution & Azure compute gallery: Select this option to store the
image in Azure Compute Gallery and automatically distribute it to the selected Azure
regions.
l
Azure Compute Gallery: From the drop-down list, select an existing Azure
Compute Gallery or create a new one.
Note: Only one Azure Computer Gallery can be selected. The existing
Azure Compute Gallery must be in a linked resource group in the same
Azure subscription as the image VM.
l
Azure Regions: From the drop- down list, select Azure regions where the
Desktop Image version should be replicated.
Note: The current Azure region must be part of the selection.
l
Custom (Stack HCI) Locations: From the drop- down list, select custom
locations where the desktop image should be replicated.
l
Replica Count (Per Region): Type number of replicas per region.
104
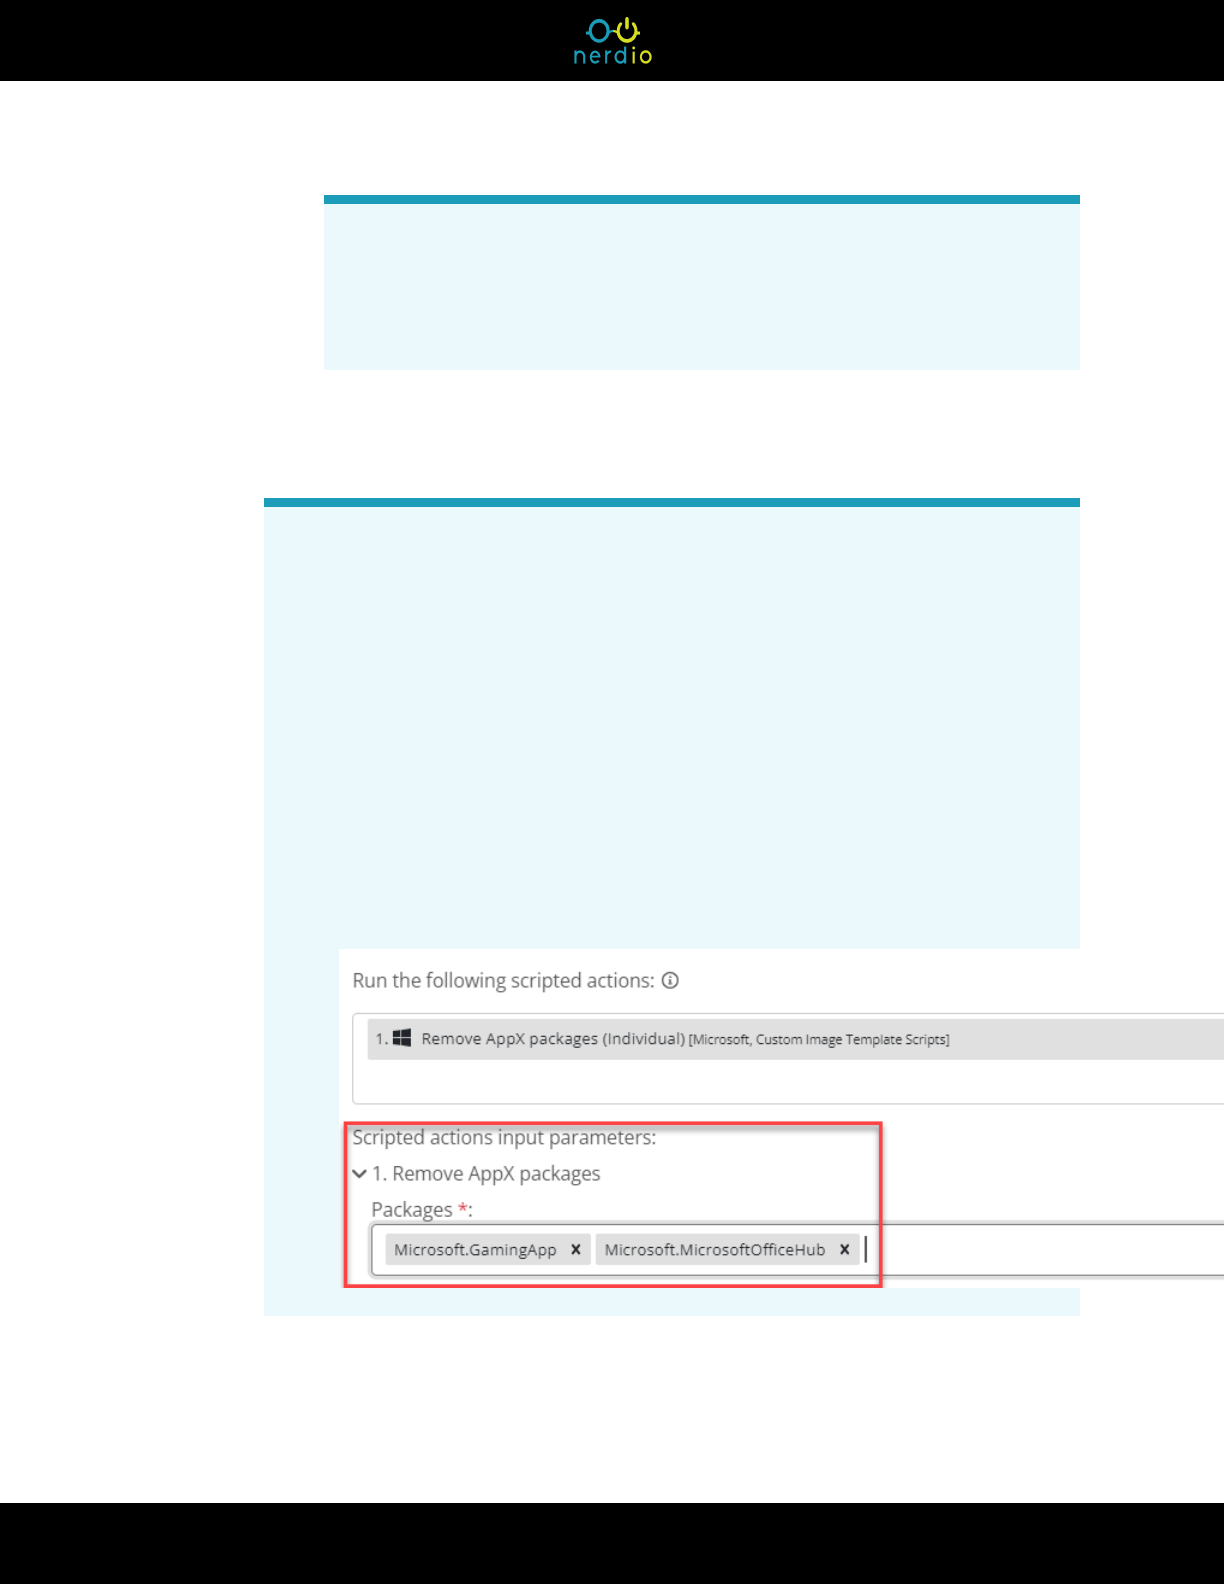
Note: Azure Compute Gallery replicas support a maximum of 20 concurrent
clone operations per replica. Ensure that the number of replicas specified
meets your deployment requirements. Up to 100 replicas per region are
supported. Replicas may only be deployed within the same subscription.
l
Run the following scripted actions: Toggle this option on to specify the scripts that
run during creation.
Notes:
l
Windows scripts are executed via the Azure Custom Script extension and
run in the context of LocalSystem account on the clone of the desktop
image VM before it is Sysprep'ed. These commands do not run on the
image VM itself.
l
Azure runbooks are executed via the Azure automation account and run in
the context of Nerdio Manager app service principal.
l
Several variables are passed to the script and can be used in the
PowerShell commands.
l
If necessary, provide the required parameters. For example:
105

l
Applications Management: Toggle this option on to specify the applications to
deploy during creation.
l
Applications: In the applications list, select Add new application, and then
from the drop-down list, select the application to include in this policy.
Notes:
l
You may add as many applications as desired.
l
Drag and drop an application in the list to change its order on the list.
l
Select the "X" next to an application to remove it from the list.
l
Install/Uninstall: Select whether the deployment policy should install or
uninstall the selected applications.
l
Reboot after installation: Select this option to place the host in drain mode
and restart it when no sessions are present.
l
Show favorites only: Select this option to only display applications marked as
favorites. Otherwise, you may search the list of applications.
l
Apply tags: Optionally, type the Name and Value of the Azure tag.
Note: You may specify multiple tags. The specified tags are applied to image VM,
OS disk, network interface, image object, and Azure Compute Gallery image. See
this Microsoft article for details about using tags to organize your Azure
resources.
4.
Once you have entered all the desired information, select OK.
The desktop image is created. This may take up to an hour to complete.
Import Custom Azure Managed Images
Nerdio Manager allows you to leverage your customized and managed Azure images and deploy
them directly into Nerdio Manager.
106

To import an Azure custom image:
1. Navigate to Desktop Images.
2.
Select Add from Azure library.
3. Enter the following information:
l
Azure Image: From the drop-down list, select the desired image.
Note: The list contains all the standard Azure Marketplace images. In addition, it
contains all the custom images that are available inside your Azure subscription.
Tip: Hover over any unavailable (grayed out) custom image to see why it is
unavailable.
l
Enter the information for the other fields. See "Import Images from the Azure Library"
on page 101 for detailed information.
4.
Once you have entered all the desired information, select OK.
The desktop image is created. This may take up to an hour to complete.
Import an Existing VM
You can import an existing VM as an image into Nerdio Manager. For example, you can take a
custom VM from another virtual desktop deployment, that has all your applications installed, and
use it as a custom image in your Nerdio Manager AVD deployment.
Note: In order for this to work, your VM needs to be based on a Managed Disk. That is, you
need to generate the accompanying SAS URL directly from the Azure portal, as explained
below.
To import an image:
107

1. In Azure, navigate to the virtual machine.
Warning: Make sure that the VM is powered off.
2. Navigate to Settings > Disks.
3.
Select the OS disk and then select Disk Export.
4.
Select Generate URL.
The URL is generated.
5. Copy the generated URL to the clipboard.
6. In Nerdio Manager, navigate to Desktop Images.
7.
Select Add from Azure VM.
8. Enter the following information:
l
SAS URL: Paste the URL from the clipboard.
l
Create image VM as Gen2: Select this option to create the VM as Gen2.
Note: By default, desktop image VMs are created as Gen1. See this Microsoft
document to learn more about the differences between Gen1 and Gen2 VMs.
l
Security Type: From the drop-down list, select the security type.
108

Notes:
l
Security type refers to the different security features available for a virtual
machine. Security features like Trusted Launch and Confidential virtual
machines improve the security of Gen2 VMs. However, additional security
features have some limitations, which include not supporting back up,
managed disks, and ephemeral OS disks. See the following Microsoft
articles for more information:
l
Trusted launch for Azure virtual machines
l
About Azure confidential VMs
l
If you select Standard, Trusted launch virtual machines, or
Confidential virtual machines, then the desktop image and session
host VMs are created with the specific security type.
l
If you select one of the xxxx supported options, then the desktop
image is created as Standard but the session host VMs can be
deployed as Standard or the supported type (s). (Trusted Launch
and/or Confidential)
l
Uninstall FSLogix app: Select this option if the FSLogix app is already installed in
the base image and you want to remove it in order to allow Nerdio Manager to
manage FSLogix.
l
Uninstall AVD agent: Select this option if you are creating an image from an existing
AVD session host where the AVD agent has been previously installed.
l
Enter the information for the other fields. See "Import Images from the Azure Library"
on page 101 for detailed information.
9.
Once you have entered all the desired information, select OK.
The desktop image import task starts.
Tip: Be sure to uninstall the AVD agent before you set this imported VM as a desktop image.
See "Desktop Images Manually Uninstall AVD Agent" on page 116 for details.
109

Desktop Images Set as Image
Nerdio Manager provides a powerful tool that performs an extensive automation process to
commit the Desktop Image changes to an image object. This includes many tasks you would
have had to do manually like Sysprep and sealing the image. This would normally be done after
you have made the updates to your image. Once you perform Set as image, the image object is
created and is ready to be used either to build new host pools or to re-image existing host pools.
To set a desktop image:
1. Navigate to Desktop Images.
2. Locate the desktop image you wish to work with.
3.
From the action menu, select Power off & set as image or Set as image (according
to the power state of this desktop image).
4. Enter the following information:
l
Run the following scripted actions before set as image: Toggle on this option to run
scripted action(s) before the set as image.
Note: For example, you can run scripts to optimize the image, install software, or
install updates.
l
From the drop-down menu, select the scripted action(s) you wish to run.
l
Pass AD credentials: Select this option if you want to use them to run the
scripted actions.
l
Applications Management: Toggle this option on to specify the applications to
deploy during creation.
l
Applications: In the applications list, select Add new application, and then
from the drop-down list, select the application to include in this policy.
110

Notes:
l
You may add as many applications as desired.
l
Drag and drop an application in the list to change its order on the list.
l
Select the "X" next to an application to remove it from the list.
l
Install/Uninstall: Select whether the deployment policy should install or
uninstall the selected applications.
l
Reboot after installation: Select this option to place the host in drain mode
and restart it when no sessions are present.
l
Show favorites only: Select this option to only display applications marked as
favorites. Otherwise, you may search the list of applications.
l
Schedule: Toggle on the Schedule to perform the operations at a selected time(s).
See "Manage Schedules for Tasks" on page 79 for details about creating a schedule.
l
Security type: From the drop-down list, select the security option that best suits your
desktop image VM.
Note:
l
Standard is set by default. Additional security options are only available for
generation 2 VMs with the Geographic distribution & Azure compute
gallery option enabled.
l
The Trusted launch and Confidential virtual machines security options
help improve the security of Azure generation 2 virtual machines. However,
additional security features they provide also have some limitations, such
as the lack of support for backup, managed disks, and ephemeral OS disks.
To learn more, see:
l
Trusted launch for Azure virtual machines
l
About Azure confidential VMs
111

l
OS State: From the drop-down list, select the OS state.
Note:
l
Generalized images have had the machine and user-specific information
removed by running a command on the VM.
l
Specialized images have not been through the process to remove machine
and user-specific information.
l
Geographic distribution & Azure compute gallery: Select this option to store the
image in Azure Compute Gallery and automatically distribute it to the selected Azure
regions.
l
Azure Compute Gallery: From the drop-down list, select an existing Azure
Compute Gallery or create a new one.
Note: Only one Azure Computer Gallery can be selected. The existing
Azure Compute Gallery must be in a linked resource group in the same
Azure subscription as the image VM.
l
Azure Regions: From the drop- down list, select Azure regions where the
Desktop Image version should be replicated.
Note: The current Azure region must be part of the selection.
l
Custom (Stack HCI) Locations: From the drop- down list, select custom
locations where the desktop image should be replicated.
l
Stage new image as inactive: Select this option to create the new image version
without setting it as active.
112

Note: Any existing configurations continue to use the current version of the
image. See "Stage Desktop Images" on page 126 for details about activating
staged desktop images.
l
Save current image as a backup: Select this image to retain the existing image as a
standalone object and not overwrite it with the new one.
l
Note: This image is not visible or manageable via Nerdio Manager, so be sure to
delete it manually when it is no longer needed to avoid unnecessary Azure
storage costs.
If the current image is stored in Azure Compute Gallery, it is retained with an older
version number. If the image is not stored in Azure Compute Gallery, you can find
it in Azure portal>Images. It is listed under "Custom images" in the Nerdio
Manager image selector drop-down list.
l
Install MSIX app attach certificates: Select this option to install all stored certificates
on the image VM, if any.
l
Skip removal of local profiles: Select this option to bypass removing all local user
profiles.
Note: During the image creation process, Nerdio Manager removes all local user
profiles. This increases the likelihood of Sysprep success. Selecting this option
bypasses this step. If there are any partially installed APPX apps on the image
VM, Sysprep does to remove them.
l
Leave desktop image VM running: Select this option to leave the VM running after
the Set as image task completes.
Note: This is useful if you want to push OS and application updates to the running
VM.
113

l
Change log: Type the list of changes made to the image.
5.
Once you have entered all the desired information, select Run now (not scheduled) or Save
& close (scheduled).
You can see the job's progress in the logs. See "Desktop Images Change Log Feature" on
page 124 for details about the logs.
Desktop Images Scripted Actions
Nerdio Manager enables you to execute scripts on desktop images.
Note: You can execute a scripted action immediately or run it on a schedule.
To execute a scripted action:
1. From the main menu, select Desktop Images.
2.
From the action menu, select Run script.
3. Enter the following information:
l
Schedule: Toggle to turn the scheduler On/Off. See "Manage Schedules for Tasks"
on page 79 for details about creating a schedule.
l
Scripted Actions: From the drop-down list, select the script you wish to run.
114

Note:
l
Windows scripts are executed via the Azure Custom Script extension and
run in the context of the LocalSystem account.
l
Azure runbooks are executed via the Azure automation account and run in
the context of the Nerdio Manager app service principal.
l
The following variables are passed to the script and can be used in the
PowerShell commands:
l
$AzureSubscriptionId
l
$AzureSubscriptionName
l
$AzureResourceGroupName
l
$AzureRegionName
l
$AzureVMName
l
$ADUsername (if passing AD credentials)
l
$ADPassword (if passing AD credentials)
l
$SATrigger = "RunOnce"
l
$SATriggerMode = "Manual" | "Schedule"
l
$DesktopImageVmName
l
$DesktopImageActiveVersion
l
$DesktopImageStagedVersion
l
Scripted actions input parameters: If necessary, provide the required parameters.
l
Pass AD credentials: Select to pass your AD credentials to the script being
executed.
l
Restart VM after script execution: Select to restart the VM after script execution.
115

Note: It is preferable to select this option instead of restarting the VM in your
PowerShell commands because the Custom Script extension fails if the script
restarts the VM.
4.
Once you have entered all the desired information, select either Run now to execute
immediately or Save & close to save the script and execute as per the schedule.
Desktop Images Manually Uninstall AVD Agent
Before you create a desktop image from an imported VM, you must first manually uninstall the
AVD agent.
To manually uninstall the AVD Agent:
1. Navigate to Desktop Images.
2. Locate the desktop image you wish to work with.
3.
Select Power on.
4. RDP to the desktop image using the local admin credentials.
5. Navigate to Control Panel > Programs and Features and remove all the Remote Desktop
programs.
6. In the Registry, navigate to HKLM\Software\Microsoft.
116

7. Remove all traces of the AVD agent (RD*) from the registry, if any.
8. Reboot the desktop and verify that all the components have been removed.
9. In Nerdio Manager, return to Desktop Images.
10. Locate the desktop image you just modified and select Power off and set as image.
Use Azure to Backup and Restore Desktop Images
In Nerdio Manager, you can backup desktop images to Azure and restore a desktop image from
previous versions. No third-party tools are required, because Nerdio Manager uses the native
Azure backup functionality.
When you back up the image for the first time, it creates all the necessary Azure infrastructure to
maintain this backup.
Note: The Nerdio Manager application must be assigned the Backup Reader role at the
subscription level when you configure the backup.
l
If the user who configures the backup for the first time is an Owner on the subscription,
this role is assigned automatically.
l
If the user is not an Owner, you must manually assign the Backup Reader role to the
Nerdio Manager application.
Create a Desktop Image Backup Policy
Nerdio Manager allows you to create a desktop image backup policy. The policy determines the
backup vault, schedule, retention, etc.
117

Note: A backup policy must be configured in order for manual or automatic backups to be
created.
To create a desktop image backup policy:
1. Navigate to Desktop Images.
2. Locate the desktop image you wish to back up.
3. From the action down menu, select Manage backup.
4. Enter the following information:
l
Enable Backup: Toggle on this option.
l
Vault: From the drop-down list, select the backup vault.
l
Policy: From the drop-down list, select a policy or type the name of a new policy.
Warning: If an existing policy is selected and changed, that changes the policy for
all associated devices. It is strongly recommended that you create a new policy
for each desktop image.
l
Policy type: From the drop-down list, select either a Standard or an Enhanced policy
type.
Note: Enhanced policies are required to backup Trusted Launch enabled
desktops. See this Microsoft article for details.
l
Schedule: From the drop-down lists, create the schedule.
l
Retention: From the various options, create the retention policy.
5.
Once you have entered all the desired information, select Save.
Manually Backup a Desktop Image
Nerdio Manager allows you to manually backup a desktop image to Azure.
118

To manually backup a desktop image to Azure:
1. Navigate to Desktop Images.
2. Locate the desktop image you wish to back up.
3. From the action down menu, select Backup.
Note: If a backup policy was not configured for this desktop image, you are prompted to
create a backup policy. See "Create a Desktop Image Backup Policy" on page 117 for
details.
4. Retain image backup: Type the number of weeks to retain the backup image.
Note: After the selected number of weeks, the image backup is automatically deleted.
The image VM itself is unaffected when the expired backup version is deleted.
5.
Once you have entered all the desired information, select OK.
The desktop image is backed up to Azure.
Restore a Desktop Image from Azure
Nerdio Manager allows you to restore a desktop image from Azure.
To restore a desktop image from Azure:
119

1. Navigate to Desktop Images.
2. Locate the desktop image you want to restore.
3. From the action menu, select Restore.
4. From the drop-down list, select the desired recovery point.
5.
Select Restore.
The desktop image is recovered from the Azure backup vault. By default, this image is
powered on.
6. Select Power off & set as image.
The VM is committed to the Azure image object from the restored version.
Clone Desktop Images
Nerdio Manager allows you to clone an existing desktop image and create a new one with the
same properties. You can create new desktop images based on existing ones and recreate all the
customizations associated with your previously created desktop images. There is no need to
reconfigure the environment from scratch.
Tip: If you would like to replicate your image and move it to another region, simply select a
network available in that region as part of the cloning operation. See below for details.
To clone a desktop image:
1. Navigate to Desktop Images.
2. Locate the desktop image you wish to clone.
3.
From the action menu, select Clone.
4. Enter the following information:
l
Count: Type the number of image(s) to be created when cloning.
l
Name: Type the image's name.
120

l
Description: Type the image's description.
l
Network: From the drop-down list, select the network the VM connects to.
l
VM Size: From the drop-down list, select the VM size.
l
OS disk: From the drop-down list, select the OS disk.
l
Resource Group: From the drop-down list, select the resource group.
l
Security type: From the drop-down list, select the security option that best suits your
desktop image VM.
Note:
l
Standard is set by default. Additional security options are only available for
generation 2 VMs with the Geographic distribution & Azure compute
gallery option enabled.
l
The Trusted launch and Confidential virtual machines security options
help improve the security of Azure generation 2 virtual machines. However,
additional security features they provide also have some limitations, such
as the lack of support for backup, managed disks, and ephemeral OS disks.
To learn more, see:
l
Trusted launch for Azure virtual machines
l
About Azure confidential VMs
l
Integrity Monitoring: Select this option to enable cryptographic attestation and
verification of VM boot integrity along with monitoring alerts if the VM didn't boot
because the attestation failed with the defined baseline.
l
OS State: From the drop-down list, select the OS state.
121

Note:
l
Generalized images have had the machine and user-specific information
removed by running a command on the VM.
l
Specialized images have not been through the process to remove machine
and user-specific information.
l
Join to AD: Select this option and from the drop-down list, select the AD.
Note: Unselect this option to not join this desktop image VM to AD during the
creation process. This prevents the AD GPOs from applying to the image before it
is created. Be sure to specify local administrator credentials below to be able to
connect to the VM, since it won't be a member of the AD domain.
l
Skip removal of local profiles: Select this option to bypass removing all local user
profiles.
Note: During the image creation process, Nerdio Manager removes all local user
profiles. This increases the likelihood of Sysprep success. Selecting this option
bypasses this step. If there are any partially installed APPX apps on the image
VM, Sysprep does to remove them.
l
Do not create image object: Select this option if you do not want to create an image
object.
l
Enable time zone redirection: Select this option if you want users to view the local
time zone inside their AVD desktop sessions.
l
Install certificates: Select this option if you want to install any stored certificates on
the image VM.
l
Set time zone: From the drop-down list, select the time zone.
122

l
Provide custom credentials for a local administrator user: Toggle this option on if
you are the local admin and want to provide the username and password.
l
Geographic distribution & Azure compute gallery: Toggle this option on if you want
to replicate your cloned image across regions.
l
Azure Compute Gallery: From the drop-down list, select an existing Azure
compute gallery or create a new one.
Note: Only one gallery can be selected. The existing gallery must be in a
linked resource group in the same Azure subscription as the image VM.
l
Azure Regions: From the drop-down list, select the Azure regions where the
Desktop Image version should be replicated.
Note: The current Azure region must be part of the selection.
l
Replica count: Type the number of replicas to allow per region.
Note: The Azure Compute Gallery replicas support a maximum of 20
concurrent clone operations per replica. Ensure that the number of replicas
specified meets your deployment requirements. Up to 100 replicas per
region are supported. Replicas may only be deployed within the same
subscription.
l
Run the following scripted actions before clone image: Toggle this option on if you
want to run scripted actions before cloning the image.
l
From the drop-down list, select the scripted actions.
l
Select Pass AD credentials if you want to use them to run the scripted actions.
l
Application Management: Toggle this option on if you want to manage applications
before cloning the image.
123

Notes:
l
You may add as many applications as desired.
l
Drag and drop an application in the list to change its order on the list.
l
Select the "X" next to an application to remove it from the list.
l
Install/Uninstall: Select whether the deployment policy should install or
uninstall the selected applications.
l
Reboot after installation: Select this option to reboot the cloned image after
installation.
l
Show favorites only: Select this option to only display applications marked as
favorites. Otherwise, you may search the list of applications.
5.
Select OK.
The desktop image cloning task begins. It can take up to an hour to complete. You can
monitor the progress of the task in the Desktop Images tasks section.
Related Topics
"Import Images from the Azure Library" on page 101
"Desktop Images Change Log Feature" below
Desktop Images Change Log Feature
In Nerdio Manager you can update, version, or clone desktop images. The desktop images are
updated frequently by different users so over time it gets difficult to track changes made to them.
It is important to track these changes as desktop images are the foundation of AVD host pools.
The Nerdio Manager Change Log feature helps admins keep track of all changes made to
desktop images.
To set up a change log for a desktop image:
124

1. Navigate to Desktop Images.
2. Select a desktop image that you wish to maintain a change log for.
3. Select the Power off & set as Image.
The Set as an Image window opens.
4. Type the list of changes made to the image in the Change log section.
5.
Select Run now.
The change log record is attached to the desktop image.
You can view all changes that were done manually or automatically to the desktop image
To view the change log for a desktop image:
1. Navigate to Desktop Images.
2. Locate the desktop image you wish to view.
3. From the action menu, select Change Log.
The changed image details are displayed.
Related Topics
"Import Images from the Azure Library" on page 101
"Import an Existing VM" on page 107
"Clone Desktop Images" on page 120
Refresh Desktop Images from the Azure Marketplace
Nerdio Manager allows you to refresh desktop images from the Microsoft published and managed
images in the Azure marketplace.
This automated image refresh operation ensures that you always have a pristine image from
Microsoft with all the latest OS patches applied. The refreshed image is automatically deployed to
all session hosts that use it.
To refresh a desktop image from the Azure Marketplace:
125

1. Navigate to Desktop Images.
2. Locate the image you want to refresh.
3. Select the Power off & Set as image.
4. In the Schedule section, enable the scheduling function.
5. Enable Refresh image from Azure Marketplace.
6. Enter the following information:
l
Marketplace Image: From the drop-down list, select an image.
l
Join to AD: Select this option and then from the drop-down list, select an Entra
Domain Services or an AD profile to directly join the image.
For example, you can select a Windows 10 (2004) EVD _ Office ProPlus -Gen2
(multi-session) image and join it to the nerdio.int (default) AD. You can schedule to
refresh this image, weekly, starting 11/20/2021 at 12:00 every Saturday
You can run scripted actions (for example, installing Microsoft Teams, Zoom client,
etc.) along with the image refresh.
7.
Select Run now (not scheduled) or Save & close (scheduled).
Related Topics
"Import an Existing VM" on page 107
"Desktop Images Change Log Feature" on page 124
Stage Desktop Images
To allow administrators to test and validate changes to an image before deploying to the wider
user base, Nerdio Manager provides an Image Staging feature that allows Nerdio Manager to
deploy images to a test or "Staging" pool before activation.
126

Note: This option is available only for desktop images that have been recently refreshed from
the Azure Marketplace. This option is usually preferred by highly compliant environments. For
more information about refreshing images from the Azure Marketplace refer to "Refresh
Desktop Images from the Azure Marketplace" on page 125.
Enable Desktop Image Staging
The following steps allow you to enable staging for a desktop image.
To enable desktop image staging:
1. Navigate to Desktop Images.
2. Locate the image you wish to work with.
3. From the action menu, select Set as image.
4. Enter the following information:
l
Stage new image as inactive: Select this option to create the new image version
without setting it as active.
Notes:
l
Any existing configurations continue using the current version of the image.
To make the new version active, see "Deploy an Inactive Staged Desktop
Image" on page 129 for details.
l
By default, the option Save current image as a backup is not selected. If
you select this option, a new image is created, but Nerdio Manager keeps it
as inactive with an older version number.
l
Activate staged image after: Optionally, select this option to automatically activate
the staged image after the specified number of days.
Note: Any pools linked pools have their associated image updated.
127

l
Remove current image version: Optionally, select this option to retain the current
image version as a standalone object.
Tip: This image version is not visible or manageable via Nerdio Manager, so be
sure to delete it manually when it is no longer needed to avoid unnecessary Azure
storage costs.
5.
Once you have entered all the desired information, select Run now.
The "Power off & set as desktop image" task is triggered.
You can view the status of the task in the Desktop Images Tasks section.
6. Wait for the task to finish. The two images are now in the list.
Edit Desktop Image Staging Auto-activation Settings
The following steps allow you to edit the auto-activation settings of a staged desktop image.
To edit desktop image staging auto-activation:
1. Navigate to Desktop Images.
2. Locate the image you wish to work with.
3. From the action menu, select Configure auto-activation.
4. Enter the following information:
l
Activate staged image after: Optionally, select this option to automatically activate
the staged image after the specified number of days.
128

Note: Any pools linked pools have their associated image updated.
l
Remove current image version: Optionally, select this option to retain the current
image version as a standalone object.
Tip: This image version is not visible or manageable via Nerdio Manager, so be
sure to delete it manually when it is no longer needed to avoid unnecessary Azure
storage costs.
5.
Once you have entered all the desired information, select Save & close.
Deploy an Inactive Staged Desktop Image
The following steps allow you deploy an inactive staged desktop image.
To deploy an image that is inactive:
1. Navigate to Desktop Images.
2. Select the inactive image you want to deploy.
3. From the action menu, select Activate staged image.
4. Select Save current image version as a backup.
5.
Select OK.
The staging image becomes the active version. The older version is saved as backup and
is no longer be shown in the list.
Related Topics
"Refresh Desktop Images from the Azure Marketplace" on page 125
129

FSLogix and User Profile Management
FSLogix is a user profile container technology (FSLogix Profile Containers) that allows users to
switch virtual desktops session host without losing access to their own customizations. With
FSLogix, you can use OneDrive and the indexed search functionality in virtual desktops. This
option was not available for the legacy RDS User Profile Disks (UPDs).
FSLogix is integrated with AVD and provides, by default, an on-demand seamless user profile
storage solution. The AVD for Business and SharePoint functionality level matches that of a
stationary desktop, for example, on a physical PC or a laptop.
FSLogix supports active cache syncing in the AVD environment so that users get their updated
files from any of the connected hosts.
FSLogix retains the user credentials. You do not need to sign in to OneDrive every time you start
a session.
The Windows user profiles of AVD desktop users are encapsulated in VHD files and stored on a
file server separate from the session host VMs. If a user is assigned to a pooled (for example,
non-persistent) desktop, the profile including Windows Search cache follows the user regardless
of the virtual desktop VM they sign in to.
Nerdio Manager makes sure that setting up, configuring, and managing FSLogix Profile
Containers is easy to do. Multiple so-called FSLogix configuration profiles can be created, which
can be applied per host pool. This means you can have different FSLogix configurations where,
for example, the storage locations are different (often in the form of Azure Files, see "Create and
Manage Configured Azure Files Shares" on page 308 for more information) or where you have
different registry parameters set, again, on a per-host pool level.
We ensure that the proper agent is installed on your image, or explain how to do it manually, and
that the correct configuration profile is applied. Meaning, that when a session host VM is joined to
the host pool, or is re-imaged, all of this is automatically taken care of.
Related Topics
"FSLogix Settings and Configuration" on the next page
130

FSLogix Settings and Configuration
The FSLogix profile container is based on two components:
l
Installation of the FSLogix application (https://aka.ms/fslogix_download)
l
Configuration of the FSLogix via GPO or registry. For more information, see this Microsoft
article.
Nerdio Manager automatically installs the FSLogix application, by default, when a new session
host VM is created, or an existing one is re-imaged. This is the most common use case.
To add an FSLogix Profiles Storage configuration:
1. Navigate to Settings > Integrations.
2. In the FSLogix Profiles storage tile, select Add.
3. Enter the following information:
l
Name: Type the profile name.
l
Version From the drop-down list, select the FSLogix version.
l
Use Cloud Cache: Select this option to enable FSLogix Cloud Cache.
Tip: For performance reasons, it is strongly recommended that you use Premium
SSD and Ephemeral OS disks when Cloud Cache is enabled. (Standard SSD
disks might be sufficient in very small environments or a testing scenarios.)
Note: See the following Microsoft article for more information about FSLogix
Cloud Cache.
Cloud Cache allows you to specify multiple profile storage location. It
asynchronously replicates the profiles and makes the profiles available in multiple
storage locations at the same time. So, if one of the locations is not available, the
session host automatically fails over to one of the alternate locations.
131

l
Use Azure Page Blobs: Select this option to use storage account blob containers to
store user profiles. These containers are accessed using storage account access
keys.
l
Configure session hosts registry for Entra ID joined storage: Select this option to
nnable Entra ID Kerberos functionality and Entra ID account credentials loading.
Note: See this Microsoft article for more information.
l
FSLogix Profiles path: From the drop- down list, select an Azure Files share.
Alternatively, type in a UNC path.
Note: You can specify up to 4 paths. In addition, use the arrows to change the
order of the paths. The profiles are created in all of these locations.
l
FSLogix Registry Options: From the drop-down list, select whether you want to work
with All settings or Advanced.
l
For All settings:
l
In the Configuration column, type the setting's value.
l
Select Clear to set a specific setting to Not configured.
132

l
Select Clear all to set all the settings to Not configured.
l
Select Reset to Nerdio defaults to set all the settings to Nerdio
defaults.
l
For Advanced:
l
You can add DWORD values in the format:
"ValueName":dword:ValueData (example:
"ProfileType"=dword:00000003)
.
l
You can add string values in the format:
"ValueName":"ValueData"
(example: "VolumeType":"vhdx")
.
l
Configure Office Container to redirect Microsoft Officer user data: Toggle on this
option to redirect only areas of the profile that are specific to Microsoft Office.
Note: Office Containers separate Microsoft Office data (for example, OST files)
from the overall user profile for easier troubleshooting. Office Containers and
Profile Containers are stored in separate VHDX files can be stored on different file
shares. See this Microsoft article for details.
l
FSLogix Office Container path (VHDLocation): Modify as needed.
l
FSLogix Office Container Registry Options: Modify as needed.
l
Redirections: Select this option if you want to include Redirections in the global
profile for re-use across customers.
Note: See this Microsoft article for more information about redirections.
l
Force the installation of FSLogix apps even if already installed: Select this option
to force the re-installation of the FSLogix agent and applications.
4.
Once you have entered all the desired information, select OK.
To set Nerdio Manager to install the FSLogix application automatically:
133

1. Navigate to Settings > Integrations.
2. In the FSLogix Profiles storage tile, add, change, and remove the profiles as needed.
Notes: Be sure to select the following options for FSLogix profiles linked to hybrid host
pools.
l
Use Cloud Cache: Select this option to enable FSLogix Cloud Cache in the host
pools, and the session hosts within those host pools, that use this FSLogix profile.
l
Use Azure page blobs: Select this option to use storage account blob containers
to store users profiles. These containers are accessed using storage account
access keys.
3. Select one profile as the default.
Notes:
l
If you set the Use FSLogix Profiles option to Off, the FSLogix app is installed
automatically when new hosts are created or re-imaged.
l
Each host pool's FSLogix settings can be customized.
l
FSLogix is not installed on the desktop image.
l
The FSLogix registry settings are not set on the desktop image.
l
No environment has GPO to control the FSLogix configuration.
To manage FSLogix installation and configuration manually:
1. Locate the host pool you wish to change.
2. From the action menu, select Properties > FSLogix.
3. Toggle Use FSLogix profiles to Off.
4.
Select Save & close.
134

5. The application must be installed on the desktop image.
6. The configuration must be applied either via the registry on the desktop image or with a
GPO.
To change the FSLogix registry options:
1. Locate the host pool you wish to change.
2. From the action menu, select Properties > FSLogix.
3. Make the changes to the FSLogix registry options.
Notes:
l
You can add DWORD values in the format:
"ValueName":dword:ValueData
(example: "ProfileType"=dword:00000003)
.
l
You can add string values in the format:
"ValueName":"ValueData" (example:
"VolumeType":"vhdx")
.
4.
Once you have entered all the desired information, select Save or Save & close.
Note: These values are added under the HKLM\SOFTWARE\FSLogix\Profiles key. See the
above link for Microsoft documentation on the FSLogix profile container registry reference.
Related Topics
"FSLogix and User Profile Management" on page 130
Automated FSLogix Deployment and Per-Host Pool
Customization
You can configure FSLogix with Nerdio Manager and apply its settings to each host pool in the
WVD Deployment.
For more information refer to "Host Pools" on page 173.
135

Adding a server includes installing FSLogix and applying the necessary settings that were
selected for the host pool. You can use the global default settings or customize the settings for
each host pool.
To configure global settings for FSLogix:
Note: FSLogix settings configured here are automatically installed and fully deployed to any
newly created host pools.
1. Navigate to Settings > Integrations.
2. In the FSLogix Profiles storage tile, locate the profile you want to use as the default.
3.
Select set default, if it isn't already the default.
4. Select the profile and enter the following information:
l
Name: Type the profile's name.
l
Use Cloud Cache: Select this option to enable FSLogix Cloud Cache in the host
pools, and the session hosts within those host pools, that use this FSLogix profile.
Tip: For performance reasons, it is strongly recommended that you use Premium
SSD and Ephemeral OS disks when Cloud Cache is enabled. (Standard SSD
disks might be sufficient in very small environments or a testing scenarios.)
Note: See the following Microsoft document for more information about FSLogix
Cloud Cache.
Cloud Cache allows you to specify multiple profile storage location. It
asynchronously replicates the profiles and makes the profiles available in multiple
storage locations at the same time. So, if one of the locations is not available, the
session host automatically fails over to one of the alternate locations.
136

l
Use Azure page blobs: Select this option to use storage account blob containers to
store users profiles. These containers are accessed using storage account access
keys.
l
Configure session hosts registry for Entra ID joined storage: Select this option to
enable Entra ID Kerberos functionality and Entra ID account credentials loading.
Note: See this Microsoft document for more information.
l
FSLogix Profiles path: From the drop-down list, select an Azure Files share or Azure
NetApp Files volumes. Alternatively, type in a UNC path.
Note: You can specify up to 4 paths. In addition, use the arrows to change the
order of the paths. The profiles are created in all of these locations.
l
FSLogix Registry Options: Type the FSLogix configuration that is applied when a
session host VM is provisioned and FSLogix is installed.
l
Edit mode: From the drop-down list, select the edit mode.
Note: Select all settings to edit in "simple" mode, removing the need to
configure registry settings individually. Select Advanced to configure the
registry settings as usual.
l
Force the installation of FSLogix apps even if already installed: Select this option
to force the reinstallation of the FSLogix agent and applications.
5.
Once you have entered all the desired information, select OK.
To configure customized FSLogix settings for a host pool:
Note: Any settings configured here are applied only to newly created or re-imaged hosts in this
pool.
137

1. Navigate to the list of host pools and locate the host pool you wish to change.
2. From the action menu, select Properties > FSLogix.
3. Enter the following information:
l
Toggle Use FSLogix profiles to On.
Note: If this option is not enabled, Nerdio Manager does not install the FSLogix
profile container application on newly created VMs when they are deployed in this
host pool. Existing VMs are not affected.
l
FSLogix profile: From the drop-down list, select the FSLogix profile to use.
l
Use Cloud Cache: Select this option to enable FSLogix Cloud Cache.
l
FSLogix Profile path: Modify as needed.
l
FSLogix Registry Options: Modify as needed.
l
Edit mode: From the drop-down list, select the edit mode.
Note: Select all settings to edit in "simple" mode, removing the need to
configure registry settings individually. Select Advanced to configure the
registry settings as usual.
l
Configure Office Container to redirect Microsoft Officer user data: Toggle on this
option to redirect only areas of the profile that are specific to Microsoft Office.
Note: Office Containers separate Microsoft Office data (for example, OST files)
from the overall user profile for easier troubleshooting. Office Containers and
Profile Containers are stored in separate VHDX files can be stored on different file
shares. See this Microsoft article for details.
138

l
FSLogix Office Container path (VHDLocation): Modify as needed.
l
FSLogix Office Container Registry Options: Modify as needed.
l
Force the installation of FSLogix apps even if already installed: Select this option
to force the reinstallation of the FSLogix agent and applications.
l
Apply to existing hosts: Select this option to apply these changes to existing hosts.
Otherwise, the change only effect new or re-imaged hosts.
l
Process hosts in groups of: Type the number of concurrent actions to execute
during this bulk operation.
l
Number of failures before aborting: Type the number of failures that causes
the process to stop.
l
Messaging: Toggle on the Messaging to send messages to active users.
l
Delay: From the drop-down list, select the number of minutes to wait
after sending the message before starting the process.
l
Message: Type the message you want to send to the users.
l
Schedule: Toggle on the Schedule to apply the changes at a selected time.
l
Start Date: Type the date to start.
l
Time Zone: From the drop-down list, select the time zone for the Start
time.
l
Start Time: From the drop-down lists, select the time to start.
l
Repeat: From the drop- down list, select the recurring schedule, if
desired.
Note: The drop- down has the option After Patch Tuesday. This
allows you to create a recurring schedule based on Patch Tuesday.
l
Days After: If you selected After Patch Tuesday, type the number
of days after Patch Tuesday to run the scheduled task.
4.
Once you have entered all the desired information, select Save or Save & close.
139

Related topics
"Host Pools" on page 173
Host Pool Disaster Recovery: You can enable host pool level active/active DR configuration and
Nerdio Manager automatically distributes session hosts across two Azure regions. Users are
distributed across VMs in both regions as they sign in and FSLogix profiles are automatically
replicated using Cloud Cache. In case of an Azure region failure users continue to access VMs in
the available region. See this demo for more information.
FSLogix Shrink VHD/VHDX Containers (Scripted Action)
Nerdio Manager has a powerful automation that enables you to save money on FSLogix storage
capacity by shrinking the white space inside of FSLogix's VHD/VHDX containers.
As data is added to the VHD/VHDX file, it grows. If the data is later removed, the VHD/VHDX file
has more free space but the size of the file does not decrease. This is capacity that you are
consuming and paying for but is not utilized.
Nerdio Manager has an Azure runbook scripted action that can take these VHD files in bulk,
discover the white space inside them, and shrink them.
To shrink the FSLogix VHD/VHDX containers using a scripted action:
1. Create the following Global Secure Variables: (See "Scripted Actions Global Secure
Variables" on page 158 for details.)
l
FslResourceGroup: The resource group in which the temp VM is created.
l
FslTempVmVnet: The VNet in which the temp VM is created.
l
FslTempVmSubnet: The subnet in which the temp VM is created.
l
FslStorageUser: The storage account key user or AD user with access to the
fileshare.
l
FslStorageKey: The storage account key or AD password.
l
FslFileshare: The UNC path to the FSLogix profiles share.
2. Navigate to Scripted Actions > Azure runbooks.
140

3. Locate the script called Shrink FSLogix Profiles.
4. From the action menu, select Run now or Schedule.
141

Scripted Actions Overview
Scripted Actions are PowerShell scripts that run either in the context of a Windows VM or an
Azure Automation Account. Scripted Actions can be used to extend and customize the
functionality of Nerdio Manager. Nerdio Manager provides several pre-populated variables, such
as $VMName, that can be used in the PowerShell code.
Nerdio Manager contains many out-of-the box scripted actions. In addition, scripts can be created
and customized by the Nerdio Manager administrators. They can be applied at various stages of
the Nerdio Manager automation. For example, when a Virtual Machine is created, shut down, or
removed. You can apply an action on a schedule, or to desktop images, and more.
Nerdio Manager uses two types of scripted actions:
l
Windows scripts - "Scripted Actions for Windows Scripts" on page 163
l
Azure runbooks - "Scripted Actions for Azure Runbooks" on page 166
Scripted Actions serve as a library of PowerShell scripts that can be run in either Azure or AVD
Virtual Machines, as an included step for various tasks performed by Nerdio Manager.
142

Create a New Scripted Action
To create a new scripted action:
1. Navigate to Scripted Actions.
2. Select either Windows scripts or Azure runbooks.
3.
Select Add scripted action.
4. Enter the following information:
l
Name: Type the name of the script. This name is displayed when you select this
action from the list of available scripted actions.
143

l
Description: Type the script's description.
l
Tags: From the drop-down list, select optional tags for the script. These tags are
used for searching and organization.
l
Script Execution Mode: From the drop-down list, select the script's execution mode.
Note: This parameter determines how Nerdio Manager acts when it passes the
scripted action (s) to the VM. Nerdio Manager uses the Azure Custom Script
Extension to ultimately execute the PowerShell commands (for more information
about Scripted Actions for windows refer to Custom Script for Windows). The
extension needs to be installed and removed every time Nerdio Manager
executes a Windows Scripted Action. Optionally, PowerShell scripts can be
combined and passed in a single run, if they do not interfere with each other, thus
saving time.
l
Combined: Marks the script as one that can be combined safely with other
scripts. For example, a script that adds a registry value.
l
Individual: A stand-alone script for an action that should be run on its own. For
example, a long script with commonly used variable names that may conflict
with other scripts, or a script that requires a fresh PowerShell session.
l
Individual with restart: For Windows scripts, run the script in stand- alone
mode and perform a restart when complete.
l
Execution Timeout: For Azure runbooks in Individual mode, type the timeout
(in minutes) for the scripted action execution.
l
Enable Cloud PC: Optionally for Windows scripts, toggle this option on to create a
Cloud PC script policy.
l
Run this script using the logged on credentials: Select this option to run the
script with the user's credentials on the client computer. By default, the script
runs in system context.
l
Enforce script signature check: Select this option to enforce that the script
must be signed by a trusted publisher. By default, no warning or prompt
144

displays and the script runs unblocked.
l
Run script in 64 bit PowerShell Host: Select this option to run the script in a
64-bit PowerShell Host for a 64-bit client architecture.
l
Assign to all users: Select this option to assign the script to all users.
l
Assign to all devices: Select this option to assign the script to all devices.
l
Assign to selected groups: From the drop-down list, select the group(s) to
assign this script to.
l
Exclude assignments: From the drop-down list, select the group(s) to exclude
this script from.
l
Script: Type the PowerShell command(s) to execute.
Note: Nerdio Manager allows you to integrate variables into the Azure runbooks
scripted actions. See "Scripted Actions Azure Runbooks Variables Integration" on
page 156 for more information.
145

Note: Cmdlets used in this code must be available on the VMs or in the Azure
Automation account. If using PowerShell cmdlets from modules not present by
default on the Windows VMs or in the Azure Automation account, the modules
must first be installed.
Nerdio provides several pre-populated variables that can be used in the script
code. The available variables are:
l
$HostPoolId (Available when the script is associated with a host pool)
l
$HostPoolName (Available when the script is associated with a host pool)
l
$AzureSubscriptionId
l
$AzureSubscriptionName
l
$AzureResourceGroupName
l
$AzureRegionName
l
$AzureVMName (Available when the script is associated with a VM)
l
$ADUsername (if passing AD credentials)
l
$ADPassword (if passing AD credentials)
l
$DesktopUser (Available when the script is associated with a personal host
pool)
Tip: It is recommended to develop code using an IDE such as VSCode or ISE.
Then test the PowerShell code on a dedicated development session Host /Azure
VM.
5.
Once you have entered all the desired information, select Save & close.
View and Edit Existing Scripted Actions
Nerdio Manager allows you to view or edit existing scripted actions.
To view and edit an existing scripted action:
146

1. Navigate to Scripted actions.
2. Select either Windows Scripts or Azure runbooks.
3.
Locate the scripted action you want to work with and select Edit.
4.
If desired, make the necessary changes and select Save and close.
Clone a Scripted Action
Nerdio Manager allows you to clone a scripted action.
To clone a scripted action:
1. Navigate to Scripted actions.
2. Select either Windows Scripts or Azure runbooks.
3.
Locate the scripted action you want to clone, and from the action menu select Clone.
4.
Make all the necessary changes and select Clone.
Scripted Actions Groups
Scripted Actions Groups allows administrators to create script collections and assigns these
during standard deployment tasks. See "Scripted Actions Groups" on page 150 for details.
Apply Scripted Actions
Scripted Actions can be used as part of these tasks:
l
VM Lifecycle Events: Executed during the provisioning or re-imaging of Session Host
VMs, or when a VM is stopped/started. Whenever a session host is created, destroyed,
stopped, or started, the scripted action is performed as a final step. For more information
about re-imaging the hosts refer to "Resize/Re-image a Host Pool" on page 235.
l
Run Script: Manually run a command against a host pool. This is useful if you need to
change all the session hosts without fully re-imaging them (for example, a script to change
a registry key). For more information refer to "Run Bulk Host Scripted Actions" on page 252.
To apply a configured scripted action to AVD host VM lifecycle events:
147

1. Locate the host pool you wish to work with.
2. From the action menu, select Properties > VM Deployment.
3. Toggle on the desired Run scripted actions when... options.
4. For each option, enter the following information:
l
Script: From the drop-down list, select the script to execute.
l
Scripted actions input parameters: If necessary, provide the required parameters.
l
Pass AD credentials: Select this option to pass AD credentials to the script as
variables.
l
AD Credentials: From the drop-down list, select the AD credentials to pass.
5.
Once you have entered all the desired information, select Save & close.
The scripted actions are added to the list of scripted actions for this host pool.
Warning: For some automations, the necessary actions to take must be done in the context of
Azure, outside of the VM itself. While these commands could be run on the session host VM
with the Azure PowerShell module installed, running scripts on session hosts that target Azure
are less efficient and can be unreliable. Azure Automation allows for consistent execution, and
allows for the Nerdio Manager to run the scripts as itself easily. Some scripts even require the
VM to be restarted or shutdown, which means it could not be run on the session host VM
regardless.
For information about troubleshooting the Azure scripts, refer to "Troubleshoot Scripts" on
page 159.
To run a scripted action on the Host Pool using the Run Script option:
1. Locate the host pool you wish to work with.
2.
From the action menu, select Hosts > Run script.
3. Enter the following information:
148

l
Run the following scripted actions on all VMs in ...: From the drop-down list, select
the scripted actions that you want to apply.
l
Scripted actions input parameters: If necessary, provide the required parameters.
l
Pass AD credentials: Select this option to pass AD credentials.
l
AD Credentials: From the drop-down list, select the AD credentials to pass.
l
Restart VMs after scripted action: Select this option to restart the VMs after script
execution. It is preferable to use this option instead of using any PowerShell restart
commands as Custom Script extension fails if the script restarts the computer.
l
Process hosts in groups of: Type the number of concurrent actions to execute
during this bulk operation
l
Number of failures before aborting: Type the number of failures that causes the
process to stop.
l
Schedule: Toggle on the Schedule, and enter the schedule information, to enable
running the script per a schedule.
l
Messaging: Toggle on the Messaging to send messages to active users.
l
Delay: From the drop-down list, select the number of minutes to wait after
sending the message before starting the process.
l
Message: Type the message you want to send to the users.
4.
Once you have entered all the desired information, select Save & close.
Related Topics
"Resize/Re-image a Host Pool" on page 235
"Run Bulk Host Scripted Actions" on page 252
"Scripted Actions for Windows Scripts" on page 163
"Scripted Actions for Azure Runbooks" on page 166
"Troubleshoot Scripts" on page 159
149

Scripted Actions Groups
Scripted Actions Groups allows administrators to create script collections and assign them during
standard deployment tasks.
Scripted actions group tasks are not performed in isolation. If a scripted action group is deployed
as part of task, it operates in exactly the same way as it would if the scripts had been added
individually. Therefore, administrators should ensure that tasks within a scripted actions group
are ordered correctly for the required outcome. In addition, ensure that the order of both individual
scripted actions and scripted actions groups within the task are sequenced appropriately.
To create a scripted actions group:
1. Navigate to Scripted Actions > Scripted actions groups.
2. Select Add scripted actions group.
3. Enter the following information:
l
Name: Type the name of the scripted actions group. This name is displayed when
you select this action from the list of available scripted actions.
l
Description: Type the group's description.
l
Tags: From the drop-down list, select optional tags for the group. These tags are
used for searching and organization.
l
Scripted Actions: From the drop-down list, select the scripted action(s) to include in
the group.
Note: The scripted actions are performed in the order specified in the list. You can
drag & drop a script to change its order in the list.
l
Default parameters: If necessary, provide the default parameters.
4.
Once you have entered all the desired information, select Save & close.
150

Note: The new scripted actions group is now available for deployment tasks. See
"Scripted Actions Overview" on page 142 for details.
Default Scripts for Nerdio Manager
Every installation of Nerdio Manager contains default scripted actions. These are commonly used
scripts and examples that you can use or reference for your own scripts. Default scripts have the
Nerdio Tag and are locked for editing. You can clone them in order to create a customized,
editable version.
Note: This is a partial list. Nerdio continuously updates the default Scripted Actions.
Name Use Case
Recommended
Target
Requires Customization*
Install MS
Teams
Save time manually
uninstalling and
reinstalling MS Teams.
Also enables AVD Mode.
Image VMs
(preferred),
Session Hosts
No
Install MS 365
Office Apps
Save time manually
updating MS Office
apps.
Image VMs Yes: If the default list of
apps installed is not
desired.
Virtual Desktop
Optimization
Optimize session hosts
for better performance.
Commonly used for
Remote App Session
hosts.
Session Hosts Yes: By default, many
apps are removed, such
as calculator. If this is not
desired, remove them
from the script.
Install Zoom
VDI Client
Installs Zoom (VDI
Version).
Image VMs No
Default Window Scripts
151

Name Use Case
Recommended
Target
Requires Customization*
Enable RDP
Shortpath
Enables RDP Shortpath Image VMs or
Session Hosts
No
Enable AVD
Screen
Capture
Protection
Enables screen capture
protection.
Note: This is an example
of how to use
PowerShell to edit
registry via scripted
actions.
Image VMs or
Session Hosts
No
Grant user
local admin
rights
Adds user who is
assigned to the personal
desktop VM to the local
admin group.
Session Hosts No
Update
Windows
Runs Windows 10/11
Updates.
Image VMs No
*This script is intended to be cloned and edited to suit your needs.
Name Purpose Requires Customization*
Assign Public IP to
VM
Allows VM to have a
public IP.
Yes: If Static IPs are required or naming
scheme is not desired.
Enable Anti- Malware
Extension
Adds anti- malware
extension.
Yes: If custom exclusions or scan settings
times are needed.
Enable VM OS Disk
Encryption
Encrypts Disk with
Key Vault.
Yes: If using an existing key vault.
Default Azure Runbooks
*This script is intended to be cloned and edited to suit your needs.
152

Considerations for Scripted Actions
Considerations for Window Scripted Actions
For information about Windows scripted actions considerations refer to Custom Script Windows -
Tips and Tricks.
l
Custom script extensions have a 90-minute timeout set by Azure. The script fails after 90
minutes if:
l
It is stuck.
l
It waited too long for user input.
l
It did not complete on time.
l
The script is run with administrative privileges and does not interrupt other sessions. Most
scripts are safe to run while users are on the VM.
Note: For information about troubleshooting Windows scripts refer to "Troubleshoot
Scripts" on page 159.
Considerations for Azure Scripted Actions
Some general conventions and common procedures used for runbooks are not applicable in
Nerdio Manager.
These key considerations are important:
l
There is no need to specify authentication, such as authenticating using the RunAs account
or passing a credential. By the time the actual code in the scripted action is executed,
Nerdio Manager is already logged in to Azure, and no additional authentication is required.
Note: In this case, the Nerdio Manager service principal needs the appropriate
permissions on resources it attempts to alter.
153

l
Azure Modules are already installed in the Azure Automation Account. If you require a
specific version, change the modules attached to the automation account. Any other
modules that are needed require additional installation.
l
Some Variables are defined prior to your code. This is useful to get the necessary
parameters. For example, the VM name, the subscription the VM is in, etc. To view the
variables, hover over the Info icon next to Script.
Note: Nerdio provides several pre-populated variables that can be used in the script
code. The available variables are:
l
$HostPoolId (Available when the script is associated with a host pool)
l
$HostPoolName (Available when the script is associated with a host pool)
l
$AzureSubscriptionId
l
$AzureSubscriptionName
l
$AzureResourceGroupName
l
$AzureRegionName
l
$AzureVMName (Available when the script is associated with a VM)
l
$ADUsername (if passing AD credentials)
l
$ADPassword (if passing AD credentials)
l
$DesktopUser (Available when the script is associated with a personal host
pool)
154

Tips:
l
It is advisable to use the Write- Output command throughout the script to provide
information about what the script is doing and how far the script has progressed. The
output appears in Nerdio Manager. Output from Write-Error also appears, but the output
from Write-Verbose does not.
l
Have commands that result in an error exit out of the script entirely. In that case, the Run
job results in "Fail" instead of "Complete", which is relayed to Nerdio Manager.
155

Note: For information about troubleshooting Azure runbooks refer to "Troubleshoot Scripts" on
page 159.
Scripted Actions Azure Runbooks Variables Integration
Nerdio Manager allows you to integrate variables into the Azure runbooks scripted actions.
Nerdio Manager prompts the user for these variables when the scripted action is run interactively
via the action menu's Run now.
To integrate variables into Azure runbooks scripted actions.
1. Navigate to Scripted Actions > Azure runbooks.
2. Locate the scripted action you want to work with.
3. Select Edit.
4. In the Script section, locate the part of the script that starts with <# Variables:.
5. For each variable, enter the following information: (See the example above for formatting.)
l
Name: Type the variable name.
Note: The variable can be something you create or it can be a Global Secure
Variable. See "Scripted Actions Global Secure Variables" on page 158 for details.
l
Description: Type the variable's description.
156

l
IsRequired: Type true (is required) or false (is not required).
l
DefaultValue: Optionally, type the variable's default value.
6. Add, change, or delete the variables as desired.
7.
When you have entered all the desired information, select Save and close.
Note: When the scripted action is run interactively, a page is displayed that contains the
Parameters section. All the variables are shown along with their default values and
descriptions.
157

Scripted Actions Global Secure Variables
Nerdio Manager allows you to manage Global Secure Variables. These secure variables can be
passed to scripted actions or shell apps. The variables are stored securely in the Azure Key Vault
and can be passed to scripted actions using the $SecureVars.Variable_Name variable name.
Tip: This feature is especially helpful if you want to pass sensitive information to a scripted
action without passing it via clear text.
To manage global secure variables:
1. Navigate to Settings > Nerdio environment.
2.
In the Secure variables tile, select the action (add, edit, or remove) you wish to perform.
3. To add or edit a global secure variable, enter the following information:
l
Name: Type the name of the variable.
Note: The variable name must be between 1 and 20 alphanumeric characters.
l
Value: Type the variable's value.
l
Allow usage within shell apps: Select this option to make the variable available in
Shell Apps.
l
Pass variable to specified scripted actions only: Optionally, select this option to
only pass this variable to the scripted action(s) specified below. When unselected, it
is passed to all scripted actions.
l
Scripted actions: From the drop-down list, select which scripted action(s) the
variable is passed to.
Note: The variable is listed in the Secure Variables column of each
158
selected scripted action in the Azure runbooks window.
4.
When you have entered the desired information, select OK.
Troubleshoot Scripts
Azure Runbooks Logs
Azure runbooks have enhanced logs that help you troubleshoot issues with scripted actions.
To view the Azure runbook logs:
1. Navigate to Scripted Actions > Azure runbooks.
2. At the bottom of the window, in the Scripted Actions Tasks section, locate the task with an
Error in the Status column.
3. Select Details.
The Job Details window displays.
4. Locate the entry in the log with an error.
5. In the Output section, select any of the following:
l
Show: Select Show to display the standard Azure automation account runbook
output.
l
Exception: Select Exception to display the exception's details.
159

Troubleshoot Azure Runbooks
Problem Solution Description
In some cases, a script fails
to perform the scripted
action, but its status is
incorrectly set to Complete.
This means that the
PowerShell script failed to
encounter fatal errors. The
final output from the script
presents information about
the script but has no
indication of an error.
1. Navigate to the
associated Automation
account.
2. View the log with the
time stamp that
matches the Nerdio
Manager task log.
3. Find and resolve the
error that is produced
by the script in your
Nerdio Manager.
When running an Azure
scripted action, the
associated Automation
account runs a specialized
runbook, which copies the
code directly from the Nerdio
Manager and executes it. All
scripts are executed as
instances of the same
Automation Account job.
Here you can find the errors
generated when running
your script. The errors vary
based on your script.
Troubleshooting Azure Runbooks
160

Problem Solution Description
Troubleshoot Windows Scripts
For information about troubleshooting Windows scripts refer to Custom Script Windows -
Troubleshoot and Support.
For more information about troubleshooting the custom script extension (CSE or CSExtension)
refer to Custom Script Windows - Troubleshoot and Support for Extensions.
161

Tip: It is recommended that you use an isolated development session host and run the scripts
directly on the host to test your scripts. This ensures that the PowerShell code is functional
and preforms as desired. In addition, it provides quicker results than running the commands
through Nerdio Manager.
Problem Solution Description
Scripts that cause reboots fail
the entire process. When the
extension is waiting for the
PowerShell script to complete
fully (and if a reboot is
started), the script fails.
For actions which require
restarts and then additional
actions:
1. Split the script up into
multiple scripts.
2. Select the "Individual
with restart" script
execution mode.
3. Place the rest of the
scripts in order.
N/A
Troubleshooting Windows Scripts
Upgrade Azure Az PowerShell Module
Sometimes a scripted action or PowerShell script that works locally fails in Nerdio Manager with
an error such as:
Method 'get_SerializationSettings' in type
'Microsoft.Azure.Management.Internal.Resources.ResourceManagementClient'
from assembly 'Microsoft.Azure.PowerShell.Clients.ResourceManager,
Version=1.0.0.0, Culture=neutral, PublicKeyToken=31b57jpo856ad4e35' does not have an
implementation.
162

Sometimes the error message is different, or the error message suggests upgrading your Az
modules. These errors can often be resolved by upgrading the Az module or modules used by the
scripted action automation account.
To upgrade your Azure Az PowerShell module:
1. Find the scripted actions automation account by selecting the Browse gallery button.
Note: Do not use the Update Az Modules button because it does not actually update to
the latest versions.
2. Search for the relevant Az module, such as Az.KeyVault, and upgrade it.
Note: This is determined by the specific command that is failing. For example, if the
script fails on Get-AzKeyVault, then it is the Az.KeyVault module that needs to be
updated.
3. Sometimes the modules have dependencies on other Az modules, such as Az.Accounts.
Dependencies may need to be updated as well.
Note: If you use a hybrid worker to execute scripted actions, then the modules need to be
updated on the hybrid worker VM, rather than in the automation account. This can be
accomplished using the Update-Module command on the hybrid worker VM.
Scripted Actions for Windows Scripts
Windows Scripts are scripted actions that are run directly on the Virtual Machine. They can be
thought of as "sign in scripts," except executed machine-wide and performed as part of the
provisioning process for creating or removing session hosts, or running commands against the
Desktop Image VMs for installing or updating software, or other tasks.
You can create a new scripted action, view, edit, and apply the existing scripted actions. For more
information refer to "Scripted Actions Overview" on page 142.
For more information about Scripted Actions for windows refer to Custom Script for Windows.
163

Custom Script Extensions
Nerdio Manager uses the custom script extension to execute PowerShell code on the Virtual
Machine.
Notes:
l
Nerdio Manager also uses the custom script extension for other tasks. For example,
installing FSLogix and AVD agents.
l
The script runs with administrative privileges and does not interrupt other sessions. This
means that most scripts are safe to run while users are on the VM.
The PowerShell code is taken from the Nerdio Manager scripted actions library, and then passed
to the extension to be run on the VM. Certain variables are passed with it (for example,
$DesktopUser). These variables are defined according to the Virtual Machines to which Nerdio
Manager is passing the script.
164


Related Topics
"Scripted Actions Overview" on page 142
Custom Script for Windows
Troubleshoot and Support
"Troubleshoot Scripts" on page 159
"Considerations for Scripted Actions" on page 153
Scripted Actions for Azure Runbooks
Azure Runbooks are Azure Automation Account runbooks that run outside the context of a
specific VM. They run directly in your Azure environment through an Azure Automation Account
that is created and managed by the Nerdio Manager App in the security context of the Nerdio
Manager service principal.
You can create a new scripted action, view, edit, and apply the existing scripted actions. For more
information refer to "Scripted Actions Overview" on page 142.
Note: For more information about Scripted Actions refer to "Scripted Actions for Windows
Scripts" on page 163.
Azure runbook scripted actions are run via an Automation Account in Azure. This enables
automated actions of Azure resources outside of the Virtual Machine.
Notes:
l
Azure Runbooks must be enabled manually. For more information about Automation
Account refer to Azure Automation - Overview.
l
Some of the Azure Runbooks scripted actions are customized by the Nerdio Manager
Admin. You can modify the existing script or add your own.
l
Each Automation Account is created specifically per an Azure Runbook.
166

Nerdio Manager allows you to leverage dedicated hybrid worker VMs to integrate Azure
Automation accounts with environments that require private endpoints. Hybrid worker VMs are
connected directly to a VNet and scripted actions can be used when Key Vault and other Nerdio
Manager components are only accessible via private endpoints.
Before you can implement hybrid workers in Nerdio Manager, you must do the following:
l
Create an extension-based hybrid worker .See this Microsoft document for details.
l
Install the Run As account certificate on the hybrid worker. See "Install the Run As account
certificate on the hybrid worker:" below below for details.
To configure the Azure runbooks settings:
1. Navigate to Settings > Nerdio environment.
2. In the Azure runbooks scripted actions tile, select Enabled or Disabled (depending on the
current status).
3. Enter the following information:
l
Use Azure Automation Runbooks?: Toggle this option on or off.
l
Off: The Automation Account is deleted when you disable this feature.
l
On: You can select an Azure region where an Automation Account is created
to run this Runbook.
l
Automation Account Name: Type the account name. This is a unique name and is
only used to run these Azure Runbooks.
l
Hybrid Worker Group: Optionally, from the drop-down list, select the hybrid worker
group.
4.
Once you have entered the desired information, select OK.
Install the Run As account certificate on the hybrid worker:
Note: See this Microsoft document for details.
167

1. Find the Azure Key vault associated with the Nerdio installation. It begins with nmw-app-
kv-.
2. In the Key Vault, select Certificates.
3. Select the certificate called nmw-scripted-action-cert.
4. Select Download in PFX/PEM format.
Note: In order to download the certificate, your user account needs permission to list/get
certificates AND secrets from the key vault. See this Microsoft article for more
information.
5. Install the downloaded certificate on the hybrid worker VM.
Renew the Azure Runbook Scripted Actions Automation Certificate
Nerdio Manager allows you to renew the Azure Runbook scripted actions automation certificate.
To renew the certificate:
1. Navigate to Settings > Nerdio environment.
2. In the Azure runbooks scripted actions tile, select Renew certificate.
3. Certificate Validity (Months); Type the desired number of months.
Note: The default value of 120 months is recommended.
4.
Once you have entered the desired information, select OK.
Note: This task may take some time to run. You can follow its progress in the Settings
Tasks window.
5. After you renew the certificate, be sure to connect the subscriptions.
168

l
In the Azure runbooks scripted actions tile, select connect for each subscription
that is not connected.
l
Follow the on-screen instructions to connect each subscription.
Related Topics
"Scripted Actions Overview" on page 142
"Scripted Actions for Windows Scripts" on page 163
"Considerations for Scripted Actions" on page 153
Scripted Actions for Windows 365
This is an overview about how to use scripted actions in the context of Windows 365.
Note: Before you start this topic, be sure that you have read Windows 365 Enable and
Configure Cloud PCs.
Note: Nerdio Manager is set up so that you can use the same scripts for AVD and Windows
365 without any significant modifications.
To add a new scripted action:
1. Navigate to Scripted Actions > Windows scripts.
Note: Only Windows scripts are relevant for Windows 365 scripted actions.
2.
Select Add scripted action.
3. Enter the following information:
l
Name: Type the script's name.
l
Description: Type the script's description.
169

l
Tags: From the drop-down list, select the tag(s). Alternatively, type a new tag.
l
Script Executing Mode: From the drop-down list, select the script's execution mode.
l
Enable Cloud PC: You must select this option to enable this script for Windows 365.
l
Run this script using the logged on credentials: Select this option to run the
script with the user's credentials. Otherwise, the script runs in the system
context.
l
Enforce script signature check: Select this option to force the script to be
signed by a trusted publisher. Otherwise, no warning or prompt displays and
the script runs unblocked.
l
Run this script in 64 bit PowerShell host: Select this option to run the script in
64-bit PowerShell host for a 64-bit client architecture. Otherwise, the script
runs in 32-bit PowerShell host.
l
Assign to all users: Optionally, assign the scripted action to all users.
l
Assign to all devices: Optionally, assign the scripted action to all devices.
l
Assign to selected groups: Optionally, assign the scripted action to selected
groups. (Recommended)
l
Exclude assignments: Optionally, exclude members in the selected groups
from applying the scripted action.
Note: Cloud PC security works with user groups and not with individual
users.
l
Script: Type or copy/paste the script.
4.
Once you have entered all the desired information, select OK.
170

Notes:
l
The script is now enabled for Cloud PC and is submitted to run on the Cloud PCs. This
could take quite a long time to finish, possibly several hours.
l
In the Windows Scripts list, the Applied To column is updated with the number of
devices this script applies to.
l
Select the number to see the detail log information.
171

l
In addition, you can navigate to Windows 365 > Cloud PCs. The Scripts column shows
you all the scripts that have executed on the Cloud PC. Select any script to see its detail
log information.
172

Host Pools
After you create the desktop images, the next step in the Nerdio Manager AVD deployment flow is
to create host pools from the desktop images.
Host pools are groups of identical Azure VMs that host the Azure Virtual Desktops that end users
sign in to. All VMs in the host pool share a set of configuration options: VM size, OS disk size,
base image, AD domain, user profile storage location, and more.
You can configure two types of host pools:
l
Static: A static host pool contains a set number of session hosts that the administrator
configures. That is, it does not have auto-scale enabled.
Note: When Nerdio Manager is first deployed to an existing environment, the host pools
that are created are static host pools. They can be converted to dynamic host pools.
l
Dynamic: A dynamic host pool is a host pool whose configuration can be scaled in and out
(auto- scale) as per the workload. That is, auto- scale can create the session hosts
automatically based on the auto-scale configuration.
Related Topics
"Create Static Host Pools Without Auto-Scaling" on page 175
"Create Dynamic Host Pools" on page 182
Delete Hosts, Host Pools, and Workspaces
"Convert a Static Host Pool to Dynamic" on page 179
Workspace Management
A workspace is a container for host pools and session hosts that provide desktops and
RemoteApps to users. This topic discusses creating and managing workspaces.
Create a Workspace
A workspace must be created before you can create host pools and session hosts.
173
To create a workspace:
1. Navigate to Workspaces.
2. Select Add Workspace.
3. Enter the following information:
l
Name: Type the workspace's name.
Note: The Name is assigned to the workspace during creation and cannot be
changed later. By default, it is visible to the end-user. Specifying a Friendly Name
overrides what is visible to the end-user.
l
Friendly Name: Type the Friendly Name.
l
Description: Type the description, which is only visible to admins.
l
Resource group: From the drop-down list, select the resource group to contain the
workspace.
l
Location: From the drop-down list, select the Azure location for the workspace's
objects and associated metadata.
l
Apply tags: Optionally, type the Name and Value of the Azure tag to apply to the
Workspace.
Note: You may specify multiple tags. See this Microsoft article for details about
using tags to organize your Azure resources.
4.
Once you have entered all the desired information, select OK.
The workspace is created.
Manage Workspaces
From the Workspaces table, you can do the following:
174

l
Dynamic host pools: Manage the workspace's dynamic host pools.
l
Static host pools: Manage the workspace's static host pools.
l
Unassign: Unassign the workspace from Nerdio Manager.
l
Delete: Delete a Workspace.
Note: You may only delete a workspace that has no host pools.
l
User Sessions: Manage the workspace's user sessions.
Create Static Host Pools Without Auto-Scaling
The following procedure allows you to create a new static host pool.
To create a new static host pool:
1. Navigate to Workspaces.
2. Select the workspace you wish to work with.
3. Navigate to Workspaces > Static Host Pools.
4. Select Add static host pool.
5. Enter the following information:
Note: For several of the required parameters, you may filter the available choices by
using the Resource Selection Rules. For example, you may filter the VM Size or
OS Disk choices for Intel RAM-optimized VMs only. See "Resource Selection Rules
Management" on page 74 for details.
l
Name: Type the name of the static host pool.
l
Description: Type the host pool's description.
175

Note: Optionally, select Generate using AI to have AI create the description. See
Overview of AI-Powered Description Generation for details.
l
Desktop Experience: From the drop-down list, select the desktop experience.
Note:
l
Multi user desktop (pooled): This is the full desktop experience. Users are
not assigned to individual session hosts and are placed on a host based on
its load. Multiple users are pooled together on a group of hosts.
l
Multi user RemoteApp (pooled): This is only published applications, not a
full desktop experience. Published RemoteApps are visible to users as
native apps running on their local computer. The RemoteApps are provided
by a collection (pool) of session hosts.
l
Single user desktop (pooled): This is the full desktop experience. Users
are placed on individual desktop VMs (one user per session host) and a
preconfigured number of spare(available) desktops is maintained.
l
Single user desktop (personal): This is a personal (persistent) full desktop
experience. A dedicated session host VM is assigned to each user.
l
Directory: From the drop-down list, select the directory.
Note: The default option is the global default Nerdio Manager AD configuration.
To use a custom configuration for the host pool, select the Custom option.
l
FSLogix: From the drop-down list, select the FSLogix configuration profile to be used
when creating or re-imaging hosts in this host pool.
l
Initial Host Count: Type the number of sessions hosts to add to the host pool during
creation.
176

Note: Static host pools can be created with zero or more session hosts. New
session hosts can be added or deleted at any time.
l
Name: Type the name of the newly added hosts for the Exact name, a Prefix or the
Prefix+Pattern.
l
Exact/Prefix/Pattern: From the drop-down list, select whether to use an Exact
name, a Prefix, or a Pattern.
Note:
l
Exact applies when adding a single host and specifying an exact
name. For example, MYADVHOST.
l
Prefix can be used when creating multiple session hosts. The Prefix
limit is 10 valid, Windows computer name characters. When using a
Prefix, a unique suffix is automatically appended in the format "-
xxxx", where xxxx are 4 random alphanumeric characters. For
example: AVDHOST-s72h. Do not add a "-" to the Prefix.
l
Pattern can be used to specify an advanced naming convention for
new hosts. Pattern characters must be enclosed in {} and can be #
(for sequential numbers) and/or ? (for random alphanumeric
characters). One # implies numbers from 0 to 9, two #s implies
numbers of 0 to 99, etc.
l
Example 1: AVDHOST{###} (AVDHOST000..AVDHOST999).
l
Example 2: AVDHOST-{???} (AVDHOST-d83, AVDHOST-7sl,
etc.).
l
Network: From the drop-down list, select the network. The network determines the
Azure region of the VM.
Note: The network is the Azure VNETS and subnets. If it is not present in the list,
it must be added in Settings > Azure environment > Linked networks.
177

l
Desktop Image: From the drop-down list, select the desktop image that is used as
the golden image for newly created session hosts.
l
VM Size: From the drop-down, select the VM disk size and type for newly created
session hosts.
Note: If any VM size is not available for a subscription or region, it doesn't appear
in the list. At times, even if a VM size is available in a specific Azure region, it
cannot be used due to the subscription having restrictions on a particular size. In
such cases, we show the VM size in the drop-down list, but don't allow users to
select it (the size is disabled).
l
OS Disk: From the drop-down list, select the OS Disk type and size for newly created
session hosts.
Note: This must be equal to or larger than the size of the Desktop Image selected
above. Using Standard HDD (S- type) is not recommended. Premium SSD
provides best performance.
l
Resource Group: From the drop-down list, select the resource group to contain the
VMs.
l
Quick Assign: From the drop-down list, select the users or groups to pre-assign to
newly created desktops.
Note: The number of users specified cannot exceed the number of hosts being
added. User assignment can be modified after the host pool is created.
l
Apply tags: Optionally, type the Name and Value of the Azure tag to apply to the
host pool.
178

Note: You may specify multiple tags. See this Microsoft article for details about
using tags to organize your Azure resources.
l
Add "cm-resource- parent" tag: Select this option to add the "cm-resource-
parent" tag to the host pool.
l
App group settings: Optionally, type the App group name of the host pool.
l
Application policies: Optionally, select the application policies to assign to the host
pool.
6.
Once you have entered all the desired information, select OK.
The process of host pool creation begins. First a host pool itself is created, then session host VMs
are built out. Session hosts are joined to Active Directory, AVD and FSLogix agents are installed
on the session hosts and users/groups are assigned per the configuration you selected.
Note: You can convert a static pool into a dynamic pool. For more information refer to "Convert
a Static Host Pool to Dynamic" below.
Related Topics
"Host Pools" on page 173
"Create Dynamic Host Pools" on page 182
Delete Hosts, Host Pools, and Workspaces
"Convert a Static Host Pool to Dynamic" below
Convert a Static Host Pool to Dynamic
The following procedure allows to a user to convert a static host pool to a dynamic host pool. The
dynamic host pool can then be configured for auto-scaling.
To convert a static host pool to dynamic:
179

1. Locate the static host pool you wish to convert.
2. Select Convert to Dynamic.
3. On the confirmation window, select Confirm.
Note: By default, the auto-scale option for this host pool is off. This new host pool has no
user sessions. You can manually add and remove hosts to and from the pool.
Alternatively, you can enable auto-scale. See "Enable Dynamic Host Pool Auto-scaling"
on page 186 for details.
Add a New Session Host to a Static Host Pool
Once a host pool is created, you can manually add session hosts.
To add a session host to a static host pool:
1. Locate the static host pool you wish to work with.
2. From action menu, select Hosts > Add new.
3. Enter the following information:
Note: For several of the required parameters, you may filter the available choices by
using the Resource Selection Rules. For example, you may filter the VM Size or
OS Disk choices for Intel RAM-optimized VMs only. See "Resource Selection Rules
Management" on page 74 for details.
l
Host Count: Type the number of session hosts to add to the host pool.
l
Host Name: Type the name of the newly added hosts for the Exact name, a Prefix or
the Prefix+Pattern.
l
Exact/Prefix/Pattern: From the drop-down list, select whether to use an Exact
name, a Prefix, or a Pattern.
180

Note:
l
Exact applies when adding a single host and specifying an exact
name. For example, MYADVHOST.
l
Prefix can be used when creating multiple session hosts. The Prefix
limit is 10 valid, Windows computer name characters. When using a
Prefix, a unique suffix is automatically appended in the format "-
xxxx", where xxxx are 4 random alphanumeric characters. For
example: AVDHOST-s72h. Do not add a "-" to the Prefix.
l
Pattern can be used to specify an advanced naming convention for
new hosts. Pattern characters must be enclosed in {} and can be #
(for sequential numbers) and/or ? (for random alphanumeric
characters). One # implies numbers from 0 to 9, two #s implies
numbers of 0 to 99, etc.
l
Example 1: AVDHOST{###} (AVDHOST000..AVDHOST999).
l
Example 2: AVDHOST-{???} (AVDHOST-d83, AVDHOST-7sl,
etc.).
l
Network: From the drop-down list, select the network. The network determines the
Azure region of the VM.
l
Desktop Image: From the drop-down list, select the desktop image that is used as
the golden image for newly created session hosts.
Note: The Unmanaged Azure Compute Gallery image versions section is at the
bottom of the list. These are unmanaged, backup versions of images that were
created while activating staged images. These images can be used to restore any
changes made to session hosts.
l
VM Size: From the drop-down, select the VM disk size and type for newly created
session hosts.
181

l
OS Disk: From the drop-down list, select the OS Disk type and size for newly created
session hosts.
Note: This must be equal to or larger than the size of the Desktop Image selected
above. Using Standard HDD (S- type) is not recommended. Premium SSD
provides best performance.
l
Resource Group: From the drop-down list, select the resource group to contain the
VMs.
l
Apply tags: Optionally, type the Name and Value of the Azure tag to apply to the
session host.
Note: You may specify multiple tags. See this Microsoft article for details about
using tags to organize your Azure resources.
l
Schedule: Optionally, toggle on the schedule, and enter the schedule information, to
run this job per the schedule.
4.
Once you have entered all the desired information, select Run now (not scheduled) or Save
& close (scheduled).
Create Dynamic Host Pools
The following procedure allows you to create a new dynamic host pool.
To create a new dynamic host pool:
1. Navigate to Workspaces.
2. Select the workspace you wish to work with.
3. Navigate to Workspaces > Dynamic Host Pools.
4. Select Add dynamic host pool.
5. Enter the following information:
182

Note: For several of the required parameters, you may filter the available choices by
using the Resource Selection Rules. For example, you may filter the VM Size or
OS Disk choices for Intel RAM-optimized VMs only. See "Resource Selection Rules
Management" on page 74 for details.
l
Name: Type the name of the static host pool.
l
Description: Type the host pool's description.
Note: Optionally, select Generate using AI to have AI create the description. See
Overview of AI-Powered Description Generation for details.
l
Desktop Experience: From the drop-down list, select the desktop experience.
Note:
l
Multi user desktop (pooled): This is the full desktop experience. Users are
not assigned to individual session hosts and are placed on a host based on
its load. Multiple users are pooled together on a group of hosts.
l
Multi user RemoteApp (pooled): This is only published applications, not a
full desktop experience. Published RemoteApps are visible to users as
native apps running on their local computer. The RemoteApps are provided
by a collection (pool) of session hosts.
l
Single user desktop (pooled): This is the full desktop experience. Users
are placed on individual desktop VMs (one user per session host) and a
preconfigured number of spare(available) desktops is maintained.
l
Single user desktop (personal): This is a personal (persistent) full desktop
experience. A dedicated session host VM is assigned to each user.
l
Directory: From the drop-down list, select the directory.
183

Note: The default option is the global default Nerdio Manager AD configuration.
To use a custom configuration for the host pool, select the Custom option.
l
FSLogix: From the drop-down list, select the FSLogix configuration profile to be used
when creating or re-imaging hosts in this host pool.
l
Name: Type the name of the newly added hosts for Prefix or the Prefix+Pattern.
l
Prefix/Pattern: From the drop-down list, select whether to use a Prefix or a
Pattern.
Note:
l
Prefix can be used when creating multiple session hosts. The Prefix
limit is 10 valid, Windows computer name characters. When using a
Prefix, a unique suffix is automatically appended in the format "-
xxxx", where xxxx are 4 random alphanumeric characters. For
example: AVDHOST-s72h. Do not add a "-" to the Prefix.
l
Pattern can be used to specify an advanced naming convention for
new hosts. Pattern characters must be enclosed in {} and can be #
(for sequential numbers) and/or ? (for random alphanumeric
characters). One # implies numbers from 0 to 9, two #s implies
numbers of 0 to 99, etc.
l
Example 1: AVDHOST{###} (AVDHOST000..AVDHOST999).
l
Example 2: AVDHOST-{???} (AVDHOST-d83, AVDHOST-7sl,
etc.).
l
Network: From the drop-down list, select the network. The network determines the
Azure region of the VM.
184

Note: Nerdio Manager verifies that there is a sufficient number of available IP
addresses on the selected network before deploying new host pool VMs. If there
are insufficient available IP addresses, an error message is displayed and you
may not add the new host pool.
l
Desktop Image: From the drop-down list, select the desktop image that is used as
the golden image for newly created session hosts.
l
VM Size: From the drop-down, select the VM disk size and type for newly created
session hosts.
Note: If any VM size is not available for a subscription or region, it doesn't appear
in the list. At times, even if a VM size is available in a specific Azure region, it
cannot be used due to the subscription having restrictions on a particular size. In
such cases, we show the VM size in the drop-down list, but don't allow users to
select it (the size is disabled).
l
OS Disk: From the drop-down list, select the OS Disk type and size for newly created
session hosts.
Note: This must be equal to or larger than the size of the Desktop Image selected
above. Using Standard HDD (S- type) is not recommended. Premium SSD
provides best performance.
l
Resource Group: From the drop-down list, select the resource group to contain the
VMs.
l
Quick Assign: From the drop-down list, select the users or groups to pre-assign to
newly created desktops.
Note: The number of users specified cannot exceed the number of hosts being
added. User assignment can be modified after the host pool is created.
185

l
Apply tags: Optionally, type the Name and Value of the Azure tag to apply to the
host pool.
Note: You may specify multiple tags. See this Microsoft article for details about
using tags to organize your Azure resources.
l
Add "cm-resource- parent" tag: Select this option to add the "cm-resource-
parent" tag to the host pool.
l
App group settings: Optionally, type the App group name of the host pool.
l
Application policies: Optionally, select the application policies to assign to the host
pool.
6.
Once you have entered all the desired information, select OK.
7. The auto-scale configuration window displays. If desired, configure the auto-scaling for the
host pool. See "Enable Dynamic Host Pool Auto-scaling" below for more information.
The process of host pool creation begins. If auto-scaling has been enabled, it may take some time
to complete. Otherwise, the host pool is created immediately. This creates an "empty" host pool –
there are no session hosts in that host pool. An end-user who attempts to connect to the empty
host pool is informed that there are no resources (that is, session hosts) to serve up a desktop.
You can monitor progress in the Host Pools Tasks section.
Related Topics
"Enable Dynamic Host Pool Auto-scaling" below
"Host Pools" on page 173
"Create Static Host Pools Without Auto-Scaling" on page 175
Delete Hosts, Host Pools, and Workspaces
Enable Dynamic Host Pool Auto-scaling
The auto-scale feature ensures that only the number of session host VMs required to serve the
current demand are running. When not in use, VMs are stopped or deleted. When demand rises,
186

or at specific times of the day, additional VMs in the host pool are started or created. This allows
for cost savings.
You can enable and configure the auto-scaling feature for dynamic host pools.
Note: By default, the Auto-scale option is disabled. When you enable auto-scaling, you can
configure the desktop image, VM size, and OS disk template, and also set the criteria for host
pool sizing, scaling logic, and pre-stage hosts.
To enable dynamic host pool auto-scaling:
1. Locate the dynamic host pool you wish to work with.
2. From the action menu, select Auto-scale > Configure.
3. Enter the following basic auto-scale information:
l
Auto-Scale: Toggle this option On.
l
Auto-scale Timezone: From the drop-down list, select the time zone for the auto-
scale process.
l
Name: Type the name of the newly added hosts for Prefix or the Prefix+Pattern.
l
Prefix/Pattern: From the drop-down list, select whether to use a Prefix or a
Pattern.
187

Note:
l
Prefix can be used when creating multiple session hosts. The Prefix
limit is 10 valid, Windows computer name characters. When using a
Prefix, a unique suffix is automatically appended in the format "-
xxxx", where xxxx are 4 random alphanumeric characters. For
example: AVDHOST-s72h. Do not add a "-" to the Prefix.
l
Pattern can be used to specify an advanced naming convention for
new hosts. Pattern characters must be enclosed in {} and can be #
(for sequential numbers) and/or ? (for random alphanumeric
characters). One # implies numbers from 0 to 9, two #s implies
numbers of 0 to 99, etc.
l
Example 1: AVDHOST{###} (AVDHOST000..AVDHOST999).
l
Example 2: AVDHOST-{???} (AVDHOST-d83, AVDHOST-7sl,
etc.).
l
Network: From the drop-down list, select the network the VM connects to.
Note: The VM that is created on the selected network is created in the Azure
region associated with the network.
l
Desktop Image: From the drop-down list, select a desktop image to be used as the
golden image for new session hosts.
l
VM Size: From the drop-down list, select the VM size for new session hosts.
l
Running OS Disk (Template): From the drop-down list, select the OS disk type and
size for new session hosts.
l
Stopped OS Disk Type: From the drop-down list, select the OS disk type when
session host VMs are stopped.
188

Note: See Auto-Scale Cost Optimization OS Disk Storage for more information
about OS disk auto-scale configuration.
l
Resource Group: From the drop-down list, select the resource group where VMs
should be created.
l
VM Naming: From the drop-down list, select the VM naming to use.
Note: Host VMs that are created automatically by the scale out or auto-grow
process use names based on the selected VM naming mode. See How Session
Host VM Names are Generated for more information.
l
Re-use names: Always attempt to re-use names that were previously used
in the pool, if available.
l
Standard names: Use the next available name.
l
Unique names: Always attempt to use a unique name for new hosts.
l
Automatically Re-image Used Hosts: Selecting this option to re-image hosts that
had at least one user logged into them. For multi-session hosts, the hosts are re-
imaged once the last user signs out.
4. Select the Default schedule or Alternative schedule.
Note: Nerdio Manager allows you to configure separate auto-scale settings for a default
schedule (normal operations) and an alternative schedule (outside of normal
operations). For example, you may want fewer session hosts available on weekends or
bank holidays. Alternatively, you may want more session hosts available two weeks
prior to Christmas when you have a large number of temporary customer support
agents. In either case, you would use the Alternative schedule tab to configure the
auto-scale settings for those periods that are outside of normal operations.
189

l
To create an alternative schedule, navigate to the Alternative schedule tab and
enter the following information:
Note: The Estimated Monthly Costs shown at the top of this page only consider
the Default Schedule's settings.
l
Schedule: Toggle on the Schedule option to turn on the Alternative Schedule
process.
l
Days: From the drop-down list, select the off-peak day(s).
l
Dates: Select the specific off-peak date(s).
l
Select + or - to add or remove off-peak dates.
5. Select the Auto-scale profile (Premium only):
l
From the drop-down list, select the auto-scale profile to use. Alternatively, select
Custom to create a custom auto-scale configuration.
Note: See Manage Auto-scale Profiles for details about creating and working with
auto-scale profiles.
6. Enter the following Host Pool Properties information:
l
Session limit host: Type the maximum number of sessions per host. Once this
session limit is reached, and there are no more available hosts, a new host is started
automatically, if it exists.
l
Load Balancing: From the drop-down list, select the desired load balancing.
190
Note:
l
Breadth First means that the load-balancing algorithm spreads the users
evenly across all available session hosts.
l
Depth First means the load-balancing algorithm places all the users in the
first session host until the host's session limit is reached. Only then, does it
place the users in the next session host. If necessary, it powers on the
VM and makes it available to the users.
l
Start on connect: Select this option to start the session host VMs on connect.
7. Enter the following Host Pool Sizing information:
l
Active Host Defined As: From the drop-down list, select the active host definition.
Note: When set to “VM started,” the system identifies a session host VM as active
as long as the VM is running in Azure. There are very few instances when "VM
started" should be selected.
When set to “AVD Agent Available,” the system identifies a session host VM as
active only when the AVD back-end is receiving heartbeats and sees the session
host as “Available.” In general, you should select "AVD Agent Available.”
l
Base Host Pool Capacity: Type the number of session host VMs to always be part of
this host pool. These session hosts may be stopped or running.
l
Min Active Host Capacity: Type the minimum number of running session hosts that
are always available. Typically, a session host must be running for users to sign in or
the "Start on connect" feature is enabled. Other VMs can be either stopped or turned
on, as configured by the user auto-scaling logic.
l
Burst Beyond Base Capacity: Type the capacity to burst above the standard
number of session host VMs when there is user demand. The system automatically
creates up to this number of new session host VMs above the Base Host Pool
191

Capacity, when needed. These session hosts are the first ones to be removed when
the system scales in after business hours.
8. Enter the following Scaling Logic information:
l
Use Multiple Auto- scale Triggers: Select this option to enable multiple usage
triggers to be used for scaling out and scaling in.
The multiple auto-scale triggers feature is only available in the Nerdio Manager
Premium edition.
Notes:
l
Auto-scale adds capacity when any of the scale out conditions are met.
Capacity is removed only when all the scale in conditions are met.
l
Use the + and - buttons to add or remove scale out triggers. You may select
up to 3 triggers.
l
Select Auto-scale Trigger: From the drop-down list, select the auto-scale trigger.
192

Note: The available triggers are:
l
CPU usage or RAM usage: This scales out when the average CPU or RAM
usage across all running session hosts in the pool exceeds a predefined
value for a predefined duration.
l
Average active sessions: This scales out when the average number of
active sessions per host exceeds a predefined value.
l
Available sessions: This maintains the number of available hosts by
scaling out and scaling in within the limits of the Host Pool Sizing and the
maximum number of sessions per host.
l
User-driven: Hosts are started when users connect and are automatically
stopped after a defined amount of time after all users sign out.
l
For CPU usage or RAM usage:
l
Start or Create (Scale Out) Up To: Scale out by starting (if there are stopped
VMs) or creating (if there are no stopped VMs) session hosts if the trigger is
exceeded.
l
Stop or Remove (Scale In) Up To: Scale in by stopping (if there are no burst
VMs) or removing (if there are burst VMs) session hosts if scale in trigger is
met.
l
For Average active sessions:
l
Start or Create (Scale Out) Up To: Scale out by starting (if there are stopped
VMs) or creating (if there are no stopped VMs) session hosts if the average
active sessions across all hosts is exceeded.
l
Stop or Remove (Scale In) Up To: Scale in by stopping (if there are no burst
VMs) or removing (if there are burst VMs) session hosts if if the average active
sessions across all hosts is below the number specified.
l
For Available sessions:
193

l
Maximum sessions per host: Type the maximum sessions per host.
l
Maintain up to X available sessions: Type the number of sessions that must
be available either always or during work hours.
Note: This ensures that there are this many available sessions during work
hours or at all times. Work hours start at Start of work hours specified in the
Pre- Stage Hosts section and end at the beginning of scale in period
specified in the Scale in restrictions section below.
l
Outside work hours: Type the number of sessions to maintain outside of
work hours.
Note: This value cannot exceed the number of desktops available
during work hours.
l
Working hours: From the drop-down lists, select the start and end times
for working hours.
l
For User Driven:
l
When all users log off, scale in hosts after: From the drop-down list, select
the number of minutes to scale in after all users have signed out.
Note: Desktops are automatically stopped only when there are no active or
disconnected sessions. To automatically sign out disconnected users after
a certain time, use the user session limits settings on the host pool
properties.
l
Scale in Restrictions:
l
Stop or Remove (Scale In) Hosts Only From: From the drop-down list, select
the time to perform the scale in operation. Select <any time> to allow scaling
in to be performed at any time.
194

l
Scale In Aggressiveness: Drop the drop- down list, select the scale in
aggressiveness.
Note:
l
High Aggressiveness: Scale in aggressiveness is set to High by
default, which means it is guaranteed that after business hours, hosts
that have active or disconnected sessions running on them are
automatically deleted or powered off to reduce capacity. After
business hours, the auto-scale logic first removes the hosts that have
no sessions running on them. The remaining hosts are sorted based
on the least number of sessions running on them. The users with
active sessions are then consolidated and moved to a single host and
the other hosts are removed by auto-scale. A warning message is
sent to the active session users before removing the session hosts.
l
Medium Aggressiveness: When scale in aggressiveness is set to
Medium, after business hours, the scaling logic only removes the
hosts that have disconnected sessions running on them. The session
hosts with active sessions running on them won't be removed. In this
case, the host pool is scaled in to some extent.
l
Low Aggressiveness: When scale in aggressiveness is set to Low,
after business hours, the scaling logic only removes those session
hosts that have absolutely no sessions running on them. The auto-
scale logic does not remove any session host that have sessions,
either active or disconnected, running on them. Though this option is
less disruptive for the users, there is no guarantee that the host pool
is ever scaled in.
l
Deactivate (drain mode) hosts: Optionally, you can tell the auto-scale engine
to deactivate all hosts at the start of the scale in window. It does leave the
minimum number of hosts as specified in the Min active host capacity in the
Host Pooling Size section.
9. Enter the following Rolling Drain Mode information:
195

Notes:
l
You can create multiple drain windows and target a specific percentage of your
hosts to drain mode, outside of the Scale- in Restriction window. This feature
allows you to prevent new connections to a percentage of hosts and allows these
hosts to be shut down more quickly, saving on resource costs.
l
Rolling drain mode selects hosts to scale in as follows:
l
First, it starts with lowest active sessions.
l
Then it scales in hosts that are already in drain mode,
l
Finally, it scales in hosts with the lowest number of total sessions (active +
disconnected).
l
Rolling Drain Mode: Toggle this option on to enable rolling drain mode.
l
Window name: Type the name for this drain window.
l
Start time: From the drop-down lists, select the start time when this drain window
comes into effect.
Note: The last drain window remains in effect until 11:59 PM.
l
% hosts in drain mode: Type the percentage of hosts in drain mode during this
window.
Note: Use to add or remove drain windows.
l
Load balancing: From the drop- down list, select the preferred load balancing
algorithm.
196

Note: This option is only available in the Nerdio Manager Premium edition.
l
Depth First: The load balancing algorithm places users on a single host
until the session limit is reached, at which point users start being placed on
the next host until the session limit is reached again.
l
Breadth First: The load balancing algorithm spreads users evenly across
available session hosts.
10. Enter the following Pre-Stage Hosts information:
Note: Configure the system to automatically pre-stage some hosts as available capacity
with respect to the business hours. For example, you can pre- stage hosts at the
beginning of the work day, so the system does not have to auto-scale in real time for
users who all sign in at the same time when they start work.
l
Use Multiple Schedules: Select this option to enable multiple, non-overlapping pre-
staging schedules to be used.
Note: This is not available for the Available Sessions trigger when During Work
Hours option is specified.
l
Work Days: From the drop-down list, select the work days when pre-stage tasks
should be run.
l
Start of Work Hours: From the drop-down select the starting hour when pre-stage
tasks should be run.
l
Host to be Active by Start of Work Hours: Type the number of session hosts that
should be ready to accept user connections by this time.
l
Scale In Delay: From the drop-down list, select a delay to restrict scale in operations
after the start of work hours. Pre-staged hosts are not scaled in during this time even
if they are unused.
197

11. Enter the following Messaging information:
Note: The system sends messages to any users connected to a session host that has
been selected for scale in.
l
Send a Warning Message to Users on the host: From the drop-down list, select the
number of minutes before scaling in that the message should be sent.
l
The message should say: Type the warning message text.
12. Enter the following Auto-Heal Broken Hosts information:
Note: Session hosts may get impaired due to domain trust issues or FSLogix
configuration issues. The AVD agent reports the status of such hosts as unavailable.
Admins then have to manually remove such hosts from the pool. However, Nerdio
Manager allows you to configure a set of actions to repair these session hosts during the
auto-scale process. Auto-scale can automatically attempt to repair "broken" session
hosts by restarting and deleting/recreating them. It can make a few attempts to restart
the host to try to get it back into an operational state and then either leave it alone or
delete and recreate the host.
l
Auto-Heal Broken Hosts: Toggle this option on to enable auto-heal.
l
Host is Broken if AVD Agent Status is: From the drop-down lists, select the desired
statuses along with the sessions status.
Note: The status is reported to the AVD service by the AVD agent installed on the
session host VM. If something is wrong, the status is something other than
"Available." Not every status other than "Available" means that there is a problem.
See this Microsoft article for more details. Hosts with active sessions may still be
somewhat functional and such hosts are not treated as broken. Only hosts that
have either no sessions at all or no active session (that is, disconnected sessions
only) are considered broken by auto-scale.
198

l
Minutes before first action: Type the number of minutes to wait before running the
first action.
l
Recovery actions: From the drop-down list, select the recovery action(s).
Notes:
l
You may select a VM action (for example, Restart VM or Remove VM), or a
scripted action (for example, reinstall SxS, re-register host with AVD, etc.).
l
The recovery actions are run in the order shown. You can drag and drop
any action to change its place in the list and, therefore, the order it is run.
l
Minutes between recovery actions: Type the number of minutes to wait after each
restart attempt before moving on to next step (for example, Restart VM, then
Remove VM, then etc.).
Note: If the Auto-Heal operation requires deletion and re-creation of a broken host
VM, a spare VM is powered on to replace the capacity, if available.
13.
Once you have entered all the desired information, select Save or Save & close.
Related Topics
"Create Dynamic Host Pools" on page 182
"Enable Personal Host Pool Auto-scaling" below
Enable Personal Host Pool Auto-scaling
Nerdio Manager allows you to perform auto-scaling on personal host pools. This enables you to
do the following:
l
Personal desktops can be automatically powered on and off based on a schedule.
Alternatively, personal desktops can be stopped when there are no active or disconnected
sessions.
199

l
The host OS disk type can be changed to a lower priced storage type when the personal
desktop is not running.
l
Auto-healing automatically attempts to repair "broken" session hosts. In addition, it allows
scripted actions, such as SxS re-install or AVD host re-register, to be executed against
them.
To configure the basic auto-scale information:
1. Locate the personal host pool you wish to work with.
2. From the action menu, select Auto-scale > Configure.
3. Auto-Scale: Toggle this option On.
4. Enter the following basic auto-scale information:
l
Auto-scale Timezone: From the drop-down list, select the time zone for the auto-
scale process.
l
Name: Type the name of the newly added hosts for Prefix or the Prefix+Pattern.
l
Prefix/Pattern: From the drop-down list, select whether to use a Prefix or a
Pattern.
200

Note:
l
Prefix can be used when creating multiple session hosts. The Prefix
limit is 10 valid, Windows computer name characters. When using a
Prefix, a unique suffix is automatically appended in the format "-
xxxx", where xxxx are 4 random alphanumeric characters. For
example: AVDHOST-s72h. Do not add a "-" to the Prefix.
l
Pattern can be used to specify an advanced naming convention for
new hosts. Pattern characters must be enclosed in {} and can be #
(for sequential numbers) and/or ? (for random alphanumeric
characters). One # implies numbers from 0 to 9, two #s implies
numbers of 0 to 99, etc.
l
Example 1: AVDHOST{###} (AVDHOST000..AVDHOST999).
l
Example 2: AVDHOST-{???} (AVDHOST-d83, AVDHOST-7sl,
etc.).
l
Network: From the drop-down list, select the network the VM connects to.
Note: The VM that is created on the selected network is created in the Azure
region associated with the network.
l
Desktop Image: From the drop-down list, select a desktop image to be used as the
golden image for new session hosts.
l
VM Size: From the drop-down list, select the VM size for new session hosts.
l
Running OS Disk (Template): From the drop-down list, select the OS disk type and
size for new session hosts.
l
Stopped OS Disk Type: From the drop-down list, select the OS disk type when
session host VMs are stopped.
201

l
Name: Type the name of the newly added hosts for Prefix or the Prefix+Pattern.
l
Prefix/Pattern: From the drop-down list, select whether to use a Prefix or a
Pattern.
Note:
l
Prefix can be used when creating multiple session hosts. The Prefix
limit is 10 valid, Windows computer name characters. When using a
Prefix, a unique suffix is automatically appended in the format "-
xxxx", where xxxx are 4 random alphanumeric characters. For
example: AVDHOST-s72h. Do not add a "-" to the Prefix.
l
Pattern can be used to specify an advanced naming convention for
new hosts. Pattern characters must be enclosed in {} and can be #
(for sequential numbers) and/or ? (for random alphanumeric
characters). One # implies numbers from 0 to 9, two #s implies
numbers of 0 to 99, etc.
l
Example 1: AVDHOST{###} (AVDHOST000..AVDHOST999).
l
Example 2: AVDHOST-{???} (AVDHOST-d83, AVDHOST-7sl,
etc.).
l
Resource Group: From the drop-down list, select the resource group where VMs
should be created.
l
VM Naming: From the drop-down list, select the VM naming to use.
202

Note: Host VMs that are created automatically by the scale out or auto-grow
process use names based on the selected VM naming mode. See How Session
Host VM Names are Generated for more information.
l
Re-use names: Always attempt to re-use names that were previously used
in the pool, if available.
l
Standard names: Use the next available name.
l
Unique names: Always attempt to use a unique name for new hosts.
5. Select the Default schedule or Alternative schedule.
Note:Nerdio Manager allows you to configure separate auto-scale settings for a default
schedule (normal operations) and an alternative schedule (outside of normal
operations). For example, you may want fewer session hosts available on weekends or
bank holidays. Alternatively, you may want more session hosts available two weeks
prior to Christmas when you have a large number of temporary customer support
agents. In either case, you would use the Alternative schedule tab to configure the
auto-scale settings for those periods that are outside of normal operations.
l
To create an alternative schedule, navigate to the Alternative schedule tab and
enter the following information:
Note: The Estimated Monthly Costs shown at the top of this page only consider
the Default Schedule's settings.
l
Schedule: Toggle on the Schedule option to turn on the Alternative Schedule
process.
l
Days: From the drop-down list, select the off-peak day(s).
203

l
Dates: Select the specific off-peak date(s).
l
Select + or - to add or remove off-peak dates.
6. Auto-scale Mode: From the drop-down list, select the desired auto-scale mode.
Notes:
l
User- driven: The auto- scaling is performed when there are no active or
disconnected sessions.
l
Schedule-based: The auto-scaling is performed as per the specified schedule.
7. Auto-scale profile (Premium only): Optionally, from the drop-down list, select the auto-
scale profile to use. Alternatively, select Custom to create a custom auto- scale
configuration.
Note: See Manage Auto-scale Profiles for details about creating and working with auto-
scale profiles.
8. Continue the configuration process with the relevant auto-scale mode:
l
User-driven: See "To enable user-driven personal host pool auto-scaling:" below
l
Schedule-based: "To enable schedule-based personal host pool auto-scaling:" on
page 210
To enable user-driven personal host pool auto-scaling:
1. Auto-scale Mode: From the drop-down list, select the User-driven.
2. Enter the following Host Pool Properties information:
l
Start on connect: Select this option to start the desktop on connect.
3. Enter the following Desktop Start and Stop information:
204

l
Desktop Start and Stop: Toggle this option on to enable desktop start and stop.
l
Desktops are stopped when users log off after: From the drop-down list, select the
number of minutes or hours to scale in after all users have signed out.
Notes:
l
Desktops are automatically started when users connect.
l
Desktops are automatically stopped only when there are no active or
disconnected sessions. To automatically sign out disconnected users after
a certain time, use the user session limits settings on the host pool
properties.
l
Bypass drain mode for desktops in this pool: Select this option so that desktops do
not enter drain mode before shutdown.
4. Enter the following Pre-stage Host OS Disks information:
l
Pre-stage Host OS Disks: Toggle this option on to enable pre-staging OS disks.
l
From the drop-down lists, select the Days and Times the session host VMs' OS disks
should be pre-staged.
l
Leave desktops that are not assigned to a user with STOPPED OS disk
type: Select this option so that desktop VMs that are unassigned to a user do not
have the OS disk converted from STOPPED to RUNNING.
l
Use intelligent disk pre-staging for users: Select this option to have intelligent disk
pre-staging learn user behavior and automatically adjusts the disk pre-stage times.
Note: This feature requires AVD insights to be enabled and configured for the
host pool.
205

l
Mode: From the drop-down list, select the mode.
Note:
l
Hybrid Mode: Disks are always be pre-staged based on the defined
schedule. The behavior of users whose work patterns are learned,
and additional staging activity are scheduled. This function is
designed as "learning mode," with the benefits of both the standard
pre-stage functionality and learned requirements.
l
Automated Mode: Disks are pre- staged for existing users only
according to the learned schedule. New users respect the defined
schedule until Intelligent pre-staging has enough data to automate
this process. Disks are pre- staged 30 minutes before anticipated
user log on events.
5. Enter the following Auto-Grow information:
Note: Automatically add desktops to the host pool when the number of unassigned
desktops remaining falls below a specified threshold.
l
Auto-Grow: Toggle this option on to enable auto-grow.
l
Add a new host when the number of available (not assigned to a user) falls
below: Type the threshold and from the drop-down list, select whether the threshold
is a number of desktops or a percentage of total desktops.
6. Enter the following Auto-Shrink information:
Note: The system automatically remove desktops that have not been used in a long
time.
206

l
Auto-Shrink: Toggle this option on to enable auto-shrink.
l
Delete VM if the user hasn't logged in for: Type the number of days to wait before
the system automatically deletes the VM.
Note: User activity on this session host VM is determined based on Nerdio
Manager auto-scale history and AVD diagnostics data. Each time the desktop is
processed by auto-scale, an Azure tag with date/time the desktop was last used is
set. If the desktop hasn't been used for the number of days specified in this
setting, the session host VM is shut down and a "pending deletion" tag is set.
l
Desktop will be set to “Pending deletion” state and deleted after: From the drop-
down list, select the "Pending deletion" duration.
Note: The desktop is set to "Pending deletion" state by the auto-scale process by
adding a tag to the VM. A task is logged during this process, which can be used
for admin notification of a desktop entering the "Pending deletion" state. There
also are notification banners in the Nerdio Manager UI indicating that a personal
host pool has VMs that are pending deletion. After the "pending deletion" period
expires (default: 24 hours), the VM is permanently deleted.
l
Exclude the following groups (or individual users): Enable this option, and then
select the group(s) or individual user(s) to exclude from auto-shrink.
Note: Desktops assigned to users listed here are not automatically removed,
even after a prolonged time of inactivity.
l
Exclude unassigned Desktops from Auto- shrink: Select this option to exclude
desktops that have not been assigned to a user from the auto-shrink operations.
Note: Use this setting in combination with Auto-Grow to maintain a buffer of free
unassigned desktops.
207

l
Notify users of scheduled deletion: Select this option to notify the user via email
about deletion of their desktop when the inactivity period is exceeded.
Note: Notifications on the Settings > Nerdio environment page must be enabled
for this feature to work.
l
Message Subject: Expand this option to type the subject line of the auto-
shrink message.
l
Message Text: Expand this option to open the editor to create a custom auto-
shrink message for users.
Note: The following variables are available for use in the message body:
l
%HOSTPOOL%: Returns the name of the affected host pool.
l
%HOSTNAME%: Returns the specific host name.
l
%HOST_ IDLE_ DAYS_ THRESHOLD%: Returns the configured
maximum idle days before auto shrink is started.
l
%SHRINK_TIME_UTC%: Returns the exact time in UTC when the
auto-shrink task is set to occur.
l
%SHRINK_DATE%: Returns the exact date when the auto-shrink
task is set to occur.
l
Notify an additional email recipient when desktops are scheduled to be
deleted: Select this option to notify an additional email recipient when desktops are
scheduled to be deleted.
l
Send notification emails to: Type the additional recipient's email address.
l
Send notification emails from: Type the sender's email address.
l
Notifications frequency (Premium only): From the drop-down list, select how
208

frequently the email reminders are sent to the user.
Note: A final email is always be sent 1 day before the scheduled deletion.
7. Enter the following Auto-Heal Broken Hosts information:
Note: Session hosts may get impaired due to domain trust issues or FSLogix
configuration issues. The AVD agent reports the status of such hosts as unavailable.
Admins then have to manually remove such hosts from the pool. However, Nerdio
Manager allows you to configure a set of actions to repair these session hosts during the
auto-scale process. Auto-scale can automatically attempt to repair "broken" session
hosts by restarting and deleting/recreating them. It can make a few attempts to restart
the host to try to get it back into an operational state and then either leave it alone or
delete and recreate the host.
l
Auto-Heal Broken Hosts: Toggle this option on to enable auto-heal.
l
Host is Broken if AVD Agent Status is: From the drop-down lists, select the desired
statuses along with the session status.
Note: The status is reported to the AVD service by the AVD agent installed on the
session host VM. If something is wrong, the status is something other than
"Available." Not every status other than "Available" means that there is a problem.
See this Microsoft article for more details. Hosts with active sessions may still be
somewhat functional and such hosts are not treated as broken. Only hosts that
have either no sessions at all or no active session (that is, disconnected sessions
only) are considered broken by auto-scale.
l
Minutes before first action: Type the number of minutes to wait before running the
first action.
l
Recovery actions: From the drop-down list, select the recovery action(s).
209
Notes:
l
You may select a VM action (for example, Restart VM or Remove VM), or a
scripted action (for example, reinstall SxS, re-register host with AVD, etc.).
l
The recovery actions are run in the order shown. You can drag and drop
any action to change its place in the list and, therefore, the order it is run.
l
Minutes between recovery actions: Type the number of minutes to wait after each
recovery action step before moving on to next step (for example, Restart VM, then
Remove VM, then etc.).
Note: If the Auto-Heal operation requires deletion and re-creation of a broken host
VM, a spare VM is powered on to replace the capacity, if available.
8.
Once you have entered all the desired information, select Save or Save & close.
To enable schedule-based personal host pool auto-scaling:
1. Auto-scale Mode: From the drop-down list, select the Schedule-based.
2. Enter the following Host Pool Properties information:
l
Start on connect: Select this option to start the desktop on connect.
3. Enter the following Working Hours information:
l
From the drop-down lists, select the Days and Times the session host VMs' OS disks
should be pre-staged.
l
Power off aggressiveness: From the drop- down list, select the power off
aggressiveness. (Schedule-based only)
210

Note:
l
High: Power off all session host VMs, including those with active and
disconnected sessions. Users with active sessions are sent a message,
defined below, and given time to sign out before their session host VM is
powered off.
l
Medium: Power off only those session host VMs that do not have an active
user session, including those with disconnected sessions.
l
Low: Only power off those session host VMs that have no active or
disconnected sessions.
l
Power on timing: From the drop-down list, select the power on timing. (Schedule-
based only)
Note:
l
Never: Do not power on session host VMs at the beginning of the working
hours defined above. Users must manually power on their session host
VMs.
l
Once: All sessions host VMs are only powered on once at the start of the
working hours. If a session host VM is powered off after the start of the
working hours, it is not automatically powered back on by auto-scale.
l
Continuously: All session host VMs are powered on at the start of the
working hours. In addition, for the duration of the working hours, auto-scale
automatically powers on any session host VMs that were manually
powered off.
l
Power off timing: From the drop-down list, select the power off timing.
211

Note:
l
Never: Do not power off session host VMs at the end of the working hours
defined above.
l
Once: At the end of the working hours, all session host VMs are powered
off, subject to the aggressiveness defined above. If any session host VMs
are manually powered on outside of the working hours, auto-scale does not
automatically power them off.
l
Continuously: At the end of the working hours, all session host VMs are
powered off, subject to the aggressiveness defined above. If any session
host VMs are manually powered on outside of the working hours, auto-
scale automatically powers them off, subject to the aggressiveness defined
above.
l
Include hosts without assigned user: Select this option to also start unassigned
desktops during the auto-scale process.
Note: This may be useful for organizations wishing to perform scheduled tasks
against desktops during the working day.
4. Enter the following Host OS Disks information:
l
Set all hosts to running OS disk type during work hours: Select this option to
convert all stopped host VM OS disks to running disk type during the working hours
defined above.
Note: This is necessary to ensure that if a VM is started via Azure Start VM on
Connect that it has the correct, high-performance disk type. When this setting is
enabled, all "Disk type differs from policy" warnings are hidden for this pool.
212

l
Use intelligent disk pre-staging for users: Select this option to have intelligent disk
pre-staging learn user behavior and automatically adjusts the disk pre-stage times.
Note: This feature requires AVD insights to be enabled and configured for the
host pool.
l
Mode: From the drop-down list, select the mode.
Note:
l
Hybrid Mode: Disks are always be pre-staged based on the defined
schedule. The behavior of users whose work patterns are learned,
and additional staging activity are scheduled. This function is
designed as "learning mode," with the benefits of both the standard
pre-stage functionality and learned requirements.
l
Automated Mode: Disks are pre- staged for existing users only
according to the learned schedule. New users respect the defined
schedule until Intelligent pre-staging has enough data to automate
this process. Disks are pre- staged 30 minutes before anticipated
user log on events.
5. Enter the following Auto-Grow information:
Note: Automatically add desktops to the host pool when the number of unassigned
desktops remaining falls below a specified threshold.
l
Auto-Grow: Toggle this option on to enable auto-grow.
l
Add a new host when the number of available (not assigned to a user) falls
below: Type the threshold and from the drop-down list, select whether the threshold
is a number of desktops or a percentage of total desktops.
6. Enter the following Auto-Shrink information:
213

Note: The system automatically remove desktops that have not been used in a long
time.
l
Auto-Shrink: Toggle this option on to enable auto-shrink.
l
Delete VM if the user hasn't logged in for: Type the number of days to wait before
the system automatically deletes the VM.
Note: User activity on this session host VM is determined based on Nerdio
Manager auto-scale history and AVD diagnostics data. Each time the desktop is
processed by auto-scale, an Azure tag with date/time the desktop was last used is
set. If the desktop hasn't been used for the number of days specified in this
setting, the session host VM is shut down and a "pending deletion" tag is set.
l
Desktop will be set to “Pending deletion” state and deleted after: From the drop-
down list, select the "Pending deletion" duration.
Note: The desktop is set to "Pending deletion" state by the auto-scale process by
adding a tag to the VM. A task is logged during this process, which can be used
for admin notification of a desktop entering the "Pending deletion" state. There
also are notification banners in the Nerdio Manager UI indicating that a personal
host pool has VMs that are pending deletion. After the "pending deletion" period
expires (default: 24 hours), the VM is permanently deleted.
l
Exclude the following groups (or individual users): Enable this option, and then
select the group(s) or individual user(s) to exclude from auto-shrink.
Note: Desktops assigned to users listed here are not automatically removed,
even after a prolonged time of inactivity.
l
Notify user when their desktop is about to be deleted: Select this option to notify
the user via email about deletion of their desktop when the inactivity period is
214

exceeded.
Note: Notifications on the Settings > Nerdio environment page must be enabled
for this feature to work.
l
Message Subject: Expand this option to type the subject line of the auto-
shrink message.
l
Message Text: Expand this option to open the editor to create a custom auto-
shrink message for users.
Note: The following variables are available for use in the message body:
l
%HOSTPOOL%: Returns the name of the affected host pool.
l
%HOSTNAME%: Returns the specific host name.
l
%HOST_ IDLE_ DAYS_ THRESHOLD%: Returns the configured
maximum idle days before auto shrink is started.
l
%SHRINK_TIME_UTC%: Returns the exact time in UTC when the
auto-shrink task is set to occur.
l
%SHRINK_DATE%: Returns the exact date when the auto-shrink
task is set to occur.
l
Notify an additional email recipient when desktops are scheduled to be
deleted: Select this option to notify additional users about auto-shrink activity.
l
Send notification emails to: Type the additional email addresses.
l
Send notification emails from: From the drop-down list, select the "Send From"
email address.
7. Enter the following Messaging information:
215

Note: The system sends messages to any users connected to a session host that has
been selected for scale in.
l
Send a warning message to active users: From the drop- down list, select the
number of minutes before scaling in that the message should be sent.
l
The message should say: Type the warning message text.
8. Enter the following Auto-Heal Broken Hosts information:
Note: Session hosts may get impaired due to domain trust issues or FSLogix
configuration issues. The AVD agent reports the status of such hosts as unavailable.
Admins then have to manually remove such hosts from the pool. However, Nerdio
Manager allows you to configure a set of actions to repair these session hosts during the
auto-scale process. Auto-scale can automatically attempt to repair "broken" session
hosts by restarting and deleting/recreating them. It can make a few attempts to restart
the host to try to get it back into an operational state and then either leave it alone or
delete and recreate the host.
l
Auto-Heal Broken Hosts: Toggle this option on to enable auto-heal.
l
Host is Broken if AVD Agent Status is: From the drop-down lists, select the desired
statuses along with the session status.
Note: The status is reported to the AVD service by the AVD agent installed on the
session host VM. If something is wrong, the status is something other than
"Available." Not every status other than "Available" means that there is a problem.
See this Microsoft article for more details. Hosts with active sessions may still be
somewhat functional and such hosts are not treated as broken. Only hosts that
have either no sessions at all or no active session (that is, disconnected sessions
only) are considered broken by auto-scale.
216

l
Minutes before first action: Type the number of minutes to wait before running the
first action.
l
Recovery actions: From the drop-down list, select the recovery action(s).
Notes:
l
You may select a VM action (for example, Restart VM or Remove VM), or a
scripted action (for example, reinstall SxS, re-register host with AVD, etc.).
l
The recovery actions are run in the order shown. You can drag and drop
any action to change its place in the list and, therefore, the order it is run.
l
Minutes between recovery actions: Type the number of minutes to wait after each
recovery action step before moving on to next step (for example, Restart VM, then
Remove VM, then etc.).
Note: If the Auto-Heal operation requires deletion and re-creation of a broken host
VM, a spare VM is powered on to replace the capacity, if available.
9.
Once you have entered all the desired information, select Save or Save & close.
Related Topics
"Create Dynamic Host Pools" on page 182
"Enable Dynamic Host Pool Auto-scaling" on page 186
Auto-scale: Cost Optimization Session Host VM OS Disk
Storage
There are two types of costs associated with a VM - compute costs and storage costs. Compute
costs are incurred only when the VM is in use, while the storage costs are incurred even when the
VM is stopped.
The Running OS disk size and Stopped OS disk type settings, along with other auto-scale
settings, provide up to 75% storage cost savings. The auto-scale logic can automatically change
217

the OS disk type of VMs in both pooled and personal host pools to a cheaper storage tier (from
premium SSD to standard HDD), while the host VM is powered off, and back to the higher
performance tier immediately before it is started.
To configure Running OS disk size and Stopped OS disk type settings on
your session hosts:
1. Locate the host pool you wish to work with.
2. From the action menu, select Auto-scale > Configure.
3. In the Auto-Scale section, configure the following:
l
Running OS Disk (Template): From the drop-down list, select the running disk type.
l
Stopped OS Disk Type: From the drop-down list, select the stopped disk type.
4.
Once you have changed the parameters above, select Save & close.
Note: With Azure's Start VM on connect feature, VMs can be powered on outside of
Nerdio Manager and may override Running OS disk size and Stopped OS disk type.
That is, a VM powered on by the Start VM on connect feature is not able to change the
disk performance. Instead, we recommend configuring Pre- stage to enable "Set all
hosts to running os disk type" if Start VM on connect is enabled with storage scaling.
218

For a single-user host pool that has schedule-based auto-scaling, you can configure the
Host OS Disks in and out of working hours. For example, you can specify Premium SSD
when the VM is running and Standard SSD when the VM is stopped, thus saving on Azure
storage costs
To configure Host OS disks:
1. Navigate to Workspaces > Dynamic host pools.
2. Locate the single-user host pool you wish to change.
3. From the action menu, select Auto-scale> Configure.
4. In the Host OS Disks section, configure the following:
l
Running: From the drop-down list, select the disk type when the VM is running.
l
Stopped: From the drop- down list, select the disk type when the VM is
stopped.
5.
Once you have changed the parameters above, select Save & close.
For a multi-user host pool that has its Minimum Active Host Capacity set to 0, you can
configure the system so that all stopped VM OS disks are automatically converted to
Running OS Disk type during the pre-staging hours. This is necessary to ensure that if a
219

VM is started via Azure Start VM on Connect that it has the proper high-performance disk
type.
To configure the pre-staging OS disk type conversion:
1. Locate the single-user host pool you wish to work with.
2. From the action menu, select Auto-scale> Configure.
3. In the Pre-stage Hosts section, configure the following:
l
If necessary, enable Pre-stage hosts.
l
Set all host to running OS disk type: Select this option.
l
Set the pre-stage time as desired.
4.
Once you have entered all the desired information, select Save & close.
Auto-scale History for Dynamic Host Pools
The auto-scale history visualization helps you understand auto-scale behavior and how it impacts
your deployment.
The following are important auto-scale history features.
l
Time Range: At the top of the window, select the desired time range to display.
l
Show: At the top of the window, select the desired graph(s) to display.
l
Savings: At the top of the window, you can view auto-scale savings. Select view details
to see the savings details.
l
Zoom In: For the Active users graph only, click and drag the mouse over the section of the
graph you wish to zoom in on. When you are zoomed in, select Zoom-out to restore the full
graph.
l
Gray Background: A gray background on a graph indicates that a scale-in restriction is
active during that time period.
l
Hover: You can hover over any part of any graph to see its details. For example:
220

l
Action Points:
l
Scale Out: This action point indicates that a scale-out event took place. (Red
indicates that the scale-out event is costing money.)
l
Scale In: This action point indicates that a scale-in event took place. (Green
means that the scale-in event is saving money.)
l
Auto-Heal: This action point indicates that an auto-heal event took place.
l
Azure Issue: This indicates that there was a problem communicating with
Azure. If this occurs frequently, please contact Nerdio Manager technical support.
l
At the bottom of any graph, select the data set name to toggle on/off the display line
associated with that information. For example, select Total user sessions to suppress that
line on the graph. Select it again to display it.
l
Depending on which auto-scale trigger has been configured, that determines which graph
contains extra values. For example, if the auto- scale trigger is configured based on
CPU Usage%, then the CPU Usage% graph contains extra data sets such as Scale In
Threshold and Scale Out Threshold.
221

Note: Regardless of which auto-scale trigger is configured for the host pool, you can configure
the host pool to always have the auto-scale process collect CPU, RAM, and Average active
sessions data. See "Host Pool AVD Configuration" on page 242 for details. Otherwise, the
auto-scale process only collects data related to the auto-scale trigger.
To view auto-scale history for a dynamic host pool:
1. Locate the dynamic host pool you want to work with.
2. From the action menu, select Auto-scale > History.
3. Select the desired time range and the specific graphs to display.
l
Active hosts: The Active hosts graph displays Section 1 of the auto- scale
configuration (Host Pool Sizing) and host pool activity as recorded by the auto-scale
process. This includes the following:
l
Base capacity: This is the number of session host VMs to always be part of
this host pool. These session hosts may be stopped or running.
l
Min active capacity: This is the minimum number of running session hosts
that are always available.
l
Burst capacity: This is the capacity to burst above the base capacity of
session host VMs when there is user demand. The system automatically
creates up to this number of new session host VMs above the base capacity
when needed.
l
Active hosts: The current number of active session hosts at this point in time.
l
Peak capacity: This the highest number of recorded session hosts for this time
period.
222

Notes:
l
Select an action point to see its details in the Related Tasks section at the
bottom of the window. In addition, for any task shown in Related Tasks,
select Details to view the task's details.
l
Select any point on the graph to see the status of the session hosts in the
Hosts Snapshot section at the bottom of the window.
l
User sessions: The User sessions graph displays the following information about
when users are signing in and signing out. This includes users connected to full
desktop sessions or RemoteApps.
l
Total user sessions: The total number user sessions, which includes
disconnected sessions.
l
Active user sessions: The total number of active user sessions, which only
includes users who are actively connected.
l
CPU usage %: The CPU usage% graph displays the Average CPU%.
l
RAM usage %: The RAM usage% graph displays the Average RAM%.
l
Average user sessions: The Average user sessions displays the average number of
user sessions per session host.
Note: If CPU usage%, RAM usage%, or Average user sessions is the auto-scale
trigger, then additional scale- out and scale- in data sets are displayed on the
graph.
l
Savings (graph): The Savings graph displays compute and storage savings.
Note: As session hosts are started or created, the savings goes down due to
increased compute and storage resources. As session hosts are shut down,
removed, or disk types converted, the savings go up.
223

Auto-scale Session Host Scale In-Out Restrictions
Individual session host VMs within host pools with auto-scale enabled can be excluded from
scale in and/or scale out indefinitely, or for a predefined period. This is especially useful when
certain session host VMs are not healthy and need to be put into maintenance mode or when long
running operations must not be interrupted during a scale in window.
To restrict scale in or scale out for a session host:
1. Locate the session host you wish to work with.
2. From the action menu, select Restrict scale in.
3. Enter the following information:
l
Would you like to exclude...: From the drop- down menu, select the type of
exclusion.
l
Exclusion Duration: Select either an indefinite exclusion or select a date and time
when the exclusion ends.
4.
Once you have made the desired selections, select Confirm.
Note: The scale in restrictions take effect once the task completes. You can see the
task's progress in the Host Pool Tasks.
Add a New Session Host to a Dynamic Host Pool
Once a host pool is created, you can manually add session hosts.
Tip: When using Dynamic Host pools it is recommended that you create the hosts with auto-
scaling configured. See "Enable Dynamic Host Pool Auto- scaling" on page 186 for more
information.
To add a session host to a dynamic host pool:
224

1. Locate the dynamic host pool you wish to work with.
2. From action menu, select Hosts > Add new.
3. Enter the following information:
Note: For several of the required parameters, you may filter the available choices by
using the Resource Selection Rules. For example, you may filter the VM Size or
OS Disk choices for Intel RAM-optimized VMs only. See "Resource Selection Rules
Management" on page 74 for details.
l
Host Count: Type the number of session hosts to add to the host pool during
creation.
l
Host Name: Type the name of the newly added hosts for the Exact name, a Prefix or
the Prefix+Pattern.
l
Exact/Prefix/Pattern: From the drop-down list, select whether to use an Exact
name, a Prefix, or a Pattern.
225

Note:
l
Exact applies when adding a single host and specifying an exact
name. For example, MYADVHOST.
l
Prefix can be used when creating multiple session hosts. The Prefix
limit is 10 valid, Windows computer name characters. When using a
Prefix, a unique suffix is automatically appended in the format "-
xxxx", where xxxx are 4 random alphanumeric characters. For
example: AVDHOST-s72h. Do not add a "-" to the Prefix.
l
Pattern can be used to specify an advanced naming convention for
new hosts. Pattern characters must be enclosed in {} and can be #
(for sequential numbers) and/or ? (for random alphanumeric
characters). One # implies numbers from 0 to 9, two #s implies
numbers of 0 to 99, etc.
l
Example 1: AVDHOST{###} (AVDHOST000..AVDHOST999).
l
Example 2: AVDHOST-{???} (AVDHOST-d83, AVDHOST-7sl,
etc.).
l
Network: From the drop-down list, select the network. The network determines the
Azure region of the VM.
l
Desktop Image: From the drop-down list, select the desktop image that is used as
the golden image for newly created session hosts.
Note: The Unmanaged Azure Compute Gallery image versions section is at the
bottom of the list. These are unmanaged, backup versions of images that were
created while activating staged images. These images can be used to restore any
changes made to session hosts.
l
VM Size: From the drop-down, select the VM disk size and type for newly created
session hosts.
226

l
OS Disk: From the drop-down list, select the OS Disk type and size for newly created
session hosts.
Note: This must be equal to or larger than the size of the Desktop Image selected
above. Using Standard HDD (S- type) is not recommended. Premium SSD
provides best performance.
l
Resource Group: From the drop-down list, select the resource group to contain the
VMs.
l
Apply tags: Optionally, type the Name and Value of the Azure tag to apply to the
session host.
Note: You may specify multiple tags. See this Microsoft article for details about
using tags to organize your Azure resources.
l
Schedule: Optionally, toggle on the schedule, and enter the schedule information, to
run this job per the schedule.
l
When Host Count is greater than 1, enter the following:
l
Process Host in Groups Of: Type the number of concurrent operations when
adding the new hosts.
l
Number of failures before aborting: Type the number of failed tasks before
the process stops.
4.
Once you have entered all the desired information, select Run now (not scheduled) or Save
& close (scheduled).
Host Pool Disaster Recovery
This feature is only available in the Nerdio Manager Premium edition.
The disaster recovery feature in Nerdio Manager automatically distributes newly created VMs
between a primary and secondary Azure region. When the users connect, they are evenly split
227

between the two regions. In case of an outage in one of the regions, users are automatically
connected to the remaining region.
The networking in both regions must be configured to communicate with the Active Directory
domain controllers (or for the future Entra ID). Currently, in production scenarios, you need line of
sight to the Active Directory domain controllers from networks in both locations.
The active-active DR setup is configured on the host pool level. It distributes the VMs, takes care
of the FSLogix configuration, and replication of the profiles. The FSLogix profiles are replicated
between storage locations in both regions, leveraging the FSLogix Cloud Cache feature.
Prerequisites: A network with line of sight visibility for domain controllers in both regions and an
Azure files storage location for the FSLogix local profile copies.
Note: To enable DR on this host pool, the selected FSLogix profile must use Cloud Cache.
Create a new profile, or modify an existing one, with Cloud Cache enabled and select it on the
FSLogix properties page.
Both primary and secondary FSLogix storage locations are configured on every new session
host with Cloud Cache replication. VMs in the primary Azure region are configured with
FSLogix storage in that region as primary and VMs in the secondary Azure region are
configured with FSLogix storage in that region as primary.
If there are existing hosts in the host pool, delete and recreate them after enabling DR.
To configure host pool disaster recovery:
1. Locate the host pool you wish to work with.
2. From the action menu, select Properties > Disaster Recovery.
3. Enter the following information:
l
Enable Disaster Recovery: Toggle this option on.
l
Secondary VM Prefix: Type the prefix to be used when creating session hosts in the
secondary Azure region.
228

Note: The Name prefix limit is 10 valid, Windows computer name characters.
When using a prefix, the system automatically appends “-xxxx” to the name prefix
to make a unique name. Do not add “-“ to your name prefix.
l
Secondary Network: From the drop-down list, select a secondary network that 50%
of the newly created VMs are connected to. The selected network also determines
the Azure region of the VM.
l
Secondary Resource Group: From the drop-down list, select the resource group
that contains the VMs in the secondary region.
l
Desktop Image (Template): From the drop-down list, select the desktop image that
is used for newly created VMs in the primary and secondary regions.
Note: The image must be stored in the Azure Compute Gallery and replicated to
both regions.
l
Secondary FSLogix Storage: From the drop-down list, select the FSLogix storage
location in the secondary region.
l
Secondary FSLogix Office Container: From the drop-down list, select the FSLogix
office container location in the secondary region.
4.
Once you have entered all the desired information, select Save or Save & close.
You now need to review the host pool's auto-scale configuration.
5. Locate the host pool.
6. From the action menu, select Auto-scale > Configure.
7. Make sure that the Desktop Image (Template) is the same that was configured in disaster
recovery.
8. In the Host Pool Sizing section, enter the Base host pool capacity.
9. Select Save & close.
Related Topics
229

"FSLogix Settings and Configuration" on page 131
Host Pool Backup
Nerdio Manager allows you to enable automatic Azure backup of pooled and personal host pools.
To configure host pool backups:
1. Locate the host pool you wish to work with.
2. From the action menu, select Properties > Backup.
3. Enter the following information:
l
Enable backup: Toggle this option on.
l
Disable backups on VMs protected by NME: Select this option to .stop all VM
backups which were created by Nerdio Manager. If not selected, existing protected
items are not affected.
l
Vault: Create a new vault, or select an existing vault, to contain the backups for this
host pool.
Note: The vault must be in the same region as the VMs. Backup for VMs that are
not in the same region as the vault are skipped.
l
Policy: Create a new backup policy, or select an existing backup policy, for this host
pool.
Note: The backup policy dictates the frequency and retention of backups. The
higher the frequency, and the longer the retention, results in higher costs.
l
Backup schedule: Enter the following schedule information:
230

l
Frequency: From the drop-down list, select the frequency.
l
Time and Timezone: From the drop-down lists, select the time and timezone
to run the backup.
l
Days: For weekly backups, select the day(s) to run the backup.
l
Retention range: Enter the following retention information:
l
Instant recovery snapshots retention days: Type the number of days to retain
the instant recovery snapshots.
l
Retention of daily/weekly backup point: Type the number of days/weeks to
retain the daily backup point.
l
Retention of weekly backup point: For daily backups, from the drop-down list,
select the day (s) to retain a weekly backup point. In addition, specify the
number of weeks.
l
Retention of monthly backup point: Select this option to retain a monthly
backup point.
l
Configure the monthly backup point, as desired.
l
Retention of yearly backup point: Select this option to retain a yearly backup
point.
l
Configure the yearly backup point, as desired.
4.
Once you have entered all the desired information, select Save or Save & close.
Clone Host Pools
You can clone existing host pools. This creates a new host pool based on an existing one, cloning
all its customizations. Therefore, there is no need to reconfigure the environment from scratch.
The clone feature allows you to create several template host pools. These configurations contain
no actual hosts and provide no desktops to users, but they provide setups for the future host
pools and their environments. You can clone them according to your requirements when you
need to deploy new capacity.
To clone a host pool:
231

1. Locate the host pool you wish to clone.
2.
From the action menu, select Clone Host Pool.
3. Enter the following information:
l
Destination Workspace: From the drop-down list, select the workspace you want to
use.
l
Resource Group: From the drop-down list, select the resource group to contain the
VMs.
l
New Host Pool Name: Type the host pool's name.
l
Friendly Name: Type the friendly name that is visible to end users.
l
Description: Type the description visible to admins.
l
New Host Name Prefix: Type the unique prefix for the VMs to be used when creating
multiple session hosts.
Note: This must not be the same as any existing host pools. The name prefix limit
is 10 valid, Windows computer name characters. When using a prefix, the system
automatically appends “-xxxx” to the name prefix to make a unique name. Do not
add “-“ to the name prefix.
l
Copy users and group assignments: Select this option to copy the users and groups
assigned to this host pool and paste them into the clone.
l
Use new Custom app group names: Select this option to specify a new custom app
group name.
l
Custom App Group Name: Type the new custom app group name(s).
4. When you have entered all the desired information, select Clone.
A copy of the existing host is generated with a different name and a different VM prefix. The
new cloned host pool is added to the list of the existing host pools.
232

Note: By default, the auto-scale option for this host pool is off. Do not forget to turn it on.
See "Enable Dynamic Host Pool Auto-scaling" on page 186 for details.
Tip: To delete the existing host pool, refer to Delete Hosts, Host Pools, and Workspaces.
Related Topics
"Host Pools" on page 173
Bulk Host Actions
You can perform bulk actions on all the session hosts, or on selected sessions hosts, in a host
pool.
Note: Many of the tasks listed below can be run by scheduling the task. See "Manage
Schedules for Tasks" on page 79 for details about creating a schedule.
To perform a bulk host action on all session hosts:
1. Locate the host pool you wish to work with.
2. From the action menu, select Manage Hosts.
3. Select one of the following bulk actions:
l
Add New: Add a new session host the host pool. See "Add a New Session Host to a
Dynamic Host Pool" on page 224 and "Add a New Session Host to a Static Host Pool" on
page 180 for details.
l
Re-size/Re-image: See "Resize/Re-image a Host Pool" on page 235 for details.
l
Restart: See "Restart a Host Pool" on page 238 for details.
l
Power on: Power on all the hosts.
l
Power off: See "Power Off a Host Pool" on page 240 for details.
233

l
Request logs: Download the selected logs to a zip file.
l
Exclude from auto-scale: Exclude all the hosts from auto-scale.
l
Activate: Take all the hosts out of drain mode.
l
Deactivate: Put all the hosts into drain mode.
l
Delete all: See Delete Hosts, Host Pools, and Workspaces for details.
l
Message Users: Send notifications to all the users connected to all the hosts in the host
pool.
l
Disconnect Users: Disconnect all users from all session hosts.
l
Log off users: Sign out all users from all session hosts.
l
Run script: Run a PowerShell command on all the hosts in the host pool. See "Run Bulk
Host Scripted Actions" on page 252 for details.
l
Exclude from auto- scale selected: See "Auto- scale Session Host Scale In- Out
Restrictions" on page 224 for details.
Note: Some bulk actions noted above allow you to perform the action in groups. You
need to enter the following:
l
Process Host in Groups Of: Type the number of concurrent operations for the
bulk action.
l
Number of failures before aborting: Type the number of failed tasks before the
process stops.
To perform a bulk action on selected session hosts:
1. Locate the host pool you wish to work with.
2. Select the host pool's Name to view all the session hosts in the host pool.
3. In the list of session hosts, select the one(s) you want to work with by selecting them in the
column.
234

4. Once you have selected all the desired session hosts, select Select bulk action, and then
select any of the relevant actions that apply to the session hosts.
Note: For example, you have 5 session hosts in the host pool, with 3 powered on and 2
powered off. The action menu displays (this is a partial list of relevant actions):
l
Power off selected (3)
l
Power on selected (2)
l
Restart selected (3)
That is, only the 3 session hosts that are powered on can be powered off or restarted.
Only the 2 session hosts that are powered off can be powered on.
Related Topics
"Run Bulk Host Scripted Actions" on page 252
Delete Hosts, Host Pools, and Workspaces
"Host Pools" on page 173
"Convert a Static Host Pool to Dynamic" on page 179
Resize/Re-image a Host Pool
The system automates the process of updating the session hosts when there are changes that
need to be made to applications, operating systems, or other system components. This is
accomplished by use of desktop images.
You can use the updated image to:
235

l
Re-image existing session hosts. (A common use case.)
l
Create new session hosts.
In Nerdio Manager, the desktop image consists of the following Azure objects:
l
A virtual machine that is used to manage the image.
l
The actual image that is used to deploy session hosts.
Note: When you power on a desktop image, you are powering on the virtual machine.
To re-image session hosts with desktop images:
1. Navigate to Desktop Images.
2. Locate the desktop image you want to work with and power it on, if necessary.
3. Connect to the desktop using any remote connection tool (RDP) and make all the desired
changes.
4. Once you have completed all the desired changes, return to the Desktop Images.
5. Select Power off & set as image.
6.
When prompted to confirm your request, select OK.
Note: Once you confirm your request, an extensive automation process begins that
commits the changes to an image object.
7. At the bottom of the Desktop Images window, in the Desktop Images Tasks section, you
can see the task’s progress. Select Details to see the task’s details.
8. Locate the host pool you want to re-image.
9. From the action menu, select Hosts > Resize/Re-image.
10. Enter the following information:
236

l
Run now or Schedule: Optionally, navigate to the Schedule tab to perform the task
during selected time frame(s). Otherwise, the task starts as soon as you select OK.
See "Manage Schedules for Tasks" on page 79 for details about creating a schedule.
l
Desktop Image: From the drop-down list, select the desktop image you want to
update the hosts with.
l
VM Size: Optionally, from the drop-down list select a new VM size.
l
OS Disk: Optionally, from the drop-down list select a new OS disk.
l
Process Host in Groups Of: Type the number of concurrent operations for the host
re-imaging.
Warnings: A larger number of hosts selected allows the re-imaging process to
complete quicker, but if there is an issue with the desktop image or Azure, many
hosts may end up in an error state and unusable.
You must select this value with care. For example, if you have 150 hosts in the
pool, you do not want to want to re-image them one at a time. That would take too
long. On the other hand, you do not want to run all 150 operations at the same
time. That could overload your environment. So, you may want to run 25
operations per group.
l
Number of failures before aborting: Type the number of failed tasks before the
process stops.
Note: This setting can help prevent a problem on the desktop image or Azure
from making session hosts unavailable to the users.
l
After first group is done, set remaining hosts to drain mode: Select this option to
set all hosts that haven't yet been resized/re-imaged to drain mode as soon as the
first group of hosts completes the resize/re-image process.
237

Note: This ensures that users who connect to their desktop are only directed to
a host session VM that has already been resized/re-imaged.
l
Force Users to Log Off: From the drop-down list, select the time to wait before
forcing users to log off.
Note: You may force users to log off either immediately or after a specified time
period. Optionally, by selecting Never, Nerdio Manager waits for all users to log
off by themselves before re-imaging the host. That is, the re-imaging operation
waits indefinitely until all users are logged off. If another scheduled re-imaging
operation is due to run while it is waiting for the users to log off, the new scheduled
task is skipped.
l
Set hosts to drain mode while waiting for users to log off: Select this option
to set the hosts to drain mode while waiting for all the users to log off.
Note: By default, this option is selected. You may only unselect it if Force
User to Log Off is set to Never.
l
Send message while waiting for users to log off: Select this option and type
the text of the message to send.
11.
Once you have entered all the desired information, select Run now (not scheduled) or Save
& close (scheduled).
Restart a Host Pool
Nerdio Manager allows you to restart all session hosts in a host pool.
To restart all session hosts in a host pool:
1. Locate the host pool that contains the session hosts you want to restart.
2. From the action menu, select Hosts > Restart.
238

3. Enter the following information:
l
Run now or Schedule: Optionally, navigate to the Schedule tab to perform the task
during selected time frame(s). Otherwise, the task starts as soon as you select OK.
See "Manage Schedules for Tasks" on page 79 for details about creating a schedule.
l
Log off users: Select this option to sign out users before restarting.
l
Process Host in Groups Of: Type the number of restart operations that start at the
same time.
Warning: You must select this value with care. For example, if you have 150
hosts in the pool, you do not want to want to restart them one at a time. That would
take too long. On the other hand, you do not want to run all 150 restarts at the
same time. That could overload your environment. So, you may want to run 25
restarts per group.
l
Number of failures before aborting: Type the number of failed tasks before the
process stops.
l
Messaging: Optionally, toggle on messaging to send a message to all the users on a
session prior to performing the operation.
l
Delay: From the list, select the time to send the message before the operation
starts.
l
Message: Type the text of the message to send.
4.
Once you have entered all the desired information, select Run now (not scheduled) or Save
& close (scheduled).
Power On a Host Pool
Nerdio Manager allows you to power on all session hosts in a host pool.
To power on all session hosts in a host pool:
239

1. Locate the host pool you want to power off.
2. From the action menu, select Hosts > Power on.
3. Enter the following information:
l
Run now or Schedule: Optionally, navigate to the Schedule tab to perform the task
during selected time frame(s). Otherwise, the task starts as soon as you select OK.
See "Manage Schedules for Tasks" on page 79 for details about creating a schedule.
l
Restrict scale in for (hours): Select this option to restrict auto-scale from scaling it in
for the specified number of hours.
l
Type the number of hours for the auto-scale restriction.
4.
Once you have entered all the desired information, select Run now (not scheduled) or Save
& close (scheduled).
Power Off a Host Pool
Nerdio Manager allows you to power off all session hosts in a host pool.
Note: If you are working with a dynamic host pool with auto-scaling enabled, if you power off
all the session hosts, auto- scaling powers them back on again. If you need to power
everything off, you must temporarily disable auto-scaling.
To power off all session hosts in a host pool:
1. Locate the host pool you want to power off.
2. From the action menu, select Hosts > Power off.
3. Enter the following information:
l
Run now or Schedule: Optionally, navigate to the Schedule tab to perform the
power off operations during selected time frame(s). Otherwise, the power offs start
as soon as you select OK. See "Manage Schedules for Tasks" on page 79 for details
about creating a schedule.
l
Log off users: Select this option to sign out users before powering off.
240

l
Restrict autoscale operations for (hours): Select this option to restrict auto-scale
from scaling it in or out for the specified number of hours.
l
Type the number of hours for the auto-scale restriction.
l
Process Host in Groups Of: Type the number of power off operations that start at
the same time.
Warning: You must select this value with care. For example, if you have 150
hosts in the pool, you do not want to want to power them off one at a time. That
would take too long. On the other hand, you do not want to run all 150 operations
at the same time. That could overload your environment. So, you may want to run
25 operations per group.
l
Number of failures before aborting: Type the number of failed tasks before the
process stops.
l
Messaging: Optionally, toggle on messaging to send a message to all the users on a
session prior to performing the operation.
l
Delay: From the list, select the time to send the message before the operation
starts.
l
Message: Type the text of the message to send.
4.
Once you have entered all the desired information, select Run now (not scheduled) or Save
& close (scheduled).
Exclude Session Host VMs from Auto-scale During
Power On/Off
Nerdio Manager allows you to disable auto-scale on a selected session host VM for a specified
number of hours when manually powering the session host VM on or off.
In addition, when starting session host VMs on a schedule to apply updates, auto-scale does not
automatically stop them until after the number of specified hours elapses. See "Power On a Host
Pool" on page 239 and "Power Off a Host Pool" on the previous page for details.
241

To exclude Session Host VMs from auto-scale during power on/off:
1. Locate the session host VM that you wish to power on or off.
2. For a Power On request:
l
Select the option Restrict scale in for (hours).
l
Type the number of hours for the auto-scale restriction.
Note: After session host VM is powered on, auto-scale does not scale it in for the
specified number of hours.
3. For a Power Off request:
l
Select the option Restrict autoscale operations for (hours).
l
Type the number of hours for the auto-scale restriction.
Note: After session host VM is powered off, auto-scale does not scale it in or out
for the specified number of hours.
Host Pool AVD Configuration
Nerdio Manager enables you to customize the host pool's AVD settings.
To configure host pool AVD settings:
1. Locate the host pool you wish to work with.
2. From the action menu, select Properties > AVD.
3. Enter the following information:.
l
Friendly Name: Type the friendly name that is visible to the end users.
l
Description: Type the description that is visible to the administrators.
242

Note: Both the Friendly Name and Description can be changed at any time.
l
Load Balancing: Select the desired load balancing option.
Note: The load balancing algorithm is used by the AVD Management Service to
determine how to route a particular user’s desktop or RemoteApp connection.
Breadth First means that the load-balancing algorithm spreads the users evenly
across all available session hosts.
Depth First means the load-balancing algorithm places all the users in the first
session host until the host's session limit is reached. Only then, does it place the
users in the next session host. If necessary, it powers on the VM and makes it
available to the users.
l
Session Limit: Type the number of sessions that a single host in the host pool
can accept.
l
Validation environment: Select this option designate this host pool as a validation
host pool.
Note: Validation host pools receive service updates at a faster cadence than non-
validation host pools, allowing you to test service changes before they are
deployed broadly to production.
l
Allow the users to manually start a session host when none are started: Select
this option to allow a user to sign in to Nerdio Manager and perform service actions.
For example, power on the session hosts within the host pool. Only specified users
that have the permissions to sign in to Nerdio Manager can start the session host VM
this way.
l
Start VM on connect: The VM is powered on automatically when the user connects.
Any user can start the VM when they sign in.
243

l
Unassign user from host pool when removing host: For personal host pools, select
this option to unassign the user from the host pool when the host is deleted.
l
Collect hosts CPU usage: Select this option to have the auto-scale process always
collect CPU usage regardless of the host pool's auto-scale trigger.
l
Collect hosts RAM usage: Select this option to have the auto-scale process always
collect RAM usage regardless of the host pool's auto-scale trigger.
l
Collect hosts average active sessions: Select this option to have the auto-scale
process always collect average active sessions data regardless of the host pool
auto-scale trigger..
l
Enable Scheduled AVD Agent Update: Toggle on this option to specify the day and
time you want to update the AVD agent.
Note: Deploying updates at convenient times, or outside of peak business hours,
ensures greater reliability and business continuity, while also enhancing the
employee experience without interrupting business critical work.
l
Time Zone: From the drop-down list, select the time zone for the scheduled
update.
Note: Setting the time zone ensures that updates to the session host VMs
in the host pool take place at the same time according to the selected time
zone, regardless of the session host VMs' local time zones. See this
Microsoft article for details.
l
Use local session host time zone: Select this option to perform the agent
update using the local time zone of each session host VM in the host pool.
Note: . Use this setting when all session host VMs in your host pool, or their
assigned users, are in different time zones.
244

l
Maintenance window: From the drop-down lists, specify the day and time for
the agent update.
Note: All maintenance windows are two hours long.
l
Set additional maintenance window: Optionally, select this option to specify a
second maintenance window.
Note: Creating two maintenance windows gives the agent components an
additional opportunity to update if the first update is unsuccessful.
l
Power on all hosts during window(s): Optionally, select this option to power
on all hosts in a pool during maintenance window operations to ensure the
installation of the latest AVD agent and other updates.
Note: Hosts that are started as part of this process are shut down after 2
hours. Hosts that were already running do not have their power state
changed.
l
Exclude Drain mode hosts: Optionally, select this option to exclude drain
mode hosts from the AVD agent maintenance window tasks configured in the
host pool properties.
4.
Once you have entered all the desired information, select Save or Save & close.
Host Pool VM Deployment
Nerdio Manager enables you to customize the way session host VMs are deployed in a host pool.
This is a feature-rich facility that is detailed below.
To configure host pool VM deployment:
245

1. Locate the host pool you wish to work with.
2. From the action menu, select Properties > VM Deployment.
3. Enter the following information:.
l
Set time zone: Select this option, and from the drop-down list select the time zone, to
set the time zone on the VM when it is provisioned.
l
Enable time zone redirection: Select this option to allow users to see their local
device's time zone inside of their session.
l
Enable Accelerated Networking for VMs that support it: Select this option to enable
Accelerated Networking, if available.
Note: The Azure VM accelerated networking feature is available in some of the
larger Azure VMs. This feature is useful for enterprise organizations and IT
professionals who need to deploy, manage, and optimize large amounts of Azure
Virtual Desktops. It speeds up networking performance of individual VMs.
If this feature is not supported on your Azure VM, it is not enabled. See this
Microsoft document for more information.
l
Install GPU drivers on supported VM sizes: Select this option to install either
NVidia or AMD drivers.
Note: GPU drivers can be installed on N-series VMs.
l
Distribute VMs across Availability Zones: Select this option to automatically
distribute newly created or re-imaged session host VMs across Availability Zones in
the selected Azure region.
Note: See this Microsoft article for more details about Azure Regions and
Availability Zones.
246
l
Place VMs on Dedicated Hosts: Select this option to place the VMs to physical
servers.
Note: See this Microsoft article for more details about Azure dedicated hosts.
l
Dedicated Host Group: From the drop-down list, select the dedicated host
group.
l
Dedicated Host: From the drop-down list, select the dedicated host for the
VMs.
Note: If Automatic assignment is selected, the VMs are automatically
assigned to the appropriate hosts when powered on.
l
Place VMs in Capacity Reservation Groups: Select this option to place the VMs in a
capacity reservation group.
Note: See Manage Capacity Reservations Groups for full details.
l
Capacity Reservation Groups: From the drop-down list, select the capacity
reservation group(s).
l
Deallocate powered off but not deallocated VMs: Select this option to have a
periodic task check if any session host VMs are in a powered off (but not deallocated)
state and automatically deallocate them to save on Azure compute costs.
l
Install App Attach certificates: Select this option to install all stored certificates if the
App Attach packages are added to this host pool.
l
Install Applications: Select this option to install applications configured by recurrent
UAM policies before moving the host out of drain mode.
l
Restart VM after deployment: Select this option to restart the VM after it is created.
247

Note: If certain extensions are installed during deployment (FSLogix, Sepago,
Virtual Desktop Optimizations, or User Sessions Time Limits), the VM is
automatically rebooted even if this option is not selected.
l
Always prompt for password: Select this option to always prompt the user for a
password.
Note: This policy setting specifies whether Remote Desktop Services always
prompts the client for a password upon connection. You can use this setting to
enforce a password prompt for users signing in to Remote Desktop Services,
even if they already provided the password in the Remote Desktop Connection
client.
By default, Remote Desktop Services allows users to automatically sign in by
entering a password in the Remote Desktop Connection client.
l
If you select this option, users cannot automatically sign in to Remote
Desktop Services by supplying their passwords in the Remote Desktop
Connection client. They are prompted for a password to sign in.
l
If you do not select this option, users can always sign in to Remote Desktop
Services automatically by supplying their passwords in the Remote
Desktop Connection client.
l
Enable encryption at host: Select this option so that data stored on the session host
VMs is encrypted at rest and flows encrypted to the Storage service.
248

Notes:
l
This setting only applies to newly created desktops.
l
Encryption sets are per subscription/region. You can create hosts in
different subscriptions/regions, and based on the host's subscription/region
we select the appropriate encryption set.
l
See this Microsoft article to learn more about the encryption at host feature.
l
Register: If necessary, select this option to register the feature
"microsoft.compute/encryptionathost" with the linked subscriptions that do not
have this feature.
Notes:
l
Nerdio Manager supports the use of both platform-managed keys
(default) and customer-managed keys (Encryption Sets). If you are
using Encryption Sets, these must be created in the same region as
the target session host VMs.
l
If this subscription was registered in Nerdio Manager using the
"logged in user" option, you must use an account with Subscription
Owner permissions to register these features.
l
If this feature is not registered, hosts in the linked subscriptions would
not have encrypted data.
l
This is a sample pop-up warning message:
249

l
Enable boot diagnostics: Select this option to apply the Boot Diagnostics feature to
desktops in this pool.
Note: This setting only applies to newly created desktops.
l
Storage accounts for boot data: Optionality, from the drop-down list, select an
available storage account to be used to store boot data.
Note: By default, Azure uses an automatic managed storage account for
screen shots and other data. To use the default setting, leave this empty.
l
Enable watermarking: Select this option to enable watermarking.
Note: Watermarking helps prevent sensitive information from being captured on
client endpoints. When you enable watermarking, QR code watermarks appear
as part of the remote desktops. The QR code contains the connection ID of a
remote session that admins can use to trace the session.
l
Scale: Select the scale, which is the size in pixels of each QR code dot. This
value determines the number of squares per dot in the QR code.
l
Opacity: Select the opacity, which is how transparent the watermark is, in
percent, where 0 is fully transparent.
l
Width factor: Select the width factor which determines the distance between
the QR codes in percent. When combined with the height factor, a value of 0
would make the QR codes appear side-by-side and fill the entire screen.
l
Height factor: Select the scale, which determines the distance between the
QR codes in percent. When combined with the width factor, a value of 0 would
make the QR codes appear side-by-side and fill the entire screen.
l
Enable Hibernation: Select this option to save time and money by deallocating your
virtual machine and saving the contents of its RAM to the root volume, allowing you
250

to resume from where you left off when your VM restarts.
l
Security Type: From the drop-down list, select the security type.
Note: Security type refers to the different security features available for a virtual
machine. Security features like Trusted Launch and Confidential virtual machines
improve the security of Gen2 VMs. However, additional security features have
some limitations, which include not supporting back up, managed disks, and
ephemeral OS disks.
l
Secure Boot: Select this option to enable Secure Boot, which helps protect your VMs
against boot kits, rootkits, and kernel-level malware.
l
vTPM: Select this option to enable Virtual Trusted Platform Module (vTPM), which is
TPM 2.0 compliant and validates your VM boot integrity apart from securely storing
keys and secrets.
l
Integrity Monitoring: Select this option to enable cryptographic attestation and
verification of VM boot integrity along with monitoring alerts if the VM didn't boot
because the attestation failed with the defined baseline.
l
Entra ID group(s): From the drop-down list, select the default Entra ID group(s) to
add the session hosts to.
l
Enforce Intune Compliance : Select this option to make hosts unavailable to users
until the Intune compliance requirements are met.
Note: You may select that all Intune policies are met or only compliance policies
are met. In addition, enabling this feature may result in significant increase in
provisioning time, depending on the configured Intune compliance requirements.
l
Allow non- admin users to shadow sessions: Toggle on this option to enable
selected non-admin users or groups to shadow sessions.
251

Note: Session shadowing is only available with multi- session versions of
Windows OS. This feature does not work with Windows 10 Enterprise (single
session).
l
User or Group Name: From the drop-down list, select the users or groups to
allow to shadow sessions.
l
Run scripted actions when...: Toggle on the desired run script options.
For each option, enter the following information:
l
Script: From the drop-down list, select the scripts to execute.
Note: You can select both Windows scripts and Azure Runbooks. In
addition, you can drag and drop the scripts to change the order in which
they are run.
l
Scripted actions input parameters: If necessary, provide the required
parameters.
l
Pass AD credentials: Select this option to pass AD credentials.
l
AD Credentials: From the drop-down list, select the AD credentials to pass.
4.
Once you have entered all the desired information, select Save or Save & close.
Run Bulk Host Scripted Actions
Nerdio Manager enables you to manage your environment using Scripted Actions, which are
PowerShell scripts. By using Scripted Actions, you can perform bulk operations and automation
to create and manage the AVD Environment using Nerdio Manager.
For more information about bulk host actions (in general), refer to "Bulk Host Actions" on
page 233.
For example, you can take all of the session host VMs inside the host pool and install the latest
version of Microsoft Teams and enable the AV redirection of the media optimizations for AVD.
252

To run a PowerShell script on all the hosts in a host pool:
1. Locate the host pool you wish to work with.
2. From the action menu, select Hosts > Run script.
Note: See "Scripted Actions Overview" on page 142 for more information about creating
and managing scripted actions.
3. Enter the following information:
l
Run now or Schedule: Optionally, navigate to the Schedule tab to perform the task
during selected time frame(s). Otherwise, the task starts as soon as you select OK.
See "Manage Schedules for Tasks" on page 79 for details about creating a schedule.
l
Run the following scripted action: From the drop-down list, select the script to run.
l
Scripted actions input parameters: If necessary, provide the required parameters.
l
Pass AD credentials: Select this option to pass AD credentials.
l
AD Credentials: From the drop-down list, select the AD credentials to pass.
l
Restart VMs after scripted action: Select this option to restart the VMs after script
execution. It is preferable to use this option instead of using any PowerShell restart
commands as Custom Script extension fails if the script restarts the computer.
l
Exclude not running hosts: Select this option to exclude stopped and deallocated
hosts from scheduled scripted tasks to prevent additional resource costs being
incurred.
l
Process hosts in groups of: Type the number of concurrent actions to execute
during this bulk operation.
l
Number of failures before aborting: Type the number of failures that causes the
process to stop.
l
Messaging: Toggle on the Messaging to send messages to active users.
253

l
Delay: From the drop-down list, select the number of minutes to wait after
sending the message before starting the process.
l
Message: Type the message you want to send to the users.
4.
Once you have entered all the desired information, select Run now (not scheduled) or Save
& close (scheduled).
Note: If any session hosts VMs are currently powered off, they are automatically powered on
and the command runs on these VMs. They are automatically powered off after the action
ends.
Related Topics
"Bulk Host Actions" on page 233
Manage Host Pool User Assignments
Nerdio Manager allows you to view users assigned to various host pools. In addition, you can
assign or unassign users from the host pool.
To manage host pool user assignments:
1. Locate the host pool you wish to work with.
2. In the Status column, select the number next to Assigned Users to view the users and
groups.
254

3. In the Manage Assignments window, you may search, sort, and filter the users and
groups. For example, filter for all users not assigned to the host pool.
4.
To unassign users from the host pool, select the icon next to the user(s) you wish to
unassign.
5.
When you have selected all the users, select Unassign.
255

6.
To assign users to the host pool, select the icon next to the user(s) you wish to assign.
7.
When you have selected all the users, select Assign.
Apply Host Changes Without Re-Imaging
Nerdio Manager allows you to apply FSLogix changes to hosts without re-imaging.
Note: In legacy systems, the changes were applied only to newly created hosts. A message
appears: These changes will apply only to newly created (or re-imaged) hosts., because
the changes apply during the VM creation. For more information refer to "FSLogix Settings
and Configuration" on page 131.
To apply changes to a host without re-imaging it:
1. Locate the host pool you wish to work with.
2. From the action menu, select Properties > FSLogix.
Note: The same process applies to other third-party and user session time limits.
3. Select the option Apply to existing hosts.
4. Enter the following information:
l
Process hosts in groups of: Type the number of concurrent actions to execute
during this bulk operation.
l
Number of failures before aborting: Type the number of failures that causes the
process to stop.
l
Messaging: Toggle on the Messaging to send messages to active users.
l
Delay: From the drop-down list, select the number of minutes to wait after
sending the message before starting the process.
l
Message: Type the message you want to send to the users.
5.
Once you have entered all the desired information, select Save or Save & close.
256

l
Notes:
l
This operation only adds new settings or updates the existing settings. No
existing settings are deleted. To delete the existing settings, you must re-
image the host pool. The re-imaging recreates the host and reapplies the
settings from scratch.
l
Any powered off hosts are powered on and then powered off again when
the process is complete.
Related Topics
"FSLogix Settings and Configuration" on page 131
Configure the Host Pool's Active Directory Settings
By default, every host pool uses the global default Active Directory configuration that was used
when Nerdio Manager was installed. Nerdio Manager allows you to create multiple Active
Directory profiles containing different service accounts and OUs, if required, We can then use
these multiple profiles on different host pools.
To configure Active Directory for a host pool:
1. Locate the host pool you wish to work with.
2. From the action menu, select Properties > Directory.
3. Enter the following information:
l
AD Configuration: From the drop-down list, select the Active Directory configuration.
For a custom configuration, enter the following:
l
Directory: From the drop-down list, select the directory.
l
AD Domain: Type the domain for session host VMs to join in Fully Qualified
Domain Name (FQDN) format.
l
AD Username: Type the username in FQDN format.
257

Note: This user must have permissions to create computer objects in the
OU specified below and the ability to disable these AD computer objects
when the VM leaves the AD domain.
l
AD Password: Type the password.
l
Organization Unit: Type the OU name in Distinguished Name (DN) format.
Note: This is the OU where all session host VMs and Desktop Images AD
computer objects are created by default. Leaving this field blank places all
the computer objects in the computer's AD container.
4.
When you have entered all the desired information, select Save or Save & close.
Related Topics
"Entra ID - Definition of Terms" on page 15
"Configure Entra Domain Services for use with AVD" on page 20
Start VM on Connect for Pooled Host Pools
Nerdio Manager allows you to take advantage of the "Start VM on connect" feature. This feature
powers on a session host VM in a host pool where all the session host VMs currently powered off.
Therefore, if the user signs in, a VM is powered on to give this user a session.
Note: End users can start a session host VM in more than one way. It depends on the user's
permissions.
l
Allow the users to manually start a session host when none are started: This allows
user to sign in to Nerdio Manager and perform service actions. For example, power on
the session hosts within the host pool. Only specified users that have the permissions to
sign in to Nerdio Manager can start the session host VM this way.
l
Start VM on connect: The VM is powered on automatically when the user connects.
Any user can start the VM when they sign in.
258

To configure Start VM on connect for pooled host pools:
1. Locate the host pool you wish to work with.
2. From the menu, select Properties > AVD.
3. Select the Start VM on connect option.
4.
Select Save or Save & close.
Configure User Session Time Limits
Nerdio Manager allows you to apply host session limits to individual host pools at the host pool
level. This enables you to:
l
Optimize your AVD deployment and auto-scaling.
l
Conserve resources by signing out users who leave their sessions open or leave
themselves in a disconnected state.
Note: By default, the session time limits option is disabled. Session time limits do not apply,
and the system accepts any changes that users make to a single image or through the group
policy.
To set the user session time limits for full desktops:
1. Locate the host pool you want to work with.
2. From the action menu, select Properties > Session time limits.
3. Enter the following information:
l
Enable user session time limits: Toggle this option On.
l
Log off Disconnected sessions after: From the drop-down list, select the time to
sign out disconnected users.
259
Note: By default, users can disconnect from an AVD session without signing out
and ending the session. When a session is in a disconnected state, running
programs are kept active even though the user is no longer actively connected. By
default, these disconnected sessions are maintained for an unlimited time on the
server.
If you enable this policy setting, disconnected sessions are deleted from the
server after the specified amount of time. To enforce the default behavior that
disconnected sessions are maintained for an unlimited time, select Never. If you
have a console session, disconnected session time limits do not apply.
l
Disconnect Idle Session After:: From the drop- down list, select the maximum
amount of time that an active session can be idle (without user input) before it is
automatically disconnected.
Note: If you enable this policy setting, the idle session is disconnected after the
specified amount of time. The user receives a warning two minutes before the
session disconnects, which allows the user to press a key or move the mouse to
keep the session active. If you have a console session, idle session time limits do
not apply.
l
Disconnect Active session after: From the drop- down list, select the maximum
amount of time that a session can be active before it is automatically disconnected.
The recommended setting: Not configured.
Note: If you enable this policy setting, active sessions are automatically
disconnected after the specified amount of time. The user receives a warning two
minutes before the session disconnects, which allows the user to save open files
and close programs. If you have a console session, active session time limits do
not apply.
l
Log off Empty RemoteApp sessions after: From the drop- down list, select the
amount of time a user's RemoteApp session remains in a disconnected state after
260

closing all RemoteApp programs before the session is signed out.
Note: By default, if a user closes a RemoteApp program, the session is
disconnected but it is not signed out. If you enable this policy setting, when a user
closes the last running RemoteApp program associated with a session, the
RemoteApp session remains in a disconnected state until the time limit that you
specify is reached. When the time limit specified is reached, the RemoteApp
session is signed out. If the user starts a RemoteApp program before the time limit
is reached, the user reconnects to the disconnected session on the AVD session
host VM.
If you disable or do not configure this policy setting, when a user closes the last
RemoteApp program, the session is disconnected but it is not signed out.
l
Log off, instead of disconnecting, idle and active sessions: From the drop-down
list, select the option to specify whether to end an active or idle session that has
timed out instead of disconnecting it.
Note: You can use this setting to sign out a session after time limits for active or
idle sessions are reached. By default, sessions are disconnected (not signed out)
when they reach their time limits.
If you disable this policy setting, idle and active sessions that reach their time limit
are disconnected even if specified otherwise by the server administrator.
This policy setting only applies to time-out limits that are explicitly set by the
administrator. This policy setting does not apply to time-out events that occur due
to connectivity or network conditions.
l
Apply to existing hosts: Select this option to apply the modified session time limits to
existing hosts.
l
Restart VMs: Select this option to restart session host VMs after updating
session timeouts.
261

l
Process Host in Groups Of: Type the number of concurrent operations when
applying the change.
l
Number of failures before aborting: Type the number of failed tasks before
the process stops.
l
Schedule: Toggle on the Schedule to apply the changes at a selected time.
l
Start Date: Type the date to start.
l
Time Zone: From the drop-down list, select the time zone for the Start
time.
l
Start Time: From the drop-down lists, select the time to start.
l
Repeat: From the drop- down list, select the recurring schedule, if
desired.
Note: The drop- down has the option After Patch Tuesday. This
allows you to create a recurring schedule based on Patch Tuesday.
l
Days After: If you selected After Patch Tuesday, type the number
of days after Patch Tuesday to run the scheduled task.
4.
Once you have entered all the desired information, select Save or Save & close.
Publish Remote Applications to Users
You can use Nerdio Manager to easily publish applications (RemoteApps) within Azure Virtual
Desktop. These applications may be restricted by Application Group, if required, allowing
administrators to publish different apps to different users from the same host pool.
Add App Groups to Host Pools
Application Groups allow the assignment of users and groups to desktops and RemoteApps. This
helps simplify application management because applications can be managed by app groups
instead of individual users.
262

Note: There must be at least one app group associated with a host pool.
To add an app group to a host pool:
1. Select the host pool you want to work with.
2. From the action menu, select Manage > App groups.
3. Enter the following information:
l
RemoteApp app groups: Type the name(s) of the app groups for RemoteApps.
Note: A host pool may have multiple RemoteApp app groups.
l
Desktop app group: Type the name of the Desktop app group.
Note: A host pool may only have one Desktop app group.
4. Once you have entered the desired information, select OK.
Publish RemoteApps to Users
RemoteApps gives the user the ability to launch a single application without having to launch the
full desktop experience. For example, the user can launch Excel without having to sign in to a
desktop. This saves on session host resources because the users do not have to use a full
desktop. So, in our Excel example, you might be able to have 10 users working with Excel as a
RemoteApp, but had the users connected as a full desktop, the session host might have been
able to handle fewer users. That means you would have to deploy additional session hosts to
handle all the Excel users.
To publish a remote application to users:
1. Select the host pool with RemoteApp (Pooled) you want to work with.
2. From the action menu, select Applications > RemoteApps.
263

3. Select Add RemoteApp.
Notes:
l
When adding the RemoteApp, the host must be switched on and the applications
that you want to publish must be already installed.
l
If the host pool has multiple RemoteApp app groups, a specific RemoteApp app
group must be selected. By publishing different applications to different
Application Groups, administrators can control access to these applications via
group membership. This allows user groups to be served different applications
from the same host pool.
4. Enter the following information:
l
Application Source: From the drop-down list, select application's source.
l
Application: From the drop-down list, select the application.
l
Name: Type the name of the RemoteApp.
Note: The Name is visible to the user unless overridden by the Friendly Name.
l
Friendly Name: Optionally, type the friendly name that is visible to the user.
l
Description: Type the description that is visible to the admin.
l
File Path: Type the path to the application executable on the session host.
l
Icon Path: Optionally, type the path to an icon file to be used for this RemoteApp
when it appears in the user's Remote Desktop feed.
l
Icon Index: Optionally, type the numeric icon index in the icon file.
For Installed on Host:
264

l
Command Line Setting: Select this option to require a command line setting.
Note: This option should be selected if a command line value is required.
l
Command Line: Type the command line to pass to the executable when
launching the RemoteApp.
5. Once you have entered the desired information, select OK.
The authorized host pool users now need to be assigned to the RemoteApp Group that
contains the newly published RemoteApp.
Note:
l
Host pool users are not automatically assigned to that host pool's RemoteApp
Groups. Each user must be individually assigned to the appropriate RemoteApp
Group.
l
From the action menu, you can Edit or Delete published apps.
Related Topics
Remote Applications Maintenance Mode
Accelerated Networking on Session Host VMs
The Azure VM accelerated networking feature is available in some of the larger Azure VMs.
This feature is useful for enterprise organizations and IT professionals who need to deploy,
manage, and optimize large amounts of Azure Virtual Desktops. It speeds up networking
performance of individual VMs.
To enable and apply accelerated networking on session host VMs in the
workspace:
265

1. Locate the host pool you want to work with.
2. From the action menu, select Properties > VM Deployment.
3. Select Enable Accelerated Networking for VMs that support it.
Note: If this feature is not supported on your Azure VM, it is not enabled. See this
Microsoft document for more information.
4.
Select Save or Save & close.
The process is automatically performed.
266

Security
This section discusses topics related to permissions and access needed to install and work with
Nerdio Manager.
Nerdio Manager is Veracode verified
Azure Permissions and Nerdio Manager
Nerdio Manager is an Azure application that is deployed from the Azure Marketplace and runs
inside your own Entra ID tenant and Azure subscription. It requires certain permissions during
installation, configuration, and ongoing use.
Tip: See the following document for a deep dive into the Azure permissions and Nerdio
Manager: Nerdio Manager for Enterprise - Permissions.
Installation Permissions
The Entra ID user performing the installation of Nerdio Manager requires the following
permissions:
l
Global Administrator role in Entra ID.
l
Owner role in the Azure subscription.
Note: These elevated permissions are only needed for the initial installation and configuration
process and are not necessary for ongoing use of Nerdio Manager.
267

When Nerdio Manager is installed, it has the following API application permissions in Azure:
Service Permission Function
Azure Resource
Manager
Subscription Reader
Subscription Backup Reader
List the available
resources in the
Azure subscription
and make requests
on behalf of the user.
Microsoft Graph Application.Read.All (delegated)
AppRoleAssignment.ReadWrite.All
(delegated)
Application.ReadWrite.All
(delegated)
Manage the Nerdio
Manager application
service principal and
assign the users to
the Nerdio Manager
application to enable
user sign in.
Microsoft Graph Organization.Read.All (delegated)
Organization.Read.All (application)
Read organization-
level information,
such as tenant
name.
Microsoft Graph User.Read (delegated)
User.ReadBasic.All (delegated)
User.Read.All (application)
User.Read.All (delegated)
Group.Read.All (application)
Group.Read.All (delegated)
GroupMember.Read.All (delegated)
Read the Entra ID
groups and
membership for app
group assignments.
Microsoft Graph Offline_access (delegated)
Openid (delegated)
Allow user sign in
and delegated
268

Service Permission Function
profile (delegated)
(Optional) Mail.Send (delegated)
actions.
Azure Service
Management
user_impersonation (delegated) Make requests to
Azure on behalf of
the user.
Windows Virtual
Desktop
TenantCreator (application) (AVD Classic/V1)
Create the AVD
tenants.
Windows Virtual
Desktop
user_impersonation (delegated) (AVD Classic/V1)
Make requests on
behalf of the user.
Note: Group.Read.All and User.Read.All application-level API permissions can be removed
in version 4.0+. Removing these permissions has the following implications:
l
REST API cannot be used to assign users to host pools without User.Read.All
application-level permission.
l
If using Installed Apps management with existing rulesets, after removing
Group.Read.All application-level permissions be sure to open each ruleset and save it.
Subscription Permissions
While activating Nerdio Manager licensing subscription, a new SaaS subscription object Azure
resource is created on the Azure subscription, which allows Nerdio Manager to charge for license
consumption as a 3rd party service on the Azure bill. In order to configure a SaaS subscription
object, because it causes additional costs to be included on the subscription, the user completing
the configuration must be a subscription owner.
A new Entra ID application registration specific for Nerdio Manager's billing is also created
automatically as part of the resource deployment. This application is granted the below
269

permissions in order to authenticate as your user on behalf of your Azure tenant, and register the
SaaS subscription object as being tied to your Azure subscription. These permissions allow the
billing application to inform Nerdio Manager's licensing service the following details:
l
Who is completing the purchase.
l
Which SaaS subscription object is used for billing.
l
Which Entra ID tenant you are connecting from.
Note: These are the same permissions being granted to the billing application as are granted
to the primary Nerdio Manager application above.
Service Permission Function
Microsoft
Graph
openid, profile, User.Read (delegated) Allows user sign in
(name & Azure tenant
ID are shared).
Configuration Permissions
Once the Nerdio Manager application is installed, there are several configuration actions that can
be taken inside of Nerdio Manager to "link" it to existing Azure resources or create new ones.
These actions require the requesting user (that is, the user logged in and performing the action
via Nerdio Manager) to have certain permissions on the Azure resources that are being used.
Action Permissions Required
Link a resource group The requesting user must be an Owner on
the resource group being linked.
Link a network The requesting user must be an Owner on
the vNet that is being linked (or the
resource group that contains the vNet).
Link an additional Azure subscription The requesting user must be an Owner on
270

Action Permissions Required
the subscription that is being linked.
Switch the AVD object model from Classic to
ARM
The requesting user must be a Global
Administrator in the Entra ID in order to
grant the required admin consent.
Enable Sepago Azure monitoring The requesting user must be an Owner on
the selected resource group for
deployment of the Log Analytics
resources and permission assignment.
Create Azure Files shares The requesting user must be a Contributor
on the selected resource group for the
storage account deployment. To join a
newly created Azure Files share to Active
Directory, the selected AD profile must
have permissions to create
ServicePrincipalName objects (See
Permissions required to join Azure file
share to domain for additional details.)
Create Azure NetApp Files volumes The requesting user must be a Contributor
on the selected resource group for
NetApp account deployment and the vNet
containing the NetApp Files subnet.
Create AVD ARM host pools The requesting user must be a Contributor
on the resource group in which the host
pool is being created. To allow Nerdio
Manager to manage app group
membership, the requesting user must be
an Owner on the resource group into
which the host pool and app group are
being deployed.
271
Action Permissions Required
Add access to the Nerdio Manager for other
users
The requesting user must be an AVD
Admin in Nerdio Manager.
Associate session host VMs from previous AVD
deployment
The requesting user must be a Contributor
in the resource group that contains the
VMs.
Ongoing Use Permissions
When the Nerdio Manager application is installed and configured, no user permissions in Azure
are required to manage the configured AVD environment via Nerdio Manager. Most actions in
Nerdio Manager run on Nerdio Manager on behalf of the signed in user.
Note: There are several RBAC roles available. See Role-based Access Control (RBAC) in
NME for details.
Role-based Access Control (RBAC) in Nerdio Manager
You can use Role-based Access Controls (RBAC) to allow users in your organization to sign in to
Nerdio Manager and control which actions they can perform once signed in.
The following roles are available:
l
AVD Admin: A user with the AVD Admin role has complete access to all areas of Nerdio
Manager. Only AVD Admins can manage users and roles.
l
Desktop Admin: A user with the Desktop Admin role has complete access to user
sessions, the ability to view Host Pools, power on/off/restart session hosts, but does not
have the ability to add/remove hosts or change any host pool settings. This role also allows
for full access to Desktop Images and Scripted Actions.
l
Help Desk: A user with the Help Desk role has access to manage user sessions only.
l
Reviewer: A user with the Reviewer role has view-only access to all areas of Nerdio
Manager. They cannot make edits and save changes.
272

l
End User: A user with the End User role can view and manage their own sessions
(message, sign out, disconnect). Personal desktop users can restart, power off, and power
on their personal desktops.
For more information about custom roles, see "Role-based Access Control (RBAC) Custom
Roles" on page 276.
Companion Video
Select this link for a deep dive into RBAC.
Users and Roles Management
l
Navigate to RBAC Roles > Assignments. The list of users is displayed.
273

Notes:
l
The search section at the top allows you to search by various fields, including name,
username, role, and Workspace.
l
You can have the system list up to 1,000 rows on a single page. This is particularly
useful when you are looking at a list of end users, which can often be hundreds or
thousands.
l
Select the down arrow next to Edit to display an action menu.
Add Users to Roles/Workspaces
You can add users to Roles/Workspaces.
To add users to Roles/Workspaces:
1. Navigate to RBAC Roles > Assignments.
2.
In the upper right side, select the Add User icon or select the Add button.
3. Enter the following information:
l
Role: From the drop-down list, select a role.
l
Users/Groups: From the drop-down list, select the users/groups you wish to grant
access to.
l
AVD Tenant: From the drop-down list, select the AVD tenant(s) you wish to grant
access to.
l
Workspaces: For Workspaces roles, from the drop-down list, select the Workspace
(s) the user should have access to.
274

l
Images: For Desktop Images roles, from the drop- down list, select the Desktop
Image(s) the user should have access to.
4.
Once you have entered all the desired information, select OK.
Notes:
l
The changes are logged as a task. You can review the task's status to ensure the
task completed successfully.
l
Once access has been granted, users may sign in to Nerdio Manager using their
Entra ID username and password. Simply share the URL for Nerdio Manager
from your browser's address bar with the user. If MFA is being enforced, the user
needs to go through the MFA process while signing in.
Edit a User's Roles/Workspaces
You can change a user's role or the Workspaces the user has access to.
To edit a user:
1. Navigate to RBAC Roles > Assignments.
2. Locate the user you wish to edit.
3.
Select Edit.
4.
Once you have made the changes, select OK.
Note: The changes are logged as a task. You can review the task's status to ensure the
task completed successfully.
Remove User Access
You can prevent a user from accessing Nerdio Manager by removing the user's access.
To remove a user's access:
275

1. Navigate to RBAC Roles > Assignments.
2. Locate the user you wish to work with.
3.
From the action menu, select Remove access.
4.
On the confirmation window, select OK.
Note: The changes are logged as a task. You can review the task's status to ensure the
task completed successfully.
Role-based Access Control (RBAC) Custom Roles
This feature is only available in the Nerdio Manager Premium edition.
You can create custom roles to control access to all areas of Nerdio Manager. Custom roles
define the scope and level of access and can be assigned to users and security groups. Users
can access modules in read-only or full-access mode.
To create a custom role:
1. Navigate to RBAC Roles > Definitions .
2.
Select Add.
3. Enter the following information:
l
Name: Type the custom role's name.
l
Description: Type a description of the custom role.
l
Modules: Select all the applicable modules and modes (Read Only or Full Access).
276

Note: In addition to Read Only or Full Access, the Workspaces module has the
following modes:
l
Manage hosts: Select this mode to allow users to manage hosts within
assigned host pools.
l
Manage assignments: Select this mode to allow users to manage
assignments within assigned host pools.
l
Manage sessions: Select this mode to allow users to manage sessions
within assigned host pools.
l
Manage power state: Select this mode to allow users to manage the power
state of the sessions within assigned host pools.
l
Manage drain mode: Select this mode to allow users to manage the drain
mode of the sessions within assigned host pools.
4.
Once you have entered all the desired information, select OK.
Note: From the list of definitions, you can edit or delete a custom role.
For more information, see Role-based Access Control (RBAC) in Nerdio Manager.
277

Manage User Sessions
You can use Nerdio Manager to manage active and disconnected user sessions within the
selected Workspace.
l
RBAC permissions are required in order to manage user sessions. See "Role- based
Access Control (RBAC) in Nerdio Manager" on page 272 for details. In addition, the user
needs permission for RDP.
l
The host pool must be enabled to allow selected non-admin users or groups to shadow
sessions. See "Host Pool VM Deployment" on page 245 for details. In addition, you also
need network connectivity to the desktop.
Note: You can also select multiple user sessions and perform actions on those user sessions
in bulk.
To manage user sessions:
1. Navigate to Workspaces.
2. Locate the desired workspace and select User sessions.
The User Sessions window opens. It displays all the active or disconnected user sessions
across the host pools in this Workspace.
278

3. Use the Search feature to search for:
l
Username
l
Host name
4. Use the Filter feature to filter by:
l
Show active user sessions
l
Show disconnected user sessions
l
Selected host pool
5. You can select and perform these actions with the users:
279

l
Send message: Send a message to the user session.
l
Disconnect: Disconnect the user session.
l
Log off: Sign out the user session.
l
Shadow session: Shadow (remote access) the session and provide on- screen
support.
l
Log off and flush: Log off and archive or delete user profiles in order to troubleshoot
user issues.
280

Windows 365
This section discusses topics related to Windows 365.
Windows 365 - Enable and Configure Cloud PCs
The following topics discuss how to enable and configure Windows 365 Cloud PCs.
Enable Windows 365 in Nerdio Manager
The following procedure allows you to enable the Windows 365 environment in Nerdio Manager.
Important:
l
The user who enables Windows 365 must be a Global Administrator in order for the
process to complete successfully.
l
An Intune license must be present in the Entra ID tenant where Nerdio Manager is
installed.
l
A Windows 365 license must be present in the Entra ID tenant where Nerdio Manager
is installed.
l
Entra ID also requires approval on an application permission request consent page. If a
‘grant consent on behalf of my organization’ selection is available, be sure to approve.
To enable Windows 365 in Nerdio Manager
1. Navigate to Settings > Azure Environment.
2. In the Intune (Unified Endpoint Management) tile, if Intune is currently disabled, the status
displays as Disabled. Select Disabled to enable Intune.
3. Enter the following information:
l
Current Status: Toggle this option On to enable Intune. Toggle this option Off to
disable Intune.
281

l
Configurable Features: Select all the desired configurable features and their related
permissions.
Note: See Unified Endpoint Management: Intune Integration - Granular
Permissions for a deep dive into the features and permissions.
l
Device Visibility Scope Limitations: In this section, select the desired device
visibility scope limitations.
l
Device type scope: Optionally, from the drop-down list, select the device type
(s) to manage.
Note: By default, all Intune devices are included. Optionally, device
management can be limited to AVD hosts, Windows 365 Cloud PC, and/or
physical devices.
l
Limit by Entra ID group: Optionally, from the drop-down list, select one or
more Entra ID groups to restrict management to include only devices for the
users defined within the selected groups.
Note: This option works in combination with the selected Device type
scope.
l
Include devices that have no primary user: Select this option to include any
devices that have not been assigned to a user.
Note: This option is limited by the selected Device type scope, but ignores
any selected Limit by Entra ID group rules.
4.
Once you have entered all the desired information, select Save.
Windows 365 is enabled in your install of Nerdio Manager.
282

Notes:
l
Nerdio Manager now walks you through the process of creating a provisioning
policy. You may cancel this and create a provisioning policy later. See "Create a
Provisioning Policy" on page 287 for more information.
l
A new Endpoints > Windows 365 option on the main menu is now available. See
"Hide or Display Individual Cloud PC Hosts Page" below for more information.
l
At the top of the window, use the tabs to navigate to the desired Windows 365
feature.
Hide or Display Individual Cloud PC Hosts Page
Nerdio Manager allows you to hide or display the individual Cloud PC hosts page.
Note: All the functionality (restart, resize, etc.) is available no matter whether you hide or
display the individual hosts page.
When you hide the individual Cloud PC hosts page:
283

l
The Cloud PCs hosts are shown in Endpoints > All Devices, which can be filtered for
Windows 365 Cloud PCs only.
l
Endpoints > Windows 365 settings only contains settings and no hosts.
When you display the individual Cloud PC hosts page:
l
The Cloud PCs hosts are shown in Endpoints > Windows 365 > Cloud PCs tab.
l
Endpoints > Windows 365 also contains the settings.
l
The Cloud PCs hosts are also shown in Endpoints > All Devices.
To hide or display the individual Cloud PCs hosts page:
1. Navigate to Settings > Azure Environment.
2. In the Intune (Unified Endpoint Management) tile, select Enabled.
284

3. Under Cloud PC, toggle the Hide individual Cloud PC hosts page option On or Off as
desired.
4.
Select Save.
Configure a Windows 365 Network Connection
Windows 365 Enterprise Cloud PCs require Active Directory with Hybrid Entra ID sync. In order
for that to work, you need to configure a network connection.
To configure a Windows 365 network connection:
1. Navigate to Endpoints > Windows 365 settings or Windows 365.
2. Select the Network Connections tab.
3.
Select Add network connection.
4. Enter the following information:
l
Name: Type the name of the network connection.
l
Network type: From the drop-down list, select the network type.
l
Resource Group for cloud PC network cards: From the drop-down list, select the
resource group to contain the network interface cards of the Cloud PC desktops.
l
Network: From the drop-down list, select the desired network and sub-net.
Note: The Cloud PC desktops that are created on the selected network are
created in the Azure region associated with the network.
l
Active Directory: From the drop-down list, select the AD profile. This provides the
credentials when creating the computer objects as the Cloud PCs come online. AD
profiles can be modified under Settings > Integrations within Nerdio Manager.
5.
Once you have entered all the desired information, select OK.
After several minutes, the network is created.
285

Note: After the network connection is created, the Windows 365 service initiates
automatic health checks to validate that the provisioning is successful. The health
checks may take 30-60 minutes or longer to complete. These must pass before any
Cloud PC desktops may be provisioned.
Manage Windows 365 Network Connections
Nerdio Manager allows you to manage Windows 365 network connections.
To manage Windows 365 network connections:
1. Navigate to Endpoints > Windows 365 settings or Windows 365.
2. Select the Network Connections tab.
3. Locate the network connection you wish to work with.
4. You can perform any of the following functions:
l
Select the Name to see the configuration information.
l
Select the VNet to open it in Azure.
l
Select the Domain to view the domain the network is connected to.
l
Select the Status to see the test details.
l
Select Edit to change the network connection.
l
From the action menu, select Health check to perform a health check on the network
connection.
l
From the action menu, select Delete to delete the network connection.
Note: Microsoft tests this network on a regular basis to make sure it is still healthy and
functioning. If there is a problem with the network, review the test details to find and fix
the issue. See this Microsoft article for more information.
286

Create a Provisioning Policy
This feature is only available in the Nerdio Manager Premium edition.
A provisioning policy is a combination of a network connection with an image. It then maps the
combination to an assignment of security groups in Entra ID. This enables the Cloud PC
desktops to be provisioned.
To create a provisioning policy:
1. Navigate to Endpoints > Windows 365 settings or Windows 365.
2. Select the Provisioning Policies tab.
3.
Select Add policy.
4. Enter the following information:
l
Name: Type the name of the policy.
l
Description: Type the policy's description.
l
License type: From the drop-down list, select the license type.
l
Cloud PC image: From the drop-down list, select the Cloud PC image. You may
select either a Managed Image (created by Nerdio Manager in the Desktop Images
menu), a Microsoft Gallery Image, or any of the Custom Images uploaded to
Endpoint Manager directly.
l
Language & Region: From the drop-down list, select the language and region.
l
Network connection: From the drop- down list, select the desired network
connection. If only one network connection is available, it is selected by default.
Note: From the drop- down list, you can select Built In Network > Microsoft
Hosted Network to provision Cloud PCs without on- premises AD domain
controllers. Both customer- managed and Microsoft- managed VNets are
supported. Cloud PCs provision faster and join Entra ID automatically.
287

l
Windows 365 license assignment mode: From the drop-down list, select Manual to
manually select the security groups containing users that should be provisioned a
cloud PC desktop. Alternatively, select Automatic to allow Nerdio Manager to
manage entitlements and group assignments to optimize license utilization.
l
For the Enterprise license type and manual license assignment mode, enter the
following:
l
Manual Entra ID group assignments: From the drop- down list, select the
Entra ID security group(s) to assign to this provisioning policy.
l
For the Frontline license type and manual license assignment mode, enter the
following:
l
Groups: From the drop- down list, select the Entra ID security group (s) to
assign to this provisioning policy.
l
Cloud PC Size: From the drop-down list, select the required desktop sizes.
Note: The list of available sizes reflects your organization's available
licenses.
l
Select Assign to save the new group assignment.
l
Optionally, select Remove to delete a group assignment.
5.
Once you have entered all the desired information, select OK.
The provisioning policy is created.
Edit a Provisioning Policy
Nerdio Manager allows you to edit an existing provisioning policy.
To edit a provisioning policy:
1. Navigate to Endpoints > Windows 365 settings or Windows 365.
2. Select the Provisioning Policies tab.
288

3. Locate the desired provisioning policy and select Edit.
4. Enter the following information:
l
Force apply region change: Select this option to force apply a change to the
provisioning policy's region.
Warning: Cloud PCs are shutdown during this process. Users are disconnected
and any unsaved work is lost. Cloud PCs are unavailable for all actions until the
region change is complete. The process may take several hours. See this
Microsoft article for details.
l
See "Create a Provisioning Policy" on page 287 for details of the other parameters.
5.
Once you have entered all the desired information, select OK.
Assign Licenses to Users
Once you have created the necessary provisioning policies, you can assign users licenses to
Cloud PCs.
To assign Licenses to Users:
1. Open a browser and navigate to your Microsoft 365 admin portal. (This is not your Azure
admin portal.)
2. Purchase and assign a Cloud PC SKU to a user.
Notes:
l
The SKU determines the size of the desktop VM the user receives.
l
If the user is a member of a user group that has been assigned to a provisioning
policy, and the provisioning policy has a healthy network connection and an
assigned image, the desktop automatically comes online in 30-60 minutes.
289

Access Assigned Cloud PCs
Once Cloud PCs are provisioned, the users can access them.
To access your assigned Cloud PC:
1. Open a browser and navigate to windows365.microsoft.com or cloudpc.microsoft.com.
Alternatively, use the AVD Remote Desktop Client.
2. Sign in with your Entra ID credentials.
3. In the user self-service portal, all the assigned Cloud PCs are displayed.
4.
Select Open in browser to open the desired Cloud PC.
Manage Cloud PCs
Nerdio Manager enables you to manage provisioned Cloud PCs.
To manage Cloud PCs:
1. If you hide the individual Cloud PC hosts page, navigate to Endpoints > All Devices.
2. If you display the individual Cloud PC hosts page, navigate to Endpoints > Windows 365,
select the Cloud PCs tab.
3. Use the Cloud PCs list's robust search and filter capabilities to locate the desired device(s).
4. Locate the device you wish to work with.
l
Select the Device Name to view the device's details in the Microsoft Endpoint
Manager.
Note: Devices with a name of Not provisioned indicate the user has a Cloud PC
license assigned, but is not included on a provisioning policy.
l
Select the Provisioning Policy to view the device's policy.
l
Select a Script to view its run state.
l
The Image displays what image was used for this device and the SKU.
290

l
Select Restart to reboot the device.
l
From the action menu, select Reprovision to discard the current device and rebuild
it.
l
From the action menu, select Resize to the change the user's Cloud PC license to a
different SKU.
l
From the action menu, select Restoreto restore the Cloud PC from a restore point.
Windows 365 - Use and Configure Desktop Images for
Cloud PCs
Note: Before you start this topic, be sure that you have read Windows 365 Enable and
Configure Cloud PCs.
This topic contains additional information about using and configuring Windows 365 Cloud PC
Desktop Images using Nerdio Manager. Desktop images that you are familiar with in Nerdio
Manager can also be used for Cloud PCs.
Warning:
These are the Windows 365 limitations:
l
Windows 365 only supports single-session operating systems. That means the multi-
session EVD version of Windows 10/11 is not supported.
l
Cloud PCs and images only support Generation 2 VMs in Azure and not Generation 1.
l
There is a limit of 20 custom images per Entra ID tenant.
Create a Desktop Image for Cloud PC
Creating a desktop image for Cloud PC is basically the same as creating a regular desktop
image, with a few important differences.
To create a new desktop image for Cloud PC:
291

1. Navigate to Desktop Images.
2.
Select Add from Azure library.
3. Enter the desired Name, Description, etc.
l
In the Azure Image drop- down, be sure to select Windows 10 single- session
version, or Windows 11 single-session version, and Gen 2.
l
Select Enable for cloud PCs.
Note: Selecting this option tells Nerdio Manager to prepare this desktop image for
Cloud PC and upload it to the Windows 365 service.
l
Enter any other desired desktop image configuration information.
4.
Once you have entered all the desired information, select OK.
The image comes online, and its Cloud PC status is displayed in the Cloud PC column.
Note: This process may take 1-2 hours to complete.
292

5.
In the Cloud PC column, select Ready to open the image in your Intune Admin Center.
Manage Desktop Image for Cloud PC
Nerdio Manager allows to you change a desktop image that was created for Cloud PC.
To change an existing desktop image for Cloud PC:
1. From the main menu, select Desktop Images.
2. Locate the desired desktop image make sure it is powered on.
3. From the action menu, select Generate RDP file.
293

4.
Select your RDP options and then select Download.
5. Open the RDP file and log in the virtual machine.
6. Make the desired changes on the virtual machine.
7.
Back in Nerdio Manager, from the action menu, select Power off & set as image.
294
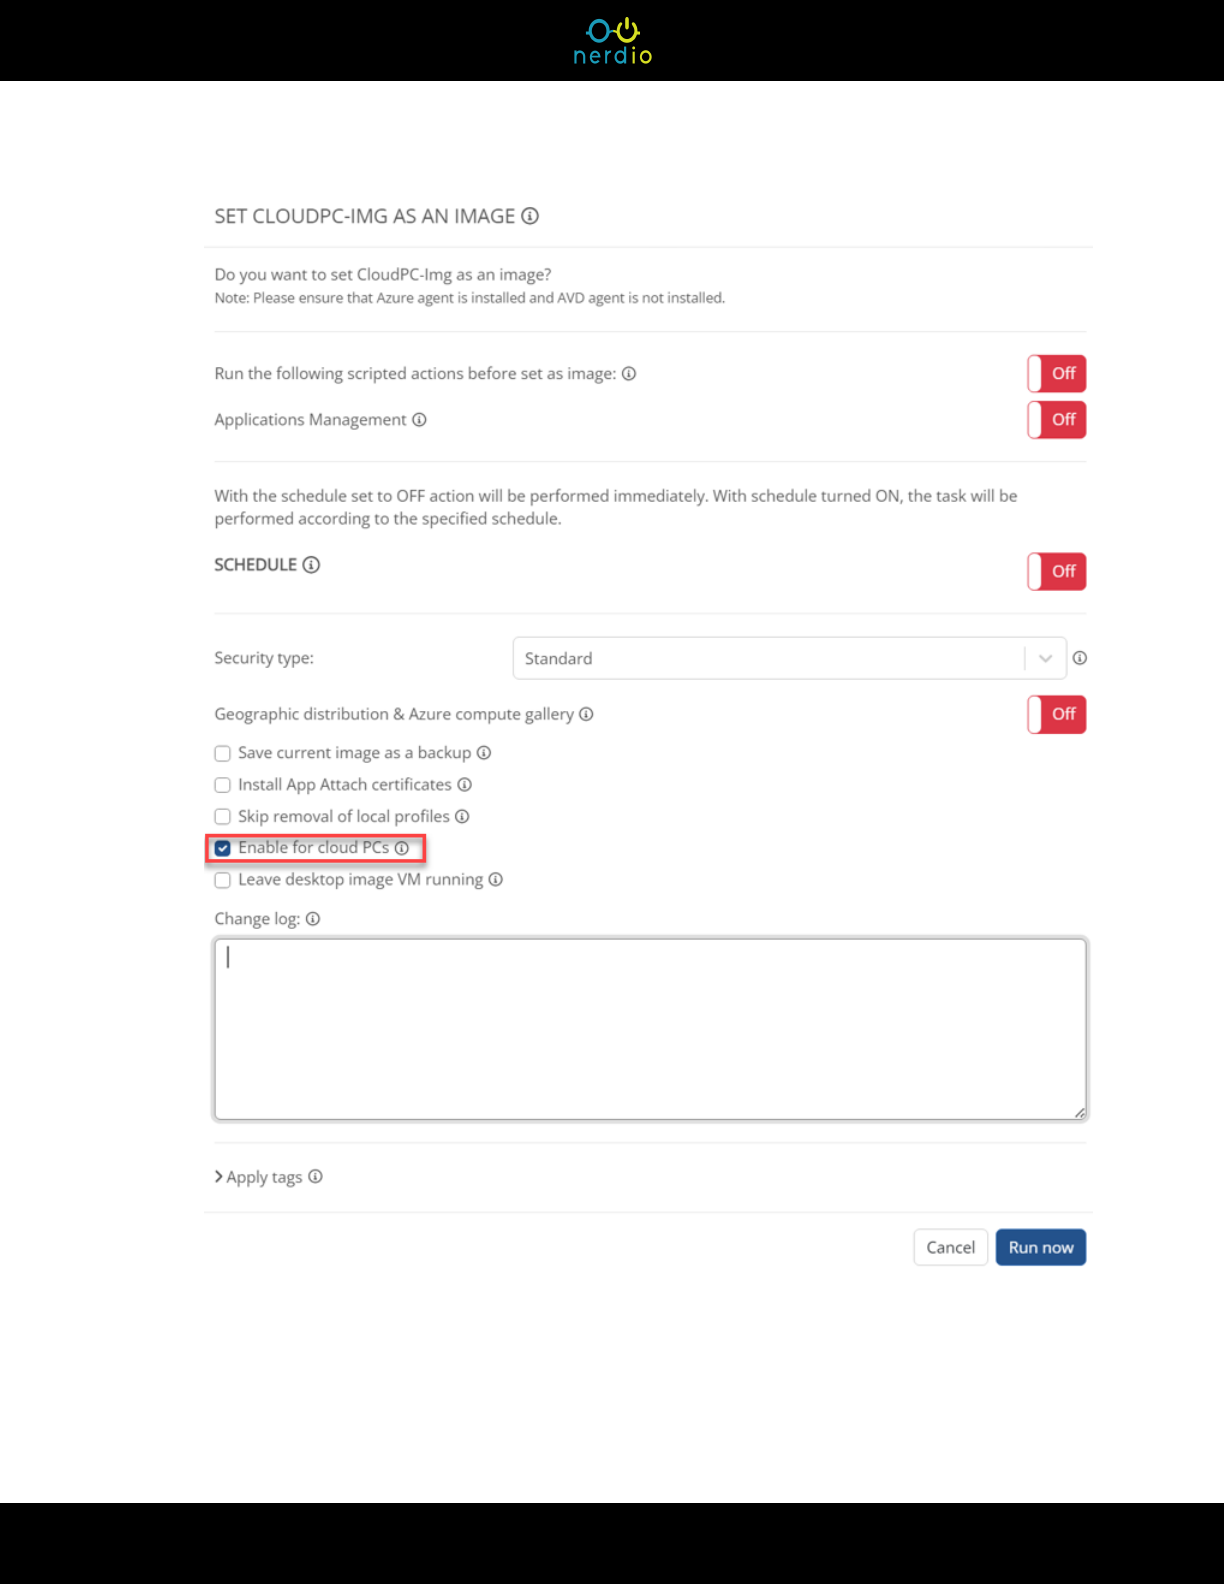
295

Note: Since this desktop image was created for Cloud PC, option Enable for cloud PC
is already selected.
8.
Select Run Now.
Notes:
l
All the changes to the image are stored as an Azure image, as well as uploaded to
the Cloud PC service with a new version: Intune Admin Center > Devices >
Windows 365 > Custom images tab.
l
You can use this new Cloud PC image for Windows 365 provisioning policies.
Windows 365 - User Settings Policies
This is a new concept in Cloud PC. For more information, please review this article from
Microsoft.
Note: Before you start this topic, be sure that you have read Windows 365 Enable and
Configure Cloud PCs.
To add a new user settings policy:
296

1. Navigate to Endpoints > Windows 365 or Windows 365 settings.
2. Select the User Settings tab.
3. Select Add user settings.
4. Enter the following information:
l
Name: Type the policy's name.
l
Local Admin Enabled: Select this option to elevate the end users assigned to this
policy to local admins on all their Cloud PCs.
l
Allow user to initiate restore service: Select this option to give the end user the
ability to use snapshots to restore their own Cloud PCs. Otherwise, non-admin users
cannot use snapshots to restore the Cloud PC.
l
Frequency of restore-point service: From the drop-down list, select the time interval
to automatically take snapshots (restore points) of a Cloud PC.
297

l
Assignments: Type the name of the group to assign this policy to.
5. Once you have entered all the desired information, select OK.
Note: You can edit or delete any of the policies by selecting Edit or Delete on the User
Settings list.
298

MSIX App Attach
This section discusses topics related to MSIX App Attach.
An MSIX App Attach Image is an expanded container, such as a vhd, vhdx, or cim file, that
contains an extracted version of the MSIX packages. An image can contain one or more MSIX
packages. The MSIX App Attach images are mounted to the session hosts in the host pool and
the applications made available to users who sign in to the session hosts.
Create and Manage MSIX App Attach Images and Host
Pool Assignments
This topic discusses how to do the following:
l
Upload an MSIX app attach image.
l
Upload an MSIX package file.
l
Assign an app to a host pool.
l
Create a new version of an app.
l
Change an app to a new version.
Sample VHD(X) Packages and Certificate
To help you get you started, we created a few VHD(X) packages for some popular applications
that you can download and start using in your AVD environment for testing purposes.
Note: These packages are not intended for production purposes. They should be used for
proof of concept testing.
Google Chrome
l
VHD file MSIX package
l
MSIX file
299

Mozilla Firefox
l
VHD file MSIX package
l
MSIX file
Notepad++
l
VHD file MSIX package
l
MSIX file
PuTTY
l
VHD file MSIX package
l
MSIX file
VLC
l
VHD file MSIX package
l
MSIX file
Certificate
l
The certificate can be downloaded here.
l
The certificate is the same for all the packages.
Upload an MSIX App Attach Image File
Nerdio Manager allows you to upload new versions of packages and automatically apply them to
existing host pools. In addition, Nerdio Manager can create an image from an existing MSIX
package, or you can upload an image file.
To upload an image:
300

1. Navigate to Applications > App Attach.
2.
Select Upload image.
3. Enter the following information:
l
Friendly Name: Type the name that you want to appear on the images list.
l
Description: Type a description.
l
Storage Location: From the drop-down list, select the linked app storage location in
the AD-integrated Azure Files share.
Note: MSIX App Attach does not support Entra Domain Services or Entra ID. This
needs to be Active Directory Domain Services (ADDS).
l
Version: Type the version number of the image that you are uploading. This must be
unique.
l
Image File(s): Select the VHD(X)/CIM file(s) that contains the App Attach application
expanded from the MSIX installer.
l
Certificate (.cer) File: Select the certificate file.
Note: A certificate that was used to create the MSIX package must be installed on
all session hosts VMs. If you used a self-signed certificate to create the MSIX
package, upload it here and it is automatically installed for you. Alternatively, you
can install the certificate on the desktop image and re-image the session host
VMs
4.
Once you have entered all the desired information, select Upload.
The image is uploaded to Nerdio Manager.
301

Upload an MSIX Package File
This feature is only available in the Nerdio Manager Premium edition.
If you do not already have a VHD/VHDX./CIM that contains the image, Nerdio Manager allows
you to upload the MSIX file and Nerdio Manager automatically creates a VHD file for you.
To upload an MSIX package file:
1. Navigate to Applications > App Attach.
2.
Select Upload MSIX app(s).
3. Enter the following information:
l
Image Name: Type the image name.
l
Storage Location: From the drop-down list, select the linked app storage location in
the AD-integrated Azure Files share.
l
MSIX File(s): Select the MSIX file(s).
l
Certificate (.cer) File(s): Optionally, select the certificate file(s).
Note: To expand the MSIX app into a VHDX container, a temporary VM is created
to perform the operation and then deleted. It is recommended that you simply let
Nerdio Manager handle the temporary VM's configuration. Otherwise, select Show
advanced settings to specify the temporary VM's details.
4.
Once you have entered all the desired information, select OK.
The MSIX file is uploaded, and Nerdio Manager begins the process of creating a VM to
package the file into a VHDX image.
Assign an App to a Host Pool
Once you have uploaded an MSIX app attach image, you can assign the app to a host pool.
302

To assign an app to a host pool:
1. Locate the host pool you wish to assign the app to.
2. From the action menu, select Applications> MSIX App Attach.
3.
When the Manage MSIX App Attach window displays, select Add.
4. Enter the following information:
l
Image Source: From the drop- down list, select the location of the image that
contains MSIX packages. The image can be stored in Nerdio Manager's image
library or on any SMB file share that session host VMs have access to. If you have
uploaded or created MSIX images using Nerdio Manager, select Image Library.
l
MSIX App Attach Image: From the drop-down list, select an MSIX App Attach image
containing the MSIX packages.
l
Image Version: From the drop-down list, select the image's version to be added to
the host pool.
l
Packages: From the drop- down list, select one or more MSIX packages/apps
present in the image to make available to users on this host pool.
Notes:
l
The package in the file share closest to the host pool’s region is prioritized
to reduce latency.
l
Ensure that the host pool has at least one running session host VM.
l
Each VM in the host pool must have certificates that were used to sign
MSIX installed. Select Install certificates to install them if they aren't
already.
5.
Once you have entered all the desired information, select OK.
The MSIX app is added to the host pool.
Assign an App Attach v2 App to Users and Groups
Once you have uploaded an MSIX App Attach v2, you can assign the app to users and groups.
303

To assign an App Attach v2 app to users and groups:
1. Navigate to Applications > App Attach.
2. Select the App Attach v2 packages tab.
3. Locate the App Attach v2 app you want to work with.
4. From the action menu, select Users and groups.
5. From the drop-down list, select the Users and Groups.
6.
Once you have entered all the desired information, select OK.
The MSIX app is assigned to the users and groups.
Use the App Attach v2 Package Wizard
The App Attach wizard can be used to deploy App Attach packages to all required AVD host pools
automatically, without the need to manually deploy packages.
Note: This feature is applicable to App Attach v2 packages only. Ensure that the required
Nerdio App Attach image version is replicated to all required regions before proceeding.
To use the App Attach v2 package wizard:
1. Navigate to Applications > App Attach.
2. Select the App Attach v2 packages tab.
3. Locate the App Attach v2 app you want to work with.
4. From the action menu, select Package wizard.
5. In the Image tab, enter the following information:
l
Image version: From the drop-down list, select the image version.
l
Temporary replica: From the drop- down list, select the version replica used to
extract metadata from the selected App Attach image.
304

l
Temporary host pool: From the drop-down list, select the temporary host pool used
to expand the image.
Note: A temporary host pool is required as a proxy to extract metadata from the
selected App Attach image. No changes are made to the pool configuration and
any host pool may be used. However, as best practice we recommend the
creation of a dedicated App Attach pool. At least one desktop must be running in
the pool to proceed.
6. In the Package tab, enter the following information:
l
Resource group: From the drop-down list, select the resource group where the App
Attach package is created.
Note: This resource group does not need to be in the same region as the pool
assignments, but it is recommended as best practice.
l
Packages: From the drop-down list, select one or more MSIX packages to make
available to users on the selected host pools.
7. In the Assignments tab, enter the following information:
l
Host pools: From the drop- down list, select one or more host pools from the
subscription of the selected resource group that are assigned to the package(s).
l
Users and groups: From the drop-down list, select the authorized users and groups
to run the applications included in the selected package(s).
8. In the Summary tab, review the selections.
9.
Once you have reviewed all the desired selections, select Run.
The App Attach wizard task starts. You can see the task's progress in the App Attach
Tasks window.
Create a New Version of an App
Nerdio Manager allows you to manage multiple versions of an app.
305

To add a new version of an app:
1. Navigate to Applications > App Attach.
2. Select either the Nerdio images or App Attach v2 packages tab.
3. Locate the image you want to add an app to.
4. From the action menu, select Upload version.
5. Enter the following information:
l
Version: Type the version number of the image that you are uploading. This must be
unique.
l
Image File(s): Select the VHD(X)/CIM file(s) that contains the App Attach application
expanded from the MSIX installer.
l
Certificate (.cer) File(s): Optionally, select the certificate file(s).
Note: A certificate that was used to create the MSIX package must be installed on
all session hosts VMs. If you used a self-signed certificate to create the MSIX
package, upload it here and it is automatically installed for you. Alternatively, you
can install the certificate on the desktop image and re-image the session host
VMs.
6.
Once you have entered all the desired information, select Upload.
The image is uploaded to Nerdio Manager
Change to a New Version of an App
Nerdio Manager allows you to change to a new version an app.
To change to a new version of an app:
1. Navigate Applications > App Attach.
2. Select either the Nerdio images or App Attach v2 packages tab.
306

3. Locate the image you want to work with.
4.
Select Image versions. The list of image versions displays.
5. Locate the image version you wish to set as the default.
6.
Select Set as default. The confirmation window displays.
7.
Select Update host pools where this package is assigned to assign the new
version of the image to the host pools listed above.
8.
Select OK.
The new version is now the default.
Upload a New Image Version of an App
Nerdio Manager allows you to upload a new image version an app.
To upload a new image version of an app:
1. Navigate Applications > App Attach.
2. Select either the Nerdio images or App Attach v2 packages tab.
3. Locate the image you want to work with.
4.
From the action menu, select Upload a new Image version.
5. Enter the following information:
l
Version: Type the version number of the image that you are uploading. This must be
unique.
l
Storage Location: From the drop-down list, select the linked app storage location in
the AD-integrated Azure Files share.
l
Image File(s): Select the VHD(X)/CIM file(s) that contains the App Attach application
expanded from the MSIX installer.
l
Certificate (.cer) File(s): Optionally, select the certificate file(s).
6.
Once you have entered all the desired information, select Upload.
307

Storage
This section discusses topics related to Azure Files and Azure NetApp Files management.
Azure Files and Azure NetApp Files are a native Azure service often used instead of a traditional
IaaS- based virtual machine acting as a file server. It is a more flexible approach offering
configurable throughput, including input/output performance characteristics. Azure Files is often
used in combination with a user profile management solution such as FSLogix.
Nerdio Manager enables you to work with existing Azure File shares, by linking these to Nerdio
Manager. Alternatively, Nerdio Manager can create a completely new Azure Files file share for
you, including things such as adding permissions, joining it to the domain, and more.
Nerdio Manager also offers some unique management features not found anywhere else. A great
example of this is the ability to auto-scale your Azure Files file share, meaning you are only
charged for the storage you consume and you do not have to over provision your file shares
leading to higher monthly costs.
Create and Manage Configured Azure Files Shares
The Azure Files page contains a list of all the configured and linked Azure Files shares. You can
perform various actions on the Azure Files shares such as creating, linking, or managing shares.
This includes options such as auto- scale, unlink, setting/changing permissions, closing file
handles, and copy the Azure Files UNC path.
To link to an existing Azure Files file share:
1. Navigate to Storage > Azure Files.
2.
Select Link Azure Files.
3. Enter the following information:
l
Storage Account: From the drop-down list, select the storage account.
l
File Share: From the drop-down list, select the file share.
4.
Once you have entered all the desired information, select OK.
After a few moments, the Azure Files file share is added to Nerdio Manager.
308

To create a new Azure Files file share and/or storage account:
1. Navigate to Storage > Azure Files.
2.
Select Add Azure Files.
3. Enter the following information:
l
Storage Account: From the drop-down list, select the storage account.
l
Storage Account Description: Type the description of the storage account.
l
Resource Group: From the drop-down list, select resource group for the storage
account and Azure Files share.
l
Performance: From the drop-down list, select performance tier for the share.
Tip: It is strongly recommended that you select Premium for the best user
experience.
l
Replication: From the drop-down list, select the type of storage replication.
Note: See this Microsoft article for more information about Azure storage
redundancy.
l
File Share Name: Type the share's name.
l
File Share Description: Type the share's description.
l
Provisioned Capacity (GiB): Type the size of the provisioned capacity.
l
Share-level permissions: Select this option to set default share-level permissions on
storage account.
309

Note:
l
SMB Share Contributor permission can be used to allow all authenticated
users read/write access to the share.
l
SMB Share Reader can be used to allow all authenticated users read-only
access to the share (for example, MSIX app attach).
See this Microsoft article for additional information.
l
Permissions (SMB Share Contributors): Specify users/groups that have Storage
File Data SMB Share Contributor role on the share.
Note: This is required for read/write access to the share.
l
Add users / groups from host pools: From the drop-down list, select users/groups
currently assigned to these host pools to be given Storage File Data SMB Share
Contributor role on the share.
l
Join to AD or Entra ID: Select this option and then from the drop-down list, select an
Entra ID or an AD profile to directly join the share.
Note: To use an Azure Files share as a storage location for FSLogix profiles and
MSIX App Attach images, the storage account must be integrated with Active
Directory, Entra Domain Services, or Entra ID. If you select not to join the storage
account to AD or Entra ID, you can do so later. Joining the storage account to AD
creates a temporary VM and uses the AD profile credentials to add the storage
account as a Computer object in selected AD. Integrating storage account with
Entra Domain Services sets the appropriate flag in Azure. Entra Domain Services
admin profile credentials are necessary to create a temporary VM to be domain-
joined and enable AES-256 encryption. Joining the storage account with Entra ID
creates the necessary app registration and provides you with an option to grant
needed consents.
310

l
Create a computer-joined file share: Select this option to join Azure Files storage
accounts to AD by creating either a user object or a computer object in Active
Directory.
Note: It is recommended that a user object is used for the domain join process.
Please ensure that no policies are in effect that may disable or remove this
account or reset its password. If a computer object is selected, ensure this
account is excluded from any automated cleanup process. All file shares are
created with AES256 encryption enabled.
l
Assign NTFS file-level permissions: Select this option to have Nerdio Manager
assign NTFS file-level permissions to newly created file shares.
Notes:
l
This is in addition to assigning Azure RBAC roles selected above.
l
This process automatically creates a temporary VM to perform the
permission assignment task.
l
See this Microsoft article for information about default file permissions used
on new Azure Files shares.
l
App Attach: Select this option to grant Authenticated Users Read permission
to sub-directories in the share. This is recommended for shares containing
App Attach applications.
l
FSLogix: Select this option to grant Authenticated Users Modify permission to
the root directory in the share, allowing for the creation of FSLogix profile
folders. This is recommended for shares containing FSLogix profiles.
l
Show advanced settings: To join Azure Files to the Active Directory Nerdio
Manager creates a temporary VM to perform the operation. Select the settings to be
used for this temporary VM.
311

Tip: It is strongly recommended that you allow Nerdio Manager to use the default
settings when creating the temporary VM. That is, we recommend that you do not
use the advanced settings.
l
Enable SMB Multichannel: Select this option to improve the Azure Files Premium
performance.
l
Apply tags: Optionally, type the Name and Value of the Azure tag to apply to the
Azure Files share.
Note: You may specify multiple tags. See this Microsoft article for details about
using tags to organize your Azure resources.
4.
Once you have entered all the desired information, select OK.
To manage configured Azure Files shares:
1. Navigate to Storage > Azure Files.
2. Locate the Azure Files share you want to manage.
3. The action menu allows you to perform the following functions:
l
Manage: Manage the file share's configuration.
l
Auto-scale: See "Auto-scale for Azure Files Storage Premium" on the next page for
more information.
312

l
File handles: Unlock files/Close open file handles.
l
Copy UNC Path: Copy the UNC path to the clipboard.
l
Unlink: Remove the Azure Files file share from Nerdio Manager.
l
Delete FSLogix Profiles: Delete a selected FSLogix profile.
l
Restore FSLogix Profiles: Restore a selected FSLogix profile that was previously
deleted.
4. From the action menu, select Manage to change the Azure Files share's parameters and
permissions.
Related Topics
"Create and Manage Configured Azure NetApp Files" on page 318
Auto-scale for Azure Files Storage Premium
A premium file share is billed by provisioned size, regardless of the capacity used. Share sizes
can range from 100 GiB to 102,400 GiB. IO and network bandwidth limits scale with the
provisioned share size.
When enabled, storage auto-scale grows the provisioned share size in response to anticipated
usage demand or increased storage latency. It also decreases the provisioned capacity to reduce
costs when the extra performance is no longer needed (not more than once every 24 hours).
Storage auto- scaling with Azure Files can also be used to maintain a specified headroom to
avoid running out of space on the volume or capacity pool.
Note: Auto-scale is not available for Azure Files standard storage, because both capacity cost
and performance are not controlled by the size of the share.
You must configure these auto-scale parameters:
l
Provisioned Size (Quota)
l
Scheduled Data Increase (Optional)
l
Scaling Logic
313

To configure and manage auto-scale for Azure Files premium:
1. Navigate to Storage > Azure Files.
2. Locate the files share you want to manage.
3. From the action menu, select Auto-scale > Configure.
4. Toggle the Auto-Scale option to On.
5. Enter the Provisioned Size (Quota) settings.
l
Quota unit: From the drop-down list, select the unit (Relative % or Absolute GiB).
Relative is a percentage of currently used capacity.
l
Minimum size: Type the minimum size in GiBs or %.
Note: The minimum size is 100 GiB and it may not be smaller than the used
capacity. In addition, this defines the minimum buffer that the system always
maintains as the user capacity grows. This guarantees the minimum amount of
free space in the file share.
l
Maximum size: Type the maximum size in GiBs or %.
l
Less than: Type the size the file share should be increased, below the total file
share size, to prevent the uncontrolled system growth..
The Performance displays the minimum and maximum configuration values, and displays
the performance characteristics.
6. Optionally, toggle Scheduled Quota Increase On and enter the settings.
Note: These are the parameters by which you are committed to increase the scheduled
quota. The quota is increased during this period and decreased between these periods.
This is useful if you have days with peak performance.
l
Days: From the drop-down list, select the range of days.
l
Hours: From the drop-down list, select the time zone.
314

l
Set provisioned size (quota) to: Type the quota that you commit to increase above
the current used capacity.
7. Enter the Scaling Logic settings.
Note: Provisioned size (quota) can be decreased only 24 hours after the last quota
increase. The quota is increased at the beginning of the period and decreased to the
minimum size only at the end of this period.
l
Select auto-scale trigger: From the drop-down list, select the trigger.
Note: The auto-scale logic configuration allows the scaling engine to determine
when to grow or shrink the share. It is based on two available metrics provided by
Azure files shares via the API. It describes how long it takes the IOPs to be
processed. It can either be the Average Success Server Latency (default) or the
Maximum Success Server Latency.
l
Increase the quota (scale out) by: Type the size the quota is increased according to
the Quota unit value specified in the Provisioned Size (Quota) section.
Note: When threshold is exceeded, the system continues scaling out until either it
reaches the specified Max size, or until the server latency is below the threshold.
l
Decrease the quota (scale in): Type the size the quota is decreased if the server
latency drops below the specified threshold.
8.
Once you have entered all the desired information, select Save or Save & close.
The configured file share appears in the list of shares on the Azure Files list.
Related Topics
"Auto-scale for Azure NetApp Files" on page 320
315

Auto-scale History for Azure Files Shares
The auto-scale history visualization helps you understand auto-scale behavior and how it impacts
your deployment.
The following are important auto-scale history features.
l
Time Range: At the top of the window, select the desired time range to display.
l
Show: At the top of the window, select the desired graph(s) to display.
l
Savings: At the top of the window, you can view auto-scale savings.
l
Zoom In: For the Quota (GiB) graph only, click and drag the mouse over the section of the
graph you wish to zoom in on. When you are zoomed in, select Zoom-out to restore the full
graph.
l
Hover: You can hover over any part of any graph to see its details. For example:
l
Action Points:
l
Scale Out: This action point indicates that a scale-out event took place. (Red
indicates that the scale-out event is costing money.)
l
Scale In: This action point indicates that a scale-in event took place. (Green
means that the scale-in event is saving money.)
l
Azure Issue: This indicates that there was a problem communicating with
Azure. If this occurs frequently, please contact Nerdio Manager technical support.
l
At the bottom of any graph, select the data set name to toggle on/off the display line
associated with that information. For example, select Peak Quota to suppress that line on
316

the graph. Select it again to display it.
To view auto-scale history for an Azure Files share:
1. Navigate to Storage > Azure Files.
2. Locate the file share you wish to work with.
3. From the action menu, select Auto-scale > History.
4. Select the desired time range and the specific graphs to display.
l
Quota (GiB): The Quota graph displays the following information about the file share
quota:
l
Peak Quota: The maximum size of the quota.
l
Actual Quota: The actual quota size as it is currently configured.
l
Used Capacity: The actual storage used.
l
Latency (ms): The Latency graph displays the following information:
l
Server Latency (avg): The average time used to process a successful request
by Azure Storage. This value does not include the network latency specified in
the End-to-End Latency.
l
End-to-End Latency (avg): The average end-to-end latency of successful
requests made to a storage service or the specified API operation. This value
includes the required processing time within Azure Storage to read the
request, send the response, and receive acknowledgment of the response.
l
Transactions: The Transactions graph displays the number of transactions.
l
Savings%: The Savings graph displays the savings percentage.
Related Topics
"Auto-scale History for Azure NetApp Shares" on page 323
317

Create and Manage Configured Azure NetApp Files
This feature is only available in the Nerdio Manager Premium edition.
The Azure NetApp Files page contains a list of all the configured and linked Azure NetApp files
shares. You can perform various actions on the files shares such as creating or managing files
shares.
To link to an existing Azure NetApp Files share:
1. Navigate to Storage > Azure NetApp Files.
2.
Select Link ANF Volume.
3. From the drop-down list, select the NetApp Files Account.
4.
Select OK.
After a few moments, the Azure NetApp Files file share is added to Nerdio Manager.
Create an Azure files and/or storage account.
Note: Before proceeding, verify that ANF is available in your Azure region and that your Azure
subscription is whitelisted for this service.
1. Navigate to Storage > Azure NetApp Files.
2.
Select Add ANF Volume.
3. Enter the following information:
l
Active directory: From the drop-down list, select the active directory.
l
Resource group: From the drop-down list, select the resource group.
l
Network: From the drop-down list, select the network.
318
l
Subnet: From the drop-down list, select the subnet.
l
AD-aware DNS Server: Type the address of the AD-aware DNS server.
4.
Once you have entered all the desired information, select Next.
5. Enter the following information:
l
Resource group for ANF account: From the drop-down list, select a resource group
to contain the Azure NetApp Files account objects.
l
Account name: Type the ANF account name or leave it blank for it to be
automatically generated.
l
SMB server prefix: Type the prefix of the computer objects that are to be joined to
the AD domain and used for the UNC path. For example: \\SMB- PREFIX -
random\volume\share\folder.
l
Volume name: Type the volume name to be created on the SMB server specified
above.
Note: There can be multiple volumes in the same ANF account.
l
Capacity (TiB): Type the capacity in TiB.
Note: The minimum capacity of an ANF capacity pool is 4 TiB.
l
Performance Tier: From the drop-down list, select the performance tier of the new
capacity pool and volume.
Note: Performance tiers vary in price and throughput (IOPS). See the following
Microsoft document for details.
6.
Once you have entered all the desired information, select Add.
Related Topics
"Create and Manage Configured Azure Files Shares" on page 308
319

Auto-scale for Azure NetApp Files
This feature is only available in the Nerdio Manager Premium edition.
In Azure storage NetApp files, you have an ANF account that can have multiple capacity pools.
Capacity pools are created with a service level (Standard, Premium, Ultra) that determines
performance. Within each capacity pool you can have one or more volumes that, in aggregate,
cannot exceed the size of this capacity pool. The cost of the ANF storage is determined by the
size of the capacity pool, with the minimum size of 4 TiB. You can grow and shrink a capacity pool
in increments of 1 TiB, but not smaller than the sum of the volumes that are contained within that
capacity pool.
The throughput limit of the ANF storage system is determined by a combination of the quota
assigned to the volume and the service level selected.
Storage auto- scaling with ANF is required when you need to dial-up the performance of a
particular volume during times of high demand on the storage system, and then dial it back down,
on a scheduled basis, when that performance is no longer needed. For example, during sign
in/sign out storms from Azure VD machines. Or it could be needed when there is heavy activity on
the storage system in the middle of the day and the latency of that volume is detected to be high.
Storage auto- scaling with ANF can also be used to maintain a specified headroom to avoid
running out of space on the volume or capacity pool.
To configure and manage auto-scale for Azure NetApp files:
1. Navigate to Storage > Azure NetApp Files.
2. Locate the ANF you want to manage.
3. From the action menu, select Auto-scale > Configure.
4. Toggle the Auto-Scale option to On.
5. Enter the Provisioned Size settings.
320

Note: If the volume free space drops below the Min, the system tries to grow the volume.
If it cannot grow the volume within the current capacity pool, the capacity pool is always
expanded by 1 TiB, and the volume grows at least for 1 TiB.
The volume won't grow beyond the configured maximum size.
l
Mode: From the drop-down list, select the mode:
l
Volume only: Auto-scales the volume without the capacity pool that contains
it. The volume is limited to the available free space within the capacity pool,
and the capacity pool does not increase automatically.
l
Volume and capacity pool: Auto-scales the volume and the capacity pool that
contains it (default).
l
For Volume only:
l
Size unit: From the drop-down list, select the unit (Relative % or Absolute
GiB). Relative is a percentage of currently used capacity.
l
Minimum size: When scaling down, type the minimum size to maintain on the
volume. This is evaluated as the currently used capacity + headroom amount.
Note: If the available space drops below the configured minimum free
space, the volume is increased to meet the minimum available space. If
exceeding capacity pool size, and capacity pool scaling is enabled, then an
additional 1 TiB is added to the capacity pool to increase the volume – up to
the configured maximum total size.
l
Maximum size: When scaling out, type the maximum amount the volume
should increase. This is evaluated as the currently used capacity + the scaling
amount.
l
Less than: Define the Max size the volume may grow in order to prevent
the uncontrolled system growth. This is limited by the available capacity
pool size.
321

l
For Volume and capacity pool:
l
Minimum volume free space: Type the minimum free to maintain on the
volume. If the current free space falls below this threshold, the volume
automatically grows along with the capacity pool.
l
Maximum volume total size: Type the maximum volume size of the volume in
TiBs. The volume and capacity pool combination cannot grow larger than this
value.
l
Exceeding the limit should trigger an error: Select this option to have the auto-scale
process trigger an error if the calculated size exceeds the maximum limit.
Note: This allows you to track these errors using notifications. See Configure
Email Notifications for details.
The Size and Performance calculator displays the minimum and maximum configuration
values and displays the performance characteristics.
6. Optionally, toggle Scheduled-Based Scaling On and configure the settings.
Note: This is useful if you have peaks in demand on the storage system (for example,
when multiple users sign in and sign out during the same time). You can specify more
than one period of the peak auto-scaling, after which the system automatically scales
down to the Min size. Be sure that the schedules do not overlap.
l
Time Zone: From the drop-down list, select the time zone.
l
Days: From the drop-down list, select the days.
l
Hours: From the drop-down list, select the range of hours.
l
Set provisioned size to: Type the amount of additional capacity to add to the
volume, beyond the current capacity.
7. Optionally, toggle Latency-Based Scaling On and configure the settings.
322

l
Select auto-scale trigger: From the drop-down list, select the trigger.
Note: This is the average or maximum time used to process a successful request
by Azure Storage.
l
Increase volume size (scale out): The system increases the volume size by the
value that you set if the server latency exceeds the specified threshold.
l
Decrease volume size (scale in): The system decreases the volume size by the
value that you set if the server latency drops below the specified threshold.
8.
Once you have entered all the desired information, select Save or Save & close.
The configured file appears in the list of files on the Azure NetApp Files list.
Related Topics
"Auto-scale for Azure Files Storage Premium" on page 313
Auto-scale History for Azure NetApp Shares
This feature is only available in the Nerdio Manager Premium edition.
The auto-scale history visualization helps you understand auto-scale behavior and how it impacts
your deployment.
The following are important auto-scale history features.
l
Time Range: At the top of the window, select the desired time range to display.
l
Show: At the top of the window, select the desired graph(s) to display.
l
Savings: At the top of the window, you can view auto-scale savings.
l
Zoom In: For the Size (GiB) graph only, click and drag the mouse over the section of the
graph you wish to zoom in on. When you are zoomed in, select Zoom-out to restore the full
graph.
323

l
Hover: You can hover over any part of any graph to see its details. For example:
l
Action Points:
l
Scale Out: This action point indicates that a scale-out event took place. (Red
indicates that the scale-out event is costing money.)
l
Scale In: This action point indicates that a scale-in event took place. (Green
means that the scale-in event is saving money.)
l
Azure Issue: This indicates that there was a problem communicating with
Azure. If this occurs frequently, please contact Nerdio Manager technical support.
l
At the bottom of any graph, select the data set name to toggle on/off the display line
associated with that information. For example, select Peak Size to suppress that line on
the graph. Select it again to display it.
To view auto-scale history for an Azure NetApp share:
1. Navigate to Storage > Azure NetApp Files.
2. Locate the file share you wish to work with.
3. From the action menu, select Auto-scale > History.
4. Select the desired time range and the specific graphs to display.
l
Size (GiB): The Size graph displays the following information about the file share
size:
324

l
Peak Size: The maximum size of the file share.
l
Actual Size: The actual size of the file share.
l
Used Capacity: The current capacity used in the file share.
l
Latency (ms): The latency graph displays the following information.
l
Read Latency (avg): The average read latency.
l
Write Latency (avg): The average write latency.
l
Savings%: The Savings graph displays the savings percentage.
Related Topics
"Auto-scale History for Azure Files Shares" on page 316
325

Logs Module
The Logs module allows you to access an audit trail of all tasks performed in Nerdio Manager. In
addition, you may configure the logs retention policy.
Access the Logs Module
The Logs module allows you to access an audit trail of all tasks performed in Nerdio Manager.
To access the logs module:
1. Navigate to Logs.
2. The following information is displayed:
l
Task: The task's name and description.
l
Resource Name: The name of the resource the task was performed on.
l
User: The user who performed the task.
l
Status: The current status of the task.
l
Created: The date and time the task was submitted.
l
Completed: The date and time the task completed.
Note: The Created and Completed dates are displayed in your local time zone as
dictated by your browser.
l
Details: Select Details to view the log entry's details.
3. Optionally, in Search, type the Resource name you wish to search for.
4. Optionally, set the desired filters:
Note: You can start typing the User, Type, or Status to search the respective lists.
326

l
Filter by Users: From the drop-down list, select the user(s) you wish to view.
l
Filter by Types: From the drop-down list, select the type(s) of activities you wish to
view.
l
Filter by Status: From the drop-down list, select the job status(es) you wish to view.
l
Filter by Date: Select the date range to view.
5.
In the upper right side, select the refresh icon to refresh the list when desired.
6.
In the upper right side, select the export icon to export the logs in JSON format. The file
is downloaded to your browser's default download folder.
Note: Optionally, when prompted, you can include any requested log bundled in the
tasks listed below to be included in the export request.
7. Optionally, in the column headings use the Up-Down arrows to sort the list.
Configure Logs Retention Policy
You may configure the logs retention policy. That is, you may configure how long to retain the
logs, which reduces the database size and the associated costs.
To configure the logs retention policy:
1. Navigate to Settings > Nerdio environment.
2. In the Nerdio Manager database resilience tile, select the link next to Log retention
period.
3. Enter the following information:
327

l
Retention: From the drop-down list, select the retention period.
Note: Log records older than the specified retention period are automatically
deleted.
l
1 year is 365 days.
l
1 month is 30 days.
l
Cleanup Schedule: If Retention is not Indefinite, from the drop-down lists select the
date and time when the automatic deletion runs.
4.
Once you have entered all the desired information, select OK.
AI-Powered Personally Identifiable Information Detector
The AI-Powered personally identifiable information (PII) Detector feature automatically scans and
identifies PII within Nerdio Manager's logs, ensuring data privacy and regulatory compliance.
See AI-Powered Personally Identifiable Information Detector for full details.
Download Application Insights Exceptions Log
Nerdio Manager runs in an app service, which logs all of its exceptions into an instance of
Application Insights. The Application Insights exceptions log can be downloaded to help analyze
any errors that may come up in Nerdio Manager or to send to Nerdio technical support for
assistance.
To download the Application Insights exceptions log:
1. Navigate to Settings > Nerdio Environment.
2.
In the Support tile, select Download Applications Insights exceptions.
3. Type the number of days of logs to download.
4.
Select OK.
The log is downloaded as a zip file to your browser's default download folder.
328

Gather Application Insights Logs
While troubleshooting some Nerdio Manager issues, support may request Application Insights
logs.
To gather the Application Insights logs:
1. In the Azure portal, search for Applications Insights.
2. Select the resource named nmw-app-insights-xxxxxx.
3. On the blade on the left side, in the Monitoring section, select Logs.
4. When presented with the Getting Started window, close it.
5. When presented with the Presets window, close it.
6. Run the Exceptions query:
l
In the query editor, type exceptions | where timestamp > ago (10d) | order by
timestamp.
l
Select Run.
l
When the query finishes, select Export > Export to CSV - all columns.
7. Run Traces query:
l
In the query editor, type traces | where timestamp > ago(10d) and severityLevel >=
3 | order by timestamp.
l
Select Run.
l
When the query finishes, select Export > Export to CSV - all columns.
8. Send the two CSV files as attachments in your reply to the ticket that requested the logs.
329
