
September 27,
Using Adobe FrameMaker
Publishing Server

i
Contents
Getting Started . . . . . . . . . . . . . . . . . . . . . . . . . . . . . . . . . . . . . . . . . . . . . . . . . . . . . . . . . . . . . . . . . . . . . . . . . . . . . . . 1
Resources
. . . . . . . . . . . . . . . . . . . . . . . . . . . . . . . . . . . . . . . . . . . . . . . . . . . . . . . . . . . . . . . . . . . . . . . . . 1
System requirements and licensing
. . . . . . . . . . . . . . . . . . . . . . . . . . . . . . . . . . . . . . . . . . . . . . . . . 1
System requirements
. . . . . . . . . . . . . . . . . . . . . . . . . . . . . . . . . . . . . . . . . . . . . . . . . . . . . . . . . . . 1
Installation
. . . . . . . . . . . . . . . . . . . . . . . . . . . . . . . . . . . . . . . . . . . . . . . . . . . . . . . . . . . . . . . . . . . . . 2
License activation
. . . . . . . . . . . . . . . . . . . . . . . . . . . . . . . . . . . . . . . . . . . . . . . . . . . . . . . . . . . . . . 2
Help and support
. . . . . . . . . . . . . . . . . . . . . . . . . . . . . . . . . . . . . . . . . . . . . . . . . . . . . . . . . . . . . . . . . . 3
Community Help
. . . . . . . . . . . . . . . . . . . . . . . . . . . . . . . . . . . . . . . . . . . . . . . . . . . . . . . . . . . . . . . 3
Other resources
. . . . . . . . . . . . . . . . . . . . . . . . . . . . . . . . . . . . . . . . . . . . . . . . . . . . . . . . . . . . . . . . 3
Introduction . . . . . . . . . . . . . . . . . . . . . . . . . . . . . . . . . . . . . . . . . . . . . . . . . . . . . . . . . . . . . . . . . . . . . . . . . . . . . . . . . 4
F
rameMaker Publishing Server
. . . . . . . . . . . . . . . . . . . . . . . . . . . . . . . . . . . . . . . . . . . . . . . . . . . . . 4
What’s new in FrameMaker Publishing Server
. . . . . . . . . . . . . . . . . . . . . . . . . . . . . . . . . . . . . . 4
Other features in FrameMaker Publishing Server
. . . . . . . . . . . . . . . . . . . . . . . . . . . . . . . . . . . 5
Installation and setup . . . . . . . . . . . . . . . . . . . . . . . . . . . . . . . . . . . . . . . . . . . . . . . . . . . . . . . . . . . . . . . . . . . . . . . 8
S
ystem requirements
. . . . . . . . . . . . . . . . . . . . . . . . . . . . . . . . . . . . . . . . . . . . . . . . . . . . . . . . . . . . . 8
Plan the deployment architecture
. . . . . . . . . . . . . . . . . . . . . . . . . . . . . . . . . . . . . . . . . . . . . . . . . 8
Vertical scaling
. . . . . . . . . . . . . . . . . . . . . . . . . . . . . . . . . . . . . . . . . . . . . . . . . . . . . . . . . . . . . . . . 9
Horizontal scaling
. . . . . . . . . . . . . . . . . . . . . . . . . . . . . . . . . . . . . . . . . . . . . . . . . . . . . . . . . . . . . 10
Mixed scaling
. . . . . . . . . . . . . . . . . . . . . . . . . . . . . . . . . . . . . . . . . . . . . . . . . . . . . . . . . . . . . . . . . 11
Install and configure MongoDB
. . . . . . . . . . . . . . . . . . . . . . . . . . . . . . . . . . . . . . . . . . . . . . . . . . . 11
Install FrameMaker Publishing Server
. . . . . . . . . . . . . . . . . . . . . . . . . . . . . . . . . . . . . . . . . . . . . 13
Configure the server component
. . . . . . . . . . . . . . . . . . . . . . . . . . . . . . . . . . . . . . . . . . . . . . . . . . 15
Stop the server component
. . . . . . . . . . . . . . . . . . . . . . . . . . . . . . . . . . . . . . . . . . . . . . . . . . . . 16
Configure the server_url.txt file
. . . . . . . . . . . . . . . . . . . . . . . . . . . . . . . . . . . . . . . . . . . . . . . . 16
Configure the development.json file
. . . . . . . . . . . . . . . . . . . . . . . . . . . . . . . . . . . . . . . . . . . 16
Launch the server using the run.bat file
. . . . . . . . . . . . . . . . . . . . . . . . . . . . . . . . . . . . . . . 20
Configure the client components
. . . . . . . . . . . . . . . . . . . . . . . . . . . . . . . . . . . . . . . . . . . . . . . . . . 21
Stop the client component
. . . . . . . . . . . . . . . . . . . . . . . . . . . . . . . . . . . . . . . . . . . . . . . . . . . . 21
Configure the server.ini file
. . . . . . . . . . . . . . . . . . . . . . . . . . . . . . . . . . . . . . . . . . . . . . . . . . . . 21
Configure the FrameMaker instance
. . . . . . . . . . . . . . . . . . . . . . . . . . . . . . . . . . . . . . . . . . 22

ii
Launch the client using the StartWorker.bat file . . . . . . . . . . . . . . . . . . . . . . . . . . . . . . . 22
Common customizations for FrameMaker Publishing Server
. . . . . . . . . . . . . . . . . . . . . . 24
Access FrameMaker Publishing Server
. . . . . . . . . . . . . . . . . . . . . . . . . . . . . . . . . . . . . . . . . . . . 25
FrameMaker Publishing Server dashboard
. . . . . . . . . . . . . . . . . . . . . . . . . . . . . . . . . . . . . . . . 25
Autorefresh of the FMPS interface
. . . . . . . . . . . . . . . . . . . . . . . . . . . . . . . . . . . . . . . . . . . . 26
Create and manage publication tasks . . . . . . . . . . . . . . . . . . . . . . . . . . . . . . . . . . . . . . . . . . . . . . . . . . . . . . 28
P
ublishing
. . . . . . . . . . . . . . . . . . . . . . . . . . . . . . . . . . . . . . . . . . . . . . . . . . . . . . . . . . . . . . . . . . . . . . . 28
Tasks
. . . . . . . . . . . . . . . . . . . . . . . . . . . . . . . . . . . . . . . . . . . . . . . . . . . . . . . . . . . . . . . . . . . . . . . . 28
Create a task
. . . . . . . . . . . . . . . . . . . . . . . . . . . . . . . . . . . . . . . . . . . . . . . . . . . . . . . . . . . . . 30
Run tasks from the list
. . . . . . . . . . . . . . . . . . . . . . . . . . . . . . . . . . . . . . . . . . . . . . . . . . . . 32
Duplicate a task
. . . . . . . . . . . . . . . . . . . . . . . . . . . . . . . . . . . . . . . . . . . . . . . . . . . . . . . . . . 32
Edit a task
. . . . . . . . . . . . . . . . . . . . . . . . . . . . . . . . . . . . . . . . . . . . . . . . . . . . . . . . . . . . . . . . 32
Delete a task
. . . . . . . . . . . . . . . . . . . . . . . . . . . . . . . . . . . . . . . . . . . . . . . . . . . . . . . . . . . . . 32
Scheduling
. . . . . . . . . . . . . . . . . . . . . . . . . . . . . . . . . . . . . . . . . . . . . . . . . . . . . . . . . . . . . . . . . . . . . . 32
Create a schedule for run
. . . . . . . . . . . . . . . . . . . . . . . . . . . . . . . . . . . . . . . . . . . . . . . . . . . . . 33
View the schedules for tasks
. . . . . . . . . . . . . . . . . . . . . . . . . . . . . . . . . . . . . . . . . . . . . . . . . . 34
Work with presets . . . . . . . . . . . . . . . . . . . . . . . . . . . . . . . . . . . . . . . . . . . . . . . . . . . . . . . . . . . . . . . . . . . . . . . . . . 35
P
resets
. . . . . . . . . . . . . . . . . . . . . . . . . . . . . . . . . . . . . . . . . . . . . . . . . . . . . . . . . . . . . . . . . . . . . . . . . . 35
Add a preset
. . . . . . . . . . . . . . . . . . . . . . . . . . . . . . . . . . . . . . . . . . . . . . . . . . . . . . . . . . . . . . . . . 35
Edit a preset
. . . . . . . . . . . . . . . . . . . . . . . . . . . . . . . . . . . . . . . . . . . . . . . . . . . . . . . . . . . . . . . . . 35
Duplicate a preset
. . . . . . . . . . . . . . . . . . . . . . . . . . . . . . . . . . . . . . . . . . . . . . . . . . . . . . . . . . . . 36
Delete presets
. . . . . . . . . . . . . . . . . . . . . . . . . . . . . . . . . . . . . . . . . . . . . . . . . . . . . . . . . . . . . . . . 36
Logs . . . . . . . . . . . . . . . . . . . . . . . . . . . . . . . . . . . . . . . . . . . . . . . . . . . . . . . . . . . . . . . . . . . . . . . . . . . . . . . . . . . . . . . . 37
S
pecify default log settings
. . . . . . . . . . . . . . . . . . . . . . . . . . . . . . . . . . . . . . . . . . . . . . . . . . . . . . . 37
View logs
. . . . . . . . . . . . . . . . . . . . . . . . . . . . . . . . . . . . . . . . . . . . . . . . . . . . . . . . . . . . . . . . . . . . . . . . 37
Work with FMPS using REST APIs . . . . . . . . . . . . . . . . . . . . . . . . . . . . . . . . . . . . . . . . . . . . . . . . . . . . . . . . . . 39
R
EST API protocol
. . . . . . . . . . . . . . . . . . . . . . . . . . . . . . . . . . . . . . . . . . . . . . . . . . . . . . . . . . . . . . . 39
REST API for user management
. . . . . . . . . . . . . . . . . . . . . . . . . . . . . . . . . . . . . . . . . . . . . . . . . . 40
Register a new user
. . . . . . . . . . . . . . . . . . . . . . . . . . . . . . . . . . . . . . . . . . . . . . . . . . . . . . . . . . 40
Change user permission
. . . . . . . . . . . . . . . . . . . . . . . . . . . . . . . . . . . . . . . . . . . . . . . . . . . . . . . 41
User login with USERLOGIN authentication
. . . . . . . . . . . . . . . . . . . . . . . . . . . . . . . . . . . 42
User login with LDAP authentication
. . . . . . . . . . . . . . . . . . . . . . . . . . . . . . . . . . . . . . . . . 43
REST APIs for working with presets
. . . . . . . . . . . . . . . . . . . . . . . . . . . . . . . . . . . . . . . . . . . . . . . 44
Upload an STS file
. . . . . . . . . . . . . . . . . . . . . . . . . . . . . . . . . . . . . . . . . . . . . . . . . . . . . . . . . . . . 44
Upload a DITAVAL file
. . . . . . . . . . . . . . . . . . . . . . . . . . . . . . . . . . . . . . . . . . . . . . . . . . . . . . . . 45
Create a preset
. . . . . . . . . . . . . . . . . . . . . . . . . . . . . . . . . . . . . . . . . . . . . . . . . . . . . . . . . . . . . . . 46
Update a preset
. . . . . . . . . . . . . . . . . . . . . . . . . . . . . . . . . . . . . . . . . . . . . . . . . . . . . . . . . . . . . . 48
Delete a preset
. . . . . . . . . . . . . . . . . . . . . . . . . . . . . . . . . . . . . . . . . . . . . . . . . . . . . . . . . . . . . . . 50
Get all presets
. . . . . . . . . . . . . . . . . . . . . . . . . . . . . . . . . . . . . . . . . . . . . . . . . . . . . . . . . . . . . . . . . 51
Get a specific output preset
. . . . . . . . . . . . . . . . . . . . . . . . . . . . . . . . . . . . . . . . . . . . . . . . . . . . 51

iii
REST APIs for working with tasks . . . . . . . . . . . . . . . . . . . . . . . . . . . . . . . . . . . . . . . . . . . . . . . . . 52
Create a task
. . . . . . . . . . . . . . . . . . . . . . . . . . . . . . . . . . . . . . . . . . . . . . . . . . . . . . . . . . . . . . . . . 52
Delete a task
. . . . . . . . . . . . . . . . . . . . . . . . . . . . . . . . . . . . . . . . . . . . . . . . . . . . . . . . . . . . . . . . . 64
Get all tasks
. . . . . . . . . . . . . . . . . . . . . . . . . . . . . . . . . . . . . . . . . . . . . . . . . . . . . . . . . . . . . . . . . . 65
Get a specific task
. . . . . . . . . . . . . . . . . . . . . . . . . . . . . . . . . . . . . . . . . . . . . . . . . . . . . . . . . . . . 65
Get the status of a task of a specific user
. . . . . . . . . . . . . . . . . . . . . . . . . . . . . . . . . . . . . . 66
Get the status of a running task
. . . . . . . . . . . . . . . . . . . . . . . . . . . . . . . . . . . . . . . . . . . . . . . 67
Update a task
. . . . . . . . . . . . . . . . . . . . . . . . . . . . . . . . . . . . . . . . . . . . . . . . . . . . . . . . . . . . . . . . 68
Upload a post-publish script file
. . . . . . . . . . . . . . . . . . . . . . . . . . . . . . . . . . . . . . . . . . . . . . 70
Upload a prepublish script file
. . . . . . . . . . . . . . . . . . . . . . . . . . . . . . . . . . . . . . . . . . . . . . . . . 71
REST APIs to work with scheduling tasks
. . . . . . . . . . . . . . . . . . . . . . . . . . . . . . . . . . . . . . . . . . 72
Schedule a task
. . . . . . . . . . . . . . . . . . . . . . . . . . . . . . . . . . . . . . . . . . . . . . . . . . . . . . . . . . . . . . . 72
Get ID of a running task
. . . . . . . . . . . . . . . . . . . . . . . . . . . . . . . . . . . . . . . . . . . . . . . . . . . . . . 73
Stop a running task
. . . . . . . . . . . . . . . . . . . . . . . . . . . . . . . . . . . . . . . . . . . . . . . . . . . . . . . . . . 74
Get running object details for a GUID
. . . . . . . . . . . . . . . . . . . . . . . . . . . . . . . . . . . . . . . . . 75
Get all objects present in the running task queue
. . . . . . . . . . . . . . . . . . . . . . . . . . . . . . 77
Get the details of a specific queued object
. . . . . . . . . . . . . . . . . . . . . . . . . . . . . . . . . . . . . 77
Other REST APIs to work with the server and logs
. . . . . . . . . . . . . . . . . . . . . . . . . . . . . . . . 78
Get the server status
. . . . . . . . . . . . . . . . . . . . . . . . . . . . . . . . . . . . . . . . . . . . . . . . . . . . . . . . . 78
Get server connection parameters
. . . . . . . . . . . . . . . . . . . . . . . . . . . . . . . . . . . . . . . . . . . . 79
Enable or disable logging and change log level
. . . . . . . . . . . . . . . . . . . . . . . . . . . . . . . 80
Get last n number of logs for a specific task
. . . . . . . . . . . . . . . . . . . . . . . . . . . . . . . . . . . . 81
Get logs for a specific task by its run ID
. . . . . . . . . . . . . . . . . . . . . . . . . . . . . . . . . . . . . . . . 82
Get all clients (or workers)
. . . . . . . . . . . . . . . . . . . . . . . . . . . . . . . . . . . . . . . . . . . . . . . . . . . 83
Access API documentation
. . . . . . . . . . . . . . . . . . . . . . . . . . . . . . . . . . . . . . . . . . . . . . . . . . . . . . . 84
FMPS troubleshooting
. . . . . . . . . . . . . . . . . . . . . . . . . . . . . . . . . . . . . . . . . . . . . . . . . . . . . . . . . . . 85
Legal notices . . . . . . . . . . . . . . . . . . . . . . . . . . . . . . . . . . . . . . . . . . . . . . . . . . . . . . . . . . . . . . . . . . . . . . . . . . . . . . . 87

GETTING STARTED
RESOURCES
1
Getting Started
Adobe FrameMaker Publishing Server (FMPS) is an enterprise software that allows you to automate your
multichannel publishing process. Using the horizontal and vertical scaling architecture, FMPS can run on
one or multiple remote systems. You can automate output generation in multiple formats: PDF, Respon
-
sive HTML5, Mobile App, ePub, Kindle, Microsoft HTML Help, and Basic HTML. Leverage out-of-the-box
su
pport for leading Content Management Systems (CMS), or use the web APIs to smoothly integrate with
other CMSs.
Resources
Before you begin working with Adobe FrameMaker Publishing Server, take a few moments to read an
overview of activation and the many resources available to you. You have access to instructional videos,
plug-ins, templates, user communities, seminars, tutorials, RSS feeds, and much more.
System requirements and licensing
To review complete system requirements and recommendations for your Adobe FrameMaker Publishing
Server software, see the FrameMaker Publishing Server product page at www.adobe.com/prod-
ucts/fmserver.
System requirements
FrameMaker Publishing Server is available in English only. Before you install FrameMaker Publishing
Server ensure that your computer meets the following minimum system requirements:
Hardware
64-bit 4 vCPU with Core i5 or faster processor
Operating System
64-bit Microsoft® Windows® Server 2022
RAM
8 GB or higher
Hard Disk Space
8 GB of available hard-disk space; additional free space required during installation (cannot install on
a
volume that uses a case-sensitive file system or on removable flash storage devices).

GETTING STARTED
SYSTEM REQUIREMENTS AND LICENSING
2
NOTE:
If you copy your source documents to the server that hosts FrameMaker Publishing Server, allocate
ad
ditional disk space.
Screen Resolution
Maximum supported screen resolution – 4K (3480 x 2160, 8.3 megapixels, aspect ratio 16:9).
Activation
FrameMaker Publishing Server does not operate without activation. Internet connection and registra-
tion are required for software activation, validation of subscriptions, and access to Online Services.
Ph
one activation is not available.
Pre-requisite
You must have MongoDB Community Server version 5.0 or 4.0.19 installed and configured on your
s
y
stem before installing FrameMaker Publishing Server. For downloading MongoDB, visit
https://www.mongodb.com/try/download/community.
NOTE:
You can find the download link either in the Available Downloads section or the Archived Releases
se
ction.
Browsers
• Google Chrome
• Firefox Mozilla
• Microsoft Edge
Installation
You can install FMPS on a machine that meets the System requirements and then access it over the
network using other machines. For more information on installation, see Installation and setup.
License activation
During the installation process, your Adobe software contacts an Adobe server to complete the license
activation process. No personal data is transmitted. For more information on product activation, visit the
Adobe website at
www.adobe.com/go/activation.

GETTING STARTED
HELP AND SUPPORT
3
Help and support
Understand the various Help resources for you to get started with FMPS and other related products like
FrameMaker.
Community Help
Community Help is an integrated environment on Adobe.com that gives you access to community-gener-
ated content moderated by Adobe and industry experts. Comments from users help guide you to an
an
swer. Search the FrameMaker Community Help to find the best content on the web about Adobe prod-
ucts and technologies, including these resources:
• Videos, tutorials, tips and techniques, blogs, articles, and examples for designers and developers. Check
the publishing workflow videos on the FrameMaker video hub page.
• Complete online Help, which is updated regularly and may contain more information than the Help
delivered with FrameMaker Publishing Server.
• All other content on Adobe.com, including knowledge-base articles, downloads and updates, Adobe
Developer Connection, and more.
Other resources
Online Help also include links to the complete, updated PDF and HTML versions of Help for FMPS and
other related products.
Visit the Adobe Support website at www.adobe.com/support to learn about free and paid technical
support options.

INTRODUCTION
FRAMEMAKER PUBLISHING SERVER
4
Introduction
FrameMaker Publishing Server
With centralized and automated publications, it is easy to integrate and synchronize publication of tech-
nical documents with product build schedules. With support for scalable architecture, you can deploy
FM
PS on one or multiple systems. In a scalable setup, the server component is configured to communicate
with the FrameMaker instances deployed on one or multiple systems.
Multiple users can remotely access FMPS simultaneously and run various operations such as create
pre
sets and creating and scheduling publishing tasks. FMPS leverages out-of-the-box integration with
leading Content Management Systems (CMS) like OpenText Documentum, Microsoft SharePoint, DitaEx
-
change and Adobe Experience Manager. Using the FMPS APIs, you can smoothly integrate with other
CMSs as well to enable you to manage publication tasks and enforce version control.
With ExtendScript Toolkit integrated with FMPS, you can create custom publication tasks that work with
so
urce files in XML/DITA and FrameMaker formats. By creating reusable publication task settings, you can
quickly set up custom publication environments and schedule the build processes to run daily, weekly, or
at any defined intervals.
Watch this video Overview of FrameMaker Publishing Server for more information about the release.
What’s new in FrameMaker Publishing Server
Faster PDF publishing of DITA content
PDF publishing has been enhanced and made much faster and seamless for a composite document
an
d a book with FrameMaker components.
You can now quickly generate a composite book with a much improved workflow. The composite
do
cument is a basic PDF without any title, table of contents, list of figures, and other components.
Composite documents generally require importing many documents and media files which is now
done much more quickly. Keyspace generation and content resolution are also now done very effi
-
ciently before the PDF is generated.
With the new, improved workflow, you can also very efficiently generate the PDF through the book
with
the FrameMaker components route (Flat Book Hierarchy), where you get the title page, table of
contents, front matter, back matter, list of figures or tables, and other book components.
Depending on the references used in your DITA map, the performance of PDF generation has
incre
ased by 5x compared to the earlier FrameMaker versions, so now you can generate a composite
document or book with FrameMaker components very efficiently.
Improved quality of graphics in PDF output
Graphics are a key component of your PDF output. Now the graphics in your PDF output of both struc-
tured and unstructured documents have been significantly improved. Various graphic objects like
da
shed lines, arcs, shapes, and curves are drawn very uniformly, and the edges are sharply defined. The

INTRODUCTION
OTHER FEATURES IN FRAMEMAKER PUBLISHING SERVER
5
corners and curves in the objects are crisp and clear. Unlike the previous versions, the quality isn't
compromised even when you zoom the output.
Other features in FrameMaker Publishing Server
Customize DITA templates for PDF
FMPS can now store and use DITA templates for PDF output. You can store your PDF output settings
in a
settings (.sts) file and easily make changes to it. The same settings file can then be exported and
imported into a new publishing task
Responsive HTML5 layouts
Create modern Responsive HTML5 layout to deliver a superior navigation experience. Also, the respon-
sive HTML5 output comes with first-of-its kind search experience. The newly redesigned responsive
HT
ML5 output now displays predictive search results based on a few characters that you type in the
search box. This reduces the search time and improves the usability of your Help system.
Basic HTML output
You can now publish in Basic HTML format from FMPS. The Basic HTML output format takes each
to
pic file within your book or DITA map and generates a corresponding HTML file with the similar
look-and-feel controlled through a CSS file. The generated output does not contain any JavaScript or
custom layouts that can be re-purposed or customized for the intended audience.
Enhanced native integration with Adobe Experience Manager Guides
Experience Manager Guides is an end-to-end enterprise-class component content management solu-
tion (CCMS). Experience Manager Guides integrates with FMPS that allows you to publish DITA
co
nt
ent to formats like Responsive HTML5, PDF, ePub, Kindle and more.
Enhanced template-based publishing solution
Quickly automate document assembly and formatting by defining multiple output template presets
fo
r generating output. FMPS comes with HTML5 template that helps you generate HTML5 output
without investing time and effort in creating a new template.
Bidirectional language publishing
Publish documents with bidirectional content, including XML/DITA content, from within FrameMaker
in m
ultiple formats: PDF, Responsive HTML5, Mobile App, ePub, Kindle, Microsoft HTML Help, and
Basic HTML. Optionally, flip the HTML5 layout so that the navigation pane appears on the right for RTL
content, and render smoothly on any device - desktop, tablet, or a mobile.
Personalized dynamic content
Empower users to find relevant content faster in the document, TOC, and index in the final Responsive
HT
ML5 or Mobile App output. Leverage existing conditional tags and expressions to enable end users
to dynamically filter content in the final HTML5 output, thereby delivering personalized help experi
-
ences.

INTRODUCTION
OTHER FEATURES IN FRAMEMAKER PUBLISHING SERVER
6
Simply assign names for existing conditional tags or expressions, categorize them under any Group you
want (such as region, audience, market segment etc.), enable single or multiple selections within a
Group, and then display this two-level hierarchy as content filter criteria in the final output.
Customizable HTML5 Layout
Use the customizable Responsive HTML5 layouts to deliver an amazing content consumption experi-
ence. With more powerful search options, configure search to appear on the content or topic panes,
an
d show informative context and breadcrumbs in the results. This helps your readers identify the best
choice among results. You can also customize the search context message for each topic. The search
results can also be configured to appear on the left pane.
Easily show or hide widgets such as glossary, TOC, index, and filters. Convert the layout to right-to-left
la
nguages (Arabic and Hebrew) to meet the needs of a global audience, just by changing one property.
Also add Facebook and Twitter widgets to your pages to allow users to share the content that they are
reading – with a single click!
Provide your users with a different experience for the device (desktop, tablet, and mobile) that they use
by
customizing the function bar, side bar, and TOC in the output.
Use the powerful, yet easy-to-use Layout Customization tool to customize not only your content, but
al
so the appearance of buttons, labels, fonts, background color, search boxes, and most components
of your online content.
Reference page image publishing
Publish reference pages content such as images, headers and footers, and logos, in all output formats
su
pported by FrameMaker Publishing Server.
SVG support in HTML5 output
Let your end users see top quality images regardless of the screen size and resolution of the device on
which
they are being viewed. This is because FrameMaker Publishing Server embeds the entire SVG
code in the final responsive HTML5 output.
Reusable publishing elements
Reuse elements easily with the enhanced multi-device publishing settings file. Create elements, such
as
responsive HTML5 layouts, CSS, and HTML page templates, just once. Then import or export the
setting files for use across different books and documents.
HTML page template support
Improve the usability of your output by adding mini-TOCs, breadcrumbs, and headers and footers.
Co
nfigure the output settings just once and then easily reuse these across all outputs to give your users
a uniform experience.
Integration with leading CMSs
Leverage the out-of-the-box integration with leading Content Management Systems (CMS) like Open-
Text Documentum, Microsoft SharePoint, DitaExchange and Adobe Experience Manager. You can also
us
e the FMPS APIs to smoothly integrate with other CMSs to enable you to manage publication tasks

INTRODUCTION
OTHER FEATURES IN FRAMEMAKER PUBLISHING SERVER
7
and enforce version control. Use the Repository view to check-out files, manage dependencies, version
management and perform search. Use the advanced metadata-based filter to quickly browse and find
relevant topics, DITA maps, or graphics in a large volume of content.

INSTALLATION AND SETUP
SYSTEM REQUIREMENTS
8
Installation and setup
To work with FrameMaker Publishing Server, do the following:
1) System requirements
2) Plan the deployment architecture
3) Install and configure MongoDB
4) Install FrameMaker Publishing Server
5) Configure the server component
6) Configure the client components
7) Common customizations for FrameMaker Publishing Server
8) Access FrameMaker Publishing Server
You can also install a free command line tool, such as cURL, to access FrameMaker Publishing Server using
t
h
e command line.
IMPORTANT
You must not run FrameMaker Publishing Server (December 2022 release) and Summer 2020 release
on
the same system simultaneously.
System requirements
Before installing FrameMaker Publishing Server, make sure that you have the required hardware and soft-
ware. See System requirements for more details.
Plan the deployment architecture
The new and much improved scalable architecture of FrameMaker Publishing Server (FMPS) allows you
to maximize your system utilization. FMPS is designed to support three types of scaling architecture:
• Vertical scaling
• Horizontal scaling
• Mix scaling or a combination of vertical and horizontal scaling

INSTALLATION AND SETUP
PLAN THE DEPLOYMENT ARCHITECTURE
9
Vertical scaling
The following illustration shows the vertical scaling deployment architecture:
In vertical scaling, FrameMaker Publishing Server component, client component, FrameMaker, and data-
base are installed on the same system. In this architecture, for each publishing task, a new instance of
Fr
ameMaker is launched. The number of FrameMaker instances that a system can launch depend on the
number of cores. For example, on a 4-core machine, FMPS can launch 1 instance of FrameMaker. On an
8-core machine, there can be a maximum of 3 instances of FrameMaker that can run simultaneously.In
case the number of publishing tasks is more than the number of FrameMaker instance, then FMPS keeps
such tasks in a queue. Once an existing task completes, then the task in the queue is assigned to the avail
-
able instance of FrameMaker. This way, FrameMaker Publishing Server also acts as a load balancer.
INSTALLATION AND SETUP
PLAN THE DEPLOYMENT ARCHITECTURE
10
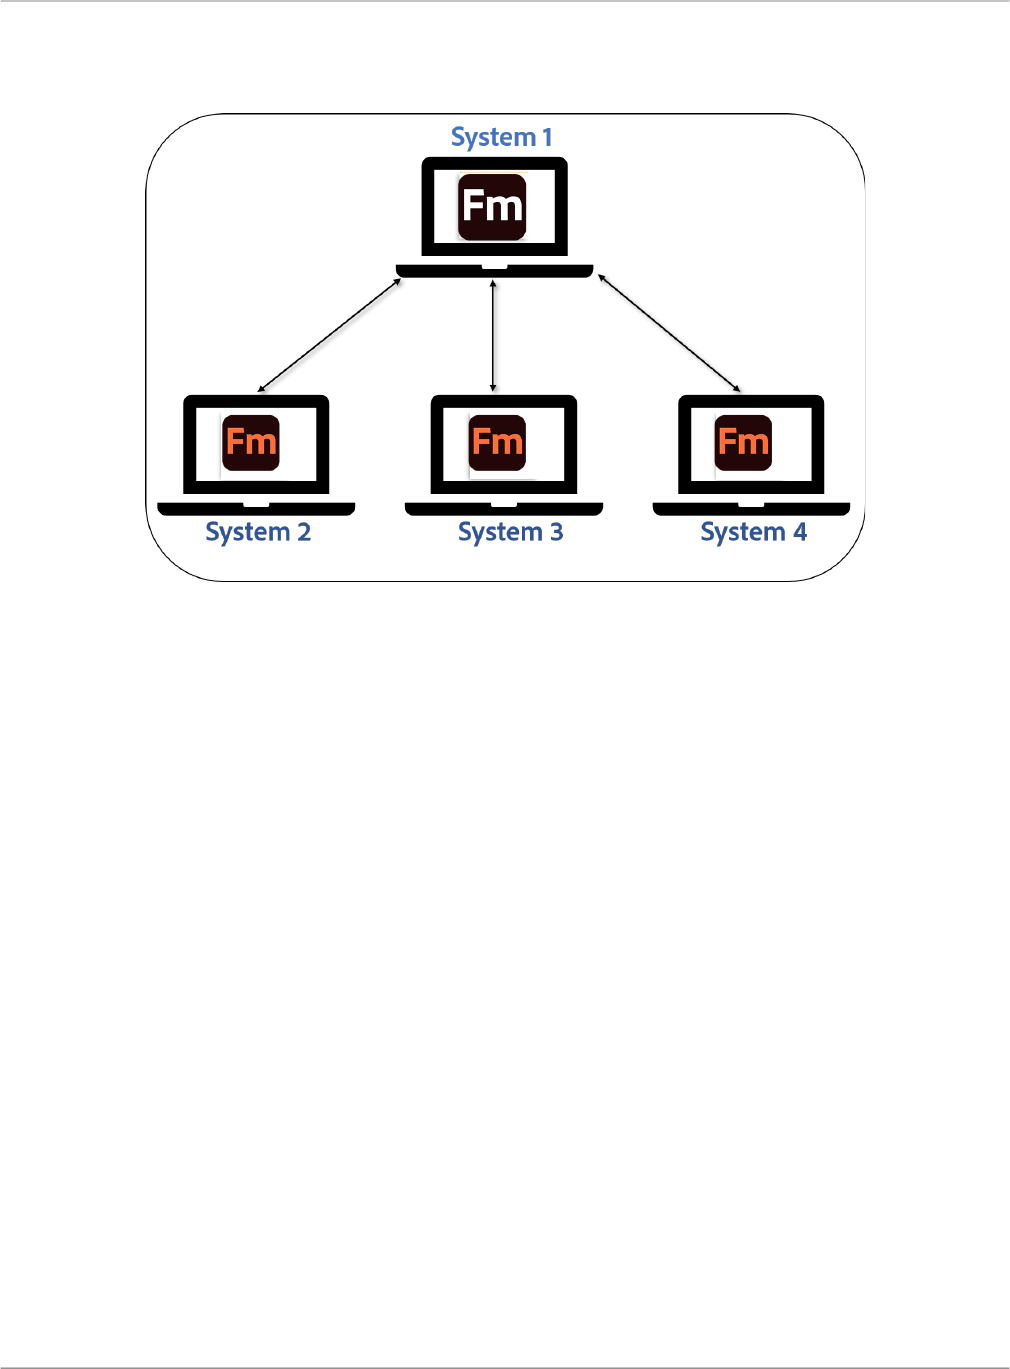
Horizontal scaling
The following illustration shows the horizontal scaling architecture:
In horizontal scaling, FrameMaker Publishing Server component, client component, FrameMaker, and
da
tabase are installed on different systems. As shown in the above illustration, FMPS is installed on System
1, and a single instance of FrameMaker along with client component is installed on System 2, System 3, and
System 4. You can have as many instances of FrameMaker as you need, but you need only a single instance
o
f
FrameMaker Publishing Server. The load balancing happens in a similar way as described in vertical
scaling

INSTALLATION AND SETUP
INSTALL AND CONFIGURE MONGODB
11
Mixed scaling
The third possible architecture is a mix of horizontal and vertical scaling:
In a mixed scaling architecture, a single instance of FrameMaker Publishing Server controls multiple
inst
ances of FrameMaker spread across multiple systems. As shown in the preceding illustration, System 2
ha
s two instances of FrameMaker on it and System 4 has three instances of FrameMaker, each communi-
cating with a single instance of FrameMaker Publishing Server.
Install and configure MongoDB
As FrameMaker Publishing Server uses MongoDB for data storage, you need a working setup of MongoDB
on your system before installing FMPS.
To install MongoDB, perform the following steps:
IMPORTANT
Before installing FrameMaker Publishing Server or any update, clean the MongoDB instance. This is
re
quired to fix some critical security issues.
1) Download MongoDB Community Server version 5.0 or 4.0.19 from the official website:
https://www.mongodb.com/try/download/community

INSTALLATION AND SETUP
INSTALL AND CONFIGURE MONGODB
12
NOTE:
You can find the download link either in the Available Downloads section or the Archived Releases
se
ction.
2) Configure the MongoDB Service as follows:
– Service Name:
MongoDB (keep the default name)
– Data Directory: Any directory outside the
Program Files folder where all programs and users
would have the read and write access.
– Log Directory: Specify a directory to store the logs.
3) Configure the IP address of the MongoDB Service in the
mongod.cfg file. By default, the
mongod.cfg file is available in the following location:
<Drive>:\MongoDB\Server\<version>\bin\
Change the default IP address from 127.0.0.1 to 0.0.0.0. This will ensure that MongoDB can be
accessed from any other system by using the host system’s IP address and port.
4) Create the default user account with administrative privileges to access MongoDB.
To create the basic user account, run the following commands:
a) Open the command prompt.
b) Change the working directory to “
%INSTALLDIR%\mongodb\bin”.
c) Run “
mongod.exe”.
d) Run “
mongo.exe”.
e) In the MongoDB interface, run the following script:
use admin
db.createUser(
{
user: "fmadmin",
pwd: "fmadmin",
roles: [
{ role: "userAdminAnyDatabase", db: "admin" },
{ role: "readWriteAnyDatabase", db: "admin" },
{ role: "dbAdminAnyDatabase", db: "admin" },
{ role: "clusterAdmin", db: "admin" },
{ role: "root", db: "admin" },
{ role: "readWrite", db: "admin" },
]
})
exit
If you are using LDAP-based authentication, then you need to create and assign administrative privileges
to a LDAP user ID. This is a one-time activity. For the subsequent requests, you can use this user account

INSTALLATION AND SETUP
INSTALL FRAMEMAKER PUBLISHING SERVER
13
to grant privileges to other users via API. To assign administrative privileges to a LDAP user ID, perform the
following steps:
NOTE:
The following instructions are using the CLI. However, you can also use MongoDB Compass, which is
free a UI tool to access and work with MongoDB.
1) Open the command prompt.
2) Change the working directory to “
%INSTALLDIR%\mongodb\bin”.
3) Run “
mongod.exe”.
4) Run “
mongo.exe”.
5) In the MongoDB interface, run the following script:
use stubFM;db.users.find();
Note the user ID that you want to update.
6) Run the following script:
db.users.update(
{ _id: ObjectId("5a321b0c602d2e16677760f5") },
{
$set: {
userPermission: "ADMIN"
}
}
)
This script will update the user with an ID of “5a321b0c602d2e16677760f5” with administrative
privileges.
Install FrameMaker Publishing Server
To install FMPS, perform the following steps:

INSTALLATION AND SETUP
INSTALL FRAMEMAKER PUBLISHING SERVER
14
IMPORTANT
Before installing FrameMaker Publishing Server or any update, clean the MongoDB instance. This is
re
quired to fix some critical security issues.
1) Run the FMPS installer. The following Installation Options dialog appears:
2) Based on your deployment strategy, you can choose to:
– Install only the server component (for horizontal scaling)
– Install only the client component and FrameMaker (for horizontal scaling)
– Install all components (for vertical scaling)
If you want to install only the server component, then choose only the second component - Adobe
Fr
ameMaker Publishing Server Component.
INSTALLATION AND SETUP
CONFIGURE THE SERVER COMPONENT
15
If you want to install only the client components, then choose the first and the third options - Adobe
FrameMaker and Adobe FrameMaker Publishing Client Component.
3) If you want to change the default install location, click the Browse icon next to the Location field and
select a new destination.
4) Click Continue.
The selected FMPS components are installed on the system.
5) Once the installation in complete, click Close.
IMPORTANT
By default, on completion of the installation process, FrameMaker Publishing Server and client are
la
unched. It is configured to work in case you have installed all components on a single system (vertical
scaling). However, if you have deployed FMPS on multiple systems (horizontal scaling), then you will
have to configure FMPS server and client components to work correctly.
Next, you need to customize the server and client components before you can start using FrameMaker
Pu
blishing Server. The following sections will guide you through the configuration and customizations that
you need to perform.
NOTE:
For information on issues during installation, see FMPS troubleshooting.
Configure the server component
The system where you have deployed the server component contains the files and folders required to
configure and launch the server. The typical process of configuring the launching the server component
involves the following steps:
1) Stop the server component
2) Configure the server_url.txt file
3) Configure the development.json file
4) Launch the server using the run.bat file
The following sections will guide you through the above-mentioned steps.

INSTALLATION AND SETUP
CONFIGURE THE SERVER COMPONENT
16
Stop the server component
Before you start making configuration changes in the server component, ensure that the server compo-
nent is not running. If the server component is running on your system, you will see a command prompt
windo
w with “FMPS” title as shown below:
To stop the server component, simply close the command prompt window with “FMPS” title by clicking
on
the “X” icon.
Configure the server_url.txt file
The server_url.txt file contains the fully qualified domain name (FQDN) and port of the system
where your server component is deployed. The default location of
server_url.txt file is:
\Program Files\Adobe\AdobeFrameMakerPublishingServer
2022\server\server_url.txt
You can open this file in a text editor and provide your server’s host name and port information in the
following format:
http[s]://<fully-qualified-domain-name_or_ip-address>:<port>
NOTE:
By default, when you complete the installation process, the FQDN of the server machine is fetched and
ent
ered in the
server_url.txt file. However, if the installation process is not able to get the FQDN,
then
localhost is added in the server_url.txt file, which should be manually updated with
FQDN.
Configure the development.json file
The development.json file contains most of the configurable settings for FrameMaker Publishing
Server. It allows you to configure the MongoDB settings, user credentials for default users, logging infor-
mation, and much more.
The following snippet of the development.json file highlights the configuration settings that you can
m
o
dify as per your deployment setup.

INSTALLATION AND SETUP
CONFIGURE THE SERVER COMPONENT
17
IMPORTANT
The
ANONYMOUS login type for the typeOfAuth setting is deprecated. It is recommended to use other
supported authentication methods.
{
"FMPS": {
"dbConfig": {
"MONGO_HOST": "localhost", //The hostname of MongoDB server.
Default is
localhost.
"MONGO_PORT": 27017, //The port where MongoDB is listening.
Default is
27017.
"dbName": "stubFM",
"dbNameLog4j": "logs",
"dbNameQueue": "stubFM_Queue",
"username": "fmadmin", //Basic username and password that is
cre
ated to
access MongoDB.
"password": "fmadmin",
"authMechanism": "SCRAM-SHA-1", //Authentication mechanism
to
use
to connect with MongoDB. For version 4.x, you can choose from
SCRAM-SHA-1 or none.
"authSource": "admin",
"SCHEMA_VERSION": 16, //This is used to identify the schema.
Ple
ase Do
Not Change.",
"defaultUser": "fmpsuser", //Default username and password
to access
FMPS as an Administrator.
"defaultPassword": "fmpsuser",
"defaultEmail": "fmpsuse[email protected]", //Default email
ID
to send
notifications. You must replace it with a valid email ID.
"LogQueue": "logqueue",
"LogMonQueue": "logmongoqueue",
"MaxNoOfLogs": "5", //Maximum number of task logs that are

INSTALLATION AND SETUP
CONFIGURE THE SERVER COMPONENT
18
returned by the API.
"logLevel": "INFO"// Level of logs to maintain. Supported
values are
: FATAL, ERROR, WARN, INFO, DEBUG. By default INFO level
logs are enabled.
},
"webConfig": {
"apiVersion": "v16", // This is used to identify the API
ver
sions.
Please Do Not Change
"host": "localhost", // The hostname of the server where FMPS
is deploye
d. If FMPS is started by executing the run.bat file, then
the value of this setting is picked from the server_url.txt file. Else,
you need to change it manually.
"port": 7000, // The port where FMPS is listening. If FMPS
is
started
by executing the run.bat file, then the value of this
setting is picked from the server_url.txt file. Else, you need to
change it manually.
"sslPort": 6234, // If FMPS is deployed on HTTPS, then specify
the
port on which it is listening. If FMPS is started by executing the
run.bat file, then the value of this setting is picked from the
server_url.txt file. Else, you need to change it manually.
"protocol": "http://", // Specify the protocol “http://” or
“ht
tps://”
where FMPS is deployed. If FMPS is started by executing the
run.bat file, then the value of this setting is picked from the
server_url.txt file. Else, you need to change it manually.
"typeOfAuth": "USERLOGIN", // Type of authentication to use
wit
h FMPS.
Supported values are: USERLOGIN, ANONYMOUS, LDAP. The
default authentication mechanism is basic username/password
(USERLOGIN). If you change this, then the server restart is required.
"daysForTokenExpiryUserLogin":7, // Days for token to expire
use
d in US
ERLOGIN and LDAP.
"useSSL": false, //By default SSL is not enabled. In case
FMPS is se
tup on SSL, change this to true.
If useSSL is set to true, then set this component according to the
location o
f the SSL certificate:
"keyPath": absolute or URL path to server key, // Save the
SSL
certificate and the key of your organization in the “cert” folder.
You must replace the sample path with your actual path.
"certPath": absolute or URL path to SSL certificate, // Save
the
SSL ce
rtificate and the key of your organization in the “cert”

INSTALLATION AND SETUP
CONFIGURE THE SERVER COMPONENT
19
folder. You must replace the sample path with your actual path.
For example, a sample path can be:
"keyPath": "C:\\Program
Files\\Ado
be\\AdobeFrameMakerPublishingServer
2022\\server\\cert\\server.key",
"certPath": "C:\\Program
Files\\Ado
be\\AdobeFrameMakerPublishingServer
2022\\server\\cert\\bundle.crt",
"taskTimeOut": 60, // If the queued task is not picked up
wit
hin the
specified time (default 60 minutes), then it will retire
and is pushed back with +1 number of retries.
"runningtaskTimeOut": 200, // This is the timeout for running
tas
k, whic
h means if a publishing task does not complete in 200
minutes, it will retire and is pushed back with +1 number of retries.
"maxRetries": 5, //Max number of retries for a publishing task.
"defaultTimezone": "Atlantic/Reykjavik" //Default time
zon
e for F
MPS. Supported values are: Atlantic/Reykjavik for GMT,
Asia/Kolkata for India, America/Los_Angeles for PDT, America/New_York
for EDT, see https://momentjs.com/timezone/ for time zone information.
Ideally this should align with the Server time zone.
},
"cronConfig": {
"workscheduler": "*/10 * * * * *",
"TaskPoller": "*/5 * * * * *",
"TaskPollerFailed": "*/40 * * * * *"
},
"ldapConfig": { //If you are using LDAP-based authentication, then
upd
ate the
settings in this section.
"ldapurl": "ldaps://global.enterprise.com:636", //Specify
the LDAP U
RL that is used for authentication.
"baseDN":
"cn=users,
dc=enterprise,dc=global,dc=enterprise,dc=com", //LDAP
domain name string.
"tlsOptions": false, //Set as “true” if LDAP uses TLS, else
set
it to
“false”.
"domainName": "enterprise" //Specify the domain name that is
appended w
ith the username. For example, domainname\\username.
},
"smtpConfig": { //Settings in this section are used to configure the
email serv
er that is used to send email notifications.
"host": "smtp.enterprise.com", //Specify the SMTP hostname.

INSTALLATION AND SETUP
CONFIGURE THE SERVER COMPONENT
20
"smtpport": 25, //Specify the SMTP port.
"username": "fmpsuser@enterprise.com", //Specify the SMPT
username t
hat is used to send email notifications.
"password": "fmadmin", //Specify the password for the SMPT
user.
"requirePassword": false, //Set to true if password is required
by th
e SMTP server and a value for the password settings is provided.
"disableSMTP": true, // By default SMTP is disabled. If you
have confi
gured the SMTP server, then set this setting to false.
"triggerAlertEmail":false, //Set to true if you want to enable
email noti
fications for events such as high memory usage or server
restart. By default, it is disabled (set to false).
"alertEmail":fmpsuser@enterprise.com //A comma separated
ema
il IDs
of users to whom an alert email notification is sent.
},
"appConfig": {
"_comment_For_AppConfig": "Settings in this section are used
to
setup a
pplication folders and logs.",
"Company": "Adobe",
"Product": "FrameMakerPublishingServer",
"NodeLogs": "Nodelogs",
"Version": "16",
"MaxMem": 4096,
"lengthOfLogMessage":10000 // Specify the total length
of
a log m
essage in characters
}
}
}
Launch the server using the run.bat file
To launch the server component, you need to run the run.bat file available at the following location:
\Program Files\Adobe\AdobeFrameMakerPublishingServer 2022\server\run.bat
Typically, you would launch the server only after completing all configurations required for the server as
well as the client components. The following section will guide you to configure the client components.

INSTALLATION AND SETUP
CONFIGURE THE CLIENT COMPONENTS
21
Configure the client components
A client is system where you have installed Adobe FrameMaker and Adobe FrameMaker Publishing Client
Component. The client has to establish a connection with the server to be able to receive information
about what needs to be published and send a response back.
The typical process of configuring and launching the client component involves the following steps:
1) Stop the client component
2) Configure the server.ini file
3) Configure the FrameMaker instance
4) Launch the client using the StartWorker.bat file
The following sections will guide you through the above-mentioned steps.
Stop the client component
Before you start making configuration changes in the client component, ensure that the client component
is not running. If the client component is running on your system, you will see one or more command
prompt windows with “FrameServerEx” title as shown below:
To stop the client component, simply close all command prompt windows with “FrameServerEx” title by
clicking on the “X” icon.
Configure the server.ini file
The server.ini file contains the parameters to connect to the server component of FMPS. Open the
server.ini file in a text editor and configure the following parameters:
port
Specify the port on which the server component is listening for incoming requests.
server
Specify the fully-qualified domain name or the IP address of the server.

INSTALLATION AND SETUP
CONFIGURE THE CLIENT COMPONENTS
22
scheme
Specify the protocol (http or https) used by the server.
MaxFMSessions
Specify the maximum number of concurrent FrameMaker sessions that the can run on a client
ma
chine. By default it is set to 4. This setting works in conjunction with the
VAR variable setting in the
StartWorker.bat file. For more details, see Launch the client using the StartWorker.bat file.
doNotDeleteGeneratedFile
Supported values -
On and Off. By default, it is set to On, which indicates that the publishing process
will not delete any existing file on the given location where the output is saved.
HTTPTimeout
Specify the time in seconds after which the connection with the server machine is timed out. This
ha
ppens when no response is received from the server machine during the configured time.
Delay
Specify the time in seconds that the client machine waits for before launching another instance of
Fr
ameMaker.
Configure the FrameMaker instance
To optimize the performance of FrameMaker in automated publishing tasks, make the following changes
to FrameMaker configuration. These changes are essential to run scheduled tasks on FMPS and modify
the behavior in the following ways.
FMPS ignores unresolved cross-references, unresolved text insets, and missing graphics.
• To use MathML, accept the EULA in FrameMaker.
• Check all source documents for errors before initiating a build task.
• FMPS does not report missing fonts. Ensure that the machine that hosts FMPS client component has
all the required fonts.
Launch the client using the StartWorker.bat file
The StartWorker.bat file is used to launch FrameMaker instances (or workers) on the client machine
that listen to the publishing requests from the server component. Each worker opens and works with a
single FrameMaker instance to complete a publishing task. Once the task is complete, the FrameMaker
instance is closed by the worker. The
MaxFMSessions parameter in the server.ini file controls how
many maximum instances of FrameMaker can run parallelly. The settings in
StartWorker.bat file
defines how many instances of FrameMaker will run on a given client machine. For example, say you have
set the
MaxFMSessions parameter to 4 and in the StartWorker.bat file you have defined 8 workers
to run. In this case, the client machine can only run 4 instances of FrameMaker at any given time, even
though it has launched 8 workers. If the server sends 5 publishing commands to this client system, then 4
publishing tasks will start immediately, and the 5th task will be pushed to a queue. The moment any task

INSTALLATION AND SETUP
CONFIGURE THE CLIENT COMPONENTS
23
gets complete, then the next available worker will take up the 5th task from the queue and start executing
it.
IMPORTANT
To launch the client, provide a valid user email and password. User authentication is done at the server.
Al
l users eligible to log in to the server are allowed to launch a client.
The contents of StartWorker.bat file are:
%~d0
cd %~dp0
SET /a VAR=0
:HOME
SET /a VAR=VAR+1
IF %VAR%==3 goto :End
start cmd /K FrameServerEx.exe -username %1 -password %2
goto :HOME
:END
Provide your email and password in quotes. For example, StartWorker.bat "[email protected]" "abc
! 123"
The typeOfAuth used for client authentication is same as that used in the server configuration.
In this file, the line -
IF %VAR%==2 goto :End controls how many worker instances will be launched
on the client machine. Let's say, you want to launch 4 worker instances, then you must configure it as:
IF %VAR%==5 goto :End
Note that the value of VAR is always 1+ (or one more) than the number of workers you want to launch on
the client machine.

INSTALLATION AND SETUP
COMMON CUSTOMIZATIONS FOR FRAMEMAKER PUBLISHING SERVER
24
After configuring the maximum number of FrameMaker instances that can run simultaneously and the
number of workers, you are ready to launch the client component. To launch the client component, you
need to run the
StartWorker.bat file available at the following location:
\Program Files\Adobe\AdobeFrameMakerPublishingServer
2022\FrameServerExe\StartWorker.bat
Common customizations for FrameMaker Publishing Server
The following additional customizations are required on the systems where you have deployed the server
or client components:
1) Turn off the IE Enhanced Security Configuration.
See FAQ about Internet Explorer Enhanced Security Configuration (ESC)in Microsoft documentation.
2) Add rules for inbound and outbound ports in Windows firewall. Also ensure that the ports on which
you have deployed FrameMaker Publishing Server and MongoDB are opened for listening. By default,
FMPS runs on port 7000 and MongoDB runs on port 27017.
See Create an Inbound Port Rule and Create an Outbound Port Rule in Microsoft documentation.
3) Allow
FrameMaker.exe, FrameMakerEx.exe, and node.exe to run through the firewall.
4) Change the following security and privacy settings for Internet Options.
NOTE:
You can access the Internet Options by opening the Control Panel and clicking Internet Options.
– In the Security tab, set the security to Medium-high.
– In the Security tab, click Custom level, and ensure that the following settings are Enabled:
• In the ActiveX controls and plug-ins section: Allow Scriptlets and Binary and scripts behav-
iors.
• In the Downloads section: File download and Font download.
• Enable .NET Framework setup.
• In the Miscellaneous section: Access data sources across domains and Display mixed
content.
• In the Scripting section: Active scripting.
– In the Privacy tab, click Advanced and configure the following settings:
• First-party Cookies: Accept
• Third-party Cookies: Accept
• Always allow session cookies: Enabled
5) Enable the .NET Framework 3.5 in Control Panel.

INSTALLATION AND SETUP
ACCESS FRAMEMAKER PUBLISHING SERVER
25
Access FrameMaker Publishing Server
Multiple users can simultaneously access FMPS by logging in to the server that hosts it. Using the
web-based user interface of FMPS, you can access it remotely from any machine. To launch and access
FMPS, perform the following steps:
1) On the system where you have deployed the server component, start the server by double-clicking the
run.bat file.
2) On the system where you have deployed the client components, start the client by double-clicking the
StartWorker.bat file.
3) Access the FMPS web interface by entering the following URL in your browser:
http[s]://<FMPS_server>:<port>/index.html
NOTE:
<FMPS_Server> is the DNS or IP address of the system hosting FMPS. The default port is 7000.
FrameMaker Publishing Server dashboard
FMPS provides a simple, web-based user interface using which you can:
• Create, manage, and schedule publication tasks
• Create and use presets to quickly apply and populate settings to the repetitive tasks with similar
settings
• Manage and view task logs
• Use in-app API documentation to create custom scripts for scheduling and publishing tasks
Once you have installed FMPS on a machine, you can access it on the network from any machine to use it.
Adobe FrameMaker Publishing Server dashboard
A.
Add New <Task/Preset> drop-down - Depending on which tab you are in, this drop-down allows you
to
create and duplicate Tasks and Presets.

INSTALLATION AND SETUP
FRAMEMAKER PUBLISHING SERVER DASHBOARD
26
B.
The Run button: To run tasks, select one or more tasks and click Run.
NOTE:
If you have scheduled a task to run, then it cannot be added to the scheduled queue again. If you
want
to run the task using the Run button, then you must first remove the scheduled task from the
task scheduling queue.
C.
Incremental search: Search for a Task or Preset name (depending on the tab you are on) - as you type
t
e
xt, FMPS finds matches the text and displays them in the list
D.
Autorefresh settings: You can enable autorefresh for FMPS and specify the number of seconds after
which
FMPS automatically refreshes
By clicking on the column names, you can sort the list of tasks by that column. The tasks are color coded:
gre
en are successful, red are failed, and orange are queued.
For more information on:
• Using FMPS through a browser on a client machine, see Create and manage publication tasks.
• Using FMPS through the APIs on a client machine, see Work with FMPS using REST APIs.
Related topics
• Create and manage publication tasks
• Tasks
Autorefresh of the FMPS interface
The FMPS web interface’s autorefresh is disabled by default. You can set it to autorefresh every 10-500
seconds.
1) Click Settings ( )
The Settings dialog appears.
2) In the Settings dialog, select Duration and enter the number of seconds after which you want FMPS
web interface to autorefresh. You can enter a number from 10 to 500.

INSTALLATION AND SETUP
FRAMEMAKER PUBLISHING SERVER DASHBOARD
27
Configure Autorefresh in the Settings dialog
3) Click Save.
NOTE:
You can also manually refresh FMPS by clicking the refresh button on the FMPS dashboard.

CREATE AND MANAGE PUBLICATION TASKS
PUBLISHING
28
Create and manage publication tasks
You can create publishing task that can be scheduled to run at off-peak times and on regular time intervals
to ensure that published content is always current. The FMPS dashboard notifications keep you informed
about pending jobs as you turn your attention to other publishing tasks.
Publishing
Tasks
You remotely define the publication tasks in Adobe FrameMaker Publishing Server and schedule them to
run at the required interval. A task is a complete collection of all the build information that is required to
run a publication task.
For more information, watch this video - FrameMaker Publishing Server: Automated publishing delivered
remotely.
Typically, you define a task for each book or source document that you want to create outputs from. For
ex
ample, if you have a book file from which you want to create Adobe PDF, Basic HTML, Responsive
HTML5, or more outputs, specify the following settings for the Task:
Input Source
Location of the source document or book. You can specify sources from the local file system, a network
or
WebDAV folder, an OpenText Documentum repository, a Microsoft SharePoint repository, DitaEx-
change or Adobe Experience Manager (AEM).
If you are accessing the server from the same system where you have deployed it, then a local file path
will
work. However, in other cases, you must specify a network location or the location of your CMS
repository. In case the source files are available on a network location of a CMS, you need to specify
the User Name and Password of the user who has access rights on the files, else the publishing process
will fail.
Output Settings > Format
Output formats required and their settings.
The supported output formats are: PDF, Responsive HTML5, Mobile App, ePub, Kindle, Microsoft
H
T
ML Help, and Basic HTML.

CREATE AND MANAGE PUBLICATION TASKS
PUBLISHING
29
Presets
Presets for all supported output formats include the settings such as DITAVAL File and Settings File
(
.STS). These files are saved in MongoDB and attached to the task being created. Preset help you
apply these settings to repetitive and similar tasks and save time.
NOTE:
For more information about configuring output presets using FrameMaker, see the Print and Publish
to
pic in FrameMaker User Guide.
Output Folder Path
The location where you want the output from the output generation process saved. You can specify
th
e output location as a folder in the local file system, a network or WebDAV folder, or an OpenText
Documentum, Microsoft SharePoint repository, DitaExchange, or AEM. Again, the Output Folder Path
can be a local system if you are running the server and client components on a single system. For
multi-system deployment scenario, you have specify a network location along with user credentials to
access the network path.
Pre- and Post-Publish Script
The location of the script file that you want to run before and after the publishing process. You can
spe
cify a
.jsx or .jsxbin file in the pre-publish script. However, post-publish scripts can contain
scripts or batch files that can run from the command prompt only. The script file is uploaded into
MongoDB and attached with this task.
Scheduling
Schedule to run the task and the frequency.
NOTE:
If you schedule a task to run at a specific time, then you will not be able to run that task dynamically.
Send Log In Email
The Email IDs where you want the task logs to be sent.

CREATE AND MANAGE PUBLICATION TASKS
PUBLISHING
30
Log Settings
The information you want to capture in the task logs.
Create a task
1) On the FrameMaker Publishing Server dashboard, select the Task tab.
2) In the Add New Task drop-down, select Add New Task.
3) On the new Task screen, specify a Name for the publishing task.
Tasks in the task queue are listed with the task name. Provide intuitive task names that indicate the
t
y
pe of document and the output formats to easily identify your task in the queue.
4) Click the browse button next to the Input Source field.
The Specify Input Source dialog appears. Enter the following details in it:
a) An input source file (
.book, .ditamap, .fm, or .mif file). Enter full path and name of the input
file.
b) Enter login credentials to access the input file, if required. For example, login information is
required to access files over a network or a CMS.

CREATE AND MANAGE PUBLICATION TASKS
PUBLISHING
31
c) If your input file is on a CMS, select the CMS option, choose the CMS type, and specify the CMS
details, such as login information, server, and workspace.
5) To edit book settings, click the M
odify link in front of Book Settings. In the Book Settings dialog,
double-click (or use the move icons) to move the required entries in the Don’t Include and Include
lis
ts.
6) To add an output type, choose an output format, preset, and then click the browse button next to the
Output Folder Path field. The Specify Output dialog appears. Enter the following details in it:
NOTE:
By default, FrameMaker Publishing Server does not overwrite existing files with the newly generated
ou
tput. You can change this setting by turning the doNotDeleteGeneratedFile parameter to
Off in
the
server.ini file. To keep the output files from an earlier publication task, move them to
another folder. You can run a post-publish command as part of the publication task to move the
output files to another location after the publication task completes.
a) Specify the destination file path where the output file is saved.
b) If required, enter login credentials to save the output file. For example, login information is required
save output files on the network or on the CMS.
c) To save output file to a CMS, select CMS and enter the CMS details.
7) To add more output types, click A
dd Another Output and repeat step 6.
8) (Optional) Enter the path and name of a Pre-Publish Script to specify any automation script that you
created.
9) (Optional) Enter the name and path of a Post-Publish script to specify any system command that you
want to run on the outputs after the publication task is run. You can create a batch script and provide
its path so that FrameMaker Publishing Server runs the script after the publication task completes.
10) Click the Not Scheduled link to open the Schedule dialog. Specify the time and frequency for the task
to execute.
NOTE:
If you schedule a task to run at a specific time, then you will not be able to run that task dynamically.
11) (Optional) In Send Log in Email, specify the email addresses where you want to send the task log. Use
semicolons between multiple email IDs.
12) To add or delete information in the task logs, click Modify in front of Log Settings. In the Log Settings
dialog, double-click (or use the move icons) to move the required entries in the Don’t Include and
Include lists.
13) Click Save.
Related Links:

CREATE AND MANAGE PUBLICATION TASKS
SCHEDULING
32
Scheduling
Run tasks from the list
On the FrameMaker Publishing Server dashboard, select the tasks from the task list and click Run.
NOTE:
If a task is scheduled to run at a specific time, then you will not be able to execute it from the task list.
Duplicate a task
An easy way to create multiple tasks is to make a copy of an existing task, and then make the necessary
cha
nges for the duplicated task.
1) On the FrameMaker Publishing Server dashboard, do one of the following:
– Click a task’s name and in the Task dialog, click the Duplicate icon.
– Select a task and then select Duplicate Task from the Add New Task drop-down.
The Task dialog opens with the same task settings and name of the task duplicated with the suffix
-copy.
2) Edit the name and other details of the task and click Save.
Edit a task
1) On the FrameMaker Publishing Server interface, click on a task name.
The Task dialog appears.
2) Make the required changes in the task and click Save.
Delete a task
• On the FrameMaker Publishing Server dashboard, select one or more tasks and click Delete.
NOTE:
If you delete a task when it is currently running, the task is removed, but the current run is allowed to
com
plete.
Scheduling
Typically, you create publication settings for recurring tasks. With FrameMaker Publishing Server, you can
create multiple publication tasks and schedule them to run at specified intervals. In a typical technical
publications department, many teams create automated builds that are then run at the required intervals.
You can specify the intervals as once, daily, weekly, or monthly. A publication task requires a defined

CREATE AND MANAGE PUBLICATION TASKS
SCHEDULING
33
schedule to run or a user can run them manually. For more information on running tasks manually, see
Create a schedule for run.
After you schedule a task to run, FrameMaker Publishing Server adds these as scheduled tasks to the
Wind
ows Task Scheduler. You can view and edit these tasks from Windows Task Scheduler independent
of FrameMaker Publishing Server. The scheduled tasks appear with the name of the task and the user
name associated with the task.
Keep in mind the following when you determine the build schedules:
• Each source document requires a separate publication task. If you have a large documentation set that
heavily uses single-sourcing approach, you will need to create as many publication tasks as the
number of book files.
• Builds are queued—if you want to run an immediate publication task when a large number of builds
are in the queue, you will have to wait for the builds in the queue to be completed before you can run
your publication task.
• If you require daily builds, consult with other teams so that your build schedule doesn’t clash with
theirs. If you schedule a large build in the day time, chances are that a once-only build task you want
to run urgently will have to wait until the build queue is completed. A good way to ensure that daily
build schedules do not affect other build tasks is to plan your daily builds to run in after-office hours.
Create a schedule for run
1) In the Task dialog, click the link next to Scheduling. The link could be:
– Not Scheduled: If the task is not scheduled
– A description of the scheduled task, such as 20:23 every SUN of every week if the task is scheduled
2) In the Schedule window, select the required interval, and specify the options.
3) Click Save.

CREATE AND MANAGE PUBLICATION TASKS
SCHEDULING
34
View the schedules for tasks
FrameMaker Publishing Server lists all the tasks that are defined for the server, and shows their run status.
In addition to the list of all tasks, you can see the next run status of each task in the Next Run column of
th
e Tasks dashboard.

WORK WITH PRESETS
PRESETS
35
Work with presets
In FMPS, you can reuse publishing tasks presets and save time.
Presets
In FMPS, you can create presets for output-formats that you want to generate. Presets include settings such
as:
• Name for the preset
• DITAVAL file to use
• Settings (
.sts) file to use
For repetitive tasks with the same settings, you can create and apply the presets to populate all the settings
to
save time. You can create private or shared presets. Private presets are visible and accessible to the
creator of preset only. Shared presets are visible and accessible to all the users but can be edited only by
the users who created them.
Add a preset
1) Select the Preset tab.
2) Using the Add New PDF Preset drop-down, select Add New Preset.
3) Provide a Name for the preset.
4) Specify the location of the DitaVal File that you want to attach to the preset.
5) Specify the location of the publish Settings File that you want to attach to the preset
NOTE:
The DITAVAL file and the settings file are uploaded and saved in MongoDB.
6) If you want to make your preset available for others, select Shared. If you do not select Shared, your
preset is visible and available to you only.
7) Click Save.
Edit a preset
1) On the Preset tab, click on a preset’s name.
The Publish Preset dialog appears.
2) Make the required changes and click Save.

WORK WITH PRESETS
PRESETS
36
Duplicate a preset
Typically, you would need to create a duplicate of a preset when you want to use the same settings file,
but a different DITAVAL file. In such a scenario, you can easily create a duplicate preset and use it with a
publishing task.
1) On the FrameMaker Publishing Server dashboard, do one of the following:
– Click a preset’s name and in the Publish Preset dialog, click the Duplicate icon.
– Select a preset and then select Duplicate Preset from the Add New Preset drop-down.
2) Open the duplicate preset, edit the required files, and click Save.
Delete presets
1) Do one of the following:
– On the Preset tab, select the presets to be deleted and click Delete.
– In the Publish Preset dialog, click Delete.

LOGS
SPECIFY DEFAULT LOG SETTINGS
37
Logs
FrameMaker Publishing Server includes extensive logging features. You can use the FrameMaker
Publishing Server logs to troubleshoot any publication task errors, and fix errors in the source documents
such as unresolved cross-references. You can define FrameMaker Publishing Server logs to have extensive
reports including the number of markers, pages, and so on.
You can specify the log settings for each publication task, or can use the default log settings for all tasks.
Specify default log settings
1) Open the publishing task for which you want to modify the log settings.
2) In the Task dialog, click the Modify link next to Log Settings.
3) In the Log Settings dialog, double-click (or use the move icons) to move the required entries in the
Don’t Include and Include lists.
4) Click Save.
View logs
You can view the logs of the completed publication tasks in two ways:
In the Task dialog
In the Task dialog, click on the Log tab. The Log tab displays all the logs relevant to the task in a reverse
chr
onological order.
In the FrameMaker Publishing Server application folder
FMPS store all logs under the base folder:
%appdata%\Adobe\FrameMakerPublishingServer\17\
You can use log parsers to quickly collect publication-related reports from these logs.
The server component maintains the following logs:
• Access logs: The server access logs are stored in the following folder:
%appdata%\Adobe\FrameMakerPublishingServer\17\Nodelogs\logs
– Node logs: The Node js is another component of the server. The logs for this component are stored
in the following folder:
%appdata%.Adobe\FrameMakerPublishingServer\17\Nodelogs
Error logs, warnings, information logs, and server restarts are logged here. The Node js opens a con-
sole for reporting logs, which can also be redirected to a temporary file using the command
pro
mpt.
The client component maintains the following logs:

LOGS
VIEW LOGS
38
• FMPSWorker: The client component (or worker/FrameMakerServerEx.exe) maintains any
exception logs of its interaction with the FrameMaker instance in the following folder:
%appdata%\Adobe\FrameMakerPublishingServer\17\FMPSWorker

WORK WITH FMPS USING REST APIS
REST API PROTOCOL
39
Work with FMPS using REST APIs
FrameMaker Publishing Server comes with out-of-the-box REST APIs that can be used to create publishing
tasks to publish content from Microsoft SharePoint, OpenText Documentum, or Adobe Experience
Manager. The APIs work on resources such as users, tasks, presets, and more to create, retrieve, update,
and delete resources.
IMPORTANT
The REST APIs are case-sensitive. Add the Request URL in the same case as the given syntax.
The end-point or the base URL of FMPS APIs is:
http[s]://<FMPS_server>:<port>/
NOTE:
<FMPS_Server> is the DNS or IP address of the system hosting FMPS. The default port is 7000.
REST API protocol
From a client machine, you can query FMPS using the following methods to create, retrieve, update, or
delete (CRUD) resources. According to the REST protocol, everything on the server, such as tasks, presets,
users, is treated as a resource. For more information on the REST protocol, see
http://en.wiki-
pedia.org/wiki/Representational_state_transfer
In the REST API URLs and method types table, the various GET, POST, DELETE, and PUT requests map to
CR
UD framework as:
The following topics describe the REST APIs available to you for building your own FMPS custom client.
Ea
ch API has its a specific URL that you can query. The methods, such as Get and Post, are the type of oper-
ations you are performing on the REST API. The URLs include parameters that you can pass to an API.
Create and update (Post and Put) requests have parameters passed in the body of the HTTP request as a
J
S
ON file as well as in the URL. Get and Delete have parameters in the URLs only. The various task type
links in the Help URL include the schema required for the various tasks.
REST API method types CRUD aspect
Post Create
Get Retrieve
Put Update
Delete Delete

WORK WITH FMPS USING REST APIS
REST API FOR USER MANAGEMENT
40
REST API for user management
The following REST APIs are available for managing user and their permissions in FMPS.
Register a new user
A POST method that registers a new user, and can only be used when typeOfAuth is set as USERLOGIN
in
development.json. Only a user with administrative privileges can register other users.
Request URL
http://<FMPS_server>:<port>/v16/auth/register
Header
Header example
{
"content-type": "application/json",
"X-Access-Token": "eyJ0eXAiOiJKhjshjafakjfkadfas"
}
The authorization header must also contain the basic authentication type authorization containing
credentials (email and password) of the user who is to be registered. For example:
Authorization: Basic YWJjZEBhZG9iZS5jb206YWJjZA==
Request body
JSON body example
{"email":"[email protected]"}
Name Type Description
content-type String Type of content that is sent in the request.
X-Access-Token String The authentication token that is sent in the request. This must be
of another user with administrative privileges.
Name Type Description
email JSON An email ID with which the user account is created.

WORK WITH FMPS USING REST APIS
REST API FOR USER MANAGEMENT
41
Successful response
Returns a HTTP 200 (Successful) response with the user object.
Error response
Change user permission
A PUT method that changes the user permissions. There are two types of user permissions: USER and
ADMIN. Only a user with ADMIN permissions can invoke this API.
To assign administrative permissions to your default (first) LDAP user, you will have to use the MongoDB’s
com
mand-line tool. See Install and configure MongoDB for more details.
Request URL
http://<FMPS_server>:<port>/v16/user/changePermission/:id
Header
Header example
{
"content-type": "application/json",
"X-Access-Token": "eyJ0eXAiOiJKhjshjafakjfkadfas"
}
Code Type Description
400 String A bad request is sent.
406 String The request is not acceptable
409 String User with the same credentials is already present.
Name Type Description
content-type String Type of content that is sent in the request.
X-Access-Token String The authentication token that is sent in the request. This must be
of another user with administrative permissions.

WORK WITH FMPS USING REST APIS
REST API FOR USER MANAGEMENT
42
Parameter
Parameter example
5e4302fafdfdfadsfdfasgafsafgsag
Request body
JSON body example
{
"userPermission": "ADMIN"
}
Successful response
Returns a HTTP 200 (Successful) response with the user object.
Error response
User login with USERLOGIN authentication
A POST method that logs the user into the system when USERLOGIN authentication mechanism is used.
Request URL
http://<FMPS_server>:<port>/v16/auth/login
Name Type Description
id String The user ID of a user whose has to be granted administrative
permissions.
Name Type Description
userPermission String The type of permission that you want to assign to the user. Use
ADMIN for administrative permissions, and USER for
non-administrative permissions.
Code Type Description
400 String A bad request is sent.
422 String The request is sent with incorrect data.

WORK WITH FMPS USING REST APIS
REST API FOR USER MANAGEMENT
43
Header
Header example
{ "content-type": "application/json",}
The authorization header must also contain the basic authentication type authorization containing
credentials (email and password) of the user who wants to login. For example:
Authorization: Basic dXNlcm5hbWVAYWRvYmUuY29tOnBhc3N3b3Jk
Successful response
Returns a HTTP 200 (Successful) response with the user’s access token.
Error response
User login with LDAP authentication
A POST method that logs the user into the system when LDAP authentication mechanism is used.
Request URL
http://<FMPS_server>:<port>/v16/auth/ldap
Name Type Description
content-type String Type of content that is sent in the request.
X-Access-Token String The authentication token that is sent in the request.
Authorization String A USERLOGIN (basic) authentication type authorization header
containing credentials (email and password) of the user that wants
to login.
Code Type Description
400 String A bad request is sent.
403 String Access not granted.
406 String The request is not acceptable.

WORK WITH FMPS USING REST APIS
REST APIS FOR WORKING WITH PRESETS
44
Header
Header example
{ "content-type": "application/json",}
The authorization header must also contain the basic authentication type authorization header
containing credentials (email and password) of the user who wants to login. For example:
Authorization: Basic dXNlcm5hbWVAYWRvYmUuY29tOnBhc3N3b3Jk
Successful response
Returns a HTTP 200 (Successful) response with the user’s access token.
Error response
REST APIs for working with presets
The following REST APIs are available for working with publishing presets.
Upload an STS file
A POST method that uploads a settings (.sts) file in a preset.
Request URL
http://<FMPS_server>:<port>/v16/presets/sts/upload
Name Type Description
content-type String Type of content that is sent in the request.
Authorization String A USERLOGIN (basic) authentication type authorization header
containing credentials (email and password) of the user that wants
to login.
Code Type Description
400 String A bad request is sent.
401 String Use is not authorized.
406 String The request is not acceptable.

WORK WITH FMPS USING REST APIS
REST APIS FOR WORKING WITH PRESETS
45
Header
Header example
{
"content-type": "multipart/form-data",
"X-Access-Token": "eyJ0eXAiOiJKhjshjafakjfkadfas"
}
Request body
JSON body example
multipart/form-data
Successful response
Returns a HTTP 200 (Successful) response with the settings file object.
Error response
Upload a DITAVAL file
A POST method that uploads a DITAVAL file in a preset.
Request URL
http://<FMPS_server>:<port>/v16/presets/ditaval/upload
Name Type Description
content-type String Type of content that is sent in the request.
X-Access-Token String The authentication token that is sent in the request.
Name Type Description
file form-data Path of the settings file that you want to upload.
Code Type Description
400 String A bad request is sent.

WORK WITH FMPS USING REST APIS
REST APIS FOR WORKING WITH PRESETS
46
Header
Header example
{
"content-type": "multipart/form-data",
"X-Access-Token": "eyJ0eXAiOiJKhjshjafakjfkadfas"
}
Request body
JSON body example
multipart/form-data
Successful response
Returns a HTTP 200 (Successful) response with the DITAVAL file’s object.
Error response
Create a preset
A POST method that creates a preset, which contains one settings (.sts) file and an optional DITAVAL
file.
Request URL
http://<FMPS_server>:<port>/v16/presets
Name Type Description
content-type String Type of content that is sent in the request.
X-Access-Token String The authentication token that is sent in the request.
Name Type Description
file form-data Path of the DITAVAL file that you want to upload.
Code Type Description
400 String A bad request is sent.

WORK WITH FMPS USING REST APIS
REST APIS FOR WORKING WITH PRESETS
47
Header
Header example
{
"content-type": "application/json",
"X-Access-Token": "eyJ0eXAiOiJKhjshjafakjfkadfas"
}
Request body
JSON body example
{
"Name": "test1234",
"Shared": "NO",
"ditavalid": "23525252542gsgsggxbc",
"stsfileid": "23525252542sagRWEWGGSG"
}
Successful response
Returns a HTTP 200 (Successful) response with the newly created preset object.
Name Type Description
content-type String Type of content that is sent in the request.
X-Access-Token String The authentication token that is sent in the request.
Name Type Description
Name String A unique name of the preset that you want to create.
Shared String Specify whether the preset is shared or not. Possible values are
“
NO” and “YES”.
ditavalid String Unique ID of the DITAVAL file to associate with the preset. This is
an optional parameter.
stsfileid String Unique ID of the settings (.sts) file to associate with the preset.
This is a mandatory parameter.

WORK WITH FMPS USING REST APIS
REST APIS FOR WORKING WITH PRESETS
48
Error response
Update a preset
A PUT method that updates a preset, which contains one settings (.sts) file and an optional DITAVAL file.
Request URL
http://<FMPS_server>:<port>/v16/presets/:id
Header
Header example
{
"content-type": "application/json",
"X-Access-Token": "eyJ0eXAiOiJKhjshjafakjfkadfas"
}
Parameter
Parameter example
5e4302fafdfdfadsfdfasgafsafgsag
Code Type Description
400 String A bad request is sent.
Name Type Description
content-type String Type of content that is sent in the request.
X-Access-Token String The authentication token that is sent in the request.
Name Type Description
id String A unique ID of the preset that you want to update.

WORK WITH FMPS USING REST APIS
REST APIS FOR WORKING WITH PRESETS
49
Request body
JSON body example
{
"Name": "test1234",
"Shared": "NO",
"stsfileid": "{{UStsId}}",
"stsdirty":"YES",
"ditavalid": "23525252542gsgsggxbc",
"ditadirty":"YES"
}
Successful response
Returns a HTTP 200 (Successful) response.
Error response
Name Type Description
Name String A unique name of the preset that you want to update.
NOTE:
The name of the preset cannot be updated.
Shared String Specify whether the preset is shared or not. Possible values are
“
NO” and “YES”.
ditavalid String Unique ID of the DITAVAL file to associate with the preset. This is
an optional parameter.
ditadirty String Specified only if the DITAVAL file is updated. Possible values are
YES or NO.
stsfileid String Unique ID of the settings (.sts) file to associate with the preset.
This is a mandatory parameter.
stsdirty String Specified only if the settings file is updated. Possible values are
YES or NO.
Code Type Description
400 String A bad request is sent.

WORK WITH FMPS USING REST APIS
REST APIS FOR WORKING WITH PRESETS
50
Delete a preset
A DELETE method that deletes a preset using the preset’s ID.
Request URL
http://<FMPS_server>:<port>/v16/presets/:id
Header
Header example
{
"content-type": "application/json",
"X-Access-Token": "eyJ0eXAiOiJKhjshjafakjfkadfas"
}
Parameter
Parameter example
5e4302fafdfdfadsfdfasgafsafgsag
Successful response
Returns a HTTP 200 (Successful) response with the deleted preset object.
Error response
Name Type Description
content-type String Type of content that is sent in the request.
X-Access-Token String The authentication token that is sent in the request.
Name Type Description
id String The unique ID of the preset that you want to delete.
Code Type Description
400 String A bad request is sent.

WORK WITH FMPS USING REST APIS
REST APIS FOR WORKING WITH PRESETS
51
Get all presets
A GET method that retrieves all presets available in the system.
Request URL
http://<FMPS_server>:<port>/v16/presets
Header
Header example
{
"content-type": "application/json",
"X-Access-Token": "eyJ0eXAiOiJKhjshjafakjfkadfas"
}
Successful response
Returns a HTTP 200 (Successful) response with an array of all preset objects.
Error response
Get a specific output preset
A GET method that retrieves an existing output preset using its unique ID.
Request URL
http://<FMPS_server>:<port>/v16/presets/:id
Header
Name Type Description
content-type String Type of content that is sent in the request.
X-Access-Token String The authentication token that is sent in the request.
Code Type Description
400 String A bad request is sent.
Name Type Description
content-type String Type of content that is sent in the request.

WORK WITH FMPS USING REST APIS
REST APIS FOR WORKING WITH TASKS
52
Header example
{
"content-type": "application/json",
"X-Access-Token": "eyJ0eXAiOiJKhjshjafakjfkadfas"
}
Parameter
Parameter example
5e4302fafdfdfadsfdfasgafsafgsag
Successful response
Returns a HTTP 200 (Successful) response with the preset object.
Error response
REST APIs for working with tasks
The following REST APIs are available for working with publishing tasks.
Create a task
A POST method that creates a new publishing task. A task can be created using the preconfigured output
presets, such as PDF, ePub, Responsive HTML5, and more, or a custom preset. To create a task with custom
preset, you must have the settings file and DITAVAL (optional) file IDs before creating a task. Use the
Upload an STS file and Upload a DITAVAL file APIs to upload the settings and DITAVAL files and get the
file IDs.
X-Access-Token String The authentication token that is sent in the request.
Name Type Description
id String The unique ID of the preset that you want to retrieve.
Code Type Description
400 String A bad request is sent.
Name Type Description

WORK WITH FMPS USING REST APIS
REST APIS FOR WORKING WITH TASKS
53
Request URL
http://<FMPS_server>:<port>/v16/tasks
Header
Header example
{
"content-type": "application/json",
"X-Access-Token": "eyJ0eXAiOiJKhjshjafakjfkadfas"
}
Request body
JSON body example
The following JSON request is for creating a task with the preconfigured output presets.
Name Type Description
content-type String Type of content that is sent in the request.
X-Access-Token String The authentication token that is sent in the request.
Name Type Description
Name String A unique name of the task that you want to create.
Input JSON Contains the path of the file to publish and parameters to
configure the book components. In case the input files are hosted
on a CMS, then the connector settings are also included in the
Input parameter.
PrePublish JSON Path of the script file to execute during the prepublish process.
PostPublish JSON Path of the script file or commands to execute after the publishing
process completes.
LogInfo JSON Specify the information to capture in the log file for the current
task.
Outputs JSON Contains the path to publish the output, the output format, and
the preset ID to use. In case the output is to be stored on a CMS,
then the login credentials for the CMS are also included in the
Outputs parameter.
If you are using GUID-based file system, then you must configure
th
e
PublishedFileName option in the Outputs parameter.
Notification JSON Specify an email ID on which the notification email is sent.

WORK WITH FMPS USING REST APIS
REST APIS FOR WORKING WITH TASKS
54
{
"Name": "SamePresetMultiOut4322",
"FMServerTask": {
"Version": 16,
"Jobs": [
{
"Input": {
"InputFile": "C:\\Sample\\Books\\Special\\Tables.fm",
"UpdateBook": {
"UpdateOLELinks": "NO",
"UpdateTextInsets": "NO",
"UpdateNumbering": "NO",
"UpdateXrefs": "NO",
"ApplyMasterPages": "NO",
"UpdateGeneratableComponents": "NO"
}
},
"PrePublish": {
"ExtendScript": {
"ScriptFile": ""
},
"prePublishid": ""
},
"PostPublish": {
"SystemCommand": {
"ScriptFile": ""
},
"postPublishid": ""
},
"LogInfo": {
"SupportedEncodings": "NO",
"AvailableFontFamilies": "NO",
"NumberofChaptersInBook": "NO",
"EmptyBookError": "NO",
"NumberofIndexMarkersPresent": "NO",
"ListofReferencedGraphics": "NO",
"ListofMissingGraphics": "NO",
"UnresolvedXrefInBook": "NO",
"UnresolvedTextRefInBook": "NO",
"ListofFilesInBook": "NO",
"ListofChaptersInBook": "NO",
"ListofGeneratableFilesInBook": "NO",
"NumberofAuthorMarkers": "NO",
"NumberofHF1Markers": "NO",
"NumberofHF2Markers": "NO",
"NumberofCommentMarkers": "NO",
"NumberofSubjectMarkers": "NO",
"NumberofGlossaryMarkers": "NO",
"NumberofEquationMarkers": "NO",

WORK WITH FMPS USING REST APIS
REST APIS FOR WORKING WITH TASKS
55
"NumberofHyperTextMarkers": "NO",
"NumberofCrossRefMarkers": "NO",
"NumberofConditionalTextMarkers": "NO",
"NumberofHTMLMacroMarkers": "NO"
},
"Outputs": [
{
"OutputFile":
"Z:
\\SameP
resetMultiOut32323\\Responsive",
"OutputFormat": "RH_RESPONSIVEHELP",
"Configuration": {
"presetid": "2346453767sfgfddfhfgdhfdgh"
}
},
{
"OutputFile":
"Z:
\\SameP
resetMultiOut65646464\\html",
"OutputFormat": "RH_BASICHTML",
"Configuration": {
"presetid": "gfsdsdhfghdhhgd"
}
},
{
"OutputFile":
"Z:
\\SameP
resetMultiOut543534543542\\pdf",
"OutputFormat": "FM_PDF",
"Configuration": {
"presetid": "235542352354235234sgsdg"
}
}
]
}
],
"Notification": {
"Emails": "test@adobe.com"
}
}
}
The following JSON request is for creating a task with the custom output presets.
{
"Name": "testcustompreset",
"_id": null,
"runtaskid": "",
"FMServerTask": {
"Version": 16,
"Jobs": [{

WORK WITH FMPS USING REST APIS
REST APIS FOR WORKING WITH TASKS
56
"Input": {
"InputFile":
"/content/
dam/testfm/Samples/UserGuide/Legal.fm",
"Connector": {
"ConnectorType": "Adobe Experience Manager",
"Server": "http://yyyy.corp.adobe.com:4502/",
"UserField1": "crx.default",
"UserName": "",
"Password": "",
"id": ""
},
"UpdateBook": {
"UpdateOLELinks": "NO",
"UpdateTextInsets": "NO",
"UpdateNumbering": "NO",
"UpdateXrefs": "NO",
"ApplyMasterPages": "NO",
"UpdateGeneratableComponents": "NO"
}
},
"PrePublish": {
"ExtendScript": {
"ScriptFile": ""
},
"prePublishid": ""
},
"PostPublish": {
"SystemCommand": {
"ScriptFile": ""
},
"postPublishid": ""
},
"LogInfo": {
"SupportedEncodings": "NO",
"AvailableFontFamilies": "NO",
"NumberofChaptersInBook": "NO",
"EmptyBookError": "NO",
"NumberofIndexMarkersPresent": "NO",
"ListofReferencedGraphics": "NO",
"ListofMissingGraphics": "NO",
"UnresolvedXrefInBook": "NO",
"UnresolvedTextRefInBook": "NO",
"ListofFilesInBook": "NO",
"ListofChaptersInBook": "NO",
"ListofGeneratableFilesInBook": "NO",
"NumberofAuthorMarkers": "NO",
"NumberofHF1Markers": "NO",
"NumberofHF2Markers": "NO",
"NumberofCommentMarkers": "NO",
"NumberofSubjectMarkers": "NO",

WORK WITH FMPS USING REST APIS
REST APIS FOR WORKING WITH TASKS
57
"NumberofGlossaryMarkers": "NO",
"NumberofEquationMarkers": "NO",
"NumberofHyperTextMarkers": "NO",
"NumberofCrossRefMarkers": "NO",
"NumberofConditionalTextMarkers": "NO",
"NumberofHTMLMacroMarkers": "NO"
},
"Outputs": [{
"OutputFile": "/content/dam/fmdita-outputs",
"Connector": {
"ConnectorType": "Adobe Experience Manager",
"Server": "http://abc.def.adobe.com:4502",
"UserField1": "crx.default",
"UserName": "",
"Password": "",
"id": ""
},
"OutputFormat": "FM_PDF",
"Configuration": {
"PresetName": "Custom",
"PresetType": "PDF",
"FM_PDFConfiguration": {
"DitaValFile": "ProductA_Administrator.ditaval",
"SettingsFile": "Default.sts",
"stsfileid": "5f083bb493655a1fc060f5d4",
"ditavalid": "5f083bb593655a1fc060f5d5"
},
"presetid": ""
}
}]
}],
"Notification": {
"Emails": "[email protected]"
}
},
"Schedule": {
"_id": null
}
}
The following JSON request is for creating a task using the input files available on a CMS.
{
"Name": "AEM Task1",
"_id": null,
"runtaskid": "",
"FMServerTask": {

WORK WITH FMPS USING REST APIS
REST APIS FOR WORKING WITH TASKS
58
"Version": 16,
"Jobs": [
{
"Input": {
"InputFile":
"/c
ontent/
dam/testfm/Samples/PartsCatalog/PartsCatalog.book",
"Connector": {
"ConnectorType": "Adobe Experience Manager",
"Server": "AEMHOST",
"UserField1": "crx.default",
"UserName": "AEMUSER",
"Password": "AEMPASS",
"id": ""
},
"UpdateBook": {
"UpdateOLELinks": "NO",
"UpdateTextInsets": "NO",
"UpdateNumbering": "NO",
"UpdateXrefs": "NO",
"ApplyMasterPages": "NO",
"UpdateGeneratableComponents": "NO"
}
},
"PrePublish": {
"ExtendScript": {
"ScriptFile": ""
},
"prePublishid": ""
},
"PostPublish": {
"SystemCommand": {
"ScriptFile": ""
},
"postPublishid": ""
},
"LogInfo": {
"SupportedEncodings": "NO",
"AvailableFontFamilies": "NO",
"NumberofChaptersInBook": "NO",
"EmptyBookError": "NO",
"NumberofIndexMarkersPresent": "NO",
"ListofReferencedGraphics": "NO",
"ListofMissingGraphics": "NO",
"UnresolvedXrefInBook": "NO",
"UnresolvedTextRefInBook": "NO",
"ListofFilesInBook": "NO",
"ListofChaptersInBook": "NO",
"ListofGeneratableFilesInBook": "NO",
"NumberofAuthorMarkers": "NO",
"NumberofHF1Markers": "NO",

WORK WITH FMPS USING REST APIS
REST APIS FOR WORKING WITH TASKS
59
"NumberofHF2Markers": "NO",
"NumberofCommentMarkers": "NO",
"NumberofSubjectMarkers": "NO",
"NumberofGlossaryMarkers": "NO",
"NumberofEquationMarkers": "NO",
"NumberofHyperTextMarkers": "NO",
"NumberofCrossRefMarkers": "NO",
"NumberofConditionalTextMarkers": "NO",
"NumberofHTMLMacroMarkers": "NO"
},
"Outputs": [
{
"OutputFile": "/content/dam/fmdita-outputs",
"Connector": {
"ConnectorType": "Adobe Experience Manager",
"Server": "AEMHOST",
"UserField1": "crx.default",
"UserName": "AEMUSER",
"Password": "AEMPASS",
"id": ""
},
"OutputFormat": "FM_PDF",
"Configuration": {
"presetid": "PresetId"
}
}
]
}
],
"Notification": {
"Emails": "user@enterprise.com"
}
},
"Schedule": {
"_id": null
}
}
The following JSON request is for creating a task and scheduling the execution time.
{
"Name": "ScheduledTask",
"_id": null,
"runtaskid": "",
"FMServerTask": {
"Version": 16,
"Jobs": [{

WORK WITH FMPS USING REST APIS
REST APIS FOR WORKING WITH TASKS
60
"Input": {
"InputFile": "E:\\HTMLBUGS\\basic.fm",
"UpdateBook": {
"UpdateOLELinks": "NO",
"UpdateTextInsets": "NO",
"UpdateNumbering": "NO",
"UpdateXrefs": "NO",
"ApplyMasterPages": "NO",
"UpdateGeneratableComponents": "NO"
}
},
"PrePublish": {
"ExtendScript": {
"ScriptFile": ""
},
"prePublishid": ""
},
"PostPublish": {
"SystemCommand": {
"ScriptFile": ""
},
"postPublishid": ""
},
"LogInfo": {
"SupportedEncodings": "NO",
"AvailableFontFamilies": "NO",
"NumberofChaptersInBook": "NO",
"EmptyBookError": "NO",
"NumberofIndexMarkersPresent": "NO",
"ListofReferencedGraphics": "NO",
"ListofMissingGraphics": "NO",
"UnresolvedXrefInBook": "NO",
"UnresolvedTextRefInBook": "NO",
"ListofFilesInBook": "NO",
"ListofChaptersInBook": "NO",
"ListofGeneratableFilesInBook": "NO",
"NumberofAuthorMarkers": "NO",
"NumberofHF1Markers": "NO",
"NumberofHF2Markers": "NO",
"NumberofCommentMarkers": "NO",
"NumberofSubjectMarkers": "NO",
"NumberofGlossaryMarkers": "NO",
"NumberofEquationMarkers": "NO",
"NumberofHyperTextMarkers": "NO",
"NumberofCrossRefMarkers": "NO",
"NumberofConditionalTextMarkers": "NO",
"NumberofHTMLMacroMarkers": "NO"
},
"Outputs": [{
"OutputFile": "E:\\HTMLBUGS\\OUT",

WORK WITH FMPS USING REST APIS
REST APIS FOR WORKING WITH TASKS
61
"OutputFormat": "FM_PDF",
"Configuration": {
"PresetName": "test1597120516",
"PresetType": "PDF",
"presetid": "5f322004900d1e21a89e92de"
}
}]
}],
"Notification": {
"Emails": ""
}
},
"MetaInfo": {
"Creator":
"{\
"userna
me\":\"fmpsuser\",\"email\":\"fmpsuser@adobe.com\",\"userT
ype\":\"ADMIN\"}"
},
"Schedule": {
"_id": null,
"Daily": {
"StartDate": {
"Year": 2022,
"Month": "DEC",
"DayofMonth": 16
},
"Time": {
"Hour": 9,
"Minute": 15,
"AMPM": "AM"
},
"Interval": 1
}
}
}
The following JSON request is for creating a task using the preconfigured output presets to generate
PDF output. If you are integrating with Adobe Experience Manager (AEM), which uses GUID-based file
naming convention, then you must configure the
PublishedFileName option. If you do not specify
the file name, then FMPS will generate the PDF using the same GUID as the source file, which will
result in deletion of the source file. While specifying the
PublishedFileName option, you don’t
need to specify the file extension, which defaults to
.pdf.
The
PublishedFileName option is optional for systems that do not use GUID-based file naming
convention.

WORK WITH FMPS USING REST APIS
REST APIS FOR WORKING WITH TASKS
62
{
"Name": "Publish PDF GUID AEM",
"FMServerTask": {
"Version": 16,
"Jobs": [
{
"Input": {
"InputFile":
"C:
\\Sampl
es\\UserGuide\\UserGuide.book",
"UpdateBook": {
"UpdateOLELinks": "NO",
"UpdateTextInsets": "NO",
"UpdateNumbering": "NO",
"UpdateXrefs": "NO",
"ApplyMasterPages": "NO",
"UpdateGeneratableComponents": "NO"
}
},
"PrePublish": {
"ExtendScript": {
"ScriptFile": ""
},
"prePublishid": ""
},
"PostPublish": {
"SystemCommand": {
"ScriptFile": ""
},
"postPublishid": ""
},
"LogInfo": {
"SupportedEncodings": "NO",
"AvailableFontFamilies": "NO",
"NumberofChaptersInBook": "NO",
"EmptyBookError": "NO",
"NumberofIndexMarkersPresent": "NO",
"ListofReferencedGraphics": "NO",
"ListofMissingGraphics": "NO",
"UnresolvedXrefInBook": "NO",
"UnresolvedTextRefInBook": "NO",
"ListofFilesInBook": "NO",
"ListofChaptersInBook": "NO",
"ListofGeneratableFilesInBook": "NO",
"NumberofAuthorMarkers": "NO",
"NumberofHF1Markers": "NO",
"NumberofHF2Markers": "NO",
"NumberofCommentMarkers": "NO",
"NumberofSubjectMarkers": "NO",
"NumberofGlossaryMarkers": "NO",

WORK WITH FMPS USING REST APIS
REST APIS FOR WORKING WITH TASKS
63
"NumberofEquationMarkers": "NO",
"NumberofHyperTextMarkers": "NO",
"NumberofCrossRefMarkers": "NO",
"NumberofConditionalTextMarkers": "NO",
"NumberofHTMLMacroMarkers": "NO"
},
"Outputs": [
{
"OutputFile": "C:\\FMPS\\output",
"PublishedFileName": "samplePublishedFile",
"OutputFormat": "FM_PDF",
"Configuration": {
"presetid": "6011f0bc301fb91fa0e0e97c"
}
}
]
}
],
"Notification": {
"Emails": "punagpal@adobe.com"
}
},
"Creator":
"{\
"username\":\"fmpsuser\",\"email\":\"f[email protected]\",\"userT
ype\":\"ADMIN\"}"
},
"Schedule": {
"Once": {
"Date": {
"Year": 2021,
"Month": "MAR",
"DayofMonth": 8
},
"Time": {
"Hour": 1,
"Minute": 15,
"AMPM": "PM"
}
}
}
}
Successful response
Returns a HTTP 200 (Successful) response with the newly created task’s object.

WORK WITH FMPS USING REST APIS
REST APIS FOR WORKING WITH TASKS
64
Error response
Delete a task
A DELETE method that deletes a task using the task’s ID.
Request URL
http://<FMPS_server>:<port>/v16/tasks/:id
Header
Header example
{
"content-type": "application/json",
"X-Access-Token": "eyJ0eXAiOiJKhjshjafakjfkadfas"
}
Parameter
Parameter example
5e4302fafdfdfadsfdfasgafsafgsag
Successful response
Returns a HTTP 200 (Successful) response with the deleted task’s object.
Code Type Description
400 String A bad request is sent.
Name Type Description
content-type String Type of content that is sent in the request.
X-Access-Token String The authentication token that is sent in the request.
Name Type Description
id String The unique ID of the task that you want to delete.

WORK WITH FMPS USING REST APIS
REST APIS FOR WORKING WITH TASKS
65
Error response
Get all tasks
A GET method that retrieves all tasks available in the system.
Request URL
http://<FMPS_server>:<port>/v16/tasks
Header
Header example
{
"content-type": "application/json",
"X-Access-Token": "eyJ0eXAiOiJKhjshjafakjfkadfas"
}
Successful response
Returns a HTTP 200 (Successful) response with an array of all task objects.
Error response
Get a specific task
A GET method that retrieves an existing task using its unique ID.
Request URL
http://<FMPS_server>:<port>/v16/task/:id
Code Type Description
400 String A bad request is sent.
Name Type Description
content-type String Type of content that is sent in the request.
X-Access-Token String The authentication token that is sent in the request.
Code Type Description
400 String A bad request is sent.

WORK WITH FMPS USING REST APIS
REST APIS FOR WORKING WITH TASKS
66
Header
Header example
{
"content-type": "application/json",
"X-Access-Token": "eyJ0eXAiOiJKhjshjafakjfkadfas"
}
Parameter
Parameter example
5e4302fafdfdfadsfdfasgafsafgsag
Successful response
Returns a HTTP 200 (Successful) response with the task’s object.
Error response
Get the status of a task of a specific user
A GET method that retrieves the status of an existing task created by a specific user.
Request URL
http://<FMPS_server>:<port>/v16/tasks/status/:taskid/:userid
Name Type Description
content-type String Type of content that is sent in the request.
X-Access-Token String The authentication token that is sent in the request.
Name Type Description
id String The unique ID of the task that you want to retrieve.
Code Type Description
400 String A bad request is sent.

WORK WITH FMPS USING REST APIS
REST APIS FOR WORKING WITH TASKS
67
Header
Header example
{
"content-type": "application/json",
"X-Access-Token": "eyJ0eXAiOiJKhjshjafakjfkadfas"
}
Parameter
Parameter example
5e4302fafdfdfadsfdfasgafsafgsag
5e4302fafdfdfadsfdfasgafsafgsag
Successful response
Returns a HTTP 200 (Successful) response with the status of the retrieved task.
Error response
Get the status of a running task
A GET method that retrieves the status of a running task.
Name Type Description
content-type String Type of content that is sent in the request.
X-Access-Token String The authentication token that is sent in the request.
Name Type Description
taskid String The unique ID of the task that you want to retrieve.
userid String The unique ID of the user who has created the task.
Code Type Description
400 String A bad request is sent.

WORK WITH FMPS USING REST APIS
REST APIS FOR WORKING WITH TASKS
68
Request URL
http://<FMPS_server>:<port>/v16/queue/status/:runid
Header
Header example
{
"content-type": "application/json",
"X-Access-Token": "eyJ0eXAiOiJKhjshjafakjfkadfas"
}
Parameter
Parameter example
5e4302fafdfdfadsfdfasgafsafgsag
Successful response
Returns a HTTP 200 (Successful) response with the running status of the retrieved task. The status
cou
ld have the following values:
NOT_SCHEDULED, QUEUED, RUNNING, COMPLETED, FAILED,
or
KILLED.
Error response
Update a task
A PUT method that updates a task using its task ID.
Name Type Description
content-type String Type of content that is sent in the request.
X-Access-Token String The authentication token that is sent in the request.
Name Type Description
runid String The unique ID of the task whose status you want to retrieve.
Code Type Description
400 String A bad request is sent.

WORK WITH FMPS USING REST APIS
REST APIS FOR WORKING WITH TASKS
69
Request URL
http://<FMPS_server>:<port>/v16/tasks/:id
Header
Header example
{
"content-type": "application/json",
"X-Access-Token": "eyJ0eXAiOiJKhjshjafakjfkadfas"
}
Parameter
Parameter example
5e4302fafdfdfadsfdfasgafsafgsag
Request body
Name Type Description
content-type String Type of content that is sent in the request.
X-Access-Token String The authentication token that is sent in the request.
Name Type Description
id String The unique ID of the task that you want to update.
Name Type Description
Name String A unique name of the task that you want to update.
NOTE:
The name of the task cannot be updated.
Input JSON Contains the path of the file to publish and parameters to
configure the book components. In case the input files are hosted
on a CMS, then the connector settings are also included in the
Input parameter.
PrePublish JSON Path of the script file to execute during the prepublish process.

WORK WITH FMPS USING REST APIS
REST APIS FOR WORKING WITH TASKS
70
JSON body example
Refer to the example given under Create a task.
Successful response
Returns a HTTP 200 (Successful) response with the updated task’s object.
Error response
Upload a post-publish script file
A POST method that uploads a post-publish script file to use in a task. Once the file is uploaded, you can
use the file’s ID in a task to associate with the corresponding task.
Request URL
http://<FMPS_server>:<port>/v16/tasks/post/upload
Header
PostPublish JSON Path of the script file or commands to execute after the publishing
process completes.
LogInfo JSON Specify the information to capture in the log file for the current
task.
Outputs JSON Contains the path to publish the output, the output format, and
the preset ID to use. In case the output is to be stored on a CMS,
then the login credentials for the CMS are also included in the
Outputs parameter.
Notification JSON Specify the email ID on which the notification email is sent.
Code Type Description
400 String A bad request is sent.
Name Type Description
content-type String Type of content that is sent in the request.
X-Access-Token String The authentication token that is sent in the request.
Name Type Description

WORK WITH FMPS USING REST APIS
REST APIS FOR WORKING WITH TASKS
71
Header example
{
"content-type": "multipart/form-data",
"X-Access-Token": "eyJ0eXAiOiJKhjshjafakjfkadfas"
}
Request body
JSON body example
multipart/form-data
Successful response
Returns a HTTP 200 (Successful) response with the post-publish script file’s object.
Error response
Upload a prepublish script file
A POST method that uploads a prepublish script file use in a task. Once the file is uploaded, you can use
the file’s ID in a task to associate with the corresponding task.
Request URL
http://<FMPS_server>:<port>/v16/tasks /pre/upload
Header
Name Type Description
file form-data Path of the file that you want to upload and execute in the
post-publish process.
Code Type Description
400 String A bad request is sent.
Name Type Description
content-type String Type of content that is sent in the request.
X-Access-Token String The authentication token that is sent in the request.

WORK WITH FMPS USING REST APIS
REST APIS TO WORK WITH SCHEDULING TASKS
72
Header example
{
"content-type": "multipart/form-data",
"X-Access-Token": "eyJ0eXAiOiJKhjshjafakjfkadfas"
}
Request body
JSON body example
multipart/form-data
Successful response
Returns a HTTP 200 (Successful) response with the prepublish script file’s object.
Error response
REST APIs to work with scheduling tasks
The following REST APIs are available for working with scheduling tasks.
Schedule a task
A POST method that schedules a task using the task ID. At any time, there can be only one task in the
schedule queue. Also, you must keep a delay of ~1 second in between two consecutive tasks.
Request URL
http://<FMPS_server>:<port>/v16/queue/scheduleTask/:id
Name Type Description
file form-data Path of the file that you want to upload and execute in the
prepublish process.
Code Type Description
400 String A bad request is sent.

WORK WITH FMPS USING REST APIS
REST APIS TO WORK WITH SCHEDULING TASKS
73
Header
Header example
{
"content-type": "application/json",
"X-Access-Token": "eyJ0eXAiOiJKhjshjafakjfkadfas"
}
Parameter
Parameter example
5e4302fafdfdfadsfdfasgafsafgsag
Successful response
Returns a HTTP 200 (Successful) response with scheduled event.
Error response
Get ID of a running task
A GET method that retrieves the running ID of a publishing task.
Request URL
http://<FMPS_server>:<port>/v16/queue/task/running/:id
Name Type Description
content-type String Type of content that is sent in the request.
X-Access-Token String The authentication token that is sent in the request.
Name Type Description
id String The unique ID of the task that you want to schedule.
Code Type Description
400 String A bad request is sent.

WORK WITH FMPS USING REST APIS
REST APIS TO WORK WITH SCHEDULING TASKS
74
Header
Header example
{
"content-type": "application/json",
"X-Access-Token": "eyJ0eXAiOiJKhjshjafakjfkadfas"
}
Parameter
Parameter example
5e4302fafdfdfadsfdfasgafsafgsag
Successful response
Returns a HTTP 200 (Successful) response with the queue object that contains the running ID of the
publ
ishing task.
Error response
Stop a running task
A POST method that stops a running publishing task.
Request URL
http://<FMPS_server>:<port>/v16/queue/stopTask
Name Type Description
content-type String Type of content that is sent in the request.
X-Access-Token String The authentication token that is sent in the request.
Name Type Description
id String The unique ID of the task that you want to retrieve the running ID
for.
Code Type Description
400 String A bad request is sent.

WORK WITH FMPS USING REST APIS
REST APIS TO WORK WITH SCHEDULING TASKS
75
Header
Header example
{
"content-type": "application/json",
"X-Access-Token": "eyJ0eXAiOiJKhjshjafakjfkadfas"
}
Request body
JSON body example
{"runid":"454654456464"}
Successful response
Returns a HTTP 200 (Successful) response with an object to terminate the task.
Error response
Get running object details for a GUID
A GET method that retrieves the run object’s ID for a task through its GUID.
Request URL
http://<FMPS_server>:<port>/v16/queue/task/lastrunguid/:guid
Name Type Description
content-type String Type of content that is sent in the request.
X-Access-Token String The authentication token that is sent in the request.
Name Type Description
runid String ID of the running task that you want to stop.
Code Type Description
400 String A bad request is sent.

WORK WITH FMPS USING REST APIS
REST APIS TO WORK WITH SCHEDULING TASKS
76
Header
Header example
{
"content-type": "application/json",
"X-Access-Token": "eyJ0eXAiOiJKhjshjafakjfkadfas"
}
Parameter
Parameter example
342342553423425
Successful response
Returns a HTTP 200 (Successful) response with the run object’s ID for a task that has already started
ex
ecuting. If the task has been scheduled, but it has not yet started, then the following message is
returned in a JSON:
Guid is present in the task, but not for the running queue. It is
probably scheduled. Please wait.
Error response
Name Type Description
content-type String Type of content that is sent in the request.
X-Access-Token String The authentication token that is sent in the request.
Name Type Description
guid String GUID of the task that is scheduled for running in the publishing
queue.
Code Type Description
400 String A bad request is sent.
404 String Task not found for the given GUID.

WORK WITH FMPS USING REST APIS
REST APIS TO WORK WITH SCHEDULING TASKS
77
Get all objects present in the running task queue
A GET method that retrieves all objects present in the running task queue. This includes completed,
queued, terminated, or currently running tasks.
Request URL
http://<FMPS_server>:<port>/v16/queue
Header
Header example
{
"content-type": "application/json",
"X-Access-Token": "eyJ0eXAiOiJKhjshjafakjfkadfas"
}
Successful response
Returns a HTTP 200 (Successful) response with the list of queued objects.
Error response
Get the details of a specific queued object
A GET method that retrieves the status of a particular queued object. The queued object’s ID is used to
retrieve all details.
Request URL
http://<FMPS_server>:<port>/v16/queue/:id
Name Type Description
content-type String Type of content that is sent in the request.
X-Access-Token String The authentication token that is sent in the request.
Code Type Description
400 String A bad request is sent.

WORK WITH FMPS USING REST APIS
OTHER REST APIS TO WORK WITH THE SERVER AND LOGS
78
Header
Header example
{
"content-type": "application/json",
"X-Access-Token": "eyJ0eXAiOiJKhjshjafakjfkadfas"
}
Parameter
Parameter example
5e4302fafdfdfadsfdfasgafsafgsag
Successful response
Returns a HTTP 200 (Successful) response with the queued object.
Error response
Other REST APIs to work with the server and logs
The following REST APIs are available for checking server status, connection parameters, and working with
FMPS logs.
Get the server status
A GET method that returns the status of the server component.
Name Type Description
content-type String Type of content that is sent in the request.
X-Access-Token String The authentication token that is sent in the request.
Name Type Description
id String The unique ID of the queued object that you want to retrieve.
Code Type Description
400 String A bad request is sent.

WORK WITH FMPS USING REST APIS
OTHER REST APIS TO WORK WITH THE SERVER AND LOGS
79
Request URL
http://<FMPS_server>:<port>/ping
Successful response
Returns a HTTP 200 (Successful) response with JSON object containing information about the server’s
st
atus.
Error response
Get server connection parameters
A GET method that retrieves the server’s connection parameters.
Request URL
http://<FMPS_server>:<port>/v16/connectionParameter
Header
Header example
{
"content-type": "application/json",
}
Successful response
Returns a HTTP 200 (Successful) response with JSON object containing server’s connection parame-
ters.
Error response
Code Type Description
500 String A error occurred while retrieving the server’s status.
Name Type Description
content-type String Type of content that is sent in the request.
Code Type Description
400 String A bad request is sent.

WORK WITH FMPS USING REST APIS
OTHER REST APIS TO WORK WITH THE SERVER AND LOGS
80
Enable or disable logging and change log level
A POST method that enables or disables logging. By default, logs are turned off. You can also configure logs
from the application’s user interface, for more details see Specify default log settings.
In addition to enabling logs, you can also configure the log level. The possible values for log level are:
FATAL, ERROR, WARN, INFO, andDEBUG. By default, log level is set to INFO.
You can either enable the logs or set the log level, or configure both by providing the required parameters
in q
uery string of the API.
Request URL
http://<FMPS_server>:<port>/v16/enableLogging?enable=[]&level=[]
Header
Header example
{
"X-Access-Token": "eyJ0eXAiOiJKhjshjafakjfkadfas"
}
Request body
JSON body example
?enable=0
?level=ERROR
Successful response
Returns a HTTP 200 (Successful) response.
Name Type Description
X-Access-Token String The authentication token that is sent in the request.
Name Type Description
enable Integer Query parameter that enables (1) or disables (0) logs.
level String Query parameter that sets the level of logging information to
capture. Possible values are:
FATAL, ERROR, WARN, INFO,
and
DEBUG.

WORK WITH FMPS USING REST APIS
OTHER REST APIS TO WORK WITH THE SERVER AND LOGS
81
Error response
Get last n number of logs for a specific task
A GET method that retrieves the last n number of logs for a specific task. It uses the task ID and the number
specified in the parameters to retrieve the logs.
Request URL
http://<FMPS_server>:<port>/v16/logs/task/list/:id/:lastnrun
Header
Header example
{
"content-type": "application/json",
"X-Access-Token": "eyJ0eXAiOiJKhjshjafakjfkadfas"
}
Parameter
Parameter example
5e4302fafdfdfadsfdfasgafsafgsag
Code Type Description
400 String A bad request is sent.
403 String Access not granted.
Name Type Description
content-type String Type of content that is sent in the request.
X-Access-Token String The authentication token that is sent in the request.
Name Type Description
id String The unique ID of the task for which you want to retrieve the logs.
lastnrun Integer The number of last n logs to retrieve for the given task.

WORK WITH FMPS USING REST APIS
OTHER REST APIS TO WORK WITH THE SERVER AND LOGS
82
5
Successful response
Returns a HTTP 200 (Successful) response with the last n logs for the task.
Error response
Get logs for a specific task by its run ID
A GET method that retrieves the logs for a specific task using the run ID. It uses the task ID and the run ID
in the parameters to retrieve the logs. In addition, you can also specify the type of logs to retrieve in the
query string.
Request URL
http://<FMPS_server>:<port>/v16/logs/task/run/:id/:runid
Header
Header example
{
"content-type": "application/json",
"X-Access-Token": "eyJ0eXAiOiJKhjshjafakjfkadfas"
}
Parameter
Code Type Description
400 String A bad request is sent.
Name Type Description
content-type String Type of content that is sent in the request.
X-Access-Token String The authentication token that is sent in the request.
Name Type Description
id String The unique ID of the task for which you want to retrieve the logs.
runid Integer ID of the run task for which you want to retrieve the logs.

WORK WITH FMPS USING REST APIS
OTHER REST APIS TO WORK WITH THE SERVER AND LOGS
83
Parameter example
5e4302fafdfdfadsfdfasgafsafgsag
5e4302fafdfdfadsfdfasgafsafgsag
Successful response
Returns a HTTP 200 (Successful) response with the logs for the given task and run ID.
Error response
Get all clients (or workers)
A GET method that retrieves all clients that are available and ready to take publishing tasks from the server.
Request URL
http://<FMPS_server>:<port>/v16/worker/getallworkers
Header
Header example
{
"content-type": "application/json",
"X-Access-Token": "eyJ0eXAiOiJKhjshjafakjfkadfas"
}
Successful response
Returns a HTTP 200 (Successful) response with an array of all clients (or workers).
Code Type Description
400 String A bad request is sent.
Name Type Description
content-type String Type of content that is sent in the request.
X-Access-Token String The authentication token that is sent in the request.

WORK WITH FMPS USING REST APIS
ACCESS API DOCUMENTATION
84
Error response
Access API documentation
You can access the complete API documentation from FMPS user interface. To access the documentation,
perform the following steps:
1) Access the FMPS web interface by entering the following URL in your browser:
http[s]://<FMPS_server>:<port>/index.html
NOTE:
<FMPS_Server> is the DNS or IP address of the system hosting FMPS. The default port is 7000.
2) Click Settings ( )
The Settings dialog appears.
3) In the Settings dialog, click on the (highlighted) API documentation link.
NOTE:
You can also access the API documentation by entering
http[s]://<FMPS_-
server>:<port>/documentation/index.html
URL in your browser.
Access the API documentation
4) The FMPS API documentation is launched in a new tab.
Code Type Description
400 String A bad request is sent.

WORK WITH FMPS USING REST APIS
FMPS TROUBLESHOOTING
85
FMPS API documentation
From the left navigation panel, click on the API that you want to view. The right (body) area displays
the API details.
FMPS troubleshooting
1) What products are installed via FMPS?
a) FrameMaker (September 2022 release)
b) FrameMaker Publishing Server Component
c) FrameMaker Publishing Client Component
2) If a task/log/file is not getting deleted via the APIs, what could be the issue?
a) There could be a problem with the permissions. You should give full permissions to the
domain\user who runs the task.
3) I get a message "Object reference not set to an instance of an object". What can be the problem?
a) The website type you are accessing is not correct. Check if the http port is open or https is correctly
configured.
4) How do I enable http ports for the FMPS website to be accessed from other computers?
a) Say you want to allow Win Server allow for port access.
b) To access the firewall, select Start -> Type in "Firewall" -> Click on "Windows Firewall With
Advanced Security"
c) To configure an inbound traffic rule:
i. Right click "Inbound Rules" on the left pane
ii. Choose "New Rule”
iii. Choose "Port”
iv. Under "Specific ports" enter your port number (default port is 7000)

WORK WITH FMPS USING REST APIS
FMPS TROUBLESHOOTING
86
v. Continue with "Next" until the end of the wizard, naming the rule when prompted
d) Check if your port is now accessible - you might need to restart the Windows Firewall service
(under "Services")
5) Why do I not get an email after a task is complete?
a
) Your virus scan may be blocking the emails. Try disabling that setting. For example, in McAfee ->
Access protection properties -> (uncheck) Prevent mass mailing worms from sending mails
6) W
hy am I not able to see Math ML equations in the published documents?
a
) Check whether you have accepted EULA for Math ML. Open FrameMaker and go to Special >
MathML , if the EULA pops up ,accept it.
b) Check whether JRE is installed on the machine. If not, install it from: http://java.com/en/down-
load/help/index_installing.xml

