
Step-by-step Guide for
Processing Your DTS Travel
Voucher
23 CPTS TRAVEL CELL, MOODY AFB, 23CPTS.DTS.TRA[email protected].MIL
A1C GREINER, SRA MUCKER, SRA WEST, MARIAH WYAND

Table of Contents
Required Documents:
-
How to Obtain GTC Statements: 3
- Airfare Receipts: 6
- Lodging Receipts: 7
Travel Voucher:
-
How to Create Your Travel Voucher: 8
- Updating Itinerary: 10
- Updating Per Diem and Lodging: 13
- Adding Receipts: 19
- Attaching Lodging Receipts: 20
- Substantiating Documents: 21
- Adding Receipts and Other Expenses: 24
- Airfare Receipts and CTO Fees: 27
- Ensuring Your Profile is Correct: 30
- Completing Your Pre-Audits: 32
- Submitting Your Voucher: 33
Conclusion: 35


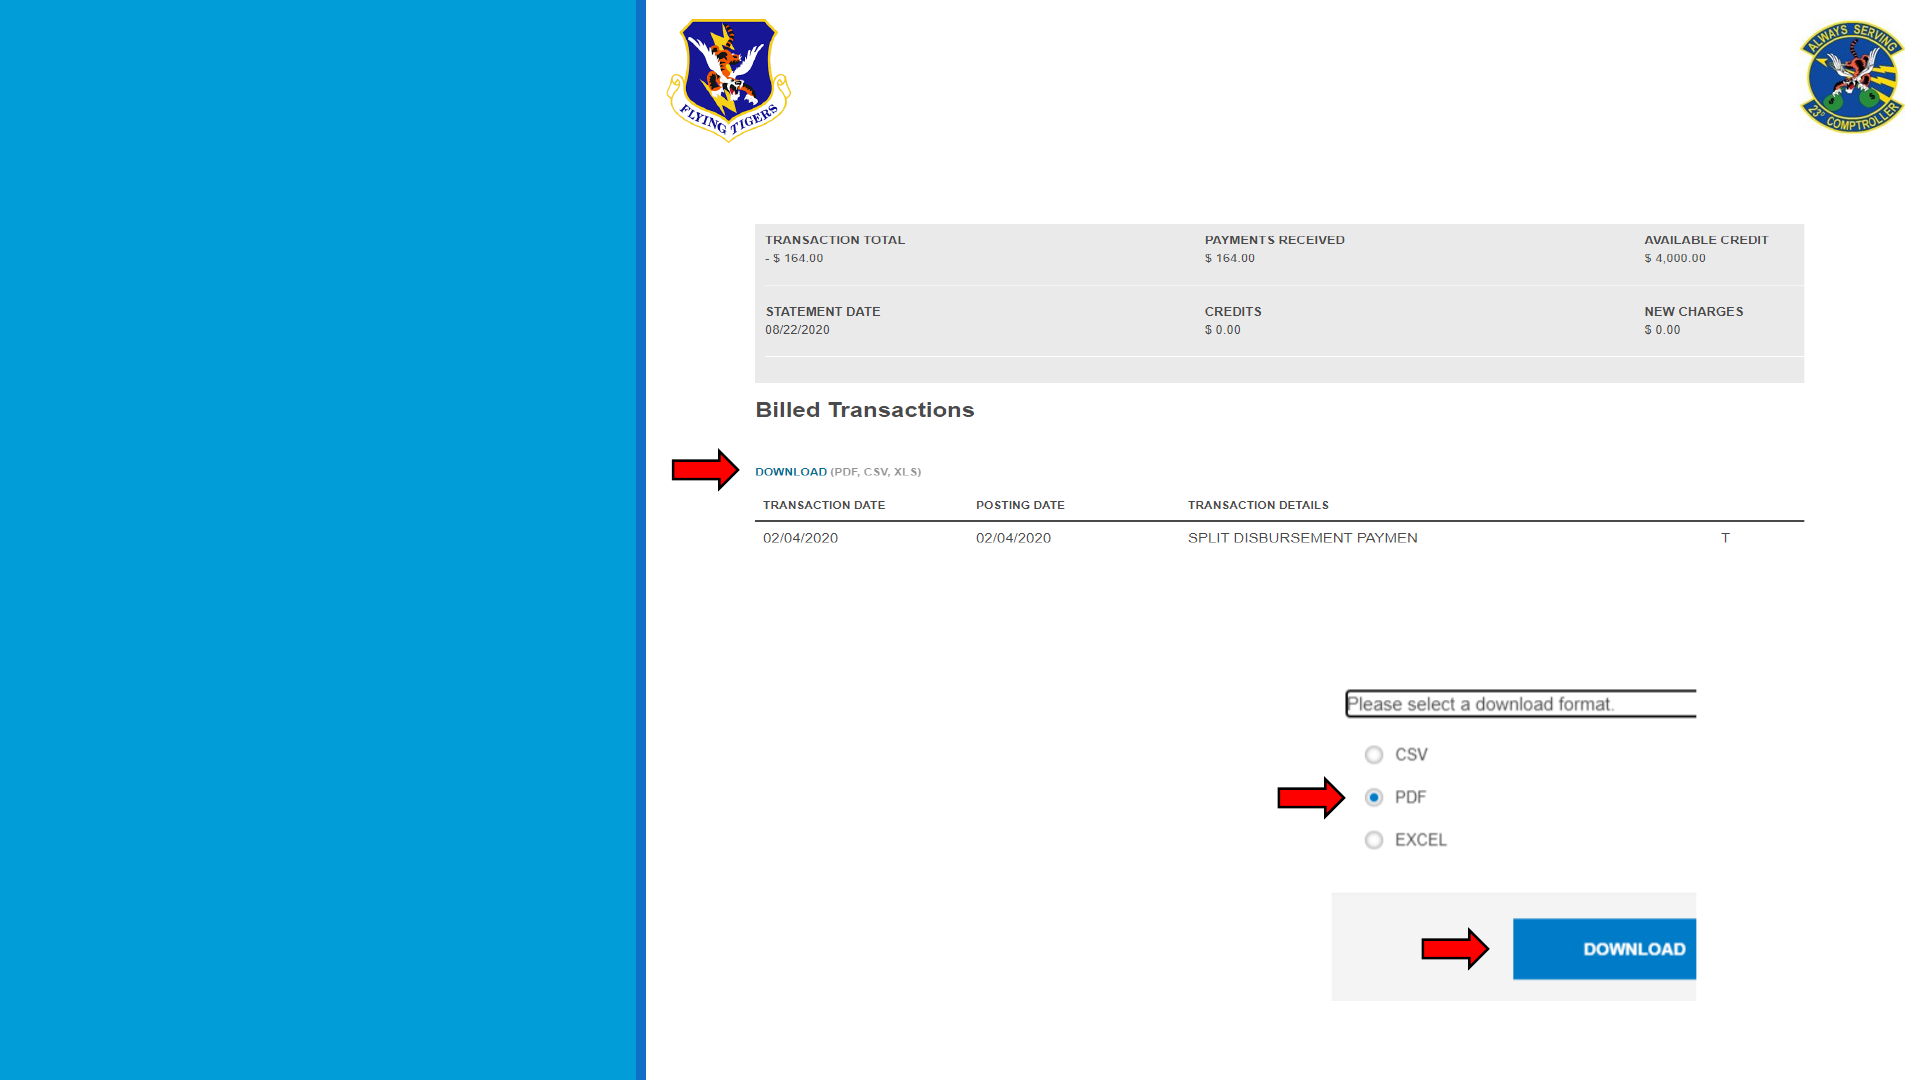
How to Obtain
GTC Statements
- Go to the first monthly
statement that an
expense was incurred
- Select the download
button as shown by the
arrow in the upper left
corner
- Select PDF and then
the blue download
button as shown in the
lower right corner
How to Obtain
GTC Statements
- Label each of your
statements to the
corresponding month
that an expense was
incurred
- You will need to repeat
this process for each
month that your GTC
had an expense during
your Deployment/TDY

Airfare
Receipts
- Dates of travel
- Traveler name
- Issued date of ticket
- Ticket price in USD
- If not in USD, GTC
statement will show
currency conversion
- Ticket numbers
- Last 4 of GTC to show
payment
- Zero Dollar Balance
Steve Snuffy
Steve Snuffy
v
xxxx
xxxx
0123456789012

Lodging
Receipts
Lodging Receipt
Requirements:
- Your name
- Itemized dates
- Nightly rate
- Zero dollar balance
g
XXXX
Amn Steve Snuffy

How to Create
Your Travel
Voucher
- Login to DTS
- Select
create new
document
as shown in
the upper right corner
- Select voucher

How to Create
Your Travel
Voucher
- A list of available
vouchers to create
should populate
- Select the appropriate
voucher
- Contact your ODTA for
assistance if the
voucher does not
populate

Updating
Itinerary
- Before proceeding
with your voucher you
will need to update
your itinerary
- From the main page in
your voucher select
the edit itinerary tab
on the left-hand side
of the page

Updating
Itinerary
- To add more locations
click on the +to the
right of the location
- You will need all
locations to/from the
AOR, TDY location, etc.

Updating
Itinerary
- Arriving and departing
dates should overlap.
i.e. (Norfolk depart
9/18, arrive Al Udeid
9/18)
- Once your itinerary is
complete, click
Continue
at the bottom
of the page

Updating Per
Diem and
Lodging
- Go to your
Per Diem
tab
- Go to the date(s) that
you need to update and
select the three
vertical dots located
on the right
- Click edit

Updating Per
Diem and
Lodging
- Change the date range
to what you are
updating
- Choose the authorized
meal rate
- Full meal rate while
in transit or if your
orders authorize it
- Meals available at
TDY location if
government meals
are available
(Cont. on next page)

Updating Per
Diem and
Lodging
- Choose the authorized
meal rate (cont.)
- Special meal rate of
$3.50 if at a deployed
location if stated in
orders
- Uncheck
Quarters
Available
if not
staying at government
lodging
- Input the nightly rate
for your lodging under
lodging cost

Updating Per
Diem and
Lodging
- Be sure to check your
GTC statement for your
lodging amount if you
stayed OCONUS and
divide by the nights
stayed
- If lodged in CONUS do
not include taxes,
these will be claimed
separately
- If no lodging was used
input $0 into the cost

Updating Per
Diem and
Lodging
- Scroll all the way
down to the bottom of
the pop-up
- Make sure the lodging
method of
reimbursement is
GOVCC-Individual
- If this option does not
pop-up please contact
your Organizational
Defense Travel
Administrator (ODTA)
for assistance

Updating Per
Diem and
Lodging
- Once you are finished
adjusting the per diem
select
Save
Adjustments
- Repeat previous 4
slides until all lodging
and meals are
properly claimed for
the entire itinerary

Adding
Receipts
- Ensure you have all of
your receipts and
substantiating
documents ready to
attach
- Select the expenses
tab

Attaching
Lodging
Receipts
- Lodging expenses will
automatically
populate here from the
per diem page
- To attach lodging
receipts, select
Details
on the appropriate
lodging location
- You can drag and drop
files here or select the
+ sign to browse

Substantiating
Documents
- To add substantiating
documents or new
expenses select
Add
in the upper right of
the screen
- For documents that
will not have an
expense attached
(Missed meal forms,
MFR, GTC Statement,
Orders, etc.) select
Documents
at the
bottom

Substantiating
Documents
- To attach the
document you will
need to select
Attach
Document
and then
Browse
- Include a short
summary of the
document in the notes
section
- Select
Add
to finish
submitting the
document

Substantiating
Documents
- If attaching any
document with a
digital signature, i.e.
(Signed with Adobe),
you will need to keep
the document as a PDF
- If you do not retain as a
PDF the signature will
be wiped and the
document will be
invalid

Adding
Receipts and
Other Expenses
- To add expenses
select the same
Add
button as you did for
substantiating
documents
- Nearly every expense
should have a pre-
built name/category
already made for it
- Custom expense
names should rarely
ever be built

Adding
Receipts and
Other Expenses
- Claiming will be a
similar process for
nearly every expense
apart from airfare
- Select the appropriate
expense you are trying
to claim (for example,
lodging expenses not
included in the nightly
rate)
- Select the appropriate
sub-category/name

Adding
Receipts and
Other Expenses
- Input the expense date
or date range that the
expense was incurred
- Add expense amount
- Lodging taxes all on
one receipt can be
added and claimed
together
- Scroll down and
ensure the
reimbursement
method is your GTCC
- Select Add
xxxx

Airfare
Receipts and
CTO Fees
- To claim airfare select
Ticketed Expenses
- Select
Airline ticket
(IBA)
- If
(IBA)
is not
available please
reach out to your unit
ODTA,
(CBA)
will not
reimburse you

Airfare
Receipts and
CTO Fees
- Attach your Airfare
receipt
- Input the amount of your
airline ticket minus the
CTO fee (you will claim it
separately)
- Input the ticket number
- Input the ticket value
(frequently the same as
the expense amount)
- Input the date the ticket
was issued to you
- Select add

Airfare
Receipts and
CTO Fees
- To claim CTO fees, select
TMC Fee (IBA)
- No receipt should be
required
- Input CTO fee expense
amount
- Input the ticket number
- Input the cost of the
airline ticket
- Input ticket date
- Select add

Ensuring Your
Profile is
Correct
- In order to ensure that
you get paid without delay
you will want to check
your payment information
- Select
Review Profile
- Select
Open Profile
Steve Snuffy
3044 USAF Rd, Moody
AFB
xxxx

Ensuring Your
Profile is
Correct
- Select
EFT and credit
card accounts
- Check your GOVCC
expiration date (if date
is expired it needs to
be updated)
- Check your bank
account and routing
numbers
- If you have updated
your DTS profile select
Refresh Account Data
- Save your info

Completing
Your Pre-
Audits
- Pre-Audits are used to
catch any possible areas
of concern
- Select appropriate
codes for your situation
- Enter brief justification
- Pay special attention to
anything you believe
Approvers might return
your voucher for
i.e. (Expense not
normally authorized,
etc.)

Submitting Your
Voucher
- Check the
I Agree
box
- Choose the
appropriate routing
list
- CED order TDYs go to
Deployed
- Unit funded TDYs will
go to your units
routing list
- Select
Submit
Completed Document
and then
Confirm and
continue

Submitting Your
Voucher
- Please ensure that you
check up periodically
on your voucher for
any return for
corrections
- You can view the
needed corrections on
the
Sign and Submit
tab
- Once corrections have
been made, please
resubmit

Conclusion
If at any point you are having trouble with your
voucher, please reach out to your unit ODTA
Submit any further questions or concerns to the
Comptroller Services Portal (CSP)
You can access the CSP by going to:
https://usaf.dps.mil/teams/SAFFMCSP/portal/SitePages/Home.aspx
