
Administration Guide
AWS Directory Service
Version 1.0
Copyright © 2024 Amazon Web Services, Inc. and/or its affiliates. All rights reserved.

AWS Directory Service Administration Guide
AWS Directory Service: Administration Guide
Copyright © 2024 Amazon Web Services, Inc. and/or its affiliates. All rights reserved.
Amazon's trademarks and trade dress may not be used in connection with any product or service
that is not Amazon's, in any manner that is likely to cause confusion among customers, or in any
manner that disparages or discredits Amazon. All other trademarks not owned by Amazon are
the property of their respective owners, who may or may not be affiliated with, connected to, or
sponsored by Amazon.

AWS Directory Service Administration Guide
Table of Contents
What is AWS Directory Service? ..................................................................................................... 1
AWS Directory Service options .................................................................................................................. 1
Which to choose ........................................................................................................................................... 5
Working with Amazon EC2 ......................................................................................................................... 6
AWS Managed Microsoft AD ........................................................................................................... 7
Getting started .............................................................................................................................................. 9
AWS Managed Microsoft AD prerequisites ...................................................................................... 10
AWS IAM Identity Center prerequisites ............................................................................................ 10
Multi-factor authentication prerequisites ........................................................................................ 11
Creating your AWS Managed Microsoft AD ..................................................................................... 12
What gets created with your AWS Managed Microsoft AD .......................................................... 14
Administrator account permissions ................................................................................................... 24
Key concepts and best practices ............................................................................................................. 26
Key concepts .......................................................................................................................................... 27
Best practices ......................................................................................................................................... 31
Use cases ...................................................................................................................................................... 40
Use Case 1: Sign in to AWS applications and services with Active Directory credentials ........ 42
Use Case 2: Manage Amazon EC2 instances ................................................................................... 46
Use Case 3: Provide directory services to your Active Directory-aware workloads .................. 47
Use Case 4: AWS IAM Identity Center to Office 365 and other cloud applications .................. 47
Use Case 5: Extend your on-premises Active Directory to the AWS Cloud ................................ 47
Use Case 6: Share your directory to seamlessly join Amazon EC2 instances to a domain
across AWS accounts ............................................................................................................................ 48
Maintain your directory ............................................................................................................................ 48
Viewing directory information ........................................................................................................... 49
Restoring your directory with snapshots ......................................................................................... 50
Deploying additional domain controllers ........................................................................................ 53
Upgrading your AWS Managed Microsoft AD ................................................................................. 56
Adding alternate UPN suffixes ........................................................................................................... 58
Renaming your directory's site name ............................................................................................... 59
Deleting your AWS Managed Microsoft AD ..................................................................................... 59
Secure your directory ................................................................................................................................ 61
Understanding password policies ...................................................................................................... 62
Enabling multi-factor authentication ............................................................................................... 67
Version 1.0 iii

AWS Directory Service Administration Guide
Enable Secure LDAP or LDAPS ........................................................................................................... 71
Manage compliance for your directory ............................................................................................ 84
Enhancing network security ............................................................................................................... 86
Editing directory security settings .................................................................................................... 98
Setting up AWS Private CA Connector for AD ............................................................................. 111
Monitor your directory ........................................................................................................................... 113
Understanding your directory status ............................................................................................. 113
Enabling directory status notifications with Amazon SNS ........................................................ 115
Understanding your directory logs ................................................................................................. 118
Enabling Amazon CloudWatch log forwarding ............................................................................ 120
Using CloudWatch to monitor your directory .............................................................................. 124
Disabling Amazon CloudWatch log forwarding ........................................................................... 127
Monitoring DNS Server with Microsoft Event Viewer ................................................................. 128
Access to AWS applications and services ............................................................................................ 129
Application compatibility .................................................................................................................. 129
Enabling access to AWS applications and services ...................................................................... 132
Enabling access to the AWS Management Console .................................................................... 135
Creating an access URL ..................................................................................................................... 138
Enabling single sign-on ..................................................................................................................... 139
Granting access to AWS resources ....................................................................................................... 147
Creating a new role ........................................................................................................................... 147
Editing the trust relationship for an existing role ....................................................................... 148
Assigning users or groups to an existing role .............................................................................. 149
Viewing users and groups assigned to a role ............................................................................... 151
Removing a user or group from a role .......................................................................................... 151
Using AWS managed policies ........................................................................................................... 152
Configure Multi-Region replication ...................................................................................................... 153
How it works ....................................................................................................................................... 154
Benefits ................................................................................................................................................. 156
Global vs Regional features ............................................................................................................. 157
Primary vs additional Regions ......................................................................................................... 158
Adding a replicated Region .............................................................................................................. 159
Deleting a replicated Region ............................................................................................................ 161
Share your directory ............................................................................................................................... 162
Key concepts ........................................................................................................................................ 162
Considerations ..................................................................................................................................... 164
Version 1.0 iv

AWS Directory Service Administration Guide
Tutorial: Share your AWS Managed Microsoft AD directory ...................................................... 165
Unsharing your directory .................................................................................................................. 176
Migrating Active Directory users to AWS Managed Microsoft AD ................................................. 176
Connect your existing Active Directory infrastructure ..................................................................... 177
Creating a trust relationship ............................................................................................................ 177
Adding IP routes ................................................................................................................................. 183
Tutorial: Create a trust relationship between your AWS Managed Microsoft AD and your
self-managed Active Directory domain ......................................................................................... 184
Tutorial: Create a trust relationship between AWS Managed Microsoft AD domains ........... 195
Extend your directory schema .............................................................................................................. 202
When to extend your AWS Managed Microsoft AD schema ...................................................... 202
Tutorial: Extending your AWS Managed Microsoft AD schema ................................................. 202
Ways to join an instance to your directory ........................................................................................ 210
Launching a directory administration instance ............................................................................ 210
Joining a Windows instance ............................................................................................................. 213
Joining a Linux instance .................................................................................................................... 219
Joining a Mac instance ...................................................................................................................... 269
Delegating directory join privileges ................................................................................................ 271
Creating or changing a DHCP options set .................................................................................... 273
User and group management ............................................................................................................... 275
AWS Management Console .............................................................................................................. 276
AWS CLI ................................................................................................................................................ 276
On-premises or Amazon EC2 instance ........................................................................................... 277
Manage users and group with the console or CLI ....................................................................... 277
Manage users and groups with an Amazon EC2 instance .......................................................... 309
Directory Service Data ............................................................................................................................ 321
Replication and consistency ............................................................................................................. 322
AWS Directory Service Data attributes .......................................................................................... 322
Group type and group scope ........................................................................................................... 327
Connecting to Microsoft Entra Connect Sync .................................................................................... 329
Prerequisites ........................................................................................................................................ 329
Create an Active Directory domain user ........................................................................................ 330
Download Entra Connect Sync ........................................................................................................ 330
Run Windows PowerShell Script ..................................................................................................... 330
Install Entra Connect Sync ............................................................................................................... 332
AWS Managed Microsoft AD test lab tutorials .................................................................................. 335
Version 1.0 v

AWS Directory Service Administration Guide
Tutorial: Set up your base AWS Managed Microsoft AD test lab .............................................. 336
Tutorial: Create a trust from AWS Managed Microsoft AD to a self-managed AD install on
EC2 ......................................................................................................................................................... 354
Quotas ........................................................................................................................................................ 365
Troubleshooting ....................................................................................................................................... 367
Problems with your AWS Managed Microsoft AD ....................................................................... 367
Problems with Netlogon and secure channel communications ................................................ 367
You receive a 'Response Status: 400 Bad Request' error when attempting to reset a user's
password ............................................................................................................................................... 368
Password recovery .............................................................................................................................. 368
Additional resources ........................................................................................................................... 368
Amazon EC2 Linux instance domain join errors ........................................................................... 369
Low available storage space ............................................................................................................ 371
Schema extension errors ................................................................................................................... 375
Trust creation status reasons ........................................................................................................... 377
AD Connector ............................................................................................................................... 382
Getting started ......................................................................................................................................... 383
AD Connector prerequisites .............................................................................................................. 383
Create an AD Connector ................................................................................................................... 399
What gets created with your AD Connector ................................................................................. 401
Best practices ............................................................................................................................................ 402
Setting up: Prerequisites ................................................................................................................... 402
Programming your applications ...................................................................................................... 404
Using your directory .......................................................................................................................... 405
Maintain your directory .......................................................................................................................... 405
Viewing directory information ......................................................................................................... 405
Updating the DNS address for your AD Connector ..................................................................... 406
Deleting your AD Connector ............................................................................................................ 406
Secure your directory .............................................................................................................................. 408
Enabling multi-factor authentication ............................................................................................. 409
Enabling client-side LDAPS .............................................................................................................. 411
Enabling mTLS authentication ........................................................................................................ 417
Updating your AD Connector service account credentials ......................................................... 426
Setting up AWS Private CA Connector for AD ............................................................................. 426
Monitor your directory ........................................................................................................................... 430
Understanding your directory status ............................................................................................. 430
Version 1.0 vi

AWS Directory Service Administration Guide
Enabling directory status notifications with Amazon SNS ........................................................ 432
Access to AWS applications and services ............................................................................................ 434
Application compatibility .................................................................................................................. 435
Enabling access to AWS applications and services from AD Connector .................................. 436
Ways to join an Amazon EC2 instance to your Active Directory .................................................... 437
Quotas ........................................................................................................................................................ 438
Troubleshooting ....................................................................................................................................... 438
Creation issues .................................................................................................................................... 439
Connectivity issues ............................................................................................................................. 440
Authentication issues ......................................................................................................................... 441
Maintenance issues ............................................................................................................................. 446
I cannot delete my AD Connector .................................................................................................. 446
Simple AD .................................................................................................................................... 448
Getting started ......................................................................................................................................... 449
Simple AD prerequisites .................................................................................................................... 450
Create your Simple AD ...................................................................................................................... 452
What gets created with your Simple AD Active Directory ......................................................... 455
Best practices ............................................................................................................................................ 456
Setting up: Prerequisites ................................................................................................................... 456
Setting up: Creating your directory ................................................................................................ 458
Programming your applications ...................................................................................................... 459
Maintain your directory .......................................................................................................................... 460
Viewing directory information ......................................................................................................... 460
Configuring DNS servers ................................................................................................................... 460
Restoring your directory with snapshot ........................................................................................ 461
Deleting your Simple AD .................................................................................................................. 463
Secure your directory .............................................................................................................................. 465
Reset krbtgt account password ....................................................................................................... 465
Monitor your directory ........................................................................................................................... 470
Understanding your directory status ............................................................................................. 471
Enabling directory status notifications with Amazon Simple Notification Service ................ 472
Access to AWS applications and services ............................................................................................ 475
Application compatibility .................................................................................................................. 475
Enabling access to AWS applications and services ...................................................................... 476
Enabling access to the AWS Management Console .................................................................... 477
Creating an access URL ..................................................................................................................... 479
Version 1.0 vii

AWS Directory Service Administration Guide
Enabling single sign-on ..................................................................................................................... 480
Ways to join an instance to your directory ........................................................................................ 488
Joining a Windows instance ............................................................................................................. 489
Join Linux instance ............................................................................................................................. 494
Delegating directory join privileges ................................................................................................ 519
Creating a DHCP options set ........................................................................................................... 521
Users and groups management ............................................................................................................ 523
Installing AD Administration Tools ................................................................................................. 524
Creating a user .................................................................................................................................... 526
Deleting a user .................................................................................................................................... 529
Resetting a user password ................................................................................................................ 530
Creating a group ................................................................................................................................. 532
Adding a user to a group ................................................................................................................. 534
Quotas ........................................................................................................................................................ 535
Troubleshooting ....................................................................................................................................... 535
Password recovery .............................................................................................................................. 536
I receive a 'KDC can't fulfill requested option' error when adding a user to Simple AD ........ 536
I am not able to update the DNS name or IP address of an instance joined to my domain
(DNS dynamic update) ...................................................................................................................... 536
I can't log onto SQL Server using a SQL Server account ........................................................... 537
My Simple AD is stuck in the 'Requested' state ........................................................................... 537
I receive an 'AZ constrained' error when I create a Simple AD .................................................. 537
Some of my users can't authenticate with my Simple AD ......................................................... 537
Additional resources ........................................................................................................................... 368
Troubleshooting directory status messages ................................................................................. 538
Security ........................................................................................................................................ 542
Identity and access management ......................................................................................................... 543
Authentication ..................................................................................................................................... 544
Access control ...................................................................................................................................... 544
Overview of managing access ......................................................................................................... 544
AWS managed policies for AWS Directory Service ...................................................................... 548
Using identity-based policies (IAM policies) ................................................................................. 551
AWS Directory Service API permissions reference ....................................................................... 558
Directory Service Data condition keys ........................................................................................... 561
Authorization for AWS applications and services using AWS Directory Service .......................... 567
Authorizing an AWS application on an Active Directory ........................................................... 567
Version 1.0 viii

AWS Directory Service Administration Guide
AWS application authorization with Directory Service Data ..................................................... 568
Logging and monitoring ........................................................................................................................ 569
AWS Directory Service logs .............................................................................................................. 570
AWS Directory Service Data logs .................................................................................................... 573
Compliance validation ............................................................................................................................ 582
Resilience ................................................................................................................................................... 583
Infrastructure security ............................................................................................................................. 584
Cross-service confused deputy prevention ......................................................................................... 584
AWS PrivateLink ....................................................................................................................................... 588
Considerations ..................................................................................................................................... 588
Availability ............................................................................................................................................ 588
Create an interface Amazon VPC endpoint .................................................................................. 589
Create an endpoint policy ................................................................................................................ 589
Service level agreement .............................................................................................................. 592
Region availability ....................................................................................................................... 593
Supported AWS Regions for Directory Service Data ........................................................................ 597
Browser compatibility ................................................................................................................. 601
What is TLS? ............................................................................................................................................. 601
Which TLS versions are supported by IAM Identity Center ............................................................. 601
How do I enable supported TLS versions in my browser ................................................................ 602
Document history ........................................................................................................................ 603
Version 1.0 ix

AWS Directory Service Administration Guide
What is AWS Directory Service?
AWS Directory Service provides multiple ways to use Microsoft Active Directory (AD) with other
AWS services. Directories store information about users, groups, and devices, and administrators
use them to manage access to information and resources. AWS Directory Service provides multiple
directory choices for customers who want to use existing Microsoft AD or Lightweight Directory
Access Protocol (LDAP)–aware applications in the cloud. It also offers those same choices to
developers who need a directory to manage users, groups, devices, and access.
AWS Directory Service options
AWS Directory Service includes several directory types to choose from. For more information,
select one of the following tabs:
AWS Directory Service for Microsoft Active Directory
Also known as AWS Managed Microsoft AD, AWS Directory Service for Microsoft Active
Directory is powered by an actual Microsoft Windows Server Active Directory (AD), managed
by AWS in the AWS Cloud. It enables you to migrate a broad range of Active Directory–aware
applications to the AWS Cloud. AWS Managed Microsoft AD works with Microsoft SharePoint,
Microsoft SQL Server Always On Availability Groups, and many .NET applications. It also
supports AWS managed applications and services including Amazon WorkSpaces, Amazon
WorkDocs, Amazon QuickSight, Amazon Chime, Amazon Connect, and Amazon Relational
Database Service for Microsoft SQL Server (Amazon RDS for SQL Server, Amazon RDS for
Oracle, and Amazon RDS for PostgreSQL).
AWS Managed Microsoft AD is approved for applications in the AWS Cloud that are subject to
U.S. Health Insurance Portability and Accountability Act (HIPAA) or Payment Card Industry Data
Security Standard (PCI DSS) compliance when you enable compliance for your directory.
All compatible applications work with user credentials that you store in AWS Managed Microsoft
AD, or you can connect to your existing AD infrastructure with a trust and use credentials from
an Active Directory running on-premises or on EC2 Windows. If you join EC2 instances to your
AWS Managed Microsoft AD, your users can access Windows workloads in the AWS Cloud with
the same Windows single sign-on (SSO) experience as when they access workloads in your on-
premises network.
AWS Directory Service options Version 1.0 1

AWS Directory Service Administration Guide
AWS Managed Microsoft AD also supports federated use cases using Active Directory
credentials. Alone, AWS Managed Microsoft AD enables you to sign in to the AWS Management
Console. With AWS IAM Identity Center, you can also obtain short-term credentials for use
with the AWS SDK and CLI, and use preconfigured SAML integrations to sign in to many cloud
applications. By adding Microsoft Entra Connect (formerly known as Azure Active Directory
Connect), and optionally Active Directory Federation Service (AD FS), you can sign in to
Microsoft Office 365 and other cloud applications with credentials stored in AWS Managed
Microsoft AD.
The service includes key features that enable you to extend your schema, manage password
policies, and enable secure LDAP communications through Secure Socket Layer (SSL)/Transport
Layer Security (TLS). You can also enable multi-factor authentication (MFA) for AWS Managed
Microsoft AD to provide an additional layer of security when users access AWS applications
from the Internet. Because Active Directory is an LDAP directory, you can also use AWS
Managed Microsoft AD for Linux Secure Shell (SSH) authentication and for other LDAP-enabled
applications.
AWS provides monitoring, daily snapshots, and recovery as part of the service—you add users
and groups to AWS Managed Microsoft AD, and administer Group Policy using familiar Active
Directory tools running on a Windows computer joined to the AWS Managed Microsoft AD
domain. You can also scale the directory by deploying additional domain controllers and help
improve application performance by distributing requests across a larger number of domain
controllers.
AWS Managed Microsoft AD is available in two editions: Standard and Enterprise.
• Standard Edition: AWS Managed Microsoft AD (Standard Edition) is optimized to be a
primary directory for small and midsize businesses with up to 5,000 employees. It provides
you enough storage capacity to support up to 30,000* directory objects, such as users,
groups, and computers.
• Enterprise Edition: AWS Managed Microsoft AD (Enterprise Edition) is designed to support
enterprise organizations with up to 500,000* directory objects.
* Upper limits are approximations. Your directory may support more or less directory objects
depending on the size of your objects and the behavior and performance needs of your
applications.
When to use
AWS Directory Service options Version 1.0 2

AWS Directory Service Administration Guide
AWS Managed Microsoft AD is your best choice if you need actual Active Directory features
to support AWS applications or Windows workloads, including Amazon Relational Database
Service for Microsoft SQL Server. It's also best if you want a standalone Active Directory in
the AWS Cloud that supports Office 365 or you need an LDAP directory to support your Linux
applications. For more information, see AWS Managed Microsoft AD.
AD Connector
AD Connector is a proxy service that provides an easy way to connect compatible AWS
applications, such as Amazon WorkSpaces, Amazon QuickSight, and Amazon EC2 for Windows
Server instances, to your existing on-premises Microsoft Active Directory. With AD Connector ,
you can simply add one service account to your Active Directory. AD Connector also eliminates
the need of directory synchronization or the cost and complexity of hosting a federation
infrastructure.
When you add users to AWS applications such as Amazon QuickSight, AD Connector reads
your existing Active Directory to create lists of users and groups to select from. When
users log in to the AWS applications, AD Connector forwards sign-in requests to your on-
premises Active Directory domain controllers for authentication. AD Connector works with
many AWS applications and services including Amazon WorkSpaces, Amazon WorkDocs,
Amazon QuickSight, Amazon Chime, Amazon Connect, and Amazon WorkMail. You can also
join your EC2 Windows instances to your on-premises Active Directory domain through AD
Connector using seamless domain join. AD Connector also allows your users to access the
AWS Management Console and manage AWS resources by logging in with their existing Active
Directory credentials. AD Connector is not compatible with RDS SQL Server.
You can also use AD Connector to enable multi-factor authentication (MFA) for your AWS
application users by connecting it to your existing RADIUS-based MFA infrastructure. This
provides an additional layer of security when users access AWS applications.
With AD Connector, you continue to manage your Active Directory as you do now. For
example, you add new users and groups and update passwords using standard Active Directory
administration tools in your on-premises Active Directory . This helps you consistently enforce
your security policies, such as password expiration, password history, and account lockouts,
whether users are accessing resources on premises or in the AWS Cloud.
When to use
AWS Directory Service options Version 1.0 3

AWS Directory Service Administration Guide
AD Connector is your best choice when you want to use your existing on-premises directory
with compatible AWS services. For more information, see AD Connector.
Simple AD
Simple AD is a Microsoft Active Directory–compatible directory from AWS Directory Service
that is powered by Samba 4. Simple AD supports basic Active Directory features such as
user accounts, group memberships, joining a Linux domain or Windows based EC2 instances,
Kerberos-based SSO, and group policies. AWS provides monitoring, daily snap-shots, and
recovery as part of the service.
Simple AD is a standalone directory in the cloud, where you create and manage user identities
and manage access to applications. You can use many familiar Active Directory–aware
applications and tools that require basic Active Directory features. Simple AD is compatible with
the following AWS applications: Amazon WorkSpaces, Amazon WorkDocs, Amazon QuickSight,
and Amazon WorkMail. You can also sign in to the AWS Management Console with Simple AD
user accounts and to manage AWS resources.
Simple AD does not support multi-factor authentication (MFA), trust relationships, DNS
dynamic update, schema extensions, communication over LDAPS, PowerShell AD cmdlets, or
FSMO role transfer. Simple AD is not compatible with RDS SQL Server. Customers who require
the features of an actual Microsoft Active Directory, or who envision using their directory with
RDS SQL Server should use AWS Managed Microsoft AD instead. Please verify your required
applications are fully compatible with Samba 4 before using Simple AD. For more information,
see https://www.samba.org.
When to use
You can use Simple AD as a standalone directory in the cloud to support Windows workloads
that need basic Active Directory features, compatible AWS applications, or to support Linux
workloads that need LDAP service. For more information, see Simple AD.
Amazon Cognito
Amazon Cognito is a user directory that adds sign-up and sign-in to your mobile app or web
application using Amazon Cognito User Pools.
When to use
AWS Directory Service options Version 1.0 4

AWS Directory Service Administration Guide
You can also use Amazon Cognito when you need to create custom registration fields and store
that metadata in your user directory. This fully managed service scales to support hundreds of
millions of users. For more information, see Amazon Cognito user pools in the Amazon Cognito
Developer Guide.
See Region availability for AWS Directory Service for a list of supported directory types per Region.
Which to choose
You can choose directory services with the features and scalability that best meets your needs. Use
the following table to help you determine which AWS Directory Service directory option works best
for your organization.
What do you need to do? Recommended AWS Directory Service options
I need Active Directory or LDAP for
my applications in the cloud
Use AWS Directory Service for Microsoft Active
Directory (Standard Edition or Enterprise Edition) if you
need an actual Microsoft Active Directory in the AWS
Cloud that supports Active Directory–aware workloads
, or AWS applications and services such as Amazon
WorkSpaces and Amazon QuickSight, or you need LDAP
support for Linux applications.
Use AD Connector if you only need to allow your on-
premises users to log in to AWS applications and services
with their Active Directory credentials. You can also use
AD Connector to join Amazon EC2 instances to your
existing Active Directory domain.
Use Simple AD if you need a low-scale, low-cost
directory with basic Active Directory compatibility that
supports Samba 4–compatible applications, or you need
LDAP compatibility for LDAP-aware applications.
I develop SaaS applications Use Amazon Cognito if you develop high-scale SaaS
applications and need a scalable directory to manage and
Which to choose Version 1.0 5

AWS Directory Service Administration Guide
What do you need to do? Recommended AWS Directory Service options
authenticate your subscribers and that works with social
media identities.
For more information about AWS Directory Service directory options, see How to choose Active
Directory solutions on AWS.
Working with Amazon EC2
A basic understanding of Amazon EC2 is essential to using AWS Directory Service. We recommend
that you begin by reading the following topics:
• What is Amazon EC2? in the Amazon EC2 User Guide.
• Launching EC2 instances in the Amazon EC2 User Guide.
• Security groups in the Amazon EC2 User Guide.
• What is Amazon VPC? in the Amazon VPC User Guide.
• Adding a Hardware Virtual Private Gateway to Your VPC in the Amazon VPC User Guide.
Working with Amazon EC2 Version 1.0 6

AWS Directory Service Administration Guide
AWS Managed Microsoft AD
AWS Directory Service lets you run Microsoft Active Directory (AD) as a managed service. AWS
Directory Service for Microsoft Active Directory, also referred to as AWS Managed Microsoft AD,
is powered by Windows Server 2019. When you select and launch this directory type, it is created
as a highly available pair of domain controllers connected to your virtual private cloud (Amazon
VPC). The domain controllers run in different Availability Zones in a Region of your choice. Host
monitoring and recovery, data replication, snapshots, and software updates are automatically
configured and managed for you.
With AWS Managed Microsoft AD, you can run directory-aware workloads in the AWS Cloud,
including Microsoft SharePoint and custom .NET and SQL Server-based applications. You can
also configure a trust relationship between AWS Managed Microsoft AD in the AWS Cloud and
your existing on-premises Microsoft Active Directory, providing users and groups with access to
resources in either domain, using AWS IAM Identity Center.
AWS Directory Service makes it easy to set up and run directories in the AWS Cloud, or connect
your AWS resources with an existing on-premises Microsoft Active Directory. Once your directory is
created, you can use it for a variety of tasks:
• Manage users and groups
• Provide single sign-on to applications and services
• Create and apply group policy
• Simplify the deployment and management of cloud-based Linux and Microsoft Windows
workloads
• You can use AWS Managed Microsoft AD to enable multi-factor authentication by integrating
with your existing RADIUS-based MFA infrastructure to provide an additional layer of security
when users access AWS applications
• Securely connect to Amazon EC2 Linux and Windows instances
Note
AWS manages the licensing of your Windows Server instances for you; all you need to
do is pay for the instances you use. There is also no need to buy additional Windows
Server Client Access Licenses (CALs), as access is included in the price. Each instance comes
Version 1.0 7

AWS Directory Service Administration Guide
with two remote connections for admin purposes only. If you require more than two
connections, or need those connections for purposes other than admin, you may have to
bring in additional Remote Desktop Services CALs for use on AWS.
Read the topics in this section to get started creating a AWS Managed Microsoft AD directory,
creating a trust relationship between AWS Managed Microsoft AD and your on-premises
directories, and extending your AWS Managed Microsoft AD schema.
Topics
• Getting started with AWS Managed Microsoft AD
• Key concepts and best practices for AWS Managed Microsoft AD
• Use cases for AWS Managed Microsoft AD
• Maintain your AWS Managed Microsoft AD
• Secure your AWS Managed Microsoft AD
• Monitor your AWS Managed Microsoft AD
• Access to AWS applications and services from your AWS Managed Microsoft AD
• Granting AWS Managed Microsoft AD users and groups access to AWS resources with IAM roles
• Configure Multi-Region replication for AWS Managed Microsoft AD
• Share your AWS Managed Microsoft AD
• Migrating Active Directory users to AWS Managed Microsoft AD
• Connect AWS Managed Microsoft AD to your existing Active Directory infrastructure
• Extend your AWS Managed Microsoft AD schema
• Ways to join an Amazon EC2 instance to your AWS Managed Microsoft AD
• User and group management in AWS Managed Microsoft AD
• AWS Directory Service Data
• Connecting your AWS Managed Microsoft AD to Microsoft Entra Connect Sync
• AWS Managed Microsoft AD test lab tutorials
• AWS Managed Microsoft AD quotas
• Troubleshooting AWS Managed Microsoft AD
Related AWS Security blog articles
Version 1.0 8

AWS Directory Service Administration Guide
• How to delegate administration of your AWS Managed Microsoft AD directory to your on-
premises Active Directory users
• How to configure even stronger password policies to help meet your security standards by using
AWS Directory Service for AWS Managed Microsoft AD
• How to increase the redundancy and performance of your AWS Directory Service for AWS
Managed Microsoft AD by adding Domain controllers
• How to enable the use of remote desktops by deploying Microsoft remote desktop licensing
manager on AWS Managed Microsoft AD
• How to access the AWS Management Console using AWS Managed Microsoft AD and your on-
premises credentials
• How to enable multi-factor authentication for AWS services by using AWS Managed Microsoft AD
and on-premises credentials
• How to easily log on to AWS services by using your on-premises Active Directory
Getting started with AWS Managed Microsoft AD
AWS Managed Microsoft AD creates a fully managed, Microsoft Active Directory in the AWS
Cloud and is powered by Windows Server 2019 and operates at the 2012 R2 Forest and Domain
functional levels. When you create a directory with AWS Managed Microsoft AD, AWS Directory
Service creates two domain controllers and adds the DNS service on your behalf. The domain
controllers are created in different subnets in an Amazon VPC this redundancy helps ensure that
your directory remains accessible even if a failure occurs. If you need more domain controllers, you
can add them later. For more information, see Deploying additional domain controllers for your
AWS Managed Microsoft AD.
Topics
• Prerequisites for creating a AWS Managed Microsoft AD
• AWS IAM Identity Center prerequisites
• Multi-factor authentication prerequisites
• Creating your AWS Managed Microsoft AD
• What gets created with your AWS Managed Microsoft AD
• AWS Managed Microsoft AD Administrator account permissions
Getting started Version 1.0 9

AWS Directory Service Administration Guide
Prerequisites for creating a AWS Managed Microsoft AD
To create a AWS Managed Microsoft AD Active Directory, you need an Amazon VPC with the
following:
• At least two subnets. Each of the subnets must be in a different Availability Zone.
• The VPC must have default hardware tenancy.
• You cannot create a AWS Managed Microsoft AD in a VPC using addresses in the 198.18.0.0/15
address space.
If you need to integrate your AWS Managed Microsoft AD domain with an existing on-premises
Active Directory domain, you must have the Forest and Domain functional levels for your on-
premises domain set to Windows Server 2003 or higher.
AWS Directory Service uses a two VPC structure. The EC2 instances which make up your directory
run outside of your AWS account, and are managed by AWS. They have two network adapters,
ETH0 and ETH1. ETH0 is the management adapter, and exists outside of your account. ETH1 is
created within your account.
The management IP range of your directory's ETH0 network is 198.18.0.0/15.
For a tutorial on how to create the AWS environment and AWS Managed Microsoft AD, see AWS
Managed Microsoft AD test lab tutorials.
AWS IAM Identity Center prerequisites
If you plan to use IAM Identity Center with AWS Managed Microsoft AD, you need to ensure that
the following are true:
• Your AWS Managed Microsoft AD directory is set up in your AWS organization’s management
account.
• Your instance of IAM Identity Center is in the same Region where your AWS Managed Microsoft
AD directory is set up.
For more information, see IAM Identity Center prerequisites in the AWS IAM Identity Center User
Guide.
AWS Managed Microsoft AD prerequisites Version 1.0 10

AWS Directory Service Administration Guide
Multi-factor authentication prerequisites
To support multi-factor authentication with your AWS Managed Microsoft AD directory, you must
configure either your on-premises or cloud-based Remote Authentication Dial-In User Service
(RADIUS) server in the following way so that it can accept requests from your AWS Managed
Microsoft AD directory in AWS.
1. On your RADIUS server, create two RADIUS clients to represent both of the AWS Managed
Microsoft AD domain controllers (DCs) in AWS. You must configure both clients using the
following common parameters (your RADIUS server may vary):
• Address (DNS or IP): This is the DNS address for one of the AWS Managed Microsoft AD DCs.
Both DNS addresses can be found in the AWS Directory Service Console on the Details page
of the AWS Managed Microsoft AD directory in which you plan to use MFA. The DNS addresses
displayed represent the IP addresses for both of the AWS Managed Microsoft AD DCs that are
used by AWS.
Note
If your RADIUS server supports DNS addresses, you must create only one RADIUS
client configuration. Otherwise, you must create one RADIUS client configuration for
each AWS Managed Microsoft AD DC.
• Port number: Configure the port number for which your RADIUS server accepts RADIUS client
connections. The standard RADIUS port is 1812.
• Shared secret: Type or generate a shared secret that the RADIUS server will use to connect
with RADIUS clients.
• Protocol: You might need to configure the authentication protocol between the AWS
Managed Microsoft AD DCs and the RADIUS server. Supported protocols are PAP, CHAP MS-
CHAPv1, and MS-CHAPv2. MS-CHAPv2 is recommended because it provides the strongest
security of the three options.
• Application name: This may be optional in some RADIUS servers and usually identifies the
application in messages or reports.
2. Configure your existing network to allow inbound traffic from the RADIUS clients (AWS Managed
Microsoft AD DCs DNS addresses, see Step 1) to your RADIUS server port.
Multi-factor authentication prerequisites Version 1.0 11

AWS Directory Service Administration Guide
3. Add a rule to the Amazon EC2 security group in your AWS Managed Microsoft AD domain that
allows inbound traffic from the RADIUS server DNS address and port number defined previously.
For more information, see Adding rules to a security group in the EC2 User Guide.
For more information about using AWS Managed Microsoft AD with MFA, see Enabling multi-factor
authentication for AWS Managed Microsoft AD.
Creating your AWS Managed Microsoft AD
To create a new AWS Managed Microsoft AD Active Directory, perform the following steps.
Before starting this procedure, make sure that you have completed the prerequisites identified in
Prerequisites for creating a AWS Managed Microsoft AD.
To create an AWS Managed Microsoft AD
1. In the AWS Directory Service console navigation pane, choose Directories and then choose Set
up directory.
2. On the Select directory type page, choose AWS Managed Microsoft AD, and then choose
Next.
3. On the Enter directory information page, provide the following information:
Edition
Choose from either the Standard Edition or Enterprise Edition of AWS Managed Microsoft
AD. For more information about editions, see AWS Directory Service for Microsoft Active
Directory.
Directory DNS name
The fully qualified name for the directory, such as corp.example.com.
Note
If you plan on using Amazon Route53 for DNS, the domain name of your AWS
Managed Microsoft AD must be different than your Route53 domain name. DNS
resolution issues can occur if Route53 and AWS Managed Microsoft AD share the
same domain name.
Creating your AWS Managed Microsoft AD Version 1.0 12

AWS Directory Service Administration Guide
Directory NetBIOS name
The short name for the directory, such as CORP.
Directory description
An optional description for the directory.
Admin password
The password for the directory administrator. The directory creation process creates an
administrator account with the user name Admin and this password.
The password cannot include the word "admin."
The directory administrator password is case-sensitive and must be between 8 and 64
characters in length, inclusive. It must also contain at least one character from three of the
following four categories:
• Lowercase letters (a-z)
• Uppercase letters (A-Z)
• Numbers (0-9)
• Non-alphanumeric characters (~!@#$%^&*_-+=`|\(){}[]:;"'<>,.?/)
Confirm password
Retype the administrator password.
(Optional) User and group management
To enable AWS Managed Microsoft AD user and group management from the AWS
Management Console, select Manage user and group management in the AWS
Management Console. For more information on how to use user and group management,
see the section called “Manage users and group with the console or CLI”.
4. On the Choose VPC and subnets page, provide the following information, and then choose
Next.
VPC
The VPC for the directory.
Creating your AWS Managed Microsoft AD Version 1.0 13

AWS Directory Service Administration Guide
Subnets
Choose the subnets for the domain controllers. The two subnets must be in different
Availability Zones.
5. On the Review & create page, review the directory information and make any necessary
changes. When the information is correct, choose Create directory. Creating the directory
takes 20 to 40 minutes. Once created, the Status value changes to Active.
For more information on what is created with your AWS Managed Microsoft AD, see the following:
• What gets created with your AWS Managed Microsoft AD
• AWS Managed Microsoft AD Administrator account permissions
What gets created with your AWS Managed Microsoft AD
When you create an Active Directory with AWS Managed Microsoft AD, AWS Directory Service
performs the following tasks on your behalf:
• Automatically creates and associates an elastic network interface (ENI) with each of your
domain controllers. Each of these ENIs are essential for connectivity between your VPC and
AWS Directory Service domain controllers and should never be deleted. You can identify all
network interfaces reserved for use with AWS Directory Service by the description: "AWS created
network interface for directory directory-id". For more information, see Elastic Network Interfaces
in the Amazon EC2 User Guide. The default DNS Server of the AWS Managed Microsoft AD
Active Directory is the VPC DNS server at Classless Inter-Domain Routing (CIDR)+2. For more
information, see Amazon DNS server in Amazon VPC User Guide.
Note
Domain controllers are deployed across two Availability Zones in a region by default and
connected to your Amazon VPC (VPC). Backups are automatically taken once per day,
and the Amazon EBS (EBS) volumes are encrypted to ensure that data is secured at rest.
Domain controllers that fail are automatically replaced in the same Availability Zone
using the same IP address, and a full disaster recovery can be performed using the latest
backup.
What gets created with your AWS Managed Microsoft AD Version 1.0 14

AWS Directory Service Administration Guide
• Provisions Active Directory within your VPC using two domain controllers for fault tolerance
and high availability. More domain controllers can be provisioned for higher resiliency
and performance after the directory has been successfully created and is Active. For more
information, see Deploying additional domain controllers for your AWS Managed Microsoft AD.
Note
AWS does not allow the installation of monitoring agents on AWS Managed Microsoft AD
domain controllers.
• Creates an AWS security group that establishes network rules for traffic in and out of your
domain controllers. The default outbound rule permits all traffic ENIs or instances attached to
the created AWS Security Group. The default inbound rules allows only traffic through ports
that are required by Active Directory from your VPC CIDR for your AWS Managed Microsoft AD.
These rules do not introduce security vulnerabilities as traffic to the domain controllers is limited
to traffic from your VPC, from other peered VPCs, or from networks that you have connected
using AWS Direct Connect, AWS Transit Gateway, or Virtual Private Network. For additional
security, the ENIs that are created do not have Elastic IPs attached to them and you do not
have permission to attach an Elastic IP to those ENIs. Therefore, the only inbound traffic that
can communicate with your AWS Managed Microsoft AD is local VPC and VPC routed traffic.
Use extreme caution if you attempt to change these rules as you may break your ability to
communicate with your domain controllers. For more information, see AWS Managed Microsoft
AD best practices. The following AWS Security Group rules are created by default:
Inbound Rules
Protocol Port range Source Type of traffic Active
Directory usage
ICMP N/A AWS Managed
Microsoft AD
VPC IPv4 CIDR
Ping LDAP Keep
Alive, DFS
TCP & UDP 53 AWS Managed
Microsoft AD
VPC IPv4 CIDR
DNS User and
computer
authentication,
What gets created with your AWS Managed Microsoft AD Version 1.0 15

AWS Directory Service Administration Guide
Protocol Port range Source Type of traffic Active
Directory usage
name resolutio
n, trusts
TCP & UDP 88 AWS Managed
Microsoft AD
VPC IPv4 CIDR
Kerberos User and
computer
authentication,
forest level
trusts
TCP & UDP 389 AWS Managed
Microsoft AD
VPC IPv4 CIDR
LDAP Directory,
replication, user
and computer
authentication
group policy,
trusts
TCP & UDP 445 AWS Managed
Microsoft AD
VPC IPv4 CIDR
SMB / CIFS Replication, user
and computer
authentication,
group policy,
trusts
TCP & UDP 464 AWS Managed
Microsoft AD
VPC IPv4 CIDR
Kerberos
change / set
password
Replication, user
and computer
authentication,
trusts
TCP 135 AWS Managed
Microsoft AD
VPC IPv4 CIDR
Replication RPC, EPM
What gets created with your AWS Managed Microsoft AD Version 1.0 16

AWS Directory Service Administration Guide
Protocol Port range Source Type of traffic Active
Directory usage
TCP 636 AWS Managed
Microsoft AD
VPC IPv4 CIDR
LDAP SSL Directory,
replication, user
and computer
authentication,
group policy,
trusts
TCP 1024 - 65535 AWS Managed
Microsoft AD
VPC IPv4 CIDR
RPC Replication, user
and computer
authentication,
group policy,
trusts
TCP 3268 - 3269 AWS Managed
Microsoft AD
VPC IPv4 CIDR
LDAP GC &
LDAP GC SSL
Directory,
replication, user
and computer
authentication,
group policy,
trusts
UDP 123 AWS Managed
Microsoft AD
VPC IPv4 CIDR
Windows Time Windows Time,
trusts
UDP 138 AWS Managed
Microsoft AD
VPC IPv4 CIDR
DFSN &
NetLogon
DFS, group
policy
All All AWS Managed
Microsoft AD
VPC IPv4 CIDR
All Traffic
Outbound Rules
What gets created with your AWS Managed Microsoft AD Version 1.0 17

AWS Directory Service Administration Guide
Protocol Port range Destination Type of traffic Active
Directory usage
All All 0.0.0.0/0 All Traffic
• For more information about the ports and protocols used by Active Directory, see Service
overview and network port requirements for Windows in Microsoft documentation.
• Creates a directory administrator account with the user name Admin and the specified password.
This account is located under the Users OU (For example, Corp > Users). You use this account to
manage your directory in the AWS Cloud. For more information, see AWS Managed Microsoft AD
Administrator account permissions.
Important
Be sure to save this password. AWS Directory Service does not store this password, and it
cannot be retrieved. However, you can reset a password from the AWS Directory Service
console or by using the ResetUserPassword API.
• Creates the following three organizational units (OUs) under the domain root:
OU name Description
AWS Delegated Groups Stores all of the groups that you can use to
delegate AWS specific permissions to your
users.
AWS Reserved Stores all AWS management specific
accounts.
<yourdomainname> The name of this OU is based off of the
NetBIOS name you typed when you created
your directory. If you did not specify a
NetBIOS name, it will default to the first part
of your Directory DNS name (for example, in
the case of corp.example.com, the NetBIOS
name would be corp). This OU is owned by
AWS and contains all of your AWS-related
What gets created with your AWS Managed Microsoft AD Version 1.0 18

AWS Directory Service Administration Guide
OU name Description
directory objects, which you are granted Full
Control over. Two child OUs exist under this
OU by default; Computers and Users. For
example:
• Corp
• Computers
• Users
• Creates the following groups in the AWS Delegated Groups OU:
Group name Description
AWS Delegated Account Operators Members of this security group have limited
account management capability such as
password resets
AWS Delegated Active Directory Based
Activation Administrators
Members of this security group can create
Active Directory volume licensing activation
objects, which enables enterprises to activate
computers through a connection to their
domain.
AWS Delegated Add Workstations To Domain
Users
Members of this security group can join 10
computers to a domain.
AWS Delegated Administrators Members of this security group can manage
AWS Managed Microsoft AD, have full control
of all the objects in your OU and can manage
groups contained in the AWS Delegated
Groups OU.
AWS Delegated Allowed to Authenticate
Objects
Members of this security group are provided
the ability to authenticate to computer
resources in the AWS Reserved OU (Only
What gets created with your AWS Managed Microsoft AD Version 1.0 19

AWS Directory Service Administration Guide
Group name Description
needed for on-premises objects with
Selective Authentication enabled Trusts).
AWS Delegated Allowed to Authenticate to
Domain Controllers
Members of this security group are provided
the ability to authenticate to computer
resources in the Domain Controllers OU
(Only needed for on-premises objects with
Selective Authentication enabled Trusts).
AWS Delegated Deleted Object Lifetime
Administrators
Members of this security group can modify
the msDS-DeletedObjectLifetime object,
which defines how long a deleted object will
be available to recover from the AD Recycle
Bin.
AWS Delegated Distributed File System
Administrators
Members of this security group can add and
remove FRS, DFS-R, and DFS name spaces.
AWS Delegated Domain Name System
Administrators
Members of this security group can manage
Active Directory integrated DNS.
AWS Delegated Dynamic Host Configuration
Protocol Administrators
Members of this security group can authorize
Windows DHCP servers in the enterprise.
AWS Delegated Enterprise Certificate
Authority Administrators
Members of this security group can deploy
and manage Microsoft Enterprise Certificate
Authority infrastructure.
AWS Delegated Fine Grained Password Policy
Administrators
Members of this security group can modify
precreated fine-grained password policies.
AWS Delegated FSx Administrators Members of this security group are provided
the ability to manage Amazon FSx resources.
AWS Delegated Group Policy Administrators Members of this security group can perform
group policy management tasks (create, edit,
delete, link).
What gets created with your AWS Managed Microsoft AD Version 1.0 20

AWS Directory Service Administration Guide
Group name Description
AWS Delegated Kerberos Delegation
Administrators
Members of this security group can enable
delegation on computer and user account
objects.
AWS Delegated Managed Service Account
Administrators
Members of this security group can create
and delete Managed Service Accounts.
AWS Delegated MS-NPRC Non-Compliant
Devices
Members of this security group will be
provided an exclusion from requiring secure
channel communications with domain
controllers. This group is for computer
accounts.
AWS Delegated Remote Access Service
Administrators
Members of this security group can add and
remove RAS servers from the RAS and IAS
Servers group.
AWS Delegated Replicate Directory Changes
Administrators
Members of this security group can synchroni
ze profile information in Active Directory
with SharePoint Server.
AWS Delegated Server Administrators Members of this security group are included
in the local administrators group on all
domain joined computers.
AWS Delegated Sites and Services Administr
ators
Members of this security group can rename
the Default-First-Site-Name object in Active
Directory Sites and Services.
AWS Delegated System Management
Administrators
Members of this security group can
create and manage objects in the System
Management container.
AWS Delegated Terminal Server Licensing
Administrators
Members of this security group can add and
remove Terminal Server License Servers from
the Terminal Server License Servers group.
What gets created with your AWS Managed Microsoft AD Version 1.0 21

AWS Directory Service Administration Guide
Group name Description
AWS Delegated User Principal Name Suffix
Administrators
Members of this security group can add and
remove user principal name suffixes.
• Creates and applies the following Group Policy Objects (GPOs):
Note
You do not have permissions to delete, modify, or unlink these GPOs. This is by design as
they are reserved for AWS use. You may link them to OUs that you control if needed.
Group policy name Applies to Description
Default Domain Policy Domain Includes domain password
and Kerberos policies.
ServerAdmins All non domain controller
computer accounts
Adds the 'AWS Delegated
Server Administrators' as a
member of the BUILTIN\A
dministrators Group.
AWS Reserved Policy:User AWS Reserved user accounts Sets recommended security
settings on all user accounts
in the AWS Reserved OU.
AWS Managed Active
Directory Policy
All domain controllers Sets recommended security
settings on all domain
controllers.
TimePolicyNT5DS All non PDCe domain
controllers
Sets all non PDCe domain
controllers time policy to use
Windows Time (NT5DS).
TimePolicyPDC The PDCe domain controller Sets the PDCe domain
controller's time policy to
What gets created with your AWS Managed Microsoft AD Version 1.0 22

AWS Directory Service Administration Guide
Group policy name Applies to Description
use Network Time Protocol
(NTP).
Default Domain Controllers
Policy
Not used Provisioned during domain
creation, AWS Managed
Active Directory Policy is
used in its place.
If you would like to see the settings of each GPO, you can view them from a domain joined
Windows instance with the Group policy management console (GPMC) enabled.
• Creates the following default local accounts for AWS Managed Microsoft AD management:
Important
Be sure to save the admin password. AWS Directory Service does not store this password,
and it cannot be retrieved. However, you can reset a password from the AWS Directory
Service console or by using the ResetUserPassword API.
Admin
The admin is the directory administrator account created when the AWS Managed Microsoft
AD is first created. You provide a password for this account when you create an AWS Managed
Microsoft AD. This account is located under the Users OU (For example, Corp > Users). You
use this account to manage your Active Directory in the AWS. For more information, see AWS
Managed Microsoft AD Administrator account permissions.
AWS_11111111111
Any account name starting with AWS followed by an underscore and located in AWS Reserved
OU is a service-managed account. This service-managed account is used by AWS to interact
with the Active Directory. These accounts are created when AWS Directory Service Data is
enabled and with each new AWS application is authorized on Active Directory. These accounts
are only accessible by AWS services.
What gets created with your AWS Managed Microsoft AD Version 1.0 23

AWS Directory Service Administration Guide
For more information about the admin account and other accounts created by Active Directory, see
Microsoft documentation.
AWS Managed Microsoft AD Administrator account permissions
When you create an AWS Directory Service for Microsoft Active Directory directory, AWS creates an
organizational unit (OU) to store all AWS related groups and accounts. For more information about
this OU, see What gets created with your AWS Managed Microsoft AD. This includes the Admin
account. The Admin account has permissions to perform the following common administrative
activities for your OU:
• Add, update, or delete users, groups, and computers. For more information, see User and group
management in AWS Managed Microsoft AD.
• Add resources to your domain such as file or print servers, and then assign permissions for those
resources to users and groups in your OU.
• Create additional OUs and containers.
• Delegate authority of additional OUs and containers. For more information, see Delegating
directory join privileges for AWS Managed Microsoft AD.
• Create and link group policies.
• Restore deleted objects from the Active Directory Recycle Bin.
• Run Active Directory and DNS Windows PowerShell modules on the Active Directory Web
Service.
• Create and configure group Managed Service Accounts. For more information, see Group
Managed Service Accounts.
• Configure Kerberos constrained delegation. For more information, see Kerberos constrained
delegation.
The Admin account also has rights to perform the following domainwide activities:
• Manage DNS configurations (add, remove, or update records, zones, and forwarders)
• View DNS event logs
• View security event logs
Only the actions listed here are allowed for the Admin account. The Admin account also lacks
permissions for any directory-related actions outside of your specific OU, such as on the parent OU.
Administrator account permissions Version 1.0 24

AWS Directory Service Administration Guide
Important
AWS Domain Administrators have full administrative access to all domains hosted on AWS.
See your agreement with AWS and the AWS data protection FAQ for more information
about how AWS handles content, including directory information, that you store on AWS
systems.
Note
We recommend that you do not delete or rename this account. If you no longer want to use
the account, we recommend you set a long password (at most 64 random characters) and
then disable the account.
Enterprise and domain administrator privileged accounts
AWS automatically rotates the built-in Administrator password to a random password every 90
days. Anytime the built in Administrator password is requested for human use an AWS ticket is
created and logged with the AWS Directory Service team. Account credentials are encrypted and
handled over secure channels. Also the Administrator account credentials can only be requested by
the AWS Directory Service management team.
To perform operational management of your directory, AWS has exclusive control of accounts with
Enterprise Administrator and Domain Administrator privileges. This includes exclusive control of
the Active Directory administrator account. AWS protects this account by automating password
management through the use of a password vault. During automated rotation of the administrator
password, AWS creates a temporary user account and grants it Domain Administrator privileges.
This temporary account is used as a back-up in the event of password rotation failure on the
administrator account. After AWS successfully rotates the administrator password, AWS deletes the
temporary administrator account.
Normally AWS operates the directory entirely through automation. In the event that an
automation process is unable to resolve an operational problem, AWS may need to have a support
engineer sign in to your domain controller (DC) to perform diagnosis. In these rare cases, AWS
implements a request/notification system to grant access. In this process, AWS automation creates
a time-limited user account in your directory that has Domain Administrator permissions. AWS
associates the user account with the engineer who is assigned to work on your directory. AWS
Administrator account permissions Version 1.0 25

AWS Directory Service Administration Guide
records this association in our log system and provides the engineer with the credentials to use.
All actions taken by the engineer are logged in the Windows event logs. When the allocated time
elapses, automation deletes the user account.
You can monitor administrative account actions by using the log forwarding feature of your
directory. This feature enables you to forward the AD Security events to your CloudWatch system
where you can implement monitoring solutions. For more information, see Enabling Amazon
CloudWatch Logs log forwarding for AWS Managed Microsoft AD.
Security Event IDs 4624, 4672 and 4648 are all logged when someone logs onto a DC interactively.
You can view each DC’s Windows Security event log using the Event Viewer Microsoft Management
Console (MMC) from a domain joined Windows computer. You can also Enabling Amazon
CloudWatch Logs log forwarding for AWS Managed Microsoft AD to send all of the Security event
logs to CloudWatch Logs in your account.
You might occasionally see users created and deleted within the AWS Reserved OU. AWS is
responsible for the management and security of all objects in this OU and any other OU or
container where we have not delegated permissions for you to access and manage. You may see
creations and deletions in that OU. This is because AWS Directory Service uses automation to
rotate the Domain Administrator password on a regular basis. When the password is rotated, a
backup is created in the event that the rotation fails. Once the rotation is successful, the backup
account is automatically deleted. Also in the rare event that interactive access is needed on the DCs
for troubleshooting purposes, a temporary user account is created for an AWS Directory Service
engineer to use. Once an engineer has completed their work, the temporary user account will
be deleted. Note that every time interactive credentials are requested for a directory, the AWS
Directory Service management team is notified.
Key concepts and best practices for AWS Managed Microsoft AD
You can get more out of your AWS Managed Microsoft AD by becoming familiar with key concepts
and best practices. Key concepts help you understand how AWS Managed Microsoft AD works.
Key concepts include learning more about Active Directory schema, patching schedule, and Group
Managed Service Accounts. Active Directory schema includes elements like attributes, classes, and
objects that make up AWS Managed Microsoft AD. AWS patches your AWS Managed Microsoft AD
domain controllers with Microsoft updates on your behalf. You can also learn more about group
Managed Service Accounts (gMSAs) and use them with your AWS Managed Microsoft AD.
You can avoid problems with your AWS Managed Microsoft AD by considering best practices. Some
of these best practices include:
Key concepts and best practices Version 1.0 26

AWS Directory Service Administration Guide
• When setting up your AWS Managed Microsoft AD, configuring the security groups to meet your
needs, remember your administrator account ID and password, and enable conditional forwarder
setting.
• When using your AWS Managed Microsoft AD, don't alter the organizational unit AWS created
when the directory is created, monitor performance with tools like Amazon CloudWatch and
Amazon SNS, and use SMB 2.x clients.
• When programming applications to work with AWS Managed Microsoft AD, use Windows DC
locator service, load test changes before rolling them out to production environments, and use
efficient LDAP queries to avoid significant CPU cycles in a domain controller.
Topics
• AWS Managed Microsoft AD key concepts
• AWS Managed Microsoft AD best practices
AWS Managed Microsoft AD key concepts
You'll get more out of AWS Managed Microsoft AD if you become familiar with the following key
concepts.
Topics
• Active Directory schema
• Patching and maintenance for AWS Managed Microsoft AD
• Group Managed Service Accounts
• Kerberos constrained delegation
Active Directory schema
A schema is the definition of attributes and classes that are part of a distributed directory and is
similar to fields and tables in a database. Schemas include a set of rules which determine the type
and format of data that can be added or included in the database. The User class is one example of
a class that is stored in the database. Some example of User class attributes can include the user’s
first name, last name, phone number, and so on.
Key concepts Version 1.0 27

AWS Directory Service Administration Guide
Schema elements
Attributes, classes and objects are the basic elements that are used to build object definitions in
the schema. The following provides details about schema elements that are important to know
before you begin the process to extend your AWS Managed Microsoft AD schema.
Attributes
Each schema attribute, which is similar to a field in a database, has several properties that
define the characteristics of the attribute. For example, the property used by LDAP clients to
read and write the attribute is LDAPDisplayName. The LDAPDisplayName property must
be unique across all attributes and classes. For a complete list of attribute characteristics, see
Characteristics of Attributes on the MSDN website. For additional guidance on how to create a
new attribute, see Defining a New Attribute on the MSDN website.
Classes
The classes are analogous to tables in a database and also have several properties to be
defined. For example, the objectClassCategory defines the class category. For a complete
list of class characteristics, see Characteristics of Object Classes on the MSDN website. For more
information about how to create a new class, see Defining a New Class on the MSDN website.
Object identifier (OID)
Each class and attribute must have an OID that is unique for all of your objects. Software
vendors must obtain their own OID to ensure uniqueness. Uniqueness avoids conflicts when
the same attribute is used by more than one application for different purposes. To ensure
uniqueness, you can obtain a root OID from an ISO Name Registration Authority. Alternatively,
you can obtain a base OID from Microsoft. For more information about OIDs and how to obtain
them, see Object Identifiers on the MSDN website.
Schema linked attributes
Some attributes are linked between two classes with forward and back links. The best example
is groups. When you look at a group it shows you the members of the group; if you look at a
user you can see what groups it belongs to. When you add a user to a group, Active Directory
creates a forward link to the group. Then Active Directory adds a back link from the group to
the user. A unique link ID must be generated when creating an attribute that will be linked. For
more information, see Linked Attributes on the MSDN website.
Key concepts Version 1.0 28

AWS Directory Service Administration Guide
Related topics
• When to extend your AWS Managed Microsoft AD schema
• Tutorial: Extending your AWS Managed Microsoft AD schema
Patching and maintenance for AWS Managed Microsoft AD
AWS Directory Service for Microsoft Active Directory, also known as AWS DS for AWS Managed
Microsoft AD, is actually Microsoft Active Directory Domain Services (AD DS), delivered as a
managed service. The system uses Microsoft Windows Server 2019 for the domain controllers
(DCs), and AWS adds software to the DCs for service management purposes. AWS updates
(patches) DCs to add new functionality and keep the Microsoft Windows Server software current.
During the patching process, your directory remains available for use.
Ensuring availability
By default each directory consists of two DCs, each installed in a different Availability Zone. At your
option, you may add DCs to further increase availability. For critical environments needing high-
availability and fault-tolerance, we recommend deploying additional DCs. AWS patches your DCs
sequentially, during which time the DC that AWS is actively patching is unavailable. In the event
that one or more of your DCs is temporarily out of service, AWS defers patching until your directory
has at least two operational DCs. This lets you use the other operating DCs during the patch
process, which typically takes 30 to 45 minutes per DC, although this time may vary. To ensure your
applications can reach an operating DC in the event that one or more DCs is unavailable for any
reason, including patching, your applications should use the Windows DC locator service and not
use static DC addresses.
Understanding the patching schedule
To keep the Microsoft Windows Server software current on your DCs, AWS utilizes Microsoft
updates. As Microsoft makes monthly rollup patches available for Windows Server, AWS makes
a best effort to test and apply the rollup to all customer DCs within three calendar weeks. In
addition, AWS reviews updates that Microsoft releases outside of the monthly rollup based on
applicability to DCs and urgency. For security patches that Microsoft rates as Critical or Important,
and that are relevant to DCs, AWS makes every effort to test and deploy the patch within five days.
Key concepts Version 1.0 29

AWS Directory Service Administration Guide
Group Managed Service Accounts
With Windows Server 2012, Microsoft introduced a new method that administrators could use to
manage service accounts called group Managed Service Accounts (gMSAs). Using gMSAs, service
administrators no longer needed to manually manage password synchronization between service
instances. Instead, an administrator could simply create a gMSA in Active Directory and then
configure multiple service instances to use that single gMSA.
To grant permissions so users in AWS Managed Microsoft AD can create a gMSA, you must add
their accounts as a member of the AWS Delegated Managed Service Account Administrators security
group. By default, the Admin account is a member of this group. For more information about
gMSAs, see Group Managed Service Accounts Overview on the Microsoft TechNet website.
Related AWS Security Blog post
• How AWS Managed Microsoft AD Helps to Simplify the Deployment and Improve the Security of
Active Directory–Integrated .NET Applications
Kerberos constrained delegation
Kerberos constrained delegation is a feature in Windows Server. This feature gives service
administrators the ability to specify and enforce application trust boundaries by limiting the
scope where application services can act on a user’s behalf. This can be useful when you need
to configure which front-end service accounts can delegate to their backend services. Kerberos
constrained delegation also prevents your gMSA from connecting to any and all services on behalf
of your Active Directory users, avoiding the potential for abuse by a rogue developer.
For example, let’s say user jsmith logs into an HR application. You want the SQL Server to apply
jsmith’s database permissions. However, by default SQL Server opens the database connection
using the service account credentials that apply hr-app-service’s permissions instead of jsmith’s
configured permissions. You must make it possible for the HR payroll application to access the
SQL Server database using the jsmith’s credentials. To do that, you enable Kerberos constrained
delegation for the hr-app-service service account on your AWS Managed Microsoft AD directory in
AWS. When jsmith logs on, Active Directory provides a Kerberos ticket that Windows automatically
uses when jsmith attempts to access other services in the network. Kerberos delegation enables
the hr-app-service account to reuse the jsmith Kerberos ticket when accessing the database, thus
applying permissions specific to jsmith when opening the database connection.
Key concepts Version 1.0 30

AWS Directory Service Administration Guide
To grant permissions that allow users in AWS Managed Microsoft AD to configure Kerberos
constrained delegation, you must add their accounts as a member of the AWS Delegated Kerberos
Delegation Administrators security group. By default, the Admin account is a member of this group.
For more information about Kerberos constrained delegation, see Kerberos Constrained Delegation
Overview on the Microsoft TechNet website.
Resource-based constrained delegation was introduced with Windows Server 2012. It provides the
back-end service administrator the ability to configure constrained delegation for the service.
AWS Managed Microsoft AD best practices
Here are some suggestions and guidelines you should consider to avoid problems and get the most
out of AWS Managed Microsoft AD.
Topics
• Best practices for setting up a AWS Managed Microsoft AD
• Best practices when using your directory
• Best practices when programming your applications for your directory
Best practices for setting up a AWS Managed Microsoft AD
Here are some suggestions and guidelines for when you'r setting up your AWS Managed Microsoft
AD:
Topics
• Prerequisites
• Creating your AWS Managed Microsoft AD
Prerequisites
Consider these guidelines before creating your directory.
Verify you have the right directory type
AWS Directory Service provides multiple ways to use Microsoft Active Directory with other AWS
services. You can choose the directory service with the features you need at a cost that fits your
budget:
Best practices Version 1.0 31

AWS Directory Service Administration Guide
• AWS Directory Service for Microsoft Active Directory is a feature-rich managed Microsoft
Active Directory hosted on the AWS cloud. AWS Managed Microsoft AD is your best choice if
you have more than 5,000 users and need a trust relationship set up between an AWS hosted
directory and your on-premises directories.
• AD Connector simply connects your existing on-premises Active Directory to AWS. AD Connector
is your best choice when you want to use your existing on-premises directory with AWS services.
• Simple AD is a low-scale, low-cost directory with basic Active Directory compatibility. It supports
5,000 or fewer users, Samba 4–compatible applications, and LDAP compatibility for LDAP-aware
applications.
For a more detailed comparison of AWS Directory Service options, see Which to choose.
Ensure your VPCs and instances are configured correctly
In order to connect to, manage, and use your directories, you must properly configure the VPCs
that the directories are associated with. See either Prerequisites for creating a AWS Managed
Microsoft AD, AD Connector prerequisites, or Simple AD prerequisites for information about the
VPC security and networking requirements.
If you are adding an instance to your domain, ensure that you have connectivity and remote access
to your instance as described in Ways to join an Amazon EC2 instance to your AWS Managed
Microsoft AD.
Be aware of your limits
Learn about the various limits for your specific directory type. The available storage and the
aggregate size of your objects are the only limitations on the number of objects you may store in
your directory. See either AWS Managed Microsoft AD quotas, AD Connector quotas, or Simple AD
quotas for details about your chosen directory.
Understand your directory’s AWS security group configuration and use
AWS creates a security group and attaches it to your directory’s domain controller elastic network
interfaces. This security group blocks unnecessary traffic to the domain controller and allows traffic
that is necessary for Active Directory communications. AWS configures the security group to open
only the ports that are required for Active Directory communications. In the default configuration,
the security group accepts traffic to these ports from AWS Managed Microsoft AD VPC IPv4 CIDR
address. AWS attaches the security group to your domain controllers’ interfaces that are accessible
from within your peered or resized VPCs. These interfaces are inaccessible from the internet even
Best practices Version 1.0 32

AWS Directory Service Administration Guide
if you modify routing tables, change the network connections to your VPC, and configure the NAT
Gateway service. As such, only instances and computers that have a network path into the VPC
can access the directory. This simplifies setup by eliminating the requirement for you to configure
specific address ranges. Instead, you configure routes and security groups into the VPC that permit
traffic only from trusted instances and computers.
Modifying the directory security group
If you want to increase the security of your directories’ security groups, you can modify them
to accept traffic from a more restrictive list of IP addresses. For example, you could change the
accepted addresses from your VPC IPv4 CIDR range to a CIDR range that is specific to a single
subnet or computer. Similarly, you might choose to restrict the destination addresses to which your
domain controllers can communicate. Make such changes only if you fully understand how security
group filtering works. For more information, see Amazon EC2 security groups for Linux instances
in the Amazon EC2 User Guide. Improper changes can result in loss of communications to intended
computers and instances. AWS recommends that you do not attempt to open additional ports to
the domain controller as this decreases the security of your directory. Please carefully review the
AWS Shared Responsibility Model.
Warning
It is technically possible for you to associate the security groups, which your directory uses,
with other EC2 instances that you create. However, AWS recommends against this practice.
AWS may have reasons to modify the security group without notice to address functional
or security needs of the managed directory. Such changes affect any instances with which
you associate the directory security group. Furthermore, associating the directory security
group with your EC2 instances creates a potential security risk for your EC2 instances.
The directory security group accepts traffic on required Active Directory ports from AWS
Managed Microsoft AD VPC IPv4 CIDR address. If you associate this Security Group with an
EC2 instance that has a public IP address attached to the internet, then any computer on
the internet can communicate with your EC2 instance on the opened ports.
Creating your AWS Managed Microsoft AD
Here are some suggestions to consider as you create your AWS Managed Microsoft AD.
Topics
• Remember your administrator ID and password
Best practices Version 1.0 33

AWS Directory Service Administration Guide
• Create a DHCP options set
• Enable Conditional Forwarder Setting
• Deploy additional domain controllers
• Understand username restrictions for AWS applications
Remember your administrator ID and password
When you set up your directory, you provide a password for the administrator account. That
account ID is Admin for AWS Managed Microsoft AD. Remember the password that you create for
this account; otherwise you will not be able to add objects to your directory.
Create a DHCP options set
We recommend that you create a DHCP options set for your AWS Directory Service directory and
assign the DHCP options set to the VPC that your directory is in. That way any instances in that VPC
can point to the specified domain, and DNS servers can resolve their domain names.
For more information about DHCP options sets, see Creating or changing a DHCP options set for
AWS Managed Microsoft AD.
Enable Conditional Forwarder Setting
The following conditional forward settings Store this conditional forwarder in Active Directory,
replicate as follows: should be enabled. Enabling these settings will prevent the conditional
forwarder setting from disappearing when a node is replaced due to infrastructure failure or
overload failure.
Deploy additional domain controllers
By default, AWS creates two domain controllers that exist in separate Availability Zones. This
provides fault resiliency during software patching and other events that may make one domain
controller unreachable or unavailable. We recommend that you deploy additional domain
controllers to further increase resiliency and ensure scale-out performance in the event of a longer
term event that affects access to a domain controller or an Availability Zone.
For more information, see Use the Windows DC locator service.
Understand username restrictions for AWS applications
AWS Directory Service provides support for most character formats that can be used in the
construction of usernames. However, there are character restrictions that are enforced on
Best practices Version 1.0 34

AWS Directory Service Administration Guide
usernames that will be used for signing in to AWS applications, such as WorkSpaces, Amazon
WorkDocs, Amazon WorkMail, or Amazon QuickSight. These restrictions require that the following
characters not be used:
• Spaces
• Multibyte characters
• !"#$%&'()*+,/:;<=>?@[\]^`{|}~
Note
The @ symbol is allowed as long as it precedes a UPN suffix.
Best practices when using your directory
Here are some suggestions to keep in mind when using your AWS Managed Microsoft AD.
Topics
• Do not alter predefined users, groups and organizational units
• Automatically join domains
• Set up trusts correctly
• Track your domain controller performance
• Carefully plan for schema extensions
• About load balancers
• Make a backup of your instance
• Set up SNS messaging
• Apply directory service settings
• Remove Amazon Enterprise applications before deleting a directory
• Use SMB 2.x clients when accessing the SYSVOL and NETLOGON shares
Do not alter predefined users, groups and organizational units
When you use AWS Directory Service to launch a directory, AWS creates an organizational unit (OU)
that contains all your directory’s objects. This OU, which has the NetBIOS name that you typed
Best practices Version 1.0 35

AWS Directory Service Administration Guide
when you created your directory, is located in the domain root. The domain root is owned and
managed by AWS. Several groups and an administrative user are also created.
Do not move, delete or in any other way alter these predefined objects. Doing so can make your
directory inaccessible by both yourself and AWS. For more information, see What gets created with
your AWS Managed Microsoft AD.
Automatically join domains
When launching a Windows instance that is to be part of an AWS Directory Service domain, it is
often easiest to join the domain as part of the instance creation process rather than manually
adding the instance later. To automatically join a domain, simply select the correct directory for
Domain join directory when launching a new instance. You can find details in Joining an Amazon
EC2 Windows instance to your AWS Managed Microsoft AD Active Directory.
Set up trusts correctly
When setting up trust relationship between your AWS Managed Microsoft AD directory and
another directory, keep in mind these guidelines:
• The trust type must match on both sides (Forest or External)
• Ensure the trust direction is setup correctly if using a one-way trust (Outgoing on trusting
domain, Incoming on trusted domain)
• Both fully qualified domain names (FQDNs) and NetBIOS names must be unique between
forests / domains
For more details and specific instructions on setting up a trust relationship, see Creating a trust
relationship.
Track your domain controller performance
To help optimize scaling decisions and improve directory resilience and performance, we
recommend that you use CloudWatch metrics. For more information, see Using CloudWatch to
monitor your AWS Managed Microsoft AD domain controllers' performance.
For instructions on how to set up domain controller metrics using the CloudWatch console, see
How to automate AWS Managed Microsoft AD scaling based on utilization metrics in the AWS
Security Blog.
Best practices Version 1.0 36

AWS Directory Service Administration Guide
Carefully plan for schema extensions
Thoughtfully apply schema extensions to index your directory for important and frequent queries.
Use care to not over-index the directory as indexes consume directory space and rapidly changing
indexed values can result in performance problems. To add indexes, you must create a Lightweight
Directory Access Protocol (LDAP) Directory Interchange Format (LDIF) file and extend your schema
change. For more information, see Extend your AWS Managed Microsoft AD schema.
About load balancers
Do not use a load balancer in front of the AWS Managed Microsoft AD end-points. Microsoft
designed Active Directory (AD) for use with a domain controller (DC) discovery algorithm that
finds the most responsive operational DC without external load balancing. External network load
balancers inaccurately detect active DCs and can result in your application being sent to a DC that
is coming up but not ready for use. For more information, see Load balancers and Active Directory
on Microsoft TechNet which recommends fixing applications to use Active Directory correctly rather
than implementing external load balancers.
Make a backup of your instance
If you decide to manually add an instance to an existing AWS Directory Service domain, make a
backup or take a snapshot of that instance first. This is particularly important when joining a Linux
instance. Some of the procedures used to add an instance, if not performed correctly, can render
your instance unreachable or unusable. For more information, see Restoring your AWS Managed
Microsoft AD with snapshots.
Set up SNS messaging
With Amazon Simple Notification Service (Amazon SNS), you can receive email or text (SMS)
messages when the status of your directory changes. You will be notified if your directory goes
from an Active status to an Impaired or Inoperable status. You also receive a notification when the
directory returns to an Active status.
Also remember that if you have an SNS topic that receives messages from AWS Directory Service,
before deleting that topic from the Amazon SNS console, you should associate your directory
with a different SNS topic. Otherwise you risk missing important directory status messages. For
information about how to set up Amazon SNS, see Enabling AWS Managed Microsoft AD directory
status notifications with Amazon Simple Notification Service.
Best practices Version 1.0 37
AWS Directory Service Administration Guide
Apply directory service settings
AWS Managed Microsoft AD allows you to tailor your security configuration to meet your
compliance and security requirements. AWS Managed Microsoft AD deploys and maintains the
configuration to all domain controllers in your directory, including when adding new regions or
additional domain controllers. You can configure and apply these security settings for all your
new and existing directories. You can do this in the console by following the steps in Edit directory
security settings or through the UpdateSettings API.
For more information, see Editing AWS Managed Microsoft AD directory security settings.
Remove Amazon Enterprise applications before deleting a directory
Before deleting a directory that is associated with one or more Amazon Enterprise Applications
such as, WorkSpaces, Amazon WorkSpaces Application Manager, Amazon WorkDocs, Amazon
WorkMail, AWS Management Console, or Amazon Relational Database Service (Amazon RDS), you
must first remove each application. For more information how to remove these applications, see
Deleting your AWS Managed Microsoft AD.
Use SMB 2.x clients when accessing the SYSVOL and NETLOGON shares
Client computers use Server Message Block (SMB) to access the SYSVOL and NETLOGON shares on
AWS Managed Microsoft AD domain controllers for Group Policy, login scripts and other files. AWS
Managed Microsoft AD only supports SMB version 2.0 (SMBv2) and newer.
The SMBv2 and newer version protocols add a number of features that improve client
performance and increase the security of your domain controllers and clients. This change follows
recommendations by the United States Computer Emergency Readiness Team and Microsoft to
disable SMBv1.
Important
If you currently use SMBv1 clients to access the SYSVOL and NETLOGON shares of
your domain controller, you must update those clients to use SMBv2 or newer. Your
directory will work correctly but your SMBv1 clients will fail to connect to the SYSVOL and
NETLOGON shares of your AWS Managed Microsoft AD domain controllers, and will also be
unable to process Group Policy.
Best practices Version 1.0 38

AWS Directory Service Administration Guide
SMBv1 clients will work with any other SMBv1 compatible file servers that you have. However, AWS
recommends that you update all of your SMB servers and clients to SMBv2 or newer. To learn more
about disabling SMBv1 and updating it to newer SMB versions on your systems, see these postings
on Microsoft TechNet and Microsoft Documentation.
Tracking SMBv1 Remote Connections
You can review the Microsoft-Windows-SMBServer/Audit Windows Event log remotely
connecting to the AWS Managed Microsoft AD domain controller, any events in this log indicate
SMBv1 connections. Below is an example of the information you might see in one of these logs:
SMB1 access
Client Address: ###.###.###.###
Guidance:
This event indicates that a client attempted to access the server using SMB1. To stop auditing SMB1
access, use the Windows PowerShell cmdlet Set-SmbServerConfiguration.
Best practices when programming your applications for your directory
Before you program your applications to work with AWS Managed Microsoft AD, consider the
following:
Topics
• Use the Windows DC locator service
• Load test before rolling out to production
• Use efficient LDAP queries
Use the Windows DC locator service
When developing applications, use the Windows DC locator service or use the Dynamic DNS
(DDNS) service of your AWS Managed Microsoft AD to locate domain controllers (DCs). Do not hard
code applications with the address of a DC. The DC locator service helps ensure directory load is
distributed and enables you to take advantage of horizontal scaling by adding domain controllers
to your deployment. If you bind your application to a fixed DC and the DC undergoes patching or
recovery, your application will lose access to the DC instead of using one of the remaining DCs.
Best practices Version 1.0 39

AWS Directory Service Administration Guide
Furthermore, hard coding of the DC can result in hot spotting on a single DC. In severe cases, hot
spotting may cause your DC to become unresponsive. Such cases may also cause AWS directory
automation to flag the directory as impaired and may trigger recovery processes that replace the
unresponsive DC.
Load test before rolling out to production
Be sure to do lab testing with objects and requests that are representative of your production
workload to confirm that the directory scales to the load of your application. Should you require
additional capacity, test with additional DCs while distributing requests between the DCs. For more
information, see Deploying additional domain controllers for your AWS Managed Microsoft AD.
Use efficient LDAP queries
Broad LDAP queries to a domain controller across tens of thousands of objects can consume
significant CPU cycles in a single DC, resulting in hot spotting. This may affect applications that
share the same DC during the query.
Use cases for AWS Managed Microsoft AD
With AWS Managed Microsoft AD, you can share a single directory for multiple use cases. For
example, you can share a directory to authenticate and authorize access for .NET applications,
Amazon RDS for SQL Server with Windows authentication enabled, and Amazon Chime for
messaging and video conferencing.
The following diagram shows some of the use cases for your AWS Managed Microsoft AD directory.
These include the ability to grant your users access to external cloud applications and allow your
on-premises Active Directory users to manage and have access to resources in the AWS Cloud.
Use cases Version 1.0 40

AWS Directory Service Administration Guide
Use AWS Managed Microsoft AD for either of the following business use cases.
Topics
• Use Case 1: Sign in to AWS applications and services with Active Directory credentials
• Use Case 2: Manage Amazon EC2 instances
• Use Case 3: Provide directory services to your Active Directory-aware workloads
• Use Case 4: AWS IAM Identity Center to Office 365 and other cloud applications
• Use Case 5: Extend your on-premises Active Directory to the AWS Cloud
• Use Case 6: Share your directory to seamlessly join Amazon EC2 instances to a domain across
AWS accounts
Use cases Version 1.0 41

AWS Directory Service Administration Guide
Use Case 1: Sign in to AWS applications and services with Active
Directory credentials
You can enable multiple AWS applications and services such as AWS Client VPN, AWS Management
Console, AWS IAM Identity Center, Amazon Chime, Amazon Connect, Amazon FSx, Amazon
QuickSight, Amazon RDS for SQL Server, Amazon WorkDocs, Amazon WorkMail, and WorkSpaces
to use your AWS Managed Microsoft AD directory. When you enable an AWS application or service
in your directory, your users can access the application or service with their Active Directory
credentials.
For example, you can enable your users to sign in to the AWS Management Console with their
Active Directory credentials. To do this, you enable the AWS Management Console as an application
in your directory, and then assign your Active Directory users and groups to IAM roles. When your
users sign in to the AWS Management Console, they assume an IAM role to manage AWS resources.
This makes it easy for you to grant your users access to the AWS Management Console without
needing to configure and manage a separate SAML infrastructure.
To further enhance the end user experience you can enable Single sign-on capabilities for Amazon
WorkDocs, which provides your users the ability to access Amazon WorkDocs from a computer
joined to the directory without having to enter their credentials separately.
You can grant access to user accounts in your directory or in your on-premises Active Directory,
so they can sign in to the AWS Management Console or through the AWS CLI using their existing
credentials and permissions to manage AWS resources by assigning IAM roles directly to the
existing user accounts.
FSx for Windows File Server integration with AWS Managed Microsoft AD
Integrating FSx for Windows File Server with AWS Managed Microsoft AD provides a fully managed
native Microsoft Windows based Server Message Block (SMB) protocol file system that allows you
to easily move your Windows-based applications and clients (that utilize shared file storage) to
AWS. Although FSx for Windows File Server can be integrated with a self-managed Microsoft Active
Directory, we do not discuss that scenario here.
Common Amazon FSx use cases and resources
This section provides a reference to resources on common FSx for Windows File Server integrations
with AWS Managed Microsoft AD use cases. Each of the use cases in this section start with a basic
Use Case 1: Sign in to AWS applications and services with Active Directory credentials Version 1.0 42

AWS Directory Service Administration Guide
AWS Managed Microsoft AD and FSx for Windows File Server configuration. For more information
about how to create these configurations, see:
• Getting started with AWS Managed Microsoft AD
• Getting started with Amazon FSx
FSx for Windows File Server as persistent storage on Windows containers
Amazon Elastic Container Service (ECS) supports Windows containers on container instances that
are launched with the Amazon ECS-optimized Windows AMI. Windows container instances use their
own version of the Amazon ECS container agent. On the Amazon ECS-optimized Windows AMI, the
Amazon ECS container agent runs as a service on the host.
Amazon ECS supports Active Directory authentication for Windows containers through a special
kind of service account called a group Managed Service Account (gMSA). Because Windows
containers cannot be domain-joined, you must configure a Windows container to run with gMSA.
Related Items
• Using FSx for Windows File Server as persistent storage on Windows Containers
• Group Managed Service Accounts
Amazon AppStream 2.0 support
Amazon AppStream 2.0 is a fully managed application streaming service. It provides a range of
solutions for users to save and access data through their applications. Amazon FSx with AppStream
2.0 provides a personal persistent storage drive using Amazon FSx and can be configured to
provide a shared folder to access common files.
Related Items
• Walkthrough 4: Using Amazon FSx with Amazon AppStream 2.0
• Using Amazon FSx with Amazon AppStream 2.0
• Using Active Directory with AppStream 2.0
Use Case 1: Sign in to AWS applications and services with Active Directory credentials Version 1.0 43

AWS Directory Service Administration Guide
Microsoft SQL Server support
FSx for Windows File Server can be used as a storage option for Microsoft SQL Server 2012
(starting with 2012 version 11.x) and newer system databases (including Master, Model, MSDB, and
TempDB), and for Database Engine user databases.
Related Items
• Install SQL Server with SMB fileshare storage
• Simplify your Microsoft SQL Server high availability deployments using FSx for Windows File
Server
• Group Managed Service Accounts
Home folders and roaming user profile support
FSx for Windows File Server can be used to store data from Active Directory user home folders and
My Documents in a central location. FSx for Windows File Server can also be used to store data
from Roaming User Profiles.
Related items
• Windows home directories made easy with Amazon FSx
• Deploying roaming user profiles
• Using FSx for Windows File Server with WorkSpaces
Networked file share support
Networked file shares on an FSx for Windows File Server provide a managed and scalable file
sharing solution. One use case is mapped drives for clients that can be created manually or via
Group Policy.
Related items
• Walkthrough 6: Scaling out performance with Shards
• Drive mapping
• Using FSx for Windows File Server with WorkSpaces
Use Case 1: Sign in to AWS applications and services with Active Directory credentials Version 1.0 44

AWS Directory Service Administration Guide
Group policy software installation support
Because the size and performance of the SYSVOL folder is limited, you should as a best practice,
avoid storing data such as software installation files in that folder. As a possible solution to this,
FSx for Windows File Server can be configured to store all software files that are installed using
Group Policy.
Related items
• Use Group Policy to remotely install software
Windows Server Backup target support
FSx for Windows File Server can be configured as a target drive in Windows Server Backup using
the UNC file share. In this case, you would specify the UNC path to your FSx for Windows File
Server instead of to the attached EBS volume.
Related Items
• Perform a system state recovery of your server
Amazon FSx also supports AWS Managed Microsoft AD Directory Sharing. For more information,
see:
• Share your AWS Managed Microsoft AD
• Using Amazon FSx with AWS Managed Microsoft AD in a different VPC or account
Amazon RDS integration with AWS Managed Microsoft AD
Amazon RDS supports external authentication of database users using Kerberos with Microsoft
Active Directory. Kerberos is a network authentication protocol that uses tickets and symmetric-
key cryptography to eliminate the need to transmit passwords over the network. Amazon RDS
support for Kerberos and Active Directory provides the benefits of single sign-on and centralized
authentication of database users so you can keep your user credentials in Active Directory.
To get started with this use case you'll first need to set up a basic AWS Managed Microsoft AD and
Amazon RDS configuration.
• Getting started with AWS Managed Microsoft AD
Use Case 1: Sign in to AWS applications and services with Active Directory credentials Version 1.0 45

AWS Directory Service Administration Guide
• Getting started with Amazon RDS
All of the use cases referenced below will start with a base AWS Managed Microsoft AD and
Amazon RDS and cover how to integrate Amazon RDS with AWS Managed Microsoft AD.
• Using Windows authentication with an Amazon RDS for SQL Server DB instance
• Using Kerberos authentication for MySQL
• Using Kerberos authentication with Amazon RDS for Oracle
• Using Kerberos authentication with Amazon RDS for PostgreSQL
Amazon RDS also supports AWS Managed Microsoft AD Directory Sharing. For more information,
see:
• Share your AWS Managed Microsoft AD
• Joining your Amazon RDS DB instances across accounts to a single shared domain
For more information about joining an Amazon RDS for SQL Server to your Active Directory, see
Join Amazon RDS for SQL Server to your self-managed Active Directory.
.NET application using Amazon RDS for SQL Server with group Managed Service Accounts
You can integrate Amazon RDS for SQL Server with a basic .NET application and group Managed
Service Accounts (gMSAs). For more information, see How AWS Managed Microsoft AD Helps
to Simplify the Deployment and Improve the Security of Active Directory–Integrated .NET
Applications
Use Case 2: Manage Amazon EC2 instances
Using familiar Active Directory administration tools, you can apply Active Directory group policy
objects (GPOs) to centrally manage your Amazon EC2 for Windows or Linux instances by joining
your instances to your AWS Managed Microsoft AD domain.
In addition, your users can sign in to your instances with their Active Directory credentials. This
eliminates the need to use individual instance credentials or distribute private key (PEM) files. This
makes it easier for you to instantly grant or revoke access to users by using Active Directory user
administration tools you already use.
Use Case 2: Manage Amazon EC2 instances Version 1.0 46

AWS Directory Service Administration Guide
Use Case 3: Provide directory services to your Active Directory-aware
workloads
AWS Managed Microsoft AD is an actual Microsoft Active Directory that enables you to run
traditional Active Directory-aware workloads such as Remote Desktop Licensing Manager
and Microsoft SharePoint and Microsoft SQL Server Always On in the AWS Cloud. AWS
Managed Microsoft AD also helps you to simplify and improve the security of Active Directory-
integrated .NET applications by using group Managed Service Accounts (gMSAs) and Kerberos
constrained delegation (KCD).
Use Case 4: AWS IAM Identity Center to Office 365 and other cloud
applications
You can use AWS Managed Microsoft AD to provide AWS IAM Identity Center services for cloud
applications. You can use Microsoft Entra Connect (formerly known as Azure Active Directory
Connect) to synchronize your users into Microsoft Entra (formerly known as Azure Active Directory
(Azure AD)), and then use Active Directory Federation Services (AD FS) so that your users can
access Microsoft Office 365 and other SAML 2.0 cloud applications by using their Active Directory
credentials.
Integrating AWS Managed Microsoft AD with IAM Identity Center adds SAML capabilities to
your AWS Managed Microsoft AD and / or your on-premises trusted domains. Once integrated
your users can then use IAM Identity Center with services that support SAML, including the AWS
Management Console and third-party cloud applications such as Office 365, Concur, and Salesforce
without having to configure a SAML infrastructure. For a demonstration on the process of allowing
your on-premises users to use IAM Identity Center, see the following YouTube video.
Note
AWS Single Sign-On was renamed to IAM Identity Center.
Use Case 5: Extend your on-premises Active Directory to the AWS Cloud
If you already have an Active Directory infrastructure and want to use it when migratingActive
Directory-aware workloads to the AWS Cloud, AWS Managed Microsoft AD can help. You can use
Use Case 3: Provide directory services to your Active Directory-aware workloads Version 1.0 47

AWS Directory Service Administration Guide
Active Directory trusts to connect AWS Managed Microsoft AD to your existing Active Directory.
This means your users can access Active Directoryy-aware and AWS applications with their on-
premises Active Directory credentials, without needing you to synchronize users, groups, or
passwords.
For example, your users can sign in to the AWS Management Console and Amazon WorkSpaces
by using their existing Active Directory user names and passwords. Also, when you use Active
Directory-aware applications such as SharePoint with AWS Managed Microsoft AD, your logged-in
Windows users can access these applications without needing to enter credentials again.
You can also migrate your on-premises Active Directory domain to AWS to be free of the
operational burden of your Active Directory infrastructure using the Active Directory Migration
Toolkit (ADMT) along with the Password Export Service (PES) to perform the migration.
Use Case 6: Share your directory to seamlessly join Amazon EC2
instances to a domain across AWS accounts
Sharing your directory across multiple AWS accounts enables you to manage AWS services such as
Amazon EC2 easily without the need to operate a directory for each account and each VPC. You
can use your directory from any AWS account and from any Amazon VPC within an AWS Region.
This capability makes it easier and more cost effective to manage directory-aware workloads with
a single directory across accounts and VPCs. For example, you can now manage your Windows
workloads deployed in EC2 instances across multiple accounts and VPCs easily by using a single
AWS Managed Microsoft AD directory.
When you share your AWS Managed Microsoft AD directory with another AWS account, you can
use the Amazon EC2 console or AWS Systems Manager to seamlessly join your instances from any
Amazon VPC within the account and AWS Region. You can quickly deploy your directory-aware
workloads on EC2 instances by eliminating the need to manually join your instances to a domain or
to deploy directories in each account and VPC. For more information, see Share your AWS Managed
Microsoft AD.
Maintain your AWS Managed Microsoft AD
You can use the AWS Management Console to maintain your AWS Managed Microsoft AD and
complete day-to-day administrative tasks. Ways you can maintain your directory include:
Use Case 6: Share your directory to seamlessly join Amazon EC2 instances to a domain across AWS
accounts
Version 1.0 48
AWS Directory Service Administration Guide
• View your AWS Managed Microsoft AD directory details to learn your AWS Managed Microsoft
AD directory type, directory ID, directory status, and networking details such as its Amazon VPC,
subnets, and Availability zones.
• Restore your AWS Managed Microsoft AD with snapshots. You can also create snapshot and
delete snapshots.
• Deploy additional domain controllers to improve your AWS Managed Microsoft AD performance
and availability.
• Upgrade your AWS Managed Microsoft AD from Standard edition to Enterprise edition which
supports more directory objects.
• Add alternate user principal name (UPN) to improve the user login experience.
• Rename your AWS Managed Microsoft AD site name to improve AWS Managed Microsoft AD
ability to find and authenticate your existing Active Directory users in your on-premises directory.
• Delete your AWS Managed Microsoft AD when you no longer need it.
Viewing AWS Managed Microsoft AD directory information
You can use the AWS Management Console to view your AWS Managed Microsoft AD directory
details like:
• Directory type
• Directory ID
• Directory status
• Networking details for your AWS Managed Microsoft AD like:
• Amazon VPC
• Subnets
• Availability zones
• DNS addresses
You can find the following information about your AWS Managed Microsoft AD:
• Under the Share & share tab, you can share your AWS Managed Microsoft AD with other AWS
accounts and learn the networking details for your domain controllers.
Viewing directory information Version 1.0 49

AWS Directory Service Administration Guide
• Under the Application management tab, you can enable an application access URL for your
AWS Managed Microsoft AD and enable AWS applications and services for your AWS Managed
Microsoft AD.
• Under the Maintenance tab, you can enable Amazon Simple Notification Service to receive
notifications of your AWS Managed Microsoft AD status and review snapshots of your AWS
Managed Microsoft AD.
To view detailed directory information in the AWS Management Console
1. In the AWS Directory Service console navigation pane, under Active Directory, select
Directories.
2. Click the directory ID link for your directory. Information about the directory is displayed in the
Directory details page.
For more information about the Status field, see Understanding your AWS Managed Microsoft AD
directory status.
Restoring your AWS Managed Microsoft AD with snapshots
AWS Directory Service provides automated daily snapshots and the ability to take manual
snapshots of data for your AWS Managed Microsoft AD Active Directory. These snapshots can be
used to perform a point-in-time restore for your Active Directory. You are limited to five manual
snapshots for each AWS Managed Microsoft AD Active Directory. If you have already reached this
limit, you must delete one of your existing manual snapshots before you can create another. You
cannot take snapshots of AD Connector directories.
Restoring your directory with snapshots Version 1.0 50

AWS Directory Service Administration Guide
Note
Snapshot is a global feature of AWS Managed Microsoft AD. If you are using Configure
Multi-Region replication for AWS Managed Microsoft AD, the following procedures must be
performed in the Primary Region. The changes will be applied across all replicated Regions
automatically. For more information, see Global vs Regional features.
Topics
• Creating a snapshot of your directory
• Restoring your directory from a snapshot
• Deleting a snapshot
Creating a snapshot of your directory
A snapshot can be used to restore your directory to what it was at the point in time that the
snapshot was taken. To create a manual snapshot of your directory, perform the following steps.
Note
You are limited to 5 manual snapshots for each directory. If you have already reached
this limit, you must delete one of your existing manual snapshots before you can create
another.
To create a manual snapshot
1. In the AWS Directory Service console navigation pane, select Directories.
2. On the Directories page, choose your directory ID.
3. On the Directory details page, choose the Maintenance tab.
4. In the Snapshots section, choose Actions, and then select Create snapshot.
5. In the Create directory snapshot dialog box, provide a name for the snapshot, if desired.
When ready, choose Create.
Depending on the size of your directory, it may take several minutes to create the snapshot. When
the snapshot is ready, the Status value changes to Completed.
Restoring your directory with snapshots Version 1.0 51

AWS Directory Service Administration Guide
Restoring your directory from a snapshot
Restoring a directory from a snapshot is equivalent to moving the directory back in time. Directory
snapshots are unique to the directory they were created from. A snapshot can only be restored
to the directory from which it was created. In addition, the maximum supported age of a manual
snapshot is 180 days. For more information, see Useful shelf life of a system-state backup of Active
Directory on the Microsoft website.
Warning
We recommend that you contact the AWS Support Center before any snapshot restore;
we may be able to help you avoid the need to do a snapshot restore. Any restore from
snapshot can result in data loss as they are a point in time. It is important you understand
that all of the DCs and DNS servers associated with the directory will be offline until the
restore operation has been completed.
To restore your directory from a snapshot, perform the following steps.
To restore a directory from a snapshot
1. In the AWS Directory Service console navigation pane, select Directories.
2. On the Directories page, choose your directory ID.
3. On the Directory details page, choose the Maintenance tab.
4. In the Snapshots section, select a snapshot in the list, choose Actions, and then select Restore
snapshot.
5. Review the information in the Restore directory snapshot dialog box, and choose Restore.
For an AWS Managed Microsoft AD directory, it can take from two to three hours for the directory
to be restored. When it has been successfully restored, the Status value of the directory changes to
Active. Any changes made to the directory after the snapshot date are overwritten.
Deleting a snapshot
To delete a snapshot
1. In the AWS Directory Service console navigation pane, select Directories.
Restoring your directory with snapshots Version 1.0 52

AWS Directory Service Administration Guide
2. On the Directories page, choose your directory ID.
3. On the Directory details page, choose the Maintenance tab.
4. In the Snapshots section, choose Actions, and then select Delete snapshot.
5. Verify that you want to delete the snapshot, and then choose Delete.
Deploying additional domain controllers for your AWS Managed
Microsoft AD
Deploying additional domain controllers for your AWS Managed Microsoft AD increases the
redundancy, which results in even greater resilience and higher availability. This also improves the
performance of your directory by supporting a greater number of Active Directory requests. For
example, you can now use AWS Managed Microsoft AD to support multiple .NET applications that
are deployed on large fleets of Amazon EC2 and Amazon RDS for SQL Server instances.
When you first create your directory, AWS Managed Microsoft AD deploys two domain controllers
across multiple Availability Zones, which is required for highly availability purposes. Later, you can
easily deploy additional domain controllers via the AWS Directory Service console by just specifying
the total number of domain controllers that you want. AWS Managed Microsoft AD distributes the
additional domain controllers to the Availability Zones and Amazon VPC subnets on which your
directory is running.
For example, in the below illustration, DC-1 and DC-2 represent the two domain controllers that
were originally created with your directory. The AWS Directory Service console refers to these
default domain controllers as Required. AWS Managed Microsoft AD intentionally locates each
of these domain controllers in separate Availability Zones during the directory creation process.
Later, you might decide to add two more domain controllers to help distribute the authentication
load over peak login times. Both DC-3 and DC-4 represent the new domain controllers, which the
console now refers to as Additional. As before, AWS Managed Microsoft AD again automatically
places the new domain controllers in different Availability Zones to ensure your domain's high
availability.
Deploying additional domain controllers Version 1.0 53

AWS Directory Service Administration Guide
This process eliminates the need for you to manually configure directory data replication,
automated daily snapshots, or monitoring for the additional domain controllers. It's also easier for
you to migrate and run mission critical Active Directory–integrated workloads in the AWS Cloud
without having to deploy and maintain your own Active Directory infrastructure.
You can use either of the following tools to deploy or remove additional domain controllers to your
AWS Managed Microsoft AD:
•
update-number-of-domain-controllers AWS CLI command
• UpdateNumberOfDomainControllers API
• Adding or removing additional domain controllers with the AWS Management Console
Note
Additional domain controllers is a Regional feature of AWS Managed Microsoft AD. If you
are using Configure Multi-Region replication for AWS Managed Microsoft AD, the following
Deploying additional domain controllers Version 1.0 54

AWS Directory Service Administration Guide
procedures must be applied separately in each Region. For more information, see Global vs
Regional features.
Adding or removing additional domain controllers with the AWS Management
Console
You can use the AWS Management Console to add or remove additional domain controllers to your
AWS Managed Microsoft AD.
Prerequisites
Before adding or removing additional domain controllers to your AWS Managed Microsoft AD,
here's more information about domain controller requirements:
• After deploying additional domain controllers, you can reduce the number of domain controllers
to two, which is the minimum required for fault-tolerance and high availability purposes.
• The deleted domain controllers will be delete from the list of additional domain controllers. The
primary and secondary domain controllers are required and can't be deleted.
• If you have configured your AWS Managed Microsoft AD to enable LDAPS, any additional domain
controllers you add will also have LDAPS enabled automatically. For more information, see
Enable Secure LDAP or LDAPS.
Procedure
Use the following procedure to deploy or remove additional domain controllers in your AWS
Managed Microsoft AD with the AWS Management Console.
To add or remove additional domain controllers
1. In the AWS Directory Service console navigation pane, choose Directories.
2. On the Directories page, choose your directory ID.
3. On the Directory details page, do one of the following:
• If you have multiple Regions showing under Multi-Region replication, select the Region
where you want to add or remove domain controllers, and then choose the Scale & share
tab. For more information, see Primary vs additional Regions.
Deploying additional domain controllers Version 1.0 55

AWS Directory Service Administration Guide
• If you do not have any Regions showing under Multi-Region replication, choose the Scale &
share tab.
4. In the Domain controllers section, choose Edit.
5. Specify the number of domain controllers to add or remove from your directory, and then
choose Modify.
6. When AWS Managed Microsoft AD completes the deployment process, all domain controllers
show Active status, and both the assigned Availability Zone and Amazon VPC subnets appear.
New domain controllers are equally distributed across the Availability Zones and subnets
where your directory is already deployed.
Related AWS Security Blog Article
• How to increase the redundancy and performance of your AWS Directory Service for AWS
Managed Microsoft AD by adding domain controllers
Upgrading your AWS Managed Microsoft AD
You can upgrade your Standard edition AWS Managed Microsoft AD to Enterprise edition. The
following outlines the differences between Standard and Enterprise editions:
• Standard Edition: AWS Managed Microsoft AD (Standard Edition) is optimized to be a primary
directory for small and midsize businesses with up to 5,000 employees. It provides you
enough storage capacity to support up to 30,000* directory objects, such as users, groups, and
computers.
• Enterprise Edition: AWS Managed Microsoft AD (Enterprise Edition) is designed to support
enterprise organizations with up to 500,000* directory objects.
* Upper limits are approximations. Your directory may support more or less directory objects
depending on the size of your objects and the behavior and performance needs of your
applications.
To upgrade your Standard edition AWS Managed Microsoft AD Active Directory to Enterprise
edition, you'll need to contact AWS Support. For more information, see Creating support cases and
case management in AWS Support User Guide.
Upgrading your AWS Managed Microsoft AD Version 1.0 56

AWS Directory Service Administration Guide
Note
Multi-region replication is only available in AWS Managed Microsoft AD Enterprise edition
for the following regions:
• US East (Ohio)
• US East (N. Virginia)
• US West (N. California)
• US West (Oregon)
• Asia Pacific (Mumbai)
• Asia Pacific (Osaka)
• Asia Pacific (Seoul)
• Asia Pacific (Singapore)
• Asia Pacific (Sydney)
• Asia Pacific (Tokyo)
• Canada (Central)
• China (Beijing)
• China (Ningxia)
• Europe (Frankfurt)
• Europe (Ireland)
• Europe (London)
• Europe (Paris)
• Europe (Stockholm)
• South America (São Paulo)
• AWS GovCloud (US-West)
• AWS GovCloud (US-East)
There are a few limitations to be aware of when upgrading your AWS Managed Microsoft AD. They
are:
• The upgrade will incur additional cost. See AWS Directory Service Pricing for more information.
• Once your Active Directory is upgraded, it can't be reverted back to its previous edition.
Upgrading your AWS Managed Microsoft AD Version 1.0 57

AWS Directory Service Administration Guide
• Previous snapshots can't be used to restore the Active Directory after it has been upgraded.
• Upgrades occur at a scheduled date and time agreed upon with AWS Support. Upgrades occur
between Monday through Friday, 9 AM - 5 PM Pacific Standard Time.
• The upgrade process requires four to five hours.
• During the upgrade process, the domain controllers of your AWS Managed Microsoft AD are
upgraded one at a time. This can negatively impact your performance and can cause downtime
during your maintenance window.
• The upgrade process will change the hostname of each domain controller instance, but their IP
addresses will remain the same.
• If you are using LDAPS (Lightweight Directory Access Protocol over SSL), the domain controllers
will need new certificates.
Adding alternate UPN suffixes to your AWS Managed Microsoft AD
You can simplify the management of Active Directory (AD) login names and improve the user login
experience by adding alternate user principal name (UPN) suffixes to your AWS Managed Microsoft
AD directory. To do that, you must be logged on with the Admin account or with an account that
is a member of the AWS Delegated User Principal Name Suffix Administrators group. For more
information about this group, see What gets created with your AWS Managed Microsoft AD.
To add alternate UPN suffixes
1. Open the Amazon EC2 console at https://console.aws.amazon.com/ec2/.
2. Locate an Amazon EC2 instance that is joined to your AWS Managed Microsoft AD directory.
Select the instance and then choose Connect.
3. In the Server Manager window, choose Tools. Then choose Active Directory Domains and
Trusts.
4. In the left pane, right-click Active Directory Domains and Trusts and then choose Properties .
5.
In the UPN Suffixes tab, type an alternative UPN suffix (such as sales.example.com).
Choose Add and then choose Apply.
6. If you need to add additional alternative UPN suffixes, repeat step 5 until you have the UPN
suffixes you require.
Adding alternate UPN suffixes Version 1.0 58

AWS Directory Service Administration Guide
Renaming your AWS Managed Microsoft AD directory's site name
You can rename your AWS Managed Microsoft AD directory’s default site name so that it matches
with your existing Microsoft Active Directory (AD) site names. This makes it faster for AWS
Managed Microsoft AD to find and authenticate your existing AD users in your on-premises
directory. The result is a better experience when users login to AWS resources such as Amazon EC2
and Amazon RDS for SQL Server instances that you have joined to your AWS Managed Microsoft
AD directory.
To do that, you must be logged in with the Admin account or with an account that is a member
of the AWS Delegated Sites and Services Administrators group. For more information about this
group, see What gets created with your AWS Managed Microsoft AD.
For additional benefits on renaming your site in relation to trusts, see Domain Locator Across a
Forest Trust on Microsoft's website.
To rename the AWS Managed Microsoft AD site name
1. Open the Amazon EC2 console at https://console.aws.amazon.com/ec2/.
2. Locate an Amazon EC2 instance that is joined to your AWS Managed Microsoft AD directory.
Select the instance and then choose Connect.
3. In the Server Manager window, choose Tools. Then choose Active Directory Sites and
Services.
4. In the left pane, expand the Sites folder, right-click the site name (default is Default-Site-
Name), and then choose Rename.
5. Type the new site name, and then choose Enter.
Deleting your AWS Managed Microsoft AD
When an AWS Managed Microsoft AD is deleted, all of the directory data and snapshots are
deleted and cannot be recovered. After the directory is deleted, all instances that are joined to
the directory remain intact. You cannot, however, use your directory credentials to log in to these
instances. You need to log in to these instances with a user account that is local to the instance.
Renaming your directory's site name Version 1.0 59

AWS Directory Service Administration Guide
To delete a directory
1. In the AWS Directory Service console navigation pane, select Directories. Ensure you are in the
AWS Region where your Active Directory is deployed. For more information, see Choosing a
Region.
2. Ensure that no AWS applications are enabled for the directory you intend to delete. Enabled
AWS applications will prevent you for deleting your AWS Managed Microsoft AD or Simple AD.
a. On the Directories page, choose your directory ID.
b. On the Directory details page, select the Application management tab. In the AWS apps
& services section, you see which AWS applications are enabled for your directory.
• Disable AWS Management Console access. For more information, see Disabling AWS
Management Console access.
• To disable Amazon WorkSpaces, you must deregister the service from the directory in
the WorkSpaces console. For more information, see Delete a directory in the Amazon
WorkSpaces Administration Guide.
• To disable Amazon WorkDocs, you must delete the Amazon WorkDocs site in the
Amazon WorkDocs console. For more information, see Delete a site in the Amazon
WorkDocs Administration Guide.
• To disable Amazon WorkMail, you must remove the Amazon WorkMail organization in
the Amazon WorkMail console. For more information, see Remove an organization in
the Amazon WorkMail Administrator Guide.
• To disable Amazon FSx for Windows File Server, you must remove the Amazon FSx file
system from the domain. For more information, see Working with Active Directory in
FSx for Windows File Server in the Amazon FSx for Windows File Server User Guide.
• To disable Amazon Relational Database Service, you must remove the Amazon RDS
instance from the domain. For more information, see Managing a DB instance in a
domain in the Amazon RDS User Guide.
• To disable AWS Client VPN Service, you must remove the directory service from the
Client VPN Endpoint. For more information, see Work with Client VPN in the AWS Client
VPN Administrator Guide.
• To disable Amazon Connect, you must delete the Amazon Connect Instance. For
more information, see Delete your Amazon Connect instance in the Amazon Connect
Administration Guide.
Deleting your AWS Managed Microsoft AD Version 1.0 60

AWS Directory Service Administration Guide
• To disable Amazon QuickSight, you must unsubscribe from Amazon QuickSight.
For more information, see Closing your Amazon QuickSight account in the Amazon
QuickSight User Guide.
Note
If you are using AWS IAM Identity Center and have previously connected it to the
AWS Managed Microsoft AD directory you plan to delete, you must first change
the identity source before you can delete it. For more information, see Change
your identity source in the IAM Identity Center User Guide.
3. In the navigation pane, choose Directories.
4. Select only the directory to be deleted and click Delete. It takes several minutes for the
directory to be deleted. When the directory has been deleted, it is removed from your
directory list.
Secure your AWS Managed Microsoft AD
You can use password policies, features like multi-factor authentication (MFA), and settings to
secure your AWS Managed Microsoft AD. Ways you can secure your directory include:
• Understand how the password policies in Active Directory works so they can be applied to AWS
Managed Microsoft AD users. You can also delegate which user can manage your AWS Managed
Microsoft AD password policies.
• Enable MFA which increases your AWS Managed Microsoft AD security.
• >Enable Lightweight Directory Access Protocol over Secure Socket Layer (SSL)/Transport Layer
Security (TLS) (LDAPS) so that communications over LDAP are encrypted and improves security.
• Manage your AWS Managed Microsoft AD compliance with standards like Federal Risk and
Authorization Management Program (FedRAMP) and Payment Card Industry (PCI) Data Security
Standard (DSS).
• Enhance your AWS Managed Microsoft AD network security configuration> by modifying AWS
Security Group to meet your environment needs.
• Edit your AWS Managed Microsoft AD directory security settings like Certificate Base
Authentication, Secure Channel Cipher and Protocol to meet your needs.
Secure your directory Version 1.0 61

AWS Directory Service Administration Guide
• Set up AWS Private Certificate Authority Connector for AD so you can issue and manage
certificates for your AWS Managed Microsoft AD with AWS Private CA.
Understanding AWS Managed Microsoft AD password policies
AWS Managed Microsoft AD enables you to define and assign different password and account
lockout policies (also referred to as fine-grained password policies) for groups of users you manage
in your AWS Managed Microsoft AD domain. When you create an AWS Managed Microsoft AD
directory, a default domain policy is created and applied to the Active Directory. This policy
includes the following settings:
Policy Setting
Enforce password history 24 passwords remembered
Maximum password age 42 days *
Minimum password age 1 day
Minimum password length 7 characters
Password must meet complexity requirements Enabled
Store passwords using reversible encryption Disabled
Note
* The 42 day maximum password age includes the admin password.
For example, you can assign a less strict policy setting for employees that have access to low
sensitivity information only. For senior managers who regularly access confidential information you
can apply more strict settings.
The following resources provide more information on Microsoft Active Directory fine-grained
password policies and security policies:
• Configure security policy settings
Understanding password policies Version 1.0 62

AWS Directory Service Administration Guide
• Password complexity requirements
• Password complexity security considerations
AWS provides a set of fine-grained password policies in AWS Managed Microsoft AD that you can
configure and assign to your groups. To configure the policies, you can use standard Microsoft
policy tools such as Active Directory Administrative Center. To get started with the Microsoft policy
tools, see Installing Active Directory Administration Tools for AWS Managed Microsoft AD.
How password policies are applied
There are differences in how the fine-grained password policies are applied depending on whether
the password was reset or changed. Domain users can change their own password. An Active
Directory administrator or user with the necessary permissions can reset users passwords. See the
following chart for more information.
Policy Password Reset Password Change
Enforce password history
No Yes
Maximum password age
Yes Yes
Minimum password age
No Yes
Minimum password length
Yes Yes
Understanding password policies Version 1.0 63

AWS Directory Service Administration Guide
Policy Password Reset Password Change
Password must meet
complexity requirements
Yes Yes
These differences have security implications. For example, whenever a user's password is reset,
the enforce password history and minimum password age policies are not enforced. For more
information, see Microsoft documentation on the security considerations related to enforce
password history and minimum password age policies.
Supported policy settings
AWS Managed Microsoft AD includes five fine-grained policies with a non-editable precedence
value. The policies have a number of properties you can configure to enforce the strength of
passwords, and account lock-out actions in the event of login failures. You can assign the policies
to zero or more Active Directory groups. If an end-user is a member of multiple groups and receives
more than one password policy, Active Directory enforces the policy with the lowest precedence
value.
AWS pre-defined password policies
The following table lists the five policies included in your AWS Managed Microsoft AD directory and
their assigned precedence value. For more information, see Precedence.
Policy name Precedence
CustomerPSO-01 10
CustomerPSO-02 20
CustomerPSO-03 30
CustomerPSO-04 40
CustomerPSO-05 50
Understanding password policies Version 1.0 64

AWS Directory Service Administration Guide
Password policy properties
You may edit the following properties in your password policies to conform to the compliance
standards that meet your business needs.
• Policy name
• Enforce password history
• Minimum password length
• Minimum password age
• Maximum password age
• Store passwords using reversible encryption
• Password must meet complexity requirements
You cannot modify the precedence values for these policies. For more details about how these
settings affect password enforcement, see AD DS: Fine-grained password policies on the Microsoft
TechNet website. For general information about these policies, see Password policy on the
Microsoft TechNet website.
Account lockout policies
You may also modify the following properties of your password policies to specify if and how
Active Directory should lockout an account after login failures:
• Number of failed logon attempts allowed
• Account lockout duration
• Reset failed logon attempts after some duration
For general information about these policies, see Account lockout policy on the Microsoft TechNet
website.
Precedence
Policies with a lower precedence value have higher priority. You assign password policies to Active
Directory security groups. While you should apply a single policy to a security group, a single user
may receive more than one password policy. For example, suppose jsmith is a member of the
HR group and also a member of the MANAGERS group. If you assign CustomerPSO-05 (which has
Understanding password policies Version 1.0 65

AWS Directory Service Administration Guide
a precedence of 50) to the HR group, and CustomerPSO-04 (which has a precedence of 40) to
MANAGERS, CustomerPSO-04 has the higher priority and Active Directory applies that policy to
jsmith.
If you assign multiple policies to a user or group, Active Directory determines the resultant policy
as follows:
1. A policy you assign directly to the user object applies.
2. If no policy is assigned directly to the user object, the policy with the lowest precedence value of
all policies received by the user as a result of group membership applies.
For additional details, see AD DS: Fine-grained password policies on the Microsoft TechNet website.
Topics
• Assigning password policies to your AWS Managed Microsoft AD users
• Delegating who can manage your AWS Managed Microsoft AD password policies
Related AWS Security blog article
• How to configure even stronger password policies to help meet your security standards by using
AWS Directory Service for AWS Managed Microsoft AD
Assigning password policies to your AWS Managed Microsoft AD users
User accounts that are a member of the AWS Delegated Fine Grained Password Policy
Administrators security group can use the following procedure to assign policies to users and
security groups.
To assign password policies to your users
1. Launch Active Directory administrative center (ADAC) from any managed EC2 instance that you
joined to your AWS Managed Microsoft AD domain.
2. Switch to the Tree View and navigate to System\Password Settings Container.
3. Double click on the fine-grained policy you want to edit. Click Add to edit the policy
properties, and add users or security groups to the policy. For more information about the
default fine-grained policies provided with AWS Managed Microsoft AD, see AWS pre-defined
password policies.
Understanding password policies Version 1.0 66

AWS Directory Service Administration Guide
4. To verify the password policy has been applied, run the following PowerShell command:
Get-ADUserResultantPasswordPolicy -Identity 'username'
Note
Avoid using the net user command as its results could be inaccurate.
If you do not configure any of the five password policies in your AWS Managed Microsoft AD
directory, Active Directory uses the default domain group policy. For additional details on using
Password Settings Container, see this Microsoft blog post.
Delegating who can manage your AWS Managed Microsoft AD password policies
You can delegate permissions to manage password policies to specific user accounts you created
in your AWS Managed Microsoft AD by adding the accounts to the AWS Delegated Fine Grained
Password Policy Administrators security group. When an account becomes a member of this
group, the account has permissions to edit and configure any of the password policies listed
previously.
To delegate who can manage password policies
1. Launch Active Directory administrative center (ADAC) from any managed EC2 instance that you
joined to your AWS Managed Microsoft AD domain.
2. Switch to the Tree View and navigate to the AWS Delegated Groups OU. For more
information about this OU, see What gets created with your AWS Managed Microsoft AD.
3. Find the AWS Delegated Fine Grained Password Policy Administrators user group. Add any
users or groups from your domain to this group.
Enabling multi-factor authentication for AWS Managed Microsoft AD
You can enable multi-factor authentication (MFA) for your AWS Managed Microsoft AD directory
to increase security when your users specify their AD credentials to access Supported Amazon
Enterprise applications. When you enable MFA, your users enter their username and password
(first factor) as usual, and they must also enter an authentication code (the second factor) they
obtain from your virtual or hardware MFA solution. These factors together provide additional
Enabling multi-factor authentication Version 1.0 67

AWS Directory Service Administration Guide
security by preventing access to your Amazon Enterprise applications, unless users supply valid
user credentials and a valid MFA code.
To enable MFA, you must have an MFA solution that is a Remote authentication dial-in user service
(RADIUS) server, or you must have an MFA plugin to a RADIUS server already implemented in your
on-premises infrastructure. Your MFA solution should implement One Time Passcodes (OTP) that
users obtain from a hardware device or from software running on a device such as a cell phone.
RADIUS is an industry-standard client/server protocol that provides authentication, authorization,
and accounting management to enable users to connect to network services. AWS Managed
Microsoft AD includes a RADIUS client that connects to the RADIUS server upon which you have
implemented your MFA solution. Your RADIUS server validates the username and OTP code. If
your RADIUS server successfully validates the user, AWS Managed Microsoft AD then authenticates
the user against Active Directory. Upon successful Active Directory authentication, users can
then access the AWS application. Communication between the AWS Managed Microsoft AD
RADIUS client and your RADIUS server require you to configure AWS security groups that enable
communication over port 1812.
You can enable multi-factor authentication for your AWS Managed Microsoft AD directory by
performing the following procedure. For more information about how to configure your RADIUS
server to work with AWS Directory Service and MFA, see Multi-factor authentication prerequisites.
Considerations
The following are some considerations for multi-factor authentication for your AWS Managed
Microsoft AD:
• Multi-factor authentication is not available for Simple AD. However, MFA can be enabled for your
AD Connector directory. For more information, see Enabling multi-factor authentication for AD
Connector.
• MFA is a Regional feature of AWS Managed Microsoft AD. If you are using Configure Multi-Region
replication for AWS Managed Microsoft AD, the following procedures must be applied separately
in each Region. For more information, see Global vs Regional features.
• If you intend to use AWS Managed Microsoft AD for external communications, we recommend
you configure a Network Address Translation (NAT) Internet Gateway or Internet Gateway
outside of the AWS network for these communications.
• If you wish to support external communications between your AWS Managed Microsoft AD and
your RADIUS server hosted on the AWS network, please contact AWS Support.
Enabling multi-factor authentication Version 1.0 68

AWS Directory Service Administration Guide
• All Amazon Enterprise IT applications including WorkSpaces, Amazon WorkDocs, Amazon
WorkMail, Amazon QuickSight, and access to AWS IAM Identity Center and AWS Management
Console are supported when using AWS Managed Microsoft AD and AD Connector with MFA.
• For information about how to configure basic user access to Amazon Enterprise applications,
AWS Single Sign-On and the AWS Management Console using AWS Directory Service, see
Access to AWS applications and services from your AWS Managed Microsoft AD and Enabling
AWS Management Console access with AWS Managed Microsoft AD credentials.
• See the following this AWS Security Blog post to learn how to enable MFA for Amazon
WorkSpaces users on your AWS Managed Microsoft AD, How to enable multi-factor
authentication for AWS services by using AWS Managed Microsoft AD and on-premises
credentials
Enable multi-factor authentication for AWS Managed Microsoft AD
The following procedure shows you how to enable multi-factor authentication for AWS Managed
Microsoft AD.
1. Identify the IP address of your RADIUS MFA server and your AWS Managed Microsoft AD
directory.
2. Edit your Virtual Private Cloud (VPC) security groups to enable communications over port
1812 between your AWS Managed Microsoft AD IP end points and your RADIUS MFA server.
3. In the AWS Directory Service console navigation pane, select Directories.
4. Choose the directory ID link for your AWS Managed Microsoft AD directory.
5. On the Directory details page, do one of the following:
• If you have multiple Regions showing under Multi-Region replication, select the Region
where you want to enable MFA, and then choose the Networking & security tab. For more
information, see Primary vs additional Regions.
• If you do not have any Regions showing under Multi-Region replication, choose the
Networking & security tab.
6. In the Multi-factor authentication section, choose Actions, and then choose Enable.
7. On the Enable multi-factor authentication (MFA) page, provide the following values:
Display label
Provide a label name.
Enabling multi-factor authentication Version 1.0 69

AWS Directory Service Administration Guide
RADIUS server DNS name or IP addresses
The IP addresses of your RADIUS server endpoints, or the IP address of your RADIUS server
load balancer. You can enter multiple IP addresses by separating them with a comma (e.g.,
192.0.0.0,192.0.0.12).
Note
RADIUS MFA is applicable only to authenticate access to the AWS Management
Console, or to Amazon Enterprise applications and services such as WorkSpaces,
Amazon QuickSight, or Amazon Chime. It does not provide MFA to Windows
workloads running on EC2 instances, or for signing into an EC2 instance. AWS
Directory Service does not support RADIUS Challenge/Response authentication.
Users must have their MFA code at the time they enter their user name and
password. Alternatively, you must use a solution that performs MFA out-of-band
such as SMS text verification for the user. In out-of-band MFA solutions, you must
make sure you set the RADIUS time-out value appropriately for your solution. When
using an out-of-band MFA solution, the sign-in page will prompt the user for an
MFA code. In this case, users must enter their password in both the password field
and the MFA field.
Port
The port that your RADIUS server is using for communications. Your on-premises network
must allow inbound traffic over the default RADIUS server port (UDP:1812) from the AWS
Directory Service servers.
Shared secret code
The shared secret code that was specified when your RADIUS endpoints were created.
Confirm shared secret code
Confirm the shared secret code for your RADIUS endpoints.
Protocol
Select the protocol that was specified when your RADIUS endpoints were created.
Enabling multi-factor authentication Version 1.0 70

AWS Directory Service Administration Guide
Server timeout (in seconds)
The amount of time, in seconds, to wait for the RADIUS server to respond. This must be a
value between 1 and 50.
Note
We recommend configuring your RADIUS server timeout to 20 seconds or less. If
the timeout exceeds 20 seconds, the system cannot retry with another RADIUS
server and may result in a timeout failure.
Max RADIUS request retries
The number of times that communication with the RADIUS server is attempted. This must
be a value between 0 and 10.
Multi-factor authentication is available when the RADIUS Status changes to Enabled.
8. Choose Enable.
Enable Secure LDAP or LDAPS
Lightweight Directory Access Protocol (LDAP) is a standard communications protocol used to read
and write data to and from Active Directory. Some applications use LDAP to add, remove, or search
users and groups in Active Directory or to transport credentials for authenticating users in Active
Directory. Every LDAP communication includes a client (such as an application) and a server (such
as Active Directory).
By default, communications over LDAP are not encrypted. This makes it possible for a malicious
user to use network monitoring software to view data packets over the wire. This is why many
corporate security policies typically require that organizations encrypt all LDAP communication.
To mitigate this form of data exposure, AWS Managed Microsoft AD provides an option: You can
enable LDAP over Secure Sockets Layer (SSL)/Transport Layer Security (TLS), also known as LDAPS.
With LDAPS, you can improve security across the wire. You can also meet compliance requirements
by encrypting all communications between your LDAP-enabled applications and AWS Managed
Microsoft AD.
Enable Secure LDAP or LDAPS Version 1.0 71

AWS Directory Service Administration Guide
AWS Managed Microsoft AD provides support for LDAPS in the following deployment scenarios:
• Server-side LDAPS encrypts LDAP communications between your commercial or homegrown
LDAP-aware applications (acting as LDAP clients) and AWS Managed Microsoft AD (acting as
an LDAP server). For more information, see Enabling server-side LDAPS using AWS Managed
Microsoft AD.
• Client-side LDAPS encrypts LDAP communications between AWS applications such as
WorkSpaces (acting as LDAP clients) and your self-managed (on-premises) Active Directory
(acting as LDAP server). For more information, see Enabling client-side LDAPS using AWS
Managed Microsoft AD.
Topics
• Enabling server-side LDAPS using AWS Managed Microsoft AD
• Enabling client-side LDAPS using AWS Managed Microsoft AD
Enabling server-side LDAPS using AWS Managed Microsoft AD
Server-side Lightweight Directory Access Protocol Secure Sockets Layer (SSL)/Transport Layer
Security (TLS) (LDAPS) support encrypts LDAP communications between your commercial or
homegrown LDAP-aware applications and your AWS Managed Microsoft AD directory. This helps to
improve security across the wire and meet compliance requirements using the Secure Sockets Layer
(SSL) cryptographic protocol.
Enable server-side LDAPS
For detailed instructions on how to set up and configure server-side LDAPS and your certificate
authority (CA) server, see How to Enable Server-Side LDAPS for Your AWS Managed Microsoft AD
Directory on the AWS Security Blog.
You must do most of the setup from the Amazon EC2 instance that you use to manage your AWS
Managed Microsoft AD domain controllers. The following steps guide you through enabling LDAPS
for your domain in the AWS Cloud.
If you would like to use automation to setup your PKI Infrastructure, you can use the Microsoft
Public Key Infrastructure on AWS QuickStart Guide. Specifically you will want to follow the
instructions in the guide to load the template for Deploy Microsoft PKI into an existing VPC on
AWS. Once you load the template, be sure to choose AWSManaged when you get to the Active
Enable Secure LDAP or LDAPS Version 1.0 72

AWS Directory Service Administration Guide
Directory Domain Services Type option. If you used the QuickStart guide, you can jump directly to
Step 3: Create a certificate template.
Topics
• Step 1: Delegate who can enable LDAPS
• Step 2: Set up your certificate authority
• Step 3: Create a certificate template
• Step 4: Add security group rules
Step 1: Delegate who can enable LDAPS
To enable server-side LDAPS, you must be a member of the Admins or AWS Delegated Enterprise
Certificate Authority Administrators group in your AWS Managed Microsoft AD directory.
Alternatively, you can be the default administrative user (Admin account). If you prefer, you can
have a user other than the Admin account setup LDAPS. In that case, add that user to the Admins
or AWS Delegated Enterprise Certificate Authority Administrators group in your AWS Managed
Microsoft AD directory.
Step 2: Set up your certificate authority
Before you can enable server-side LDAPS, you must create a certificate. This certificate must
be issued by a Microsoft enterprise CA server that is joined to your AWS Managed Microsoft
AD domain. Once created, the certificate must be installed on each of your domain controllers
in that domain. This certificate lets the LDAP service on the domain controllers listen for and
automatically accept SSL connections from LDAP clients.
Note
Server-side LDAPS with AWS Managed Microsoft AD does not support certificates that
are issued by a standalone CA. It also does not support certificates issued by a third-party
certification authority.
Depending on your business need, you have the following options for setting up or connecting to a
CA in your domain:
• Create a subordinate Microsoft Enterprise CA – (Recommended) With this option, you can
deploy a subordinate Microsoft enterprise CA server in the AWS Cloud. The server can use
Enable Secure LDAP or LDAPS Version 1.0 73

AWS Directory Service Administration Guide
Amazon EC2 so that it works with your existing root Microsoft CA. For more information about
how to set up a subordinate Microsoft enterprise CA, see Step 4: Add a Microsoft Enterprise
CA to your AWS Microsoft AD directory in How to Enable Server-Side LDAPS for Your AWS
Managed Microsoft AD Directory.
• Create a root Microsoft enterprise CA – With this option, you can create a root Microsoft
enterprise CA in the AWS Cloud using Amazon EC2 and join it to your AWS Managed Microsoft
AD domain. This root CA can issue the certificate to your domain controllers. For more
information about setting up a new root CA, see Step 3: Install and configure an offline CA in
How to Enable Server-Side LDAPS for Your AWS Managed Microsoft AD Directory.
For more information about how to join your EC2 instance to the domain, see Ways to join an
Amazon EC2 instance to your AWS Managed Microsoft AD.
Step 3: Create a certificate template
After your enterprise CA has been set up, you can configure the Kerberos Authentication certificate
template.
To create a certificate template
1. Launch Microsoft Windows Server Manager. Select Tools > Certification Authority.
2. In the Certificate Authority window, expand the Certificate Authority tree in the left pane.
Right-click Certificate Templates, and choose Manage.
3. In the Certificate Templates Console window, right-click Kerberos Authentication and choose
Duplicate Template.
4. The Properties of New Template window will pop up.
5. In the Properties of New Template window, go to the Compatibility tab, and then do the
following:
a. Change Certification Authority to the OS that matches your CA.
b. If a Resulting changes window pops up, select OK.
c. Change Certification recipient to Windows 10 / Windows Server 2016.
Note
AWS Managed Microsoft AD is powered by Windows Server 2019.
Enable Secure LDAP or LDAPS Version 1.0 74

AWS Directory Service Administration Guide
d. If a Resulting changes windows pops up, select OK.
6. Click the General tab and change the Template display name to LDAPOverSSL or any other
name you would prefer.
7. Click the Security tab, and choose Domain Controllers in the Group or user names section. In
the Permissions for Domain Controllers section, verify that the Allow check boxes for Read,
Enroll, and Autoenroll are checked.
8. Choose OK to create the LDAPOverSSL (or the name you specified above) certificate template.
Close the Certificate Templates Console window.
9. In the Certificate Authority window, right-click Certificate Templates, and choose New >
Certificate Template to Issue.
10. In the Enable Certificate Templates window, choose LDAPOverSSL (or the name you specified
above), and then choose OK.
Step 4: Add security group rules
In the final step, you must open the Amazon EC2 console and add security group rules. These rules
allow your domain controllers to connect to your enterprise CA to request a certificate. To do this,
you add inbound rules so that your enterprise CA can accept incoming traffic from your domain
controllers. Then you add outbound rules to allow traffic from your domain controllers to the
enterprise CA.
Once both rules have been configured, your domain controllers request a certificate from your
enterprise CA automatically and enable LDAPS for your directory. The LDAP service on your domain
controllers is now ready to accept LDAPS connections.
To configure security group rules
1. Navigate to your Amazon EC2 console at https://console.aws.amazon.com/ec2 and sign in
with administrator credentials.
2. In the left pane, choose Security Groups under Network & Security.
3. In the main pane, choose the AWS security group for your CA.
4. Choose the Inbound tab, and then choose Edit.
5. In the Edit inbound rules dialog box, do the following:
• Choose Add Rule.
• Choose All traffic for Type and Custom for Source.
Enable Secure LDAP or LDAPS Version 1.0 75

AWS Directory Service Administration Guide
• Enter your directory’s AWS security group (for example, sg-123456789) in the box next to
Source.
• Choose Save.
6. Now choose the AWS security group of your AWS Managed Microsoft AD directory. Choose the
Outbound tab and then choose Edit.
7. In the Edit outbound rules dialog box, do the following:
• Choose Add Rule.
• Choose All traffic for Type and Custom for Destination.
• Type your CA's AWS security group in the box next to Destination.
• Choose Save.
You can test the LDAPS connection to the AWS Managed Microsoft AD directory using the LDP
tool. The LDP tool comes with the Active Directory Administrative Tools. For more information, see
Installing Active Directory Administration Tools for AWS Managed Microsoft AD.
Note
Before you test the LDAPS connection, you must wait up to 30 minutes for the subordinate
CA to issue a certificate to your domain controllers.
For additional details about server-side LDAPS and to see an example use case on how to set it up,
see How to Enable Server-Side LDAPS for Your AWS Managed Microsoft AD Directory on the AWS
Security Blog.
Enabling client-side LDAPS using AWS Managed Microsoft AD
Client-side Lightweight Directory Access Protocol Secure Sockets Layer (SSL)/Transport Layer
Security (TLS) (LDAPS) support in AWS Managed Microsoft AD encrypts communications between
self-managed (on-premises) Microsoft Active Directory (AD) and AWS applications. Examples of
such applications include WorkSpaces, AWS IAM Identity Center, Amazon QuickSight, and Amazon
Chime. This encryption helps you to better protect your organization’s identity data and meet your
security requirements.
Enable Secure LDAP or LDAPS Version 1.0 76

AWS Directory Service Administration Guide
Prerequisites
Before you enable client-side LDAPS, you need to meet the following requirements.
Topics
• Create a trust relationship between your AWS Managed Microsoft AD and self-managed
Microsoft Active Directory
• Deploy server certificates in Active Directory
• Certificate Authority certificate requirements
• Networking requirements
Create a trust relationship between your AWS Managed Microsoft AD and self-managed
Microsoft Active Directory
First, you need to establish a trust relationship between your AWS Managed Microsoft AD and self-
managed Microsoft Active Directory to enable client-side LDAPS. For more information, see the
section called “Creating a trust relationship”.
Deploy server certificates in Active Directory
In order to enable client-side LDAPS, you need to obtain and install server certificates for each
domain controller in Active Directory. These certificates will be used by the LDAP service to listen
for and automatically accept SSL connections from LDAP clients. You can use SSL certificates
that are either issued by an in-house Active Directory Certificate Services (ADCS) deployment or
purchased from a commercial issuer. For more information on Active Directory server certificate
requirements, see LDAP over SSL (LDAPS) Certificate on the Microsoft website.
Certificate Authority certificate requirements
A certificate authority (CA) certificate, which represents the issuer of your server certificates, is
required for client-side LDAPS operation. CA certificates are matched with the server certificates
that are presented by your Active Directory domain controllers to encrypt LDAP communications.
Note the following CA certificate requirements:
• Enterprise Certification Authority (CA) is required to enable client-side LDAPS. You can use
either Active Directory Certificate Service, a third-party commercial certificate authority, or AWS
Certificate Manager. For more information about Microsoft Enterprise Certificate Authority, see
Microsoft documentation.
Enable Secure LDAP or LDAPS Version 1.0 77

AWS Directory Service Administration Guide
• To register a certificate, it must be more than 90 days away from expiration.
• Certificates must be in Privacy-Enhanced Mail (PEM) format. If exporting CA certificates from
inside Active Directory, choose base64 encoded X.509 (.CER) as the export file format.
• A maximum of five (5) CA certificates can be stored per AWS Managed Microsoft AD directory.
• Certificates using the RSASSA-PSS signature algorithm are not supported.
• CA certificates that chain to every server certificate in every trusted domain must be registered.
Networking requirements
AWS application LDAP traffic will run exclusively on TCP port 636, with no fallback to LDAP port
389. However, Windows LDAP communications supporting replication, trusts, and more will
continue using LDAP port 389 with Windows-native security. Configure AWS security groups
and network firewalls to allow TCP communications on port 636 in AWS Managed Microsoft AD
(outbound) and self-managed Active Directory (inbound). Leave open LDAP port 389 between AWS
Managed Microsoft AD and self-managed Active Directory.
Enable client-side LDAPS
To enable client-side LDAPS, you import your certificate authority (CA) certificate into AWS
Managed Microsoft AD, and then enable LDAPS on your directory. Upon enabling, all LDAP traffic
between AWS applications and your self-managed Active Directory will flow with Secure Sockets
Layer (SSL) channel encryption.
You can use two different methods to enable client-side LDAPS for your directory. You can use
either the AWS Management Console method or the AWS CLI method.
Note
Client-Side LDAPS is a Regional feature of AWS Managed Microsoft AD. If you are using
Configure Multi-Region replication for AWS Managed Microsoft AD, the following
procedures must be applied separately in each Region. For more information, see Global vs
Regional features.
Topics
• Step 1: Register a certificate in AWS Directory Service
• Step 2: Check registration status
Enable Secure LDAP or LDAPS Version 1.0 78

AWS Directory Service Administration Guide
• Step 3: Enable client-side LDAPS
• Step 4: Check LDAPS status
Step 1: Register a certificate in AWS Directory Service
Use either of the following methods to register a certificate in AWS Directory Service.
Method 1: To register your certificate in AWS Directory Service (AWS Management Console)
1. In the AWS Directory Service console navigation pane, select Directories.
2. Choose the directory ID link for your directory.
3. On the Directory details page, do one of the following:
• If you have multiple Regions showing under Multi-Region replication, select the Region
where you want to register your certificate, and then choose the Networking & security tab.
For more information, see Primary vs additional Regions.
• If you do not have any Regions showing under Multi-Region replication, choose the
Networking & security tab.
4. In the Client-side LDAPS section, select the Actions menu, and then select Register
certificate.
5. In the Register a CA certificate dialog box, select Browse, and then select the certificate and
choose Open.
6. Choose Register certificate.
Method 2: To register your certificate in AWS Directory Service (AWS CLI)
• Run the following command. For the certificate data, point to the location of your CA
certificate file. A certificate ID will be provided in the response.
aws ds register-certificate --directory-id your_directory_id --certificate-data
file://your_file_path
Step 2: Check registration status
To see the status of a certificate registration or a list of registered certificates, use either of the
following methods.
Enable Secure LDAP or LDAPS Version 1.0 79

AWS Directory Service Administration Guide
Method 1: To check certificate registration status in AWS Directory Service (AWS Management
Console)
1. Go to the Client-side LDAPS section on the Directory details page.
2. Review the current certificate registration state that is displayed under the Registration status
column. When the registration status value changes to Registered, your certificate has been
successfully registered.
Method 2: To check certificate registration status in AWS Directory Service (AWS CLI)
•
Run the following command. If the status value returns Registered, your certificate has been
successfully registered.
aws ds list-certificates --directory-id your_directory_id
Step 3: Enable client-side LDAPS
Use either of the following methods to enable client-side LDAPS in AWS Directory Service.
Note
You must have successfully registered at least one certificate before you can enable client-
side LDAPS.
Method 1: To enable client-side LDAPS in AWS Directory Service (AWS Management Console)
1. Go to the Client-side LDAPS section on the Directory details page.
2. Choose Enable. If this option is not available, verify that a valid certificate has been
successfully registered, and then try again.
3. In the Enable client-side LDAPS dialog box, choose Enable.
Method 2: To enable client-side LDAPS in AWS Directory Service (AWS CLI)
• Run the following command.
aws ds enable-ldaps --directory-id your_directory_id --type Client
Enable Secure LDAP or LDAPS Version 1.0 80

AWS Directory Service Administration Guide
Step 4: Check LDAPS status
Use either of the following methods to check the LDAPS status in AWS Directory Service.
Method 1: To check LDAPS status in AWS Directory Service (AWS Management Console)
1. Go to the Client-side LDAPS section on the Directory details page.
2. If the status value is displayed as Enabled, LDAPS has been successfully configured.
Method 2: To check LDAPS status in AWS Directory Service (AWS CLI)
•
Run the following command. If the status value returns Enabled, LDAPS has been successfully
configured.
aws ds describe-ldaps-settings –-directory-id your_directory_id
Manage client-side LDAPS
Use these commands to manage your LDAPS configuration.
You can use two different methods to manage client-side LDAPS settings. You can use either the
AWS Management Console method or the AWS CLI method.
View certificate details
Use either of the following methods to see when a certificate is set to expire.
Method 1: To view certificate details in AWS Directory Service (AWS Management Console)
1. In the AWS Directory Service console navigation pane, select Directories.
2. Choose the directory ID link for your directory.
3. On the Directory details page, do one of the following:
• If you have multiple Regions showing under Multi-Region replication, select the Region
where you want to view the certificate, and then choose the Networking & security tab. For
more information, see Primary vs additional Regions.
• If you do not have any Regions showing under Multi-Region replication, choose the
Networking & security tab.
Enable Secure LDAP or LDAPS Version 1.0 81

AWS Directory Service Administration Guide
4. In the Client-side LDAPS section, under CA certificates, information about the certificate will
be displayed.
Method 2: To view certificate details in AWS Directory Service (AWS CLI)
•
Run the following command. For the certificate ID, use the identifier returned by register-
certificate or list-certificates.
aws ds describe-certificate --directory-id your_directory_id --certificate-
id your_cert_id
Deregister a certificate
Use either of the following methods to deregister a certificate.
Note
If only one certificate is registered, you must first disable LDAPS before you can deregister
the certificate.
Method 1: To deregister a certificate in AWS Directory Service (AWS Management Console)
1. In the AWS Directory Service console navigation pane, select Directories.
2. Choose the directory ID link for your directory.
3. On the Directory details page, do one of the following:
• If you have multiple Regions showing under Multi-Region replication, select the Region
where you want to deregister a certificate, and then choose the Networking & security tab.
For more information, see Primary vs additional Regions.
• If you do not have any Regions showing under Multi-Region replication, choose the
Networking & security tab.
4. In the Client-side LDAPS section, choose Actions, and then choose Deregister certificate.
5. In the Deregister a CA certificate dialog box, choose Deregister.
Enable Secure LDAP or LDAPS Version 1.0 82

AWS Directory Service Administration Guide
Method 2: To deregister a certificate in AWS Directory Service (AWS CLI)
•
Run the following command. For the certificate ID, use the identifier returned by register-
certificate or list-certificates.
aws ds deregister-certificate --directory-id your_directory_id --certificate-
id your_cert_id
Disable client-side LDAPS
Use either of the following methods to disable client-side LDAPS.
Method 1: To disable client-side LDAPS in AWS Directory Service (AWS Management Console)
1. In the AWS Directory Service console navigation pane, select Directories.
2. Choose the directory ID link for your directory.
3. On the Directory details page, do one of the following:
• If you have multiple Regions showing under Multi-Region replication, select the Region
where you want to disable client-side LDAPS, and then choose the Networking & security
tab. For more information, see Primary vs additional Regions.
• If you do not have any Regions showing under Multi-Region replication, choose the
Networking & security tab.
4. In the Client-side LDAPS section, choose Disable.
5. In the Disable client-side LDAPS dialog box, choose Disable.
Method 2: To disable client-side LDAPS in AWS Directory Service (AWS CLI)
• Run the following command.
aws ds disable-ldaps --directory-id your_directory_id --type Client
Certificate enrollment issues
The process to enroll your AWS Managed Microsoft AD domain controllers with the CA certificates
can take up to 30 minutes. If you experience issues with the certificate enrollment and want to
Enable Secure LDAP or LDAPS Version 1.0 83

AWS Directory Service Administration Guide
restart your AWS Managed Microsoft AD domain controllers, you can contact AWS Support. To
create a support case, see Creating support cases and case management.
Manage compliance for AWS Managed Microsoft AD
You can use AWS Managed Microsoft AD to support your Active Directory–aware applications,
in the AWS Cloud, that are subject to the following compliance requirements. However, your
applications will not adhere to compliance requirements if you use Simple AD.
Supported compliance standards
AWS Managed Microsoft AD has undergone auditing for the following standards and is eligible for
use as part of solutions for which you need to obtain compliance certification.
AWS Managed Microsoft AD meets Federal Risk and
Authorization Management Program (FedRAMP)
security requirements and has received a FedRAMP
Joint Authorization Board (JAB) Provisional Authority
to Operate (P-ATO) at the FedRAMP Moderate and High
Baseline. For more information about FedRAMP, see
FedRAMP compliance.
AWS Managed Microsoft AD has an Attestation of
Compliance for Payment Card Industry (PCI) Data
Security Standard (DSS) version 3.2 at Service Provider
Level 1. Customers who use AWS products and services to
store, process, or transmit cardholder data can use AWS
Managed Microsoft AD as they manage their own PCI DSS
compliance certification.
For more information about PCI DSS, including how to
request a copy of the AWS PCI Compliance Package, see
PCI DSS level 1. Importantly, you must configure fine-
grained password policies in AWS Managed Microsoft
Manage compliance for your directory Version 1.0 84

AWS Directory Service Administration Guide
AD to be consistent with PCI DSS version 3.2 standards
. For details on which policies must be enforced, see the
section below titled Enable PCI Compliance for Your AWS
Managed Microsoft AD Directory.
AWS has expanded its Health Insurance Portability
and Accountability Act (HIPAA) compliance program to
include AWS Managed Microsoft AD as a HIPAA eligible
service. If you have an executed Business Associate
Agreement (BAA) with AWS, you can use AWS Managed
Microsoft AD to help build your HIPAA-compliant
applications.
AWS offers a HIPAA-focused whitepaper for customers
who are interested in learning more about how they can
leverage AWS for the processing and storage of health
information. For more information, see HIPAA complianc
e.
Shared responsibility
Security, including FedRAMP, HIPAA and PCI compliance, is a shared responsibility. It is important
to understand that AWS Managed Microsoft AD compliance status does not automatically apply
to applications that you run in the AWS Cloud. You need to ensure that your use of AWS services
complies with the standards.
For a complete list of all the various AWS compliance programs that AWS Managed Microsoft AD
supports, see AWS services in scope by compliance program.
Enable PCI compliance for your AWS Managed Microsoft AD directory
To enable PCI compliance for your AWS Managed Microsoft AD directory, you must configure
fine-grained password policies as specified in the PCI DSS Attestation of Compliance (AOC) and
Responsibility Summary document provided by AWS Artifact.
For more information about using fine-grained password policies, see Understanding AWS
Managed Microsoft AD password policies.
Manage compliance for your directory Version 1.0 85

AWS Directory Service Administration Guide
Enhancing your AWS Managed Microsoft AD network security
configuration
The AWS Security Group that is provisioned for the AWS Managed Microsoft AD directory is
configured with the minimum inbound network ports required to support all known use cases for
your AWS Managed Microsoft AD directory. For more information on the provisioned AWS Security
Group, see What gets created with your AWS Managed Microsoft AD.
To further enhance the network security of your AWS Managed Microsoft AD directory, you can
modify the AWS Security Group based on the following common scenarios.
Scenarios
• AWS applications only support
• AWS applications only with trust support
• AWS applications and native Active Directory workload support
• AWS applications and native Active Directory workload support with trust support
AWS applications only support
All user accounts are provisioned only in your AWS Managed Microsoft AD to be used with
supported AWS applications, such as the following:
• Amazon Chime
• Amazon Connect
• Amazon QuickSight
• AWS IAM Identity Center
• Amazon WorkDocs
• Amazon WorkMail
• AWS Client VPN
• AWS Management Console
You can use the following AWS Security Group configuration to block all non-essential traffic to
your AWS Managed Microsoft AD domain controllers.
Enhancing network security Version 1.0 86

AWS Directory Service Administration Guide
Note
• The following are not compatible with this AWS Security Group configuration:
• Amazon EC2 instances
• Amazon FSx
• Amazon RDS for MySQL
• Amazon RDS for Oracle
• Amazon RDS for PostgreSQL
• Amazon RDS for SQL Server
• WorkSpaces
• Active Directory trusts
• Domain joined clients or servers
Inbound Rules
None.
Outbound Rules
None.
AWS applications only with trust support
All user accounts are provisioned in your AWS Managed Microsoft AD or trusted Active Directory to
be used with supported AWS applications, such as the following:
• Amazon Chime
• Amazon Connect
• Amazon QuickSight
• AWS IAM Identity Center
• Amazon WorkDocs
• Amazon WorkMail
• Amazon WorkSpaces
• AWS Client VPN
Enhancing network security Version 1.0 87

AWS Directory Service Administration Guide
• AWS Management Console
You can modify the provisioned AWS Security Group configuration to block all non-essential traffic
to your AWS Managed Microsoft AD domain controllers.
Note
• The following are not compatible with this AWS Security Group configuration:
• Amazon EC2 instances
• Amazon FSx
• Amazon RDS for MySQL
• Amazon RDS for Oracle
• Amazon RDS for PostgreSQL
• Amazon RDS for SQL Server
• WorkSpaces
• Active Directory trusts
• Domain joined clients or servers
• This configuration requires you to ensure the “On-premises CIDR” network is secure.
• TCP 445 is used for trust creation only and can be removed after the trust has been
established.
• TCP 636 is only required when LDAP over SSL is in use.
Inbound Rules
Protocol Port range Source Type of traffic Active Directory
usage
TCP & UDP 53 On-premises
CIDR
DNS User and
computer
authentication,
name resolution,
trusts
Enhancing network security Version 1.0 88

AWS Directory Service Administration Guide
Protocol Port range Source Type of traffic Active Directory
usage
TCP & UDP 88 On-premises
CIDR
Kerberos User and
computer
authentication,
forest level
trusts
TCP & UDP 389 On-premises
CIDR
LDAP Directory,
replication, user
and computer
authentication
group policy,
trusts
TCP & UDP 464 On-premises
CIDR
Kerberos
change / set
password
Replication, user
and computer
authentication,
trusts
TCP 445 On-premises
CIDR
SMB / CIFS Replication, user
and computer
authentication,
group policy
trusts
TCP 135 On-premises
CIDR
Replication RPC, EPM
TCP 636 On-premises
CIDR
LDAP SSL Directory,
replication, user
and computer
authentication
group policy,
trusts
Enhancing network security Version 1.0 89

AWS Directory Service Administration Guide
Protocol Port range Source Type of traffic Active Directory
usage
TCP 49152 - 65535 On-premises
CIDR
RPC Replication, user
and computer
authentication,
group policy,
trusts
TCP 3268 - 3269 On-premises
CIDR
LDAP GC & LDAP
GC SSL
Directory,
replication, user
and computer
authentication
group policy,
trusts
UDP 123 On-premises
CIDR
Windows Time Windows Time,
trusts
Outbound Rules
Protocol Port range Source Type of traffic Active Directory
usage
All All On-premises
CIDR
All traffic
AWS applications and native Active Directory workload support
User accounts are provisioned only in your AWS Managed Microsoft AD to be used with supported
AWS applications, such as the following:
• Amazon Chime
• Amazon Connect
• Amazon EC2 instances
• Amazon FSx
Enhancing network security Version 1.0 90

AWS Directory Service Administration Guide
• Amazon QuickSight
• Amazon RDS for MySQL
• Amazon RDS for Oracle
• Amazon RDS for PostgreSQL
• Amazon RDS for SQL Server
• AWS IAM Identity Center
• Amazon WorkDocs
• Amazon WorkMail
• WorkSpaces
• AWS Client VPN
• AWS Management Console
You can modify the provisioned AWS Security Group configuration to block all non-essential traffic
to your AWS Managed Microsoft AD domain controllers.
Note
• Active Directory trusts cannot be created and maintained between your AWS Managed
Microsoft AD directory and on-premises domain.
• It requires you to ensure the “Client CIDR” network is secure.
• TCP 636 is only required when LDAP over SSL is in use.
• If you want to use an Enterprise CA with this configuration you will need to create an
outbound rule “TCP, 443, CA CIDR”.
Inbound Rules
Protocol Port range Source Type of traffic Active Directory
usage
TCP & UDP 53 Client CIDR DNS User and
computer
authentication,
Enhancing network security Version 1.0 91

AWS Directory Service Administration Guide
Protocol Port range Source Type of traffic Active Directory
usage
name resolution,
trusts
TCP & UDP 88 Client CIDR Kerberos User and
computer
authentication,
forest level
trusts
TCP & UDP 389 Client CIDR LDAP Directory,
replication, user
and computer
authentication
group policy,
trusts
TCP & UDP 445 Client CIDR SMB / CIFS Replication, user
and computer
authentication,
group policy
trusts
TCP & UDP 464 Client CIDR Kerberos
change / set
password
Replication, user
and computer
authentication,
trusts
TCP 135 Client CIDR Replication RPC, EPM
TCP 636 Client CIDR LDAP SSL Directory,
replication, user
and computer
authentication
group policy,
trusts
Enhancing network security Version 1.0 92
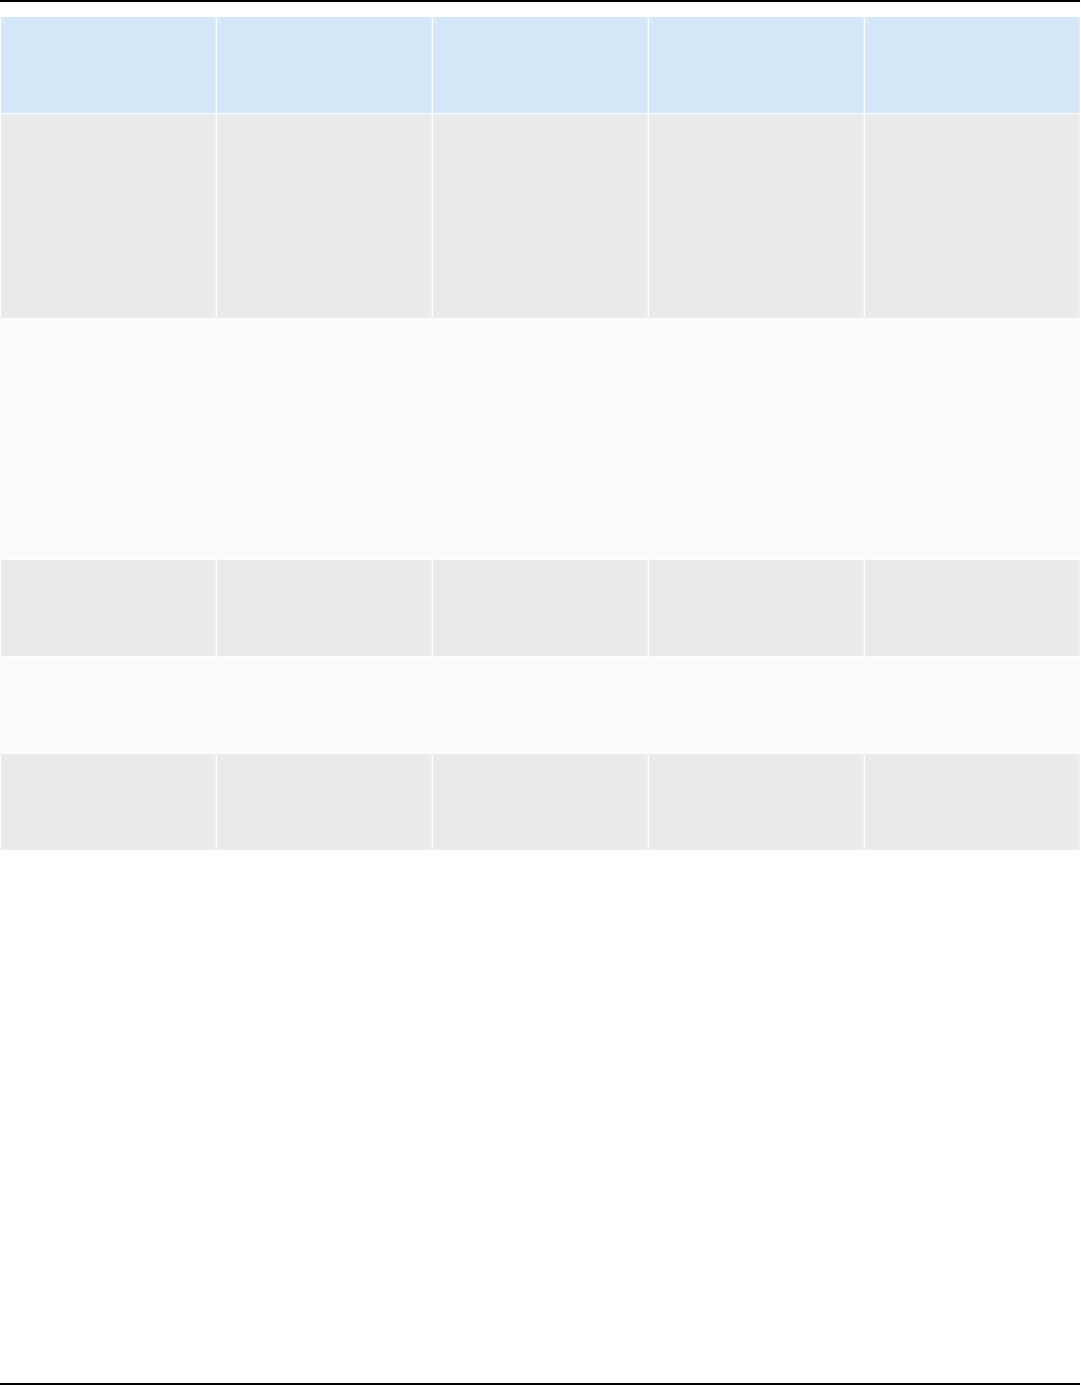
AWS Directory Service Administration Guide
Protocol Port range Source Type of traffic Active Directory
usage
TCP 49152 - 65535 Client CIDR RPC Replication, user
and computer
authentication,
group policy,
trusts
TCP 3268 - 3269 Client CIDR LDAP GC & LDAP
GC SSL
Directory,
replication, user
and computer
authentication
group policy,
trusts
TCP 9389 Client CIDR SOAP AD DS web
services
UDP 123 Client CIDR Windows Time Windows Time,
trusts
UDP 138 Client CIDR DFSN &
NetLogon
DFS, group
policy
Outbound Rules
None.
AWS applications and native Active Directory workload support with trust
support
All user accounts are provisioned in your AWS Managed Microsoft AD or trusted Active Directory to
be used with supported AWS applications, such as the following:
• Amazon Chime
• Amazon Connect
• Amazon EC2 instances
Enhancing network security Version 1.0 93

AWS Directory Service Administration Guide
• Amazon FSx
• Amazon QuickSight
• Amazon RDS for MySQL
• Amazon RDS for Oracle
• Amazon RDS for PostgreSQL
• Amazon RDS for SQL Server
• AWS IAM Identity Center
• Amazon WorkDocs
• Amazon WorkMail
• WorkSpaces
• AWS Client VPN
• AWS Management Console
You can modify the provisioned AWS Security Group configuration to block all non-essential traffic
to your AWS Managed Microsoft AD domain controllers.
Note
• It requires you to ensure the “On-premises CIDR” and “Client CIDR” networks are secure.
• TCP 445 with the “On-premises CIDR” is used for trust creation only and can be removed
after the trust has been established.
• TCP 445 with the “Client CIDR” should be left open as it is required for Group Policy
processing.
• TCP 636 is only required when LDAP over SSL is in use.
• If you want to use an Enterprise CA with this configuration you will need to create an
outbound rule “TCP, 443, CA CIDR”.
Inbound Rules
Enhancing network security Version 1.0 94

AWS Directory Service Administration Guide
Protocol Port range Source Type of traffic Active Directory
usage
TCP & UDP 53 On-premises
CIDR
DNS User and
computer
authentication,
name resolution,
trusts
TCP & UDP 88 On-premises
CIDR
Kerberos User and
computer
authentication,
forest level
trusts
TCP & UDP 389 On-premises
CIDR
LDAP Directory,
replication, user
and computer
authentication
group policy,
trusts
TCP & UDP 464 On-premises
CIDR
Kerberos
change / set
password
Replication, user
and computer
authentication,
trusts
TCP 445 On-premises
CIDR
SMB / CIFS Replication, user
and computer
authentication,
group policy
trusts
TCP 135 On-premises
CIDR
Replication RPC, EPM
TCP 636 On-premises
CIDR
LDAP SSL Directory,
replication, user
Enhancing network security Version 1.0 95

AWS Directory Service Administration Guide
Protocol Port range Source Type of traffic Active Directory
usage
and computer
authentication
group policy,
trusts
TCP 49152 - 65535 On-premises
CIDR
RPC Replication, user
and computer
authentication,
group policy,
trusts
TCP 3268 - 3269 On-premises
CIDR
LDAP GC & LDAP
GC SSL
Directory,
replication, user
and computer
authentication
group policy,
trusts
UDP 123 On-premises
CIDR
Windows Time Windows Time,
trusts
TCP & UDP 53 Client CIDR DNS User and
computer
authentication,
name resolution,
trusts
TCP & UDP 88 Client CIDR Kerberos User and
computer
authentication,
forest level
trusts
Enhancing network security Version 1.0 96
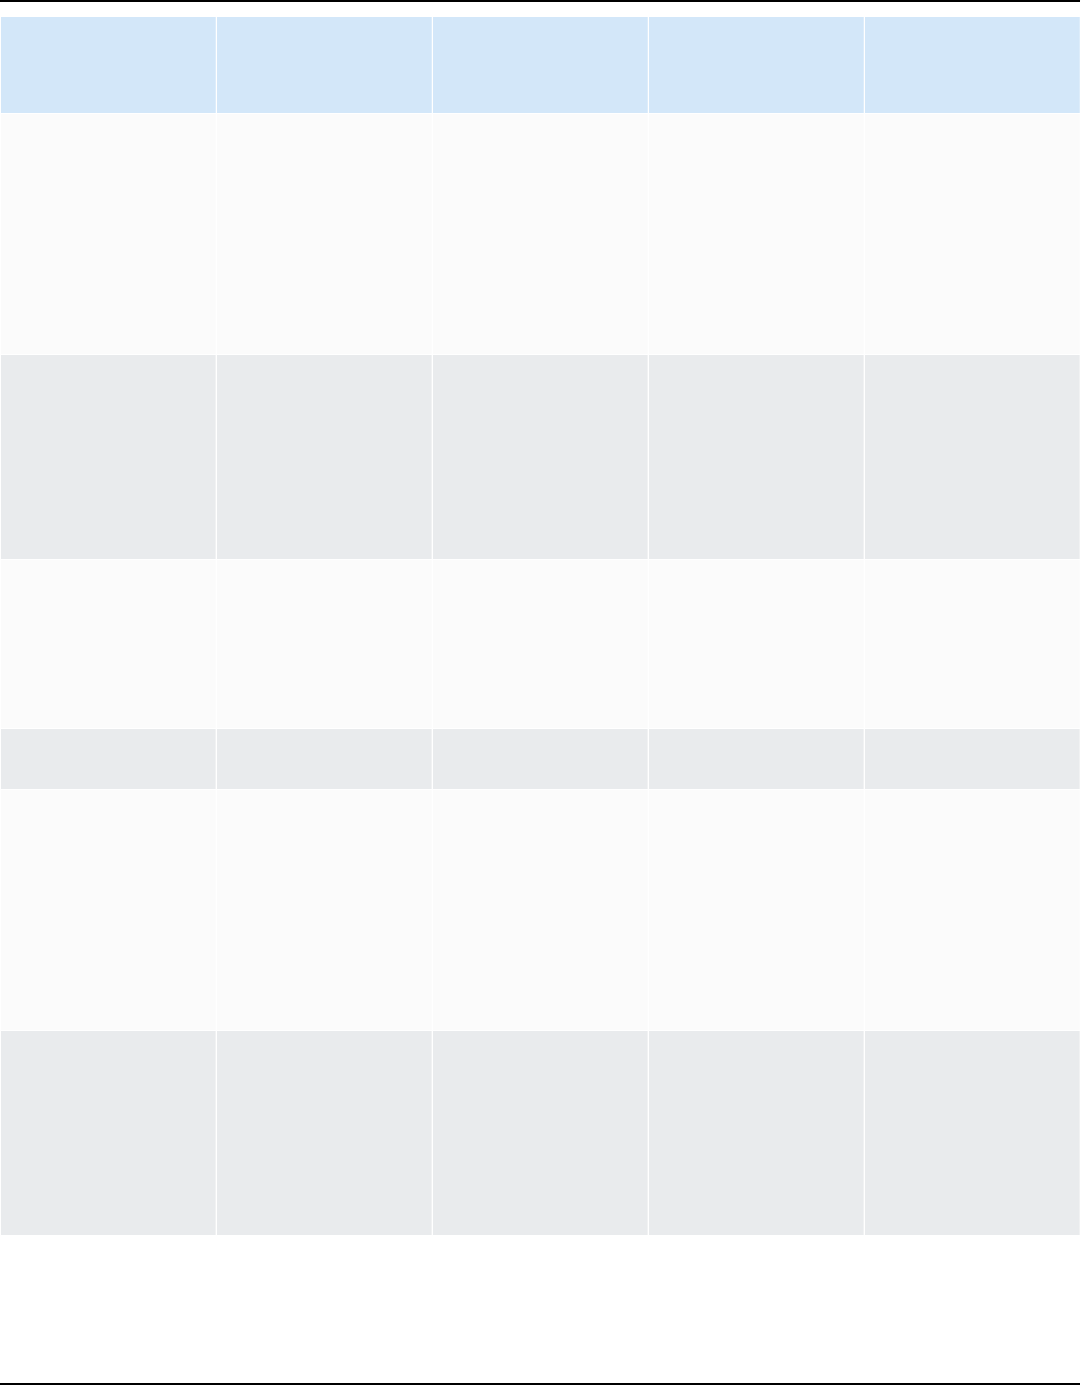
AWS Directory Service Administration Guide
Protocol Port range Source Type of traffic Active Directory
usage
TCP & UDP 389 Client CIDR LDAP Directory,
replication, user
and computer
authentication
group policy,
trusts
TCP & UDP 445 Client CIDR SMB / CIFS Replication, user
and computer
authentication,
group policy
trusts
TCP & UDP 464 Client CIDR Kerberos
change / set
password
Replication, user
and computer
authentication,
trusts
TCP 135 Client CIDR Replication RPC, EPM
TCP 636 Client CIDR LDAP SSL Directory,
replication, user
and computer
authentication
group policy,
trusts
TCP 49152 - 65535 Client CIDR RPC Replication, user
and computer
authentication,
group policy,
trusts
Enhancing network security Version 1.0 97

AWS Directory Service Administration Guide
Protocol Port range Source Type of traffic Active Directory
usage
TCP 3268 - 3269 Client CIDR LDAP GC & LDAP
GC SSL
Directory,
replication, user
and computer
authentication
group policy,
trusts
TCP 9389 Client CIDR SOAP AD DS web
services
UDP 123 Client CIDR Windows Time Windows Time,
trusts
UDP 138 Client CIDR DFSN &
NetLogon
DFS, group
policy
Outbound Rules
Protocol Port range Source Type of traffic Active Directory
usage
All All On-premises
CIDR
All traffic
Editing AWS Managed Microsoft AD directory security settings
You can configure fine-grained directory settings for your AWS Managed Microsoft AD to meet
your compliance and security requirements without any increase in operational workload. In
directory settings, you can update secure channel configuration for protocols and ciphers used in
your directory. For example, you have the flexibility to disable individual legacy ciphers, such as
RC4 or DES, and protocols, such as SSL 2.0/3.0 and TLS 1.0/1.1. AWS Managed Microsoft AD then
deploys the configuration to all domain controllers in your directory, manages domain controller
Editing directory security settings Version 1.0 98

AWS Directory Service Administration Guide
reboots, and maintains this configuration as you scale out or deploy additional AWS Regions. For
all available settings, see List of directory security settings.
Edit directory security settings
You can configure and edit settings for any of your directories.
To edit directory settings
1. Sign in to the AWS Management Console and open the AWS Directory Service console at
https://console.aws.amazon.com/directoryservicev2/.
2. On the Directories page, choose your directory ID.
3. Under Networking & security, find Directory settings, and then choose Edit settings.
4. In Edit settings, change the Value for the settings that you want to edit. When you edit a
setting, its status changes from Default to Ready to Update. If you have edited the setting
previously, its status changes from Updated to Ready to Update. Then, choose Review.
5. In Review and update settings, see Directory settings and make sure that the new values are
all correct. If you want to make any other changes to your settings, choose Edit settings. When
you’re satisfied with your changes and ready to implement the new values, choose Update
settings. Then, you’re taken back to the directory ID page.
Note
Under Directory settings, you can view the Status of your updated settings. While
settings are implemented, the Status displays Updating. You cannot edit other
settings while a setting displays Updating under Status. The Status displays Updated
if the setting successfully updates with your edit. The Status displays Failed if the
setting fails to update with your edit.
Failed directory security settings
If an error occurs during a settings update, the Status displays as Failed. In a failed status, the
settings do not update to the new values, and the original values remain implemented. You can
retry updating these settings or revert them to their previous values.
Editing directory security settings Version 1.0 99
AWS Directory Service Administration Guide
To resolve failed updated settings
• Under Directory settings, choose Resolve failed settings. Then, do one of the following:
• To revert your settings back to their original value before the failure state, choose Revert
failed settings. Then, choose Revert in the pop-up modal.
• To retry updating your directory settings, choose Retry failed settings. If you want to make
additional changes to your directory settings before retrying the failed updates, choose
Continue editing. On Review and retry failed updates, choose Update settings.
List of directory security settings
The following list shows the type, setting name, API name, potential values, and setting description
for all available directory security settings.
TLS 1.2 and AES 256/256 are the default directory security settings if all other security settings are
disabled. They cannot be disabled.
Type Setting
name
API name Potential values Setting
description
Certifica
te Based
Authentication
Certifica
te
Backdatin
g
Compensat
ion
CERTIFICA
TE_BACKDA
TING_COMP
ENSATION
Years: 0 to 50
Months: 0 to 11
Days: 0 to 30
Hours: 0 to 23
Minutes: 0 to 59
Seconds: 0 to 59
Specify a value
to indicate the
length of time
that a certifica
te can predate
a user in Active
Directory and
still be used
for authentic
ation in Active
Directory. The
default value
is 10 minutes.
You can set
this value from
1 second to 50
years.
Editing directory security settings Version 1.0 100

AWS Directory Service Administration Guide
Type Setting
name
API name Potential values Setting
description
To configure
this setting,
you must
select the
Compatibi
lity type
for Strong
Certifica
te Binding
Enforcement.
For more
informati
on, see
KB5014754
—Certific
ate-based
authentic
ation changes
on Windows
domain
controllers in
the Microsoft
Support
documenta
tion.
Editing directory security settings Version 1.0 101

AWS Directory Service Administration Guide
Type Setting
name
API name Potential values Setting
description
Certifica
te
Strong
Enforceme
nt
CERTIFICA
TE_STRONG
_ENFORCEM
ENT
Compatibility, Full Enforcement Specify
either of the
following
enforcement
types:
• Compatibi
lity (default)
: Authentic
ation is
allowed if
a certifica
te can't be
strongly
mapped to
a user. If the
certificate
predates the
user account
in Active
Directory
, you must
also set
Certificate
Backdating
Compensat
ion, or
authentic
ation will
fail.
• Full
Enforceme
nt:
Authentic
Editing directory security settings Version 1.0 102
AWS Directory Service Administration Guide
Type Setting
name
API name Potential values Setting
description
ation isn't
allowed if
a certifica
te can't be
strongly
mapped to
a user. If you
choose this
enforceme
nt type,
Certificate
Backdating
Compensat
ion can't be
configured.
For more
informati
on, see
KB5014754
—Certific
ate-based
authentic
ation changes
on Windows
domain
controllers in
the Microsoft
Support
documenta
tion.
Editing directory security settings Version 1.0 103

AWS Directory Service Administration Guide
Type Setting
name
API name Potential values Setting
description
AES
128/128
AES_128_128 Enable, Disable Enable or
disable the
AES 128/128
encryption
cipher for
secure channel
communica
tions between
domain
controllers in
your directory.
Secure
Channel:
Cipher
DES
56/56
DES_56_56 Enable, Disable Enable or
disable the
DES 56/56
encryption
cipher for
secure channel
communica
tions between
domain
controllers in
your directory.
Editing directory security settings Version 1.0 104

AWS Directory Service Administration Guide
Type Setting
name
API name Potential values Setting
description
RC2
40/128
RC2_40_128 Enable, Disable Enable or
disable the
RC2 40/128
encryption
cipher for
secure channel
communica
tions between
domain
controllers in
your directory.
RC2
56/128
RC2_56_128 Enable, Disable Enable or
disable the
RC2 56/128
encryption
cipher for
secure channel
communica
tions between
domain
controllers in
your directory.
Editing directory security settings Version 1.0 105

AWS Directory Service Administration Guide
Type Setting
name
API name Potential values Setting
description
RC2
128/128
RC2_128_128 Enable, Disable Enable or
disable the
RC2 128/128
encryption
cipher for
secure channel
communica
tions between
domain
controllers in
your directory.
RC4
40/128
RC4_40_128 Enable, Disable Enable or
disable the
RC4 40/128
encryption
cipher for
secure channel
communica
tions between
domain
controllers in
your directory.
Editing directory security settings Version 1.0 106

AWS Directory Service Administration Guide
Type Setting
name
API name Potential values Setting
description
RC4
56/128
RC4_56_128 Enable, Disable Enable or
disable the
RC4 56/128
encryption
cipher for
secure channel
communica
tions between
domain
controllers in
your directory.
RC4
64/128
RC4_64_128 Enable, Disable Enable or
disable the
RC4 64/128
encryption
cipher for
secure channel
communica
tions between
domain
controllers in
your directory.
Editing directory security settings Version 1.0 107

AWS Directory Service Administration Guide
Type Setting
name
API name Potential values Setting
description
RC4
128/128
RC4_128_128 Enable, Disable Enable or
disable the
RC4 128/128
encryption
cipher for
secure channel
communica
tions between
domain
controllers in
your directory.
Triple
DES
168/168
3DES_168_
168
Enable, Disable Enable or
disable the
Triple DES
168/168
encryption
cipher for
secure channel
communica
tions between
domain
controllers in
your directory.
Editing directory security settings Version 1.0 108

AWS Directory Service Administration Guide
Type Setting
name
API name Potential values Setting
description
PCT
1.0
PCT_1_0 Enable, Disable Enable or
disable the
PCT 1.0
protocol for
secure channel
communica
tions (Server
and Client) on
the domain
controllers in
your directory.
Secure
Channel:
Protocol
SSL
2.0
SSL_2_0 Enable, Disable Enable or
disable the SSL
2.0 protocol
for secure
channel
communica
tions (Server
and Client) on
the domain
controllers in
your directory.
Editing directory security settings Version 1.0 109

AWS Directory Service Administration Guide
Type Setting
name
API name Potential values Setting
description
SSL
3.0
SSL_3_0 Enable, Disable Enable or
disable the SSL
3.0 protocol
for secure
channel
communica
tions (Server
and Client) on
the domain
controllers in
your directory.
TLS
1.0
TLS_1_0 Enable, Disable Enable or
disable the
TLS 1.0
protocol for
secure channel
communica
tions (Server
and Client) on
the domain
controllers in
your directory.
Editing directory security settings Version 1.0 110

AWS Directory Service Administration Guide
Type Setting
name
API name Potential values Setting
description
TLS
1.1
TLS_1_1 Enable, Disable Enable or
disable the
TLS 1.1
protocol for
secure channel
communica
tions (Server
and Client) on
the domain
controllers in
your directory.
Setting up AWS Private CA Connector for AD
You can integrate your AWS Managed Microsoft AD with AWS Private Certificate Authority (CA) to
issue and manage certificates for your Active Directory domain joined users, groups, and machines.
AWS Private CA Connector for Active Directory allows you to use a fully managed AWS Private CA
drop-in replacement for your self-managed enterprise CAs without the need to deploy, patch, or
update local agents or proxy servers.
Note
Server-side LDAPS certificate enrollment for AWS Managed Microsoft AD domain
controllers with AWS Private CA Connector for Active Directory is not supported. To enable
server-side LDAPS for your directory, see How to enable server-side LDAPS for your AWS
Managed Microsoft AD directory.
You can set up AWS Private CA integration with your directory through the Directory Service
console, the AWS Private CA Connector for Active Directory console, or by calling the
CreateTemplate API. To set up the Private CA integration through the AWS Private CA Connector
for Active Directory console, see Creating a connector template. See below for steps on how to set
up this integration from the AWS Directory Service console.
Setting up AWS Private CA Connector for AD Version 1.0 111

AWS Directory Service Administration Guide
To set up AWS Private CA Connector for AD
1. Sign in to the AWS Management Console and open the AWS Directory Service console at
https://console.aws.amazon.com/directoryservicev2/.
2. On the Directories page, choose your directory ID.
3. Under the Network & Security tab, under AWS Private CA Connector for AD, choose Set
up AWS Private CA Connector for AD. The page Create Private CA certificate for Active
Directory appears. Follow the steps on the console to create your Private CA for Active
Directory connector to enroll with your Private CA. For more information, see Creating a
connector.
4. After you create your connector, follow the steps below to view details, including the
connector’s status and the associated Private CA’s status.
To view AWS Private CA Connector for AD
1. Sign in to the AWS Management Console and open the AWS Directory Service console at
https://console.aws.amazon.com/directoryservicev2/.
2. On the Directories page, choose your directory ID.
3. Under Network & Security, under AWS Private CA Connector for AD, you can view your
Private CA connectors and associated Private CA. By default, you see the following fields:
a. AWS Private CA Connector ID — The unique identifier for an AWS Private CA connector.
Clicking on it leads to the details page of that AWS Private CA connector.
b. AWS Private CA subject — Information about the distinguished name for the CA. Clicking
on it leads to the details page of that AWS Private CA.
c. Status — Based on a status check for the AWS Private CA Connector and the AWS Private
CA. If both checks pass, Active displays. If one of the checks fails, 1/2 checks failed
displays. If both checks fail, Failed displays. For more information about a failed status,
hover over the hyperlink to learn which check failed. Follow the instructions in the console
to remediate.
d. Date created — The day the AWS Private CA Connector was created.
For more information, see View connector details.
Setting up AWS Private CA Connector for AD Version 1.0 112

AWS Directory Service Administration Guide
Monitor your AWS Managed Microsoft AD
You can get the most out of your AWS Managed Microsoft AD by learning more about the different
AWS Managed Microsoft AD statuses and what they mean for your AWS Managed Microsoft AD.
You can also use AWS services like Amazon Simple Notification Service and Amazon CloudWatch
to monitor your AWS Managed Microsoft AD. Amazon Simple Notification Service can send you
notifications of your AWS Managed Microsoft AD directory status. Amazon CloudWatch can
monitor the performance of your AWS Managed Microsoft AD domain controllers.
Tasks to monitor your AWS Managed Microsoft AD
• Understanding your AWS Managed Microsoft AD directory status
• Enabling AWS Managed Microsoft AD directory status notifications with Amazon Simple
Notification Service
• Understanding your AWS Managed Microsoft AD directory logs
• Enabling Amazon CloudWatch Logs log forwarding for AWS Managed Microsoft AD
• Using CloudWatch to monitor your AWS Managed Microsoft AD domain controllers' performance
• Disabling Amazon CloudWatch log forwarding for AWS Managed Microsoft AD
• Monitoring DNS Server with Microsoft Event Viewer
Understanding your AWS Managed Microsoft AD directory status
The following are the various statuses for a directory.
Active
The directory is operating normally. No issues have been detected by the AWS Directory Service
for your directory.
Creating
The directory is currently being created. Directory creation typically takes between 20 to 45
minutes but may vary depending on the system load.
Deleted
The directory has been deleted. All resources for the directory have been released. Once a
directory enters this state, it cannot be recovered.
Monitor your directory Version 1.0 113

AWS Directory Service Administration Guide
Deleting
The directory is currently being deleted. The directory will remain in this state until it has
been completely deleted. Once a directory enters this state, the delete operation cannot be
cancelled, and the directory cannot be recovered.
Failed
The directory could not be created. Please delete this directory. If this problem persists, please
contact the AWS Support Center.
Impaired
The directory is running in a degraded state. One or more issues have been detected, and not
all directory operations may be working at full operational capacity. There are many potential
reasons for the directory being in this state. These include normal operational maintenance
activity such as patching or EC2 instance rotation, temporary hot spotting by an application
on one of your domain controllers, or changes you made to your network that inadvertently
disrupt directory communications. For more information, see either Troubleshooting AWS
Managed Microsoft AD, Troubleshooting AD Connector, Troubleshooting Simple AD. For normal
maintenance related issues, AWS resolves these issues within 40 minutes. If after reviewing
the troubleshooting topic, your directory is in an Impaired state longer than 40 minutes, we
recommend that you contact the AWS Support Center.
Important
Do not restore a snapshot while a directory is in an Impaired state. It is rare that
snapshot restore is necessary to resolve impairments. For more information, see
Restoring your AWS Managed Microsoft AD with snapshots.
Requested
A request to create your directory is currently pending.
RestoreFailed
Restoring the directory from a snapshot failed. Please retry the restore operation. If this
continues, try a different snapshot, or contact the AWS Support Center.
Understanding your directory status Version 1.0 114
AWS Directory Service Administration Guide
Restoring
The directory is currently being restored from an automatic or manual snapshot. Restoring from
a snapshot typically takes several minutes, depending on the size of the directory data in the
snapshot.
Enabling AWS Managed Microsoft AD directory status notifications
with Amazon Simple Notification Service
Using Amazon Simple Notification Service (Amazon SNS), you can receive email or text (SMS)
messages when the status of your directory changes. You get notified if your directory goes from
an Active status to an Impaired status. You also receive a notification when the directory returns to
an Active status.
How It Works
Amazon SNS uses “topics” to collect and distribute messages. Each topic has one or more
subscribers who receive the messages that have been published to that topic. Using the steps
below you can add AWS Directory Service as publisher to an Amazon SNS topic. When AWS
Directory Service detects a change in your directory’s status, it publishes a message to that topic,
which is then sent to the topic's subscribers.
You can associate multiple directories as publishers to a single topic. You can also add directory
status messages to topics that you’ve previously created in Amazon SNS. You have detailed control
over who can publish to and subscribe to a topic. For complete information about Amazon SNS, see
What is Amazon SNS?.
Note
Directory status notifications is a Regional feature of AWS Managed Microsoft AD. If you
are using Configure Multi-Region replication for AWS Managed Microsoft AD, the following
procedures must be applied separately in each Region. For more information, see Global vs
Regional features.
Enabling Amazon SNS
The following walks you through how you can enable Amazon SNS for your AWS Managed
Microsoft AD:
Enabling directory status notifications with Amazon SNS Version 1.0 115

AWS Directory Service Administration Guide
1. Sign in to the AWS Management Console and open the AWS Directory Service console.
2. On the Directories page, choose your directory ID.
3. On the Directory details page, do one of the following:
• If you have multiple Regions showing under Multi-Region replication, select the Region
where you want to enable SNS messaging, and then choose the Maintenance tab. For more
information, see Primary vs additional Regions.
• If you do not have any Regions showing under Multi-Region replication, choose the
Maintenance tab.
4. In the Directory monitoring section, choose Actions, and then select Create notification.
5. On the Create notification page, select Choose a notification type, and then choose Create
a new notification. Alternatively, if you already have an existing SNS topic, you can choose
Associate existing SNS topic to send status messages from this directory to that topic.
Note
If you choose Create a new notification but then use the same topic name for an SNS
topic that already exists, Amazon SNS does not create a new topic, but just adds the
new subscription information to the existing topic.
If you choose Associate existing SNS topic, you will only be able to choose an SNS
topic that is in the same Region as the directory.
6. Choose the Recipient type and enter the Recipient contact information. If you enter a phone
number for SMS, use numbers only. Do not include dashes, spaces, or parentheses.
7. (Optional) Provide a name for your topic and an SNS display name. The display name is a short
name up to 10 characters that is included in all SMS messages from this topic. When using the
SMS option, the display name is required.
Note
If you are logged in using an IAM user or role that has only the
DirectoryServiceFullAccess managed policy, your topic name must start with
“DirectoryMonitoring”. If you’d like to further customize your topic name you’ll need
additional privileges for SNS.
8. Choose Create.
Enabling directory status notifications with Amazon SNS Version 1.0 116

AWS Directory Service Administration Guide
If you want to designate additional SNS subscribers, such as an additional email address, Amazon
SQS queues or AWS Lambda, you can do this from the Amazon SNS console.
Removing directory status messages from an Amazon SNS topic
The following walks you through how you can remove your AWS Managed Microsoft AD directory
status messages from an Amazon SNS topic:
1. Sign in to the AWS Management Console and open the AWS Directory Service console.
2. On the Directories page, choose your directory ID.
3. On the Directory details page, do one of the following:
• If you have multiple Regions showing under Multi-Region replication, select the Region
where you want to remove status messages, and then choose the Maintenance tab. For
more information, see Primary vs additional Regions.
• If you do not have any Regions showing under Multi-Region replication, choose the
Maintenance tab.
4. In the Directory monitoring section, select an SNS topic name in the list, choose Actions, and
then select Remove.
5. Choose Remove.
This removes your directory as a publisher to the selected SNS topic.
Deleting an Amazon SNS topic
If you want to delete the entire topic, you can do this from the Amazon SNS console.
Before deleting an Amazon SNS topic using the SNS console, you should ensure that a directory is
not sending status messages to that topic.
If you delete an Amazon SNS topic using the SNS console, this change will not immediately
be reflected within the Directory Services console. You would only be notified the next time a
directory publishes a notification to the deleted topic, in which case you would see an updated
status on the directory’s Monitoring tab indicating the topic could not be found.
Therefore, to avoid missing important directory status messages, before deleting any topic that
receives messages from AWS Directory Service, associate your directory with a different Amazon
SNS topic.
Enabling directory status notifications with Amazon SNS Version 1.0 117

AWS Directory Service Administration Guide
For more information on how to delete an Amazon SNS topic, see Deleting an Amazon SNS topic
and subscription.
Understanding your AWS Managed Microsoft AD directory logs
Security logs from AWS Managed Microsoft AD domain controller instances are archived for a year.
You can also configure your AWS Managed Microsoft AD directory to forward domain controller
logs to Amazon CloudWatch Logs in near real time. For more information, see Enabling Amazon
CloudWatch Logs log forwarding for AWS Managed Microsoft AD.
AWS logs the following events for compliance.
Monitoring category Policy setting Audit state
Account Logon Audit Credential Validation Success, Failure
Audit Other Account Logon
Events
Success, Failure
Audit Kerberos Authentication
Service
Success, Failure
Account Management Audit Computer Account
Management
Success, Failure
Audit Other Account
Management Events
Success, Failure
Audit Security Group
Management
Success, Failure
Audit User Account
Management
Success, Failure
Detailed Tracking Audit DPAPI Activity Success, Failure
Audit PNP Activity Success
Audit Process Creation Success, Failure
Understanding your directory logs Version 1.0 118

AWS Directory Service Administration Guide
Monitoring category Policy setting Audit state
DS Access Audit Directory Service Access Success, Failure
Audit Directory Service
Changes
Success, Failure
Logon/Logoff Audit Account Lockout Success, Failure
Audit Logoff Success
Audit Logon Success, Failure
Audit Other Logon/Logoff
Events
Success, Failure
Audit Special Logon Success, Failure
Object Access Audit Other Object Access
Events
Success, Failure
Audit Removable Storage Success, Failure
Audit Central Access Policy
Staging
Success, Failure
Policy Change Audit Policy Change Success, Failure
Audit Authentication Policy
Change
Success, Failure
Audit Authorization Policy
Change
Success, Failure
Audit MPSSVC Rule-Level
Policy Change
Success
Audit Other Policy Change
Events
Failure
Privilege Use Audit Sensitive Privilege Use Success, Failure
Understanding your directory logs Version 1.0 119

AWS Directory Service Administration Guide
Monitoring category Policy setting Audit state
System Audit IPsec Driver Success, Failure
Audit Other System Events Success, Failure
Audit Security State Change Success, Failure
Audit Security System
Extension
Success, Failure
Audit System Integrity Success, Failure
Enabling Amazon CloudWatch Logs log forwarding for AWS Managed
Microsoft AD
You can use either the AWS Directory Service console or APIs to forward domain controller security
event logs to Amazon CloudWatch Logs for your AWS Managed Microsoft AD. This helps you
to meet your security monitoring, audit, and log retention policy requirements by providing
transparency of the security events in your directory.
CloudWatch Logs can also forward these events to other AWS accounts, AWS services, or third
party applications. This makes it easier for you to centrally monitor and configure alerts to detect
and respond proactively to unusual activities in near real time.
Once enabled, you can then use the CloudWatch Logs console to retrieve the data from the log
group you specified when you enabled the service. This log group contains the security logs from
your domain controllers.
For more information about log groups and how to read their data, see Working with log groups
and log streams in the Amazon CloudWatch Logs User Guide.
Note
Log forwarding is a Regional feature of AWS Managed Microsoft AD. If you are using
Configure Multi-Region replication for AWS Managed Microsoft AD, the following
procedures must be applied separately in each Region. For more information, see Global vs
Regional features.
Enabling Amazon CloudWatch log forwarding Version 1.0 120

AWS Directory Service Administration Guide
Once enabled, the log forwarding capability will begin transmitting logs from your domain
controllers to the specified CloudWatch log group. Any logs created before log forwarding
is enabled will not be transferred to the CloudWatch log group.
Topics
• Using the AWS Management Console to enable Amazon CloudWatch Logs log forwarding
• Using the CLI or PowerShell to enable Amazon CloudWatch Logs log forwarding
Using the AWS Management Console to enable Amazon CloudWatch Logs log
forwarding
You can enable Amazon CloudWatch Logs log forwarding for your AWS Managed Microsoft AD in
the AWS Management Console.
1. In the AWS Directory Service console navigation pane, choose Directories.
2. Choose the directory ID of the AWS Managed Microsoft AD directory that you want to share.
3. On the Directory details page, do one of the following:
• If you have multiple Regions showing under Multi-Region replication, select the Region
where you want to enable log forwarding, and then choose the Networking & security tab.
For more information, see Primary vs additional Regions.
• If you do not have any Regions showing under Multi-Region replication, choose the
Networking & security tab.
4. In the Log forwarding section, choose Enable.
5. On the Enable log forwarding to CloudWatch dialog, choose either of the following options:
a. Select Create a new CloudWatch log group, under CloudWatch Log group name, specify
a name that you can refer to in CloudWatch Logs.
b. Select Choose an existing CloudWatch log group, and under Existing CloudWatch log
groups, select a log group from the menu.
6. Review the pricing information and link, and then choose Enable.
Enabling Amazon CloudWatch log forwarding Version 1.0 121

AWS Directory Service Administration Guide
Using the CLI or PowerShell to enable Amazon CloudWatch Logs log forwarding
Before you can use the ds create-log-subscription command, you must first create
an Amazon CloudWatch log group and then create an IAM resource policy that will grant the
necessary permission to that group. To enable log forwarding using the CLI or PowerShell,
complete the following steps.
Step 1: Create a log group in CloudWatch Logs
Create a log group that will be used to receive the security logs from your domain controllers. We
recommend pre-pending the name with /aws/directoryservice/, but that is not required. For
example:
CLI Command
aws logs create-log-group --log-group-name '/aws/directoryservice/d-1111111111'
PowerShell Command
New-CWLLogGroup -LogGroupName '/aws/directoryservice/d-1111111111'
For instructions on how to create a CloudWatch Logs group, see Create a log group in CloudWatch
Logs in the Amazon CloudWatch Logs User Guide.
Step 2: Create a CloudWatch Logs resource policy in IAM
Create a CloudWatch Logs resource policy granting AWS Directory Service rights to add logs into
the new log group you created in Step 1. You can either specify the exact ARN to the log group
to limit AWS Directory Service’s access to other log groups or use a wild card to include all log
groups. The following sample policy uses the wild card method to identify that all log groups that
start with /aws/directoryservice/ for the AWS account where your directory resides will be
included.
{
"Version": "2012-10-17",
"Statement": [
{
"Effect": "Allow",
"Principal": {
"Service": "ds.amazonaws.com"
Enabling Amazon CloudWatch log forwarding Version 1.0 122
AWS Directory Service Administration Guide
},
"Action": [
"logs:CreateLogStream",
"logs:PutLogEvents"
],
"Resource": "arn:aws:logs:YOUR_REGION:YOUR_ACCOUNT_NUMBER:log-group:/aws/
directoryservice/*"
}
]
}
You will need to save this policy to a text file (for example DSPolicy.json) on your local workstation
as you will need to run it from the CLI. For example:
CLI Command
aws logs put-resource-policy --policy-name DSLogSubscription --policy-document
file://DSPolicy.json
PowerShell Command
$PolicyDocument = Get-Content .\DSPolicy.json –Raw
Write-CWLResourcePolicy -PolicyName DSLogSubscription -PolicyDocument
$PolicyDocument
Step 3: Create an AWS Directory Service log subscription
In this final step, you can now proceed to enable log forwarding by creating the log subscription.
For example:
CLI Command
aws ds create-log-subscription --directory-id 'd-1111111111' --log-group-name '/aws/
directoryservice/d-1111111111'
PowerShell Command
New-DSLogSubscription -DirectoryId 'd-1111111111' -LogGroupName '/aws/
directoryservice/d-1111111111'
Enabling Amazon CloudWatch log forwarding Version 1.0 123

AWS Directory Service Administration Guide
Using CloudWatch to monitor your AWS Managed Microsoft AD domain
controllers' performance
AWS Directory Service integrates with Amazon CloudWatch to help provide you with important
performance metrics for each domain controller in your Active Directory. This means that you can
monitor domain controller performance counters, such as CPU and memory utilization. You can
also configure alarms and initiate automated actions to respond to periods of high utilization.
For example, you can configure an alarm for domain controller CPU utilization above 70 percent
and create an SNS topic to notify you when this occurs. You can use this SNS topic to initiate
automation, such as AWS Lambda functions, to increase the number of domain controllers to your
Active Directory.
For more information about monitoring your domain controllers, see Determining when to add
domain controllers with CloudWatch metrics.
There are fees associated with Amazon CloudWatch. For more information, see CloudWatch billing
and cost.
Important
Domain controller performance metrics with CloudWatch is unavailable in the Canada West
(Calgary) Region.
To enable CloudWatch, see Enabling Amazon CloudWatch Logs log forwarding for AWS
Managed Microsoft AD.
Finding domain controllers performance metrics in CloudWatch
In the Amazon CloudWatch console, metrics for a given service are grouped first by the service's
namespace. You can add metric filters that are subordinate to that namespace. Use the following
procedure to locate the correct namespace and subordinate metric that is required to set up AWS
Managed Microsoft AD domain controller metrics in CloudWatch.
To find domain controller metrics in the CloudWatch console
1. Sign in to the AWS Management Console and open the CloudWatch console at https://
console.aws.amazon.com/cloudwatch/.
2. In the navigation pane, choose Metrics.
Using CloudWatch to monitor your directory Version 1.0 124

AWS Directory Service Administration Guide
3. From the list of metrics, select the Directory Service namespace, and then from the list, select
the AWS Managed Microsoft AD metric.
For instructions on how to set up domain controller metrics using the CloudWatch console, see
How to automate AWS Managed Microsoft AD scaling based on utilization metrics in the AWS
Security Blog.
Determining when to add domain controllers with CloudWatch metrics
Load balancing across all of your domain controllers is important for the resilience and
performance of your Active Directory. To help you optimize the performance of your domain
controllers in AWS Managed Microsoft AD, we recommend that you first monitor important metrics
in CloudWatch to form a baseline. During this process, you analyze your Active Directory over time
to identify your average and peak Active Directory utilization. After determining your baseline, you
can monitor these metrics on a regular basis to help determine when to add a domain controller to
your Active Directory.
The following metrics are important to monitor on a regular basis. For a full list of available
domain controller metrics in CloudWatch, see AWS Managed Microsoft AD performance counters.
• Domain controller-specific metrics, such as:
• Processor
• Memory
• Logical Disk
• Network Interface
• AWS Managed Microsoft AD directory-specific metrics, such as:
• LDAP searches
• Binds
• DNS queries
• Directory reads
• Directory writes
For instructions on how to set up domain controller metrics using the CloudWatch console,
see How to automate AWS Managed Microsoft AD scaling based on utilization metrics in the
Using CloudWatch to monitor your directory Version 1.0 125

AWS Directory Service Administration Guide
AWS Security Blog. For general information about metrics in CloudWatch, see Using Amazon
CloudWatch metrics in the Amazon CloudWatch User Guide.
For general information about domain controller planning, see Capacity planning for Active
Directory Domain Services on the Microsoft website.
AWS Managed Microsoft AD performance counters
The following table lists all performance counters available in Amazon CloudWatch for tracking
domain controller and directory performance in AWS Managed Microsoft AD.
Metric category Metric name
Database Cache % Hit
I/O Database Reads Average Latency
I/O Database Reads/sec
Database ==> Instances (NTDSA)
I/O Log Writes Average Latency
LDAP Bind Time
DRA Pending Replication Operations
DirectoryServices (NTDS)
DRA Pending Replication Synchronizations
Recursive Queries/sec
Recursive Query Failure/sec
TCP Query Received/sec
Total Query Received/sec
Total Response Sent/sec
DNS
UDP Query Received/sec
Avg. Disk Queue Length
LogicalDisk
% Free Space
Using CloudWatch to monitor your directory Version 1.0 126

AWS Directory Service Administration Guide
Metric category Metric name
% Committed Bytes in Use
Memory
Long-Term Average Standby Cache Lifetime (s)
Bytes Sent/sec
Bytes Received/sec
Network Interface
Current Bandwidth
ATQ Estimated Queue Delay
ATQ Request Latency
DS Directory Reads/Sec
DS Directory Searches/Sec
DS Directory Writes/Sec
LDAP Client Sessions
LDAP Searches/sec
NTDS
LDAP Successful Binds/sec
Processor % Processor Time
Kerberos Authentications
Security System-Wide Statistics
NTLM Authentications
Disabling Amazon CloudWatch log forwarding for AWS Managed
Microsoft AD
You can disable CloudWatch Logs log forwarding for your AWS Managed Microsoft AD in the AWS
Management Console. For more information on log forwarding, see the section called “Using
CloudWatch to monitor your directory”.
Disabling Amazon CloudWatch log forwarding Version 1.0 127

AWS Directory Service Administration Guide
1. In the AWS Directory Service console navigation pane, choose Directories.
2. Choose the directory ID of the AWS Managed Microsoft AD directory that you want to share.
3. On the Directory details page, do one of the following:
• If you have multiple Regions showing under Multi-Region replication, select the Region
where you want to disable log forwarding, and then choose the Networking & security tab.
For more information, see Primary vs additional Regions.
• If you do not have any Regions showing under Multi-Region replication, choose the
Networking & security tab.
4. In the Log forwarding section, choose Disable.
5. Once you’ve read the information in the Disable log forwarding dialog, choose Disable.
Monitoring DNS Server with Microsoft Event Viewer
You can audit your AWS Managed Microsoft AD DNS events, making it easier to identify and
troubleshoot DNS issues. For example, if a DNS record is missing, you can use the DNS audit event
log to help identify the root cause and fix the issue. You can also use DNS audit event logs to
improve security by detecting and blocking requests from suspicious IP addresses.
To do that, you must be logged on with the Admin account or with an account that is a member of
the AWS Domain Name System Administrators group. For more information about this group, see
What gets created with your AWS Managed Microsoft AD.
To access Event Viewer for your AWS Managed Microsoft AD DNS
1. Open the Amazon EC2 console at https://console.aws.amazon.com/ec2/.
2. In the left navigation pane, choose Instances.
3. Locate an Amazon EC2 instance that is joined to your AWS Managed Microsoft AD directory.
Select the instance and then choose Connect.
4. Once connected to the Amazon EC2 instance, open the Start menu and select the Windows
Administrative Tools folder. Within the Administrative Tools folder, select Event Viewer.
5. In the Event Viewer window, choose Action and then choose Connect to Another Computer.
6. Select Another computer, type one of your AWS Managed Microsoft AD DNS servers name or
IP address, and choose OK.
7. In the left pane, navigate to Applications and Services Logs>Microsoft>Windows>DNS-
Server, and then select Audit.
Monitoring DNS Server with Microsoft Event Viewer Version 1.0 128

AWS Directory Service Administration Guide
Access to AWS applications and services from your AWS
Managed Microsoft AD
You can grant access to your AWS Managed Microsoft AD users to access AWS applications and
services. Some of these AWS applications and services include:
• Amazon Chime
• Amazon EC2
• Amazon QuickSight
• AWS Management Console
• Amazon WorkSpaces
You can also use access URLs and single sign-on with your AWS Managed Microsoft AD.
Tasks to access AWS applications and services from AWS Managed Microsoft AD
• Application compatibility for AWS Managed Microsoft AD
• Enabling access to AWS applications and services for your AWS Managed Microsoft AD
• Enabling AWS Management Console access with AWS Managed Microsoft AD credentials
• Creating an access URL for AWS Managed Microsoft AD
• Enabling single sign-on for AWS Managed Microsoft AD
Application compatibility for AWS Managed Microsoft AD
AWS Directory Service for Microsoft Active Directory (AWS Managed Microsoft AD) is compatible
with multiple AWS services and third-party applications.
The following is a list of compatible AWS applications and services:
• Amazon Chime
• Amazon Connect
• Amazon EC2
• Amazon QuickSight
• Amazon RDS
Access to AWS applications and services Version 1.0 129

AWS Directory Service Administration Guide
• Amazon WorkDocs
• Amazon WorkMail
• AWS Client VPN
• AWS IAM Identity Center
• AWS License Manager
• AWS Management Console
• FSx for Windows File Server
• WorkSpaces
For more information, see Enabling access to AWS applications and services for your AWS Managed
Microsoft AD.
Due to the magnitude of custom and commercial off-the-shelf applications that use Active
Directory, AWS does not and cannot perform formal or broad verification of third-party application
compatibility with AWS Directory Service for Microsoft Active Directory (AWS Managed Microsoft
AD). Although AWS works with customers in an attempt to overcome any potential application
installation challenges they might encounter, we are unable to guarantee that any application is or
will continue to be compatible with AWS Managed Microsoft AD.
The following third-party applications are compatible with AWS Managed Microsoft AD:
• Active Directory-Based Activation (ADBA)
• Active Directory Certificate Services (AD CS): Enterprise Certificate Authority
• Active Directory Federation Services (AD FS)
• Active Directory Users and Computers (ADUC)
• Application Server (.NET)
• Microsoft Entra (formerly known as Azure Active Directory (Azure AD))
• Microsoft Entra Connect (formerly known as Azure Active Directory Connect)
• Distributed File System Replication (DFSR)
• Distributed File System Namespaces (DFSN)
• Microsoft Remote Desktop Services Licensing Server
• Microsoft SharePoint Server
Application compatibility Version 1.0 130

AWS Directory Service Administration Guide
• Microsoft SQL Server (including SQL Server Always On Availability Groups)
• Microsoft System Center Configuration Manager (SCCM) - The user deploying SCCM must be a
member of the AWS Delegated System Management Administrators group.
• Microsoft Windows and Windows Server OS
• Office 365
Note that not all configurations of these applications may be supported.
Compatibility guidelines
Although applications may have configurations that are incompatible, application deployment
configurations can often overcome incompatibility. The following describes the most common
reasons for application incompatibility. Customers can use this information to investigate
compatibility characteristics of a desired application and identify potential deployment changes.
• Domain administrator or other privileged permissions – Some applications state that you
must install them as the domain administrator. Because AWS must retain exclusive control of
this permission level in order to deliver Active Directory as a managed service, you cannot act
as the domain administrator to install such applications. However, you can often install such
applications by delegating specific, less privileged, and AWS supported permissions to the person
who performs the installation. For more details on the precise permissions that your application
requires, ask your application provider. For more information about permissions that AWS allows
you to delegate, see What gets created with your AWS Managed Microsoft AD.
• Access to privileged Active Directory containers – Within your directory, AWS Managed
Microsoft AD provides an Organizational Unit (OU) over which you have full administrative
control. You do not have create or write permissions and may have limited read permissions to
containers that are higher in the Active Directory tree than your OU. Applications that create or
access containers for which you have no permissions might not work. However, such applications
often have an ability to use a container that you create in your OU as an alternative. Check with
your application provider to find ways to create and use a container in your OU as an alternative.
For more information on your OU, see What gets created with your AWS Managed Microsoft AD.
• Schema changes during the install workflow – Some Active Directory applications require
changes to the default Active Directory schema, and they may attempt to install those changes
as part of the application installation workflow. Due to the privileged nature of schema
extensions, AWS makes this possible by importing Lightweight Directory Interchange Format
(LDIF) files through the AWS Directory Service console, CLI, or SDK only. Such applications often
Application compatibility Version 1.0 131

AWS Directory Service Administration Guide
come with an LDIF file that you can apply to the directory through the AWS Directory Service
schema update process. For more information about how the LDIF import process works, see
Tutorial: Extending your AWS Managed Microsoft AD schema. You can install the application in a
way to bypass the schema installation during the installation process.
Known incompatible applications
The following lists commonly requested commercial off-the-shelf applications for which we have
not found a configuration that works with AWS Managed Microsoft AD. AWS updates this list from
time to time at its sole discretion as a courtesy to help you avoid unproductive efforts. AWS provide
this information without warranty or claims regarding current or future compatibility.
• Active Directory Certificate Services (AD CS): Certificate Enrollment Web Service
• Active Directory Certificate Services (AD CS): Certificate Enrollment Policy Web Service
• Microsoft Exchange Server
• Microsoft Skype for Business Server
Enabling access to AWS applications and services for your AWS
Managed Microsoft AD
Users can authorize AWS Managed Microsoft AD to give AWS applications and services, such as
Amazon WorkSpaces, access to your Active Directory. The following AWS applications and services
can be enabled or disabled to work with AWS Managed Microsoft AD.
AWS application / service More information...
Amazon Chime For more information, see the Connecting to
Active Directory.
Amazon Connect For more information, see the Amazon
Connect Administration Guide.
Amazon EC2 For more information, see Ways to join an
Amazon EC2 instance to your AWS Managed
Microsoft AD.
Enabling access to AWS applications and services Version 1.0 132

AWS Directory Service Administration Guide
AWS application / service More information...
Amazon FSx for Windows File Server For more information, see Using Amazon
FSx with AWS Directory Service for Microsoft
Active Directory.
Amazon QuickSight For more information, see the Using Active
Directory with Amazon QuickSight Enterprise
edition.
Amazon Relational Database Service For more information, see the following:
• Using Kerberos authentication for MySQL
• Using Kerberos authentication with Amazon
RDS for Oracle
• Using Kerberos authentication with Amazon
RDS for PostgreSQL
• Working with AWS Managed Microsoft AD
with Amazon RDS for SQL Server
Amazon WorkDocs For more information, see the Enable Amazon
WorkDocs for AWS Managed Microsoft AD.
Amazon WorkMail For more information, see the Creating an
organization.
Amazon WorkSpaces You can create a Simple AD, AWS Managed
Microsoft AD, or AD Connector directly from
WorkSpaces. Simply launch Advanced Setup
when creating your Workspace.
For more information, see the Register an
existing AWS Directory Service directory with
WorkSpaces Personal.
AWS Client VPN For more information, see the Active Directory
authentication in Client VPN.
Enabling access to AWS applications and services Version 1.0 133
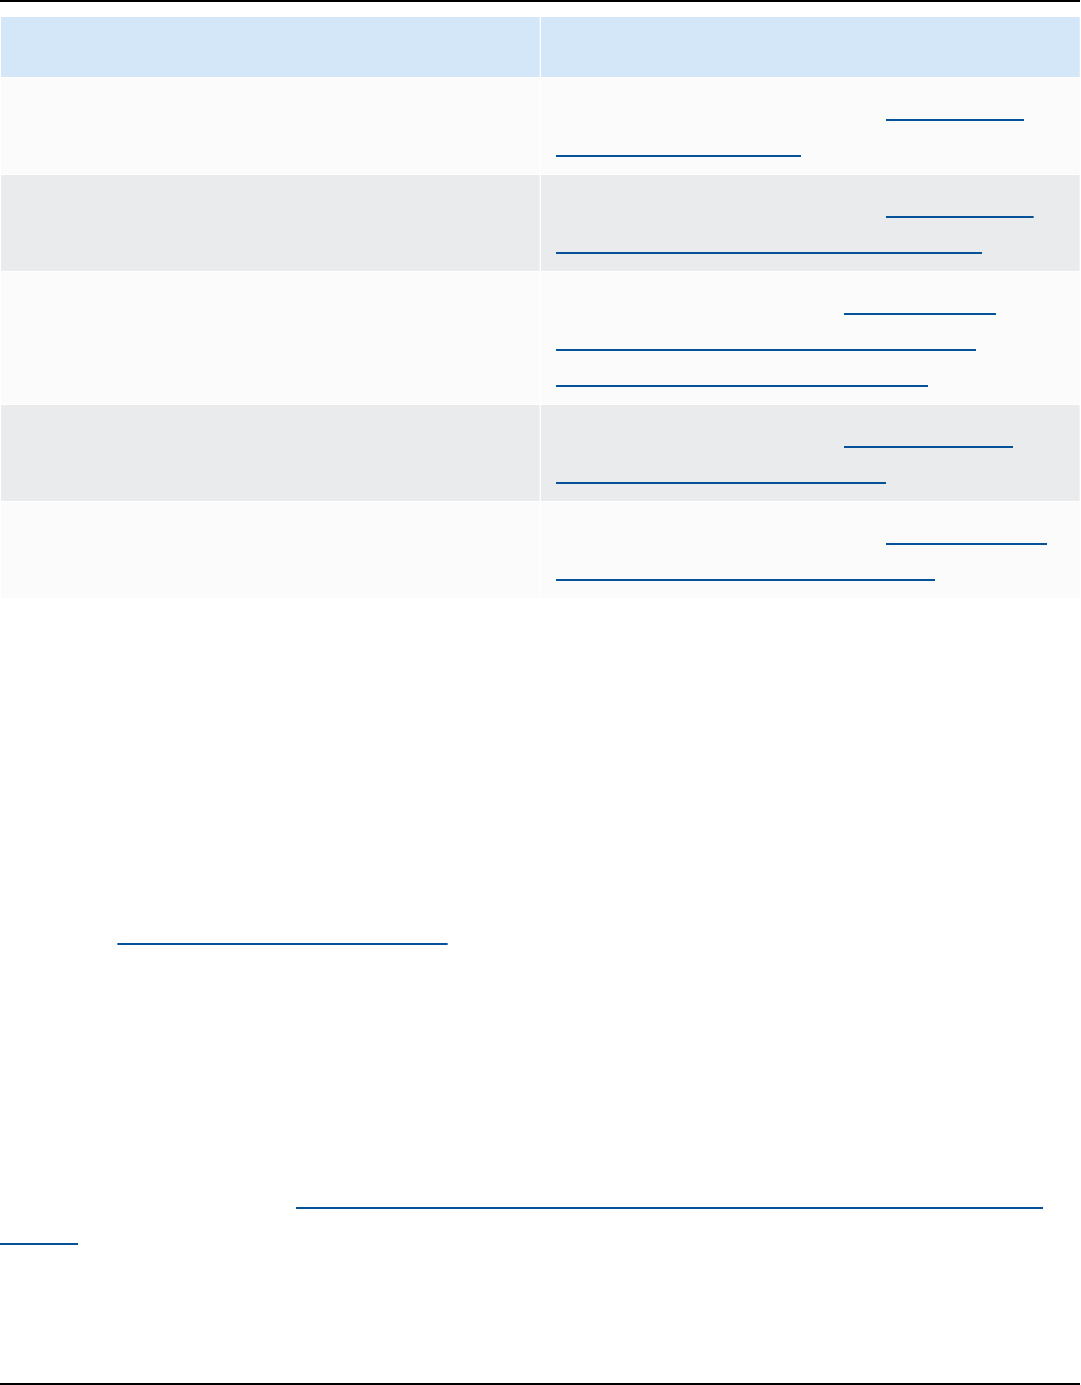
AWS Directory Service Administration Guide
AWS application / service More information...
AWS IAM Identity Center For more information, see the Connect to a
Microsoft AD directory.
AWS License Manager For more information, see the Manage user-
based subscriptions in License Manager.
AWS Management Console For more information, see Enabling AWS
Management Console access with AWS
Managed Microsoft AD credentials.
AWS Private Certificate Authority For more information, see AWS Private CA
Connector for Active Directory.
AWS Transfer Family For more information, see the Configuring an
SFTP, FTPS, or FTP server endpoint.
Once enabled, you manage access to your directories in the console of the application or service
that you want to give access to your directory.
Find AWS applications and services
To find the AWS applications and services previously described in the AWS Directory Service
console, perform the following steps.
1. In the AWS Directory Service console navigation pane, choose Directories.
2. On the Directories page, choose your directory ID.
3. On the Directory details page, select the Application management tab.
4. Review the list under the AWS apps & services section.
For more information about how to authorize or deauthorize AWS applications and services using
AWS Directory Service, see Authorization for AWS applications and services using AWS Directory
Service.
Enabling access to AWS applications and services Version 1.0 134

AWS Directory Service Administration Guide
Enabling AWS Management Console access with AWS Managed
Microsoft AD credentials
AWS Directory Service allows you to grant members of your directory access to the AWS
Management Console. By default, your directory members do not have access to any AWS
resources. You assign IAM roles to your directory members to give them access to the various AWS
services and resources. The IAM role defines the services, resources, and level of access that your
directory members have.
Before you can grant console access to your directory members, your directory must have an
access URL. For more information about how to view directory details and get your access URL, see
Viewing AWS Managed Microsoft AD directory information. For more information about how to
create an access URL, see Creating an access URL for AWS Managed Microsoft AD.
For more information about how to create and assign IAM roles to your directory members, see
Granting AWS Managed Microsoft AD users and groups access to AWS resources with IAM roles.
Topics
• Enabling AWS Management Console access
• Disabling AWS Management Console access
• Setting AWS Management Console login session length
Related AWS Security Blog Article
• How to Access the AWS Management Console Using AWS Managed Microsoft AD and Your On-
Premises Credentials
Note
Access to the AWS Management Console is a Regional feature of AWS Managed Microsoft
AD. If you are using Configure Multi-Region replication for AWS Managed Microsoft AD, the
following procedures must be applied separately in each Region. For more information, see
Global vs Regional features.
Enabling access to the AWS Management Console Version 1.0 135

AWS Directory Service Administration Guide
Enabling AWS Management Console access
By default, console access is not enabled for any directory. To enable console access for your
directory users and groups, perform the following steps:
To enable console access
1. In the AWS Directory Service console navigation pane, choose Directories.
2. On the Directories page, choose your directory ID.
3. On the Directory details page, do one of the following:
• If you have multiple Regions showing under Multi-Region replication, select the Region
where you want to enable access to the AWS Management Console, and then choose the
Application management tab. For more information, see Primary vs additional Regions.
• If you do not have any Regions showing under Multi-Region replication, choose the
Application management tab.
4. Under the AWS Management Console section, choose Enable. Console access is now enabled
for your directory.
Before users can sign-in to the console with your access URL, you must first add your users
to the role. For general information about assigning users to IAM roles, see Assigning users
or groups to an existing role. After the IAM roles have been assigned, users can then access
the console using your access URL. For example, if your directory access URL is example-
corp.awsapps.com, the URL to access the console is https://example-corp.awsapps.com/
console/.
Disabling AWS Management Console access
To disable AWS Management Console access for your AWS Managed Microsoft AD directory users
and groups, perform the following steps:
To disable console access
1. In the AWS Directory Service console navigation pane, choose Directories.
2. On the Directories page, choose your directory ID.
3. On the Directory details page, do one of the following:
Enabling access to the AWS Management Console Version 1.0 136

AWS Directory Service Administration Guide
• If you have multiple Regions showing under Multi-Region replication, select the Region
where you want to disable access to the AWS Management Console, and then choose the
Application management tab. For more information, see Primary vs additional Regions.
• If you do not have any Regions showing under Multi-Region replication, choose the
Application management tab.
4. Under the AWS Management Console section, choose Disable. Console access is now disabled
for your directory.
5. If any IAM roles have been assigned to users or groups in the directory, the Disable button
may be unavailable. In this case, you must remove all IAM role assignments for the directory
before proceeding, including assignments for users or groups in your directory that have been
deleted, which will show as Deleted User or Deleted Group.
After all IAM role assignments have been removed, repeat the steps above.
Setting AWS Management Console login session length
By default, users have 1 hour to use their session after successfully signing in to the AWS
Management Console before they are logged out. After that, users must sign in again to start the
next 1 hour session before being logged off again. You can use the following procedure to change
the length of time to up to 12 hours per session.
To set AWS Management Console login session length
1. In the AWS Directory Service console navigation pane, choose Directories.
2. On the Directories page, choose your directory ID.
3. On the Directory details page, do one of the following:
• If you have multiple Regions showing under Multi-Region replication, select the Region
where you want to set the login session length, and then choose the Application
management tab. For more information, see Primary vs additional Regions.
• If you do not have any Regions showing under Multi-Region replication, choose the
Application management tab.
4. Under the AWS apps & services section, choose AWS Management Console.
5. In the Manage Access to AWS Resource dialog box, choose Continue.
Enabling access to the AWS Management Console Version 1.0 137

AWS Directory Service Administration Guide
6. In the Assign users and groups to IAM roles page, under Set login session length, edit the
numbered value, and then choose Save.
Creating an access URL for AWS Managed Microsoft AD
An access URL is used with AWS applications and services, such as Amazon WorkDocs, to reach a
login page that is associated with your directory. The URL must be unique globally. You can create
an access URL for your directory by performing the following steps.
Warning
Once you create an application access URL for this directory, it cannot be changed. After an
access URL is created, it cannot be used by others. If you delete your directory, the access
URL is also deleted and can then be used by any other account.
Note
The access URL can only be configured from the primary region when using Multi-Region
directories.
To create an access URL
1. In the AWS Directory Service console navigation pane, select Directories.
2. On the Directories page, choose your directory ID.
3. On the Directory details page, do one of the following:
• If you have multiple Regions showing under Multi-Region replication, select the Primary
Region and then choose the Application management tab. For more information, see
Primary vs additional Regions.
• If you do not have any regions showing under Multi-Region replication, choose the
Application management tab.
4. In the Application access URL section, if an access URL has not been assigned to the directory,
the Create button is displayed. Enter a directory alias and choose Create. If an Entity Already
Exists error is returned, the specified directory alias has already been allocated. Choose
another alias and repeat this procedure.
Creating an access URL Version 1.0 138

AWS Directory Service Administration Guide
Your access URL is displayed in the format <alias>.awsapps.com. By default, this URL will
take you to the sign-in page for Amazon WorkDocs.
Enabling single sign-on for AWS Managed Microsoft AD
AWS Directory Service provides the ability to allow your users to access Amazon WorkDocs from a
computer joined to the directory without having to enter their credentials separately.
Before you enable single sign-on, you need to take additional steps to enable your users web
browsers to support single sign-on. Users may need to modify their web browser settings to enable
single sign-on.
Note
Single sign-on only works when used on a computer that is joined to the AWS Directory
Service directory. It cannot be used on computers that are not joined to the directory.
If your directory is an AD Connector directory and the AD Connector service account does not have
the permission to add or remove its service principal name attribute, then for Steps 5 and 6 below,
you have two options:
1. You can proceed and will be prompted for the username and password for a directory user that
has this permission to add or remove the service principal name attribute on the AD Connector
service account. These credentials are only used to enable single sign-on and are not stored by
the service. The AD Connector service account permissions are not changed.
2. You can delegate permissions to allow the AD Connector service account to add or remove the
service principal name attribute on itself, you can run the below PowerShell commands from
a domain joined computer using an account that has permissions to modify the permissions
on the AD Connector service account. The below command will give the AD Connector service
account the ability to add and remove a service principal name attribute only for itself.
$AccountName = 'ConnectorAccountName'
# DO NOT modify anything below this comment.
# Getting Active Directory information.
Import-Module 'ActiveDirectory'
Enabling single sign-on Version 1.0 139

AWS Directory Service Administration Guide
$RootDse = Get-ADRootDSE
[System.GUID]$ServicePrincipalNameGuid = (Get-ADObject -SearchBase
$RootDse.SchemaNamingContext -Filter { lDAPDisplayName -eq 'servicePrincipalName' } -
Properties 'schemaIDGUID').schemaIDGUID
# Getting AD Connector service account Information.
$AccountProperties = Get-ADUser -Identity $AccountName
$AclPath = $AccountProperties.DistinguishedName
$AccountSid = New-Object -TypeName 'System.Security.Principal.SecurityIdentifier'
$AccountProperties.SID.Value
# Getting ACL settings for AD Connector service account.
$ObjectAcl = Get-ACL -Path "AD:\$AclPath"
# Setting ACL allowing the AD Connector service account the ability to add and remove a
Service Principal Name (SPN) to itself
$AddAccessRule = New-Object -TypeName
'System.DirectoryServices.ActiveDirectoryAccessRule' $AccountSid, 'WriteProperty',
'Allow', $ServicePrincipalNameGUID, 'None'
$ObjectAcl.AddAccessRule($AddAccessRule)
Set-ACL -AclObject $ObjectAcl -Path "AD:\$AclPath"
To enable or disable single sign-on with Amazon WorkDocs
1. In the AWS Directory Service console navigation pane, select Directories.
2. On the Directories page, choose your directory ID.
3. On the Directory details page, select the Application management tab.
4. In the Application access URL section, choose Enable to enable single sign-on for Amazon
WorkDocs.
If you do not see the Enable button, you may need to first create an Access URL before
this option will be displayed. For more information about how to create an access URL, see
Creating an access URL for AWS Managed Microsoft AD.
5. In the Enable Single Sign-On for this directory dialog box, choose Enable. Single sign-on is
enabled for the directory.
6. If you later want to disable single sign-on with Amazon WorkDocs, choose Disable, and then in
the Disable Single Sign-On for this directory dialog box, choose Disable again.
Topics
• Single sign-on for IE and Chrome
• Single sign-on for Firefox
Enabling single sign-on Version 1.0 140

AWS Directory Service Administration Guide
Single sign-on for IE and Chrome
To allow Microsoft Internet Explorer (IE) and Google Chrome browsers to support single sign-on,
the following tasks must be performed on the client computer:
•
Add your access URL (e.g., https://<alias>.awsapps.com) to the list of approved sites for single
sign-on.
• Enable active scripting (JavaScript).
• Allow automatic logon.
• Enable integrated authentication.
You or your users can perform these tasks manually, or you can change these settings using Group
Policy settings.
Topics
• Manual update for single sign-on on Windows
• Manual update for single sign-on on OS X
• Group policy settings for single sign-on
Manual update for single sign-on on Windows
To manually enable single sign-on on a Windows computer, perform the following steps on the
client computer. Some of these settings may already be set correctly.
To manually enable single sign-on for Internet Explorer and Chrome on Windows
1.
To open the Internet Properties dialog box, choose the Start menu, type Internet Options
in the search box, and choose Internet Options.
2. Add your access URL to the list of approved sites for single sign-on by performing the
following steps:
a. In the Internet Properties dialog box, select the Security tab.
b. Select Local intranet and choose Sites.
c. In the Local intranet dialog box, choose Advanced.
d. Add your access URL to the list of websites and choose Close.
e. In the Local intranet dialog box, choose OK.
Enabling single sign-on Version 1.0 141

AWS Directory Service Administration Guide
3. To enable active scripting, perform the following steps:
a. In the Security tab of the Internet Properties dialog box, choose Custom level.
b. In the Security Settings - Local Intranet Zone dialog box, scroll down to Scripting and
select Enable under Active scripting.
c. In the Security Settings - Local Intranet Zone dialog box, choose OK.
4. To enable automatic logon, perform the following steps:
a. In the Security tab of the Internet Properties dialog box, choose Custom level.
b. In the Security Settings - Local Intranet Zone dialog box, scroll down to User
Authentication and select Automatic logon only in Intranet zone under Logon.
c. In the Security Settings - Local Intranet Zone dialog box, choose OK.
d. In the Security Settings - Local Intranet Zone dialog box, choose OK.
5. To enable integrated authentication, perform the following steps:
a. In the Internet Properties dialog box, select the Advanced tab.
b. Scroll down to Security and select Enable Integrated Windows Authentication.
c. In the Internet Properties dialog box, choose OK.
6. Close and re-open your browser to have these changes take effect.
Manual update for single sign-on on OS X
To manually enable single sign-on for Chrome on OS X, perform the following steps on the client
computer. You will need administrator rights on your computer to complete these steps.
To manually enable single sign-on for Chrome on OS X
1. Add your access URL to the AuthServerAllowlist policy by running the following command:
defaults write com.google.Chrome AuthServerAllowlist "https://<alias>.awsapps.com"
2.
Open System Preferences, go to the Profiles panel, and delete the Chrome Kerberos
Configuration profile.
3. Restart Chrome and open chrome://policy in Chrome to confirm that the new settings are in
place.
Enabling single sign-on Version 1.0 142

AWS Directory Service Administration Guide
Group policy settings for single sign-on
The domain administrator can implement Group Policy settings to make the single sign-on changes
on client computers that are joined to the domain.
Note
If you manage the Chrome web browsers on the computers in your domain with Chrome
policies, you must add your access URL to the AuthServerAllowlist policy. For more
information about setting Chrome policies, go to Policy Settings in Chrome.
To enable single sign-on for Internet Explorer and Chrome using Group Policy settings
1. Create a new Group Policy object by performing the following steps:
a. Open the Group Policy Management tool, navigate to your domain and select Group
Policy Objects.
b. From the main menu, choose Action and select New.
c. In the New GPO dialog box, enter a descriptive name for the Group Policy object, such as
IAM Identity Center Policy, and leave Source Starter GPO set to (none). Click OK.
2. Add the access URL to the list of approved sites for single sign-on by performing the following
steps:
a. In the Group Policy Management tool, navigate to your domain, select Group Policy
Objects, open the context (right-click) menu for your IAM Identity Center policy, and
choose Edit.
b. In the policy tree, navigate to User Configuration > Preferences > Windows Settings.
c. In the Windows Settings list, open the context (right-click) menu for Registry and choose
New registry item.
d. In the New Registry Properties dialog box, enter the following settings and choose OK:
Action
Update
Hive
HKEY_CURRENT_USER
Enabling single sign-on Version 1.0 143

AWS Directory Service Administration Guide
Path
Software\Microsoft\Windows\CurrentVersion\Internet Settings
\ZoneMap\Domains\awsapps.com\<alias>
The value for <alias> is derived from your access URL. If your access URL is
https://examplecorp.awsapps.com, the alias is examplecorp, and the registry
key will be Software\Microsoft\Windows\CurrentVersion\Internet
Settings\ZoneMap\Domains\awsapps.com\examplecorp.
Value name
https
Value type
REG_DWORD
Value data
1
3. To enable active scripting, perform the following steps:
a. In the Group Policy Management tool, navigate to your domain, select Group Policy
Objects, open the context (right-click) menu for your IAM Identity Center policy, and
choose Edit.
b. In the policy tree, navigate to Computer Configuration > Policies > Administrative
Templates > Windows Components > Internet Explorer > Internet Control Panel >
Security Page > Intranet Zone.
c. In the Intranet Zone list, open the context (right-click) menu for Allow active scripting
and choose Edit.
d. In the Allow active scripting dialog box, enter the following settings and choose OK:
• Select the Enabled radio button.
• Under Options set Allow active scripting to Enable.
4. To enable automatic logon, perform the following steps:
a. In the Group Policy Management tool, navigate to your domain, select Group Policy
Objects, open the context (right-click) menu for your SSO policy, and choose Edit.
Enabling single sign-on Version 1.0 144

AWS Directory Service Administration Guide
b. In the policy tree, navigate to Computer Configuration > Policies > Administrative
Templates > Windows Components > Internet Explorer > Internet Control Panel >
Security Page > Intranet Zone.
c. In the Intranet Zone list, open the context (right-click) menu for Logon options and
choose Edit.
d. In the Logon options dialog box, enter the following settings and choose OK:
• Select the Enabled radio button.
• Under Options set Logon options to Automatic logon only in Intranet zone.
5. To enable integrated authentication, perform the following steps:
a. In the Group Policy Management tool, navigate to your domain, select Group Policy
Objects, open the context (right-click) menu for your IAM Identity Center policy, and
choose Edit.
b. In the policy tree, navigate to User Configuration > Preferences > Windows Settings.
c. In the Windows Settings list, open the context (right-click) menu for Registry and choose
New registry item.
d. In the New Registry Properties dialog box, enter the following settings and choose OK:
Action
Update
Hive
HKEY_CURRENT_USER
Path
Software\Microsoft\Windows\CurrentVersion\Internet Settings
Value name
EnableNegotiate
Value type
REG_DWORD
Value data
1
Enabling single sign-on Version 1.0 145

AWS Directory Service Administration Guide
6. Close the Group Policy Management Editor window if it is still open.
7. Assign the new policy to your domain by following these steps:
a. In the Group Policy Management tree, open the context (right-click) menu for your
domain and choose Link an Existing GPO.
b. In the Group Policy Objects list, select your IAM Identity Center policy and choose OK.
These changes will take effect after the next Group Policy update on the client, or the next time
the user logs in.
Single sign-on for Firefox
To allow Mozilla Firefox browser to support single sign-on, add your access URL (e.g.,
https://<alias>.awsapps.com) to the list of approved sites for single sign-on. This can be done
manually, or automated with a script.
Topics
• Manual update for single sign-on
• Automatic update for single sign-on
Manual update for single sign-on
To manually add your access URL to the list of approved sites in Firefox, perform the following
steps on the client computer.
To manually add your access URL to the list of approved sites in Firefox
1.
Open Firefox and open the about:config page.
2.
Open the network.negotiate-auth.trusted-uris preference and add your access URL
to the list of sites. Use a comma (,) to separate multiple entries.
Automatic update for single sign-on
As a domain administrator, you can use a script to add your access URL to the Firefox
network.negotiate-auth.trusted-uris user preference on all computers on your network.
For more information, go to https://support.mozilla.org/en-US/questions/939037.
Enabling single sign-on Version 1.0 146

AWS Directory Service Administration Guide
Granting AWS Managed Microsoft AD users and groups access
to AWS resources with IAM roles
AWS Directory Service provides the ability to give your AWS Managed Microsoft AD users and
groups access to AWS services and resources, such as access to the Amazon EC2 console. Similar
to granting IAM users access to manage directories as described in Identity-based policies (IAM
policies), in order for users in your directory to have access to other AWS resources, such as Amazon
EC2 you must assign IAM roles and policies to those users and groups. For more information, see
IAM roles in the IAM User Guide.
For information about how to grant users access to the AWS Management Console, see Enabling
AWS Management Console access with AWS Managed Microsoft AD credentials.
Topics
• Creating a new role
• Editing the trust relationship for an existing role
• Assigning users or groups to an existing role
• Viewing users and groups assigned to a role
• Removing a user or group from a role
• Using AWS managed policies with AWS Directory Service
Creating a new role
If you need to create a new IAM role for use with AWS Directory Service, you must create it using
the IAM console. Once the role has been created, you must then set up a trust relationship with
that role before you can see that role in the AWS Directory Service console. For more information,
see Editing the trust relationship for an existing role.
Note
The user performing this task must have permission to perform the following IAM actions.
For more information, see Identity-based policies (IAM policies).
• iam:PassRole
• iam:GetRole
• iam:CreateRole
Granting access to AWS resources Version 1.0 147

AWS Directory Service Administration Guide
• iam:PutRolePolicy
To create a new role in the IAM console
1. In the navigation pane of the IAM console, chooseRoles. For more information, see Creating a
role (AWS Management Console) in the IAM User Guide.
2. Choose Create role.
3. Under Choose the service that will use this role, choose Directory Service, and then choose
Next.
4. Select the check box next to the policy (for example, AmazonEC2FullAccess) that you want to
apply to your directory users, and then choose Next.
5. If necessary, add a tag to the role, and then choose Next.
6. Provide a Role name and optional Description, and then choose Create role.
Example: Create a role to enable AWS Management Console access
The following checklist provides an example of the tasks you must complete to create a new role
that will give specific directory users access to the Amazon EC2 console.
1. Create a role with the IAM console using the procedure above. When prompted for a policy,
choose AmazonEC2FullAccess.
2. Use the steps in Editing the trust relationship for an existing role to edit the role you just
created, and then add the required trust relationship information to the policy document. This
step is necessary for the role to be visible immediately after you enable access to the AWS
Management Console in the next step.
3. Follow the steps in Enabling AWS Management Console access with AWS Managed Microsoft
AD credentials to configure general access to the AWS Management Console.
4. Follow the steps in Assigning users or groups to an existing role to add the users who need full
access to EC2 resources to the new role.
Editing the trust relationship for an existing role
You can assign your existing IAM roles to your AWS Directory Service users and groups. To do this,
however, the role must have a trust relationship with AWS Directory Service. When you use AWS
Editing the trust relationship for an existing role Version 1.0 148

AWS Directory Service Administration Guide
Directory Service to create a role using the procedure in Creating a new role, this trust relationship
is automatically set. You only need to establish this trust relationship for IAM roles that are not
created by AWS Directory Service.
To establish a trust relationship for an existing role to AWS Directory Service
1. Open the IAM console at https://console.aws.amazon.com/iam/.
2. In the navigation pane of the IAM console, under Access management, chooseRoles.
The console displays the roles for your account.
3. Choose the name of the role that you want to modify, and once on the role's page, select
theTrust relationshipstab.
4. ChooseEdit trust policy.
5. Under Edit trust policy, paste the following, and then choose Update policy.
{
"Version": "2012-10-17",
"Statement": [
{
"Sid": "",
"Effect": "Allow",
"Principal": {
"Service": "ds.amazonaws.com"
},
"Action": "sts:AssumeRole"
}
]
}
You can also update this policy document using the AWS CLI. For more information, see update-
trust in the AWS CLI Command Reference.
Assigning users or groups to an existing role
You can assign an existing IAM role to an AWS Directory Service user or group. To do this, make
sure you have completed the following.
Assigning users or groups to an existing role Version 1.0 149

AWS Directory Service Administration Guide
Prerequisites
• Create an AWS Managed Microsoft AD.
• Create a user or create a group.
• Create a role that has a trust relationship with AWS Directory Service. You can edit the trust
relationship for an existing role.
Note
Access for users in nested groups within your directory are not supported. Members of the
parent group have console access, but members of child groups do not.
To assign users or groups to an existing IAM role
1. In the AWS Directory Service console navigation pane, under Active Directory, choose
Directories.
2. On the Directories page, choose your directory ID.
3. On the Directory details page, do one of the following:
• If you do not have any Regions showing under Multi-Region replication, choose the
Application management tab.
• If you have multiple Regions showing under Multi-Region replication, select the Region
where you want to make your assignments, and then choose the Application management
tab. For more information, see Primary vs additional Regions.
4. Scroll down to the AWS Management Console section, choose Actions and Enable.
5. Under the Delegate console access section, choose the IAM role name for the existing IAM role
that you want to assign users to.
6. On the Selected role page, under Manage users and groups for this role, choose Add.
7. On the Add users and groups to the role page, under Select Active Directory Forest, choose
either the AWS Managed Microsoft AD forest (this forest) or the on-premises forest (trusted
forest), whichever contains where the accounts that need access to the AWS Management
Console. For more information about how to set up a trusted forest, see Tutorial: Create a
trust relationship between your AWS Managed Microsoft AD and your self-managed Active
Directory domain.
Assigning users or groups to an existing role Version 1.0 150

AWS Directory Service Administration Guide
8. Under Specify which users or groups to add, select either Find by user or Find by group, and
then type the name of the user or group. In the list of possible matches, choose the user or
group that you want to add.
9. Choose Add to finish assigning the users and groups to the role.
Viewing users and groups assigned to a role
To view the users and groups assigned to a role, perform the following steps.
Prerequisites
• Assign your users or groups to an existing role.
To view users and group assigned to a role
1. In the AWS Directory Service console navigation pane, under Active Directory, choose
Directories.
2. On the Directories page, choose your directory ID.
3. On the Directory details page, do one of the following:
• If you have multiple Regions showing under Multi-Region replication, select the Region
where you want to view your assignments, and then choose the Application management
tab. For more information, see Primary vs additional Regions.
• If you do not have any Regions showing under Multi-Region replication, choose the
Application management tab.
4. Under the Delegate Console Access section, choose the IAM role you want to view.
5. On the Selected role page, under the Manage users and groups for this role section, you can
view the users and groups assigned to the role.
Removing a user or group from a role
To remove a user or group from a role, perform the following steps.
To remove a user or group from a role
1. In the AWS Directory Service console navigation pane, choose Directories.
Viewing users and groups assigned to a role Version 1.0 151

AWS Directory Service Administration Guide
2. On the Directories page, choose your directory ID.
3. On the Directory details page, do one of the following:
• If you have multiple Regions showing under Multi-Region replication, select the
Region where you want to remove your assignments, and then choose the Application
management tab. For more information, see Primary vs additional Regions.
• If you do not have any Regions showing under Multi-Region replication, choose the
Application management tab.
4. Under the AWS Management Console section, choose the role you want to view.
5. On the Selected role page, under Manage users and groups for this role, select the users or
groups to remove the role from and choose Remove. The role is removed from the specified
users and groups, but the role is not removed from your account.
Using AWS managed policies with AWS Directory Service
AWS Directory Service provides the following AWS managed policies to give your users and groups
access to AWS services and resources, such as access to the Amazon EC2 console. You must log in to
the AWS Management Console before you can view these policies.
• Read only access
• Power user access
• AWS Directory Service full access
• AWS Directory Service read only access
• AWS Directory Service Data full access
• AWS Directory Service Data read only access
• Amazon Cloud Directory full access
• Amazon Cloud Directory read only access
• Amazon EC2 full access
• Amazon EC2 read only access
• Amazon VPC full access
• Amazon VPC read only access
• Amazon RDS full access
Using AWS managed policies Version 1.0 152

AWS Directory Service Administration Guide
• Amazon RDS read only access
• Amazon DynamoDB full access
• Amazon DynamoDB read only access
• Amazon S3 full access
• Amazon S3 read only access
• AWS CloudTrail full access
• AWS CloudTrail read only access
• Amazon CloudWatch full access
• Amazon CloudWatch read only access
• Amazon CloudWatch Logs full access
• Amazon CloudWatch Logs read only access
For more information on how to create your own policies, see Example policies for administering
AWS resources in the IAM User Guide.
Configure Multi-Region replication for AWS Managed Microsoft
AD
Multi-Region replication can be used to automatically replicate your AWS Managed Microsoft AD
directory data across multiple AWS Regions. This replication can improve performance for users
and applications in disperse geographic locations. AWS Managed Microsoft AD uses native Active
Directory replication to replicate your directory’s data securely to the new Region.
Multi-Region replication is only supported for the Enterprise Edition of AWS Managed Microsoft
AD.
You can use automated multi-Region replication in most Regions where AWS Managed Microsoft
AD is available.
Important
Multi-Region replication is unavailable in the following opt-in Regions:
• Africa (Cape Town) af-south-1
Configure Multi-Region replication Version 1.0 153

AWS Directory Service Administration Guide
• Asia Pacific (Hong Kong) ap-east-1
• Asia Pacific (Hyderabad) ap-south-2
• Asia Pacific (Jakarta) ap-southeast-3
• Asia Pacific (Melbourne) ap-southeast-4
• Canada West (Calgary) ca-west-1
• Europe (Milan) eu-south-1
• Europe (Spain) eu-south-2
• Europe (Zurich) eu-central-2
• Israel (Tel Aviv) il-central-1
• Middle East (Bahrain) me-south-1
• Middle East (UAE) me-central-1
For more information about opt-in Regions and how to enable them, see Specify which
AWS Regions your account can use in the AWS Account Management Guide.
How multi-Region replication works
With the multi-Region replication feature, AWS Managed Microsoft AD eliminates the
undifferentiated heavy lifting of managing a global Active Directory infrastructure. When
configured, AWS replicates all customer directory data including users, groups, group policies, and
schema across multiple AWS Regions.
Once a new Region has been added, the following operations automatically occur as shown in the
illustration:
• AWS Managed Microsoft AD creates two domain controllers in the selected VPC and deploys
them to the new Region in the same AWS account. Your directory identifier (directory_id)
remains the same across all Regions. You can add additional domain controllers later if you want.
• AWS Managed Microsoft AD configures the networking connection between the primary Region
and the new Region.
• AWS Managed Microsoft AD creates a new Active Directory site and gives it the same name as
the Region, such as us-east-1. You can also rename this later using the Active Directory Sites and
Services tool.
How it works Version 1.0 154

AWS Directory Service Administration Guide
• AWS Managed Microsoft AD replicates all Active Directory objects and configurations to the new
Region, including users, groups, group policies, Active Directory trusts, organizational units, and
Active Directory schema. Active Directory site links are configured to use Change Notification.
With change notification between sites enabled, changes propagate to the remote site with the
same frequency that they are propagated within the source site, including changes that warrant
urgent replication.
• If this is the first Region you've added, AWS Managed Microsoft AD makes all features multi-
Region aware. For more information, see Global vs Regional features.
Active Directory sites
Multi-Region replication supports multiple Active Directory sites (one Active Directory site per
Region). When a new Region is added, it is given the same name as the Region—for example, us-
east-1. You can also rename this later using Active Directory Sites and Services.
How it works Version 1.0 155

AWS Directory Service Administration Guide
AWS services
AWS services such as Amazon RDS for SQL Server and Amazon FSx connect to the local instances
of the global directory. This allows your users to sign in once to Active Directory-aware applications
that run in AWS as well as AWS services like Amazon RDS for SQL Server in any AWS Region. To do
so, users need credentials from AWS Managed Microsoft AD or on-premises Active Directory when
you have a trust with your AWS Managed Microsoft AD.
You can use the following AWS services with the multi-Region replication feature.
• Amazon EC2
• Amazon FSx for Windows File Server
• Amazon Relational Database Service for SQL Server
• Amazon RDS for Oracle
• Amazon RDS for MySQL
• Amazon RDS for PostgreSQL
• Amazon RDS for MariaDB
• Amazon Aurora for MySQL
• Amazon Aurora for PostgreSQL
Failover
In the event that all domain controllers in one Region are down, AWS Managed Microsoft AD
recovers the domain controllers and replicates the directory data automatically. Meanwhile domain
controllers in other Regions stay up and running.
Benefits of multi-Region replication
With multi-Region replication in AWS Managed Microsoft AD, Active Directory-aware applications
use the directory locally for high performance and the multi-Region feature for resiliency. You can
use multi-Region replication with Active Directory-aware applications like SharePoint and SQL
Server Always On as well as AWS services like Amazon RDS for SQL Server and FSx for Windows
File Server. The following are additional benefits of multi-Region replication.
• It lets you deploy a single AWS Managed Microsoft AD instance globally, quickly, and eliminates
the heavy lifting of self-managing a global Active Directory infrastructure.
Benefits Version 1.0 156

AWS Directory Service Administration Guide
• It makes it easier and more cost-effective for you to deploy and manage Windows and Linux
workloads in multiple AWS Regions. Automated multi-Region replication enables optimal
performance in your global Active Directory-aware applications. All applications deployed in
Windows or Linux instances use AWS Managed Microsoft AD locally in the Region, which enables
responses to user requests from the closest Region possible.
• It provides multi-Region resiliency. Deployed in the highly available AWS managed infrastructure,
AWS Managed Microsoft AD handles automated software updates, monitoring, recovery, and the
security of the underlying Active Directory infrastructure across all Regions. This allows you to
focus on building your applications.
Topics
• Global vs Regional features
• Primary vs additional Regions
• Adding a replicated Region for AWS Managed Microsoft AD
• Deleting a replicated Region for AWS Managed Microsoft AD
Global vs Regional features
When you add an AWS Region to your directory using multi-Region replication, AWS Directory
Service enhances the scope of all features so that they become Region-aware. These features
are listed on various tabs of the details page that appears when you choose the ID of a directory
in the AWS Directory Service console. This means that all features are enabled, configured, or
managed based on the Region that you select in the Multi-Region replication section of the
console. Changes you make to features in each Region are either applied globally or per Region.
Multi-Region replication is only supported for the Enterprise Edition of AWS Managed Microsoft
AD.
Global features
Any changes that you make to global features while the Primary Region is selected will be applied
across all Regions.
You can identify the features that are used globally on the Directory details page because they
display Applied to all replicated Regions next to them. Alternatively, if you selected another
Region in the list that is not the primary Region, you can identify the globally used features
because they display Inherited from primary Region.
Global vs Regional features Version 1.0 157

AWS Directory Service Administration Guide
Regional features
Any changes that you make to a feature in an Additional Region will be applied only to that Region.
You can identify the features that are Regional on the Directory details page because they do not
display Applied to all replicated Regions or Inherited from primary Region next to them.
Primary vs additional Regions
With multi-Region replication, AWS Managed Microsoft AD uses the following two types of Regions
to differentiate how global or Regional features should be applied across your directory.
Primary Region
The initial Region where you first created your directory is referred to as the primary Region. You
can perform only global directory level operations such as creating Active Directory trusts and
updating the AD schema from the primary Region.
The primary Region can always be identified as the first Region showing at the top of the list in the
Multi-Region replication section, and ends with - Primary. For example, US East (N. Virginia) -
Primary.
Any changes that you make to Global features while the primary Region is selected will be applied
across all Regions.
You can only add Regions while the primary Region is selected. For more information, see Adding a
replicated Region for AWS Managed Microsoft AD.
Additional Region
Any Regions that you have added to your directory are referred to as additional Regions.
Although some features can be managed globally for all Regions, others are managed individually
per Region. To manage a feature for an additional Region (non-primary Region), you must first
select the additional Region from the list in the Multi-Region replication section on the Directory
details page. Then you can proceed to manage the feature.
Any changes that you make to Regional features while an additional Region is selected will be
applied only to that Region.
Primary vs additional Regions Version 1.0 158

AWS Directory Service Administration Guide
Adding a replicated Region for AWS Managed Microsoft AD
When you add a Region using the Configure Multi-Region replication for AWS Managed Microsoft
AD feature, AWS Managed Microsoft AD creates two domain controllers in the selected AWS
Region, Amazon Virtual Private Cloud (VPC), and subnet. AWS Managed Microsoft AD also creates
the related security groups that enable Windows workloads to connect to your directory in the new
Region. It also creates these resources using the same AWS account where your directory is already
deployed. You do this by choosing the Region, specifying the VPC, and providing the configurations
for the new Region.
Multi-Region replication is only supported for the Enterprise Edition of AWS Managed Microsoft
AD.
Prerequisites
Before you proceed with the steps to add a new replication Region, we recommend that you first
review the following prerequisite tasks.
• Verify that you have the necessary AWS Identity and Access Management (IAM) permissions,
Amazon VPC setup, and the subnet setup in the new Region to which you want to replicate the
directory.
• If you want to use your existing on-premises Active Directory credentials to access and manage
Active Directory-aware workloads in AWS, you must create an Active Directory trust between
AWS Managed Microsoft AD and your on-premises AD infrastructure. For more information
about trusts, see Connect AWS Managed Microsoft AD to your existing Active Directory
infrastructure.
• If you have an existing trust relationship between your on-premises Active Directory and you
want to add a replicated region, you need to verify you have the necessary Amazon VPC and
subnet setup in the new Region to which you want to replicate the directory.
You can also create a trust between your AWS Managed Microsoft AD and on-premise AD
infrastructure, so you can use existing on-premises Active Directory credentials to manage AD-
aware workloads. For more information, see Connect AWS Managed Microsoft AD to your existing
Active Directory infrastructure.
Adding a replicated Region Version 1.0 159

AWS Directory Service Administration Guide
Add a Region
Use the following procedure to add a replicated Region for your AWS Managed Microsoft AD
directory.
To add a replicated Region
1. In the AWS Directory Service console navigation pane, choose Directories.
2. On the Directories page, choose your directory ID.
3. On the Directory details page, under Multi-Region replication, choose the Primary Region
from the list, and then choose Add Region.
Note
You can only add Regions while the Primary Region is selected. For more information,
see Primary Region.
4. On the Add Region page, under Region, choose the Region you want to add from the list.
5. Under VPC, choose the VPC to use for this Region.
Note
This VPC must not have a Classless Inter-Domain Routing (CIDR) that overlaps with a
VPC used by this directory in another Region.
6. Under Subnets, choose the subnet to use for this Region.
7. Review the information under Pricing, and then choose Add.
8. When AWS Managed Microsoft AD completes the domain controller deployment process, the
Region will display Active status. You can now make updates to this Region as needed.
Next steps
After you add your new Region, you should consider doing the following next steps:
• Deploy additional domain controllers (up to 20) to your new Region as needed. The number of
domain controllers when you add a new Region is 2 by default, which is the minimum required
for fault-tolerance and high availability purposes. For more information, see Adding or removing
additional domain controllers with the AWS Management Console.
Adding a replicated Region Version 1.0 160

AWS Directory Service Administration Guide
Note
When you add a replicated AWS Region to your AWS Managed Microsoft AD, two domain
controllers are created by default, which is the minimum number of domain controllers
required for fault-tolerance and high availability.
• Share your directory with more AWS accounts per Region. Directory sharing configurations are
not replicated from the primary Region automatically. For more information, see Share your AWS
Managed Microsoft AD.
Note
Directory sharing configurations aren't automatically replicated in the primary AWS
Region.
• Enable log forwarding to retrieve your directory’s security logs using Amazon CloudWatch Logs
from the new Region. When you enable log forwarding, you must provide a log group name in
each Region where you replicated your directory. For more information, see Enabling Amazon
CloudWatch Logs log forwarding for AWS Managed Microsoft AD.
Note
When you enable log forwarding, you must provide a name for the log group in each
AWS Region where you replicated your directory.
• Enable Amazon Simple Notification Service (Amazon SNS) monitoring for the new Region to
track your directory health status per Region. For more information, see Enabling AWS Managed
Microsoft AD directory status notifications with Amazon Simple Notification Service.
Deleting a replicated Region for AWS Managed Microsoft AD
Use the following procedure to delete a Region for your AWS Managed Microsoft AD directory.
Before you delete a Region, make sure it does not have either of the following:
• Authorized applications attached to it.
• Shared directories associated with it.
Deleting a replicated Region Version 1.0 161

AWS Directory Service Administration Guide
To delete a replicated Region
1. In the AWS Directory Service console navigation pane, choose Directories.
2. From the navigation bar, choose the Regions selector and choose the region where your
directory is stored.
3. On the Directories page, choose your directory ID.
4. On the Directory details page, under Multi-Region replication choose Delete Region.
5. In the Delete Region dialog box, review the information, and then enter in the Region name to
confirm. Then choose Delete.
Note
You cannot make updates to the Region while it's being deleted.
Share your AWS Managed Microsoft AD
AWS Managed Microsoft AD integrates tightly with AWS Organizations to allow seamless directory
sharing across multiple AWS accounts. You can share a single directory with other trusted AWS
accounts within the same organization or share the directory with other AWS accounts that
are outside your organization. You can also share your directory when your AWS account is not
currently a member of an organization.
Key directory sharing concepts
You'll get more out of the directory sharing feature if you become familiar with the following key
concepts.
Share your directory Version 1.0 162

AWS Directory Service Administration Guide
Directory owner account
A directory owner is the AWS account holder that owns the originating directory in the shared
directory relationship. An administrator in this account initiates the directory sharing workflow by
specifying which AWS accounts to share their directory with. Directory owners can see who they've
shared a directory with using the Scale & Share tab for a given directory in the AWS Directory
Service console.
Directory consumer account
In a shared directory relationship, a directory consumer represents the AWS account to which
the directory owner shared the directory with. Depending on the sharing method used, an
administrator in this account may need to accept an invite sent from the directory owner before
they can start using the shared directory.
The directory sharing process creates a shared directory in the directory consumer account. This
shared directory contains the metadata that enables the EC2 instance to seamlessly join the
domain, which locates the originating directory in the directory owner account. Each shared
directory in the directory consumer account has a unique identifier (Shared directory ID).
Sharing methods
AWS Managed Microsoft AD provides the following two directory sharing methods:
Key concepts Version 1.0 163

AWS Directory Service Administration Guide
• AWS Organizations – This method makes it easier to share the directory within your
organization because you can browse and validate the directory consumer accounts. To use
this option, your organization must have All features enabled, and your directory must be in
the organization management account. This method of sharing simplifies your setup because
it doesn’t require the directory consumer accounts to accept your directory sharing request. In
the console, this method is referred to as Share this directory with AWS accounts inside your
organization.
• Handshake – This method enables directory sharing when you aren’t using AWS Organizations.
The handshake method requires the directory consumer account to accept the directory sharing
request. In the console, this method is referred to as Share this directory with other AWS
accounts.
Network connectivity
Network connectivity is a prerequisite to use a directory sharing relationship across AWS accounts.
AWS supports many solutions to connect your VPCs, some of these include VPC peering, Transit
Gateway, and VPN. To get started, see Tutorial: Sharing your AWS Managed Microsoft AD directory
for seamless EC2 domain-join.
Considerations
The following are some considerations when using directory share with your AWS Managed
Microsoft AD:
Pricing
• AWS charges an additional fee for directory sharing. The AWS account that is using the shared
AWS Managed Microsoft AD is the account charged the sharing fees. To learn more, see the
Pricing page on the AWS Directory Service website.
• Directory sharing makes AWS Managed Microsoft AD a more cost-effective way of integrating
with Amazon EC2 in multiple accounts and VPCs. Directory sharing is available in all AWS regions
where AWS managed Microsoft AD is offered.
Region availability
• In the AWS China (Ningxia), this feature is available only when using AWS Systems Manager
(SSM) to seamlessly join your Amazon EC2 instances.
Considerations Version 1.0 164

AWS Directory Service Administration Guide
For more information about directory sharing and how to extend the reach of your AWS Managed
Microsoft AD directory across AWS account boundaries, see the following topics.
Topics
• Tutorial: Sharing your AWS Managed Microsoft AD directory for seamless EC2 domain-join
• Unsharing your directory
Tutorial: Sharing your AWS Managed Microsoft AD directory for
seamless EC2 domain-join
This tutorial shows you how to share your AWS Managed Microsoft AD directory (the directory
owner account) with another AWS account (the directory consumer account). Once the networking
prerequisites have been completed, you will share a directory between two AWS accounts. Then
you'll learn how to seamlessly join an EC2 instance to a domain in the directory consumer account.
We recommend that you first review directory sharing key concepts and use case content before
you start work on this tutorial. For more information, see Key directory sharing concepts.
The process for sharing your directory differs depending on whether you share the directory with
another AWS account in the same AWS organization or with an account that is outside of the AWS
organization. For more information about how sharing works, see Sharing methods.
This workflow has four basic steps.
Step 1: Set up your networking environment
In the directory owner account, you set up all of the networking prerequisites necessary for the
directory sharing process.
Tutorial: Share your AWS Managed Microsoft AD directory Version 1.0 165

AWS Directory Service Administration Guide
Step 2: Share your directory
While signed in with directory owner administrator credentials, you open the AWS Directory
Service console and start the share directory workflow, which sends an invitation to the
directory consumer account.
Step 3: Accept shared directory invite - Optional
While signed in with directory consumer administrator credentials, you open the AWS Directory
Service console and accept the directory sharing invite.
Step 4: Test seamlessly joining an EC2 instance for Windows Server to a domain
Finally, as the directory consumer administrator, you attempt to join an EC2 instance to your
domain and verify that it works.
Additional resources
• Use case: Share your directory to seamlessly join Amazon EC2 instances to a domain across AWS
accounts
• AWS Security Blog Article: How to Join Amazon EC2 Instances From Multiple Accounts and VPCs
to a Single AWS Managed Microsoft AD Directory
Step 1: Set up your networking environment
Before you begin the steps in this tutorial, you must first do the following:
• Create two new AWS accounts for testing purposes in the same Region. When you create an AWS
account, it automatically creates a dedicated virtual private cloud (VPC) in each account. Take
note of the VPC ID in each account. You will need this later.
• Create a VPC peering connection between the two VPCs in each account using the procedures in
this step.
Note
While there are many ways to connect Directory owner and Directory consumer account
VPCs, this tutorial will use the VPC peering method. For additional VPC connectivity
options, see Network connectivity.
Tutorial: Share your AWS Managed Microsoft AD directory Version 1.0 166

AWS Directory Service Administration Guide
Configure a VPC peering connection between the directory owner and the directory consumer
account
The VPC peering connection you will create is between the directory consumer and directory owner
VPCs. Follow these steps to configure a VPC peering connection for connectivity with the directory
consumer account. With this connection you can route traffic between both VPCs using private IP
addresses.
To create a VPC peering connection between the directory owner and directory consumer
account
1. Open the Amazon VPC console at https://console.aws.amazon.com/vpc/. Makes sure to sign in
as a user with administrator credentials in the directory owner account.
2. In the navigation pane, choose Peering Connections. Then choose Create Peering
Connection.
3. Configure the following information:
• Peering connection name tag: Provide a name that clearly identifies this connection with
the VPC in the directory consumer account.
• VPC (Requester): Select the VPC ID for the directory owner account.
• Under Select another VPC to peer with, ensure that My account and This region are
selected.
• VPC (Accepter): Select the VPC ID for the directory consumer account.
4. Choose Create Peering Connection. In the confirmation dialog box, choose OK.
Since both VPCs are in the same Region, the administrator of the directory owner account who sent
the VPC peering request can also accept the peering request on behalf of the directory consumer
account.
To accept the peering request on behalf of the directory consumer account
1. Open the Amazon VPC console at https://console.aws.amazon.com/vpc/.
2. In the navigation pane, choose Peering Connections.
3. Select the pending VPC peering connection. (Its status is Pending Acceptance.) Choose Actions,
Accept Request.
Tutorial: Share your AWS Managed Microsoft AD directory Version 1.0 167

AWS Directory Service Administration Guide
4. In the confirmation dialog, choose Yes, Accept. In the next confirmation dialog box, choose
Modify my route tables now to go directly to the route tables page.
Now that your VPC peering connection is active, you must add an entry to your VPC route table
in the directory owner account. Doing so enables traffic to be directed to the VPC in the directory
consumer account.
To add an entry to the VPC route table in the directory owner account
1. While in the Route Tables section of the Amazon VPC console, select the route table for the
directory owner VPC.
2. Choose the Routes tab, choose Edit routes, and then choose Add route.
3. In the Destination column, enter the CIDR block for the directory consumer VPC.
4. In the Target column, enter the VPC peering connection ID (such as
pcx-123456789abcde000) for the peering connection that you created earlier in the
directory owner account.
5. Choose Save changes.
To add an entry to the VPC route table in the directory consumer account
1. While in the Route Tables section of the Amazon VPC console, select the route table for the
directory consumer VPC.
2. Choose the Routes tab, choose Edit routes, and then choose Add route.
3. In the Destination column, enter the CIDR block for the directory owner VPC.
4. In the Target column, type in the VPC peering connection ID (such as
pcx-123456789abcde001) for the peering connection that you created earlier in the
directory consumer account.
5. Choose Save changes.
Make sure to configure your directory consumer VPCs’ security group to enable outbound traffic by
adding the Active Directory protocols and ports to the outbound rules table. For more information,
see Security groups for your VPC and AWS Managed Microsoft AD prerequisites.
Next Step
Step 2: Share your directory
Tutorial: Share your AWS Managed Microsoft AD directory Version 1.0 168

AWS Directory Service Administration Guide
Step 2: Share your directory
Use the following procedures to begin the directory sharing workflow from within the directory
owner account.
Note
Directory sharing is a Regional feature of AWS Managed Microsoft AD. If you are using
Configure Multi-Region replication for AWS Managed Microsoft AD, the following
procedures must be applied separately in each Region. For more information, see Global vs
Regional features.
To share your directory from the directory owner account
1. Sign into the AWS Management Console with administrator credentials in the directory owner
account and open the AWS Directory Service console at https://console.aws.amazon.com/
directoryservicev2/.
2. In the navigation pane, choose Directories.
3. Choose the directory ID of the AWS Managed Microsoft AD directory that you want to share.
4. On the Directory details page, do one of the following:
• If you have multiple Regions showing under Multi-Region replication, select the Region
where you want to share your directory, and then choose the Scale & share tab. For more
information, see Primary vs additional Regions.
• If you do not have any Regions showing under Multi-Region replication, choose the Scale &
share tab.
5. In the Shared directories section, choose Actions, and then choose Create new shared
directory.
6. On the Choose which AWS accounts to share with page, choose one of the following sharing
methods depending on your business needs:
a. Share this directory with AWS accounts inside your organization – With this option you
can select the AWS accounts you want to share your directory with from a list showing all
the AWS accounts inside your AWS organization. You must enable trusted access with AWS
Directory Service before you share a directory. For more information, see How to enable or
disable trusted access.
Tutorial: Share your AWS Managed Microsoft AD directory Version 1.0 169

AWS Directory Service Administration Guide
Note
To use this option, your organization must have All features enabled, and your
directory must be in the organization management account.
i. Under AWS accounts in your organization, select the AWS accounts that you want to
share the directory with and click Add.
ii. Review the pricing details, and then choose Share.
iii. Proceed to Step 4 in this guide. Because all AWS accounts are in the same
organization, you do not need to follow Step 3.
b. Share this directory with other AWS accounts - With this option, you can share a
directory with accounts inside or outside your AWS organization. You can also use this
option when your directory is not a member of an AWS organization and you want to
share with another AWS account.
i. In AWS account ID(s), enter all the AWS account IDs that you want to share the
directory with, and then click Add.
ii. In Send a note, type a message to the administrator in the other AWS account.
iii. Review the pricing details, and then choose Share.
iv. Proceed to Step 3.
Next Step
Step 3: Accept shared directory invite - Optional
Step 3: Accept shared directory invite - Optional
If you chose the Share this directory with other AWS accounts (handshake method) option in the
previous procedure, you should use this procedure to finish the shared directory workflow. If you
chose the Share this directory with AWS accounts inside your organization option, skip this step
and proceed to Step 4.
Tutorial: Share your AWS Managed Microsoft AD directory Version 1.0 170

AWS Directory Service Administration Guide
To accept the shared directory invite
1. Sign into the AWS Management Console with administrator credentials in the
directory consumer account and open the AWS Directory Service console at https://
console.aws.amazon.com/directoryservicev2/.
2. In the navigation pane, choose Directories shared with me.
3. In the Shared directory ID column, choose the directory ID that is in the Pending acceptance
state.
4. On the Shared directory details page, choose Review.
5. In the Pending shared directory invitation dialog, review the note, directory owner details,
and information about pricing. If you agree, choose Accept to start using the directory.
Next Step
Step 4: Test seamlessly joining an EC2 instance for Windows Server to a domain
Step 4: Test seamlessly joining an EC2 instance for Windows Server to a domain
You can use either of the following two methods to test seamlessly joining an EC2 instance to a
domain.
Method 1: Test domain join using the Amazon EC2 console
Use these steps in the directory consumer account.
1. Sign in to the AWS Management Console and open the Amazon EC2 console at https://
console.aws.amazon.com/ec2/.
2. In the navigation bar, choose the same AWS Region as the existing directory.
3. On the EC2 Dashboard, in the Launch instance section, choose Launch instance.
4. On the Launch an instance page, under the Name and Tags section, enter the name you
would like to use for your Windows EC2 instance.
5. (Optional) Choose Add additional tags to add one or more tag key-value pairs to organize,
track, or control access for this EC2 instance.
6. In the Application and OS Image (Amazon Machine Image) section, choose Windows in
the Quick Start pane. You can change the Windows Amazon Machine Image (AMI) from the
Amazon Machine Image (AMI) dropdown list.
Tutorial: Share your AWS Managed Microsoft AD directory Version 1.0 171

AWS Directory Service Administration Guide
7. In the Instance type section, choose the instance type you would like to use from Instance
type dropdown list.
8. In the Key pair (login) section, you can either choose to create a new key pair or choose from
an existing key pair.
a. To create a new key pair, choose Create new key pair.
b. Enter a name for the key pair and select an option for the Key pair type and Private key
file format.
c. To save the private key in a format that can be used with OpenSSH, choose .pem. To save
the private key in a format that can be used with PuTTY, choose .ppk.
d. Choose create key pair.
e. The private key file is automatically downloaded by your browser. Save the private key file
in a safe place.
Important
This is the only chance for you to save the private key file.
9. On the Launch an instance page, under Network settings section, choose Edit. Choose the
VPC that your directory was created in from the VPC - required dropdown list.
10. Choose one of the public subnets in your VPC from the Subnet dropdown list. The subnet you
choose must have all external traffic routed to an internet gateway. If this is not the case, you
won't be able to connect to the instance remotely.
For more information on how to connect to a internet gateway, see Connect to the internet
using an internet gateway in the Amazon VPC User Guide.
11. Under Auto-assign public IP, choose Enable.
For more information about public and private IP addressing, see Amazon EC2 instance IP
addressing in the Amazon EC2 User Guide.
12. For Firewall (security groups) settings, you can use the default settings or make changes to
meet your needs.
13. For Configure storage settings, you can use the default settings or make changes to meet your
needs.
14. Select Advanced details section, choose your domain from the Domain join directory
dropdown list.
Tutorial: Share your AWS Managed Microsoft AD directory Version 1.0 172

AWS Directory Service Administration Guide
Note
After choosing the Domain join directory, you may see:
This error occurs if the EC2 launch wizard identifies an existing SSM document with
unexpected properties. You can do one of the following:
• If you previously edited the SSM document and the properties are expected, choose
close and proceed to launch the EC2 instance with no changes.
• Select the delete the existing SSM document here link to delete the SSM document.
This will allow for the creation of an SSM document with the correct properties. The
SSM document will automatically be created when you launch the EC2 instance.
15. For IAM instance profile, you can select an existing IAM instance profile or create
a new one. Select an IAM instance profile that has the AWS managed policies
AmazonSSMManagedInstanceCore and AmazonSSMDirectoryServiceAccess attached to it
from the IAM instance profile dropdown list. To create a new one, choose Create new IAM
profile link, and then do the following:
1. Choose Create role.
2. Under Select trusted entity, choose AWS service.
3. Under Use case, choose EC2.
4. Under Add permissions, in the list of policies, select the
AmazonSSMManagedInstanceCore and AmazonSSMDirectoryServiceAccess policies. To
filter the list, type SSM in the search box. Choose Next.
Note
AmazonSSMDirectoryServiceAccess provides the permissions to join
instances to an Active Directory managed by AWS Directory Service.
AmazonSSMManagedInstanceCore provides the minimum permissions necessary to
use the AWS Systems Manager service. For more information about creating a role
Tutorial: Share your AWS Managed Microsoft AD directory Version 1.0 173

AWS Directory Service Administration Guide
with these permissions, and for information about other permissions and policies
you can assign to your IAM role, see Create an IAM instance profile for Systems
Manager in the AWS Systems Manager User Guide.
5. On the Name, review, and create page, enter a Role name. You will need this role name to
attach to the EC2 instance.
6. (Optional) You can provide a description of the IAM instance profile in the Description field.
7. Choose Create role.
8. Return to Launch an instance page and choose the refresh icon next to the IAM instance
profile. Your new IAM instance profile should be visible in the IAM instance profile
dropdown list. Choose the new profile and leave the rest of the settings with their default
values.
16. Choose Launch instance.
Method 2: Test domain join using AWS Systems Manager
Use these steps in the directory consumer account. To complete this procedure, you'll need some
information about the directory owner account such as the Directory ID, directory name, and the
DNS IP addresses.
Prerequisites
• Setup AWS Systems Manager.
• For more information about Systems Manager, see General setup for AWS Systems Manager.
• Instances you wish to join the AWS Managed Microsoft Active Directory domain must
have an attached IAM role containing the AmazonSSMManagedInstanceCore and
AmazonSSMDirectoryServiceAccess managed policies.
• For more information about these managed policies and other policies you can attach to an
IAM instance profile for Systems Manager, see Create an IAM instance profile for Systems
Manager in the AWS Systems Manager User Guide. For information about managed policies, see
AWS Managed policies in the IAM User Guide.
For more information on using Systems Manager to join EC2 instances to a AWS Managed
Microsoft Active Directory domain, see How do I use AWS Systems Manager to join a running EC2
Windows instance to my AWS Directory Service domain?.
Tutorial: Share your AWS Managed Microsoft AD directory Version 1.0 174

AWS Directory Service Administration Guide
1. Open the AWS Systems Manager console at https://console.aws.amazon.com/systems-
manager/.
2. In the navigation pane, under Node Management, choose Run Command.
3. Choose Run command.
4.
On the Run a command page, search for AWS-JoinDirectoryServiceDomain. When it is
displayed in the search results, select the AWS-JoinDirectoryServiceDomain option.
5. Scroll down to the Command parameters section. You must provide the following parameters:
Note
You can locate the Directory ID, directory name, and DNS IP addresses by going
back to the AWS Directory Service console, selecting Directories shared with me, and
selecting your directory. Your Directory ID can be found under the Shared directory
details section. You can locate the values for Directory name and DNS IP addresses
under the Owner directory details section.
• For Directory ID, enter the name of the AWS Managed Microsoft Active Directory.
• For Directory Name, enter the name of the AWS Managed Microsoft Active Directory (for
the directory owner account).
• For DNS IP Addresses, enter the IP addresses of the DNS servers in the AWS Managed
Microsoft Active Directory (for the directory owner account).
6. For Targets, choose Choose instances manually, and then select the instances that you want
to join the domain.
7. Leave the remainder of the form set to their default values, scroll down the page, and then
choose Run.
8. The command status will change from Pending to Success once the instances have
successfully joined the domain. You can view the command output by selecting the Instance
ID of the instance that joined the domain and View output.
After completing either of these steps, you should now be able to join your EC2 instance to the
domain. Once you do that, you can then log into your instance using a Remote Desktop Protocol
(RDP) client with the credentials from your AWS Managed Microsoft AD user account.
Tutorial: Share your AWS Managed Microsoft AD directory Version 1.0 175

AWS Directory Service Administration Guide
Unsharing your directory
Use the following procedure to unshare an AWS Managed Microsoft AD directory.
To unshare your directory
1. In the AWS Directory Service console navigation pane, under Active Directory, select
Directories.
2. Choose the directory ID of the AWS Managed Microsoft AD directory that you want to unshare.
3. On the Directory details page, do one of the following:
• If you have multiple Regions showing under Multi-Region replication, select the Region
where you want to unshare your directory, and then choose the Scale & share tab. For more
information, see Primary vs additional Regions.
• If you do not have any Regions showing under Multi-Region replication, choose the Scale &
share tab.
4. In the Shared directories section, select the shared directory you want to unshare, choose
Actions, and then choose Unshare.
5. In the Unshare directory dialog box, choose Unshare.
Additional resources
• Use case: Share your directory to seamlessly join amazon EC2 instances to a domain across AWS
accounts
• AWS security blog article: How to join Amazon EC2 instances from multiple accounts and VPCs to
a single AWS Managed Microsoft AD directory
• Joining your Amazon RDS DB instances across accounts to a single shared domain
Migrating Active Directory users to AWS Managed Microsoft AD
You can use the Active Directory Migration Toolkit (ADMT) along with the Password Export Service
(PES) to migrate users from your self-managed Active Directory to your AWS Managed Microsoft
AD directory. This enables you to migrate Active Directory objects and encrypted passwords for
your users more easily.
Unsharing your directory Version 1.0 176

AWS Directory Service Administration Guide
For detailed instructions, see How to migrate your on-premises domain to AWS Managed Microsoft
AD using ADMT on the AWS Security Blog.
Connect AWS Managed Microsoft AD to your existing Active
Directory infrastructure
This section describes how to configure trust relationships between AWS Managed Microsoft AD
and your existing Active Directory infrastructure.
Tasks to connect your AWS Managed Microsoft AD to your existing Active Directory:
• Creating a trust relationship
• Adding IP routes when using public IP addresses
• Tutorial: Create a trust relationship between your AWS Managed Microsoft AD and your self-
managed Active Directory domain
• Tutorial: Create a trust relationship between two AWS Managed Microsoft AD domains
Creating a trust relationship
You can configure one and two-way external and forest trust relationships between your AWS
Directory Service for Microsoft Active Directory and self-managed (on-premises) directories, as
well as between multiple AWS Managed Microsoft AD directories in the AWS cloud. AWS Managed
Microsoft AD supports all three trust relationship directions: Incoming, Outgoing and Two-way (Bi-
directional).
For more information about trust relationship, see Everything you wanted to know about trusts
with AWS Managed Microsoft AD.
Note
When setting up trust relationships, you must ensure that your self-managed directory
is and remains compatible with AWS Directory Services. For more information on your
responsibilities, please see our shared responsibility model.
AWS Managed Microsoft AD supports both external and forest trusts. To walk through an example
scenario showing how to create a forest trust, see Tutorial: Create a trust relationship between your
AWS Managed Microsoft AD and your self-managed Active Directory domain.
Connect your existing Active Directory infrastructure Version 1.0 177

AWS Directory Service Administration Guide
A two-way trust is required for AWS Enterprise Apps such as Amazon Chime, Amazon Connect,
Amazon QuickSight, AWS IAM Identity Center, Amazon WorkDocs, Amazon WorkMail, Amazon
WorkSpaces, and the AWS Management Console. AWS Managed Microsoft AD must be able to
query the users and groups in your self-managed Active Directory.
Amazon EC2, Amazon RDS, and Amazon FSx will work with either a one-way or two-way trust.
Prerequisites
Creating the trust requires only a few steps, but you must first complete several prerequisite steps
prior to setting up the trust.
Note
AWS Managed Microsoft AD does not support trust with Single Label Domains.
Connect to VPC
If you are creating a trust relationship with your self-managed directory, you must first connect
your self-managed network to the Amazon VPC containing your AWS Managed Microsoft AD. The
firewall for your self-managed and AWS Managed Microsoft AD networks must have the network
ports open that are listed in Windows Server 2008 and later versions in Microsoft documentation.
To use your NetBIOS name instead of your full domain name for authentication with your AWS
applictions like Amazon WorkDocs or Amazon QuickSight, you must allow port 9389. For more
information about Active Directory ports and protocols, see Service overview and network port
requirements for Windows in Microsoft documentation.
These are the minimum ports that are needed to be able to connect to your directory. Your specific
configuration may require additional ports be open.
Configure your VPC
The VPC that contains your AWS Managed Microsoft AD must have the appropriate outbound and
inbound rules.
To configure your VPC outbound rules
1. In the AWS Directory Service console, on the Directory Details page, note your AWS Managed
Microsoft AD directory ID.
Creating a trust relationship Version 1.0 178

AWS Directory Service Administration Guide
2. Open the Amazon VPC console at https://console.aws.amazon.com/vpc/.
3. Choose Security Groups.
4. Search for your AWS Managed Microsoft AD directory ID. In the search results, select the item
with the description "AWS created security group for directory ID directory controllers".
Note
The selected security group is a security group that is automatically created when you
initially create your directory.
5. Go to the Outbound Rules tab of that security group. Select Edit, then Add another rule. For
the new rule, enter the following values:
• Type: All Traffic
• Protocol: All
• Destination determines the traffic that can leave your domain controllers and where it can
go in your self-managed network. Specify a single IP address or an IP address range in CIDR
notation (for example, 203.0.113.5/32). You can also specify the name or ID of another
security group in the same Region. For more information, see Understand your directory’s
AWS security group configuration and use.
6. Select Save.
Enable Kerberos pre-authentication
Your user accounts must have Kerberos pre-authentication enabled. For more information about
this setting, review Preauthentication on Microsoft TechNet.
Configure DNS conditional forwarders on your self-managed domain
You must set up DNS conditional forwarders on your self-managed domain. Refer to Assign
a Conditional Forwarder for a Domain Name on Microsoft TechNet for details on conditional
forwarders.
To perform the following steps, you must have access to following Windows Server tools for your
self-managed domain:
• AD DS and AD LDS Tools
Creating a trust relationship Version 1.0 179

AWS Directory Service Administration Guide
• DNS
To configure conditional forwarders on your self-managed domain
1. First you must get some information about your AWS Managed Microsoft AD. Sign into the
AWS Management Console and open the AWS Directory Service console.
2. In the navigation pane, select Directories.
3. Choose the directory ID of your AWS Managed Microsoft AD.
4. Take note of the fully qualified domain name (FQDN) and the DNS addresses of your directory.
5. Now, return to your self-managed domain controller. Open Server Manager.
6. On the Tools menu, choose DNS.
7. In the console tree, expand the DNS server of the domain for which you are setting up the
trust.
8. In the console tree, choose Conditional Forwarders.
9. On the Action menu, choose New conditional forwarder.
10. In DNS domain, type the fully qualified domain name (FQDN) of your AWS Managed Microsoft
AD, which you noted earlier.
11. Choose IP addresses of the primary servers and type the DNS addresses of your AWS
Managed Microsoft AD directory, which you noted earlier.
After entering the DNS addresses, you might get a "timeout" or "unable to resolve" error. You
can generally ignore these errors.
12. Select Store this conditional forwarder in Active Directory and replicate as follows: All DNS
servers in this domain. Choose OK.
Trust relationship password
If you are creating a trust relationship with an existing domain, set up the trust relationship on that
domain using Windows Server Administration tools. As you do so, note the trust password that you
use. You will need to use this same password when setting up the trust relationship on the AWS
Managed Microsoft AD. For more information, see Managing Trusts on Microsoft TechNet.
You are now ready to create the trust relationship on your AWS Managed Microsoft AD.
Creating a trust relationship Version 1.0 180

AWS Directory Service Administration Guide
NetBIOS and Domain Names
The NetBIOS and domain names must be unique and cannot be the same to establish a trust
relationship.
Create, verify, or delete a trust relationship
Note
Trust relationships is a global feature of AWS Managed Microsoft AD. If you are using
Configure Multi-Region replication for AWS Managed Microsoft AD, the following
procedures must be performed in the Primary Region. The changes will be applied across
all replicated Regions automatically. For more information, see Global vs Regional features.
To create a trust relationship with your AWS Managed Microsoft AD
1. Open the AWS Directory Service console.
2. On the Directories page, choose your AWS Managed Microsoft AD ID.
3. On the Directory details page, do one of the following:
• If you have multiple Regions showing under Multi-Region replication, select the primary
Region, and then choose the Networking & security tab. For more information, see Primary
vs additional Regions.
• If you do not have any Regions showing under Multi-Region replication, choose the
Networking & security tab.
4. In the Trust relationships section, choose Actions, and then select Add trust relationship.
5. On the Add a trust relationship page, provide the required information, including the trust
type, fully qualified domain name (FQDN) of your trusted domain, the trust password and the
trust direction.
6. (Optional) If you want to allow only authorized users to access resources in your AWS Managed
Microsoft AD directory, you can optionally choose the Selective authentication check box. For
general information about selective authentication, see Security Considerations for Trusts on
Microsoft TechNet.
7. For Conditional forwarder, type the IP address of your self-managed DNS server. If you have
previously created conditional forwarders, you can type the FQDN of your self-managed
domain instead of a DNS IP address.
Creating a trust relationship Version 1.0 181

AWS Directory Service Administration Guide
8. (Optional) Choose Add another IP address and type the IP address of an additional self-
managed DNS server. You can repeat this step for each applicable DNS server address for a
total of four addresses.
9. Choose Add.
10. If the DNS server or the network for your self-managed domain uses a public (non-RFC 1918)
IP address space, go to the IP routing section, choose Actions, and then choose Add route.
Type the IP address block of your DNS server or self-managed network using CIDR format,
for example 203.0.113.0/24. This step is not necessary if both your DNS server and your self-
managed network are using RFC 1918 IP address spaces.
Note
When using a public IP address space, make sure that you do not use any of the AWS IP
address ranges as these cannot be used.
11. (Optional) We recommend that while you are on the Add routes page that you also select
Add routes to the security group for this directory's VPC. This will configure the security
groups as detailed above in the "Configure your VPC." These security rules impact an internal
network interface that is not exposed publicly. If this option is not available, you will instead
see a message indicating that you have already customized your security groups.
You must set up the trust relationship on both domains. The relationships must be complementary.
For example, if you create an outgoing trust on one domain, you must create an incoming trust on
the other.
If you are creating a trust relationship with an existing domain, set up the trust relationship on that
domain using Windows Server Administration tools.
You can create multiple trusts between your AWS Managed Microsoft AD and various Active
Directory domains. However, only one trust relationship per pair can exist at a time. For example,
if you have an existing, one-way trust in the “Incoming direction” and you then want to set up
another trust relationship in the “Outgoing direction,” you will need to delete the existing trust
relationship, and create a new “Two-way” trust.
To verify an outgoing trust relationship
1. Open the AWS Directory Service console.
2. On the Directories page, choose your AWS Managed Microsoft AD ID.
Creating a trust relationship Version 1.0 182

AWS Directory Service Administration Guide
3. On the Directory details page, do one of the following:
• If you have multiple Regions showing under Multi-Region replication, select the primary
Region, and then choose the Networking & security tab. For more information, see Primary
vs additional Regions.
• If you do not have any Regions showing under Multi-Region replication, choose the
Networking & security tab.
4. In the Trust relationships section, select the trust you want to verify, choose Actions, and then
select Verify trust relationship.
This process verifies only the outgoing direction of a two-way trust. AWS does not support
verification of an incoming trusts. For more information on how to verify a trust to or from your
self-managed Active Directory, refer to Verify a Trust on Microsoft TechNet.
To delete an existing trust relationship
1. Open the AWS Directory Service console.
2. On the Directories page, choose your AWS Managed Microsoft AD ID.
3. On the Directory details page, do one of the following:
• If you have multiple Regions showing under Multi-Region replication, select the primary
Region, and then choose the Networking & security tab. For more information, see Primary
vs additional Regions.
• If you do not have any Regions showing under Multi-Region replication, choose the
Networking & security tab.
4. In the Trust relationships section, select the trust you want to delete, choose Actions, and
then select Delete trust relationship.
5. Choose Delete.
Adding IP routes when using public IP addresses
You can use AWS Directory Service for Microsoft Active Directory to take advantage of many
powerful Active Directory features, including establishing trusts with other directories. However, if
the DNS servers for the networks of the other directories use public (non-RFC 1918) IP addresses,
you must specify those IP addresses as part of configuring the trust. Instructions for doing this can
be found in Creating a trust relationship.
Adding IP routes Version 1.0 183

AWS Directory Service Administration Guide
Similarly, you must also enter the IP address information when routing traffic from your AWS
Managed Microsoft AD on AWS to a peer AWS VPC, if the VPC uses public IP ranges.
When you add the IP addresses as described in Creating a trust relationship, you have the option of
selecting Add routes to the security group for this directory's VPC. This option should be selected
unless you have previously customized your security group to allow the necessary traffic as shown
below. For more information, see Understand your directory’s AWS security group configuration
and use.
Tutorial: Create a trust relationship between your AWS Managed
Microsoft AD and your self-managed Active Directory domain
This tutorial walks you through all the steps necessary to set up a trust relationship between AWS
Directory Service for Microsoft Active Directory and your self-managed (on-premises) Microsoft
Active Directory. Although creating the trust requires only a few steps, you must first complete the
following prerequisite steps.
Topics
• Prerequisites
• Step 1: Prepare your self-managed AD Domain
• Step 2: Prepare your AWS Managed Microsoft AD
• Step 3: Create the trust relationship
See Also
Creating a trust relationship
Prerequisites
This tutorial assumes you already have the following:
Note
AWS Managed Microsoft AD does not support trust with Single label domains.
• An AWS Managed Microsoft AD directory created on AWS. If you need help doing this, see
Getting started with AWS Managed Microsoft AD.
Tutorial: Create a trust relationship between your AWS Managed Microsoft AD and your self-managed
Active Directory domain
Version 1.0 184

AWS Directory Service Administration Guide
• An EC2 instance running Windows added to that AWS Managed Microsoft AD. If you need help
doing this, see Joining an Amazon EC2 Windows instance to your AWS Managed Microsoft AD
Active Directory.
Important
The admin account for your AWS Managed Microsoft AD must have administrative access
to this instance.
• The following Windows Server tools installed on that instance:
• AD DS and AD LDS Tools
• DNS
If you need help doing this, see Installing Active Directory Administration Tools for AWS
Managed Microsoft AD.
• A self-managed (on-premises) Microsoft Active Directory
You must have administrative access to this directory. The same Windows Server tools as listed
above must also be available for this directory.
• An active connection between your self-managed network and the VPC containing your
AWS Managed Microsoft AD. If you need help doing this, see Amazon Virtual Private Cloud
Connectivity Options.
•
A correctly set local security policy. CheckLocal Security Policy > Local Policies
> Security Options > Network access: Named Pipes that can be accessed
anonymously and ensure that it contains at least the following three named pipes:
• netlogon
• samr
• lsarpc
• The NetBIOS and domain names must be unique and cannot be the same to establish a trust
relationship
For more information about the prerequisites for creating a trust relationship, see Creating a trust
relationship.
Tutorial: Create a trust relationship between your AWS Managed Microsoft AD and your self-managed
Active Directory domain
Version 1.0 185

AWS Directory Service Administration Guide
Tutorial configuration
For this tutorial, we've already created a AWS Managed Microsoft AD and a self-managed domain.
The self-managed network is connected to the AWS Managed Microsoft AD's VPC. Following are
the properties of the two directories:
AWS Managed Microsoft AD running on AWS
• Domain name (FQDN): MyManagedAD.example.com
• NetBIOS name: MyManagedAD
• DNS Addresses: 10.0.10.246, 10.0.20.121
• VPC CIDR: 10.0.0.0/16
The AWS Managed Microsoft AD resides in VPC ID: vpc-12345678.
Self-managed or AWS Managed Microsoft AD domain
• Domain name (FQDN): corp.example.com
• NetBIOS name: CORP
• DNS Addresses: 172.16.10.153
• Self-managed CIDR: 172.16.0.0/16
Next Step
Step 1: Prepare your self-managed AD Domain
Step 1: Prepare your self-managed AD Domain
First you need to complete several prerequisite steps on your self-managed (on-premises) domain.
Configure your self-managed firewall
You must configure your self-managed firewall so that the following ports are open to the CIDRs
for all subnets used by the VPC that contains your AWS Managed Microsoft AD. In this tutorial, we
allow both incoming and outgoing traffic from 10.0.0.0/16 (the CIDR block of our AWS Managed
Microsoft AD's VPC) on the following ports:
Tutorial: Create a trust relationship between your AWS Managed Microsoft AD and your self-managed
Active Directory domain
Version 1.0 186

AWS Directory Service Administration Guide
• TCP/UDP 53 - DNS
• TCP/UDP 88 - Kerberos authentication
• TCP/UDP 389 - Lightweight Directory Access Protocol (LDAP)
• TCP 445 - Server Message Block (SMB)
• TCP 9389 - Active Directory Web Services (ADWS) (Optional - This port needs to be open if you
want to use your NetBIOS name instead of your full domain name for authentication with AWS
applications like Amazon WorkDocs or Amazon QuickSight.)
Note
SMBv1 is no longer supported.
These are the minimum ports that are needed to connect the VPC to the self-managed
directory. Your specific configuration may require additional ports be open.
Ensure that Kerberos pre-authentication is enabled
User accounts in both directories must have Kerberos preauthentication enabled. This is the
default, but let's check the properties of any random user to make sure nothing has changed.
To view user's Kerberos settings
1. On your self-managed domain controller, open Server Manager.
2. On the Tools menu, choose Active Directory Users and Computers.
3. Choose the Users folder and open the context (right-click) menu. Select any random user
account listed in the right pane. Choose Properties.
4. Choose the Account tab. In the Account options list, scroll down and ensure that Do not
require Kerberos preauthentication is not checked.
Tutorial: Create a trust relationship between your AWS Managed Microsoft AD and your self-managed
Active Directory domain
Version 1.0 187

AWS Directory Service Administration Guide
Configure DNS conditional forwarders for your self-managed domain
You must set up DNS conditional forwarders on each domain. Before doing this on your self-
managed domain, you will first get some information about your AWS Managed Microsoft AD.
To configure conditional forwarders on your self-managed domain
1. Sign into the AWS Management Console and open the AWS Directory Service console.
2. In the navigation pane, select Directories.
3. Choose the directory ID of your AWS Managed Microsoft AD.
4. On the Details page, take note of the values in Directory name and the DNS address of your
directory.
5. Now, return to your self-managed domain controller. Open Server Manager.
6. On the Tools menu, choose DNS.
7. In the console tree, expand the DNS server of the domain for which you are setting up the
trust. Our server is WIN-5V70CN7VJ0.corp.example.com.
8. In the console tree, choose Conditional Forwarders.
Tutorial: Create a trust relationship between your AWS Managed Microsoft AD and your self-managed
Active Directory domain
Version 1.0 188

AWS Directory Service Administration Guide
9. On the Action menu, choose New conditional forwarder.
10. In DNS domain, type the fully qualified domain name (FQDN) of your AWS Managed Microsoft
AD, which you noted earlier. In this example, the FQDN is MyManagedAD.example.com.
11. Choose IP addresses of the primary servers and type the DNS addresses of your AWS
Managed Microsoft AD directory, which you noted earlier. In this example those are:
10.0.10.246, 10.0.20.121
After entering the DNS addresses, you might get a "timeout" or "unable to resolve" error. You
can generally ignore these errors.
12. Select Store this conditional forwarder in Active Directory, and replicate it as follows.
13. Select All DNS servers in this domain, and then choose OK.
Next Step
Step 2: Prepare your AWS Managed Microsoft AD
Tutorial: Create a trust relationship between your AWS Managed Microsoft AD and your self-managed
Active Directory domain
Version 1.0 189

AWS Directory Service Administration Guide
Step 2: Prepare your AWS Managed Microsoft AD
Now let's get your AWS Managed Microsoft AD ready for the trust relationship. Many of the
following steps are almost identical to what you just completed for your self-managed domain.
This time, however, you are working with your AWS Managed Microsoft AD.
Configure your VPC subnets and security groups
You must allow traffic from your self-managed network to the VPC containing your AWS Managed
Microsoft AD. To do this, you will need to make sure that the ACLs associated with the subnets
used to deploy your AWS Managed Microsoft AD and the security group rules configured on your
domain controllers, both allow the requisite traffic to support trusts.
Port requirements vary based on the version of Windows Server used by your domain controllers
and the services or applications that will be leveraging the trust. For the purposes of this tutorial,
you will need to open the following ports:
Inbound
• TCP/UDP 53 - DNS
• TCP/UDP 88 - Kerberos authentication
• UDP 123 - NTP
• TCP 135 - RPC
• TCP/UDP 389 - LDAP
• TCP/UDP 445 - SMB
• TCP/UDP 464 - Kerberos authentication
• TCP 636 - LDAPS (LDAP over TLS/SSL)
• TCP 3268-3269 - Global Catalog
• TCP/UDP 49152-65535 - Ephemeral ports for RPC
Note
SMBv1 is no longer supported.
Outbound
Tutorial: Create a trust relationship between your AWS Managed Microsoft AD and your self-managed
Active Directory domain
Version 1.0 190

AWS Directory Service Administration Guide
• ALL
Note
These are the minimum ports that are needed to be able to connect the VPC and self-
managed directory. Your specific configuration may require additional ports be open.
To configure your AWS Managed Microsoft AD domain controller outbound and inbound rules
1. Return to the AWS Directory Service console. In the list of directories, take note the directory
ID for your AWS Managed Microsoft AD directory.
2. Open the Amazon VPC console at https://console.aws.amazon.com/vpc/.
3. In the navigation pane, choose Security Groups.
4. Use the search box to search for your AWS Managed Microsoft AD directory ID. In the search
results, select the Security Group with the description AWS created security group for
yourdirectoryID directory controllers.
5. Go to the Outbound Rules tab for that security group. Choose Edit outbound rules, and then
Add rule. For the new rule, enter the following values:
• Type: ALL Traffic
• Protocol: ALL
• Destination determines the traffic that can leave your domain controllers and where it
can go. Specify a single IP address or an IP address range in CIDR notation (for example,
203.0.113.5/32). You can also specify the name or ID of another security group in the
same Region. For more information, see Understand your directory’s AWS security group
configuration and use.
6. Select Save Rule.
Tutorial: Create a trust relationship between your AWS Managed Microsoft AD and your self-managed
Active Directory domain
Version 1.0 191

AWS Directory Service Administration Guide
Ensure that Kerberos pre-authentication is enabled
Now you want to confirm that users in your AWS Managed Microsoft AD also have Kerberos pre-
authentication enabled. This is the same process you completed for your self-managed directory.
This is the default, but let's check to make sure nothing has changed.
To view user kerberos settings
1. Log in to an instance that is a member of your AWS Managed Microsoft AD directory using
either the AWS Managed Microsoft AD Administrator account permissions for the domain or an
account that has been delegated permissions to manage users in the domain.
2. If they are not already installed, install the Active Directory Users and Computers tool and the
DNS tool. Learn how to install these tools in Installing Active Directory Administration Tools
for AWS Managed Microsoft AD.
3. Open Server Manager. On the Tools menu, choose Active Directory Users and Computers.
4. Choose the Users folder in your domain. Note that this is the Users folder under your NetBIOS
name, not the Users folder under the fully qualified domain name (FQDN).
Tutorial: Create a trust relationship between your AWS Managed Microsoft AD and your self-managed
Active Directory domain
Version 1.0 192

AWS Directory Service Administration Guide
5. In the list of users, right-click on a user, and then choose Properties.
6. Choose the Account tab. In the Account options list, ensure that Do not require Kerberos
preauthentication is not checked.
Next Step
Step 3: Create the trust relationship
Step 3: Create the trust relationship
Now that the preparation work is complete, the final steps are to create the trusts. First you create
the trust on your self-managed domain, and then finally on your AWS Managed Microsoft AD.
If you have any issues during the trust creation process, see Trust creation status reasons for
assistance.
Configure the trust in your self-managed Active Directory
In this tutorial, you configure a two-way forest trust. However, if you create a one-way forest trust,
be aware that the trust directions on each of your domains must be complementary. For example,
if you create a one-way, outgoing trust on your self-managed domain, you need to create a one-
way, incoming trust on your AWS Managed Microsoft AD.
Tutorial: Create a trust relationship between your AWS Managed Microsoft AD and your self-managed
Active Directory domain
Version 1.0 193
AWS Directory Service Administration Guide
Note
AWS Managed Microsoft AD also supports external trusts. However, for the purposes of this
tutorial, you will create a two-way forest trust.
To configure the trust in your self-managed Active Directory
1. Open Server Manager and on the Tools menu, choose Active Directory Domains and Trusts.
2. Open the context (right-click) menu of your domain and choose Properties.
3. Choose the Trusts tab and choose New trust. Type the name of your AWS Managed Microsoft
AD and choose Next.
4. Choose Forest trust. Choose Next.
5. Choose Two-way. Choose Next.
6. Choose This domain only. Choose Next.
7. Choose Forest-wide authentication. Choose Next.
8. Type a Trust password. Make sure to remember this password as you will need it when setting
up the trust for your AWS Managed Microsoft AD.
9. In the next dialog box, confirm your settings and choose Next. Confirm that the trust was
created successfully and again choose Next.
10. Choose No, do not confirm the outgoing trust. Choose Next.
11. Choose No, do not confirm the incoming trust. Choose Next.
Configure the trust in your AWS Managed Microsoft AD directory
Finally, you configure the forest trust relationship with your AWS Managed Microsoft AD directory.
Because you created a two-way forest trust on the self-managed domain, you also create a two-
way trust using your AWS Managed Microsoft AD directory.
Note
Trust relationships is a global feature of AWS Managed Microsoft AD. If you are using
Configure Multi-Region replication for AWS Managed Microsoft AD, the following
procedures must be performed in the Primary Region. The changes will be applied across
all replicated Regions automatically. For more information, see Global vs Regional features.
Tutorial: Create a trust relationship between your AWS Managed Microsoft AD and your self-managed
Active Directory domain
Version 1.0 194

AWS Directory Service Administration Guide
To configure the trust in your AWS Managed Microsoft AD directory
1. Return to the AWS Directory Service console.
2. On the Directories page, choose your AWS Managed Microsoft AD ID.
3. On the Directory details page, do one of the following:
• If you have multiple Regions showing under Multi-Region replication, select the primary
Region, and then choose the Networking & security tab. For more information, see Primary
vs additional Regions.
• If you do not have any Regions showing under Multi-Region replication, choose the
Networking & security tab.
4. In the Trust relationships section, choose Actions, and then select Add trust relationship.
5. On the Add a trust relationship page, specify the Trust type. In this case, we choose Forest
trust. Type the FQDN of your self-managed domain (in this tutorial corp.example.com).
Type the same trust password that you used when creating the trust on your self-managed
domain. Specify the direction. In this case, we choose Two-way.
6. In the Conditional forwarder field, enter the IP address of your self-managed DNS server. In
this example, enter 172.16.10.153.
7. (Optional) Choose Add another IP address and enter a second IP address for your self-
managed DNS server. You can specify up to a total of four DNS servers.
8. Choose Add.
Congratulations. You now have a trust relationship between your self-managed domain
(corp.example.com) and your AWS Managed Microsoft AD (MyManagedAD.example.com). Only one
relationship can be set up between these two domains. If for example, you want to change the
trust direction to one-way, you would first need to delete this existing trust relationship and create
a new one.
For more information, including instructions about verifying or deleting trusts, see Creating a trust
relationship.
Tutorial: Create a trust relationship between two AWS Managed
Microsoft AD domains
This tutorial walks you through all the steps necessary to set up a trust relationship between two
AWS Directory Service for Microsoft Active Directory domains.
Tutorial: Create a trust relationship between AWS Managed Microsoft AD domains Version 1.0 195

AWS Directory Service Administration Guide
Topics
• Step 1: Prepare your AWS Managed Microsoft AD
• Step 2: Create the trust relationship with another AWS Managed Microsoft AD domain
See Also
Creating a trust relationship
Step 1: Prepare your AWS Managed Microsoft AD
In this section, you will get your AWS Managed Microsoft AD ready for the trust relationship with
another AWS Managed Microsoft AD. Many of the following steps are almost identical to what you
completed in Tutorial: Create a trust relationship between your AWS Managed Microsoft AD and
your self-managed Active Directory domain. This time, however, you are configuring your AWS
Managed Microsoft AD environments to work with each other.
Configure your VPC subnets and security groups
You must allow traffic from one AWS Managed Microsoft AD network to the VPC containing your
other AWS Managed Microsoft AD. To do this, you will need to make sure that the ACLs associated
with the subnets used to deploy your AWS Managed Microsoft AD and the security group rules
configured on your domain controllers, both allow the requisite traffic to support trusts.
Port requirements vary based on the version of Windows Server used by your domain controllers
and the services or applications that will be leveraging the trust. For the purposes of this tutorial,
you will need to open the following ports:
Inbound
• TCP/UDP 53 - DNS
• TCP/UDP 88 - Kerberos authentication
• UDP 123 - NTP
• TCP 135 - RPC
• TCP/UDP 389 - LDAP
• TCP/UDP 445 - SMB
Tutorial: Create a trust relationship between AWS Managed Microsoft AD domains Version 1.0 196

AWS Directory Service Administration Guide
Note
SMBv1 is no longer supported.
• TCP/UDP 464 - Kerberos authentication
• TCP 636 - LDAPS (LDAP over TLS/SSL)
• TCP 3268-3269 - Global Catalog
• TCP/UDP 1024-65535 - Ephemeral ports for RPC
Outbound
• ALL
Note
These are the minimum ports that are needed to be able to connect the VPCs from both
AWS Managed Microsoft AD's. Your specific configuration may require additional ports be
open. For more information, see How to configure a firewall for Active Directory domains
and trusts on Microsoft's website.
To configure your AWS Managed Microsoft AD domain controller outbound rules
Note
Repeat steps 1-6 below for each directory.
1. Go to the AWS Directory Service console. In the list of directories, take note the directory ID for
your AWS Managed Microsoft AD directory.
2. Open the Amazon VPC console at https://console.aws.amazon.com/vpc/.
3. In the navigation pane, choose Security Groups.
4. Use the search box to search for your AWS Managed Microsoft AD directory ID. In the
search results, select the item with the description AWS created security group for
yourdirectoryID directory controllers.
Tutorial: Create a trust relationship between AWS Managed Microsoft AD domains Version 1.0 197

AWS Directory Service Administration Guide
5. Go to the Outbound Rules tab for that security group. Choose Edit, and then Add another
rule. For the new rule, enter the following values:
• Type: ALL Traffic
• Protocol: ALL
• Destination determines the traffic that can leave your domain controllers and where it
can go. Specify a single IP address or an IP address range in CIDR notation (for example,
203.0.113.5/32). You can also specify the name or ID of another security group in the
same Region. For more information, see Understand your directory’s AWS security group
configuration and use.
6. Select Save.
Ensure that Kerberos pre-authentication is enabled
Now you want to confirm that users in your AWS Managed Microsoft AD also have Kerberos pre-
authentication enabled. This is the same process you completed for your on-premises directory.
This is the default, but let's check to make sure nothing has changed.
To view user kerberos settings
1. Log in to an instance that is a member of your AWS Managed Microsoft AD directory using
either the AWS Managed Microsoft AD Administrator account permissions for the domain or an
account that has been delegated permissions to manage users in the domain.
Tutorial: Create a trust relationship between AWS Managed Microsoft AD domains Version 1.0 198

AWS Directory Service Administration Guide
2. If they are not already installed, install the Active Directory Users and Computers tool and the
DNS tool. Learn how to install these tools in Installing Active Directory Administration Tools
for AWS Managed Microsoft AD.
3. Open Server Manager. On the Tools menu, choose Active Directory Users and Computers.
4. Choose the Users folder in your domain. Note that this is the Users folder under your NetBIOS
name, not the Users folder under the fully qualified domain name (FQDN).
5. In the list of users, right-click on a user, and then choose Properties.
6. Choose the Account tab. In the Account options list, ensure that Do not require Kerberos
preauthentication is not checked.
Next Step
Step 2: Create the trust relationship with another AWS Managed Microsoft AD domain
Step 2: Create the trust relationship with another AWS Managed Microsoft AD
domain
Now that the preparation work is complete, the final steps are to create the trusts between your
two AWS Managed Microsoft AD domains. If you have any issues during the trust creation process,
see Trust creation status reasons for assistance.
Tutorial: Create a trust relationship between AWS Managed Microsoft AD domains Version 1.0 199

AWS Directory Service Administration Guide
Configure the trust in your first AWS Managed Microsoft AD domain
In this tutorial, you configure a two-way forest trust. However, if you create a one-way forest
trust, be aware that the trust directions on each of your domains must be complementary. For
example, if you create a one-way, outgoing trust on this first domain, you need to create a one-
way, incoming trust on your second AWS Managed Microsoft AD domain.
Note
AWS Managed Microsoft AD also supports external trusts. However, for the purposes of this
tutorial, you will create a two-way forest trust.
To configure the trust in your first AWS Managed Microsoft AD domain
1. Open the AWS Directory Service console.
2. On the Directories page, choose your first AWS Managed Microsoft AD ID.
3. On the Directory details page, do one of the following:
• If you have multiple Regions showing under Multi-Region replication, select the primary
Region, and then choose the Networking & security tab. For more information, see Primary
vs additional Regions.
• If you do not have any Regions showing under Multi-Region replication, choose the
Networking & security tab.
4. In the Trust relationships section, choose Actions, and then select Add trust relationship.
5. On the Add a trust relationship page, Type the FQDN of your second AWS Managed Microsoft
AD domain. Make sure to remember this password as you will need it when setting up the trust
for your second AWS Managed Microsoft AD. Specify the direction. In this case, choose Two-
way.
6. In the Conditional forwarder field, enter the IP address of your second AWS Managed
Microsoft AD DNS server.
7. (Optional) Choose Add another IP address and enter a second IP address for your second AWS
Managed Microsoft AD DNS server. You can specify up to a total of four DNS servers.
8. Choose Add. The trust will fail at this point which is expected until we create the other side of
the trust.
Tutorial: Create a trust relationship between AWS Managed Microsoft AD domains Version 1.0 200

AWS Directory Service Administration Guide
Configure the trust in your second AWS Managed Microsoft AD domain
Now, you configure the forest trust relationship with your second AWS Managed Microsoft AD
directory. Because you created a two-way forest trust on the first AWS Managed Microsoft AD
domain, you also create a two-way trust using this AWS Managed Microsoft AD domain.
To configure the trust in your second AWS Managed Microsoft AD domain
1. Return to the AWS Directory Service console.
2. On the Directories page, choose your second AWS Managed Microsoft AD ID.
3. On the Directory details page, do one of the following:
• If you have multiple Regions showing under Multi-Region replication, select the primary
Region, and then choose the Networking & security tab. For more information, see Primary
vs additional Regions.
• If you do not have any Regions showing under Multi-Region replication, choose the
Networking & security tab.
4. In the Trust relationships section, choose Actions, and then select Add trust relationship.
5. On the Add a trust relationship page, Type the FQDN of your first AWS Managed Microsoft
AD domain. Type the same trust password that you used when creating the trust on your on-
premises domain. Specify the direction. In this case, choose Two-way.
6. In the Conditional forwarder field, enter the IP address of your first AWS Managed Microsoft
AD DNS server.
7. (Optional) Choose Add another IP address and enter a second IP address for your first AWS
Managed Microsoft AD DNS server. You can specify up to a total of four DNS servers.
8. Choose Add. The trust should be verified shortly afterwards.
9. Now, go back to the trust you created in the first domain and verify the trust relationship
again.
Congratulations. You now have a trust relationship between your two AWS Managed Microsoft
AD domains. Only one relationship can be set up between these two domains. If for example, you
want to change the trust direction to one-way, you would first need to delete this existing trust
relationship and create a new one.
Tutorial: Create a trust relationship between AWS Managed Microsoft AD domains Version 1.0 201

AWS Directory Service Administration Guide
Extend your AWS Managed Microsoft AD schema
AWS Managed Microsoft AD uses schemas to organize and enforce how directory data is stored.
The process of adding definitions to the schema is referred to as “extending the schema.” Schema
extensions make it possible for you to modify the schema of your AWS Managed Microsoft AD
directory using a valid LDAP Data Interchange Format (LDIF) file. For more information about AD
schemas and how to extend your schema, see the topics listed below.
When to extend your AWS Managed Microsoft AD schema
You can extend your AWS Managed Microsoft AD schema by adding new object classes and
attributes. For example, you might do this if you have an application that requires changes to your
schema in order to support single sign-on capabilities.
You can also use schema extensions to enable support for applications that rely on specific Active
Directory object classes and attributes. This can be especially useful in the case where you need
to migrate corporate applications that are dependent on AWS Managed Microsoft AD, to the AWS
cloud.
Each attribute or class that is added to an existing Active Directory schema must be defined with a
unique ID. That way when companies add extensions to the schema, they can be guaranteed to be
unique and not to conflict with each other. These IDs are referred to as AD Object Identifiers (OIDs)
and are stored in AWS Managed Microsoft AD.
To get started, see Tutorial: Extending your AWS Managed Microsoft AD schema.
Related topics
• Extend your AWS Managed Microsoft AD schema
• Schema elements
Topics
• Tutorial: Extending your AWS Managed Microsoft AD schema
Tutorial: Extending your AWS Managed Microsoft AD schema
In this tutorial, you will learn how to extend the schema for your AWS Directory Service for
Microsoft Active Directory directory, also known as AWS Managed Microsoft AD, by adding unique
Extend your directory schema Version 1.0 202

AWS Directory Service Administration Guide
attributes and classes that meet your specific requirements. AWS Managed Microsoft AD schema
extensions can only be uploaded and applied using a valid LDIF (Lightweight Directory Interchange
Format) script file.
Attributes (attributeSchema) define the fields in the database while classes (classSchema) define
the tables in the database. For example, all of the user objects in Active Directory are defined by
the schema class User while the individual properties of a user, such as email address or phone
number, are each defined by an attribute.
If you wanted to add a new property, such as Shoe-Size, you would define a new attribute, which
would be of type integer. You could also define lower and upper limits like 1 to 20. Once the Shoe-
Size attributeSchema object has been created, you would then alter the User classSchema object to
contain that attribute. Attributes can be linked to multiple classes. Shoe-Size could also be added
to the Contact class for example. For more information about Active Directory schemas, see When
to extend your AWS Managed Microsoft AD schema.
This workflow has three basic steps.
Step 1: Create your LDIF file
First, you create an LDIF file and define the new attributes and any classes that the attributes
should be added to. You use this file for the next phase of the workflow.
Tutorial: Extending your AWS Managed Microsoft AD schema Version 1.0 203

AWS Directory Service Administration Guide
Step 2: Import your LDIF file
In this step, you use the AWS Directory Service console to import the LDIF file to your Microsoft
Active Directory environment.
Step 3: Verify if the schema extension was successful
Finally, as an administrator, you use an EC2 instance to verify that the new extensions appear in
the Active Directory Schema Snap-in.
Step 1: Create your LDIF file
An LDIF file is a standard plain text data interchange format for representing LDAP (Lightweight
Directory Access Protocol) directory content and update requests. LDIF conveys directory content
as a set of records, one record for each object (or entry). It also represents update requests, such as
Add, Modify, Delete, and Rename, as a set of records, one record for each update request.
The AWS Directory Service imports your LDIF file with the schema changes by running the
ldifde.exe application on your AWS Managed Microsoft AD directory. Therefore, you'll find it
helpful to understand the LDIF script syntax. For more information, see LDIF Scripts.
Several third-party LDIF tools can extract, clean-up, and update your schema updates. Regardless
of which tool you use, it is important to understand that all identifiers used in your LDIF file must
be unique.
We highly recommend that you review the following concepts and tips prior to creating your LDIF
file.
• Schema elements – Learn about schema elements such as attributes, classes, object IDs, and
linked attributes. For more information, see Schema elements.
• Sequence of items – Make sure that the order in which the items in your LDIF file are laid out
follow the Directory Information Tree (DIT) from the top down. The general rules for sequencing
in an LDIF file include the following:
• Separate items with a blank line.
• List child items after their parent items.
Tutorial: Extending your AWS Managed Microsoft AD schema Version 1.0 204

AWS Directory Service Administration Guide
• Ensure that items such as attributes or object classes exist in the schema. If they are not
present, you must add them to the schema before they can be used. For example, before you
can assign an attribute to a class, the attribute must be created.
• Format of the DN – For each new instruction in the LDIF file, define the distinguished name (DN)
as the first line of the instruction. The DN identifies an Active Directory object within the Active
Directory object’s tree and must contain the domain components for your directory. For example,
the domain components for the directory in this tutorial are DC=example,DC=com.
The DN also must contain the common name (CN) of the Active Directory object. The first CN
entry is the attribute or class name. Next, you must use CN=Schema,CN=Configuration. This
CN ensures that you are able to extend the Active Directory schema. As mentioned before, you
cannot add or modify Active Directory objects’ content. The general format for a DN follows.
dn: CN=[attribute or class name],CN=Schema,CN=Configuration,DC=[domain_name]
For this tutorial, the DN for the new Shoe-Size attribute would look like:
dn: CN=Shoe-Size,CN=Schema,CN=Configuration,DC=example,DC=com
• Warnings – Review the warnings below before you extend your schema.
• Before you extend your Active Directory schema, it is important to review Microsoft's warnings
on the impact of this operation. For more information, see What You Must Know Before
Extending the Schema.
• You cannot delete a schema attribute or class. Therefore, if you make a mistake and don’t want
to restore from backup, you can only disable the object. For more information, see Disabling
Existing Classes and Attributes.
• Changes to defaultSecurityDescriptor are not supported.
To learn more about how LDIF files are constructed and see a sample LDIF file that can be used for
testing AWS Managed Microsoft AD schema extensions, see the article How to Extend your AWS
Managed Microsoft AD Directory Schema on the AWS Security Blog.
Next Step
Step 2: Import your LDIF file
Tutorial: Extending your AWS Managed Microsoft AD schema Version 1.0 205

AWS Directory Service Administration Guide
Step 2: Import your LDIF file
You can extend your schema by importing an LDIF file from either the AWS Directory Service
console or by using the API. For more information about how to do this with the schema extension
APIs, see the AWS Directory Service API Reference. At this time, AWS does not support external
applications, such as Microsoft Exchange, to perform schema updates directly.
Important
When you make an update to your AWS Managed Microsoft AD directory schema, the
operation is not reversible. In other words, once you create a new class or attribute, Active
Directory doesn’t allow you to remove it. However, you can disable it.
If you must delete the schema changes, one option is to restore the directory from a
previous snapshot. Restoring a snapshot rolls both the schema and the directory data back
to a previous point, not just the schema. Note, the maximum supported age of a snapshot
is 180 days. For more information, see Useful shelf life of a system-state backup of Active
Directory on the Microsoft website.
Before the update process begins, AWS Managed Microsoft AD takes a snapshot to preserve the
current state of your directory.
Note
Schema extensions is a global feature of AWS Managed Microsoft AD. If you are using
Configure Multi-Region replication for AWS Managed Microsoft AD, the following
procedures must be performed in the Primary Region. The changes will be applied across
all replicated Regions automatically. For more information, see Global vs Regional features.
To import your LDIF file
1. In the AWS Directory Service console navigation pane, select Directories.
2. On the Directories page, choose your directory ID.
3. On the Directory details page, do one of the following:
Tutorial: Extending your AWS Managed Microsoft AD schema Version 1.0 206

AWS Directory Service Administration Guide
• If you have multiple Regions showing under Multi-Region replication, select the primary
Region, and then choose the Maintenance tab. For more information, see Primary vs
additional Regions.
• If you do not have any Regions showing under Multi-Region replication, choose the
Maintenance tab.
4. In the Schema extensions section, choose Actions, and then select Upload and update
schema.
5. In the dialog box, click Browse, select a valid LDIF file, type a description, and then choose
Update Schema.
Important
Extending the schema is a critical operation. Don’t apply any schema update in
production environment without first testing it with your application in a development
or test environment.
How is the LDIF file applied
After your LDIF file has been uploaded, AWS Managed Microsoft AD takes steps to protect your
directory against errors as it applies the changes in the following order.
1. Validates the LDIF file. Since LDIF scripts can manipulate any object in the domain, AWS
Managed Microsoft AD runs checks right after you upload to help ensure that the import
operation will not fail. These include checks to ensure the following:
• The objects to be updated are only held in the schema container
• The DC (domain controllers) part matches the name of the domain where the LDIF script is
running
2. Takes a snapshot of your directory. You can use the snapshot to restore your directory in case
you encounter any problems with your application after updating the schema.
3. Applies the changes to a single DC. AWS Managed Microsoft AD isolates one of your DCs and
applies the updates in the LDIF file to the isolated DC. It then selects one of your DCs to be the
primary schema, removes that DC from directory replication, and applies your LDIF file using
Ldifde.exe.
Tutorial: Extending your AWS Managed Microsoft AD schema Version 1.0 207

AWS Directory Service Administration Guide
4. Replication occurs to all DCs. AWS Managed Microsoft AD adds the isolated DC back in to
replication to complete the update. While this is all happening, your directory continues to
provide the Active Directory service to your applications without disruption.
Next step
Step 3: Verify if the schema extension was successful
Step 3: Verify if the schema extension was successful
After you have finished the import process, it is important to verify that schema updates were
applied to your directory. This is especially critical before you migrate or update any application
that relies on the schema update. You can do this using a variety of different LDAP tools or by
writing a test tool that issues the appropriate LDAP commands.
This procedure uses the Active Directory Schema Snap-in and/or PowerShell to verify that the
schema updates were applied. You must run these tools from a computer that is domain joined
to your AWS Managed Microsoft AD. This can be a Windows server running in your on-premises
network with access to your virtual private cloud (VPC) or through a virtual private network (VPN)
connection. You can also run these tools on an Amazon EC2 Windows instance (see How to launch
a new EC2 instance with seamless domain join).
To verify using the Active Directory Schema Snap-in
1. Install the Active Directory Schema Snap-In using the instructions on the TechNet website.
2. Open the Microsoft Management Console (MMC) and expand the AD Schema tree for your
directory.
3. Navigate through the Classes and Attributes folders until you find the schema changes that
you made earlier.
To verify using PowerShell
1. Open a PowerShell window.
2.
Use the Get-ADObject cmdlet as shown below to verify the schema change. For example:
get-adobject -Identity 'CN=Shoe-
Size,CN=Schema,CN=Configuration,DC=example,DC=com' -Properties *
Tutorial: Extending your AWS Managed Microsoft AD schema Version 1.0 208

AWS Directory Service Administration Guide
Optional step
Add a value to the new attribute - Optional
Add a value to the new attribute - Optional
Use this optional step when you have created a new attribute and want to add a new value to the
attribute in your AWS Managed Microsoft AD directory.
To add a value to an attribute
1. Open the Windows PowerShell command line utility and set the new attribute with the
following command. In this example, we will add a new EC2InstanceID value to the attribute
for a specific computer.
PS C:\> set-adcomputer -Identity computer name -add @{example-
EC2InstanceID = 'EC2 instance ID'}
2. You can validate if the EC2InstanceID value was added to the computer object by running the
following command:
PS C:\> get-adcomputer -Identity computer name –Property example-
EC2InstanceID
Related resources
The following resource links are located on the Microsoft website and provide related information.
• Extending the Schema (Windows)
• Active Directory Schema (Windows)
• Active Directory Schema
• Windows Administration: Extending the Active Directory Schema
• Restrictions on Schema Extension (Windows)
• Ldifde
Tutorial: Extending your AWS Managed Microsoft AD schema Version 1.0 209

AWS Directory Service Administration Guide
Ways to join an Amazon EC2 instance to your AWS Managed
Microsoft AD
You can seamlessly join an Amazon EC2 instance to your Active Directory domain when the
instance is launched. For more information, see Joining an Amazon EC2 Windows instance to your
AWS Managed Microsoft AD Active Directory. You can also launch an EC2 instance and join it to
an Active Directory domain directly from the AWS Directory Service console with AWS Systems
Manager Automation.
If you need to manually join an EC2 instance to your Active Directory domain, you must launch the
instance in the proper Region and security group or subnet, then join the instance to the domain.
To be able to connect remotely to these instances, you must have IP connectivity to the instances
from the network you are connecting from. In most cases, this requires that an internet gateway be
attached to your VPC and that the instance has a public IP address.
Topics
• Launching a directory administration instance in your AWS Managed Microsoft AD Active
Directory
• Joining an Amazon EC2 Windows instance to your AWS Managed Microsoft AD Active Directory
• Joining an Amazon EC2 Linux instance to your AWS Managed Microsoft AD Active Directory
• Joining an Amazon EC2 Mac instance to your AWS Managed Microsoft AD Active Directory
• Delegating directory join privileges for AWS Managed Microsoft AD
• Creating or changing a DHCP options set for AWS Managed Microsoft AD
Launching a directory administration instance in your AWS Managed
Microsoft AD Active Directory
This procedure launches an Amazon EC2 directory administration Windows instance in the AWS
Management Console using AWS Systems Manager Automation to manage your directories. You
can also accomplish this by running the automation AWS-CreateDSManagementInstance in the
AWS Systems Manager Automation console directly.
Ways to join an instance to your directory Version 1.0 210

AWS Directory Service Administration Guide
Prerequisites
To launch a directory administration EC2 instance from the console, you must have the following
permissions enabled in your account.
•
ds:DescribeDirectories
•
ec2:AuthorizeSecurityGroupIngress
•
ec2:CreateSecurityGroup
•
ec2:CreateTags
•
ec2:DeleteSecurityGroup
•
ec2:DescribeInstances
•
ec2:DescribeInstanceStatus
•
ec2:DescribeKeyPairs
•
ec2:DescribeSecurityGroups
•
ec2:DescribeVpcs
•
ec2:RunInstances
•
ec2:TerminateInstances
•
iam:AddRoleToInstanceProfile
•
iam:AttachRolePolicy
•
iam:CreateInstanceProfile
•
iam:CreateRole
•
iam:DeleteInstanceProfile
•
iam:DeleteRole
•
iam:DetachRolePolicy
•
iam:GetInstanceProfile
•
iam:GetRole
•
iam:ListAttachedRolePolicies
•
iam:ListInstanceProfiles
•
iam:ListInstanceProfilesForRole
•
iam:PassRole
Launching a directory administration instance Version 1.0 211

AWS Directory Service Administration Guide
•
iam:RemoveRoleFromInstanceProfile
•
iam:TagInstanceProfile
•
iam:TagRole
•
ssm:CreateDocument
•
ssm:DeleteDocument
•
ssm:DescribeInstanceInformation
•
ssm:GetAutomationExecution
•
ssm:GetParameters
•
ssm:ListCommandInvocations
•
ssm:ListCommands
•
ssm:ListDocuments
•
ssm:SendCommand
•
ssm:StartAutomationExecution
•
ssm:GetDocument
Launching a directory administration EC2 instance in the AWS Management
Console
1. Sign in to the AWS Directory Service console.
2. Under Active Directory, choose Directories.
3. Choose the Directory ID of the directory where you want to launch a directory administration
EC2 instance.
4. On the directory page, in the top right corner, choose Actions.
5. In the Actions dropdown list, choose Launch directory administration EC2 instance.
6. On the Launch directory administration EC2 instance page, under Input parameters,
complete the fields.
a. (Optional) You can provide a key pair for the instance. From the Key Pair Name - optional
dropdown list, select a key pair.
b. (Optional) Choose View AWS CLI command to see an example that you use in the AWS
CLI to run this automation.
7. Choose Submit.
Launching a directory administration instance Version 1.0 212

AWS Directory Service Administration Guide
8. You're taken back to the directory page. A green flashbar displays at the top of your screen to
indicate that you successfully began the launch.
Viewing directory administration EC2 instance
If you haven't launched any EC2 instances for a directory, a dash (-) displays under Directory
administration EC2 instance.
1. Under Active Directory, choose Directories and select the directory you want to view.
2. Under Directory details, under Directory administration EC2 instance, choose one or all of
your instances to view.
3. When you choose an instance, you're routed to the EC2 Connect to instance page to connect a
remote desktop to your instance.
Joining an Amazon EC2 Windows instance to your AWS Managed
Microsoft AD Active Directory
You can launch and join an Amazon EC2 Windows instance to an AWS Managed Microsoft AD.
Alternatively, you can manually join an existing EC2 Windows instance to an AWS Managed
Microsoft AD.
Seamlessly join EC2 Windows instance
This procedure seamlessly joins an Amazon EC2 Windows instance to your AWS Managed
Microsoft AD. If you need to perform seamless domain join across multiple AWS accounts, see
Tutorial: Sharing your AWS Managed Microsoft AD directory for seamless EC2 domain-join. For
more information about Amazon EC2, see What is Amazon EC2?.
To seamlessly join an Amazon EC2 Windows instance
1. Sign in to the AWS Management Console and open the Amazon EC2 console at https://
console.aws.amazon.com/ec2/.
2. In the navigation bar, choose the same AWS Region as the existing directory.
3. On the EC2 Dashboard, in the Launch instance section, choose Launch instance.
4. On the Launch an instance page, under the Name and Tags section, enter the name you
would like to use for your Windows EC2 instance.
Joining a Windows instance Version 1.0 213

AWS Directory Service Administration Guide
5. (Optional) Choose Add additional tags to add one or more tag key-value pairs to organize,
track, or control access for this EC2 instance.
6. In the Application and OS Image (Amazon Machine Image) section, choose Windows in
the Quick Start pane. You can change the Windows Amazon Machine Image (AMI) from the
Amazon Machine Image (AMI) dropdown list.
7. In the Instance type section, choose the instance type you would like to use from Instance
type dropdown list.
8. In the Key pair (login) section, you can either choose to create a new key pair or choose
from an existing key pair.
a. To create a new key pair, choose Create new key pair.
b. Enter a name for the key pair and select an option for the Key pair type and Private
key file format.
c. To save the private key in a format that can be used with OpenSSH, choose .pem. To
save the private key in a format that can be used with PuTTY, choose .ppk.
d. Choose create key pair.
e. The private key file is automatically downloaded by your browser. Save the private key
file in a safe place.
Important
This is the only chance for you to save the private key file.
9. On the Launch an instance page, under Network settings section, choose Edit. Choose the
VPC that your directory was created in from the VPC - required dropdown list.
10. Choose one of the public subnets in your VPC from the Subnet dropdown list. The subnet
you choose must have all external traffic routed to an internet gateway. If this is not the
case, you won't be able to connect to the instance remotely.
For more information on how to connect to a internet gateway, see Connect to the internet
using an internet gateway in the Amazon VPC User Guide.
11. Under Auto-assign public IP, choose Enable.
For more information about public and private IP addressing, see Amazon EC2 instance IP
addressing in the Amazon EC2 User Guide.
Joining a Windows instance Version 1.0 214
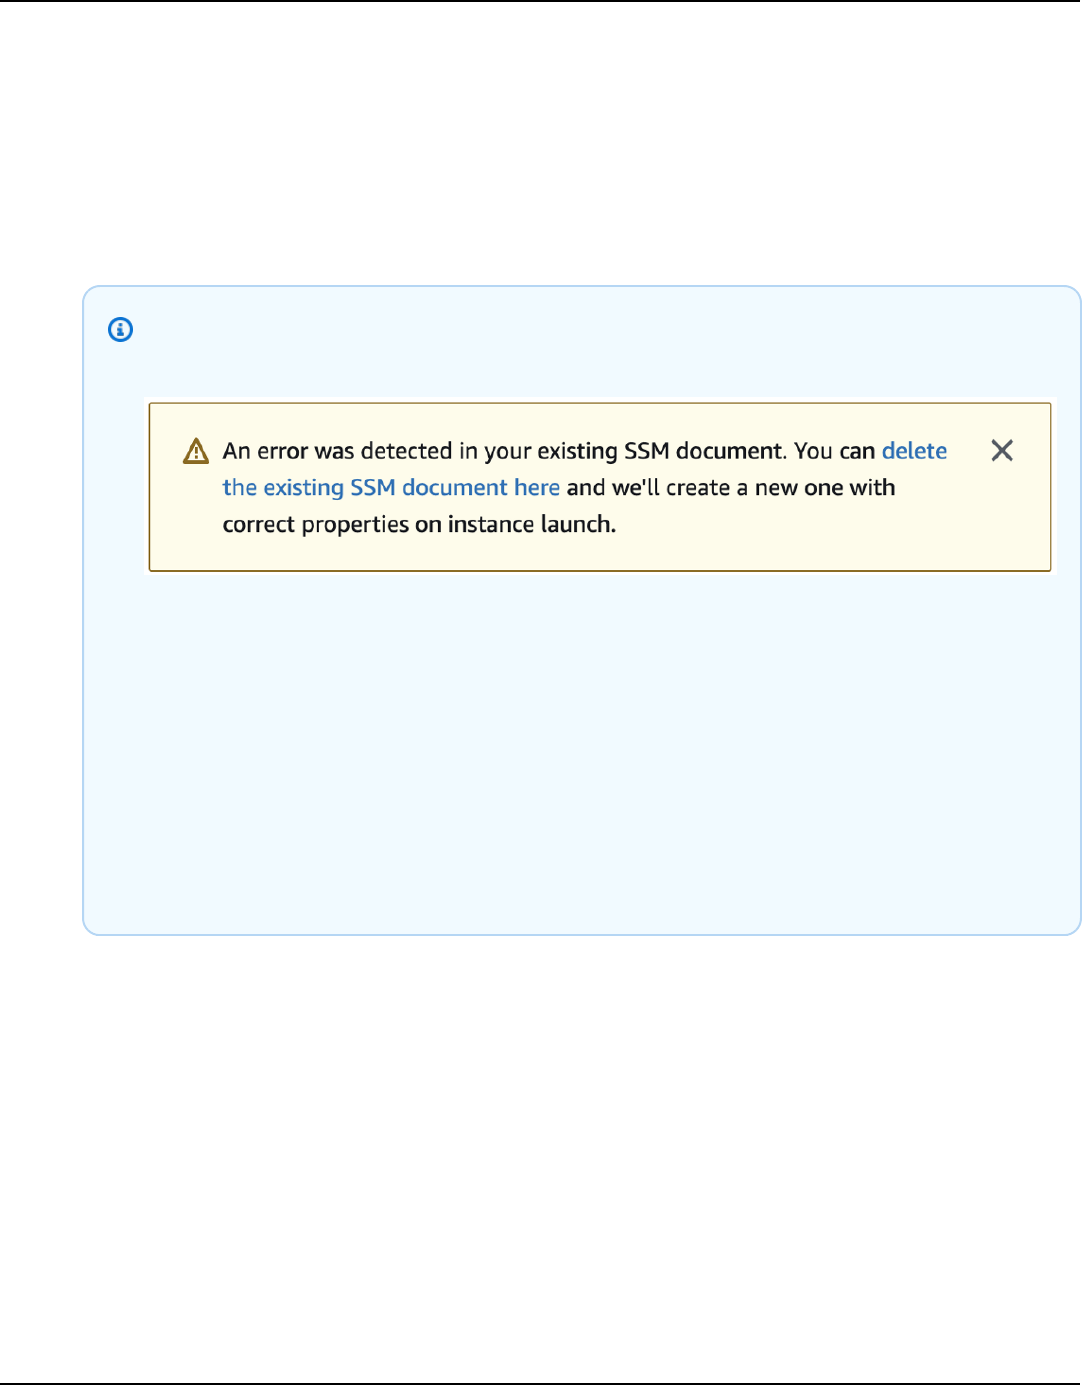
AWS Directory Service Administration Guide
12. For Firewall (security groups) settings, you can use the default settings or make changes
to meet your needs.
13. For Configure storage settings, you can use the default settings or make changes to meet
your needs.
14. Select Advanced details section, choose your domain from the Domain join directory
dropdown list.
Note
After choosing the Domain join directory, you may see:
This error occurs if the EC2 launch wizard identifies an existing SSM document with
unexpected properties. You can do one of the following:
• If you previously edited the SSM document and the properties are expected,
choose close and proceed to launch the EC2 instance with no changes.
• Select the delete the existing SSM document here link to delete the SSM
document. This will allow for the creation of an SSM document with the correct
properties. The SSM document will automatically be created when you launch the
EC2 instance.
15. For IAM instance profile, you can select an existing IAM instance profile or create
a new one. Select an IAM instance profile that has the AWS managed policies
AmazonSSMManagedInstanceCore and AmazonSSMDirectoryServiceAccess attached to
it from the IAM instance profile dropdown list. To create a new one, choose Create new
IAM profile link, and then do the following:
1. Choose Create role.
2. Under Select trusted entity, choose AWS service.
3. Under Use case, choose EC2.
Joining a Windows instance Version 1.0 215

AWS Directory Service Administration Guide
4. Under Add permissions, in the list of policies, select the
AmazonSSMManagedInstanceCore and AmazonSSMDirectoryServiceAccess policies.
To filter the list, type SSM in the search box. Choose Next.
Note
AmazonSSMDirectoryServiceAccess provides the permissions to join
instances to an Active Directory managed by AWS Directory Service.
AmazonSSMManagedInstanceCore provides the minimum permissions
necessary to use the AWS Systems Manager service. For more information
about creating a role with these permissions, and for information about other
permissions and policies you can assign to your IAM role, see Create an IAM
instance profile for Systems Manager in the AWS Systems Manager User Guide.
5. On the Name, review, and create page, enter a Role name. You will need this role name
to attach to the EC2 instance.
6. (Optional) You can provide a description of the IAM instance profile in the Description
field.
7. Choose Create role.
8. Return to Launch an instance page and choose the refresh icon next to the IAM instance
profile. Your new IAM instance profile should be visible in the IAM instance profile
dropdown list. Choose the new profile and leave the rest of the settings with their
default values.
16. Choose Launch instance.
Manually join EC2 Windows instnace
To manually join an existing Amazon EC2 Windows instance to an AWS Managed Microsoft AD
Active Directory, the instance must be launched using the parameters as specified in Joining an
Amazon EC2 Windows instance to your AWS Managed Microsoft AD Active Directory.
You will need the IP addresses of the AWS Managed Microsoft AD DNS servers. This information
can be found under Directory Services > Directories > the Directory ID link for your directory
> Directory details and Networking & Security sections.
Joining a Windows instance Version 1.0 216

AWS Directory Service Administration Guide
To join a Windows instance to an AWS Managed Microsoft AD Active Directory
1. Connect to the instance using any Remote Desktop Protocol client.
2. Open the TCP/IPv4 properties dialog box on the instance.
a. Open Network Connections.
Tip
You can open Network Connections directly by running the following from a
command prompt on the instance.
%SystemRoot%\system32\control.exe ncpa.cpl
b. Open the context menu (right-click) for any enabled network connection and then
choose Properties.
c. In the connection properties dialog box, open (double-click) Internet Protocol Version
4.
Joining a Windows instance Version 1.0 217

AWS Directory Service Administration Guide
3. Select Use the following DNS server addresses, change the Preferred DNS server and
Alternate DNS server addresses to the IP addresses of your AWS Managed Microsoft AD-
provided DNS servers, and choose OK.
4. Open the System Properties dialog box for the instance, select the Computer Name tab,
and choose Change.
Tip
You can open the System Properties dialog box directly by running the following
from a command prompt on the instance.
%SystemRoot%\system32\control.exe sysdm.cpl
5. In the Member of field, select Domain, enter the fully qualified name of your AWS
Managed Microsoft AD Active Directory, and choose OK.
6. When prompted for the name and password for the domain administrator, enter
the username and password of an account that has domain join privileges. For more
Joining a Windows instance Version 1.0 218

AWS Directory Service Administration Guide
information about delegating these privileges, see Delegating directory join privileges for
AWS Managed Microsoft AD.
Note
You can enter either the fully qualified name of your domain or the NetBIOS
name, followed by a backslash (\), and then the username. The username would be
Admin. For example, corp.example.com\admin or corp\admin.
7. After you receive the message welcoming you to the domain, restart the instance to have
the changes take effect.
Now that your instance has been joined to the AWS Managed Microsoft AD Active Directory
domain, you can log into that instance remotely and install utilities to manage the directory,
such as adding users and groups. The Active Directory Administration Tools can be used to
create users and groups. For more information, see Installing Active Directory Administration
Tools for AWS Managed Microsoft AD.
Note
You can also use Amazon Route53 to process DNS queries instead of manually
changing the DNS addresses on your Amazon EC2 instances. For more information, see
Integrating your Directory Service's DNS resolution with Amazon Route53 Resolver and
Forwarding outbound DNS queries to your network.
Joining an Amazon EC2 Linux instance to your AWS Managed Microsoft
AD Active Directory
You can launch and join an EC2 Linux instance to your AWS Managed Microsoft AD in the AWS
Management Console. You can also manually join EC2 Linux instance to your AWS Managed
Microsoft AD. Tools like Winbind can also be used so you can domain join an EC2 Linux instance to
your AWS Managed Microsoft AD.
The following Linux instance distributions and versions are supported:
• Amazon Linux AMI 2018.03.0
Joining a Linux instance Version 1.0 219

AWS Directory Service Administration Guide
• Amazon Linux 2 (64-bit x86)
• Red Hat Enterprise Linux 8 (HVM) (64-bit x86)
• Ubuntu Server 18.04 LTS & Ubuntu Server 16.04 LTS
• CentOS 7 x86-64
• SUSE Linux Enterprise Server 15 SP1
Note
Distributions prior to Ubuntu 14 and Red Hat Enterprise Linux 7 do not support the
seamless domain join feature.
Ways to domain join a EC2 Linux instance:
• Seamlessly joining an Amazon EC2 Linux instance to your AWS Managed Microsoft AD Active
Directory
• Seamlessly joining an Amazon EC2 Linux instance to a shared AWS Managed Microsoft AD
• Manually joining an Amazon EC2 Linux instance to your AWS Managed Microsoft AD Active
Directory
• Manually joining an Amazon EC2 Linux instance to your AWS Managed Microsoft AD Active
Directory using Winbind
Seamlessly joining an Amazon EC2 Linux instance to your AWS Managed
Microsoft AD Active Directory
This procedure seamlessly joins an Amazon EC2 Linux instance to your AWS Managed Microsoft AD
Active Directory. If you need to perform seamless domain join across multiple AWS accounts, you
can optionally choose to enable Directory sharing.
The following Linux instance distributions and versions are supported:
• Amazon Linux AMI 2018.03.0
• Amazon Linux 2 (64-bit x86)
• Red Hat Enterprise Linux 8 (HVM) (64-bit x86)
• Ubuntu Server 18.04 LTS & Ubuntu Server 16.04 LTS
Joining a Linux instance Version 1.0 220

AWS Directory Service Administration Guide
• CentOS 7 x86-64
• SUSE Linux Enterprise Server 15 SP1
Note
Distributions prior to Ubuntu 14 and Red Hat Enterprise Linux 7 do not support the
seamless domain join feature.
For a demonstration on the process of seamlessly joining a Linux instance to your AWS Managed
Microsoft AD Active Directory, see the following YouTube video.
Amazon EC2 for Linux seamless AD domain join demo
Prerequisites
Before you can set up seamless domain join to a Linux instance, you need to complete the
procedures in this section.
Select your seamless domain join service account
You can seamlessly join Linux computers to your AWS Managed Microsoft AD Active Directory
domain. To do that, you must use a user account with create computer account permissions
to join the machines to the domain. Although members of the AWS delegated administrators
or other groups might have sufficient privileges to join computers to the domain, we do not
recommend using these. As a best practice, we recommend that you use a service account that has
the minimum privileges necessary to join the computers to the domain.
To delegate an account with the minimum privileges necessary to join the computers to the
domain, you can run the following PowerShell commands. You must run these commands from
a domain-joined Windows computer with the Installing Active Directory Administration Tools for
AWS Managed Microsoft AD installed. In addition, you must use an account that has permission
to modify the permissions on your Computers OU or container. The PowerShell command sets
permissions allowing the service account to create computer objects in your domain’s default
computers container.
$AccountName = 'awsSeamlessDomain'
# DO NOT modify anything below this comment.
# Getting Active Directory information.
Joining a Linux instance Version 1.0 221
AWS Directory Service Administration Guide
Import-Module 'ActiveDirectory'
$Domain = Get-ADDomain -ErrorAction Stop
$BaseDn = $Domain.DistinguishedName
$ComputersContainer = $Domain.ComputersContainer
$SchemaNamingContext = Get-ADRootDSE | Select-Object -ExpandProperty
'schemaNamingContext'
[System.GUID]$ServicePrincipalNameGuid = (Get-ADObject -SearchBase $SchemaNamingContext
-Filter { lDAPDisplayName -eq 'Computer' } -Properties 'schemaIDGUID').schemaIDGUID
# Getting Service account Information.
$AccountProperties = Get-ADUser -Identity $AccountName
$AccountSid = New-Object -TypeName 'System.Security.Principal.SecurityIdentifier'
$AccountProperties.SID.Value
# Getting ACL settings for the Computers container.
$ObjectAcl = Get-ACL -Path "AD:\$ComputersContainer"
# Setting ACL allowing the service account the ability to create child computer objects
in the Computers container.
$AddAccessRule = New-Object -TypeName
'System.DirectoryServices.ActiveDirectoryAccessRule' $AccountSid, 'CreateChild',
'Allow', $ServicePrincipalNameGUID, 'All'
$ObjectAcl.AddAccessRule($AddAccessRule)
Set-ACL -AclObject $ObjectAcl -Path "AD:\$ComputersContainer"
If you prefer using a graphical user interface (GUI) you can use the manual process that is described
in Delegate privileges to your service account.
Create the secrets to store the domain service account
You can use AWS Secrets Manager to store the domain service account.
To create secrets and store the domain service account information
1. Sign in to the AWS Management Console and open the AWS Secrets Manager console at
https://console.aws.amazon.com/secretsmanager/.
2. Choose Store a new secret.
3. On the Store a new secret page, do the following:
a. Under Secret type, choose Other type of secrets.
b. Under Key/value pairs, do the following:
i.
In the first box, enter awsSeamlessDomainUsername. On the same row, in
the next box, enter the username for your service account. For example, if you
Joining a Linux instance Version 1.0 222
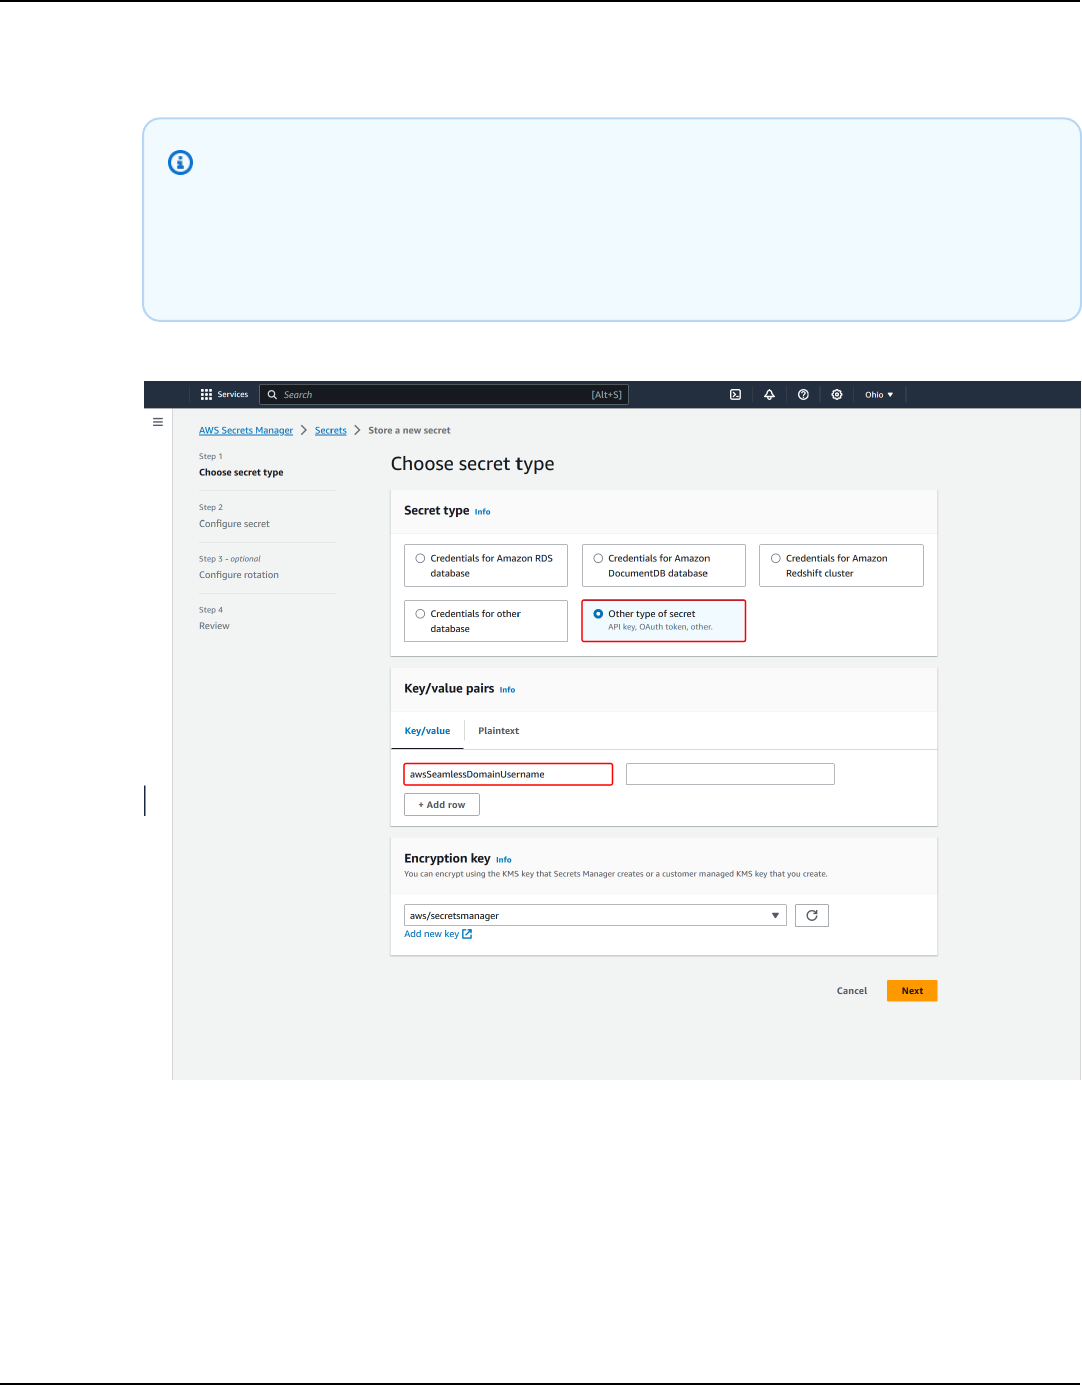
AWS Directory Service Administration Guide
used the PowerShell command previously, the service account name would be
awsSeamlessDomain.
Note
You must enter awsSeamlessDomainUsername exactly as it is. Make sure
there are not any leading or ending spaces. Otherwise the domain join will
fail.
ii. Choose Add row.
iii.
On the new row, in the first box, enter awsSeamlessDomainPassword. On the same
row, in the next box, enter the password for your service account.
Joining a Linux instance Version 1.0 223

AWS Directory Service Administration Guide
Note
You must enter awsSeamlessDomainPassword exactly as it is. Make sure
there are not any leading or ending spaces. Otherwise the domain join will
fail.
iv.
Under Encryption key, leave the default value aws/secretsmanager. AWS Secrets
Manager always encrypts the secret when you choose this option. You also may
choose a key you created.
Note
There are fees associated with AWS Secrets Manager, depending on which
secret you use. For the current complete pricing list, see AWS Secrets Manager
Pricing.
You can use the AWS managed key aws/secretsmanager that Secrets
Manager creates to encrypt your secrets for free. If you create your own KMS
keys to encrypt your secrets, AWS charges you at the current AWS KMS rate.
For more information, see AWS Key Management Service Pricing.
v. Choose Next.
4. Under Secret name, enter a secret name that includes your directory ID using the following
format, replacing d-xxxxxxxxx with your directory ID:
aws/directory-services/d-xxxxxxxxx/seamless-domain-join
This will be used to retrieve secrets in the application.
Note
You must enter aws/directory-services/d-xxxxxxxxx/seamless-domain-
join exactly as it is but replace d-xxxxxxxxxx with your directory ID. Make sure that
there are no leading or ending spaces. Otherwise the domain join will fail.
Joining a Linux instance Version 1.0 224
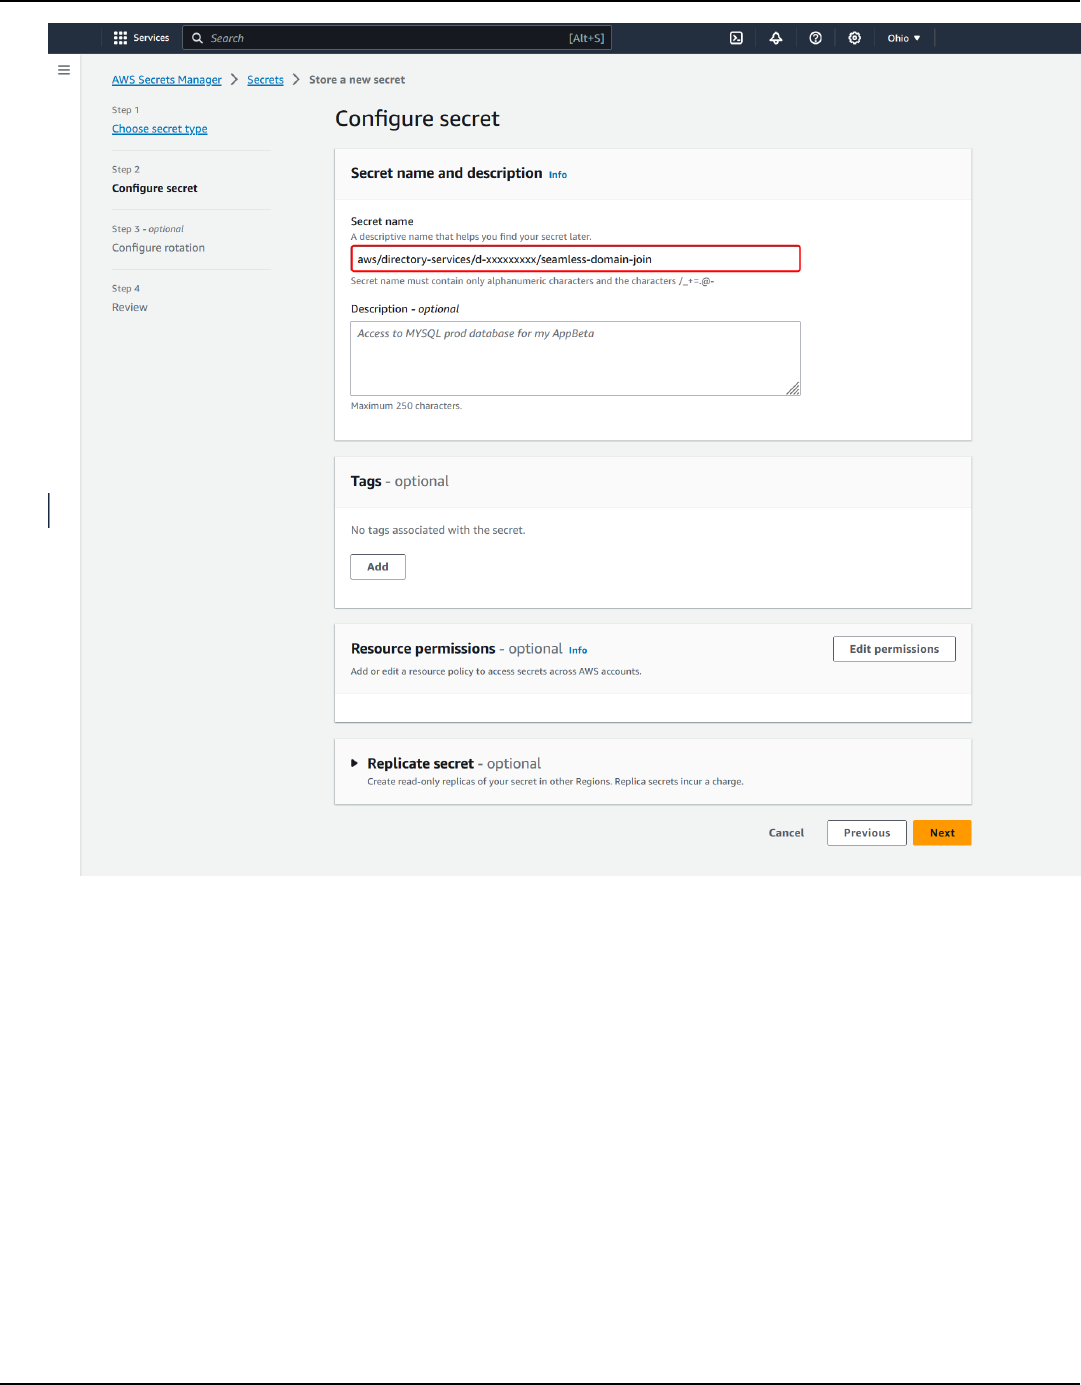
AWS Directory Service Administration Guide
5. Leave everything else set to defaults, and then choose Next.
6. Under Configure automatic rotation, choose Disable automatic rotation, and then choose
Next.
You can turn on rotation for this secret after you store it.
7. Review the settings, and then choose Store to save your changes. The Secrets Manager console
returns you to the list of secrets in your account with your new secret now included in the list.
8. Choose your newly created secret name from the list, and take note of the Secret ARN value.
You will need it in the next section.
Joining a Linux instance Version 1.0 225

AWS Directory Service Administration Guide
Turn on rotation for the domain service account secret
We recommend that you regularly rotate secrets to improve your security posture.
To turn on rotation for the domain service account secret
• Follow the instructions in Set up automatic rotation for AWS Secrets Manager secrets in the
AWS Secrets Manager User Guide.
For Step 5, use the rotation template Microsoft Active Directory credentials in the AWS Secrets
Manager User Guide.
For help, see Troubleshoot AWS Secrets Manager rotation in the AWS Secrets Manager User
Guide.
Create the required IAM policy and role
Use the following prerequisite steps to create a custom policy that allows read-only access to your
Secrets Manager seamless domain join secret (which you created earlier), and to create a new
LinuxEC2DomainJoin IAM role.
Create the Secrets Manager IAM read policy
You use the IAM console to create a policy that grants read-only access to your Secrets Manager
secret.
To create the Secrets Manager IAM read policy
1. Sign in to the AWS Management Console as a user that has permission to create IAM policies.
Then open the IAM console at https://console.aws.amazon.com/iam/.
2. In the navigation pane, Access Management, choose Policies.
3. Choose Create policy.
4. Choose the JSON tab and copy the text from the following JSON policy document. Then paste
it into the JSON text box.
Note
Make sure you replace the Region and Resource ARN with the actual Region and ARN
of the secret that you created earlier.
Joining a Linux instance Version 1.0 226
AWS Directory Service Administration Guide
{
"Version": "2012-10-17",
"Statement": [
{
"Effect": "Allow",
"Action": [
"secretsmanager:GetSecretValue",
"secretsmanager:DescribeSecret"
],
"Resource": [
"arn:aws:secretsmanager:us-east-1:xxxxxxxxx:secret:aws/directory-
services/d-xxxxxxxxx/seamless-domain-join"
]
}
]
}
5. When you are finished, choose Next. The policy validator reports any syntax errors. For more
information, see Validating IAM policies.
6.
On the Review policy page, enter a policy name, such as SM-Secret-Linux-DJ-d-
xxxxxxxxxx-Read. Review the Summary section to see the permissions that your policy
grants. Then choose Create policy to save your changes. The new policy appears in the list of
managed policies and is now ready to attach to an identity.
Note
We recommend you create one policy per secret. Doing so ensures that instances only have
access to the appropriate secret and minimizes the impact if an instance is compromised.
Create the LinuxEC2DomainJoin role
You use the IAM console to create the role that you will use to domain join your Linux EC2 instance.
To create the LinuxEC2DomainJoin role
1. Sign in to the AWS Management Console as a user that has permission to create IAM policies.
Then open the IAM console at https://console.aws.amazon.com/iam/.
Joining a Linux instance Version 1.0 227

AWS Directory Service Administration Guide
2. In the navigation pane, under Access Management, choose Roles.
3. In the content pane, choose Create role.
4. Under Select type of trusted entity, choose AWS service.
5. Under Use case, choose EC2, and then choose Next.
6. For Filter policies, do the following:
a.
Enter AmazonSSMManagedInstanceCore. Then select the check box for that item in the
list.
b.
Enter AmazonSSMDirectoryServiceAccess. Then select the check box for that item in
the list.
c.
Enter SM-Secret-Linux-DJ-d-xxxxxxxxxx-Read (or the name of the policy that you
created in the previous procedure). Then select the check box for that item in the list.
d. After adding the three policies listed above, select Create role.
Note
AmazonSSMDirectoryServiceAccess provides the permissions to join
instances to an Active Directory managed by AWS Directory Service.
AmazonSSMManagedInstanceCore provides the minimum permissions necessary to
use the AWS Systems Manager service. For more information about creating a role with
these permissions, and for information about other permissions and policies you can
Joining a Linux instance Version 1.0 228

AWS Directory Service Administration Guide
assign to your IAM role, see Create an IAM instance profile for Systems Manager in the
AWS Systems Manager User Guide.
7.
Enter a name for your new role, such as LinuxEC2DomainJoin or another name that you
prefer in the Role name field.
8. (Optional) For Role description, enter a description.
9. (Optional) Choose Add new tag under Step 3: Add tags to add tags. Tag key-value pairs are
used to organize, track, or control access for this role.
10. Choose Create role.
Seamlessly join your Linux instance
To seamlessly join your Linux instance
1. Sign in to the AWS Management Console and open the Amazon EC2 console at https://
console.aws.amazon.com/ec2/.
2. From the Region selector in the navigation bar, choose the same AWS Region as the existing
directory.
3. On the EC2 Dashboard, in the Launch instance section, choose Launch instance.
4. On the Launch an instance page, under the Name and Tags section, enter the name you
would like to use for your Linux EC2 instance.
5. (Optional) Choose Add additional tags to add one or more tag key-value pairs to organize,
track, or control access for this EC2 instance.
6. In the Application and OS Image (Amazon Machine Image) section, choose a Linux AMI you
wish to launch.
Note
The AMI used must have AWS Systems Manager (SSM Agent) version 2.3.1644.0 or
higher. To check the installed SSM Agent version in your AMI by launching an instance
from that AMI, see Getting the currently installed SSM Agent version. If you need to
upgrade the SSM Agent, see Installing and configuring SSM Agent on EC2 instances for
Linux.
SSM uses the aws:domainJoin plugin when joining a Linux instance to a Active
Directory domain. The plugin changes the hostname for the Linux instances to the
format EC2AMAZ-XXXXXXX. For more information about aws:domainJoin, see AWS
Joining a Linux instance Version 1.0 229

AWS Directory Service Administration Guide
Systems Manager command document plugin reference in the AWS Systems Manager
User Guide.
7. In the Instance type section, choose the instance type you would like to use from Instance
type dropdown list.
8. In the Key pair (login) section, you can either choose to create a new key pair or choose from
an existing key pair. To create a new key pair, choose Create new key pair. Enter a name for
the key pair and select an option for the Key pair type and Private key file format. To save the
private key in a format that can be used with OpenSSH, choose .pem. To save the private key
in a format that can be used with PuTTY, choose .ppk. Choose create key pair. The private key
file is automatically downloaded by your browser. Save the private key file in a safe place.
Important
This is the only chance for you to save the private key file.
9. On the Launch an instance page, under Network settings section, choose Edit. Choose the
VPC that your directory was created in from the VPC - required dropdown list.
10. Choose one of the public subnets in your VPC from the Subnet dropdown list. The subnet you
choose must have all external traffic routed to an internet gateway. If this is not the case, you
won't be able to connect to the instance remotely.
For more information on how to connect to a internet gateway, see Connect to the internet
using an internet gateway in the Amazon VPC User Guide.
11. Under Auto-assign public IP, choose Enable.
For more information about public and private IP addressing, see Amazon EC2 instance IP
addressing in the Amazon EC2 User Guide.
12. For Firewall (security groups) settings, you can use the default settings or make changes to
meet your needs.
13. For Configure storage settings, you can use the default settings or make changes to meet your
needs.
14. Select Advanced details section, choose your domain from the Domain join directory
dropdown list.
Joining a Linux instance Version 1.0 230

AWS Directory Service Administration Guide
Note
After choosing the Domain join directory, you may see:
This error occurs if the EC2 launch wizard identifies an existing SSM document with
unexpected properties. You can do one of the following:
• If you previously edited the SSM document and the properties are expected, choose
close and proceed to launch the EC2 instance with no changes.
• Select the delete the existing SSM document here link to delete the SSM document.
This will allow for the creation of an SSM document with the correct properties. The
SSM document will automatically be created when you launch the EC2 instance.
15. For IAM instance profile, choose the IAM role that you previously created in the prerequisites
section Step 2: Create the LinuxEC2DomainJoin role.
16. Choose Launch instance.
Note
If you are performing a seamless domain join with SUSE Linux, a reboot is required before
authentications will work. To reboot SUSE from the Linux terminal, type sudo reboot.
Seamlessly joining an Amazon EC2 Linux instance to a shared AWS Managed
Microsoft AD
In this procedure, you'll seamlessly join an Amazon EC2 Linux instance to a shared AWS Managed
Microsoft AD. To do this, you'll create an AWS Secrets Manager IAM read policy in the EC2 instance
role in the account where you wish to launch the EC2 Linux instance. This will be referred to as
Account 2 in this procedure. This instance will be using the AWS Managed Microsoft AD that is
being shared from the other account which is referred to as Account 1.
Joining a Linux instance Version 1.0 231

AWS Directory Service Administration Guide
Prerequisites
Before you can seamlessly join an Amazon EC2 Linux instance to a shared AWS Managed Microsoft
AD, you'll need to complete the following:
• Steps 1 through 3 in the tutorial, Tutorial: Sharing your AWS Managed Microsoft AD directory for
seamless EC2 domain-join. This tutorial walks you through setting up your network and sharing
your AWS Managed Microsoft AD.
• The procedure outlined in Seamlessly joining an Amazon EC2 Linux instance to your AWS
Managed Microsoft AD Active Directory.
Step 1. Create LinuxEC2DomainJoin role in Account 2
In this step, you'll use the IAM console to create the IAM role that you'll use to domain join your
EC2 Linux instance while signed in to Account 2.
Create the LinuxEC2DomainJoin role
1. Open the IAM console at https://console.aws.amazon.com/iam/.
2. In the left navigation pane, under Access Management, choose Roles.
3. On the Roles page, choose Create role.
4. Under Select type of trusted entity, choose AWS service.
5. Under Use case, choose EC2, and then choose Next
6. For Filter policies, do the following:
a.
Enter AmazonSSMManagedInstanceCore. Then select the checkbox for that item in the
list.
b.
Enter AmazonSSMDirectoryServiceAccess. Then select the checkbox for that item in
the list.
c. After adding these policies, select Create role.
Note
AmazonSSMDirectoryServiceAccess provides the permissions to
join instances to an Active Directory managed by AWS Directory Service.
AmazonSSMManagedInstanceCore provides the minimum permissions
necessary to use AWS Systems Manager. For more information about creating
Joining a Linux instance Version 1.0 232

AWS Directory Service Administration Guide
a role with these permissions, and for information about other permissions and
policies you can assign to your IAM role, see Configure instance permissions
required for Systems Manager in the AWS Systems Manager User Guide.
7.
Enter a name for your new role, such as LinuxEC2DomainJoin or another name that you
prefer in the Role name field.
8. (Optional) For Role description, enter a description.
9. (Optional) Choose Add new tag under Step 3: Add tags to add tags. Tag key-value pairs are
used to organize, track, or control access for this role.
10. Choose Create role.
Step 2. Create cross account resource access to share AWS Secrets Manager secrets
The next section are additional requirements that need to be met to seamlessly join EC2 Linux
instances with a shared AWS Managed Microsoft AD. These requirements include creating resource
policies and attaching them to the appropriate services and resources.
To allow users in an account to access AWS Secrets Manager secrets in another account, you must
allow access in both a resource policy and identity policy. This type of access is called cross account
resource access.
This type of access is different than granting access to identities in the same account as the Secrets
Manager secret. You must also allow the identity to use AWS Key Management Service (KMS) key
that the secret is encrypted with. This permission is necessary as you can’t use the AWS managed
key (aws/secretsmanager) for cross-account access. Instead, you'll encrypt your secret with a
KMS key that you create, and then attach a key policy to it. To change the encryption key for a
secret, see Modify an AWS Secrets Manager secret.
Note
There are fees associated with AWS Secrets Manager, depending on which secret you use.
For the current complete pricing list, see AWS Secrets Manager Pricing. You can use the
AWS managed key aws/secretsmanager that Secrets Manager creates to encrypt your
secrets for free. If you create your own KMS keys to encrypt your secrets, AWS charges you
at the current AWS KMS rate. For more information, see AWS Key Management Service
Pricing.
Joining a Linux instance Version 1.0 233

AWS Directory Service Administration Guide
The following steps allow you to create the resource policies to enable users to seamlessly join a
EC2 Linux instance to a shared AWS Managed Microsoft AD.
Attach a resource policy to the secret in Account 1
1. Open the Secrets Manager console at https://console.aws.amazon.com/secretsmanager/.
2. From the list of secrets, choose your Secret you created during the Prerequisites.
3. On the Secret's details page under the Overview tab, scroll down to Resource permissions.
4. Select Edit permissions.
• In the policy field, enter the following policy. The following policy allows
LinuxEC2DomainJoin in Account 2 to access the secret in Account 1. Replace the ARN
value with the ARN value for your Account 2, LinuxEC2DomainJoin role you created
in Step 1. To use this policy, see Attach a permissions policy to an AWS Secrets Manager
secret.
{
{
"Version": "2012-10-17",
"Statement": [
{
"Effect": "Allow",
"Principal": {
"AWS": "arn:aws:iam::Account2:role/LinuxEC2DomainJoin"
},
"Action": "secretsmanager:GetSecretValue",
"Resource": "*"
}
]
}
Add a statement to the key policy for the KMS key in Account 1
1. Open the Secrets Manager console at https://console.aws.amazon.com/secretsmanager/.
2. In the left navigation pane, select Customer managed keys.
3. On the Customer managed keys page, select the key you created.
4. On the Key Details page, navigate to Key policy, and select Edit.
Joining a Linux instance Version 1.0 234

AWS Directory Service Administration Guide
5.
The following key policy statement allows ApplicationRole in Account 2 to use the KMS
key in Account 1 to decrypt the secret in Account 1. To use this statement, add it to the key
policy for your KMS key. For more information, see Changing a key policy.
{
{
"Effect": "Allow",
"Principal": {
"AWS": "arn:aws:iam::Account2:role/ApplicationRole"
},
"Action": [
"kms:Decrypt",
"kms:DescribeKey"
],
"Resource": "*"
}
Create an identity policy to the identity in Account 2
1. Open the IAM console at https://console.aws.amazon.com/iam/.
2. In the left navigation pane, under Access management, select Policies.
3. Select Create Policy. Choose JSON in the Policy editor.
4.
The following policy allows ApplicationRole in Account 2 to access the secret in Account
1 and decrypt the secret value by using the encryption key which is also in Account 1. You
can find the ARN for your secret in the Secrets Manager console on the Secret Details page
under Secret ARN. Alternatively, you can call describe-secret to identify the secret’s ARN.
Replace the Resource ARN with the Resource ARN for the secret ARN and Account 1. To use
this policy, see Attach a permissions policy to an AWS Secrets Manager secret.
{
{
"Version" : "2012-10-17",
"Statement" : [
{
"Effect": "Allow",
"Action": "secretsmanager:GetSecretValue",
"Resource": "SecretARN"
},
{
Joining a Linux instance Version 1.0 235

AWS Directory Service Administration Guide
"Effect": "Allow",
"Action": [
"kms:Decrypt",
"kms:Describekey"
],
"Resource": "arn:aws:kms:Region:Account1:key/Your_Encryption_Key"
}
]
}
5. Select Next and then select Save changes.
6.
Find and select the Role you created in Account 2 in Attach a resource policy to the secret in
Account 1.
7. Under Add permissions, select Attach policies.
8. In the search bar, find the policy you created in Add a statement to the key policy for the KMS
key in Account 1 and select the box to add the policy to the role. Then select Add permissions.
Step 3. Seamlessly join your Linux instance
You can now use the following procedure to seamlessly join your EC2 Linux instance to your shared
AWS Managed Microsoft AD.
To seamlessly join your Linux instance
1. Sign in to the AWS Management Console and open the Amazon EC2 console at https://
console.aws.amazon.com/ec2/.
2. From the Region selector in the navigation bar, choose the same AWS Region as the existing
directory.
3. On the EC2 Dashboard, in the Launch instance section, choose Launch instance.
4. On the Launch an instance page, under the Name and Tags section, enter the name you
would like to use for your Linux EC2 instance.
5. (Optional) Choose Add additional tags to add one or more tag key-value pairs to organize,
track, or control access for this EC2 instance.
6. In the Application and OS Image (Amazon Machine Image) section, choose a Linux AMI you
wish to launch.
Joining a Linux instance Version 1.0 236

AWS Directory Service Administration Guide
Note
The AMI used must have AWS Systems Manager (SSM Agent) version 2.3.1644.0 or
higher. To check the installed SSM Agent version in your AMI by launching an instance
from that AMI, see Getting the currently installed SSM Agent version. If you need to
upgrade the SSM Agent, see Installing and configuring SSM Agent on EC2 instances for
Linux.
SSM uses the aws:domainJoin plugin when joining a Linux instance to a Active
Directory domain. The plugin changes the hostname for the Linux instances to the
format EC2AMAZ-XXXXXXX. For more information about aws:domainJoin, see AWS
Systems Manager command document plugin reference in the AWS Systems Manager
User Guide.
7. In the Instance type section, choose the instance type you would like to use from Instance
type dropdown list.
8. In the Key pair (login) section, you can either choose to create a new key pair or choose from
an existing key pair. To create a new key pair, choose Create new key pair. Enter a name for
the key pair and select an option for the Key pair type and Private key file format. To save the
private key in a format that can be used with OpenSSH, choose .pem. To save the private key
in a format that can be used with PuTTY, choose .ppk. Choose create key pair. The private key
file is automatically downloaded by your browser. Save the private key file in a safe place.
Important
This is the only chance for you to save the private key file.
9. On the Launch an instance page, under Network settings section, choose Edit. Choose the
VPC that your directory was created in from the VPC - required dropdown list.
10. Choose one of the public subnets in your VPC from the Subnet dropdown list. The subnet you
choose must have all external traffic routed to an internet gateway. If this is not the case, you
won't be able to connect to the instance remotely.
For more information on how to connect to a internet gateway, see Connect to the internet
using an internet gateway in the Amazon VPC User Guide.
11. Under Auto-assign public IP, choose Enable.
Joining a Linux instance Version 1.0 237

AWS Directory Service Administration Guide
For more information about public and private IP addressing, see Amazon EC2 instance IP
addressing in the Amazon EC2 User Guide.
12. For Firewall (security groups) settings, you can use the default settings or make changes to
meet your needs.
13. For Configure storage settings, you can use the default settings or make changes to meet your
needs.
14. Select Advanced details section, choose your domain from the Domain join directory
dropdown list.
Note
After choosing the Domain join directory, you may see:
This error occurs if the EC2 launch wizard identifies an existing SSM document with
unexpected properties. You can do one of the following:
• If you previously edited the SSM document and the properties are expected, choose
close and proceed to launch the EC2 instance with no changes.
• Select the delete the existing SSM document here link to delete the SSM document.
This will allow for the creation of an SSM document with the correct properties. The
SSM document will automatically be created when you launch the EC2 instance.
15. For IAM instance profile, choose the IAM role that you previously created in the prerequisites
section Step 2: Create the LinuxEC2DomainJoin role.
16. Choose Launch instance.
Note
If you are performing a seamless domain join with SUSE Linux, a reboot is required before
authentications will work. To reboot SUSE from the Linux terminal, type sudo reboot.
Joining a Linux instance Version 1.0 238

AWS Directory Service Administration Guide
Manually joining an Amazon EC2 Linux instance to your AWS Managed Microsoft
AD Active Directory
In addition to Amazon EC2 Windows instances, you can also join certain Amazon EC2 Linux
instances to your AWS Managed Microsoft AD Active Directory. The following Linux instance
distributions and versions are supported:
• Amazon Linux AMI 2018.03.0
• Amazon Linux 2 (64-bit x86)
• Amazon Linux 2023 AMI
• Red Hat Enterprise Linux 8 (HVM) (64-bit x86)
• Ubuntu Server 18.04 LTS & Ubuntu Server 16.04 LTS
• CentOS 7 x86-64
• SUSE Linux Enterprise Server 15 SP1
Note
Other Linux distributions and versions may work but have not been tested.
Join a Linux instance to your AWS Managed Microsoft AD
Before you can join either an Amazon Linux, CentOS, Red Hat, or Ubuntu instance to your directory,
the instance must first be launched as specified in Seamlessly join your Linux instance.
Important
Some of the following procedures, if not performed correctly, can render your instance
unreachable or unusable. Therefore, we strongly suggest you make a backup or take a
snapshot of your instance before performing these procedures.
To join a Linux instance to your directory
Follow the steps for your specific Linux instance using one of the following tabs:
Joining a Linux instance Version 1.0 239

AWS Directory Service Administration Guide
Amazon Linux
1. Connect to the instance using any SSH client.
2. Configure the Linux instance to use the DNS server IP addresses of the AWS Directory
Service-provided DNS servers. You can do this either by setting it up in the DHCP Options
set attached to the VPC or by setting it manually on the instance. If you want to set it
manually, see How do I assign a static DNS server to a private Amazon EC2 instance in the
AWS Knowledge Center for guidance on setting the persistent DNS server for your particular
Linux distribution and version.
3. Make sure your Amazon Linux - 64bit instance is up to date.
sudo yum -y update
4. Install the required Amazon Linux packages on your Linux instance.
Note
Some of these packages may already be installed.
As you install the packages, you might be presented with several pop-up
configuration screens. You can generally leave the fields in these screens blank.
Amazon Linux
sudo yum install samba-common-tools realmd oddjob oddjob-mkhomedir sssd adcli
krb5-workstation
Note
For help with determining the Amazon Linux version you are using, see Identifying
Amazon Linux images in the Amazon EC2 User Guide for Linux Instances.
5. Join the instance to the directory with the following command.
sudo realm join -U [email protected] example.com --verbose
Joining a Linux instance Version 1.0 240

AWS Directory Service Administration Guide
An account in the example.com domain that has domain join privileges. Enter the
password for the account when prompted. For more information about delegating these
privileges, see Delegating directory join privileges for AWS Managed Microsoft AD.
example.com
The fully qualified DNS name of your directory.
...
* Successfully enrolled machine in realm
6. Set the SSH service to allow password authentication.
a.
Open the /etc/ssh/sshd_config file in a text editor.
sudo vi /etc/ssh/sshd_config
b.
Set the PasswordAuthentication setting to yes.
PasswordAuthentication yes
c. Restart the SSH service.
sudo systemctl restart sshd.service
Alternatively:
sudo service sshd restart
7. After the instance has restarted, connect to it with any SSH client and add the AWS
Delegated Administrators group to the sudoers list by performing the following steps:
a.
Open the sudoers file with the following command:
sudo visudo
b.
Add the following to the bottom of the sudoers file and save it.
## Add the "AWS Delegated Administrators" group from the example.com domain.
Joining a Linux instance Version 1.0 241

AWS Directory Service Administration Guide
%AWS\ Delegated\ Administrators@example.com ALL=(ALL:ALL) ALL
(The above example uses "\<space>" to create the Linux space character.)
CentOS
1. Connect to the instance using any SSH client.
2. Configure the Linux instance to use the DNS server IP addresses of the AWS Directory
Service-provided DNS servers. You can do this either by setting it up in the DHCP Options
set attached to the VPC or by setting it manually on the instance. If you want to set it
manually, see How do I assign a static DNS server to a private Amazon EC2 instance in the
AWS Knowledge Center for guidance on setting the persistent DNS server for your particular
Linux distribution and version.
3. Make sure your CentOS 7 instance is up to date.
sudo yum -y update
4. Install the required CentOS 7 packages on your Linux instance.
Note
Some of these packages may already be installed.
As you install the packages, you might be presented with several pop-up
configuration screens. You can generally leave the fields in these screens blank.
sudo yum -y install sssd realmd krb5-workstation samba-common-tools
5. Join the instance to the directory with the following command.
sudo realm join -U [email protected] example.com --verbose
Joining a Linux instance Version 1.0 242
AWS Directory Service Administration Guide
An account in the example.com domain that has domain join privileges. Enter the
password for the account when prompted. For more information about delegating these
privileges, see Delegating directory join privileges for AWS Managed Microsoft AD.
example.com
The fully qualified DNS name of your directory.
...
* Successfully enrolled machine in realm
6. Set the SSH service to allow password authentication.
a.
Open the /etc/ssh/sshd_config file in a text editor.
sudo vi /etc/ssh/sshd_config
b.
Set the PasswordAuthentication setting to yes.
PasswordAuthentication yes
c. Restart the SSH service.
sudo systemctl restart sshd.service
Alternatively:
sudo service sshd restart
7. After the instance has restarted, connect to it with any SSH client and add the AWS
Delegated Administrators group to the sudoers list by performing the following steps:
a.
Open the sudoers file with the following command:
sudo visudo
b.
Add the following to the bottom of the sudoers file and save it.
## Add the "AWS Delegated Administrators" group from the example.com domain.
Joining a Linux instance Version 1.0 243

AWS Directory Service Administration Guide
%AWS\ Delegated\ Administrators@example.com ALL=(ALL:ALL) ALL
(The above example uses "\<space>" to create the Linux space character.)
Red Hat
1. Connect to the instance using any SSH client.
2. Configure the Linux instance to use the DNS server IP addresses of the AWS Directory
Service-provided DNS servers. You can do this either by setting it up in the DHCP Options
set attached to the VPC or by setting it manually on the instance. If you want to set it
manually, see How do I assign a static DNS server to a private Amazon EC2 instance in the
AWS Knowledge Center for guidance on setting the persistent DNS server for your particular
Linux distribution and version.
3. Make sure the Red Hat - 64bit instance is up to date.
sudo yum -y update
4. Install the required Red Hat packages on your Linux instance.
Note
Some of these packages may already be installed.
As you install the packages, you might be presented with several pop-up
configuration screens. You can generally leave the fields in these screens blank.
sudo yum -y install sssd realmd krb5-workstation samba-common-tools
5. Join the instance to the directory with the following command.
sudo realm join -v -U join_account example.com --install=/
Joining a Linux instance Version 1.0 244

AWS Directory Service Administration Guide
join_account
The sAMAccountName for an account in the example.com domain that has domain join
privileges. Enter the password for the account when prompted. For more information
about delegating these privileges, see Delegating directory join privileges for AWS
Managed Microsoft AD.
example.com
The fully qualified DNS name of your directory.
...
* Successfully enrolled machine in realm
6. Set the SSH service to allow password authentication.
a.
Open the /etc/ssh/sshd_config file in a text editor.
sudo vi /etc/ssh/sshd_config
b.
Set the PasswordAuthentication setting to yes.
PasswordAuthentication yes
c. Restart the SSH service.
sudo systemctl restart sshd.service
Alternatively:
sudo service sshd restart
7. After the instance has restarted, connect to it with any SSH client and add the AWS
Delegated Administrators group to the sudoers list by performing the following steps:
a.
Open the sudoers file with the following command:
sudo visudo
b.
Add the following to the bottom of the sudoers file and save it.
## Add the "AWS Delegated Administrators" group from the example.com domain.
Joining a Linux instance Version 1.0 245

AWS Directory Service Administration Guide
%AWS\ Delegated\ Administrators@example.com ALL=(ALL:ALL) ALL
(The above example uses "\<space>" to create the Linux space character.)
SUSE
1. Connect to the instance using any SSH client.
2. Configure the Linux instance to use the DNS server IP addresses of the AWS Directory
Service-provided DNS servers. You can do this either by setting it up in the DHCP Options
set attached to the VPC or by setting it manually on the instance. If you want to set it
manually, see How do I assign a static DNS server to a private Amazon EC2 instance in the
AWS Knowledge Center for guidance on setting the persistent DNS server for your particular
Linux distribution and version.
3. Make sure your SUSE Linux 15 instance is up to date.
a. Connect the package repository.
sudo SUSEConnect -p PackageHub/15.1/x86_64
b. Update SUSE.
sudo zypper update -y
4. Install the required SUSE Linux 15 packages on your Linux instance.
Note
Some of these packages may already be installed.
As you install the packages, you might be presented with several pop-up
configuration screens. You can generally leave the fields in these screens blank.
sudo zypper -n install realmd adcli sssd sssd-tools sssd-ad samba-client krb5-
client
5. Join the instance to the directory with the following command.
Joining a Linux instance Version 1.0 246

AWS Directory Service Administration Guide
sudo realm join -U join_account example.com --verbose
join_account
The sAMAccountName in the example.com domain that has domain join privileges. Enter
the password for the account when prompted. For more information about delegating
these privileges, see Delegating directory join privileges for AWS Managed Microsoft AD.
example.com
The fully-qualified DNS name of your directory.
…
realm: Couldn't join realm: Enabling SSSD in nsswitch.conf and PAM failed.
Note that both of the following returns are expected.
! Couldn't authenticate with keytab while discovering which salt to use:
! Enabling SSSD in nsswitch.conf and PAM failed.
6. Manually enable SSSD in PAM.
sudo pam-config --add --sss
7. Edit nsswitch.conf to enable SSSD in nsswitch.conf
sudo vi /etc/nsswitch.conf
passwd: compat sss
group: compat sss
shadow: compat sss
8. Add the following line to /etc/pam.d/common-session to auto create a home directory at
initial login
sudo vi /etc/pam.d/common-session
session optional pam_mkhomedir.so skel=/etc/skel umask=077
Joining a Linux instance Version 1.0 247

AWS Directory Service Administration Guide
9. Reboot the instance to complete the domain joined process.
sudo reboot
10.Reconnect to the instance using any SSH client to verify the domain join has completed
successfully and finalize additional steps.
a. To confirm the instance has been enrolled on the domain
sudo realm list
example.com
type: kerberos
realm-name: EXAMPLE.COM
domain-name: example.com
configured: kerberos-member
server-software: active-directory
client-software: sssd
required-package: sssd-tools
required-package: sssd
required-package: adcli
required-package: samba-client
login-formats: %[email protected]
login-policy: allow-realm-logins
b. To verify the status of SSSD daemon
systemctl status sssd
sssd.service - System Security Services Daemon
Loaded: loaded (/usr/lib/systemd/system/sssd.service; enabled; vendor
preset: disabled)
Active: active (running) since Wed 2020-04-15 16:22:32 UTC; 3min 49s ago
Main PID: 479 (sssd)
Tasks: 4
CGroup: /system.slice/sssd.service
##479 /usr/sbin/sssd -i --logger=files
##505 /usr/lib/sssd/sssd_be --domain example.com --uid 0 --gid 0 --
logger=files
##548 /usr/lib/sssd/sssd_nss --uid 0 --gid 0 --logger=files
##549 /usr/lib/sssd/sssd_pam --uid 0 --gid 0 --logger=files
Joining a Linux instance Version 1.0 248

AWS Directory Service Administration Guide
11.To permit a user access via SSH and console
sudo realm permit [email protected]
To permit a domain group access via SSH and console
sudo realm permit -g 'AWS Delegated Administrators'
Or to permit all users access
sudo realm permit --all
12.Set the SSH service to allow password authentication.
a.
Open the /etc/ssh/sshd_config file in a text editor.
sudo vi /etc/ssh/sshd_config
b.
Set the PasswordAuthentication setting to yes.
PasswordAuthentication yes
c. Restart the SSH service.
sudo systemctl restart sshd.service
Alternatively:
sudo service sshd restart
13.13. After the instance has restarted, connect to it with any SSH client and add the AWS
Delegated Administrators group to the sudoers list by performing the following steps:
a. Open the sudoers file with the following command:
sudo visudo
b. Add the following to the bottom of the sudoers file and save it.
## Add the "Domain Admins" group from the awsad.com domain.
Joining a Linux instance Version 1.0 249

AWS Directory Service Administration Guide
%AWS\ Delegated\ [email protected] ALL=(ALL) NOPASSWD: ALL
Ubuntu
1. Connect to the instance using any SSH client.
2. Configure the Linux instance to use the DNS server IP addresses of the AWS Directory
Service-provided DNS servers. You can do this either by setting it up in the DHCP Options
set attached to the VPC or by setting it manually on the instance. If you want to set it
manually, see How do I assign a static DNS server to a private Amazon EC2 instance in the
AWS Knowledge Center for guidance on setting the persistent DNS server for your particular
Linux distribution and version.
3. Make sure your Ubuntu - 64bit instance is up to date.
sudo apt-get update
sudo apt-get -y upgrade
4. Install the required Ubuntu packages on your Linux instance.
Note
Some of these packages may already be installed.
As you install the packages, you might be presented with several pop-up
configuration screens. You can generally leave the fields in these screens blank.
sudo apt-get -y install sssd realmd krb5-user samba-common packagekit adcli
5. Disable Reverse DNS resolution and set the default realm to your domain's FQDN. Ubuntu
Instances must be reverse-resolvable in DNS before the realm will work. Otherwise, you have
to disable reverse DNS in /etc/krb5.conf as follows:
sudo vi /etc/krb5.conf
[libdefaults]
default_realm = EXAMPLE.COM
rdns = false
Joining a Linux instance Version 1.0 250

AWS Directory Service Administration Guide
6. Join the instance to the directory with the following command.
sudo realm join -U join_account example.com --verbose
The sAMAccountName for an account in the example.com domain that has domain join
privileges. Enter the password for the account when prompted. For more information
about delegating these privileges, see Delegating directory join privileges for AWS
Managed Microsoft AD.
example.com
The fully qualified DNS name of your directory.
...
* Successfully enrolled machine in realm
7. Set the SSH service to allow password authentication.
a.
Open the /etc/ssh/sshd_config file in a text editor.
sudo vi /etc/ssh/sshd_config
b.
Set the PasswordAuthentication setting to yes.
PasswordAuthentication yes
c. Restart the SSH service.
sudo systemctl restart sshd.service
Alternatively:
sudo service sshd restart
8. After the instance has restarted, connect to it with any SSH client and add the AWS
Delegated Administrators group to the sudoers list by performing the following steps:
a.
Open the sudoers file with the following command:
Joining a Linux instance Version 1.0 251

AWS Directory Service Administration Guide
sudo visudo
b.
Add the following to the bottom of the sudoers file and save it.
## Add the "AWS Delegated Administrators" group from the example.com domain.
%AWS\ Delegated\ Administrators@example.com ALL=(ALL:ALL) ALL
(The above example uses "\<space>" to create the Linux space character.)
Restricting account login access
Since all accounts are defined in Active Directory, by default, all the users in the directory can log in
to the instance. You can allow only specific users to log in to the instance with ad_access_filter in
sssd.conf. For example:
ad_access_filter = (memberOf=cn=admins,ou=Testou,dc=example,dc=com)
memberOf
Indicates that users should only be allowed access to the instance if they are a member of a
specific group.
cn
The common name of the group that should have access. In this example, the group name is
admins.
ou
This is the organizational unit in which the above group is located. In this example, the OU is
Testou.
dc
This is the domain component of your domain. In this example, example.
dc
This is an additional domain component. In this example, com.
Joining a Linux instance Version 1.0 252

AWS Directory Service Administration Guide
You must manually add ad_access_filter to your /etc/sssd/sssd.conf.
Open the /etc/sssd/sssd.conf file in a text editor.
sudo vi /etc/sssd/sssd.conf
After you do this, your sssd.conf might look like this:
[sssd]
domains = example.com
config_file_version = 2
services = nss, pam
[domain/example.com]
ad_domain = example.com
krb5_realm = EXAMPLE.COM
realmd_tags = manages-system joined-with-samba
cache_credentials = True
id_provider = ad
krb5_store_password_if_offline = True
default_shell = /bin/bash
ldap_id_mapping = True
use_fully_qualified_names = True
fallback_homedir = /home/%u@%d
access_provider = ad
ad_access_filter = (memberOf=cn=admins,ou=Testou,dc=example,dc=com)
In order for the configuration to take effect, you need to restart the sssd service:
sudo systemctl restart sssd.service
Alternatively, you could use:
sudo service sssd restart
Since all accounts are defined in Active Directory, by default, all the users in the directory can log in
to the instance. You can allow only specific users to log in to the instance with ad_access_filter in
sssd.conf.
For example:
Joining a Linux instance Version 1.0 253

AWS Directory Service Administration Guide
ad_access_filter = (memberOf=cn=admins,ou=Testou,dc=example,dc=com)
memberOf
Indicates that users should only be allowed access to the instance if they are a member of a
specific group.
cn
The common name of the group that should have access. In this example, the group name is
admins.
ou
This is the organizational unit in which the above group is located. In this example, the OU is
Testou.
dc
This is the domain component of your domain. In this example, example.
dc
This is an additional domain component. In this example, com.
You must manually add ad_access_filter to your /etc/sssd/sssd.conf.
1. Open the /etc/sssd/sssd.conf file in a text editor.
sudo vi /etc/sssd/sssd.conf
2. After you do this, your sssd.conf might look like this:
[sssd]
domains = example.com
config_file_version = 2
services = nss, pam
[domain/example.com]
ad_domain = example.com
krb5_realm = EXAMPLE.COM
realmd_tags = manages-system joined-with-samba
cache_credentials = True
id_provider = ad
Joining a Linux instance Version 1.0 254

AWS Directory Service Administration Guide
krb5_store_password_if_offline = True
default_shell = /bin/bash
ldap_id_mapping = True
use_fully_qualified_names = True
fallback_homedir = /home/%u@%d
access_provider = ad
ad_access_filter = (memberOf=cn=admins,ou=Testou,dc=example,dc=com)
3. In order for the configuration to take effect, you need to restart the sssd service:
sudo systemctl restart sssd.service
Alternatively, you could use:
sudo service sssd restart
ID Mapping
ID mapping can be performed by two methods to maintain a unified experience between UNIX/
Linux User Identifier (UID) and Group Identifier (GID) and Windows and Active Directory Security
Identifier (SID) identities.
1. Centralized
2. Distributed
Note
Centralized user identity mapping in Active Directory requires Portable Operating System
Interface or POSIX.
Centralized user identity mapping
Active Directory or another Lightweight Directory Access Protocol (LDAP) service provides UID and
GID to the Linux users. In Active Directory, these identifiers are stored in the users' attributes:
• UID - The Linux username (String)
• UID Number - The Linux User ID number (Integer)
Joining a Linux instance Version 1.0 255

AWS Directory Service Administration Guide
• GID Number - The Linux Group ID number (Integer)
To configure a Linux instance to use the UID and GID from Active Directory, set ldap_id_mapping
= False in the sssd.conf file. Before setting this value, verify you have added a UID, UID number
and GID number to the users and groups in Active Directory.
Distributed user identity mapping
If Active Directory doesn't have the POSIX extension or if you choose not to centrally manage
identity mapping, Linux can calculate the UID and GID values. Linux uses the user's unique Security
Identifier (SID) to maintain consistency.
To configure distributed user ID mapping, set ldap_id_mapping = True in the sssd.conf file.
Connect to the Linux instance
When a user connects to the instance using an SSH client, they are prompted for their username.
The user can enter the username in either the [email protected] or EXAMPLE\username
format. The response will appear similar to the following, depending on which Linux distribution
you are using:
Amazon Linux, Red Hat Enterprise Linux, and CentOS Linux
login as: [email protected]
[email protected]'s password:
Last login: Thu Jun 25 16:26:28 2015 from XX.XX.XX.XX
SUSE Linux
SUSE Linux Enterprise Server 15 SP1 x86_64 (64-bit)
As "root" (sudo or sudo -i) use the:
- zypper command for package management
- yast command for configuration management
Management and Config: https://www.suse.com/suse-in-the-cloud-basics
Documentation: https://www.suse.com/documentation/sles-15/
Forum: https://forums.suse.com/forumdisplay.php?93-SUSE-Public-Cloud
Have a lot of fun...
Joining a Linux instance Version 1.0 256

AWS Directory Service Administration Guide
Ubuntu Linux
login as: [email protected]
[email protected]@10.24.34.0's password:
Welcome to Ubuntu 18.04.4 LTS (GNU/Linux 4.15.0-1057-aws x86_64)
* Documentation: https://help.ubuntu.com
* Management: https://landscape.canonical.com
* Support: https://ubuntu.com/advantage
System information as of Sat Apr 18 22:03:35 UTC 2020
System load: 0.01 Processes: 102
Usage of /: 18.6% of 7.69GB Users logged in: 2
Memory usage: 16% IP address for eth0: 10.24.34.1
Swap usage: 0%
Manually joining an Amazon EC2 Linux instance to your AWS Managed Microsoft
AD Active Directory using Winbind
You can use the Winbind service to manually join your Amazon EC2 Linux instances to an AWS
Managed Microsoft AD Active Directory domain. This enables your existing on-premises Active
Directory users to use their Active Directory credentials when accessing the Linux instances joined
to your AWS Managed Microsoft AD Active Directory. The following Linux instance distributions and
versions are supported:
• Amazon Linux AMI 2018.03.0
• Amazon Linux 2 (64-bit x86)
• Amazon Linux 2023 AMI
• Red Hat Enterprise Linux 8 (HVM) (64-bit x86)
• Ubuntu Server 18.04 LTS & Ubuntu Server 16.04 LTS
• CentOS 7 x86-64
• SUSE Linux Enterprise Server 15 SP1
Note
Other Linux distributions and versions may work but have not been tested.
Joining a Linux instance Version 1.0 257

AWS Directory Service Administration Guide
Join a Linux instance to your AWS Managed Microsoft AD Active Directory
Important
Some of the following procedures, if not performed correctly, can render your instance
unreachable or unusable. Therefore, we strongly suggest you make a backup or take a
snapshot of your instance before performing these procedures.
To join a Linux instance to your directory
Follow the steps for your specific Linux instance using one of the following tabs:
Amazon Linux/CENTOS/REDHAT
1. Connect to the instance using any SSH client.
2. Configure the Linux instance to use the DNS server IP addresses of the AWS Directory
Service-provided DNS servers. You can do this either by setting it up in the DHCP Options
set attached to the VPC or by setting it manually on the instance. If you want to set it
manually, see How do I assign a static DNS server to a private Amazon EC2 instance in the
AWS Knowledge Center for guidance on setting the persistent DNS server for your particular
Linux distribution and version.
3. Make sure your Linux instance is up to date.
sudo yum -y update
4. Install the required Samba / Winbind packages on your Linux instance.
sudo yum -y install authconfig samba samba-client samba-winbind samba-winbind-
clients
5.
Make a backup of the main smb.conf file so you can revert back to it in case of any failure:
sudo cp /etc/samba/smb.conf /etc/samba/smb.bk
6.
Open the original configuration file [/etc/samba/smb.conf] in a text editor.
sudo vim /etc/samba/smb.conf
Joining a Linux instance Version 1.0 258

AWS Directory Service Administration Guide
Fill in your Active Directory domain environment information as shown in the below example:
[global]
workgroup = example
security = ads
realm = example.com
idmap config * : rangesize = 1000000
idmap config * : range = 1000000-19999999
idmap config * : backend = autorid
winbind enum users = no
winbind enum groups = no
template homedir = /home/%U@%D
template shell = /bin/bash
winbind use default domain = false
7.
Open the hosts file [/etc/hosts] in a text editor.
sudo vim /etc/hosts
Add your Linux instance private IP address as follows:
10.x.x.x Linux_hostname.example.com Linux_hostname
Note
If you did not specify your IP Address in the /etc/hosts file, you might receive the
following DNS error while joining the instance to the domain.:
No DNS domain configured for linux-instance. Unable to perform
DNS Update. DNS update failed: NT_STATUS_INVALID_PARAMETER
This error means that the join was successful but the [net ads] command was unable
to register the DNS record in DNS.
8. Join the Linux instance to Active Directory using the net utility.
sudo net ads join -U [email protected]
Joining a Linux instance Version 1.0 259
AWS Directory Service Administration Guide
An account in the example.com domain that has domain join privileges. Enter the
password for the account when prompted. For more information about delegating these
privileges, see Delegating directory join privileges for AWS Managed Microsoft AD.
example.com
The fully qualified DNS name of your directory.
Enter join_account@example.com's password:
Using short domain name -- example
Joined 'IP-10-x-x-x' to dns domain 'example.com'
9. Modify PAM Configuration file, Use the command below to add the necessary entries for
winbind authentication:
sudo authconfig --enablewinbind --enablewinbindauth --enablemkhomedir --update
10.
Set the SSH service to allow password authentication by editing the /etc/ssh/
sshd_config file..
a.
Open the /etc/ssh/sshd_config file in a text editor.
sudo vi /etc/ssh/sshd_config
b.
Set the PasswordAuthentication setting to yes.
PasswordAuthentication yes
c. Restart the SSH service.
sudo systemctl restart sshd.service
Alternatively:
sudo service sshd restart
11.After the instance has restarted, connect to it with any SSH client and add the root privileges
for a domain user or group to the sudoers list by performing the following steps:
a.
Open the sudoers file with the following command:
Joining a Linux instance Version 1.0 260

AWS Directory Service Administration Guide
sudo visudo
b. Add the required groups or users from your Trusting or Trusted domain as follows, and
then save it.
## Adding Domain Users/Groups.
%domainname\\AWS\ Delegated\ Administrators ALL=(ALL:ALL) ALL
%domainname\\groupname ALL=(ALL:ALL) ALL
domainname\\username ALL=(ALL:ALL) ALL
%Trusted_DomainName\\groupname ALL=(ALL:ALL) ALL
Trusted_DomainName\\username ALL=(ALL:ALL) ALL
(The above example uses "\<space>" to create the Linux space character.)
SUSE
1. Connect to the instance using any SSH client.
2. Configure the Linux instance to use the DNS server IP addresses of the AWS Directory
Service-provided DNS servers. You can do this either by setting it up in the DHCP Options
set attached to the VPC or by setting it manually on the instance. If you want to set it
manually, see How do I assign a static DNS server to a private Amazon EC2 instance in the
AWS Knowledge Center for guidance on setting the persistent DNS server for your particular
Linux distribution and version.
3. Make sure your SUSE Linux 15 instance is up to date.
a. Connect the package repository.
sudo SUSEConnect -p PackageHub/15.1/x86_64
b. Update SUSE.
sudo zypper update -y
4. Install the required Samba / Winbind packages on your Linux instance.
sudo zypper in -y samba samba-winbind
5.
Make a backup of the main smb.conf file so you can revert back to it in case of any failure:
Joining a Linux instance Version 1.0 261

AWS Directory Service Administration Guide
sudo cp /etc/samba/smb.conf /etc/samba/smb.bk
6.
Open the original configuration file [/etc/samba/smb.conf] in a text editor.
sudo vim /etc/samba/smb.conf
Fill in your Active directory domain environment information as shown in the below example:
[global]
workgroup = example
security = ads
realm = example.com
idmap config * : rangesize = 1000000
idmap config * : range = 1000000-19999999
idmap config * : backend = autorid
winbind enum users = no
winbind enum groups = no
template homedir = /home/%U@%D
template shell = /bin/bash
winbind use default domain = false
7.
Open the hosts file [/etc/hosts] in a text editor.
sudo vim /etc/hosts
Add your Linux instance private IP address as follows:
10.x.x.x Linux_hostname.example.com Linux_hostname
Note
If you did not specify your IP Address in the /etc/hosts file, you might receive the
following DNS error while joining the instance to the domain.:
No DNS domain configured for linux-instance. Unable to perform
DNS Update. DNS update failed: NT_STATUS_INVALID_PARAMETER
This error means that the join was successful but the [net ads] command was unable
to register the DNS record in DNS.
Joining a Linux instance Version 1.0 262

AWS Directory Service Administration Guide
8. Join the Linux instance to the directory with the following command.
sudo net ads join -U [email protected]
join_account
The sAMAccountName in the example.com domain that has domain join privileges. Enter
the password for the account when prompted. For more information about delegating
these privileges, see Delegating directory join privileges for AWS Managed Microsoft AD.
example.com
The fully-qualified DNS name of your directory.
Enter [email protected]'s password:
Using short domain name -- example
Joined 'IP-10-x-x-x' to dns domain 'example.com'
9. Modify PAM Configuration file, Use the command below to add the necessary entries for
Winbind authentication:
sudo pam-config --add --winbind --mkhomedir
10.
Open the Name Service Switch configuration file [/etc/nsswitch.conf] in a text editor.
vim /etc/nsswitch.conf
Add the Winbind directive as shown below.
passwd: files winbind
shadow: files winbind
group: files winbind
11.
Set the SSH service to allow password authentication by editing the /etc/ssh/
sshd_config file..
a.
Open the /etc/ssh/sshd_config file in a text editor.
sudo vim /etc/ssh/sshd_config
b.
Set the PasswordAuthentication setting to yes.
Joining a Linux instance Version 1.0 263

AWS Directory Service Administration Guide
PasswordAuthentication yes
c. Restart the SSH service.
sudo systemctl restart sshd.service
Alternatively:
sudo service sshd restart
12.After the instance has restarted, connect to it with any SSH client and add root privileges for
a domain user or group, to the sudoers list by performing the following steps:
a.
Open the sudoers file with the following command:
sudo visudo
b. Add the required groups or users from your Trusting or Trusted domain as follows, and
then save it.
## Adding Domain Users/Groups.
%domainname\\AWS\ Delegated\ Administrators ALL=(ALL:ALL) ALL
%domainname\\groupname ALL=(ALL:ALL) ALL
domainname\\username ALL=(ALL:ALL) ALL
%Trusted_DomainName\\groupname ALL=(ALL:ALL) ALL
Trusted_DomainName\\username ALL=(ALL:ALL) ALL
(The above example uses "\<space>" to create the Linux space character.)
Ubuntu
1. Connect to the instance using any SSH client.
2. Configure the Linux instance to use the DNS server IP addresses of the AWS Directory
Service-provided DNS servers. You can do this either by setting it up in the DHCP Options
set attached to the VPC or by setting it manually on the instance. If you want to set it
manually, see How do I assign a static DNS server to a private Amazon EC2 instance in the
Joining a Linux instance Version 1.0 264

AWS Directory Service Administration Guide
AWS Knowledge Center for guidance on setting the persistent DNS server for your particular
Linux distribution and version.
3. Make sure your Linux instance is up to date.
sudo yum -y update
sudo apt-get -y upgrade
4. Install the required Samba / Winbind packages on your Linux instance.
sudo apt -y install samba winbind libnss-winbind libpam-winbind
5.
Make a backup of the main smb.conf file so you can revert back to it in case of any failure.
sudo cp /etc/samba/smb.conf /etc/samba/smb.bk
6.
Open the original configuration file [/etc/samba/smb.conf] in a text editor.
sudo vim /etc/samba/smb.conf
Fill in your Active directory domain environment information as shown in the below example:
[global]
workgroup = example
security = ads
realm = example.com
idmap config * : rangesize = 1000000
idmap config * : range = 1000000-19999999
idmap config * : backend = autorid
winbind enum users = no
winbind enum groups = no
template homedir = /home/%U@%D
template shell = /bin/bash
winbind use default domain = false
7.
Open the hosts file [/etc/hosts] in a text editor.
sudo vim /etc/hosts
Add your Linux instance private IP address as follows:
Joining a Linux instance Version 1.0 265

AWS Directory Service Administration Guide
10.x.x.x Linux_hostname.example.com Linux_hostname
Note
If you did not specify your IP Address in the /etc/hosts file, you might receive the
following DNS error while joining the instance to the domain.:
No DNS domain configured for linux-instance. Unable to perform
DNS Update. DNS update failed: NT_STATUS_INVALID_PARAMETER
This error means that the join was successful but the [net ads] command was unable
to register the DNS record in DNS.
8. Join the Linux instance to Active Directory using the net utility.
sudo net ads join -U [email protected]
An account in the example.com domain that has domain join privileges. Enter the
password for the account when prompted. For more information about delegating these
privileges, see Delegating directory join privileges for AWS Managed Microsoft AD.
example.com
The fully qualified DNS name of your directory.
Enter join_account@example.com's password:
Using short domain name -- example
Joined 'IP-10-x-x-x' to dns domain 'example.com'
9. Modify PAM Configuration file, Use the command below to add the necessary entries for
Winbind authentication:
sudo pam-auth-update --add --winbind --enable mkhomedir
10.
Open the Name Service Switch configuration file [/etc/nsswitch.conf] in a text editor.
vim /etc/nsswitch.conf
Joining a Linux instance Version 1.0 266

AWS Directory Service Administration Guide
Add the Winbind directive as shown below.
passwd: compat winbind
group: compat winbind
shadow: compat winbind
11.
Set the SSH service to allow password authentication by editing the /etc/ssh/
sshd_config file..
a.
Open the /etc/ssh/sshd_config file in a text editor.
sudo vim /etc/ssh/sshd_config
b.
Set the PasswordAuthentication setting to yes.
PasswordAuthentication yes
c. Restart the SSH service.
sudo systemctl restart sshd.service
Alternatively:
sudo service sshd restart
12.After the instance has restarted, connect to it with any SSH client and add root privileges for
a domain user or group, to the sudoers list by performing the following steps:
a.
Open the sudoers file with the following command:
sudo visudo
b. Add the required groups or users from your Trusting or Trusted domain as follows, and
then save it.
## Adding Domain Users/Groups.
%domainname\\AWS\ Delegated\ Administrators ALL=(ALL:ALL) ALL
%domainname\\groupname ALL=(ALL:ALL) ALL
domainname\\username ALL=(ALL:ALL) ALL
%Trusted_DomainName\\groupname ALL=(ALL:ALL) ALL
Trusted_DomainName\\username ALL=(ALL:ALL) ALL
Joining a Linux instance Version 1.0 267

AWS Directory Service Administration Guide
(The above example uses "\<space>" to create the Linux space character.)
Connect to the Linux instance
When a user connects to the instance using an SSH client, they are prompted for their username.
The user can enter the username in either the [email protected] or EXAMPLE\username
format. The response will appear similar to the following, depending on which Linux distribution
you are using:
Amazon Linux, Red Hat Enterprise Linux, and CentOS Linux
login as: [email protected]
[email protected]'s password:
Last login: Thu Jun 25 16:26:28 2015 from XX.XX.XX.XX
SUSE Linux
SUSE Linux Enterprise Server 15 SP1 x86_64 (64-bit)
As "root" (sudo or sudo -i) use the:
- zypper command for package management
- yast command for configuration management
Management and Config: https://www.suse.com/suse-in-the-cloud-basics
Documentation: https://www.suse.com/documentation/sles-15/
Forum: https://forums.suse.com/forumdisplay.php?93-SUSE-Public-Cloud
Have a lot of fun...
Ubuntu Linux
login as: [email protected]
[email protected]@10.24.34.0's password:
Welcome to Ubuntu 18.04.4 LTS (GNU/Linux 4.15.0-1057-aws x86_64)
* Documentation: https://help.ubuntu.com
* Management: https://landscape.canonical.com
* Support: https://ubuntu.com/advantage
System information as of Sat Apr 18 22:03:35 UTC 2020
Joining a Linux instance Version 1.0 268

AWS Directory Service Administration Guide
System load: 0.01 Processes: 102
Usage of /: 18.6% of 7.69GB Users logged in: 2
Memory usage: 16% IP address for eth0: 10.24.34.1
Swap usage: 0%
Joining an Amazon EC2 Mac instance to your AWS Managed Microsoft
AD Active Directory
This procedure manually joins an Amazon EC2 Mac instance to your AWS Managed Microsoft AD
Active Directory.
Prerequisites
• Amazon EC2 Mac instances require Amazon EC2 Dedicated Hosts. You must allocate a dedicated
host and launch an instance onto the host. For more information, see Launch a Mac instance in
Amazon EC2 User Guide.
• We recommend creating a DHCP option set for your AWS Managed Microsoft AD Active
Directory. This will allow any instances in your Amazon VPC to point to the specified domain and
DNS servers to resolve their domain names. See Creating or changing a DHCP options set for
AWS Managed Microsoft AD for more information.
Note
Dedicated Host pricing varies by the payment option that you select. For more information,
see Pricing and Billing in Amazon EC2 User Guide.
Manually joining a Mac instance
1. Use the following SSH command to connect to your Mac instance. For more information about
connecting to your Mac instance, see Connect to your Mac instance.
ssh -i /path/key-pair-name.pem ec2-user@my-instance-public-dns-name
2.
After you connect to your Mac instance, create a password for the ec2-user account using the
following command:
sudo passwd ec2-user
Joining a Mac instance Version 1.0 269

AWS Directory Service Administration Guide
3.
When prompted at the command line, provide a password for the ec2-user account. You
can update your operating system and software by following the procedure in Update the
operating system and software in Amazon EC2 User Guide.
4.
Use the following dsconfigad command to join your Mac instance to the AWS Managed
Microsoft AD Active Directory domain. Make sure to replace the domain name, computer
name, and organizational unit with your AWS Managed Microsoft AD Active Directory domain
information. For more information, see Configuring domain access in Directory Utility on Mac
on Apple website.
Warning
The computer name shouldn't contain a hyphen. Hyphens might prevent the bind to
the AWS Managed Microsoft AD Active Directory.
sudo dsconfigad -add domainName -computer computerName -username Username -
ou "Your-AWS-Delegated-Organizational-Unit"
The following example is what the command should look like when joining an administrative
user on a Mac instance named myec2mac01 to the example.com domain:
sudo dsconfigad -add example.com -computer myec2mac01 -username admin -
ou "OU=Computers,OU=Example,DC=Example,DC=com"
5. Use the following command to add the AWS Delegated Administrators to the administrative
user on your Mac instance:
sudo dsconfigad -group "EXAMPLE\aws delegated administrators
6. Use the following command to confirm the AWS Managed Microsoft AD Active Directory
domain join was successful:
dsconfigad -show
You have successfully joined your Mac instance to your AWS Managed Microsoft AD Active
Directory. You can now log in to your Mac instance using your AWS Managed Microsoft AD Active
Directory credentials.
Joining a Mac instance Version 1.0 270

AWS Directory Service Administration Guide
When you first log in to your Mac instance, you should be provided with an option to log in as the
"Other" user. At this point, you can use your Active Directory domain credentials to log in to the
Mac instance. If you're not provided with "Other" on the log in screen after completing these steps,
log in as ec2-user and then log out.
To log in using the graphical user interface with a domain user, follow the steps in Connect to your
instance's graphical user interface (GUI) in Amazon EC2 User Guide.
Delegating directory join privileges for AWS Managed Microsoft AD
To join a computer to your AWS Managed Microsoft AD, you need an account that has privileges to
join computers to the directory.
With AWS Directory Service for Microsoft Active Directory, members of the Admins and AWS
Delegated Server Administrators groups have these privileges.
However, as a best practice, you should use an account that has only the minimum privileges
necessary. The following procedure demonstrates how to create a new group called Joiners and
delegate the privileges to this group that are needed to join computers to the directory.
You must perform this procedure on a computer that is joined to your directory and has the Active
Directory User and Computers MMC snap-in installed. You must also be logged in as a domain
administrator.
To delegate join privileges for AWS Managed Microsoft AD
1. Open Active Directory User and Computers and select the organizational unit (OU) that has
your NetBIOS name in the navigation tree, then select the Users OU.
Important
When you launch a AWS Directory Service for Microsoft Active Directory, AWS creates
an organizational unit (OU) that contains all your directory’s objects. This OU, which
has the NetBIOS name that you typed when you created your directory, is located in
the domain root. The domain root is owned and managed by AWS. You cannot make
changes to the domain root itself, therefore, you must create the Joiners group
within the OU that has your NetBIOS name.
2. Open the context menu (right-click) for Users, choose New, and then choose Group.
Delegating directory join privileges Version 1.0 271

AWS Directory Service Administration Guide
3. In the New Object - Group box, type the following and choose OK.
•
For Group name, type Joiners.
• For Group scope, choose Global.
• For Group type, choose Security.
4. In the navigation tree, select the Computers container under your NetBIOS name. From the
Action menu, choose Delegate Control.
5. On the Delegation of Control Wizard page, choose Next, and then choose Add.
6.
In the Select Users, Computers, or Groups box, type Joiners and choose OK. If more than
one object is found, select the Joiners group created above. Choose Next.
7. On the Tasks to Delegate page, select Create a custom task to delegate, and then choose
Next.
8. Select Only the following objects in the folder, and then select Computer objects.
9. Select Create selected objects in this folder and Delete selected objects in this folder. Then
choose Next.
10. Select Read and Write, and then choose Next.
Delegating directory join privileges Version 1.0 272

AWS Directory Service Administration Guide
11. Verify the information on the Completing the Delegation of Control Wizard page and choose
Finish.
12.
Create a user with a strong password and add that user to the Joiners group. This user must
be in the Users container that is under your NetBIOS name. The user will then have sufficient
privileges to connect instances to the directory.
Creating or changing a DHCP options set for AWS Managed Microsoft
AD
AWS recommends that you create a DHCP options set for your AWS Directory Service directory and
assign the DHCP options set to the VPC that your directory is in. This allows any instances in that
VPC to point to the specified domain and DNS servers to resolve their domain names.
For more information about DHCP options sets, see DHCP options sets in the Amazon VPC User
Guide.
To create a DHCP options set for your directory
1. Open the Amazon VPC console at https://console.aws.amazon.com/vpc/.
Creating or changing a DHCP options set Version 1.0 273

AWS Directory Service Administration Guide
2. In the navigation pane, choose DHCP Options Sets, and then choose Create DHCP options set.
3. On the Create DHCP options set page, enter the following values for your directory:
Name
An optional tag for the options set.
Domain name
The fully qualified name of your directory, such as corp.example.com.
Domain name servers
The IP addresses of your AWS-provided directory's DNS servers.
Note
You can find these addresses by going to the AWS Directory Service console
navigation pane, selecting Directories and then choosing the correct directory ID.
NTP servers
Leave this field blank.
NetBIOS name servers
Leave this field blank.
NetBIOS node type
Leave this field blank.
4. Choose Create DHCP options set. The new set of DHCP options appears in your list of DHCP
options.
5.
Make a note of the ID of the new set of DHCP options (dopt-xxxxxxxx). You use it to associate
the new options set with your VPC.
To change the DHCP options set associated with a VPC
After you create a set of DHCP options, you can't modify them. If you want your VPC to use a
different set of DHCP options, you must create a new set and associate them with your VPC. You
can also set up your VPC to use no DHCP options at all.
Creating or changing a DHCP options set Version 1.0 274

AWS Directory Service Administration Guide
1. Open the Amazon VPC console at https://console.aws.amazon.com/vpc/.
2. In the navigation pane, choose Your VPCs.
3. Select the VPC, and then choose Actions, Edit VPC settings.
4. For DHCP options set, select an options set or choose No DHCP options set, and then choose
Save.
To change the DHCP options set associated with a VPC using command line see the following:
• AWS CLI: associate-dhcp-options
• AWS Tools for Windows PowerShell: Register-EC2DhcpOption
User and group management in AWS Managed Microsoft AD
You can manage users and groups in AWS Managed Microsoft AD. You create a user to represent
a person or entity that can access your directory. You can also create a group to grant and deny
permissions to more than one user at a time. You can add not only users to a group, but also
groups to a group. When you add a user to a group, the user inherits the roles and permissions
assigned to the group. When you add a group to a group, the groups share a parent-child
relationship, where the child group inherits the roles and permissions assigned to the parent group.
You can also copy a user's group memberships into another user.
You can manage users and groups with the section called “Directory Service Data” using the
following methods:
• AWS Management Console
• AWS CLI
• AWS Directory Service Data API
For a demonstration of the AWS Directory Service Data CLI, see the following YouTube video.
Manage users and groups in AWS Managed Microsoft AD using CRUD APIs
Alternatively, you can use a domain-joined instance.
User and group management Version 1.0 275

AWS Directory Service Administration Guide
Manage users and groups with the AWS Management Console
You can manage users and groups with the AWS Management Console with AWS Directory Service
Data. Directory Service Data is an extension of AWS Directory Service that provides you with the
ability to perform built-in object management tasks. Some of these tasks include creating users
and groups and adding users to groups as well as groups to a group.
For more information, see Manage AWS Managed Microsoft AD users and groups with the AWS
Management Console.
Note
To use this feature, it must be enabled. For more information, see Enable user and group
management.
You can only manage users and groups with the AWS Management Console from the
Primary AWS Region. For more information, see Primary vs additional Regions.
Manage users and groups with the AWS CLI
You can manage users and groups with the AWS CLI through the AWS Directory Service Data API.
Directory Service Data is an extension of AWS Directory Service that provides you with the ability
to perform built-in object management tasks using the ds-data namespace. Some of these tasks
include creating users and groups and adding users to groups as well as groups to a group.
Create a user with AWS Directory Service Data CLI
The following is an example AWS CLI command that uses the ds-data namespace to create a user.
aws ds-data create-user --directory-id d-1234567890 --sam-account-name "jane.doe" --
region your-Primary-Region-name
Note
To use this AWS CLI, it must be enabled. For more information, see Enabling or disabling
user and group management or AWS Directory Service Data.
You can only manage users and groups with the AWS Directory Service Data CLI from the
primary AWS Region. For more information, see Primary vs additional Regions.
AWS Management Console Version 1.0 276

AWS Directory Service Administration Guide
For more information, see Manage AWS Managed Microsoft AD users and groups with the AWS CLI.
Manage users and groups with an on-premise instance or Amazon EC2
instance
If the AWS Directory Service Data doesn't support your use case, we recommend managing users
and groups with an on-premise or EC2 instance.
To create users and groups in an AWS Managed Microsoft AD, you can use any instance (from
either on-premises or EC2) that has been joined to your AWS Managed Microsoft AD. You need to
be logged in as a user that has privileges to create users and groups. You will also need to install
the Active Directory Tools on your instance so you can add your users and groups with the Active
Directory Users and Computers tool.
• You can deploy a pre-configured EC2 instance with preinstalled Active Directory administrative
tools from AWS Directory Service management console. For more information, see Launching a
directory administration instance in your AWS Managed Microsoft AD Active Directory.
• If you need to deploy a self-managed EC2 instance with administrative tools and install the
necessary tools, see Step 3: Deploy an Amazon EC2 instance to manage your AWS Managed
Microsoft AD Active Directory.
Topics
• Manage AWS Managed Microsoft AD users and groups with the AWS Management Console or
AWS CLI
• Manage users and groups with an Amazon EC2 instance
Manage AWS Managed Microsoft AD users and groups with the AWS
Management Console or AWS CLI
You can use the AWS Management Console or AWS CLI to manage your AWS Managed Microsoft
AD users and groups with AWS Directory Service Data. The AWS Directory Service Data CLI uses the
ds-data namespace. For more information on the AWS CLI, see Getting started with AWS CLI.
See the following procedures for more information on creating, viewing, updating, and deleting
AWS Managed Microsoft AD users and groups.
User and group management procedures
On-premises or Amazon EC2 instance Version 1.0 277
AWS Directory Service Administration Guide
• Enabling or disabling user and group management or AWS Directory Service Data
• Creating an AWS Managed Microsoft AD user
• Viewing and updating an AWS Managed Microsoft AD user
• Deleting an AWS Managed Microsoft AD user
• Disabling an AWS Managed Microsoft AD user
• Resetting and enabling an AWS Managed Microsoft AD user's password
• Creating an AWS Managed Microsoft AD group
• Viewing and updating an AWS Managed Microsoft AD group's details
• Deleting an AWS Managed Microsoft AD group
• Adding and removing AWS Managed Microsoft AD members to groups and groups to groups
• Copying an AWS Managed Microsoft AD group memberships in the AWS Management Console
Enabling or disabling user and group management or AWS Directory Service Data
To use user and group management or AWS Directory Service Data, it must be enabled. Once
enabled, you can manage users and groups from the AWS Management Console or AWS CLI.
Important
• You can only enable this feature from the Primary AWS Region. For more information,
see Primary vs additional Regions.
• Access controls for AWS Directory Service Data are different than access controls for AWS
services like Amazon WorkSpaces, Amazon QuickSight, and Amazon WorkMail. For more
information, see AWS application authorization with Directory Service Data.
Enabling AWS Directory Service Data
Use the following procedure to enable user and group management or AWS Directory Service Data
for an existing AWS Managed Microsoft AD with either the AWS Management Console or AWS CLI.
AWS Management Console
You can enable user and group management with the AWS Management Console.
Manage users and group with the console or CLI Version 1.0 278

AWS Directory Service Administration Guide
To enable user and group management
1. Open the AWS Directory Service console at https://console.aws.amazon.com/
directoryservicev2/.
2. On the Directory details page, to enable user and group management, select Enable.
3. In the Enable user and group management dialog box, select Enable.
AWS CLI
The following describes how to format a request that enables the AWS Directory Service Data
CLI. You must include your Directory ID number in your request.
Note
The enable AWS Directory Service Data CLI commands use aws ds.
To enable AWS Directory Service Data CLI
• Open the AWS CLI, and run the following command, replacing the Directory ID with your
AWS Managed Microsoft AD Directory ID:
aws ds enable-directory-data-access --directory-id d-1234567890
Disabling AWS Directory Service Data
Use the following procedure to disable user and group management or AWS Directory Service Data
for an existing AWS Managed Microsoft AD with either the AWS Management Console or AWS CLI.
AWS Management Console
You can disable user and group management with the AWS Management Console.
To disable user and group management
1. Open the AWS Directory Service console at https://console.aws.amazon.com/
directoryservicev2/.
2. On the Directory details page, to disable user and group management, select Disable.
Manage users and group with the console or CLI Version 1.0 279
AWS Directory Service Administration Guide
3. In the Disable user and group management dialog box, select Disable.
AWS CLI
The following describes how to format a request that disables the AWS Directory Service Data
CLI. You must include your Directory ID number in your request.
Note
The disable AWS Directory Service Data CLI commands use aws ds.
To disable AWS Directory Service Data CLI
• Open the AWS CLI, and run the following command, replacing the Directory ID with your
AWS Managed Microsoft AD Directory ID:
aws ds disable-directory-data-access --directory-id d-1234567890
Creating an AWS Managed Microsoft AD user
Use the following procedure to create a new AWS Managed Microsoft AD user with user and group
management or AWS Directory Service Data in either the AWS Management Console or AWS CLI.
Before you begin either procedure, you need to complete the following:
• By default, Kerberos preauthentication is enabled for all new user accounts. This setting
shouldn't be modified. For more information, see Preauthentication on the Microsoft website.
• To use user and group management or AWS Directory Service Data CLI, it must be enabled. For
more information, see Enable user and group management or Directory Service Data.
• You can only enable this feature from the Primary AWS Region. For more information, see
Primary vs additional Regions.
AWS Management Console
You can create a new AWS Managed Microsoft AD user account in the AWS Management
Console. When you create a new user account, you specify the new user's details and determine
Manage users and group with the console or CLI Version 1.0 280

AWS Directory Service Administration Guide
whether to add the new user to a group or copy another user's group memberships into the
new user.
For more information, see AWS Directory Service Data attributes and Group type and group
scope.
To create an AWS Managed Microsoft AD user with the AWS Management Console
1. Open the AWS Directory Service console at https://console.aws.amazon.com/
directoryservicev2/.
2. From the navigation pane, choose Active Directory, and then choose Directories. You're
directed to the Directories screen where you can view a list of directories in your AWS
Region.
3. Choose a directory. You're directed to the Directory details screen.
4. On the Directory details page, under the Users section, choose Create users account.
5. The Specify user details page opens. Under the Required information section, enter a user
logon name and password. User logon names must meet the following conditions:
• Must be a unique logon name
• Can be up to 20 characters long
• Can only contain alphanumeric characters
•
Cannot contain any of the following characters: / [ ] : ; | , + * ? < > @
• The password must adhere to your password policy requirements. Check with your AWS
administrator for more information.
Warning
The user logon name cannot be changed after the user is created.
a. (Optional) Under the Primary information section, you can enter a first and last name
for the user. You can also enter a display name and description for the user.
b. (Optional) Under the Contact methods section, you can enter an email address and
telephone numbers for the user.
c. (Optional) Under the Job-related information section, you can enter a department,
manager, office, and company for the user.
Manage users and group with the console or CLI Version 1.0 281

AWS Directory Service Administration Guide
d. (Optional) Under the Address section, you can enter an address for the user.
e. (Optional) Under the Account settings section, you can enter notes, a preferred
language, and service principal name for the user.
For more information on user attributes, see AWS Directory Service Data attributes and
Microsoft documentation.
6. Choose Next once you've provided the user account details.
7. On the Add users to groups - optional page, you can add the user to a new group or to
an existing group. You can also copy the group membership of an existing user to the new
user. If you don't want to add a user to a group, choose Next. Move to Step 12 to continue
this procedure.
8. (Optional) To create a new group, see Create a AWS Managed Microsoft AD group.
9. (Optional) To add a new user to an existing group:
• Select the group you want to add the new user to in the Groups section. To find
groups, enter the group name in the search box.
10. (Optional) To copy the group membership of an existing user to a new user:
a. Choose the Copy group membership from user tab. To find a user with a group
membership you want to copy, enter the user logon name in the search box under the
Users section.
b. In the Selected groups section, select the groups the new user should become a
member of.
11. Choose Next when you're ready to create the new user account.
12. On the Review and create user page, review all the choices you made. Choose Create user.
13. After the user is configured, you've taken to the new user's details page. A banner appears
stating the user was successfully created.
Important
If you receive an error message telling you that you don't have permission to create a
user, follow the instructions in the error message to request that your administrator
grant you access.
Manage users and group with the console or CLI Version 1.0 282

AWS Directory Service Administration Guide
AWS CLI
The following describes how to format a request that creates a new AWS Managed Microsoft
AD user account with the AWS Directory Service Data CLI. You must include your directory ID
number and a user logon name in your request. You can also include other attributes, such as a
user display name with the DisplayName attribute. For more information, see AWS Directory
Service Data attributes and Group type and group scope.
To create an AWS Managed Microsoft AD user with AWS CLI
• Open the AWS CLI, and run the following command, replacing the Directory ID, username,
and display name with your AWS Managed Microsoft AD Directory ID and desired
credentials:
aws ds-data create-user --directory-id d-1234567890 --sam-account-name "jane.doe" --
other-attributes '{ "DisplayName ": { "S": "jane.doe"} }'
Viewing and updating an AWS Managed Microsoft AD user
Use the following procedure to view or update an AWS Managed Microsoft AD user's details with
user and group management or AWS Directory Service Data in either the AWS Management
Console or AWS CLI.
Viewing an AWS Managed Microsoft AD user's details
You can view a user's details in the AWS Management Console or AWS CLI. The user's details
includes profile and account information and group membership.
Before you begin either procedure, you need to complete the following:
• Creating your AWS Managed Microsoft AD.
• To use user and group management or AWS Directory Service Data CLI, it must be enabled. For
more information, see Enable user and group management or Directory Service Data.
• You can only enable this feature from the Primary AWS Region. For more information, see
Primary vs additional Regions.
• Creating an AWS Managed Microsoft AD user.
Manage users and group with the console or CLI Version 1.0 283

AWS Directory Service Administration Guide
AWS Management Console
You can view an AWS Managed Microsoft AD user's details in the AWS Management Console.
To view an AWS Managed Microsoft AD user's details and account details with the AWS
Management Console
1. Open the AWS Directory Service console at https://console.aws.amazon.com/
directoryservicev2/.
2. From the navigation pane, choose Active Directory, and then choose Directories. You're
directed to the Directories screen where you can view a list of directories in your AWS
Region.
3. Choose a directory. You're directed to the Directory details screen.
4. Choose Users. The tab shows a list of users in your directory.
5. Select a user. You’re directed to the User details screen. The User details screen shows the
following information:
• Groups the user is a member of (group memberships)
• Profile details (such as primary information like user logon name, first name, last name,
etc.)
• Account settings (such as account information like user principal name, service principal
name, distinguished name, etc.)
• Account status
For more information on user attributes, see AWS Directory Service Data attributes and
Microsoft documentation.
AWS CLI
With the AWS CLI, you can view a user's details, which includes profile and account information
and group memberships.
To view an AWS Managed Microsoft AD user's profile and account details with the AWS CLI
The following describes how to view an AWS Managed Microsoft AD user's details with the AWS
Directory Service Data CLI.
Manage users and group with the console or CLI Version 1.0 284

AWS Directory Service Administration Guide
• To view a user's details, open the AWS CLI, and run the following command, replacing
the Directory ID and username with your AWS Managed Microsoft AD Directory ID and
username:
aws ds-data describe-user --directory-id d-1234567890 --sam-account-name "jane.doe"
To view a user's group memberships
The following describes how to view an AWS Managed Microsoft AD user's group membership
with the AWS Directory Service Data CLI.
• To view a user's group memberships, open the AWS CLI, and run the following command,
replacing the Directory ID and username with your AWS Managed Microsoft AD Directory ID
and username:
aws ds-data list-groups-for-member --directory-id d-1234567890 --sam-account-name
"jane.doe"
For more information on user attributes, see AWS Directory Service Data attributes and
Microsoft documentation.
Updating an AWS Managed Microsoft AD user's details
Use the following procedure to update an AWS Managed Microsoft AD user with user and group
management or AWS Directory Service Data in either the AWS Management Console or AWS CLI.
Before you begin either procedure, you need to complete the following:
• Creating your AWS Managed Microsoft AD.
• To use user and group management or AWS Directory Service Data CLI, it must be enabled. For
more information, see Enable user and group management or Directory Service Data.
• You can only enable this feature from the Primary AWS Region. For more information, see
Primary vs additional Regions.
• Creating an AWS Managed Microsoft AD user.
Manage users and group with the console or CLI Version 1.0 285

AWS Directory Service Administration Guide
AWS Management Console
You can update an AWS Managed Microsoft AD user's details in the AWS Management Console.
To update an AWS Managed Microsoft AD user's details with the AWS Management Console
1. Open the AWS Directory Service console at https://console.aws.amazon.com/
directoryservicev2/.
2. From the navigation pane, choose Active Directory, and then choose Directories. You're
directed to the Directories screen where you can view a list of directories in your AWS
Region.
3. Choose a directory. You're directed to the Directory details screen.
4. Choose Users. The tab shows a list of users in your directory.
5. Select a user. To find a user, enter the user logon name in the search box under the Users
section. You’re directed to the User details screen.
6. To edit groups the user is a member of, choose Groups. From this tab, you can add and
remove the user from groups. For more information, see Add an AWS Managed Microsoft
AD member to a group.
7. To edit the user's profile details, choose Profile, and then choose Edit. Or choose Actions,
and then choose Edit user. Make and review your updates, and then choose Save.
Warning
The user logon name cannot be changed after the user is created.
8. To edit the user's account settings, choose User account settings. Or choose Actions, and
then choose Edit user. Make and review your updates, and then choose Save.
For more information on user attributes, see AWS Directory Service Data attributes and
Microsoft documentation.
AWS CLI
The following describes how to format a request that updates an AWS Managed Microsoft AD
user's details with AWS Directory Service Data CLI.
When you update a user's account, you must include your directory ID number and user logon
name. You also must include the update type and attribute you want to update in your request,
Manage users and group with the console or CLI Version 1.0 286

AWS Directory Service Administration Guide
such as a user last name with the Surname parameter. For more information, see AWS Directory
Service Data attributes.
• To update a user's details, open the AWS CLI, and run the following command, replacing
the Directory ID, username, user type, and attribute value with your AWS Managed
Microsoft AD Directory ID, username, and desired user type and attribute value:
aws ds-data update-user --directory-id d-1234567890 --sam-account-name "jane.doe" --
update-type "your-update-type" --surname "your-attribute-value"
For more information on user attributes, see AWS Directory Service Data attributes and
Microsoft documentation.
Deleting an AWS Managed Microsoft AD user
Use the following procedure to delete an AWS Managed Microsoft AD user with user and group
management or AWS Directory Service Data in either the AWS Management Console or AWS CLI.
Important
When you delete a user's account from a directory, all information about the user is
removed, including any permissions the user has to access their account and applications.
Before you begin either procedure, you need to complete the following:
• Creating your AWS Managed Microsoft AD.
• To use user and group management or AWS Directory Service Data CLI, it must be enabled. For
more information, see Enable user and group management or Directory Service Data.
• You can only enable this feature from the Primary AWS Region. For more information, see
Primary vs additional Regions.
• Creating an AWS Managed Microsoft AD user.
AWS Management Console
You can delete an AWS Managed Microsoft AD user account in the AWS Management Console.
Manage users and group with the console or CLI Version 1.0 287

AWS Directory Service Administration Guide
To delete an AWS Managed Microsoft AD user account with the AWS Management Console
1. Open the AWS Directory Service console at https://console.aws.amazon.com/
directoryservicev2/.
2. From the navigation pane, choose Active Directory, and then choose Directories. You're
directed to the Directories screen where you can view a list of directories in your AWS
Region.
3. Choose a directory. You're directed to the Directory details screen.
4. Choose Users. The tab shows a list of users in your directory.
5. Choose the user whose account you want to delete. To find a user, enter the user logon
name in the search box under the Users section. You're directed to the User details screen.
6. Choose Actions. Then choose Delete user account and Delete user account again.
AWS CLI
The following describes how to format a request that deletes an AWS Managed Microsoft AD
user's account with the AWS Directory Service Data CLI.
To delete an AWS Managed Microsoft AD user account with AWS CLI
• Open the AWS CLI, and run the following command, replacing the Directory ID and
username with your AWS Managed Microsoft AD Directory ID and username:
aws ds-data delete-user --directory-id d-1234567890 --sam-account-name "jane.doe"
Disabling an AWS Managed Microsoft AD user
Use the following procedure to disable an AWS Managed Microsoft AD user with user and group
management or AWS Directory Service Data in either the AWS Management Console or AWS CLI.
Important
When you disable a user's account, the user loses any permissions to access their account
and applications.
Manage users and group with the console or CLI Version 1.0 288

AWS Directory Service Administration Guide
Before you begin either procedure, you need to complete the following:
• Creating your AWS Managed Microsoft AD.
• To use user and group management or AWS Directory Service Data CLI, it must be enabled. For
more information, see Enable user and group management or Directory Service Data.
• You can only enable this feature from the Primary AWS Region. For more information, see
Primary vs additional Regions.
• Creating an AWS Managed Microsoft AD user.
AWS Management Console
You can disable an AWS Managed Microsoft AD user account in the AWS Management Console.
To disable an AWS Managed Microsoft AD user account with the AWS Management Console
1. Open the AWS Directory Service console at https://console.aws.amazon.com/
directoryservicev2/.
2. From the navigation pane, choose Active Directory, and then choose Directories. You're
directed to the Directories screen where you can view a list of directories in your AWS
Region.
3. Choose a directory. You're directed to the Directory details screen.
4. Choose Users. The tab shows a list of users in your directory.
5. Choose the user whose account you want to disable. You're directed to the User details
screen.
6. Choose Actions. Then choose Disable user account and Disable user account again.
Note
To re-enable your user's account, you must reset the user's password. For more
information, see Resetting and enabling an AWS Managed Microsoft AD user's
password.
Manage users and group with the console or CLI Version 1.0 289

AWS Directory Service Administration Guide
AWS CLI
The following describes how to format a request that disables an AWS Managed Microsoft AD
user account with the AWS Directory Service Data CLI.
To disable an AWS Managed Microsoft AD user account with the AWS CLI
• Open the AWS CLI, and run the following command, replacing the Directory ID and
username with your AWS Managed Microsoft AD Directory ID and username:
aws ds-data disable-user --directory-id 1234567890 --sam-account-name "jane.doe"
Note
To re-enable your user account, you must reset the user's password. For more
information, see Resetting and enabling an AWS Managed Microsoft AD user's
password.
Resetting and enabling an AWS Managed Microsoft AD user's password
Use the following procedure to reset an AWS Managed Microsoft AD user's password to enable
their account with user and group management or AWS Directory Service Data in either the AWS
Management Console or AWS CLI.
Before you begin either procedure, you need to complete the following:
• Creating your AWS Managed Microsoft AD.
• To use user and group management or AWS Directory Service Data CLI, it must be enabled. For
more information, see Enable user and group management or Directory Service Data.
• You can only enable this feature from the Primary AWS Region. For more information, see
Primary vs additional Regions.
• Creating an AWS Managed Microsoft AD user.
Manage users and group with the console or CLI Version 1.0 290

AWS Directory Service Administration Guide
AWS Management Console
You can reset an AWS Managed Microsoft AD user's password to enable their account in the
AWS Management Console. You can perform this task from either the Directories screen or
Directory details screen.
Directories
1. Open the AWS Directory Service console at https://console.aws.amazon.com/
directoryservicev2/.
2. From the navigation pane, choose Active Directory, and then choose Directories. You're
directed to the Directories screen where you can view a list of directories in your AWS
Region.
3. Choose Actions, and then choose Reset user password and enable account.
a. Under User logon name, enter the user logon name for the user whose password you
want to reset.
b. Under New password, enter the user's new password.
c. Under Confirm password, enter user's new password again.
4. After you confirm the user's new password, choose Reset password and enable account.
Directory details
1. Open the AWS Directory Service console at https://console.aws.amazon.com/
directoryservicev2/.
2. From the navigation pane, choose Active Directory, and then choose Directories. You're
directed to the Directories screen where you can view a list of directories in your AWS
Region.
3. Choose a directory. You're directed to the Directory details screen.
4. Choose Users. The tab shows a list of users in your directory.
5. Select the user whose password you want to reset.
6. Choose Actions, and then choose Reset user password and enable account.
a. Under New password, enter the user's new password.
b. Under Confirm password, enter user's new password again.
7. After you confirm the user's new password, choose Reset password and enable account.
Manage users and group with the console or CLI Version 1.0 291

AWS Directory Service Administration Guide
AWS CLI
You can reset an AWS Managed Microsoft AD use's password to enable their account with the
AWS Directory Service Data CLI.
Note
The reset user's password command uses aws ds.
To reset an AWS Managed Microsoft AD user's password with the AWS CLI
• To reset a user's password, open the AWS CLI, and run the following command, replacing
the Directory ID, username, and password with your AWS Managed Microsoft AD Directory
ID, username, and desired credentials:
aws ds reset-user-password --directory-id d-1234567890 --user-name jane.doe --new-
password your-password
Creating an AWS Managed Microsoft AD group
Use the following procedure to create an AWS Managed Microsoft AD group with user and group
management or AWS Directory Service Data in either the AWS Management Console or AWS CLI.
Before you begin either procedure, you need to complete the following:
• Creating your AWS Managed Microsoft AD.
• To use user and group management or AWS Directory Service Data CLI, it must be enabled. For
more information, see Enable user and group management or Directory Service Data.
• You can only enable this feature from the Primary AWS Region. For more information, see
Primary vs additional Regions.
AWS Management Console
You can create a new AWS Managed Microsoft AD group in the AWS Management Console.
When you create a new group, you specify the group's details and determine the group's type
Manage users and group with the console or CLI Version 1.0 292

AWS Directory Service Administration Guide
and scope. You also have the option to add users and child groups to your new group or add
your new group to a parent group.
To create an AWS Managed Microsoft AD group with the AWS Management Console
1. Open the AWS Directory Service console at https://console.aws.amazon.com/
directoryservicev2/.
2. From the navigation pane, choose Active Directory, and then choose Directories. You're
directed to the Directories screen where you can view a list of directories in your AWS
Region.
3. Choose a directory. You're directed to the Directory details screen.
4. Choose Group. The tab shows a list of groups in your AWS Region.
5. Choose Create group. You're directed to a procedure where you finish creating your new
group.
6. The Specify group details page opens. Enter a Group name. Group names must meet the
following conditions:
• Must be unique group name
• Can be up to 64 characters long
• Can only contain alphanumeric characters
•
Cannot contain any of the following characters: / [ ] : ; | , + * ? < > @
Warning
The group name cannot be changed after the group is created.
7. Choose the Group type from one of the following:
• Security
• Distribution
• To learn more, see the section called “Group type”.
8. Choose the Group scope from one of the following:
• Domain local
• Universal
Manage users and group with the console or CLI Version 1.0 293

AWS Directory Service Administration Guide
• Global
• You can turn on Compare scopes to display a chart of the similarities and differences
between group scopes. To learn more, see the section called “Group scope”.
9. After providing the primary information and contact methods, choose Next.
10. The Add users to group - Optional page opens and you can add users to the new group.
To find a user to add to the group, enter the user logon name in the search box under the
Users section. Select the users you want to add to the group and choose Next.
11. The Add child groups - Optional page opens and you can add existing groups to the new
group. The existing groups becomes child groups of the newly created group. When you
add a child group to your group, your group becomes the parent group, and the child group
inherits all of your group's roles and permissions. To find groups to add, enter the group
name in the search box under the Add child groups section. Select the children groups you
want to add to the new group and choose Next.
12. The Add parent groups - Optional page opens and you can add the new group to existing
groups. The new group becomes the parent group of the existing groups. When you add
your group to a parent group, your group becomes the child group and inherits all of the
parent group's roles and permissions. To find groups to add, enter the group name in the
search box under the Add parent groups section. Select the parent groups you want to add
to the new group and choose Next.
13. On the Review and create group page, review your choices, and then choose Create group.
AWS CLI
The following describes how to format a request that creates an AWS Managed Microsoft AD
group with the AWS Directory Service Data CLI. When you create a new group, you must include
your Directory ID number and a group name. You can also add other attributes, such as a group
display name with the DisplayName attribute. For more information, see AWS Directory
Service Data attributes and Group type and group scope.
To create an AWS Managed Microsoft AD group with the AWS CLI
• Open the AWS CLI, and run the following command, replacing the Directory ID, username
and group display name with your AWS Managed Microsoft AD Directory ID, username, and
desired group display name:
Manage users and group with the console or CLI Version 1.0 294

AWS Directory Service Administration Guide
aws ds-data create-group --directory-id d-1234567890 --sam-account-name "your-group-
name" --other-attributes '{ "DisplayName ": { "S": "myGroupDisplayName"} }'
Viewing and updating an AWS Managed Microsoft AD group's details
Use the following procedure to view or update an AWS Managed Microsoft AD group's details
with user and group management or AWS Directory Service Data in either the AWS Management
Console or AWS CLI.
Viewing an AWS Managed Microsoft AD group's detail
You can view a group's details in the AWS Management Console.
Before you begin either procedure, you need to complete the following:
• Creating your AWS Managed Microsoft AD.
• To use user and group management or AWS Directory Service Data CLI, it must be enabled. For
more information, see Enable user and group management or Directory Service Data.
• You can only enable this feature from the Primary AWS Region. For more information, see
Primary vs additional Regions.
• Creating an AWS Managed Microsoft AD group.
AWS Management Console
You can view an AWS Managed Microsoft AD group's details in the AWS Management Console.
To view AWS Managed Microsoft AD group's details with the AWS Management Console
1. Open the AWS Directory Service console at https://console.aws.amazon.com/
directoryservicev2/.
2. From the navigation pane, choose Active Directory, and then choose Directories. You're
directed to the Directories screen where you can view a list of directories in your AWS
Region.
3. Choose a directory. You're directed to the Directory details screen.
4. Choose Group. The tab shows a list of groups in your AWS Region.
Manage users and group with the console or CLI Version 1.0 295

AWS Directory Service Administration Guide
5. Choose a group. To find groups, enter the group name in the search box under the Groups
section. You're directed to the Group details screen. The Group details screen shows the
following information:
• Member tab lists the users and child groups that are members of your group.
• Parent groups tab lists the parent groups that your group is a member of.
• Properties tab lists the group properties (such as primary information like group name,
group display name, etc.).
AWS CLI
You can view and update an AWS Managed Microsoft AD group's details with the AWS Directory
Service Data CLI.
To view an AWS Managed Microsoft AD group's details with the AWS CLI
The following describes how to view an AWS Managed Microsoft AD group's details with the
AWS CLI.
• To view a group's details, open the AWS CLI, and run the following command, replacing the
Directory ID and group name with your AWS Managed Microsoft AD Directory ID and group
name:
aws ds-data describe-group --directory-id d-1234567890 --sam-account-name "your-
group-name"
To view an AWS Managed Microsoft AD group's group members with the AWS Management
Console
The following describes how to view an AWS Managed Microsoft AD group's members with the
AWS CLI.
• To view a group's details, open the AWS CLI, and run the following command, replacing the
Directory ID and group name with your AWS Managed Microsoft AD Directory ID and group
name:
Manage users and group with the console or CLI Version 1.0 296

AWS Directory Service Administration Guide
aws ds-data list-group-members --directory-id d-1234567890 --sam-account-name "your-
group-name"
Updating an AWS Managed Microsoft AD group's details
Use the following procedure to update an AWS Managed Microsoft AD group's details with user
and group management or AWS Directory Service Data in either the AWS Management Console or
AWS CLI.
Before you begin either procedure, you need to complete the following:
• Creating your AWS Managed Microsoft AD.
• To use user and group management or AWS Directory Service Data CLI, it must be enabled. For
more information, see Enable user and group management or Directory Service Data.
• You can only enable this feature from the Primary AWS Region. For more information, see
Primary vs additional Regions.
• Creating an AWS Managed Microsoft AD group.
AWS Management Console
You can update a group's details with the AWS Management Console. For more information, see
AWS Directory Service Data attributes and Group type and group scope
To update an AWS Managed Microsoft AD group's details with the AWS Management
Console
1. Open the AWS Directory Service console at https://console.aws.amazon.com/
directoryservicev2/.
2. From the navigation pane, choose Active Directory, and then choose Directories. You're
directed to the Directories screen where you can view a list of directories in your AWS
Region.
3. Choose a directory. You're directed to the Directory details screen.
4. Choose Group. The tab shows a list of groups in your AWS Region.
5. Choose a group. To find groups, enter the group name in the search box under the Groups
section. You're directed to the Group details screen.
Manage users and group with the console or CLI Version 1.0 297

AWS Directory Service Administration Guide
6. To edit users and child groups that are members of your group, choose Members. From
this tab, you can add and remove users and child groups from your group. For more
information, see Adding and removing members to groups and groups to groups.
7. To edit parent groups that your group is a member of, choose Parent groups. From this tab,
you can add and remove your group from parent groups. For more information, see Adding
and removing members to groups and groups to groups.
8. To edit your group properties, choose Properties, and then choose Edit. Or choose Actions,
and then choose Edit group. Make and review your updates, and then choose Save.
AWS CLI
The following describes how to format a request that updates an AWS Managed Microsoft AD
group's details with the AWS Directory Service Data CLI.
When you update a group, you must include your directory ID number and group name. You
also must include the update type and attribute you want to update in your request, such as
a group email address with the EmailAddress parameter. For more information, see AWS
Directory Service Data attributes and Group type and group scope.
• To update an AWS Managed Microsoft AD group's details with the AWS CLI
To update a group's details, open the AWS CLI, and run the following command, replacing
the Directory ID, group name, update type, and attribute with your AWS Managed
Microsoft AD Directory ID, group name, and desired update type and attribute:
aws ds-data update-group --directory-id d-1234567890 --sam-account-name "your-group-
name" --update-type "your-update-type" --email-address "your-attribute-value"
Deleting an AWS Managed Microsoft AD group
Use the following procedure to delete an AWS Managed Microsoft AD group with user and group
management or AWS Directory Service Data in either the AWS Management Console or AWS CLI.
Manage users and group with the console or CLI Version 1.0 298

AWS Directory Service Administration Guide
Important
When you delete a group, all information about the group is removed, including any
permissions that group members inherit.
Before you begin either procedure, you need to complete the following:
• Creating your AWS Managed Microsoft AD.
• To use user and group management or AWS Directory Service Data CLI, it must be enabled. For
more information, see Enable user and group management or Directory Service Data.
• You can only enable this feature from the Primary AWS Region. For more information, see
Primary vs additional Regions.
• Create an AWS Managed Microsoft AD group.
AWS Management Console
You can delete an AWS Managed Microsoft AD group in the AWS Management Console.
To delete an AWS Managed Microsoft AD group with the AWS Management Console
1. Open the AWS Directory Service console at https://console.aws.amazon.com/
directoryservicev2/.
2. From the navigation pane, choose Active Directory, and then choose Directories. You're
directed to the Directories screen where you can view a list of directories in your AWS
Region.
3. Choose a directory. You're directed to the Directory details screen.
4. Choose Group. The tab shows a list of groups in your AWS Region.
5. Choose the group that you want to delete. To find groups, enter the group name in the
search box under the Groups section. You're directed to the Group details screen.
6. Choose Delete group. A dialog box appears where you can choose Confirm to delete the
group.
Manage users and group with the console or CLI Version 1.0 299
AWS Directory Service Administration Guide
AWS CLI
The following describes how to format a request that deletes an AWS Managed Microsoft AD
group with the AWS Directory Service Data CLI.
To delete an AWS Managed Microsoft AD group with the AWS CLI
• Open the AWS CLI, and run the following command, replacing the Directory ID and group
name with your AWS Managed Microsoft AD Directory ID and group name:
aws ds-data delete-group --directory-id d-1234567890 --sam-account-name "your-group-
name"
Adding and removing AWS Managed Microsoft AD members to groups and groups
to groups
With the AWS Directory Service Data API, a member can be a user, group, or computer. A user
represents a person or entity that can access your directory. Groups allow you to grant and deny
permissions to more than one user at a time.
Use the following procedures to add or remove an AWS Managed Microsoft AD user to a group or
group to another group with user and group management or AWS Directory Service Data in either
the AWS Management Console or AWS CLI.
Adding a user to a group
Use the following procedure to add an AWS Managed Microsoft AD user to a group with user and
group management or AWS Directory Service Data in either the AWS Management Console or AWS
CLI.
Important
When you add an AWS Managed Microsoft AD user to a group, the user inherits the roles
and permissions assigned to the group. These roles and permissions are part of the user's
group memberships.
Manage users and group with the console or CLI Version 1.0 300

AWS Directory Service Administration Guide
Before you begin either procedure, you need to complete the following:
• Creating your AWS Managed Microsoft AD.
• To use user and group management or AWS Directory Service Data CLI, it must be enabled. For
more information, see Enable user and group management or Directory Service Data.
• You can only enable this feature from the Primary AWS Region. For more information, see
Primary vs additional Regions.
• Create an AWS Managed Microsoft AD user.
• Create an AWS Managed Microsoft AD group.
AWS Management Console
You can add an AWS Managed Microsoft AD member to a group with the AWS Management
Console.
To add AWS Managed Microsoft AD user to a group with the AWS Management Console
1. Open the AWS Directory Service console at https://console.aws.amazon.com/
directoryservicev2/.
2. From the navigation pane, choose Active Directory, and then choose Directories. You're
directed to the Directories screen where you can view a list of directories in your AWS
Region.
3. Choose a directory. You're directed to the Directory details screen.
4. Choose Groups. To find groups, enter the group name in the search box under the Groups
section. The tab shows a list of groups in your AWS Region.
5. Choose a group. You're directed to the Group details screen.
6. Choose Members. The tab shows a list of users and child groups by member type in your
group.
7. Under Members tab, Choose Add member.
8. Under Members, select the user you want to add to your group, and then choose Add
member to group. To find members, enter the user logon name for users and group name
for groups in the search box under the Members section.
Manage users and group with the console or CLI Version 1.0 301

AWS Directory Service Administration Guide
AWS CLI
The following describes how to format a request that adds an AWS Managed Microsoft AD
member to a group with the AWS Directory Service Data CLI.
To add an AWS Managed Microsoft AD user to a group with the AWS CLI
• To add a user to a group, open the AWS CLI, and run the following command, replacing the
Directory ID, group and member names with your AWS Managed Microsoft AD Directory ID
and group and member names:
aws ds-data add-group-member --directory-id d-1234567890 --group-name "your-group-
name" --member-name "jane.doe"
Removing a user from a group
With the AWS Directory Service Data API, a member can be a user, group, or computer. A user
represents a person or entity that can access your directory. Groups allow you to grant and deny
permissions to more than one user at a time.
Use the following procedure to remove an AWS Managed Microsoft AD user to a group with user
and group management or AWS Directory Service Data in either the AWS Management Console or
AWS CLI.
Important
When you remove an AWS Managed Microsoft AD user from a group, the user loses access
to the roles and permissions assigned to the group. These roles and permissions are part of
the group's memberships.
Before you begin either procedure, you need to complete the following:
• Creating your AWS Managed Microsoft AD.
• To use user and group management or AWS Directory Service Data CLI, it must be enabled. For
more information, see Enable user and group management or Directory Service Data.
• You can only enable this feature from the Primary AWS Region. For more information, see
Primary vs additional Regions.
Manage users and group with the console or CLI Version 1.0 302

AWS Directory Service Administration Guide
• Create an AWS Managed Microsoft AD user.
• Create an AWS Managed Microsoft AD group.
AWS Management Console
You can remove an AWS Managed Microsoft AD member from a group with the AWS
Management Console.
To remove an AWS Managed Microsoft AD user from a group with the AWS Management
Console
1. Open the AWS Directory Service console at https://console.aws.amazon.com/
directoryservicev2/.
2. From the navigation pane, choose Active Directory, and then choose Directories. You're
directed to the Directories screen where you can view a list of directories in your AWS
Region.
3. Choose a directory. You're directed to the Directory details screen.
4. Choose Groups. The tab shows a list of groups in your AWS Region.
5. Choose a group. To find groups, enter the group name in the search box under the Groups
section. You're directed to the Group details screen.
6. Choose Members. The tab shows a list of users and child groups by member type in your
group.
7. Select the user you want to remove from your group, and then choose Remove. To find
users, enter the user logon name in the search box under the Members section.
8. Confirm that you want to remove the user from your group, and then choose Remove
again.
AWS CLI
The following describes how to format a request that removes an AWS Managed Microsoft AD
member from a group with the AWS Directory Service Data CLI.
Manage users and group with the console or CLI Version 1.0 303

AWS Directory Service Administration Guide
To remove an AWS Managed Microsoft AD user from a group with AWS CLI
• To remove a user to a group, open the AWS CLI, and run the following command, replacing
the Directory ID, group and member names with your AWS Managed Microsoft AD
Directory ID, group and member names:
aws ds-data remove-group-member --directory-id d-1234567890 --group-name "your-
group-name" --member-name "jane.doe"
Adding a group to a group
When you add an AWS Managed Microsoft AD group to another group, the groups share a parent-
child relationship. The child group gains access to the roles and permissions that are assigned to
the parent group. You can add a child group to your group and your group to a parent group.
Before you begin either procedure, you need to complete the following:
• Creating your AWS Managed Microsoft AD.
• To use user and group management or AWS Directory Service Data CLI, it must be enabled. For
more information, see Enable user and group management or Directory Service Data.
• You can only enable this feature from the Primary AWS Region. For more information, see
Primary vs additional Regions.
• Create an AWS Managed Microsoft AD group.
AWS Management Console
You can add an AWS Managed Microsoft AD group to a group with the AWS Management
Console.
To add a child group to your group with the AWS Management Console
1. Open the AWS Directory Service console at https://console.aws.amazon.com/
directoryservicev2/.
2. From the navigation pane, choose Active Directory, and then choose Directories. You're
directed to the Directories screen where you can view a list of directories in your AWS
Region.
3. Choose a directory. You're directed to the Directory details screen.
Manage users and group with the console or CLI Version 1.0 304

AWS Directory Service Administration Guide
4. Choose Groups. The tab shows a list of groups in your AWS Region.
5. Choose a group. To find groups, enter the group name in the search box under the Groups
section. You're directed to the Group details screen.
6. Choose Members. The tab shows a list of users and child groups by member type in your
group.
7. Choose Add member.
8. Under Members, select the child group(s) you want to add to your group, and then choose
Add member to group.
To add a parent group to a group with the AWS Management Console
1. Open the AWS Directory Service console at https://console.aws.amazon.com/
directoryservicev2/.
2. From the navigation pane, choose Active Directory, and then choose Directories. You're
directed to the Directories screen where you can view a list of directories in your AWS
Region.
3. Choose a directory. You're directed to the Directory details screen.
4. Choose Groups. The tab shows a list of groups in your AWS Region.
5. Choose a group. To find groups, enter the group name in the search box under the Groups
section. You're directed to the Group details screen.
6. Choose Parent groups. The tab shows a list of groups that your group is a member of.
7. Choose Add parent groups.
8. Under Groups, select the group(s) you want to add your group to, and then choose Add
parent groups again.
AWS CLI
The following describes how to format a request that adds an AWS Managed Microsoft AD
group to a group with the AWS Directory Service Data CLI.
To add a child group to your group with the AWS CLI
• To add a child group to a parent group, open the AWS CLI, and run the following command,
replacing the Directory ID, group and member names with your AWS Managed Microsoft
AD Directory ID, group and member names:
Manage users and group with the console or CLI Version 1.0 305

AWS Directory Service Administration Guide
aws ds-data add-group-member --directory-id d-1234567890 --group-name "parent-group-
name" --member-name "child-group-name"
Removing a group from a group
When you remove an AWS Managed Microsoft AD group from another group, the groups no longer
share a parent-child relationship. The child group loses access to the roles and permissions that are
assigned to the parent group. You can remove a child group from your group and your group from
a parent group.
Before you begin either procedure, you need to complete the following:
• Creating your AWS Managed Microsoft AD.
• To use user and group management or AWS Directory Service Data CLI, it must be enabled. For
more information, see Enable user and group management or Directory Service Data.
• You can only enable this feature from the Primary AWS Region. For more information, see
Primary vs additional Regions.
• Create an AWS Managed Microsoft AD group.
AWS Management Console
You can remove an AWS Managed Microsoft AD group to a group with the AWS Management
Console.
To remove a child group from your group with the AWS Management Console
1. Open the AWS Directory Service console at https://console.aws.amazon.com/
directoryservicev2/.
2. From the navigation pane, choose Active Directory, and then choose Directories. You're
directed to the Directories screen where you can view a list of directories in your AWS
Region.
3. Choose a directory. You're directed to the Directory details screen.
4. Choose Groups. The tab shows a list of groups in your AWS Region.
5. Choose a group. You're directed to the Group details screen. To find groups, enter the
group name in the search box under the Groups section.
Manage users and group with the console or CLI Version 1.0 306

AWS Directory Service Administration Guide
6. Choose Members. The tab shows a list of users and child groups by member type in your
group.
7. Select the child group(s) you want to remove from your group, and then choose Remove.
8. Confirm the child group(s) you want to remove from your group, and then choose Remove
again.
To remove your group from a parent group with the AWS Management Console
1. Open the AWS Directory Service console at https://console.aws.amazon.com/
directoryservicev2/.
2. From the navigation pane, choose Active Directory, and then choose Directories. You're
directed to the Directories screen where you can view a list of directories in your AWS
Region.
3. Choose a directory. You're directed to the Directory details screen.
4. Choose Groups. The tab shows a list of groups in your AWS Region.
5. Choose a group. You're directed to the Group details screen. To find groups, enter the
group name in the search box under the Groups section.
6. Choose Parent groups. The tab shows a list of groups that your group is a member of.
7. Select the parent group you want to remove your group from, and then choose Remove
parent groups.
8. Confirm the parent group you want to remove your group from, and then choose Remove
parent groups again.
AWS CLI
The following describes how to format a request that removes an AWS Managed Microsoft AD
group to a group with the AWS Directory Service Data CLI.
• To remove a child group from a parent group with the AWS CLI
To add remove a child group from a parent group, open the AWS CLI, and run the following
command, replacing the Directory ID, group and member names with your AWS Managed
Microsoft AD Directory ID, group and member names:
Manage users and group with the console or CLI Version 1.0 307

AWS Directory Service Administration Guide
aws ds-data remove-group-member --directory-id d-1234567890 --group-name "parent-
group-name" --member-name "child-group-name"
Copying an AWS Managed Microsoft AD group memberships in the AWS
Management Console
You can copy group memberships from one AWS Managed Microsoft AD user into another user
in the AWS Management Console. Group memberships are the roles and permissions that a user
inherits when you add them to a group.
Before you begin this procedure, you need to complete the following:
• Creating your AWS Managed Microsoft AD.
• To use user and group management or AWS Directory Service Data CLI, it must be enabled. For
more information, see Enable user and group management or Directory Service Data.
• You can only enable this feature from the Primary AWS Region. For more information, see
Primary vs additional Regions.
• Create an AWS Managed Microsoft AD group.
To copy AWS Managed Microsoft AD group memberships with the AWS Management Console
1. Open the AWS Directory Service console at https://console.aws.amazon.com/
directoryservicev2/.
2. From the navigation pane, choose Active Directory, and then choose Directories. You're
directed to the Directories screen where you can view a list of directories in your AWS Region.
3. Choose a directory. You're directed to the Directory details screen.
4. Choose Groups. The tab shows a list of groups in your AWS Region.
5. Choose the user whose account you want to copy their group membership. To find a user,
enter the user logon name in the search box under the Users section. You're directed to the
User details screen.
6. Choose Copy all group memberships. You're directed to a procedure where you can specify
which groups you want to copy.
a. For Verify groups to copy, under Groups to copy, select the groups with roles and
permissions you want to copy, and then choose Next.
Manage users and group with the console or CLI Version 1.0 308

AWS Directory Service Administration Guide
b. For Select destination account, under Account type, choose Existing user account to
copy group memberships into an existing user account. Alternatively, choose New user
account to create a new user and copy group memberships into the new user account. To
find a group, enter the group's name in the search box under the Selected groups section.
i. (Optional) If you choose Existing user account, select destination accounts where you
want to copy the roles and permissions into, and then choose Next.
ii. (Optional) If you choose New user account, complete the procedure, and then choose
Next. For information about creating a user, see Creating a user.
c. For Review and copy group memberships, review your choices, and then choose Copy
group membership.
Manage users and groups with an Amazon EC2 instance
This section includes procedures for managing users and groups with an Amazon EC2 instance
that's joined to your AWS Managed Microsoft AD.
We recommend managing users and groups with an Amazon EC2 instance if the Directory Service
Data API doesn't support your use case. For more information, see the AWS Directory Service Data
API Reference.
Note
Before you complete any of the procedures in the following topics, you must install the
Active Directory administration tools. For more information, see Install the Active Directory
administration tools.
Topics
• Installing Active Directory Administration Tools for AWS Managed Microsoft AD
• Creating an AWS Managed Microsoft AD user
• Delete a user's account with an Amazon EC2 instance
• Resetting an AWS Managed Microsoft AD user password
• Creating an AWS Managed Microsoft AD group
• Adding an AWS Managed Microsoft AD user to a group
Manage users and groups with an Amazon EC2 instance Version 1.0 309

AWS Directory Service Administration Guide
Installing Active Directory Administration Tools for AWS Managed Microsoft AD
You can manage your AWS Managed Microsoft AD Active Directory using Active Directory Domain
Services and Active Directory Lightweight Directory Services Tools. To use Active Directory Domain
Services and Active Directory Lightweight Directory Services Tools, you'll need to install them.
The following procedures walks you through how you can install these tools on an Amazon EC2
Windows Server instance or with a Windows PowerShell command. Alternatively, you can launch a
directory administration EC2 instance which already has these tools installed.
EC2 Windows Server instance
Before you can begin this procedure, complete the following:
1. Create an AWS Managed Microsoft AD Active Directory. For more information, see Creating
your AWS Managed Microsoft AD.
2. Launch and join an EC2 Windows Server instance to your AWS Managed Microsoft AD
Active Directory. The EC2 instance needs the following policies to create users and groups:
AWSSSMManagedInstanceCore and AmazonSSMDirectoryServiceAccess. For more
information, see Launching a directory administration instance in your AWS Managed
Microsoft AD Active Directory and Joining an Amazon EC2 Windows instance to your AWS
Managed Microsoft AD Active Directory.
3. You will need the credentials for your Active Directory domain Administrator. These
credentials were created when the AWS Managed Microsoft AD was created. If you followed
the procedure in Creating your AWS Managed Microsoft AD, your Administrator username
includes your NetBIOS name, corp\admin.
Installing Active Directory administration tools on a EC2 Windows Server instance
1. Open the Amazon EC2 console at https://console.aws.amazon.com/ec2/.
2. In the Amazon EC2 console, choose Instances, select the Windows Server instance, and
then choose Connect.
3. In the Connect to instance page, choose RDP client.
4. In the RDP client tab, choose Download Remote Desktop File, then choose Get Password
to retrieve your password.
5. In the Get Windows password, choose Upload private key file. Choose the .pem private
key file associated with the Windows Server instance. After uploading the private key file,
select Decrypt password.
Manage users and groups with an Amazon EC2 instance Version 1.0 310

AWS Directory Service Administration Guide
6. In the Windows Security dialog box, copy your local administrator credentials for the
Windows Server computer to sign in. The username can be in the following formats:
NetBIOS-Name\admin or DNS-Name\admin. For example, corp\admin would be the
username if you followed the procedure in Creating your AWS Managed Microsoft AD.
7. Once signed in to the Windows Server instance, open Server Manager from the Start menu
by choosing Server Manager.
8. In the Server Manager Dashboard, choose Add roles and features.
9. In the Add Roles and Features Wizard choose Installation Type, select Role-based or
feature-based installation, and choose Next.
10. Under Server Selection, make sure the local server is selected, and choose Features in the
left navigation pane.
11. In the Features tree, select and open Remote Server Administration Tools, Role
Administration Tools, and AD DS and AD LDS Tools. With AD DS and AD LDS Tools
selected, Active Directory module for Windows PowerShell, AD DS Tools, and AD LDS
Snap-ins and Command-Line Tools are selected. Scroll down and select DNS Server Tools,
and then choose Next.
Manage users and groups with an Amazon EC2 instance Version 1.0 311

AWS Directory Service Administration Guide
12. Review the information and choose Install. When the feature installation is finished, the
Active Directory Domain Services and Active Directory Lightweight Directory Services Tools
are available from the Start menu in the Administrative Tools folder.
Windows PowerShell
You can install the Active Directory Administration Tools using Windows PowerShell. For
example, you can install the Active Directory remote administration tools from a PowerShell
prompt using Install-WindowsFeature RSAT-ADDS. For more information, see Install-
WindowsFeature on the Microsoft website.
Directory administration instance
You can launch a directory administration EC2 instance in the AWS Management Console that
already has the Active Directory Domain Services and Active Directory Lightweight Directory
Services Tools installed by following the procedures in Launching a directory administration
instance in your AWS Managed Microsoft AD Active Directory.
Manage users and groups with an Amazon EC2 instance Version 1.0 312

AWS Directory Service Administration Guide
Creating an AWS Managed Microsoft AD user
You can create AWS Managed Microsoft AD users with the Active Directory Administration Tools
and Windows PowerShell. Before you can create user with the Active Directory Administration
Tools, you'll need to complete the procedure in Installing Active Directory Administration Tools for
AWS Managed Microsoft AD.
Active Directory Administration Tools
Use the following procedure to create an AWS Managed Microsoft AD user with Active Directory
Administration Tools.
1. Connect to the instance where the Active Directory Administration Tools were installed.
2. Open the Active Directory Users and Computers tool from the Windows Start menu. There
is a shortcut to this tool found in the Windows Administrative Tools folder.
Tip
You can run the following from a command prompt on the instance to open the
Active Directory Users and Computers tool box directly.
%SystemRoot%\system32\dsa.msc
3. In the directory tree, select an OU under your directory's NetBIOS name OU where you
want to store your user (for example, corp\Users). For more information about the
OU structure used by directories in AWS, see What gets created with your AWS Managed
Microsoft AD.
Manage users and groups with an Amazon EC2 instance Version 1.0 313

AWS Directory Service Administration Guide
4. On the Action menu, choose New, and then choose User to open the new user wizard.
5. On the first page of the wizard, enter the values for the following fields, and then choose
Next.
• First name
• Last name
• User logon name
6. On the second page of the wizard, enter a temporary password in Password and Confirm
Password. Make sure the User must change password at next logon option is selected.
None of the other options should be selected. Choose Next.
7. On the third page of the wizard, verify that the new user information is correct and choose
Finish. The new user will appear in the Users folder.
Windows PowerShell
Use the following procedure to create an AWS Managed Microsoft AD user with Windows
PowerShell.
1. Connect to the instance joined to your Active Directory domain as the Active Directory
administrator.
2. Open Windows PowerShell.
Manage users and groups with an Amazon EC2 instance Version 1.0 314

AWS Directory Service Administration Guide
3.
Type the following command replacing the username jane.doe with the username of
the user you want to create. You will be prompted by Windows PowerShell to provide a
password for the new user. For more information on Active Directory password complexity
requirements, see Microsoft documentation. For more information on the New-ADUser
command, see Microsoft documentation.
New-ADUser -Name "jane.doe" -Enabled $true -AccountPassword (Read-Host -
AsSecureString 'Password')
Delete a user's account with an Amazon EC2 instance
You can use the following procedure to delete a user with an Amazon EC2 instance that's joined to
your AWS Managed Microsoft AD.
Note
Before you complete this procedure, you must install the Active Directory administration
tools. For more information, see Install the Active Directory administration tools.
To delete a user
1. Open the Active Directory Users and Computers tool. There is a shortcut to this tool in the
Windows Administrative Tools folder.
Tip
You can run the following from a command prompt on the instance to open the Active
Directory Users and Computers tool box directly.
%SystemRoot%\system32\dsa.msc
2. In the directory tree, select the OU containing the user that you want to delete (for example,
Corp\Users).
3. Select the user you wish to delete. On the Action menu, choose Delete.
Manage users and groups with an Amazon EC2 instance Version 1.0 315

AWS Directory Service Administration Guide
4. A dialog box will appear prompting you to confirm you want to delete the user. Choose Yes to
delete the user.
Deleted users are stored temporarily in the AD Recycle Bin. For more information about the
AD Recycle Bin, see The AD Recycle Bin: Understanding, Implementing, Best Practices, and
Troubleshooting in Microsoft's Ask the Directory Services Team blog.
Resetting an AWS Managed Microsoft AD user password
Users must adhere to password policies as defined in the Active Directory. Sometimes this can get
the best of users, including the Active Directory administrator, and they forget their password.
When this happens, you can quickly reset the user's password using AWS Directory Service if the
user resides AWS Managed Microsoft AD.
You must be signed in as a user with the necessary permissions to reset passwords. For more
information about permissions, see Overview of managing access permissions to your AWS
Directory Service resources.
You can reset the password for any user in your Active Directory with the following exceptions:
• You can reset the password for any user within the Organizational Unit (OU) that is based off
of the NetBIOS name you used when you created your Active Directory. For example, if you
followed the procedure in Creating your AWS Managed Microsoft AD your NetBIOS name would
be CORP and the users passwords you could reset would be members of Corp/Users OU.
• You cannot reset the password of any user outside of the OU that is based off the NetBIOS name
you used when you created your Active Directory. For example, you cannot reset the password
for a user in AWS Reserved OU. For more information about the OU structure for AWS Managed
Microsoft AD, see What gets created with your AWS Managed Microsoft AD.
For more information on how the password policies are applied when a password is reset in AWS
Managed Microsoft AD, see How password policies are applied.
You can use any of the following tools to reset an AWS Managed Microsoft AD user password:
• AWS Management Console
• AWS CLI
• Windows PowerShell
Manage users and groups with an Amazon EC2 instance Version 1.0 316

AWS Directory Service Administration Guide
AWS Management Console
Use the following procedure to reset an AWS Managed Microsoft AD user password with the
AWS Management Console.
1. In the AWS Directory Service console navigation pane, under Active Directory, choose
Directories, and then select the Active Directory in the list where you want to reset a user
password.
2. On the Directory details page, choose Actions, and then choose Reset user password.
3. In the Reset user password dialog, in Username type the username of the user whose
password needs to change.
4. Type a password in New password and Confirm password, and then choose Reset
password.
AWS CLI
Use the following procedure to reset an AWS Managed Microsoft AD user password with the
AWS CLI.
1. To install the AWS CLI, see Install or update the latest version of the AWS CLI.
2. Open the AWS CLI.
3.
Type the following command and replace the Directory ID, username jane.doe, and
password P@ssw0rd with your Active Directory Directory ID and desired credentials. See
reset-user-password in the AWS CLI Command Reference for more information.
aws ds reset-user-password --directory-id d-1234567890 --user-name "jane.doe" --new-
password "P@ssw0rd"
Windows PowerShell
Use the following procedure to reset an AWS Managed Microsoft AD user password with the
Windows PowerShell.
1. Connect to the instance joined to your Active Directory domain as the Active Directory
administrator.
2. Open Windows PowerShell.
Manage users and groups with an Amazon EC2 instance Version 1.0 317

AWS Directory Service Administration Guide
3.
Type the following command replacing the username jane.doe, the Directory ID, and
password P@ssw0rd with your Active Directory Directory ID and desired credentials. See
Reset-DSUserPassword Cmdlet for more information.
Reset-DSUserPassword -UserName "jane.doe" -DirectoryId d-1234567890 -NewPassword
"P@ssw0rd"
Creating an AWS Managed Microsoft AD group
You can create groups in your AWS Managed Microsoft AD. Use the following procedure to create
a security group with an Amazon EC2 instance that is joined to your AWS Managed Microsoft AD
directory. Before you can create security groups, you need to complete the procedures in Installing
the Active Directory Administration Tools.
Active Directory Administration Tools
Use the following procedures to create an AWS Managed Microsoft AD group with Active
Directory Administration Tools.
To create a group
1. Connect to the instance where the Active Directory Administration Tools were installed.
2. Open the Active Directory Users and Computers tool. There is a shortcut to this tool in the
Administrative Tools folder.
Tip
You can run the following from a command prompt on the instance to open the
Active Directory Users and Computers tool box directly.
%SystemRoot%\system32\dsa.msc
3. In the directory tree, select an OU under your directory's NetBIOS name OU where you
want to store your group (for example, Corp\Users). For more information about the OU
structure used by directories in AWS, see What gets created with your AWS Managed
Microsoft AD.
Manage users and groups with an Amazon EC2 instance Version 1.0 318

AWS Directory Service Administration Guide
4. On the Action menu, click New, and then click Group to open the new group wizard.
5. Type a name for the group in Group name, select a Group scope that meets your needs,
and select Security for the Group type. For more information on Active Directory group
scope and security groups, see Active Directory security groups in Microsoft Windows
Server documentation.
6. Click OK. The new security group will appear in the Users folder.
Windows PowerShell
You can use Windows PowerShell commands to create groups. For more information, see New-
ADGroup in Windows Server 2022 PowerShell documentation.
Adding an AWS Managed Microsoft AD user to a group
You can add AWS Managed Microsoft AD users to a group. Use the following procedure to add
a user to a security group with an Amazon EC2 instance that is joined to your AWS Managed
Microsoft AD directory.
Manage users and groups with an Amazon EC2 instance Version 1.0 319

AWS Directory Service Administration Guide
Active Directory Administration Tools
To add a user to a group
1. Connect to the instance where the Active Directory Administration Tools were installed.
2. Open the Active Directory Users and Computers tool. There is a shortcut to this tool in the
Administrative Tools folder.
Tip
You can run the following from a command prompt on the instance to open the
Active Directory Users and Computers tool box directly.
%SystemRoot%\system32\dsa.msc
3. In the directory tree, select the OU under your directory's NetBIOS name OU where you
stored your group, and select the group that you want to add a user as a member.
4. On the Action menu, click Properties to open the properties dialog box for the group.
5. Select the Members tab and click Add.
Manage users and groups with an Amazon EC2 instance Version 1.0 320

AWS Directory Service Administration Guide
6. For Enter the object names to select, type the username you want to add and click OK.
The name will be displayed in the Members list. Click OK again to update the group
membership.
7. Verify that the user is now a member of the group by selecting the user in the Users folder
and clicking Properties in the Action menu to open the properties dialog box. Select the
Member Of tab. You should see the name of the group in the list of groups that the user
belongs to.
AWS Directory Service Data
AWS Directory Service Data is an extension of AWS Directory Service. You can create, read, update,
and Active Directory (AD) users, groups, and memberships from an AWS Directory Service for
Microsoft Active Directory without deploying dedicated AD management instances on an Amazon
EC2 instance. You can also perform built-in object management tasks across directories without
any direct network connectivity. This simplifies provisioning and access management to achieve
fully automated deployments. For more information, see the AWS Directory Service Data API
Reference .
Directory Service Data supports user and group write operations, like CreateUser and
CreateGroup, within the AWS Managed Microsoft AD that's in your organizational unit (OU).
Directory Service Data supports read operations, like ListUsers and ListGroups, on all users,
groups, and group memberships within the AWS Managed Microsoft AD and across trusted realms.
Directory Service Data supports adding and removing group members from groups in your OU
and the AWS Delegated Groups OU, so you can delegate permissions by adding users to specific
delegated group objects. For more information, see User and group management in AWS Managed
Microsoft AD.
Note
Directory Service Data is only available in your Primary Region. For more information, see
Primary vs additional Regions.
Topics
• Replication and consistency
• AWS Directory Service Data attributes
Directory Service Data Version 1.0 321

AWS Directory Service Administration Guide
• Group type and group scope
Replication and consistency
The Directory Service Data API connects to your AWS Managed Microsoft AD domain controllers to
perform operations on the underlying directory objects. Active Directory is an eventually consistent
platform, and replication is continuously occurring between AWS Directory Service directory
domain controllers. By default, every AWS Directory Service directory is created with two domain
controllers.
Directory Service Data attempts to maintain a consistent experience by utilizing the same domain
controller across requests. In the event that a domain controller is unavailable, Directory Service
Data switches to an alternative domain controller. During these events, you might notice eventual
consistency across domain controllers while objects are replicated across domain controllers.
Directory limits vary by AWS Managed Microsoft AD edition:
• Standard edition – Supports 8 transactions per second for read operations and 4 TPS for write
operations per directory.
Note
There's a concurrency limit of 10 concurrent requests.
• Enterprise edition – Supports 16 transactions per second for read operations and 8 TPS for write
operations per directory.
Note
There's a concurrency limit of 10 concurrent requests.
• AWS account – Supports a total of 100 transactions per second for Directory Service Data
operations across all directories.
AWS Directory Service Data attributes
This topic describes how to work with attributes in the AWS Directory Service Data API Reference.
Replication and consistency Version 1.0 322

AWS Directory Service Administration Guide
Request Attributes
The following attributes must be defined in the request body parameters. For an example of how
to define these attributes, see CreateGroup in the AWS Directory Service Data API Reference.
Directory
Service
Data
attribute
name
LDAP
display
name
AWS
Managemen
t
Console
PowerShel
l alias
Access
type
Object
type
Attribute
value
Searchabl
e
Distingui
shedName
distingui
shedName
Distingui
shed
name
None ReadOnly User,
Group
String No
EmailAddr
ess
mail Email
address
EmailAddr
ess
Creatable User String Yes
Enabled None Enabled Enabled Mutable User Boolean No
GivenName givenName First
Name
GivenName Creatable User String Yes
GroupScop
e
groupScop
e
Group
scope
None Creatable Group Enum No
GroupType groupType Group
type
None Creatable Group Enum No
SamAccoun
tName
sAMAccoun
tName
User
logon
name
sAMAccoun
tName
Creatable User,
Group
String Yes
SID objectSid User /
Group
security
identifier
(SID)
SID ReadOnly User,
Group
String No
AWS Directory Service Data attributes Version 1.0 323

AWS Directory Service Administration Guide
Directory
Service
Data
attribute
name
LDAP
display
name
AWS
Managemen
t
Console
PowerShel
l alias
Access
type
Object
type
Attribute
value
Searchabl
e
Surname sn Last
name
Surname Creatable User String Yes
UserPrinc
ipalName
userPrinc
ipalName
User
principal
name
UserPrinc
ipalName
ReadOnly User String No
Other Attributes
The following attributes must be defined in OtherAttributes and don't map to any request
body parameters. When you define other attributes in your requests, you must specify the
attribute name, data type, and the value for each attribute. For an example of how to define these
attributes, see CreateUser in the AWS Directory Service Data API Reference.
Note
The names of these attributes are case insensitive when provided as inputs and the
equivalent of the LDAP display name.
Directory
Service
Data
attribute
name
LDAP
display
name
AWS
Managemen
t
Console
PowerShel
l alias
Access
type
Object
type
Attribute
value
Searchabl
e
Assistant assistant Assistant None ReadOnly User String No
Cn cn Common
Name
None ReadOnly User,
Group
String No
AWS Directory Service Data attributes Version 1.0 324

AWS Directory Service Administration Guide
Directory
Service
Data
attribute
name
LDAP
display
name
AWS
Managemen
t
Console
PowerShel
l alias
Access
type
Object
type
Attribute
value
Searchabl
e
Co co Country/
region
Country Mutable User String No
Company company Company Company Creatable User String No
Departmen
t
departmen
t
Departmen
t
Departmen
t
Creatable User String No
Descripti
on
descripti
on
Descripti
on
Descripti
on
Creatable User,
Group
String No
DirectRep
orts
directRep
orts
Direct
reports
None ReadOnly User String
set
No
DisplayNa
me
displayNa
me
Display
name
DisplayNa
me
Creatable User,
Group
String Yes
Facsimile
Telephone
Number
facsimile
Telephone
Number
Fax Fax Creatable User,
Group
String No
HomePhonehomePhone Home
phone
number
HomePhoneCreatable User String No
Info info Notes None Mutable User,
Group
String No
Initials initials Initials Initials ReadOnly User String No
IpPhone ipPhone IP Phone None Mutable User String No
L l City City Creatable User String Yes
AWS Directory Service Data attributes Version 1.0 325

AWS Directory Service Administration Guide
Directory
Service
Data
attribute
name
LDAP
display
name
AWS
Managemen
t
Console
PowerShel
l alias
Access
type
Object
type
Attribute
value
Searchabl
e
Manager manager Manager Manager Mutable User String No
Mail mail Email
address
EmailAddr
ess
Mutable Group String Yes
Mobile mobile Mobile
phone
number
MobilePho
ne
Mutable User String No
ObjectCla
ss
objectCla
ss
User /
Group
None ReadOnly Group String No
ObjectGUI
D
objectGUI
D
Global
unique
identifier
(GUID)
None ReadOnly User,
Group
String No
Pager pager Pager None Mutable User String No
PhysicalD
eliveryOf
ficeName
physicalD
eliveryOf
ficeName
Office None Creatable User String Yes
PostalCod
e
postalCod
e
Zip/
Postal
code
PostalCod
e
Creatable User String No
Preferred
Language
preferred
Language
Preferred
language
None Mutable User String No
ProxyAddr
esses
proxyAddr
esses
Proxy
address
None ReadOnly User,
Group
Multi-
valued
string
Yes
AWS Directory Service Data attributes Version 1.0 326

AWS Directory Service Administration Guide
Directory
Service
Data
attribute
name
LDAP
display
name
AWS
Managemen
t
Console
PowerShel
l alias
Access
type
Object
type
Attribute
value
Searchabl
e
ServicePr
incipalNa
me
servicePr
incipalNa
me
Service
principal
name
ServicePr
incipalNa
me
Mutable User Multi-
valued
string
No
St st State/
Province
State Creatable User String No
StreetAdd
ress
streetAdd
ress
Street
address
StreetAdd
ress
Creatable User String No
Telephone
Number
telephone
Number
Telephone
number
OfficePho
ne
Creatable User String No
Title title Job title Title ReadOnly User String No
WhenChang
ed
whenChang
ed
Last
updated
None ReadOnly User,
Group
String No
WWWHomePa
ge
wWWHomePa
ge
Home
page URL
wWWHomePa
ge
Mutable User,
Group
String No
Group type and group scope
Groups in AWS Managed Microsoft AD have both a group type and a group scope. See the
following sections for more information on each.
Topics
• Group type
• Group scope
Group type and group scope Version 1.0 327

AWS Directory Service Administration Guide
Group type
Group type determines which shared resources within the Active Directory the group members can
access. There are two group types:
• Security - You can assign permissions to these groups so that group members can access shared
Active Directory resources.
• Distribution - You can use this type to create email distribution lists. These group members
cannot access Active Directory shared resources.
There are no limitations when changing between group types.
For more information about group types, see Microsoft documentation.
Group scope
Group scope determines how group members are defined with the domain tree or forest. There are
three group scopes:
• Domain local - to assign permissions to group members located in the same domain.
• Universal - to assign permissions to group members located within any domain.
• Global - to assign permissions to group members located within any domain or forest.
There are limitations when changing a group scope. The following list and diagram outline these
limitations.
• Changing group scope from Domain Local to Universal - Yes
• Unless the domain local group is a parent of another domain local group.
• Changing group scope from Universal to Domain Local - Yes
• Unless the universal group is a child group of another universal group.
• Changing group scope from Universal to Global - Yes
• Unless the universal group is a parent of another universal group.
• Changing group scope from Global to Universal - Yes
• Unless the global group is a child of another global group.
For more information about group scopes, see Microsoft documentation.
Group type and group scope Version 1.0 328

AWS Directory Service Administration Guide
Connecting your AWS Managed Microsoft AD to Microsoft Entra
Connect Sync
This tutorial walks you through the necessary steps to install Microsoft Entra Connect Sync to sync
your Microsoft Entra ID to your AWS Managed Microsoft AD.
In this tutorial, you do the following:
1. Create an AWS Managed Microsoft AD domain user.
2. Download Entra Connect Sync.
3. Use Windows PowerShell to run a script to provision the appropriate permissions for the newly
created user.
4. Install Entra Connect Sync.
Prerequisites
You will need the following to complete this tutorial:
• An AWS Managed Microsoft AD. For more information, see the section called “Creating your AWS
Managed Microsoft AD”.
• An Amazon EC2 Windows Server instance joined to your AWS Managed Microsoft AD. For more
information, see Joining a Windows instance.
Connecting to Microsoft Entra Connect Sync Version 1.0 329

AWS Directory Service Administration Guide
• An EC2 Windows Server with Active Directory Administration Tools installed to manage your
AWS Managed Microsoft AD. For more information, see the section called “Installing AD
Administration Tools”.
Create an Active Directory domain user
This tutorial assumes you already have an AWS Managed Microsoft AD as well as an EC2 Windows
Server instance with Active Directory Administration Tools installed. For more information, see the
section called “Installing AD Administration Tools”.
1. Connect to the instance where the Active Directory Administration Tools were installed.
2. Create an AWS Managed Microsoft AD domain user. This user will become the Active Directory
Directory Service (AD DS) Connector account for Entra Connect Sync. For detailed steps on this
process, see the section called “Creating a user”.
Download Entra Connect Sync
• Download Entra Connect Sync from Microsoft website onto the EC2 instance that is the AWS
Managed Microsoft AD admin.
Warning
Do not open or run Entra Connect Sync at this point. The next steps will provision the
necessary permissions for your domain user created in Step 1.
Run Windows PowerShell Script
• Open PowerShell as an Administrator and run the following script. While the script is running,
you will be asked to enter the sAMAccountName for the newly created domain user from Step
1.
$modulePath = "C:\Program Files\Microsoft Azure Active Directory Connect\AdSyncConfig
\AdSyncConfig.psm1"
try {
Create an Active Directory domain user Version 1.0 330

AWS Directory Service Administration Guide
# Attempt to import the module
Write-Host -ForegroundColor Green "Importing Module for Azure Entra Connect..."
Import-Module $modulePath -ErrorAction Stop
Write-Host -ForegroundColor Green "Success!"
}
catch {
# Display the exception message
Write-Host -ForegroundColor Red "An error occurred: $($_.Exception.Message)"
}
Function Set-EntraConnectSvcPerms {
[CmdletBinding()]
Param (
[String]$ServiceAccountName
)
#Requires -Modules 'ActiveDirectory' -RunAsAdministrator
Try {
$Domain = Get-ADDomain -ErrorAction Stop
} Catch [System.Exception] {
Write-Output "Failed to get AD domain information $_"
}
$BaseDn = $Domain | Select-Object -ExpandProperty 'DistinguishedName'
$Netbios = $Domain | Select-Object -ExpandProperty 'NetBIOSName'
Try {
$OUs = Get-ADOrganizationalUnit -SearchBase "OU=$Netbios,$BaseDn" -
SearchScope 'Onelevel' -Filter * -ErrorAction Stop | Select-Object -ExpandProperty
'DistinguishedName'
} Catch [System.Exception] {
Write-Output "Failed to get OUs under OU=$Netbios,$BaseDn $_"
}
Try {
$ADConnectorAccountDN = Get-ADUser -Identity $ServiceAccountName -ErrorAction
Stop | Select-Object -ExpandProperty 'DistinguishedName'
} Catch [System.Exception] {
Write-Output "Failed to get service account DN $_"
}
Foreach ($OU in $OUs) {
try {
Run Windows PowerShell Script Version 1.0 331

AWS Directory Service Administration Guide
Set-ADSyncMsDsConsistencyGuidPermissions -ADConnectorAccountDN
$ADConnectorAccountDN -ADobjectDN $OU -Confirm:$false -ErrorAction Stop
Write-Host "Permissions set successfully for $ADConnectorAccountDN and $OU"
Set-ADSyncBasicReadPermissions -ADConnectorAccountDN $ADConnectorAccountDN -
ADobjectDN $OU -Confirm:$false -ErrorAction Stop
Write-Host "Basic read permissions set successfully for $ADConnectorAccountDN
on OU $OU"
}
catch {
Write-Host "An error occurred while setting permissions for
$ADConnectorAccountDN on OU $OU : $_"
}
}
}
Install Entra Connect Sync
1. Once the script has completed, you can run the downloaded Microsoft Entra Connect (formerly
known as Azure Active Directory Connect) configuration file.
2. A Microsoft Azure Active Directory Connect window opens after running the configuration file
from the previous step. On the Express Settings window, select Customize.
Install Entra Connect Sync Version 1.0 332

AWS Directory Service Administration Guide
3. On the Install required components window, select the Use an existing service account
checkbox. In SERVICE ACCOUNT NAME and SERVICE ACCOUNT PASSWORD, enter the AD DS
Connector account name and password for the user you created in Step 1. For example, if your
AD DS Connector account name is entra, the account name would be corp\entra. Then
select Install.
Install Entra Connect Sync Version 1.0 333

AWS Directory Service Administration Guide
4. On the User Sign-in window, select one of the following options:
a. Pass-through Authentication - This option allows you to sign in to your Active Directory
with your username and password.
b. Do not configure - This allows you to use federated sign in with Microsoft Entra (formerly
known as Azure Active Directory (Azure AD)) or Office 365.
Then select Next.
5. On the Connect to Azure window, enter your Global Administrator username and password for
Entra ID and select Next.
6. On the Connect your directories window, choose Active Directory for DIRECTORY TYPE.
Choose the forest for your AWS Managed Microsoft AD for FOREST. Then select Add
Directory.
Install Entra Connect Sync Version 1.0 334

AWS Directory Service Administration Guide
7. A pop-up box appears requesting your account options. Select Use existing AD account. Enter
the AD DS Connector account username and password created in Step 1 and then select OK.
Then select Next.
8. On the Azure AD Sign-in window, select Continue without matching all UPN suffixes to
verified domains, only if you do not have a verified vanity domain added to Entra ID. Then
select Next.
9. On Domain/OU filtering window, select the options to suit your needs. For more information,
see Entra Connect Sync: Configure filtering in Microsoft documentation. Then select Next.
10. On the Identifying Users, Filtering and Optional Features window, keep the default values
and select Next.
11. On the Configure window, review the configuration settings and select Configure. The
installation for Entra Connect Sync will finalize and users will begin to synchronize with
Microsoft Entra ID.
AWS Managed Microsoft AD test lab tutorials
This section provides a series of guided tutorials to help you establish a test lab environment in
AWS where you can experiment with AWS Managed Microsoft AD.
Topics
• Tutorial: Setting up your base AWS Managed Microsoft AD test lab in AWS
AWS Managed Microsoft AD test lab tutorials Version 1.0 335

AWS Directory Service Administration Guide
• Tutorial: Creating a trust from AWS Managed Microsoft AD to a self-managed Active Directory
installation on Amazon EC2
Tutorial: Setting up your base AWS Managed Microsoft AD test lab in
AWS
This tutorial teaches you how to set up your AWS environment to prepare for a new AWS Managed
Microsoft AD installation that uses a new Amazon EC2 instance running Windows Server 2019.
It then teaches you to use typical Active Directory administration tools to manage your AWS
Managed Microsoft AD environment from your EC2 Windows instance. By the time you complete
the tutorial, you will have set up the network prerequisites and have configured a new AWS
Managed Microsoft AD forest.
As shown in the following illustration, the lab you create from this tutorial is the foundational
component for hands-on learning about AWS Managed Microsoft AD. You can later add optional
tutorials for more hands-on experience. This tutorial series is ideal for anyone who is new to
AWS Managed Microsoft AD and wants a test lab for evaluation purposes. This tutorial takes
approximately 1 hour to complete.
Tutorial: Set up your base AWS Managed Microsoft AD test lab Version 1.0 336

AWS Directory Service Administration Guide
Step 1: Set up your AWS environment for AWS Managed Microsoft AD Active Directory
After you've completed your prerequisite tasks, you create and configure an Amazon VPC in
your EC2 instance.
Step 2: Create your AWS Managed Microsoft AD Active Directory
In this step, you set up AWS Managed Microsoft AD in AWS for the first time.
Step 3: Deploy an Amazon EC2 instance to manage your AWS Managed Microsoft AD Active
Directory
Here, you walk through the various post-deployment tasks necessary for client computers to
connect to your new domain and set up a new Windows Server system in EC2.
Tutorial: Set up your base AWS Managed Microsoft AD test lab Version 1.0 337

AWS Directory Service Administration Guide
Step 4: Verify that the base test lab is operational
Finally, as an administrator, you verify that you can log in and connect to AWS Managed
Microsoft AD from your Windows Server system in EC2. Once you've successfully tested that the
lab is operational, you can continue to add other test lab guide modules.
Prerequisites
If you plan to use only the UI steps in this tutorial to create your test lab, you can skip this
prerequisites section and move on to Step 1. However, if you plan to use either AWS CLI commands
or AWS Tools for Windows PowerShell modules to create your test lab environment, you must first
configure the following:
• IAM user with the access and secret access key – An IAM user with an access key is required if
you want to use the AWS CLI or AWS Tools for Windows PowerShell modules. If you do not have
an access key, see Creating, modifying, and viewing access keys (AWS Management Console).
• AWS Command Line Interface (optional) – Download and Install the AWS CLI on Windows.
Once installed, open the command prompt or Windows PowerShell window, and then type aws
configure. Note that you need the access key and secret key to complete the setup. See the
first prerequisite for steps on how to do this. You will be prompted for the following:
•
AWS access key ID [None]: AKIAIOSFODNN7EXAMPLE
•
AWS secret access key [None]: wJalrXUtnFEMI/K7MDENG/bPxRfiCYEXAMPLEKEY
•
Default Region name [None]: us-west-2
•
Default output format [None]: json
• AWS Tools for Windows PowerShell (optional) – Download and install the latest version of
the AWS Tools for Windows PowerShell from https://aws.amazon.com/powershell/, and then
run the following command. Note that you need your access key and secret key to complete the
setup. See the first prerequisite for the steps on how to do this.
Set-AWSCredentials -AccessKey {AKIAIOSFODNN7EXAMPLE} -SecretKey
{wJalrXUtnFEMI/K7MDENG/ bPxRfiCYEXAMPLEKEY} -StoreAs {default}
Tutorial: Set up your base AWS Managed Microsoft AD test lab Version 1.0 338

AWS Directory Service Administration Guide
Step 1: Set up your AWS environment for AWS Managed Microsoft AD Active
Directory
Before you can create AWS Managed Microsoft AD in your AWS test lab, you first need to set up
your Amazon EC2 key pair so that all login data is encrypted.
Create a key pair
If you already have a key pair, you can skip this step. For more information about Amazon EC2 key
pairs, see Create key pairs.
To create a key pair
1. Sign in to the AWS Management Console and open the Amazon EC2 console at https://
console.aws.amazon.com/ec2/.
2. In the navigation pane, under Network & Security, choose Key Pairs, and then choose Create
Key Pair.
3.
For Key pair name, type AWS-DS-KP. For Key pair file format, select pem, and then choose
Create.
4. The private key file is automatically downloaded by your browser. The file name is the name
you specified when you created your key pair with an extension of .pem. Save the private key
file in a safe place.
Important
This is the only chance for you to save the private key file. You need to provide the
name of your key pair when you launch an instance and the corresponding private key
each time you decrypt the password for the instance.
Create, configure, and peer two Amazon VPCs
As shown in the following illustration, by the time you finish this multi-step process you will have
created and configured two public VPCs, two public subnets per VPC, one Internet Gateway per
VPC, and one VPC Peering connection between the VPCs. We chose to use public VPCs and subnets
for the purpose of simplicity and cost. For production workloads, we recommend that you use
private VPCs. For more information about improving VPC Security, see Security in Amazon Virtual
Private Cloud.
Tutorial: Set up your base AWS Managed Microsoft AD test lab Version 1.0 339

AWS Directory Service Administration Guide
All of the AWS CLI and PowerShell examples use the VPC information from below and are built
in us-west-2. You may choose any supported Region to build you environment in. For general
information, see What is Amazon VPC?.
Step 1: Create two VPCs
In this step, you need to create two VPCs in the same account using the specified parameters in the
following table. AWS Managed Microsoft AD supports the use of separate accounts with the Share
your AWS Managed Microsoft AD feature. The first VPC will be used for AWS Managed Microsoft
AD. The second VPC will be used for resources that can be used later in Tutorial: Creating a trust
from AWS Managed Microsoft AD to a self-managed Active Directory installation on Amazon EC2.
Tutorial: Set up your base AWS Managed Microsoft AD test lab Version 1.0 340

AWS Directory Service Administration Guide
Managed Active Directory VPC information On-premises VPC information
Name tag: AWS-DS-VPC01
IPv4 CIDR block: 10.0.0.0/16
IPv6 CIDR block: No IPv6 CIDR Block
Tenancy: Default
Name tag: AWS-OnPrem-VPC01
IPv4 CIDR block: 10.100.0.0/16
IPv6 CIDR block: No IPv6 CIDR Block
Tenancy: Default
For detailed instructions, see Creating a VPC.
Step 2: Create two subnets per VPC
After you have created the VPCs you will need to create two subnets per VPC using the specified
parameters in the following table. For this test lab each subnet will be a /24. This will allows up
to 256 addresses to be issued per subnet. Each subnet must be a in a separate AZ. Putting each
subnet in a separate in AZ is one of the Prerequisites for creating a AWS Managed Microsoft AD.
AWS-DS-VPC01 subnet Information: AWS-OnPrem-VPC01 subnet information
Name tag: AWS-DS-VPC01-Subnet01
VPC: vpc-xxxxxxxxxxxxxxxxx AWS-DS-VPC01
Availability Zone: us-west-2a
IPv4 CIDR block: 10.0.0.0/24
Name tag: AWS-OnPrem-VPC01-Subnet01
VPC: vpc-xxxxxxxxxxxxxxxxx AWS-OnPrem-
VPC01
Availability Zone: us-west-2a
IPv4 CIDR block: 10.100.0.0/24
Name tag: AWS-DS-VPC01-Subnet02
VPC: vpc-xxxxxxxxxxxxxxxxx AWS-DS-VPC01
Availability Zone: us-west-2b
IPv4 CIDR block: 10.0.1.0/24
Name tag: AWS-OnPrem-VPC01-Subnet02
VPC: vpc-xxxxxxxxxxxxxxxxx AWS-OnPrem-
VPC01
Availability Zone: us-west-2b
IPv4 CIDR block: 10.100.1.0/24
Tutorial: Set up your base AWS Managed Microsoft AD test lab Version 1.0 341

AWS Directory Service Administration Guide
For detailed instructions, see Creating a subnet in your VPC.
Step 3: Create and attach an Internet Gateway to your VPCs
Since we are using public VPCs you will need to create and attach an Internet gateway to your VPCs
using the specified parameters in the following table. This will allow you to be able to connect to
and manage your EC2 instances.
AWS-DS-VPC01 Internet Gateway informati
on
AWS-OnPrem-VPC01 Internet Gateway
information
Name tag: AWS-DS-VPC01-IGW
VPC: vpc-xxxxxxxxxxxxxxxxx AWS-DS-VPC01
Name tag: AWS-OnPrem-VPC01-IGW
VPC: vpc-xxxxxxxxxxxxxxxxx AWS-OnPrem-
VPC01
For detailed instructions, see Internet gateways.
Step 4: Configure a VPC peering connection between AWS-DS-VPC01 and AWS-OnPrem-VPC01
Since you already created two VPCs earlier, you will need to network them together using VPC
peering using the specified parameters in the following table. While there are many ways to
connect your VPCs, this tutorial will use VPC Peering. AWS Managed Microsoft AD supports many
solutions to connect your VPCs, some of these include VPC peering, Transit Gateway, and VPN.
Peering connection name tag: AWS-DS-VPC01&AWS-OnPrem-VPC01-Peer
VPC (Requester): vpc-xxxxxxxxxxxxxxxxx AWS-DS-VPC01
Account: My Account
Region: This Region
VPC (Accepter): vpc-xxxxxxxxxxxxxxxxx AWS-OnPrem-VPC01
For instructions on how to create a VPC Peering Connection with another VPC from with in your
account, see Creating a VPC peering connection with another VPC in your account.
Step 5: Add two routes to each VPC’s main route table
Tutorial: Set up your base AWS Managed Microsoft AD test lab Version 1.0 342

AWS Directory Service Administration Guide
In order for the Internet Gateways and VPC Peering Connection created in the previous steps
to be functional you will need to update the main route table of both VPCs using the specified
parameters in the following table. You will be adding two routes; 0.0.0.0/0 which will route to all
destinations not explicitly known to the route table and 10.0.0.0/16 or 10.100.0.0/16 which will
route to each VPC over the VPC Peering Connection established above.
You can easily find the correct route table for each VPC by filtering on the VPC name tag (AWS-DS-
VPC01 or AWS-OnPrem-VPC01).
AWS-DS-VPC01
route 1 information
AWS-DS-VPC01
route 2 information
AWS-OnPrem-VPC01
route 1 Information
AWS-OnPrem-VPC01
route 2 Information
Destination: 0.0.0.0/0
Target: igw-xxxxx
xxxxxxxxxxxx AWS-
DS-VPC01-IGW
Destination:
10.100.0.0/16
Target: pcx-xxxxx
xxxxxxxxxxxx AWS-
DS-VPC01&AWS-O
nPrem-VPC01-Peer
Destination: 0.0.0.0/0
Target: igw-xxxxx
xxxxxxxxxxxx AWS-
Onprem-VPC01
Destination: 10.0.0.0/
16
Target: pcx-xxxxx
xxxxxxxxxxxx AWS-
DS-VPC01&AWS-O
nPrem-VPC01-Peer
For instructions on how to add routes to a VPC route table, see Adding and removing routes from a
route table.
Create security groups for Amazon EC2 instances
By default, AWS Managed Microsoft AD creates a security group to manage traffic between its
domain controllers. In this section, you will need to create 2 security groups (one for each VPC)
which will be used to manage traffic within your VPC for your EC2 instances using the specified
parameters in the following tables. You also add a rule that allows RDP (3389) inbound from
anywhere and for all traffic types inbound from the local VPC. For more information, see Amazon
EC2 security groups for Windows instances.
AWS-DS-VPC01 security group information:
Security group name: AWS DS Test Lab Security Group
Description: AWS DS Test Lab Security Group
Tutorial: Set up your base AWS Managed Microsoft AD test lab Version 1.0 343

AWS Directory Service Administration Guide
AWS-DS-VPC01 security group information:
VPC: vpc-xxxxxxxxxxxxxxxxx AWS-DS-VPC01
Security Group Inbound Rules for AWS-DS-VPC01
Type Protocol Port range Source Type of traffic
Custom TCP
Rule
TCP 3389 My IP Remote Desktop
All Traffic All All 10.0.0.0/16 All local VPC
traffic
Security Group Outbound Rules for AWS-DS-VPC01
Type Protocol Port range Destination Type of traffic
All Traffic All All 0.0.0.0/0 All traffic
AWS-OnPrem-VPC01 security group information:
Security group name: AWS OnPrem Test Lab Security Group.
Description: AWS OnPrem Test Lab Security Group.
VPC: vpc-xxxxxxxxxxxxxxxxx AWS-OnPrem-VPC01
Security Group Inbound Rules for AWS-OnPrem-VPC01
Type Protocol Port range Source Type of traffic
Custom TCP
Rule
TCP 3389 My IP Remote Desktop
Tutorial: Set up your base AWS Managed Microsoft AD test lab Version 1.0 344

AWS Directory Service Administration Guide
Type Protocol Port range Source Type of traffic
Custom TCP
Rule
TCP 53 10.0.0.0/16 DNS
Custom TCP
Rule
TCP 88 10.0.0.0/16 Kerberos
Custom TCP
Rule
TCP 389 10.0.0.0/16 LDAP
Custom TCP
Rule
TCP 464 10.0.0.0/16 Kerberos
change / set
password
Custom TCP
Rule
TCP 445 10.0.0.0/16 SMB / CIFS
Custom TCP
Rule
TCP 135 10.0.0.0/16 Replication
Custom TCP
Rule
TCP 636 10.0.0.0/16 LDAP SSL
Custom TCP
Rule
TCP 49152 - 65535 10.0.0.0/16 RPC
Custom TCP
Rule
TCP 3268 - 3269 10.0.0.0/16 LDAP GC & LDAP
GC SSL
Custom UDP
Rule
UDP 53 10.0.0.0/16 DNS
Custom UDP
Rule
UDP 88 10.0.0.0/16 Kerberos
Custom UDP
Rule
UDP 123 10.0.0.0/16 Windows Time
Tutorial: Set up your base AWS Managed Microsoft AD test lab Version 1.0 345

AWS Directory Service Administration Guide
Type Protocol Port range Source Type of traffic
Custom UDP
Rule
UDP 389 10.0.0.0/16 LDAP
Custom UDP
Rule
UDP 464 10.0.0.0/16 Kerberos
change / set
password
All Traffic All All 10.100.0.0/16 All local VPC
traffic
Security Group Outbound Rules for AWS-OnPrem-VPC01
Type Protocol Port range Destination Type of traffic
All Traffic All All 0.0.0.0/0 All traffic
For detailed instructions on how to create and add rules to your security groups, see Working with
security groups.
Step 2: Create your AWS Managed Microsoft AD Active Directory
You can use three different methods to create your directory. You can use the AWS Management
Console procedure (recommended for this tutorial) or you can use either the AWS CLI or AWS Tools
for Windows PowerShell procedures to create your directory.
Method 1: To create your AWS Managed Microsoft AD directory (AWS Management Console)
1. In the AWS Directory Service console navigation pane, choose Directories and then choose Set
up directory.
2. On the Select directory type page, choose AWS Managed Microsoft AD, and then choose
Next.
3. On the Enter directory information page, provide the following information, and then choose
Next.
Tutorial: Set up your base AWS Managed Microsoft AD test lab Version 1.0 346

AWS Directory Service Administration Guide
• For Edition, select either Standard Edition or Enterprise Edition. For more information
about editions, see AWS Directory Service for Microsoft Active Directory.
•
For Directory DNS name, type corp.example.com.
•
For Directory NetBIOS name, type corp.
•
For Directory description, type AWS DS Managed.
• For Admin password, type the password you want to use for this account and type the
password again in Confirm password. This Admin account is automatically created during
the directory creation process. The password cannot include the word admin. The directory
administrator password is case sensitive and must be between 8 and 64 characters in
length, inclusive. It must also contain at least one character from three of the following four
categories:
• Lowercase letters (a-z)
• Uppercase letters (A-Z)
• Numbers (0-9)
• Non-alphanumeric characters (~!@#$%^&*_-+=`|\(){}[]:;"'<>,.?/)
4. On the Choose VPC and subnets page, provide the following information, and then choose
Next.
• For VPC, choose the option that begins with AWS-DS-VPC01 and ends with (10.0.0.0/16).
• For Subnets, choose the 10.0.0.0/24 and 10.0.1.0/24 public subnets.
5. On the Review & create page, review the directory information and make any necessary
changes. When the information is correct, choose Create directory. Creating the directory
takes 20 to 40 minutes. Once created, the Status value changes to Active.
Method 2: To create your AWS Managed Microsoft AD (Windows PowerShell) (Optional)
1. Open Windows PowerShell.
2. Type the following command. Make sure to use the values provided in Step 4 of the preceding
AWS Management Console procedure.
New-DSMicrosoftAD -Name corp.example.com –ShortName corp –Password P@ssw0rd
–Description “AWS DS Managed” - VpcSettings_VpcId vpc-xxxxxxxx -
VpcSettings_SubnetId subnet-xxxxxxxx, subnet-xxxxxxxx
Tutorial: Set up your base AWS Managed Microsoft AD test lab Version 1.0 347

AWS Directory Service Administration Guide
Method 3: To create your AWS Managed Microsoft AD (AWS CLI) (Optional)
1. Open the AWS CLI.
2. Type the following command. Make sure to use the values provided in Step 4 of the preceding
AWS Management Console procedure.
aws ds create-microsoft-ad --name corp.example.com --short-name corp --
password P@ssw0rd --description "AWS DS Managed" --vpc-settings VpcId= vpc-
xxxxxxxx,SubnetIds= subnet-xxxxxxxx, subnet-xxxxxxxx
Step 3: Deploy an Amazon EC2 instance to manage your AWS Managed Microsoft
AD Active Directory
For this lab, we are using Amazon EC2 instances that have public IP addresses to make it easy to
access the management instance from anywhere. In a production setting, you can use instances
that are in a private VPC that are only accessible through a VPN or AWS Direct Connect link. There
is no requirement the instance have a public IP address.
In this section, you walk through the various post-deployment tasks necessary for client computers
to connect to your domain using the Windows Server on your new EC2 instance. You use the
Windows Server in the next step to verify that the lab is operational.
Optional: Create a DHCP options set in AWS-DS-VPC01 for your directory
In this optional procedure, you set up a DHCP option scope so that EC2 instances in your VPC
automatically use your AWS Managed Microsoft AD for DNS resolution. For more information, see
DHCP options sets.
To create a DHCP options set for your directory
1. Open the Amazon VPC console at https://console.aws.amazon.com/vpc/.
2. In the navigation pane, choose DHCP Options Sets, and then choose Create DHCP options set.
3. On the Create DHCP options set page, provide the following values for your directory:
•
For Name, type AWS DS DHCP.
•
For Domain name, type corp.example.com.
• For Domain name servers, type the IP addresses of your AWS provided directory's DNS
servers.
Tutorial: Set up your base AWS Managed Microsoft AD test lab Version 1.0 348

AWS Directory Service Administration Guide
Note
To find these addresses, go to the AWS Directory Service Directories page, and then
choose the applicable directory ID. On the Details page, identify and use the IPs that
are displayed in DNS address.
Alternatively, to find these addresses, go to the AWS Directory Service Directories
page, and choose the applicable directory ID. Then, choose Scale & share. Under
Domain controllers, identify and use the IPs that are displayed in IP address.
• Leave the settings blank for NTP servers, NetBIOS name servers, and NetBIOS node type.
4. Choose Create DHCP options set, and then choose Close. The new set of DHCP options appear
in your list of DHCP options.
5.
Make a note of the ID of the new set of DHCP options (dopt-xxxxxxxx). You use it at the end
of this procedure when you associate the new options set with your VPC.
Note
Seamless domain join works without having to configure a DHCP Options Set.
6. In the navigation pane, choose Your VPCs.
7. In the list of VPCs, select AWS DS VPC, choose Actions, and then choose Edit DHCP options
set.
8. On the Edit DHCP options set page, select the options set that you recorded in Step 5, and
then choose Save.
Create a role to join Windows instances to your AWS Managed Microsoft AD domain
Use this procedure to configure a role that joins an Amazon EC2 Windows instance to a domain. For
more information, see Joining an Amazon EC2 Windows instance to your AWS Managed Microsoft
AD Active Directory.
To configure EC2 to join Windows instances to your domain
1. Open the IAM console at https://console.aws.amazon.com/iam/.
2. In the navigation pane of the IAM console, choose Roles, and then choose Create role.
3. Under Select type of trusted entity, choose AWS service.
Tutorial: Set up your base AWS Managed Microsoft AD test lab Version 1.0 349

AWS Directory Service Administration Guide
4. Immediately under Choose the service that will use this role, choose EC2, and then choose
Next: Permissions.
5. On the Attached permissions policy page, do the following:
• Select the box next to the AmazonSSMManagedInstanceCore managed policy. This policy
provides the minimum permissions necessary to use the Systems Manager service.
• Select the box next to AmazonSSMDirectoryServiceAccess managed policy. The policy
provides the permissions to join instances to an Active Directory managed by AWS Directory
Service.
For information about these managed policies and other policies you can attach to an IAM
instance profile for Systems Manager, see Create an IAM instance profile for Systems Manager
in the AWS Systems Manager User Guide. For information about managed policies, see AWS
Managed policies in the IAM User Guide.
6. Choose Next: Tags.
7. (Optional) Add one or more tag key-value pairs to organize, track, or control access for this
role, and then choose Next: Review.
8. For Role name, enter a name for the role that describes that it is used to join instances to a
domain, such as EC2DomainJoin.
9. (Optional) For Role description, enter a description.
10. Choose Create role. The system returns you to the Roles page.
Create an Amazon EC2 instance and automatically join the directory
In this procedure you set up a Windows Server system in a EC2 instance that can be used later to
administer users, groups, and policies in Active Directory.
To create an EC2 instance and automatically join the directory
1. Open the Amazon EC2 console at https://console.aws.amazon.com/ec2/.
2. Choose Launch Instance.
3. On the Step 1 page, next to Microsoft Windows Server 2019 Base -
ami-xxxxxxxxxxxxxxxxx choose Select.
4. On the Step 2 page, select t3.micro (note, you can choose a larger instance type), and then
choose Next: Configure Instance Details.
Tutorial: Set up your base AWS Managed Microsoft AD test lab Version 1.0 350

AWS Directory Service Administration Guide
5. On the Step 3 page, do the following:
• For Network, choose the VPC that ends with AWS-DS-VPC01 (for example,
vpc-xxxxxxxxxxxxxxxxx | AWS-DS-VPC01).
• For Subnet choose Public subnet 1, which should be preconfigured for your preferred
Availability Zone (for example, subnet-xxxxxxxxxxxxxxxxx | AWS-DS-VPC01-Subnet01 |
us-west-2a).
• For Auto-assign Public IP, choose Enable (if the subnet setting is not set to enable by
default).
•
For Domain join directory, choose corp.example.com (d-xxxxxxxxxx).
• For IAM role choose the name you gave your instance role in Create a role to join Windows
instances to your AWS Managed Microsoft AD domain, such as EC2DomainJoin.
• Leave the rest of the settings at their defaults.
• Choose Next: Add Storage.
6. On the Step 4 page, leave the default settings, and then choose Next: Add Tags.
7.
On the Step 5 page, choose Add Tag. Under Key type corp.example.com-mgmt and then
choose Next: Configure Security Group.
8. On the Step 6 page, choose Select an existing security group, select AWS DS Test Lab
Security Group (which you previously set up in the Base tutorial), and then choose Review and
Launch to review your instance.
9. On the Step 7 page, review the page, and then choose Launch.
10. On the Select an existing key pair or create a new key pair dialog box, do the following:
• Choose Choose an existing key pair.
• Under Select a key pair, choose AWS-DS-KP.
• Select the I acknowledge... check box.
• Choose Launch Instances.
11. Choose View Instances to return to the Amazon EC2 console and view the status of the
deployment.
Tutorial: Set up your base AWS Managed Microsoft AD test lab Version 1.0 351

AWS Directory Service Administration Guide
Install the Active Directory tools on your EC2 instance
You can choose from two methods to install the Active Directory Domain Management Tools on
your EC2 instance. You can use the Server Manager UI (recommended for this tutorial) or Windows
PowerShell.
To install the Active Directory tools on your EC2 instance (Server Manager)
1. In the Amazon EC2 console, choose Instances, select the instance you just created, and then
choose Connect.
2. In the Connect To Your Instance dialog box, choose Get Password to retrieve your password if
you haven’t already, and then choose Download Remote Desktop File.
3. In the Windows Security dialog box, type your local administrator credentials for the Windows
Server computer to log in (for example, administrator).
4. From the Start menu, choose Server Manager.
5. In the Dashboard, choose Add Roles and Features.
6. In the Add Roles and Features Wizard, choose Next.
7. On the Select installation type page, choose Role-based or feature-based installation, and
then choose Next.
8. On the Select destination server page, make sure that the local server is selected, and then
choose Next.
9. On the Select server roles page, choose Next.
10. On the Select features page, do the following:
• Select the Group Policy Management check box.
• Expand Remote Server Administration Tools, and then expand Role Administration Tools.
• Select the AD DS and AD LDS Tools check box.
• Select the DNS Server Tools check box.
• Choose Next.
11. On the Confirm installation selections page, review the information, and then choose Install.
When the feature installation is finished, the following new tools or snap-ins will be available
in the Windows Administrative Tools folder in the Start menu.
• Active Directory Administrative Center
• Active Directory Domains and Trusts
Tutorial: Set up your base AWS Managed Microsoft AD test lab Version 1.0 352

AWS Directory Service Administration Guide
• Active Directory Module for Windows PowerShell
• Active Directory Sites and Services
• Active Directory Users and Computers
• ADSI Edit
• DNS
• Group Policy Management
To install the Active Directory tools on your EC2 instance (Windows PowerShell) (Optional)
1. Start Windows PowerShell.
2. Type the following command.
Install-WindowsFeature -Name GPMC,RSAT-AD-PowerShell,RSAT-AD-AdminCenter,RSAT-ADDS-
Tools,RSAT-DNS-Server
Step 4: Verify that the base test lab is operational
Use the following procedure to verify that the test lab has been set up successfully before
adding on additional test lab guide modules. This procedure verifies that your Windows Server is
configured appropriately, can connect to the corp.example.com domain, and be used to administer
your AWS Managed Microsoft AD forest.
To verify that the test lab is operational
1. Sign out of the EC2 instance where you were logged in as the local administrator.
2. Back in the Amazon EC2 console, choose Instances in the navigation pane. Then select the
instance that you created. Choose Connect.
3. In the Connect To Your Instance dialog box, choose Download Remote Desktop File.
4. In the Windows Security dialog box, type your administrator credentials for the CORP domain
to log in (for example, corp\admin).
5. Once you are logged in, in the Start menu, under Windows Administrative Tools, choose
Active Directory Users and Computers.
6. You should see corp.example.com displayed with all the default OUs and accounts associated
with a new domain. Under Domain Controllers, notice the names of the domain controllers
Tutorial: Set up your base AWS Managed Microsoft AD test lab Version 1.0 353

AWS Directory Service Administration Guide
that were automatically created when you created your AWS Managed Microsoft AD back in
Step 2 of this tutorial.
Congratulations! Your AWS Managed Microsoft AD base test lab environment has now been
configured. You are ready to begin adding the next test lab in the series.
Next tutorial: Tutorial: Creating a trust from AWS Managed Microsoft AD to a self-managed Active
Directory installation on Amazon EC2
Tutorial: Creating a trust from AWS Managed Microsoft AD to a self-
managed Active Directory installation on Amazon EC2
In this tutorial, you learn how to create a trust between the AWS Directory Service for Microsoft
Active Directory forest that you created in the Base tutorial. You also learn to create a new native
Active Directory forest on a Windows Server in Amazon EC2. As shown in the following illustration,
the lab that you create from this tutorial is the second building block necessary when setting up a
complete AWS Managed Microsoft AD test lab. You can use the test lab to test your pure cloud or
hybrid cloud–based AWS solutions.
You should only need to create this tutorial once. After that you can add optional tutorials when
necessary for more experience.
Tutorial: Create a trust from AWS Managed Microsoft AD to a self-managed AD install on EC2 Version 1.0 354

AWS Directory Service Administration Guide
Step 1: Set up your environment for trusts
Before you can establish trusts between a new Active Directory forest and the AWS Managed
Microsoft AD forest that you created in the Base tutorial, you need to prepare your Amazon EC2
environment. To do that, you first create a Windows Server 2019 server, promote that server to
a domain controller, and then configure your VPC accordingly.
Step 2: Create the trusts
In this step, you create a two-way forest trust relationship between your newly created Active
Directory forest hosted in Amazon EC2 and your AWS Managed Microsoft AD forest in AWS.
Step 3: Verify the trust
Finally, as an administrator, you use the AWS Directory Service console to verify that the new
trusts are operational.
Tutorial: Create a trust from AWS Managed Microsoft AD to a self-managed AD install on EC2 Version 1.0 355

AWS Directory Service Administration Guide
Step 1: Set up your environment for trusts
In this section, you set up your Amazon EC2 environment, deploy your new forest, and prepare your
VPC for trusts with AWS.
Create a Windows Server 2019 EC2 instance
Use the following procedure to create a Windows Server 2019 member server in Amazon EC2.
To create a Windows Server 2019 EC2 instance
1. Open the Amazon EC2 console at https://console.aws.amazon.com/ec2/.
2. In the Amazon EC2 console, choose Launch Instance.
3. On the Step 1 page, locate Microsoft Windows Server 2019 Base -
ami-xxxxxxxxxxxxxxxxx in the list. Then choose Select.
Tutorial: Create a trust from AWS Managed Microsoft AD to a self-managed AD install on EC2 Version 1.0 356

AWS Directory Service Administration Guide
4. On the Step 2 page, select t2.large, and then choose Next: Configure Instance Details.
5. On the Step 3 page, do the following:
•
For Network, select vpc-xxxxxxxxxxxxxxxxx AWS-OnPrem-VPC01 (which you previously
set up in the Base tutorial).
•
For Subnet, select subnet-xxxxxxxxxxxxxxxxx | AWS-OnPrem-VPC01-Subnet01 | AWS-
OnPrem-VPC01.
• For Auto-assign Public IP list, choose Enable (if the subnet setting is not set to Enable by
default).
• Leave the rest of the settings at their defaults.
• Choose Next: Add Storage.
6. On the Step 4 page, leave the default settings, and then choose Next: Add Tags.
7.
On the Step 5 page, choose Add Tag. Under Key type example.local-DC01, and then
choose Next: Configure Security Group.
8. On the Step 6 page, choose Select an existing security group, select AWS On-Prem Test Lab
Security Group (which you previously set up in the Base tutorial), and then choose Review and
Launch to review your instance.
9. On the Step 7 page, review the page, and then choose Launch.
10. On the Select an existing key pair or create a new key pair dialog box, do the following:
• Choose Choose an existing key pair.
• Under Select a key pair, choose AWS-DS-KP (which you previously set up in the Base
tutorial).
• Select the I acknowledge... check box.
• Choose Launch Instances.
11. Choose View Instances to return to the Amazon EC2 console and view the status of the
deployment.
Promote your server to a domain controller
Before you can create trusts, you must build and deploy the first domain controller for a new
forest. During this process you configure a new Active Directory forest, install DNS, and set this
server to use the local DNS server for name resolution. You must reboot the server at the end of
this procedure.
Tutorial: Create a trust from AWS Managed Microsoft AD to a self-managed AD install on EC2 Version 1.0 357

AWS Directory Service Administration Guide
Note
If you want to create a domain controller in AWS that replicates with your on-premises
network, you would first manually join the EC2 instance to your on-premises domain. After
that you can promote the server to a domain controller.
To promote your server to a domain controller
1. In the Amazon EC2 console, choose Instances, select the instance you just created, and then
choose Connect.
2. In the Connect To Your Instance dialog box, choose Download Remote Desktop File.
3. In the Windows Security dialog box, type your local administrator credentials for the Windows
Server computer to login (for example, administrator). If you do not yet have the local
administrator password, go back to the Amazon EC2 console, right-click on the instance, and
choose Get Windows Password. Navigate to your AWS DS KP.pem file or your personal .pem
key, and then choose Decrypt Password.
4. From the Start menu, choose Server Manager.
5. In the Dashboard, choose Add Roles and Features.
6. In the Add Roles and Features Wizard, choose Next.
7. On the Select installation type page, choose Role-based or feature-based installation, and
then choose Next.
8. On the Select destination server page, make sure that the local server is selected, and then
choose Next.
9. On the Select server roles page, select Active Directory Domain Services. In the Add Roles
and Features Wizard dialog box, verify that the Include management tools (if applicable)
check box is selected. Choose Add Features, and then choose Next.
10. On the Select features page, choose Next.
11. On the Active Directory Domain Services page, choose Next.
12. On the Confirm installation selections page, choose Install.
13. Once the Active Directory binaries are installed, choose Close.
14. When Server Manager opens, look for a flag at the top next to the word Manage. When this
flag turns yellow, the server is ready to be promoted.
15. Choose the yellow flag, and then choose Promote this server to a domain controller.
Tutorial: Create a trust from AWS Managed Microsoft AD to a self-managed AD install on EC2 Version 1.0 358

AWS Directory Service Administration Guide
16. On the Deployment Configuration page, choose Add a new forest. In Root domain name,
type example.local, and then choose Next.
17. On the Domain Controller Options page, do the following:
• In both Forest functional level and Domain functional level, choose Windows Server 2016.
• Under Specify domain controller capabilities, verify that both DNS server and Global
Catalog (GC) are selected.
• Type and then confirm a Directory Services Restore Mode (DSRM) password. Then choose
Next.
18. On the DNS Options page, ignore the warning about delegation and choose Next.
19. On the Additional options page, make sure that EXAMPLE is listed as the NetBios domain
name.
20. On the Paths page, leave the defaults, and then choose Next.
21. On Review Options page, choose Next. The server now checks to make sure all the
prerequisites for the domain controller are satisfied. You may see some warnings displayed,
but you can safely ignore them.
22. Choose Install. Once the installation is complete, the server reboots and then becomes a
functional domain controller.
Configure your VPC
The following three procedures guide you through the steps to configure your VPC for connectivity
with AWS.
To configure your VPC outbound rules
1. In the AWS Directory Service console, make a note of the AWS Managed Microsoft AD
directory ID for corp.example.com that you previously created in the Base tutorial.
2. Open the Amazon VPC console at https://console.aws.amazon.com/vpc/.
3. In the navigation pane, choose Security Groups.
4. Search for your AWS Managed Microsoft AD directory ID. In the search results, select the item
with the description AWS created security group for d-xxxxxx directory controllers.
Tutorial: Create a trust from AWS Managed Microsoft AD to a self-managed AD install on EC2 Version 1.0 359

AWS Directory Service Administration Guide
Note
This security group was automatically created when you initially created your directory.
5. Choose the Outbound Rules tab under that security group. Choose Edit, choose Add another
rule, and then add the following values:
• For Type, choose All Traffic.
•
For Destination, type 0.0.0.0/0.
• Leave the rest of the settings at their defaults.
• Select Save.
To verify kerberos preauthentication is enabled
1. On the example.local domain controller, open Server Manager.
2. On the Tools menu, choose Active Directory Users and Computers.
3. Navigate to the Users directory, right-click on any user and select Properties, and then choose
the Account tab. In the Account options list, scroll down and ensure that Do not require
Kerberos preauthentication is not selected.
4. Perform the same steps for the corp.example.com domain from the corp.example.com-
mgmt instance.
To configure DNS conditional forwarders
Note
A conditional forwarder is a DNS server on a network that is used to forward DNS
queries according to the DNS domain name in the query. For example, a DNS server
can be configured to forward all the queries it receives for names ending with
widgets.example.com to the IP address of a specific DNS server or to the IP addresses of
multiple DNS servers.
1. Open the AWS Directory Service console.
2. In the navigation pane, choose Directories.
Tutorial: Create a trust from AWS Managed Microsoft AD to a self-managed AD install on EC2 Version 1.0 360

AWS Directory Service Administration Guide
3. Select the directory ID of your AWS Managed Microsoft AD.
4. Take note of the fully qualified domain name (FQDN), corp.example.com, and the DNS
addresses of your directory.
5. Now, return to your example.local domain controller, and then open Server Manager.
6. On the Tools menu, choose DNS.
7. In the console tree, expand the DNS server of the domain for which you are setting up the
trust, and navigate to Conditional Forwarders.
8. Right-click Conditional Forwarders, and then choose New Conditional Forwarder.
9.
In DNS domain, type corp.example.com.
10. Under IP addresses of the primary servers, choose <Click here to add ...>, type the first DNS
address of your AWS Managed Microsoft AD directory (which you made note of in the previous
procedure), and then press Enter. Do the same for the second DNS address. After typing the
DNS addresses, you might get a "timeout" or "unable to resolve" error. You can generally
ignore these errors.
11. Select the Store this conditional forwarder in Active Directory, and replicate as follows
check box. In the drop-down menu, choose All DNS servers in this Forest, and then choose
OK.
Step 2: Create the trusts
In this section, you create two separate forest trusts. One trust is created from the Active Directory
domain on your EC2 instance and the other from your AWS Managed Microsoft AD in AWS.
To create the trust from your EC2 domain to your AWS Managed Microsoft AD
1. Log into example.local.
2. Open Server Manager and in the console tree choose DNS. Take note of the IPv4 address
listed for the server. You will need this in the next procedure when you create a conditional
forwarder from corp.example.com to the example.local directory.
Tutorial: Create a trust from AWS Managed Microsoft AD to a self-managed AD install on EC2 Version 1.0 361

AWS Directory Service Administration Guide
3. In the Tools menu, choose Active Directory Domains and Trusts.
4. In the console tree, right-click example.local and then choose Properties.
5. On the Trusts tab, choose New Trust, and then choose Next.
6.
On the Trust Name page, type corp.example.com, and then choose Next.
7. On the Trust Type page, choose Forest trust, and then choose Next.
Note
AWS Managed Microsoft AD also supports external trusts. However, for the purposes of
this tutorial, you will create a two-way forest trust.
8. On the Direction of Trust page, choose Two-way, and then choose Next.
Note
If you decide later to try this with a one-way trust instead, ensure that the trust
directions are setup correctly (Outgoing on trusting domain, Incoming on trusted
domain). For general information, see Understanding trust direction on Microsoft's
website.
9. On the Sides of Trust page, choose This domain only, and then choose Next.
10. On the Outgoing Trust Authentication Level page, choose Forest-wide authentication, and
then choose Next.
Note
Although Selective authentication in an option, for the simplicity of this tutorial we
recommend that you do not enable it here. When configured it restricts access over an
external or forest trust to only those users in a trusted domain or forest who have been
explicitly given authentication permissions to computer objects (resource computers)
residing in the trusting domain or forest. For more information, see Configuring
selective authentication settings.
11. On the Trust Password page, type the trust password twice, and then choose Next. You will
use this same password in the next procedure.
12. On the Trust Selections Complete page, review the results, and then choose Next.
Tutorial: Create a trust from AWS Managed Microsoft AD to a self-managed AD install on EC2 Version 1.0 362

AWS Directory Service Administration Guide
13. On the Trust Creation Complete page, review the results, and then choose Next.
14. On the Confirm Outgoing Trust page, choose No, do not confirm the outgoing trust. Then
choose Next
15. On the Confirm Incoming Trust page, choose No, do not confirm the incoming trust. Then
choose Next
16. On the Completing the New Trust Wizard page, choose Finish.
Note
Trust relationships is a global feature of AWS Managed Microsoft AD. If you are using
Configure Multi-Region replication for AWS Managed Microsoft AD, the following
procedures must be performed in the Primary Region. The changes will be applied across
all replicated Regions automatically. For more information, see Global vs Regional features.
To create the trust from your AWS Managed Microsoft AD to your EC2 domain
1. Open the AWS Directory Service console.
2. Choose the corp.example.com directory.
3. On the Directory details page, do one of the following:
• If you have multiple Regions showing under Multi-Region replication, select the primary
Region, and then choose the Networking & security tab. For more information, see Primary
vs additional Regions.
• If you do not have any Regions showing under Multi-Region replication, choose the
Networking & security tab.
4. In the Trust relationships section, choose Actions, and then select Add trust relationship.
5. In the Add a trust relationship dialog box, do the following:
• Under Trust type select Forest trust.
Tutorial: Create a trust from AWS Managed Microsoft AD to a self-managed AD install on EC2 Version 1.0 363

AWS Directory Service Administration Guide
Note
Make sure that the Trust type you choose here matches the same trust type
configured in the previous procedure (To create the trust from your EC2 domain to
your AWS Managed Microsoft AD).
• For Existing or new remote domain name, type example.local.
• For Trust password, type the same password that you provided in the previous procedure.
• Under Trust direction, select Two-Way.
Note
• If you decide later to try this with a one-way trust instead, ensure that the trust
directions are setup correctly (Outgoing on trusting domain, Incoming on trusted
domain). For general information, see Understanding trust direction on Microsoft's
website.
• Although Selective authentication in an option, for the simplicity of this tutorial
we recommend that you do not enable it here. When configured it restricts
access over an external or forest trust to only those users in a trusted domain or
forest who have been explicitly given authentication permissions to computer
objects (resource computers) residing in the trusting domain or forest. For more
information, see Configuring selective authentication settings.
• For Conditional forwarder, type the IP address of your DNS server in the example.local
forest (which you noted in the previous procedure).
Note
A conditional forwarder is a DNS server on a network that is used to forward DNS
queries according to the DNS domain name in the query. For example, a DNS
server can be configured to forward all the queries it receives for names ending
with widgets.example.com to the IP address of a specific DNS server or to the IP
addresses of multiple DNS servers.
6. Choose Add.
Tutorial: Create a trust from AWS Managed Microsoft AD to a self-managed AD install on EC2 Version 1.0 364

AWS Directory Service Administration Guide
Step 3: Verify the trust
In this section, you test whether the trusts were set up successfully between AWS and Active
Directory on Amazon EC2.
To verify the trust
1. Open the AWS Directory Service console.
2. Choose the corp.example.com directory.
3. On the Directory details page, do one of the following:
• If you have multiple Regions showing under Multi-Region replication, select the primary
Region, and then choose the Networking & security tab. For more information, see Primary
vs additional Regions.
• If you do not have any Regions showing under Multi-Region replication, choose the
Networking & security tab.
4. In the Trust relationships section, select the trust relationship you just created.
5. Choose Actions, and then choose Verify trust relationship.
Once the verification has completed, you should see Verified displayed under the Status column.
Congratulations on completing this tutorial! You now have a fully functional multiforest Active
Directory environment from which you can begin testing various scenarios. Additional test lab
tutorials are planned in 2018, so check back on occasion to see what's new.
AWS Managed Microsoft AD quotas
The following are the default quotas for AWS Managed Microsoft AD. Each quota is per Region
unless otherwise noted.
AWS Managed Microsoft AD quotas
Resource Default quota
AWS Managed Microsoft AD directories 20
Manual snapshots * 5 per AWS Managed Microsoft AD
Quotas Version 1.0 365
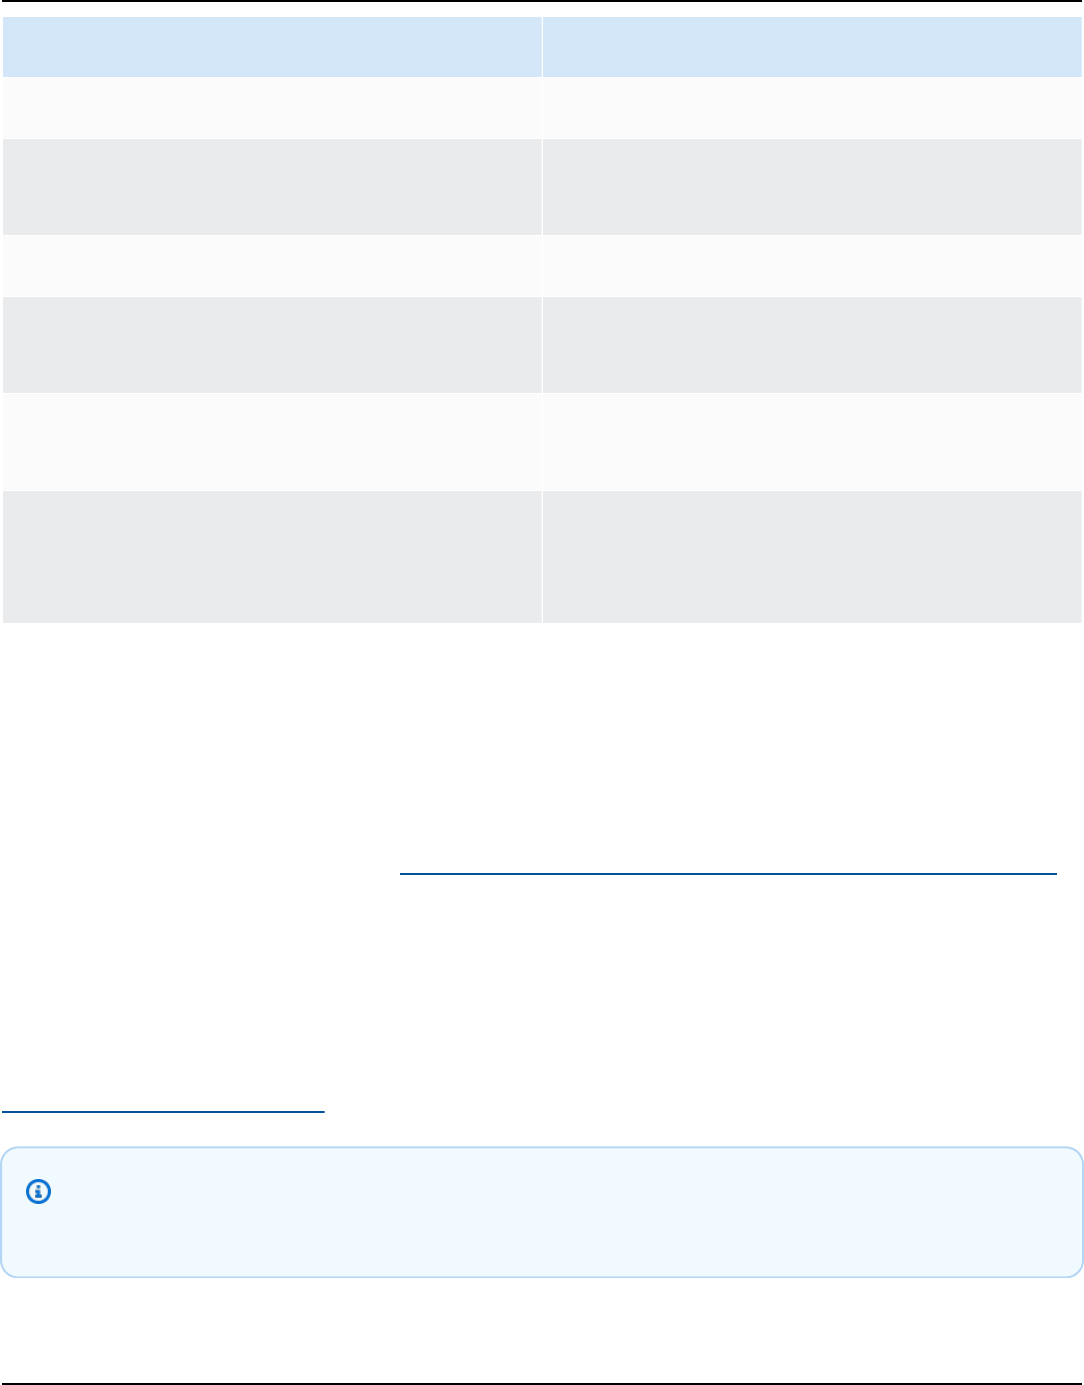
AWS Directory Service Administration Guide
Resource Default quota
Manual snapshots age ** 180 days
Maximum number of domain controllers per
directory
20
Shared domains per Standard Microsoft AD *** 5
Shared domains per Enterprise Microsoft AD
***
125
Maximum number of registered certificate
authority (CA) certificates per directory
5
Maximum number of total AWS Regions in a
single AWS Managed Microsoft AD (Enterprise
Edition) directory ****
5
* The manual snapshot quota cannot be changed.
** The maximum supported age of a manual snapshot is 180 days and cannot be changed. This is
due to the Tombstone-Lifetime attribute of deleted objects which defines the useful shelf life of
a system-state backup of Active Directory. It is not possible to restore from a snapshot older than
180 days. For more information, see Useful shelf life of a system-state backup of Active Directory
on the Microsoft website.
*** The shared domain default quota refers to the number of accounts that an individual directory
can be shared to.
**** This includes 1 primary Region and up to 4 additional Regions. For more information, see
Primary vs additional Regions.
Note
You cannot attach a public IP address to your AWS elastic network interface (ENI).
Quotas Version 1.0 366

AWS Directory Service Administration Guide
For information regarding application design and load distribution, see Best practices when
programming your applications for your directory.
For storage and object quotas, see the Comparison Table on the AWS Directory Service Pricing
page.
Troubleshooting AWS Managed Microsoft AD
The following can help you troubleshoot some common problems you might encounter when
creating or using your AWS Managed Microsoft AD Active Directory.
Problems with your AWS Managed Microsoft AD
Some troubleshooting tasks can only be completed by AWS Support. Here are some of the tasks:
• Restarting your AWS Directory Service-provided domain controllers.
• Upgrading your AWS Managed Microsoft AD.
To create a support case, see Creating support cases and case management.
Problems with Netlogon and secure channel communications
As a mitigation against CVE-2020-1472, Microsoft has released patching which modifies the way
that Netlogon secure channel communications are processed by domain controllers. Since the
introduction of these secure Netlogon changes, some Netlogon connections (servers, workstations,
and trust validations) may not be accepted by your AWS Managed Microsoft AD.
To verify if your issue is related to Netlogon or secure channel communications, search your
Amazon CloudWatch Logs for event IDs 5827 (for device authentication related issues) or 5828 (for
AD trust validation related issues). For information about CloudWatch in AWS Managed Microsoft
AD, see Enabling Amazon CloudWatch Logs log forwarding for AWS Managed Microsoft AD.
For more information about the mitigation against CVE-2020-1472, see How to manage the
changes in Netlogon secure channel connections associated with CVE-2020-1472 on Microsoft ’s
website.
Troubleshooting Version 1.0 367

AWS Directory Service Administration Guide
You receive a 'Response Status: 400 Bad Request' error when
attempting to reset a user's password
You receive an error message similar to the following when attempting to reset a user's password:
Response Status: 400 Bad Request
You may experience this issue when there are duplicate objects in your AWS Managed Microsoft AD
Organizational Unit (OU) with identical user logon names. User logon names must be unique. See
Troubleshooting Directory Data problems in Microsoft documentation for more information.
Password recovery
If a user forgets a password or is having trouble signing in to your AWS Managed Microsoft AD
directory, you can reset their password using either the AWS Management Console, Windows
PowerShell or the AWS CLI.
For more information, see Resetting an AWS Managed Microsoft AD user password.
Additional resources
The following resources can help you troubleshoot as you work with AWS.
• AWS Knowledge Center–Find FAQs and links to other resources to help you troubleshoot issues.
• AWS Support Center–Get technical support.
• AWS Premium Support Center–Get premium technical support.
The following resources can help you troubleshoot common Active Directory issues.
• Active Directory Documentation
• AD DS Troubleshooting
Topics
• Amazon EC2 Linux instance domain join errors
• AWS Managed Microsoft AD low available storage space
• Schema extension errors
• Trust creation status reasons
You receive a 'Response Status: 400 Bad Request' error when attempting to reset a user's password Version 1.0 368

AWS Directory Service Administration Guide
Amazon EC2 Linux instance domain join errors
The following can help you troubleshoot some error messages you might encounter when joining
an Amazon EC2 Linux instance to your AWS Managed Microsoft AD directory.
Linux instances unable to join domain or authenticate
Ubuntu 14.04, 16.04, and 18.04 instances must be reverse-resolvable in the DNS before a realm
can work with Microsoft Active Directory. Otherwise, you might encounter one of the following two
scenarios:
Scenario 1: Ubuntu instances that are not yet joined to a realm
For Ubuntu instances that are attempting to join a realm, the sudo realm join command might
not provide the required permissions to join the domain and might display the following error:
! Couldn't authenticate to active directory: SASL(-1): generic failure: GSSAPI Error: An invalid name
was supplied (Success) adcli: couldn't connect to EXAMPLE.COM domain: Couldn't authenticate to
active directory: SASL(-1): generic failure: GSSAPI Error: An invalid name was supplied (Success) !
Insufficient permissions to join the domain realm: Couldn't join realm: Insufficient permissions to
join the domain
Scenario 2: Ubuntu instances that are joined to a realm
For Ubuntu instances that are already joined to a Microsoft Active Directory domain, attempts to
SSH into the instance using the domain credentials might fail with following errors:
$ ssh admin@EXAMPLE.[email protected]
no such identity: /Users/username/.ssh/id_ed25519: No such file or directory
admin@EXAMPLE.[email protected]'s password:
Permission denied, please try again.
admin@EXAMPLE.[email protected]'s password:
If you log in to the instance with a public key and check /var/log/auth.log, you might see the
following errors about being unable to find the user:
May 12 01:02:12 ip-192-0-2-0 sshd[2251]: pam_unix(sshd:auth): authentication failure; logname=
uid=0 euid=0 tty=ssh ruser= rhost=203.0.113.0
Amazon EC2 Linux instance domain join errors Version 1.0 369

AWS Directory Service Administration Guide
May 12 01:02:12 ip-192-0-2-0 sshd[2251]: pam_sss(sshd:auth): authentication failure; logname=
uid=0 euid=0 tty=ssh ruser= rhost=203.0.113.0 [email protected]OM
May 12 01:02:12 ip-192-0-2-0 sshd[2251]: pam_sss(sshd:auth): received for user
admin@EXAMPLE.COM: 10 (User not known to the underlying authentication module)
May 12 01:02:14 ip-192-0-2-0 sshd[2251]: Failed password for invalid user [email protected]OM
from 203.0.113.0 port 13344 ssh2
May 12 01:02:15 ip-192-0-2-0 sshd[2251]: Connection closed by 203.0.113.0 [preauth]
However, kinit for the user still works. See this example:
ubuntu@ip-192-0-2-0:~$ kinit admin@EXAMPLE.COM Password for [email protected]OM:
ubuntu@ip-192-0-2-0:~$ klist Ticket cache: FILE:/tmp/krb5cc_1000 Default principal:
admin@EXAMPLE.COM
Workaround
The current recommended workaround for both of these scenarios is to disable reverse DNS in /
etc/krb5.conf in the [libdefaults] section as shown below:
[libdefaults]
default_realm = EXAMPLE.COM
rdns = false
One-way trust authentication issue with seamless domain join
If you have a one-way outgoing trust established between your AWS Managed Microsoft AD and
your on-premises Active Directory, you might encounter an authentication issue when attempting
to authenticate against the domain joined Linux instance using your trusted Active Directory
credentials with Winbind.
Errors
Jul 31 00:00:00 EC2AMAZ-LSMWqT sshd[23832]: Failed password for user@corp.example.com
from xxx.xxx.xxx.xxx port 18309 ssh2
Jul 31 00:05:00 EC2AMAZ-LSMWqT sshd[23832]: pam_winbind(sshd:auth): getting password
(0x00000390)
Amazon EC2 Linux instance domain join errors Version 1.0 370

AWS Directory Service Administration Guide
Jul 31 00:05:00 EC2AMAZ-LSMWqT sshd[23832]: pam_winbind(sshd:auth): pam_get_item returned
a password
Jul 31 00:05:00 EC2AMAZ-LSMWqT sshd[23832]: pam_winbind(sshd:auth): request
wbcLogonUser failed: WBC_ERR_AUTH_ERROR, PAM error: PAM_SYSTEM_ERR (4), NTSTATUS:
**NT_STATUS_OBJECT_NAME_NOT_FOUND**, Error message was: The object name is not found.
Jul 31 00:05:00 EC2AMAZ-LSMWqT sshd[23832]: pam_winbind(sshd:auth): internal module error
(retval = PAM_SYSTEM_ERR(4), user = 'CORP\user')
Workaround
To resolve this issue, you will need to comment out or remove a directive from the PAM module
configuration file (/etc/security/pam_winbind.conf) using the following steps.
1.
Open the /etc/security/pam_winbind.conf file in a text editor.
sudo vim /etc/security/pam_winbind.conf
2. Comment out or remove the following directive krb5_auth = yes.
[global]
cached_login = yes
krb5_ccache_type = FILE
#krb5_auth = yes
3. Stop the Winbind service, and then start it again.
service winbind stop or systemctl stop winbind
net cache flush
service winbind start or systemctl start winbind
AWS Managed Microsoft AD low available storage space
When your AWS Managed Microsoft AD is impaired due to Active Directory having low available
storage space, immediate action is required to return the directory to an active state. The two most
common causes of this impairment are covered in the sections below:
1. SYSVOL folder is storing more than essential group policy objects
Low available storage space Version 1.0 371

AWS Directory Service Administration Guide
2. Active Directory database has filled the volume
For pricing information about AWS Managed Microsoft AD storage, see AWS Directory Service
Pricing.
SYSVOL folder is storing more than essential group policy objects
A common cause of this impairment is due to storing non-essential files for Group Policy
processing in the SYSVOL folder. These non-essential files could be EXEs, MSIs, or any other file
that is not essential for Group Policy to process. The essential objects for Group Policy to process
are Group Policy Objects, Logon/off Scripts, and the Central Store for Group Policy objects. Any
non-essential files should be stored on a file server(s) other than your AWS Managed Microsoft AD
domain controllers.
If files for Group Policy Software Installation are needed you should use a file server to store those
installation files. If you would prefer to not self manage a file server, AWS provides a managed file
server option, Amazon FSx.
To remove any unnecessary files you can access the SYSVOL share via it’s universal naming
convention (UNC) path. For example, if your domain’s fully qualified domain name (FQDN) is
example.com, the UNC path for the SYSVOL would be “\\example.local\SYSVOL\example.local
\”. Once you locate and remove objects that are not essential for Group Policy to process the
directory, it should return to an Active state within 30 minutes. If after 30 minutes the directory is
not active, please contact AWS Support.
Storing only essential Group Policy files in your SYSVOL share will ensure that you will not impair
your directory due to SYSVOL bloat.
Active Directory database has filled the volume
A common cause of this impairment is due to the Active Directory database filling the volume. To
verify if this is the case, you can review the total count of objects in your directory. We bold the
word total to ensure that you understand deleted objects still count towards the total number of
objects in a directory.
By default AWS Managed Microsoft AD keeps items in the AD Recycling Bin for 180 days before
they become a Recycled-Object. Once an object becomes a Recycled-Object (tombstoned), it is
retained for another 180 days before it is finally purged from the directory. So when an object
is deleted it exists in the directory database for 360 day before it is purged. This is why the total
number of objects need to be evaluated.
Low available storage space Version 1.0 372

AWS Directory Service Administration Guide
For more details on AWS Managed Microsoft AD supported object counts, see AWS Directory
Service Pricing.
To get the total number of objects in a directory that includes the deleted objects, you can run the
following PowerShell command from a domain joined Windows instance. For steps how to setup a
management instance, see User and group management in AWS Managed Microsoft AD.
Get-ADObject -Filter * -IncludeDeletedObjects | Measure-Object -Property 'Count' |
Select-Object -Property 'Count'
Below is an example output from the above command:
Count
10000
If the total count is above the supported object count for your directory size listed in the note
above, you have exceeded the capacity of your directory.
Below are the options to resolve this impairment:
1. Cleanup AD
a. Delete any unwanted AD objects.
b. Remove any objects that are not wanted from the AD Recycling Bin. Note this is destructive
and the only way to recover those deleted objects will be to perform a restore of the
directory.
c. The following command will remove all deleted objects from the AD Recycling Bin.
Important
Use this command with extreme caution as this is a destructive command and the
only way to recover those deleted objects will be to perform a restore of the directory.
$DomainInfo = Get-ADDomain
$BaseDn = $DomainInfo.DistinguishedName
$NetBios = $DomainInfo.NetBIOSName
$ObjectsToRemove = Get-ADObject -Filter { isDeleted -eq $true } -
IncludeDeletedObjects -SearchBase "CN=Deleted Objects,$BaseDn" -Properties
'LastKnownParent','DistinguishedName','msDS-LastKnownRDN' | Where-Object
Low available storage space Version 1.0 373
AWS Directory Service Administration Guide
{ ($_.LastKnownParent -Like "*OU=$NetBios,$BaseDn") -or ($_.LastKnownParent -Like
'*\0ADEL:*') }
ForEach ($ObjectToRemove in $ObjectsToRemove) { Remove-ADObject -Identity
$ObjectToRemove.DistinguishedName -IncludeDeletedObjects }
d. Open a case with AWS Support to request that AWS Directory Service reclaims the free space.
2. If your directory type is Standard Edition Open a case with AWS Support requesting your
directory be upgraded to Enterprise Edition. This will also increase the cost of your directory. For
pricing information, see AWS Directory Service Pricing.
In AWS Managed Microsoft AD, members of the AWS Delegated Deleted Object Lifetime
Administrators group have the ability to modify the msDS-DeletedObjectLifetime attribute
which sets the amount of time in days that deleted objects are kept in the AD Recycling Bin before
they become Recycled-Objects.
Note
This is an advanced topic. If configured inappropriately, it can result in data loss. We highly
recommend that you first review The AD Recycle Bin: Understanding, Implementing, Best
Practices, and Troubleshooting to get a better understanding of these processes.
The ability to change the msDS-DeletedObjectLifetime attribute value to a lower number
can help ensure your object count does not exceed supported levels. The lowest valid value
this attribute can be set to is 2 days. Once that value has exceeded you will no longer be able
to recover the deleted object using the AD Recycling Bin. It will require restoring your directory
from a snapshot to recover the object(s). For more information, see Restoring your AWS Managed
Microsoft AD with snapshots. Any restore from snapshot can result in data loss as they are a
point in time.
To change Deleted Object Lifetime of your directory run the following command:
Note
If you run the command as is, it will set the Deleted Object Lifetime attribute value to 30
days. If you would like to make it longer or shorter replace “30” with whatever number you
prefer. However, we recommend that you go no higher than the default number of 180.
Low available storage space Version 1.0 374

AWS Directory Service Administration Guide
$DeletedObjectLifetime = 30
$DomainInfo = Get-ADDomain
$BaseDn = $DomainInfo.DistinguishedName
Set-ADObject -Identity "CN=Directory Service,CN=Windows
NT,CN=Services,CN=Configuration,$BaseDn" -Partition "CN=Configuration,$BaseDn" -
Replace:@{"msDS-DeletedObjectLifetime" = $DeletedObjectLifetime}
Schema extension errors
The following can help you troubleshoot some error messages you might encounter when
extending the schema for your AWS Managed Microsoft AD directory.
Referral
Error
Add error on entry starting on line 1: Referral The server side error is: 0x202b A referral was
returned from the server. The extended server error is: 0000202B: RefErr: DSID-0310082F, data 0,
1 access points \tref 1: ‘example.com’ Number of Objects Modified: 0
Troubleshooting
Ensure that all of the distinguished name fields have the correct domain name. In the example
above, DC=example,dc=com should be replaced with the DistinguishedName shown by the
cmdlet Get-ADDomain.
Unable to read import file
Error
Unable to read the import file. Number of Objects Modified: 0
Troubleshooting
The imported LDIF file is empty (0 bytes). Ensure the correct file was uploaded.
Schema extension errors Version 1.0 375

AWS Directory Service Administration Guide
Syntax error
Error
There is a syntax error in the input file Failed on line 21. The last token starts with 'q'. Number of
Objects Modified: 0
Troubleshooting
The text on line 21 is not formatted correctly. The first letter of the invalid text is A. Update line
21 with valid LDIF syntax. For more information about how to format the LDIF file, see Step 1:
Create your LDIF file.
Attribute or value exists
Error
Add error on entry starting on line 1: Attribute Or Value Exists The server side error is: 0x2083 The
specified value already exists. The extended server error is: 00002083: AtrErr: DSID-03151830,
#1: \t0: 00002083: DSID-03151830, problem 1006 (ATT_OR_VALUE_EXISTS), data 0, Att 20019
(mayContain):len 4 Number of Objects Modified: 0
Troubleshooting
The schema change has already been applied.
No such attribute
Error
Add error on entry starting on line 1: No Such Attribute The server side error is: 0x2085 The
attribute value cannot be removed because it is not present on the object. The extended server
error is: 00002085: AtrErr: DSID-03152367, #1: \t0: 00002085: DSID-03152367, problem 1001
(NO_ATTRIBUTE_OR_VAL), data 0, Att 20019 (mayContain):len 4 Number of Objects Modified: 0
Troubleshooting
The LDIF file is trying to remove an attribute from a class, but that attribute is currently not
attached to the class. Schema change was probably already applied.
Schema extension errors Version 1.0 376

AWS Directory Service Administration Guide
Error
Add error on entry starting on line 41: No Such Attribute 0x57 The parameter is incorrect.
The extended server error is: 0x208d Directory object not found. The extended server error is:
"00000057: LdapErr: DSID-0C090D8A, comment: Error in attribute conversion operation, data 0,
v2580" Number of Objects Modified: 0
Troubleshooting
The attribute listed on line 41 is incorrect. Double-check the spelling.
No such object
Error
Add error on entry starting on line 1: No Such Object The server side error is: 0x208d Directory
object not found. The extended server error is: 0000208D: NameErr: DSID-03100238, problem
2001 (NO_OBJECT), data 0, best match of: ’CN=Schema,CN=Configuration,DC=example,DC=com’
Number of Objects Modified: 0
Troubleshooting
The object referenced by the distinguished name (DN) does not exist.
Trust creation status reasons
When trust creation fails for AWS Managed Microsoft AD, the status message contains additional
information. The following can help you understand what those messages mean.
Access is denied
Access was denied when trying to create the trust. Either the trust password is incorrect or the
remote domain’s security settings do not allow a trust to be configured. To resolve this problem,
try the following:
• The AWS Managed Microsoft AD Active Directory and the self-managed Active Directory you
wish to create a trust relationship with, must have the same First Site name. The First Site
name is set to Default-First-Site-Name. An access denied error occurs if these names vary
between domains.
Trust creation status reasons Version 1.0 377

AWS Directory Service Administration Guide
• Verify that you are using the same trust password that you used when creating the
corresponding trust on the remote domain.
• Verify that your domain security settings allow for trust creation.
•
Verify that your local security policy is set correctly. Specifically check Local Security
Policy > Local Policies > Security Options > Network access: Named Pipes
that can be accessed anonymously and ensure that it contains at least the following
three named pipes:
• netlogon
• samr
• lsarpc
• Verify that the above named pipes exist as the value(s) on the NullSessionPipes registry key
which is in the registry path HKLM\SYSTEM\CurrentControlSet\services\LanmanServer
\Parameters. These values must be inserted on separated rows.
Note
By default, Network access: Named Pipes that can be accessed
anonymously is not set and will display Not Defined. This is normal, as the domain
controller's effective default settings for Network access: Named Pipes that can
be accessed anonymously is netlogon, samr, lsarpc.
• Verify the following Server Message Block (SMB) Signing Setting in the Default Domain
Controllers Policy. These settings can be found under Computer Configuration > Windows
Settings > Security Settings > Local Policies/Security Options. They should match the
following settings:
• Microsoft network client: Digitally sign communications (always): Default: Enabled
• Microsoft network client: Digitally sign communications (if server agrees): Default: Enabled
• Microsoft network server: Digitally sign communications (always): Enabled
• Microsoft network server: Digitally sign communications (if client agrees): Default: Enabled
The specified domain name does not exist or could not be contacted
To resolve this problem, ensure the security group settings for your domain and access control
list (ACL) for your VPC are correct and you have accurately entered the information for your
conditional forwarder. AWS configures the security group to open only the ports that are required
Trust creation status reasons Version 1.0 378

AWS Directory Service Administration Guide
for Active Directory communications. In the default configuration, the security group accepts
traffic to these ports from any IP address. Outbound traffic is restricted to the Security group. You
will need to update the outbound rule on the security group to allow traffic to your on premise
network. For more information about security requirements, please see Step 2: Prepare your AWS
Managed Microsoft AD.
If the DNS servers for the networks of the other directories use public (non-RFC 1918) IP addresses,
you will need add an IP route on the directory from the Directory Services Console to the DNS
Servers. For more information, see Create, verify, or delete a trust relationship and Prerequisites.
The Internet Assigned Numbers Authority (IANA) has reserved the following three blocks of the IP
address space for private internets:
• 10.0.0.0 - 10.255.255.255 (10/8 prefix)
• 172.16.0.0 - 172.31.255.255 (172.16/12 prefix)
• 192.168.0.0 - 192.168.255.255 (192.168/16 prefix)
For more information, see https://tools.ietf.org/html/rfc1918.
Verify that the Default AD Site Name for your AWS Managed Microsoft AD matches the Default
AD Site Name in your on-premises infrastructure. The computer determines the site name using
a domain of which the computer is a member, not the user's domain. Renaming the site to match
the closest on-premises ensures the DC locator will use a domain controller from the closest site.
If this does not solve the issue, it is possible that information from a previously created conditional
forwarder has been cached, preventing the creation of a new trust. Wait several minutes, and then
try creating the trust and conditional forwarder again.
For more information about how this works, see Domain Locator Across a Forest Trust on Microsoft
website.
Trust creation status reasons Version 1.0 379

AWS Directory Service Administration Guide
The operation could not be performed on this domain
To resolve this, ensure both domains / directories do not have overlapping NETBIOS name(s). If the
domains / directories do have overlapping NETBIOS names, recreate one of them with a different
NETBIOS name, and then try again.
Trust creation is failing because of the error "Required and valid domain name"
DNS names can contain only alphabetical characters (A-Z), numeric characters (0-9), the minus
sign (-), and a period (.). Period characters are allowed only when they are used to delimit the
components of domain style names. Also, consider the following:
• AWS Managed Microsoft AD does not support trusts with Single label domains. For more
information, see Microsoft support for Single Label Domains.
• According to RFC 1123 (https://tools.ietf.org/html/rfc1123), the only characters that can be
used in DNS labels are "A" to "Z", "a" to "z", "0" to "9", and a hyphen ("-"). A period [.] is also used
in DNS names, but only between DNS labels and at the end of an FQDN.
• According to RFC 952 (https://tools.ietf.org/html/rfc952), a "name" (Net, Host, Gateway, or
Domain name) is a text string up to 24 characters drawn from the alphabet (A-Z), digits (0-9),
minus sign (-), and period (.). Note that periods are only allowed when they serve to delimit
components of "domain style names".
For more information, see Complying with Name Restrictions for Hosts and Domains on Microsoft
website.
General tools for testing trusts
The following are tools that can be used to troubleshoot various trust related issues.
Trust creation status reasons Version 1.0 380

AWS Directory Service Administration Guide
AWS Systems Manager Automation troubleshooting tool
Support Automation Workflows (SAW) leverage AWS Systems Manager Automation to
provide you with a predefined runbook for AWS Directory Service. The AWSSupport-
TroubleshootDirectoryTrust runbook tool helps you diagnose common trust creation issues
between AWS Managed Microsoft AD and an on-premises Microsoft Active Directory.
DirectoryServicePortTest tool
The DirectoryServicePortTest testing tool can be helpful when troubleshooting trust creation issues
between AWS Managed Microsoft AD and on-premises Active Directory. For an example on how the
tool can be used, see Test your AD Connector.
NETDOM and NLTEST tool
Administrators can use both the Netdom and Nltest command-line tools to find, display, create,
remove and manage trusts. These tools communicate directly with the LSA authority on a domain
controller. For an example on how to use these tools, see Netdom and NLTEST on Microsoft
website.
Packet capture tool
You can use the built-in Windows package capture utility to investigate and troubleshoot a
potential network issue. For more information, see Capture a Network Trace without installing
anything.
Trust creation status reasons Version 1.0 381

AWS Directory Service Administration Guide
AD Connector
AD Connector is a directory gateway with which you can redirect directory requests to your on-
premises Microsoft Active Directory without caching any information in the cloud. AD Connector
comes in two sizes, small and large. A small AD Connector is designed for smaller organizations
and is intended to handle a low number of operations per second. A large AD Connector is
designed for larger organizations and is intended to handle a moderate to high number of
operations per second. You can spread application loads across multiple AD Connectors to scale to
your performance needs. There are no enforced user or connection limits.
AD Connector does not support Active Directory transitive trusts. AD Connectors and your on-
premises Active Directory domains have a 1-to-1 relationship. That is, for each on-premises
domain, including child domains in an Active Directory forest that you want to authenticate
against, you must create a unique AD Connector.
Note
AD Connector cannot be shared with other AWS accounts. If this is a requirement, consider
using AWS Managed Microsoft AD to Share your AWS Managed Microsoft AD. AD Connector
is also not multi-VPC aware, which means that AWS applications like WorkSpaces are
required to be provisioned into the same VPC as your AD Connector.
Once set up, AD Connector offers the following benefits:
• Your end users and IT administrators can use their existing corporate credentials to log on to
AWS applications such as WorkSpaces, Amazon WorkDocs, or Amazon WorkMail.
• You can manage AWS resources like Amazon EC2 instances or Amazon S3 buckets through IAM
role-based access to the AWS Management Console.
• You can consistently enforce existing security policies (such as password expiration, password
history, and account lockouts) whether users or IT administrators are accessing resources in your
on-premises infrastructure or in the AWS Cloud.
• You can use AD Connector to enable multi-factor authentication by integrating with your
existing RADIUS-based MFA infrastructure to provide an additional layer of security when users
access AWS applications.
Version 1.0 382

AWS Directory Service Administration Guide
Continue reading the topics in this section to learn how to connect to a directory and make the
most of AD Connector features.
Topics
• Getting started with AD Connector
• Best practices for AD Connector
• Maintain your AD Connector directory
• Secure your AD Connector directory
• Monitor your AD Connector directory
• Access to AWS applications and services from AD Connector
• Ways to join an Amazon EC2 instance to your Active Directory
• AD Connector quotas
• Troubleshooting AD Connector
Getting started with AD Connector
With AD Connector you can connect AWS Directory Service to your existing enterprise Active
Directory. When connected to your existing directory, all of your directory data remains on your
domain controllers. AWS Directory Service does not replicate any of your directory data.
Topics
• AD Connector prerequisites
• Create an AD Connector
• What gets created with your AD Connector
AD Connector prerequisites
To connect to your existing directory with AD Connector, you need the following:
Amazon VPC
Set up a VPC with the following:
• At least two subnets. Each of the subnets must be in a different Availability Zone.
Getting started Version 1.0 383

AWS Directory Service Administration Guide
• The VPC must be connected to your existing network through a virtual private network (VPN)
connection or AWS Direct Connect.
• The VPC must have default hardware tenancy.
AWS Directory Service uses a two VPC structure. The EC2 instances which make up your
directory run outside of your AWS account, and are managed by AWS. They have two network
adapters, ETH0 and ETH1. ETH0 is the management adapter, and exists outside of your account.
ETH1 is created within your account.
The management IP range of your directory's ETH0 network is chosen programmatically to
ensure it does not conflict with the VPC where your directory is deployed. This IP range can be
in either of the following pairs (as Directories run in two subnets):
• 10.0.1.0/24 & 10.0.2.0/24
• 169.254.0.0/16
• 192.168.1.0/24 & 192.168.2.0/24
We avoid conflicts by checking the first octet of the ETH1 CIDR. If it starts with a 10, then we
choose a 192.168.0.0/16 VPC with 192.168.1.0/24 and 192.168.2.0/24 subnets. If the first
octet is anything else other than a 10 we choose a 10.0.0.0/16 VPC with 10.0.1.0/24 and
10.0.2.0/24 subnets.
The selection algorithm does not include routes on your VPC. It is therefore possible to have an
IP routing conflict result from this scenario.
For more information, see the following topics in the Amazon VPC User Guide:
• What is Amazon VPC?
• Subnets in your VPC
• Adding a Hardware Virtual Private Gateway to Your VPC
For more information about AWS Direct Connect, see the AWS Direct Connect User Guide.
Existing Active Directory
You'll need to connect to an existing network with an Active Directory domain.
Note
AD Connector does not support Single Label Domains.
AD Connector prerequisites Version 1.0 384

AWS Directory Service Administration Guide
The functional level of this Active Directory domain must be Windows Server 2003 or higher.
AD Connector also supports connecting to a domain hosted on an Amazon EC2 instance.
Note
AD Connector does not support Read-only domain controllers (RODC) when used in
combination with the Amazon EC2 domain-join feature.
Service account
You must have credentials for a service account in the existing directory which has been
delegated the following privileges:
• Read users and groups - Required
• Join computers to the domain - Required only when using Seamless Domain Join and
WorkSpaces
• Create computer objects - Required only when using Seamless Domain Join and WorkSpaces
• The service account password should be compliant with AWS password requirements. AWS
passwords should be:
• Between 8 and 128 characters in length, inclusive.
• Contain at least one character from three of the following four categories:
• Lowercase letters (a-z)
• Uppercase letters (A-Z)
• Numbers (0-9)
• Non-alphanumeric characters (~!@#$%^&*_-+=`|\(){}[]:;"'<>,.?/)
For more information, see Delegate privileges to your service account.
Note
AD Connector uses Kerberos for authentication and authorization of AWS applications.
LDAP is only used for user and group object lookups (read operations). With the
LDAP transactions, nothing is mutable and credentials are not passed in clear text.
Authentication is handled by an AWS internal service, which uses Kerberos tickets to
perform LDAP operations as a user.
AD Connector prerequisites Version 1.0 385

AWS Directory Service Administration Guide
User permissions
All Active Directory users must have permissions to read their own attributes. Specifically the
following attributes:
• GivenName
• SurName
• Mail
• SamAccountName
• UserPrincipalName
• UserAccountControl
• MemberOf
By default, Active Directory users do have read permission to these attributes. However,
Administrators can alter these permissions over time so you might want to verify your users
have these read permissions prior to setting up AD Connector for the first time.
IP addresses
Get the IP addresses of two DNS servers or domain controllers in your existing directory.
AD Connector obtains the _ldap._tcp.<DnsDomainName> and
_kerberos._tcp.<DnsDomainName> SRV records from these servers when connecting to
your directory, so these servers must contain these SRV records. The AD Connector attempts to
find a common domain controller that will provide both LDAP and Kerberos services, so these
SRV records must include at least one common domain controller. For more information about
SRV records, go to SRV Resource Records on Microsoft TechNet.
Ports for subnets
For AD Connector to redirect directory requests to your existing Active Directory domain
controllers, the firewall for your existing network must have the following ports open to the
CIDRs for both subnets in your Amazon VPC.
• TCP/UDP 53 - DNS
• TCP/UDP 88 - Kerberos authentication
• TCP/UDP 389 - LDAP
These are the minimum ports that are needed before AD Connector can connect to your
directory. Your specific configuration may require additional ports be open.
AD Connector prerequisites Version 1.0 386
AWS Directory Service Administration Guide
If you want to use AD Connector and Amazon WorkSpaces, the DisableVLVSupportLDAP
attribute needs to be set to 0 for your domain controllers. This is the default setting for
the domain controllers. AD Connector will be unable to query users in the directory if the
DisableVLVSupportLDAP attribute is enabled. This prevents AD Connector from working with
Amazon WorkSpaces.
Note
If the DNS servers or Domain Controller servers for your existing Active Directory
Domain are within the VPC, the security groups associated with those servers must have
the above ports open to the CIDRs for both subnets in the VPC.
For additional port requirements, see AD and AD DS Port Requirements on Microsoft
documentation.
Kerberos preauthentication
Your user accounts must have Kerberos preauthentication enabled. For detailed instructions on
how to enable this setting, see Ensure that Kerberos pre-authentication is enabled. For general
information about this setting, go to Preauthentication on Microsoft TechNet.
Encryption types
AD Connector supports the following encryption types when authenticating via Kerberos to
your Active Directory domain controllers:
• AES-256-HMAC
• AES-128-HMAC
• RC4-HMAC
AWS IAM Identity Center prerequisites
If you plan to use IAM Identity Center with AD Connector, you need to ensure that the following are
true:
• Your AD Connector is set up in your AWS organization’s management account.
• Your instance of IAM Identity Center is in the same Region where your AD Connector is set up.
AD Connector prerequisites Version 1.0 387

AWS Directory Service Administration Guide
For more information, see IAM Identity Center prerequisites in the AWS IAM Identity Center User
Guide.
Multi-factor authentication prerequisites
To support multi-factor authentication with your AD Connector directory, you need the following:
• A Remote Authentication Dial-In User Service (RADIUS) server in your existing network that has
two client endpoints. The RADIUS client endpoints have the following requirements:
• To create the endpoints, you need the IP addresses of the AWS Directory Service servers. These
IP addresses can be obtained from the Directory IP Address field of your directory details.
• Both RADIUS endpoints must use the same shared secret code.
• Your existing network must allow inbound traffic over the default RADIUS server port (1812)
from the AWS Directory Service servers.
• The usernames between your RADIUS server and your existing directory must be identical.
For more information about using AD Connector with MFA, see Enabling multi-factor
authentication for AD Connector.
Delegate privileges to your service account
To connect to your existing directory, you must have the credentials for your AD Connector service
account in the existing directory that has been delegated certain privileges. While members of the
Domain Admins group have sufficient privileges to connect to the directory, as a best practice,
you should use a service account that only has the minimum privileges necessary to connect to the
directory. The following procedure demonstrates how to create a new group called Connectors,
delegate the necessary privileges that are needed to connect AWS Directory Service to this group,
and then add a new service account to this group.
This procedure must be performed on a machine that is joined to your directory and has the Active
Directory User and Computers MMC snap-in installed. You must also be logged in as a domain
administrator.
To delegate privileges to your service account
1. Open Active Directory User and Computers and select your domain root in the navigation
tree.
2. In the list in the left-hand pane, right-click Users, select New, and then select Group.
AD Connector prerequisites Version 1.0 388

AWS Directory Service Administration Guide
3. In the New Object - Group dialog box, enter the following and click OK.
Field Value/Selection
Group name
Connectors
Group scope Global
Group type Security
4. In the Active Directory User and Computers navigation tree, select identify the
Organizational Unit (OU) where the computer accounts will be created. In the menu, select
Action, and then Delegate Control. You may select a parent OU up to the domain as
permissions propagate to the child OUs. If your AD Connector is connected to AWS Managed
Microsoft AD, you will not have access to delegate control at the domain root level. In this
case, to delegate control, select the OU under your directory OU where your computer objects
will be created.
5. On the Delegation of Control Wizard page, click Next, then click Add.
6.
In the Select Users, Computers, or Groups dialog box, enter Connectors and click OK. If
more than one object is found, select the Connectors group created above. Click Next.
7. On the Tasks to Delegate page, select Create a custom task to delegate, and then choose
Next.
8. Select Only the following objects in the folder, and then select Computer objects and User
objects.
9. Select Create selected objects in this folder and Delete selected objects in this folder. Then
choose Next.
AD Connector prerequisites Version 1.0 389

AWS Directory Service Administration Guide
10. Select Read, and then choose Next.
Note
If you will be using Seamless Domain Join or WorkSpaces, you must also enable Write
permissions so that the Active Directory can create computer objects.
AD Connector prerequisites Version 1.0 390

AWS Directory Service Administration Guide
11. Verify the information on the Completing the Delegation of Control Wizard page, and click
Finish.
12.
Create a user account with a strong password and add that user to the Connectors group.
This user will be known as your AD Connector service account and since it is now a member of
the Connectors group it now has sufficient privileges to connect AWS Directory Service to
the directory.
Test your AD Connector
For AD Connector to connect to your existing directory, the firewall for your existing network must
have certain ports open to the CIDRs for both subnets in the VPC. To test if these conditions are
met, perform the following steps:
To test the connection
1. Launch a Windows instance in the VPC and connect to it over RDP. The instance must be a
member of your existing domain. The remaining steps are performed on this VPC instance.
AD Connector prerequisites Version 1.0 391

AWS Directory Service Administration Guide
2. Download and unzip the DirectoryServicePortTest test application. The source code and Visual
Studio project files are included so you can modify the test application if desired.
Note
This script is not supported on Windows Server 2003 or older operating systems.
3. From a Windows command prompt, run the DirectoryServicePortTest test application with
the following options:
Note
The DirectoryServicePortTest test application can only be used when the domain and
forest functional levels are set to Windows Server 2012 R2 and below.
DirectoryServicePortTest.exe -d <domain_name> -ip <server_IP_address> -tcp
"53,88,389" -udp "53,88,389"
<domain_name>
The fully qualified domain name. This is used to test the forest and domain functional
levels. If you exclude the domain name, the functional levels won't be tested.
<server_IP_address>
The IP address of a domain controller in your existing domain. The ports will be tested
against this IP address. If you exclude the IP address, the ports won't be tested.
This test app determines if the necessary ports are open from the VPC to your domain, and
also verifies the minimum forest and domain functional levels.
The output will be similar to the following:
Testing forest functional level.
Forest Functional Level = Windows2008R2Forest : PASSED
Testing domain functional level.
Domain Functional Level = Windows2008R2Domain : PASSED
AD Connector prerequisites Version 1.0 392

AWS Directory Service Administration Guide
Testing required TCP ports to <server_IP_address>:
Checking TCP port 53: PASSED
Checking TCP port 88: PASSED
Checking TCP port 389: PASSED
Testing required UDP ports to <server_IP_address>:
Checking UDP port 53: PASSED
Checking UDP port 88: PASSED
Checking UDP port 389: PASSED
The following is the source code for the DirectoryServicePortTest application.
using System;
using System.Collections.Generic;
using System.IO;
using System.Linq;
using System.Net;
using System.Net.Sockets;
using System.Text;
using System.Threading.Tasks;
using System.DirectoryServices.ActiveDirectory;
using System.Threading;
using System.DirectoryServices.AccountManagement;
using System.DirectoryServices;
using System.Security.Authentication;
using System.Security.AccessControl;
using System.Security.Principal;
namespace DirectoryServicePortTest
{
class Program
{
private static List<int> _tcpPorts;
private static List<int> _udpPorts;
private static string _domain = "";
private static IPAddress _ipAddr = null;
static void Main(string[] args)
{
if (ParseArgs(args))
AD Connector prerequisites Version 1.0 393

AWS Directory Service Administration Guide
{
try
{
if (_domain.Length > 0)
{
try
{
TestForestFunctionalLevel();
TestDomainFunctionalLevel();
}
catch (ActiveDirectoryObjectNotFoundException)
{
Console.WriteLine("The domain {0} could not be found.\n",
_domain);
}
}
if (null != _ipAddr)
{
if (_tcpPorts.Count > 0)
{
TestTcpPorts(_tcpPorts);
}
if (_udpPorts.Count > 0)
{
TestUdpPorts(_udpPorts);
}
}
}
catch (AuthenticationException ex)
{
Console.WriteLine(ex.Message);
}
}
else
{
PrintUsage();
}
Console.Write("Press <enter> to continue.");
Console.ReadLine();
}
AD Connector prerequisites Version 1.0 394

AWS Directory Service Administration Guide
static void PrintUsage()
{
string currentApp =
Path.GetFileName(System.Reflection.Assembly.GetExecutingAssembly().Location);
Console.WriteLine("Usage: {0} \n-d <domain> \n-ip \"<server IP address>\"
\n[-tcp \"<tcp_port1>,<tcp_port2>,etc\"] \n[-udp \"<udp_port1>,<udp_port2>,etc\"]",
currentApp);
}
static bool ParseArgs(string[] args)
{
bool fReturn = false;
string ipAddress = "";
try
{
_tcpPorts = new List<int>();
_udpPorts = new List<int>();
for (int i = 0; i < args.Length; i++)
{
string arg = args[i];
if ("-tcp" == arg | "/tcp" == arg)
{
i++;
string portList = args[i];
_tcpPorts = ParsePortList(portList);
}
if ("-udp" == arg | "/udp" == arg)
{
i++;
string portList = args[i];
_udpPorts = ParsePortList(portList);
}
if ("-d" == arg | "/d" == arg)
{
i++;
_domain = args[i];
}
AD Connector prerequisites Version 1.0 395

AWS Directory Service Administration Guide
if ("-ip" == arg | "/ip" == arg)
{
i++;
ipAddress = args[i];
}
}
}
catch (ArgumentOutOfRangeException)
{
return false;
}
if (_domain.Length > 0 || ipAddress.Length > 0)
{
fReturn = true;
}
if (ipAddress.Length > 0)
{
_ipAddr = IPAddress.Parse(ipAddress);
}
return fReturn;
}
static List<int> ParsePortList(string portList)
{
List<int> ports = new List<int>();
char[] separators = {',', ';', ':'};
string[] portStrings = portList.Split(separators);
foreach (string portString in portStrings)
{
try
{
ports.Add(Convert.ToInt32(portString));
}
catch (FormatException)
{
}
}
return ports;
AD Connector prerequisites Version 1.0 396

AWS Directory Service Administration Guide
}
static void TestForestFunctionalLevel()
{
Console.WriteLine("Testing forest functional level.");
DirectoryContext dirContext = new
DirectoryContext(DirectoryContextType.Forest, _domain, null, null);
Forest forestContext = Forest.GetForest(dirContext);
Console.Write("Forest Functional Level = {0} : ",
forestContext.ForestMode);
if (forestContext.ForestMode >= ForestMode.Windows2003Forest)
{
Console.WriteLine("PASSED");
}
else
{
Console.WriteLine("FAILED");
}
Console.WriteLine();
}
static void TestDomainFunctionalLevel()
{
Console.WriteLine("Testing domain functional level.");
DirectoryContext dirContext = new
DirectoryContext(DirectoryContextType.Domain, _domain, null, null);
Domain domainObject = Domain.GetDomain(dirContext);
Console.Write("Domain Functional Level = {0} : ", domainObject.DomainMode);
if (domainObject.DomainMode >= DomainMode.Windows2003Domain)
{
Console.WriteLine("PASSED");
}
else
{
Console.WriteLine("FAILED");
}
AD Connector prerequisites Version 1.0 397

AWS Directory Service Administration Guide
Console.WriteLine();
}
static List<int> TestTcpPorts(List<int> portList)
{
Console.WriteLine("Testing TCP ports to {0}:", _ipAddr.ToString());
List<int> failedPorts = new List<int>();
foreach (int port in portList)
{
Console.Write("Checking TCP port {0}: ", port);
TcpClient tcpClient = new TcpClient();
try
{
tcpClient.Connect(_ipAddr, port);
tcpClient.Close();
Console.WriteLine("PASSED");
}
catch (SocketException)
{
failedPorts.Add(port);
Console.WriteLine("FAILED");
}
}
Console.WriteLine();
return failedPorts;
}
static List<int> TestUdpPorts(List<int> portList)
{
Console.WriteLine("Testing UDP ports to {0}:", _ipAddr.ToString());
List<int> failedPorts = new List<int>();
foreach (int port in portList)
{
Console.Write("Checking UDP port {0}: ", port);
AD Connector prerequisites Version 1.0 398

AWS Directory Service Administration Guide
UdpClient udpClient = new UdpClient();
try
{
udpClient.Connect(_ipAddr, port);
udpClient.Close();
Console.WriteLine("PASSED");
}
catch (SocketException)
{
failedPorts.Add(port);
Console.WriteLine("FAILED");
}
}
Console.WriteLine();
return failedPorts;
}
}
}
Create an AD Connector
To connect to your existing directory with AD Connector, perform the following steps. Before
starting this procedure, make sure you have completed the prerequisites identified in AD Connector
prerequisites.
Note
You cannot create an AD Connector with a Cloud Formation template.
To connect with AD Connector
1. In the AWS Directory Service console navigation pane, choose Directories and then choose Set
up directory.
2. On the Select directory type page, choose AD Connector, and then choose Next.
3. On the Enter AD Connector information page, provide the following information:
Create an AD Connector Version 1.0 399

AWS Directory Service Administration Guide
Directory size
Choose from either the Small or Large size option. For more information about sizes, see
AD Connector.
Directory description
An optional description for the directory.
4. On the Choose VPC and subnets page, provide the following information, and then choose
Next.
VPC
The VPC for the directory.
Subnets
Choose the subnets for the domain controllers. The two subnets must be in different
Availability Zones.
5. On the Connect to AD page, provide the following information:
Directory DNS name
The fully qualified name of your existing directory, such as corp.example.com.
Directory NetBIOS name
The short name of your existing directory, such as CORP.
DNS IP addresses
The IP address of at least one DNS server in your existing directory. These servers must be
accessible from each subnet specified in step 4. These servers can be located outside of
AWS, as long as there is network connectivity between the specified subnets and the DNS
server IP addresses.
Service account username
The user name of a user in the existing directory. For more information about this account,
see the AD Connector prerequisites.
Create an AD Connector Version 1.0 400

AWS Directory Service Administration Guide
Service account password
The password for the existing user account. This password is case-sensitive and must
be between 8 and 128 characters in length, inclusive. It must also contain at least one
character from three of the following four categories:
• Lowercase letters (a-z)
• Uppercase letters (A-Z)
• Numbers (0-9)
• Non-alphanumeric characters (~!@#$%^&*_-+=`|\(){}[]:;"'<>,.?/)
Confirm password
Retype the password for the existing user account.
6. On the Review & create page, review the directory information and make any necessary
changes. When the information is correct, choose Create directory. It takes several minutes for
the directory to be created. Once created, the Status value changes to Active.
For more information on what is created with your AD Connector, see What gets created with your
AD Connector.
What gets created with your AD Connector
When you create an AD Connector, AWS Directory Service automatically creates and associates an
elastic network interface (ENI) with each of your AD Connector instances. Each of these ENIs are
essential for connectivity between your VPC and AWS Directory Service AD Connector and should
never be deleted. You can identify all network interfaces reserved for use with AWS Directory
Service by the description: "AWS created network interface for directory directory-id". For more
information, see Elastic Network Interfaces in the Amazon EC2 User Guide.
Note
AD Connector instances are deployed across two Availability Zones in a Region by default
and connected to your Amazon Virtual Private Cloud (VPC). AD Connector instances that
fail are automatically replaced in the same Availability Zone using the same IP address.
When you sign in to any AWS application or service integrated with an AD Connector (AWS IAM
Identity Center included), the app or service forwards your authentication request to AD Connector
What gets created with your AD Connector Version 1.0 401

AWS Directory Service Administration Guide
which then forwards the request to a domain controller in your self-managed Active Directory for
authentication. If you are successfully authenticated to your self-managed Active Directory, AD
Connector then returns an authentication token to the app or service (similar to a Kerberos token).
At this point, you can now access the AWS app or service.
Best practices for AD Connector
Here are some suggestions and guidelines you should consider to avoid problems and get the most
out of AD Connector.
Setting up: Prerequisites
Consider these guidelines before creating your directory.
Verify you have the right directory type
AWS Directory Service provides multiple ways to use Microsoft Active Directory with other AWS
services. You can choose the directory service with the features you need at a cost that fits your
budget:
• AWS Directory Service for Microsoft Active Directory is a feature-rich managed Microsoft
Active Directory hosted on the AWS cloud. AWS Managed Microsoft AD is your best choice if
you have more than 5,000 users and need a trust relationship set up between an AWS hosted
directory and your on-premises directories.
• AD Connector simply connects your existing on-premises Active Directory to AWS. AD Connector
is your best choice when you want to use your existing on-premises directory with AWS services.
• Simple AD is a low-scale, low-cost directory with basic Active Directory compatibility. It supports
5,000 or fewer users, Samba 4–compatible applications, and LDAP compatibility for LDAP-aware
applications.
For a more detailed comparison of AWS Directory Service options, see Which to choose.
Ensure your VPCs and instances are configured correctly
In order to connect to, manage, and use your directories, you must properly configure the VPCs
that the directories are associated with. See either Prerequisites for creating a AWS Managed
Microsoft AD, AD Connector prerequisites, or Simple AD prerequisites for information about the
VPC security and networking requirements.
Best practices Version 1.0 402

AWS Directory Service Administration Guide
If you are adding an instance to your domain, ensure that you have connectivity and remote access
to your instance as described in Ways to join an Amazon EC2 instance to your AWS Managed
Microsoft AD.
Be aware of your limits
Learn about the various limits for your specific directory type. The available storage and the
aggregate size of your objects are the only limitations on the number of objects you may store in
your directory. See either AWS Managed Microsoft AD quotas, AD Connector quotas, or Simple AD
quotas for details about your chosen directory.
Understand your directory’s AWS security group configuration and use
AWS creates a security group and attaches it to your directory’s elastic network interfaces that are
accessible from within your peered or resized VPCs. AWS configures the security group to block
unnecessary traffic to the directory and allows necessary traffic.
Modifying the directory security group
If you want to modify the security of your directories’ security groups, you can do so. Make such
changes only if you fully understand how security group filtering works. For more information, see
Amazon EC2 security groups for Linux instances in the Amazon EC2 User Guide. Improper changes
can result in loss of communications to intended computers and instances. AWS recommends that
you do not attempt to open additional ports to your directory as this decreases the security of your
directory. Please carefully review the AWS Shared Responsibility Model.
Warning
It is technically possible for you to associate the directory’s security group with other
EC2 instances that you create. However, AWS recommends against this practice. AWS
may have reasons to modify the security group without notice to address functional or
security needs of the managed directory. Such changes affect any instances with which
you associate the directory security group and may disrupt operation of the associated
instances. Furthermore, associating the directory security group with your EC2 instances
may create a potential security risk for your EC2 instances.
Setting up: Prerequisites Version 1.0 403

AWS Directory Service Administration Guide
Configure on-premises sites and subnets correctly when using AD Connector
If your on-premises network has Active Directory sites defined, you must make sure the subnets
in the VPC where your AD Connector resides are defined in an Active Directory site, and that no
conflicts exist between the subnets in your VPC and the subnets in your other sites.
To discover domain controllers, AD Connector uses the Active Directory site whose subnet IP
address ranges are close to those in the VPC that contain the AD Connector. If you have a site
whose subnets have the same IP address ranges as those in your VPC, AD Connector will discover
the domain controllers in that site, which may not be physically close to your Region.
Understand username restrictions for AWS applications
AWS Directory Service provides support for most character formats that can be used in the
construction of usernames. However, there are character restrictions that are enforced on
usernames that will be used for signing in to AWS applications, such as WorkSpaces, Amazon
WorkDocs, Amazon WorkMail, or Amazon QuickSight. These restrictions require that the following
characters not be used:
• Spaces
• Multibyte characters
• !"#$%&'()*+,/:;<=>?@[\]^`{|}~
Note
The @ symbol is allowed as long as it precedes a UPN suffix.
Programming your applications
Before you program your applications, consider the following:
Load test before rolling out to production
Be sure to do lab testing with applications and requests that are representative of your production
workload to confirm that the directory scales to the load of your application. Should you require
additional capacity, spread your loads across multiple AD Connector directories.
Programming your applications Version 1.0 404

AWS Directory Service Administration Guide
Using your directory
Here are some suggestions to keep in mind when using your directory.
Rotate Admin credentials regularly
Change your AD Connector service account Admin password regularly, and make sure that the
password is consistent with your existing Active Directory password policies. For instructions on
how to change the service account password, see Updating your AD Connector service account
credentials in AWS Management Console.
Use unique AD Connectors for each domain
AD Connectors and your on-premises AD domains have a 1-to-1 relationship. That is, for each on-
premises domain, including child domains in an AD forest that you want to authenticate against,
you must create a unique AD Connector. Each AD Connector that you create must use a different
service account, even if they are connected to the same directory.
Check for compatibility
When using AD Connector, you must ensure that your on-premises directory is and remains
compatible with AWS Directory Services. For more information on your responsibilities, please see
our shared responsibility model.
Maintain your AD Connector directory
You can use the AWS Management Console to maintain your AD Connector and complete day-to-
day administrative tasks. Ways you can maintain your directory include:
• View details about your AD Connector.
• Update DNS address your AD Connector points to.
• Delete your AD Connector when it is no longer needed.
Viewing AD Connector directory information
To view detailed directory information in the AWS Management Console
1. In the AWS Directory Service console navigation pane, under Active Directory, select
Directories.
Using your directory Version 1.0 405
AWS Directory Service Administration Guide
2. Click the directory ID link for your directory. Information about the directory is displayed in the
Directory details page.
For more information about the Status field, see Understanding your directory status.
Updating the DNS address for your AD Connector
Use the following steps to update the DNS addresses that your AD Connector is pointing to.
Note
If you have an update in progress, you must wait until it is complete before submitting
another update.
If you are using WorkSpaces with your AD Connector, ensure that your WorkSpace’s
DNS addresses are updated as well. For more information, see Update DNS servers for
WorkSpaces.
To update your DNS settings for AD Connector
1. In the AWS Directory Service console navigation pane, under Active Directory, choose
Directories.
2. Choose the directory ID link for your directory.
3. On the Directory details page, choose the Network & Security tab.
4. Scroll down to the Existing DNS settings section and choose Update.
5. In the Update existing DNS addresses dialog, type the updated DNS IP addresses, and then
choose Update.
For more information on troubleshooting AD Connector, see Troubleshooting AD Connector.
Deleting your AD Connector
When an AD Connector is deleted, your on-premises directory remains intact. All instances that are
joined to the directory also remain intact and remain joined to your on-premises directory. You can
still use your directory credentials to log in to these instances.
Updating the DNS address for your AD Connector Version 1.0 406

AWS Directory Service Administration Guide
To delete AD Connector
1. In the AWS Directory Service console navigation pane, select Directories. Ensure you are in
the AWS Region where your AD Connector is deployed. For more information, see Choosing a
Region.
2. Ensure that no AWS applications are enabled for the AD Connector you intend to delete.
Enabled AWS applications will prevent you for deleting your AD Connector.
a. On the Directories page, choose your directory ID.
b. On the Directory details page, select the Application management tab. In the AWS apps
& services section, you see which AWS applications are enabled for your AD Connector.
• Disable AWS Management Console access. For more information, see Disabling AWS
Management Console access.
• To disable Amazon WorkSpaces, you must deregister the service from the directory in
the WorkSpaces console. For more information, see Delete a directory in the Amazon
WorkSpaces Administration Guide.
• To disable Amazon WorkDocs, you must delete the Amazon WorkDocs site in the
Amazon WorkDocs console. For more information, see Delete a site in the Amazon
WorkDocs Administration Guide.
• To disable Amazon WorkMail, you must remove the Amazon WorkMail organization in
the Amazon WorkMail console. For more information, see Remove an organization in
the Amazon WorkMail Administrator Guide.
• To disable Amazon FSx for Windows File Server, you must remove the Amazon FSx file
system from the domain. For more information, see Working with Active Directory in
FSx for Windows File Server in the Amazon FSx for Windows File Server User Guide.
• To disable Amazon Relational Database Service, you must remove the Amazon RDS
instance from the domain. For more information, see Managing a DB instance in a
domain in the Amazon RDS User Guide.
• To disable AWS Client VPN Service, you must remove the directory service from the
Client VPN Endpoint. For more information, see Work with Client VPN in the AWS Client
VPN Administrator Guide.
• To disable Amazon Connect, you must delete the Amazon Connect Instance. For
more information, see Delete your Amazon Connect instance in the Amazon Connect
Administration Guide.
Deleting your AD Connector Version 1.0 407
AWS Directory Service Administration Guide
• To disable Amazon QuickSight, you must unsubscribe from Amazon QuickSight.
For more information, see Closing your Amazon QuickSight account in the Amazon
QuickSight User Guide.
Note
If you are using AWS IAM Identity Center and have previously connected it to the
AWS Managed Microsoft AD directory you plan to delete, you must first change
the identity source before you can delete it. For more information, see Change
your identity source in the IAM Identity Center User Guide.
3. In the navigation pane, choose Directories.
4. Select only the AD Connector to be deleted and click Delete. It takes several minutes for the
AD Connector to be deleted. When the AD Connector has been deleted, it is removed from
your directory list.
Secure your AD Connector directory
You can use features like multi-factor authentication (MFA), client-side Lightweight Directory
Access Protocol over Secure Sockets Layer (SSL)/Transport Layer Security (TLS) (LDAPS), and AWS
Private Certificate Authority to secure your AD Connector. Ways you can secure your AD Connector
include:
• Enable MFA which increases your AD Connector security.
• Enable client-side Lightweight Directory Access Protocol over Secure Socket Layer (SSL)/
Transport Layer Security (TLS) (LDAPS) so that communications over LDAP are encrypted and
improves security.
• Enable certificate-based mutual Transport Layer Security (mTLS) authentication with smart cards
which allows users to authenticate in to Amazon Web Services through your Active Directory and
AD Connector.
• Update your AD Connector service account credentials.
• Set up AWS Private CA Connector for AD so you can issue and manage certificates for your AD
Connector.
Tasks to secure your AD Connector
Secure your directory Version 1.0 408

AWS Directory Service Administration Guide
• Enabling multi-factor authentication for AD Connector
• Enabling client-side LDAPS using AD Connector
• Enabling mTLS authentication in AD Connector for use with smart cards
• Updating your AD Connector service account credentials in AWS Management Console
• Setting up AWS Private CA Connector for AD
Enabling multi-factor authentication for AD Connector
You can enable multi-factor authentication for AD Connector when you have Active Directory
running on-premises or in Amazon EC2 instances. For more information about using multi-factor
authentication with AWS Directory Service, see AD Connector prerequisites.
Note
Multi-factor authentication is not available for Simple AD. However, MFA can be enabled
for your AWS Managed Microsoft AD directory. For more information, see Enabling multi-
factor authentication for AWS Managed Microsoft AD.
To enable multi-factor authentication for AD Connector
1. In the AWS Directory Service console navigation pane, select Directories.
2. Choose the directory ID link for your AD Connector directory.
3. On the Directory details page, select the Networking & security tab.
4. In the Multi-factor authentication section, choose Actions, and then choose Enable.
5. On the Enable multi-factor authentication (MFA) page, provide the following values:
Display label
Provide a label name.
RADIUS server DNS name or IP addresses
The IP addresses of your RADIUS server endpoints, or the IP address of your RADIUS server
load balancer. You can enter multiple IP addresses by separating them with a comma (e.g.,
192.0.0.0,192.0.0.12).
Enabling multi-factor authentication Version 1.0 409

AWS Directory Service Administration Guide
Note
RADIUS MFA is applicable only to authenticate access to the AWS Management
Console, or to Amazon Enterprise applications and services such as WorkSpaces,
Amazon QuickSight, or Amazon Chime. It does not provide MFA to Windows
workloads running on EC2 instances, or for signing into an EC2 instance. AWS
Directory Service does not support RADIUS Challenge/Response authentication.
Users must have their MFA code at the time they enter their username and
password. Alternatively, you must use a solution that performs MFA out-of-band
such as SMS text verification for the user. In out-of-band MFA solutions, you must
make sure you set the RADIUS time-out value appropriately for your solution. When
using an out-of-band MFA solution, the sign-in page will prompt the user for an
MFA code. In this case, the best practice is for users to enter their password in both
the password field and the MFA field.
Port
The port that your RADIUS server is using for communications. Your on-premises network
must allow inbound traffic over the default RADIUS server port (UDP:1812) from the AWS
Directory Service servers.
Shared secret code
The shared secret code that was specified when your RADIUS endpoints were created.
Confirm shared secret code
Confirm the shared secret code for your RADIUS endpoints.
Protocol
Select the protocol that was specified when your RADIUS endpoints were created.
Server timeout (in seconds)
The amount of time, in seconds, to wait for the RADIUS server to respond. This must be a
value between 1 and 50.
Enabling multi-factor authentication Version 1.0 410

AWS Directory Service Administration Guide
Max RADIUS request retries
The number of times that communication with the RADIUS server is attempted. This must
be a value between 0 and 10.
Multi-factor authentication is available when the RADIUS Status changes to Enabled.
6. Choose Enable.
Enabling client-side LDAPS using AD Connector
Client-side LDAPS support in AD Connector encrypts communications between Microsoft Active
Directory (AD) and AWS applications. Examples of such applications include WorkSpaces, AWS
IAM Identity Center, Amazon QuickSight, and Amazon Chime. This encryption helps you to better
protect your organization’s identity data and meet your security requirements.
You can also deregister and disable client-side LDAPS.
Topics
• Prerequisites
• Enabling client-side LDAPS
• Managing client-side LDAPS
Prerequisites
Before you enable client-side LDAPS, you need to meet the following requirements.
Prerequisites:
• Deploy server certificates in Active Directory
• CA certificate requirements
• Networking requirements
Deploy server certificates in Active Directory
In order to enable client-side LDAPS, you need to obtain and install server certificates for each
domain controller in Active Directory. These certificates will be used by the LDAP service to listen
Enabling client-side LDAPS Version 1.0 411

AWS Directory Service Administration Guide
for and automatically accept SSL connections from LDAP clients. You can use SSL certificates
that are either issued by an in-house Active Directory Certificate Services (ADCS) deployment or
purchased from a commercial issuer. For more information on Active Directory server certificate
requirements, see LDAP over SSL (LDAPS) Certificate on the Microsoft website.
CA certificate requirements
A certificate authority (CA) certificate, which represents the issuer of your server certificates, is
required for client-side LDAPS operation. CA certificates are matched with the server certificates
that are presented by your Active Directory domain controllers to encrypt LDAP communications.
Note the following CA certificate requirements:
• To register a certificate, it must be more than 90 days away from expiration.
• Certificates must be in Privacy-Enhanced Mail (PEM) format. If exporting CA certificates from
inside Active Directory, choose base64 encoded X.509 (.CER) as the export file format.
• A maximum of five (5) CA certificates can be stored per AD Connector directory.
• Certificates using the RSASSA-PSS signature algorithm are not supported.
Networking requirements
AWS application LDAP traffic will run exclusively on TCP port 636, with no fallback to LDAP port
389. However, Windows LDAP communications supporting replication, trusts, and more will
continue using LDAP port 389 with Windows-native security. Configure AWS security groups and
network firewalls to allow TCP communications on port 636 in AD Connector (outbound) and self-
managed Active Directory (inbound).
Enabling client-side LDAPS
To enable client-side LDAPS, you import your certificate authority (CA) certificate into AD
Connector, and then enable LDAPS on your directory. Upon enabling, all LDAP traffic between
AWS applications and your self-managed Active Directory will flow with Secure Sockets Layer (SSL)
channel encryption.
You can use two different methods to enable client-side LDAPS for your directory. You can use
either the AWS Management Console method or the AWS CLI method.
Registering certificate in AWS Directory Service
Use either of the following methods to register a certificate in AWS Directory Service.
Enabling client-side LDAPS Version 1.0 412

AWS Directory Service Administration Guide
Method 1: To register your certificate in AWS Directory Service (AWS Management Console)
1. In the AWS Directory Service console navigation pane, select Directories.
2. Choose the directory ID link for your directory.
3. On the Directory details page, choose the Networking & security tab.
4. In the Client-side LDAPS section, select the Actions menu, and then select Register
certificate.
5. In the Register a CA certificate dialog box, select Browse, and then select the certificate and
choose Open.
6. Choose Register certificate.
Method 2: To register your certificate in AWS Directory Service (AWS CLI)
• Run the following command. For the certificate data, point to the location of your CA
certificate file. A certificate ID will be provided in the response.
aws ds register-certificate --directory-id your_directory_id --certificate-data
file://your_file_path
Checking registration status
To see the status of a certificate registration or a list of registered certificates, use either of the
following methods.
Method 1: To check certificate registration status in AWS Directory Service (AWS Management
Console)
1. Go to the Client-side LDAPS section on the Directory details page.
2. Review the current certificate registration state that is displayed under the Registration status
column. When the registration status value changes to Registered, your certificate has been
successfully registered.
Method 2: To check certificate registration status in AWS Directory Service (AWS CLI)
•
Run the following command. If the status value returns Registered, your certificate has been
successfully registered.
Enabling client-side LDAPS Version 1.0 413

AWS Directory Service Administration Guide
aws ds list-certificates --directory-id your_directory_id
Enabling client-side LDAPS
Use either of the following methods to enable client-side LDAPS in AWS Directory Service.
Note
You must have successfully registered at least one certificate before you can enable client-
side LDAPS.
Method 1: To enable client-side LDAPS in AWS Directory Service (AWS Management Console)
1. Go to the Client-side LDAPS section on the Directory details page.
2. Choose Enable. If this option is not available, verify that a valid certificate has been
successfully registered, and then try again.
3. In the Enable client-side LDAPS dialog box, choose Enable.
Method 2: To enable client-side LDAPS in AWS Directory Service (AWS CLI)
• Run the following command.
aws ds enable-ldaps --directory-id your_directory_id --type Client
Checking LDAPS status
Use either of the following methods to check the LDAPS status in AWS Directory Service.
Method 1: To check LDAPS status in AWS Directory Service (AWS Management Console)
1. Go to the Client-side LDAPS section on the Directory details page.
2. If the status value is displayed as Enabled, LDAPS has been successfully configured.
Enabling client-side LDAPS Version 1.0 414

AWS Directory Service Administration Guide
Method 2: To check LDAPS status in AWS Directory Service (AWS CLI)
•
Run the following command. If the status value returns Enabled, LDAPS has been successfully
configured.
aws ds describe-ldaps-settings –directory-id your_directory_id
For more information on viewing your client-side LDAPS certificate, deregistering or disabling your
LDAPS certificate, see Managing client-side LDAPS.
Managing client-side LDAPS
Use these commands to manage your LDAPS configuration.
You can use two different methods to manage client-side LDAPS settings. You can use either the
AWS Management Console method or the AWS CLI method.
View certificate details
Use either of the following methods to see when a certificate is set to expire.
Method 1: To view certificate details in AWS Directory Service (AWS Management Console)
1. In the AWS Directory Service console navigation pane, select Directories.
2. Choose the directory ID link for your directory.
3. On the Directory details page, choose the Networking & security tab.
4. In the Client-side LDAPS section, under CA certificates, information about the certificate will
be displayed.
Method 2: To view certificate details in AWS Directory Service (AWS CLI)
•
Run the following command. For the certificate ID, use the identifier returned by register-
certificate or list-certificates.
aws ds describe-certificate --directory-id your_directory_id --certificate-
id your_cert_id
Enabling client-side LDAPS Version 1.0 415

AWS Directory Service Administration Guide
Deregister a certificate
Use either of the following methods to deregister a certificate.
Note
If only one certificate is registered, you must first disable LDAPS before you can deregister
the certificate.
Method 1: To deregister a certificate in AWS Directory Service (AWS Management Console)
1. In the AWS Directory Service console navigation pane, select Directories.
2. Choose the directory ID link for your directory.
3. On the Directory details page, choose the Networking & security tab.
4. In the Client-side LDAPS section, choose Actions, and then choose Deregister certificate.
5. In the Deregister a CA certificate dialog box, choose Deregister.
Method 2: To deregister a certificate in AWS Directory Service (AWS CLI)
•
Run the following command. For the certificate ID, use the identifier returned by register-
certificate or list-certificates.
aws ds deregister-certificate --directory-id your_directory_id --certificate-
id your_cert_id
Disable client-side LDAPS
Use either of the following methods to disable client-side LDAPS.
Method 1: To disable client-side LDAPS in AWS Directory Service (AWS Management Console)
1. In the AWS Directory Service console navigation pane, select Directories.
2. Choose the directory ID link for your directory.
3. On the Directory details page, choose the Networking & security tab.
4. In the Client-side LDAPS section, choose Disable.
5. In the Disable client-side LDAPS dialog box, choose Disable.
Enabling client-side LDAPS Version 1.0 416

AWS Directory Service Administration Guide
Method 2: To disable client-side LDAPS in AWS Directory Service (AWS CLI)
• Run the following command.
aws ds disable-ldaps --directory-id your_directory_id --type Client
Enabling mTLS authentication in AD Connector for use with smart
cards
You can use certificate-based mutual Transport Layer Security (mTLS) authentication with smart
cards to authenticate users into Amazon WorkSpaces through your self-managed Active Directory
(AD) and AD Connector. When enabled, users select their smart card at the WorkSpaces login
screen and enter a PIN to authenticate, instead of using a username and password. From there,
the Windows or Linux virtual desktop uses the smart card to authenticate into AD from the native
desktop OS.
Note
Smart card authentication in AD Connector is only available in the following AWS Regions,
and only with WorkSpaces. Other AWS applications are not supported at this time.
• US East (N. Virginia)
• US West (Oregon)
• Asia Pacific (Sydney)
• Asia Pacific (Tokyo)
• Europe (Ireland)
• AWS GovCloud (US-West)
• AWS GovCloud (US-East)
You can also deregister and disable the certificates.
Topics
• Prerequisites
• Enabling smart card authentication
Enabling mTLS authentication Version 1.0 417

AWS Directory Service Administration Guide
• Managing smart card authentication settings
Prerequisites
To enable certificate-based mutual Transport Layer Security (mTLS) authentication using smart
cards for the Amazon WorkSpaces client, you need an operational smart card infrastructure
integrated with your self-managed Active Directory. For more information on how to set up smart
card authentication with Amazon WorkSpaces and Active Directory, see the Amazon WorkSpaces
Administration Guide.
Before you enable smart card authentication for WorkSpaces, please review the following
prerequisites:
• CA certificate requirements
• User certificate requirements
• Certificate revocation checking process
• Considerations
CA certificate requirements
AD Connector requires a certificate authority (CA) certificate, which represents the issuer of your
user certificates, for smart card authentication. AD Connector matches CA certificates with the
certificates presented by your users with their smart cards. Note the following CA certificate
requirements:
• Before you can register a CA certificate, it must be more than 90 days away from expiration.
• CA certificates must be in Privacy-Enhanced Mail (PEM) format. If you export CA certificates from
inside Active Directory, choose Base64-encoded X.509 (.CER) as the export file format.
• All root and intermediary CA certificates that chain from an issuing CA to user certificates must
be uploaded for smart card authentication to succeed.
• A maximum of 100 CA certificates can be stored per AD Connector directory
• AD Connector does not support the RSASSA-PSS signature algorithm for CA certificates.
• Verify the Certificate Propagation Service is set to Automatic and running.
Enabling mTLS authentication Version 1.0 418

AWS Directory Service Administration Guide
User certificate requirements
The following are some of the requirements for the user certificate:
• The user’s smart card certificate has a Subject Alternative Name (SAN) of the user’s
userPrincipalName (UPN).
• The user’s smart card certificate has Enhanced Key Usage as the smart card log-on
(1.3.6.1.4.1.311.20.2.2) Client Authentication (1.3.6.1.5.5.7.3.2).
• The Online Certificate Status Protocol (OCSP) information for the user’s smart card certificate
should be Access Method=On-line Certificate Status Protocol (1.3.6.1.5.5.7.48.1) in the Authority
Information Access.
For more information on AD Connector and smart card authentication requirements, see
Requirements in Amazon WorkSpaces Administration Guide. For help troubleshooting Amazon
WorkSpaces issues, like logging into WorkSpaces, resetting password, or connecting to
WorkSpaces, see Troubleshoot WorkSpaces client issues in Amazon WorkSpaces User Guide.
Certificate revocation checking process
In order to perform smart card authentication, AD Connector must check the revocation status of
user certificates using Online Certificate Status Protocol (OCSP). To perform certificate revocation
checking, an OCSP responder URL must be internet-accessible. If using a DNS name, an OCSP
responder URL must use a top-level domain found in the Internet Assigned Numbers Authority
(IANA) Root Zone Database.
AD Connector certificate revocation checking uses the following process:
• AD Connector must check the Authority Information Access (AIA) extension in the user certificate
for an OCSP responder URL, then AD Connector uses the URL to check for revocation.
• If AD Connector cannot resolve the URL found in the user certificate AIA extension, or find an
OCSP responder URL in the user certificate, then AD Connector uses the optional OCSP URL
provided during root CA certificate registration.
If the URL in the user certificate AIA extension resolves but is unresponsive, then user
authentication fails.
• If the OCSP responder URL provided during root CA certificate registration cannot resolve, is
unresponsive, or no OCSP responder URL was provided, user authentication fails.
Enabling mTLS authentication Version 1.0 419

AWS Directory Service Administration Guide
• The OCSP server must be compliant with RFC 6960. Additionally, the OCSP server must support
requests using the GET method for requests that are less than or equal to 255 bytes in total.
Note
AD Connector requires an HTTP URL for the OCSP responder URL.
Considerations
Before enabling smart card authentication in AD Connector, consider the following items:
• AD Connector uses certificate-based mutual Transport Layer Security authentication (mutual
TLS) to authenticate users to Active Directory using hardware or software-based smart card
certificates. Only common access cards (CAC) and personal identity verification (PIV) cards are
supported at this time. Other types of hardware or software-based smart cards might work but
have not been tested for use with the WorkSpaces Streaming Protocol.
• Smart card authentication replaces username and password authentication to WorkSpaces.
If you have other AWS applications configured on your AD Connector directory with smart card
authentication enabled, those applications still present the username and password input screen.
• Enabling smart card authentication limits the user session length to the maximum lifetime for
Kerberos service tickets. You can configure this setting using a Group Policy, and is set to 10
hours by default. For more information on this setting, see Microsoft documentation.
• The AD Connector service account's supported Kerberos encryption type should match each of
the domain controller's supported Kerberos encryption type.
Enabling smart card authentication
To enable smart card authentication for WorkSpaces on your AD Connector, first you need to
import your certificate authority (CA) certificates into AD Connector. You can import your CA
certificates into AD Connector using AWS Directory Service console, API or CLI. Use the following
steps to import your CA certificates and subsequently enable smart card authentication.
Steps
• Enabling Kerberos constrained delegation for the AD Connector service account
• Registering the CA certificate in AD Connector
Enabling mTLS authentication Version 1.0 420

AWS Directory Service Administration Guide
• Enabling smart card authentication for supported AWS applications and services
Enabling Kerberos constrained delegation for the AD Connector service account
To use smart card authentication with AD Connector, you must enable Kerberos Constrained
Delegation (KCD) for the AD Connector Service account to the LDAP service in the self-managed
AD directory.
Kerberos Constrained Delegation is a feature in Windows Server. This feature enables
administrators to specify and enforce application trust boundaries by limiting the scope where
application services can act on a user’s behalf. For more information, see Kerberos constrained
delegation.
Note
Kerberos Constrained Delegation (KCD) requires the username portion of the AD
Connector service account to match the sAMAccountName of the same user. The
sAMAccountName is restricted to 20 characters. sAMAccountName is a Microsoft Active
Directory attribute used as a sign in name for prior versions of Windows clients and servers.
1.
Use the SetSpn command to set a Service Principal Name (SPN) for the AD Connector service
account in the self-managed AD. This enables the service account for delegation configuration.
The SPN can be any service or name combination but not a duplicate of an existing SPN. The -
s checks for duplicates.
setspn -s my/spn service_account
2. In AD Users and Computers, open the context (right-click) menu and choose the AD Connector
service account and choose Properties.
3. Choose the Delegation tab.
4. Choose the Trust this user for delegation to specified service only and Use any
authentication protocol options.
5. Choose Add and then Users or Computers to locate the domain controller.
6. Choose OK to display a list of available services used for delegation.
7. Choose the ldap service type and choose OK.
Enabling mTLS authentication Version 1.0 421

AWS Directory Service Administration Guide
8. Choose OK again to save the configuration.
9. Repeat this process for other domain controllers in the Active Directory. Alternatively you can
automate the process using PowerShell.
Registering the CA certificate in AD Connector
Use either of the following methods to register a CA certificate for your AD Connector directory.
Method 1: To register your CA certificate in AD Connector (AWS Management Console)
1. In the AWS Directory Service console navigation pane, select Directories.
2. Choose the directory ID link for your directory.
3. On the Directory details page, choose the Networking & security tab.
4. In the Smart card authentication section, choose Actions, and then choose Register
certificate.
5. In the Register a certificate dialog box, select Choose file, and then choose a certificate and
choose Open. You can optionally choose to perform revocation checking for this certificate by
providing an Online Certificate Status Protocol (OCSP) responder URL. For more information
about OCSP, see Certificate revocation checking process.
6. Choose Register certificate. When you see the certificate status change to Registered, the
registration process has completed successfully.
Method 2: To register your CA certificate in AD Connector (AWS CLI)
• Run the following command. For the certificate data, point to the location of your
CA certificate file. To provide a secondary OCSP responder address, use the optional
ClientCertAuthSettings object.
aws ds register-certificate --directory-id your_directory_id --certificate-
data file://your_file_path --type ClientCertAuth --client-cert-auth-settings
OCSPUrl=http://your_OCSP_address
If successful, the response provides a certificate ID. You can also verify your CA certificate
registered successfully by running the following CLI command:
aws ds list-certificates --directory-id your_directory_id
Enabling mTLS authentication Version 1.0 422

AWS Directory Service Administration Guide
If the status value returns Registered, you have successfully registered your certificate.
Enabling smart card authentication for supported AWS applications and services
Use either of the following methods to register a CA certificate for your AD Connector directory.
Method 1: To enable smart card authentication in AD Connector (AWS Management Console)
1. Navigate to the Smart card authentication section on the Directory details page, and choose
Enable. If this option is not available, verify that a valid certificate has been successfully
registered, and then try again.
2. In the Enable smart card authentication dialog box, select Enable.
Method 2: To enable smart card authentication in AD Connector (AWS CLI)
• Run the following command.
aws ds enable-client-authentication --directory-id your_directory_id --type
SmartCard
If successful, AD Connector returns an HTTP 200 response with an empty HTTP body.
For more information on viewing your certificate, deregistering or disabling your certificate, see
Managing smart card authentication settings.
Managing smart card authentication settings
You can use two different methods to manage smart card settings. You can use either the AWS
Management Console method or the AWS CLI method.
Topics
• View certificate details
• Deregister a certificate
• Disable smart card authentication
Enabling mTLS authentication Version 1.0 423

AWS Directory Service Administration Guide
View certificate details
Use either of the following methods to see when a certificate is set to expire.
Method 1: To view certificate details in AWS Directory Service (AWS Management Console)
1. In the AWS Directory Service console navigation pane, select Directories.
2. Choose the directory ID link for your AD Connector directory.
3. On the Directory details page, choose the Networking & security tab.
4. In the Smart card authentication section, under CA certificates, choose the certificate ID to
display details about that certificate.
Method 2: To view certificate details in AWS Directory Service (AWS CLI)
•
Run the following command. For the certificate ID, use the identifier returned by register-
certificate or list-certificates.
aws ds describe-certificate --directory-id your_directory_id --certificate-
id your_cert_id
Deregister a certificate
Use either of the following methods to deregister a certificate.
Note
If only one certificate is registered, you must first disable smart card authentication before
you can deregister the certificate.
Method 1: To deregister a certificate in AWS Directory Service (AWS Management Console)
1. In the AWS Directory Service console navigation pane, select Directories.
2. Choose the directory ID link for your AD Connector directory.
3. On the Directory details page, choose the Networking & security tab.
4. In the Smart card authentication section, under CA certificates, select the certificate you
want to deregister, choose Actions, and then choose Deregister certificate.
Enabling mTLS authentication Version 1.0 424

AWS Directory Service Administration Guide
Important
Ensure that the certificate you are about to deregister is not active or is currently being
used as part of a CA certificate chain for smart card authentication.
5. In the Deregister a CA certificate dialog box, choose Deregister.
Method 2: To deregister a certificate in AWS Directory Service (AWS CLI)
•
Run the following command. For the certificate ID, use the identifier returned by register-
certificate or list-certificates.
aws ds deregister-certificate --directory-id your_directory_id --certificate-
id your_cert_id
Disable smart card authentication
Use either of the following methods to disable smart card authentication.
Method 1: To disable smart card authentication in AWS Directory Service (AWS Management
Console)
1. In the AWS Directory Service console navigation pane, select Directories.
2. Choose the directory ID link for your AD Connector directory.
3. On the Directory details page, choose the Networking & security tab.
4. In the Smart card authentication section, choose Disable.
5. In the Disable smart card authentication dialog box, choose Disable.
Method 2: To disable smart card authentication in AWS Directory Service (AWS CLI)
• Run the following command.
aws ds disable-client-authentication --directory-id your_directory_id --type
SmartCard
Enabling mTLS authentication Version 1.0 425

AWS Directory Service Administration Guide
Updating your AD Connector service account credentials in AWS
Management Console
The AD Connector credentials you provide in AWS Directory Service represent the service account
that is used to access your existing on-premises directory. You can modify the service account
credentials in AWS Directory Service by performing the following steps.
Note
If AWS IAM Identity Center is enabled for the directory, AWS Directory Service must
transfer the service principal name (SPN) from the current service account to the new
service account. If the current service account does not have permission to delete the SPN
or the new service account does not have permission to add the SPN, you are prompted for
the credentials of a directory account that does have permission to perform both actions.
These credentials are only used to transfer the SPN and are not stored by the service.
To update your AD Connector service account credentials in AWS Directory Service
1. In the AWS Directory Service console navigation pane, under Active Directory, choose
Directories.
2. Choose the directory ID link for your directory.
3. On the Directory details page, scroll down to the Service account credentials section.
4. In the Service account credentials section, choose Update.
5. In the Update service account credentials dialog box, type the service account username and
password. Reenter the password to confirm it and then choose Update.
Setting up AWS Private CA Connector for AD
You can integrate your self-managed Active Directory (AD) with AWS Private Certificate Authority
(CA) with AD Connector to issue and manage certificates for your AD domain joined users, groups
and machines. AWS Private CA Connector for AD allows you to use a fully managed AWS Private CA
drop-in replacement for your self-managed enterprise CAs without the need to deploy, patch, or
update local agents or proxy servers.
You can set up AWS Private CA integration with your directory through the Directory Service
console, the AWS Private CA Connector for AD console, or by calling the CreateTemplate API.
Updating your AD Connector service account credentials Version 1.0 426

AWS Directory Service Administration Guide
To set up the Private CA integration through the AWS Private CA Connector for Active Directory
console, see AWS Private CA Connector for Active Directory. See below for steps on how to set up
this integration from the AWS Directory Service console.
Prerequisites
When you use AD Connector, you need to delegate additional permissions to the service account.
Set the access-control list (ACL) on your service account to give yourself the ability to do the
following.
• Add and remove a Service Principal Name (SPN) to itself.
• Create and update certification authorities in the following containers:
#containers
CN=Public Key Services,CN=Services,CN=Configuration
CN=AIA,CN=Public Key Services,CN=Services,CN=Configuration
CN=Certification Authorities,CN=Public Key Services,CN=Services,CN=Configuration
• Create and update a NTAuthCertificates Certification Authority object like the example below. If
the NTAuthCertificates Certification Authority object exists, you must delegate permissions for
it. If the object does not exist, you must delegate the ability to create child objects on the Public
Key Services container.
#objects
CN=NTAuthCertificates,CN=Public Key Services,CN=Services,CN=Configuration
Note
If you’re using AWS Managed Microsoft AD, the additional permissions will be delegated
automatically when you authorize the AWS Private CA Connector for AD service with your
directory.
You can use the following PowerShell script to delegate the additional permissions and create the
NTAuthCertifiates certification authority object. Replace ‘myconnectoraccount’ with the service
account name.
$AccountName = 'myconnectoraccount'
Setting up AWS Private CA Connector for AD Version 1.0 427

AWS Directory Service Administration Guide
# DO NOT modify anything below this comment.
# Getting Active Directory information.
Import-Module -Name 'ActiveDirectory'
$RootDSE = Get-ADRootDSE
# Getting AD Connector service account Information
$AccountProperties = Get-ADUser -Identity $AccountName
$AccountSid = New-Object -TypeName 'System.Security.Principal.SecurityIdentifier'
$AccountProperties.SID.Value
[System.GUID]$ServicePrincipalNameGuid = (Get-ADObject -SearchBase
$RootDse.SchemaNamingContext -Filter { lDAPDisplayName -eq 'servicePrincipalName' } -
Properties 'schemaIDGUID').schemaIDGUID
$AccountAclPath = $AccountProperties.DistinguishedName
# Getting ACL settings for AD Connector service account.
$AccountAcl = Get-ACL -Path "AD:\$AccountAclPath"
# Setting ACL allowing the AD Connector service account the ability to add and remove a
Service Principal Name (SPN) to itself
$AccountAccessRule = New-Object -TypeName
'System.DirectoryServices.ActiveDirectoryAccessRule' $AccountSid, 'WriteProperty',
'Allow', $ServicePrincipalNameGuid, 'None'
$AccountAcl.AddAccessRule($AccountAccessRule)
Set-ACL -AclObject $AccountAcl -Path "AD:\$AccountAclPath"
# Add ACLs allowing AD Connector service account the ability to create certification
authorities
[System.GUID]$CertificationAuthorityGuid = (Get-ADObject -SearchBase
$RootDse.SchemaNamingContext -Filter { lDAPDisplayName -eq 'certificationAuthority' }
-Properties 'schemaIDGUID').schemaIDGUID
$CAAccessRule = New-Object -TypeName
'System.DirectoryServices.ActiveDirectoryAccessRule' $AccountSid,
'ReadProperty,WriteProperty,CreateChild,DeleteChild', 'Allow',
$CertificationAuthorityGuid, 'None'
$PKSDN = "CN=Public Key Services,CN=Services,CN=Configuration,
$($RootDSE.rootDomainNamingContext)"
$PKSACL = Get-ACL -Path "AD:\$PKSDN"
$PKSACL.AddAccessRule($CAAccessRule)
Set-ACL -AclObject $PKSACL -Path "AD:\$PKSDN"
$AIADN = "CN=AIA,CN=Public Key Services,CN=Services,CN=Configuration,
$($RootDSE.rootDomainNamingContext)"
$AIAACL = Get-ACL -Path "AD:\$AIADN"
Setting up AWS Private CA Connector for AD Version 1.0 428

AWS Directory Service Administration Guide
$AIAACL.AddAccessRule($CAAccessRule)
Set-ACL -AclObject $AIAACL -Path "AD:\$AIADN"
$CertificationAuthoritiesDN = "CN=Certification Authorities,CN=Public Key
Services,CN=Services,CN=Configuration,$($RootDSE.rootDomainNamingContext)"
$CertificationAuthoritiesACL = Get-ACL -Path "AD:\$CertificationAuthoritiesDN"
$CertificationAuthoritiesACL.AddAccessRule($CAAccessRule)
Set-ACL -AclObject $CertificationAuthoritiesACL -Path "AD:\$CertificationAuthoritiesDN"
$NTAuthCertificatesDN = "CN=NTAuthCertificates,CN=Public Key
Services,CN=Services,CN=Configuration,$($RootDSE.rootDomainNamingContext)"
If (-Not (Test-Path -Path "AD:\$NTAuthCertificatesDN")) {
New-ADObject -Name 'NTAuthCertificates' -Type 'certificationAuthority' -OtherAttributes
@{certificateRevocationList=[byte[]]'00';authorityRevocationList=[byte[]]'00';cACertificate=[byte[]]'00'}
-Path "CN=Public Key Services,CN=Services,CN=Configuration,
$($RootDSE.rootDomainNamingContext)"
}
$NTAuthCertificatesACL = Get-ACL -Path "AD:\$NTAuthCertificatesDN"
$NullGuid = [System.GUID]'00000000-0000-0000-0000-000000000000'
$NTAuthAccessRule = New-Object -TypeName
'System.DirectoryServices.ActiveDirectoryAccessRule' $AccountSid,
'ReadProperty,WriteProperty', 'Allow', $NullGuid, 'None'
$NTAuthCertificatesACL.AddAccessRule($NTAuthAccessRule)
Set-ACL -AclObject $NTAuthCertificatesACL -Path "AD:\$NTAuthCertificatesDN"
Setting up AWS Private CA Connector for AD
1. Sign in to the AWS Management Console and open the AWS Directory Service console at
https://console.aws.amazon.com/directoryservicev2/.
2. On the Directories page, choose your directory ID.
3. Under the Network & Security tab, under AWS Private CA Connector for AD, choose Set
up AWS Private CA Connector for AD. The page Create Private CA certificate for Active
Directory appears. Follow the steps on the console to create your Private CA for Active
Directory connector to enroll with your Private CA. For more information, see Creating a
connector.
4. After you create your connector, follow the steps below to view details, including the
connector’s status and the associated Private CA’s status.
Setting up AWS Private CA Connector for AD Version 1.0 429

AWS Directory Service Administration Guide
Viewing AWS Private CA Connector for AD
1. Sign in to the AWS Management Console and open the AWS Directory Service console at
https://console.aws.amazon.com/directoryservicev2/.
2. On the Directories page, choose your directory ID.
3. Under Network & Security, under AWS Private CA Connector for AD, you can view your
Private CA connectors and associated Private CA. By default, you see the following fields:
a. AWS Private CA Connector ID — The unique identifier for an AWS Private CA connector.
Clicking on it leads to the details page of that AWS Private CA connector.
b. AWS Private CA subject — Information about the distinguished name for the CA. Clicking
on it leads to the details page of that AWS Private CA.
c. Status — Based on a status check for the AWS Private CA Connector and the AWS Private
CA. If both checks pass, Active displays. If one of the checks fails, 1/2 checks failed
displays. If both checks fail, Failed displays. For more information about a failed status,
hover over the hyperlink to learn which check failed. Follow the instructions in the console
to remediate.
d. Date created — The day the AWS Private CA Connector was created.
For more information, see View connector details.
Monitor your AD Connector directory
You can get the most out of your AD Connector by learning more about the different AD Connector
status and what they mean for your AD Connector. You can also use Amazon Simple Notification
Service to receive notifications regarding your AD Connector status.
Tasks to monitor your AD Connector:
• Understanding your directory status
• Enabling AD Connector directory status notifications with Amazon SNS
Understanding your directory status
The following are the various statuses for a directory.
Monitor your directory Version 1.0 430

AWS Directory Service Administration Guide
Active
The directory is operating normally. No issues have been detected by the AWS Directory Service
for your directory.
Creating
The directory is currently being created. Directory creation typically takes between 20 to 45
minutes but may vary depending on the system load.
Deleted
The directory has been deleted. All resources for the directory have been released. Once a
directory enters this state, it cannot be recovered.
Deleting
The directory is currently being deleted. The directory will remain in this state until it has
been completely deleted. Once a directory enters this state, the delete operation cannot be
cancelled, and the directory cannot be recovered.
Failed
The directory could not be created. Please delete this directory. If this problem persists, please
contact the AWS Support Center.
Impaired
The directory is running in a degraded state. One or more issues have been detected, and not
all directory operations may be working at full operational capacity. There are many potential
reasons for the directory being in this state. These include normal operational maintenance
activity such as patching or EC2 instance rotation, temporary hot spotting by an application
on one of your domain controllers, or changes you made to your network that inadvertently
disrupt directory communications. For more information, see either Troubleshooting AWS
Managed Microsoft AD, Troubleshooting AD Connector, Troubleshooting Simple AD. For normal
maintenance related issues, AWS resolves these issues within 40 minutes. If after reviewing
the troubleshooting topic, your directory is in an Impaired state longer than 40 minutes, we
recommend that you contact the AWS Support Center.
Understanding your directory status Version 1.0 431

AWS Directory Service Administration Guide
Important
Do not restore a snapshot while a directory is in an Impaired state. It is rare that
snapshot restore is necessary to resolve impairments. For more information, see
Restoring your AWS Managed Microsoft AD with snapshots.
Inoperable
The directory is not functional. All directory endpoints have reported issues.
Requested
A request to create your directory is currently pending.
Enabling AD Connector directory status notifications with Amazon SNS
Using Amazon Simple Notification Service (Amazon SNS), you can receive email or text (SMS)
messages when the status of your directory changes. You get notified if your directory goes from
an Active status to an Impaired or Inoperable status. You also receive a notification when the
directory returns to an Active status.
How it works
Amazon SNS uses “topics” to collect and distribute messages. Each topic has one or more
subscribers who receive the messages that have been published to that topic. Using the steps
below you can add AWS Directory Service as publisher to an Amazon SNS topic. When AWS
Directory Service detects a change in your directory’s status, it publishes a message to that topic,
which is then sent to the topic's subscribers.
You can associate multiple directories as publishers to a single topic. You can also add directory
status messages to topics that you’ve previously created in Amazon SNS. You have detailed control
over who can publish to and subscribe to a topic. For complete information about Amazon SNS, see
What is Amazon SNS?.
To enable SNS messaging for your directory
1. Sign in to the AWS Management Console and open the AWS Directory Service console.
2. On the Directories page, choose your directory ID.
Enabling directory status notifications with Amazon SNS Version 1.0 432

AWS Directory Service Administration Guide
3. Select the Maintenance tab.
4. In the Directory monitoring section, choose Actions, and then select Create notification.
5. On the Create notification page, select Choose a notification type, and then choose Create
a new notification. Alternatively, if you already have an existing SNS topic, you can choose
Associate existing SNS topic to send status messages from this directory to that topic.
Note
If you choose Create a new notification but then use the same topic name for an SNS
topic that already exists, Amazon SNS does not create a new topic, but just adds the
new subscription information to the existing topic.
If you choose Associate existing SNS topic, you will only be able to choose an SNS
topic that is in the same Region as the directory.
6. Choose the Recipient type and enter the Recipient contact information. If you enter a phone
number for SMS, use numbers only. Do not include dashes, spaces, or parentheses.
7. (Optional) Provide a name for your topic and an SNS display name. The display name is a short
name up to 10 characters that is included in all SMS messages from this topic. When using the
SMS option, the display name is required.
Note
If you are logged in using an IAM user or role that has only the
DirectoryServiceFullAccess managed policy, your topic name must start with
“DirectoryMonitoring”. If you’d like to further customize your topic name you’ll need
additional privileges for SNS.
8. Choose Create.
If you want to designate additional SNS subscribers, such as an additional email address, Amazon
SQS queues or AWS Lambda, you can do this from the Amazon SNS console.
To remove directory status messages from a topic
1. Sign in to the AWS Management Console and open the AWS Directory Service console.
2. On the Directories page, choose your directory ID.
3. Select the Maintenance tab.
Enabling directory status notifications with Amazon SNS Version 1.0 433

AWS Directory Service Administration Guide
4. In the Directory monitoring section, select an SNS topic name in the list, choose Actions, and
then select Remove.
5. Choose Remove.
This removes your directory as a publisher to the selected SNS topic. If you want to delete the
entire topic, you can do this from the Amazon SNS console.
Note
Before deleting an Amazon SNS topic using the SNS console, you should ensure that a
directory is not sending status messages to that topic.
If you delete an Amazon SNS topic using the SNS console, this change will not immediately
be reflected within the Directory Services console. You would only be notified the next time
a directory publishes a notification to the deleted topic, in which case you would see an
updated status on the directory’s Monitoring tab indicating the topic could not be found.
Therefore, to avoid missing important directory status messages, before deleting any
topic that receives messages from AWS Directory Service, associate your directory with a
different Amazon SNS topic.
Access to AWS applications and services from AD Connector
You can allow your AD Connector access to AWS applications and services for your connected
Active Directory. Some of the supported AWS applications and services include:
• Amazon Chime
• Amazon WorkSpaces
• IAM Identity Center
• AWS Management Console
There are no third-party applications that work with AD Connector.
Tasks to access AWS applications and services from AD Connector
• Application compatibility policy for AD Connector
• Enabling access to AWS applications and services from AD Connector
Access to AWS applications and services Version 1.0 434

AWS Directory Service Administration Guide
Application compatibility policy for AD Connector
As an alternative to AWS Directory Service for Microsoft Active Directory (AWS Managed Microsoft
AD), AD Connector is an Active Directory proxy for AWS created applications and services only. You
configure the proxy to use a specified Active Directory domain. When the application must look
up a user or group in Active Directory, AD Connector proxies the request to the directory. Similarly,
when a user logs in to the application, AD Connector proxies the authentication request to the
directory. There are no third-party applications that work with AD Connector.
The following is a list of compatible AWS applications and services:
• Amazon Chime - For detailed instructions, see Connect to your Active Directory.
• Amazon Connect - For more information, see How Amazon Connect works.
• Amazon EC2 for Windows or Linux – You can use the seamless Active Directory domain join
feature of Amazon EC2 Windows or Linux to join your instance to your self-managed Active
Directory (on-premises). Once joined, the instance communicates directly with your Active
Directory and bypasses AD Connector. For more information, see Ways to join an Amazon EC2
instance to your Active Directory.
• AWS Management Console – You can use AD Connector to authenticate AWS Management
Console users with their Active Directory credentials without setting up SAML infrastructure. For
more information, see Enabling AWS Management Console access with AWS Managed Microsoft
AD credentials.
• Amazon QuickSight - For more information, see Managing user accounts in Amazon QuickSight
Enterprise Edition.
• AWS IAM Identity Center - For detailed instructions, see Connect IAM Identity Center to an on-
premises Active Directory.
• AWS Transfer Family - For detailed instructions, see Working with AWS Directory Service for
Microsoft Active Directory.
• AWS Client VPN - For detailed instructions, see Client authentication and authorization.
• Amazon WorkDocs - For detailed instructions, see Connecting to your on-premises directory with
AD Connector.
• Amazon WorkMail - For detailed instructions, see Integrate Amazon WorkMail with an existing
directory (standard setup).
• WorkSpaces - For detailed instructions, see Launch a WorkSpace using AD Connector.
Application compatibility Version 1.0 435

AWS Directory Service Administration Guide
Note
Amazon RDS is compatible with AWS Managed Microsoft AD only, and is not compatible
with AD Connector. For more information, see the AWS Managed Microsoft AD section in
the AWS Directory Service FAQs page.
Enabling access to AWS applications and services from AD Connector
Users can authorize AD Connector to give AWS applications and services, such as Amazon
WorkSpaces, access to your Active Directory. The following AWS applications and services can be
enabled or disabled to work with AD Connector.
AWS application / service More information...
Amazon Chime For more information, see the Connecting to
Active Directory.
Amazon Connect For more information, see the Amazon
Connect Administration Guide.
Amazon WorkDocs For more information, see the Getting started
with Amazon WorkDocs.
Amazon WorkMail For more information, see the Creating an
organization.
Amazon WorkSpaces You can create a Simple AD, AWS Managed
Microsoft AD, or AD Connector directly from
WorkSpaces. Simply launch Advanced Setup
when creating your Workspace.
For more information, see the Amazon
WorkSpaces Administration Guide.
AWS Client VPN For more information, see the AWS Client VPN
User Guide.
Enabling access to AWS applications and services from AD Connector Version 1.0 436

AWS Directory Service Administration Guide
AWS application / service More information...
AWS IAM Identity Center For more information, see the AWS IAM
Identity Center User Guide.
AWS Management Console For more information, see Enabling AWS
Management Console access with AWS
Managed Microsoft AD credentials.
AWS Transfer Family For more information, see the AWS Transfer
Family User Guide.
Once enabled, you manage access to your directories in the console of the application or service
that you want to give access to your directory. To find the AWS applications and services links
described above in the AWS Directory Service console, perform the following steps.
To display the applications and services for a directory
1. In the AWS Directory Service console navigation pane, choose Directories.
2. On the Directories page, choose your directory ID.
3. On the Directory details page, select the Application management tab.
4. Review the list under the AWS apps & services section.
For more information about how to authorize or deauthorize AWS applications and services using
AWS Directory Service, see Authorization for AWS applications and services using AWS Directory
Service.
Ways to join an Amazon EC2 instance to your Active Directory
AD Connector is a directory gateway with which you can redirect directory requests to your on-
premises Microsoft Active Directory without caching any information in the cloud. Here's more
information on how you can join an Amazon EC2 to an Active Directory domain:
• You can seamlessly join an Amazon EC2 instance to your Active Directory domain when the
instance is launched. For more information on joining an EC2 Windows instance to an AWS
Managed Microsoft AD, see Joining an Amazon EC2 Windows instance to your AWS Managed
Microsoft AD Active Directory.
Ways to join an Amazon EC2 instance to your Active Directory Version 1.0 437

AWS Directory Service Administration Guide
• If you need to manually join an EC2 instance to your Active Directory domain, you must launch
the instance in the proper AWS Region and security group or subnet, then join the instance to
the Active Directory domain.
• To be able to connect remotely to these instances, you must have IP connectivity to the instances
from the network you are connecting from. In most cases, this requires that an internet gateway
be attached to your Amazon VPC and that the instance has a public IP address. For more
information about connecting to the internet using an internet gateway see Connect to the
internet using an internet gateway in the Amazon VPC User Guide.
Note
Once you join an instance to your self-managed Active Directory (on-premises), the
instance communicates directly with your Active Directory and bypasses AD Connector.
AD Connector quotas
The following are the default quotas for AD Connector. Each quota is per Region unless otherwise
noted.
AD Connector quotas
Resource Default quota
AD Connector directories 10
Maximum number of registered certificate
authority (CA) certificates per directory
5
Troubleshooting AD Connector
The following can help you troubleshoot some common issues you might encounter when creating
or using your AD Connector.
Topics
• Creation issues
Quotas Version 1.0 438

AWS Directory Service Administration Guide
• Connectivity issues
• Authentication issues
• Maintenance issues
• I cannot delete my AD Connector
Creation issues
The following are common creation issues for AD Connector
• I receive an "AZ Constrained" error when I create a directory
• I receive a "Connectivity issues detected" error when I try to create AD Connector
I receive an "AZ Constrained" error when I create a directory
Some AWS accounts created before 2012 might have access to Availability Zones in the US East (N.
Virginia), US West (N. California), or Asia Pacific (Tokyo) Regions that do not support AWS Directory
Service directories. If you receive an error such as this when creating a Active Directory, choose a
subnet in a different Availability Zone and try to create the directory again.
I receive a "Connectivity issues detected" error when I try to create AD Connector
If you receive the "Connectivity issue detected" error when trying to create an AD Connector, the
error could be due to port availability or AD Connector password complexity. You can test your AD
Connector's connection to see whether the following ports are available:
• 53 (DNS)
• 88 (Kerberos)
• 389 (LDAP)
To test your connection, see Test your AD Connector. The connection test should be performed on
the instance joined to both subnets that the AD Connector's IP addresses are associated to.
If the connection test is successful and the instance joins the domain, then check your AD
Connector’s password. AD Connector must meet AWS password complexity requirements. For more
information, see Service account in AD Connector prerequisites.
Creation issues Version 1.0 439

AWS Directory Service Administration Guide
If your AD Connector does not meet these requirements, recreate your AD Connector with a
password that complies with these requirements.
Connectivity issues
The following are common connectivity issues for AD Connector
• I receive a "Connectivity issues detected" error when I try to connect to my on-premises directory
• I receive a "DNS unavailable" error when I try to connect to my on-premises directory
• I receive an "SRV record" error when I try to connect to my on-premises directory
I receive a "Connectivity issues detected" error when I try to connect to my on-
premises directory
You receive an error message similar to the following when connecting to your on-premises
directory:
Connectivity issues detected: LDAP unavailable (TCP port 389) for IP: <IP address>
Kerberos/authentication unavailable (TCP port 88) for IP: <IP address> Please ensure
that the listed ports are available and retry the operation.
AD Connector must be able to communicate with your on-premises domain controllers via TCP and
UDP over the following ports. Verify that your security groups and on-premises firewalls allow TCP
and UDP communication over these ports. For more information, see AD Connector prerequisites.
• 88 (Kerberos)
• 389 (LDAP)
You may need additional TCP/UDP ports depending on your needs. See the following list for some
of these ports. For more information about ports used by Active Directory, see How to configure a
firewall for Active Directory domains and trusts in Microsoft documentation.
• 135 (RPC Endpoint Mapper)
• 646 (LDAP SSL)
• 3268 (LDAP GC)
• 3269 (LDAP GC SSL)
Connectivity issues Version 1.0 440

AWS Directory Service Administration Guide
I receive a "DNS unavailable" error when I try to connect to my on-premises
directory
You receive an error message similar to the following when connecting to your on-premises
directory:
DNS unavailable (TCP port 53) for IP: <DNS IP address>
AD Connector must be able to communicate with your on-premises DNS servers via TCP and
UDP over port 53. Verify that your security groups and on-premises firewalls allow TCP and UDP
communication over this port. For more information, see AD Connector prerequisites.
I receive an "SRV record" error when I try to connect to my on-premises directory
You receive an error message similar to one or more of the following when connecting to your on-
premises directory:
SRV record for LDAP does not exist for IP: <DNS IP address> SRV record for Kerberos
does not exist for IP: <DNS IP address>
AD Connector needs to obtain the _ldap._tcp.<DnsDomainName> and
_kerberos._tcp.<DnsDomainName> SRV records when connecting to your directory. You will
get this error if the service cannot obtain these records from the DNS servers that you specified
when connecting to your directory. For more information about these SRV records, see SRV record
requirements.
Authentication issues
Here are some common authentication issues with AD Connector:
• I receive a '“Certificate Validation failed” error when I try to sign in to Amazon WorkSpaces with a
smart card
• I receive an "Invalid Credentials" error when the service account used by AD Connector attempts
to authenticate
• I receive a “Unable to Authenticate” error when using AWS applications to search for users or
groups
• I receive an error about my directory credentials when I try to update the AD Connector service
account
Authentication issues Version 1.0 441

AWS Directory Service Administration Guide
• Some of my users cannot authenticate with my directory
I receive a '“Certificate Validation failed” error when I try to sign in to Amazon
WorkSpaces with a smart card
You receive an error message similar to the following when you try to sign in to your WorkSpaces
with a smart card:
ERROR: Certificate Validation failed. Please try again by restarting your browser or
application and make sure you select the correct certificate.
The error occurs if the smart card’s certificate is not properly stored on the client that uses the
certificates. For more information on AD Connector and smart card requirements, see Prerequisites.
Use the following procedures to troubleshoot the smart card’s ability to store certificates in the
user’s certificate store:
1. On the device that is having trouble accessing the certificates, access the Microsoft
Management Console (MMC).
Important
Before moving forward, create a copy of the smart card’s certificate.
2. Navigate to the certificate store in the MMC. Delete the user's smart card certificate from the
certificate store. For more information about viewing the certificate store in the MMC, see How
to: View certificates with the MMC snap-in in Microsoft documentation.
3. Remove the smart card.
4. Reinsert the smart card so it can repopulate the smart card certificate in the user’s certificate
store.
Warning
If the smart card is not repopulating the certificate to the user store then it cannot be
used for WorkSpaces smart card authentication.
The AD Connector's Service account should have the following:
Authentication issues Version 1.0 442

AWS Directory Service Administration Guide
•
my/spn added to the Service Principle Name
• Delegated for LDAP service
After the certificate is repopulated on the smart card, the on-premise domain controller should
be checked to determine if they are blocked from User Principal Name (UPN) mapping for Subject
Alternative Name. For more information about this change, see How to disable the Subject
Alternative Name for UPN mapping in Microsoft documentation.
Use the following procedure to check your domain controller's registry key:
1. In the Registry Editor, navigate to the following hive key
HKEY_LOCAL_MACHINE\SYSTEM\CurrentControlSet\Services\Kdc\UseSubjectAltName
2. Select UseSubjectAltName. Ensure the value is set to 0.
Note
If the registry key is set on the on-premise Domain Controllers then the AD Connector will
not be able to locate the users in Active Directory and result in the above error message.
The Certificate Authority (CA) certificates should be uploaded to the AD Connector smart
card certificate. The certificate should contain OCSP information. The following list additional
requirements for the CA:
• The certificate should be in the Trusted Root Authority of the Domain Controller, the Certificate
Authority Server, and the WorkSpaces.
• Offline and Root CA certificates will not contain the OSCP information. These certificates contain
information about their revocation.
• If you are using a third-party CA certificate for smart card authentication, then the CA and
intermediate certificates need to be published to the Active Directory NTAuth store. They must
be installed in the trusted root authority for all domain controllers, certificate authority servers,
and WorkSpaces.
• You can use the follow command to publish certificates to the Active Directory NTAuth store:
Authentication issues Version 1.0 443

AWS Directory Service Administration Guide
certutil -dspublish -f Third_Party_CA.cer NTAuthCA
For more information about publishing certificates to the NTAuth store, see Import the issuing CA
certificate into the Enterprise NTAuth store in Access Amazon WorkSpaces with Common Access
Cards Installation Guide.
You can check to see if the user certificate or CA chain certificates are verified by OCSP by
following this procedure:
1. Export the smart card certificate to a location on the local machine like the C: drive.
2. Open a Command Line prompt and navigate to the location where the exported smart card
certificate is stored.
3. Enter the following command:
certutil -URL Certficate_name.cer
4. A pop-up window should appear following the command. Select the OCSP option on the right
corner and select Retrieve. The status should return as verified.
For more information about the certutil command, see certutil in Microsoft documentation
I receive an "Invalid Credentials" error when the service account used by AD
Connector attempts to authenticate
This can occur if the hard drive on your domain controller runs out of space. Ensure that your
domain controller's hard drives are not full.
I receive a “Unable to Authenticate” error when using AWS applications to search
for users or groups
You may experience errors when searching for users while using AWS applications, such as
WorkSpaces or Amazon QuickSight, even while the AD Connector status was active. Expired
credentials can prevent AD Connector from completing queries on objects in your Active Directory.
Update the password for the service account using the ordered steps provided in Seamless domain
join for Amazon EC2 instances stopped working.
Authentication issues Version 1.0 444

AWS Directory Service Administration Guide
I receive an error about my directory credentials when I try to update the AD
Connector service account
You receive an error message similar to one or more of the following when trying to update the AD
Connector service account:
Message:An Error Has Occurred
Your directory needs a credential update. Please update the directory credentials.
An Error Has Occurred
Your directory needs a credential update. Please update the directory credentials
following Update your AD Connector Service Account Credentials
Message:
An Error Has Occurred
Your request has a problem. Please see the following details.
There was an error with the service account/password combination
There could be an issue with the time synchronization and Kerberos. AD Connector sends Kerberos
authentication requests to Active Directory. These requests are time sensitive and if the requests
are delayed, they will fail. To resolve this issue, see Recommendation - Configure the Root PDC with
an Authoritative Time Source and Avoid Widespread Time Skew in Microsoft documentation. For
more information about time service and synchronization, see below:
• How the Windows Time Service Works
• Maximum tolerance for computer clock synchronization
• Windows Time service tools and settings
Some of my users cannot authenticate with my directory
Your user accounts must have Kerberos preauthentication enabled. This is the default setting for
new user accounts, but it should not be modified. For more information about this setting, go to
Preauthentication on Microsoft TechNet.
Authentication issues Version 1.0 445

AWS Directory Service Administration Guide
Maintenance issues
The following are common maintenance issues for AD Connector
• My directory is stuck in the "Requested" state
• Seamless domain join for Amazon EC2 instances stopped working
My directory is stuck in the "Requested" state
If you have a directory that has been in the "Requested" state for more than five minutes, try
deleting the directory and recreating it. If this problem persists, contact AWS Support.
Seamless domain join for Amazon EC2 instances stopped working
If seamless domain join for EC2 instances was working and then stopped while the AD Connector
was active, the credentials for your AD Connector service account may have expired. Expired
credentials can prevent AD Connector from creating computer objects in your Active Directory.
To resolve this issue, update the service account passwords in the following order so that the
passwords match:
1. Update the password for the service account in your Active Directory.
2. Update the password for the service account in your AD Connector in AWS Directory Service.
For more information, see Updating your AD Connector service account credentials in AWS
Management Console.
Important
Updating the password only in AWS Directory Service does not push the password change
to your existing on-premises Active Directory so it is important to do it in the order shown
in the previous procedure.
I cannot delete my AD Connector
If your AD Connector switches to an inoperable state, you no longer have access to your domain
controllers. We block the deletion of an AD Connector when there are still applications linked to
Maintenance issues Version 1.0 446

AWS Directory Service Administration Guide
it because one of those applications may still be using the directory. For a list of applications you
need to disable in order to delete your AD Connector, see Deleting your AD Connector. If you still
can’t delete your AD Connector, you can request help through AWS Support.
I cannot delete my AD Connector Version 1.0 447

AWS Directory Service Administration Guide
Simple AD
Simple AD is a standalone managed directory that is powered by a Samba 4 Active Directory
Compatible Server. It is available in two sizes.
• Small - Supports up to 500 users (approximately 2,000 objects including users, groups, and
computers).
• Large - Supports up to 5,000 users (approximately 20,000 objects including users, groups, and
computers).
Simple AD provides a subset of the features offered by AWS Managed Microsoft AD, including the
ability to manage user accounts and group memberships, create and apply group policies, securely
connect to Amazon EC2 instances, and provide Kerberos-based single sign-on (SSO). However,
note that Simple AD does not support features such as multi-factor authentication (MFA), trust
relationships with other domains, Active Directory Administrative Center, PowerShell support,
Active Directory recycle bin, group managed service accounts, and schema extensions for POSIX
and Microsoft applications.
Simple AD offers many advantages:
• Simple AD makes it easier to manage amazon EC2 instances running Linux and Windows and
deploy Windows applications in the AWS Cloud.
• Many of the applications and tools that you use today that require Microsoft Active Directory
support can be used with Simple AD.
• User accounts in Simple AD allow access to AWS applications such as WorkSpaces, Amazon
WorkDocs, or Amazon WorkMail.
• You can manage AWS resources through IAM role–based access to the AWS Management
Console.
• Daily automated snapshots enable point-in-time recovery.
Simple AD does not support any of the following:
• Amazon AppStream 2.0
• Amazon Chime
• Amazon RDS for SQL Server
Version 1.0 448

AWS Directory Service Administration Guide
• Amazon RDS for Oracle
• AWS IAM Identity Center
• Trust relationships with other domains
• Active Directory Administrative Center
• PowerShell
• Active Directory recycle bin
• Group managed service accounts
• Schema extensions for POSIX and Microsoft applications
Continue reading the topics in this section to learn how to create your own Simple AD.
Topics
• Getting started with Simple AD
• Best practices for Simple AD
• Maintain your Simple AD directory
• Secure your Simple AD directory
• Monitor your Simple AD directory
• Access to AWS applications and services from your Simple AD
• Ways to join an Amazon EC2 instance to your Simple AD
• Users and groups management in Simple AD
• Simple AD quotas
• Troubleshooting Simple AD
Getting started with Simple AD
Simple AD creates a fully managed, Samba-based directory in the AWS cloud. When you create a
directory with Simple AD, AWS Directory Service creates two domain controllers and DNS servers
on your behalf. The domain controllers are created in different subnets in an Amazon VPC this
redundancy helps ensures that your directory remains accessible even if a failure occurs.
Topics
Getting started Version 1.0 449

AWS Directory Service Administration Guide
• Simple AD prerequisites
• Create your Simple AD
• What gets created with your Simple AD Active Directory
Simple AD prerequisites
To create a Simple AD Active Directory, you need an Amazon VPC with the following:
• The VPC must have default hardware tenancy.
• The VPC must not be configured with the following VPC endpoint(s):
• Route53 VPC endpoints that include DNS conditional overrides for *.amazonaws.com which
resolve to non public AWS IP addresses
• CloudWatch VPC endpoint
• Systems Manager VPC endpoint
• Security Token Service VPC endpoint
• At least two subnets in two different Availability Zones. The subnets must be in the same
Classless Inter-Domain Routing (CIDR) range. If you want to extend or resize the VPC for your
directory, then make sure to select both of the domain controller subnets for the extended VPC
CIDR range. When you create a Simple AD, AWS Directory Service creates two domain controllers
and DNS servers on your behalf.
• For more information about the CIDR range, see IP addressing for your VPCs and subnets in
the Amazon VPC User Guide.
• If you require LDAPS support with Simple AD, we recommend that you configure it using a
Network Load Balancer connected to port 389. This model enables you to use a strong certificate
for the LDAPS connection, simplify access to LDAPS through a single NLB IP address, and
have automatic fail-over through the NLB. Simple AD does not support the use of self-signed
certificates on port 636. For more information about how to configure LDAPS with Simple AD,
see How to configure an LDAPS endpoint for Simple AD in the AWS Security Blog.
• The following encryption types must be enabled in the directory:
• RC4_HMAC_MD5
• AES128_HMAC_SHA1
• AES256_HMAC_SHA1
• Future encryption types
Simple AD prerequisites Version 1.0 450

AWS Directory Service Administration Guide
Note
Disabling these encryption types can cause communication issues with RSAT (Remote
Server Administration Tools) and impact the availability or your directory.
• For more information, see What is Amazon VPC? in the Amazon VPC User Guide.
AWS Directory Service uses a two VPC structure. The EC2 instances which make up your directory
run outside of your AWS account, and are managed by AWS. They have two network adapters,
ETH0 and ETH1. ETH0 is the management adapter, and exists outside of your account. ETH1 is
created within your account.
The management IP range of your directory's ETH0 network is chosen programmatically to ensure
it does not conflict with the VPC where your directory is deployed. This IP range can be in either of
the following pairs (as Directories run in two subnets):
• 10.0.1.0/24 & 10.0.2.0/24
• 169.254.0.0/16
• 192.168.1.0/24 & 192.168.2.0/24
We avoid conflicts by checking the first octet of the ETH1 CIDR. If it starts with a 10, then we
choose a 192.168.0.0/16 VPC with 192.168.1.0/24 and 192.168.2.0/24 subnets. If the first octet
is anything else other than a 10 we choose a 10.0.0.0/16 VPC with 10.0.1.0/24 and 10.0.2.0/24
subnets.
The selection algorithm does not include routes on your VPC. It is therefore possible to have an IP
routing conflict result from this scenario.
Important
If any of the Simple AD prerequisites are altered after your Simple AD is created, your
Simple AD can become Impaired. To resolve your Simple AD Impaired status, you'll need to
contact AWS Support.
Simple AD prerequisites Version 1.0 451

AWS Directory Service Administration Guide
Create your Simple AD
This procedure walks you through all the necessary steps to create a Simple AD. It is intended to
get you started with Simple AD quickly and easily, but is not intended to be used in a large-scale
production environment.
Steps
• Prerequisites
• Creating and configuring your Amazon VPC for your Simple AD
• Creating your Simple AD
Prerequisites
This procedure assumes the following:
• You have an active AWS account.
• Your account has not reached its limit of Amazon VPCs for the Region in which you want to use
Simple AD. For more information about VPC, see What is Amazon VPC? and Subnets in your VPC
in the Amazon VPC User Guide.
•
You do not have an existing VPC in the Region with a CIDR of 10.0.0.0/16.
• You are in a Region where Simple AD is available. For more information, see Region availability
for AWS Directory Service.
For more information, see Simple AD prerequisites.
Creating and configuring your Amazon VPC for your Simple AD
First, you'll create and configure an Amazon VPC for use with your Simple AD. Before starting this
procedure, make sure you have completed the Prerequisites.
The VPC you'll create will have two public subnets. AWS Directory Service requires two subnets in
your VPC, and each subnet must be in a different Availability Zone.
Create a VPC
1. Open the Amazon VPC console at https://console.aws.amazon.com/vpc/.
Create your Simple AD Version 1.0 452

AWS Directory Service Administration Guide
2. In the VPC Dashboard, choose Create VPC.
3. Under VPC settings, choose VPC and more.
4. Complete these fields as follows:
•
Keep Auto-generated selected under Name tag auto-generation. Change project to ADS
VPC.
•
The IPv4 CIDR block should be 10.0.0.0/16.
• Keep No IPv6 CIDR block option selected.
• The Tenancy should remain Default.
• Select 2 for the Number of Availability Zones (AZs).
• Select 2 for the Number of public subnets. The number of private subnets can be changed
to 0.
• Choose Customize subnet CIDR blocks to configure the public subnet IP address range. The
public subnet CIDR blocks should be 10.0.0.0/20 and 10.0.16.0/20.
5. Choose Create VPC. It takes several minutes for the VPC to be created.
Creating your Simple AD
To create a new Simple AD, perform the following steps. Before starting this procedure, make sure
you have completed the following in Prerequisites and Creating and configuring your Amazon VPC
for your Simple AD.
Create a Simple AD
1. In the AWS Directory Service console navigation pane, choose Directories and then choose Set
up directory.
2. On the Select directory type page, choose Simple AD, and then choose Next.
3. On the Enter directory information page, provide the following information:
Directory size
Choose from either the Small or Large size option. For more information about sizes, see
Simple AD.
Organization name
A unique organization name for your directory that will be used to register client devices.
Create your Simple AD Version 1.0 453

AWS Directory Service Administration Guide
This field is only available if you are creating your directory as part of launching
WorkSpaces.
Directory DNS name
The fully qualified name for the directory, such as corp.example.com.
Directory NetBIOS name
The short name for the directory, such as CORP.
Administrator password
The password for the directory administrator. The directory creation process creates an
administrator account with the username Administrator and this password.
The directory administrator password is case-sensitive and must be between 8 and 64
characters in length, inclusive. It must also contain at least one character from three of the
following four categories:
• Lowercase letters (a-z)
• Uppercase letters (A-Z)
• Numbers (0-9)
• Non-alphanumeric characters (~!@#$%^&*_-+=`|\(){}[]:;"'<>,.?/)
Confirm password
Retype the administrator password.
Important
Be sure to save this password. AWS Directory Service does not store this password,
and it cannot be retrieved. However, you can reset a password from the AWS
Directory Service console or by using the ResetUserPassword API.
Directory description
An optional description for the directory.
4. On the Choose VPC and subnets page, provide the following information, and then choose
Next.
Create your Simple AD Version 1.0 454

AWS Directory Service Administration Guide
VPC
The VPC for the directory.
Subnets
Choose the subnets for the domain controllers. The two subnets must be in different
Availability Zones.
5. On the Review & create page, review the directory information and make any necessary
changes. When the information is correct, choose Create directory. It takes several minutes for
the directory to be created. Once created, the Status value changes to Active.
For more information on what is created with your Simple AD, see What gets created with your
Simple AD Active Directory.
What gets created with your Simple AD Active Directory
When you create a Active Directory with Simple AD, AWS Directory Service performs the following
tasks on your behalf:
• Sets up a Samba-based directory within the VPC.
•
Creates a directory administrator account with the user name Administrator and the specified
password. You use this account to manage your directory.
Important
Be sure to save this password. AWS Directory Service does not store this password, and it
cannot be retrieved. However, you can reset a password from the AWS Directory Service
console or by using the ResetUserPassword API.
• Creates a security group for the directory controllers.
•
Creates an account with the name AWSAdminD-xxxxxxxx that has domain admin privileges.
This account is used by AWS Directory Service to perform automated operations for directory
maintenance operations, such as taking directory snapshots and FSMO role transfers. The
credentials for this account are securely stored by AWS Directory Service.
• Automatically creates and associates an elastic network interface (ENI) with each of your
domain controllers. Each of these ENIs are essential for connectivity between your VPC and
What gets created with your Simple AD Active Directory Version 1.0 455

AWS Directory Service Administration Guide
AWS Directory Service domain controllers and should never be deleted. You can identify all
network interfaces reserved for use with AWS Directory Service by the description: "AWS created
network interface for directory directory-id". For more information, see Elastic Network Interfaces
in the Amazon EC2 User Guide. The default DNS Server of the AWS Managed Microsoft AD
Active Directory is the VPC DNS server at Classless Inter-Domain Routing (CIDR)+2. For more
information, see Amazon DNS server in Amazon VPC User Guide.
Note
Domain controllers are deployed across two Availability Zones in a region by default and
connected to your Amazon Virtual Private Cloud (VPC). Backups are automatically taken
once per day, and the Amazon Elastic Block Store (EBS) volumes are encrypted to ensure
that data is secured at rest. Domain controllers that fail are automatically replaced in
the same Availability Zone using the same IP address, and a full disaster recovery can be
performed using the latest backup.
Best practices for Simple AD
Here are some suggestions and guidelines you should consider to avoid problems and get the most
out of Simple AD.
Setting up: Prerequisites
Consider these guidelines before creating your directory.
Verify you have the right directory type
AWS Directory Service provides multiple ways to use Microsoft Active Directory with other AWS
services. You can choose the directory service with the features you need at a cost that fits your
budget:
• AWS Directory Service for Microsoft Active Directory is a feature-rich managed Microsoft
Active Directory hosted on the AWS cloud. AWS Managed Microsoft AD is your best choice if
you have more than 5,000 users and need a trust relationship set up between an AWS hosted
directory and your on-premises directories.
• AD Connector simply connects your existing on-premises Active Directory to AWS. AD Connector
is your best choice when you want to use your existing on-premises directory with AWS services.
Best practices Version 1.0 456

AWS Directory Service Administration Guide
• Simple AD is a low-scale, low-cost directory with basic Active Directory compatibility. It supports
5,000 or fewer users, Samba 4–compatible applications, and LDAP compatibility for LDAP-aware
applications.
For a more detailed comparison of AWS Directory Service options, see Which to choose.
Ensure your VPCs and instances are configured correctly
In order to connect to, manage, and use your directories, you must properly configure the VPCs
that the directories are associated with. See either Prerequisites for creating a AWS Managed
Microsoft AD, AD Connector prerequisites, or Simple AD prerequisites for information about the
VPC security and networking requirements.
If you are adding an instance to your domain, ensure that you have connectivity and remote access
to your instance as described in Ways to join an Amazon EC2 instance to your AWS Managed
Microsoft AD.
Be aware of your limits
Learn about the various limits for your specific directory type. The available storage and the
aggregate size of your objects are the only limitations on the number of objects you may store in
your directory. See either AWS Managed Microsoft AD quotas, AD Connector quotas, or Simple AD
quotas for details about your chosen directory.
Understand your directory’s AWS security group configuration and use
AWS creates a security group and attaches it to your directory’s domain controller elastic network
interfaces. AWS configures the security group to block unnecessary traffic to the directory and
allows necessary traffic.
Modifying the directory security group
If you want to modify the security of your directories’ security groups, you can do so. Make such
changes only if you fully understand how security group filtering works. For more information, see
Amazon EC2 security groups for Linux instances in the Amazon EC2 User Guide. Improper changes
can result in loss of communications to intended computers and instances. AWS recommends that
you do not attempt to open additional ports to your directory as this decreases the security of your
directory. Please carefully review the AWS Shared Responsibility Model.
Setting up: Prerequisites Version 1.0 457

AWS Directory Service Administration Guide
Warning
It is technically possible for you to associate the directory’s security group with other
EC2 instances that you create. However, AWS recommends against this practice. AWS
may have reasons to modify the security group without notice to address functional or
security needs of the managed directory. Such changes affect any instances with which
you associate the directory security group and may disrupt operation of the associated
instances. Furthermore, associating the directory security group with your EC2 instances
may create a potential security risk for your EC2 instances.
Use AWS Managed Microsoft AD if trusts are required
Simple AD does not support trust relationships. If you need to establish a trust between your
AWS Directory Service directory and another directory, you should use AWS Directory Service for
Microsoft Active Directory.
Setting up: Creating your directory
Here are some suggestions to consider as you create your directory.
Remember your administrator ID and password
When you set up your directory, you provide a password for the administrator account. That
account ID is Administrator for Simple AD. Remember the password that you create for this
account; otherwise you will not be able to add objects to your directory.
Understand username restrictions for AWS applications
AWS Directory Service provides support for most character formats that can be used in the
construction of usernames. However, there are character restrictions that are enforced on
usernames that will be used for signing in to AWS applications, such as WorkSpaces, Amazon
WorkDocs, Amazon WorkMail, or Amazon QuickSight. These restrictions require that the following
characters not be used:
• Spaces
• Multibyte characters
• !"#$%&'()*+,/:;<=>?@[\]^`{|}~
Setting up: Creating your directory Version 1.0 458

AWS Directory Service Administration Guide
Note
The @ symbol is allowed as long as it precedes a UPN suffix.
Programming your applications
Before you program your applications, consider the following:
Use the Windows DC locator service
When developing applications, use the Windows DC locator service or use the Dynamic DNS
(DDNS) service of your AWS Managed Microsoft AD to locate domain controllers (DCs). Do not hard
code applications with the address of a DC. The DC locator service helps ensure directory load is
distributed and enables you to take advantage of horizontal scaling by adding domain controllers
to your deployment. If you bind your application to a fixed DC and the DC undergoes patching or
recovery, your application will lose access to the DC instead of using one of the remaining DCs.
Furthermore, hard coding of the DC can result in hot spotting on a single DC. In severe cases, hot
spotting may cause your DC to become unresponsive. Such cases may also cause AWS directory
automation to flag the directory as impaired and may trigger recovery processes that replace the
unresponsive DC.
Load test before rolling out to production
Be sure to do lab testing with objects and requests that are representative of your production
workload to confirm that the directory scales to the load of your application. Should you require
additional capacity, you should use AWS Directory Service for Microsoft Active Directory, which
enables you to add domain controllers for high performance. For more information, see Deploying
additional domain controllers for your AWS Managed Microsoft AD.
Use efficient LDAP queries
Broad LDAP queries to a domain controller across thousands of objects can consume significant
CPU cycles in a single DC, resulting in hot spotting. This may affect applications that share the
same DC during the query.
Programming your applications Version 1.0 459

AWS Directory Service Administration Guide
Maintain your Simple AD directory
You can use the AWS Management Console to maintain your Simple AD and complete day-to-day
administrative tasks. Ways you can maintain your Simple AD include:
• View details about your Simple AD like the DNS name, Directory ID, and directory status.
• Update the DNS address for your Simple AD.
• Restore your Simple AD with snapshots. You can also create snapshot and delete snapshots.
• Delete your Simple AD when it is no longer needed.
Viewing Simple AD directory information
To view detailed directory information in the AWS Management Console
1. In the AWS Directory Service console navigation pane, under Active Directory, select
Directories.
2. Click the directory ID link for your directory. Information about the directory is displayed in the
Directory details page.
For more information about the Status field, see Understanding your Simple AD directory status.
Configuring DNS servers for Simple AD
Simple AD forwards DNS requests to the IP address of the Amazon-provided DNS servers for your
Amazon VPC. These DNS servers will resolve names configured in your Amazon Route53 private
Maintain your directory Version 1.0 460

AWS Directory Service Administration Guide
hosted zones. By pointing your on-premises computers to your Simple AD, you can now resolve
DNS requests to the private hosted zone. For more information on Route53, see What is Route53.
Note that to enable your Simple AD to respond to external DNS queries, the network access control
list (ACL) for the VPC containing your Simple AD must be configured to allow traffic from outside
the VPC.
• If you are not using Route53 private hosted zones, your DNS requests will be forwarded to
public DNS servers.
• If you're using custom DNS servers that are outside of your VPC and you want to use private
DNS, you must reconfigure to use custom DNS servers on EC2 instances within your VPC. For
more information, see Working with private hosted zones.
• If you want your Simple AD to resolve names using both DNS servers within your VPC and
private DNS servers outside of your VPC, you can do this using a DHCP options set. For a detailed
example, see this article.
• Integrating your Directory Service's DNS resolution with Amazon Route53 Resolver.
Note
DNS dynamic updates are not supported in Simple AD domains. You can instead make the
changes directly by connecting to your directory using DNS Manager on an instance that is
joined to your domain.
Restoring your Simple AD with snapshot
AWS Directory Service provides the ability to take manual snapshots of data for your Simple AD
directory. These snapshots can be used to perform a point-in-time restore for your directory. You
cannot take snapshots of AD Connector directories.
Topics
• Creating a snapshot of your directory
• Restoring your directory from a snapshot
• Deleting a snapshot
Restoring your directory with snapshot Version 1.0 461

AWS Directory Service Administration Guide
Creating a snapshot of your directory
A snapshot can be used to restore your directory to what it was at the point in time that the
snapshot was taken. To create a manual snapshot of your directory, perform the following steps.
Note
You are limited to 5 manual snapshots for each directory. If you have already reached
this limit, you must delete one of your existing manual snapshots before you can create
another.
To create a manual snapshot
1. In the AWS Directory Service console navigation pane, select Directories.
2. On the Directories page, choose your directory ID.
3. On the Directory details page, select the Maintenance tab.
4. In the Snapshots section, choose Actions, and then select Create snapshot.
5. In the Create directory snapshot dialog box, provide a name for the snapshot, if desired.
When ready, choose Create.
Depending on the size of your directory, it may take several minutes to create the snapshot. When
the snapshot is ready, the Status value changes to Completed.
Restoring your directory from a snapshot
Restoring a directory from a snapshot is equivalent to moving the directory back in time. Directory
snapshots are unique to the directory they were created from. A snapshot can only be restored
to the directory from which it was created. In addition, the maximum supported age of a manual
snapshot is 180 days. For more information, see Useful shelf life of a system-state backup of Active
Directory on the Microsoft website.
Warning
We recommend that you contact the AWS Support Center before any snapshot restore;
we may be able to help you avoid the need to do a snapshot restore. Any restore from
snapshot can result in data loss as they are a point in time. It is important you understand
Restoring your directory with snapshot Version 1.0 462

AWS Directory Service Administration Guide
that all of the DCs and DNS servers associated with the directory will be offline until the
restore operation has been completed.
To restore your directory from a snapshot, perform the following steps.
To restore a directory from a snapshot
1. In the AWS Directory Service console navigation pane, select Directories.
2. On the Directories page, choose your directory ID.
3. On the Directory details page, select the Maintenance tab.
4. In the Snapshots section, select a snapshot in the list, choose Actions, and then select Restore
snapshot.
5. Review the information in the Restore directory snapshot dialog box, and choose Restore.
For a Simple AD directory, it may take several minutes for the directory to be restored. When it
has been successfully restored, the Status value of the directory changes to Active. Any changes
made to the directory after the snapshot date are overwritten.
Deleting a snapshot
To delete a snapshot
1. In the AWS Directory Service console navigation pane, select Directories.
2. On the Directories page, choose your directory ID.
3. On the Directory details page, select the Maintenance tab.
4. In the Snapshots section, choose Actions, and then select Delete snapshot.
5. Verify that you want to delete the snapshot, and then choose Delete.
Deleting your Simple AD
When a Simple AD is deleted, all of the directory data and snapshots are deleted and cannot be
recovered. After the directory is deleted, all instances that are joined to the directory remain intact.
You cannot, however, use your directory credentials to log in to these instances. You need to log in
to these instances with a user account that is local to the instance.
Deleting your Simple AD Version 1.0 463

AWS Directory Service Administration Guide
To delete a directory
1. In the AWS Directory Service console navigation pane, select Directories. Ensure you are in the
AWS Region where your Active Directory is deployed. For more information, see Choosing a
Region.
2. Ensure that no AWS applications are enabled for the directory you intend to delete. Enabled
AWS applications will prevent you for deleting your AWS Managed Microsoft AD or Simple AD.
a. On the Directories page, choose your directory ID.
b. On the Directory details page, select the Application management tab. In the AWS apps
& services section, you see which AWS applications are enabled for your directory.
• Disable AWS Management Console access. For more information, see Disabling AWS
Management Console access.
• To disable Amazon WorkSpaces, you must deregister the service from the directory in
the WorkSpaces console. For more information, see Delete a directory in the Amazon
WorkSpaces Administration Guide.
• To disable Amazon WorkDocs, you must delete the Amazon WorkDocs site in the
Amazon WorkDocs console. For more information, see Delete a site in the Amazon
WorkDocs Administration Guide.
• To disable Amazon WorkMail, you must remove the Amazon WorkMail organization in
the Amazon WorkMail console. For more information, see Remove an organization in
the Amazon WorkMail Administrator Guide.
• To disable Amazon FSx for Windows File Server, you must remove the Amazon FSx file
system from the domain. For more information, see Working with Active Directory in
FSx for Windows File Server in the Amazon FSx for Windows File Server User Guide.
• To disable Amazon Relational Database Service, you must remove the Amazon RDS
instance from the domain. For more information, see Managing a DB instance in a
domain in the Amazon RDS User Guide.
• To disable AWS Client VPN Service, you must remove the directory service from the
Client VPN Endpoint. For more information, see Work with Client VPN in the AWS Client
VPN Administrator Guide.
• To disable Amazon Connect, you must delete the Amazon Connect Instance. For
more information, see Delete your Amazon Connect instance in the Amazon Connect
Administration Guide.
Deleting your Simple AD Version 1.0 464

AWS Directory Service Administration Guide
• To disable Amazon QuickSight, you must unsubscribe from Amazon QuickSight.
For more information, see Closing your Amazon QuickSight account in the Amazon
QuickSight User Guide.
Note
If you are using AWS IAM Identity Center and have previously connected it to the
AWS Managed Microsoft AD directory you plan to delete, you must first change
the identity source before you can delete it. For more information, see Change
your identity source in the IAM Identity Center User Guide.
3. In the navigation pane, choose Directories.
4. Select only the directory to be deleted and click Delete. It takes several minutes for the
directory to be deleted. When the directory has been deleted, it is removed from your
directory list.
Secure your Simple AD directory
This section describes considerations for securing your Simple AD environment.
Topics
• How to reset a Simple AD krbtgt account password
How to reset a Simple AD krbtgt account password
The krbtgt account plays an important role in the Kerberos ticket exchanges. The krbtgt account
is a special account used for Kerberos ticket-granting ticket (TGT) encryption, and it plays a crucial
role in the security of the Kerberos authentication protocol. In Samba AD, krbtgt is represented
as a (disabled) user account. The password to this account is randomly generated at the time the
domain is provisioned. Access to this secret can result in undetectable total domain compromise
as new Kerberos tickets can be printed without auditing. For more information, see Samba
documentation.
It is recommended to change this password regularly every 90 days. You can reset the krbtgt
account password from an Amazon EC2 Windows instanced joined to your Simple AD.
Secure your directory Version 1.0 465

AWS Directory Service Administration Guide
Note
AWS Simple AD is powered by Samba-AD. Samba-AD doesn't store N-1 hash for the krbtgt
account. Therefore, when the krbtgt account password is reset, the Kerberos client will be
required to negotiate a new Ticket Granting Ticket (TGT) during their next Service Ticket
(ST) request. To minimize potential service disruptions, you should schedule the krbtgt
account password resets outside of business hours. This approach mitigates impacts on
ongoing operations and ensures smooth authentication continuity.
The following procedures shows how you can reset the krbtgt account password from an Amazon
EC2 Windows instance.
Prerequisites
• Before you can begin this procedure, complete the following:
• You have domain joined an EC2 instance to your Simple AD directory.
• For more information on how to join an EC2 Windows instance to a Simple AD, see the
section called “Joining a Windows instance”.
• You have the Simple AD directory administrator credentials. You will be signing in as the
Simple AD directory administrator for this procedure.
Note
Some AWS services like Amazon WorkDocs, Amazon WorkMail, and Amazon WorkSpaces,
will create a Simple AD on your behalf. For more information, see:
• Getting started with Amazon WorkDocs in Amazon WorkDocs Administration Guide.
• Creating an organization in Amazon WorkMail Administrator Guide.
• Get started with WorkSpaces in Amazon WorkSpaces Administration Guide.
Reset Simple AD krbtgt account password
1. Open the Amazon EC2 console at https://console.aws.amazon.com/ec2/.
2. In the Amazon EC2 console, choose Instances and select the Windows Server instance. Then
choose Connect.
Reset krbtgt account password Version 1.0 466

AWS Directory Service Administration Guide
3. In the Connect to instance page, choose RDP client.
4. In the Windows Security dialog box, copy your local administrator credentials for the Windows
Server computer to sign in. The username can be in the following formats: NetBIOS-Name
\administrator or DNS-Name\administrator. For example, corp\administrator
would be the username if you followed the procedure in the section called “Create your Simple
AD”.
5. Once signed in to the Windows Server computer, open Windows Administrative Tools from
the Start menu by choosing Windows Administrative Tools folder.
6. In the Windows Administrative Tools dashboard, open Active Directory Users and Computers
by choosing Active Directory User and Computers.
Reset krbtgt account password Version 1.0 467

AWS Directory Service Administration Guide
7. In the Active Directory Users and Computers window, select View and then choose Enable
Advanced Features.
8. In the Active Directory Users and Computers window, select Users from the left panel.
9. Find the user named krbtgt, right click on it and select Reset Password.
Reset krbtgt account password Version 1.0 468

AWS Directory Service Administration Guide
10. In the new window, enter the new password, enter it again, and then choose OK to reset the
krbtgt account password.
11. In the Windows Administrative Tools dashboard, choose Active Directory Sites and Services.
12. In the Active Directory Sites and Services window, expand Site, Default-First-Site-Name, and
Servers.
Reset krbtgt account password Version 1.0 469

AWS Directory Service Administration Guide
13. In the NTDS Settings window, right click on the server and select Replicate Now.
14. Repeat steps 13 - 14 for your other servers.
Monitor your Simple AD directory
You can get the most out of your Simple AD by learning more about the different Simple AD
statuses and what they mean for your Simple AD. You can also use AWS services like Amazon
Simple Notification Service to monitor your Simple AD. Amazon Simple Notification Service can
send you notifications of your Simple AD directory status.
Tasks to monitor your
• Understanding your Simple AD directory status
Monitor your directory Version 1.0 470

AWS Directory Service Administration Guide
• Enabling Simple AD directory status notifications with Amazon Simple Notification Service
Understanding your Simple AD directory status
The following are the various statuses for a directory.
Active
The directory is operating normally. No issues have been detected by the AWS Directory Service
for your directory.
Creating
The directory is currently being created. Directory creation typically takes between 20 to 45
minutes but may vary depending on the system load.
Deleted
The directory has been deleted. All resources for the directory have been released. Once a
directory enters this state, it cannot be recovered.
Deleting
The directory is currently being deleted. The directory will remain in this state until it has
been completely deleted. Once a directory enters this state, the delete operation cannot be
cancelled, and the directory cannot be recovered.
Failed
The directory could not be created. Please delete this directory. If this problem persists, please
contact the AWS Support Center.
Impaired
The directory is running in a degraded state. One or more issues have been detected, and not
all directory operations may be working at full operational capacity. There are many potential
reasons for the directory being in this state. These include normal operational maintenance
activity such as patching or EC2 instance rotation, temporary hot spotting by an application
on one of your domain controllers, or changes you made to your network that inadvertently
disrupt directory communications. Your directory can have an impaired status if you alter the
settings outlined in Simple AD prerequisites. For more information, see either Troubleshooting
AWS Managed Microsoft AD, Troubleshooting AD Connector, Troubleshooting Simple AD.
Understanding your directory status Version 1.0 471

AWS Directory Service Administration Guide
For normal maintenance related issues, AWS resolves these issues within 40 minutes. If after
reviewing the troubleshooting topic, your directory is in an Impaired state longer than 40
minutes, we recommend that you contact the AWS Support Center.
Important
Do not restore a snapshot while a directory is in an Impaired state. It is rare that
snapshot restore is necessary to resolve impairments. For more information, see
Restoring your AWS Managed Microsoft AD with snapshots.
Inoperable
The directory is not functional. All directory endpoints have reported issues.
Requested
A request to create your directory is currently pending.
RestoreFailed
Restoring the directory from a snapshot failed. Please retry the restore operation. If this
continues, try a different snapshot, or contact the AWS Support Center.
Restoring
The directory is currently being restored from an automatic or manual snapshot. Restoring from
a snapshot typically takes several minutes, depending on the size of the directory data in the
snapshot.
For more information, see Troubleshooting Simple AD directory status messages.
Enabling Simple AD directory status notifications with Amazon Simple
Notification Service
Using Amazon Simple Notification Service (Amazon SNS), you can receive email or text (SMS)
messages when the status of your directory changes. You get notified if your directory goes from
an Active status to an Impaired or Inoperable status. You also receive a notification when the
directory returns to an Active status.
Enabling directory status notifications with Amazon Simple Notification Service Version 1.0 472

AWS Directory Service Administration Guide
How it works
Amazon SNS uses “topics” to collect and distribute messages. Each topic has one or more
subscribers who receive the messages that have been published to that topic. Using the steps
below you can add AWS Directory Service as publisher to an Amazon SNS topic. When AWS
Directory Service detects a change in your directory’s status, it publishes a message to that topic,
which is then sent to the topic's subscribers.
You can associate multiple directories as publishers to a single topic. You can also add directory
status messages to topics that you’ve previously created in Amazon SNS. You have detailed control
over who can publish to and subscribe to a topic. For complete information about Amazon SNS, see
What is Amazon SNS?.
To enable SNS messaging for your directory
1. Sign in to the AWS Management Console and open the AWS Directory Service console.
2. On the Directories page, choose your directory ID.
3. Select the Maintenance tab.
4. In the Directory monitoring section, choose Actions, and then select Create notification.
5. On the Create notification page, select Choose a notification type, and then choose Create
a new notification. Alternatively, if you already have an existing SNS topic, you can choose
Associate existing SNS topic to send status messages from this directory to that topic.
Note
If you choose Create a new notification but then use the same topic name for an SNS
topic that already exists, Amazon SNS does not create a new topic, but just adds the
new subscription information to the existing topic.
If you choose Associate existing SNS topic, you will only be able to choose an SNS
topic that is in the same Region as the directory.
6. Choose the Recipient type and enter the Recipient contact information. If you enter a phone
number for SMS, use numbers only. Do not include dashes, spaces, or parentheses.
7. (Optional) Provide a name for your topic and an SNS display name. The display name is a short
name up to 10 characters that is included in all SMS messages from this topic. When using the
SMS option, the display name is required.
Enabling directory status notifications with Amazon Simple Notification Service Version 1.0 473

AWS Directory Service Administration Guide
Note
If you are logged in using an IAM user or role that has only the
DirectoryServiceFullAccess managed policy, your topic name must start with
“DirectoryMonitoring”. If you’d like to further customize your topic name you’ll need
additional privileges for SNS.
8. Choose Create.
If you want to designate additional SNS subscribers, such as an additional email address, Amazon
SQS queues or AWS Lambda, you can do this from the Amazon SNS console.
To remove directory status messages from a topic
1. Sign in to the AWS Management Console and open the AWS Directory Service console.
2. On the Directories page, choose your directory ID.
3. Select the Maintenance tab.
4. In the Directory monitoring section, select an SNS topic name in the list, choose Actions, and
then select Remove.
5. Choose Remove.
This removes your directory as a publisher to the selected SNS topic. If you want to delete the
entire topic, you can do this from the Amazon SNS console.
Note
Before deleting an Amazon SNS topic using the SNS console, you should ensure that a
directory is not sending status messages to that topic.
If you delete an Amazon SNS topic using the SNS console, this change will not immediately
be reflected within the Directory Services console. You would only be notified the next time
a directory publishes a notification to the deleted topic, in which case you would see an
updated status on the directory’s Monitoring tab indicating the topic could not be found.
Therefore, to avoid missing important directory status messages, before deleting any
topic that receives messages from AWS Directory Service, associate your directory with a
different Amazon SNS topic.
Enabling directory status notifications with Amazon Simple Notification Service Version 1.0 474

AWS Directory Service Administration Guide
Access to AWS applications and services from your Simple AD
You can grant access to your Simple AD users to access AWS applications and services. Some of
these AWS applications and services include:
• Amazon Chime
• Amazon WorkDocs
• AWS Management Console
• Amazon WorkSpaces
You can also use access URLs and single sign-on with your Simple AD.
Topics
• Application compatibility policy for Simple AD
• Enabling access to AWS applications and services for your Simple AD
• Enabling access to the AWS Management Console with Simple AD credentials
• Creating an access URL for Simple AD
• Enabling single sign-on
Application compatibility policy for Simple AD
Simple AD is an implementation of Samba that provides many of the basic features of Active
Directory. Due to the magnitude of custom and commercial off-the-shelf applications that use
Active Directory, AWS does not and cannot perform formal or broad verification of third-party
application compatibility with Simple AD. Although AWS works with customers in an attempt to
overcome any potential application installation challenges they might encounter, we are unable to
guarantee that any application is or will continue to be compatible with Simple AD.
The following third-party applications are compatible with Simple AD:
• Microsoft Internet Information Services (IIS) on the following platforms:
• Windows Server 2003 R2
• Windows Server 2008 R1
• Windows Server 2008 R2
Access to AWS applications and services Version 1.0 475
AWS Directory Service Administration Guide
• Windows Server 2012
• Windows Server 2012 R2
• Microsoft SQL Server:
• SQL Server 2005 R2 (Express, Web, and Standard editions)
• SQL Server 2008 R2 (Express, Web, and Standard editions)
• SQL Server 2012 (Express, Web, and Standard editions)
• SQL Server 2014 (Express, Web, and Standard editions)
• Microsoft SharePoint:
• SharePoint 2010 Foundation
• SharePoint 2010 Enterprise
• SharePoint 2013 Enterprise
Customers can choose to use AWS Directory Service for Microsoft Active Directory (AWS Managed
Microsoft AD) for a higher level of compatibility based on actual Active Directory.
Enabling access to AWS applications and services for your Simple AD
Users can authorize Simple AD to give AWS applications and services, such as Amazon WorkSpaces,
access to your Active Directory. The following AWS applications and services can be enabled or
disabled to work with Simple AD.
AWS application / service More information...
Amazon Chime For more information, see the Amazon Chime
Administration Guide.
Amazon WorkDocs For more information, see the Amazon
WorkDocs Administration Guide
Amazon WorkMail For more information, see the Amazon
WorkMail Administrator Guide.
Amazon WorkSpaces You can create a Simple AD, AWS Managed
Microsoft AD, or AD Connector directly from
WorkSpaces. Simply launch Advanced Setup
when creating your Workspace.
Enabling access to AWS applications and services Version 1.0 476

AWS Directory Service Administration Guide
AWS application / service More information...
For more information, see the Amazon
WorkSpaces Administration Guide.
AWS Management Console For more information, see Enabling AWS
Management Console access with AWS
Managed Microsoft AD credentials.
Once enabled, you manage access to your directories in the console of the application or service
that you want to give access to your directory. To find the AWS applications and services links
described above in the AWS Directory Service console, perform the following steps.
To display the applications and services for a directory
1. In the AWS Directory Service console navigation pane, choose Directories.
2. On the Directories page, choose your directory ID.
3. On the Directory details page, select the Application management tab.
4. Review the list under the AWS apps & services section.
For more information about how to authorize or deauthorize AWS applications and services using
AWS Directory Service, see Authorization for AWS applications and services using AWS Directory
Service.
Enabling access to the AWS Management Console with Simple AD
credentials
AWS Directory Service allows you to grant members of your directory access to the AWS
Management Console. By default, your directory members do not have access to any AWS
resources. You assign IAM roles to your directory members to give them access to the various AWS
services and resources. The IAM role defines the services, resources, and level of access that your
directory members have.
Before you can grant console access to your directory members, your directory must have an
access URL. For more information about how to view directory details and get your access URL, see
Viewing AWS Managed Microsoft AD directory information. For more information about how to
create an access URL, see Creating an access URL for AWS Managed Microsoft AD.
Enabling access to the AWS Management Console Version 1.0 477

AWS Directory Service Administration Guide
For more information about how to create and assign IAM roles to your directory members, see
Granting AWS Managed Microsoft AD users and groups access to AWS resources with IAM roles.
Topics
• Enabling AWS Management Console access
• Disabling AWS Management Console access
• Setting login session length
Related AWS Security Blog Article
• How to Access the AWS Management Console Using AWS Managed Microsoft AD and Your On-
Premises Credentials
Enabling AWS Management Console access
By default, console access is not enabled for any directory. To enable console access for your
directory users and groups, perform the following steps:
To enable console access
1. In the AWS Directory Service console navigation pane, choose Directories.
2. On the Directories page, choose your directory ID.
3. On the Directory details page, select the Application management tab.
4. Under the AWS Management Console section, choose Enable. Console access is now enabled
for your directory.
Before users can sign-in to the console with your access URL, you must first add your users
to the role. For general information about assigning users to IAM roles, see Assigning users
or groups to an existing role. After the IAM roles have been assigned, users can then access
the console using your access URL. For example, if your directory access URL is example-
corp.awsapps.com, the URL to access the console is https://example-corp.awsapps.com/
console/.
Disabling AWS Management Console access
To disable console access for your directory users and groups, perform the following steps:
Enabling access to the AWS Management Console Version 1.0 478

AWS Directory Service Administration Guide
To disable console access
1. In the AWS Directory Service console navigation pane, choose Directories.
2. On the Directories page, choose your directory ID.
3. On the Directory details page, select the Application management tab.
4. Under the AWS Management Console section, choose Disable. Console access is now disabled
for your directory.
5. If any IAM roles have been assigned to users or groups in the directory, the Disable button
may be unavailable. In this case, you must remove all IAM role assignments for the directory
before proceeding, including assignments for users or groups in your directory that have been
deleted, which will show as Deleted User or Deleted Group.
After all IAM role assignments have been removed, repeat the steps above.
Setting login session length
By default, users have 1 hour to use their session after successfully signing in to the console before
they are logged out. After that, users must sign in again to start the next 1 hour session before
being logged off again. You can use the following procedure to change the length of time to up to
12 hours per session.
To set login session length
1. In the AWS Directory Service console navigation pane, choose Directories.
2. On the Directories page, choose your directory ID.
3. On the Directory details page, select the Application management tab.
4. Under the AWS apps & services section, choose AWS Management Console.
5. In the Manage Access to AWS Resource dialog box, choose Continue.
6. In the Assign users and groups to IAM roles page, under Set login session length, edit the
numbered value, and then choose Save.
Creating an access URL for Simple AD
An access URL is used with AWS applications and services, such as Amazon WorkDocs, to reach a
login page that is associated with your directory. The URL must be unique globally. You can create
an access URL for your directory by performing the following steps.
Creating an access URL Version 1.0 479

AWS Directory Service Administration Guide
Warning
Once you create an application access URL for this directory, it cannot be changed. After an
access URL is created, it cannot be used by others. If you delete your directory, the access
URL is also deleted and can then be used by any other account.
To create an access URL
1. In the AWS Directory Service console navigation pane, select Directories.
2. On the Directories page, choose your directory ID.
3. On the Directory details page, select the Application management tab.
4. In the Application access URL section, if an access URL has not been assigned to the directory,
the Create button is displayed. Enter a directory alias and choose Create. If an Entity Already
Exists error is returned, the specified directory alias has already been allocated. Choose
another alias and repeat this procedure.
Your access URL is displayed in the format <alias>.awsapps.com.
Enabling single sign-on
AWS Directory Service provides the ability to allow your users to access Amazon WorkDocs from a
computer joined to the directory without having to enter their credentials separately.
Before you enable single sign-on, you need to take additional steps to enable your users web
browsers to support single sign-on. Users may need to modify their web browser settings to enable
single sign-on.
Note
Single sign-on only works when used on a computer that is joined to the AWS Directory
Service directory. It cannot be used on computers that are not joined to the directory.
If your directory is an AD Connector directory and the AD Connector service account does not have
the permission to add or remove its service principal name attribute, then for Steps 5 and 6 below,
you have two options:
Enabling single sign-on Version 1.0 480

AWS Directory Service Administration Guide
1. You can proceed and will be prompted for the username and password for a directory user that
has this permission to add or remove the service principal name attribute on the AD Connector
service account. These credentials are only used to enable single sign-on and are not stored by
the service. The AD Connector service account permissions are not changed.
2. You can delegate permissions to allow the AD Connector service account to add or remove the
service principal name attribute on itself, you can run the below PowerShell commands from
a domain joined computer using an account that has permissions to modify the permissions
on the AD Connector service account. The below command will give the AD Connector service
account the ability to add and remove a service principal name attribute only for itself.
$AccountName = 'ConnectorAccountName'
# DO NOT modify anything below this comment.
# Getting Active Directory information.
Import-Module 'ActiveDirectory'
$RootDse = Get-ADRootDSE
[System.GUID]$ServicePrincipalNameGuid = (Get-ADObject -SearchBase
$RootDse.SchemaNamingContext -Filter { lDAPDisplayName -eq 'servicePrincipalName' } -
Properties 'schemaIDGUID').schemaIDGUID
# Getting AD Connector service account Information.
$AccountProperties = Get-ADUser -Identity $AccountName
$AclPath = $AccountProperties.DistinguishedName
$AccountSid = New-Object -TypeName 'System.Security.Principal.SecurityIdentifier'
$AccountProperties.SID.Value
# Getting ACL settings for AD Connector service account.
$ObjectAcl = Get-ACL -Path "AD:\$AclPath"
# Setting ACL allowing the AD Connector service account the ability to add and remove a
Service Principal Name (SPN) to itself
$AddAccessRule = New-Object -TypeName
'System.DirectoryServices.ActiveDirectoryAccessRule' $AccountSid, 'WriteProperty',
'Allow', $ServicePrincipalNameGUID, 'None'
$ObjectAcl.AddAccessRule($AddAccessRule)
Set-ACL -AclObject $ObjectAcl -Path "AD:\$AclPath"
To enable or disable single sign-on with Amazon WorkDocs
1. In the AWS Directory Service console navigation pane, select Directories.
2. On the Directories page, choose your directory ID.
3. On the Directory details page, select the Application management tab.
Enabling single sign-on Version 1.0 481

AWS Directory Service Administration Guide
4. In the Application access URL section, choose Enable to enable single sign-on for Amazon
WorkDocs.
If you do not see the Enable button, you may need to first create an Access URL before
this option will be displayed. For more information about how to create an access URL, see
Creating an access URL for AWS Managed Microsoft AD.
5. In the Enable Single Sign-On for this directory dialog box, choose Enable. Single sign-on is
enabled for the directory.
6. If you later want to disable single sign-on with Amazon WorkDocs, choose Disable, and then in
the Disable Single Sign-On for this directory dialog box, choose Disable again.
Topics
• Single sign-on for IE and Chrome
• Single sign-on for Firefox
Single sign-on for IE and Chrome
To allow Microsoft Internet Explorer (IE) and Google Chrome browsers to support single sign-on,
the following tasks must be performed on the client computer:
•
Add your access URL (e.g., https://<alias>.awsapps.com) to the list of approved sites for single
sign-on.
• Enable active scripting (JavaScript).
• Allow automatic logon.
• Enable integrated authentication.
You or your users can perform these tasks manually, or you can change these settings using Group
Policy settings.
Topics
• Manual update for single sign-on on Windows
• Manual update for single sign-on on OS X
• Group policy settings for single sign-on
Enabling single sign-on Version 1.0 482

AWS Directory Service Administration Guide
Manual update for single sign-on on Windows
To manually enable single sign-on on a Windows computer, perform the following steps on the
client computer. Some of these settings may already be set correctly.
To manually enable single sign-on for Internet Explorer and Chrome on Windows
1.
To open the Internet Properties dialog box, choose the Start menu, type Internet Options
in the search box, and choose Internet Options.
2. Add your access URL to the list of approved sites for single sign-on by performing the
following steps:
a. In the Internet Properties dialog box, select the Security tab.
b. Select Local intranet and choose Sites.
c. In the Local intranet dialog box, choose Advanced.
d. Add your access URL to the list of websites and choose Close.
e. In the Local intranet dialog box, choose OK.
3. To enable active scripting, perform the following steps:
a. In the Security tab of the Internet Properties dialog box, choose Custom level.
b. In the Security Settings - Local Intranet Zone dialog box, scroll down to Scripting and
select Enable under Active scripting.
c. In the Security Settings - Local Intranet Zone dialog box, choose OK.
4. To enable automatic logon, perform the following steps:
a. In the Security tab of the Internet Properties dialog box, choose Custom level.
b. In the Security Settings - Local Intranet Zone dialog box, scroll down to User
Authentication and select Automatic logon only in Intranet zone under Logon.
c. In the Security Settings - Local Intranet Zone dialog box, choose OK.
d. In the Security Settings - Local Intranet Zone dialog box, choose OK.
5. To enable integrated authentication, perform the following steps:
a. In the Internet Properties dialog box, select the Advanced tab.
b. Scroll down to Security and select Enable Integrated Windows Authentication.
c. In the Internet Properties dialog box, choose OK.
6. Close and re-open your browser to have these changes take effect.
Enabling single sign-on Version 1.0 483
AWS Directory Service Administration Guide
Manual update for single sign-on on OS X
To manually enable single sign-on for Chrome on OS X, perform the following steps on the client
computer. You will need administrator rights on your computer to complete these steps.
To manually enable single sign-on for Chrome on OS X
1. Add your access URL to the AuthServerAllowlist policy by running the following command:
defaults write com.google.Chrome AuthServerAllowlist "https://<alias>.awsapps.com"
2.
Open System Preferences, go to the Profiles panel, and delete the Chrome Kerberos
Configuration profile.
3. Restart Chrome and open chrome://policy in Chrome to confirm that the new settings are in
place.
Group policy settings for single sign-on
The domain administrator can implement Group Policy settings to make the single sign-on changes
on client computers that are joined to the domain.
Note
If you manage the Chrome web browsers on the computers in your domain with Chrome
policies, you must add your access URL to the AuthServerAllowlist policy. For more
information about setting Chrome policies, go to Policy Settings in Chrome.
To enable single sign-on for Internet Explorer and Chrome using Group Policy settings
1. Create a new Group Policy object by performing the following steps:
a. Open the Group Policy Management tool, navigate to your domain and select Group
Policy Objects.
b. From the main menu, choose Action and select New.
c. In the New GPO dialog box, enter a descriptive name for the Group Policy object, such as
IAM Identity Center Policy, and leave Source Starter GPO set to (none). Click OK.
2. Add the access URL to the list of approved sites for single sign-on by performing the following
steps:
Enabling single sign-on Version 1.0 484

AWS Directory Service Administration Guide
a. In the Group Policy Management tool, navigate to your domain, select Group Policy
Objects, open the context (right-click) menu for your IAM Identity Center policy, and
choose Edit.
b. In the policy tree, navigate to User Configuration > Preferences > Windows Settings.
c. In the Windows Settings list, open the context (right-click) menu for Registry and choose
New registry item.
d. In the New Registry Properties dialog box, enter the following settings and choose OK:
Action
Update
Hive
HKEY_CURRENT_USER
Path
Software\Microsoft\Windows\CurrentVersion\Internet Settings
\ZoneMap\Domains\awsapps.com\<alias>
The value for <alias> is derived from your access URL. If your access URL is
https://examplecorp.awsapps.com, the alias is examplecorp, and the registry
key will be Software\Microsoft\Windows\CurrentVersion\Internet
Settings\ZoneMap\Domains\awsapps.com\examplecorp.
Value name
https
Value type
REG_DWORD
Value data
1
3. To enable active scripting, perform the following steps:
a. In the Group Policy Management tool, navigate to your domain, select Group Policy
Objects, open the context (right-click) menu for your IAM Identity Center policy, and
choose Edit.
Enabling single sign-on Version 1.0 485

AWS Directory Service Administration Guide
b. In the policy tree, navigate to Computer Configuration > Policies > Administrative
Templates > Windows Components > Internet Explorer > Internet Control Panel >
Security Page > Intranet Zone.
c. In the Intranet Zone list, open the context (right-click) menu for Allow active scripting
and choose Edit.
d. In the Allow active scripting dialog box, enter the following settings and choose OK:
• Select the Enabled radio button.
• Under Options set Allow active scripting to Enable.
4. To enable automatic logon, perform the following steps:
a. In the Group Policy Management tool, navigate to your domain, select Group Policy
Objects, open the context (right-click) menu for your SSO policy, and choose Edit.
b. In the policy tree, navigate to Computer Configuration > Policies > Administrative
Templates > Windows Components > Internet Explorer > Internet Control Panel >
Security Page > Intranet Zone.
c. In the Intranet Zone list, open the context (right-click) menu for Logon options and
choose Edit.
d. In the Logon options dialog box, enter the following settings and choose OK:
• Select the Enabled radio button.
• Under Options set Logon options to Automatic logon only in Intranet zone.
5. To enable integrated authentication, perform the following steps:
a. In the Group Policy Management tool, navigate to your domain, select Group Policy
Objects, open the context (right-click) menu for your IAM Identity Center policy, and
choose Edit.
b. In the policy tree, navigate to User Configuration > Preferences > Windows Settings.
c. In the Windows Settings list, open the context (right-click) menu for Registry and choose
New registry item.
d. In the New Registry Properties dialog box, enter the following settings and choose OK:
Action
Update
Enabling single sign-on Version 1.0 486

AWS Directory Service Administration Guide
Hive
HKEY_CURRENT_USER
Path
Software\Microsoft\Windows\CurrentVersion\Internet Settings
Value name
EnableNegotiate
Value type
REG_DWORD
Value data
1
6. Close the Group Policy Management Editor window if it is still open.
7. Assign the new policy to your domain by following these steps:
a. In the Group Policy Management tree, open the context (right-click) menu for your
domain and choose Link an Existing GPO.
b. In the Group Policy Objects list, select your IAM Identity Center policy and choose OK.
These changes will take effect after the next Group Policy update on the client, or the next time
the user logs in.
Single sign-on for Firefox
To allow Mozilla Firefox browser to support single sign-on, add your access URL (e.g.,
https://<alias>.awsapps.com) to the list of approved sites for single sign-on. This can be done
manually, or automated with a script.
Topics
• Manual update for single sign-on
• Automatic update for single sign-on
Enabling single sign-on Version 1.0 487

AWS Directory Service Administration Guide
Manual update for single sign-on
To manually add your access URL to the list of approved sites in Firefox, perform the following
steps on the client computer.
To manually add your access URL to the list of approved sites in Firefox
1.
Open Firefox and open the about:config page.
2.
Open the network.negotiate-auth.trusted-uris preference and add your access URL
to the list of sites. Use a comma (,) to separate multiple entries.
Automatic update for single sign-on
As a domain administrator, you can use a script to add your access URL to the Firefox
network.negotiate-auth.trusted-uris user preference on all computers on your network.
For more information, go to https://support.mozilla.org/en-US/questions/939037.
Ways to join an Amazon EC2 instance to your Simple AD
You can seamlessly join an Amazon EC2 instance to your Active Directory domain when the
instance is launched. For more information, see Joining an Amazon EC2 Windows instance to your
AWS Managed Microsoft AD Active Directory. You can also launch an EC2 instance and join it to
an Active Directory domain directly from the AWS Directory Service console with AWS Systems
Manager Automation.
If you need to manually join an EC2 instance to your Active Directory domain, you must launch the
instance in the proper Region and security group or subnet, then join the instance to the domain.
To be able to connect remotely to these instances, you must have IP connectivity to the instances
from the network you are connecting from. In most cases, this requires that an internet gateway be
attached to your VPC and that the instance has a public IP address.
Topics
• Joining an Amazon EC2 Windows instance to your Simple AD Active Directory
• Join an Amazon EC2 Linux instance to your Simple AD Active Directory
• Delegating directory join privileges for Simple AD
• Creating a DHCP options set for Simple AD
Ways to join an instance to your directory Version 1.0 488

AWS Directory Service Administration Guide
Joining an Amazon EC2 Windows instance to your Simple AD Active
Directory
You can launch and join an Amazon EC2 Windows instance to a Simple AD. Alternatively, you can
manually join an existing EC2 Windows instance to a Simple AD
Seamlessly join a Windows Amazon EC2
1. Sign in to the AWS Management Console and open the Amazon EC2 console at https://
console.aws.amazon.com/ec2/.
2. In the navigation bar, choose the same AWS Region as the existing directory.
3. On the EC2 Dashboard, in the Launch instance section, choose Launch instance.
4. On the Launch an instance page, under the Name and Tags section, enter the name you
would like to use for your Windows EC2 instance.
5. (Optional) Choose Add additional tags to add one or more tag key-value pairs to organize,
track, or control access for this EC2 instance.
6. In the Application and OS Image (Amazon Machine Image) section, choose Windows in
the Quick Start pane. You can change the Windows Amazon Machine Image (AMI) from the
Amazon Machine Image (AMI) dropdown list.
7. In the Instance type section, choose the instance type you would like to use from Instance
type dropdown list.
8. In the Key pair (login) section, you can either choose to create a new key pair or choose
from an existing key pair.
a. To create a new key pair, choose Create new key pair.
b. Enter a name for the key pair and select an option for the Key pair type and Private
key file format.
c. To save the private key in a format that can be used with OpenSSH, choose .pem. To
save the private key in a format that can be used with PuTTY, choose .ppk.
d. Choose create key pair.
e. The private key file is automatically downloaded by your browser. Save the private key
file in a safe place.
Joining a Windows instance Version 1.0 489

AWS Directory Service Administration Guide
Important
This is the only chance for you to save the private key file.
9. On the Launch an instance page, under Network settings section, choose Edit. Choose the
VPC that your directory was created in from the VPC - required dropdown list.
10. Choose one of the public subnets in your VPC from the Subnet dropdown list. The subnet
you choose must have all external traffic routed to an internet gateway. If this is not the
case, you won't be able to connect to the instance remotely.
For more information on how to connect to a internet gateway, see Connect to the internet
using an internet gateway in the Amazon VPC User Guide.
11. Under Auto-assign public IP, choose Enable.
For more information about public and private IP addressing, see Amazon EC2 instance IP
addressing in the Amazon EC2 User Guide.
12. For Firewall (security groups) settings, you can use the default settings or make changes
to meet your needs.
13. For Configure storage settings, you can use the default settings or make changes to meet
your needs.
14. Select Advanced details section, choose your domain from the Domain join directory
dropdown list.
Note
After choosing the Domain join directory, you may see:
This error occurs if the EC2 launch wizard identifies an existing SSM document with
unexpected properties. You can do one of the following:
• If you previously edited the SSM document and the properties are expected,
choose close and proceed to launch the EC2 instance with no changes.
Joining a Windows instance Version 1.0 490

AWS Directory Service Administration Guide
• Select the delete the existing SSM document here link to delete the SSM
document. This will allow for the creation of an SSM document with the correct
properties. The SSM document will automatically be created when you launch the
EC2 instance.
15. For IAM instance profile, you can select an existing IAM instance profile or create
a new one. Select an IAM instance profile that has the AWS managed policies
AmazonSSMManagedInstanceCore and AmazonSSMDirectoryServiceAccess attached to
it from the IAM instance profile dropdown list. To create a new one, choose Create new
IAM profile link, and then do the following:
1. Choose Create role.
2. Under Select trusted entity, choose AWS service.
3. Under Use case, choose EC2.
4. Under Add permissions, in the list of policies, select the
AmazonSSMManagedInstanceCore and AmazonSSMDirectoryServiceAccess policies.
To filter the list, type SSM in the search box. Choose Next.
Note
AmazonSSMDirectoryServiceAccess provides the permissions to join
instances to an Active Directory managed by AWS Directory Service.
AmazonSSMManagedInstanceCore provides the minimum permissions
necessary to use the AWS Systems Manager service. For more information
about creating a role with these permissions, and for information about other
permissions and policies you can assign to your IAM role, see Create an IAM
instance profile for Systems Manager in the AWS Systems Manager User Guide.
5. On the Name, review, and create page, enter a Role name. You will need this role name
to attach to the EC2 instance.
6. (Optional) You can provide a description of the IAM instance profile in the Description
field.
7. Choose Create role.
8. Return to Launch an instance page and choose the refresh icon next to the IAM instance
profile. Your new IAM instance profile should be visible in the IAM instance profile
Joining a Windows instance Version 1.0 491

AWS Directory Service Administration Guide
dropdown list. Choose the new profile and leave the rest of the settings with their
default values.
16. Choose Launch instance.
Manually join Windows Amazon EC2
To manually join an existing Amazon EC2 Windows instance to a Simple AD Active Directory,
the instance must be launched using the parameters as specified in Joining an Amazon EC2
Windows instance to your Simple AD Active Directory.
You will need the IP addresses of the Simple AD DNS servers. This information can be found
under Directory Services > Directories > the Directory ID link for your directory > Directory
details and Networking & Security sections.
To join a Windows instance to a Simple AD Active Directory
1. Connect to the instance using any Remote Desktop Protocol client.
2. Open the TCP/IPv4 properties dialog box on the instance.
a. Open Network Connections.
Joining a Windows instance Version 1.0 492

AWS Directory Service Administration Guide
Tip
You can open Network Connections directly by running the following from a
command prompt on the instance.
%SystemRoot%\system32\control.exe ncpa.cpl
b. Open the context menu (right-click) for any enabled network connection and then
choose Properties.
c. In the connection properties dialog box, open (double-click) Internet Protocol Version
4.
3. Select Use the following DNS server addresses, change the Preferred DNS server and
Alternate DNS server addresses to the IP addresses of your Simple AD-provided DNS
servers, and choose OK.
4. Open the System Properties dialog box for the instance, select the Computer Name tab,
and choose Change.
Joining a Windows instance Version 1.0 493

AWS Directory Service Administration Guide
Tip
You can open the System Properties dialog box directly by running the following
from a command prompt on the instance.
%SystemRoot%\system32\control.exe sysdm.cpl
5. In the Member of field, select Domain, enter the fully qualified name of your Simple AD
Active Directory, and choose OK.
6. When prompted for the name and password for the domain administrator, enter
the username and password of an account that has domain join privileges. For more
information about delegating these privileges, see Delegating directory join privileges for
Simple AD.
Note
You can enter either the fully qualified name of your domain or the NetBIOS
name, followed by a backslash (\), and then the username. The username would
be Administrator. For example, corp.example.com\administrator or corp
\administrator.
7. After you receive the message welcoming you to the domain, restart the instance to have
the changes take effect.
Now that your instance has been joined to the Simple AD Active Directory domain, you can log
into that instance remotely and install utilities to manage the directory, such as adding users
and groups. The Active Directory Administration Tools can be used to create users and groups.
For more information, see Installing the Active Directory Administration Tools for Simple AD.
Join an Amazon EC2 Linux instance to your Simple AD Active Directory
You can launch and join an Amazon EC2 Linux instance to your Simple AD in the AWS Management
Console. You can also manually join EC2 Linux instance to your Simple AD.
The following Linux instance distributions and versions are supported:
Join Linux instance Version 1.0 494

AWS Directory Service Administration Guide
• Amazon Linux AMI 2018.03.0
• Amazon Linux 2 (64-bit x86)
• Red Hat Enterprise Linux 8 (HVM) (64-bit x86)
• Ubuntu Server 18.04 LTS & Ubuntu Server 16.04 LTS
• CentOS 7 x86-64
• SUSE Linux Enterprise Server 15 SP1
Note
Distributions prior to Ubuntu 14 and Red Hat Enterprise Linux 7 do not support the
seamless domain join feature.
Ways to domain join a EC2 Linux instance:
• Seamlessly join an Amazon EC2 Linux instance to your Simple AD Active Directory
• Manually join an Amazon EC2 Linux instance to your Simple AD Active Directory
Seamlessly join an Amazon EC2 Linux instance to your Simple AD Active Directory
This procedure seamlessly joins an Amazon EC2 Linux instance to your Simple AD Active Directory.
The following Linux instance distributions and versions are supported:
• Amazon Linux AMI 2018.03.0
• Amazon Linux 2 (64-bit x86)
• Red Hat Enterprise Linux 8 (HVM) (64-bit x86)
• Ubuntu Server 18.04 LTS & Ubuntu Server 16.04 LTS
• CentOS 7 x86-64
• SUSE Linux Enterprise Server 15 SP1
Note
Distributions prior to Ubuntu 14 and Red Hat Enterprise Linux 7 do not support the
seamless domain join feature.
Join Linux instance Version 1.0 495

AWS Directory Service Administration Guide
Prerequisites
Before you can set up seamless domain join to a Linux instance, you need to complete the
procedures in this section.
Select your seamless domain join service account
You can seamlessly join Linux computers to your Simple AD domain. To do that, you must create
a user account with create computer account permissions to join the computers to the domain.
Although members of the Domain Admins or other groups may have sufficient privileges to join
computers to the domain, we do not recommend this. As a best practice, we recommend you use a
service account that has the minimum privileges necessary to join the computers to the domain.
For information about how to process and delegate permissions to your service account for
computer account creation, see Delegate privileges to your service account.
Create the secrets to store the domain service account
You can use AWS Secrets Manager to store the domain service account.
To create secrets and store the domain service account information
1. Sign in to the AWS Management Console and open the AWS Secrets Manager console at
https://console.aws.amazon.com/secretsmanager/.
2. Choose Store a new secret.
3. On the Store a new secret page, do the following:
a. Under Secret type, choose Other type of secrets.
b. Under Key/value pairs, do the following:
i.
In the first box, enter awsSeamlessDomainUsername. On the same row, in
the next box, enter the username for your service account. For example, if you
used the PowerShell command previously, the service account name would be
awsSeamlessDomain.
Note
You must enter awsSeamlessDomainUsername exactly as it is. Make sure
there are not any leading or ending spaces. Otherwise the domain join will
fail.
Join Linux instance Version 1.0 496

AWS Directory Service Administration Guide
ii. Choose Add row.
iii.
On the new row, in the first box, enter awsSeamlessDomainPassword. On the same
row, in the next box, enter the password for your service account.
Note
You must enter awsSeamlessDomainPassword exactly as it is. Make sure
there are not any leading or ending spaces. Otherwise the domain join will
fail.
iv.
Under Encryption key, leave the default value aws/secretsmanager. AWS Secrets
Manager always encrypts the secret when you choose this option. You also may
choose a key you created.
Join Linux instance Version 1.0 497

AWS Directory Service Administration Guide
Note
There are fees associated with AWS Secrets Manager, depending on which
secret you use. For the current complete pricing list, see AWS Secrets Manager
Pricing.
You can use the AWS managed key aws/secretsmanager that Secrets
Manager creates to encrypt your secrets for free. If you create your own KMS
keys to encrypt your secrets, AWS charges you at the current AWS KMS rate.
For more information, see AWS Key Management Service Pricing.
v. Choose Next.
4. Under Secret name, enter a secret name that includes your directory ID using the following
format, replacing d-xxxxxxxxx with your directory ID:
aws/directory-services/d-xxxxxxxxx/seamless-domain-join
This will be used to retrieve secrets in the application.
Note
You must enter aws/directory-services/d-xxxxxxxxx/seamless-domain-
join exactly as it is but replace d-xxxxxxxxxx with your directory ID. Make sure that
there are no leading or ending spaces. Otherwise the domain join will fail.
Join Linux instance Version 1.0 498

AWS Directory Service Administration Guide
5. Leave everything else set to defaults, and then choose Next.
6. Under Configure automatic rotation, choose Disable automatic rotation, and then choose
Next.
You can turn on rotation for this secret after you store it.
7. Review the settings, and then choose Store to save your changes. The Secrets Manager console
returns you to the list of secrets in your account with your new secret now included in the list.
8. Choose your newly created secret name from the list, and take note of the Secret ARN value.
You will need it in the next section.
Join Linux instance Version 1.0 499

AWS Directory Service Administration Guide
Turn on rotation for the domain service account secret
We recommend that you regularly rotate secrets to improve your security posture.
To turn on rotation for the domain service account secret
• Follow the instructions in Set up automatic rotation for AWS Secrets Manager secrets in the
AWS Secrets Manager User Guide.
For Step 5, use the rotation template Microsoft Active Directory credentials in the AWS Secrets
Manager User Guide.
For help, see Troubleshoot AWS Secrets Manager rotation in the AWS Secrets Manager User
Guide.
Create the required IAM policy and role
Use the following prerequisite steps to create a custom policy that allows read-only access to your
Secrets Manager seamless domain join secret (which you created earlier), and to create a new
LinuxEC2DomainJoin IAM role.
Create the Secrets Manager IAM read policy
You use the IAM console to create a policy that grants read-only access to your Secrets Manager
secret.
To create the Secrets Manager IAM read policy
1. Sign in to the AWS Management Console as a user that has permission to create IAM policies.
Then open the IAM console at https://console.aws.amazon.com/iam/.
2. In the navigation pane, Access Management, choose Policies.
3. Choose Create policy.
4. Choose the JSON tab and copy the text from the following JSON policy document. Then paste
it into the JSON text box.
Note
Make sure you replace the Region and Resource ARN with the actual Region and ARN
of the secret that you created earlier.
Join Linux instance Version 1.0 500

AWS Directory Service Administration Guide
{
"Version": "2012-10-17",
"Statement": [
{
"Effect": "Allow",
"Action": [
"secretsmanager:GetSecretValue",
"secretsmanager:DescribeSecret"
],
"Resource": [
"arn:aws:secretsmanager:us-east-1:xxxxxxxxx:secret:aws/directory-
services/d-xxxxxxxxx/seamless-domain-join"
]
}
]
}
5. When you are finished, choose Next. The policy validator reports any syntax errors. For more
information, see Validating IAM policies.
6.
On the Review policy page, enter a policy name, such as SM-Secret-Linux-DJ-d-
xxxxxxxxxx-Read. Review the Summary section to see the permissions that your policy
grants. Then choose Create policy to save your changes. The new policy appears in the list of
managed policies and is now ready to attach to an identity.
Note
We recommend you create one policy per secret. Doing so ensures that instances only have
access to the appropriate secret and minimizes the impact if an instance is compromised.
Create the LinuxEC2DomainJoin role
You use the IAM console to create the role that you will use to domain join your Linux EC2 instance.
To create the LinuxEC2DomainJoin role
1. Sign in to the AWS Management Console as a user that has permission to create IAM policies.
Then open the IAM console at https://console.aws.amazon.com/iam/.
Join Linux instance Version 1.0 501

AWS Directory Service Administration Guide
2. In the navigation pane, under Access Management, choose Roles.
3. In the content pane, choose Create role.
4. Under Select type of trusted entity, choose AWS service.
5. Under Use case, choose EC2, and then choose Next.
6. For Filter policies, do the following:
a.
Enter AmazonSSMManagedInstanceCore. Then select the check box for that item in the
list.
b.
Enter AmazonSSMDirectoryServiceAccess. Then select the check box for that item in
the list.
c.
Enter SM-Secret-Linux-DJ-d-xxxxxxxxxx-Read (or the name of the policy that you
created in the previous procedure). Then select the check box for that item in the list.
d. After adding the three policies listed above, select Create role.
Note
AmazonSSMDirectoryServiceAccess provides the permissions to join
instances to an Active Directory managed by AWS Directory Service.
AmazonSSMManagedInstanceCore provides the minimum permissions necessary to
use the AWS Systems Manager service. For more information about creating a role with
these permissions, and for information about other permissions and policies you can
Join Linux instance Version 1.0 502

AWS Directory Service Administration Guide
assign to your IAM role, see Create an IAM instance profile for Systems Manager in the
AWS Systems Manager User Guide.
7.
Enter a name for your new role, such as LinuxEC2DomainJoin or another name that you
prefer in the Role name field.
8. (Optional) For Role description, enter a description.
9. (Optional) Choose Add new tag under Step 3: Add tags to add tags. Tag key-value pairs are
used to organize, track, or control access for this role.
10. Choose Create role.
Seamlessly join a Linux instance to your Simple AD Active Directory
To seamlessly join your Linux instance
1. Sign in to the AWS Management Console and open the Amazon EC2 console at https://
console.aws.amazon.com/ec2/.
2. From the Region selector in the navigation bar, choose the same AWS Region as the existing
directory.
3. On the EC2 Dashboard, in the Launch instance section, choose Launch instance.
4. On the Launch an instance page, under the Name and Tags section, enter the name you
would like to use for your Linux EC2 instance.
5. (Optional) Choose Add additional tags to add one or more tag key-value pairs to organize,
track, or control access for this EC2 instance.
6. In the Application and OS Image (Amazon Machine Image) section, choose a Linux AMI you
wish to launch.
Note
The AMI used must have AWS Systems Manager (SSM Agent) version 2.3.1644.0 or
higher. To check the installed SSM Agent version in your AMI by launching an instance
from that AMI, see Getting the currently installed SSM Agent version. If you need to
upgrade the SSM Agent, see Installing and configuring SSM Agent on EC2 instances for
Linux.
SSM uses the aws:domainJoin plugin when joining a Linux instance to a Active
Directory domain. The plugin changes the hostname for the Linux instances to the
format EC2AMAZ-XXXXXXX. For more information about aws:domainJoin, see AWS
Join Linux instance Version 1.0 503

AWS Directory Service Administration Guide
Systems Manager command document plugin reference in the AWS Systems Manager
User Guide.
7. In the Instance type section, choose the instance type you would like to use from Instance
type dropdown list.
8. In the Key pair (login) section, you can either choose to create a new key pair or choose from
an existing key pair. To create a new key pair, choose Create new key pair. Enter a name for
the key pair and select an option for the Key pair type and Private key file format. To save the
private key in a format that can be used with OpenSSH, choose .pem. To save the private key
in a format that can be used with PuTTY, choose .ppk. Choose create key pair. The private key
file is automatically downloaded by your browser. Save the private key file in a safe place.
Important
This is the only chance for you to save the private key file.
9. On the Launch an instance page, under Network settings section, choose Edit. Choose the
VPC that your directory was created in from the VPC - required dropdown list.
10. Choose one of the public subnets in your VPC from the Subnet dropdown list. The subnet you
choose must have all external traffic routed to an internet gateway. If this is not the case, you
won't be able to connect to the instance remotely.
For more information on how to connect to a internet gateway, see Connect to the internet
using an internet gateway in the Amazon VPC User Guide.
11. Under Auto-assign public IP, choose Enable.
For more information about public and private IP addressing, see Amazon EC2 instance IP
addressing in the Amazon EC2 User Guide.
12. For Firewall (security groups) settings, you can use the default settings or make changes to
meet your needs.
13. For Configure storage settings, you can use the default settings or make changes to meet your
needs.
14. Select Advanced details section, choose your domain from the Domain join directory
dropdown list.
Join Linux instance Version 1.0 504

AWS Directory Service Administration Guide
Note
After choosing the Domain join directory, you may see:
This error occurs if the EC2 launch wizard identifies an existing SSM document with
unexpected properties. You can do one of the following:
• If you previously edited the SSM document and the properties are expected, choose
close and proceed to launch the EC2 instance with no changes.
• Select the delete the existing SSM document here link to delete the SSM document.
This will allow for the creation of an SSM document with the correct properties. The
SSM document will automatically be created when you launch the EC2 instance.
15. For IAM instance profile, choose the IAM role that you previously created in the prerequisites
section Step 2: Create the LinuxEC2DomainJoin role.
16. Choose Launch instance.
Note
If you are performing a seamless domain join with SUSE Linux, a reboot is required before
authentications will work. To reboot SUSE from the Linux terminal, type sudo reboot.
Manually join an Amazon EC2 Linux instance to your Simple AD Active Directory
In addition to Amazon EC2 Windows instances, you can also join certain Amazon EC2 Linux
instances to your Simple AD Active Directory. The following Linux instance distributions and
versions are supported:
• Amazon Linux AMI 2018.03.0
• Amazon Linux 2 (64-bit x86)
Join Linux instance Version 1.0 505

AWS Directory Service Administration Guide
• Amazon Linux 2023 AMI
• Red Hat Enterprise Linux 8 (HVM) (64-bit x86)
• Ubuntu Server 18.04 LTS & Ubuntu Server 16.04 LTS
• CentOS 7 x86-64
• SUSE Linux Enterprise Server 15 SP1
Note
Other Linux distributions and versions may work but have not been tested.
Prerequisites
Before you can join either an Amazon Linux, CentOS, Red Hat, or Ubuntu instance to your directory,
the instance must first be launched as specified in Seamlessly join an Amazon EC2 Linux instance to
your Simple AD Active Directory.
Important
Some of the following procedures, if not performed correctly, can render your instance
unreachable or unusable. Therefore, we strongly suggest you make a backup or take a
snapshot of your instance before performing these procedures.
To join a Linux instance to your directory
Follow the steps for your specific Linux instance using one of the following tabs:
Amazon Linux
1. Connect to the instance using any SSH client.
2. Configure the Linux instance to use the DNS server IP addresses of the AWS Directory
Service-provided DNS servers. You can do this either by setting it up in the DHCP Options
set attached to the VPC or by setting it manually on the instance. If you want to set it
manually, see How do I assign a static DNS server to a private Amazon EC2 instance in the
Join Linux instance Version 1.0 506

AWS Directory Service Administration Guide
AWS Knowledge Center for guidance on setting the persistent DNS server for your particular
Linux distribution and version.
3. Make sure your Amazon Linux - 64bit instance is up to date.
sudo yum -y update
4. Install the required Amazon Linux packages on your Linux instance.
Note
Some of these packages may already be installed.
As you install the packages, you might be presented with several pop-up
configuration screens. You can generally leave the fields in these screens blank.
Amazon Linux
sudo yum install samba-common-tools realmd oddjob oddjob-mkhomedir sssd adcli
krb5-workstation
Note
For help with determining the Amazon Linux version you are using, see Identifying
Amazon Linux images in the Amazon EC2 User Guide for Linux Instances.
5. Join the instance to the directory with the following command.
sudo realm join -U [email protected] example.com --verbose
An account in the example.com domain that has domain join privileges. Enter the
password for the account when prompted. For more information about delegating these
privileges, see Delegating directory join privileges for AWS Managed Microsoft AD.
example.com
The fully qualified DNS name of your directory.
Join Linux instance Version 1.0 507
AWS Directory Service Administration Guide
...
* Successfully enrolled machine in realm
6. Set the SSH service to allow password authentication.
a.
Open the /etc/ssh/sshd_config file in a text editor.
sudo vi /etc/ssh/sshd_config
b.
Set the PasswordAuthentication setting to yes.
PasswordAuthentication yes
c. Restart the SSH service.
sudo systemctl restart sshd.service
Alternatively:
sudo service sshd restart
7. After the instance has restarted, connect to it with any SSH client and add the domain
admins group to the sudoers list by performing the following steps:
a.
Open the sudoers file with the following command:
sudo visudo
b.
Add the following to the bottom of the sudoers file and save it.
## Add the "Domain Admins" group from the example.com domain.
%Domain\ Admins@example.com ALL=(ALL:ALL) ALL
(The above example uses "\<space>" to create the Linux space character.)
CentOS
1. Connect to the instance using any SSH client.
Join Linux instance Version 1.0 508

AWS Directory Service Administration Guide
2. Configure the Linux instance to use the DNS server IP addresses of the AWS Directory
Service-provided DNS servers. You can do this either by setting it up in the DHCP Options
set attached to the VPC or by setting it manually on the instance. If you want to set it
manually, see How do I assign a static DNS server to a private Amazon EC2 instance in the
AWS Knowledge Center for guidance on setting the persistent DNS server for your particular
Linux distribution and version.
3. Make sure your CentOS 7 instance is up to date.
sudo yum -y update
4. Install the required CentOS 7 packages on your Linux instance.
Note
Some of these packages may already be installed.
As you install the packages, you might be presented with several pop-up
configuration screens. You can generally leave the fields in these screens blank.
sudo yum -y install sssd realmd krb5-workstation samba-common-tools
5. Join the instance to the directory with the following command.
sudo realm join -U [email protected] example.com --verbose
An account in the example.com domain that has domain join privileges. Enter the
password for the account when prompted. For more information about delegating these
privileges, see Delegating directory join privileges for AWS Managed Microsoft AD.
example.com
The fully qualified DNS name of your directory.
...
* Successfully enrolled machine in realm
6. Set the SSH service to allow password authentication.
Join Linux instance Version 1.0 509

AWS Directory Service Administration Guide
a.
Open the /etc/ssh/sshd_config file in a text editor.
sudo vi /etc/ssh/sshd_config
b.
Set the PasswordAuthentication setting to yes.
PasswordAuthentication yes
c. Restart the SSH service.
sudo systemctl restart sshd.service
Alternatively:
sudo service sshd restart
7. After the instance has restarted, connect to it with any SSH client and add the domain
admins group to the sudoers list by performing the following steps:
a.
Open the sudoers file with the following command:
sudo visudo
b.
Add the following to the bottom of the sudoers file and save it.
## Add the "Domain Admins" group from the example.com domain.
%Domain\ Admins@example.com ALL=(ALL:ALL) ALL
(The above example uses "\<space>" to create the Linux space character.)
Red hat
1. Connect to the instance using any SSH client.
2. Configure the Linux instance to use the DNS server IP addresses of the AWS Directory
Service-provided DNS servers. You can do this either by setting it up in the DHCP Options
set attached to the VPC or by setting it manually on the instance. If you want to set it
manually, see How do I assign a static DNS server to a private Amazon EC2 instance in the
Join Linux instance Version 1.0 510
AWS Directory Service Administration Guide
AWS Knowledge Center for guidance on setting the persistent DNS server for your particular
Linux distribution and version.
3. Make sure the Red Hat - 64bit instance is up to date.
sudo yum -y update
4. Install the required Red Hat packages on your Linux instance.
Note
Some of these packages may already be installed.
As you install the packages, you might be presented with several pop-up
configuration screens. You can generally leave the fields in these screens blank.
sudo yum -y install sssd realmd krb5-workstation samba-common-tools
5. Join the instance to the directory with the following command.
sudo realm join -v -U join_account example.com --install=/
join_account
The sAMAccountName for an account in the example.com domain that has domain join
privileges. Enter the password for the account when prompted. For more information
about delegating these privileges, see Delegating directory join privileges for AWS
Managed Microsoft AD.
example.com
The fully qualified DNS name of your directory.
...
* Successfully enrolled machine in realm
6. Set the SSH service to allow password authentication.
a.
Open the /etc/ssh/sshd_config file in a text editor.
sudo vi /etc/ssh/sshd_config
Join Linux instance Version 1.0 511

AWS Directory Service Administration Guide
b.
Set the PasswordAuthentication setting to yes.
PasswordAuthentication yes
c. Restart the SSH service.
sudo systemctl restart sshd.service
Alternatively:
sudo service sshd restart
7. After the instance has restarted, connect to it with any SSH client and add the domain
admins group to the sudoers list by performing the following steps:
a.
Open the sudoers file with the following command:
sudo visudo
b.
Add the following to the bottom of the sudoers file and save it.
## Add the "Domain Admins" group from the example.com domain.
%Domain\ Admins@example.com ALL=(ALL:ALL) ALL
(The above example uses "\<space>" to create the Linux space character.)
Ubuntu
1. Connect to the instance using any SSH client.
2. Configure the Linux instance to use the DNS server IP addresses of the AWS Directory
Service-provided DNS servers. You can do this either by setting it up in the DHCP Options
set attached to the VPC or by setting it manually on the instance. If you want to set it
manually, see How do I assign a static DNS server to a private Amazon EC2 instance in the
AWS Knowledge Center for guidance on setting the persistent DNS server for your particular
Linux distribution and version.
3. Make sure your Ubuntu - 64bit instance is up to date.
Join Linux instance Version 1.0 512

AWS Directory Service Administration Guide
sudo apt-get update
sudo apt-get -y upgrade
4. Install the required Ubuntu packages on your Linux instance.
Note
Some of these packages may already be installed.
As you install the packages, you might be presented with several pop-up
configuration screens. You can generally leave the fields in these screens blank.
sudo apt-get -y install sssd realmd krb5-user samba-common packagekit adcli
5. Disable Reverse DNS resolution and set the default realm to your domain's FQDN. Ubuntu
Instances must be reverse-resolvable in DNS before the realm will work. Otherwise, you have
to disable reverse DNS in /etc/krb5.conf as follows:
sudo vi /etc/krb5.conf
[libdefaults]
default_realm = EXAMPLE.COM
rdns = false
6. Join the instance to the directory with the following command.
sudo realm join -U join_account example.com --verbose
The sAMAccountName for an account in the example.com domain that has domain join
privileges. Enter the password for the account when prompted. For more information
about delegating these privileges, see Delegating directory join privileges for AWS
Managed Microsoft AD.
example.com
The fully qualified DNS name of your directory.
Join Linux instance Version 1.0 513

AWS Directory Service Administration Guide
...
* Successfully enrolled machine in realm
7. Set the SSH service to allow password authentication.
a.
Open the /etc/ssh/sshd_config file in a text editor.
sudo vi /etc/ssh/sshd_config
b.
Set the PasswordAuthentication setting to yes.
PasswordAuthentication yes
c. Restart the SSH service.
sudo systemctl restart sshd.service
Alternatively:
sudo service sshd restart
8. After the instance has restarted, connect to it with any SSH client and add the domain
admins group to the sudoers list by performing the following steps:
a.
Open the sudoers file with the following command:
sudo visudo
b.
Add the following to the bottom of the sudoers file and save it.
## Add the "Domain Admins" group from the example.com domain.
%Domain\ Admins@example.com ALL=(ALL:ALL) ALL
(The above example uses "\<space>" to create the Linux space character.)
Note
When using Simple AD, if you create a user account on a Linux instance with the option
"Force user to change password at first login," that user will not be able to initially change
Join Linux instance Version 1.0 514

AWS Directory Service Administration Guide
their password using kpasswd. In order to change the password the first time, a domain
administrator must update the user password using the Active Directory Management
Tools.
Manage accounts from a Linux instance
To manage accounts in Simple AD from a Linux instance, you must update specific configuration
files on your Linux instance as follows:
1. Set krb5_use_kdcinfo to False in the /etc/sssd/sssd.conf file. For example:
[domain/example.com]
krb5_use_kdcinfo = False
2. In order for the configuration to take affect you need to restart the sssd service:
$ sudo systemctl restart sssd.service
Alternatively, you could use:
$ sudo service sssd start
3. If you will be managing users from a CentOS Linux instance, you must also edit the file /etc/
smb.conf to include:
[global]
workgroup = EXAMPLE.COM
realm = EXAMPLE.COM
netbios name = EXAMPLE
security = ads
Restricting account login access
Since all accounts are defined in Active Directory, by default, all the users in the directory can log in
to the instance. You can allow only specific users to log in to the instance with ad_access_filter in
sssd.conf. For example:
ad_access_filter = (memberOf=cn=admins,ou=Testou,dc=example,dc=com)
Join Linux instance Version 1.0 515

AWS Directory Service Administration Guide
memberOf
Indicates that users should only be allowed access to the instance if they are a member of a
specific group.
cn
The common name of the group that should have access. In this example, the group name is
admins.
ou
This is the organizational unit in which the above group is located. In this example, the OU is
Testou.
dc
This is the domain component of your domain. In this example, example.
dc
This is an additional domain component. In this example, com.
You must manually add ad_access_filter to your /etc/sssd/sssd.conf.
Open the /etc/sssd/sssd.conf file in a text editor.
sudo vi /etc/sssd/sssd.conf
After you do this, your sssd.conf might look like this:
[sssd]
domains = example.com
config_file_version = 2
services = nss, pam
[domain/example.com]
ad_domain = example.com
krb5_realm = EXAMPLE.COM
realmd_tags = manages-system joined-with-samba
cache_credentials = True
id_provider = ad
krb5_store_password_if_offline = True
Join Linux instance Version 1.0 516

AWS Directory Service Administration Guide
default_shell = /bin/bash
ldap_id_mapping = True
use_fully_qualified_names = True
fallback_homedir = /home/%u@%d
access_provider = ad
ad_access_filter = (memberOf=cn=admins,ou=Testou,dc=example,dc=com)
In order for the configuration to take effect, you need to restart the sssd service:
sudo systemctl restart sssd.service
Alternatively, you could use:
sudo service sssd restart
ID Mapping
ID mapping can be performed by two methods to maintain a unified experience between UNIX/
Linux User Identifier (UID) and Group Identifier (GID) and Windows and Active Directory Security
Identifier (SID) identities.
1. Centralized
2. Distributed
Note
Centralized user identity mapping in Active Directory requires Portable Operating System
Interface or POSIX.
Centralized user identity mapping
Active Directory or another Lightweight Directory Access Protocol (LDAP) service provides UID and
GID to the Linux users. In Active Directory, these identifiers are stored in the users' attributes:
• UID - The Linux username (String)
• UID Number - The Linux User ID number (Integer)
• GID Number - The Linux Group ID number (Integer)
Join Linux instance Version 1.0 517

AWS Directory Service Administration Guide
To configure a Linux instance to use the UID and GID from Active Directory, set ldap_id_mapping
= False in the sssd.conf file. Before setting this value, verify you have added a UID, UID number
and GID number to the users and groups in Active Directory.
Distributed user identity mapping
If Active Directory doesn't have the POSIX extension or if you choose not to centrally manage
identity mapping, Linux can calculate the UID and GID values. Linux uses the user's unique Security
Identifier (SID) to maintain consistency.
To configure distributed user ID mapping, set ldap_id_mapping = True in the sssd.conf file.
Connect to the Linux instance
When a user connects to the instance using an SSH client, they are prompted for their username.
The user can enter the username in either the [email protected] or EXAMPLE\username
format. The response will appear similar to the following, depending on which Linux distribution
you are using:
Amazon Linux, Red Hat Enterprise Linux, and CentOS Linux
login as: [email protected]
[email protected]'s password:
Last login: Thu Jun 25 16:26:28 2015 from XX.XX.XX.XX
SUSE Linux
SUSE Linux Enterprise Server 15 SP1 x86_64 (64-bit)
As "root" (sudo or sudo -i) use the:
- zypper command for package management
- yast command for configuration management
Management and Config: https://www.suse.com/suse-in-the-cloud-basics
Documentation: https://www.suse.com/documentation/sles-15/
Forum: https://forums.suse.com/forumdisplay.php?93-SUSE-Public-Cloud
Have a lot of fun...
Ubuntu Linux
login as: [email protected]
Join Linux instance Version 1.0 518

AWS Directory Service Administration Guide
[email protected]@10.24.34.0's password:
Welcome to Ubuntu 18.04.4 LTS (GNU/Linux 4.15.0-1057-aws x86_64)
* Documentation: https://help.ubuntu.com
* Management: https://landscape.canonical.com
* Support: https://ubuntu.com/advantage
System information as of Sat Apr 18 22:03:35 UTC 2020
System load: 0.01 Processes: 102
Usage of /: 18.6% of 7.69GB Users logged in: 2
Memory usage: 16% IP address for eth0: 10.24.34.1
Swap usage: 0%
Delegating directory join privileges for Simple AD
To join a computer to your directory, you need an account that has privileges to join computers to
the directory.
With Simple AD, members of the Domain Admins group have sufficient privileges to join
computers to the directory.
However, as a best practice, you should use an account that has only the minimum privileges
necessary. The following procedure demonstrates how to create a new group called Joiners and
delegate the privileges to this group that are needed to join computers to the directory.
You must perform this procedure on a computer that is joined to your directory and has the Active
Directory User and Computers MMC snap-in installed. You must also be logged in as a domain
administrator.
To delegate join privileges for Simple AD
1. Open Active Directory User and Computers and select your domain root in the navigation
tree.
2. In the navigation tree on the left, open the context menu (right-click) for Users, choose New,
and then choose Group.
3. In the New Object - Group box, type the following and choose OK.
•
For Group name, type Joiners.
• For Group scope, choose Global.
Delegating directory join privileges Version 1.0 519

AWS Directory Service Administration Guide
• For Group type, choose Security.
4. In the navigation tree, select your domain root. From the Action menu, choose Delegate
Control.
5. On the Delegation of Control Wizard page, choose Next, and then choose Add.
6.
In the Select Users, Computers, or Groups box, type Joiners and choose OK. If more than
one object is found, select the Joiners group created above. Choose Next.
7. On the Tasks to Delegate page, select Create a custom task to delegate, and then choose
Next.
8. Select Only the following objects in the folder, and then select Computer objects.
9. Select Create selected objects in this folder and Delete selected objects in this folder. Then
choose Next.
10. Select Read and Write, and then choose Next.
Delegating directory join privileges Version 1.0 520

AWS Directory Service Administration Guide
11. Verify the information on the Completing the Delegation of Control Wizard page and choose
Finish.
12.
Create a user with a strong password and add that user to the Joiners group. The user will
then have sufficient privileges to connect AWS Directory Service to the directory.
Creating a DHCP options set for Simple AD
AWS recommends that you create a DHCP options set for your AWS Directory Service directory and
assign the DHCP options set to the VPC that your directory is in. This allows any instances in that
VPC to point to the specified domain and DNS servers to resolve their domain names.
For more information about DHCP options sets, see DHCP options sets in the Amazon VPC User
Guide.
To create a DHCP options set for your directory
1. Open the Amazon VPC console at https://console.aws.amazon.com/vpc/.
2. In the navigation pane, choose DHCP Options Sets, and then choose Create DHCP options set.
3. On the Create DHCP options set page, enter the following values for your directory:
Creating a DHCP options set Version 1.0 521

AWS Directory Service Administration Guide
Name
An optional tag for the options set.
Domain name
The fully qualified name of your directory, such as corp.example.com.
Domain name servers
The IP addresses of your AWS-provided directory's DNS servers.
Note
You can find these addresses by going to the AWS Directory Service console
navigation pane, selecting Directories and then choosing the correct directory ID.
NTP servers
Leave this field blank.
NetBIOS name servers
Leave this field blank.
NetBIOS node type
Leave this field blank.
4. Choose Create DHCP options set. The new set of DHCP options appears in your list of DHCP
options.
5.
Make a note of the ID of the new set of DHCP options (dopt-xxxxxxxx). You use it to associate
the new options set with your VPC.
To change the DHCP options set associated with a VPC
After you create a set of DHCP options, you can't modify them. If you want your VPC to use a
different set of DHCP options, you must create a new set and associate them with your VPC. You
can also set up your VPC to use no DHCP options at all.
1. Open the Amazon VPC console at https://console.aws.amazon.com/vpc/.
Creating a DHCP options set Version 1.0 522

AWS Directory Service Administration Guide
2. In the navigation pane, choose Your VPCs.
3. Select the VPC, and then choose Actions, Edit VPC settings.
4. For DHCP options set, select an options set or choose No DHCP options set, and then choose
Save.
To change the DHCP options set associated with a VPC using command line see the following:
• AWS CLI: associate-dhcp-options
• AWS Tools for Windows PowerShell: Register-EC2DhcpOption
Users and groups management in Simple AD
Users represent individual people or entities that have access to your directory. Groups are very
useful for giving or denying privileges to groups of users, rather than having to apply those
privileges to each individual user. If a user moves to a different organization, you move that user to
a different group and they automatically receive the privileges needed for the new organization.
To create users and groups in an AWS Directory Service directory, you must use any instance (from
either on-premises or EC2) that has been joined to your AWS Directory Service directory, and be
logged in as a user that has privileges to create users and groups. You will also need to install the
Active Directory Tools on your EC2 instance so you can add your users and groups with the Active
Directory Users and Computers snap-in. For more information about how to set up an EC2 instance
and install the necessary tools, see Ways to join an Amazon EC2 instance to your Simple AD.
Note
Your user accounts must have Kerberos preauthentication enabled. This is the default
setting for new user accounts, but it should not be modified. For more information about
this setting, go to Preauthentication on Microsoft TechNet.
The following topics include instructions on how to create and manage users and groups.
Topics
• Installing the Active Directory Administration Tools for Simple AD
• Creating a Simple AD user
Users and groups management Version 1.0 523

AWS Directory Service Administration Guide
• Deleting a Simple AD user
• Resetting a Simple AD user password
• Creating a Simple AD group
• Adding a Simple AD user to a group
Installing the Active Directory Administration Tools for Simple AD
To manage your Active Directory from an Amazon EC2 Windows Server instance, you need to
install the Active Directory Domain Services and Active Directory Lightweight Directory Services
Tools on the instance. Use the following procedure to install these tools on an EC2 Windows Server
instance.
Prerequisites
Before you can begin this procedure, complete the following:
1. Create a Simple AD Active Directory. For more information, see Create your Simple AD.
2. Launch and join an EC2 Windows Server instance to your Simple AD Active
Directory. The EC2 instance needs the following policies to create users and groups:
AWSSSMManagedInstanceCore and AmazonSSMDirectoryServiceAccess. For more
information, see Joining an Amazon EC2 Windows instance to your Simple AD Active Directory.
3. You will need the credentials for your Active Directory domain Administrator. These credentials
were created when the Simple AD was created. If you followed the procedure in Create your
Simple AD, your Administrator username includes your NetBIOS name, corp\administrator.
EC2 Windows Server instance
To install the Active Directory administration tools on EC2 Windows Server instance
1. Open the Amazon EC2 console at https://console.aws.amazon.com/ec2/.
2. In the Amazon EC2 console, choose Instances, select the Windows Server instance, and
then choose Connect.
3. In the Connect to instance page, choose RDP client.
4. In the RDP client tab, choose Download Remote Desktop File, then choose Get Password
to retrieve your password.
Installing AD Administration Tools Version 1.0 524

AWS Directory Service Administration Guide
5. In the Get Windows password, choose Upload private key file. Choose the .pem private
key file associated with the Windows Server instance. After uploading the private key file,
select Decrypt password.
6. In the Windows Security dialog box, copy your local administrator credentials for the
Windows Server computer to sign in. The username can be in the following formats:
NetBIOS-Name\administrator or DNS-Name\administrator. For example, corp
\administrator would be the username if you followed the procedure in Create your
Simple AD.
7. Once signed in to the Windows Server instance, open Server Manager from the Start menu
by choosing Server Manager.
8. In the Server Manager Dashboard, choose Add roles and features.
9. In the Add Roles and Features Wizard choose Installation Type, select Role-based or
feature-based installation, and choose Next.
10. Under Server Selection, make sure the local server is selected, and choose Features in the
left navigation pane.
11. In the Features tree, select and open Remote Server Administration Tools, Role
Administration Tools, and AD DS and AD LDS Tools. With AD DS and AD LDS Tools
selected, Active Directory module for Windows PowerShell, AD DS Tools, and AD LDS
Snap-ins and Command-Line Tools are selected. Scroll down and select DNS Server Tools,
and then choose Next.
Installing AD Administration Tools Version 1.0 525

AWS Directory Service Administration Guide
12. Review the information and choose Install. When the feature installation is finished, the
Active Directory Domain Services and Active Directory Lightweight Directory Services Tools
are available from the Start menu in the Administrative Tools folder.
Windows PowerShell
• You can optionally choose to install the Active Directory administration tools using Windows
PowerShell. For example, you can install the Active Directory remote administration tools
from a PowerShell prompt using Install-WindowsFeature RSAT-ADDS. For more
information, see Install-WindowsFeature on the Microsoft website.
Creating a Simple AD user
Use the following procedure to create a user with an Amazon EC2 instance that is joined to your
Simple AD directory. Before you can create users, you need to complete the procedures in Installing
the Active Directory Administration Tools.
Creating a user Version 1.0 526

AWS Directory Service Administration Guide
Note
When using Simple AD, if you create a user account on a Linux instance with the option
"Force user to change password at first login," that user will not be able to initially change
their password using kpasswd. In order to change the password the first time, a domain
administrator must update the user password using the Active Directory Management
Tools.
You can use any of the following methods to create a user:
• Active Directory Administration Tools
• Windows PowerShell
Active Directory Administration Tools
1. Connect to the instance where the Active Directory Administration Tools were installed.
2. Open the Active Directory Users and Computers tool from the Windows Start menu. There
is a shortcut to this tool found in the Windows Administrative Tools folder.
Tip
You can run the following from a command prompt on the instance to open the
Active Directory Users and Computers tool box directly.
%SystemRoot%\system32\dsa.msc
3. In the directory tree, select an OU under your directory's NetBIOS name OU where you
want to store your user (for example, corp\Users). For more information about the
OU structure used by directories in AWS, see What gets created with your AWS Managed
Microsoft AD.
Creating a user Version 1.0 527
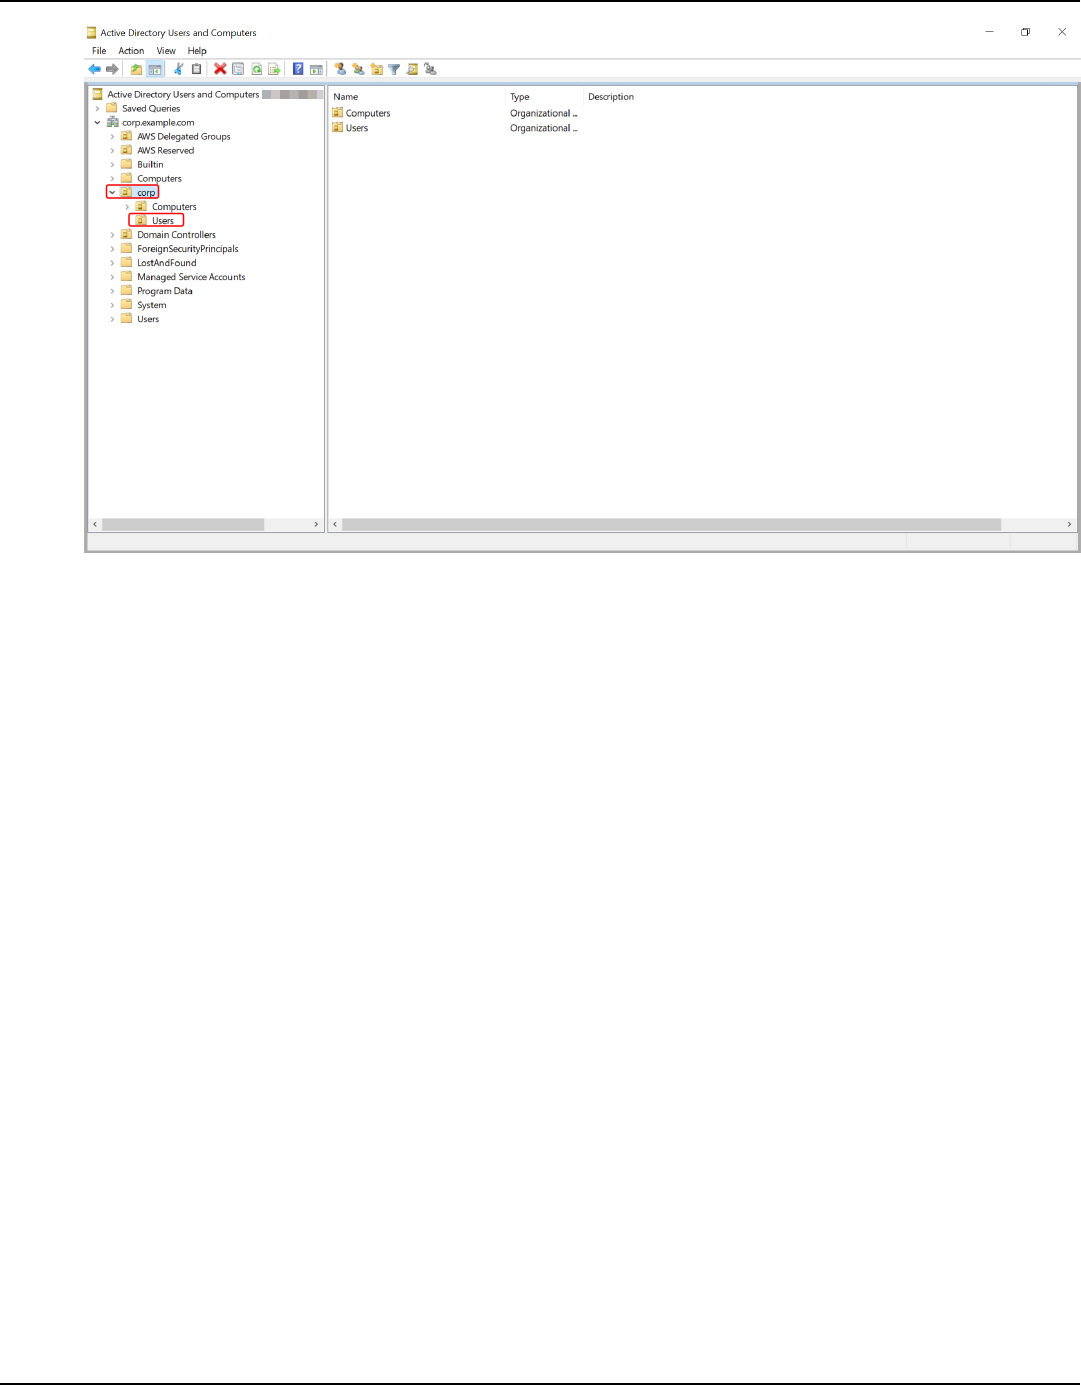
AWS Directory Service Administration Guide
4. On the Action menu, choose New, and then choose User to open the new user wizard.
5. On the first page of the wizard, enter the values for the following fields, and then choose
Next.
• First name
• Last name
• User logon name
6. On the second page of the wizard, enter a temporary password in Password and Confirm
Password. Make sure the User must change password at next logon option is selected.
None of the other options should be selected. Choose Next.
7. On the third page of the wizard, verify that the new user information is correct and choose
Finish. The new user will appear in the Users folder.
Windows PowerShell
1. Connect to the instance joined to your Active Directory domain as the Active Directory
administrator.
2. Open Windows PowerShell.
3.
Type the following command replacing the username jane.doe with the username of
the user you want to create. You will be prompted by Windows PowerShell to provide a
Creating a user Version 1.0 528

AWS Directory Service Administration Guide
password for the new user. For more information on Active Directory password complexity
requirements, see Microsoft documentation. For more information on the New-ADUser
command, see Microsoft documentation.
New-ADUser -Name "jane.doe" -Enabled $true -AccountPassword (Read-Host -
AsSecureString 'Password')
Deleting a Simple AD user
Use the following procedure to delete a user with an Amazon EC2 Windows instance that is joined
to your Simple AD directory.
You can use any of the following methods to delete a user:
• Active Directory Administration Tools
• Windows PowerShell
Active Directory Administration Tools
1. Connect to the instance where the Active Directory Administration Tools were installed.
2. Open the Active Directory Users and Computers tool from the Windows Start menu. There
is a shortcut to this tool found in the Windows Administrative Tools folder.
Tip
You can run the following from a command prompt on the instance to open the
Active Directory Users and Computers tool box directly.
%SystemRoot%\system32\dsa.msc
3. In the directory tree, select the OU containing the user that you want to delete (for
example, corp\Users).
Deleting a user Version 1.0 529

AWS Directory Service Administration Guide
4. Select the user you wish to delete. On the Action menu, choose Delete.
5. A dialog box will appear prompting you to confirm you want to delete the user. Choose Yes
to delete the user. This permanently deletes the selected user.
Windows PowerShell
1. Connect to the instance joined to your Active Directory domain as the Active Directory
administrator.
2. Open Windows PowerShell.
3.
Type the following command replacing the username jane.doe with the username of
the user you want to delete. For more information on the Remove-ADUser command, see
Microsoft documentation.
Remove-ADUser -Identity "jane.doe"
Resetting a Simple AD user password
Users must adhere to password policies as defined in the Active Directory. Sometimes this can get
the best of users, including the Active Directory administrator, and they forget their password.
Resetting a user password Version 1.0 530

AWS Directory Service Administration Guide
When this happens, you can quickly reset the user's password using AWS Directory Service if the
user resides in Simple AD.
You must be signed in as a user with the necessary permissions to reset passwords. For more
information about permissions, see Overview of managing access permissions to your AWS
Directory Service resources.
You can reset the password for any user in your Active Directory with the following exceptions:
• You can reset the password for any user within the Organizational Unit (OU) that is based off
of the NetBIOS name you used when you created your Active Directory. For example, if you
followed the procedure in Create your Simple AD, your NetBIOS name would be CORP and the
users passwords you could reset would be members of Corp/Users OU.
• You cannot reset the password of any user outside of the OU that is based off the NetBIOS name
you used when you created your Active Directory. For more information about the OU structure
for Simple AD, see What gets created with your Simple AD Active Directory.
• You cannot reset the password for any user that is a member of two domains. You also cannot
reset the password of any user that is a member of either the Domain Admins or Enterprise
Admins group except for the Administrator user.
• You cannot reset the password for any user that is a member of either the Domain Admins or
Enterprise Admins group except for the administrator user.
You can use any of the following methods to reset a user password:
• AWS Management Console
• AWS CLI
• Windows PowerShell
AWS Management Console
1. In the AWS Directory Service console navigation pane, under Active Directory, choose
Directories, and then select the Active Directory in the list where you want to reset a user
password.
2. On the Directory details page, choose Actions, and then choose Reset user password.
3. In the Reset user password dialog, in Username type the username of the user whose
password needs to change.
Resetting a user password Version 1.0 531

AWS Directory Service Administration Guide
4. Type a password in New password and Confirm password, and then choose Reset
password.
AWS CLI
1. To install the AWS CLI, see Install or update the latest version of the AWS CLI.
2. Open the AWS CLI.
3.
Type the following command and replace the Directory ID, username jane.doe, and
password P@ssw0rd with your Active Directory Directory ID and desired credentials. See
reset-user-password in the AWS CLI Command Reference for more information.
aws ds reset-user-password --directory-id d-1234567890 --user-name "jane.doe" --new-
password "P@ssw0rd"
Windows PowerShell
1. Connect to the instance joined to your Active Directory domain as the Active Directory
administrator.
2. Open Windows PowerShell.
3.
Type the following command replacing the username jane.doe, the Directory ID, and
password P@ssw0rd with your Active Directory Directory ID and desired credentials. See
Reset-DSUserPassword Cmdlet for more information.
Reset-DSUserPassword -UserName "jane.doe" -DirectoryId d-1234567890 -NewPassword
"P@ssw0rd"
Creating a Simple AD group
Use the following procedure to create a security group with an Amazon EC2 instance that is joined
to your Simple AD directory. Before you can create security groups, you need to complete the
procedures in Installing the Active Directory Administration Tools.
To create a group
1. Connect to the instance where the Active Directory Administration Tools were installed.
Creating a group Version 1.0 532

AWS Directory Service Administration Guide
2. Open the Active Directory Users and Computers tool. There is a shortcut to this tool in the
Administrative Tools folder.
Tip
You can run the following from a command prompt on the instance to open the Active
Directory Users and Computers tool box directly.
%SystemRoot%\system32\dsa.msc
3. In the directory tree, select an OU under your directory's NetBIOS name OU where you want to
store your group (for example, Corp\Users). For more information about the OU structure used
by directories in AWS, see What gets created with your AWS Managed Microsoft AD.
4. On the Action menu, click New, and then click Group to open the new group wizard.
5. Type a name for the group in Group name, select a Group scope that meets your needs,
and select Security for the Group type. For more information on Active Directory group
scope and security groups, see Active Directory security groups in Microsoft Windows Server
documentation.
6. Click OK. The new security group will appear in the Users folder.
Creating a group Version 1.0 533

AWS Directory Service Administration Guide
Adding a Simple AD user to a group
Use the following procedure to add a user to a security group with an EC2 instance that is joined to
your Simple AD directory.
To add a user to a group
1. Connect to the instance where the Active Directory Administration Tools were installed.
2. Open the Active Directory Users and Computers tool. There is a shortcut to this tool in the
Administrative Tools folder.
Tip
You can run the following from a command prompt on the instance to open the Active
Directory Users and Computers tool box directly.
%SystemRoot%\system32\dsa.msc
3. In the directory tree, select the OU under your directory's NetBIOS name OU where you stored
your group, and select the group that you want to add a user as a member.
4. On the Action menu, click Properties to open the properties dialog box for the group.
Adding a user to a group Version 1.0 534

AWS Directory Service Administration Guide
5. Select the Members tab and click Add.
6. For Enter the object names to select, type the username you want to add and click OK. The
name will be displayed in the Members list. Click OK again to update the group membership.
7. Verify that the user is now a member of the group by selecting the user in the Users folder and
clicking Properties in the Action menu to open the properties dialog box. Select the Member
Of tab. You should see the name of the group in the list of groups that the user belongs to.
Simple AD quotas
Generally, you should not add more than 500 users to a Small Simple AD directory and no more
than 5,000 users to a Large Simple AD directory. For more flexible scaling options and additional
Active Directory features, consider using AWS Directory Service for Microsoft Active Directory
(Standard Edition or Enterprise Edition) instead.
The following are the default quotas for Simple AD. Each quota is per Region unless otherwise
noted.
Simple AD quotas
Resource Default quota
Simple AD directories 10
Manual snapshots * 5 per Simple AD
* The manual snapshot quota cannot be changed.
Note
You cannot attach a public IP address to your AWS elastic network interface (ENI).
Troubleshooting Simple AD
The following can help you troubleshoot some common problems you might encounter when
creating or using your Simple AD Active Directory.
Topics
Quotas Version 1.0 535

AWS Directory Service Administration Guide
• Password recovery
• I receive a 'KDC can't fulfill requested option' error when adding a user to Simple AD
• I am not able to update the DNS name or IP address of an instance joined to my domain (DNS
dynamic update)
• I can't log onto SQL Server using a SQL Server account
• My Simple AD is stuck in the 'Requested' state
• I receive an 'AZ constrained' error when I create a Simple AD
• Some of my users can't authenticate with my Simple AD
• Additional resources
• Troubleshooting Simple AD directory status messages
Password recovery
If a user forgets a password or is having trouble signing in to your Simple AD directory, you can
reset their password using either the AWS Management Console, Windows PowerShell or the AWS
CLI.
For more information, see Resetting a Simple AD user password.
I receive a 'KDC can't fulfill requested option' error when adding a user
to Simple AD
This can occur when the Samba CLI client does not correctly send the 'net' commands to all domain
controllers. If you see this error message when using the 'net ads' command to add a user to
your Simple AD directory, use the -S argument and specify the IP address of one of your domain
controllers. If you still see the error, try the other domain controller. You can also use the Active
Directory Administration Tools to add users to your directory. For more information, see Installing
the Active Directory Administration Tools for Simple AD.
I am not able to update the DNS name or IP address of an instance
joined to my domain (DNS dynamic update)
DNS dynamic updates are not supported in Simple AD domains. You can instead make the changes
directly by connecting to your directory using DNS Manager on an instance that is joined to your
domain.
Password recovery Version 1.0 536

AWS Directory Service Administration Guide
I can't log onto SQL Server using a SQL Server account
You might receive an error if you attempt to use SQL Server Management Studio (SSMS) with a
SQL Server account to log into SQL Server running on a Windows 2012 R2 Amazon EC2 instance.
The issue occurs when SSMS runs as a domain user and can result in the error Login failed for
user, even when valid credentials are provided. This is a known issue and AWS is actively working
to resolve it.
To work around the issue, you can log into SQL Server with Windows Authentication instead of SQL
Authentication. Or launch SSMS as a local user instead of a Simple AD domain user.
My Simple AD is stuck in the 'Requested' state
If you have a Simple AD that has been in the Requested state for more than five minutes, try
deleting the directory and recreating it. If this problem persists, contact the AWS Support Center.
I receive an 'AZ constrained' error when I create a Simple AD
Some AWS accounts created before 2012 might have access to Availability Zones in the US East (N.
Virginia), US West (N. California), or Asia Pacific (Tokyo) Region that do not support AWS Directory
Service directories. If you receive an error such as this when creating a directory, choose a subnet in
a different Availability Zone and try to create the directory again.
Some of my users can't authenticate with my Simple AD
Your user accounts must have Kerberos preauthentication enabled. This is the default setting for
new user accounts, and it should not be modified. For more information about this setting, go to
Preauthentication on Simple AD TechNet.
Additional resources
The following resources can help you troubleshoot as you work with AWS.
• AWS Knowledge Center–Find FAQs and links to other resources to help you troubleshoot issues.
• AWS Support Center–Get technical support.
• AWS Premium Support Center–Get premium technical support.
Topics
I can't log onto SQL Server using a SQL Server account Version 1.0 537

AWS Directory Service Administration Guide
• Troubleshooting Simple AD directory status messages
Troubleshooting Simple AD directory status messages
When a Simple AD is impaired or inoperable, the directory status message contains additional
information. The status message is displayed in the AWS Directory Service console, or returned in
the DirectoryDescription.StageReason member by the DescribeDirectories API. For
more information about the directory status, see Understanding your AWS Managed Microsoft AD
directory status.
The following are the status messages for a Simple AD directory:
Topics
• The directory service's elastic network interface is not attached
• Issue(s) detected by instance
• The critical AWS Directory Service reserved user is missing from the directory
• The critical AWS Directory Service reserved user needs to belong to the Domain Admins group
• The critical AWS Directory Service reserved user is disabled
• The main domain controller does not have all FSMO roles
• Domain controller replication failures
The directory service's elastic network interface is not attached
Description
The critical elastic network interface (ENI) that was created on your behalf during directory
creation to establish network connectivity with your VPC is not attached to the directory
instance. AWS applications backed by this directory will not be functional. Your directory cannot
connect to your on-premises network.
Troubleshooting
If the ENI is detached but still exists, contact AWS Support. If the ENI is deleted, there is no way
to resolve the issue and your directory is permanently unusable. You must delete the directory
and create a new one.
Troubleshooting directory status messages Version 1.0 538

AWS Directory Service Administration Guide
Issue(s) detected by instance
Description
An internal error was detected by the instance. This usually signifies that the monitoring service
is actively attempting to recover the impaired instances.
Troubleshooting
In most cases, this is a transient issue, and the directory eventually returns to the Active state. If
the problem persists, contact AWS Support for more assistance.
The critical AWS Directory Service reserved user is missing from the directory
Description
When a Simple AD is created, AWS Directory Service creates a service account in the directory
with the name AWSAdminD-xxxxxxxxx. This error is received when this service account cannot
be found. Without this account, AWS Directory Service cannot perform administrative functions
on the directory, rendering the directory unusable.
Troubleshooting
To correct this issue, restore the directory to a previous snapshot that was created before
the service account was deleted. Automatic snapshots are taken of your Simple AD directory
one time a day. If it has been more than five days after this account was deleted, you may
not be able to restore the directory to a state where this account exists. If you are not able to
restore the directory from a snapshot where this account exists, your directory may become
permanently unusable. If this is the case, you must delete your directory and create a new one.
The critical AWS Directory Service reserved user needs to belong to the Domain
Admins group
Description
When a Simple AD is created, AWS Directory Service creates a service account in the directory
with the name AWSAdminD-xxxxxxxxx. This error is received when this service account is not
a member of the Domain Admins group. Membership in this group is needed to give AWS
Directory Service the privileges it needs to perform maintenance and recovery operations,
Troubleshooting directory status messages Version 1.0 539

AWS Directory Service Administration Guide
such as transferring FSMO roles, domain joining new directory controllers, and restoring from
snapshots.
Troubleshooting
Use the Active Directory Users and Computers tool to re-add the service account to the Domain
Admins group.
The critical AWS Directory Service reserved user is disabled
Description
When a Simple AD is created, AWS Directory Service creates a service account in the directory
with the name AWSAdminD-xxxxxxxxx. This error is received when this service account is
disabled. This account must be enabled so that AWS Directory Service can perform maintenance
and recovery operations on the directory.
Troubleshooting
Use the Active Directory Users and Computers tool to re-enable the service account.
The main domain controller does not have all FSMO roles
Description
All the FSMO roles are not owned by the Simple AD directory controller. AWS Directory Service
cannot guarantee certain behavior and functionality if the FSMO roles do not belong to the
correct Simple AD directory controller.
Troubleshooting
Use Active Directory tools to move the FSMO roles back to the original working
directory controller. For more information about moving the FSMO roles, go to https://
docs.microsoft.com/troubleshoot/windows-server/identity/transfer-or-seize-fsmo-roles-in-ad-
ds. If this does not correct the problem, please contact AWS Support for more assistance.
Troubleshooting directory status messages Version 1.0 540

AWS Directory Service Administration Guide
Domain controller replication failures
Description
The Simple AD directory controllers are failing to replicate with one another. This can be caused
by one or more of the following issues:
• The security groups for the directory controllers does not have the correct ports open.
• The network ACLs are too restrictive.
• The VPC route table is not routing network traffic between the directory controllers correctly.
• Another instance has been promoted to a domain controller in the directory.
Troubleshooting
For more information about your VPC network requirements, see either AWS Managed
Microsoft AD Prerequisites for creating a AWS Managed Microsoft AD, AD Connector AD
Connector prerequisites, or Simple AD Simple AD prerequisites. If there is an unknown domain
controller in your directory, you must demote it. If your VPC network setup is correct, but the
error persists, please contact AWS Support for more assistance.
Troubleshooting directory status messages Version 1.0 541

AWS Directory Service Administration Guide
Security in AWS Directory Service
Cloud security at AWS is the highest priority. As an AWS customer, you benefit from a data center
and network architecture that is built to meet the requirements of the most security-sensitive
organizations.
Security is a shared responsibility between AWS and you. The shared responsibility model describes
this as security of the cloud and security in the cloud:
• Security of the cloud – AWS is responsible for protecting the infrastructure that runs AWS
services in the AWS Cloud. AWS also provides you with services that you can use securely. Third-
party auditors regularly test and verify the effectiveness of our security as part of the AWS
compliance programs. To learn about the compliance programs that apply to AWS Directory
Service, see AWS Services in Scope by Compliance Program.
• Security in the cloud – Your responsibility is determined by the AWS service that you use. You
are also responsible for other factors including the sensitivity of your data, your company’s
requirements, and applicable laws and regulations.
This documentation helps you understand how to apply the shared responsibility model when
using AWS Directory Service. The following topics show you how to configure AWS Directory
Service to meet your security and compliance objectives. You also learn how to use other AWS
services that help you to monitor and secure your AWS Directory Service resources.
Security topics
The following security topics can be found in this section:
• Identity and access management for AWS Directory Service
• Logging and monitoring in AWS Directory Service
• Compliance validation for AWS Directory Service
• Resilience in AWS Directory Service
• Infrastructure security in AWS Directory Service
Additional security topics
The following additional security topics can be found in this guide:
Version 1.0 542

AWS Directory Service Administration Guide
Accounts, trusts, and AWS resource access
• AWS Managed Microsoft AD Administrator account permissions
• Group Managed Service Accounts
• Creating a trust relationship
• Kerberos constrained delegation
• Granting AWS Managed Microsoft AD users and groups access to AWS resources with IAM roles
• Authorization for AWS applications and services using AWS Directory Service
Secure your directory
• Secure your AWS Managed Microsoft AD
• Secure your AD Connector directory
Logging and monitoring
• Monitor your AWS Managed Microsoft AD
• Monitor your AD Connector directory
Resilience
• Patching and maintenance for AWS Managed Microsoft AD
Identity and access management for AWS Directory Service
Access to AWS Directory Service requires credentials that AWS can use to authenticate your
requests. Those credentials must have permissions to access AWS resources, such as an AWS
Directory Service directory. The following sections provide details on how you can use AWS
Identity and Access Management (IAM) and AWS Directory Service to help secure your resources by
controlling who can access them:
• Authentication
• Access control
Identity and access management Version 1.0 543

AWS Directory Service Administration Guide
Authentication
Learn how to access AWS using IAM identities.
Access control
You can have valid credentials to authenticate your requests, but unless you have permissions you
cannot create or access AWS Directory Service resources. For example, you must have permissions
to create an AWS Directory Service directory or to create a directory snapshot.
The following sections describe how to manage permissions for AWS Directory Service. We
recommend that you read the overview first.
• Overview of managing access permissions to your AWS Directory Service resources
• Using identity-based policies (IAM policies) for AWS Directory Service
• AWS Directory Service API permissions: Actions, resources, and conditions reference
Overview of managing access permissions to your AWS Directory
Service resources
Every AWS resource is owned by an AWS account. As a result, permissions to create or access the
resources are governed by permissions policies. However, an account administrator, which is a user
with administrator permissions, can attach permissions to resources. The also have the ability to
attach permissions policies to IAM identities, such as users, groups, and roles, and some services,
such as AWS Lambda also support attaching permissions policies to resources.
Note
For information about the account administrator role, see IAM best practices in the IAM
User Guide.
Topics
• AWS Directory Service resources and operations
• Understanding resource ownership
• Managing access to resources
Authentication Version 1.0 544

AWS Directory Service Administration Guide
• Specifying policy elements: Actions, effects, resources, and principals
• Specifying conditions in a policy
AWS Directory Service resources and operations
In AWS Directory Service, the primary resource is a directory. Because AWS Directory Service
supports directory snapshot resources, you can create snapshots only in the context of an existing
directory. This snapshot is referred to as a subresource.
These resources have unique Amazon Resource Names (ARNs) associated with them as shown in
the following table.
Resource Type ARN Format
Directory
arn:aws:ds: region:account-id :directory/ external-
directory-id
Snapshot
arn:aws:ds: region:account-id :snapshot/ external-
snapshot-id
AWS Directory Service includes two service namespaces based on the type of operations that you
perform.
•
The ds service namespace provides a set of operations to work with the appropriate resources.
For a list of available operations, see Directory Service Actions.
•
The ds-data service namespace provides a set of operations to Active Directory objects. For a
list of available operations, see Directory Service Data API Reference.
Understanding resource ownership
A resource owner is the AWS account that created a resource. That is, the resource owner is the AWS
account of the principal entity (the root account, an IAM user, or an IAM role) that authenticates the
request that creates the resource. The following examples illustrate how this works:
• If you use the root account credentials of your AWS account to create an AWS Directory Service
resource, such as a directory, your AWS account is the owner of that resource.
Overview of managing access Version 1.0 545

AWS Directory Service Administration Guide
• If you create an IAM user in your AWS account and grant permissions to create AWS Directory
Service resources to that user, the user can also create AWS Directory Service resources. However,
your AWS account, to which the user belongs, owns the resources.
• If you create an IAM role in your AWS account with permissions to create AWS Directory Service
resources, anyone who can assume the role can create AWS Directory Service resources. Your
AWS account, to which the role belongs, owns the AWS Directory Service resources.
Managing access to resources
A permissions policy describes who has access to what. The following section explains the available
options for creating permissions policies.
Note
This section discusses using IAM in the context of AWS Directory Service. It doesn't provide
detailed information about the IAM service. For complete IAM documentation, see What is
IAM? in the IAM User Guide. For information about IAM policy syntax and descriptions, see
IAM JSON policy reference in the IAM User Guide.
Policies attached to an IAM identity are referred to as identity-based policies (IAM polices) and
policies attached to a resource are referred to as resource-based policies. AWS Directory Service
supports only identity-based policies (IAM policies).
Topics
• Identity-based policies (IAM policies)
• Resource-based policies
Identity-based policies (IAM policies)
You can attach policies to IAM identities. For example, you can do the following:
• Attach a permissions policy to a user or a group in your account – An account administrator
can use a permissions policy that is associated with a particular user to grant permissions for that
user to create an AWS Directory Service resource, such as a new directory.
• Attach a permissions policy to a role (grant cross-account permissions) – You can attach an
identity-based permissions policy to an IAM role to grant cross-account permissions.
Overview of managing access Version 1.0 546

AWS Directory Service Administration Guide
For more information about using IAM to delegate permissions, see Access management in the
IAM User Guide.
The following permissions policy grants permissions to a user to run all of the actions that begin
with Describe. These actions show information about an AWS Directory Service resource, such
as a directory or snapshot. Note that the wildcard character (*) in the Resource element indicates
that the actions are allowed for all AWS Directory Service resources owned by the account.
{
"Version":"2012-10-17",
"Statement":[
{
"Effect":"Allow",
"Action":"ds:Describe*",
"Resource":"*"
}
]
}
For more information about using identity-based policies with AWS Directory Service, see Using
identity-based policies (IAM policies) for AWS Directory Service. For more information about users,
groups, roles, and permissions, see Identities (users, groups, and roles) in the IAM User Guide.
Resource-based policies
Other services, such as Amazon S3, also support resource-based permissions policies. For example,
you can attach a policy to an S3 bucket to manage access permissions to that bucket. AWS
Directory Service doesn't support resource-based policies.
Specifying policy elements: Actions, effects, resources, and principals
For each AWS Directory Service resource, the service defines a set of API operations. For more
information, see AWS Directory Service resources and operations. For a list of available API
operations, see Directory Service Actions.
To grant permissions for these API operations, AWS Directory Service defines a set of actions that
you can specify in a policy. Note that performing an API operation can require permissions for more
than one action.
The following are the basic policy elements:
Overview of managing access Version 1.0 547

AWS Directory Service Administration Guide
• Resource – In a policy, you use an Amazon Resource Name (ARN) to identify the resource to
which the policy applies. For AWS Directory Service resources, you always use the wildcard
character (*) in IAM policies. For more information, see AWS Directory Service resources and
operations.
• Action – You use action keywords to identify resource operations that you want to allow or
deny. For example, the ds:DescribeDirectories permission allows the user permissions to
perform the AWS Directory Service DescribeDirectories operation.
• Effect – You specify the effect when the user requests the specific action. This can be either allow
or deny. If you don't explicitly grant access to (allow) a resource, access is implicitly denied. You
can also explicitly deny access to a resource, which you might do to make sure that a user cannot
access it, even if a different policy grants access.
• Principal – In identity-based policies (IAM policies), the user that the policy is attached to is
the implicit principal. For resource-based policies, you specify the user, account, service, or
other entity that you want to receive permissions (applies to resource-based policies only). AWS
Directory Service doesn't support resource-based policies.
To learn more about IAM policy syntax and descriptions, see IAM JSON policy reference in the IAM
User Guide.
For a table showing all of the AWS Directory Service API actions and the resources that they apply
to, see AWS Directory Service API permissions: Actions, resources, and conditions reference.
Specifying conditions in a policy
When you grant permissions, you can use the access policy language to specify the conditions
when a policy should take effect. For example, you might want a policy to be applied only after a
specific date. For more information about specifying conditions in a policy language, see Condition
in the IAM User Guide.
To express conditions, you use predefined condition keys. There are no condition keys specific to
AWS Directory Service. However, there are AWS condition keys that you can use as appropriate. For
a complete list of AWS keys, see Available global condition keys in the IAM User Guide.
AWS managed policies for AWS Directory Service
The following sections describe the AWS managed policies that are specific to AWS Directory
Service. You can attach these policies to users in your account.
AWS managed policies for AWS Directory Service Version 1.0 548

AWS Directory Service Administration Guide
For more information, see AWS managed policies in the IAM User Guide.
AWSDirectoryServiceFullAccess
The AWSDirectoryServiceFullAccess policy grants a user or group the following:
• Full access to AWS Directory Service
• Access to key Amazon EC2 services required to use AWS Directory Service
• Ability to list Amazon SNS topics
• Ability to create, manage, and delete Amazon SNS topics with a name beginning with
“DirectoryMonitoring”
AWSDirectoryServiceReadOnlyAccess
The AWSDirectoryServiceReadOnlyAccess policy grants a user or group read-only access to all AWS
Directory Service resources, EC2 subnets, EC2 network interfaces, and Amazon Simple Notification
Service (Amazon SNS) topics and subscriptions for the root AWS account. For more information,
see Using AWS managed policies with AWS Directory Service.
AWSDirectoryServiceDataFullAccess
The AWSDirectoryServiceDataFullAccess policy grants a user or group full access to built-in object
management with Directory Service Data to create, manage, and view AD users, members, and
groups. For details, see AWS Directory Service Data API Reference.
• Full access to Directory Service Data
AWSDirectoryServiceDataReadOnlyAccess
The AWSDirectoryServiceDataReadOnlyAccess policy grants a user or group access to view and
search AD users, members, and groups. For details, see AWS Directory Service Data API Reference.
• Ability to list Directory Service Data
• Ability to search Directory Service Data
• Ability to get descriptions of Directory Service Data
For more information, see Using AWS managed policies with AWS Directory Service.
AWS managed policies for AWS Directory Service Version 1.0 549

AWS Directory Service Administration Guide
In addition, there are other AWS managed policies that are suitable for use with other IAM roles.
These policies are assigned to the roles that are associated with users in your AWS Directory Service
directory. These policies are required for those users to have access to other AWS resources, such
as Amazon EC2. For more information, see Granting AWS Managed Microsoft AD users and groups
access to AWS resources with IAM roles.
You can also create custom IAM policies that allow users to access the required API actions and
resources. You can attach these custom policies to the IAM users or groups that require those
permissions.
IAM and AWS Directory Service updates to AWS managed policies
View details about updates to IAM and AWS managed policies since the service began tracking
these changes. For automatic alerts about changes to this page, subscribe to the RSS feed on the
IAM and AWS Directory Service Document history pages.
Change Description Date
AWSDirectoryServic
eDataReadOnlyAccess – New
policy
AWS Directory Service added
a new policy to allow a user
or group access to view and
search AD users, members,
and groups.
September 17, 2024
AWSDirectoryServiceDataFull
Access – New policy
AWS Directory Service added
a new policy to allow a user
or group access to built-in
object management with
Directory Service Data to
create, manage, and view AD
users, members, and groups.
September 17, 2024
AWS Directory Service started
tracking changes
AWS Directory Service started
tracking changes for its AWS
managed policies.
September 17, 2024
AWS managed policies for AWS Directory Service Version 1.0 550

AWS Directory Service Administration Guide
Using identity-based policies (IAM policies) for AWS Directory Service
This topic provides examples of identity-based policies in which an account administrator can
attach permissions policies to IAM identities (users, groups, and roles).
Important
We recommend that you first review the introductory topics that explain the basic concepts
and options available for you to manage access to your AWS Directory Service resources.
For more information, see Overview of managing access permissions to your AWS Directory
Service resources.
The sections in this topic cover the following:
• Permissions required to use the AWS Directory Service console
• AWS managed (predefined) policies for AWS Directory Service
• Customer managed policy examples
• Using tags with IAM policies
The following shows an example of a permissions policy.
{
"Version": "2012-10-17",
"Statement": [
{
"Sid": "AllowDsEc2IamGetRole",
"Effect": "Allow",
"Action": [
"ds:CreateDirectory",
"ec2:RevokeSecurityGroupIngress",
"ec2:CreateNetworkInterface",
"ec2:AuthorizeSecurityGroupEgress",
"ec2:AuthorizeSecurityGroupIngress",
"ec2:DescribeNetworkInterfaces",
"ec2:DescribeVpcs",
"ec2:CreateSecurityGroup",
"ec2:RevokeSecurityGroupEgress",
"ec2:DeleteSecurityGroup",
"ec2:DeleteNetworkInterface",
Using identity-based policies (IAM policies) Version 1.0 551

AWS Directory Service Administration Guide
"ec2:DescribeSubnets",
"iam:GetRole"
],
"Resource": "*"
},
{
"Sid": "WarningAllowsCreatingRolesWithDirSvcPrefix",
"Effect": "Allow",
"Action": [
"iam:CreateRole",
"iam:PutRolePolicy"
],
"Resource": "arn:aws:iam::111122223333:role/DirSvc*"
},
{
"Sid": "AllowPassRole",
"Effect": "Allow",
"Action": "iam:PassRole",
"Resource": "*",
"Condition": {
"StringEquals": {
"iam:PassedToService": "cloudwatch.amazonaws.com"
}
}
}
]
}
The three statements in the policy grants permissions as follows:
• The first statement grants permission to create an AWS Directory Service directory. Because
AWS Directory Service doesn't support permissions at the resource level, the policy specifies a
wildcard character (*) as the Resource value.
• The second statement grants permissions to access IAM actions, so that AWS Directory Service
can read and create IAM roles on your behalf. The wildcard character (*) at the end of the
Resource value means that the statement allows permission for the IAM actions on any IAM
role. To limit this permission to a specific role, replace the wildcard character (*) in the resource
ARN with the specific role name. For more information, see IAM Actions.
• The third statement grants permissions to a specific set of resources in Amazon EC2 that are
necessary to allow AWS Directory Service to create, configure, and destroy its directories. The
wildcard character (*) at the end of the Resource value means that the statement allows
Using identity-based policies (IAM policies) Version 1.0 552

AWS Directory Service Administration Guide
permission for the EC2 actions on any EC2 resource or subresource. To limit this permission to a
specific role, replace the wildcard character (*) in the resource ARN with the specific resource or
subresource. For more information, see Amazon EC2 Actions.
You don't see a Principal element in the policy, because in an identity-based policy you don't
specify the principal who gets the permission. When you attach the policy to a user, the user is the
implicit principal. When you attach a permission policy to an IAM role, the principal identified in
the role's trust policy gets the permissions
For a table showing all of the AWS Directory Service API actions and the resources that they apply
to, see AWS Directory Service API permissions: Actions, resources, and conditions reference.
Permissions required to use the AWS Directory Service console
For a user to work with the AWS Directory Service console, that user must have permissions
listed in the preceding policy or the permissions granted by the Directory Service Full Access Role
or Directory Service Read Only role, described in AWS managed (predefined) policies for AWS
Directory Service.
If you create an IAM policy that is more restrictive than the minimum required permissions, the
console won't function as intended for users with that IAM policy.
AWS managed (predefined) policies for AWS Directory Service
AWS addresses many common use cases by providing predefined, or managed, IAM policies that
are created and administered by AWS. Managed policies grant necessary permissions for common
use cases, which helps you decide what permissions you need. For more information, see AWS
managed policies for AWS Directory Service.
Customer managed policy examples
In this section, you can find example user policies that grant permissions for various AWS Directory
Service actions.
Note
All examples use the US West (Oregon) Region (us-west-2) and contain fictitious account
IDs.
Using identity-based policies (IAM policies) Version 1.0 553

AWS Directory Service Administration Guide
Examples
• Example 1: Allow a user to perform any Describe action on any AWS Directory Service resource
• Example 2: Allow a user to create a directory
Example 1: Allow a user to perform any Describe action on any AWS Directory Service resource
The following permissions policy grants permissions to a user to run all of the actions that begin
with Describe. These actions show information about an AWS Directory Service resource, such
as a directory or snapshot. Note that the wildcard character (*) in the Resource element indicates
that the actions are allowed for all AWS Directory Service resources owned by the account.
{
"Version":"2012-10-17",
"Statement":[
{
"Effect":"Allow",
"Action":"ds:Describe*",
"Resource":"*"
}
]
}
Example 2: Allow a user to create a directory
The following permissions policy grants permissions to allow a user to create a directory and all
other related resources, such as snapshots and trusts. In order to do so, permissions to certain
Amazon EC2 services are also required.
{
"Version":"2012-10-17",
"Statement":[
{
"Effect":"Allow",
"Action": [
"ds:Create*",
"ec2:AuthorizeSecurityGroupEgress",
"ec2:AuthorizeSecurityGroupIngress",
"ec2:CreateNetworkInterface",
"ec2:CreateSecurityGroup",
"ec2:DeleteNetworkInterface",
Using identity-based policies (IAM policies) Version 1.0 554

AWS Directory Service Administration Guide
"ec2:DeleteSecurityGroup",
"ec2:DescribeNetworkInterfaces",
"ec2:DescribeSubnets",
"ec2:DescribeVpcs",
"ec2:RevokeSecurityGroupEgress",
"ec2:RevokeSecurityGroupIngress"
],
"Resource":"*"
]
}
]
}
Using tags with IAM policies
You can apply tag-based resource-level permissions in the IAM policies you use for most AWS
Directory Service API actions. This gives you better control over what resources a user can create,
modify, or use. You use the Condition element (also called the Condition block) with the
following condition context keys and values in an IAM policy to control user access (permissions)
based on a resource's tags:
•
Use aws:ResourceTag/tag-key: tag-value to allow or deny user actions on resources with
specific tags.
•
Use aws:ResourceTag/tag-key: tag-value to require that a specific tag be used (or not used)
when making an API request to create or modify a resource that allows tags.
•
Use aws:TagKeys: [tag-key, ...] to require that a specific set of tag keys be used (or not used)
when making an API request to create or modify a resource that allows tags.
Note
The condition context keys and values in an IAM policy apply only to those AWS Directory
Service actions where an identifier for a resource capable of being tagged is a required
parameter.
Controlling access using tags in the IAM User Guide has additional information on using tags. The
IAM JSON policy reference section of that guide has detailed syntax, descriptions, and examples of
the elements, variables, and evaluation logic of JSON policies in IAM.
Using identity-based policies (IAM policies) Version 1.0 555

AWS Directory Service Administration Guide
The following tag policy example allows all ds calls as long as it contains the tag key-value pair
"fooKey":"fooValue".
{
"Version":"2012-10-17",
"Statement":[
{
"Sid":"VisualEditor0",
"Effect":"Allow",
"Action":[
"ds:*"
],
"Resource":"*",
"Condition":{
"StringEquals":{
"aws:ResourceTag/fooKey":"fooValue"
}
}
},
{
"Effect":"Allow",
"Action":[
"ec2:*"
],
"Resource":"*"
}
]
}
The following resource policy example allows all ds calls as long as the resource contains the
directory ID "d-1234567890".
{
"Version":"2012-10-17",
"Statement":[
{
"Sid":"VisualEditor0",
"Effect":"Allow",
"Action":[
"ds:*"
],
"Resource":"arn:aws:ds:us-east-1:123456789012:directory/d-1234567890"
},
Using identity-based policies (IAM policies) Version 1.0 556

AWS Directory Service Administration Guide
{
"Effect":"Allow",
"Action":[
"ec2:*"
],
"Resource":"*"
}
]
}
For more information about ARNs, see Amazon Resource Names (ARNs) and AWS Service
Namespaces.
The following list of AWS Directory Service API operations support tag-based resource-level
permissions:
• AcceptSharedDirectory
• AddIpRoutes
• AddTagsToResource
• CancelSchemaExtension
• CreateAlias
• CreateComputer
• CreateConditionalForwarder
• CreateSnapshot
• CreateLogSubscription
• CreateTrust
• DeleteConditionalForwarder
• DeleteDirectory
• DeleteLogSubscription
• DeleteSnapshot
• DeleteTrust
• DeregisterEventTopic
• DescribeConditionalForwarders
• DescribeDomainControllers
• DescribeEventTopics
Using identity-based policies (IAM policies) Version 1.0 557

AWS Directory Service Administration Guide
• DescribeSharedDirectories
• DescribeSnapshots
• DescribeTrusts
• DisableRadius
• DisableSso
• EnableRadius
• EnableSso
• GetSnapshotLimits
• ListIpRoutes
• ListSchemaExtensions
• ListTagsForResource
• RegisterEventTopic
• RejectSharedDirectory
• RemoveIpRoutes
• RemoveTagsFromResource
• ResetUserPassword
• RestoreFromSnapshot
• ShareDirectory
• StartSchemaExtension
• UnshareDirectory
• UpdateConditionalForwarder
• UpdateNumberOfDomainControllers
• UpdateRadius
• UpdateTrust
• VerifyTrust
AWS Directory Service API permissions: Actions, resources, and
conditions reference
When you are setting up Access control and writing permissions policies that you can attach to
an IAM identity (identity-based policies), you can use the AWS Directory Service API permissions:
AWS Directory Service API permissions reference Version 1.0 558

AWS Directory Service Administration Guide
Actions, resources, and conditions reference table as a reference. Each API entry in the includes the
following:
• The name of each API operation
• Each API operation's corresponding action or actions in which you can grant permissions to
perform the action
• The AWS resource in which you can grant the permissions
You specify the actions in the policy's Action field and the resource value in the policy's
Resource field. To specify an action, use the ds: prefix followed by the API operation name
(for example, ds:CreateDirectory). Some AWS applications may require use of nonpublic
AWS Directory Service API operations such as ds:AuthorizeApplication, ds:CheckAlias,
ds:CreateIdentityPoolDirectory, ds:GetAuthorizedApplicationDetails,
ds:UpdateAuthorizedApplication, and ds:UnauthorizeApplication in their policies.
Some AWS Directory Service APIs can only be called through the AWS Management Console. They
are not public APIs, in the sense they cannot be called programmatically, and they are not provided
by any SDK. They accept user credentials. These API operations include ds:DisableRoleAccess,
ds:EnableRoleAccess, and ds:UpdateDirectory.
You can use AWS global condition keys in your AWS Directory Service and Directory Service Data
policies to express conditions. For a complete list of AWS keys, see Available Global Condition Keys
in the IAM User Guide.
AWS Directory Service API and required permissions for actions
AWS Directory Service Data API and required permissions for actions
Note
To specify an action, use the ds-data: prefix followed by the name of the API operation
(for example, ds-data:AddGroupMember).
AWS Directory Service API permissions reference Version 1.0 559

AWS Directory Service Administration Guide
Directory Service
Data API Operations
Required Permissions (API Actions) Resources
AddGroupMember
ds-data:AddGroupMember
*
CreateGroup
ds-data:CreateGroup
*
CreateUser
ds-data:CreateUser
*
DeleteGroup
ds-data:DeleteGroup
*
DeleteUser
ds-data:DeleteUser
*
DescribeGroup
ds-data:DescribeGroup
*
DescribeUser
ds-data:DescribeUser
*
DisableUser
ds-data:DisableUser
*
ListGroupMembers
ds-data:ListGroupMembers
*
ListGroupsForMember
ds-data:ListGroups
ForMember
*
ListUsers
ds-data:ListUsers
*
RemoveGroupMember
ds-data:RemoveGroupMember
*
SearchGroups
ds-data:DescribeGroup
ds-data:SearchGroups
*
SearchUsers
ds-data:DescribeUser
ds-data:SearchUsers
*
UpdateGroup
ds-data:UpdateGroup
*
UpdateUser
ds-data:UpdateUser
*
AWS Directory Service API permissions reference Version 1.0 560

AWS Directory Service Administration Guide
Related Topics
• Access control
Directory Service Data condition keys
Use Directory Service Data condition keys to add specific statements to users and group level
access. This allows users to decide which principals can perform actions on what resources and
under what conditions.
The Condition element, or Condition block, lets you specify conditions where a statement is in
effect. The Condition element is optional. You can create conditional expressions that use condition
operators, such as equals (=) or less than (<), to match the condition in the policy with values in the
request.
If you specify multiple Condition elements in a statement, or multiple keys in a single Condition
element, AWS evaluates them by using a logical AND operation. If you specify multiple values
for a single condition key, AWS evaluates the condition by using a logical OR operation. All of
the conditions must be met before the statement's permissions are granted. You can also use
placeholder variables when you specify conditions. For example, you can grant an IAM user
permission to access a resource only if it's tagged with their username. For information, see
Condition with multiple keys or values in the IAM User Guide.
For a list of which actions support these condition keys, see Actions defined by AWS Directory
Service Data in the Service Authorization Reference.
Note
For information about tag-based resource-level permissions, see Using tags with IAM
policies.
ds-data:SAMAccountName
Works with String operators.
Checks that the policy with the specified SAMAccountName matches the input used in the request.
Only a single SAM account name can be supplied in each request.
Directory Service Data condition keys Version 1.0 561

AWS Directory Service Administration Guide
Note
This condition key case insensitive. You must use StringEqualsIgnoreCase or
StringNotEqualsIgnoreCase condition operators to compare string values regardless
of letter cases.
Allows a user or group to search AD objects
The following policy allows the user jstiles or any member of test-group to search users,
members, and groups in the AWS Managed Microsoft AD domain.
Important
When using SAMAccountName or MemberName, we recommend specifying ds-
data:Identifier as SAMAccountName. This prevents future identifiers that AWS
Directory Service Data supports, such as SID, from breaking existing permissions.
{
"Version": "2012-10-17",
"Statement": [
{
"Sid": "SearchOnTrustedDomain",
"Effect": "Allow",
"Action": "ds-data:Search*",
"Resource": "*",
"Condition": {
"StringEqualsIgnoreCase": {
"ds-data:SAMAccountName": [
"jstiles",
"test-group"
],
"StringEqualsIgnoreCase": {
"ds-data:identifier": [
"SAMAccountName"
]
}
}
}
}
Directory Service Data condition keys Version 1.0 562

AWS Directory Service Administration Guide
]
}
ds-data:Identifier
Works with String operators.
Specifies the type of identifier that is used in the request. We recommend always specifying
SAMAccountName in the Identifier condition key, so any future identifiers supported in Directory
Service Data won't break your existing permissions.
Note
Currently, SAMAccountName is the only permitted value. However, more values might be
permitted in the future.
Allows a user or group to update users by realm
The following policy allows the user jstiles or any member of test-group to update
user information in the example-domain.com realm. The identifier key ensures that
SAMAccountName is the ID type passed in the request context.
{
"Version": "2012-10-17",
"Statement": [
{
"Sid": "UpdateUsersonDomain",
"Effect": "Allow",
"Action": "ds-data:UpdateUser",
"Resource": "*",
"Condition": {
"StringEquals": {
"ds-data:SAMAccountName": [
"jstiles",
"test-group"
],
"StringEquals": {
"ds-data:Identifier": [
"SAMAccountName"
],
"StringEquals": {
Directory Service Data condition keys Version 1.0 563

AWS Directory Service Administration Guide
"ds-data:Realm": [
"example-domain.com"
]
}
}
}
}
}
]
}
ds-data:MemberName
Works with String operators.
Checks that the policy with the specified MemberName matches the name of the member used in
the request.
Note
This condition key is case insensitive. You must use StringEqualsIgnoreCase or
StringNotEqualsIgnoreCase condition operators to compare string values, regardless
of letter cases.
Allows members to be added to a group
The following policy allows a user or role to add a member to a group in the specified directory if
the MemberName added to the group starts with region-1.
Important
When using MemberName or SAMAccountName, we recommend specifying ds-
data:Identifier as SAMAccountName. This prevents future identifiers that Directory
Service Data supports, such as SID, from breaking existing permissions.
{
"Version": "2012-10-17",
"Statement": [
Directory Service Data condition keys Version 1.0 564

AWS Directory Service Administration Guide
{
"Sid": "UpdateGroupsWithRegionalMembers",
"Effect": "Allow",
"Action": "ds-data:UpdateGroup",
"Resource": "arn:aws:ds::123456789012:directory/d-012345678",
"Condition": {
"StringEqualsIgnoreCase": {
"ds-data:MemberName": [
"region-1-*"
]
}
}
}
]
}
ds-data:MemberRealm
Works with String operators.
Checks that the MemberRealm in the policy matches the member realm that's used in the request.
Note
This condition key is case insensitive. You must use StringEqualsIgnoreCase or
StringNotEqualsIgnoreCase condition operators to compare string values, regardless
of letter cases.
Allows members to be added to a group in a realm
The following policy allows a user or role to add a member to a group in a cross-domain trusted
realm.
Note
The following example uses only the ds-data:MemberName context key.
{
"Version": "2012-10-17",
Directory Service Data condition keys Version 1.0 565

AWS Directory Service Administration Guide
"Statement": [
{
"Sid": "UpdateMembersInRealm",
"Effect": "Allow",
"Action": "ds-data:UpdateGroup",
"Resource": "arn:aws:ds::123456789012:directory/d-012345678",
"Condition": {
"StringEqualsIgnoreCase": {
"ds-data:MemberRealm": [
"region-1-*"
]
}
}
}
]
}
ds-data:Realm
Works with String operators.
Checks that the Realm in the policy matches the realm used in the request.
Note
This condition key is case insensitive. You must use StringEqualsIgnoreCase or
StringNotEqualsIgnoreCase condition operators to compare string values regardless
of letter cases.
Allows groups to be added to a realm
The following policy allows a user or role to create groups in the specified realm.
{
"Version": "2012-10-17",
"Statement": [
{
"Sid": "UpdateGroupsInRealm",
"Effect": "Allow",
"Action": "ds-data:CreateGroup",
"Resource": "*",
Directory Service Data condition keys Version 1.0 566

AWS Directory Service Administration Guide
"Condition": {
"StringEqualsIgnoreCase": {
"ds-data:Realm": [
"example-domain.com"
]
}
}
}
]
}
Authorization for AWS applications and services using AWS
Directory Service
This topic describes authorization for AWS applications and services using AWS Directory Service
and AWS Directory Service Data
Authorizing an AWS application on an Active Directory
AWS Directory Service grants specific permissions for selected applications to integrate seamlessly
with your Active Directory when you authorize an AWS application. AWS applications are only
granted the access that's necessary for their specific use-cases. The following is a set of internal
permissions granted to applications and application administrators after authorization:
Note
The ds:AuthorizationApplication permission is required to authorize a new AWS
application for an Active Directory. Permissions to this action should only be provided to
Administrators that configure integrations with Directory Service.
• Read access to Active Directory user, group, organizational unit, computer, or certification
authority data in all Organizational Units (OU) of AWS Managed Microsoft AD, Simple AD, AD
Connector directories, as well as trusted domains for AWS Managed Microsoft AD if permitted by
a trust relationship.
• Write access to users, groups, group membership, computers, or certification authority data in
your organizational unit of AWS Managed Microsoft AD. Write access to all OU‘s of Simple AD.
• Authentication and session management of Active Directory users for all directory types.
Authorization for AWS applications and services using AWS Directory Service Version 1.0 567

AWS Directory Service Administration Guide
Certain AWS Managed Microsoft AD applications such as Amazon RDS and Amazon FSx integrate
through direct network connection to your Active Directory. In this case, the directory interactions
use native Active Directory protocols such as LDAP and Kerberos. The permissions of these AWS
applications are controlled by a directory user account created in the AWS Reserved Organizational
Unit (OU) during the application authorization, which includes DNS management and full access
to a custom OU created for the application. In order to use this account, the application requires
permissions to ds:GetAuthorizedApplicationDetails action through caller credentials or an
IAM role.
For more information about AWS Directory Service API permissions, see AWS Directory Service API
permissions: Actions, resources, and conditions reference.
For more information about enabling AWS applications and services for AWS Managed Microsoft
AD, see Access to AWS applications and services from your AWS Managed Microsoft AD. For more
information about enabling AWS applications and services for Simple AD, see Access to AWS
applications and services from your Simple AD. For information about enabling AWS applications
and services for AD Connector, see Access to AWS applications and services from AD Connector.
Deauthorizing an AWS application on a Active Directory
The ds:UnauthorizedApplication permission is required to remove permissions for an AWS
application to access an Active Directory. Follow the procedure the application provides to disable
it.
AWS application authorization with Directory Service Data
For AWS Managed Microsoft AD directories, the Directory Service Data (ds-data) API provides
programmatic access to user and group management tasks. The authorization model of AWS
applications is separate from the access controls of Directory Service Data, which means that access
policies for Directory Service Data actions don't effect the authorization for AWS applications.
Denying access to a directory in ds-data will not interrupt the AWS Application integration or use-
cases of AWS applications.
When writing access policies for AWS Managed Microsoft AD directories that authorize AWS
applications, be aware that user and group functionality might be available by calling either
an authorized AWS Application or Directory Service Data API. Amazon WorkDocs, Amazon
WorkMail, Amazon WorkSpaces, Amazon QuickSight, and Amazon Chime all provide user and
group management actions in their APIs. Control access to this AWS application functionality with
IAM policies.
AWS application authorization with Directory Service Data Version 1.0 568

AWS Directory Service Administration Guide
Examples
The following snippets show the incorrect and correct ways to deny DeleteUser functionality
when AWS applications, such as Amazon WorkDocs and Amazon WorkMail, are authorized on the
directory.
Incorrect
{
"Version": "2012-10-17",
"Statement": [{
"Sid": "VisualEditor0",
"Effect": "Deny",
"Action": [
"ds-data:DeleteUser"
],
"Resource": "*"
}
]
}
Correct
{
"Version": "2012-10-17",
"Statement": [{
"Sid": "VisualEditor0",
"Effect": "Deny",
"Action": [
"ds-data:DeleteUser",
"workmail:DeleteUser",
"workdocs:DeleteUser"
],
"Resource": "*"
}
]
}
Logging and monitoring in AWS Directory Service
As a best practice, monitor your organization to ensure that changes are logged. This helps you to
ensure that any unexpected change can be investigated and unwanted changes can be rolled back.
Logging and monitoring Version 1.0 569

AWS Directory Service Administration Guide
AWS Directory Service currently supports the following two AWS services, so you can monitor your
organization and the activity that happens within it.
• Amazon CloudWatch - You can use CloudWatch Events with the AWS Managed Microsoft AD
directory type. For more information, see Enabling Amazon CloudWatch Logs log forwarding for
AWS Managed Microsoft AD. Additionally, you can use CloudWatch Metrics to monitor domain
controller performance. For more information, see Determining when to add domain controllers
with CloudWatch metrics.
• AWS CloudTrail
• You can use CloudTrail with all AWS Directory Service directory types. For more information,
see Logging AWS Directory Service API calls using AWS CloudTrail.
• You can use CloudTrail with AWS Managed Microsoft AD in the Directory Service Data API. For
more information, see Logging AWS Directory Service Data API calls using AWS CloudTrail.
Logging AWS Directory Service API calls using AWS CloudTrail
The AWS Managed Microsoft AD API is integrated with AWS CloudTrail, a service that captures API
calls made by or on behalf of AWS Managed Microsoft AD in your AWS account and delivers the log
files to an Amazon S3 bucket that you specify. CloudTrail captures API calls from the AWS Managed
Microsoft AD console and from code calls to the AWS Managed Microsoft AD APIs. Using the
information collected by CloudTrail, you can determine what request was made to AWS Managed
Microsoft AD, the source IP address from which the request was made, who made the request,
when it was made, and so on. To learn more about CloudTrail, see the AWS CloudTrail User Guide.
AWS Managed Microsoft AD Information in CloudTrail
CloudTrail is enabled on your AWS account when you create the account. When activity occurs in
AWS Managed Microsoft AD, that activity is recorded in a CloudTrail event along with other AWS
service events in Event history. You can view, search, and download recent events in your AWS
account. For more information, see Viewing Events with CloudTrail Event History.
For an ongoing record of events in your AWS account, including events for AWS Managed Microsoft
AD, create a trail. A trail enables CloudTrail to deliver log files to an Amazon S3 bucket. By default,
when you create a trail in the console, the trail applies to all AWS Regions. The trail logs events
from all Regions in the AWS partition and delivers the log files to the Amazon S3 bucket that you
specify. Additionally, you can configure other AWS services to further analyze and act upon the
event data collected in CloudTrail logs. For more information, see the following:
AWS Directory Service logs Version 1.0 570

AWS Directory Service Administration Guide
• Overview for Creating a Trail
• CloudTrail Supported Services and Integrations
• Configuring Amazon SNS Notifications for CloudTrail
• Receiving CloudTrail Log Files from Multiple Regions and Receiving CloudTrail Log Files from
Multiple Accounts
When CloudTrail logging is enabled in your AWS account, all API calls made to AWS Managed
Microsoft AD actions are tracked in log files. AWS Managed Microsoft AD records are written
together with other AWS service records in a log file. CloudTrail determines when to create and
write to a new file based on a time period and file size. All calls made to the AWS Directory Service
API or CLI calls are logged by CloudTrail.
Every log entry contains information about who generated the request. The user identity
information in the log helps you determine whether the request was made with root or IAM user
credentials, with temporary security credentials for a role or federated user, or by another AWS
service. For more information, see the userIdentity field in the CloudTrail Event Reference.
You can store your log files in your bucket for as long as you want, but you can also define Amazon
S3 lifecycle rules to archive or delete log files automatically. By default, your log files are encrypted
by using Amazon S3 server-side encryption (SSE).
You can choose to have CloudTrail publish Amazon SNS notifications when new log files are
delivered if you want to take quick action upon log file delivery. For more information, see
Configuring Amazon SNS Notifications.
You can also aggregate AWS Managed Microsoft AD log files from multiple AWS Regions and AWS
accounts into a single Amazon S3 bucket. For more information, see Aggregating CloudTrail Log
Files to a Single Amazon S3 Bucket.
Understanding AWS Managed Microsoft AD Log File Entries
CloudTrail log files can contain one or more log entries, where each entry is made up of multiple
JSON-formatted events. A log entry represents a single request from any source and includes
information about the requested action, any parameters, the date and time of the action, and so
on. The log entries are not guaranteed to be in any particular order; that is, they are not an ordered
stack trace of the public API calls.
Sensitive information, such as passwords, authentication tokens, file comments, and file contents
are redacted in the log entries.
AWS Directory Service logs Version 1.0 571

AWS Directory Service Administration Guide
The following example shows an example of a CloudTrail log entry for AWS Managed Microsoft AD:
{
"Records" : [
{
"eventVersion" : "1.02",
"userIdentity" :
{
"type" : "IAMUser",
"principalId" : "<user_id>",
"arn" : "<user_arn>",
"accountId" : "<account_id>",
"accessKeyId" : "<access_key_id>",
"userName" : "<username>"
},
"eventTime" : "<event_time>",
"eventSource" : "ds.amazonaws.com",
"eventName" : "CreateDirectory",
"awsRegion" : "<region>",
"sourceIPAddress" : "<IP_address>",
"userAgent" : "<user_agent>",
"requestParameters" :
{
"name" : "<name>",
"shortName" : "<short_name>",
"vpcSettings" :
{
"vpcId" : "<vpc_id>",
"subnetIds" : [
"<subnet_id_1>",
"<subnet_id_2>"
]
},
"type" : "<size>",
"setAsDefault" : <option>,
"password" : "***OMITTED***"
},
"responseElements" :
{
"requestId" : "<request_id>",
"directoryId" : "<directory_id>"
},
"requestID" : "<request_id>",
"eventID" : "<event_id>",
AWS Directory Service logs Version 1.0 572

AWS Directory Service Administration Guide
"eventType" : "AwsApiCall",
"recipientAccountId" : "<account_id>"
}
]
}
Logging AWS Directory Service Data API calls using AWS CloudTrail
AWS Directory Service Data integrates with AWS CloudTrail, a service that provides a record of
actions taken by a user, role, or an AWS service in Directory Service Data. CloudTrail captures all
API calls for Directory Service Data as events. The calls captured include calls from the Directory
Service Data console and code calls to Directory Service Data API operations. If you create a trail,
you can enable continuous delivery of CloudTrail events to an Amazon S3 bucket, including events
for Directory Service Data. Using the information collected by CloudTrail, you can determine the
request that was made to Directory Service Data, the IP address from which the request was made,
who made the request, when it was made, and additional details.
To learn more about CloudTrail, see the AWS CloudTrail User Guide.
Directory Service Data information in CloudTrail
CloudTrail is enabled on your AWS account when you create the account. When supported event
activity (management events) occurs in Directory Service Data, that activity is recorded in a
CloudTrail event along with other AWS service events in Event history. You can view, search, and
download the last 90 days of management events in your AWS account. For more information, see
Viewing events with CloudTrail Event history. There is no charge for viewing the Event history.
For an ongoing record of events in your AWS account, including events for Directory Service Data,
create a trail. A trail enables CloudTrail to deliver log files to an Amazon S3 bucket. By default,
when you create a trail in the console, the trail applies to all AWS Regions. The trail logs events
from all Regions in the AWS partition and delivers the log files to the Amazon S3 bucket that you
specify. Additionally, you can configure other AWS services to further analyze and act upon the
event data collected in CloudTrail logs. For more information, see the following:
• Overview for creating a trail
• CloudTrail supported services and integrations
• Configuring Amazon SNS notifications for CloudTrail
• Receiving CloudTrail log files from multiple regions and Receiving CloudTrail log files from
multiple accounts
AWS Directory Service Data logs Version 1.0 573

AWS Directory Service Administration Guide
All Directory Service Data actions are logged by CloudTrail and are documented in the Directory
Service Data API Reference. For example, calls to the AddGroupMember, DescribeUser and
SearchGroups actions generate entries in the CloudTrail log files.
Every event or log entry contains information about who generated the request. The identity
information helps you determine the following:
• Whether the request was made with root or AWS Identity and Access Management (IAM) user
credentials.
• Whether the request was made with temporary security credentials for a role or federated user.
• Whether the request was made by another AWS service.
For more information, see the CloudTrail userIdentity element.
Understanding Directory Service Data log file entries
A trail is a configuration that enables delivery of events as log files to an Amazon S3 bucket that
you specify. CloudTrail log files contain one or more log entries. An event represents a single
request from any source and includes information about the requested action, the date and time of
the action, request parameters, and so on. CloudTrail log files aren't an ordered stack trace of the
public API calls, so they don't appear in any specific order.
The following example shows a CloudTrail log entry that demonstrates the CreateUser action.
{
"eventVersion": "1.08",
"userIdentity": {
"type": "AssumedRole",
"principalId": "1234567890abcdef0:admin-role",
"arn": "arn:aws:sts::111222333444:assumed-role/AdAdmin/admin-role",
"accountId": "111222333444",
"accessKeyId": "021345abcdef6789",
"sessionContext": {
"sessionIssuer": {
"type": "Role",
"principalId": "1234567890abcdef0",
"arn": "arn:aws:iam::111222333444:role/AdAdmin",
"accountId": "111222333444",
"userName": "AdAdmin"
},
"attributes": {
AWS Directory Service Data logs Version 1.0 574

AWS Directory Service Administration Guide
"creationDate": "2023-05-30T18:22:38Z",
"mfaAuthenticated": "false"
}
}
},
"eventTime": "2023-05-30T19:17:03Z",
"eventSource": "ds.amazonaws.com",
"eventName": "CreateUser",
"awsRegion": "ap-northeast-2",
"sourceIPAddress": ": 10.24.34.0",
"userAgent": "aws-cli/2.9.20 Python/3.11.1 Darwin/21.6.0 source/x86_64 prompt/off
command/ds-data.create-user",
"requestParameters": {
"directoryId": "d-1234567890",
"sAMAccountName": "johnsmith",
"emailAddress": "HIDDEN_DUE_TO_SECURITY_REASONS",
"givenName": "HIDDEN_DUE_TO_SECURITY_REASONS",
"surname": "HIDDEN_DUE_TO_SECURITY_REASONS",
"otherAttributes": {
"physicalDeliveryOfficeName": {
"s": "HIDDEN_DUE_TO_SECURITY_REASONS"
},
"telephoneNumber": {
"s": "HIDDEN_DUE_TO_SECURITY_REASONS"
},
"streetAddress": {
"s": "HIDDEN_DUE_TO_SECURITY_REASONS"
},
"displayName": {
"s": "HIDDEN_DUE_TO_SECURITY_REASONS"
},
"homePhone": {
"s": "HIDDEN_DUE_TO_SECURITY_REASONS"
},
"postalCode": {
"s": "HIDDEN_DUE_TO_SECURITY_REASONS"
},
"description": {
"s": "HIDDEN_DUE_TO_SECURITY_REASONS"
}
},
"clientToken": "createUserToken4"
},
"responseElements": {
AWS Directory Service Data logs Version 1.0 575

AWS Directory Service Administration Guide
"directoryId": "d-1234567890",
"sID": "S-1-5-21-1234567890-123456789-123456789-1234",
"sAMAccountName": "johnsmith"
},
"requestID": "4567ab89-c12d-3333-2222-1e0012f34a7c",
"eventID": "1234567b-f0a0-12ab-3c45-d678900d1255",
"readOnly": false,
"resources": [
{
"accountId": "111222333444",
"type": "AWS::DirectoryService::MicrosoftAD",
"ARN": "arn:aws:ds:ap-northeast-2:111222333444:directory/d-1234567890"
}
],
"eventType": "AwsApiCall",
"managementEvent": true,
"recipientAccountId": "111222333444",
"eventCategory": "Management",
"tlsDetails": {
"tlsVersion": "TLSv1.3",
"cipherSuite": "TLS_AES_128_GCM_SHA256",
"clientProvidedHostHeader": "ds-data.ap-northeast-2.amazonaws.com"
}
},
The following example shows a CloudTrail log entry that demonstrates the ListUsers action.
Actions that do not create or modify an object return a null response.
{
"eventVersion": "1.08",
"userIdentity": {
"type": "AssumedRole",
"principalId": "1234567890abcdef0:admin-role",
"arn": "arn:aws:sts::111222333444:assumed-role/AdAdmin/admin-role",
"accountId": "111222333444",
"accessKeyId": "021345abcdef6789",
"sessionContext": {
"sessionIssuer": {
"type": "Role",
"principalId": "1234567890abcdef0",
"arn": "arn:aws:iam::111222333444:role/AdAdmin",
"accountId": "111222333444",
"userName": "AdAdmin"
AWS Directory Service Data logs Version 1.0 576

AWS Directory Service Administration Guide
},
"attributes": {
"creationDate": "2023-05-30T18:22:38Z",
"mfaAuthenticated": "false"
}
}
},
"eventTime": "2023-05-30T18:22:52Z",
"eventSource": "ds.amazonaws.com",
"eventName": "ListUsers",
"awsRegion": "ap-northeast-2",
"sourceIPAddress": "10.24.34.0",
"userAgent": "aws-cli/2.9.20 Python/3.11.1 Darwin/21.6.0 source/x86_64 prompt/off
command/ds-data.list-users",
"requestParameters": {
"directoryId": "d-1234567890",
"maxResults": 1
},
"responseElements": null,
"requestID": "4567ab89-c12d-3333-2222-1e0012f34a7c",
"eventID": "1234567b-f0a0-12ab-3c45-d678900d1244",
"readOnly": true,
"resources": [
{
"accountId": "111222333444",
"type": "AWS::DirectoryService::MicrosoftAD",
"ARN": "arn:aws:ds:ap-northeast-2:111222333444:directory/d-1234567890"
}
],
"eventType": "AwsApiCall",
"managementEvent": true,
"recipientAccountId": "111222333444",
"eventCategory": "Management",
"tlsDetails": {
"tlsVersion": "TLSv1.3",
"cipherSuite": "TLS_AES_128_GCM_SHA256",
"clientProvidedHostHeader": "ds-data.ap-northeast-2.amazonaws.com"
}
}
The following example shows a CloudTrail log entry that demonstrates the ListGroups action.
AWS Directory Service Data logs Version 1.0 577

AWS Directory Service Administration Guide
Note
The NextToken element is redacted from all log entries.
{
"eventVersion": "1.08",
"userIdentity": {
"type": "AssumedRole",
"principalId": "1234567890abcdef0:admin-role",
"arn": "arn:aws:sts::111222333444:assumed-role/AdAdmin/admin-role",
"accountId": "111222333444",
"accessKeyId": "021345abcdef6789",
"sessionContext": {
"sessionIssuer": {
"type": "Role",
"principalId": "1234567890abcdef0",
"arn": "arn:aws:iam::111222333444:role/AdAdmin",
"accountId": "111222333444",
"userName": "AdAdmin"
},
"attributes": {
"creationDate": "2023-05-30T18:22:38Z",
"mfaAuthenticated": "false"
}
}
},
"eventTime": "2023-05-30T18:29:15Z",
"eventSource": "ds.amazonaws.com",
"eventName": "ListGroups",
"awsRegion": "ap-northeast-2",
"sourceIPAddress": "10.24.34.0",
"userAgent": "aws-cli/2.9.20 Python/3.11.1 Darwin/21.6.0 source/x86_64 prompt/off
command/ds-data.list-groups",
"requestParameters": {
"directoryId": "d-1234567890",
"nextToken": "REDACTED",
"maxResults": 1
},
"responseElements": null,
"requestID": "4567ab89-c12d-3333-2222-1e0012f34a7c",
"eventID": "1234567b-f0a0-12ab-3c45-d678900d1255",
AWS Directory Service Data logs Version 1.0 578

AWS Directory Service Administration Guide
"readOnly": true,
"resources": [
{
"accountId": "111222333444",
"type": "AWS::DirectoryService::MicrosoftAD",
"ARN": "arn:aws:ds:ap-northeast-2:111222333444:directory/d-1234567890"
}
],
"eventType": "AwsApiCall",
"managementEvent": true,
"recipientAccountId": "111222333444",
"eventCategory": "Management",
"tlsDetails": {
"tlsVersion": "TLSv1.3",
"cipherSuite": "TLS_AES_128_GCM_SHA256",
"clientProvidedHostHeader": "ds-data.ap-northeast-2.amazonaws.com"
}
}
Log entries for exception errors
The following example shows a CloudTrail log entry for an Access Denied error. For help with this
error, see Troubleshooting access denied error messages in the IAM User Guide.
Note
The Access Denied log doesn't show request parameters.
{
"eventVersion": "1.08",
"userIdentity": {
"type": "AssumedRole",
"principalId": "1234567890abcdef0:admin-role",
"arn": "arn:aws:sts::111222333444:assumed-role/AdAdmin/admin-role",
"accountId": "111222333444",
"accessKeyId": "021345abcdef6789",
"sessionContext": {
"sessionIssuer": {
"type": "Role",
"principalId": "1234567890abcdef0",
"arn": "arn:aws:iam::111222333444:role/AdAdmin",
AWS Directory Service Data logs Version 1.0 579

AWS Directory Service Administration Guide
"accountId": "111222333444",
"userName": "AdAdmin"
},
"attributes": {
"creationDate": "2023-05-31T23:25:49Z",
"mfaAuthenticated": "false"
}
}
},
"eventTime": "2023-05-31T23:38:18Z",
"eventSource": "ds.amazonaws.com",
"eventName": "CreateUser",
"awsRegion": "ap-northeast-2",
"sourceIPAddress": "10.24.34.0",
"userAgent": "aws-cli/2.9.20 Python/3.11.1 Darwin/21.6.0 source/x86_64 prompt/off
command/ds-data.create-user",
"errorCode": "AccessDenied",
"errorMessage": "User: arn:aws:sts::111222333444:assumed-role/AdAdmin/admin-
role is not authorized to perform: ds-data:CreateUser on resource: arn:aws:ds:ap-
northeast-2:111222333444:directory/d-1234567890 because no identity-based policy allows
the ds-data:CreateUser action",
"requestParameters": null,
"responseElements": null,
"requestID": "4567ab89-c12d-3333-2222-1e0012f34a7c",
"eventID": "1234567b-f0a0-12ab-3c45-d678900d1255",
"readOnly": false,
"resources": [
{
"accountId": "111222333444",
"type": "AWS::DirectoryService::MicrosoftAD",
"ARN": "arn:aws:ds:ap-northeast-2:111222333444:directory/d-1234567890"
}
],
"eventType": "AwsApiCall",
"managementEvent": true,
"recipientAccountId": "111222333444",
"eventCategory": "Management",
"tlsDetails": {
"tlsVersion": "TLSv1.3",
"cipherSuite": "TLS_AES_128_GCM_SHA256",
"clientProvidedHostHeader": "ds-data.ap-northeast-2.amazonaws.com"
}
}
AWS Directory Service Data logs Version 1.0 580

AWS Directory Service Administration Guide
The following example shows a CloudTrail log entry for a Resource Not Found error.
{
"eventVersion": "1.08",
"userIdentity": {
"type": "AssumedRole",
"principalId": "1234567890abcdef0:admin-role",
"arn": "arn:aws:sts::111222333444:assumed-role/AdAdmin/admin-role",
"accountId": "111222333444",
"accessKeyId": "021345abcdef6789",
"sessionContext": {
"sessionIssuer": {
"type": "Role",
"principalId": "1234567890abcdef0",
"arn": "arn:aws:iam::111222333444:role/AdAdmin",
"accountId": "111222333444",
"userName": "AdAdmin"
},
"attributes": {
"creationDate": "2023-05-30T20:41:50Z",
"mfaAuthenticated": "false"
}
}
},
"eventTime": "2023-05-30T21:10:16Z",
"eventSource": "ds.amazonaws.com",
"eventName": "DescribeUser",
"awsRegion": "ap-northeast-2",
"sourceIPAddress": "10.24.34.0",
"userAgent": "aws-cli/2.9.20 Python/3.11.1 Darwin/21.6.0 source/x86_64 prompt/off
command/ds-data.describe-user",
"errorCode": "ResourceNotFoundException",
"errorMessage": "User not found in directory d-1234567890.",
"requestParameters": {
"directoryId": "d-1234567890",
"sAMAccountName": "nonExistingUser",
"otherAttributes": [
"co",
"givenName",
"sn",
"telephoneNumber"
]
},
"responseElements": null,
AWS Directory Service Data logs Version 1.0 581

AWS Directory Service Administration Guide
"requestID": "4567ab89-c12d-3333-2222-1e0012f34a7c",
"eventID": "1234567b-f0a0-12ab-3c45-d678900d1255",
"readOnly": true,
"resources": [
{
"accountId": "111222333444",
"type": "AWS::DirectoryService::MicrosoftAD",
"ARN": "arn:aws:ds:ap-northeast-2:111222333444:directory/d-1234567890"
}
],
"eventType": "AwsApiCall",
"managementEvent": true,
"recipientAccountId": "111222333444"
"eventCategory": "Management",
"tlsDetails": {
"tlsVersion": "TLSv1.3",
"cipherSuite": "TLS_AES_128_GCM_SHA256",
"clientProvidedHostHeader": "ds-data.ap-northeast-2.amazonaws.com"
}
}
Compliance validation for AWS Directory Service
To learn whether an AWS service is within the scope of specific compliance programs, see AWS
services in Scope by Compliance Program and choose the compliance program that you are
interested in. For general information, see AWS Compliance Programs.
You can download third-party audit reports using AWS Artifact. For more information, see
Downloading Reports in AWS Artifact.
Your compliance responsibility when using AWS services is determined by the sensitivity of your
data, your company's compliance objectives, and applicable laws and regulations. AWS provides the
following resources to help with compliance:
• Security and Compliance Quick Start Guides – These deployment guides discuss architectural
considerations and provide steps for deploying baseline environments on AWS that are security
and compliance focused.
• Architecting for HIPAA Security and Compliance on Amazon Web Services – This whitepaper
describes how companies can use AWS to create HIPAA-eligible applications.
Compliance validation Version 1.0 582

AWS Directory Service Administration Guide
Note
Not all AWS services are HIPAA eligible. For more information, see the HIPAA Eligible
Services Reference.
• AWS Compliance Resources – This collection of workbooks and guides might apply to your
industry and location.
• AWS Customer Compliance Guides – Understand the shared responsibility model through the
lens of compliance. The guides summarize the best practices for securing AWS services and map
the guidance to security controls across multiple frameworks (including National Institute of
Standards and Technology (NIST), Payment Card Industry Security Standards Council (PCI), and
International Organization for Standardization (ISO)).
• Evaluating Resources with Rules in the AWS Config Developer Guide – The AWS Config service
assesses how well your resource configurations comply with internal practices, industry
guidelines, and regulations.
• AWS Security Hub – This AWS service provides a comprehensive view of your security state within
AWS. Security Hub uses security controls to evaluate your AWS resources and to check your
compliance against security industry standards and best practices. For a list of supported services
and controls, see Security Hub controls reference.
• Amazon GuardDuty – This AWS service detects potential threats to your AWS accounts,
workloads, containers, and data by monitoring your environment for suspicious and malicious
activities. GuardDuty can help you address various compliance requirements, like PCI DSS, by
meeting intrusion detection requirements mandated by certain compliance frameworks.
• AWS Audit Manager – This AWS service helps you continuously audit your AWS usage to simplify
how you manage risk and compliance with regulations and industry standards.
Resilience in AWS Directory Service
The AWS global infrastructure is built around AWS Regions and Availability Zones. AWS Regions
provide multiple physically separated and isolated Availability Zones, which are connected with
low-latency, high-throughput, and highly redundant networking. With Availability Zones, you can
design and operate applications and databases that automatically fail over between Availability
Zones without interruption. Availability Zones are more highly available, fault tolerant, and
scalable than traditional single or multiple data center infrastructures.
Resilience Version 1.0 583

AWS Directory Service Administration Guide
For more information about AWS Regions and Availability Zones, see AWS global infrastructure.
In addition to the AWS global infrastructure, AWS Directory Service offers the ability to take
manual snapshots of data at any point in time to help support your data resiliency and backup
needs. For more information, see Restoring your AWS Managed Microsoft AD with snapshots.
Infrastructure security in AWS Directory Service
As a managed service, AWS Directory Service is protected by AWS global network security. For
information about AWS security services and how AWS protects infrastructure, see AWS Cloud
Security. To design your AWS environment using the best practices for infrastructure security, see
Infrastructure Protection in Security Pillar AWS Well‐Architected Framework.
You use AWS published API calls to access AWS Directory Service through the network. Clients
must support the following:
• Transport Layer Security (TLS). We require TLS 1.2 and recommend TLS 1.3.
• Cipher suites with perfect forward secrecy (PFS) such as DHE (Ephemeral Diffie-Hellman) or
ECDHE (Elliptic Curve Ephemeral Diffie-Hellman). Most modern systems such as Java 7 and later
support these modes.
Additionally, requests must be signed by using an access key ID and a secret access key that is
associated with an IAM principal. Or you can use the AWS Security Token Service (AWS STS) to
generate temporary security credentials to sign requests.
Cross-service confused deputy prevention
The confused deputy problem is a security issue where an entity that doesn't have permission to
perform an action can coerce a more-privileged entity to perform the action. In AWS, cross-service
impersonation can result in the confused deputy problem. Cross-service impersonation can occur
when one service (the calling service) calls another service (the called service). The calling service
can be manipulated to use its permissions to act on another customer's resources in a way it should
not otherwise have permission to access. To prevent this, AWS provides tools that help you protect
your data for all services with service principals that have been given access to resources in your
account.
We recommend using the aws:SourceArn and aws:SourceAccount global condition context
keys in resource policies to limit the permissions that AWS Directory Service for Microsoft
Infrastructure security Version 1.0 584

AWS Directory Service Administration Guide
Active Directory gives another service to the resource. If the aws:SourceArn value does
not contain the account ID, such as an Amazon S3 bucket ARN, you must use both global
condition context keys to limit permissions. If you use both global condition context keys and
the aws:SourceArn value contains the account ID, the aws:SourceAccount value and the
account in the aws:SourceArn value must use the same account ID when used in the same policy
statement. Use aws:SourceArn if you want only one resource to be associated with the cross-
service access. Use aws:SourceAccount if you want to allow any resource in that account to be
associated with the cross-service use.
For the following example, the value of aws:SourceArn must be a CloudWatch log group.
The most effective way to protect against the confused deputy problem is to use the
aws:SourceArn global condition context key with the full ARN of the resource. If you don't know
the full ARN of the resource or if you are specifying multiple resources, use the aws:SourceArn
global context condition key with wildcards (*) for the unknown portions of the ARN. For example,
arn:aws:servicename:*:123456789012:*.
The following example shows how you can use the aws:SourceArn and aws:SourceAccount
global condition context keys in AWS Managed Microsoft AD to prevent the confused deputy
problem.
{
"Version": "2012-10-17",
"Statement": {
"Sid": "ConfusedDeputyPreventionExamplePolicy",
"Effect": "Allow",
"Principal": {
"Service": "ds.amazonaws.com"
},
"Action": [
"logs:CreateLogStream",
"logs:PutLogEvents"
],
"Resource": [
"arn:aws:logs:YOUR_REGION:YOUR_ACCOUNT_NUMBER:log-group:/aws/
directoryservice/YOUR_LOG_GROUP:*"
],
"Condition": {
"ArnLike": {
"aws:SourceArn":
"arn:aws:ds:YOUR_REGION:YOUR_ACCOUNT_NUMBER:directory/YOUR_DIRECTORY_ID"
Cross-service confused deputy prevention Version 1.0 585

AWS Directory Service Administration Guide
},
"StringEquals": {
"aws:SourceAccount": "123456789012"
}
}
}
}
For the following example, the value of aws:SourceArn must be a SNS topic
in your account. For example, you can use something like arn:aws:sns:ap-
southeast-1:123456789012:DirectoryMonitoring_d-966739499f
where “ap-southeast-1” is your region, "123456789012" is your customer id and
"DirectoryMonitoring_d-966739499f" is the Amazon SNS topic name that you created.
The most effective way to protect against the confused deputy problem is to use the
aws:SourceArn global condition context key with the full ARN of the resource. If you don't know
the full ARN of the resource or if you are specifying multiple resources, use the aws:SourceArn
global context condition key with wildcards (*) for the unknown portions of the ARN. For example,
arn:aws:servicename:*:123456789012:*.
The following example shows how you can use the aws:SourceArn and aws:SourceAccount
global condition context keys in AWS Managed Microsoft AD to prevent the confused deputy
problem.
{
"Version": "2012-10-17",
"Statement": {
"Sid": "ConfusedDeputyPreventionExamplePolicy",
"Effect": "Allow",
"Principal": {
"Service": "ds.amazonaws.com"
},
"Action": ["SNS:GetTopicAttributes",
"SNS:SetTopicAttributes",
"SNS:AddPermission",
"SNS:RemovePermission",
"SNS:DeleteTopic",
"SNS:Subscribe",
"SNS:ListSubscriptionsByTopic",
"SNS:Publish"],
"Resource": [
Cross-service confused deputy prevention Version 1.0 586

AWS Directory Service Administration Guide
"arn:aws:sns:YOUR_REGION:YOUR_ACCOUNT_NUMBER:YOUR_SNS_TOPIC_NAME"
],
"Condition": {
"ArnLike": {
"aws:SourceArn":
"arn:aws:ds:YOUR_REGION:YOUR_ACCOUNT_NUMBER:directory/YOUR_EXTERNAL_DIRECTORY_ID"
},
"StringEquals": {
"aws:SourceAccount": "123456789012"
}
}
}
}
The following example shows an IAM trust policy for a role that has been delegated console access.
The value ofaws:SourceArnmust be adirectory resourcein your account. For more information,
see Resource types defined by AWS Directory Service. For example, you can usearn:aws:ds:us-
east-1:123456789012:directory/d-1234567890where 123456789012 is your customer ID
andd-1234567890is your directory ID.
{
"Version": "2012-10-17",
"Statement": {
"Sid": "ConfusedDeputyPreventionExamplePolicy",
"Effect": "Allow",
"Principal": {
"Service": "ds.amazonaws.com"
},
"Action": [
"sts:AssumeRole"
],
"Condition": {
"ArnLike": {
"aws:SourceArn":
"arn:aws:ds:YOUR_REGION:YOUR_ACCOUNT_NUMBER:directory/YOUR_DIRECTORY_ID"
},
"StringEquals": {
"aws:SourceAccount": "123456789012"
}
}
}
}
Cross-service confused deputy prevention Version 1.0 587

AWS Directory Service Administration Guide
AWS Directory Service API and interface Amazon VPC
endpoints using AWS PrivateLink
You can use AWS PrivateLink to create a private connection between your VPC and AWS Directory
Service and Directory Service Data APIs. This allows you to access AWS Directory Service and
Directory Service Data APIs like they were in your VPC and without the use of an internet gateway,
NAT device, VPN connection, or AWS Direct Connect connection. Instances in your Amazon VPC
don't require public IP addresses to access AWS Directory Service and Directory Service Data APIs.
To establish a private connection, you create an interface Amazon VPC endpoint that AWS
PrivateLink powers. We create an endpoint network interface in each subnet that you enable for
the interface endpoint. These are requester-managed network interfaces, which serve as the entry
point for traffic that's destined for AWS Directory Service and AWS Directory Service Data.
For more information, see Access AWS services through AWS PrivateLink in the AWS PrivateLink
Guide.
Considerations for AWS Directory Service and Directory Service Data
With AWS Directory Service and Directory Service Data, you can call API actions through interface
endpoints. For information about the prerequisites you'll need to consider before creating an
interface endpoint, see Access an AWS service using an interface Amazon VPC endpoint in the AWS
PrivateLink Guide.
AWS Directory Service and Directory Service Data Availability
AWS Directory Service supports interface endpoints in the following AWS Regions:
• US East (N. Virginia)
• AWS GovCloud (US-East)
• AWS GovCloud (US-West)
Directory Service Data supports interface endpoints in all AWS Regions where it's available. For
information about the AWS Regions that support AWS Directory Service and Directory Service
Data, see Region availability for AWS Directory Service.
AWS PrivateLink Version 1.0 588

AWS Directory Service Administration Guide
Create an interface Amazon VPC endpoint for AWS Directory Service
and Directory Service Data
You can create an interface endpoint for AWS Directory Service and Directory Service Data APIs
using the Amazon VPC console or the AWS Command Line Interface (AWS CLI).
Example: AWS Directory Service
Create an interface endpoint for AWS Directory Service APIs using the following service name:
com.amazonaws.region.ds
Example: Directory Service Data
Create an interface endpoint for Directory Service Data APIs using the following service name:
com.amazonaws.region.ds-data
For more information about creating an interface endpoint, see Access an AWS service using an
interface Amazon VPC endpoint in the AWS PrivateLink Guide.
Create a Amazon VPC endpoint policy for your interface Amazon VPC
endpoint
An endpoint policy is an IAM resource policy that you attach to an interface endpoint.
Note
If you don't attach an endpoint policy to your interface endpoint, AWS PrivateLink attaches
a default endpoint policy to your interface endpoint on your behalf. For more information,
see AWS PrivateLink concepts.
An endpoint policy specifies the following information:
• The principals (AWS accounts, IAM users, and IAM roles) that can perform actions
• The actions that can be performed
• The resources on which the actions can be performed
Create an interface Amazon VPC endpoint Version 1.0 589

AWS Directory Service Administration Guide
For more information, see Control access to services using endpoint policies in the AWS PrivateLink
Guide.
You can control access to APIs from your Amazon VPC by attaching a custom endpoint policy to
your interface endpoint.
Example: Amazon VPC endpoint policy for AWS Directory Service API actions
The following is an example of a custom endpoint policy. When you attach this policy to your
interface endpoint, it grants access to the listed AWS Directory Service actions for all principals on
all resources.
Replace action-1, action-2, and action-3 with the required permissions for the AWS
Directory Service APIs that you want to include in your policy. For a full list, see AWS Directory
Service API permissions: Actions, resources, and conditions reference.
{
"Statement": [
{
"Principal": "*",
"Effect": "Allow",
"Action": [
"ds:action-1",
"ds:action-2",
"ds:action-3"
],
"Resource":"*"
}
]
}
Example: Amazon VPC endpoint policy for Directory Service Data API actions
The following is an example of a custom endpoint policy. When you attach this policy to your
interface endpoint, it grants access to the listed Directory Service Data actions for all principals on
all resources.
Replace action-1, action-2, and action-3 with the required permissions for the Directory
Service Data APIs that you want to include in your policy. For a full list, see AWS Directory Service
API permissions: Actions, resources, and conditions reference.
{
Create an endpoint policy Version 1.0 590

AWS Directory Service Administration Guide
"Statement": [
{
"Principal": "*",
"Effect": "Allow",
"Action": [
"ds-data:action-1",
"ds-data:action-2",
"ds-data:action-3"
],
"Resource":"*"
}
]
}
Create an endpoint policy Version 1.0 591

AWS Directory Service Administration Guide
Service level agreement for AWS Directory Service
AWS Directory Service is a highly available service, and is built on AWS-managed infrastructure. It
is backed by a service level agreement that defines our service availability policy.
For more information, see Service level agreement for AWS Directory Service.
Version 1.0 592

AWS Directory Service Administration Guide
Region availability for AWS Directory Service
The following table provides a list describing which Region-specific endpoints are supported by
directory type.
Region
name
Region Endpoint Protocol AWS
Managed
Microsoft
AD
AD
Connector
Simple
AD
US
East
(N.
Virginia)
us-
east-1
ds.us-east-1.amazonaws.com HTTPS
Yes Yes Yes
US
East
(Ohio)
us-
east-2
ds.us-east-2.amazonaws.com HTTPS
Yes Yes No
US
West
(N.
Californi
a)
us-
west-1
ds.us-west-1.amazonaws.com HTTPS
Yes Yes No
US
West
(Oregon)
us-
west-2
ds.us-west-2.amazonaws.com HTTPS
Yes Yes Yes
Africa
(Cape
Town)
af-
south-
1
ds.af-south-1.amazonaws.com HTTPS
Yes Yes No
Asia
Pacific
(Hong
Kong)
ap-
east-1
ds.ap-east-1.amazonaws.com HTTPS
Yes Yes No
Version 1.0 593

AWS Directory Service Administration Guide
Region
name
Region Endpoint Protocol AWS
Managed
Microsoft
AD
AD
Connector
Simple
AD
Asia
Pacific
(Hyderaba
d)
ap-
south-
2
ds.ap-south-2.amazonaws.com HTTPS
Yes Yes No
Asia
Pacific
(Jakarta)
ap-
southe
ast-3
ds.ap-southeast-3.amazonaws.com HTTPS
Yes Yes No
Asia
Pacific
(Melbourn
e)
ap-
southe
ast-4
ds.ap-southeast-4.amazonaws.com HTTPS
Yes Yes No
Asia
Pacific
(Mumbai)
ap-
south-
1
ds.ap-south-1.amazonaws.com HTTPS
Yes Yes No
Asia
Pacific
(Osaka)
ap-
northe
ast-3
ds.ap-northeast-3.amazonaws.com HTTPS
Yes Yes No
Asia
Pacific
(Seoul)
ap-
northe
ast-2
ds.ap-northeast-2.amazonaws.com HTTPS
Yes Yes No
Asia
Pacific
(Singapor
e)
ap-
southe
ast-1
ds.ap-southeast-1.amazonaws.com HTTPS
Yes Yes Yes
Version 1.0 594

AWS Directory Service Administration Guide
Region
name
Region Endpoint Protocol AWS
Managed
Microsoft
AD
AD
Connector
Simple
AD
Asia
Pacific
(Sydney)
ap-
southe
ast-2
ds.ap-southeast-2.amazonaws.com HTTPS
Yes Yes Yes
Asia
Pacific
(Tokyo)
ap-
northe
ast-1
ds.ap-northeast-1.amazonaws.com HTTPS
Yes Yes Yes
Canada
(Central)
ca-
centra
l-1
ds.ca-central-1.amazonaws.com HTTPS
Yes Yes No
Canada
West
(Calgary)
ca-
west-1
ds.ca-west-1.amazonaws.com HTTPS
Yes Yes No
China
(Beijing)
cn-
north-
1
ds.cn-north-1.amazonaws.com.cn HTTPS
Yes Yes No
China
(Ningxia)
cn-
northw
est-1
ds.cn-northwest-1.amazonaws
.com.cn
HTTPS
Yes Yes No
Europe
(Frankfur
t)
eu-
centra
l-1
ds.eu-central-1.amazonaws.com HTTPS
Yes Yes No
Europe
(Ireland)
eu-
west-1
ds.eu-west-1.amazonaws.com HTTPS
Yes Yes Yes
Version 1.0 595

AWS Directory Service Administration Guide
Region
name
Region Endpoint Protocol AWS
Managed
Microsoft
AD
AD
Connector
Simple
AD
Europe
(London)
eu-
west-2
ds.eu-west-2.amazonaws.com HTTPS
Yes Yes No
Europe
(Milan)
eu-
south-
1
ds.eu-south-1.amazonaws.com HTTPS
Yes Yes No
Europe
(Paris)
eu-
west-3
ds.eu-west-3.amazonaws.com HTTPS
Yes Yes No
Europe
(Spain)
eu-
south-
2
ds.eu-south-2.amazonaws.com HTTPS
Yes Yes No
Europe
(Stockhol
m)
eu-
north-
1
ds.eu-north-1.amazonaws.com HTTPS
Yes Yes No
Europe
(Zurich)
eu-
centra
l-2
ds.eu-central-2.amazonaws.com HTTPS
Yes Yes No
Israel
(Tel
Aviv)
il-
centra
l-1
ds.il-central-1.amazonaws.com HTTPS
Yes Yes No
Middle
East
(Bahrain)
me-
south-
1
ds.me-south-1.amazonaws.com HTTPS
Yes Yes No
Version 1.0 596
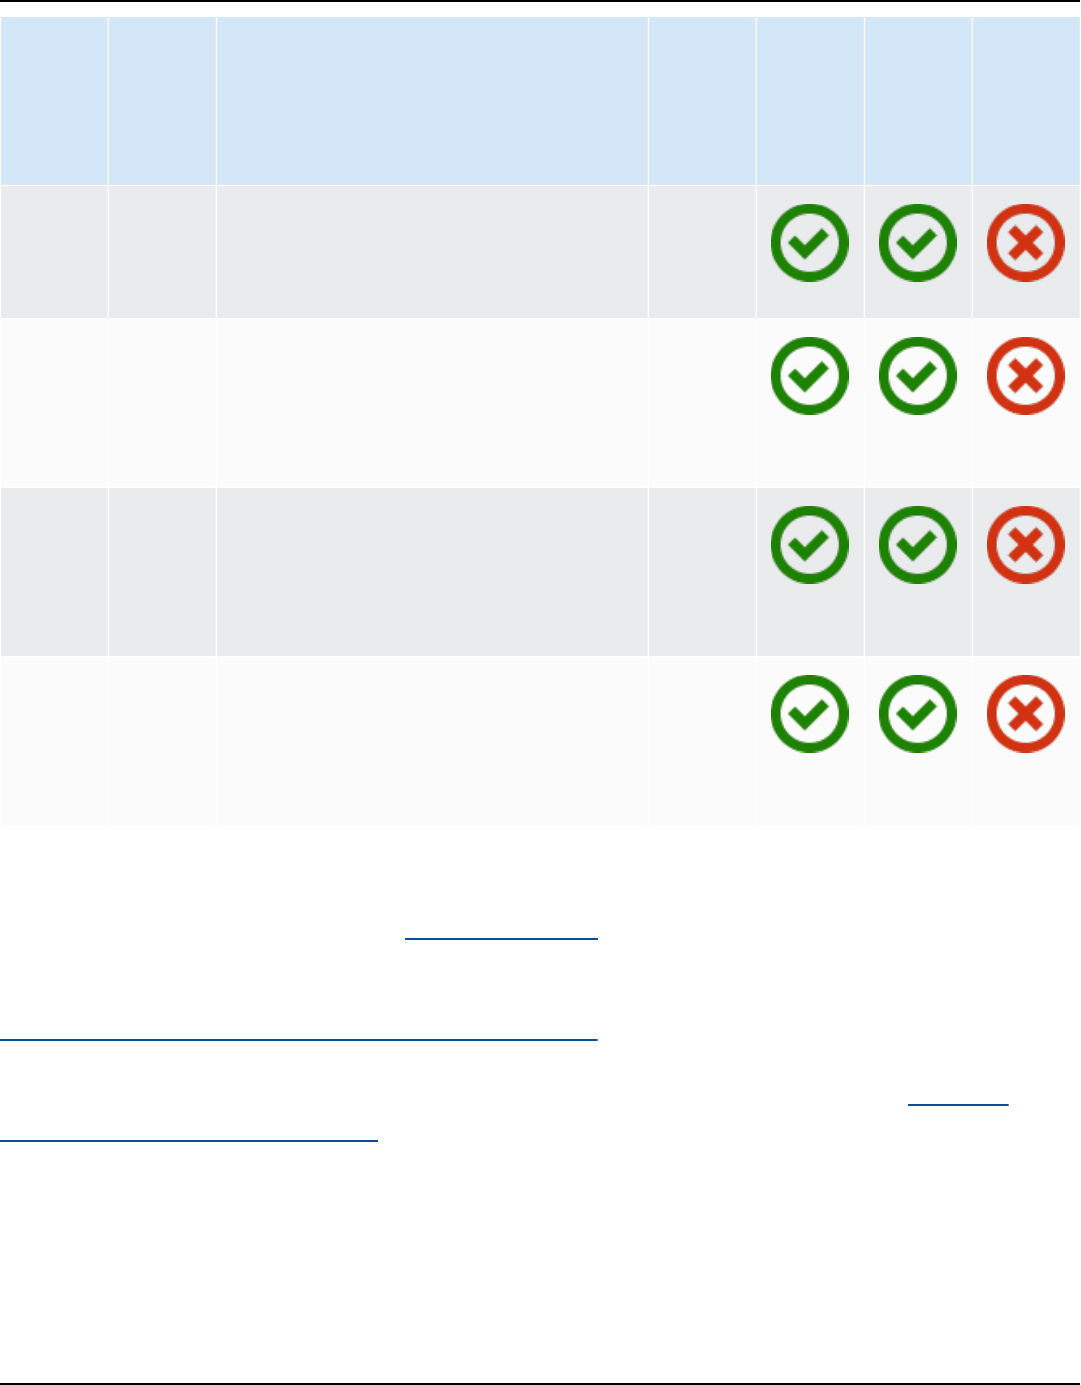
AWS Directory Service Administration Guide
Region
name
Region Endpoint Protocol AWS
Managed
Microsoft
AD
AD
Connector
Simple
AD
Middle
East
(UAE)
me-
centra
l-1
ds.me-central-1.amazonaws.com HTTPS
Yes Yes No
South
America
(São
Paulo)
sa-
east-1
ds.sa-east-1.amazonaws.com HTTPS
Yes Yes No
AWS
GovCloud
(US-
West)
us-
gov-
west-1
ds.us-gov-west-1.amazonaws.com HTTPS
Yes Yes No
AWS
GovCloud
(US-
East)
us-
gov-ea
st-1
ds.us-gov-east-1.amazonaws.com HTTPS
Yes Yes No
For information about using AWS Directory Service in the AWS GovCloud (US-West) Region and
AWS GovCloud (US-East) Region, see Service endpoints in the AWS GovCloud (US) User Guide.
For information about using AWS Directory Service in the Beijing and Ningxia Regions, see
Endpoints and ARNs for Amazon Web Services in China in Getting started with AWS in China.
For information about the FIPS endpoints that Directory Service Data supports, see Directory
Service Data endpoints and quotas in the AWS General Reference Reference Guide.
Supported AWS Regions for Directory Service Data
The following table provides a list of the Region-specific endpoints that Directory Service Data
supports by directory type.
Supported AWS Regions for Directory Service Data Version 1.0 597

AWS Directory Service Administration Guide
Region
name
Region Endpoint Protocol AWS
Managed
Microsoft
AD
AD
Connector
Simple
AD
US
East
(Ohio)
us-
east-2
ds-data.us-east-2.amazonaws.com HTTPS
Yes No No
US
East
(N.
Virginia)
us-
east-1
ds-data.us-east-1.amazonaws.com HTTPS
Yes No No
US
West
(N.
Californi
a)
us-
west-1
ds-data.us-west-1.amazonaws.com HTTPS
Yes No No
US
West
(Oregon)
us-
west-2
ds-data.us-west-2.amazonaws.com HTTPS
Yes No No
Asia
Pacific
(Hong
Kong)
ap-
east-1
ds-data.ap-east-1.amazonaws.com HTTPS
Yes No No
Asia
Pacific
(Mumbai)
ap-
south-
1
ds-data.ap-south-1.amazonaws.com HTTPS
Yes No No
Asia
Pacific
(Osaka)
ap-
northe
ast-3
ds-data.ap-northeast-3.amaz
onaws.com
HTTPS
Yes No No
Supported AWS Regions for Directory Service Data Version 1.0 598

AWS Directory Service Administration Guide
Region
name
Region Endpoint Protocol AWS
Managed
Microsoft
AD
AD
Connector
Simple
AD
Asia
Pacific
(Seoul)
ap-
northe
ast-2
ds-data.ap-northeast-2.amaz
onaws.com
HTTPS
Yes No No
Asia
Pacific
(Singapor
e)
ap-
southe
ast-1
ds-data.ap-southeast-1.amaz
onaws.com
HTTPS
Yes No No
Asia
Pacific
(Sydney)
ap-
southe
ast-2
ds-data.ap-southeast-2.amaz
onaws.com
HTTPS
Yes No No
Asia
Pacific
(Tokyo)
ap-
northe
ast-1
ds-data.ap-northeast-1.amaz
onaws.com
HTTPS
Yes No No
Canada
(Central)
ca-
centra
l-1
ds-data.ca-central-1.amazon
aws.com
HTTPS
Yes No No
Europe
(Frankfur
t)
eu-
centra
l-1
ds-data.eu-central-1.amazon
aws.com
HTTPS
Yes No No
Europe
(Ireland)
eu-
west-1
ds-data.eu-west-1.amazonaws.com HTTPS
Yes No No
Europe
(London)
eu-
west-2
ds-data.eu-west-2.amazonaws.com HTTPS
Yes No No
Supported AWS Regions for Directory Service Data Version 1.0 599

AWS Directory Service Administration Guide
Region
name
Region Endpoint Protocol AWS
Managed
Microsoft
AD
AD
Connector
Simple
AD
Europe
(Paris)
eu-
west-3
ds-data.eu-west-3.amazonaws.com HTTPS
Yes No No
Europe
(Stockhol
m)
eu-
north-
1
ds-data.eu-north-1.amazonaws.com HTTPS
Yes No No
South
America
(São
Paulo)
sa-
east-1
ds-data.sa-east-1.amazonaws.com HTTPS
Yes No No
For information about the FIPS endpoints that Directory Service Data supports, see Directory
Service Data endpoints and quotas in the AWS General Reference Reference Guide.
Supported AWS Regions for Directory Service Data Version 1.0 600

AWS Directory Service Administration Guide
Browser compatibility
AWS applications and services such as WorkSpaces, Amazon WorkMail, Amazon Connect, Amazon
Chime, Amazon WorkDocs, and AWS IAM Identity Center all require valid sign-in credentials from
a compatible browser before you can access them. The following table describes only the browsers
and browser versions that are compatible for sign-ins.
Browser Version Compatibility
Microsoft Edge Latest 3 Versions Compatible
Mozilla Firefox Latest 3 Versions Compatible
Google Chrome Latest 3 Versions Compatible
Apple Safari Latest 3 Versions Compatible
Now that you’ve verified you are using a supported version of your browser, we recommend that
you also review the section below to verify your browser has been configured to use the Transport
Layer Security (TLS) setting required by AWS.
What is TLS?
TLS is a protocol web browsers and other applications use to exchange data securely over a
network. TLS ensures that a connection to a remote endpoint is the intended endpoint through
encryption and endpoint identity verification. The versions of TLS, to date, are TLS 1.0, 1.1, 1.2 and
1.3.
Which TLS versions are supported by IAM Identity Center
AWS applications and services support TLS 1.1, 1.2 and 1.3 for secure sign-ins. As of October 30th
2019, TLS 1.0 is no longer supported so it is important that all browsers are configured to support
TLS 1.1 or above. This means, you will not be able to sign-in to AWS applications and services if
you access them while TLS 1.0 is enabled. For assistance making this change, contact your admin.
What is TLS? Version 1.0 601

AWS Directory Service Administration Guide
How do I enable supported TLS versions in my browser
It depends on your browser. Usually you can find this setting under the advanced settings area
in your browser settings. For example, in Internet Explorer you’ll find various TLS options under
Internet Properties, the Advanced tab, and then under the Security section. Check your browser
manufacturers Help website for specific instructions.
How do I enable supported TLS versions in my browser Version 1.0 602

AWS Directory Service Administration Guide
Document history
The following table describes the important changes since the last release of the AWS Directory
Service Administrator Guide.
Change Description Date
Updated logging and
monitoring topic - new
sections
Included sections for AWS
Directory Service and AWS
Directory Service Data in
logging and monitoring topic.
September 18, 2024
New Directory Service Data
API and attributes
AWS Directory Service Data
provides built-in object
management. You can now
find and update objects
with a list of supported AD
attributes.
September 18, 2024
AWS managed policies - new
policies
AWS Directory Service
Data adds new AWS
managed policies: AWSDirect
oryServiceDataFullAccess
and AWSDirectoryServic
eDataReadOnlyAccess. The
policies grant access to
Directory Service Data object
management.
September 18, 2024
Certificate based authentic
ation settings
Added content about two
new security settings for AWS
Managed Microsoft AD.
April 11, 2023
AWS PrivateLink Added content about AWS
PrivateLink.
March 31, 2023
Version 1.0 603

AWS Directory Service Administration Guide
Simple AD VPC Endpoints Added content about which
VPC endpoints should not be
configured.
August 25, 2021
AD Connector VPC Endpoints Added content about which
VPC endpoints should not be
configured.
August 25, 2021
Smart card support Added content about support
for smart cards and Amazon
WorkSpaces Application
Manager in AWS GovCloud
(US-West) Region
December 1, 2020
Password reset Added content about how
to reset user passwords
using the AWS Management
Console, Windows PowerShell
and AWS CLI.
January 2, 2019
Directory sharing Added content about how
to use directory sharing with
AWS Managed Microsoft AD.
September 25, 2018
Migrated content to new
Amazon Cloud Directory
Developer Guide
Moved the Amazon Cloud
Directory content from this
guide to the new Amazon
Cloud Directory Developer
Guide.
June 21, 2018
Complete overhaul of the
admin guide TOC
Reorganized the content
to more directly address
customer needs. Also added
new content where needed.
April 5, 2018
AWS delegated groups Added list of AWS delegated
groups that can be assigned
to on-premises users.
March 8, 2018
Version 1.0 604

AWS Directory Service Administration Guide
Fine-grained password
policies
Added content about new
password policies.
July 5, 2017
Additional domain controllers Added content about how to
add more domain controlle
rs to your directory in AWS
Managed Microsoft AD.
June 30, 2017
Tutorials Added new tutorials for
testing a AWS Managed
Microsoft AD lab environme
nt.
June 21, 2017
MFA with AWS Managed
Microsoft AD
Added content about using
MFA with AWS Managed
Microsoft AD.
February 13, 2017
Amazon Cloud Directory Added content about a new
directory type.
January 26, 2017
Schema extensions Added content about
schema extensions with
AWS Directory Service for
Microsoft Active Directory.
November 14, 2016
Major reorganization of
the AWS Directory Service
Administrator Guide
Reorganized the content
to more directly address
customer needs.
November 14, 2016
SNS notifications Added content about SNS
notifications.
February 25, 2016
Authorization and authentic
ation
Added content about how to
use IAM with AWS Directory
Service.
February 25, 2016
Version 1.0 605

AWS Directory Service Administration Guide
AWS Managed Microsoft AD Added content about AWS
Managed Microsoft AD and
combined guides into a single
guide.
November 17, 2015
Allow Linux instances to
be joined to a Simple AD
directory
Added content about how
to join a Linux instance to a
Simple AD directory.
July 23, 2015
Guide separation Split the AWS Directory
Service Administration Guide
into separate guides.
July 14, 2015
Single sign-on support Added content about support
for single sign-on.
March 31, 2015
New guide This is the first release of
the AWS Directory Service
Administration Guide.
October 21, 2014
Version 1.0 606
