
USER’S MANUAL
Acer Chromebook 315
2 -
© 2019. All Rights Reserved.
Acer Chromebook 315
Covers: CB315-2HT
This revision: May 2019
Sign up for an Acer ID and enjoy great benefits
1. Ensure you are connected to the Internet.
2. Open www.acer.com and select your country.
3. Select Support > REGISTER A PRODUCT.
4. Sign up for an Acer ID or sign in if you already have an Acer ID.
Register your Acer product
After we receive your product registration, you will be sent a confirmation
email with important data. Keep this email in a safe place.
Manage your registered products
Once you have completed the registration process, you can log onto
account.acer.com using your Acer ID and password to see and manage
all your registered products.
Note
It may take a few days for your information to be updated to the database.
Model number: _________________________________
Serial number: _________________________________
Date of purchase: _______________________________
Place of purchase: ______________________________
Google, Android, Google Play, YouTube and other marks are trademarks of Google LLC.
Important
This manual contains proprietary information that is protected by
copyright laws. The information contained in this manual is subject to
change without notice. Images provided herein are for reference only
and may contain information or features that do not apply to your
computer. Acer Group shall not be liable for technical or editorial errors
or omissions contained in this manual.

Table of contents - 3
TABLE OF CONTENTS
Getting started 4
Turn on your Chromebook....................... 4
Select your language settings ................. 4
Connect to a network............................... 4
Accept the Terms of Service....................... 4
First-time sign-in ...................................... 4
Create a new Google™ Account ................ 4
Browse as a guest ...................................... 4
Sign in to your Google Account .................. 5
Your Acer Chromebook tour 6
Front view ................................................ 6
Keyboard view ......................................... 7
Function keys.............................................. 7
Common keyboard shortcuts...................... 8
Touchpad .................................................... 9
Left view ................................................ 10
Right view .............................................. 11
USB 3.1 Gen 1 information ....................... 11
USB Type-C information ........................... 11
The Chrome OS Desktop 12
Window controls ................................... 12
Shelf ...................................................... 13
Launcher................................................... 13
Pinned apps.............................................. 14
Status area................................................ 14
Apps & extensions 15
Managing apps ...................................... 15
Installing apps from Chrome Web Store .. 15
Installing apps from Google Play Store .... 16
Removing apps from Chrome OS............. 16
Google Drive ......................................... 16
Difference between Drive and Files apps . 17
Creating a new document ......................... 17
Sync files from Downloads to Google
Drive.......................................................... 17
Enable offline access to Google Drive
files............................................................ 18
Gmail .................................................... 18
Composing an email ................................. 18
YouTube ............................................... 19
Playing video or audio files .................... 19
Other Supported File Types................... 19
Chrome OS tips and tricks 20
Documents............................................. 20
How to create documents ......................... 20
Finding your documents............................ 21
How to share documents with other
users ......................................................... 21
How to start a video chat ....................... 21
How to listen to music............................ 22
How to watch videos, TV, or movies...... 22
Working with Microsoft Office (Word,
Excel, and Powerpoint) documents ....... 23
Open and edit Microsoft Office files using
Google’s office compatibility mode ........... 23
Convert Microsoft Office files to Google
Drive formats............................................. 23
Export Google Drive documents as
Microsoft Office files.................................. 23
Opening Microsoft Office files using
Microsoft’s Office Online apps from the
Chrome Web Store or Google Play Store. 24
How to use your Chromebook when
there’s no internet .................................. 24
Gmail Offline ............................................. 25
Google Drive ............................................. 25
Settings 27
Changing the language settings ............ 27
Changing the clock settings................... 28
Customizing appearance ....................... 28
Customizing the wallpaper........................ 28
Customizing the theme ............................. 28
Setting up a printer ................................ 29
Updating Chrome OS ............................ 29
Automatic update...................................... 29
Manual update .......................................... 30
Resetting your Chromebook .................. 30
Help 32
Online and offline help ........................... 32

4 - Getting started
GETTING STARTED
Turn on your Chromebook
On the Chromebook, the power button is located at the top-right
corner of the keyboard. A "Welcome" screen will appear when the
Chromebook first boots up.
Select your language settings
Use the "Language" drop-down list to choose your default language
setting. If there is more than one way to type in your language, you
may be prompted to select a keyboard input method as well.
Connect to a network
Select a network from the "Connect to network" list to connect to the
Internet. If network access is protected, you will need an access
password to connect to it.
Accept the Terms of Service
Once connected to a network, accept the Terms of Service. Your
Chromebook will then download any available system updates, so you
automatically get the latest Chrome OS features.
First-time sign-in
Create a new Google™ Account
You can create a new Google Account if you don’t already have one.
Select Create a Google Account to set up a new account. A Google
Account gives you access to useful web services developed by
Google, such as Gmail, Google Drive, and Google Calendar.
Browse as a guest
You can also use the Chromebook without a Google Account by
selecting Browse as a Guest.

Getting started - 5
Sign in to your Google Account
If you already have a Google Account, enter your username and
password in the sign-in box that appears and select the Sign in
button.
Sign in to your Chromebook
Enter your email
More options
Forgot email?
NEXT
Back
Important
Sign in with your primary Google Account. This account will be set as
the owner and is the only account that will be able to change certain
Chrome settings.

6 - Your Acer Chromebook tour
YOUR ACER CHROMEBOOK TOUR
Now that you are done setting it up, let us show you around your new
Acer Chromebook.
Front view
# Icon Item Description
1 Microphone
Internal microphone for sound
recording.
2 Touchscreen
Displays computer output, supports
mu
lti-touch input.
3 Webcam
Web camera for video
co
mmunication.
A light next to the webcam indicates
that
the webcam is active.
2
1 3
Your Acer Chromebook tour - 7
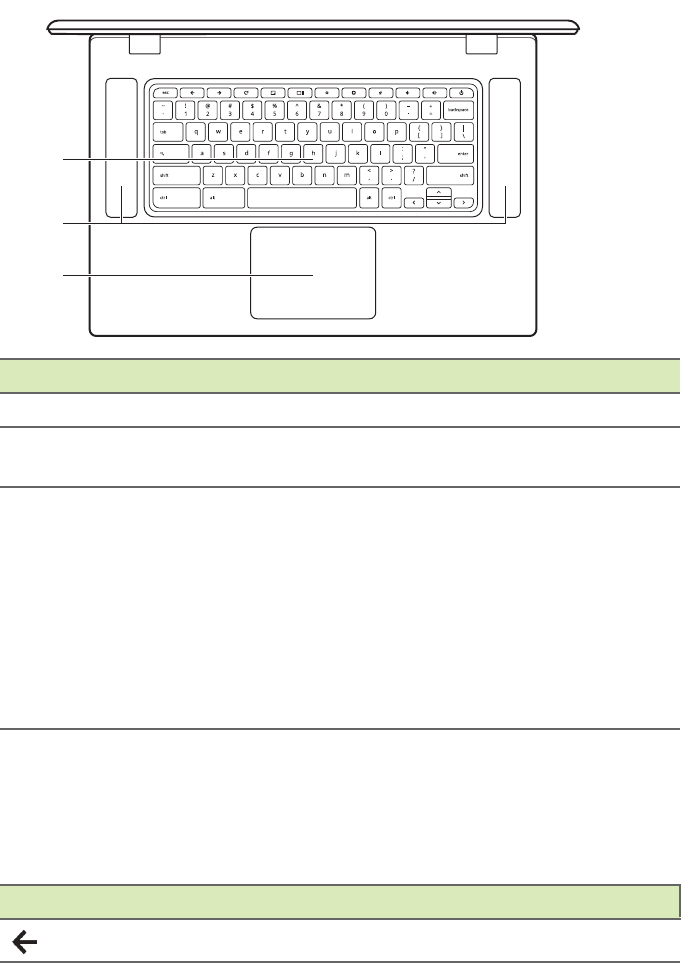
Keyboard view
# Icon Item Description
1 Keyboard For entering data into your computer.
2 Speakers
Left and right speakers deliver stereo
audio
output.
3
Touchpad / click
b
utton
Touch-sensitive pointing device
wh
ich functions like a computer
mouse.
Pressing down anywhere on the pad
funct
ions like the left button of a
mouse.
Pressing down anywhere with two
finge
rs functions like the right button
of a mouse.
1
2
3
Function keys
The computer uses function keys or key combinations to access some
hardware and software controls, such as screen brightness and
volume. The dedicated function keys each have a specific function.
Icon Function Description
Previous Go to the previous page.

8 - Your Acer Chromebook tour
Common keyboard shortcuts
You can use shortcuts to complete some tasks more quickly.
Next Go to the next page.
Reload Reload the current page.
Full-screen Open the page in full-screen mode.
Next window Switch to the next window.
Brightness down Decreases the screen brightness.
Brightness up Increases the screen brightness.
Mute Turns off audio output.
Volume down Decreases the volume.
Volume up Increases the volume.
Search Search from the Apps panel.
Icon Function Description
Keyboard shortcuts Description
Ctrl + Takes screenshot.
Alt + Toggles caps lock.
Alt + Projects your screen.
Alt + Brightens the keyboard backlight.
Alt + Dims the keyboard backlight.

Your Acer Chromebook tour - 9
Touchpad
The built-in touchpad is a pointing device that senses movement on
its surface. This means the cursor responds as you move your fingers
across the surface of the touchpad.
Action Gesture
Click Press down on any part of the touchpad.
Two-finger tap (or
alt-click)
Tapping the touchpad with two fingers or pressing
(and holding) Alt on the keyboard and tapping the
touchpad with one finger both equal a "right-click"
on a computer mouse.
Two-finger swipe
Place two fingers on the touchpad and move
them up and down to scroll vertically, left and right
to scroll horizontally.
Drag and drop
Select the item you want to move with one finger.
With a second finger, move the item. Release
both fingers to drop the item. (This gesture works
for files, not windows or icons.)

10 - Your Acer Chromebook tour
Left view
21
3 4 5
# Icon Item Description
1
Battery indicator
Indicates the computer’s battery
st
atus.
Charging: The ligh
t shows amber
when the battery is charging.
Fully charged: The
light shows blue
when in AC mode.
2
USB Type-C port
with DC-in
Connects to the provided USB Type-C
p
ower adapter and to USB devices
with a USB Type-C connector.
Supports DisplayPort
™
over USB-C
™
.
3
USB port Connects to USB devices.
4
MicroSD card slot Insert a microSD card into this slot.
5
Headset / speaker
jack
Connects to audio devices
(e.g., speakers, headphones), or a
h
eadset with microphone.

Your Acer Chromebook tour - 11
Right view
1 23
# Icon Item Description
1
USB port Connects to USB devices.
2
USB Type-C port
with DC-in
Connects to the provided USB Type-C
power a
dapter and to USB devices
with a USB Type-C connector.
Supports DisplayPort
™
over USB-C
™
.
3
Kensington lock slot
Connects to a Kensington-compatible
se
curity lock.
USB 3.1 Gen 1 information
• USB 3.1 Gen 1 compatible ports are blue.
• Compatible with USB 3.1 Gen 1 and earlier devices.
• For optimal performance, use USB 3.1 Gen 1-certified devices.
• Defined by the USB 3.1 Gen 1 specification (SuperSpeed USB).
USB Type-C information
• USB 3.1 Gen 1 with transfer speeds up to 5 Gbps.
• Supports DisplayPort
™
audio/video output.
• Delivers up to 3 A at 5 V DC for USB charging.
• DC-in: requires power adapter or power source providing 45 W at
12/18~20 V.
For optimal performance, please use a certified Acer power adapter
or USB Power Delivery device.

12 - The Chrome OS Desktop
THE CHROME OS DESKTOP
Window controls
1
8
9
10
11
7
6
5
4
3
2
Number Description
1
Goes Backward
and Forward in the current web
browsing sessions’s history (closing and reopening the
Chro
me browser begins a new session). Select to Reload
the current webpage.
2 Closes a tab.
3 Opens a new tab.
4
Type a web address or perform an internet search in this
search box (also known as the "omnib
ox").
5 Minimizes the window into the desktop shelf.
Window controls
Shelf

The Chrome OS Desktop - 13
Shelf
Status area
Launcher
Apps pinned to shelf
Launcher
Select the Launcher icon to display the launcher page. This is the
fastest way to search for something. Simply start typing to search the
internet, your bookmarks, any files you have stored in your Google
Drive, and items in the Web Store.
The Launcher page is also the place to access all your apps. Below
the search box are your frequently-used apps. Simply select one to
open it. To see all apps you have installed, select .
6
Maximizes the window to take up the entire screen. Click
a
gain to return window to previous position. Also, select
and hold to display a left
and right arrow next to the
icon. These neatly align the window to take up half the left
side
of the screen or the right side, respectively.
7 Closes the entire window (tabs and all).
8
Bookmark (save) webpage links to this quick-access area
called the
"bookmarks bar".
9 Select to bookmark (save) a link to the currrent webp
age.
10
Select to use any enabled extensions you have installed in
Chro
me from this extension list.
11 Select to customize and control Google Chrome.
Note
Specifications vary. Some icons may not be applicable to your Chromebook.
Number Description

14 - The Chrome OS Desktop
Pinned apps
You can pin or unpin apps on the shelf.
To pin an app to the shelf
1. Select the Launcher icon.
2. Click to select All Apps (or type the name of the desired app).
3. Locate and two-finger tap the desired app icon.
4. Select Pin to shelf.
To reorder the apps on the shelf, just drag them around.
To unpin an app from the shelf
1. Locate and two-finger tap the desired app icon from the shelf.
2. Select Unpin.
Status area
The Status area enables you to see vital computer information at a
glance, such as the time, Wi-Fi signal strength, and battery life. Tap
the Status area to display a box with more options.
Icon Description Icon Description
Notifications Shut down
Lock screen
Settings
Volume control
Wireless network
connection
Bluetooth status Battery status
Night light Keyboard
Brightness control

Apps & extensions - 15
APPS & EXTENSIONS
You can enhance your Chromebook with extra web applications
(Chrome apps, for short), features for the browser (also known as
extensions) and apps designed for Android™ (Play Store apps).
Chrome apps work like regular software programs for desktop
computers, except they run entirely on the web. Extensions provide
custom features and functionality for the Chrome browser. Android
apps, designed for Android mobile devices are supported on
Chromebooks. You can find Chrome apps and extensions through the
Chrome Web Store, and Android apps using the Google Play Store.
Managing apps
Installing apps from Chrome Web Store
1. Select the Launcher icon.
2. Click to select All Apps (or type "Web Store").
3. Select Web Store.
4. You can then browse through the app categories in the left column
or search for a specific type of app using the search box.
5. When you find an app that you would like to add, select it and then
select Add to Chrome.
6. A verification window will pop up, select Add to download and install
the app, or select Cancel.
To open your new app, select the Launcher, then All Apps (or type
the name of your new app), and then select the app.
Note
Certain apps and browser extensions may not be available in all countries
and regions. The contents and design of the Web Store may vary by region.
Updates may add new categories or change how to navigate the Web Store
at any time.

16 - Apps & extensions
Installing apps from Google Play Store
1. Select the Launcher icon.
2. Click to select All Apps (or type "Play Store").
3. Select Play Store.
4. You can browse apps by category or search for an app by keyword.
5. Select an app to view more information.
6. Select INSTALL to download apps.
Downloaded apps will be installed in the Launcher. If you cannot find
the apps, select All Apps from the Launcher.
Removing apps from Chrome OS
1. Select the Launcher icon.
2. Click to select All Apps (or type the name of the desired app).
3. Two-finger tap on the app you want to remove. For more information
see Touchpad on page 9.
4. Select Uninstall.
Google Drive
All files saved to your Google Drive are saved online and are
accessible to other devices, such as your smartphone or tablet. Files
saved to the Downloads folder are saved to your local drive and are
only accessible to your Chromebook.
Note
Some apps such as the Chrome web browser cannot be uninstalled.
Note
You must be connected to the Internet to do the following Google Drive
operations.

Apps & extensions - 17
Difference between Drive and Files apps
Google Drive is a web-based storage service offered by Google, and
the Files app is the onboard storage system for your Chromebook.
Because your Chromebook makes heavy use of the web, you can
easily access files both from Google Drive and those that are stored
locally by using the Files app on your Chromebook. To use the Files
app, select the Files icon in the apps list, or use the keyboard shortcut
<Alt> + <Shift> + <M>.
This user manual uses Google Drive and Files interchangeably when
giving instructions regarding accessing files.
Creating a new document
1. From the Apps list, select the Google Drive icon.
2. Select New and select the type of document you want to create.
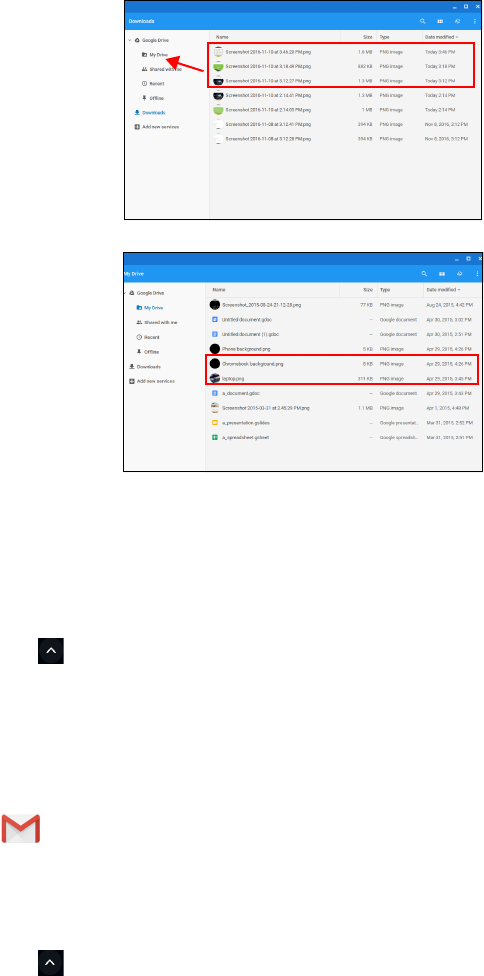
Sync files from Downloads to Google Drive
1. Select the Launcher icon.
2. Click to select All Apps (or type "Files").
3. Select the Files icon.
Note
For an alternative method of creating documents, see How to create
documents on page 20
.
18 - Apps & extensions
4. Select the files that you want to upload.
5. Drag-and-drop the files to My Drive.
Enable offline access to Google Drive files
You can access files stored on your Google Drive while offline, but
first you must enable offline access:
1. Select the Launcher icon.
2. Click to select All Apps (or type "Files").
3. Select the Files icon and then select My Drive.
4. Select the file(s) you want to access offline.
5. Two-finger tap to bring up the context sensitive menu and select
Available offline. For more information see Touchpad on page 9.
Gmail
Composing an email
1. Select the Launcher icon.
2. Click to select All Apps (or type "Gmail").

Apps & extensions - 19
3. Select the Gmail icon and then Compose.
4. Enter the recipient’s email address, the subject, and the message.
5. When you are finished composing your message, select Send.
YouTube
YouTube is a video-sharing website on which users can upload, share
and view videos. You can access it by doing the following:
1. Select the Launcher icon.
2. Click to select All Apps (or type "YouTube").
3. Select the YouTube icon.
Playing video or audio files
Your Chromebook has a built-in media player to play audio and video
files. To play a file, double-click on an audio or video file in your Files
app.
Other Supported File Types
Your Chromebook supports a number of other file formats.
Media type Supported formats
Audio / Video
.3gp, .avi, .mov, .mp4, .m4v, .m4a, .mp3, .mkv, .ogv,
.ogm, .ogg, .oga, .webm, .wav
File type Supported formats
Microsoft
Office files
.doc, .docx, .xls, .xlsx, .ppt (read-only), .pptx (read-
only)
Images .bmp, .gif, .jpg, .jpeg, .png, .webp
Compressed .zip, .rar
Other .txt, .pdf (read-only)

20 - Chrome OS tips and tricks
CHROME OS TIPS AND TRICKS
Your Chromebook is a new type of computer that works somewhat
differently than what you may be used to, so you might like to know
how easy and useful things are when using it. Here are some tips and
tricks.
Documents
How to create documents
1. Press the Search key on your keyboard or select the Launcher
icon.
2. Click to select All Apps (or type "Google Docs", "Google
Sheets", or "Google Slides" depending on the type of document you
want to create) Create word processing files with Google Docs,
spreadsheets with Google Sheets, and presentations with Google
Slides.
3. Select Google Docs , Google Sheets , or Google Slides
.
That’s it. You’ve just created a new document in a few seconds.
With your new document, you can add text, insert images, change
the font, make it bold, underline it, italicize it – you get the gist. Most
of the formatting and other stuff you might be familiar with from other
productivity suites like Microsoft Office you can do with Google
Docs.
Note
For an alternative method of creating documents, see Creating a new
document on page 17
.

Chrome OS tips and tricks - 21
Finding your documents
All documents you create are saved to your Google Drive where they
are online and accessible to other devices, such as your smartphone
or tablet. To find your documents, do the following:
1. Select the Launcher icon.
2. Click to select All Apps (or type "Google Drive").
3. Select the Google Drive icon.
4. Select My Drive (or whatever sub-folder you’ve created to put your
files in).
Since your files are saved in Google Drive, they are saved online and
available anywhere you have internet access. To access your files
from any internet-connected computer do the following:
1. Open the computer’s web browser.
2. In the browser’s address bar, type "drive.google.com" (this is the
Google Drive web address).
3. Login using your Google account username and password.
4. Select My Drive (or whatever folder you’ve created to put your files
in).
How to share documents with other users
1. Select SHARE in the upper right corner of your document.
2. Add people by typing in their email address. The sharing option
works with your Gmail contacts, so as you type your email contacts
appear for you to quickly select.
3. After you select Done , they’ll receive an email letting them
know a document has been shared with them.
How to start a video chat
For all you Skype users out there, Google+ Hangouts are free video
chats for up to ten people. To make a Hangouts video call, do the
following:
1. Press the Search key on your keyboard or select the Launcher
icon.
2. Click to select All Apps (or type "Hangouts").

22 - Chrome OS tips and tricks
3. Select the Hangouts call icon.
4. Type in the name or email address of a person.
5. Select the Invite button to start your Hangouts.
How to listen to music
1. Press the Search key on your keyboard or select the Launcher
icon.
2. Click to select All Apps (or type "Play Music").
3. Select Play Music .
To listen to streaming music, you can download streaming apps like
Pandora, Spotify, Rdio, Deezer and more (availability varies by
country) from Chrome
™
Web Store or Google Play Store .
How to watch videos, TV, or movies
1. Press the Search key on your keyboard or select the Launcher
icon.
2. Click to select All Apps and select one of the following options:
a. Select YouTube to view a vast amount of user-uploaded
videos covering nearly everything imaginable.
b. Select Play Movies to watch the movies and TV shows you
love.
c. To find more entertainment apps like Netflix, Flixster, and more
(availability varies by country), select Web Store or Play
Store . Then, search for "Netflix" or other entertainment apps.
Note
Play Music may not be available in all countries and regions. Google Play’s
current list of country availability for apps and digital content, visit https://
support.google.com/googleplay/answer/2843119?hl=en
Note
Play Movies may not be available in all countries and regions. Google Play’s
current list of country availability for apps and digital content, visit https://
support.google.com/googleplay/answer/2843119?hl=en

Chrome OS tips and tricks - 23
Working with Microsoft Office (Word, Excel, and
Powerpoint) documents
Open and edit Microsoft Office files using Google’s
office compatibility mode
1. Press the Search key on your keyboard or select the Launcher
icon.
2. Click to select All Apps (or type "Files").
3. Select the Files icon.
4. Double-click on any Microsoft Office file stored in Google Drive or
on an external hard drive or USB flash drive connected to your
Chromebook.
Google Chrome automatically opens and enables limited editing of the
document.
Convert Microsoft Office files to Google Drive formats
1. Press the Search key on your keyboard or select the Launcher
icon.
2. Click to select All Apps (or type "Files").
3. Select the Files icon.
4. Double-click on any Microsoft Office file stored in Google Drive or
on an external hard drive or USB flash drive connected to your
Chromebook.
5. Select File > Save as Google Docs, Slides, or Sheets (format
depends on the type of document).
Export Google Drive documents as Microsoft Office
files
1. Press the Search key on your keyboard or select the Launcher
icon.
2. Click to select All Apps (or type "Docs").
3. Select Google Docs, Sheets, or Slides (depending on the
document you want to create).

24 - Chrome OS tips and tricks
4. After creating the content of your document, select File > Download
as and select the type of format you want to save as.
5. The file is saved to the download section of the Files app.
Opening Microsoft Office files using Microsoft’s Office
Online apps from the Chrome Web Store or Google
Play Store
Another option for working with Microsoft Office files is to use
Microsoft’s own free web-based Office Online tools. You can
download the Word Online, Excel Online, and PowerPoint Online
apps from the Chrome Web Store or Google Play Store (you’ll need to
create a Microsoft account if you don’t already have one). Then, you
can login and create files or upload files you have already created and
edit them.
How to use your Chromebook when there’s no
internet
The Chrome Web Store contains useful offline apps. For more
information see Installing apps from Chrome Web Store on
page 15. You’re able to filter your app search by selecting the Runs
Offline checkbox. For those times you don’t have an internet
connection, these apps help you stay productive and entertained. A
few of the pre-installed options are described below.
Note
Office Online programs save files you create exclusively to Micrsoft’s own
OneDrive cloud storage. Though you can download a file you create and then
move it to Google Drive or a removable storage device, you cannot save it
directly to those locations. Also, to work on a file you’ve already created, you
must first upload it to OneDrive by selecting Open from OneDrive from
within whichever Office Online product you are using (you can install the
OneDrive app from the Web Store as well).

Chrome OS tips and tricks - 25
Gmail Offline
1. Press the Search key on your keyboard or select the Launcher
icon.
2. Click to select All Apps (or type "Gmail Offline").
3. Select the Gmail Offline icon.
4. Use the app like you normally would. It’ll update and send your
emails the next time you log on to the internet.
Google Drive
1. Press the Search key on your keyboard or select the Launcher
icon.
2. Click to select All Apps (or type "Google Drive").
3. Select the Google Drive
icon.
4. Open a Google document you have already created or create one
as you normally would. For more information see Creating a new
document on page 17. Notice the offline icon displays next to
the file name reminding you that you are working on this document
while not connected to the internet.
Note
The first time you use Gmail Offline you MUST be connected to the internet
to enable offline viewing.
Important
Any changes you make to a current document or any document you
create while offline are saved locally on your computer and will not be
seen if you open the document from Google Drive on another computer
or device. The changes will only be reflected in the Google Drive online
version of the document the next time you connect to the internet and
access Google Drive.

26 - Chrome OS tips and tricks
5. Make your desired changes. The next time you are online and have
Google Drive open, your local changes will upload to Google Drive.
You can’t open and access every type of file you have saved in
Google Drive when there is no internet connection. To enable offline
access to file types other than Google documents when offline, see
Enable offline access to Google Drive files on page 18.
Note
If you make changes to a Google document while offline and someone else
makes changes to the document as well (for example, if the document is
shared with someone else), the next time you are online and have Google
Drive open, your changes will merge with the other person’s changes.

Settings - 27
SETTINGS
Use the settings menu to adjust the various options for your
Chromebook. To access the settings menu do the following:
1. Select the Status area of the shelf in the lower-right corner of the
screen.
2. Select Settings icon.
3. To show the advanced settings, scroll to the bottom and select
Advanced.
Changing the language settings
1. Select the Status area of the shelf in the lower-right corner of the
screen.
2. Select Settings icon.
3. Select Advanced.
4. Scroll down and select Language in the Languages and input
section.
5. Select Add languages to add additional languages.
6. To enable a language for keyboard input, under Input Method select
the checkbox next to your desired input method.
7. Select Add when finished.
Note
Using default settings, the Chromebook will enter hibernate mode after one
hour.

28 - Settings
Changing the clock settings
You can change the time format and time zone on your Chromebook.
If the date or time is incorrect on your Chromebook, try adjusting the
time zone.
To change the time zone:
1. Select the Status area of the shelf in the lower-right corner of the
screen.
2. Select Settings icon.
3. Select Advanced.
4. In the Date and time section, select the desired time zone from the
the drop down box.
Customizing appearance
Customizing the wallpaper
1. Select the Status area of the shelf in the lower-right corner of the
screen.
2. Select Settings icon.
3. In the Appearance section, select Wallpaper.
4. To pick your own wallpaper, select My Images. To pick Chrome
wallpaper, you can browse through the categories in the left column
and click an image.
You can also choose Daily Refresh to set your wallpaper to cycle
through random order daily.
Customizing the theme
1. Select the Status area of the shelf in the lower-right corner of the
screen.
2. Select Settings icon.
3. In the Appearance section, select Browser themes.
4. You’ll be taken to the Chrome Web Store, where you can find extra
resources for the Chrome browser.
Settings - 29
5. Once you find a theme that you’d like to try out, select it and then
select Add to Chrome.
Setting up a printer
You can use the Google Cloud Print service to send print requests to
many types of traditional cabled printer and wireless "cloud ready"
printers; however, not all printers are supported.
To learn more about Google Cloud Print and how to set up your
printer, reference Google’s own Chromebook Help to find
comprehensive information on this topic. To access Chromebook
Help, do the following:
1. Press the Search key on your keyboard or select the Launcher
icon.
2. Click to select All Apps (or type "Get Help").
3. Select the Get Help icon.
4. Select Printing.
Updating Chrome OS
Automatic update
Each time you turn on your Chromebook, it automatically checks for
updates. When an update is available, this update icon will appear
as a notification in the status area. To apply the update:
1. Select the Status area of the shelf in the lower-right corner of the
screen.
2. Select RESTART TO UPDATE.
3. Your Chromebook will shutdown and automatically restart, with the
update applied.

30 - Settings
Manual update
To manually check for an update or check what version of Chrome OS
you are using:
1. Select the Status area of the shelf in the lower-right corner of the
screen.
2. Select Settings icon.
3. Select About Chrome OS from settings at the top left corner.
4. In the dialog that opens, select Check for updates. If any updates
are available, they will be displayed on the page.
Resetting your Chromebook
There may be times when you want to reset your Chromebook (for
example, removing your personal information and settings).
Completely resetting your Chromebook is known as "Powerwashing",
which is basically factory resetting your computer. After
powerwashing, your Chromebook will look like it did out of the box
(including all apps that came pre-installed). To powerwash your
Chromebook, do the following:
1. Select the Status area of the shelf in the lower-right corner of the
screen.
2. Select Settings icon.
3. Select Advanced.
Important
Do not modify your Chromebook’s hardware yourself. Doing so will
cause the update function to no longer work. Please get in touch with
your dealer or an authorized service center. Visit www.acer.com to find
an authorized service site.
Important
Powerwashing your Chromebook will remove all local settings, data,
and programs from your hard drive. Backup any data on your hard drive
that is not saved online by moving it to Google Drive and waiting for it
to sync.
Settings - 31
4. In the Reset settings section, select Powerwash.
5. Select Restart.

32 - Help
HELP
Online and offline help
Additional help is available both online and offline. Chromebook Help
is installed on your Chromebook and doesn’t require internet access.
It covers basic troubleshooting as well as more detailed information
about Chrome OS and using your Chromebook.
To access Chromebook Help, do the following:
1. Press the Search key on your keyboard or select the Launcher
icon.
2. Click to select All Apps (or type "Get Help").
3. Select the Get Help icon.
Note
Some sections in Chromebook Help have web links, which require you to
have internet access to view the additional information.
